#cosplay ramblings
Text
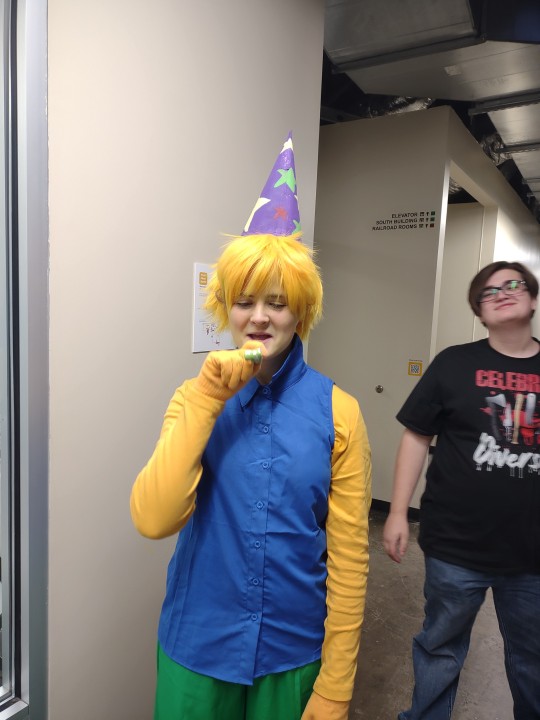
Planning phase of Dr. Dred cosplay, INITIATE!
>:3
I am least looking forward to the prosthetic mustache, it's always nerve-wracking wondering whether the Prosaid will hold. XD
Will update when I have had a chance to do some making!
3 notes
·
View notes
Text
Crying….
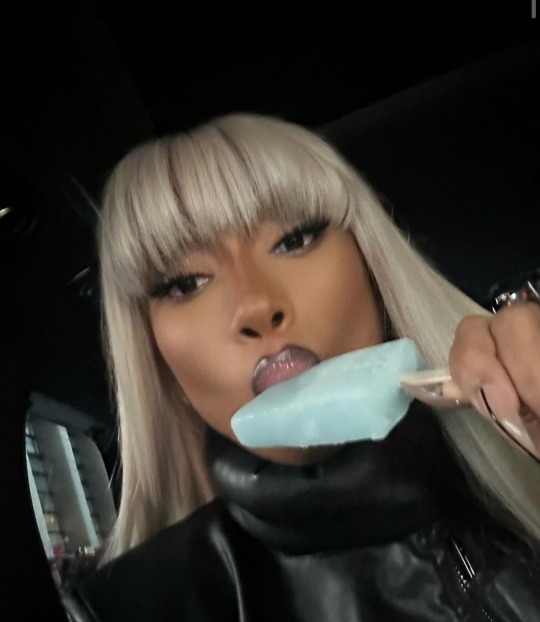

#she’s going all out oekeksk#jujutsu kaisen#gojo satoru#megan thee stallion#cosplay#so cute!!!!#rambling
7K notes
·
View notes
Text
my c!Technoblade cosplay :] I won best costume category in a convention yesterday yippee!
#ive only ever posted a cosplay pic on tumblr like almost a year ago i think#aight back to my qsmp sufgfering#technoblade#cosplay#yyuu rambles#mcyt#i post cosplay stuff on ig status and the tok bc it's easier sksjsks#dream smp#dsmp
1K notes
·
View notes
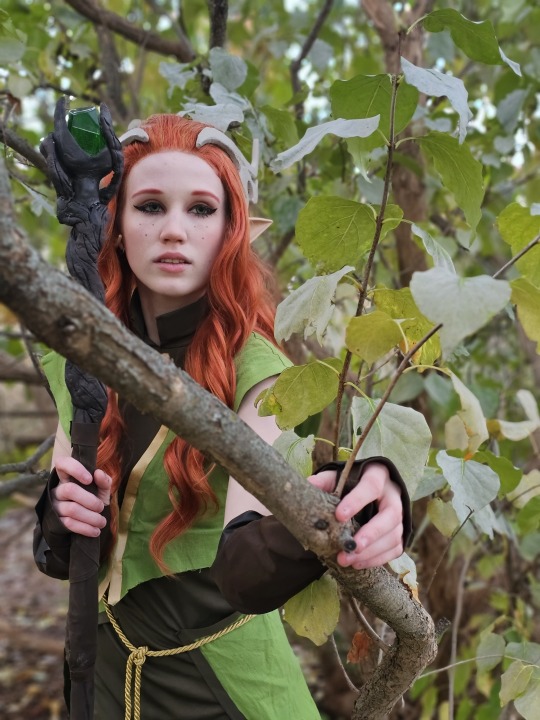
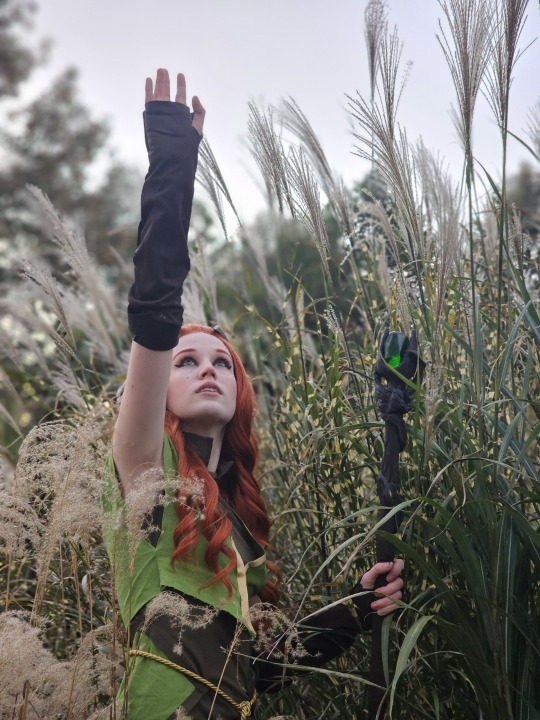
Text
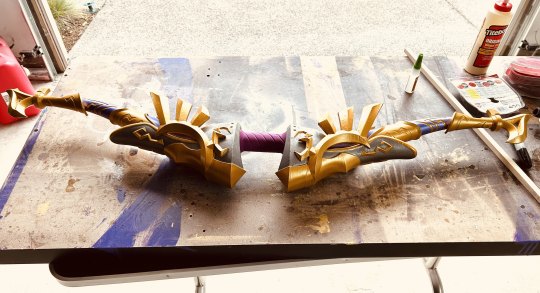
mmmmmmmm Royal Bow assembly has finally happened <3
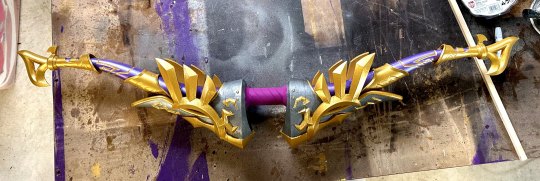
Top down angle, ft more realistic lighting... and then the OG reference:

I'm literally so happy with this prop, it looks spot on <3
#loz#botw#legend of zelda#breath of the wild#loz cosplay#link cosplay adventures#jen rambles#the mighty 500#1K
2K notes
·
View notes
Text
suddenly filled with such love and joyous whimsy for cosplayers and furries and nerds of all kinds. if you make and wear costumes (no matter what kind) out in public you are SO COOL!!!! it takes so much courage to do that shit and we dont talk about it enough. if you do ren faires and make crazily historically accurate costumes i love you!!! if you make hyper detailed cosplays of popular anime characters i love you!!! if you dress up as super obscure characters and never get recognized i love you!!! if you cosplay your ocs and infodump about them i love you!!! if your costumes are all closet cosplays i love you if youre a beginner i love you if you make fursuits i love you !!!!!!!! keep being a nerd it is wonderful
#dont know why i am suddey overcome w this love but ummm i mean it so wholeheartedly#frog rambles#cosplay#this is nonsemse what im truing to say is i love freaks and geeks and weirdos
831 notes
·
View notes
Text

we hardly took any photos even though we got asked for loads but con was very fun
417 notes
·
View notes
Text

So you guys know that one photo of Vessel with his sweater paws or whatever? I found another incredibly grainy version taken from further away and he just looks like Slenderman
(@kkarmatic)
Credits- unknown. If somebody knows, please tell me!
#the static is there because you've collected his 8 pages (all five of his albums and all three of his singles)#each grainy photo I gain of him the more I'm convinced he's actually just an analogue horror creature#if it wasn't for the context of the first photo I would've mistaken him for someone actually cosplaying Slenderman#doesnt help he just looks edited in as well#sleep token#st#vessel#vessel sleep token#mel's rambles#cryptid token
271 notes
·
View notes
Text


Here are some of the pictures of the Minoan/Mycenaean look I did yesterday! Mind you, it's all very generalized since I haven't made any clothing studies from these time periods yet, so I had just grabbed random clothes and jewelry from my closet that I could at least pass off as the ~vibe~ . I went for a pretty simple interpretation of makeup back then and ended up not really putting a whole lot on my face before the decorative elements, just a very thin amount of white foundation, but even so I figured my skin is pretty pale as it is that if this were historical I probably would have just been fairly bare faced anyway in a similar fashion. I tried to stay pretty close to how makeup might be applied back then and not go too anachronistic, and if I did it was for photographic or artistic purposes (namely, light contouring on my nose not for any sort of like, modern feature minimization, but to make sure my own Greek ethnic features weren't flattened by lighting levels or camera perspective)
Overall this was a really fun exploration of historic culture! Seeing the finished makeup on myself kind of brought over this cultural euphoria for me, even though many things have changed since ancient Mediterranean civilizations, there's almost a feeling of sameness in exploring the history of your heritage and seeing someone who looks or feels like you in ancient art. (But also a brief little disclaimer: the Mediterranean has been an extremely diverse region for thousands of years! I'm just one way of looking and that absolutely isn't representative of all people of Greece, neither then nor now!) I want to explore more historical fashions within this realm, and next time try a more extreme version of the makeup, something that feels more on the ceremonial side than casual like this one.
#wahoo! yippee!!! anywho enjoy and sorry i rambled a lot in the post im not good at being a brief person lol#historical fashion#ancient greece#minoan#mycenaean#greece#greek#history#antiquity#ancient greek#my cosplay
197 notes
·
View notes
Text


IM MAKING THIS JOKE ONE MORE TIME IF TUMBLR DOESNT UPLOAD IT I GIVE UP
I am not the step Spider-Mom
I’m the Spider-Mom that stepped up
#meet my kids#Gwen Stacy#Gwen Stacy cosplay#spider gwen#spider gwen cosplay#hobie brown#hobie brown cosplay#spider punk#spider punk cosplay#jess drew#jess drew cosplay#jessica drew#jessica drew cosplay#spider woman#spider woman cosplay#Harum scarum rambles#harum scarum cosplays
219 notes
·
View notes
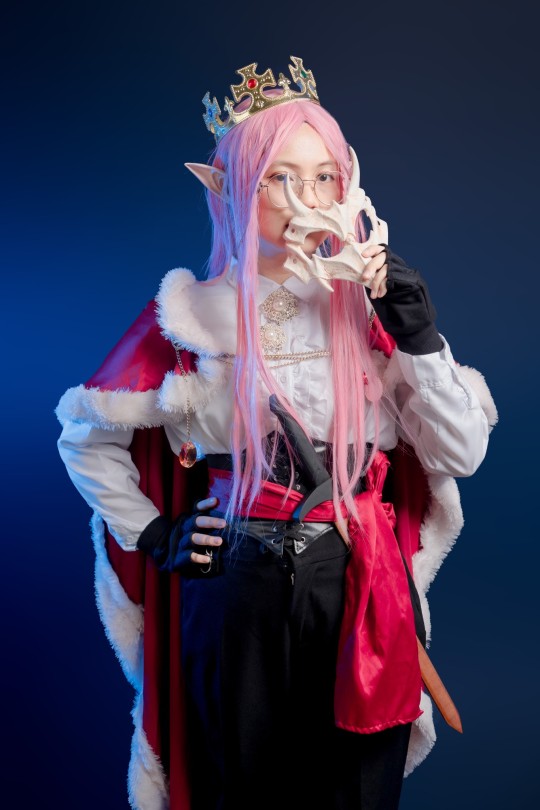
Text


Hey hi hello I didn’t take any good pictures of it but please appreciate my Imelda Pulse cosplay that I spent a lot of time on okay thanks
#ramblings#cosplay#dimension 20#mentopolis#Imelda pulse#oh god my face#if you happened to see me on Friday at kumoricon 2023 and snapped a pic please lemme know#*happened to have seen me#I’m just sad I didn’t get a full body photo including my sparkly gold shoes before my skirt got messed up#(it was my own fault but I needed to use the restroom and it was stepped on and trying to fix it I got superglue on the coat 😭)#please ignore my mess of an apartment lollll I was working on this until the second I left my apartment#ughhhhh I didn’t even realize the photo was blurry augh but oh well 😭
304 notes
·
View notes
Text
OBJECTION!!
#rambles with miles#ace attorney#ace attorney cosplay#holmat#holiday matsuri#cosplayer#cosplayers#cosplay meetup#franziska von karma#miles edgeworth#lana skye#ema skye#maya fey#mia fey#prosecutor godot#klavier gavin
191 notes
·
View notes
Text
pov ur at a con but tnt duo wine stream is on
185 notes
·
View notes
Text
Some Keyleth cosplay photos my friend took of me on Halloween, that I wanted to share <3

#usually dont post stuff of me on here#but i love this cosplay alot and wanted to show it off a bit#rosey rambles#critical role#keyleth#keyleth of the air ashari#the legend of vox machina#tlovm#vox machina#keyleth cosplay
198 notes
·
View notes
Text
You know what
Fuck you
*morphs into Poob*
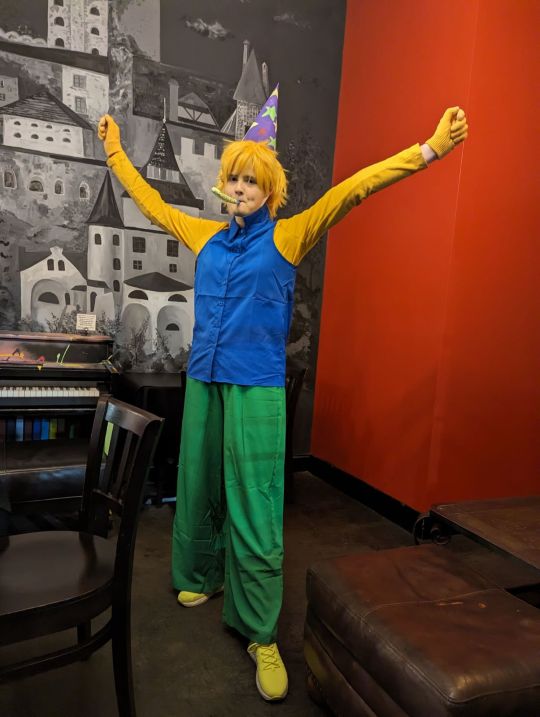

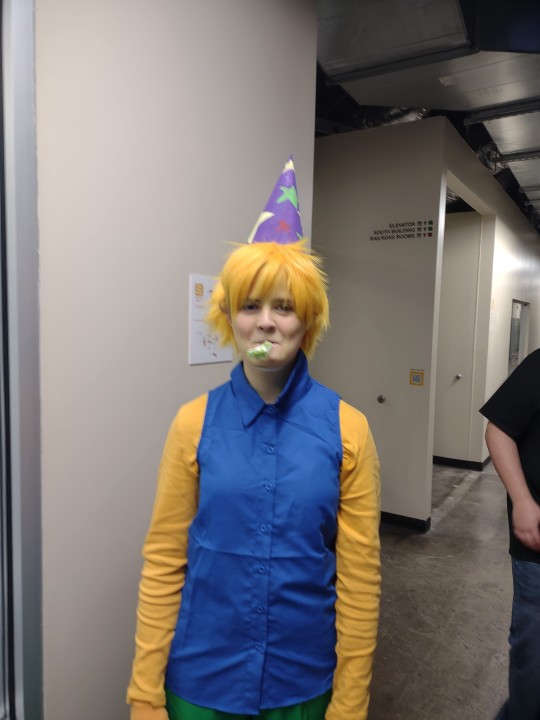
(feat. OOM24)
#gravs rambling#regretavator#regretevator poob#poob#noob#roblox regretevator#roblox Regretevator poob#cosplay#regretevator
186 notes
·
View notes
Text
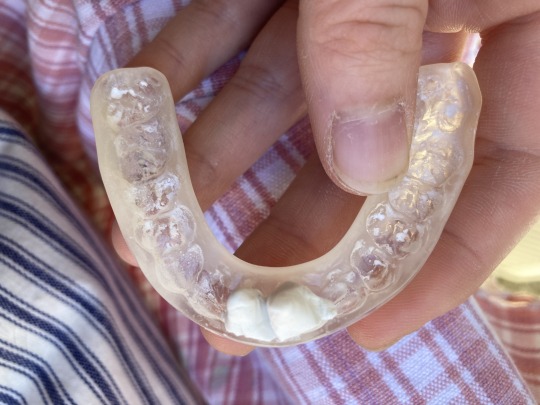
How to Make Replicas of Your Own Teeth:
A Cosplay Toothtorial
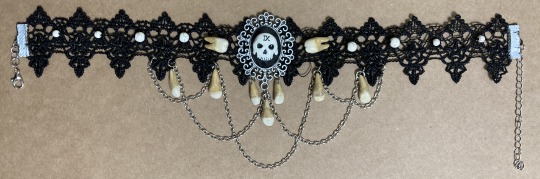
This is a method to safely use a molded mouth guard to make duplicates of your own teeth without destroying a potentially expensive piece of dental equipment. Everything that goes into the mold—clay and mold release aid—must be nontoxic/edible so you can wash your mouth guard at the end of the process and continue to use it as normal.
Benefits: No mold-making or casting experience required
Lightweight end result
Adds a truly personal touch to your project :)
Downsides: Must own a molded mouth guard/retainer
End result can be fragile and needs proper sealing for durability
Supplies
Molded mouth guard/retainer (referred to as “mold” from here on)
Cornstarch
Soft/fluffy brush
Non-toxic white air dry clay (I used Crayola Model Magic)
Craft knife
Jewelry wire (I used 20 or 22 gauge)
Pins/yarn needle/any various household implements you can sculpt or smooth small details with
Acrylic paints and a variety paint brushes
Clear glossy top coat (I used Mod Podge (satin) and UV Resin)
Prep
Brush or otherwise clean your mouth guard if you haven’t already, especially if there’s build-up.
If you’re using your container of cornstarch for cooking, set aside a small container specifically for crafting. No accidental cross-contamination here!
Dip your fluffy brush into cornstarch and brush into your DRY mouth guard. Lightly coat the entire mold and distribute any clumps. This coat of cornstarch will make it easier to remove your teeth from the mold.
Molding
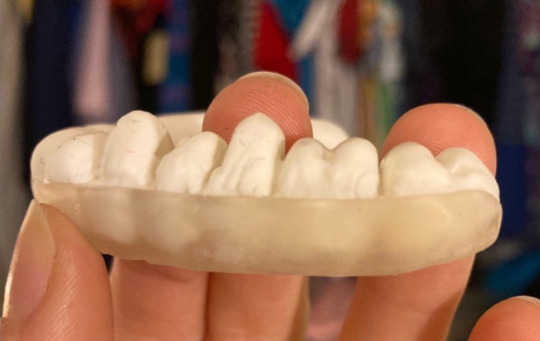
Firmly press clay into the mold so that approximately half is in the mold, half is sticking out for root sculpting. Make sure there are no air pockets or you won’t pick up the details.
Use detail scissors/craft knife to cut away excess material and indent to mark out the divisions between teeth as visible on the gum lines (see above)
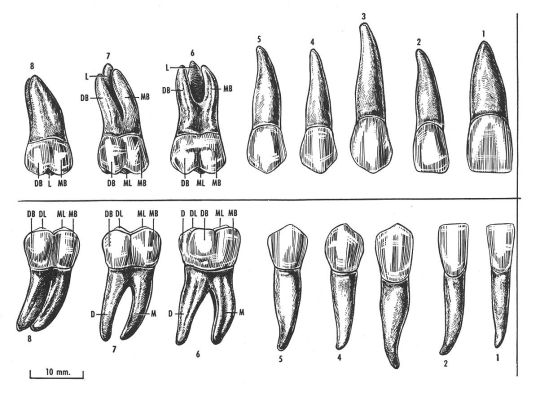
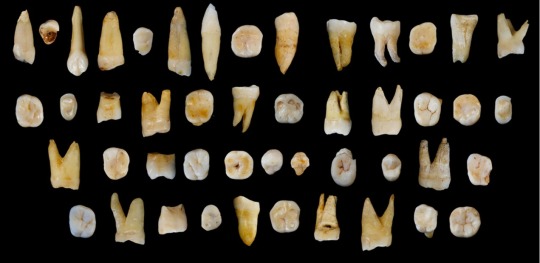
Reference a tooth diagram like the one below and separate out the roots for each tooth. Front teeth tend to have 1 leg, middle teeth have 2 legs, and some molars have 3+. I personally found that my limit was 2 roots. Sculpting 3+ roots on a single tooth was more difficult and more fragile than anatomical accuracy was worth.
Demolding
You can demold immediately after sculpting or wait up to an hour. The faster you remove the teeth, the easier they are to reshape. The longer you wait, the more they resist unintentional denting BUT the more touch-ups you'll have to do to clean the edges between teeth.
Gently lift the full row of teeth from the mold. If it won't release when you tip the mold or or push at it, try using a pin to stab one of the end teeth and use that to pry up the teeth. The rest of the row should follow. If they don't, try repeating for the other side. If they're still not lifting, set aside to dry and try again ~15-30min later.
Gently cut apart the u-shape into individual teeth.
Press raw cut edges in and smooth with various tools, like a yarn needle. Use a craft knife to help trim off any excess clay.

Touch-ups
In the case of air pockets or if you accidentally remove a root, wet some clay and use a very small amount to fill in gaps or add on roots. Don't forget the water! It makes the clay stickier and smooth out better. This is where tools come in handy, wet clay sticks less to smooth objects than your fingertips!
Once repaired, set aside any wet pieces to dry for at least 15min before doing any more sculpting work.
Set all teeth aside to dry for several hours on a wax paper or other non-stick surface. Make sure it's not textured or it will leave an imprint on your teeth!
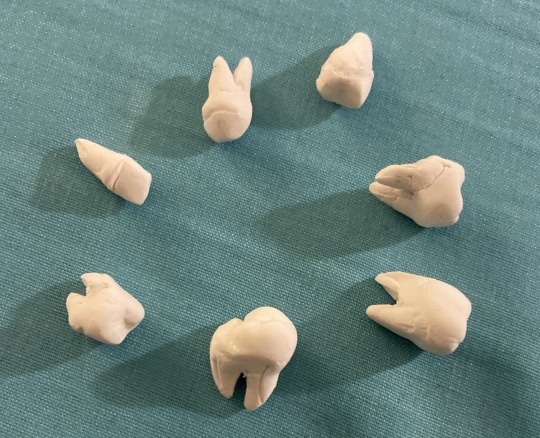
Flaws like the chip on the top left tooth and the cracks on the middle bottom teeth are great candidates for smoothing out with a little extra clay.
**PAUSE HERE AND CLEAN YOUR MOUTH GUARD**
I personally like to rinse it out with water and clean it with a dissolving denture cleaning tablet to make sure it’s fully sanitized. It also doesn’t hurt to properly brush the mouth guard to make sure there’s no clay or cornstarch residue stuck in the crevices.
Holes
Test a tooth to check if it’s dry to the touch and doesn’t immediately deform to your touch. If it’s holding shape, you can move on.
Bore a hole into the tooth with a pin or jewelry wire. Consider how you want them to hang.
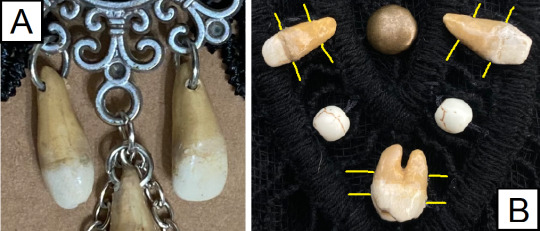
A) For the central dangling teeth on Harrowhark’s choker, I punched holes as close to the tip of the root as possible without tears, perpendicular to the teeth so I could hang them on jump rings directly from the center brooch.
B) For the teeth intended for Harrow’s tabard, I punched two sets of holes parallel to the jaw to prevent teeth from flipping around. One set just under the tooth cap, approx. 1/8in down, and one set about the same distance from the roots.
Once a hole has been punched with a pin, wiggle it around a little to open the hole or thread it on a piece of jewelry wire.
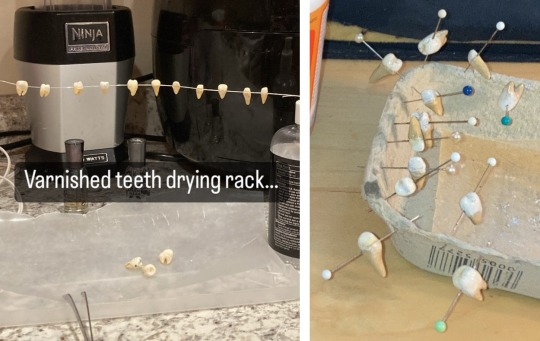
Leave teeth on a piece of wax paper or strung on a thread/wire to dry for ~48hr (or as recommended for your clay).
Painting/Weathering
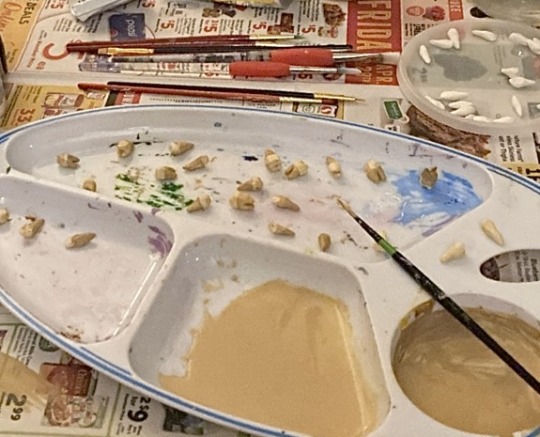
Mix a small amount of yellow-brown paint with water to create a wash (middle palette above). Paint all of your teeth with this first to establish a base color and help define any hairline cracks.
Paint with less diluted yellows and browns (right palette above).
Refer to photos like the below for reference (try searching "teeth" and "archaeology"). NOTE: The root tends to be darker and more weathered than the main tooth because it isn't protected by enamel.
Dry brush ivory or white mixed with some yellow/brown onto the tooth cap to bring out highlights.
Finishing
Your air dry clay teeth and paint job will need a top coat for protection. I highly recommend a glossy clear top coat to give the look of enamel. Below is a comparison of the two sealants I used, but there's many more options out there!

UV Resin (Left)
Pros: Harder/more durable
Cures faster
Cons: Need to work during daylight or use a UV light
Harder to get a thin even layer
Requires more set up and safety precautions
Satin Mod Podge (Right)
Pros: Can be applied with a brush
Air dries
Cons: Takes longer to dry
Teeth tend to stick together unless kept below room temp or kept from touching each other
(I solve this by storing unused beads in an old pill bottle in the fridge. Yes it's cursed and Yes I've had comments from my housemates.)
As mentioned earlier, thread teeth on a wire or pin down to dry.
This method also works well to set up for spray painting a clear coat.
Now, go forth and enjoy everyone's reactions when you tell them that you're wearing your own teeth! :D
#cosplay#cosplay tutorial#crafting tutorial#cosplay ref#harrowhark cosplay#the locked tomb#harrowhark nonagesimus#the locked tomb cosplay#locked tomb cosplay#craftblr#tutorials#tutorial#Nymph rambles#the scraps of NoN#I'm accepting my fate to potentially be know as the Tooth Harrow to a swath of people slkdfskljfsdlf#teeth#cw teeth#juuuuuust in case
110 notes
·
View notes
Text
Solar
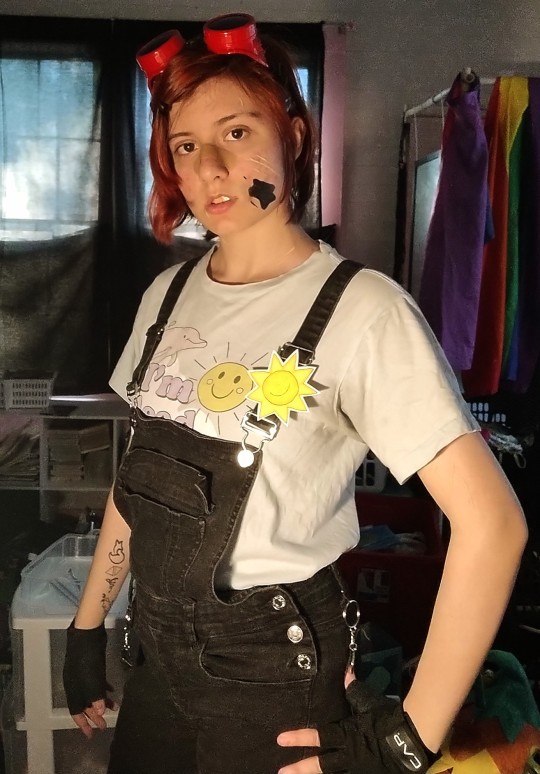
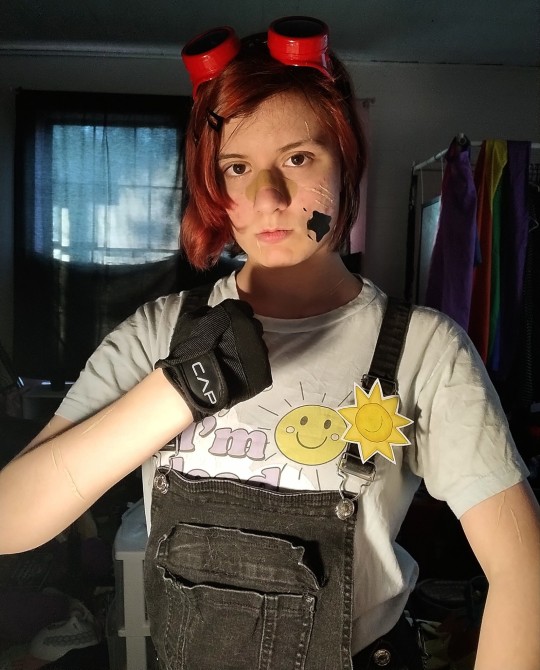

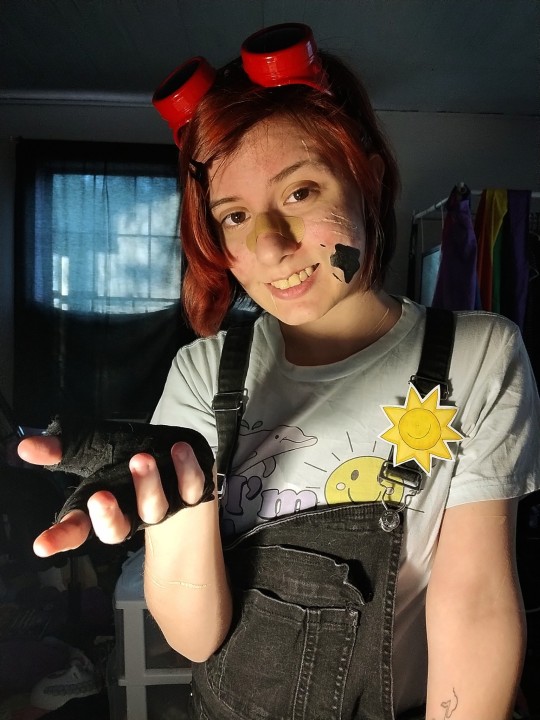
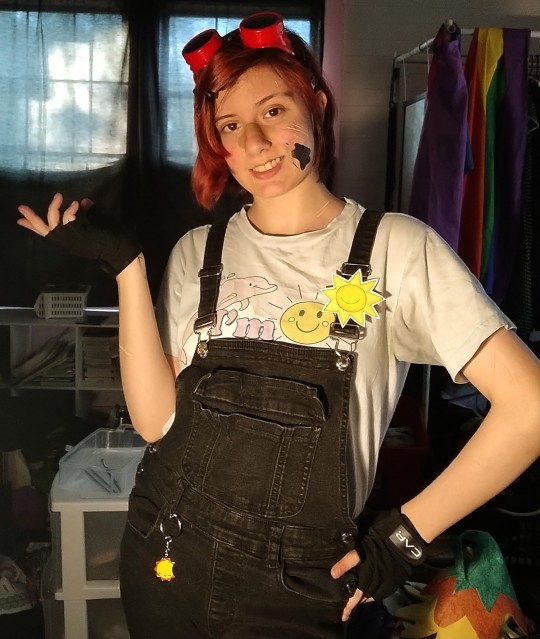

The beloved!! He's tired and sad- He fits right in with our dimension
Unfortunately I couldn't find a wrench-
#me#drew rambles#drew's face#cosplay#solar cosplay#tsams cosplay#tsams#the sun and moon show#tsams solar#tsams nice eclipse
140 notes
·
View notes
Last Seen Blogs


rookflower
so... cats, huh?

mozzaremi
Manmade horrors

chibi-encubierta
Multifandom Mess

pazjian
GLOW IN THE DARK