#createfiles
Explore tagged Tumblr posts
Visit Tumblr Blog
Explore Tumblr blogs with no restrictions, modern design and the best experience.
Last Seen Tumblr Blogs


Fun Fact
BuzzFeed published a report claiming that Tumblr was utilized as a distribution channel for Russian agents to influence American voting habits during the 2016 presidential election in Feb 2018.
Text
Calling std::fs::metadata on a named pipe on Windows seems to manipulate pipe state. Now, windows named pipes don't have meaningful metadata, and the docs state that metadata calls GetFileInformationByHandle. And the normal way to get a file handle is to call CreateFile which mutates the pipe state, but the whole thing feels off. The way the abstraction is structured and describes seems to assume things that just don't hold with Windows NPFS (which to be fair has semantics that feel strange to me).
Calling std::backtrace::Backtrace::force_create on Windows contains a bunch of frames of backtrace doing its internal business and ultimately calling into dbghelp. On Linux is seems to prune these frames successfully. Now there are a bunch of docs that state backtrace is "best effort", but their best doesn't seem particularly good. It seems like the same approach to pruning on Linux could be done on Windows, but no one asked, does this work the same on all our tier 1 platforms.
The biggest of the bunch however is CRT selection. On Linux most binaries link to glibc, maybe musl in more exotic cases. But your debug binaries and your release binaries generally link to the same libc. On windows there are half a dozen different libcs (CRTs) for different use cases. CFLAGS can affect CRT selection. But rust libc basically chooses one debug crt and one nondebug crt. This quickly can become a problem if you are building a staticlib to link into a polyglot. I think in more recent versions they have moved the location of this selection into the toolchain itself, but as far as I'm aware they haven't solved the issue.
Something really rubs me the wrong way about rust and zig declaring Windows tier 1 targets. I guess they meet whatever criteria the projects use for tier 1.
But both these languages have large standard libraries full of Unixisms where it just seems much more common to hit Windows bugs.
Maybe it’s a sign of immaturity of the test suite, I don’t know. But I wish they were more upfront about not working as smoothly on Windows.
6 notes
·
View notes
Link
Though similar to Dropbox in some ways, what makes OneDrive different is its referral system, meaning that every time you refer OneDrive to someone, you get 500 MBs of additional space for your account. And you get extra 3 GB if you choose to turn the camera feature on. Not only can you create files and folders on OneDrive, but you can also link it to all your favorite social media sites.

#microsoft#createfiles#onedrive#socialmediasites#onedriveservices#cloudstoragesolutions#cloudsolutions#itservices
0 notes
Note
After pulling my hair out getting a VM of Win95 running, only to forget to install the graphics drivers and wonder why the colours of my game were all wrong, i can only marvel at your soft-hardware necromancy. How do you learn this stuff? What do you do when you encounter a filetype you've never seen before? (What do i even do with the file CD_AUDIO.kpx?) Can you download all your knowledge into my brain?
I mainly learned this stuff by just fucking around with computers for a long time (I think I got my first computer in 1993, so I'm coming up on my 30th anniversary of being a Big Nerd). You pick up stuff eventually.
Also yes. Setting up Win95 VMs is hard (real hardware is also hard, for the record) . The bearsoftware VBE drivers seem to have some glitches but they work well enough, and the scitech display doctor drivers work better... If they work. Sometimes they are a nightmare to get working. My advice is start your win95 VM setup, immediately work on getting everything working (graphics/sound/networking drivers), then clone or savestate that shit. Then you have a working base to build on. Don't dirty your clean base, just clone it when you need to start fresh because you've messed it up somehow.
As for an unknown file, my first approach is usually a hex editor. Look for signature info towards the top of the file, Google that. I find that's more useful than searching on the extension, because extensions are reused too often. Sometimes you can search the full filename or game name plus extension and hit gold, but sometimes you just get nothing, and then it's up to you to figure it out.
So the first step is make sure you have a hex editor that can do integer decoding. I usually use HxD. See the data inspector on the right?
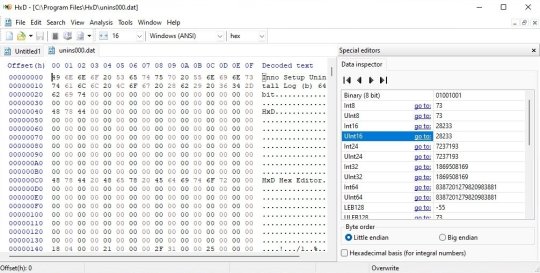
It's decoding the value of the number at the position of the cursor. This is very handy. File formats tend to have commonalities, like a count of how many sub-files there are, either right up front or at the end. (up front is more common these days, but in the Old Times it was easier to put them at the end, because of RAM limitations. That's why Zip has the index at the end)
That's a good place to start, because once you know how many subfiles are in there, you can figure out where they are, and deal with them separately. Often you only care about one part, so this lets you ignore most of the bits.
The other big tip I can give you for figuring out files is to be hands on. You don't have to just stare at a file and go WHAT DOES THIS MEAN?!
Change the file. Make a backup and then edit parts of it. See what changes in the program when you do that. Or if it's something the program writes out, save a basic file, than change something minor, then save it out again to a different file. Now you can compare the two and see what changed!
The next step up for figuring out an unknown file format is to reverse engineer the program that reads/writes them. Use a tool like Ghidra/Ida Pro, and disassemble the EXE. Figure out where it reads and writes the datafiles. This is often easy to find, you can look for imports on CreateFile/OpenFile or search for strings like the filename.
Another option is to hybridize your tools: use a debugger (I use OllyDbg usually, but it is getting long in the tooth sadly) and set a breakpoint on file opening. Run the program and step through all the files it opens and then you'll find the time it opens the file you care about. Now that you know where it is, you can locate that same function in the disassembler/decompiler.
Anyway. There's a bunch of tools and they all can help with different parts of this sort of reverse engineering, and it's often just about collecting as much info as you can, and then trying to compile it together. I usually have a text editor open on another monitor, and just keep a sort of running journal of anything I learn, so I can easily refer back and cross-reference things.
Also keep in mind that even if you can't solve the whole problem, you can learn some things, and it's useful to share that with the world. Sometimes just getting part of the solution means it'll inspire others to help finish the work, or point out stuff you missed.
111 notes
·
View notes
Text
If your EasyAntiCheat is erroring
1) go to the Program (x86) file folder for EasyAntiCheat
2) right-click on the .exe file
3) Run as Administrator
4) Select Apex Legends (or specific game)
5) Click REPAIR
Should fix the 'Createfile with 32' error, worked for me lmao
1 note
·
View note
Text
I’ve never really done GUI development and I’m trying to open a file and just
plz
// OpenFileDialog.cpp : Defines the entry point for the console application. // /* I hate all of this but I S2G these are straight from two examples on microsoft's support pages */ #include "stdafx.h" #include "windows.h" int main() { //This Is The Example That Gets You A Handle To Work From const int thisIsABadWayToCreateBuffers{ 1024 }; wchar_t oldConsoleTitle[thisIsABadWayToCreateBuffers] = { 0 }; wchar_t newConsoleTitle[thisIsABadWayToCreateBuffers] = { 0 }; GetConsoleTitle(oldConsoleTitle, thisIsABadWayToCreateBuffers); wsprintf(newConsoleTitle, L"%d/%d", GetTickCount(), GetCurrentProcessId()); SetConsoleTitle(newConsoleTitle); Sleep(40); HWND myConsolesHandle = FindWindow(nullptr, newConsoleTitle); //This Is The Example that, once you have a handle //(and have changed types around so it compiles //because it didn't in the original example) gets //you a fileopendialog for that handle OPENFILENAME ofn; // common dialog box structure wchar_t szFile[260]; // buffer for file name HWND hwnd = myConsolesHandle; // owner window HANDLE hf; // file handle const wchar_t initString[] = L"All\0*.*\0Text\0*.TXT\0"; // Initialize OPENFILENAME ZeroMemory(&ofn, sizeof(ofn)); ofn.lStructSize = sizeof(ofn); ofn.hwndOwner = hwnd; ofn.lpstrFile = szFile; // Set lpstrFile[0] to '\0' so that GetOpenFileName does not // use the contents of szFile to initialize itself. ofn.lpstrFile[0] = '\0'; ofn.nMaxFile = sizeof(szFile); ofn.lpstrFilter = initString; ofn.nFilterIndex = 1; ofn.lpstrFileTitle = NULL; ofn.nMaxFileTitle = 0; ofn.lpstrInitialDir = NULL; ofn.Flags = OFN_PATHMUSTEXIST | OFN_FILEMUSTEXIST; // Display the Open dialog box. if (GetOpenFileName(&ofn) == TRUE) hf = CreateFile(ofn.lpstrFile, GENERIC_READ, 0, (LPSECURITY_ATTRIBUTES)NULL, OPEN_EXISTING, FILE_ATTRIBUTE_NORMAL, (HANDLE)NULL); //And here the examples end and we have a pause so we can examine things even if we forgot to put in a breakpoint like a dummy. system("pause"); return 0; }
3 notes
·
View notes
Text
[Media] Dragnmove
Dragnmove Dragnmove is a post-exploitaition tool that infects files shared between users in order to move from one system to another. Dragnmove can detect actions like dropping a file into the browser window or attaching a file to an email client. After Dragnmove detects the action, it hooks CreateFile API calls to modify handles. https://github.com/OccamsXor/Dragnmove

0 notes
Text
Uninstall microsoft vc80

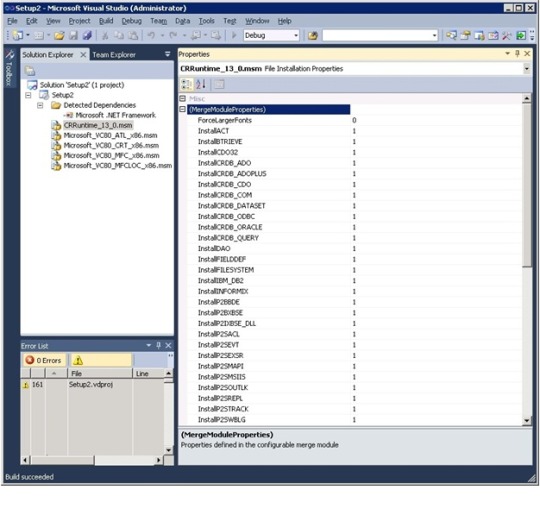
Your system might have some corruption that has gone undetected. Solution 4: Perform an installation repair of Windows If this process is running, then you will need to remove this adware. AI installer will install the merge module. 3) Install application on new Vista install. Add an application executable that needs this merge module to run. Solution 3: Remove adware and then install GBM or GTLĮrror 1935 can be caused by a certain type of adware running on the system. Add the MicrosoftVC80CRTx86圆4.msm merge module. Disable Lavasoft Ad-Watch, Ad-Aware, or similar detection software before installation.Disable the following applications or types of applications, following any instructions provided by such software:.Solution 2: Disable antispyware and antivirus software or remove adware or spyware from your computer and then install GTL or GBM If it is installed on another drive like D:, please change the drive letter appropriately. This assumes that C: is the drive in which Windows is installed. When involved to malicious activity, this file is mostly used for monitoring systems performance and degrading it. After the update is completed, restart your PC.
In the Windows Update dialog box, click ' Check for Updates ' (or similar button depending on your Windows version) If updates are available for download, click ' Install Updates '.
In the command prompt, type the following command and hit Enter: is a malicious file, which is installed and used by ErrorSweeper. In the search box, type ' Update ' and press ' ENTER '.
Right-click that result and choose Run as administrator.
From the Start menu, type cmd and you will see Command Prompt listed as the main result.
To correct this install error, you need to clear the log as follows: The transaction log is used by the Windows file system to recover when a file error occurs. If you receive a 1935 error, the Windows file system transaction log has become corrupted.
Some driver in the file system stack intercepts a CreateFile/ReadFile etc and translates the error code to “file not found” etc.
Another application deletes the file while our application tries to open this file.
The error can be caused by a variety of reasons: This error is considered fatal and causes setup to fail and initiate rollback. In general, this error means that Microsoft Windows Installer encountered an error while trying to install assemblies to the Global Assembly Cache (GAC) or the Win32 GAC (WinSxS). Please refer to Help and Support for more information”Ī 1935 error is one of the most common problems that can prevent a user from being able to install any application that uses the Microsoft Windows Installer MSIAssembly and MSIAssemblyName tables to install assemblies. Now run the utility ('Start > All programs > Windows Install Cleanup'). However, it will remove the installation files so that you can start the installation, upgrade, or uninstall over. An error occurred during the installation of assembly ‘, type=”win32″, version=”7.4053″, publicKeyToken=”1fc8b3b9a1e18e3b”, processorArchitecture=”x86″‘. Be aware that Windows Installer CleanUp Utility will not remove the actual program from your computer. After installing Genie Timeline (GTL) or Genie Backup Manager (GBM), you receive the following error in the Event Viewer:
0 notes
Text
Portsmonitor

#PORTSMONITOR INSTALL#
#PORTSMONITOR DRIVERS#
If (!XcvData(hPrinter, L"AddPort", (BYTE *)PortName, (lstrlenW(PortName) + 1) * 2, NULL, 0, &dwNeeded, &dwStatus)) The print spooler's XcvData function is the means by which a port monitor UI DLL communicates with its associated port monitor server DLL You can take name as per your requirement Printf("OpenPrinter failed - %d ", GetLastError()) If (!OpenPrinter(L",XcvMonitor Aticleworld Port Monitor", &hPrinter, &PrinterDefaults)) OpenPrinter function retrieves a handle to the specified printer or print server PrinterDefaults.DesiredAccess = SERVER_ACCESS_ADMINISTER See the below example code it worked for me. I can also create the port manually, but here I want to create a custom application which installs the monitor silently and create the port. Here the task is not completed yet after installing the print monitor I need to create the port.
#PORTSMONITOR INSTALL#
Note: Port Monitor DLL (package) should be present in system32 before running the below code.Īfter following the above steps you able to install your DLL. On the Printer Ports dialog, click the New Port Type button.Įnter the path to the INF file (port monitor) in the text input box, and then click OK. Now click the Ports tab and then click Add Port button. Select the Printers folder and click on any printer. Open Print Management in admenestrative mode. You can install the port monitor to follow the below steps If you are not familiar with windows internal and API, see this popular course: Windows Internals Here, I am assuming you are familiar with windows internals and API. Note: All the thing tested on the windows 10X64 machine (64 bits).
#PORTSMONITOR DRIVERS#
It uses the CreateFile, WriteFile, ReadFile, and DeviceIOControl functions, described in the Microsoft Windows SDK documentation, to communicate with kernel-mode port drivers also responsible for management and configuration of a server’s printer ports. It is a user-mode DLL which responsible for providing a communications path between the user-mode print spooler and the kernel-mode port drivers that access I/O port hardware. I have worked on the windows printer driver, where I have to install the port monitor silently without user interaction.
0 notes
Text
Purebasic image memory allocation

Salts by definition are meant to be cryptographically secure random data, not static/hard-coded constants. Saki wrote: ↑ Mon 8:57 pmThis is a static salt. Repeat : Until WaitWindowEvent()=#PB_Event_CloseWindow MessageRequester("Hint", "Decrypted Image not usable") WindowHeight(window_ID)/2-ImageHeight(image_ID)/2, WindowWidth(window_ID)/2-ImageWidth(image_ID)/2, If UCase(GetExtensionPart(source_path_image$))"GIF" : ResizeImage(image_ID, 300, 300) : EndIfĭefine image_gadget_ID=ImageGadget(#PB_Any, If recreate_image_file : If Not image_ID : MessageRequester("Hint", "Can not create a decrypted image") : EndIf : End : EndIfĭefine window_ID=OpenWindow(#PB_Any, 0, 0, 650, 400, "Decrypted Image", #PB_Window_SystemMenu|#PB_Window_ScreenCentered) UsePNGImageDecoder() : UseJPEGImageDecoder() : UseTIFFImageDecoder() : UseGIFImageDecoder()ĭefine recreate_image_file=0 Recreate a decrypted image from a encrypted imageĭefine image_ID=LoadImage_and_Decrypt_BF(source_path_image$, password$, recreate_image_file) If Not image_ID : ProcedureReturn -6 : EndIf : ProcedureReturn image_ID Protected image_ID=CatchImage(#PB_Any, *buffer_1, length) : FreeMemory(*buffer_1) If WriteData(file, *buffer_1, length)length : CloseFile(file) : FreeMemory(*buffer_1) : ProcedureReturn -22 : EndIf If Not file : ProcedureReturn -21 : EndIf Source_path_image$=RemoveString(source_path_image$, crypt_extender$, #PB_String_NoCase)įile=CreateFile(#PB_Any, source_path_image$) If Not AESDecoder(*buffer, *buffer_1, length, 256, #PB_Cipher_CBC)įreeMemory(*buffer) : FreeMemory(*buffer_1) : CloseFile(file) : ProcedureReturn -9 Protected *buffer_1=AllocateMemory(length) : If Not *buffer_1 : FreeMemory(*buffer) : ProcedureReturn -9 : EndIf If ReadData(file, *buffer, length)length : FreeMemory(*buffer) : CloseFile(file) : ProcedureReturn -21 : EndIf Repeat 32 2))) : ii+SizeOf(character)16 : CloseFile(file) : ProcedureReturn -21 : EndIf : FileSeek(file, 0) Protected fixed$=StringFingerprint(password$+"%$(s4DäÖÄö", #PB_Cipher_SHA3), i, ii : Dim register.q(5) UseSHA3Fingerprint() By Saki - Advanced AES CBC mode image Decrypter with crypt randomized IV Procedure LoadImage_and_Decrypt_BF(source_path_image$, password$, recreate_file=0, crypt_extender$=" ") LoadImage_Encrypt_and_Save_BF(source_path_image$, destination_path_image$, password$) Repeat 32 2))) : ii+SizeOf(character)length+16 : FreeMemory(*buffer_1) : CloseFile(file) : ProcedureReturn -22 : EndIfĭefine source_path_image$=OpenFileRequester("Select a image", "", "", 0) : If source_path_image$="" : End : EndIfĭefine destination_path_image$=source_path_image$ Protected extension$="."+GetExtensionPart(source_path_image$)ĭestination_path_image$=GetPathPart(source_path_image$)+GetFilePart(source_path_image$)ĭestination_path_image$=RemoveString(destination_path_image$, extension$) : destination_path_image$+crypt_extender$+extension$ Protected fixed$=StringFingerprint(password$+"%$(s4DäÖÄö", #PB_Cipher_SHA3), i, ii, *buffer : Dim register.q(5) UseSHA3Fingerprint() By Saki - Advanced AES CBC mode image Encrypter with crypt randomized IV Procedure LoadImage_Encrypt_and_Save_BF(source_path_image$, destination_path_image$, password$, crypt_extender$=" ")
0 notes
Text
Usb drivers windows 10 download

Usb drivers windows 10 download install#
Usb drivers windows 10 download drivers#
Usb drivers windows 10 download update#
Usb drivers windows 10 download driver#
Usb drivers windows 10 download windows 7#
Step 7: In your Control Panel/Audio Devices, select the playback device.
Usb drivers windows 10 download install#
Step 6: Follow the prompts from the installation program to install the drivers. Step 4: Connect the DAC with a standard USB A-B cable, 2M or less in length, with true USB 2.0 rating. Step 3: Click on the Schiit_USB_Gen2_1_03 folder to open it. Step 2: Double-Click on the Schiit_USB_Gen2_1_03.zip file to expand it. Step 1: Go to your Downloads folder (or Desktop, or wherever you had Windows put the drivers.)
Usb drivers windows 10 download drivers#
These drivers are for legacy Windows support only.įor Windows 8, 7: Schiit USB Gen2 Drivers 1.03 You do not need drivers for Windows 10, MacOS or for Linux distros that support UAC2. Note: (This does not apply to Windows 10).
Usb drivers windows 10 download windows 7#
How do I prevent Windows 7 from automatically installing new drivers? Number and will try to load the Newest Driver. Plugging your cable into a different USB slot will change the com port Note 2: Each USB slot is connected to a separate com port to avoid conflict.
Usb drivers windows 10 download driver#
Strictly between the PC driver and the cable. 'The system cannot find the file specified.')"Ī: After making this change, you must unplug and reinsert your USB programming cableįor the com port number change to be effective.ĭriver issues, please note this is NOT caused by your software. "An error has occurred - could not open port com: (2, 'CreateFile', Is there a quick way to find my cable's com port number?Īfter changing the com port number of my USB cable in Device Manager, You can check the driver loaded using the procedure above. When this occurs, you will need to either load driver 3.2.0.0 to the new USB slot, or plug the cable back into its original USB slot. If the cable is moved to aĭifferent USB slot, Windows will now load the newest driver to that port. Why doesn't my new driver work any longer? This message appears if the radio is not turned ONī) "Error has Occurred, Could not open Com Port x"Įach USB slot is connected to a separate com port to avoid conflict. Programming cable is not being recognized.Ī really hard push to snap in that last 1/16Ĭable's plug side and edge may be required. The driver version shown should be v3.2.0.0ġ2) Remove the USB programming cable from your PC and then plug the USB programming cable back in. You can check that the correct version is installed by double-clicking on the Prolific entry in device manager and selecting the Driver tab. You should now see a properly installed Prolific driver in Device Manger. You should get a prompt saying that the driver was installed successfully. "Prolific USB-to-Serial Comm Port Version: 3.2.0.0 ".
Usb drivers windows 10 download update#
"Let me pick from a list of device drivers on my computer"ġ0) At the third Update Driver Software prompt, scroll down and selectġ1) At the fourth Update Driver Software prompt, select "Browse my computer for driver software".ĩ) At the second Update Driver Software prompt, In 'Ports (COM & LPT)' the 'Prolific USB-to-Serial Comm Port (COMx)' willħ) Right-click on the entry with the error to open a window and selectĨ) At the first Update Driver Software prompt, select The recommended Drivers and Info can be found at the This driver for Win XP can be found here: If you are using Win XP, the Prolific driver Prolific Driver 3.2.0.0 recommended for Vista, Win7/8/10 See step 7 in the "Installing the Backdated Prolific PL-3203 Driver" section below. Note: If you recently upgraded to Win10 and the V3.2.0.0 driver was previously installed on your computer, you will only need to select it again. If Windows does not automatically load the proper driver, a caution If this occurs, you Must backdate your driver to 3.2.0.0 It was done to prevent use of the cloned chip. The cable is inserted into the radio, the transmitter will turn on. This When opening Device Manager, the Yellow Caution Triangle may not appear, however, when Windows may attempt to automatically load the Prolific driver 3.6.xx.xxx when inserting your cable. The last compatible Prolific driver was v3.3.2.105. The latest driver installed by Windows (Vista, 7, 8.1 and 10) is not compatible with these chips. Nearly every programming cable that is detected by Windows as having a Prolific chip was manufactured with an unauthorized or cloned copy of the Prolific PL2303HXA chip. Not, the driver and procedure can be found at this Link.ĭrivers for the Silicon Labs chipset (CP210x) should alsoĭownload automatically. The driver should also download automatically. Many Baofeng and generic programming cables are shipping with the WCH chipset (CH340/341). Not all provided CDs come with the correct drivers.īy using Windows Device Manager, you should easily be able to determine whichĬables with FTDI chipset (FT232R) will automatically download the Not all cables load the correct driver automatically. Programming cable Must have the correct driver installed
0 notes
Text
apex legends now failing to launch
easycheat 'createfile failed with 32'
it was working three seconds ago wtf
0 notes
Link
(Via: Lobsters)

Executive Summary
In my last post about reverse engineering Windows containers, I outlined the internal implementation of Windows Server Containers. After further investigating Windows Server Containers, I learned that running any code in these containers should be considered as dangerous as running admin on the host. These containers are not designed for sandboxing, and I found that escaping them is easy. Microsoft collaborated with us in fully understanding the security limitations of these containers. The purpose of this post is to raise awareness of the danger of running these containers.
To demonstrate this issue, I will present a container escape technique in Windows containers that I recently discovered. The technique allows processes running inside containers to write files to their host. This could be leveraged to achieve RCE (remote code execution) on the host. In Kubernetes environments, this exploit could be easily leveraged to spread between nodes. In other words, an attacker that successfully breaches a single application instance running inside a Windows Server Container could trivially breach the boundaries of the container and access other applications on the same machine. In the case of Kubernetes, the attacker could even access other machines. This may allow an attacker to gain access to a complete production workload after breaching just one endpoint instance.
This issue may affect users of cloud providers allowing the use of Windows Server Containers, including all of Microsoft’s AKS users using Windows. Palo Alto Networks customers are protected from this via Prisma™ Cloud.
Windows Server Containers
As revealed in more depth in my previous post, Microsoft developed two solutions for running Windows-based containers. The first solution is running each container inside a virtual machine (VM) based on HyperV technology. The second option, Windows Server Containers, rely on Windows kernel features, such as Silo objects, to set up containers. The latter solution resembles traditional Linux implementation for containers, i.e. processes that are run on the same kernel with logical mechanisms to isolate each from another.
Some users rely on Windows Server Containers, as opposed to HyperV containers, since running each container inside a VM comes at a performance cost, as documented by Microsoft:
“The additional isolation provided by Hyper-V containers is achieved in large part by a hypervisor layer of isolation between the container and the container host. This affects container density as, unlike Windows Server Containers, less sharing of system files and binaries can occur, resulting in an overall larger storage and memory footprint. In addition there is the expected additional overhead in some network, storage io, and CPU paths.”
My research has led me to believe that the security of Windows Server Containers can be better documented. There are references indicating that the use of HyperV containers is more secure, but I could not find a piece of documentation that clearly mentions that Windows containers are susceptible to a breakout. When we reached out to Microsoft, their guidance was recommending users not run anything in a Windows Server Container that they wouldn’t be willing to run as an admin on the host. They also noted:
“Windows Server Containers are meant for enterprise multi-tenancy. They provide a high degree of isolation between workloads, but are not meant to protect against hostile workloads. Hyper-V containers are our solution for hostile multi-tenancy.”
In the following sections, I will go through the details of the problem, including kernel internals of Windows symbolic links. Some background in Windows container internals, including Silos, as explained in my previous post, is recommended for better understanding of the proposed technique.
The Escape
Windows symbolic link resolution from inside a container supports the use of an undocumented flag that causes symbolic links to be resolved on the root directory of the host machine. That is, outside the container file system. While container processes should require special privileges to enable that flag, I found a technique to escalate privileges from a default container process that would result in this escape.
In the following sections, I will take you through the journey of how I discovered this technique and elaborate the reasons it was made possible.
Symbolic Links
Symbolic links in Windows aren’t well-documented, but they have been around since Windows NT. Windows NT came out with two types of symbolic links: object manager symbolic links and registry key symbolic links. These were not file-related, only an internal implementation of the operating system Microsoft chose to use. Only in Windows 2000 did file system symbolic links come out, and even those weren’t file-level symbolic links. They worked only as directory redirection. It was Windows Vista that first featured full file-level symbolic links. In this post, I will only cover object manager symbolic links. The others are outside the scope of this article.
Object Manager Symbolic Links
If you’re using Windows at all, you are probably using these without even knowing it. Things like the C drive letter are actually implemented using object manager symbolic links. Under the hood, when one accesses C:\ the object manager redirects the call to the actual mounted device.
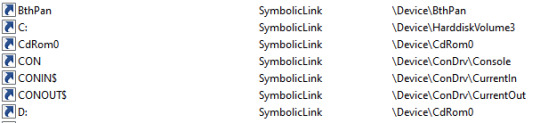
Figure 1. WinObj showing C: is just a symbolic link
The object manager handles not only files, but also registry, semaphores and many more named objects. When a user tries to access C:\secret.txt, the call arrives to the kernel function NtCreateFile with the path \??\C:\secret.txt, which is an NT path that the kernel knows how to work with. The path is modified by user-mode Windows API before the actual system call occurs. The reason for this path conversion is the \??\ part, which points the kernel to the correct directory in the root directory manager. Said directory will hold the target of the C: symbolic link.
Eventually ObpLookupObjectName is called. ObpLookupObjectName’s job is to resolve an actual object from a name. This function uses another kernel function, ObpParseSymbolicLinkEx, to parse part of the path, which is a symbolic link to its target.
Every part of the path is checked for being a symbolic link. This check is performed by ObpParseSymbolicLinkEx. The object manager iterates until it finds a leaf node, which is something that cannot be parsed any further by the object manager. If part of the path is a symbolic link, the function returns STATUS_REPARSE or STATUS_REPARSE_OBJECT and changes the relevant part of the path to the target of the symbolic link.
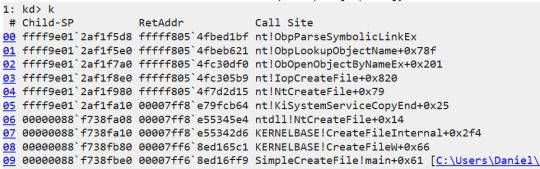
Figure 2. WinDbg showing the call stack of a CreateFile API
After all of this, our C:\secret.txt was parsed to its actual path, which will look something like \Device\HarddiskVolume3\secret.txt. The \Device\HarddiskVolume3 path will be opened under the root directory object (ObpRootDirectoryObject).
More About the Root Directory Object
The object manager root directory object is like a folder that contains all application-visible named objects (like files, registry keys and more). This mechanism allows applications to create and access these objects among themselves.
The Important Part
When accessing a file from inside a container, everything is parsed under a custom root directory object. When C: is parsed, it will be parsed against a clone C: symbolic link that will point it to a virtual mounted device and not the host’s file system.
Symbolic Links and Containers
I decided to follow the lookup process of a symbolic link from inside a container. A process inside a container calls CreateFile with the target file being C:\secret.txt. This path is transferred to \??\C:\secret.txt before getting to the kernel, as I explained earlier. Under the custom root directory object of the container, the system accesses ??, which is a reference to GLOBAL??. The system searches for a symbolic link C: under the GLOBAL?? directory and indeed finds such a symbolic link. At this point, the path is parsed to the target of said symbolic link, which in this case is \Device\VhdHardDisk{a36fab63-7f29-4e03-897e-62a6f003674f}\secret.txt. The kernel now proceeds to open said VhdHardDisk{…} device, but instead of searching this device under the Device folder in the root directory object of the host, it searches this device under the custom root directory object of the container and finds the virtual device of the container’s file system.
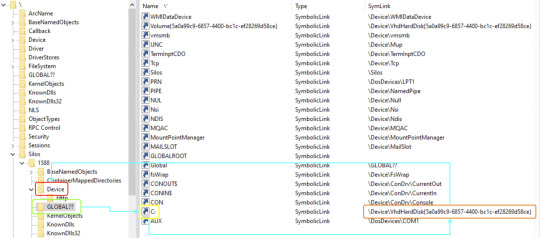
Figure 3. WinObj showing how a path is parsed under the root directory object
But something wasn’t right. When I browsed the Device folder under \Silos\1588\ I was expecting to find an object named VhdHardDisk{…} pointing to an actual device, but instead there was a symbolic link with the same name pointing to \Device\VhdHardDisk{…}. What was going on? How does Windows get to the actual device? At this point, I started researching the symbolic link lookup subject until I found a single line in slides from a talk by security researchers Alex Ionescu (CrowdStrike) and James Forshaw (Google Project Zero) at Recon 2018 mentioning there is a flag for a “global” symbolic link. I proceeded to reverse the relevant functions in order to find where this flag might be checked.
I eventually found a branch in ObpLookupObjectName that looked promising:

Figure 4. A branch in IDA that looked promising
The register edi holds the return value of ObpParseSymbolicLinkEx, so I searched this value – 368h – and found out it stands for STATUS_REPARSE_GLOBAL. So if ObpParseSymbolicLinkEx returns STATUS_REPARSE_GLOBAL, the object manager opens the file under ObpRootDirectoryObject, which is the regular root directory object, instead of getting the root directory of the Silo.
The Problem
At this point, I was certain I understood this behavior. I thought that creating a global symbolic link requires some special permission only system processes have. At the creation time of the container, the creating process has these special permissions and can create global symbolic links for the container to use, but no process inside the container can do that. The creating process controls what the global symbolic link points to and uses it only to access some special devices like the VhdHardDisk, so there is no real problem. It turned out, that was only partially true.
The Real Problem
I started searching for the value 368h that represents STATUS_REPARSE_GLOBAL in kernel code. After some work with IDA and WinDbg I ended up in the function ObpParseSymbolicLinkEx, which led me to find the relevant flag in the symbolic link object is at offset 28h (Object + 0x28). I placed a breakpoint in NtCreateSymbolicLinkObject, which is the function that creates a new symbolic link, and proceeded to create a new container using Docker. This raised many breaks for every creation of a new symbolic link for the container. This led me to the creation of the actual \Silos\1588\Device\VhdHardDisk{a36fab63-7f29-4e03-897e-62a6f003674f} object.
A reminder: This was the symbolic link object that behaved like a global symbolic link. I ended up putting an access breakpoint on the symbolic link object at offset 28h. Success! Right after the creation of the symbolic link, another function tried to modify the memory where I placed the breakpoint. The function was NtSetInformationSymbolicLink. This function seemed to get a handle to a symbolic link, open the relevant object and change things in it.
Luckily, this also got a wrapper function with the same name in ntdll, so we can easily call it from user mode. I reverse engineered this function and found a part of the code that checks for Tcb privilege in it. Tcb stands for Trusted Computing Base and its privileges description is, “Act as part of the operating system.”
I reversed ObpParseSymbolicLinkEx just enough to understand under what conditions it returns STATUS_REPARSE_GLOBAL as well as the exact parameters NtSetInformationSymbolicLink requires in order to change a symbolic link to make it global. These parameters are deliberately omitted from this post to make it harder for attackers to create an exploit.
Exploitation Plan
Knowing that I may be able to enable this global flag with Tcb privileges, and that it may allow for a container escape, I came up with the following plan to escape a container’s file system:
Create a symbolic link for the host’s C: drive.
Gain Tcb privileges.
Make said symbolic link global.
Access files on the host’s file system.
The only part missing from my plan was how to accomplish step two. We don’t have Tcb privileges in the container, do we? Well, our container processes do not have Tcb privileges by default. However, there is a special process in Windows containers called CExecSvc. This process is in charge of many aspects of the container execution, including communication between the host and the container. It also has Tcb privileges, so if a container process could execute code through CExecSvc, it would run with Tcb privileges, and the plan could unfold.
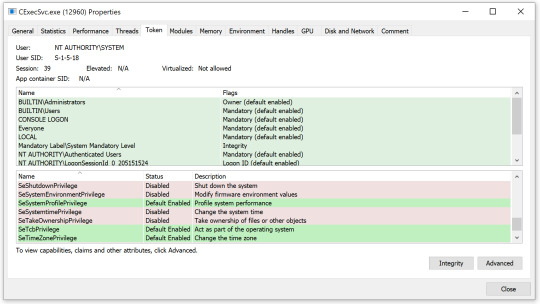
Figure 5. ProcessHacker showing CExecSvc has SeTcbPrivilege
Execution
I chose to do a simple DLL injection to CExecSvc, which included the attack logic. This worked well, and I was immediately able to gain access to the host’s file system. Because CExecSvc is a system process, I gained full, unbounded access to the entire host file system, exactly as any other system process has.
Azure Kubernetes Service (AKS)
Azure Kubernetes Service (AKS) is a managed container orchestration service, based on the open-source Kubernetes system, which is available on Microsoft Azure Public Cloud. An organization can use AKS to deploy, scale and manage Docker containers and container-based applications across a cluster of container hosts.
AKS uses Windows Server Containers for each pod, meaning every single Kubernetes cluster that has a Windows node is vulnerable to this escape.
Not only that, but once an attacker gains access to one of the Windows nodes, it is easy to spread to the rest of the cluster.
The following image shows that the Windows node has everything we need in order to control the rest of the cluster. This displays the situation after we managed to access the host (in this case, the node) from the container (in this case, the pod).

Figure 6. Everything we need inside the Windows node
From here, one can just use kubectl to control the rest of the cluster.

Figure 7. Using kubectl from inside the node
Conclusion
In this post, I have demonstrated a complete technique to escalate privileges and escape Windows Server Containers. Users should follow Microsoft’s guidance recommending not to run Windows Server Containers and strictly use Hyper-V containers for anything that relies on containerization as a security boundary. Any process running in Windows Server Containers should be assumed to be with the same privileges as admin on the host. In case you are running applications in Windows Server Containers that need to be secured, we recommend moving these applications to Hyper-V containers.
I would like to thank Alex Ionescu and James Forshaw for advising me with this research.
Palo Alto Networks Prisma™ Cloud protects customers from having their containers compromised. Prisma Cloud Compute also provides a compliance feature called Trusted Images that allows restricting users to run only known and signed images. By using this feature, customers can further reduce the attack surface by preventing execution of malicious images.
Get updates from Palo Alto Networks!
Sign up to receive the latest news, cyber threat intelligence and research from us
0 notes
Text
Instant GraphQL Backend with Fine-grained Security Using FaunaDB
GraphQL is becoming popular and developers are constantly looking for frameworks that make it easy to set up a fast, secure and scalable GraphQL API. In this article, we will learn how to create a scalable and fast GraphQL API with authentication and fine-grained data-access control (authorization). As an example, we’ll build an API with register and login functionality. The API will be about users and confidential files so we’ll define advanced authorization rules that specify whether a logged-in user can access certain files.
By using FaunaDB’s native GraphQL and security layer, we receive all the necessary tools to set up such an API in minutes. FaunaDB has a free tier so you can easily follow along by creating an account at https://dashboard.fauna.com/. Since FaunaDB automatically provides the necessary indexes and translates each GraphQL query to one FaunaDB query, your API is also as fast as it can be (no n+1 problems!).
Setting up the API is simple: drop in a schema and we are ready to start. So let’s get started!
The use-case: users and confidential files
We need an example use-case that demonstrates how security and GraphQL API features can work together. In this example, there are users and files. Some files can be accessed by all users, and some are only meant to be accessed by managers. The following GraphQL schema will define our model:
type User { username: String! @unique role: UserRole! } enum UserRole { MANAGER EMPLOYEE } type File { content: String! confidential: Boolean! } input CreateUserInput { username: String! password: String! role: UserRole! } input LoginUserInput { username: String! password: String! } type Query { allFiles: [File!]! } type Mutation { createUser(input: CreateUserInput): User! @resolver(name: "create_user") loginUser(input: LoginUserInput): String! @resolver(name: "login_user") }
When looking at the schema, you might notice that the createUser and loginUser Mutation fields have been annotated with a special directive named @resolver. This is a directive provided by the FaunaDB GraphQL API, which allows us to define a custom behavior for a given Query or Mutation field. Since we’ll be using FaunaDB’s built-in authentication mechanisms, we will need to define this logic in FaunaDB after we import the schema.
Importing the schema
First, let’s import the example schema into a new database. Log into the FaunaDB Cloud Console with your credentials. If you don’t have an account yet, you can sign up for free in a few seconds.
Once logged in, click the "New Database" button from the home page:
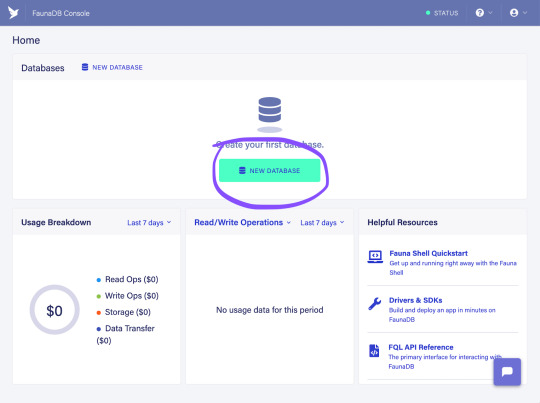
Choose a name for the new database, and click the "Save" button:

Next, we will import the GraphQL schema listed above into the database we just created. To do so, create a file named schema.gql containing the schema definition. Then, select the GRAPHQL tab from the left sidebar, click the "Import Schema" button, and select the newly-created file:

The import process creates all of the necessary database elements, including collections and indexes, for backing up all of the types defined in the schema. It automatically creates everything your GraphQL API needs to run efficiently.
You now have a fully functional GraphQL API which you can start testing out in the GraphQL playground. But we do not have data yet. More specifically, we would like to create some users to start testing our GraphQL API. However, since users will be part of our authentication, they are special: they have credentials and can be impersonated. Let’s see how we can create some users with secure credentials!
Custom resolvers for authentication
Remember the createUser and loginUser mutation fields that have been annotated with a special directive named @resolver. createUser is exactly what we need to start creating users, however the schema did not really define how a user needs to created; instead, it was tagged with a @resolver tag.
By tagging a specific mutation with a custom resolver such as @resolver(name: "create_user") we are informing FaunaDB that this mutation is not implemented yet but will be implemented by a User-defined function (UDF). Since our GraphQL schema does not know how to express this, the import process will only create a function template which we still have to fill in.
A UDF is a custom FaunaDB function, similar to a stored procedure, that enables users to define a tailor-made operation in Fauna’s Query Language (FQL). This function is then used as the resolver of the annotated field.
We will need a custom resolver since we will take advantage of the built-in authentication capabilities which can not be expressed in standard GraphQL. FaunaDB allows you to set a password on any database entity. This password can then be used to impersonate this database entity with the Login function which returns a token with certain permissions. The permissions that this token holds depend on the access rules that we will write.
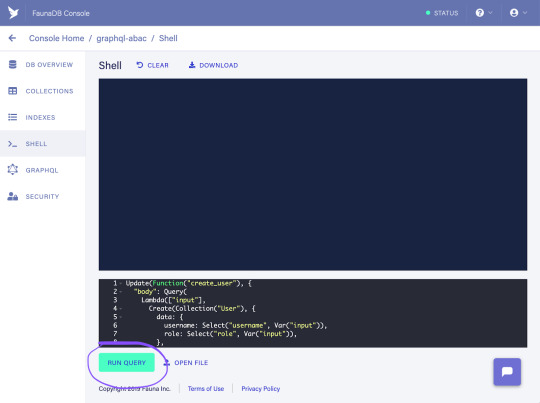
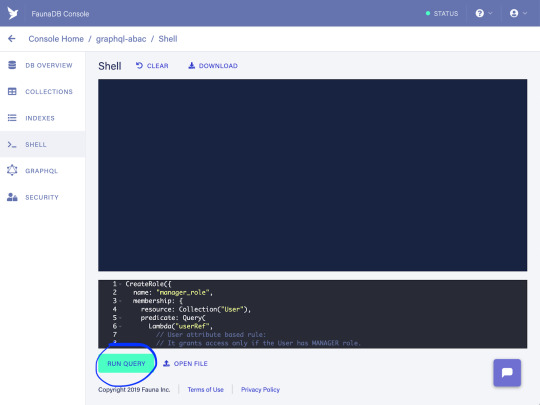
Let’s continue to implement the UDF for the createUser field resolver so that we can create some test users. First, select the Shell tab from the left sidebar:

As explained before, a template UDF has already been created during the import process. When called, this template UDF prints an error message stating that it needs to be updated with a proper implementation. In order to update it with the intended behavior, we are going to use FQL's Update function.
So, let’s copy the following FQL query into the web-based shell, and click the "Run Query" button:
Update(Function("create_user"), { "body": Query( Lambda(["input"], Create(Collection("User"), { data: { username: Select("username", Var("input")), role: Select("role", Var("input")), }, credentials: { password: Select("password", Var("input")) } }) ) ) });
Your screen should look similar to:
The create_user UDF will be in charge of properly creating a User document along with a password value. The password is stored in the document within a special object named credentials that is encrypted and cannot be retrieved back by any FQL function. As a result, the password is securely saved in the database making it impossible to read from either the FQL or the GraphQL APIs. The password will be used later for authenticating a User through a dedicated FQL function named Login, as explained next.
Now, let’s add the proper implementation for the UDF backing up the loginUser field resolver through the following FQL query:
Update(Function("login_user"), { "body": Query( Lambda(["input"], Select( "secret", Login( Match(Index("unique_User_username"), Select("username", Var("input"))), { password: Select("password", Var("input")) } ) ) ) ) });
Copy the query listed above and paste it into the shell’s command panel, and click the "Run Query" button:

The login_user UDF will attempt to authenticate a User with the given username and password credentials. As mentioned before, it does so via the Login function. The Login function verifies that the given password matches the one stored along with the User document being authenticated. Note that the password stored in the database is not output at any point during the login process. Finally, in case the credentials are valid, the login_user UDF returns an authorization token called a secret which can be used in subsequent requests for validating the User’s identity.
With the resolvers in place, we will continue with creating some sample data. This will let us try out our use case and help us better understand how the access rules are defined later on.
Creating sample data
First, we are going to create a manager user. Select the GraphQL tab from the left sidebar, copy the following mutation into the GraphQL Playground, and click the "Play" button:
mutation CreateManagerUser { createUser(input: { username: "bill.lumbergh" password: "123456" role: MANAGER }) { username role } }
Your screen should look like this:

Next, let’s create an employee user by running the following mutation through the GraphQL Playground editor:
mutation CreateEmployeeUser { createUser(input: { username: "peter.gibbons" password: "abcdef" role: EMPLOYEE }) { username role } }
You should see the following response:

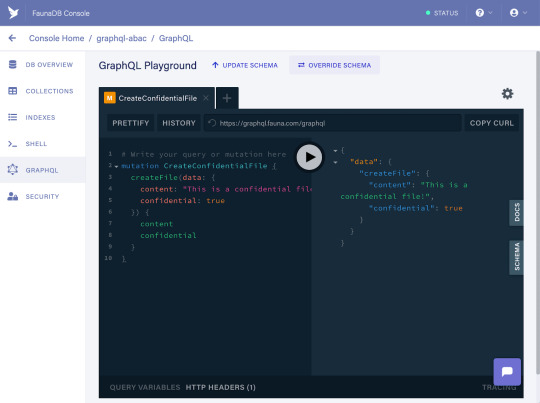
Now, let’s create a confidential file by running the following mutation:
mutation CreateConfidentialFile { createFile(data: { content: "This is a confidential file!" confidential: true }) { content confidential } }
As a response, you should get the following:
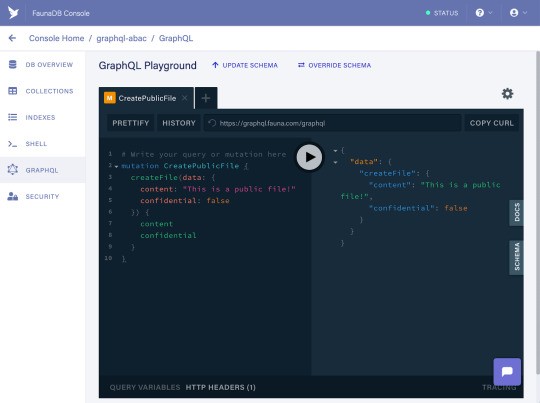
And lastly, create a public file with the following mutation:
mutation CreatePublicFile { createFile(data: { content: "This is a public file!" confidential: false }) { content confidential } }
If successful, it should prompt the following response:
Now that all the sample data is in place, we need access rules since this article is about securing a GraphQL API. The access rules determine how the sample data we just created can be accessed, since by default a user can only access his own user entity. In this case, we are going to implement the following access rules:
Allow employee users to read public files only.
Allow manager users to read both public files and, only during weekdays, confidential files.
As you might have already noticed, these access rules are highly specific. We will see however that the ABAC system is powerful enough to express very complex rules without getting in the way of the design of your GraphQL API.
Such access rules are not part of the GraphQL specification so we will define the access rules in the Fauna Query Language (FQL), and then verify that they are working as expected by executing some queries from the GraphQL API.
But what is this "ABAC" system that we just mentioned? What does it stand for, and what can it do?
What is ABAC?
ABAC stands for Attribute-Based Access Control. As its name indicates, it’s an authorization model that establishes access policies based on attributes. In simple words, it means that you can write security rules that involve any of the attributes of your data. If our data contains users we could use the role, department, and clearance level to grant or refuse access to specific data. Or we could use the current time, day of the week, or location of the user to decide whether he can access a specific resource.
In essence, ABAC allows the definition of fine-grained access control policies based on environmental properties and your data. Now that we know what it can do, let’s define some access rules to give you concrete examples.
Defining the access rules
In FaunaDB, access rules are defined in the form of roles. A role consists of the following data:
name — the name that identifies the role
privileges — specific actions that can be executed on specific resources
membership — specific identities that should have the specified privileges
Roles are created through the CreateRole FQL function, as shown in the following example snippet:
CreateRole({ name: "role_name", membership: [ // ... ], privileges: [ // ... ] })
You can see two important concepts in this role; membership and privileges. Membership defines who receives the privileges of the role and privileges defines what these permissions are. Let’s write a simple example rule to start with: “Any user can read all files.”
Since the rule applies on all users, we would define the membership like this:
membership: { resource: Collection("User") }
Simple right? We then continue to define the "Can read all files" privilege for all of these users.
privileges: [ { resource: Collection("File"), actions: { read: true } } ]
The direct effect of this is that any token that you receive by logging in with a user via our loginUser GraphQL mutation can now access all files.
This is the simplest rule that we can write, but in our example we want to limit access to some confidential files. To do that, we can replace the {read: true} syntax with a function. Since we have defined that the resource of the privilege is the "File" collection, this function will take each file that would be accessed by a query as the first parameter. You can then write rules such as: “A user can only access a file if it is not confidential”. In FaunaDB’s FQL, such a function is written by using Query(Lambda(‘x’, … <logic that users Var(‘x’)>)).
Below is the privilege that would only provide read access to non-confidential files:
privileges: [ { resource: Collection("File"), actions: { // Read and establish rule based on action attribute read: Query( // Read and establish rule based on resource attribute Lambda("fileRef", Not(Select(["data", "confidential"], Get(Var("fileRef")))) ) ) } } ]
This directly uses properties of the "File" resource we are trying to access. Since it’s just a function, we could also take into account environmental properties like the current time. For example, let’s write a rule that only allows access on weekdays.
privileges: [ { resource: Collection("File"), actions: { read: Query( Lambda("fileRef", Let( { dayOfWeek: DayOfWeek(Now()) }, And(GTE(Var("dayOfWeek"), 1), LTE(Var("dayOfWeek"), 5)) ) ) ) } } ]
As mentioned in our rules, confidential files should only be accessible by managers. Managers are also users, so we need a rule that applies to a specific segment of our collection of users. Luckily, we can also define the membership as a function; for example, the following Lambda only considers users who have the MANAGER role to be part of the role membership.
membership: { resource: Collection("User"), predicate: Query( // Read and establish rule based on user attribute Lambda("userRef", Equals(Select(["data", "role"], Get(Var("userRef"))), "MANAGER") ) ) }
In sum, FaunaDB roles are very flexible entities that allow defining access rules based on all of the system elements' attributes, with different levels of granularity. The place where the rules are defined — privileges or membership — determines their granularity and the attributes that are available, and will differ with each particular use case.
Now that we have covered the basics of how roles work, let’s continue by creating the access rules for our example use case!
In order to keep things neat and tidy, we’re going to create two roles: one for each of the access rules. This will allow us to extend the roles with further rules in an organized way if required later. Nonetheless, be aware that all of the rules could also have been defined together within just one role if needed.
Let’s implement the first rule:
“Allow employee users to read public files only.”
In order to create a role meeting these conditions, we are going to use the following query:
CreateRole({ name: "employee_role", membership: { resource: Collection("User"), predicate: Query( Lambda("userRef", // User attribute based rule: // It grants access only if the User has EMPLOYEE role. // If so, further rules specified in the privileges // section are applied next. Equals(Select(["data", "role"], Get(Var("userRef"))), "EMPLOYEE") ) ) }, privileges: [ { // Note: 'allFiles' Index is used to retrieve the // documents from the File collection. Therefore, // read access to the Index is required here as well. resource: Index("allFiles"), actions: { read: true } }, { resource: Collection("File"), actions: { // Action attribute based rule: // It grants read access to the File collection. read: Query( Lambda("fileRef", Let( { file: Get(Var("fileRef")), }, // Resource attribute based rule: // It grants access to public files only. Not(Select(["data", "confidential"], Var("file"))) ) ) ) } } ] })
Select the Shell tab from the left sidebar, copy the above query into the command panel, and click the "Run Query" button:

Next, let’s implement the second access rule:
“Allow manager users to read both public files and, only during weekdays, confidential files.”
In this case, we are going to use the following query:
CreateRole({ name: "manager_role", membership: { resource: Collection("User"), predicate: Query( Lambda("userRef", // User attribute based rule: // It grants access only if the User has MANAGER role. // If so, further rules specified in the privileges // section are applied next. Equals(Select(["data", "role"], Get(Var("userRef"))), "MANAGER") ) ) }, privileges: [ { // Note: 'allFiles' Index is used to retrieve // documents from the File collection. Therefore, // read access to the Index is required here as well. resource: Index("allFiles"), actions: { read: true } }, { resource: Collection("File"), actions: { // Action attribute based rule: // It grants read access to the File collection. read: Query( Lambda("fileRef", Let( { file: Get(Var("fileRef")), dayOfWeek: DayOfWeek(Now()) }, Or( // Resource attribute based rule: // It grants access to public files. Not(Select(["data", "confidential"], Var("file"))), // Resource and environmental attribute based rule: // It grants access to confidential files only on weekdays. And( Select(["data", "confidential"], Var("file")), And(GTE(Var("dayOfWeek"), 1), LTE(Var("dayOfWeek"), 5)) ) ) ) ) ) } } ] })
Copy the query into the command panel, and click the "Run Query" button:
At this point, we have created all of the necessary elements for implementing and trying out our example use case! Let’s continue with verifying that the access rules we just created are working as expected...
Putting everything in action
Let’s start by checking the first rule:
“Allow employee users to read public files only.”
The first thing we need to do is log in as an employee user so that we can verify which files can be read on its behalf. In order to do so, execute the following mutation from the GraphQL Playground console:
mutation LoginEmployeeUser { loginUser(input: { username: "peter.gibbons" password: "abcdef" }) }
As a response, you should get a secret access token. The secret represents that the user has been authenticated successfully:

At this point, it’s important to remember that the access rules we defined earlier are not directly associated with the secret that is generated as a result of the login process. Unlike other authorization models, the secret token itself does not contain any authorization information on its own, but it’s just an authentication representation of a given document.
As explained before, access rules are stored in roles, and roles are associated with documents through their membership configuration. After authentication, the secret token can be used in subsequent requests to prove the caller’s identity and determine which roles are associated with it. This means that access rules are effectively verified in every subsequent request and not only during authentication. This model enables us to modify access rules dynamically without requiring users to authenticate again.
Now, we will use the secret issued in the previous step to validate the identity of the caller in our next query. In order to do so, we need to include the secret as a Bearer Token as part of the request. To achieve this, we have to modify the Authorization header value set by the GraphQL Playground. Since we don’t want to miss the admin secret that is being used as default, we’re going to do this in a new tab.
Click the plus (+) button to create a new tab, and select the HTTP HEADERS panel on the bottom left corner of the GraphQL Playground editor. Then, modify the value of the Authorization header to include the secret obtained earlier, as shown in the following example. Make sure to change the scheme value from Basic to Bearer as well:
{ "authorization": "Bearer fnEDdByZ5JACFANyg5uLcAISAtUY6TKlIIb2JnZhkjU-SWEaino" }
With the secret properly set in the request, let’s try to read all of the files on behalf of the employee user. Run the following query from the GraphQL Playground:
query ReadFiles { allFiles { data { content confidential } } }
In the response, you should see the public file only:
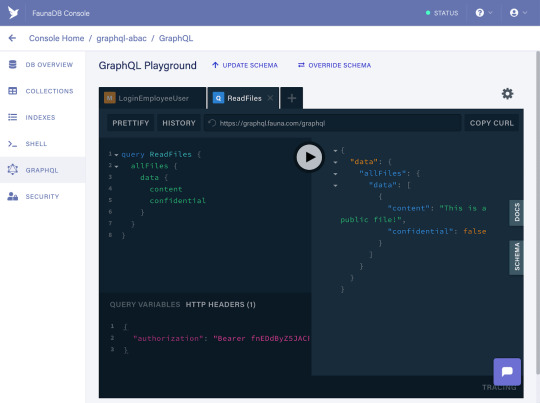
Since the role we defined for employee users does not allow them to read confidential files, they have been correctly filtered out from the response!
Let’s move on now to verifying our second rule:
“Allow manager users to read both public files and, only during weekdays, confidential files.”
This time, we are going to log in as the employee user. Since the login mutation requires an admin secret token, we have to go back first to the original tab containing the default authorization configuration. Once there, run the following query:
mutation LoginManagerUser { loginUser(input: { username: "bill.lumbergh" password: "123456" }) }
You should get a new secret as a response:
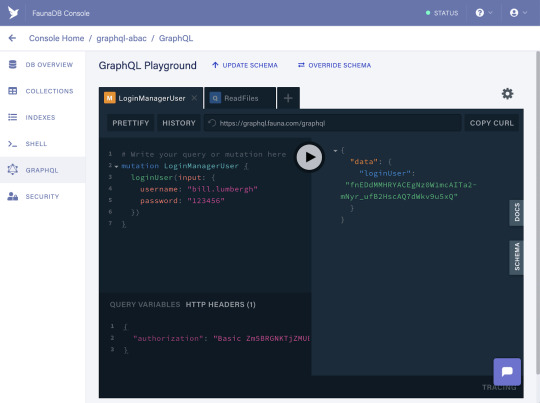
Copy the secret, create a new tab, and modify the Authorization header to include the secret as a Bearer Token as we did before. Then, run the following query in order to read all of the files on behalf of the manager user:
query ReadFiles { allFiles { data { content confidential } } }
As long as you’re running this query on a weekday (if not, feel free to update this rule to include weekends), you should be getting both the public and the confidential file in the response:
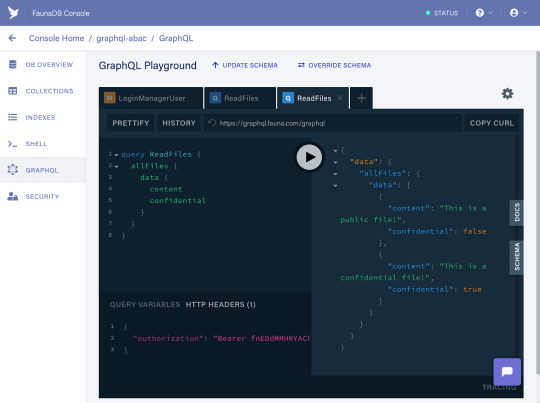
And, finally, we have verified that all of the access rules are working successfully from the GraphQL API!
Conclusion
In this post, we have learned how a comprehensive authorization model can be implemented on top of the FaunaDB GraphQL API using FaunaDB's built-in ABAC features. We have also reviewed ABAC's distinctive capabilities, which allow defining complex access rules based on the attributes of each system component.
While access rules can only be defined through the FQL API at the moment, they are effectively verified for every request executed against the FaunaDB GraphQL API. Providing support for specifying access rules as part of the GraphQL schema definition is already planned for the future.
In short, FaunaDB provides a powerful mechanism for defining complex access rules on top of the GraphQL API covering most common use cases without the need for third-party services.
The post Instant GraphQL Backend with Fine-grained Security Using FaunaDB appeared first on CSS-Tricks.
Instant GraphQL Backend with Fine-grained Security Using FaunaDB published first on https://deskbysnafu.tumblr.com/
0 notes
Text
300+ TOP APACHE WEB SERVER Objective Questions and Answers
APACHE WEB SERVER Multiple Choice Questions :-
1. What does the following set of Directives do? AddType application/x-httpd-php3 .php3. a. Adds all files with the extension .php3 to the MIME Type application/x-httpd-php3. b. Creates a new user defined type that can be used subsequently in variable declarations. c. Makes it easier to load new definitions into the configuration files. d. Installed the php3 software onto the system. 2. What does the HostNameLookups double do? a. Makes Apache perform 2 forward name lookups from different DNS servers to confirm the host name prior to logging. b. Performs a host name lookup in the double file prior to logging the result. c. Performs both a reverse name lookup and then a forward name lookup on that result, prior to logging the result. d. Sets the host name to double for all host names logged. 3. On a Microsoft Windows server the Max Spare Servers sets the number of idle child server processes that are allowed before the parent process begins to kill off the idle child processes. True or False? a. True b. False 4. What does the -v option do during startup? a. Starts Apache in verbose mode with maximum logging. b. Has no impact on Apache and has been discontinued as of Apache 1.2.6. c. Displays the version of Apache and the build date and exits. d. Disables virtual hosting for the specified virtual host name(s.. 5. What does the mod_dir Module provide? a. It provides a basic file directory searching capability for Apache to resolve spelling mismatches. b. It provides trailing slash "/" redirects and serving diectory index files. c. It allows remote synchoronizaiton for tools such as Microsoft Frontpage. d. It has been discontunued as of Apache 1.2 and is no longer used. 6. What action(s. must be done to enable cookies within Apache? a. Only installing the mon_usertrack. b. Installing mod_cookies. c. Installing mon_usertrack and setting the Directive cookietracking on. d. Only setting the Directive cookietracking on. 7. What option in the IndexOptions Directive is only available after Apache 1.3.10? a. FancyIndexing b. IconHeight c. NameWidth d. FoldersFirst 8. What Module is CacheSize used with? a. mod_proxy b. mod_ssl c. mod_usertrack d. mod_alias 9. What does the SendBufferSize Directive do? a. Sets the internal IPC buffer settings to the specified amount. b. Sets the number of 4k buffers in Windows for optimal disk buffering. c. Sets the TCP buffer size to the specified amount. d. Allows the default SMB TCP delay to be overridden. 10. What is the function of the mod_imap Module? a. Handles IMAP e-mail protocols for Apache. b. Performs image map handling. c. Allows for shared inter-module memory protocols. d. There is no mod_imap Module which is available for Apache.

APACHE WEB SERVER MCQs 11. By default, where are the HTML files located for the default site on a Windows Apache server? A. C:\Inetsrv\wwwroot B. C:\Program Files\Apache Software Foundation\ C. C:\Program Files\Apache Software Foundation\Apache2.2\www D. C:\Program Files\Apache Software Foundation\Apache2.2\htdocs E. C:\Program Files\Apache Software Foundation\Apache2.2\htdocs\www 12. Where is the default location for the main Apache configuration file (httpd.conf. on Windows? A. C:\Program Files\Apache Software Foundation\Apache2.2\conf B. C:\Program Files\Apache Software Foundation\Apache2.2\conft\extra C. C:\OpenSSL\conf D. C:\Program Files\Apache Software Foundation\Apache2.2\configuration 13. What is the default extension for Apache configuration files? A. .con B. .conf C. .txt D. .configuration E. .xml 14. Which of the following is not a valid protocol for PCI compliance? A. SSLv2 B. AES-SHA 56 bit C. SSLv1 D. All of the above APACHE WEB SERVER Objective type Questions with Answers 15. What is the recommended directive to load the Intermediate certificate(s.? A. SSLCertificateFile B. SSLCACertificateFile C. SSLCertificateChainFile D. SSLCACertificatePath 16. If a certificate is issued off of the DigiCert High Assurance CA-3 certificate, how many Intermediate certificate files (.crts. will need to be specified in the Apache configuration file? A. One B. Two C. Three D. None 17. Where are the Apache log files located by default? A. C:\Program Files\Apache Software Foundation\Apache2.2\log B. C:\Program Files\Apache Software Foundation\Apache2.2\htdocs C. C:\Program Files\Apache Software Foundation\Apache2.2\conf D. C:\Program Files\Apache Software Foundation\Apache2.2\logs 18. What’s the location of log files for Apache server? A. /deck/log/httpd B. /var/log/httpd C. /drive/log/httpd D. /location/log/httpd 19. What’s the Comamnd to check the version of Apache server? A. rpm -qa |grep | version http| B. rpm –qa |grep httpd C. rpm -qa |check http | version D. rpm -qa |grep http | version 20. Does Apache act as Proxy server? A. can’t be determined B. Yes, by default C. yes,using mod_proxy module. D. No 21. Apache server works on which ports? A. http - port 80 only B. Both http - port 80 and https - port 443 C. https - port 443 only D. none of these 22. How do you change the default web root? A. Change the DocumentRoot in httpd.server file. B. change the DocumentRoot n httpd.admin file. C. change the DocumentRoot in httpd.root file. D. change the DocumentRoot in httpd.conf file. 23. What’s the command to stop Apache? A. apachectl -k exit /etc/init.d/apache2 exit (Linux. B. apachectl -k run /etcfiit.d/apache2 stop (Linux. C. apachectl -k interact /etc/init.d/apache2 stop (Linux. D. apachectl -k stop /etc/init.d/apache2 stop(Linux. 24. Which of the following is true about the Apache HTTP server? A. can be customised by writing ‘modules’ using the Apache module API B. is a powerful flexible, HTTP/1.1 compliant web server C. All of these D. implements the latest protocols, including KTTP/1.1 (RFC2616. 25. If you specify both deny from all and allow from all, what will be the default action of Apache? A. Can’t be determined B. Only allow will be performed. C. Deny always takes precedence over allow D. Allow always takes precedence over deny. 26. What’s the command to Restart Apache? A. apachectl -k restart /etc/init.d/apache2 system B. apachectl –k restart /etc/init.d/apache2 restart C. apachectl -k run /etc/init.d/apache2 restartsystem D. apachectl -k perform /etc/init.d/apache2 restart 27. htpasswd: A. it creates a new user B. None of these C. asks to specify a password for that user D. Both it creates a new user and asks to specify a password for that user 28. To cause the Web server to work around the NFS locking limitations, include a line such as the following in your server configuration files: A. None of these B. Lockfile /var/run/apache-lock C. SetFile/var/run/apache-access D. CreateFile /var/run/apache-startup APACHE WEB SERVER Questions and Answers pdf Download Read the full article
0 notes
Text
Windows File/Folder Flags
I’ve just got done creating a summary-type document for myself that combines (and often paraphrases) most of the Microsoft Windows API programming (C/C++) information about its files and folders, particularly focused on its various flags, but also including other somewhat related information. And although it won’t look as presentable copied into here as it does within its actual file, I’ve decided to copy it here below just in case it could possibly help other people as well. It helps me personally immensely because of it simply bringing most of the information altogether here in one spot. So here’s the copy of it:
Windows Security Permissions, Access Rights, And Privileges, And Related Info: Most helpful Microsoft webpages: 'File Security and Access Rights', 'Access Control Model'.
ACCESS_MASK: Defines standard, specific, and generic rights. These rights are used in access control entries (ACEs) and are the primary means of specifying the requested or granted access to an object. Bits 0-15 --- Specific rights. Contains the access mask specific to the object type associated with the mask. SPECIFIC_RIGHTS_ALL: 0x0000FFFF ------------------------- Bits 16-23 -- Standard rights. Contains the object's standard access rights: Bit 16 ----- DELETE Delete access. Bit 17 ----- READ_CONTROL Read access to the owner, group, and DACL (SD). Bit 18 ----- WRITE_DAC Write access to the DACL. Bit 19 ----- WRITE_OWNER Write access to owner. Bit 20 ----- SYNCHRONIZE Synchronize access. The right to specify a file handle in one of the wait functions. STANDARD_RIGHTS_ALL: SYNCHRONIZE|WRITE_OWNER|WRITE_DAC|READ_CONTROL|DELETE STANDARD_RIGHTS_REQUIRED: WRITE_OWNER|WRITE_DAC|READ_CONTROL|DELETE STANDARD_RIGHTS_READ: READ_CONTROL STANDARD_RIGHTS_WRITE: READ_CONTROL STANDARD_RIGHTS_EXECUTE: READ_CONTROL An owner of an object is always implicitly granted: WRITE_DAC|READ_CONTROL. ------------------------- Bit 24 ----- ACCESS_SYSTEM_SECURITY. Access system security right. It is used to indicate access to a SACL. This type of access requires the calling process to have the SE_SECURITY_NAME (Manage auditing and security log) privilege. If this flag is set in the access mask of an audit access ACE (successful or unsuccessful access), the SACL access will be audited. Bit 25 ----- MAXIMUM_ALLOWED. Maximum Allowed right. Flag usable in requests as meaning to request all of whatever is allowed for the caller; But this flag is NOT allowed in ACEs! Bits 26-27 -- Reserved. Bit 28 ----- GENERIC_ALL Generic all. Full Complete Access. Bit 29 ----- GENERIC_EXECUTE Generic execute. Full Open/Traverse Access. Bit 30 ----- GENERIC_WRITE Generic write. Full Write Access. Bit 31 ----- GENERIC_READ Generic read. Full Read Access. The GENERIC_* flags are just special Shortcut flags that represent (replace) a specific combination group of selected flags out of the Specifc/Standard flags that are held internally within mapping structures that combine them for each different type of object. For FILES, the GENERIC_* flags are set to the following: GENERIC_ALL: FILE_ALL_ACCESS GENERIC_EXECUTE: FILE_GENERIC_EXECUTE GENERIC_WRITE: FILE_GENERIC_WRITE GENERIC_READ: FILE_GENERIC_READ And these FILE_GEERIC_* flags are further set to the following: FILE_ALL_ACCESS: SYNCHRONIZE|WRITE_OWNER|WRITE_DAC|READ_CONTROL|DELETE| FILE_LIST_DIRECTORY|FILE_READ_DATA|FILE_ADD_FILE|FILE_WRITE_DATA|FILE_ADD_SUBDIRECTORY|FILE_APPEND_DATA|FILE_CREATE_PIPE_INSTANCE|FILE_READ_EA|FILE_READ_PROPERTIES|FILE_WRITE_EA|FILE_WRITE_PROPERTIES|FILE_EXECUTE|FILE_TRAVERSE|FILE_DELETE_CHILD|FILE_READ_ATTRIBUTES|FILE_WRITE_ATTRIBUTES. FILE_GENERIC_EXECUTE: SYNCHRONIZE|READ_CONTROL| FILE_EXECUTE|FILE_READ_ATTRIBUTES. FILE_GENERIC_WRITE: SYNCHRONIZE|READ_CONTROL| FILE_WRITE_DATA|FILE_APPEND_DATA|FILE_WRITE_EA|FILE_WRITE_ATTRIBUTES. FILE_GENERIC_READ: SYNCHRONIZE|READ_CONTROL| FILE_READ_DATA|FILE_READ_EA|FILE_READ_ATTRIBUTES.
FILE/FOLDER Access Permissions (and flag values for resolving odd combinations): ------ FILE_READ_DATA 0x00000001 For a file object, the right to read the corresponding file data. For a directory object, the right to read the corresponding directory data. FILE_LIST_DIRECTORY 0x00000001 For a directory, the right to list the contents of the directory. ------ FILE_WRITE_DATA 0x00000002 For a file object, the right to write data to the file. For a directory object, the right to create a file in the directory (FILE_ADD_FILE). FILE_ADD_FILE 0x00000002 For a directory, the right to create a file in the directory. ------ FILE_APPEND_DATA 0x00000004 For a file object, the right to append data to the file. (For local files, write operations will not overwrite existing data if this flag is specified without FILE_WRITE_DATA). For a directory object, the right to create a subdirectory (FILE_ADD_SUBDIRECTORY). FILE_ADD_SUBDIRECTORY 0x00000004 For a directory, the right to create a subdirectory. FILE_CREATE_PIPE_INSTANCE 0x00000004 For a named pipe, the right to create a pipe. ------ FILE_READ_EA 0x00000008 The right to read extended file attributes. FILE_READ_PROPERTIES 0x00000008 The right to read extended file attributes. ------ FILE_WRITE_EA 0x00000010 The right to write extended file attributes. FILE_WRITE_PROPERTIES 0x00000010 The right to write extended file attributes. ------ FILE_EXECUTE 0x00000020 For a native code file, the right to execute the file. This access right given to scripts may cause the script to be executable, depending on the script interpreter. FILE_TRAVERSE 0x00000020 For a directory, the right to traverse the directory. By default, users are assigned the BYPASS_TRAVERSE_CHECKING privilege, which ignores the FILE_TRAVERSE access right. ------ FILE_DELETE_CHILD 0x00000040 For a directory, the right to delete a directory and all the files it contains, including read-only files. ------ FILE_READ_ATTRIBUTES 0x00000080 The right to read file attributes. ------ FILE_WRITE_ATTRIBUTES 0x00000100 The right to write file attributes.
For WMI classes (thereby involving C++ as well as many other object-based languages), the file and directory classes which contain an AccessMask property include: CIM_DataFile, CIM_Directory, CIM_LogicalFile, Win32_CodecFile, Win32_Directory, Win32_NTEventLogFile, Win32_Share, Win32_ShortcutFile. The function ReadDirectoryChanges is one example of a function that requires CreateFile to directly open a folder itself so that its handle can be accessed by this function, and there may be other examples as well. An application that needs to set and query the values of a registry key can open the key by using an access mask containing the following requested access rights flags: KEY_SET_VALUE|KEY_QUERY_VALUE.
==> DELETION Rules and Related: Attempts to delete a file that is read-only (via DeleteFile result in the error ERROR_ACCESS_DENIED. To delete a read-only file, first you must remove the read-only attribute. To delete or rename a file, you must have either delete permission on the file, or delete child permission in the parent directory. To recursively delete the files in a directory, use the SHFileOperation function. The RemoveDirectory function can be used to delete a folder if it is empty. If a directory is set up with all access except delete and delete child, and the ACL of new files are inherited, then you could create a file without being able to delete it. However, you could instead create the file in such a case via requesting DELETE access right on it in order to be able to delete it later. If you request delete permission at the time you create a file, you can delete or rename the file with that handle, but not with any other handle. To delete a file via handle instead of via using DeleteFile, this can be done via first calling CreateFile (while including the DELETE requested access along with requesting NO Sharing [meaning Exclusive Access!]) and then calling the function SetFileInformationByHandle with the DeleteFile MEMBER of its FILE_DISPOSITION_INFO structure set to TRUE. The DeleteFile function fails if an application attempts to delete a file that has other handles open for normal read/write to it or as a memory-mapped file at the time (FILE_SHARE_DELETE must have been specified when other handles were opened). The DeleteFile function actually just marks a file for deletion upon its fully being closed everywhere; therefore, the file deletion does not truly occur until the last handle to the file is closed. And any subsequent calls to CreateFile to open the file in such cases fail with ERROR_ACCESS_DENIED. If the path of an item being deleted points to a symbolic link, the symbolic link is deleted, not the target. So to delete a target in such cases, you must call CreateFile on the item while including the flag FILE_FLAG_DELETE_ON_CLOSE. There can also be a connection made with locking bytes within files, and this is demonstrated within a really nice and lengthy programming example shown on the webpage 'Locking and Unlocking Byte Ranges in Files', which actually includes showing database concurrency control via locking (similar to methods used in the Unify database system and the database system that I'd personally written afterword myself for United Beauty Supply (that I still have a printout of all of the source code for).
==> SHARING Flags and Rules: <NONE> 0x00000000 Prevents other processes from opening a file or device if they request read, write, or delete access. FILE_SHARE_READ 0x00000001 Enables subsequent open operations on a file or device to request read access. Otherwise, other processes cannot open the file or device if they request read access. If this flag is not specified, but the file or device has been opened for read access, the function fails. FILE_SHARE_WRITE 0x00000002 Enables subsequent open operations on a file or device to request write access. Otherwise, other processes cannot open the file or device if they request write access. If this flag is not specified, but the file or device has been opened for write access or has a file mapping with write access, the function fails. FILE_SHARE_DELETE 0x00000004 Enables subsequent open operations on a file or device to request delete access. Otherwise, other processes cannot open the file or device if they request delete access. If this flag is not specified, but the file or device has been opened for delete access, the function fails. Delete access allows both delete and rename operations. FILE_SHARE_VALID_FLAGS: FILE_SHARE_READ|FILE_SHARE_WRITE|FILE_SHARE_DELETE.
An application uses CreateFile to specify whether it wants to share the file for reading, writing, both, or neither. This is known as the sharing mode. An open file that is not shared (dwShareMode flags set to zero) cannot be opened again, either by the application that opened it or by another application, until its handle has been closed. This is also referred to as exclusive access. When a process uses CreateFile to attempt to open a file that has already been opened in a sharing mode (dwShareMode set to a valid nonzero value), the system compares the requested access and sharing modes to those specified when the file was opened. If you specify an access or sharing mode that conflicts with the modes specified in the previous call, CreateFile fails. The following table illustrates the valid combinations of two calls to CreateFile using various access modes and sharing modes (dwDesiredAccess, dwShareMode respectively). It does not matter in which order the CreateFile calls are made. However, any subsequent file I/O operations on each file handle will still be constrained by the current access and sharing modes associated with that particular file handle: First call to CreateFile ------------------------ Valid second calls to CreateFile -------------------------------- GENERIC_READ, FILE_SHARE_READ GENERIC_READ, FILE_SHARE_READ GENERIC_READ, FILE_SHARE_READ | FILE_SHARE_WRITE - - - - - - GENERIC_READ, FILE_SHARE_WRITE GENERIC_WRITE, FILE_SHARE_READ GENERIC_WRITE, FILE_SHARE_READ | FILE_SHARE_WRITE - - - - - - GENERIC_READ, FILE_SHARE_READ | FILE_SHARE_WRITE GENERIC_READ, FILE_SHARE_READ GENERIC_READ, FILE_SHARE_READ | FILE_SHARE_WRITE GENERIC_WRITE, FILE_SHARE_READ GENERIC_WRITE, FILE_SHARE_READ | FILE_SHARE_WRITE GENERIC_READ | GENERIC_WRITE, FILE_SHARE_READ GENERIC_READ | GENERIC_WRITE, FILE_SHARE_READ | FILE_SHARE_WRITE - - - - - - GENERIC_WRITE, FILE_SHARE_READ GENERIC_READ, FILE_SHARE_WRITE GENERIC_READ, FILE_SHARE_READ | FILE_SHARE_WRITE - - - - - - GENERIC_WRITE, FILE_SHARE_WRITE GENERIC_WRITE, FILE_SHARE_WRITE GENERIC_WRITE, FILE_SHARE_READ | FILE_SHARE_WRITE - - - - - - GENERIC_WRITE, FILE_SHARE_READ | FILE_SHARE_WRITE GENERIC_READ, FILE_SHARE_WRITE GENERIC_READ, FILE_SHARE_READ | FILE_SHARE_WRITE GENERIC_WRITE, FILE_SHARE_WRITE GENERIC_WRITE, FILE_SHARE_READ | FILE_SHARE_WRITE GENERIC_READ | GENERIC_WRITE, FILE_SHARE_WRITE GENERIC_READ | GENERIC_WRITE, FILE_SHARE_READ | FILE_SHARE_WRITE - - - - - - GENERIC_READ | GENERIC_WRITE, FILE_SHARE_READ GENERIC_READ, FILE_SHARE_READ | FILE_SHARE_WRITE - - - - - - GENERIC_READ | GENERIC_WRITE, FILE_SHARE_WRITE GENERIC_WRITE, FILE_SHARE_READ | FILE_SHARE_WRITE - - - - - - GENERIC_READ | GENERIC_WRITE, FILE_SHARE_READ | FILE_SHARE_WRITE GENERIC_READ, FILE_SHARE_READ | FILE_SHARE_WRITE GENERIC_WRITE, FILE_SHARE_READ | FILE_SHARE_WRITE GENERIC_READ | GENERIC_WRITE, FILE_SHARE_READ | FILE_SHARE_WRITE
==> PRIVILEGES: Privilege constants are defined as strings in Winnt.h. For example, the SE_AUDIT_NAME constant is defined as "SeAuditPrivilege" as seen here below: SE_BACKUP_NAME; SeBackupPrivilege: Required to perform backup operations. This privilege causes the system to grant all read access control to any file, regardless of the ACL specified for the file. Any access request other than read is still evaluated with the ACL. This privilege is required by the RegSaveKey and RegSaveKeyExfunctions. User Right: Back up files and directories. The following access rights are granted if this privilege is held: ACCESS_SYSTEM_SECURITY|SYNCHRONIZE|READ_CONTROL| FILE_READ_DATA|FILE_READ_EA|FILE_TRAVERSE|FILE_READ_ATTRIBUTES. SE_RESTORE_NAME; SeRestorePrivilege: Required to perform restore operations. This privilege causes the system to grant all write access control to any file, regardless of the ACL specified for the file. Any access request other than write is still evaluated with the ACL. Additionally, this privilege enables you to set any valid user or group SID as the owner of a file. This privilege is required by the RegLoadKey function. User Right: Restore files and directories. The following access rights are granted if this privilege is held: ACCESS_SYSTEM_SECURITY|SYNCHRONIZE|WRITE_OWNER|WRITE_DAC|READ_CONTROL|DELETE| FILE_ADD_FILE|FILE_WRITE_DATA|FILE_ADD_SUBDIRECTORY|FILE_APPEND_DATA|FILE_WRITE_EA|FILE_WRITE_ATTRIBUTES. SE_ASSIGNPRIMARYTOKEN_NAME; SeAssignPrimaryTokenPrivilege: Required to assign the primary token of a process. User Right: Replace a process-level token. SE_AUDIT_NAME; SeAuditPrivilege: Required to generate audit-log entries. Give this privilege to secure servers. User Right: Generate security audits. SE_CHANGE_NOTIFY_NAME; SeChangeNotifyPrivilege: Required to receive notifications of changes to files or directories. This privilege also causes the system to skip all traversal access checks. It is enabled by default for all users. User Right: Bypass traverse checking. SE_CREATE_GLOBAL_NAME; SeCreateGlobalPrivilege: Required to create named file mapping objects in the global namespace during Terminal Services sessions. This privilege is enabled by default for administrators, services, and the local system account. User Right: Create global objects. SE_CREATE_PAGEFILE_NAME; SeCreatePagefilePrivilege: Required to create a paging file. User Right: Create a pagefile. SE_CREATE_PERMANENT_NAME; SeCreatePermanentPrivilege: Required to create a permanent object. User Right: Create permanent shared objects. SE_CREATE_SYMBOLIC_LINK_NAME; SeCreateSymbolicLinkPrivilege: Required to create a symbolic link. User Right: Create symbolic links.0 SE_CREATE_TOKEN_NAME; SeCreateTokenPrivilege: Required to create a primary token. User Right: Create a token object. You cannot add this privilege to a user account with the "Create a token object" policy. Additionally, you cannot add this privilege to an owned process using Windows APIs.Windows Server 2003 and Windows XP with SP1 and earlier: Windows APIs can add this privilege to an owned process. SE_DEBUG_NAME; SeDebugPrivilege: Required to debug and adjust the memory of a process owned by another account. User Right: Debug programs. SE_DELEGATE_SESSION_USER_IMPERSONATE_NAME; SeDelegateSessionUserImpersonatePrivilege: Required to obtain an impersonation token for another user in the same session. User Right: Impersonate other users. SE_ENABLE_DELEGATION_NAME; SeEnableDelegationPrivilege: Required to mark user and computer accounts as trusted for delegation. User Right: Enable computer and user accounts to be trusted for delegation. SE_IMPERSONATE_NAME; SeImpersonatePrivilege: Required to impersonate. User Right: Impersonate a client after authentication. SE_INC_BASE_PRIORITY_NAME; SeIncreaseBasePriorityPrivilege: Required to increase the base priority of a process. User Right: Increase scheduling priority. SE_INCREASE_QUOTA_NAME; SeIncreaseQuotaPrivilege: Required to increase the quota assigned to a process. User Right: Adjust memory quotas for a process. SE_INC_WORKING_SET_NAME; SeIncreaseWorkingSetPrivilege: Required to allocate more memory for applications that run in the context of users. User Right: Increase a process working set. SE_LOAD_DRIVER_NAME; SeLoadDriverPrivilege: Required to load or unload a device driver. User Right: Load and unload device drivers. SE_LOCK_MEMORY_NAME; SeLockMemoryPrivilege: Required to lock physical pages in memory. User Right: Lock pages in memory. SE_MACHINE_ACCOUNT_NAME; SeMachineAccountPrivilege: Required to create a computer account. User Right: Add workstations to domain. SE_MANAGE_VOLUME_NAME; SeManageVolumePrivilege: Required to enable volume management privileges. User Right: Manage the files on a volume. SE_PROF_SINGLE_PROCESS_NAME; SeProfileSingleProcessPrivilege: Required to gather profiling information for a single process. User Right: Profile single process. SE_RELABEL_NAME; SeRelabelPrivilege: Required to modify the mandatory integrity level of an object. User Right: Modify an object label. SE_REMOTE_SHUTDOWN_NAME; SeRemoteShutdownPrivilege: Required to shut down a system using a network request. User Right: Force shutdown from a remote system. SE_SECURITY_NAME; SeSecurityPrivilege: Required to perform a number of security-related functions, such as controlling and viewing audit messages. This privilege identifies its holder as a security operator. User Right: Manage auditing and security log. SE_SHUTDOWN_NAME; SeShutdownPrivilege: Required to shut down a local system. User Right: Shut down the system. SE_SYNC_AGENT_NAME; SeSyncAgentPrivilege: Required for a domain controller to use the Lightweight Directory Access Protocol directory synchronization services. This privilege enables the holder to read all objects and properties in the directory, regardless of the protection on the objects and properties. By default, it is assigned to the Administrator and LocalSystem accounts on domain controllers. User Right: Synchronize directory service data. SE_SYSTEM_ENVIRONMENT_NAME; SeSystemEnvironmentPrivilege: Required to modify the nonvolatile RAM of systems that use this type of memory to store configuration information. User Right: Modify firmware environment values. SE_SYSTEM_PROFILE_NAME; SeSystemProfilePrivilege: Required to gather profiling information for the entire system. User Right: Profile system performance. SE_SYSTEMTIME_NAME; SeSystemtimePrivilege: Required to modify the system time. User Right: Change the system time. SE_TAKE_OWNERSHIP_NAME; SeTakeOwnershipPrivilege: Required to take ownership of an object without being granted discretionary access. This privilege allows the owner value to be set only to those values that the holder may legitimately assign as the owner of an object. User Right: Take ownership of files or other objects. SE_TCB_NAME; SeTcbPrivilege: This privilege identifies its holder as part of the trusted computer base. Some trusted protected subsystems are granted this privilege. User Right: Act as part of the operating system. SE_TIME_ZONE_NAME; SeTimeZonePrivilege: Required to adjust the time zone associated with the computer's internal clock. User Right: Change the time zone. SE_TRUSTED_CREDMAN_ACCESS_NAME; SeTrustedCredManAccessPrivilege: Required to access Credential Manager as a trusted caller. User Right: Access Credential Manager as a trusted caller. SE_UNDOCK_NAME; SeUndockPrivilege: Required to undock a laptop. User Right: Remove computer from docking station. SE_UNSOLICITED_INPUT_NAME; SeUnsolicitedInputPrivilege: Required to read unsolicited input from a terminal device. User Right: Not applicable.
==> ACCOUNT RIGHTS (SPECIAL TYPES OF PRIVILEGES): SE_BATCH_LOGON_NAME; SeBatchLogonRight: Required for an account to log on using the batch logon type. SE_INTERACTIVE_LOGON_NAME; SeInteractiveLogonRight: Required for an account to log on using the interactive logon type. SE_NETWORK_LOGON_NAME; SeNetworkLogonRight: Required for an account to log on using the network logon type. SE_REMOTE_INTERACTIVE_LOGON_NAME; SeRemoteInteractiveLogonRight: Required for an account to log on remotely using the interactive logon type. SE_SERVICE_LOGON_NAME; SeServiceLogonRight: Required for an account to log on using the service logon type. SE_DENY_BATCH_LOGON_NAME; SeDenyBatchLogonRight: Explicitly denies an account the right to log on using the batch logon type. SE_DENY_INTERACTIVE_LOGON_NAME; SeDenyInteractiveLogonRight: Explicitly denies an account the right to log on using the interactive logon type. SE_DENY_NETWORK_LOGON_NAME; SeDenyNetworkLogonRight: Explicitly denies an account the right to log on using the network logon type. SE_DENY_REMOTE_INTERACTIVE_LOGON_NAME; SeDenyRemoteInteractiveLogonRight: Explicitly denies an account the right to log on remotely using the interactive logon type. SE_DENY_SERVICE_LOGON_NAME; SeDenyServiceLogonRight: Explicitly denies an account the right to log on using the service logon type.
==> SID CAPABILITY CONSTANTS: SECURITY_CAPABILITY_INTERNET_CLIENT: An account has access to the Internet from a client computer. SECURITY_CAPABILITY_INTERNET_CLIENT_SERVER: An account has access to the Internet from the client and server computers. SECURITY_CAPABILITY_PRIVATE_NETWORK_CLIENT_SERVER: An account has access to the Internet from a private network. SECURITY_CAPABILITY_PICTURES_LIBRARY: An account has access to the pictures library. SECURITY_CAPABILITY_VIDEOS_LIBRARY: An account has access to the videos library. SECURITY_CAPABILITY_MUSIC_LIBRARY: An account has access to the music library. SECURITY_CAPABILITY_DOCUMENTS_LIBRARY: An account has access to the documentation library. SECURITY_CAPABILITY_ENTERPRISE_AUTHENTICATION: An account has access to the default Windows credentials. SECURITY_CAPABILITY_SHARED_USER_CERTIFICATES: An account has access to the shared user certificates. SECURITY_CAPABILITY_REMOVABLE_STORAGE: An account has access to removable storage. The capability SID constants define for applications well-known capabilities by using the AllocateAndInitializeSid function. When constructing a capability SID, you need to include the package authority, SECURITY_APP_PACKAGE_AUTHORITY {0,0,0,0,0,15}, in the call to the AllocateAndInitializeSid function. Additionally, you need the base RID and RID count for the built-in capabilities SECURITY_CAPABILITY_BASE_RID and SECURITY_BUILTIN_CAPABILITY_RID_COUNT.
The functions that get and adjust the privileges in an access token use the LUID type (somewhat like GUIDs) to identify privileges. The LUID values for a privilege can differ from one computer to another, and from one boot to another on the same computer. To get the current LUID that corresponds to one of the string constants, use the LookupPrivilegeValue function. Use the LookupPrivilegeName function to convert a LUID to its corresponding string constant.
ACCESS RULES: Suppose you want to allow the following access to the properties of a DS (Directory Service such as Active Directory) object: Allow Group A read/write permission to all of the object's properties Allow everyone else read/write permission to all properties except Proprty D To do this, set the ACEs in the object's DACL as shown in the following table. Trustee Object GUID ACE type Access rights ------- ----------- -------- ------------- Group A None Access-allowed ACE ARDRP | ARDWP Everyone Property Set 1 Access-allowed object ACE ARDRP | ARDWP Everyone Property C Access-allowed object ACE ARDRP | ARDWP (Where: ARDRP = ADS_RIGHT_DS_READ_PROP, ARDWP = ADS_RIGHT_DS_WRITE_PROP). ------------- The ACE for Group A does not have an object GUID, which means that it allows access to all the object's properties. The object-specific ACE for Property Set 1 allows everyone access to Properties A and B. The other object-specific ACE allows everyone access to Property C. Note that although this DACL does not have any access-denied ACEs, it implicitly denies Property D access to everyone except Group A. When a user tries to access an object's property, the system checks the ACEs, in order, until the requested access is explicitly granted, denied, or there are no more ACEs, in which case, access is implicitly denied. The system evaluates: ACEs that apply to the object itself, Object-specific ACEs that apply to the property set that contains the property being accessed, Object-specific ACEs that apply to the property being accessed. The system ignores object-specific ACEs that apply to other property sets or properties.
When a thread tries to access a securable object, the system either grants or denies access. If the object does not have a DACL, the system grants access; otherwise, the system looks for ACEs in the object's DACL that apply to the thread. Each ACE in the object's DACL specifies the access rights allowed or denied for a trustee, which can be a user account, a group account, or a logon session. Regarding DACLs, the system compares the trustee in each ACE to the trustees identified in the thread's access token. An access token contains SIDs that identify the user and the group accounts to which the user belongs. A token also contains a logon SID that identifies the current logon session. During an access check, the system ignores group SIDs that are not enabled within an Access Token, with the possible SID attributes being: enabled, disabled, and deny-only. Typically, the system uses the primary access token of the thread that is requesting access; however, if the thread is impersonating another user, the system uses the thread's impersonation token instead. The system examines each ACE in sequence until one of the following events occurs: 1) An access-denied ACE explicitly denies any of the requested access rights to one of the trustees listed in the thread's access token. 2) One or more access-allowed ACEs for trustees listed in the thread's access token explicitly grant all the requested access rights. 3) All ACEs have been checked and there is still at least one requested access right that has not been explicitly allowed, in which case, access is implicitly denied. EXAMPLE: For Thread A, the system reads ACE 1 and immediately denies access because the access-denied ACE applies to the user in the thread's access token. In this case, the system does not check ACEs 2 and 3. For Thread B, ACE 1 does not apply, so the system proceeds to ACE 2 which allows write access and then ACE 3 which allows read and execute access. Because the system stops checking ACEs when the requested access is explicitly granted or denied, the order of ACEs in a DACL is important. Note that if the ACE order were different in the example, the system might have granted access to Thread A. For system objects, the operating system defines a preferred order of ACEs in a DACL.
The ACCESS_SYSTEM_SECURITY access right controls the ability to get or set the SACL in an object's security descriptor. The system grants this access right only if the SE_SECURITY_NAME privilege is enabled in the access token of the requesting thread. To access an object's SACL: Call the AdjustTokenPrivileges function to enable the SE_SECURITY_NAME privilege. Request the ACCESS_SYSTEM_SECURITY access right when you open a handle to the object. Get or set the object's SACL by using a function such as GetSecurityInfo or SetSecurityInfo. Call AdjustTokenPrivileges to disable the SE_SECURITY_NAME privilege. To access a SACL using the GetNamedSecurityInfo or SetNamedSecurityInfo functions, enable the SE_SECURITY_NAME privilege. The function internally requests the access right. The ACCESS_SYSTEM_SECURITY access right is not valid in a DACL because DACLs do not control access to a SACL. However, you can use the ACCESS_SYSTEM_SECURITY access right in a SACL to audit attempts to use the access right.
The following table lists the functions that manipulate the security information for each type of Windows securable object that exists: Object type Security descriptor functions ----------- ----------------------------- Files or directories on an NTFS file system GetNamedSecurityInfo, SetNamedSecurityInfo, GetSecurityInfo, SetSecurityInfo. Named pipesAnonymous pipes GetSecurityInfo, SetSecurityInfo Console screen buffers Not supported. ProcessesThreads GetSecurityInfo, SetSecurityInfo File-mapping objects GetNamedSecurityInfo, SetNamedSecurityInfo, GetSecurityInfo, SetSecurityInfo. Access tokens SetKernelObjectSecurity, GetKernelObjectSecurity. Window-management objects (stations/desktops) GetSecurityInfo, SetSecurityInfo Registry keys GetNamedSecurityInfo, SetNamedSecurityInfo, GetSecurityInfo, SetSecurityInfo. Windows services GetNamedSecurityInfo, SetNamedSecurityInfo, GetSecurityInfo, SetSecurityInfo. Local or remote printers GetNamedSecurityInfo, SetNamedSecurityInfo, GetSecurityInfo, SetSecurityInfo. Network shares GetNamedSecurityInfo, SetNamedSecurityInfo, GetSecurityInfo, SetSecurityInfo. Interprocess synchronization objects (events, mutexes, semaphores, and waitable timers) GetNamedSecurityInfo, SetNamedSecurityInfo, GetSecurityInfo, SetSecurityInfo. Job objects GetNamedSecurityInfo, SetNamedSecurityInfo, GetSecurityInfo, SetSecurityInfo.
How Windows determines access is by comparing the requested access rights and the information in the thread's access token with the information in the file or directory object's security descriptor. If the comparison does not prohibit ANY of the requested access rights from being granted, a handle to the object is returned to the thread and the access rights are granted. By default, authorization for access to a file or directory is controlled strictly by the ACLs in the security descriptor associated with that file or directory. In particular, the security descriptor of a parent directory is not used to control access to any child file or directory. The FILE_TRAVERSE access right can be enforced by removing the BYPASS_TRAVERSE_CHECKING privilege from users. This is not recommended in the general case, as many programs do not correctly handle directory traversal errors. The primary use for the FILE_TRAVERSE access right on directories is merely to enable conformance to certain IEEE and ISO POSIX standards when interoperability with Unix systems is a requirement. Note that you cannot use an access-denied ACE to deny only GENERIC_READ or only GENERIC_WRITE access to a file. This is because for file objects, the generic mappings for both GENERIC_READ or GENERIC_WRITE include the SYNCHRONIZE access right. If an ACE denies GENERIC_WRITE access to a trustee, and the trustee requests GENERIC_READ access, the request will fail because the request implicitly includes SYNCHRONIZE access which is implicitly denied by the ACE, and vice versa. Instead of using access-denied ACEs, use access-allowed ACEs to explicitly allow the permitted access rights.
Using CreateFile with FILE_FLAG_BACKUP_SEMANTICS after getting both/either of the privileges SE_BACKUP_NAME and/or SE_RESTORE_NAME along also with requesting READ_CONTROL access right is how to bypass DACL security checks. The SE_BACKUP_NAME and SE_RESTORE_NAME access privileges were specifically created to provide special needed abilities to backup applications. If these privileges have been granted and enabled in the access token of the backup application process, it can then call CreateFile to open your file or directory for backup, specifying the standard READ_CONTROL access right as the value of the dwDesiredAccess parameter. However, to identify the calling process as a backup process, the call to CreateFile must include the FILE_FLAG_BACKUP_SEMANTICS flag in the dwFlagsAndAttributes parameter. The full syntax of the function call to backup files is the following, which allow the backup application process to open files and folders via overriding the standard security checking: ------- CreateFile(fileName, READ_CONTROL <dwDesiredAccess>, 0 <dwShareMode>, NULL <lpSecurityAttributes>, OPEN_EXISTING <dwCreationDisposition>, FILE_FLAG_BACKUP_SEMANTICS <dwFlagsAndAttributes>, NULL <hTemplateFile>); ------- And to restore files while overriding the standard security checking, the backup application would similarly use the following CreateFile call syntax when opening the files and folders to be written: ------- CreateFile(fileName, WRITE_OWNER|WRITE_DAC <dwDesiredAccess>, 0 <dwShareMode>, NULL <lpSecurityAttributes>, CREATE_ALWAYS <dwCreationDisposition>, FILE_FLAG_BACKUP_SEMANTICS <dwFlagsAndAttributes>, NULL <hTemplateFile>); ------- There are also situations when a backup application must be able to change the access control settings of a file or directory. An example is when the access control settings of the disk-resident copy of a file or directory is different from the backup copy. This would happen if these settings were changed after the file or directory was backed up, or if it was corrupted. The FILE_FLAG_BACKUP_SEMANTICS flag specified in the call to CreateFile gives the backup application process permission to read the access-control settings of the file or directory. With this permission, the backup application process can then call GetKernelObjectSecurity and SetKernelObjectSecurity to read and than reset the access-control settings. If a backup application must have access to the system-level access control settings, the ACCESS_SYSTEM_SECURITY flag must be specified in the dwDesiredAccess parameter value passed to CreateFile. Also, backup applications can call BackupRead to read the files and directories specified for the restore operation, and can call BackupWrite to write them.
OTHER Sets of Related Flags and File/Directory Rules: FILE_ATTRIBUTE_READONLY 0x00000001 FILE_ATTRIBUTE_HIDDEN 0x00000002 FILE_ATTRIBUTE_SYSTEM 0x00000004 FILE_ATTRIBUTE_DIRECTORY 0x00000010 FILE_ATTRIBUTE_ARCHIVE 0x00000020 FILE_ATTRIBUTE_DEVICE 0x00000040 FILE_ATTRIBUTE_NORMAL 0x00000080 FILE_ATTRIBUTE_TEMPORARY 0x00000100 FILE_ATTRIBUTE_SPARSE_FILE 0x00000200 FILE_ATTRIBUTE_REPARSE_POINT 0x00000400 FILE_ATTRIBUTE_COMPRESSED 0x00000800 FILE_ATTRIBUTE_OFFLINE 0x00001000 FILE_ATTRIBUTE_NOT_CONTENT_INDEXED 0x00002000 FILE_ATTRIBUTE_ENCRYPTED 0x00004000 FILE_ATTRIBUTE_INTEGRITY_STREAM 0x00008000 (Not until Win8/Srvr2012) FILE_ATTRIBUTE_VIRTUAL 0x00010000 (Reserved for system use) FILE_ATTRIBUTE_NO_SCRUB_DATA 0x00020000 (Not until Win8/Srvr2012) FILE_ATTRIBUTE_RECALL_ON_OPEN 0x00040000 (Concerns directories only) FILE_ATTRIBUTE_RECALL_ON_DATA_ACCESS 0x00400000 (Kernel mode callers only) FILE_ATTRIBUTE_VALID_FLAGS 0x00007fb7 FILE_ATTRIBUTE_VALID_SET_FLAGS 0x000031a7 ----------- FILE_DIRECTORY_FILE 0x00000001 FILE_WRITE_THROUGH 0x00000002 FILE_SEQUENTIAL_ONLY 0x00000004 FILE_NO_INTERMEDIATE_BUFFERING 0x00000008 FILE_SYNCHRONOUS_IO_ALERT 0x00000010 FILE_SYNCHRONOUS_IO_NONALERT 0x00000020 FILE_NON_DIRECTORY_FILE 0x00000040 FILE_CREATE_TREE_CONNECTION 0x00000080 FILE_COMPLETE_IF_OPLOCKED 0x00000100 FILE_NO_EA_KNOWLEDGE 0x00000200 FILE_OPEN_FOR_RECOVERY 0x00000400 FILE_RANDOM_ACCESS 0x00000800 FILE_DELETE_ON_CLOSE 0x00001000 FILE_OPEN_BY_FILE_ID 0x00002000 FILE_OPEN_FOR_BACKUP_INTENT 0x00004000 FILE_NO_COMPRESSION 0x00008000 FILE_RESERVE_OPFILTER 0x00100000 FILE_OPEN_REPARSE_POINT 0x00200000 FILE_OPEN_NO_RECALL 0x00400000 FILE_OPEN_FOR_FREE_SPACE_QUERY 0x00800000 ----------- ACE_OBJECT_TYPE_PRESENT ACE_INHERITED_OBJECT_TYPE_PRESENT ACCESS_ALLOWED_ACE_TYPE ACCESS_DENIED_ACE_TYPE SYSTEM_AUDIT_ACE_TYPE SYSTEM_ALARM_ACE_TYPE
Types of scenarios that can exist when opening files via CreateFile or related: Creating a new file when a file with that name does not already exist. Creating a new file even if a file of the same name already exists, clearing its data and starting empty. Opening an existing file only if it exists, and only intact. Opening an existing file only if it exists, truncating it to be empty. Opening a file always: as-is if it exists, creating a new one if it does not exist. These scenarios are controlled by the proper use of the dwCreationDisposition parameter. The following is a breakdown of how these scenarios map to values for this parameter and what happens when they are used: - - - - - - - - - When creating or opening a new file when a file with that name does not already exist (dwCreationDisposition set to either CREATE_NEW, CREATE_ALWAYS, or OPEN_ALWAYS), the CreateFile function performs the following actions: Combines the file attributes and flags specified by dwFlagsAndAttributes with FILE_ATTRIBUTE_ARCHIVE. Sets the file length to zero. Copies the extended attributes supplied by the template file to the new file if the hTemplateFile parameter is specified (this overrides all FILE_ATTRIBUTE_* flags specified earlier). Sets the inherit flag specified by the bInheritHandle member and the security descriptor specified by the lpSecurityDescriptor member of the lpSecurityAttributes parameter (SECURITY_ATTRIBUTES structure), if supplied. ------ When creating a new file even if a file of the same name already exists (dwCreationDisposition set to CREATE_ALWAYS), the CreateFile function performs the following actions: Checks current file attributes and security settings for write access, failing if denied. Combines the file attributes and flags specified by dwFlagsAndAttributes with FILE_ATTRIBUTE_ARCHIVE and the existing file attributes. Sets the file length to zero (that is, any data that was in the file is no longer available and the file is empty). Copies the extended attributes supplied by the template file to the new file if the hTemplateFile parameter is specified (this overrides all FILE_ATTRIBUTE_* flags specified earlier). Sets the inherit flag specified by the bInheritHandle member of the lpSecurityAttributes parameter (SECURITY_ATTRIBUTES structure) if supplied, but ignores the lpSecurityDescriptor member of the SECURITY_ATTRIBUTES structure. If otherwise successful (that is, CreateFile returns a valid handle), calling GetLastError will yield the code ERROR_ALREADY_EXISTS, even though for this particular use-case it is not actually an error as such (if you intended to create a "new" (empty) file in place of the existing one). ------ When opening an existing file (dwCreationDisposition set to either OPEN_EXISTING, OPEN_ALWAYS, or TRUNCATE_EXISTING), the CreateFile function performs the following actions: Checks current file attributes and security settings for requested access, failing if denied. Combines the file flags (FILE_FLAG_*) specified by dwFlagsAndAttributes with existing file attributes, and ignores any file attributes (FILE_ATTRIBUTE_*) specified by dwFlagsAndAttributes. Sets the file length to zero only if dwCreationDisposition is set to TRUNCATE_EXISTING, otherwise the current file length is maintained and the file is opened as-is. Ignores the hTemplateFile parameter. Sets the inherit flag specified by the bInheritHandle member of the lpSecurityAttributes parameter (SECURITY_ATTRIBUTES structure) if supplied, but ignores the lpSecurityDescriptor member of the SECURITY_ATTRIBUTES structure.
Regarding File Attributes and Directories: File attributes are part of the metadata associated with a file or directory, each with its own purpose and rules on how it can be set and changed. Some of these attributes apply only to files, and some only to directories. For example, the FILE_ATTRIBUTE_DIRECTORY attribute applies only to directories: It is used by the file system to determine whether an object on disk is a directory, but it cannot be changed for an existing file system object. Some file attributes can be set for a directory but have meaning only for files created in that directory, acting as default attributes. For example, FILE_ATTRIBUTE_COMPRESSED can be set on a directory object, but because the directory object itself contains no actual data, it is not truly compressed; however, directories marked with this attribute tell the file system to compress any new files added to that directory. Any file attribute that can be set on a directory and will also be set for new files added to that directory is referred to as an inherited attribute. The CreateFile function provides a parameter for setting certain file attributes when a file is created. In general, these attributes are the most common for an application to use at file creation time, but not all possible file attributes are available to CreateFile. Some file attributes require the use of other functions, such as SetFileAttributes, DeviceIoControl, or DecryptFile after the file already exists. In the case of FILE_ATTRIBUTE_DIRECTORY, the CreateDirectory function is required at creation time because CreateFile cannot create directories. The other file attributes that require special handling are FILE_ATTRIBUTE_REPARSE_POINT and FILE_ATTRIBUTE_SPARSE_FILE, which require DeviceIoControl. And as stated above, file attribute inheritance occurs when a file is created with file attributes read from the directory attributes where the file will be located. The following table summarizes these inherited attributes and how they relate to CreateFile capabilities: Directory attribute state ------------------------- CreateFile inheritance override capability for new files -------------------------------------------------------- FILE_ATTRIBUTE_COMPRESSED set No control. Use DeviceIoControl to clear. FILE_ATTRIBUTE_COMPRESSED not set No control. Use DeviceIoControl to set. FILE_ATTRIBUTE_ENCRYPTED set No control. Use DecryptFile. FILE_ATTRIBUTE_ENCRYPTED not set Can be set using CreateFile. FILE_ATTRIBUTE_NOT_CONTENT_INDEXED set No control. Use SetFileAttributes to clear. FILE_ATTRIBUTE_NOT_CONTENT_INDEXED not set No control. Use SetFileAttributes to set.
==> INHERITENCE Flags And Rules And Related: OBJECT_INHERIT_ACE CONTAINER_INHERIT_ACE NO_PROPAGATE_INHERIT_ACE INHERIT_ONLY_ACE INHERITED_ACE VALID_INHERIT_FLAGS: OBJECT_INHERIT_ACE|CONTAINER_INHERIT_ACE|NO_PROPAGATE_INHERIT_ACE|INHERIT_ONLY_ACE|INHERITED_ACE.
TABLE OF INHERITENCE RULES: Parent ACE flag Effect on child ACL --------------- ------------------- OBJECT_INHERIT_ACE (ONLY!) Noncontainer child objects: Inherited as an effective ACE. Container child objects: Containers inherit an inherit-only ACE unless the NO_PROPAGATE_INHERIT_ACE bit flag is also set. CONTAINER_INHERIT_ACE (ONLY!) Noncontainer child objects: No effect on the child object. Container child objects: The child object inherits an effective ACE. The inherited ACE is inheritable unless the NO_PROPAGATE_INHERIT_ACE bit flag is also set. OBJECT_INHERIT_ACE & CONTAINER_INHERIT_ACE Noncontainer child objects: Inherited as an effective ACE. Container child objects: The child object inherits an effective ACE. The inherited ACE is inheritable unless the NO_PROPAGATE_INHERIT_ACE bit flag is also set. No inheritance flags set No effect on child container or noncontainer objects.
Flags that BLOCK inheritence from the parent/ancestor folders/directories: These force access control to be set explicitly on the object and prevent a user from modifying access control to the object by setting inheritable ACEs on the object's parent container, or its parent container's predecessors. But note that the SE_DACL_PRESENT flag must be present to set SE_DACL_PROTECTED and SE_SACL_PRESENT flag must be present to set SE_SACL_PROTECTED: SE_DACL_PROTECTED: Prevents ACEs set on the DACL of the parent container, and any objects above the parent container in the directory hierarchy, from being applied to the object DACL. SE_SACL_PROTECTED: Prevents ACEs set on the SACL of the parent container, and any objects above the parent container in the directory hierarchy, from being applied to the object SACL.
The following are SECURITY_DESCRIPTOR_CONTROL bit flags: SE_OWNER_DEFAULTED 0x0001 Indicates that the SID of the owner of the security descriptor was provided by a default mechanism. This flag can be used by a resource manager to identify objects whose owner was set by a default mechanism. SE_GROUP_DEFAULTED 0x0002 Indicates that the SID of the security descriptor group was provided by a default mechanism. This flag can be used by a resource manager to identify objects whose security descriptor group was set by a default mechanism. ------- SE_DACL_DEFAULTED 0x0008 Indicates a security descriptor with a default DACL. For example, if the creator of an object does not specify a DACL, the object receives the default DACL from the access token of the creator. This flag can affect how the system treats the DACL with respect to ACE inheritance. The system ignores this flag if the SE_DACL_PRESENT flag is not set. This flag is used to determine how the final DACL on the object is to be computed and is not stored physically in the security descriptor control of the securable object. SE_DACL_PRESENT 0x0004 Indicates a security descriptor that has a DACL. If this flag is not set, or if this flag is set and the DACL is NULL, the security descriptor allows full access to everyone. This flag is used to hold the security information specified by a caller until the security descriptor is associated with a securable object. After the security descriptor is associated with a securable object, the SE_DACL_PRESENT flag is always set in the security descriptor control. SE_DACL_PROTECTED 0x1000 Prevents the DACL of the security descriptor from being modified by inheritable ACEs. SE_DACL_AUTO_INHERIT_REQ 0x0100 Indicates a required security descriptor in which the DACL is set up to support automatic propagation of inheritable ACEs to existing child objects. For ACLs that support auto inheritance, this bit is always set. SE_DACL_AUTO_INHERITED 0x0400 Indicates a security descriptor in which the DACL is set up to support automatic propagation of inheritable ACEs to existing child objects. For ACLs that support auto inheritance, this bit is always set. ------- SE_SACL_DEFAULTED 0x0008 A default mechanism, rather than the original provider of the security descriptor, provided the SACL. This flag can affect how the system treats the SACL, with respect to ACE inheritance. The system ignores this flag if the SE_SACL_PRESENT flag is not set. SE_SACL_PRESENT 0x0010 Indicates a security descriptor that has a SACL. SE_SACL_PROTECTED 0x2000 Prevents the SACL of the security descriptor from being modified by inheritable ACEs. SE_SACL_AUTO_INHERIT_REQ 0x0200 Indicates a required security descriptor in which the SACL is set up to support automatic propagation of inheritable ACEs to existing child objects. The system sets this bit when it performs the automatic inheritance algorithm for the object and its existing child objects. SE_SACL_AUTO_INHERITED 0x0800 Indicates a security descriptor in which the SACL is set up to support automatic propagation of inheritable ACEs to existing child objects. The system sets this bit when it performs the automatic inheritance algorithm for the object and its existing child objects. ------- SE_RM_CONTROL_VALID 0x4000 Indicates that the resource manager control is valid. SE_SELF_RELATIVE 0x8000 Indicates a self-relative security descriptor. If this flag is not set, the security descriptor is in absolute format.
When an application starts, it inherits all open handles from the process that started it if the handles were created as inheritable. The Windows security model provides a way for a child directory to inherit, or to be prevented from inheriting, one or more of the ACEs in the parent directory's security descriptor. Each ACE contains information that determines how it can be inherited, and whether it will have an effect on the inheriting directory object. For example, some inherited ACEs control access to the inherited directory object, and these are called effective ACEs. All other ACEs are called inherit-only ACEs. The Windows security model also enforces the automatic inheritance of ACEs to child objects according to the ACE inheritance rules. This automatic inheritance, along with the inheritance information in each ACE, determines how security restrictions are passed down the directory hierarchy. The system places inherited ACEs in the DACL of the child according to the preferred order of ACEs in a DACL. The system sets the INHERITED_ACE flag in all inherited ACEs. The ACEs inherited by container and noncontainer child objects differ, depending on the combinations of inheritance flags. These inheritance rules work the same for both DACLs and SACLs. If an inherited ACE is an effective ACE for the child object, the system maps any generic rights to the specific rights for the child object. Similarly, the system maps generic SIDs, such as CREATOR_OWNER, to the appropriate SID. If an inherited ACE is an inherit-only ACE, any generic rights or generic SIDs are left unchanged so that they can be mapped appropriately when the ACE is inherited by the next generation of child objects. For a case in which a container object inherits an ACE that is both effective on the container and inheritable by its descendants, the container may inherit two ACEs. This occurs if the inheritable ACE contains generic information. The container inherits an inherit-only ACE that contains the generic information and an effective-only ACE in which the generic information has been mapped. An object-specific ACE has an InheritedObjectType member that can contain a GUID to identify the type of object that can inherit the ACE. If the InheritedObjectType GUID is not specified, the inheritance rules for an object-specific ACE are the same as for a standard ACE. If the InheritedObjectType GUID is specified, the ACE is inheritable by objects that match the GUID if OBJECT_INHERIT_ACE is set, and by containers that match the GUID if CONTAINER_INHERIT_ACE is set. Note that currently only DS (Directory Service) objects support object-specific ACEs, and the DS treats all object types as containers.
==> Functions and Utilities directly dealing with Access Checking: AccessCheck() AccessChk/AccessChck.
#Windows#API#programming#C/C++#document#flags#files#folders#directories#sharing#permissions#privileges#attributes
0 notes
Text
-1
寻找导入函数

bp GetProcAddress,F9,第一次断下

ALT+F9返回用户领空,发现这里讲GetProcAddress的返回值写入到[ebx]中,也就是0045B78D的内存中

dd ebx,来到这里,经过多次的F9发现这里附近的内存保存着导入函数的地址
最终如下:


寻找捆绑的3个PE文件

bp CreateFileA/W,ALT+F9返回用户领空

这里首先新建一个文件,返回值-1。然后再次打开文件,然后下方设置该文件属性隐藏|系统

火绒剑中出现的文件步骤

接着下方创建文件映射,然后映射文件,这里size=0
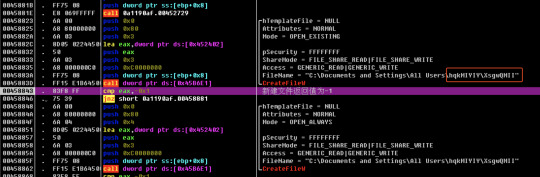
F9运行,代码又回到这里,只不过这次是创建第二个文件。同样下方也是进行属性的修改,文件映射的操作


第三个断在CreateFile,下方:创建完文件后设置文件指针,然后是几次写入文件,最后关闭句柄

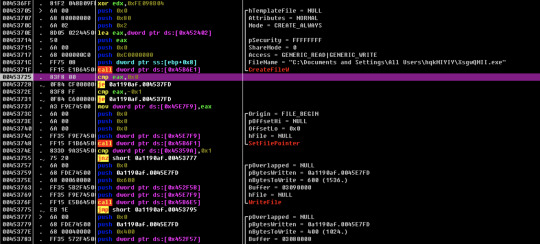
再次…
View On WordPress
0 notes