#cricut joy cutting machine
Text
Cricut Joy: Your Guide to Compact Crafting Delight

Cricut Inc. has launched a ton of cutting machines for crafters, but the Cricut Joy is one of my favorite models. This small, compact, and portable tool hit the market in 2020. Don’t judge this mini machine, as it can cut 50+ different materials from delicate paper to artboard.
I have been using this Cricut machine for the past 7 months, and there’s no way I’m going back from it now. Of course, I am now obsessed with it and love to create countless customized crafts from it. As an expert, I will lead you to the right path to learning all you need to know about this Cricut Joy cutting machine.
What Are the Salient Features of Cricut Joy?
Before including this crafting machine in the craft room, it’s evident for me to ensure that you are well aware of this Cricut model. After I will make you across the features, you get to make a clear picture of what precisely the Cricut Joy machine is.Without wasting any more time, let’s begin by learning about its features:
To begin, this craft plotter is smaller in size and lightweight compared to the Explore and Maker series. Due to this reason, it gets easier to store in a tight place without damaging its corners.
Since it is lightweight, it gets easier to carry it anywhere, either while going on a trek or going to someone’s home. Now, to keep it safe while traveling, you can keep it inside its tote bag.
In addition, this Cricut Joy comes with fewer supplies, making it easier for the DIYer to transform their DIY creative ideas into the real world.
Equally important, it supports Smart Materials, which means that you won’t need any cutting mat while using this material.
On the other hand, this craft plotter has its app, known as the Cricut Joy app, which helps the user connect mobile devices with this machine via Bluetooth feature.
After grabbing this Cricut cutting machine’s essential features, it is time to make you learn about how you can use Cricut Joy to create a do-it-yourself project.
Easy Guide: How to Use Cricut Joy?
Further adding to the blog, I am going to make you learn about how to utilize this cutting machine and create a personalized project of your choice. Let’s begin the process of how to use the Cricut Joy by going through the below steps:
Step 1: Open the Cricut Joy App and Choose a Design
First, I will turn on my mobile device and open the app. In case you don’t have the app, then get it for free from the App Store or Play Store.
After opening the app, I am going to press the Start option given under the Quick Labels section.
Now, press the Start Making button, select the label of your choice, and tap the Next option.
Next, I will change the size of your label and enter the text inside the Enter Text blank.
After making the necessary modifications, tick the Next option given on the top right side of a new page.
Step 2: Load the Material to Your Cricut Joy
Now, I am going to select the compatible materials from the Select Material screen.
Following this, press the Make It button appearing on the right side of your Cricut Joy app.
Afterward, unbox your smart material and gently insert it inside your machine.
Next, connect your craft plotter with your mobile phone via Bluetooth and wait till the wireless connection process is going on.
Step 3: Start the Cutting Process
After the connection process comes to an end, I will insert the pen inside the clamp and Cricut Joy.
Now, turn on the craft plotter, and it will begin to draw the label on the smart material.
Following the completion of drawing the design, I will remove the pen and again insert the blade in the same clamp.
Next, I will press the Go button on the app to proceed toward the final step.
After the drawing and cutting process will come to an end, I am going to unload the mat slowly.
Step 4: Peel Off Your Design
After unloading the mat from the craft plotter, I will cut the extra mat using a Cricut scissor and save it for future projects.
Now, I will peel off the final design from the cutting mat and place it in the center of your jar in a proper alignment.
Lastly, I am going to use a scraper tool to get rid of any bubbles or wrinkles on the label.
Summing up this post, as an expert, it was my responsibility to introduce you to the Cricut Joy machine as well as its features and how it works. By considering the above-said details, it will likely get more straightforward for you to access this cutting machine and create different personalized projects within minutes.
Final Words
Through this blog, I covered most of the things that were helpful in learning more about this craft plotter. This ultra-compact smart cutting machine can make fun and functional projects within 15 minutes or less. Besides, the Cricut Joy is compatible with all materials as well as Smart Materials. Some of the famous DIYers love to make various projects out of this craft plotter.
For more information visit: cricut.com/setup joy
cricut maker setup
download cricut design space
Source: Cricut Joy
#cricut.com/setup joy#cricut maker setup#design.cricut.com#cricut machine setup#cricut joy machine#cricut joy cutting machine#cricut joy app#how to use cricut joy#cricut joy#cricut joy xtra
1 note
·
View note
Text
Educational Fun: Learning Activities with the Cricut Cutting Machine
The most popular Cricut-cutting machines are Joy, Explore, and Maker. These ultimate cutting machines are a must-have companion to create a compelling craft. Whether you are running a small business or following your passion, Cricut machines meet everyone's demands. So, what are you waiting for? Set up the machine with your devices by simply navigating to Cricut cutting machine. Post setup, you can start cutting your created designs on Cricut.
Visit here for more Information :- https://mycricutspace.com/
#designcricutcomsetup#cricutcom#cricutcomsetup#cricutdesignspace#cricutdesignspacedownload#Cricut cutting machine#cricut explore air 2#Cricut sign in#cricut joy app#cricut maker 3 bundle
0 notes
Text
Which is the Newest Cricut Machine for DIYers?
All the DIYers must be celebrating as Cricut has a new bundle of joy in its cutting machine lineup: Cricut Venture and Cricut Joy Xtra. Buying the newest Cricut machine will be a huge risk and investment for the crafters. “Which cut-die machine should I buy?” is the question that every user asks when it comes to the final verdict of adding a craft plotter to the collection.
Focusing on the Cricut machine 2023, the company introduced the Venture model on 25 July 2023. Following this, the Joy Xtra model came into the market on 7 July 2023. Cricut Venture cuts a variety of materials with precision at commercial speed. Besides, it can also write, score, and foil. On the other hand, Joy Xtra is slightly bigger than Cricut Joy and cuts more than 50+ materials with its scissors.
Inside this guide, we’ll be sharing all the concepts about both models. Besides, it will help you in deciding which Cricut machine is going to be best for you.
Cricut Venture
The Cricut Venture cutting machine was developed to give a break to people who are looking to enlarge their abilities. Besides, this newest Cricut is also best for those who are looking to grow and scale their crafting businesses. By accessing this version, the user can make every size of a custom project for various events. Also, this is the largest and fastest crafting machine that is trending in the market right now.
Further, the Venture machine can accurately cut or draw on 100+ materials with 25.4 inches/60 seconds of amazing speed. Apart from that, it cuts a single image up to 12 ft long (3.6m) and repeated images up to 75 ft (22.8m). Besides, it is convertible for 13 inches and 25 inches width Smart Materials. Further, its space-saving design with a built-in mat makes it easy to use anywhere. Last but not least, try this newest machine with the Docking Stand for more flexibility.

Cricut Joy Xtra
The Cricut Joy Xtra machine is mostly the same but with a clean white aesthetic designed to help it blend in. Equally important, this small but mighty beginner machine offers a compact, user-friendly reach to crafting within budget. With its long and sharp scissors, this Cricut machine 2023 can accurately cut 50+ materials, making customized projects for various purposes.

Also, Joy Xtra's capabilities for tackling project types have been improved, and it can now handle smart materials up to 9.5 inches. In addition, with the introduction of the Print-Then-Cut facility, the DIYer can create a variety of stickers and printable iron-on on the compatible mat. Also, the Cricut Joy Xtra machine can cut material up to 5.65 inches per second with a single image up to 48 inches long to a repeated image up to 20 feet long.

Since you’ve come across the full details about both of these newest Cricut 2023, let's make progress and compare both of these craft plotters simply and crisply.
Main Difference Between Cricut Venture and Joy Xtra Machines
Before making the closing decision of adding any of these newest Cricut into the family tree, all the crafters need to consider the points below. It will make their mind clear and will guide them towards the correct road. Kindly refer to these pointers thoroughly without skipping any of the details.
Price
The primary factor that every DIYer considers before buying any of the Cricut newest machines is the prices. The amount of the cut-die machine plays a vital role as it gives the crafter a clear view of whether they are capable of adding the model to their collection or not.
Focusing on the Cricut Venture cutting machine, the actual price of this model is $999. In case you are an Access member, then you’ll be getting the machine at $949. On the other hand, the Joy Xtra machine'sreal price is $199, but the Access member will have the benefit of buying it for $179.10. Last but not least, the newest Cricut cost will change depending on whether you are buying the accessory or not.
Technical Specifications
Equally important, Cricut Joy Xtra dimensions are 12.5 inches x 6 inches x 5.5 inches (31.7 cm x 15.2 cm x 13.9 cm). On the contrary, it weighs at least 6 lbs. (2.7 kgs), with the max cut size using the machine mat being 8.2 in x 11.7 inches (20.8 cm x 29.7 cm). Also, the maximum cut size with the Smart Materials is 8.5 in x 4 ft (21.6 cm x 1.2 m) with a cutting speed of 5.65 in per second.
Furthermore, the Cricut Venture machine's dimensions are 8.81 inches x 34.82 inches x 10.4 inches (22.38 cm x 88.4 cm x 26.41 cm), along with weighing up to 34.7 lbs. (17.1 kgs). In addition, the max width is 24 inches (63.5 cm) with a cutting speed of 25.4 inches (64.5) with a repetition accuracy of 0.1 mm⁵.
Projects
While accessing Cricut Joy Xtra, the DIYer can craft projects such as Vinyl decals, written labels, cards, gift tags, custom mugs, and many more. It should be a crafter's duty to consider compatible mats and use the correct button and other supplies while making customized projects. Talking about another newest Cricut machine, the crafter can create numerous projects such as Vinyl decals, written labels, cards, jewelry, large paper flowers, banners, and many more.
Tools
Further joining into the factors, every Cricut newest machine comes with a Fine-Point blade. On the grounds of machine capabilities, extra tools to write, draw, and add decorative decorative effects are sold separately. If you are buying Cricut Joy Xtra,you need to buy Foil Transfer Tools, Pens, and Markers separately. Finally, with the Venture cutting machine, the DIYer needs to buy a Foil Transfer Tool, pens and markers, a Deep-Point Blade, a scoring stylus, and a bonded fabric blade.
Frequently Asked Questions
Question: What Materials Can the Newest Cricut Cut for Projects?
Answer: The Cricut Joy Xtra can cut materials such as Vinyl, Iron-On (HTV), Infusible Ink, Paper & cardstock, writable labels, and many more. On the other hand, Venture cutting machines can cut materials such as Kraft board, printable sticker paper, craft foam, leather, bonded fabric, and many more. However, it should be the user's duty to choose the correct machine during the crafting process.
Question: Is Cricut Design Space Compatible with Cricut Joy Xtra?
Answer: Absolutely; the Joy Xtra machine and Venture machine are compatible with the Design Space app. The Design Space app is a digital app that helps the user in designing various patterns & projects on its canvas. It is an easy-to-learn app and is available free of cost to everyone. Besides, one can transfer their virtual projects to these new cutting machines via Bluetooth or a USB cable.
Question: Is It Worth Buying a New Cricut Machine in 2023?
Answer: It doesn’t matter whether you are a newbie or an expert in making personal projects. The decision to buy a new Cricut machine is definitely worth it. Each of the newest Cricut has different features, making it better than other models. Another reason to buy any of the models is that it will give tough rivalry to another cutting machine brand.
#Cricut newest machine#Cricut joy Xtra machine#Newest Cricut machine#Cricut venture cutting machine#Newest Cricut
0 notes
Note
Hi! I saw your binding of "clear and muddy loss of love". And listen I'm not familiar with the work and all that, but how did you do that fantastic foiling if you don't mind me asking? Is it hot foil, or glued foil? And how did you get it to be so even! Did you maybe use the method with a laminator? Because I didn't know you could do that onto bookcloth, thought it was paper only? I have only a single line tool and its really difficult to get thicker text/patterns
It's no problem at all!!! So, almost all of the foil work I've done in bookbinding is through a medium of a cricut and a hot iron. I've got a foil pen as well that I'm trying to improve with, but I think I've done only one color there so far, and I don't know if it'll ever reach the crispness of what the cricut is able to do for me (though I'm not so sure about that after seeing some of the other work people have done with it!), but I'll elaborate on what I know about options really quick.
I'm not sure if the cricut foil exaaaactly fits into either the hot foil or the glued foil categories, because it's not just foil, it's foil with a heavy vinyl injection. It does have a heat-activated adhesive binding, but at one point, I tried using it to foil the edge of a book, just to see what would happen, and it FUSED the edges of that sucker together. It had definite stretch to it as I attempted to pull the thing apart, and was generally stronger and held its shape more aggressively than the true foils I've tried.
The cricut method is really easy for getting that crisp effect, but it is a bit tricky in terms of expense, if you don't have access to one. I usually use my system fonts to determine the shape of the letters I want it to cut out. For the front covers on this binding, I arranged the chinese characters for the title, volume, and author in a space the size of the measured covers, and was able to tell my machine to cut it out of the foil. Then I weeded out the bits I didn't want, and ironed the rest onto my bookcloth. I did a similar thing for the spines. It means everything was precisely shaped according to the nice vectors on the computer, all I had to do was remove the bits that I didn't want and iron it on in the right place.
It's not totally foolproof! I have some early books where I went WAY overboard with the heat and melted some of the plastic cover into my bookcloth. If you don't fully iron everything and move too quickly, you can stretch or twist half-ironed characters or leave awkward marks. And it's not a problem I've had, but I hearrrrr some people have had trouble getting the foil to stick to certain bookcloths.
It's expensive to purchase a cricut, but the silhouette is a comparable brand of 2-d cutting machine that runs a bit cheaper (but has basically the same functionality), and the cricut joy is smaller and cheaper than the big maker models. If you have a friend with a cricut, they might be able to letting you use it if you bring your own foil, maker spaces frequently stock cricuts, and at least some libraries in the us have started carrying them.
And I can't speak to laminators at all (some people print on bookcloth, so using toner-activated foil, it... might work? but i'd be worried about how evenly it would adhere). But foil pens! Part of what intimidated me bad about these was the prospect of using them to freehand what I wanted to draw. But when I went to scope out some demo videos on youtube, it turns out that the bible journaling community specifically has a lot of interesting content on their capabilities. Bible rebinders are also the best resource i've found for yapp edges, so i don't know what it is about these places that fills them with niche information useful to me specifically XD
But if you check out this video where I've started it (shortly after the three minute mark)
youtube
It works PRETTY well to use these heat-activated foils through a layer of printer paper for tracing. That's how I did the cover for 'i'm gonna love you with my hands tied,' which was... basically my first time using the foil pen for anything! It's not super crisp, partly because I picked a VERY detailed image with zero experience, and partly because I was lazy and didn't glue my layers in place well, but I've seen people get MUCH more striking results than mine with a little more practice and patience. It takes some time to fill in big surface areas, but for something like titling, printing the layout on a piece of paper and tracing it with the foil pen can take you to some good places!
With my equipment options, the cricut is usually the easiest by far, which is why I've made very little progress with the foil pen or gold tooling. But there are other choices without having to plonk down money for a big fancy machine! Hopefully something in all that rambling is useful to you, haha. Best of luck!!
30 notes
·
View notes
Text
Fanbinding 4: Cover
Current project: A Choriambic Progression
Previously: Part 1, Part 2, Part 3
Disclaimer: still new at this. Please don't judge me. And also this is just what I do and really when it comes to some of the smaller details, that's personal choice and stuff you'll decide once you get going and know what you wanna do with it!
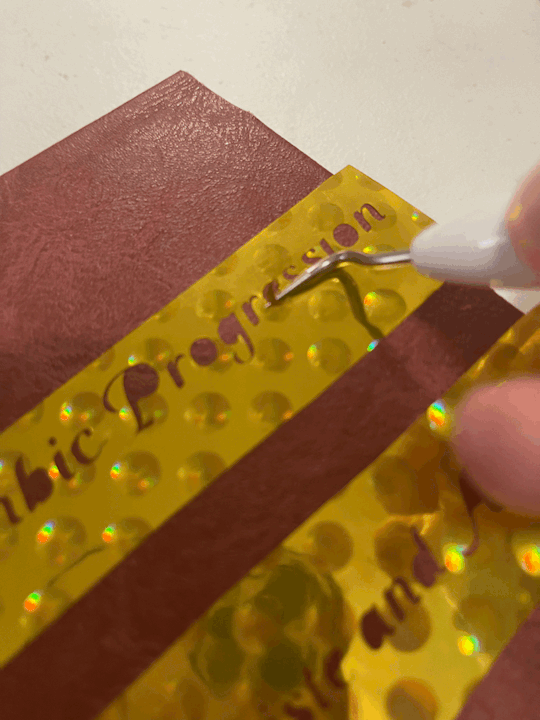
This is the most...personal/particular part of the whole process! A lot of what I do here is making stencils with my Cricut Joy.
1.) I go into Cricut Design Space, start a new project, and throw down the title and author name. I know my machine is small and my mat is 4x6 inches so I make sure the font fits within that space.
2.) Select a font and size...Not gonna lie, Cricut Design Space has very...frilly fonts. It's hard to find fonts that are dramatic enough that I also know will cut the way I need it to.

I have to do this twice, once for the cover and once for the spine. The spine will obviously need different dimensions!
3.) Then I cut out a bit of permanent vinyl, then load it up on my mat, and run it through my machine!


4.) Once that's done, I cut around the title and name so I can better see the size and decide where best to stick it.
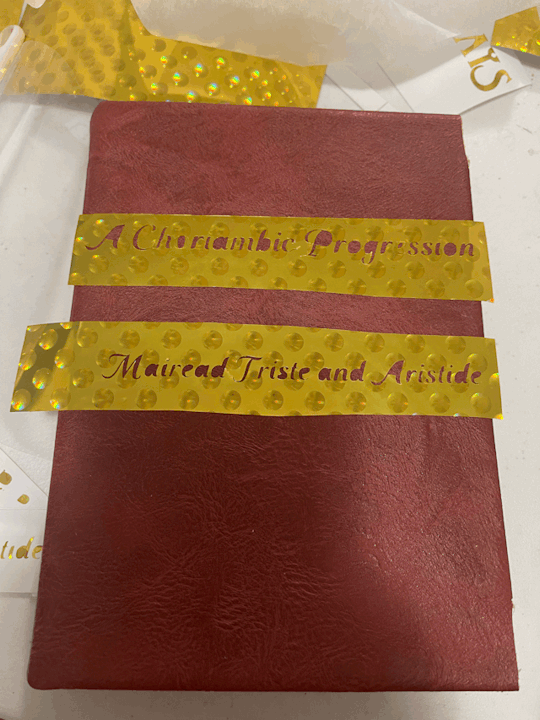
5.) then I peel and stick!
6.) From there, I choose a paint pen I like (for this I used copper) and I trace the stencils. (I also had to use a Cricut tool to pick out some of the vinyl that got stuck between letters)
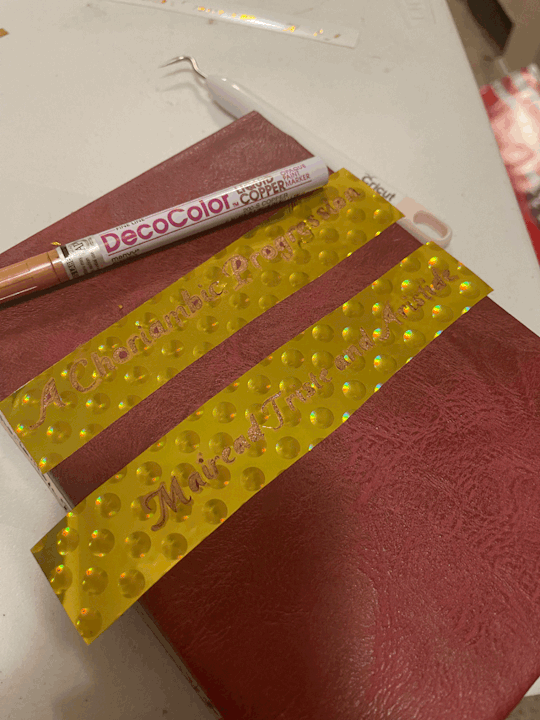
7.) I give it a few minutes to stay in place and dry.
8.) then: peel!
9.) I also use a Modge Podge spray to protect it.
10.) Once it's all dry (or in this case, I got impatient and did this part while waiting for the paint to dry lol), I pick out my book corners and fit them around the corners and hammer them down!


And that's done!
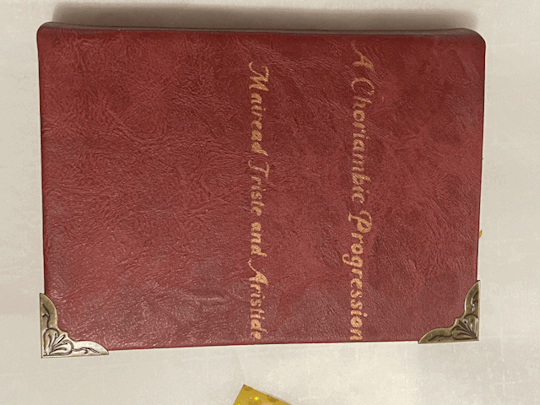
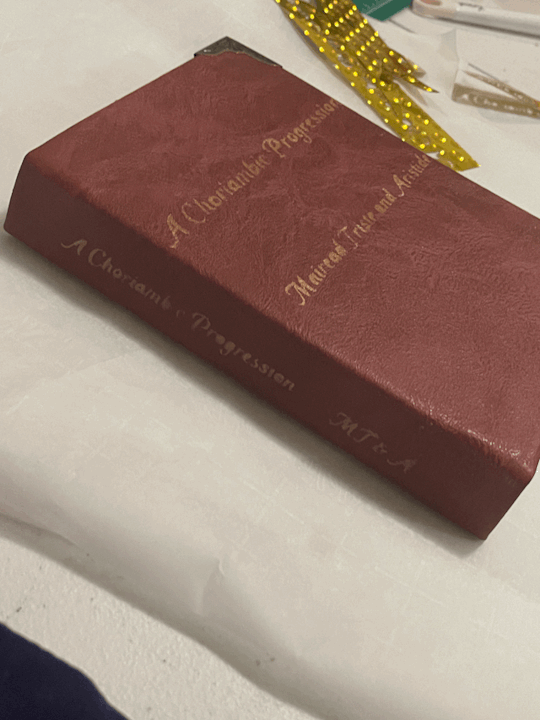
I'm no pro or anything but hey...I can make a book! 😁
12 notes
·
View notes
Note
hi! i love your bookbinds! when adding HTV to your covers, do you use a cricut/cutting machine? if not, how do you do it? it looks stunning! thanks for sharing your beautiful work with us!!
omg hi!! thank you!!! im so glad you like my binds, ahh!!
i do have a little cricut joy xtra machine (which i love), but ive experimented with a couple of different cover decoration methods other than HTV too. ive tried heat transfer foil, toner reactive foil, adhesive foil, iron-on metallic, glue transfer, and metallic paint! ive had the most luck with iron-on metallic vinyl cut with my cricut, altho i can be kind of finicky esp. if you have delicate cover material. i melt it just a TINY BIT and then pull off the designs with a sewing needle so the transfer paper doesnt rip my covers if im using paper, but admittedly thats not always successful OTL
toner reactive foil was also pretty easy, but its trickier for covers and has actually been much more effective for things like planner stickers and internal detailing.
ive wanted to try stenciling with paint, actually, but i just havent gotten around to it yet. so many crafts, so little time...
#answers#so many things i want to try!!!!#and my stack of WIPs has gotten absolutely insane since ive had to put p much everything on hold for a while#anyway THANK YOU FOR THE ASK!!!
6 notes
·
View notes
Photo


D&D 6th Anniversary Project: Phase Three - Cut Out Gold Cards
for six wonderful years i’ve run a D&D game for the same party of four players, some of my best friends in the world, and for our 6th anniversary i decided to embark on a huge multi-phase project to send them homemade gifts to celebrate!
phase three involved drawing unique design crests suited to each party member and using a Cricut Joy machine to cut the designs into black insert cards with foil gold inserts. within each card is a personal message
for Em, who plays our cleric Eilish, i included the Candle of Invocation as well as the animal she most relates to - the owl. she also has a Channel Divinity that summons scout bees, which i included, along with her mace and the symbol of her goddess Chauntea - a rose. she and her sister fill divine rolls known as the Moon and Star, so i included that imagery as well
for @aspiringtoeloquence, who plays our rogue Milah, i of course had to include the array of daggers as well as the animal that granted her the fey nature she’s undertaken - the wolf. her Stormbow is bordered up top by light symbolism for her ties to the god Lathander, and her love for herbs, books, and dragonflies are also represented
for @cracktastic, who plays our bard Gwen, she’s of course best tied to her lute and the magical lines of spellwork she casts with it. i added in a songbird, as she often Polymorphs into one, as well as the moon for her bardic troupe, the Moonsea Players, and the three arrows at the bottom matching one of her many tattoos
for @grimdarkfandango, who plays our fighter/barbarian Jadyn, i added the bear pints for her barbarian totem, the anvil to represent her being the Champion of Moradin, and the dwarven orchid and gemstones to represent her soon-to-be-husband, Kobad. Berronar’s symbol also lies between her axe and warhammer down the bottom
phase one: custom made 7 pocket dice bags for each player
phase two: custom hand painted nesting dolls of the party
9 notes
·
View notes
Text
Best Cricut Machines You Should Buy in 2023?

Do you want to buy the Cricut cutting machine, or are you still deciding which one to buy? Don't worry; you are not alone - many people share this question: "What is the best Cricut machine?" This blog post is here to provide the answer to your question.
Today, many options are available when it comes to Cricut cutting machines. Crafters and DIY enthusiasts enjoy making their designs using these machines. It allows them to complete their task 10 times faster than the traditional methods. Crafters prefer the Cricut machine as it provides professional cutting and finishing. Therefore, we have created this blog to give you an overview of various Cricut machines. Also, we'll delve into the pros and cons of various types of cutting machines.
What is a Cricut and What Does it Do?
A Cricut is a famous brand that makes cutting machines to cut and draw on materials like paper, vinyl, and cardstock. Some of them can also cut tough materials, such as leather, fabric, wood, board, etc. You can simply consider a Cricut device like a printer. However, it doesn't print anything but can cut designs onto desirable materials using a movable blade.
In terms of quality, we must say the best Cricut machine must be capable of cutting anything precisely. Hence, this is the perfect choice for making personalized crafts, including T-shirts, custom wall art, and party decor.
Different Types of Cricut Cutting Machines
Currently, there are five different Cricut cutting machines: Explore Air 2, Explore 3, Maker, Maker 3, and Cricut Joy. All of them are electric craft machines and quite similar in terms of features. However, each machine comes with a unique feature, making it perfect for different purposes.
The Cricut Explore is the mid-level option and is still considered the best Cricut machine. Whereas the Cricut Maker 3 is the upgraded version of the Explore series and has the ability to cut a range of materials with different types of tools. In comparison, the Joy machine is the smallest model. Due to this, Joy is portable and easy to set up and use. Further, in June 2021, Cricut launched the two latest machines in their lineup: Cricut Explore 3 and Maker 3.
Regarding Cricut Maker 3, it is the best-selling machine in the maker series and has ten times the cutting force. Moreover, crafters consider Maker 3 as the best Cricut machine.
1. Cricut Explore Series
Now, let us have a look at the overview of exploring a series of machines. The Explore machine is the best Cricut machine for you if you want to cut materials such as vinyl, iron-on crafts, and greeting cards
Cricut Explore Air 2
The Explore Air 2 is one of the best-selling machines, and its size is perfect for both novice and professional crafters. The machine uses cutting mats, having sizes of 12" x 12" or 12" x 24". The cutting mat size is perfect for creating iron-on decals for T-shirts, 3D projects, and large vinyl decals. All these features make Cricut Explore Air 2 the best Cricut machine for 2023.
Moreover, the Cricut Explore Air 2 has a Fine-Point blade. It can cut over 100 materials, like vinyl, paper, and cardstock. In addition to this, you can cut even more materials by swapping out the Fine Point Blade for the Bonded Fabric Blade and the Deep Point Blade.
Pros:
It can cut, foil, score, and write
Works with 100+ different materials
Bluetooth available
Print then Cut feature
Free Cricut app
Cons:
Not suitable for Adaptive system, meaning you can’t use Rotary and Knife Blades, as well as Scoring Wheels
A Cricut mat is needed
Not work with Cricut Smart Materials like Vinyl
The maximum cutting length (23″ on a 24″ mat)
It is not portable
Cricut Explore 3
The Cricut Explore 3 was introduced in June 2021 in the Explore series. Due to its powerful motor, it can cut 2x faster. Plus, it is designed for cutting Smart Materials without a mat.
It is a full-size machine that can cut 100 materials such as cardstock, glitter paper, iron-on-vinyl, and vinyl. Also, it works with 6 tools: the Fine Point Blade, Scoring Stylus, Foil Transfer, and the Deep Point Blade, enabling you to cut a wide range of materials. It even allows you to cut leather and fabric.
Pros:
It can cut, foil, score, and write
Work with 100+ materials
Bluetooth available
Can cut with 2x speed than its predecessor when using Smart Materials
Print then Cut feature
Free Design Space app
Compatible with cutting without a mat.
Cons:
Not suitable for Adaptive system, meaning you can’t use Rotary Blade, Knife Blade, Scoring Wheels
It is also not portable
2. Cricut Maker Series
These Maker series models are the most powerful cutting devices. They allow you to create any project virtually.
Cricut Maker
The Cricut Maker comes under a commercial-grade machine that can deliver a professional level of quality. This is the most versatile cutting machine in full size. It can cut 300+ materials, such as acrylic, leather, felt, plastic, fabric, wood, and more. Besides cutting and writing, it can do more than this. The versatile feature of the Maker machine is compatible with the Adaptive Tool System, which includes the knife blade, engraving tip, foiling tip, rotary cutter, and debossing tool.
Pros:
It can cut, foil, score, engrave, deboss, write, and more.
It is compatible with 300+ materials
Bluetooth available
Can cut with 10x cutting force
Adaptive Tool System: You can use Rotary Blade, Knife Blade, and Scoring Wheels.
Print then Cut feature
Free Design Space app
Cons:
You will need a cutting mat, and you can’t use it with Smart Materials like Vinyl.
It provides a maximum cutting length of 23″ on a 24″ mat.
It is also not portable.
Cricut Maker 3
This is the upgraded version of the Cricut Maker series, and it was released in June 2021. This is the best machine anyone can have. So, if you are looking for the best Cricut machine with ultimate commercial-grade performance, then you must go for Cricut Maker 3.
This Maker 3 cutting device is compatible with 13 tools for cutting as well as with Smart Materials so that you can cut a long project up to 12 ft without the need for a mat.
Pros :
It can cut, foil, score, engrave, deboss, write, and more.
It is compatible with 300+ materials
Bluetooth available
Can cut with 10x cutting force
Adaptive Tool System, meaning you can use Rotary Blade, Knife Blade, and Scoring Wheels.
Print then Cut feature
Free Cricut software
Cons:
It is the most expensive machine.
Not portable
3. Cricut Joy
The Cricut Joy is the newest model. Its small and compact design makes it portable. Hence, it will occupy less space. Moreover, it can cut 50+ materials, including adhesive vinyl and paper. Plus, you can cut thick faux leather sheets. The maximum width for cutting a design is 4.5". Hence, it's a great mini tool that can make sticker sheets, greeting cards, and other small projects.
Overall, the Cricut Joy is the best Cricut machine for beginners.
Pros:
It can cut and writes
It is compatible with 20+ materials
Bluetooth available
Portable
It can be cut without a mat by using Smart Materials
Cons:
It has a maximum cut width of 4.5.”
It is not compatible with adaptive Tool Systems and the Print then Cut projects.
Conclusion
Cricut releases the best Cricut machine, but it also depends on your usage. You will find five types of Cricut cutting machines that we have already discussed in this blog. Plus, we have shared the pros and cons of using that particular machine. In contrast, you should buy Cricut Joy if you are a beginner. It will be pocket-friendly and won't occupy much space. And, if you only want to make crafts with paper and vinyl, then go for Explore 3. Also, you can consider Maker 3 if you are a creative crafter.
Source: https://cricutapp.wordpress.com/2023/08/29/best-cricut-machines/
For More information Visit: Cricut New Machine Setup
Cricut.com setup mac
Cricut Maker Setup
install cricut design space app
Cricut Machine Set up
#Cricut New Machine Setup#Best Cricut Machines#cricut maker setup#design.cricut.com/setup#cricut explore air 2 setup#Cricut.com setup mac#Cricut.com setup#cricut design space download#cricut setup
2 notes
·
View notes
Text
Because we only girlboss, and not gatekeep, here's what you need to make stickers for fun in the same way I do (and the limitations of this method)
(I’m writing this up for transparency, seeing as I didn’t quite know what I was getting myself into when I first started out - I’m by no means an expert, but I also think information should be accessible, and it’s a really fun hobby if you’re looking for a new creative outlet!)
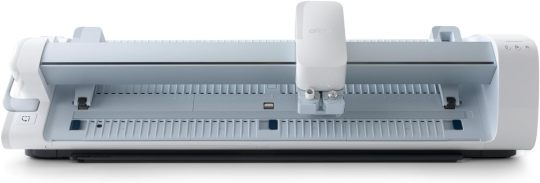
I bought a Brother Scan and Cut CM700 a few months ago. This is a plotter. I use it to cut shapes from vinyl, although, you can also put in pen tools in order to draw shapes! (I don't have the pen tool, but I could)
The specific type of plotter I have retails for around 400 euros new, I bought mine second-hand because I'm poor. Anyway, there are smaller models available, for example, the Cricut Joy (about 150 euros, new) is a more compact machine. I just knew I wanted to make bigger projects, so it wasn't an option for me.
Anyway, you have your machine, you want to make some cool stickers... now what?
You're going to need the following items:
- foil
- a cutting mat
- a cutting blade (probably included with the machine)
- even more foil
- if you decide to put your designs onto fabric, you’re going to need a heat press
- somewhere to put your sticker on, eventually, if you want.
A plotter is pretty limited in the sense that you can't really cut out multiple colours, or create a hue, in one single go. You work with negative space (generally in black and white when designing) and from there you figure out what to pull away, and what to keep.
(There are printers available that can print directly onto sticker foil, I don't have one of those, so I can't talk about them - they are generally about the same price as plotters give or take, or at least somewhere in that ballpark.)
When working with the average plotter, you can easily create designs such like these: *source, google*

As you can see, these are cut from one colour, and after removing the excess foil, you get pretty cool shapes!
Now, you should think about where you want to put your designs. But before I explain that, I should talk about the different kinds of foil.
You’re probably going to use Flex foil. Flex foil can be used to transfer your designs onto quite literally anything. Personally, I’ve put my designs onto mirrors, glass, cars (both windows as well as bumpers, but I always advice windows seeing as I don’t want people to ruin their top coat) as well as wooden furniture.
When working with Flex, you’re going to need Transfer tape, basically, you’re pulling your colourful foil off the backlayer, and using the transfer tape to put it onto the object of your desire.
The options with Flex are quite literally endless. You can just as easily put your design on paper as you can put it on the fridge. Higher quality foil makes for a more enjoyable experience all around, especially the transfer tape, so do spend the additional bucks and save yourself the hassle of screaming and crying because the cheap stuff won’t do its job properly.
If you’re more interested in making designs to put on fabric (think about shirts, hoodies, etc) you’re going to want Flock or Vinyl foil. Vinyl is thinner, where as Flock is a bit thicker, and gives a puffy look to your design.
When working with either Flock or Vinyl, you’re going to need a heat press. You’re going to ‘iron’ on the foil onto your fabric. A heat press ranges from 80 euros, to 500 euros. It all depends on how often you’ll be using it, how much space you have, etc. The one I got is the super small Cricut Easypress Mini, mostly because it was 80 euros... where the next step up was 200 euros. The mini is advertised as allowing you to make smaller things like socks, or shoes, but with a little bit of patience, you can make larger projects just as well! Simply put, we out here hustling and bustling!
Both types of foil come in a multitude in colours as well as patterns. From glitter to mat, to leopard print to metallic. Pricing ranges from 1 euro to 4 euros for a meter. When I first started out, I bought packs of foil. They didn’t let me pick colours, but it was a cheaper way to get a multitude of foils in my house without getting decision fatigue.
You have your machine, you have your foils... time to create! Not so fast there, buddy!
With the machine I have, I can’t just ‘feed’ the pieces of foil into it. It needs to be loaded up onto a cutting mat.

You can get these in various types of stickiness. For foil, use a light stick mat. These range from 25 to 40 euros depending on the size and where you buy them from (I have one that’s 30 by 30cm, and one that’s 30 by 60cm for bigger projects.)
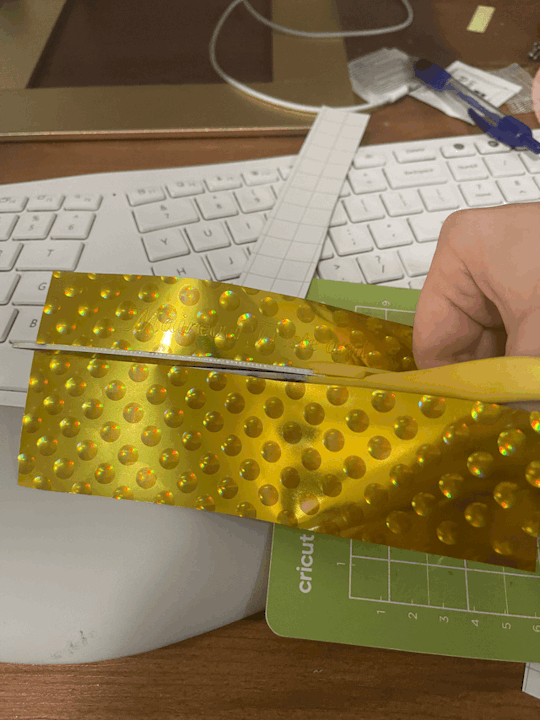
Basically, you stick your foil onto this mat, and load it into the machine. From there, the blade is going to do its work, and cut out the design for you. It’s going to come out looking roughly like this (this is a design I once made to test things out, it’s not as well done as I would have liked, but it was a trial run)

You can see the lines where it cut through the foil (this was Flex, in case you’re wondering) It’s now time to pull away the excess, and see how the shape opens up for you. This process is called weeding and you generally use a hook for this - once again, I’m poor and crafty so I use a needle... no, I can’t make this up I promise.

Now, you just peel away all of the excess that’s still left inside. Seeing as this was a large design scaled down onto a small piece of foil... this sucked. this took me forever and a day and a lot of the details were lost. But hey, that’s how you learn, right?

As you can see, you do have shapes and you can somewhat see what it’s supposed to be, but the foil itself gives you some limitations, in the sense that you can’t really make use of a hue inside of it.
Anyway. I didn’t take photos of this, but I did the whole process again, except now in blue with the colours inverted, stuck transfer tape onto it, and then yeeted it against the glass of a photo frame.

I made this design in photoshop based on a photo - but even if you don’t have any photoshop knowledge, a lot of plotters come with a program that allows you to design your stickers in there. These also come with pre-loaded shapes and fonts just to make it a bit easier!
This is just the basics of everything, and like I said before, I’m by no means a pro. There are a lot of things you should consider before investing in a plotter, but if you’re looking into a neat little hobby that allows you to make stuff for yourself, friends and loved ones? Yeah, I highly recommend a plotter.
14 notes
·
View notes
Text
Top 5 Cricut Beginner Projects to Get Started
Buying a Cricut machine for the first time, and if you are a beginner, the device can be intimidating by its features and looks. It can also seem like a complicated machine, with many blades, mats, materials, and tools. So, choosing your first project can be challenging given the wide range of Cricut machine's abilities. As you might already know, Cricut machines are cutting devices, and its high-end models can cut more than 300 materials. This blog contains curations of Cricut beginner projects to help you understand and work smoothly with the machine.
1. Custom Phone Case
If you want to make your mobile's trendiest new phone case, it is possible with your Cricut machine. You can mainly use the Explore machine for creating this project. It is because, along with Design Space, select your respective smartphone model from the iPhone and Android phones list. You can make a perfect Cricut phone case in just a few minutes.
Further, the supplies you need for creating a personalized phone case are an Explore or Maker machine. You also need a clear phone case, foil adhesive vinyl, or standard permanent vinyl. Also, you need Transfer tape and the respective designs you want to cut on the material.
2. Cute Face Mug
It is one of the easiest Cricut beginner projects. You just need to cut some vinyl material and stick it on a mug with a clean surface. You can select super cute designs from the official Design Store or create your design. You can choose some cute doodles you or your kids like. And you can make various faces and expressions, even using animals such as a kitty, puppy, or unicorn.
Further, the supplies you need for this project are a sheet of vinyl, a Cricut Machine, and a weeding tool. Plus, you need Transfer tape to transfer the design onto the surface of the mug.
3. Greeting Cards
You can make a set of greeting cards with your new Cricut machine as your first project. To do this project, all you need to do is cut two types or colors of cardstock, fold them, and put them together. Creating a set of greeting cards is very simple and quick, and you will also have cards with fancy patterned looks.

Further, all the standard cards are 5 x 7 inches, so you can keep them in envelopes and mail them easily. So, you need a standard cardstock, A Fine-point blade, a Cricut Joy, or Explore. Plus, the design of your greeting card. Additionally, you don't have to score or glue the end products. That is why it is the easiest of all Cricut beginner projects.
4. Wall Decals
The wall decals are another set of great projects to begin your Cricut crafting journey. You can add inspirational quotes or simple messages in your living room or bedroom. For this project, it is better to use regular permanent vinyl. However, you can also use colored vinyl to create a pop-up look.
Further, this project requires a Cricut machine, permanent vinyl, and an SVG design file. Additionally, you need to measure your space and cut the quote of your choice. After missing, clean the wall, free it from dirt, and then apply the design.
5. Coasters
Another way to decorate your coffee or personal table is by adding personalized coasters. Making coasters is easy and takes less time. It also needs less materials to make it. All you need to create a coaster is first to decide on the design you can easily peel off from the material. In addition, you need permanent vinyl and cut the design on it using your Cricut Maker or Joy.
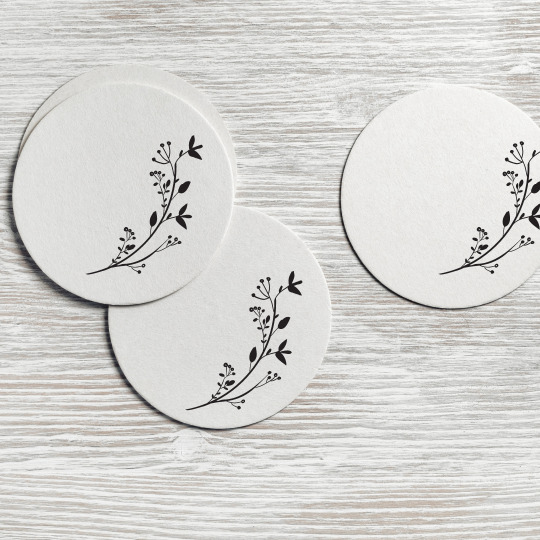
Further, using permanent vinyl to make coasters assures you of longer life and won't quickly come off from the coaster.
Conclusion
Using a Cricut machine is easy once you get comfortable with the materials, tools, and Design Space. To get comfortable as a fresh user, you must pick up projects that read to you the fundamental aspects of working with a Cricut machine. This blog will be an easy guide and Cricut beginner projects to help you in the initial stages of working with the device. In addition, you need to pick a project with fewer materials, simple steps, and less time to complete. Once you master the basic techniques, you can create complex designs and projects.
FAQs
What is the helpful advice on Cricut beginner projects?
Some important suggestions are to pay attention to instructions and get suitable materials/supplies and tools for your project. Additionally, if you are in doubt, test it first. As a beginner, you need to accept that you will make certain mistakes, and that's Okay. And your aim should always be learning and on the process and less on perfection.
What should ideally be the first Cricut project for a beginner?
Ideally, Card making is the first project new users should try with their Cricut machines. It is because you can make your cards for any situation. You can use your machine to cut the design on your cardstock and remove all the extra materials. Now; you will have your first Cricut project.
Do you need a computer to work with Cricut machine?
No, you don't need a computer to work with Maker. It is because you can use Cricut Maker with your Android or iPhone. But you can only do some things you want with a mobile. So, to use the machine's full potential, connecting it to the computer is a must.
#Cricut Beginner Projects#Top 5 Cricut Beginner Projects to Get Started#Cricut.com/setup#www.cricut.com/setup
2 notes
·
View notes
Text

Happy Bird SVG PNG
Discover the Happy Bird SVG and PNG design, a delightful and cheerful bird perfect for your creative projects. This digital download is ideal for personal or commercial use, including crafting t-shirts, stickers, tattoos, and vinyl decals. Whether you're working with Cricut, Silhouette, or other cutting machines, this bird artwork is versatile and easy to use. The design works well for DIY projects like scrapbooking, coloring pages, greeting cards, and unique home decor. With its black and white, high-quality format, the Happy Bird adds a touch of joy and liveliness to any creation. Create beautiful, custom items with this happy and joyful bird SVG for commercial or personal use, ideal for bird-themed designs.
#HappyBird#CuteBird#BirdSVG#BirdCricut#BirdVector#BirdClipart#BirdPNG#BirdPrintable#BirdShirt#etsyseller#etsysvg#digitaldownload#shirtdesign#svg#cricut
0 notes
Text
How to Print and Cut on Cricut: Easy-to-Follow Guide
Among various awesome features that Cricut machines offer, Print Then Cut is one of them. It is a worthwhile feature that helps you print and cut projects seamlessly. Almost all the cutting machines of the brand offer this feature. Moreover, crafters with the right knowledge of the process can create a project like a cakewalk. However, some of you can find it difficult to complete the procedure. The good news is that I am going to put together all the vital info and an easy guide on how to print and cut on Cricut. Keep reading the blog till the end to gain in-depth details on each process!
What Are Some Printers Suitable for the Print Then Cut Feature?
There are many laser and inkjet printers that offer great help in making a Print Then Cut project and give flawless results.
Laser
These printers use high heat to fuse toner to the material.
Laser printers work very well on regular papers, some weights of cardstock, and specialty materials specifically manufactured for use with laser printers.
If you are planning to use heat-sensitive material such as iron-on or vinyl on the printer table, you should refrain from using this printer.
InkJet
This is the most suitable type of printer for a plethora of materials, such as printable vinyl, printable iron-on, sticker paper, and many others.
InkJet printers use ink cartridges and small nozzles to spray the fine ink on the chosen material.
Note: It is suggested that you use an InkJet printer to get the best and most accurate results on your Print Then Cut projects. If you are looking forward to Print Then Cut on the Design Space app for iOS devices, make sure the printer is compatible with AirPrint.
What Cricut Machines Offer the Print Then Cut Feature?
Before you learn to print and cut on your machine, it is important to know which devices support the Print Then Cut feature.
Cricut Maker machines
Cricut Explore machines
Cricut Venture
Cricut Joy Xtra
You can choose either of these devices depending on the project design you want to create and the materials you are going to use.
How to Print and Cut on Cricut: 3 Simple Steps
The process of making a DIY project using the Print Then Cut feature includes several steps. Here, I am going to break down all the steps for you to make them simpler and more comprehensible.
Step 1: Preparing a Design for Print Then Cut
A plethora of designs are available solely for Print Then Cut. Below is a quick guide to help you understand how to use a design for this procedure.
In the Design Space app, create a new project.
After that, go to Images.
Next, you need to follow the path Filters > Operation Type > Print Then Cut. (Now, you will see all the designs that are created for Print Then Cut. Also, you will see a little printer on them.)


Then, you will notice that in the Edit bar, our chosen design is already formatted for Print Then Cut.
Once you think the design is completely ready, choose the Make It option and move to the next step, Print Then Cut.
Step 2: Prepare Your Printer for Printing
You need to follow the steps below to prepare your printer and print the design. Follow the steps carefully.
Connect your printer to a power source, keep it near your PC or smartphone, and turn the printer on.
Next, you will need to move to the Design Space app and select your printer name.
After that, you will have to send the design to the printer for printing.
You can select the size of the design before printing on the material.

Once the printing is complete, you can move on to the process of cutting it on your machine.
Step 3: Cut the Design on Your Machine
Before you cut the design on your machine make sure that your setup process is done. After that, follow the steps to cut the design.
Depending on the material you are cutting, load the material to the design you are using with or without the machine. (I am using the Maker 3 model to cut the design.)
After loading the design, press the Go button on the machine to start cutting.
Now, the machine will start the cutting designs.

Wait for the cut to complete, and then unload the design from the machine.
Weed out the extra part, and your Print Then Cut project will be complete.
Final Words
Here, I have tried to share a fundamental guide on how to print and cut on Cricut with all the other essential info. By using all this information, you can easily create a project on any of the Cricut cutting machines without facing any issues. Moreover, make sure to follow all the steps carefully to avoid facing any issues. I hope you will be able to make stunning crafts using Print Then Cut on Cricut in your first attempt. machine. However, it is wise to seek more help if the concepts are still not clear yet.
Frequently Asked Questions
Do I Need to Calibrate My Cricut Machine for Print Then Cut?
All the cutting machines offer the calibrated feature. But, if you are an inaccurate cut, then you need to perform the calibration of your machine. Calibration is a simple process designed for the questions and answers related to machine cuts. This process helps the machine and software provide the pinpoint edge-to-edge cuts flawlessly. You can select the Calibration option in the Design Space app and specify Print Then Cut to complete it by following the on-screen instructions.
How Do You Use Print and Cut on Cricut?
Here is a brief guide with simple steps for printing and cutting on your machine. Follow the guide to get a fundamental understanding of the process.
Start creating a new project on the Design Space app.
After that, choose the Image option.
Next, move to the Filters option and then choose Operation Type.
Now, you have to choose the Print Then Cut option.
Once you are ready, choose the Make It option on the app to print the design.
When the printing is complete, use the machine to cut it.
Finally, finish your DIY project.
Why Is My Cricut Not Cutting Properly on Print and Cut?
In some cases, you can face an accuracy issue while cutting the design in the Print Then Cut project. The primary reason for this problem is that the cutting setting and blade alignments are not perfect for the cut. To get rid of this problem, you can use machine calibration to perfect the device’s cutting alignment. However, make sure to get in touch with the brand customer service team to learn more about fixing the issue.
Source: how to print and cut on cricut
Visit for more info: Cricut.com/setup
Pinterest
You tube
#how to print and cut on cricut#print and cut on cricut#Cricut Explore Software#Cricut Venture#Cricut.com/setup
0 notes
Text
Cricut Machine Setup: A Full Guide for Beginners
Are you wondering how to setup your brand-new Cricut machine? Worry not! You have come to the right place. All you need to setup this amazing machine are the items that come in the box: a power cord, blade, cutting mat, USB cable, etc.
Some find the Cricut machine setup process tricky and troublesome, especially to beginners. Although it may feel difficult in the beginning, you don’t have to panic. In this blog, I will guide you through every step in a detailed manner to help you setup your crafting machine. Without any further delay, let’s start the machine setup procedure right away.
Cricut Machine Setup on Computer Using a USB Cable
You can setup your machine on both a computer and a phone. In this section, we will look at the computer setup instructions for your machine. To start setting up your machine, follow the steps in the section below:
To Cricut setup your machine, you must have the exclusive Design Space app installed on your computer. Also, you must have your Cricut ID. If you do not have either, you should create one.
First of all, ensure your crafting machine is plugged in properly, and then turn it on.
Now, connect your Mac to the back of your machine with the help of a USB cable. Insert one end into the USB port of your Mac and another cable end into the back of your machine.
After that, head to the cricut.com/setup website on your computer.
Next, you will need to download the Design Space software.
On the following screen, complete the steps on your screen and then log in to your account.
Also, setup your machine, and you will be all set to start crafting your projects.
If the app redirects you to do a test cut, know that your setup is complete. If not, rest assured that you have either not followed the above instructions carefully or your Cricut details are wrong. Another reason for this failure could be that your machine is not compatible with the version of your Mac.
Following the above steps carefully, you can easily setup your machine and enjoy designing DIY projects and giving them life on various materials.
NOTE: When setting up your machine for the first time and activating it at the same time, you should set it up very carefully. If you do not meet this requirement, you will have to reconnect the machine by navigating to design.cricut.com/setup again. You can also do this by selecting New Machine Setup, which is accessible through the Design Space menu.
Cricut Machine Setup on Your Mobile with Bluetooth
You can setup your brand-new crafting machine in the same way as in the above section. Ensure you have the Design Space app installed on your mobile phone and your Bluetooth is on. Also, you must know your Cricut details beforehand; if you do not have one, you must create a new one. To do the setup for your machine, follow these steps:
To start, ensure your machine is on and connected to a power source.
The next thing to do is to pair your mobile device to your machine via Bluetooth. To do this, go to the Settings tab and turn the Bluetooth on.
After that, open the app and then sign in with your Cricut credentials.
From the menu on the home screen of the app, move to the Machine Setup option and choose the correct machine model.
Lastly, follow the on-screen instructions to complete the full setup.
If the app takes you to the page to do a test cut, know that your Cricut machine setup is finally complete, and you can start making your designs and projects.
How to Setup Cricut Machine on Computer via Bluetooth?
You can also use your machine on your windows computer with the help of Bluetooth. These days, almost all computers and mobile devices have Bluetooth features built into them. If not, you can use a Bluetooth adapter as an external tool. Now, let’s start the process:
For Windows
To connect your machine, be it Explore, Maker, or Joy, you must perform these steps:
In the beginning,click the Start button from the search bar on the dock.
Now, open the Settings panel and then to Bluetooth and other devices.
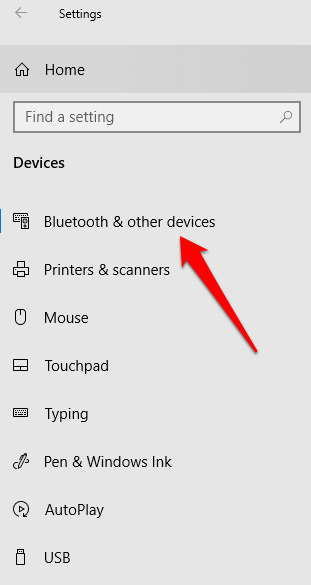
After that, click on Add Bluetooth or another device and tap on Bluetooth toggle to turn it on.
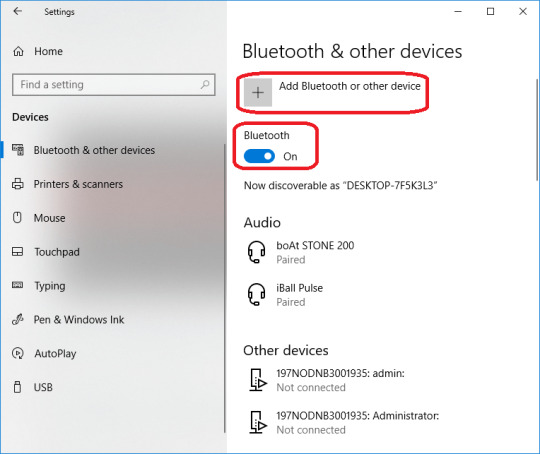
Next, you will have to wait for a few seconds to let your machine be discoverable.
Once you find the name of your machine in the list, click on it. The password for any machine is 0000. If it still does not work, look at the bottom of your machine; you will find the password close to the serial number.
For Mac
Follow the below steps to connect your machine to your Mac via Bluetooth. Also, remember that your Mac must be supported by Bluetooth.
In order to connect and setup your machine (Joy, Maker, or Explore), you must tap on the Apple icon, which is visible on the dock page.
Now, tap on the System Preferences option.
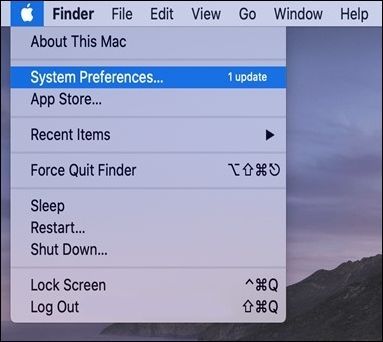
Next, look for the Bluetooth and turn it on.
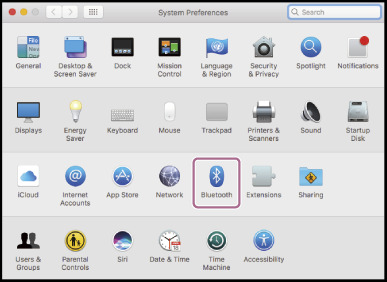
Lastly, look for the name of your machine from the list of devices. And click on your machine’s Bluetooth name. If a password is asked, type in 0000. Otherwise, you can find it at the bottom of your machine, next to the serial number.
Your setup is finally complete. Open the Design Space app, log in, and start your crafting journey. It was simple. Wasn’t it?
NOTE: Also, you must know that Cricut Joy cannot be setup with a USB cable because it is not equipped with a USB port.
Wrapping Up
Congratulations! Count yourself lucky now that you know how to do a Cricut machine setup. I hope that any confusion regarding your setup has already been removed, reading this blog. You also know how to connect your machine through USB and Bluetooth. Enjoy giving your crafts a new life. Happy designing!
0 notes
Text
Cricut Thankful Grateful Blessed Print Thank You Cards Cut File

Create heartfelt thank you cards effortlessly with our exclusive Cricut Thankful Grateful Blessed print cut file. This digital design is perfect for expressing gratitude in a personal and stylish way. Whether you're crafting for a special occasion or simply want to send a thoughtful note, our cut file makes it easy to design unique thank you cards with photos that capture your cherished moments.
Embrace the joy of DIY with our versatile design, compatible with Cricut machines for seamless cutting and crafting. Add a personalized touch by incorporating our thank you sticker design elements, enhancing your cards with charming details. Making thank you cards online has never been more enjoyable – simply download our cut file, follow easy instructions, and create beautiful cards that convey your appreciation.
Ideal for craft enthusiasts and beginners alike, this cut file ensures professional results while allowing for creativity and customization. Elevate your gratitude with each card you make, celebrating the spirit of being thankful, grateful, and blessed. Download now and embark on a crafting journey that spreads joy and appreciation with every heartfelt creation.
#printedthankyoucards#createyourownthankyoucards#designthankyoucards#customprintedthankyoucards#customisedthankyoucards#createthankyoucardonline#designmyownthankyoucards#thankyoucardsprintedonline#customizethankyoucardsonline#printthankyoupostcards#thankyoucardprintingnearme#createthankyoupostcards#designthankyoucardswithphotos#thankyoustickerdesign#makingthankyoucardsonline#printingyourownthankyoucards#carddesignthankyou#designbusinessthankyoucards#designforthankyou#freecricutthankyoucarddesigns#mandalathankyoucards#printonthankyoucards#thankyoucardwatercolordesign#thankyoucardsdrawings#thankyouforcomingdesign#thankyoupostcarddesign#thankyouposterdesign#thankyoutextdesign#thankscarddesign#thankfulquotes
0 notes
Text
How to Connect Cricut to MacBook With USB and Bluetooth?
Are you looking to learn how to connect Cricut to MacBook? If yes, you might be wondering which option you should try: wireless or wired🤔? Well, don’t worry; I will explain the pros and cons of both connections. However, I prefer a USB connection, which is more stable than a Bluetooth wireless connection.
However, one must know both ways to establish a connection with a Cricut machine. Sometimes, I use Bluetooth when I need more space in my workspace and can’t keep my Cricut and laptop together. So, this guide will be helpful whether you want to connect a new Cricut machine or an older one. I will cover both types of connection methods in this blog. So, let’s get started!
Method 1: Through a USB Cord
When learning how to connect Cricut to MacBook using USB, it is necessary to position your machine in the right place. For example, the USB cable is fixed in length, so you have to keep both devices closer to each other. However, you can’t connect your Cricut to any USB cable. Your USB cable is the one that came with your machine. Use that one only.
Here is how to connect Cricut to a Mac with a USB cable:
In case you are having trouble adding Cricut to your device, try using another USB cable or port. You can also buy the same USB cable from Cricut’s official website.
Method 2: Via Wireless Bluetooth
Now, if you want to understand how to connect Cricut to MacBook wirelessly, you should follow the steps I have explained below. Before that, you should maintain the distance between your machine and Mac. Ensure the distance between both devices is within the range of 10 to 15 feet. When you are ready, walk through the steps written below.
Here is how to connect Cricut to computer Bluetooth:
Finally, your Cricut is now paired with your MacBook. Since you have learned how to connect Cricut to MacBook, you can connect any Cricut model to your Mac using the above mentioned method.
Which Connection Method Is the Best and Why?
Okay, so now I will tell you which method is the best when connecting your Cricut to a MacBook.
I have used both, and I found them both suitable and work really well. However, you can’t deny
that wired connections are more stable and consistent than wireless ones.
In short, if you expect speed, a wired (USB) connection is the best option. It is also reliable and more secure.
Bluetooth wireless connections have advantages, such as convenience and peace of mind because you are not dealing with untidy wires. Plus, they are generally compatible with most devices, and they give you freedom of mobility to some distance.
Now, it might be clear to you how to connect Cricut to MacBook using a USB and Bluetooth connection. Moreover, it is also clear to you which method is best and why. Now, enjoy your crafting with Cricut without any hassle.
FAQs
Question 1: Can I connect all Cricut models to device with USB?
Answer: No, you can’t. You can’t connect all Cricut cutting machines with a USB connection. For example, you cannot connect your Cricut Joy model with your USB connection as it has no USB port. Since there is no USB port, you can only connect it using a Bluetooth connection.
Question 2: What is the Bluetooth adapter for Cricut machine?
Answer: A Bluetooth adapter is a quick plug-and-play device. You can plug this adapter into a USB port on your device and enable a Bluetooth connection between your compatible computer and another Bluetooth device that you are using to connect. This is usually used for Cricut machines that don’t have Bluetooth built-in.
Question 3: How to install Bluetooth adapter in Cricut machine?
Answer: If you want to install a Bluetooth adapter, follow the steps given below:
Visit: www.cricut.com/setup login
Source: https://cricricutdesigncut.wordpress.com/2024/08/16/how-to-connect-cricut-to-macbook-with-usb-and
#design space setup#cricut.com/setup#cricut.com/setup mac#cricut.com/setup windows#cricut setup#cricut explore air 2#cutfilesforcricut#cricutprojects#cricut design space setupp#setup cricut design space setup#cricut design space#cricut design space app#cricut design space login#cricut design space software#digital design#install cricut design space app#www.cricut.com/setup login#www.cricut.com setup#www.cricut.com/setup
0 notes
Text
Bring Back The Joy SVG - Vote Harris Walz 2024 SVG PNG, Cricut File
Bring Back The Joy SVG, Vote Harris Walz 2024 SVG PNG EPS DXF PDF, Cricut File, Instant Download File, Cricut File Silhouette Art, Logo Design, Designs For Shirts.
♥ Welcome to SVG OCEAN DESIGNS Store! ♥
► PLEASE NOTE:
– Since this item is digital, no physical product will be sent to you.
– Your files will be ready to download immediately after your purchase. Once payment has been completed, SVG Ocean Designs will send you an email letting you know your File is ready for Download. You may also check your Order/Purchase History on SVG Ocean Designs website and it should be available for download there as well.
– Please make sure you have the right software required and knowledge to use this graphic before making your purchase.
– Due to monitor differences and your printer settings, the actual colors of your printed product may vary slightly.
– Due to the digital nature of this listing, there are “no refunds or exchanges”.
– If you have a specific Design you would like made, just message me! I will be more than glad to create a Custom Oder for you.
► YOU RECEIVE: This listing includes a zip file with the following formats:
– SVG File (check your software to confirm it is compatible with your machine): Includes wording in both white and black (SVG only). Other files are black wording.
– PNG File: PNG High Resolution 300 dpi Clipart (transparent background – resize smaller and slightly larger without loss of quality).
– DXF: high resolution, perfect for print and many more.
– EPS: high resolution, perfect for print, Design and many more.
► USAGE:
– Can be used with Cricut Design Space, Silhouette Cameo, Silhouette Studio, Adobe Illustrator, ...and any other software or machines that work with SVG/PNG files. Please make sDisney Father's Dayure your machine and software are compatible before purchasing.
– You can edit, resize and change colors in any vector or cutting software like Inkscape, Adobe illustrator, Cricut design space, etc. SVG cut files are perfect for all your DIY projects or handmade businDisney Father's Dayess Product. You can use them for T-shirts, scrapbooks, wall vinyls, stickers, invitations cards, web and more!!! Perfect for T-shirts, iron-ons, mugs, printables, card making, scrapbooking, etc.
►TERMS OF USE:
– NO refunds on digital products. Please contact me if you experience any problems with the purchase.
– Watermark and wood background won’t be shown in the downloaded files.
– Please DO NOT resell, distribute, share, copy, or reproduce my designs.
– Customer service and satisfaction is our top priority. If you have any questions before placing orders, please contact with us via email "[email protected]".
– New products and latest trends =>> Click Here .
Thank you so much for visiting our store!
SVG OCEAN DESIGNS
Read the full article
0 notes
Last Seen Blogs

sadlovatic
тωσ ριєcєѕ †♥

fanficsfreeideas
Fanficsfreeideas

animatorvsartist
AnimatorVsArtist

thomaiserdari
LUXURY ARTS by Thomaï Serdari

shoutting-blog-blog
Smoke and Mirrors