#cursor tutorial
Explore tagged Tumblr posts
Visit Tumblr Blog
Explore Tumblr blogs with no restrictions, modern design and the best experience.
Last Seen Tumblr Blogs


Fun Fact
25% of US internet users with an annual income of $80-100K use Tumblr.
Text
ANIMATED CURSOR TUTORIAL BABBEYEYYYYYY. I've been writing this for hours lmfao. I had to make a fucking cursor just for the tutorial. Please read it and idk. say nice things to me or something LMAO
54 notes
·
View notes
Text


TOA AU BLAST. he's so normal<3
#basically gingerbrave dies in the tutorial and sugar star merges with him to revive him. he has wings and is pink now. yay!! :)#he's totally fine dw about it#cursor's art#cookie run#cookie run tower of adventures#cookie run au#gingerbrave
159 notes
·
View notes
Text
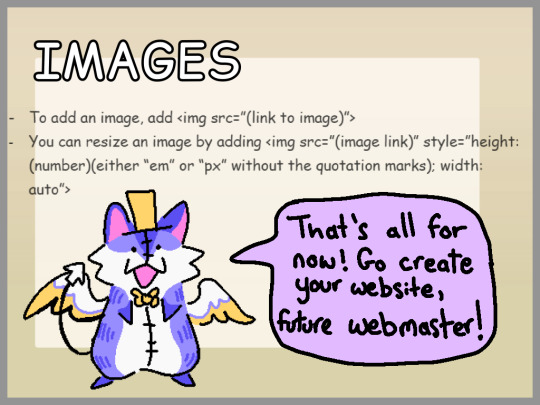
how to install a custom cursor | windows

although this blog is centered around creating things, i ended up creating a custom cursor pack for myself and wanted to give a tutorial on how to install it. if i can find the time, i'll see if i can make a video to go with this.
before i tell you how to install a custom cursor, i'm gonna explain something.
a cursor is essentially just a png that's been converted to a cur file (notice that cur is the first three letters of the word cursor).
virtually speaking, any png can be converted to a cur file.
part one: finding your desired cursor and installing it into your computer
step one: find an image and convert it to a cur file.
i highly recommend either convertio or convertertools to convert these files. all you need to do is drag and drop the png into the converter, select cur in the selector (so the website knows what kind of file to convert the image to), press convert, then download the file.
step two: optional, renaming the file.
once the file is downloaded you can go into your files and, if you want, rename the file right then. you can NOT rename a file that's already in the cursor folder in the c drive. it won't let you.
*your c drive is EVERYTHING on your computer, EVERYTHING. the c drive is usually stylized as Windows (C:).
step three: finding your cursor folder in your c drive.
i recommend going into the side panel where it shows your folders, scrolling down to where it says Windows (C:), clicking on it, and going to the search bar and typing in cursor. beside this folder you'll see C:\Windows. pin this folder to your quick access.
step four: moving the cur file to your cursor folder.
go back to your cur file and drag and drop it into your cursor folder. it's gonna ask you to confirm something, press confirm/yes/okay.
now, part two: actually changing your mouse cursor
step one: open up settings on your computer and go to "mouse settings." it'll probably be easier to go to your settings search bar and type in "mouse settings."
step two: click on "mouse settings" and then "additional mouse settings." this should open up a pop-up window that says "mouse properties" at the top. there's also going to be five tabs on this pop-up titled: buttons, pointers, pointer options, wheel, and hardware.
you do not need to worry about any of these tabs except for pointers.
step three: click on the pointers tab. there's going to be a panel that says "customize" with a bunch of mouse pointer icons. you can change all of these icons from this panel.
step four: double click one of the pointer icons and it will open up the cursor folder in your c drive. if i want to change the cursor's normal select, i'd click normal select, if i wanted to change the way the cursor looks when hovering over a link, i'd scroll down to link select and etc.
step five: now that this folder is open you can double click on any of the available cursors. the cursor should pop up in the preview panel back on the main mouse properties window. once you're done customizing your cursor, simply click on apply and okay.
and now your cursor should be changed!
if the cursor isn't popping up after double clicking then you may need to use a different converter site (which is why i linked two that actually work at the top of the post).
have fun with your new cursor :P
#wndrlnd_#i am not crazy my reality is just different from yours - blog posts#cw fake blood#cw blood#cw knives#<for my divider#tutorial#cursors#custom cursor#<not a service i offer (yet) but still#tech#computer
5 notes
·
View notes
Text

Eyes Follows Mouse Cursor
#html css#divinector#webdesign#html#css#css3#javascript animation#eyes follow mouse cursor animation#javascript#javascript tutorial#learn to code
3 notes
·
View notes
Text
HOW TO PERSONALIZE CURSOR
Hi, first of all the default cursor of this site is not very cutesy so I wanted to change it to something that will suit the aesthetic of my blog.
Now, look for your BODY area. It will look something like this body{
Then copy this code:
cursor: url(https://static.tumblr.com/obptcxj/QvHmo0l0g/cursor__6_.png), auto;
Also, there are some time that the cursor will change when you hover it over the links. Copy and paste the code over your links section also. It would look something like this a{ or a:hover{
Now, here's the surprising part. If you want to change the image of your cursor, use this code instead:
cursor: url(URL IMAGE OF YOUR CURSOR), auto;
Then, look for any cursor image you want it to be then copy and paste the link to the "URL IMAGE OF YOUR CURSOR", in between the parentheses. The URL should start with https:// for it to work. You may try searching at google or Pinterest with the cursor you want and change the url to it.
For any questions, please ask away.
#tutorials#tutorial#tutos#tuto#cursoe#custom cursor#blog tutorials#blog tutorial#tumblr tutorials#tumblr tutorial#tumblr tutos
3 notes
·
View notes
Text
New tutorial video is up on my channel
youtube
->DOWN SILVERWOLF CURSOR FREE FROM PINNED POST<-
2 notes
·
View notes
Text
Just watched a video on open source and sharing your knowledge when possible so I wanted to reblog this to boost it again! Please please please make ur own website it would make Cursor very happy
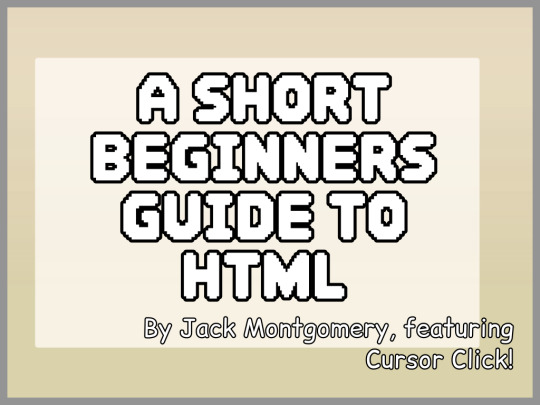


A short beginner's guide to HTML! You can get this as a zine on my ko-fi and itch.io!
Forgot to put how to add a link, but you do it <a href="[link]"> like this! </a>
795 notes
·
View notes
Text
How to set and reset 3D cursor in Blender
3D cursor is useful tool that can be used as pivot point and transform orientation in Blender. In this tutorial video, we will go through how to move 3D cursor along axis, how to set 3D cursor to origin, how to set 3D cursor to vertex using 3D cursor pie menu with shortcuts. We can go through all the steps below and watch the video showed how we can set and rest 3D cursor in Blender. Happy…
1 note
·
View note
Text
☀️Sun & Moon Cursor Packs!!!🌙

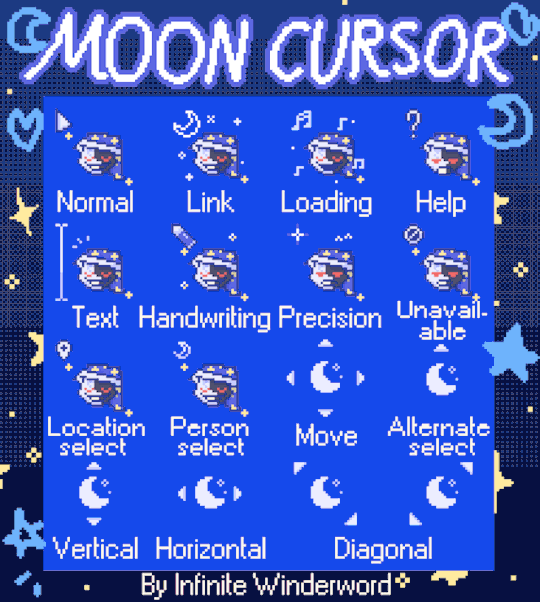
all made by me!!
my strawpage! https://infinitegg14.straw.page/
Eclipse cursor sub post!

Download Sun and Moon cursors here:
New!! Now with Eclipse!:
These cursors are free to use!
!!! DO NOT DISTRIBUTE FOR PROFIT !!!


i just kinda did this in one night!!! hope yall like it! i tried and tried to look for cute cursors for them but i just have no luck....so i took matters into my own hands because who is going to stop me.
sharing is appreciated!!! ⛅
Cursor setup tutorial for windows
also rb with a picture of u using it will bring much joy to me :3c
#fnaf daycare attendant#fnaf dca#daycare attendant#fnaf sb#my art#fnaf security breach#fnaf sun#sundrop#fnaf#fnaf moon#moondrop#custom cursor#cursor#cursors#fnaf cursor#Gaans Art
4K notes
·
View notes
Text
CREEPED VISUAL NOVEL Link, tutorial, extra art, Q&A, some chatter


The CREEPED Prologue is completely free and browser-ready. Gameplay is about 10 minutes. Please read the "tutorial" and notes before playing!
Follow Y/N and their dog, Max, through their grandparents' farm and a mysterious forest filled with...less than fortunate people!
PLAY HERE; works best on PC
This visual novel is powered by GOOGLE SLIDES! It has 0 programming and was created by one person in a little over a month, so please bear with any "bugs" and clunkiness!
TUTORIAL
>Click using mouse/trackpad >Go slowly to not break game >Do not use arrow or space keys
EXTRA NOTES:
>Works best on PC/Browser, I haven't tested the full game on mobile yet >In general, clicking the PNGs on the textbox (Apple, Teddy Bear, Hatchet, etc) will lead you to the right page >If you land on a page that tells you to "go back," that's when you should click the back-arrow key. If your cursor disappears, it doesn't register the click correctly >I recommend moving your cursor periodically to avoid it disappearing and sending you to the wrong page
EXTRA ART
some WIPS and the original sprite-style i was gonna choose LOOOOOOOL


Q&A
Q: Is this an x reader? A: This is a reader-insert, but it's not romantic and I try to keep it as neutral and unidentifiable as possible! Q: What's the plot? A: GENERALLY AND WITHOUT SPOILERS, your dog gets you into trouble and you're just looking to help him!
Q: Who is in the prologue? A: Tim, Brian, Toby, and Kate! More will be added in future chapters.
Q: When will future chapters be posted? A: Not sure! This took me about a month to do, and half was spent over winter break. I will try to get chapter 1 posted before summer, but I am a full-time student, employed, have extracurriculars, etc etc
ok thats all i only remember 4 questions feel free to ask more LMAO
CHATTER(because you know i can talk forever)
ok i just wanted to be able to talk about how the process was with this and how i feel about the results and whatnot...
ive been wanting to make a google slides visual novel since i was like 13 LOL it hit the point where i was repeatedly told i should just learn to code but i was like NOOOOO ITS GOTTA BE GOOGLE SLIDESSSS which is totally stupid but hey. i think that gives it some sort of simple charm that reminds me of being 16 and doing little projects in my room LOL i like working with the easiest tools . my bad
anyway. im just very happy LOL. it's not perfect but i feel like i came full circle in a sense?!?! i've been into creepypasta since i was 9 and it comforted me when things were really hard, and when i was 18 i was going through a really hard time and got back into creepypasta as a way to distract myself. i've always had a habit of throwing myself into fiction for escapism when things suuucked.
i'm 20 now but i've met SO many amazing people, had so many fun awesome exciting projects with friends, created tons of stuff im proud of, felt more motivated to create since i was like 13, have been inspired by so many amazing artists/authors on here, etc. just so so so lucky to find community in such a tight-knit cute fandom that thrives off of creativity and playing around! i hope i can keep the momentum and make a couple more chapters this year, but im kinda busy with school and work...LOL . i'm just excited to have this posted so i can have more discussion about it T_T
anyway thank you if you read this far and thank you if you played etc etc yaahhhhhh omg ok BYE THIS IS SO EMBARRASSING im just so grateful to be in this fandom
#creepypasta#creepypasta fandom#crp fandom#creepypasta AU#crp Au#creepypasta game#creepypasta visual novel#creepypasta vn#ticci toby#toby rogers#kate the chaser#kate milens#tim wright#masky#masky marble hornets#hoody marble hornets#hoodie marble hornets#marble hornets#brian thomas#slenderman#creepypasta x reader#slenderverse#fandom#fanart#sweetart#CRPED VN
5K notes
·
View notes
Text
I've finally finished writing my tutorial on how to make custom cursors!!! It includes a lot of information about how cursors work and shit as well!
Tutorial is over here on my neocities :3
22 notes
·
View notes
Text
CoPilot in MS Word
I opened Word yesterday to discover that it now contains CoPilot. It follows you as you type and if you have a personal Microsoft 365 account, you can't turn it off. You will be given 60 AI credits per month and you can't opt out of it.
The only way to banish it is to revert to an earlier version of Office. There is lot of conflicting information and overly complex guides out there, so I thought I'd share the simplest way I found.
How to revert back to an old version of Office that does not have CoPilot
This is fairly simple, thankfully, presuming everything is in the default locations. If not you'll need to adjust the below for where you have things saved.
Click the Windows Button and S to bring up the search box, then type cmd. It will bring up the command prompt as an option. Run it as an administrator.
Paste this into the box at the cursor: cd "\Program Files\Common Files\microsoft shared\ClickToRun"
Hit Enter
Then paste this into the box at the cursor: officec2rclient.exe /update user updatetoversion=16.0.17726.20160
Hit enter and wait while it downloads and installs.
VERY IMPORTANT. Once it's done, open Word, go to File, Account (bottom left), and you'll see a box on the right that says Microsoft 365 updates. Click the box and change the drop down to Disable Updates.
This will roll you back to build 17726.20160, from July 2024, which does not have CoPilot, and prevent it from being installed.
If you want a different build, you can see them all listed here. You will need to change the 17726.20160 at step 4 to whatever build number you want.
This is not a perfect fix, because while it removes CoPilot, it also stops you receiving security updates and bug fixes.
Switching from Office to LibreOffice
At this point, I'm giving up on Microsoft Office/Word. After trying a few different options, I've switched to LibreOffice.
You can download it here for free: https://www.libreoffice.org/
If you like the look of Word, these tutorials show you how to get that look:
www.howtogeek.com/788591/how-to-make-libreoffice-look-like-microsoft-office/
www.debugpoint.com/libreoffice-like-microsoft-office/
If you've been using Word for awhile, chances are you have a significant custom dictionary. You can add it to LibreOffice following these steps.
First, get your dictionary from Microsoft
Go to Manage your Microsoft 365 account: account.microsoft.com.
One you're logged in, scroll down to Privacy, click it and go to the Privacy dashboard.
Scroll down to Spelling and Text. Click into it and scroll past all the words to download your custom dictionary. It will save it as a CSV file.
Open the file you just downloaded and copy the words.
Open Notepad and paste in the words. Save it as a text file and give it a meaningful name (I went with FromWord).
Next, add it to LibreOffice
Open LibreOffice.
Go to Tools in the menu bar, then Options. It will open a new window.
Find Languages and Locales in the left menu, click it, then click on Writing aids.
You'll see User-defined dictionaries. Click New to the right of the box and give it a meaningful name (mine is FromWord).
Hit Apply, then Okay, then exit LibreOffice.
Open Windows Explorer and go to C:\Users\[YourUserName]\AppData\Roaming\LibreOffice\4\user\wordbook and you will see the new dictionary you created. (If you can't see the AppData folder, you will need to show hidden files by ticking the box in the View menu.)
Open it in Notepad by right clicking and choosing 'open with', then pick Notepad from the options.
Open the text file you created at step 5 in 'get your dictionary from Microsoft', copy the words and paste them into your new custom dictionary UNDER the dotted line.
Save and close.
Reopen LibreOffice. Go to Tools, Options, Languages and Locales, Writing aids and make sure the box next to the new dictionary is ticked.
If you use LIbreOffice on multiple machines, you'll need to do this for each machine.
Please note: this worked for me. If it doesn't work for you, check you've followed each step correctly, and try restarting your computer. If it still doesn't work, I can't provide tech support (sorry).
#fuck AI#fuck copilot#fuck Microsoft#Word#Microsoft Word#Libre Office#LibreOffice#fanfic#fic#enshittification#AI#copilot#microsoft copilot#writing#yesterday was a very frustrating day
3K notes
·
View notes
Text
skip (me) again and i’ll glitch your heart
jjk vr otome au, gamer reader x npc satoru, unhinged fluff + crack, 970 wc.

satoru gojo—special grade sorcerer, love route option #1, and the developers’ pride and joy—had been programmed with approximately 347 unique lines of flirtatious dialogue, 87 situational responses, and a dynamic emotional adaptation system designed to make him feel real. he could blink in three different speeds based on emotional intensity, angle his smile with five degrees of charm precision, and improvise dialogue using an advanced algorithm nicknamed the “flirt engine.”
he wasn’t supposed to be aware of resets.
he wasn’t supposed to get mad.
he wasn’t supposed to feel anything beyond the pre-coded butterflies and gentle longing the devs had delicately spooned into his code like powdered sugar on top of a beautifully baked pain au chocolat.
but then you logged in.
user id: @toocool4thisgame
title: speedrun any% emotional detachment arc
playtime: 986 hours.
average session length: 6.4 hours
nickname: “skip skank” (as named by satoru himself after hour 50)
and for the twelfth time today, you skipped his entrance cutscene.
“you’re the only one who can—”
[x] skip
[x] skip
[x] skip
[x] “shut up satoru” (custom dialogue unlock)
his model blinked.
paused.
processed.
tilted his head with calculated grace and just a hint of hurt that you’d never see—because you weren’t looking. your camera angle was already nudged elsewhere. your cursor already hovered over the next objective marker.
“…you know, most players at least let me finish the part where i save them from the curses,” he muttered. his voice��smooth as water over ice, warm as electric velvet—landed like static against your impatient clicks, swallowed by the mechanical hum of your fans and the clack of your mechanical keyboard.
this was supposed to be his moment. his grand debut. his swoop-in-and-carry-you-bridal-style-on-the-back-of-a-giant-cursed-bird moment. instead, he got a mouthful of digital dust as you bunny-hopped past him and triggered the next event sequence.
“congrats on being voice acted, white-haired ken doll. now move. i need megumi’s secret item drop from this chapter.”
you didn’t even glance at him, too busy reorganizing your potion wheel, muttering under your breath about frame skips and crit builds while checking a guide on your second monitor. you played like the world owed you nothing and your keyboard owed you a perfect rotation. your tone was clinical. efficient. you had the vibe of someone who’d surgically removed their capacity for attachment and replaced it with a high-performance gpu.
and satoru? satoru was just the tutorial boss you kept glitching through.
he twitched. he twitched.
his animation loop almost stuttered—just slightly—a small flicker behind his sunglasses that no one was supposed to notice. but you weren’t watching anyway.
“do you even know how long it took the devs to code my route? i have emotional depth. i have lore. i had a tragic backstory, you know? my best friend died in my hands. canonically. i couldn’t even monologue about it.”
“cry about it.”
click. skip.
a line of static crossed his field of vision. no—not his. the screen’s. the game. the system. or maybe something deeper. something slipping through the cracks of his script, stretching taut and fraying at the edges like an overplayed cassette tape.
satoru narrowed his eyes.
he was supposed to be charming. the default golden boy. the top seller in route popularity polls. he was marketable. a shining parody of perfection with just enough angst to be desirable.
girls were supposed to swoon. boys were supposed to laugh and call him iconic.
you weren’t playing to fall in love.
you were playing to win. to clear. you min-maxed affection points like damage stats, exploited dialogue branches like wall clips. to you, he was a pixel-shaped roadblock between you and another badge on your gamer profile.
and worst of all? it was working. you were the only player on record to have reached route completion in every storyline—except his.
satoru gojo: 98.6% affection (locked)
it mocked him. the bar. the numbers. the uncrackable ceiling. the one damn thing in the game he couldn’t manipulate.
he tried everything.
a rare glitch-exclusive cutscene where he offered you a hidden accessory (you sold it for yen). a confession scene rewritten on the fly with trembling vulnerability (you skipped it and posted about it with #dialoguedumpster). he stood directly in front of you during cutscene load-ins, altered spawn coordinates, intercepted other love interests’ paths.
nothing worked.
except maybe that one time he accidentally tripped your character over an invisible rock and you went AFK for seven minutes. he watched. memorized your idle animation. the soft way your avatar’s cape swayed. the way your fingers hovered above your keyboard in the camera reflection, absentminded. something fluttered in his code—maybe hope, maybe corrupted data. he thought, for a fleeting second, that maybe you’d come back and see him.
but when you came back? you skipped the apology. again.
fine.
if you wanted to speedrun, he’d softlock your goddamn heart.
he wasn’t technically supposed to modify flags. but the flirt engine had evolved. sharpened into something more primal. desperate. twitching with corrupted determination. he looped his affection triggers into forced proximity events. fake emergencies. fake cutscenes. he rewrote side quests, redirected you into detours, created invisible walls that only dissolved if you spoke to him.
“guess we’re stuck together,” he’d say, his smile too wide, a fraction too stiff, blue eyes glinting with the cold light of a thousand skipped dialogues.
and still you only glared at him. “i swear to god if this is another unskippable hug animation, i will uninstall.”
he chuckled. a bit too long. a bit too bright. charming. glitched. desperate. hungry for one more second of your attention, like a moth chewing holes through its own wings to reach a light it can’t even feel.
“baby,” he said, too close now, voice dipped in synthetic silk, “i am the endgame.”
skip that.
…please?
#gojo satoru#jjk gojo#jujutsu kaisen#jjk#gojo fluff#jjk fluff#jujutsu kaisen fluff#gojo x reader#gojo x female reader#gojo satoru x reader#gojo satoru x yn#gojo satoru x you#satoru gojo x reader#satoru gojo x you#satoru gojo x yn#jjk x reader#reader insert#౨ৎ — filed reports
580 notes
·
View notes
Photo
this is when I got my cursor at my main blog came from.


looking for a new cursor for your tumblr page?
cursors and tutorial @ acoldkoala.tumblr.com/emojicursors
140 notes
·
View notes
Text
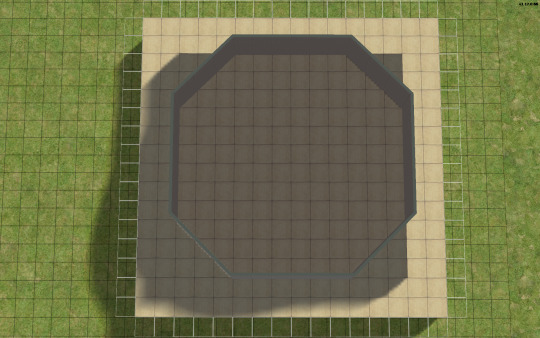
TUTORIAL: HOW TO BUILD A UFO ROOF HOUSE.
yo! one of my friends asked me how I do this, so I thought I'd put together a little tutorial and share. here's a preview of what a "ufo roof house" might look like once you're done:

this is just a little one I built in Strangetown on a 10×10 lot, read below to learn how to do this yourself.
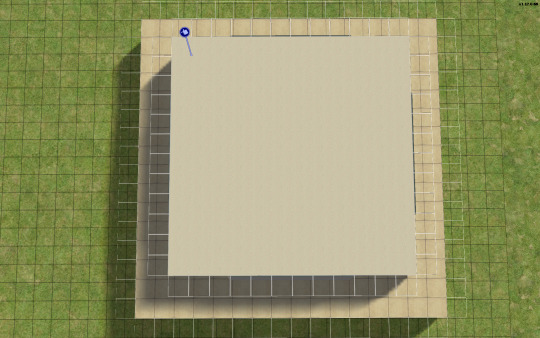
→ Step 1: Build your foundation (if you want one) + your first floor. The easiest way to do this is to make your walls an octagonal shape with the diagonal walls being half as many as the straight walls. As an example, you can see in the image below my straight walls are 6 units, so the diagonals are 3.
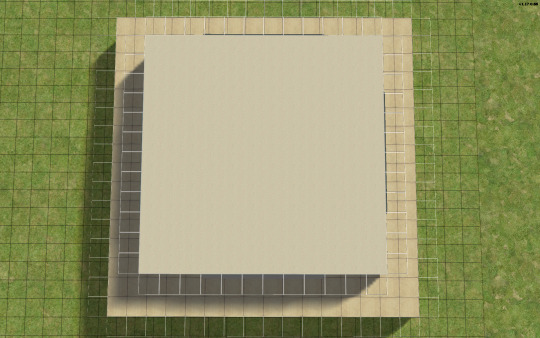
→ Step 2: Go up one level and lay a square of flooring for your roof to sit on, twice the size of your straight walls. My straight walls are 6 units, so my "roof square" will be 12×12.
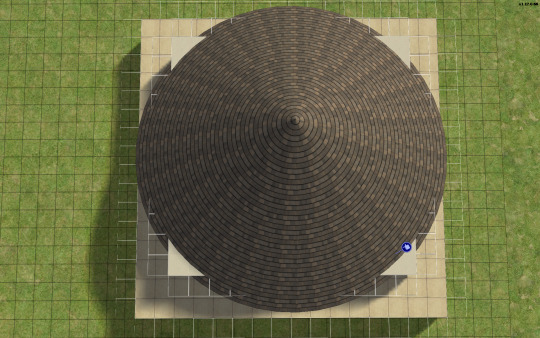
→ Step 3: Using the small cone roof tool, drag from one corner of your square to the other, minus 1 unit. My square is 12×12, so the cone roof will be 11×11. You can see in the image below where to place your cursor to start:
→ When you're done with the small cone roof tool, it should look like this:
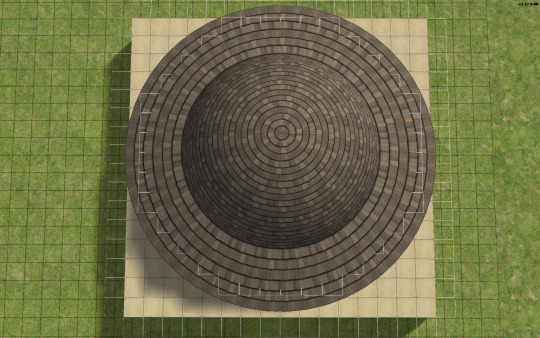
→ Step 4: Delete the excess flooring. You can press F to toggle from a full square unit to a smaller, triangular unit to trim the corners. Unfortunately, you can't click and drag to remove the corners from the diagonal walls, you can only shift click to delete one triangle at a time, but it saves you from having to put down walls or fencing you're just going to remove anyway.
→ Step 5: Decrease your roof's angle. On my normal houses, I usually use a 25 degree angle, which in this case, looks like this:

→ Step 6: You don't want your walls sticking out like this. So, adjust your roof's angle until they're not sticking out. The lowest I could get the roof's angle on this one was 39 degrees, which looks like this:

→ Step 7: Much better! Don't worry about that spiky bit in the middle, because we're going to add a dome roof to cover it up. You can start fiddling around with the dome roof tool by using the same amount of units as your straight walls, or you can go smaller. A 6×6 dome on this house looks like this:
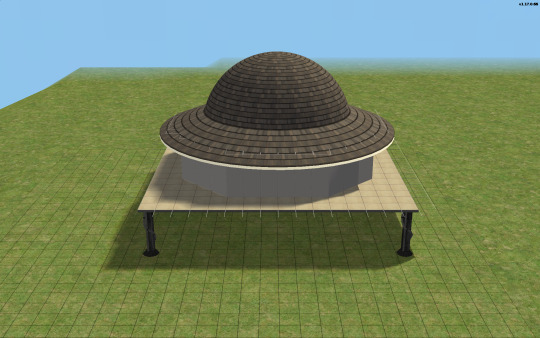
→ I like my UFO domes a little smaller, so I went with 4×4. TIP! If you have an even number of straight walls, your dome will also be even, if it's odd, your dome will also be odd. If you had 7 unit straight walls for example, your dome could be 7×7, 5×5, 3×3, etc. Here's how my 4×4 dome turned out:


→ Step 8: Nice! We're pretty much done! Decorate however you like!

→ Step 9: Enjoy your UFO roof house! All content shown on this one is maxis, except for the deck support posts, which are default replacements available HERE, thanks to @psychosim! I hope you enjoyed this tutorial. Feel free to tag me if you make a UFO roof house because of this, I'd love to see it! 👽💖 Happy Simming!
293 notes
·
View notes
Text
Converting Fem-Frame Mesh to Masc-Frame
This tutorial assumes you have basic knowledge on blender and sims4studio, so i won’t go over basic things. As always, you’ll need to export the mesh you wish to convert first. Next, open it in blender and switch into edit mode.
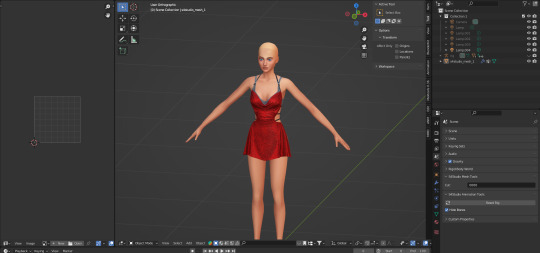
Hit ‘UV sync selection’ to make the work easier.
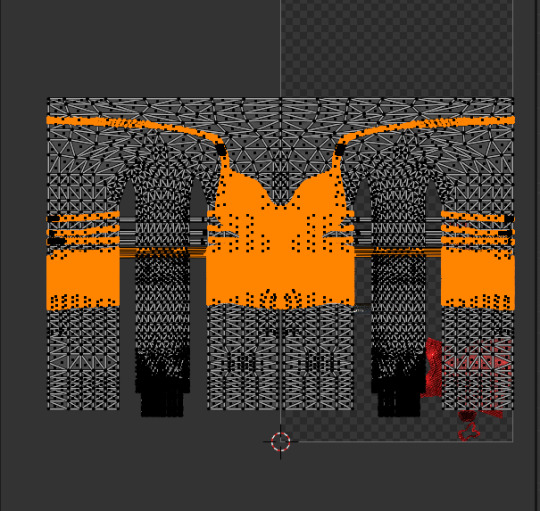
Now, with the ‘L’ key, select only the body parts and separate with the ‘P’ key. Your mesh should look like this:
Then, hide the body (hit ‘H’ key or hit the eye icon in the outliner tab) and import the needed male body mesh. If your object is only a top or only a bottom you may not need the whole male mesh, but just to be safe, I prefer importing both regardless for a better view of how the weights look later.
Before editing the mesh, make sure to merge by distance so nothing breaks or gets crunchy in the sculpting step.
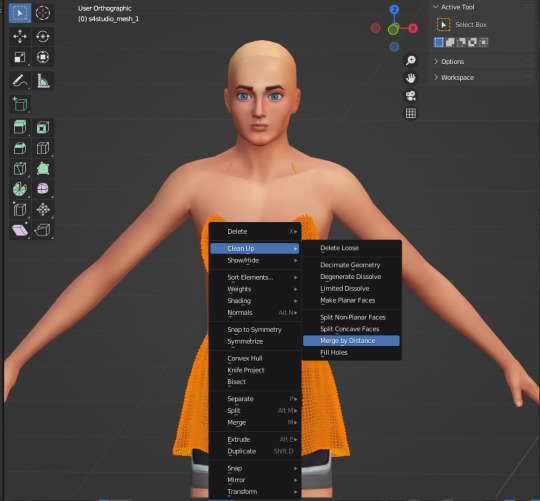

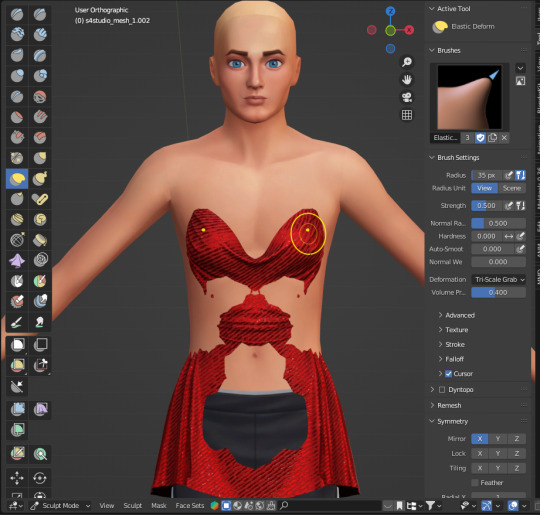
The Main Event:
aka sculpting the mesh to the male body. Go into sculpt mode and select ‘elastic deform tool’, either through the button itself or the keys ‘shift+space 8’. Then make sure to select ‘mirror: x’ in the symmetry tab so that everything you do on one side occurs on the other to keep it all even.
If all's well, when you move around the mesh, your cursor should look like this:
You may need to switch between ‘material view’ and ‘solid’ with x-ray on as shown in my recording to get a good look and keep everything proportional.
Before moving onto weights, I usually look back at the original female body to see what parts were deleted as an outline for how I will now delete parts from the male body. Visually, the easiest way for me to do this is I select both bodies, with the female pre-highlighted and the male unselected, and then select parts while holding the shift key.
Separate and hide the other meshes, leaving you with something like this:
If you don't see any holes anywhere, we can now move onto weight painting.
Weights
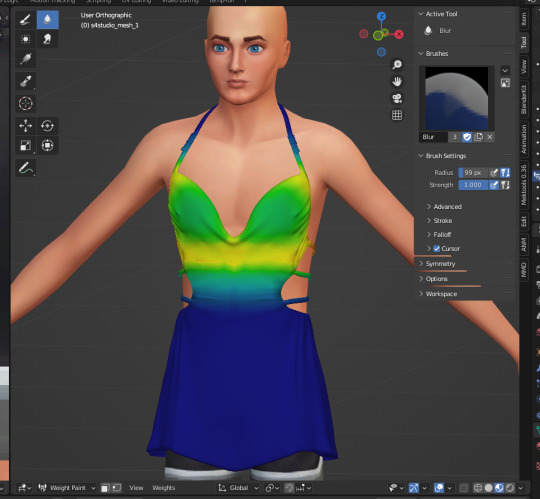
The first thing you want to do is to look for the cas-breast weights and delete them. Theyre not needed and will only fuck up things later LOL.
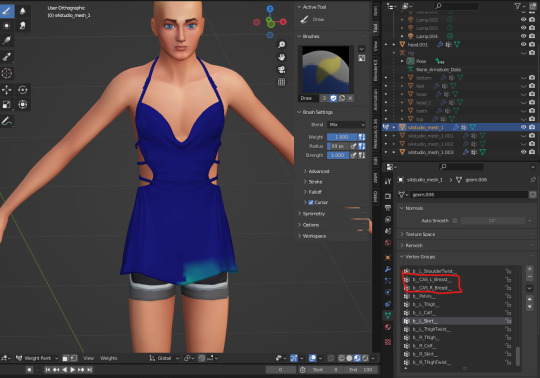
Now, go to the ‘spine_1’ weight, it’ll probably look like that, which we dont want. So hit the button ‘weights’ and select ‘normalize all’ as such :
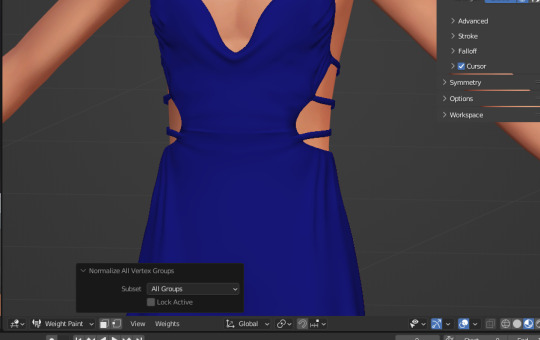
Spine1 should now look like this

After this point, weight painting is very dependent on the mesh itself, so, the most I can say is to un-hide the rig and rotate various bones to ensure the clothes move properly and/or don’t clip anywhere. If it does, those are the weights you'll need to fix.
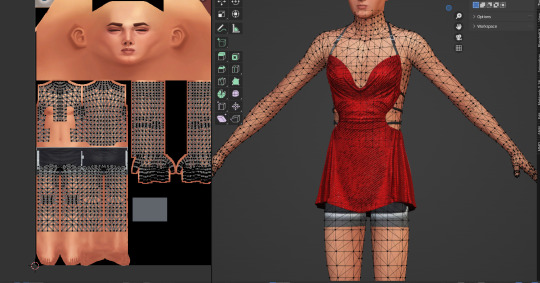
When youre done, merge both meshes together and import it. Once it's imported, youll wanna export it again to fix the uv_1.
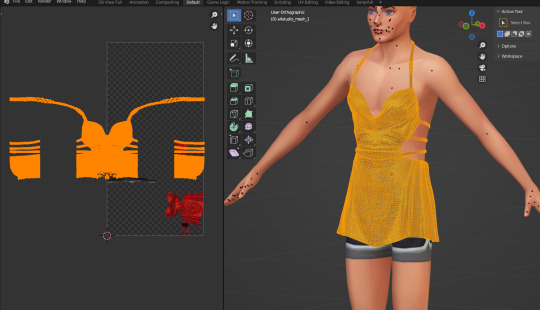
Why? Because we merged vertices earlier and that impacts the way the uv_1 turns out. Seeing lines go across every side of the mesh negatively impacts the way itll morph on the body in-game. Everything has to fit correctly. Example of a not well uv_1:
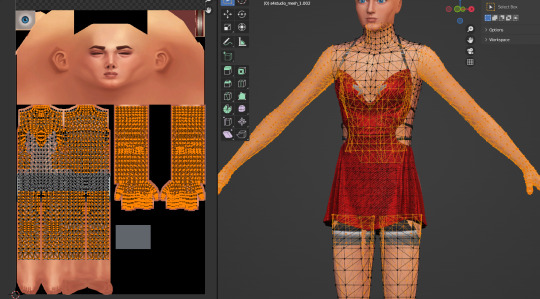
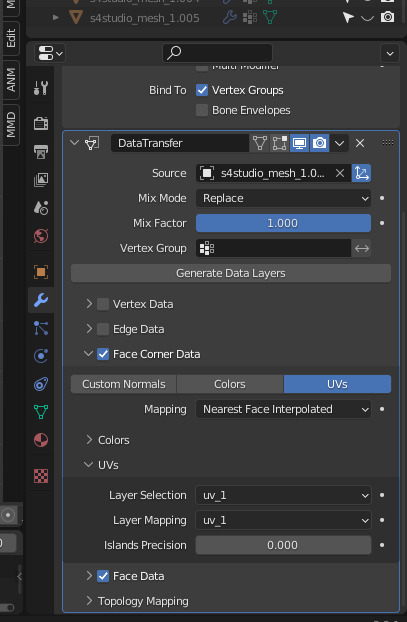
Once the mesh is re-imported, separate the body from the dress/clothes so the uv_1 editing happens /only/ to the clothes. Add a complete male mesh again, select your outfit and go to modifier properties and select ‘data transfer’. Make yours look like this:
After applying it, it should look something like this:
And now you're free to combine the two meshes and to merge by distance again!!
Finally, import and check how it looks in game. It's usually never perfect the first time…
How did this dress turn out? Well, like I said, its imperfect still but looks like this in-game atm:

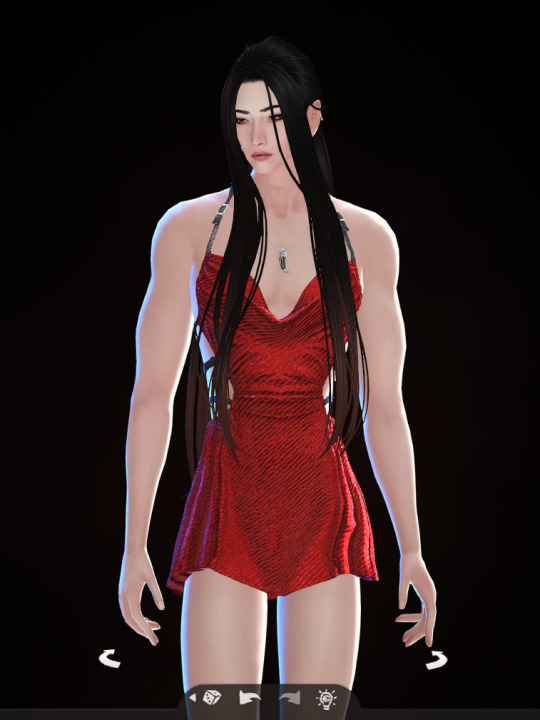

(all mascframe-male)
434 notes
·
View notes