#Blender 3D cursor
Explore tagged Tumblr posts
Visit Tumblr Blog
Explore Tumblr blogs with no restrictions, modern design and the best experience.
Last Seen Tumblr Blogs


Fun Fact
Celebrities use Tumblr as well.
Text
How to set and reset 3D cursor in Blender
3D cursor is useful tool that can be used as pivot point and transform orientation in Blender. In this tutorial video, we will go through how to move 3D cursor along axis, how to set 3D cursor to origin, how to set 3D cursor to vertex using 3D cursor pie menu with shortcuts. We can go through all the steps below and watch the video showed how we can set and rest 3D cursor in Blender. Happy…
1 note
·
View note
Text

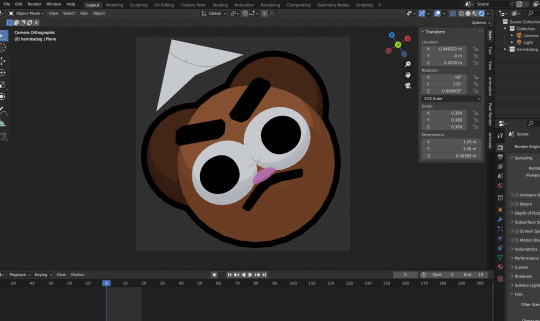
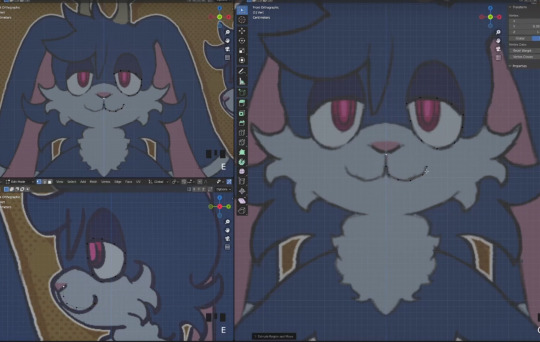
hello! sorry for not posting lately, I've been busy with college stuff. the semester is almost over, so I'll be able to spend more time on this project soon!
so here's Neru, she's still a work in progress, but she's almost done! I'm almost done with making everything i need to make the first episode of my comic! i hope i can make it soon! :D
#ignore the circle- thats the cursor#vocaloid#3d model#blender#fanloid#akita neru#the yellow one that doesnt appear in mesmerizer
9 notes
·
View notes
Text

whatre you gonna do about it
ALSOALSOALSOALSOALSOALSOALSO
I HAVEEEEEEEEEEEE
AAAAAAAAAAAAAAA SITEEEEEEEEEEEEEEEEE
I AM JUS PLAYIN WIT IT AN HAVIN A GOOD TIME it will UPDATE AS THANGS GO ON

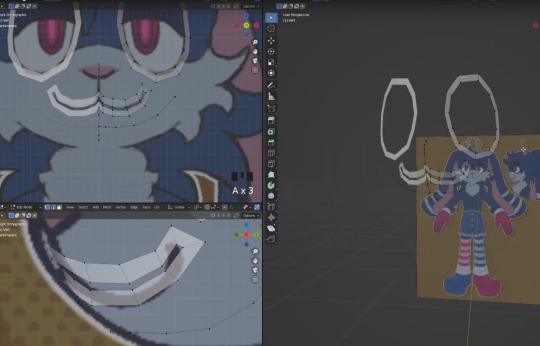
ALSO HERES A CUSTOM CURSOR I MADE FOR IT IN BLENDER
if u r readin this an u know how would u let me know how to change the default windows cursor to a this gif that would be So Cool
#my art#sketch art#digital art#webcore#old web#neocities#my website#that little guys name is hamstadog#they have a perpetual >:[ face#got no bones#kinda blobby#blender3d#blender art#3d art#custom cursor#custom cursors#mouse cursor#cursor#trans ppl are cool#<3
14 notes
·
View notes
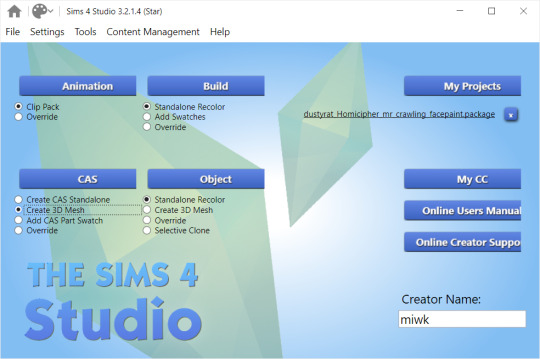
Note
hi!! this is probably a hard question so its ok if you dont answer but how do you make bang edits from hairs? i saw on one of your hair cc finds you said you used a kikiw bangs edit, and ive always wanted to make some from my favorite hair ccs but i dont know a thing about 3d modelling or meshes so i was wondering if you had a tutorial or something similar? ;; i love your sims btw theyre so cute!!


hai ty def don't mind this question so no sweat ^^)9 here's something I made to help

**huge disclaimer for all cc edits pls get permission from the original creator(s) before sharing or distributing also do not charge for them that's never allowed** ^^)pp
I still don't know a lot about cc creation lol... but I'll still share stuff I do know atm if it helps ^^)b
first thing is I copy the cc I want to edit into the s4studio "mods" folder (I created a subfolder for this tut alr directly within the s4studio mod folder so it's less crowded with files)

I open s4studio and click "my projects" to locate the cc I js copied over and click "open"

when it opens I click "export" under the texture tab and "export mesh" under the meshes tab (save as wtv I usually name them one digit numbers so they're easy to refind ^^)
next I open the exported mesh in blender (ver 2.78b for me)
there (in object mode) I click "studio_mesh_1" and shift-click the remaining 2 studio meshes (studio_mesh_2 & studio_mesh_3) when all are selected I push "ctrl + j" to join all into one
next I open "edit mode" in the bottom left
then I press "b" and drag and click my cursor to select areas I want to delete... once selected press "x" and select "vertices" from the drop menu to delete the highlighted areas
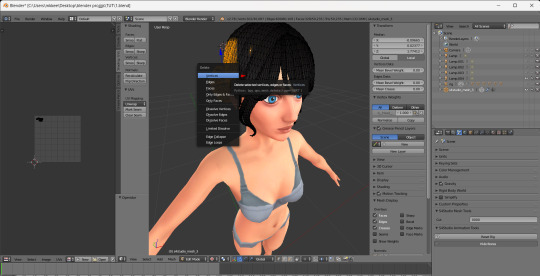

I repeat this until everything I want to delete is deleted and check that the "cut" value on the bottom right is set to 0 (0000) then click "file>save as" name file whatevs
next depending on what cas category I want the edit to appear in (lowk left wrist personally) I open s4s again and under "CAS" click "create 3D mesh"
In the s4studio searchbar I find a basegame file with the same cas category (left wrist) and click "next" (hovering shows the specific name and cas category)

once it opens I import back the exported png texture under "texture" and import the new saved blend under "meshes" (LOD 0)
or if I want the edit to generally take the same color as a cc hair ingame I open the original exported png in a photo edit software (paint.net for me) and delete everything ^^ importing back js a blank texture that looks like this

ok finished ^^)bb hope this helps some way
+++
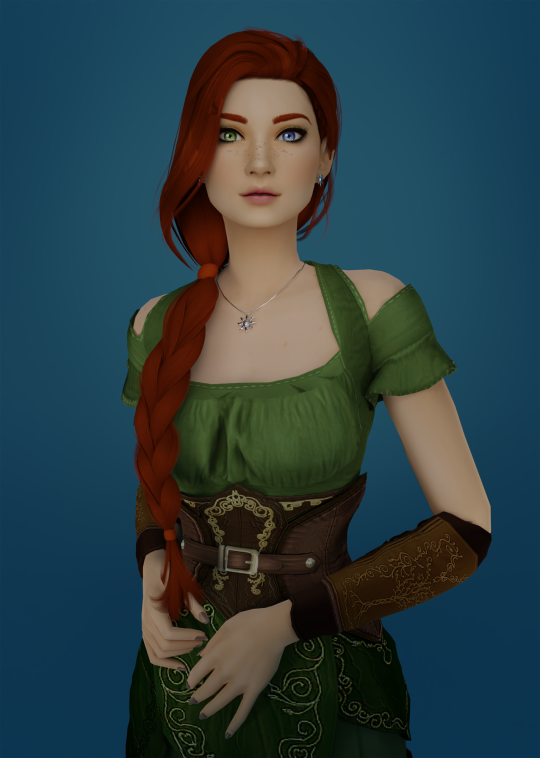
finished peek at bangs in-game on sim rey
(👇^^)

23 notes
·
View notes
Text
Blender: Which Buttons Do I press? (Part 1)
There are a lot of tutorials where you already need to know how to "do the basics" like "maneuver the camera." So this tutorial is focusing on the Buttons- not on the sculpt or the object, just on the buttons and shortcuts that I personally use in Blender.
Note: You will need a mouse with 3 buttons / scroll wheel for this.
Before we start, I'm going to explain which shortcuts I use in this, but, not to make myself redundant, there's a shortcut for seeing shortcuts: Press Spacebar + Shift to see all available shortcuts in each mode.
I'm using Blender 3.6 for this tutorial. I recommend you use the same. It's completely free and has a lot of great features! For this tutorial though, 3.4 will likely work as well.
Click "General" under New File.
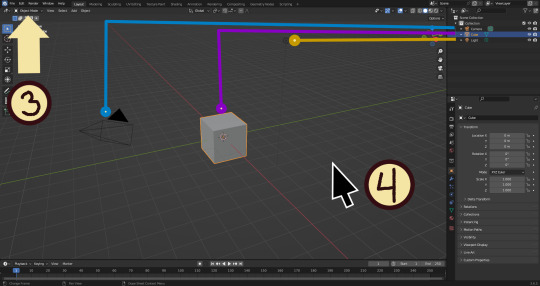
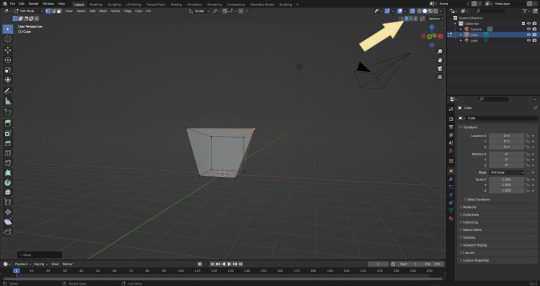
Your screen should look like this. There are 3 default objects in the file: Camera, Cube, and Light source.
3. This bar indicates that you are in Object mode. This menu will allow you to go into other modes depending on the object you have selected.
4. Lets talk about shortcuts. You can zoom, rotate, and move the screen using buttons at the top right, but I haven't marked those because I will teach you a better way. Feel free to click them all and see what they do, but I assume you're here because you don't want to explore every button in this godforsaken program the hard way.
Below, the Left and Right buttons are marked as a reminder as well as the Middle button which is also the scroll wheel (press down to click it)
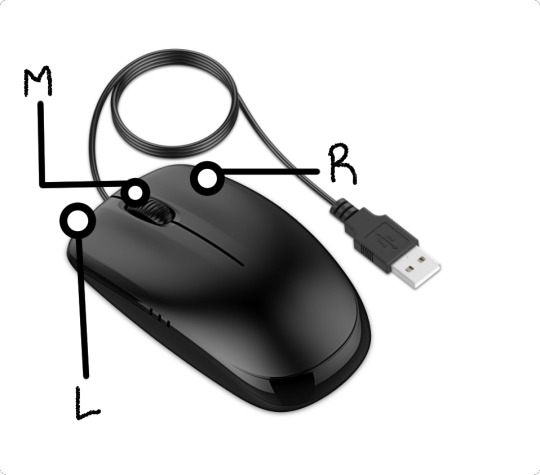
Left click: Select an Object Left click and drag: Selects multiple objects Scroll Wheel: Zoom in and out Middle Click and drag: Rotate your view Shift + Middle Click and drag: Move your view Right click: Brings up a menu that won't be relevant here. Shift + Right Click: Moves the 3D cursor. Not important for this tutorial, but I do it on accident a lot. Hit Shift + C to reset the cursor and also to reset the viewer position to see all objects at once.
Move the viewer around as practice! You're gonna need to do it a lot while modeling. If you have a keyboard with a Numpad (the calculator-looking thing on the right side, says Num at the top) you can use Numpad 1-9 to automatically adjust the view to front, left, right, backwards, and different angles. If not, test out the rotate tool at the top right which does something similar.
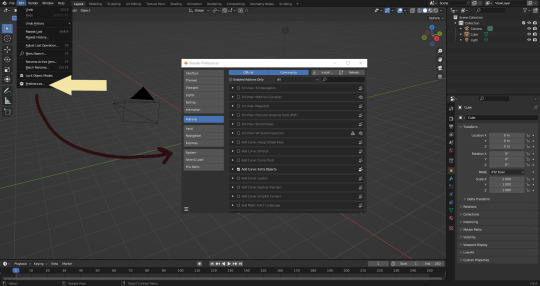
There's a helpful menu I use to switch between Modes (if you hit the dropdown menu where it says "Object Mode" you can do this without the shortcut); click Preferences to enable it.
Hop over to the Keymap section and check "Tab for Pie Menu"

And then close the window. No "Save" button is needed.
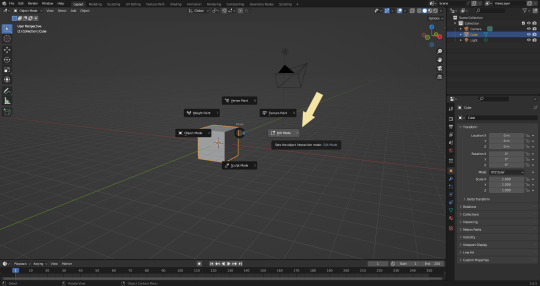
Now that you have the shortcut enabled, select your box with Left Click, hit Tab and Left click "Edit Mode"
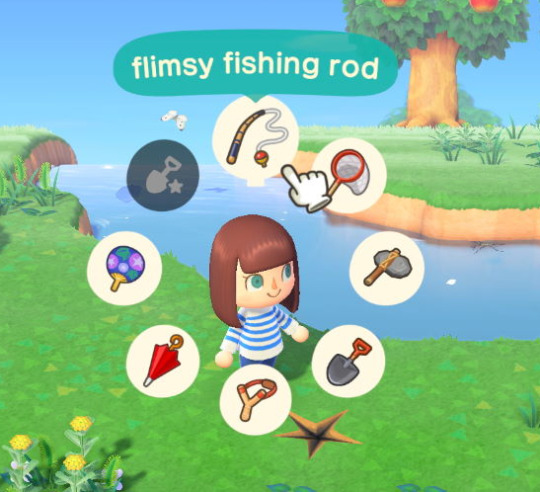
And yes, this is just like the Animal Crossing tool ring:
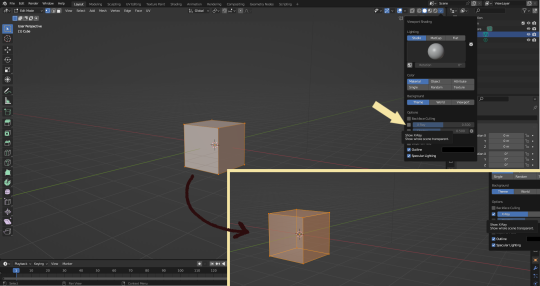
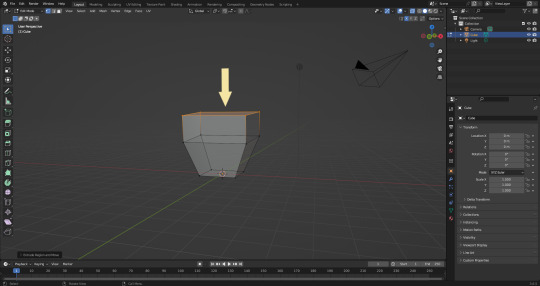
Now that you're in Edit Mode (You can swap back anytime by hitting Tab -> Object Mode), click arrow at the top right to open a menu where you can check the "X-ray" box. You'll be able to see through your cube. As a reminder, Spacebar + Shift will show you the available shortcuts in this mode, but I'll go over the important once momentarily.
What is a 3D object made out of?
This box is made out of vertices, and each face of the cube has four vertices at each corner- a triangle with three vertices also works, but we'll stick with squares for this tutorial. Moving the vertices will change the shape of the box, like a piece of stretchy fabric over a wire frame.
From now on, I'll be calling the vertices dots, because I hate reading and typing the word vertices over and over again.

5. By all means you can fiddle with the buttons over here but I'm gonna show you the shortcuts I use and the buttons you'll actually need. Don't get intimidated by the amount of buttons. Also press the T key and the toolbar will go away!
(Seriously, though, feel free to play around in this section as much as you want to, but we'll go over the shortcuts a few at a time with examples. at the end of this section will be a summarized list.)
6. Left Click one of the dots and press the G key. You'll see below a whole bunch of additional shortcuts show up at the button. Here are the ones I use:
G key: Grab and move around the dots
R key: Rotate two or more dots*
S key: Size two or more dots*; if two dots are selected, the distance between the dots will change but the angle between them will stay the same.
*Left Click and drag to select multiple dots!
CTRL + Z to Undo edits.
When you move a dot with the G key, imagine that the dot is against a piece of glass at a fixed point ahead of your viewer. The dot will not move farther or nearer to you, but will instead move parallel to your view.
As an example, if you press Numpad 1 and view the object from the front (The -Y green circle will be at front and center in the rotate tool), the dot will only move left and right (X axis) and up and down (Z axis). It will not move farther or nearer on the Y axis by default.
Play around with the G, R, and S tools before moving on.
This little X button at the top right will turn on symmetry. You don't need to use this, but it can be useful.
Left Click and drag so that an entire face (flat square) is highlighted and then press the E key to extrude. Extruding will add another set of dots that are automatically connected to the first set.
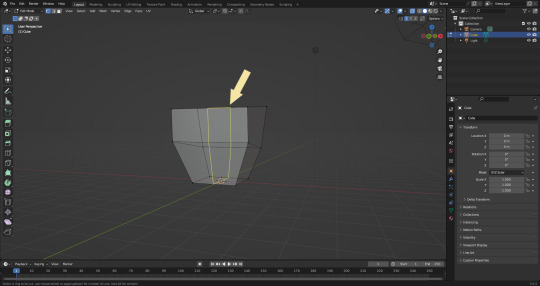
Ctrl + R adds a loop cut. This will divide the existing faces into two and add more dots. You can also drag loops to slide them to different positions.

The 3 key (not on the Numpad) will switch your Select Mode to Face Select. This is useful for extruding. Essentially it is simply selecting all the dots at the corners of the squares.
The 1 key will switch back to Vertex Select (or Dot Select) mode and the 2 key will switch to Edge Select (the least useful of the three, to me)
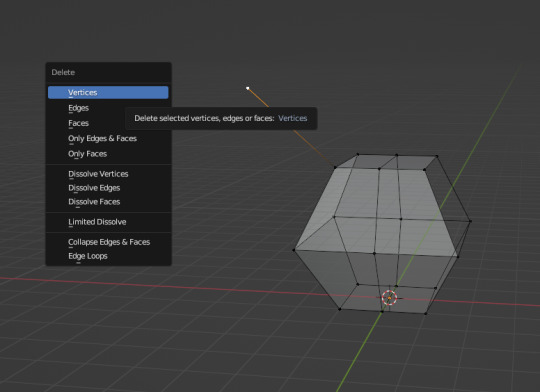
Before we go wild, there are a couple of additional things to know. For the tutorial, focus on working with faces, not vertices. If you accidentally pull a single vertex, select it and press the X key to delete it.

If you want to add shapes, I recommend sticking to cubes for now. Ctrl + A will open the Add Mesh menu and you can add a cube. Feel free to have complete cubes overlap for this tutorial.
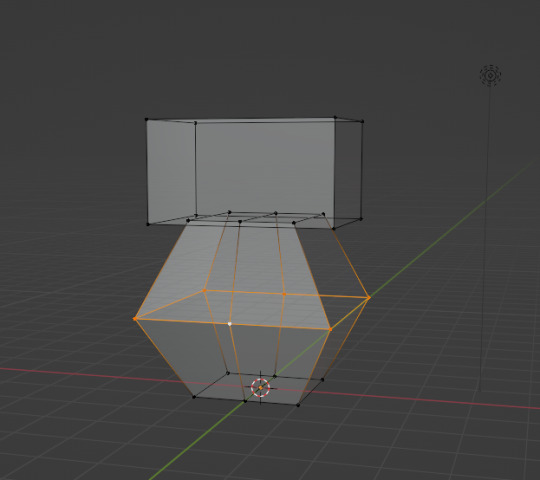
Double Left Click will select a series of dots connected in a loop, and can be helpful for selecting areas all at once.
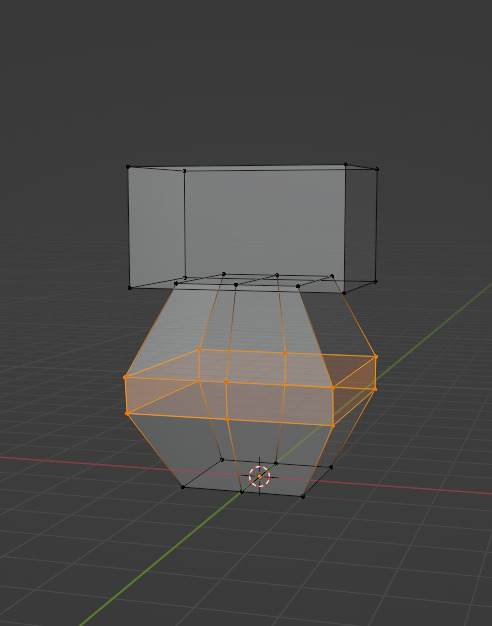
Ctrl + B is the bevel tool, and when a loop is selected it can turn it into two.
Here is a summary of all of the Edit Mode shortcuts:
G key: Grab and move around the dots R key: Rotate two or more dots* S key: Size two or more dots* *Left Click and drag to select multiple dots Double Left Click will select a series of dots CTRL + Z to Undo E key to extrude faces Ctrl + R adds a loop of dots Ctrl + B splits one loop into two X key -> Vertices to delete dots (vertices) 1, 2, 3 keys to switch Select mode Numpad 1-9 to move viewer automatically Ctrl + A to add a shape
Go play with them. See you back here in a while.
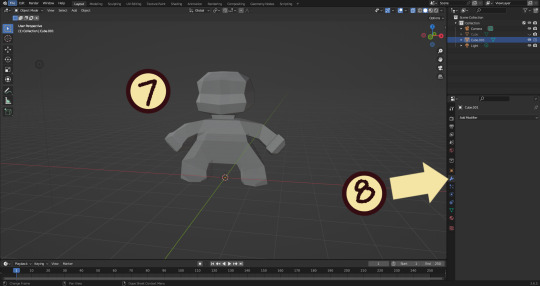
7. I used a single cube to make this figure. It's still very blocky, but that's fine. Loop cuts created additional faces which were extruded to create arms, legs, and a neck. Definition to the face was added by selecting individual dots. Remember, Ctrl + Z (undo) is your friend!
Once satisfied with the shape you made - a boxy figure or object is fine- continue on.
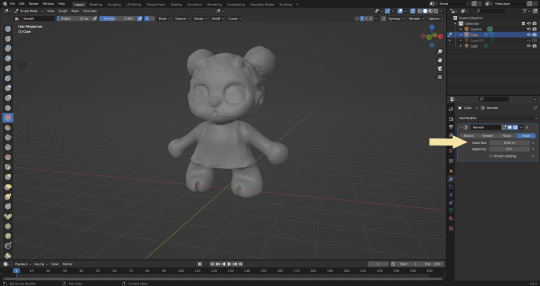
8. Press Tab -> Object Mode. Turn your attention to the right hand bar and make sure the Wrench button is selected. Note the Add Modifier Button.
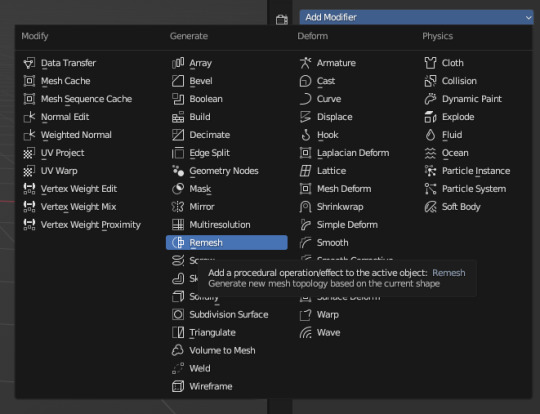
There are a heck of a lot of buttons here that you don't have to worry about- just select Remesh.
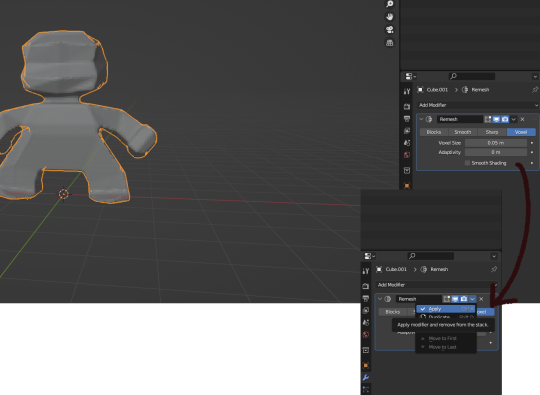
Change the number under Voxel Size to .05m by Left Clicking and typing it (there is a slider, but I find this causes lag). Then, apply the remesh by clicking the down arrow and selecting Apply.
Your figure should be shaped similar to before, but have a slight "graininess". If you have added multiple cubes, it will seamlessly merge them into one. The smaller the Voxel Size you put, the more dots will make up your object. However, I suggest starting with something in the .03-.06 range. We will refine this later.
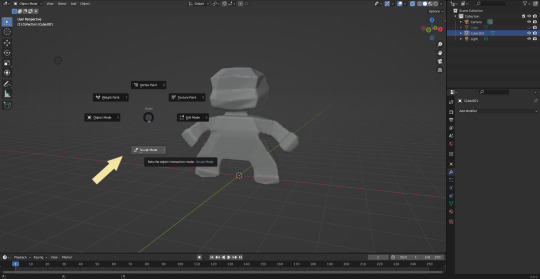
Press Tab and select Sculpt Mode.
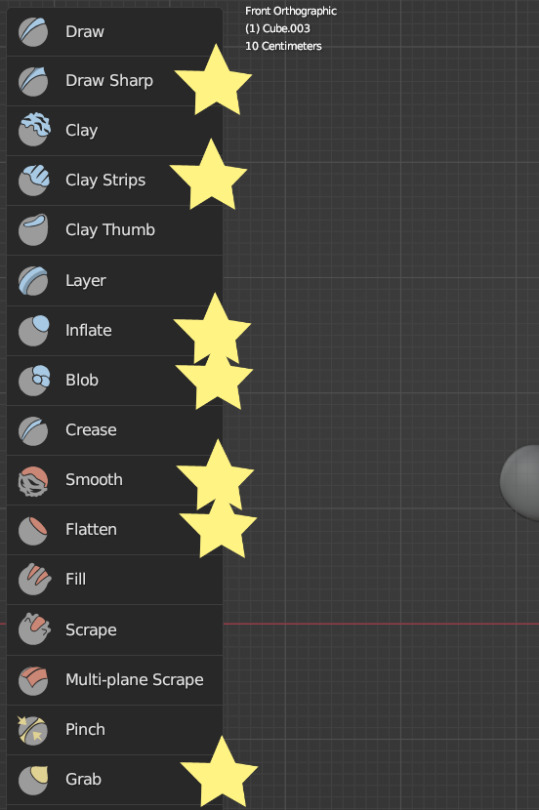
This is a mode where I actually use the tool bar for modifying my sculpt, as there are a lot of brushes . The icons show roughly what the brushes do using small icons (note on adjusting this below)
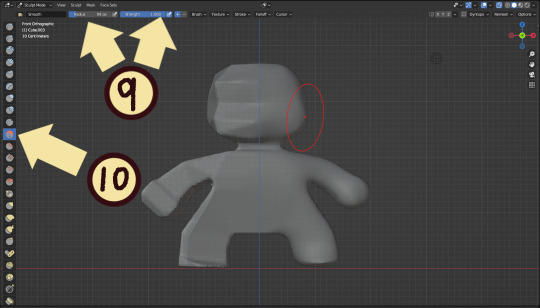
9. Observe the Radius and Strength bars, which will adjust the... well, the size and radius. Note that although the "brush" looks like a flat circle, the affected area is actually a sphere. Select a brush with Left Click and Left Click and drag on the sculpture.
10. This is the smooth tool. I have smoothed out the right side of this figure. Note that I turned off symmetry to do this, but i usually have X-axis symmetry selected.

Although I am used to the small buttons, there is a way to change them. Hover near the toolbar to Left Click + Drag so you can see the names. Hold Ctrl + Middle Mouse button and drag to resize. You will be able to make the size of the menu much larger. This goes for many of the menus in Blender.
The above arrows point to the symmetry button (Top right) and Grab brush (bottom left). The Grab brush uses the shortcut G Key.
The lines point to which tools were used for each part of the sculpt. The Draw Sharp tool was used to mark out eyes. Clay strips made the hair texture. Round cheeks were added using the Inflate tool and a nose (and buns) were added using the Blob tool. The aforementioned Smooth and Flatten tools were used judiciously to remove sharp edges.
I don't have a shortcut list for you here, but here are all the tools I use the most:
You can hold the Ctrl key while using the brush to reverse its effects. For example, if you hold the Ctrl key while using the Inflate brush, it will deflate the shape instead, creating a concave shape.
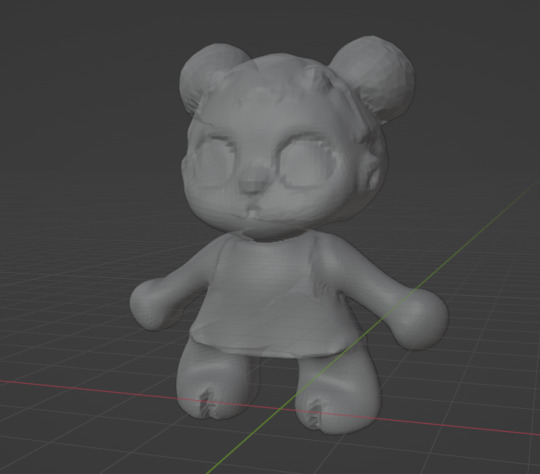
As you can see, my figure is getting a little grainy. So, we're going to remesh this model again and add more dots and therefore detail.
This time, we're putting the Voxel Size to .01m. Apply the remesh as before. Now we have more dots to work with and we're just repeating the process, smoothing, and sharpening the lines.
I was going to add a bit about how to take a photo of your sculpt, but I ran out of photo space. I will add a reblog with this information.
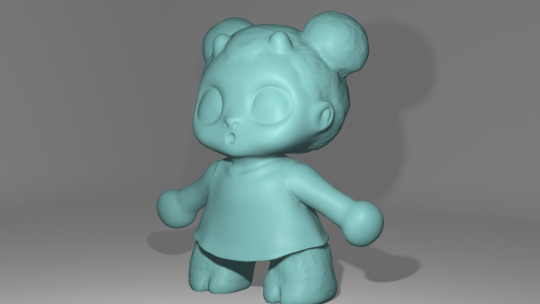
I came up with this little lamb character on the spot because the clay strips created a nice texture. She's by no means perfect, but she did turn out pretty cute so i might make a cleaner version later on.
64 notes
·
View notes
Note
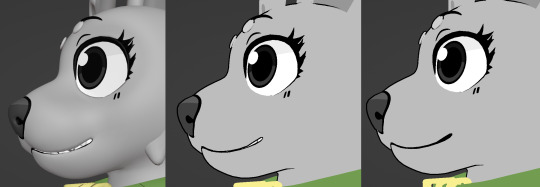
How do you do your mouths? they always seem to be very tricky for me, especially moving the teeth with the jaw for viseme blendshapes
Ooh! So, I have 2 separate workflows I do for mouths but they're both kinda the same workflow. Something that may help more than anything I'd write is my second youtube channel where I have some timelapses uploaded
Visemes first though before I get into modeling
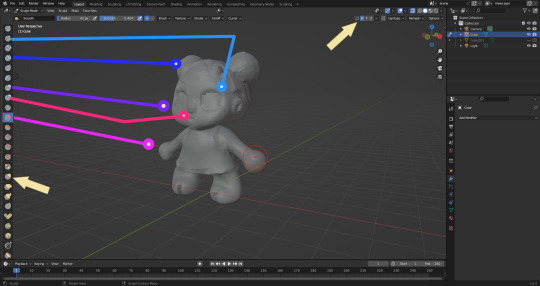
for lip sync, the first thing I do is make an AA / Jaw open shape key. I set up an empty where I want the jaw rotation to be, and i set my 3D cursor there + set my transform pivot point to 3D cursor. (Knowing where to put the jaw rotation spot is kinda tricky and takes some fiddling around) Once I get the mouth where I'd like it to be, I rotate the teeth and other mouth parts as well on their own AA shape keys
After that I use AA to make the OH viseme, and I make the EE viseme. Then, I combine those three and do extra adjustments to create OO, FF, TH, CH, and PP/MM. You can do all lip sync from just those. For VRChat, I generate visemes in the CATS blender addon and then I delete any of the visemes it generated for ones I've already made (OO,FF,TH,CH,PP) and replace them with mine, because they look better than the auto generated
More info on modeling below!
I usually leave a bit of a gap between the lips. If the outlines don't fill that gap entirely, I make a mesh that fills in that spot
So for the actual modeling I have 2 methods:
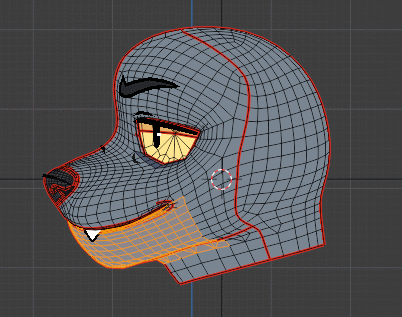
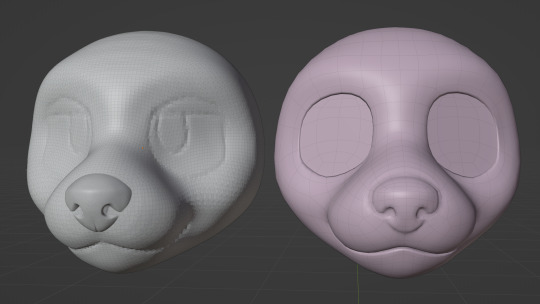
The first and primary way I do things is I trace out the mouth outline from my refs with verts, and adjust it to match the front and side view
and i just start extruding and filling in until I get a head mesh
(btw this is @pumpoen's fursona/ref art)
the second way i do things is i make a super rough sculpt, and I retopologize it! But I also combine the retopologized mesh with my first method for the eye area, because I've found that I can't really get a sculpt perfectly accurate to a 2D ref
Hope this was helpful! Sorry If I didn't go into enough detail :o
67 notes
·
View notes
Text

Beginner Blender Tutorial Basic Render: Part Three (Adjusting Render Settings, Adding Lights, and Rendering!)
(Continuing from Part Two)
Step 1: Adjusting Render Settings
I exclusively render in Cycles, and though I'll be doing some Eevee runs for the sake of tutorials, I'm going to share what I know today and show you how to set up a Cycles render the way I do
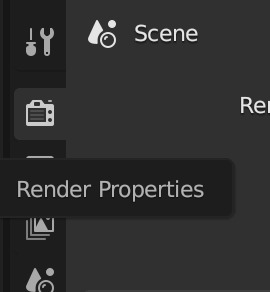
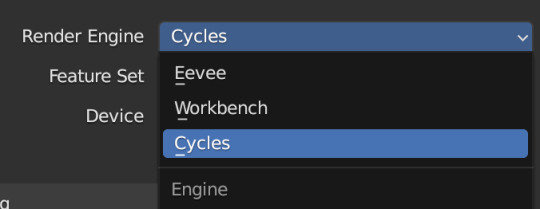
Navigate to Render Properties and select "Cycles" in the Render Engine dropdown

If you have an older system, leave CPU selected If you have a newer or beefier computer, select GPU complete I render on a MacBook Pro, so I'll select GPU
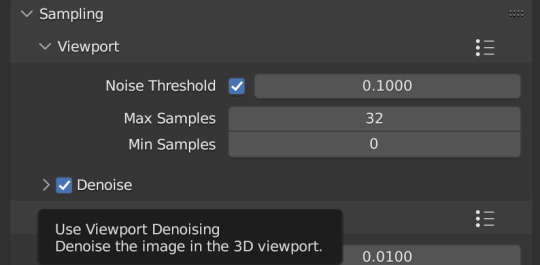
Under Sampling -> Viewport, make sure you click on the Denoise, this will clean up our render preview so we can more easily see what the final result will look like

Under the same Sampling tab, adjust your Max Samples to match mine (32 in the viewport and 128 in the render window, this will speed up your render time)
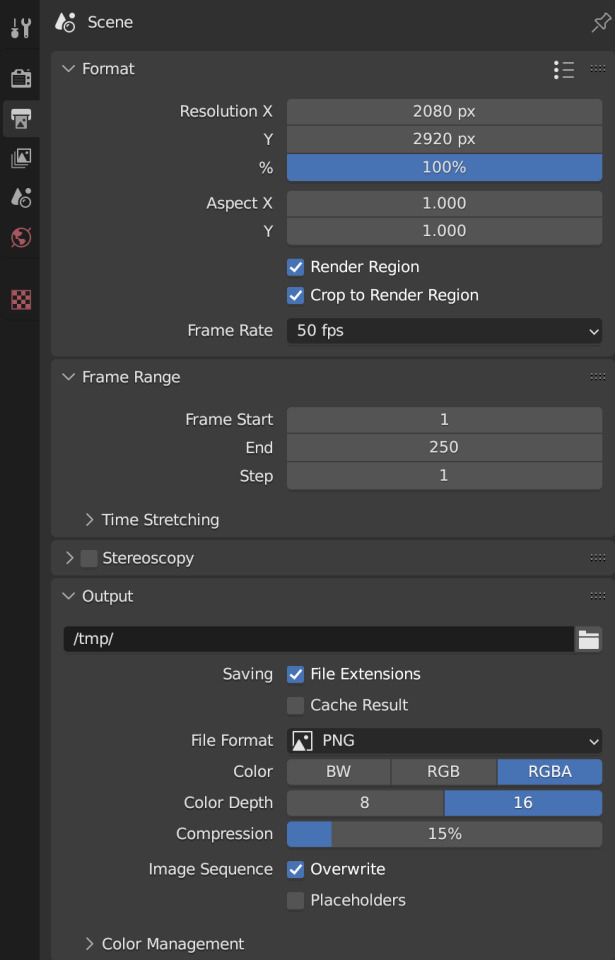
Click into Output Properties and select "Render Region" and "Crop to Render Region", and change the frame rate to 50fps In the Output tab, change the Color Depth to 16 Nothing will change in our 3D Viewport, but the settings are ready to go
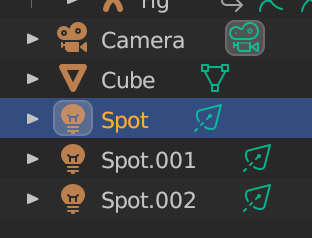
Step 2: Adding Lights
Right now, if we were to change our mode to Rendered, we'd have nothing but a black box. This is because our sim is in a cube with no light source Let's add some lights! For portraits, I like to use a combination of Spot and Point lights You add in lights the same way you add in the camera and the cube, either by clicking "Add" in the top menu or with Shift+A on your keyboard and selecting Light -> Spot or Point I'm going to add a Spotlight first I like to add in lights in Rendered view, but be careful using rendered view as it ups the chances that your Blender will crash

I added in a spotlight but it appears that nothing happened Objects are added into Blender at the Cursor point. I never adjusted mine so it's at the center of the axis, meaning below my sim's feet and outside of the box Using G and X,Y,Z, I'm going to move my spotlight up
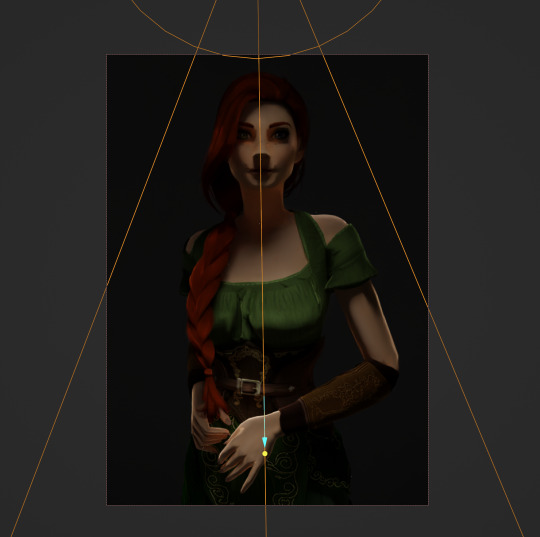
Now the light is above her, but I want it shining on her, so I'm going to rotate it forward Rotate objects using the R key and X,Y,Z directions on your keyboard
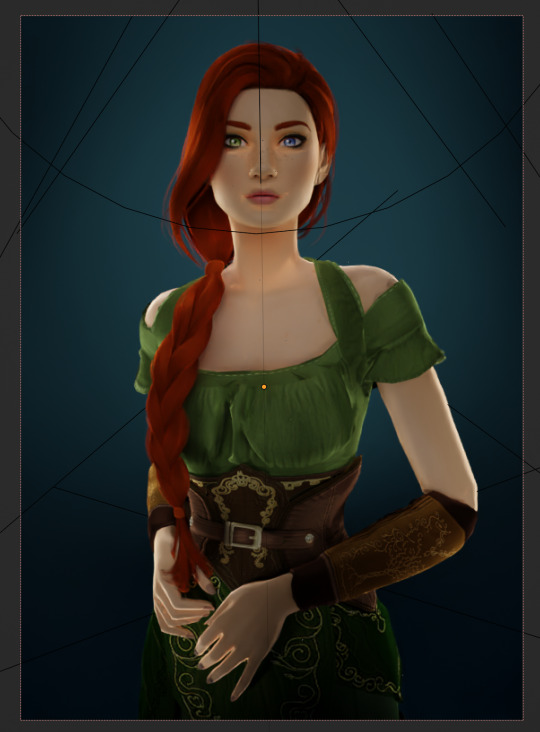
That's not bad, but I want more dynamic light. I'm going to add two more spotlights for 3 point lighting
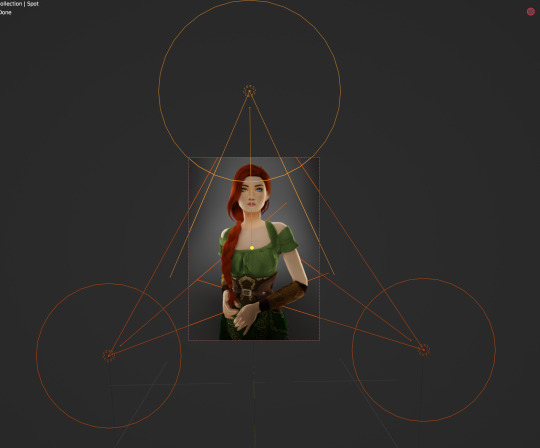
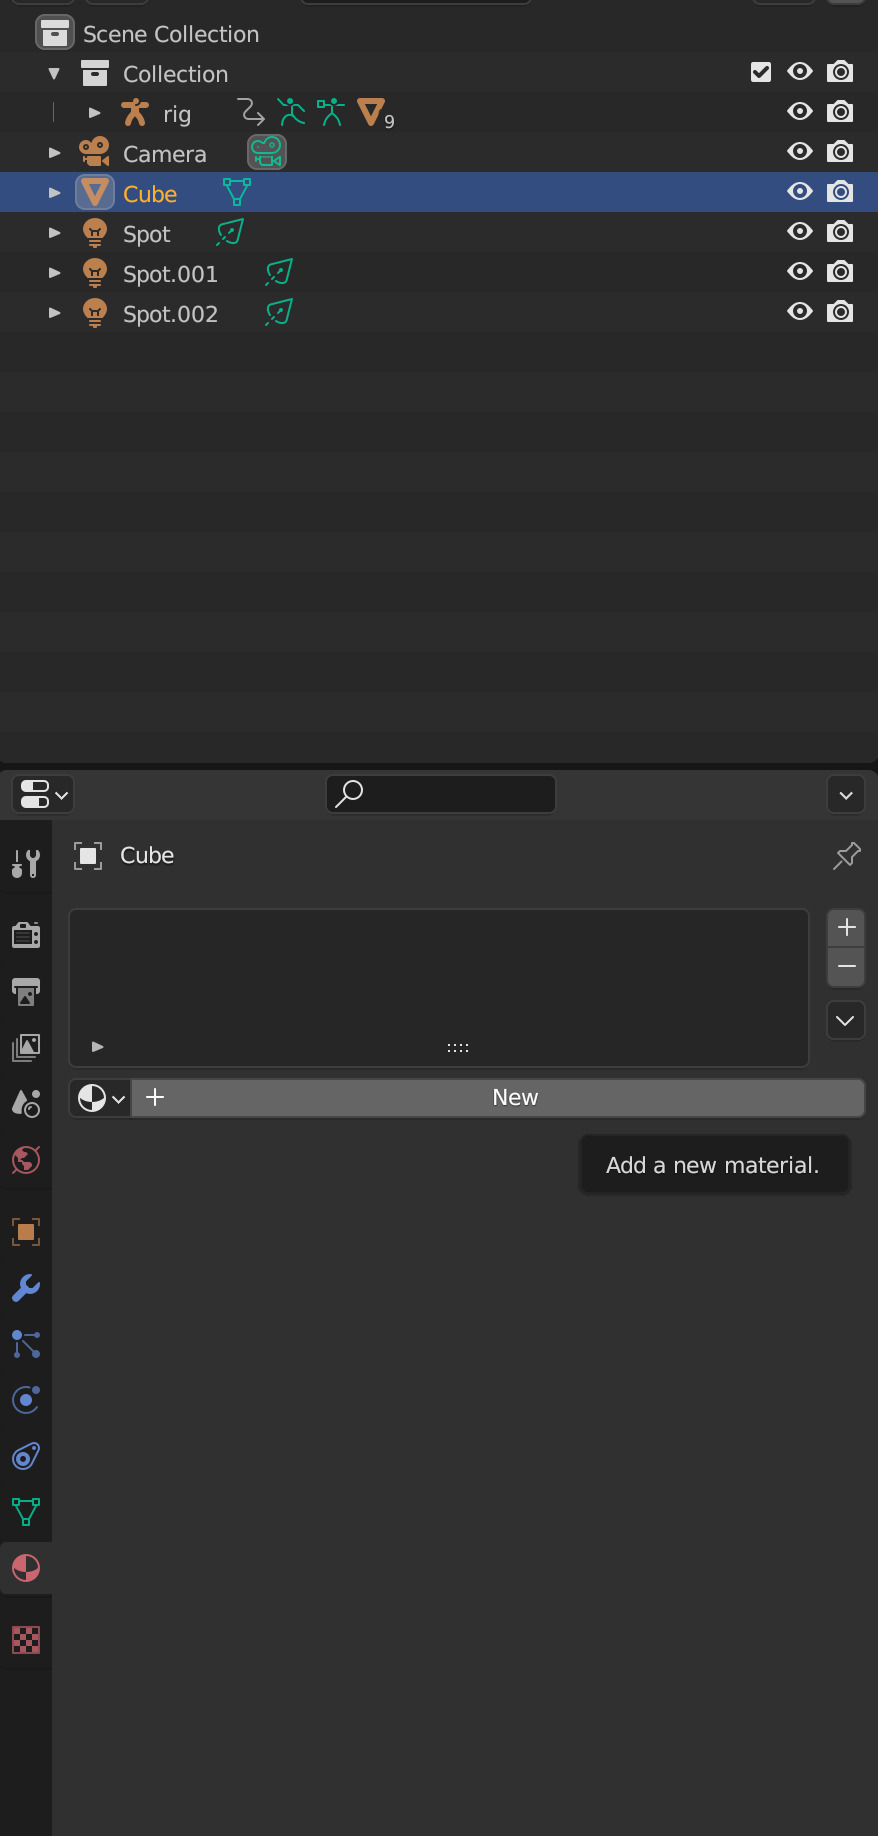
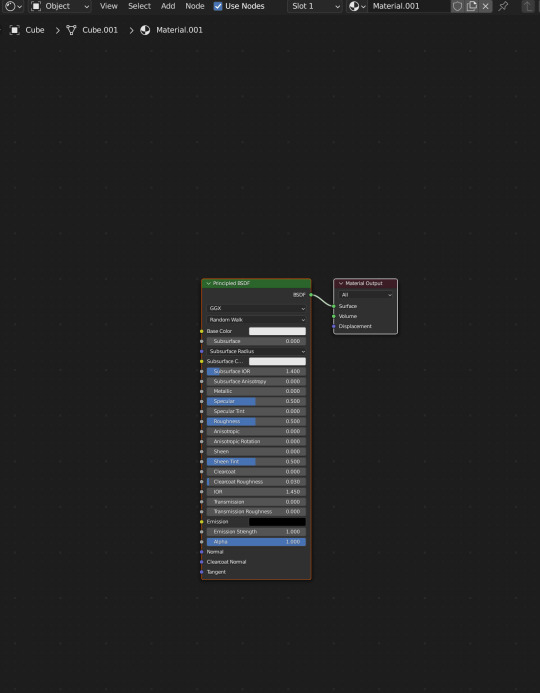
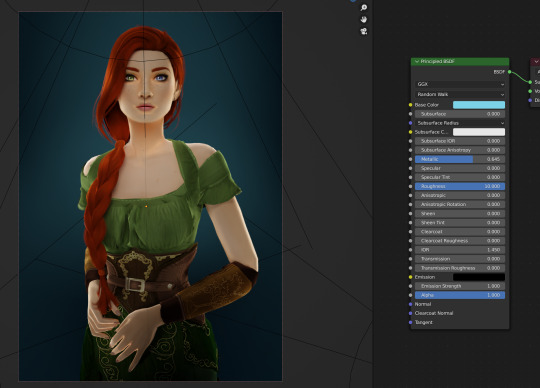
This is looking better, and you can see where my lights are and how they're oriented Now let's adjust the background Select your cube in the Outliner panel and navigate to Material Properties Click "new" in the bar Then navigate to your Shader Editor window and you'll see a Principled BSDF Node is here
We're not going to do anything too fancy here, just change the color of the cube and some aspects of how it looks Change the color of your box using the color wheel then adjust your nodes to everything is set to zero except roughness
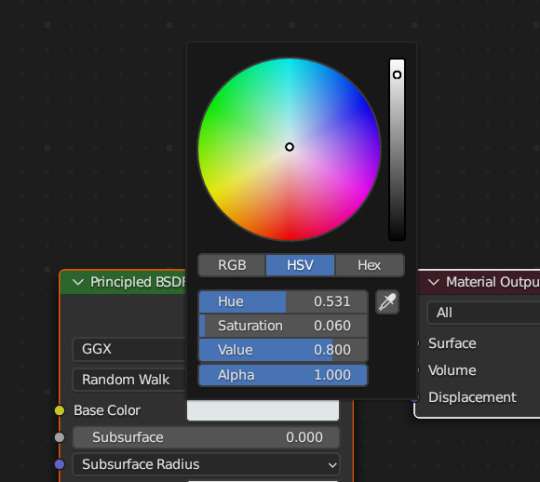
You should have something like this (of course use whatever color compliments your sim best)
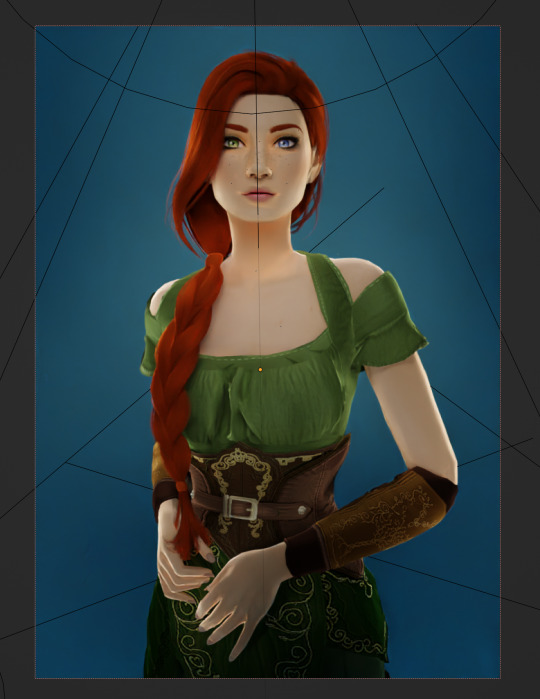
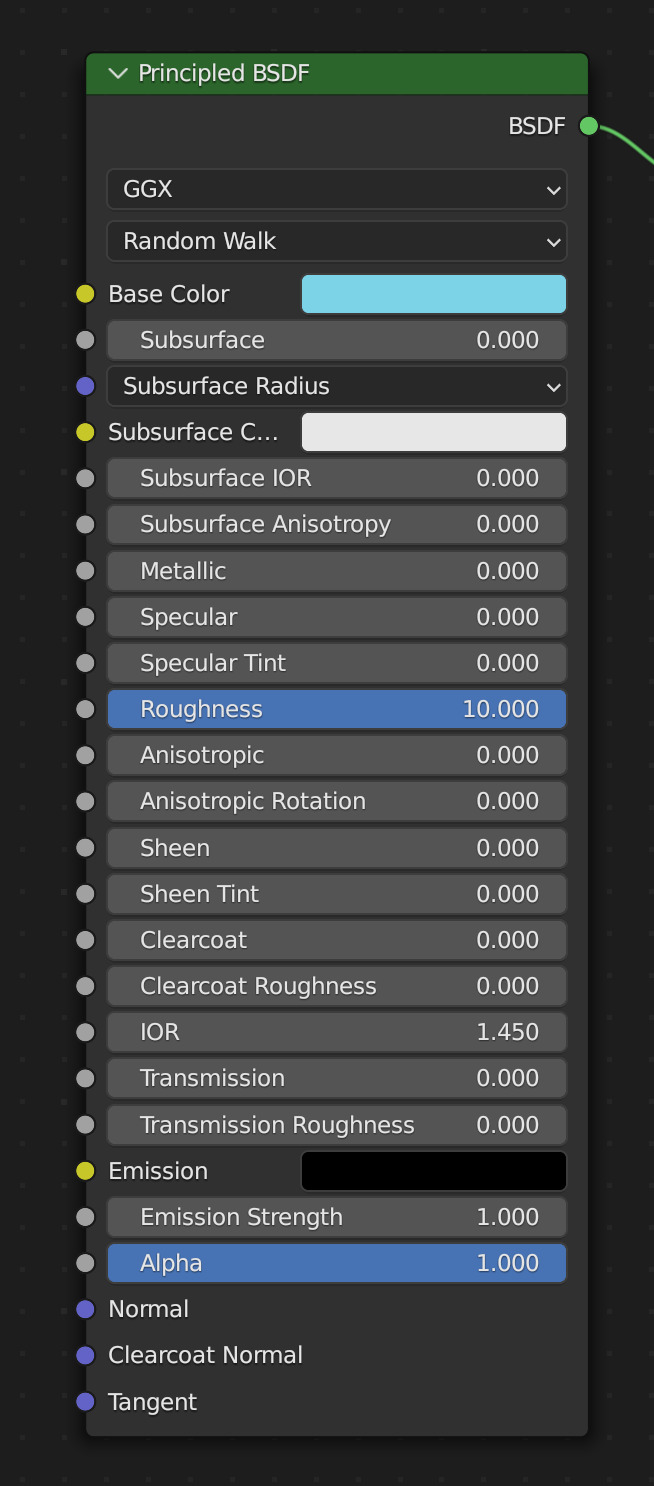
I don't want the background to be super flat, so I'm going to adjust the Metallic value on mine Now I have this:
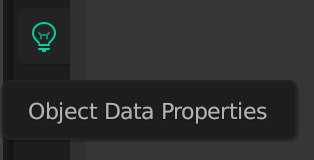
I like the lighting but I think it might be a little too bright Let's adjust it a little In your Outliner panel, select one of the spotlights then go to "Object Data Properties" (the little lightbulb)
I'm going to adjust the Power to 5 and click off multiple importance and click on shadow caustics, like this:
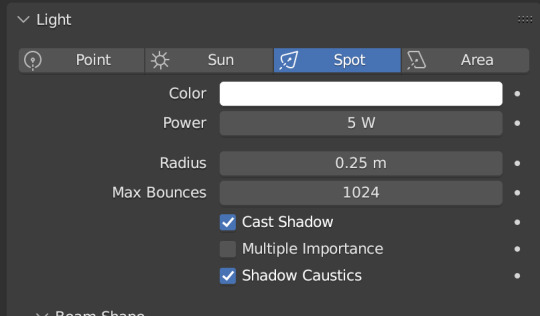
Do the same for all three spotlights and you should have something like this:
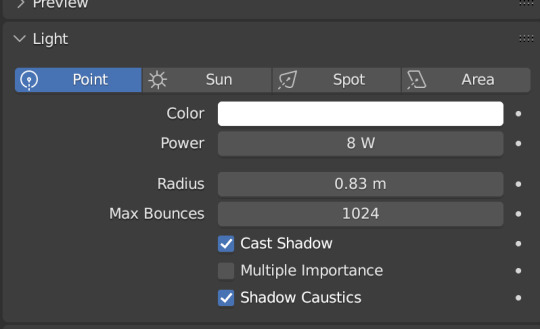
That's better, but let's draw attention to her face with a Point light Add in a point light the same way as a spot (shift+A, light -> point) or Add in the top bar) and move it in front of her face
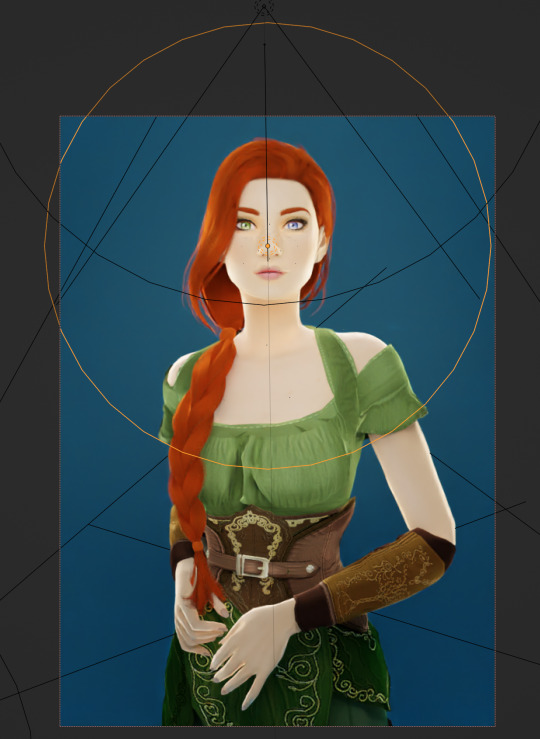
This is obviously way too bright, so let's adjust it like we did for the spotlights I've changed the radius and adjusted the power to 8, as shown here:
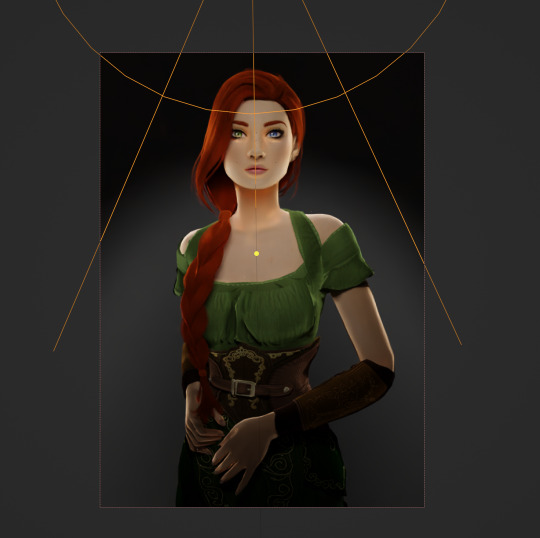
Here's the result:
That's much better! Normally at this point I would probably change her hair and add in jewelry and make minor adjustments to this and that, but for the sake of this super simple beginner render, we're ready to go! Before you run your render, save this file somewhere easy to find. I'll be using the same file for future tutorials!
Step 3: Rendering!
Once you've done all the setup, rendering is actually super easy Make sure you switch your 3D viewport back to Material Preview (rendering while in rendered mode has a tendency to make blender crash) Then go up to the navigation bar and select Render -> Render Image
A new window will pop up, and your render will begin!
Rendering time will depend on how complex your scene is and how many assets you've added in. Ours is very simple so mine says it'll take about 6 minutes
And it's done! Save your render and either post it or edit it in your favorite photo editor!
UPDATE 7/17/23
As you can see, my render was looking very glowy. I didn't know why (there was no glare node in the compositing settings or anything that would cause this, or so I thought), until I adjusted the roughness values on my sim.
Now it looks like this:
So if yours is looking glowy, adjust the roughness to 0, then back up to 10 and that should fix it!
Homework:
Your Render School homework is to create a simple portrait render using these tutorials and tag me in it! I can't wait to see what yall make!
Please leave any questions in the comments below or send an ask and I'll help as best I can!
Happy Rendering!
#salemsims tutorial#render school tutorial#sims 4 render#tutorial#sims 4 blender tutorial#blender#render tutorial#sims render tutorial
64 notes
·
View notes
Note
do you fw my blender table + 3d cursor
yeah
2 notes
·
View notes
Text
Porting Models from Dragon Age: Inquisition to Dragon Age: Origins or Dragon Age 2
Part 2b - Into Origins
Tools needed: Blender 2.49b Blender ImportExport Script GDApp The DAO Toolset OR pyGFF and TlkEdit
Make sure you have the ImportExport script installed correctly (all the files dumped into the same folder as Blender.exe), and open DragonAge_tools.blend. (Blender uses a lot of shortcut keys, so if you're unfamiliar, you might find it useful to go through a Blender tutorial)
By default, Blender will open with 4 windows: a 3D viewer in the top left, a buttons window in the bottom left, and two text windows on the right. In the upper left, use the File menu to import your DAI obj(s), setting 'Clamp_Scale' to 0. (if you haven't yet extracted your model from DAI, see Part 1 of this series)
Then right-click in the upper text window, and hit 'execute script'. Select 'MSH Tool' and browse to wherever you've extracted Origins mesh files.
Select a mesh that's similar to the one you're porting, and click 'Load MSH'.
Click 'Import as mesh'.
You'll need to adjust the Inquisition mesh to roughly the same proportions and pose as the Origins mesh. This is something that takes practice, and a lot of trial and error.
A couple little tips for armor/clothing: -Do all your adjustments in Edit Mode. -First scale (S) the entire mesh on the Z-axis so the neckline roughly lines up. -Then scale and skew (Ctrl+S) so that the fingers match up. You might need to adjust the arms separately from the rest of the body for this. -Skewing works from your viewing position, so to skew on the Y-axis, for instance, you must be viewing your model from the side. -In general, you want to make the major joint areas (shoulders, elbows, knees, hips) line up as best as you can. -Rotating a group of vertices around a single vertex can be very effective: Select that vertex, then do Shift+S, Cursor to Selection. Change the pivot point by clicking on the pivot box (two to the right of the 3D mode selection) and choose '3D cursor'. Box-select the vertices you want to rotate with B. (if you miss some, hitting B again won't remove the ones you've already selected; it will allow you to add more. Also, hitting B and drawing the box with the right mouse button removes enclosed vertices.) -I usually alternate the pivot point between '3D Cursor' and 'Median Point' a lot. -You can rotate around a specific axis and to an exact degree with keyboard inputs. For instance "R, X, 10" will rotate your selection on the X-axis by 10 degrees. This is especially useful when you're trying to keep limbs symmetrical. -'Shrink along normals' (Alt+s) is another very useful function for widening/slimming cylindrical areas, like arms & legs. -Check the model from all sides before moving to the next phase! It's always annoying to find out later that a few random vertices are sticking out weird, and got badly weighted as a result.
Once your mesh is adequately adjusted, it's time to add some weights.
Switch back to Object Mode, and select the DAO mesh, then your DAI mesh.
Find and click the 'Scripts' button in the upper right window. Click on 'Object', then 'Bone Weight Copy'.
Change the quality to 3 or 4, and hit OK. (if you're making LODs, using a quality of 1 is fine)
Wait. And wait. And wait. Seriously, this can take several minutes. You can tell it's working by the red to green progress bar at the top. If nothing happens, you likely didn't select both meshes, or both meshes already have weights.
Eventually, the weight copy will finish, and you can check how it did. Move the DAO mesh off to one side, select the DAI mesh, and then change the 3D viewer to Weight Paint mode.
Hit F9 to change the Buttons window to the Editing tab. Use the Vertex Groups box to go through the bones one-by-one, and make sure they all look reasonable. (unfortunately, they're numbered, not named, so that makes things trickier)

Mostly, you want to check that certain areas aren't trying to move when they shouldn't. Common culprits are the elbows getting a bit of weight from the chest bone(s) and vice-versa, or adjacent fingertips getting weight from each other. This is another one of those 'trial and error' things. You might find it helpful to switch back and forth between the DAO mesh and DAI mesh, going through the bones at the same time for comparison.
The weight paint brush can be used to subtract unwanted weights, or add weights where needed. You'll have to play around with the brush settings to your liking (I suggest starting with both weight and opacity at 1/2).
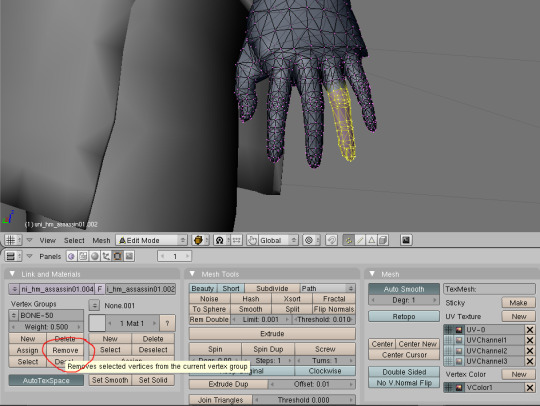
You can also switch the 3D window back to Edit mode, select vertices that shouldn't belong to the selected bone, and then click the 'Remove' button under the Vertex Groups box. MAKE SURE NOT TO HIT 'DELETE'. That can seriously mess things up.
Once you're done playing with the weights, it's time to get ready for export.
Minimize Blender, and put a copy of the vanilla mesh you used for weighting in a new folder. (the export script works by overwriting the info in a vanilla file. Don't want to mess with the original!) Also copy over the corresponding mmh & phy while you're at it.
Go back to Blender, execute the DragonAge_Tools script again, and hit the MSH Tool button. 'Browse' to your copied vanilla msh, and load it.
Instead of importing this time, you're going to make sure your ported mesh is selected in the 3D window, and then click the yellow-outlined 'Replace' button in the script window.
Then make sure the submesh (also called a "chunk") you want to replace is selected (for armor and clothing, there'll probably only be one, but with hairstyles you'll want to replace 'HairM2'), and click 'Replace chunk'.

Click 'Save filename' to confirm.
If the replacement failed, the most likely cause is that you have unweighted vertices. Finding them is frustrating, and I'm sorry. There's no easy way in Blender 2.49; the quickest way is to save your file, and reopen it in a newer version of Blender that has a "Select Unweighted Verts" function. Moving it to a new version of Blender, however, has a chance of scrambling your UV map.
Now you'll want to minimize Blender, and navigate to your overwritten vanilla msh. Unless you're making a replacer, rename the files to something unique.
It needs to start with a race/gender code (hm = "human male", hf = "human_female", and so on), and end with "_0". See Bioware's naming conventions for reference.
Open up all three files with either the DAO Toolset or pyGFF. Rename each instance of the vanilla file name with the new file name. (no need for the filepath like in DA2, thank goodness) If you're using pyGFF, you'll need to make sure to hit 'Save' in the bottom left after every change.
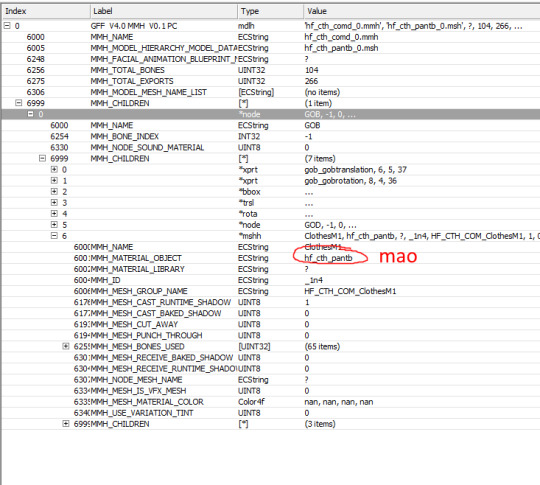
In the MMH, also expand MMH_CHILDREN, GOB, MMH_CHILDREN, and then the bottom list, *mshh. MMH_MATERIAL_OBJECT refers to the mao, you'll need to replace the vanilla with a custom mao (more on that in a bit).
If you want, you can also change the chunk name under MMH_MESH_GROUP_NAME to match the new file name. If you do, make sure to change it in the msh as well. (there's a rare glitch where if you change between two pieces of equipment with the same mmh_mesh_group_name, the mesh will not change, leading to vanilla items appearing with custom models or vice-versa. It doesn't happen consistently, but it can happen) Also in the mmh, you may want to activate some lighting options: CAST_RUNTIME_SHADOW should be active by default; if it's not, change the 0 to 1. You can also activate CAST_BAKED_SHADOW, RECEIVE_BAKED_SHADOW, and RECEIVE_RUNTIME_SHADOW in the same way, but these are less noticeable if they're inactive.
Save your files.
Making a .mao file:
My tutorial for converting DAI textures to DAO using Paint.NET can be found here. If you prefer to use GIMP or Photoshop, I recommend these tutorials: magpie's for GIMP sapphim's for Photoshop
If all you want for now is quick placeholder textures, simply extract the DAI textures as .dds files. Use a text editor to open up a vanilla .mao of the same basic appearance (color & material matters most) and replace the vanilla texture names with those from DAI. Save the new mao with a name matching your model.
Put your msh, msh, phy, mao, and textures in the DAO override folder. If you're making a replacer, testing is as simple as opening up your game and equipping the right item.
If putting in a new unique model, you'll have to tell the game how to find it. Extract the variations GDA matching the item type (armor_heavy_variation for heavy chestpieces, clothing_variation for clothing & robes, etc).
Open up the GDA with GDApp, and delete all lines except one, which you'll use as a template (so don't use line 0).
Change the 'ID' entry to something (hopefully) unique.
Thanks to a weird quirk of UTIs, the highest number you can use is 256. If you already have a lot of equipment mods, you may want to look through the Item Variation ID spreadsheet (NexusMods, Google Sheets) to avoid GDA conflicts. The item variation GDA tells the game what mmh to look for. The modeltype, modelsubtype, and modelvariation columns are combined together, along with the race/gender code, to form the model's mmh (the final "_0" is ignored for this): hf_cth_comd_0 = (human female)_(clothing)_(commoner)(d) = (race/gender code)_(modeltype)_(modelsubtype)(modelvariation)
If you've named your mmh a bit different than the Bioware convention, that's fine, as long as you can break it up into those GDA columns. I don't think there is a character limit.

Now save your GDA, keeping the original file name but adding a unique suffix (for example "armor_variation_medium_edit.gda"). The file name cannot be longer than 32 characters, including ".gda".
Put your new GDA in the override as well, and open up the toolset.
Open up a local copy of the same type of item, click on Item Variation, and look for your new model. If it doesn't show up, the most likely cause is that your GDA is missing or its name is too long.
Change the item to your new model for viewing. If your model is not for human males, you'll need to change the race & gender at the bottom. For testing, I recommend now exporting the item (Tools, Export, Export without dependent resources), and consoling yourself the item in-game if you don't already have it. (model swaps like this are not baked into the save, so you don't have to worry about permanently messing up things)
If you're NOT using the Toolset, you'll have to change the item variation in an extracted UTI with TlkEdit, and then console yourself the item for testing.
If something doesn't quite look right, go back to Blender and experiment. You'll need follow the process for overwriting a vanilla mesh every time you edit, but you shouldn't need to redo the mmh & phy.
Common problems: -- Distorted/noodly body parts: used a mmh that didn't match the msh -- Model is mint green and t-posing: can't find the mao -- Textures are gray and/or shiny: can't find texture(s) -- Game crashes: bad msh export. Try exporting again, or compare it to a vanilla msh for errors -- Invisible model: wrong msh name in the mmh, or mismatched chunk names between the msh & mmh -- Won't tint: the chunk names in the mmh MUST be BootsM1, GlovesM1, ArmorM1, HelmetM1, ClothesM1, or RobeM1. Chunk names must also be consistent for all different race/gender variations of the same model, and any LODs.
The next tutorial will cover porting static meshes for either game, since it's the same process/tools for both.
4 notes
·
View notes
Note
Hey I’m trying to get into digital art and wanted to know if you know any good free apps for laptops that you would recommend?
hiya! :D krita is one of the best ones available rn since you can both draw and animate on it, i usually just use ibis paint on my phone but if i ever switch to my laptop krita’s one of my favorites (crumb cuptoast uses it too)
there’s also firealpaca but personally it’s not my favorite to use, and gimp which is basically free photoshop but it can be complicated and overwhelming for beginners (even if you’re used to photoshop) but if you’re looking for something similar there is photopea! (web browser only i think?)
i use ms paint 3D, blender, and block bench from time to time for 3D things but i think paint 3D is the easiest of all of them (it’s meant for work / school so it’s not the best program but it’s pretty neat)
honorable mentions: cursor.cc the website for making your own mouse cursor icon and whiteboardfox another website for drawing that’s just meant for work things (you get to draw with other people)
glhf!
2 notes
·
View notes
Text
Retopology and UV Unwrapping Basics
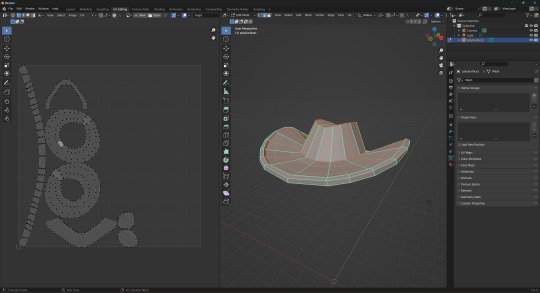
As I’m nearing the end of modelling my character I wanted to get the hang of retopology basics by practising on a very simple model. I chose to do this using the cowboy hat I made for my character and decided to retopologize it using Maya to expose myself to the software more.
I followed a basic tutorial by FlippedNormals on YouTube which went over the same process as Sean did during an earlier 3D workshop. The process:
Import the model and select ‘make the selected object live’ (this will make the object unselectable and the cursor will snap to its surface).
Select the ‘Modeling Toolkit’ in the top right of Maya; ‘Quad Draw’ tool.
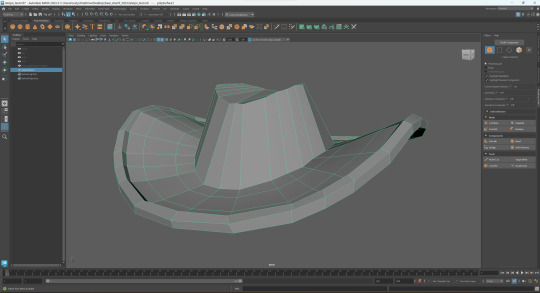
I then exported the lowpoly version and used Blender to UV unwrap the hat.
After this I exported both the low and high poly versions of the object and imported them into Substance Painter where I baked the UV maps.

The purpose of this exercise was for me to go through the process of retopology, UV unwrapping and importing into Substance Painter without focusing on the look of the object. The next step will be to practice texturing using SP.
2 notes
·
View notes
Text
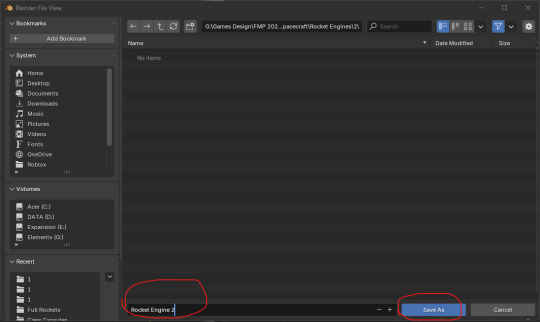
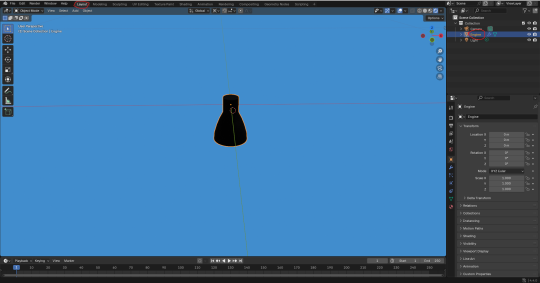
Separating the a engine into it's own file:
Firstly, to avoid accidentally saving over the separated rocket model, I saved the file as a new one. I named it "Rocket Engine 2".
Here, I deleted all the meshes I didn't need by selecting them and pressing the 'Delete' key.
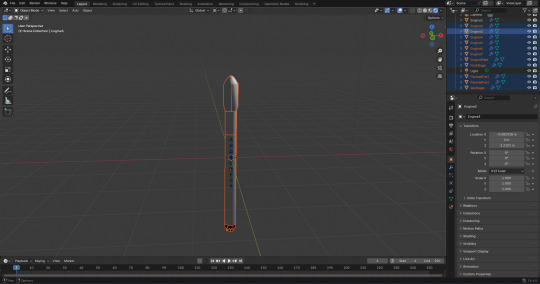
Next, I had set the engines position to 0 on the 'Z' axis.

After that, I clicked onto the 'Shading' window and changed the 'Shader Type' from 'Object' to 'World'.

From there, I added a second 'Background' box. I also added a 'Mix Shader' and 'Light Path' box. Next, I joined them together. I did this so that I could change the colour of the background without it effecting the model visually.

I looked at a blog post I made on the payload fairing models I made, and I copied and pasted the hexadecimal colour code that I used for the background colour. The code was '#0086FFFF'.

Once, I did that, I returned to the 'Layout' window and renamed the engine model from "Engine1" to "Engine". I did that so that if I was going to duplicate it for a future project, it wouldn't be called 'Engine1.001'. While I was thinking about it, it may have been an unnecessary step.
One thing I remembered about the payload fairing meshes is that I needed to apply the smooth modifier. As a result I located the modifier in the 'Modifiers'. From there, I clicked on the downfacing arrow icon and then on 'Apply'.

Here, I added a keyframe on frame 1 by pressing 'I'. I did this to essentially tell blender what position and orientation I would like the model to be in to begin with.

For the 90th frame, I had added another keyframe that rotates the model by 360' degrees on the 'X' axis.

However, it looked like it was facing a similar issue to the payload fairings.

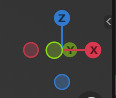
I then set the origin to the 3D cursor to see if that fixes the issue.
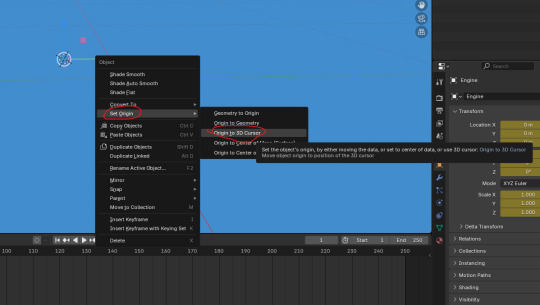
That had made it worse. In fact it was now even more like the problem with the fairings. As a result I undid that step.

I then tried setting the origin to the geometry.

Thankfully, this seemed to have worked.

For the 250th frame, I have set it back the mesh's rotation back to 0 on the 'X' axis.

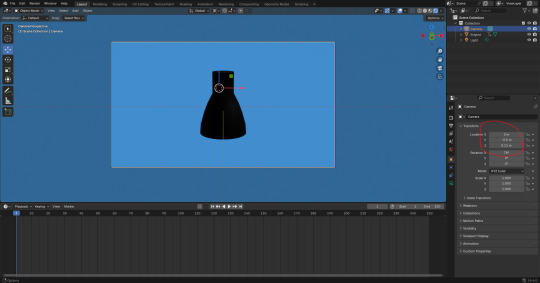
I pressed '0' on the number pad to toggle the camera view. I used this to help me set the transformations circled in the screenshot below. I did this to try and get a better view of the model. Most of the time, the default camera position is not facing the right way to see the model.
I was now ready to set up the render settings for rendering.
0 notes
Text
How to move 3D cursor in Blender
Blender basics, quick tutorial video shows how we can move 3D cursor, and reset 3D cursor with shortcut. Happy sharing and I hope this helps. Watch here, https://cgian.com/how-to-move-and-reset-3d-cursor-in-blender/

0 notes
Text
Web Design: 7 Trends Dominating The Industry Currently
In the ever-evolving digital sphere, where every click counts and first impressions are paramount, the significance of web design cannot be overstated. It’s the virtual doorway to your brand’s identity, beckoning visitors to explore, engage, and ultimately convert. For that, staying abreast of the latest trends isn’t just advantageous – it’s essential. That’s why we’re delving deep into the pulsating heart of web design, uncovering the 11 trends currently shaping the Web Design Melbourne industry.

1. Experimental Navigation
When we talk about experimental navigation, we’re discussing new ways of guiding people around websites that break from the usual style, like having all the menu options in capital letters at the top of the page in an easy font. Instead, experimental navigation tries out different styles to catch people’s attention and help them move around the website in a special way.
For instance, you can grab your audience’s attention with an all-black intro or with a cool circular menu to help them explore more. It will give them an experience like no other in your industry, making you distinct.
2. Drag Interactions
In the past, websites used to dictate how users could navigate them. But those days are long gone!
Nowadays, drag interactions are changing the game. They’re like virtual versions of picking up and moving things around with your hands. This cool feature is becoming more and more popular, especially for online stores and portfolios.
Instead of just clicking buttons on the homepage slider, you can grab and slide the images around to explore the projects. And get this—the speed at which you drag affects how the page moves, giving you even more control over your browsing experience. Isn’t that excellent for your user?
3. Text-Only Designs
In the year 2024, many web design experts in Melbourne are leaning towards minimalist design. They’re trying out new ideas, like ditching fancy images and big navigation menus and, instead, using just a few clear lines of text to tell visitors about their company.
This modern style is all about keeping things clean and straightforward. But here’s the twist—you can use multimedia on a deeper level, say, using cinemagraphs and animations that appear when you hover your mouse on a page and even a cursor that moves around the screen. It’s a cool contrast!
What’s great about this minimalist approach is that visitors get exactly what they need without any extra fluff.
4. 3D Design
Website design is all about giving visitors an immersive experience. That’s why 3D artwork is becoming more and more popular. Adobe’s 3D Modeler is a tool that makes it easy for anyone to try out 3D design. Maya is another most well-known 3D modelling software in the industry, but it requires some expertise. If you’re looking for a free option, Blender is also a fantastic choice.
This style of design has a touch of Japanese Kawaii, which focuses on cute, childlike objects and soft colours. What’s great about this design is that it’s cute and playful, keeping visitors engaged as they explore all the fun elements on your page.
Feeling overwhelmed by the idea of adding 3D to your web design in Melbourne? Don’t worry! There are plenty of freelance 3D modellers available on platforms like Fiverr and UpWork.
5. Broken Grids
Although grids are often considered the best way to organise text and images, broken grids are becoming increasingly common on popular websites, providing a refreshing departure from the usual layout.
For instance, on your homepage, you can use images and text blocks overlapping, creating a visually appealing and effortlessly readable design. It injects a sense of dynamism into pages without relying on slow-loading animations.
What stands out about this trend is how this unconventional approach can elevate the visual interest of standard website pages or sections.
6. Kinetic Typography
Kinetic typography, also known as moving text, gained popularity back in the 1960s, particularly as feature films started incorporating animated opening titles. In website design, it serves a similar purpose by instantly capturing visitors’ attention when they arrive on the homepage.
Furthermore, you can utilise kinetic typography to emphasise crucial sections, assist visitors as they scroll, and gradually unveil information. Its visual appeal and engaging nature enhance the overall user experience. What appeals about kinetic typography is its ability to delight visitors, making it easier for them to grasp your content.
7. Sci-Fi Design
Lastly, science fiction (sci-fi) is experiencing a surge, with numerous new sci-fi movies hitting the screens, suggesting its continued growth this year. Why? Utilising this web design trend, many Melbourne brands have positioned themselves as forward-thinking, making themselves particularly appealing to tech companies.
To achieve this aesthetic, incorporating vibrant colours and metallic tones is key. Additionally, adding a touch of 80s retro style can further enhance the futuristic vibe.
0 notes
Text
youtube
Bevel {Ctrl+B} - The Bevel tool allows you to create chamfered or rounded corners on geometry. A bevel is an effect that smooths out edges and corners.
Merge {M} - This tool allows you to merge all selected vertices to a unique one, dissolving all others -> At Center - It will place the remaining vertex at the center of the selection. -> At Cursor - It will place the remaining vertex at the 3D Cursor. Available in all select modes. -> Collapse - Every island of selected vertices (connected by selected edges) will merge on its median center, leaving one vertex per island. -> By Distance - Merges the closest vertices/edges/faces within a selected area
Extrude {E} - Duplicates vertices, while keeping the new geometry connected with the original vertices.
Loopcut {Ctrl+R} - This tool splits a loop of faces by inserting new edge loops intersecting the chosen edge
Gridfill {F3. type grid fill.} - Grid Fill uses a pair of connected edge loops or a single, closed-edge loop to fill in a grid that follows the surrounding geometry
Definitions are taken from the online blender manual (attached below) Video by CG Cookie
0 notes
Text
I know this isnt the topic but i fawkkg love your miku cursor so much ?@?#?
As for face textures, they're are a bit tricky since you can only change them in blender or another 3d software. Metanoia is simply a model viewer and decoder, not exactly an editor :(.
If, however, you really want to and don't mind using blender (presuming you already extracted the model to .dae), here's a little tutorial I made on the spot;
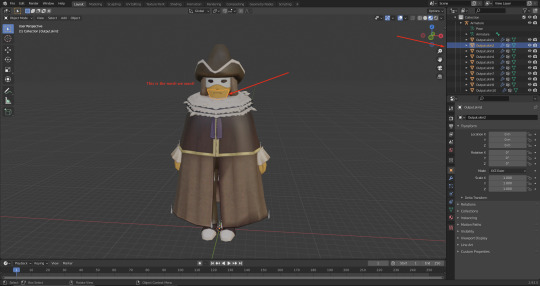
Open up Blender and import the model.
From there, on the upper righthand side with the "armature" name, click on the dropdown arrow. You'll be met with this;
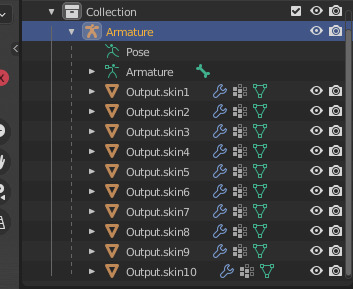
Locate the mouth mesh by clicking on each Output (or clicking on one then using the arrow keys) until the mesh is highlighted.
Go into edit mode on the upper left (dropdown from "object mode") and make sure you have the entire mesh selected. You can do this by pressing "a".

On the top part of the screen, locate and click on "UV Editing". You should be met with this;
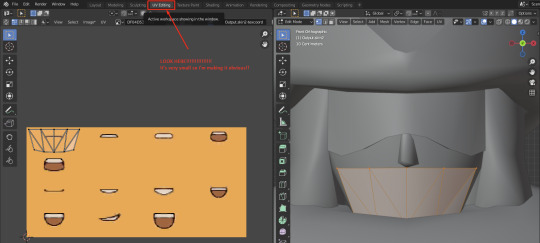
(If the model is grey, click on the third-last circle on the top right! It's right above the XYZ thing! Or you might have to use the forth circle which... im so sorry if you have to its a pain in the ass)
On the left screen, select the grey lines via a box select, then switch over to the move function.
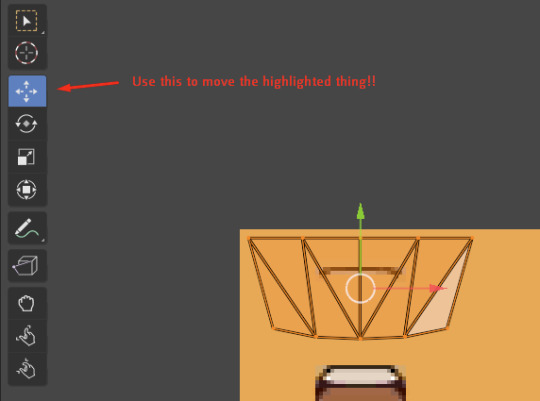
The most difficult part about this is lining it up properly ngl, but the texture will shift wherever you move the selected UV wrapping.
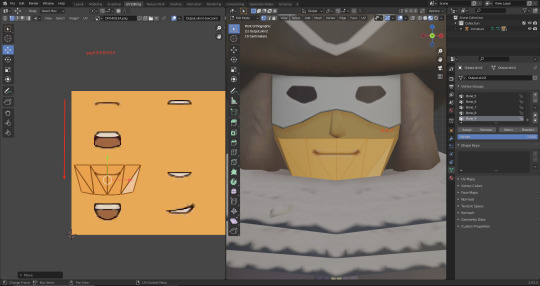
I hope this helps in some way!!! I wish there was an easy way to flick between expressions in Metanoia itself, but that's not possible to my knowledge... but the code to tell the uv wrapping where to go should be around, right?... Maybe one day lol
thanks to my #HumbleGOAT bramble i can now make layton do this
i dont know how to make the face textures change yet lets see if i can figure that one out
#bramblextracts#yeah ill count it#also being called the goat.. .teehee... blushing kickking an innocent pebble on the road
41 notes
·
View notes