#custom doll wip
Text


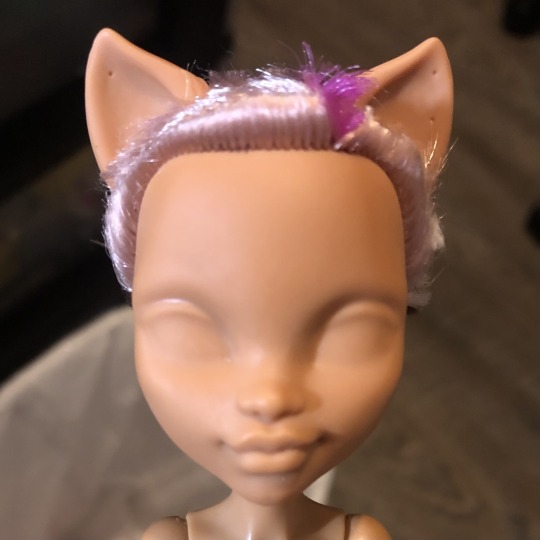
Worked on Anne’s wig installation today. It was an entire ordeal to get her original wig off, because it was brand new glue. I scraped myself twice with the spoon, but I managed minimal tearing to the circumferential wefts at the hairline.
I like to make multiple small passes with the glue during installation, so it takes an entire day. The ribbon is to keep the wefts flush with the vinyl and allow the Glue-All to bond.
18 notes
·
View notes
Text
WIP of a G1 Werewolf, using my Creepover Clawdeen.


First things first: choppy, choppy!
I didn’t bother to keep her hair because it was poly (even if it did feel a bit better because I had already heavily conditioned and straightened it- thinking I was going to just take her stock and resell the doll- whoops).
Honestly Clawdeen wouldn’t look bad with a flocked head…she could show off her cute ears more.
Wiped her face off with pure acetone and a cotton pad. I love seeing blank Monster High heads; they look so detailed (the sculpted eyelids and all of the sculpted ear tuffs on her ears).
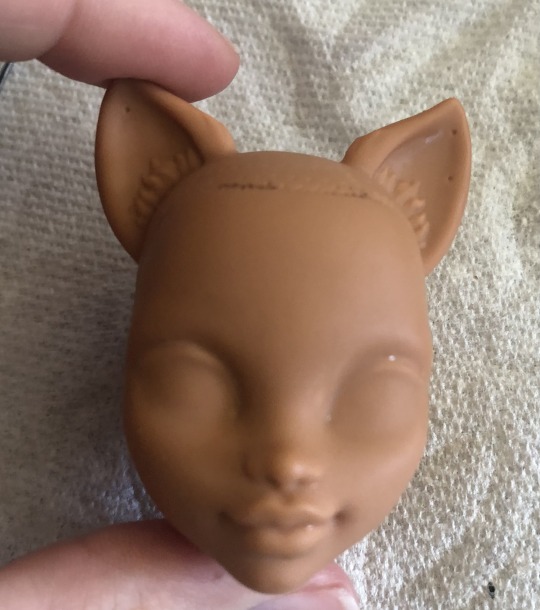
Off with her head! I dunked her head in some hot water, until it was soft, and pulled the head head parallel with the neck (using some tweezers to get around the barbs on her neck peg- the G3 doll heads are MUCH more difficult to try and remove).
I then removed her bits of hair by scraping a screw driver inside her scalp and pulling out the hair bits with tweezers.
I cleaned off most of the paint on her scalp with pure acetone, and then I dunked her back into hot water to close her hair plug holes.
Her pointy ears make Clawdeen look more like a werefox more than a werewolf. Haha.

I painted her scalp with acrylic paint (I know that I don’t need to do it, but I still like to).
While that was drying, I took my multicolored orange yarn skein, unwound it, cut out the separate oranges I wanted, bagged the extra colors (the two other oranges in the skein were waaaay to bright), cut these into manageable lengths, and unwound them to make lovely waves.
Hopefully I’ll get her re-haired before June is done!
#doll customizing#custombyaleta#custom doll wip#doll wip#monster high#monster high werewolf#monster high custom#monster high custom wip#monster high doll wip#monster high doll custom
61 notes
·
View notes
Text


(How did this become this become this become this....)
WIP of my cheer jade doll! (Shes going to clown school now!) It did have some blush and freckles before that my sibling painted after they took off the cheerleader face paint for me!
At first thought I could just do it without removing the eyes but I realized the eyelashes would be in the way of details, also don't recommend getting acetone in the eyes or on the whites of the eyes (and then touching it. It was like super glue unlocked??)
I'm probably gonna dye her hair too, I already chopped a bunch off to make it shorter and I saved what I cut so I'll use those peices for swatching new colors!!
14 notes
·
View notes
Text
WIP


4 notes
·
View notes
Text


I was pretty stressed about freehanding her face but i think she looks okay! Shes not perfectly symmetrical but theres enougb detail that isnt tooooo noticable i think. Eyebrows still need some work but i gotta mix up more paint for that.
The ears turned out rough so i lazily added some stars to them. Theyll be hidden under the hat in the end anyways.
248 notes
·
View notes
Text
Hey, look who's in one piece now. He's a long way off from being done of course, but it's nice to finally see the vision come together.
388 notes
·
View notes
Text
friends and family aren’t praising me sufficiently i need validation for my FIRST TIME DOLL REPAINTING turning out nice

#still a wip obviously#(bald)#but i think the faceup came out amazing for a first try#i’m very proud of myself#this is an old boo york draculaura i found at the thrift store with her hair covered in glue#dolls#doll repaint#monster high#monster high repaint#ooak doll#ooakartdoll#monster high ooak#mh ooak#doll customization#dollblr#draculaura#toy repaint#mh repaint#doll blog#my dolls
173 notes
·
View notes
Text

Progress on the izutsumi doll! I finished her bracers, skirt and scarf, now I just need to do her chestplate and hair and she's done!
109 notes
·
View notes
Photo

I prepared this anglerfish doll on the side over like months but i’m so behind with commissions i don’t really have the nerve to finish her right now. I think once painted and with a proper wig she will look awesome (the anglerfish light has an LED) but i can’t be arsed right now. Posting her for when i finish her in 40 years so i can look back on this WIP :D
785 notes
·
View notes
Text


MY FIRST ACTUAL FACEUP!!!
So the actual doll is still a WIP. I want to put her on a little sister body I think so I'm waiting for rn. But her faceup is finished!!!
This is my first genuine attempt at a faceup and I could not be more pleased with how it came out.
It's not perfect and on camera it looks a little streaky/patchy but I'm so happy with her :))
I have some fine/brush tip acrylic pens which is what I used for the faceup. I've tried gouache and acrylic before but I never really felt like it went on very smooth so the paint pens are really game changing for me.
I used one of those blank CAM faces. It was actually one I have had since I was a kid. One of the ones that you could stamp temporary tattoo faces on, which is why the face looks so flat.
Right now her head and her little bracelet are on a knockoff Wydowna body I use for testing and accessory painting until I get her an actual permanent body.
#monster high#monster high dolls#(me)atgutz#small artist#digital artist#digital illustrator#digital art#digital illustration#doll#dolls#ooak#faceup#doll customization#custom doll#wip#doll wip#crafting#painting#toys#toy#meatgutz#violet peopleeater
45 notes
·
View notes
Text


more clover progress 😭 it’s not perfectly accurate and gets fuzzier every time i handle it but i’m happy with the silhouette so far
44 notes
·
View notes
Text


Finished sewing Spelldon’s jacket. This took forever! The most complicated piece of done….haha; it’s not perfect, but it will work. The arm holes could have been a bit larger to more easily accommodate his shirt too.
I still plan on painting a few more details on it after I’m done sewing his socks and gloves.
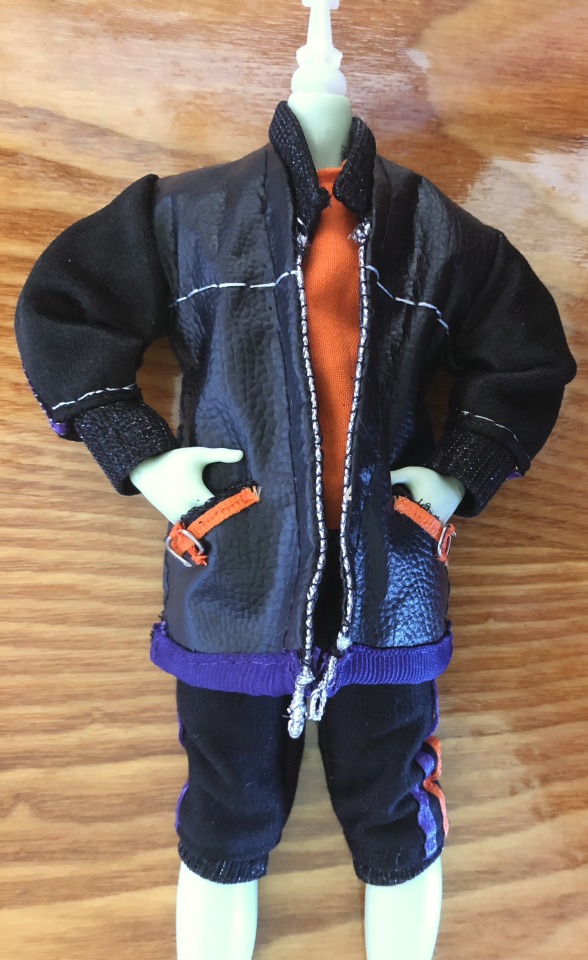

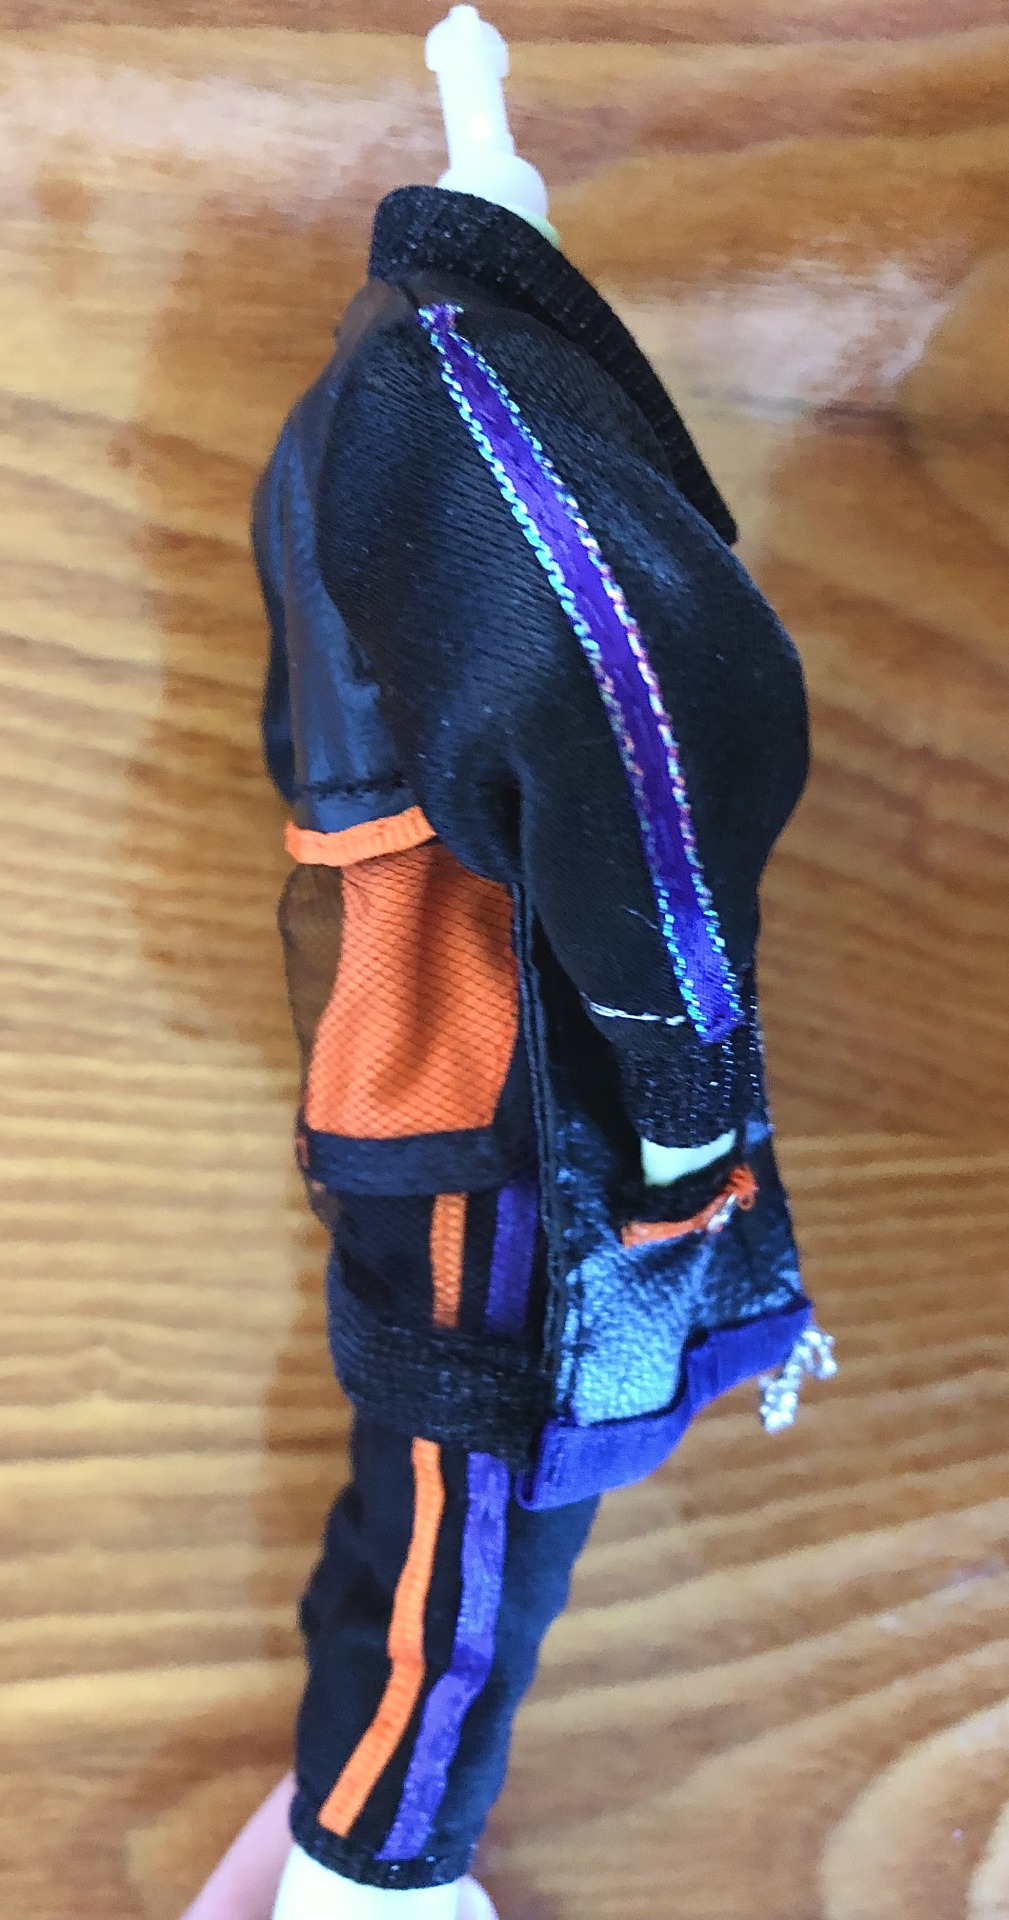
I am happy with how the mesh part turned out and the working pockets. It is also fully lined. The sparkly material I have been using in his jacket and joggers is the worst (it stretches, snags, and the sparkles shed like crazy), but I love the look of it.
EDIT:
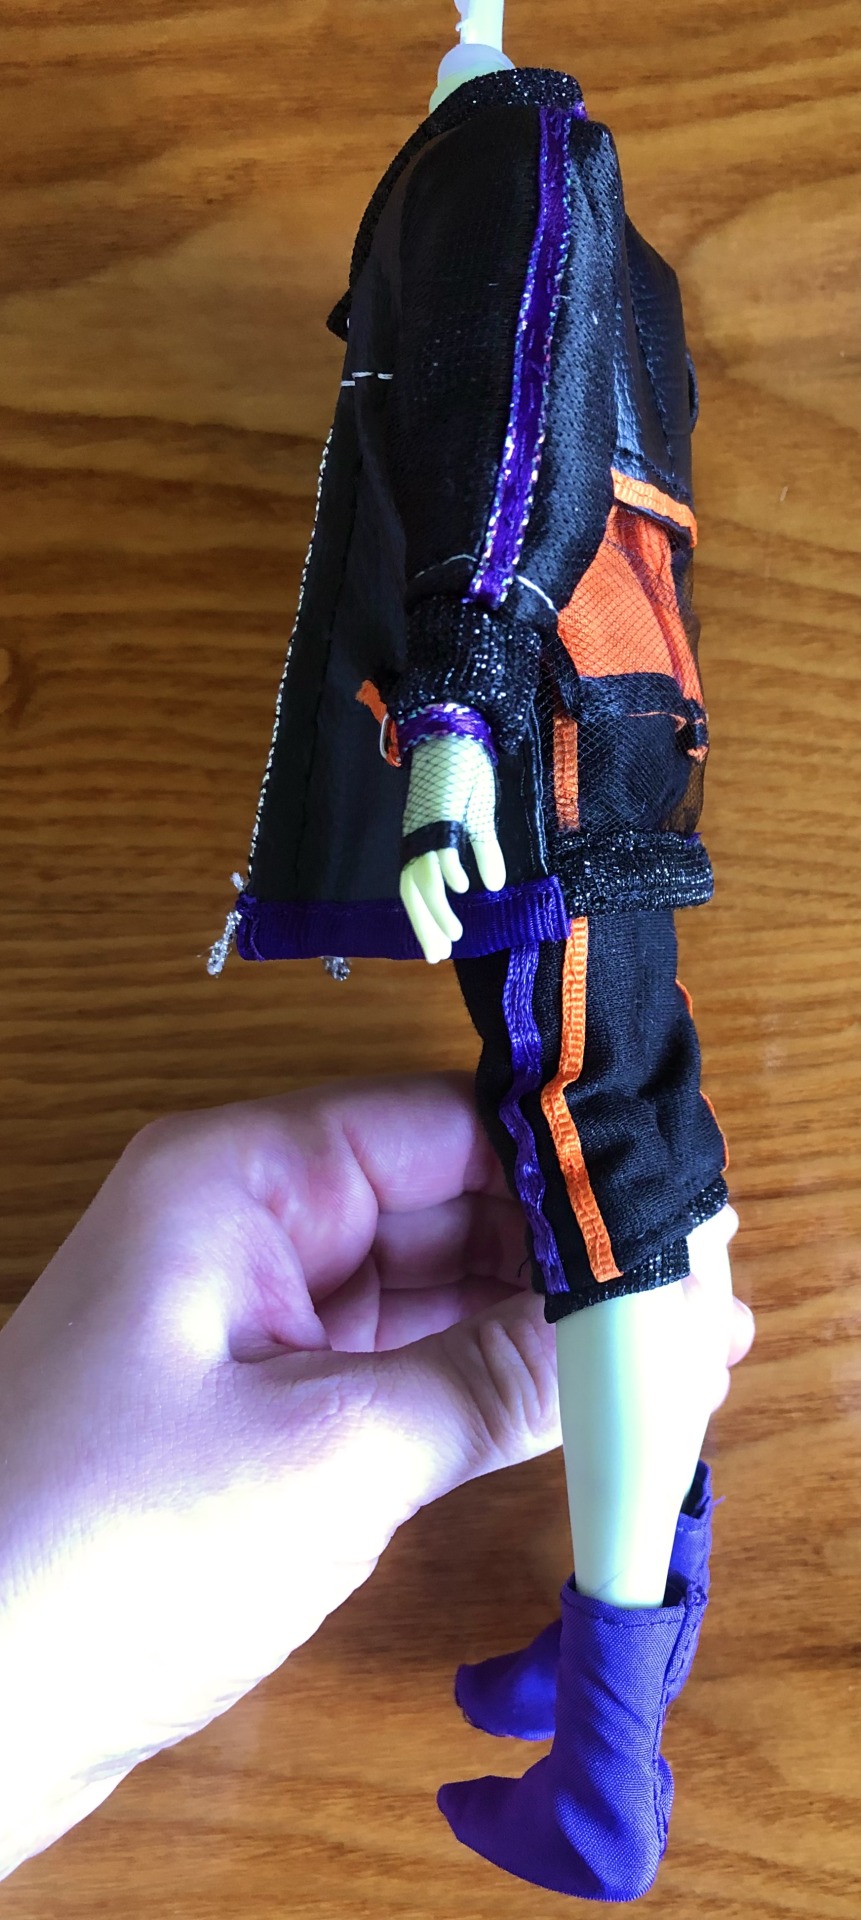

I made his gloves and socks (which I should have tried making from a pattern with his feet bent and not pointed -like I did do- oh well, they’ll mostly be hidden by his shoes anyways).
Okay, onto the paint details! I still need to make him some shoes, a belt (where some of his potion bottles can hang from), and maaaaaybe a witches hat. That one is a maybe though.
#Spelldon#spelldon cauldronello doll#spelldon custom#spelldon cauldronello#custom#custom wip#custom doll wip#doll wip#doll custom#custom doll#Monster High#mh#monster high custom#monster high doll#monster high doll custom#customsbyaleta
62 notes
·
View notes
Text
Ayeoo, finally working on my doll again. Small victory for me because my mental state has been chaotic to say the least.
I don't remember what, if anything, I've shared on my current goblin-self doll? Actually I can save this as a draft easily, lemme go check.
Oh g's like nothing. Okay. Welp, grab a snack cause I'm about to overexplain everything up to this point!
Right, so I made a custom Monster High doll a while back and for my first ever attempt at it, she turned put pretty good. Especially since she was meant to just be a practice piece for stuff as I was working on another doll along side it to be my first. Never finished that doll, but I think I have to high of expectations for it compared to my skill level right now.
Jump forward to G3 Monster High being released, and I decided to remake my test-doll-turned-goblin-self with a G3 Draculaura body because it much more accurately represents my body style. I got all the way to having the body painted, my own tattoos added, and various scars and marks detailed. And honestly, I was pretty happy with the result! Here's some photos of that;
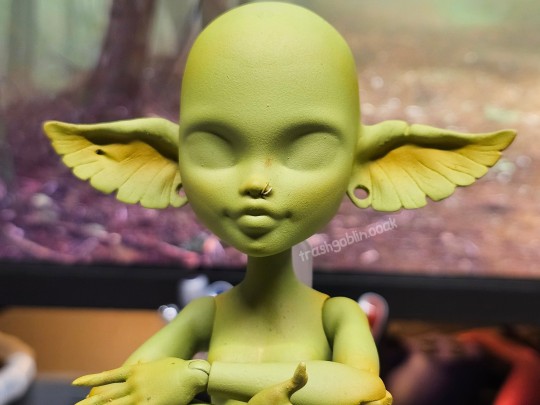
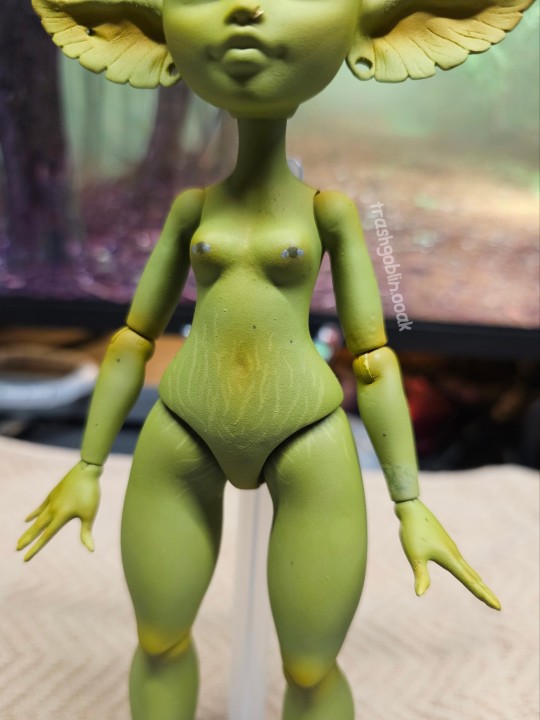

Love the colors, and I was happy enough with what I'd done to keep moving, except for the face. It was driving me crazy that I could still see the line where I added the Apoxie Sculpt to the jaw so clearly, despite it being sanded as smooth as I could get it. So I wiped her head and was going to try again. Not sure what my plan was, to be honest, but she got shoved to the corner of the desk for a good while.
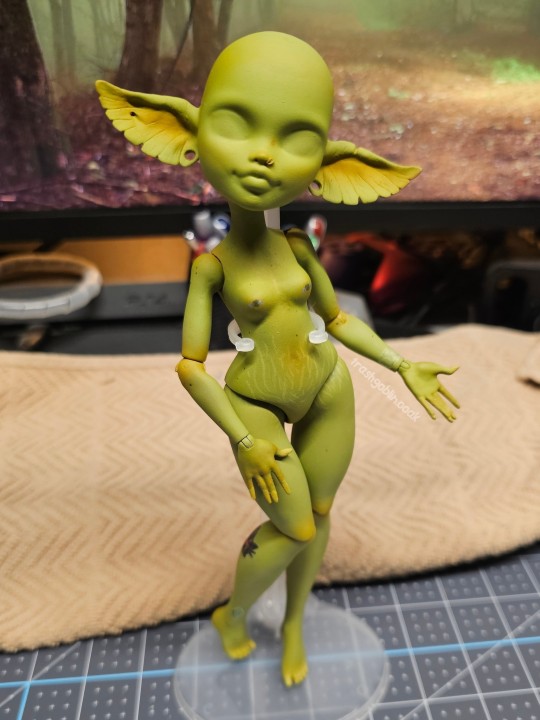
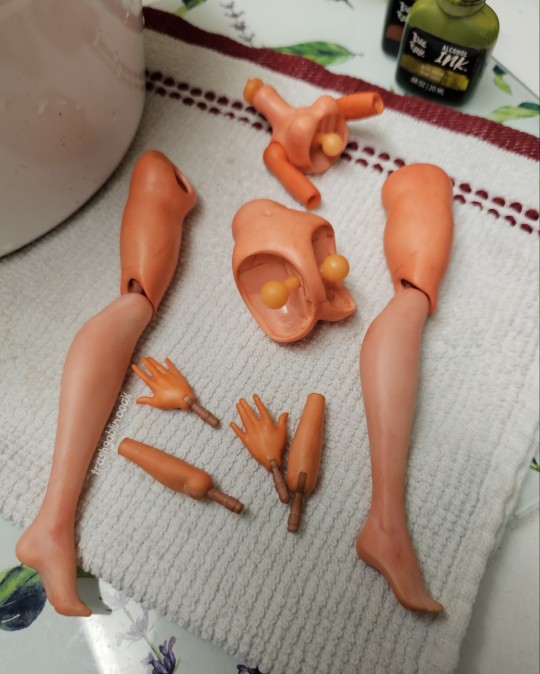
I ended up finding another G3 core Draculaura at Value Village in one of their hanging bagged toys, and for $8 bucks with all her accessories I couldn't pass it up. At the time I didn't plan on it, but ended up deciding to start over completely on v2 of my goblin-self using this doll. The core dolls have an articulated chest, unlike the budget dolls (Day Out which I was using, the 2 that came with the car from Costco, ect.), and there were a couple of things I think I could have done better on the body when it came to the joints.
Jumping forward I did all the prep work on the new doll, sanding everything to remove mold lines and smooth it all nice, removed the face up and hair, yadah yadah yadah. I then attempted to dye the new body with some Rit dye and whatever brand it is that's sold at Dollar Tree, knowing it wasn't going to take correctly because the Rit wasn't for synthetics. I was really only hoping to dye the joints darker, because if you've ever seen or customized your own dolls, body repaints rarely stay painted at the joints. It's kinda inevitable if your doll moves at all. I just wanted to reduce the jarring difference between OG light pink skin and the new green skin.
It sort of worked, the teal Rit did nothing (as I expected), but the red-orange Dollar Tree stuff dyed her a bit. I didn't do her head at all since this was just meant to darken the parts that'd be rubbing together.
If all the different plastics on the body would take dye the same way this would have been a cute color honestly 😂
Skintone differences aside, it did darken down the plastic used for the wrist and elbow joints, which was my main goal. But I had another idea I wanted to try as you may have noticed in the image background. Alcohol inks! I wouldn't recommend. At least not directly from the bottle dripped into the joint.
The high concentration of alcohol in the inks very quickly made the vinyl of the lower arms get gummy. It's the same reason you don't want to use acetone on the bodies of dolls basically, it just destroys the plastics a bit too much. The pigment did start to take to the plastic, but with how quickly I had to blot it back off to stop the plastic from melting it just didn't have enough time to stay. However it did make me think of another way to essentially stain the joints. I think the same could possibly be done with a brush and alcohol inks directly maybe? But my hubs has Prismacolor Alcohol based markers so I switched gears to bring those.
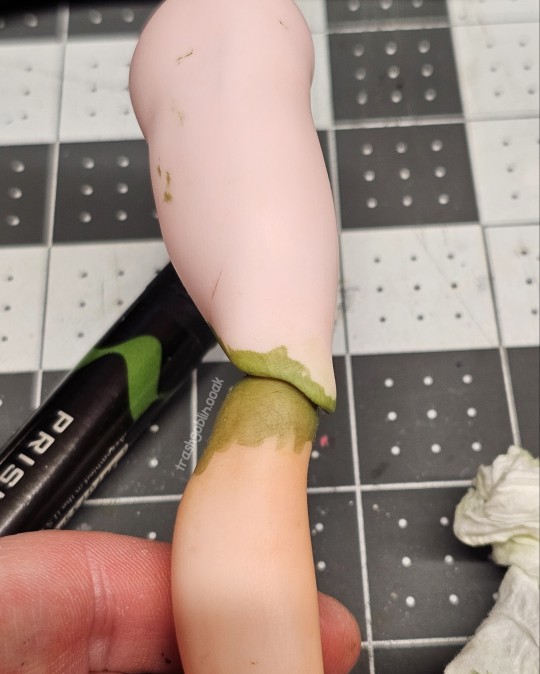
And yea! A very good option! At this point I'd already washed and resanded the body to remove the outer layers of the dye from the hard plastic parts so in that image she's pretty light again. It takes extremely well to the hard plastic parts and because the concentration of alcohol is much lower it doesn't make the vinyl arms feel sticky like the inks did. I have a video of the joints moving I'm going to upload on its own after. Cause I really think this might be a viable way to help reduce the obviousness of joints in skintone changes, and I don't want it buried in my nonsense 😂
I ended up coloring the whole body with the marker, not just the joints. The hard plastic took the pigment so well that if the paint does end up scraping off anywhere it was worth it to have the marker color underneath everything. I know that spots like the knees and the butt were getting scrape marks on the first repaint just from posing, so hopefully this helps those spots look good well after I'm finished the doll!
At this point I've now gotten the body all prepped and ready to paint with the new skintone. Sanded, dyed, MSC'd, and waiting! I started working on the new head while I was figuring out the dye situation.
I wasn't planning on making this a multiple post thing (other than the video) but I think I'ma split it up here! I'm still going to type out the next post now but I'll schedule it for later 😂 Because unlike Insta, I can do that and not have to remember to come back and actually make the post later.
And thanks if you've read this far ☺️ I apreaciate the interest! See you in the next one!
31 notes
·
View notes
Text
The projects are coming along nicely I think, I finished all the yarn hair today (I figured out how to make the parting not look so full of glue) and spray painted one side of the other project


2 notes
·
View notes
Text


Today: sharing some progress on the color block sweater I'm making for my Renfield doll. For a long time I couldn't find thin enough yarn in enough colors to make it, and then I had an "aha" moment! Embroidery thread! Comes in any imaginable color and relatively inexpensive for a lil sweater. It is taking a lot more work than I anticipated! I'm trying to not be a perfectionist about this, and it's still tricky. I got sick with COVID last week. I thought I'd knock this out while I'm recovering, but today I'm feeling better and the sweater is still far from done 🥲
35 notes
·
View notes
Text

Doll x Maria frame
#fromsoftware#fanart#art#custom#soulsborne#wip#bloodbornefanart#bloodborne#ladymaria#lady maria of the astral clocktower#bloodborne doll#framed#piece
97 notes
·
View notes
Last Seen Blogs

maidmorganstark-blog
Morgan Stark

growupstupid
Defensive Line Appreciation

flewcl0se
poor icarus.

nirvanayogasthal-blog
Nirvana Yoga Sthal Best Yoga School in Rishikesh

cvpulse-blog
Pulse Magazine