#decrypt bitlocker drive
Explore tagged Tumblr posts
Visit Tumblr Blog
Explore Tumblr blogs with no restrictions, modern design and the best experience.
Last Seen Tumblr Blogs


Fun Fact
Tumblr has 411 employees.
Text
How to Secure Your Data During IT Equipment Relocation

Relocating IT equipment is a critical process that requires meticulous planning to ensure that data security is maintained throughout the transition. This article outlines the key elements necessary to secure sensitive data during the relocation of IT assets, focusing on encryption, data wiping, and transport protocols. Furthermore, we will discuss best practices for compliance with GDPR, HIPAA, and other regulatory frameworks, as well as secure methods for disposing of obsolete equipment.
1. Encryption for Data Protection During Transit
To prevent unauthorized access, it is essential to encrypt all data stored on IT equipment before relocation. Encryption ensures that even if devices are lost or intercepted, the data remains protected and unreadable without proper decryption keys.
Best Encryption Practices:
Full-Disk Encryption (FDE): Use tools like BitLocker or VeraCrypt to encrypt the entire drive, ensuring that every file is protected.
End-to-End Encryption (E2EE): Implement encryption at both the source and destination points during data migration.
Secure Key Management: Store encryption keys in an offline or hardware security module (HSM) for additional protection.
2. Data Wiping and Sanitization Before Relocation
Before relocating sensitive data, it is essential to perform secure data wiping to prevent residual data from being accessed on redundant or old devices. Data wiping goes beyond simple deletion by overwriting all sectors with random data, ensuring no trace of the original content remains.
Recommended Wiping Techniques:
DoD 5220.22-M Standard: Performs multiple overwrites to ensure data destruction.
NIST SP 800-88 Guidelines: Offers best practices for media sanitization.
Physical Destruction: For highly sensitive data, use shredding or degaussing to physically destroy storage media.
3. Safe Handling Protocols for IT Equipment
Handling IT equipment improperly during relocation increases the risk of data breaches. Implementing strict protocols for the physical transportation of IT assets mitigates potential threats such as tampering or theft.
Secure Transport Guidelines:
Use of Tamper-Evident Seals: Secure all equipment cases with tamper-evident tape to detect unauthorized access attempts.
GPS-Tracked Vehicles: Transport IT assets in vehicles equipped with GPS tracking to monitor movement in real-time.
Chain of Custody Documentation: Maintain detailed logs of who handles the equipment at each point of the relocation.
4. Compliance with GDPR, HIPAA, and Other Regulations
When relocating IT equipment containing personal or healthcare data, ensuring compliance with relevant regulations is critical. Non-compliance can result in heavy fines and damage to reputation.
Compliance Guidelines:
GDPR (General Data Protection Regulation): Implement encryption and data minimization techniques to protect personal data.
HIPAA (Health Insurance Portability and Accountability Act): Use proper data handling practices to safeguard electronic protected health information (ePHI).
ISO 27001 Standards: Establish an information security management system (ISMS) to control risks related to data security.
5. Secure Disposal of Redundant or Outdated Hardware
Once IT equipment reaches its end of life or is no longer required, disposing of it securely is essential to prevent data leakage. Improper disposal can expose organizations to regulatory non-compliance and data breaches.
Recommended Disposal Methods:
Certified E-Waste Recycling: Partner with a certified recycling vendor that provides certificates of destruction.
On-Site Shredding Services: For highly sensitive equipment, consider shredding storage media on-site.
Asset Tagging and Reporting: Maintain a detailed asset disposal report to ensure a complete audit trail for compliance purposes.
Relocating IT equipment involves much more than just moving hardware from one place to another. Organizations must prioritize data security through encryption, secure handling, and regulatory compliance to protect sensitive information. Proper sanitization and safe disposal of outdated hardware are equally crucial to prevent unauthorized access to data. Adopting these practices will minimize risks, ensure compliance, and safeguard the integrity of your organization’s data during relocation.
#office relocation#packing & unpacking services in abu dhabi#residential relocation#relocation#global mobility services#commercial storage solutions
0 notes
Text
Recover Data from Encrypted Windows Hard Drive - BLR BitLocker Unlocker

Recovering data from encrypted Windows hard drive can be complex, especially when the hard disk drive is protected by BitLocker encryption. In such cases, it's essential to have the correct decryption key "BitLocker recovery key" or password to access the hard drive. Without BitLocker key or password, the BitLocker encrypted data remains locked and unreadable. However, if you have the necessary credentials, the process involves unlocking the drive and scanning it for recoverable files, even if the data was accidentally deleted or the drive was damaged. With professional data recovery software like BLR data recovery tool, users can recover encrypted files without compromising the integrity of the data.
Read more:https://www.linkedin.com/pulse/bitlocker-data-recovery-recover-from-encrypted-7ogkc/
0 notes
Text
Windows 11 24H2 will enable BitLocker encryption by default, including Home Edition
Windows11 24H2 will enable BitLocker encryption by default, including Home Edition
Microsoft plans to enable BitLocker encryption by default during the Windows 11 24H2 installation process. This will have two impacts on users: one is affecting the performance of the hard drive, and the other is that if the user does not have the decryption key, related data may be lost.
We noticed the change while testing the installation of Windows 11 24H2 using the newly designed installer, and thankfully users can disable Device Encryption in the Privacy & Security section of Settings.
According to reports, Windows 11 24H2 brings an improved installer. The new installation process no longer starts with a “blue window” but is similar to an in-place upgrade, except that BitLocker encryption of the drive may be performed in the background during the new installation process.

This may not only affect Windows 11 Pro and above, but also Home editions, which may surprise some.
Using BitLocker to encrypt drives is not new on Windows 11 PCs, with some OEMs already implementing it on Pro machines. Of note, there are reports that the default software-based BitLocker encryption on Windows (XTS-AES 128) can cause significant performance degradation even on some of the fastest SSDs, such as PCIe Gen4 NVMe SSDs. Furthermore, unsuspecting users may be completely unaware that their device is encrypted, and if the key is lost or not saved correctly, the encrypted data may not be recovered.
And if you need Windows 11, You can buy it from keyingo.com, it is much cheaper than the Microsoft store !
0 notes
Text
How to Recover Data from Corrupted/Failed BitLocker Drive

Introduction: Encountering a corrupted or failed BitLocker drive can be a daunting experience, potentially leading to the loss of valuable data. However, with the right approach and tools, it's possible to recover your files and regain access to your encrypted data. In this guide, we'll explore the steps to recover data from a corrupted or failed BitLocker drive and delve into how BitLocker data recovery tools can help restore your data effectively.
Understanding BitLocker Drive Encryption:
BitLocker is a built-in feature in Windows operating systems that provides encryption for your files and drives. It secures data by requiring a password or encryption key to access it, protecting against unauthorized access and data breaches. However, in the event of drive corruption or failure, recovering data from a BitLocker-encrypted drive becomes necessary.
Steps to Recover Data from Corrupted/Failed BitLocker Drive:
Assess the Extent of Corruption: The first step to recover bitlocker data from a corrupted or failed BitLocker drive is to assess the extent of the damage. Connect the corrupted drive to a computer running a Windows operating system and check if it's recognized by the system. Use Disk Management or DiskPart to identify the status of the drive, whether it's healthy, damaged, or showing as RAW.
Utilize BitLocker Recovery Options: If the BitLocker drive is partially accessible or recognized by the system but inaccessible due to corruption, attempt to decrypt it using the BitLocker recovery key or password. You can find the BitLocker recovery key in your Microsoft account, on a USB drive, or in a printed copy if you've saved it during the encryption process. Use the BitLocker Recovery Console or Recovery Wizard to access recovery options.
Use BitLocker Data Recovery Software: If traditional recovery methods fail to restore your data, consider using BitLocker data recovery software. These specialized tools are designed to recover data from corrupted or failed BitLocker drives effectively. Choose a reputable BitLocker data recovery tool that supports BitLocker drive recovery and follow the software's instructions to initiate the recovery process.
Scan and Recover Data: Once you've selected a BitLocker recovery tool, scan the corrupted drive thoroughly to identify and recover any accessible data. The software will analyze the drive's file system and attempt to recover lost or inaccessible files. Follow the software's prompts to select the files you want to recover and specify a destination for the recovered data.
Seek Professional Assistance: If all else fails and your data is critically important, consider seeking assistance from professional data recovery software services. These experts have advanced tools and techniques to recover data from severely corrupted or damaged drives. Contact reputable data recovery specialists to assess the situation and explore recovery options.
Conclusion:
Recovering data from a corrupted or failed BitLocker drive requires a systematic approach and the right tools. By assessing the extent of corruption, utilizing BitLocker recovery options, and using specialized BitLocker data recovery software, you can increase your chances of successfully recovering your valuable files. Remember to keep backups of your important data to avoid data loss in the future. With patience and persistence, you can overcome BitLocker drive failures and restore your encrypted data effectively.
#bitlocker data recovery software#bitlocker data recovery tool#bitlocker file recovery software#recover bitlocker data#retrive bitlocker data#restore bitlocker key
0 notes
Text
Acquiring Windows Operating System Credentials Through Bitlocker: A Digital Forensic Approach
BitLocker encrypts every piece of information kept on a computer's hard drive or solid-state drive, rendering it inaccessible to anyone who doesn't have the right password or decryption key. The main aim of the study was to... #bitlocker #cyberforensic
Continue reading Untitled
View On WordPress
#A Digital Forensic Approach#Acquiring Windows Operating System Credentials Through Bitlocker: A Digital Forensic Approach#bitlocker#cyber forensic
1 note
·
View note
Video
youtube
How to Use iSunshare BitLocker Genius for Windows to Manage BitLocker Pr...
#encrypt drive with bitlocker#decrypt bitlocker drive#change bitlocker password#lock bitlocker drive#unlock bitlocker drive
0 notes
Text
Windows PIN and password: What is the difference, and Which is more secure?

What is the difference between the Windows account PIN and password?
Which is more secure: Windows PIN or password? Check now the differences between Windows account PIN and Password to choose the most secure option according to your needs.
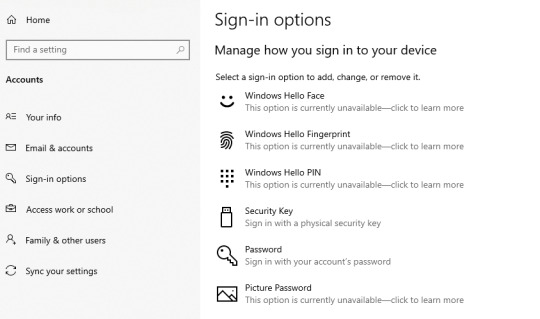
What is the difference between the Windows account PIN and password? In Windows 10 and 11 there are two popular ways to log in: via a PIN and via a regular password. However, Microsoft forces the user to use the PIN. However, as we are used to always using a common password, we asked ourselves which option would be the safest to use. Check out in this article what each of the access options offers to the user. At first, using a PIN code seems to be less secure, mainly because it contains so few digits (four). But is this really an unsafe method? See below!
What are the ways to access a Windows PC? (PIN and password?)
There are three ways to log in to a Windows computer (PC). Each of them has different characteristics, as you can see below. - A local account with a password - Only works with a specific machine (computer). There is no option to restore settings online. But, on the other hand, there are no online attacks. There is no way to monitor online or regain access remotely online. - Microsoft account with a password - fits any Microsoft online service. You can access multiple devices or services with a single password as long as they use a Microsoft operating system or program. You can restore settings and monitor access online. It is susceptible to online attacks. - Microsoft Account with PIN - Only works on the PC (computer) where the PIN has been set. There is a way to restore access through a Microsoft account. There are no online attacks, as access is local (offline). By choosing to use the PIN code, the user will benefit from the strengths of a local account password and a Microsoft Account password. As the PIN is stored locally (outside of internet access), it is immune to online attacks. Even local attacks have a hard time getting the password, as Microsoft has developed mechanisms to prevent rapid brute force attacks. While it is still possible to guess the PIN, the user can improve security by using a code of more than four digits, such as a six or eight. Even if there is unauthorized access to the computer, it is still difficult to access the user's Microsoft Account as the account-specific password will still be charged to access the data.
What is the difference between the Windows account PIN and password?
What can I do to further increase security?
For those who want to further improve security against intrusion on their computer (PC), there is the option to completely encrypt the device. When doing this, you will need to enter the password to decrypt the computer before entering the PIN, for example. Below are some options for storage drive encryption programs (HDDs and SSDs): - VeraCrypt - BitLocker - DiskCryptor What did you think of this article about the security of login methods (PIN and password?) in Windows 10 and 11? Liked? Comment below and share your opinion with us! More in NUpgrade - before you buy a USB Type-B cable here is what y should know! - How to use Amazon Echo as a speaker on TV? - How to Schedule Messages in WhatsApp Web to Send Later - Which power supply to buy for the PC? Know how to choose the right one - The 10 best movies on Netflix, according to IMDb rating - How to see which are the most played songs on TikTok? Read the full article
6 notes
·
View notes
Text
How To Open Dmg Files On Ipad
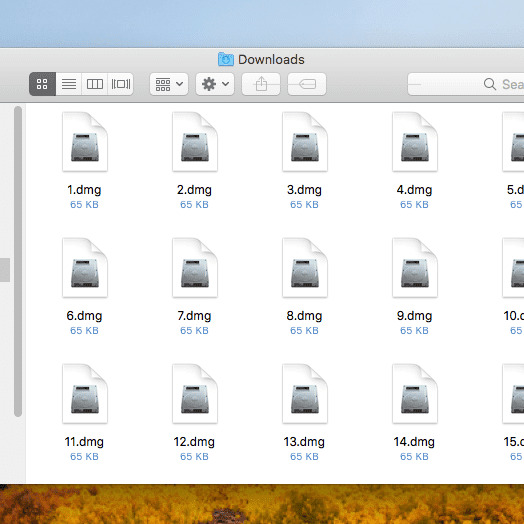
When you download software from the Internet on your Mac, you may find that the software installation file is a DMG file. So, what is a DMG file? And how to open DMG files on your Mac? Let's find the answer from the following content now.
What's a DMG file?

The DMG file is a disk image file of macOS, which is just like the Windows ISO file in some way. It is treated by macOS as it were a physical disk and can contain the program installation file.
Way 1: Open DMG Files Directly
Double-click the DMG file in the place where stores it, such as Download folder, desktop, etc. Then a box written with 'opening-name.dmg' will be shown. When the DMG file is verified successfully, it will be opened automatically and you can access it now.
Tap Select the file name Organize. Open macOS DMG files on Windows. Extract any file from a DMG archive with just a few clicks! Passcodes Explore + extract data from iOS backups & devices Download iCloud photos & data Manage & backup your iPhone and iPad Work with DMG files on Windows Get data from BlackBerry backups. Open DMG Files with DMG Extractor. DMG extractor provides another choice for extracting DMG files. The free version works well, but it does have some limitations: You cannot extract files bigger than 4 GB; You cannot extract encrypted files; You can only extract 5 files at a time, which can be a pain if you need to extract an entire DMG file. Open Dmg File On Ipad This is the best method to download the MacOS High Sierra dmg file and I have shown you the two handy methods that you can easily download dmg file. So, I hope you understand everything and if our article was helpful for you then please give your feedback in the comment box.
Way 2: Open DMG Files with Disk Image Mounter
Step 1:Right-click the DMG file and then choose Disk Image Mounter option in the menu of Open With button.
Note: After clicking Mounter button, a small window will be popped out to tell you that the DMG file is opening.
App To Open Dmg Files On Ipad
Step 2: After the DMG file is mounted, its content will be displayed directly for you to use.
Way 3: Use a Tool to Open DMG Files
Step 1: Install iSunshare BitLocker Genius on your Mac.
Step 2: Launch BitLocker Genius. Then click Attach option in the interface.
Step 3: Select the DMG file and then tap Open button in the lower-right corner of the window.
Step 4: Now, you have opened the DMG file and can install your wanted software on Mac.
Tips: iSunshare BitLocker Genius also has BitLocker decryption feature, which can unlock a BitLocker USB drive with 3 simple steps: Obtain BitLocker Genius >Mount BitLocker drive by entering password or attaching recovery key >Open BitLocker drive successfully.
Related Articles:
It’s been a week since Apple introduced iOS 15 and iPadOS 15 at WWDC 2021, but we’re still discovering some new features that weren’t mentioned on stage or on Apple’s website. In addition to having widgets on the home screen and new multitasking shortcuts, iPadOS 15 enhances the Files app with a progress bar, NTFS support, and more.
Now when you’re copying a file in Apple’s Files app, there’s finally a progress bar to indicate the remaining time and how much data has already been copied. A progress indicator icon appears right next to the create new folder button, and users can cancel ongoing tasks from there.
This alone would be a great improvement for iPad users as previously there was no way to see the progress of such tasks in the Files app, but there’s even more.
If you plug an NTFS-formatted USB stick into the iPad, it can now be read by the Files app. It’s worth noting that this is only partial support, just like on the Mac, so you’ll only get the read-only mode without being able to add files to the USB storage. Still, much better than not even being able to see the files on an NTFS flash drive as in iPadOS 14.
For those who have a mouse or trackpad paired to the iPad, iPadOS 15 enables the selection of multiple files at once with the cursor, so you no longer have to select one file at a time in order to copy, move, or share them. Unfortunately, at least in beta 1, the Files app still lacks the ability to check folder sizes or open DMG files, which are features requested by many iPad users.
iPadOS 15 beta is currently available for developers, while a public beta release will be available in July. The update is expected to be officially released to the public this fall.
How Do I Open Dmg Files On Ipad Pro
H/T Steven Fjordstrom
Read also:

FTC: We use income earning auto affiliate links.More.
1 note
·
View note
Text
Lectures - Week 6
One Time Pads
This is basically an encryption method that cannot be cracked, provided the secret key is ‘random’ enough and is not reused. The idea is to XOR each bit in the ciphertext with a corresponding bit in the key; the main caveat is the key must be at least as long as the plaintext. They are still used a fair bit today, but were more extensively used historically during wartime communications utilising codebooks and number stations.
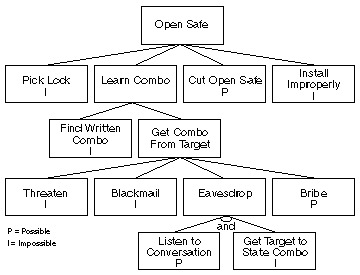
Threat / Attack Tree
One part of building a threat model can be through an attack tree - the idea is that you list all the assets as nodes. The branches from each of these nodes are threats and the causes for each of these can be listed as sub-branches. You can then expand out on any of the causes, if there are multiple ways it can occur.
It’s important to consider disasters and potential periods of turmoil in your analysis of threats as well. Organisational changes such as the introduction of new systems are ‘prime’ periods for attack.
Types of Attackers
Three main types of attackers:
Casual - doesn’t target the victim specifically and does so while checking out numerous other targets
Determined - targets the victim, has a motive and tries to find specific vulnerabilities of the victim
Funded - similar to determined except performs lots of recon on top of hiring people and equipment to perform the attack
Initialisation Vectors
More broadly IVs are simply used as initialisation values to an iterative process. They are used in cryptographic hash functions such as the Merkle-Damgard construction as constants at the beginning, in the compression with the first message block. There are also times when they are required to be random such as in block ciphers - the purpose of this is so that different messages are encrypted differently. This means that an attacker seeing two messages encrypted with the same key doesn’t give them any more information than the whole message sent together.
Let us consider the usage of the IV in a protocol such as WEP - it uses a 64-bit key where the user is responsible for picking the first 40 bits and the final 24 bits are generated randomly. Since the IV is publicly known as is only 24 bits, it only takes 2^12=4096 different generated IVs before an older one is reused. This defeats the whole purpose of not giving the attacker extra info (described above) and allows the whole key to then be cracked. This is because the user-generated component has fairly low entropy - it only permits 5 character user inputs (with 64 combinations - 0->10, a->z, A->Z) which only represents an 8% subset of all bit combinations - 2^40.
Mixing Data & Control
I’ve discussed this topic at length in previous blog posts, although I did find Richard’s example with the postal stamps quite interesting. Basically he sent himself a heap of ‘expensive’ express postal stamps from within the post office - so the ‘data’ was the stamps and the ‘control’ was the ability to exit the store with them.
I also had another interesting thought regarding this in the tutorial the other week with autonomous cars. If every self-driving car is providing driving data back to their company servers, which is then used in improving their fleet of cars’ autonomous capabilities, isn’t this also technically an example of mixing data and control? For example, if you fed faulty data from hundreds of locations back to the servers which then was distributed back to the users, it could be problematic.
Harvard Architecture
There are two main types of architectures used in microcontrollers: Von Neumann and Harvard. Von Neumann basically has all the memory in one location, with instruction and data using the same bus. Harvard overcomes the data and control issue by having code and data on separate buses; this actually results in an improved performance as they can loaded at the same time.

Buffer Overflows
We had already looked at these overflows in the tutorials a bit, so looking at them in the lecture wasn’t too unfamiliar. The basic idea is that you feed in too much user input to some shonky code which doesn’t validate the length to the size of the buffer. This results in overwriting neighbouring data to the buffer - if this is within a function, it means registers on the stack get overwritten. This may include other variables (affecting control flow within the function) or the return address itself (affecting control flow after the function). Attackers can basically use this to write their code into the buffer and then overwrite the return address to the start of the buffer. (and their code starts executing!)
Most modern programming languages have checks in place to prevent buffer overflows on the stack. (the heap is another gold mine) Canaries in the stack can also be used to detect when they occur - before jumping to the return address, they check a small integer value (of known value beforehand) just before the return address. Although, if you were able to find an exploit to read the variables on the stack beforehand, you could potentially dodge the canary still.
Proof of Work
I’m going to write an article to discuss this in more detail later with regards to the extended cryptocurrency talk. The basic idea is that miners are searching for a SHA-256 hash (with leading 0s depending on ‘difficulty’) which incorporates the previous block and current transactions as part of a header. They search through the hash combinations by changing a ‘nonce’ value within the header which leads to changes in the overall hash. You have to do a lot of work in order to find this hash which provides the security for proof-of-work networks such as Bitcoin.
Moore’s Law
This law is an interesting consideration when talking about how many bits of security we need in certain applications. It basically observed that the number of transistors in an IC doubles every two years - i.e. what we think is ‘safe’ should be 1 bit of security higher every 2 years. The problem is we’ve reached a point where it is getting ridiculously hard to reduce the size even more, so I don’t think it will continue to hold true. However if we find completely different methods (i.e. quantum computing) we could achieve an even more significant ‘sudden’ increase.
Disk Encryption and Cold Boot Attacks
Encryption intends to generate a key based on a user-given password which is then used to encrypt the hard drive contents with a block cipher such as AES (used in Bitlocker). The Master Boot Record (MBR) is typically not encrypted without other hardware-based solutions. The problem with these forms of encryptions is that they are vulnerable to cold boot attacks - the keys used in the decryption may be left in memory when the computer is turned off. This means an attacker with physical access may be able to boot the machine with an OS (on a USB say) and then take a dump of all the memory.
They can then analyse this to look for the key or other user data. Typically the attack is possible if it occurs within 90 minutes of the memory losing power, however this window can be extended in some cases by cooling the modules. Even if some of the data disappears from the memory, the process is somewhat predictable and the missing bits can be rebuilt to an extent.
Brief History of Ciphers
Security by obscurity pretty much dominated the encryption scene up until the 1970s - banks used to ‘roll their own crypto’ and this was an awful idea. It wasn’t until the 1970s when NIST began releasing password and encryption standards. They started a competition to develop a standard data encryption method which was eventually won by IBM who developed the block cipher Lucifer. This method was modified by the NSA to be resistant against differential cryptanalysis, a reduced cipher size of 56 bits and a reduced block size of 64 bits - it became the standard and was known as DES.
It wasn’t long before it was realised how weak DES in terms of the fact it was vulnerable to brute force search - this occurred due to a number of export laws which ensured the use of ‘breakable’ ciphers. (absolutely hilarious) Eventually the NIST underwent another process to find a replacement from 1997 which was a lot more transparent, and resulted in the Advanced Encryption Standard (AES256). Currently there are no good ‘known’ methods to crack AES in a significantly fast enough time (provided a random enough key is used). The main forms of attacks against it are a bit unrelated - they are side-channel attacks such as cache-timing which involve monitoring the CPU to determine the key.
Issue of Authentication
I think solving the problem of authentication is one of the biggest in cyber security - it revolves around the fact that any data a computer system may use for authentication relies on a small piece of information which ‘summarises you as an individual’. For example, it may be an image of your face or it could be a password that only you know. The ability to authenticate a person can only be a good as the ability to keep all these components from an attacker’s hands.
The main strategy (which I think I’ve touched on) we use today in authentication is defense in depth - we try to use as many factors as we can to verify you as an individual. The more factors required, the harder it is for an attacker to spoof your identity; the main factors we typically use are:
Something you know - i.e. password
Something you have - i.e. message to phone
Something you are - i.e. physical identity (picture)
Being able to know that these factors are secure is difficult too - we are only good at proving when information is known as opposed to secret. We may think that measures such as biometrics are difficult to fake, but at the end of the day, we have to remember that computer systems are based on binary. If you know the binary input that will open that door (i.e. how their fingerprint is represented), you can open the door.
Web Security - Extended
I already knew a fair bit about the different attacks due to some experiences in web development and my something awesome. However I will go over some of the key talking points. The basic idea is a HTML page will define the elements on a page, and within this we sometimes have control logic with Javascript which defines how these structures may behave or how a user can interact with them. A lot of the flaws in web revolve around the fact that data (the elements on the page) and control (the Javascript) are mixed in the same location.
The other main thing you need to know is that cookies are stored in a browser for each website you visit. A lot of the time it involves preferences for the sites, but they are also commonly used for persistence in logins; i.e. a unique ID to associated you with a user on the server-side. Sessions are pretty much cookies except they are destroyed when you close your browser and only contain IDs which link to a session file that is stored on the server.
XSS attacks for example rely on someone injecting Javascript into the user input of a website, which is then displayed to other users of the site. Their browsers will then execute the code, which could potentially do something malicious like hijacking their cookies. You can read more about them in my OWASP article on them here. Cross-site request forgery is somewhat similar to these - basically it relies on an authorised individual clicking on an image or link which executes some Javascript which uses their authority on a site for malicious purposes.
The Samy XSS worm was a good example of this - anyone who viewed a profile infected with the worm would execute the script and become infected themselves. This meant they would send Samy a friend request, and if any of their friends viewed their profile they would also be infected. Over 1 million users were infected with the worm on MySpace within 20 hours.
The other main problem associated with web is injection in the server itself. SQL injection is the main source; it involves including SQL code in a user input which (if not escaped) will execute on the server resulting in outputting unintended data or making changes to the database. Without proper protections, it means you can bypass authentication forms and steal all the data from the database.
Web Security - Cryptocurrency
I was part of this presentation and I will give a more detailed writeup on it soon.
6 notes
·
View notes
Text
Key Pieces of Bitlocker
At a while, you can want to switch off the encryption on your external encrypted drive. Briefly, encryption is fundamentally the procedure for making any data unreadable by anyone without proper authorization. After the encryption is done, you may see the status which indicates that BitLocker is on for drive C. The genuine encryption of the drive will be dependent on how large it is and the number of files are on it. There are a number of ways to run BitLocker Drive Encryption. It is a pretty advanced and useful feature of Windows and with the latest Windows 10, it's better than ever. After that, it will be turned off on the specific drive and the data is not protected by Bitlocker any more.
It is possible to get rid of a password only once you configure a new procedure of authentication. You will have to use a password you will provide when the system boots. The only issue is that you need to have a password to unlock the system that was specified when encrypt. The password shouldn't be our issue. Moreover, you must make certain you are utilizing a strong password and preferably multi-factor authentication. For passwords you have to create yourself, I prefer the DiceWare method to create strong passwords that are rather easy to remember and difficult to guess. For the reason, you wish to decide on a strong password for the account on your computer.
Your drive is going to be unlocked for as long as it's connected to your computer, but at some point, you might reboot, or will need to eject it. It is imperative to mention that if you wish to eject the USB drive, you want to click the Eject button in the computer software. Note, it is going to take a while particularly if it's a massive drive. If you wish to decrypt your hard disk, all you have to do is turn off BitLocker. So before you begin to encrypt the hard disk, you must do some particular TPM operations, which we are going to discuss in detail a bit later. With BitLocker, you make a digital hard disk, and encrypt it.
You are able to select several various ways of unlocking the drive. Then decide how you want to back up your recovery key, and last, choose how you want the drive encrypted. If you don't have either of them, it's necessary for you to erase the drive at the price of your experiment data. It's possible to also encrypt different drives than only the system drive. The operating system drive should not be encrypted with Symantec PGP or some other drive encryption technology.
The Unexpected Truth About Bitlocker
When the encryption procedure completes you'll be notified by means of a window. Depending on the size of the hard drive and the amount of data, it can take a long time so be patient. It will repartition the disk as necessary. When you discover that the encryption procedure is finished, the drive level should read BitLocker on. In addition, the procedure for establishing a personal VPN is a tiny complex.

When it's already being used, select the second option Encrypt entire drive. Being on the Internet you may take advantage of the absolute most up-to-date troubleshooters from the Windows on-line Troubleshooting Service. After encryption, nobody is going to gain access to such files till they sign in with your account. Read about the techniques you can utilize to restore access to a disk encrypted with BitLocker, and the way to restore data via an encrypted disk which you may no longer access. Also, if somebody else gains access to your passphrase or key, they will finally have the capacity to decrypt your filesso be certain to store it in a secure spot. Please note that anybody may use the recovery key to access the drive, even in case they do not know the password entered in the prior step, so please don't disclose it to others. To disable eDrive, you require physical accessibility to the drive so you may use the PSID printed on the label.
All About Bitlocker
On way it is possible to safeguard your data is by employing encryption. If you're interested in securing your data on your desktop computer or cellular devices, BitLocker is a wonderful option. DRA keys are used if you should get data off an encrypted drive and there's no wise cart readily available to decrypt. As an example, it refuses to encrypt data if you're using a weak password. The only means to guard your data completely is by utilizing encryption. In case the BitLocker metadata data on the drive is now corrupt, you must have the ability to supply a backup key package along with the recovery password or recovery key. It's now feasible to defeat the Windows Bitlocker with merely a very simple trick.
youtube
1 note
·
View note
Text
The Most Popular Enable Bitlocker
If your PC doesn't have TPM, then console indicates that Compatible may not be found (see screenshot). Then you will have to manually restart your PC. When you restart your PC, you might observe a warning your system was changed. You're able to keep working on your computer during the encryption phase, but things could be running a bit more slowly than normal. If you've got an older PC with a couple more miles on the difficult drive, you should decide to encrypt the whole drive.
If you're using Windows 10, you will observe an extra screen allowing you to pick an encryption procedure. Windows 10 has an extra feature named Device Encryption. Following that, your computer should reboot and when you log in again you'll observe the BitLocker window. Windows 10 gives you the ability to allow a Night Light mode (previously referred to as Blue Light) to decrease eye strain. After the window is shaken again, all of them are restored, very similar to desktop preview. Windows 7 also uses the TRIM command. You'll be presented a dialog window to enter new information regarding the image. Want to Know More About Enable Bitlocker Windows 7?
The bitlocker tool demands a reboot after producing the partition anyway. The Repair-bde command-line tool is designed for use once the operating system doesn't start or when you can't begin the BitLocker Recovery Console. There are several full disc encryption software to encrypt your drive or you may use inbuilt Windows option called Bitlocker. In the event your computer doesn't have a Trusted Platform Module (TPM) or the TPM isn't supported, you are going to get a warning. You'll be prompted to restart your computer to begin the encryption procedure. Some computers, particularly on the consumer line, don't have them. It is possible to get rid of a password only once you configure a new procedure of authentication. For instance, the user can enter a PIN or offer a USB drive that has a key. Please note that anybody may use the recovery key to access the drive, even in case they do not know the password entered in the prior step, so please don't disclose it to others.
Sensible option in my opinion and if you wish to finish the encryption quickly, go with first choice. BitLocker drive encryption is a somewhat advanced and useful quality of Windows and with the most current Windows 10, it's far better than ever. When the BitLocker drive encryption is done, you will observe the BitLocker On. Two factor authentication takes the basic passwords or simple to guess passwords from the equation so they are no longer a risk. Encryption is increasingly essential as organizations decide to guard their sensitive data. Briefly, it is basically the process of making any type of data unreadable by anyone without proper authorization. There is an additional way to Enable whole disk encryption on Windows 10.

You will have to copy or write the files to a partition readily available to the neighborhood device so as to modify them. It is possible to save a number of keys of different kinds into a single file. After the VHD file is made, it is going to want to get initialized. Employing BitLocker-encrypted VHD files is one particular possibility.
Placing the enable command at the beginning will significantly boost the deployment time. When there is a simpler way please allow me to know. There's no need to decrypt the entire drive simply to access the files. When it's already being used, select the second option Encrypt entire drive.
There's a choice to save your data when it get steals or you're giving it to someone for quite a while. There's an alternative though and you don't need to have a TPM to enjoy BitLocker in Windows. Additional options are also supplied for the login UI, for example, ability to customize the look of interface lighting and shadows. After you click Applysome additional options should appear. Web-based remote help alternatives are available.
When the initialization procedure is finished, BitLocker To Go will ask you to establish a password which you will utilize to unlock the drive, as shown in Figure C. The procedure is nondestructive, and therefore you don't need to be worried about any data that's already on the drive. The encryption procedure starts when the computer reboots. It will repartition the disk as necessary.
It's possible to select several various ways of unlocking the drive. It is possible to also encrypt different drives than only the system drive. If you wish to decrypt your hard disk, all you have to do is turn off BitLocker. With BitLocker, you make a digital hard disk, and encrypt it. Make certain you have a USB flash drive readily available to store the startup key.
youtube
1 note
·
View note
Text
Choosing Turn on Bitlocker
The remaining part of the procedure is the very same as the normal BitLocker setup procedure. You can locate the remainder of the BitLocker specific PowerShell cmdlets here. The period of time required will be contingent on the size of the drive. Before you do so, you can want to learn the time needed to encrypt the drive. Adding BitLocker is not going to encrypt any drives, it will merely make BitLocker available should you desire to utilize it. Just click each option you wish to utilize in turn, and stick to the directions. Find the flash drive you desire to encrypt, and click the Turn on BitLocker link.
For most people, it's not an easy job. The practice requires a while and it involves a reboot, but it is a very excellent concept to run it. After a while, it completes. The entire process is really easy, easy and takes a couple of clicks. Theencryption process will begin.
Hopefully by this time, you ought to be convinced that using BitLocker together with a TPM chip is a great thing. Turning off BitLocker isn't an intuitive practice. It is not recommended by Troy IT under any circumstances. BitLocker To Go will ask you to choose how you wish to unlock the drive once it's encrypted. BitLocker to Go can definitely supply the kind of encryption that you require, but the encryption method which I demonstrated in the very first region of the series requires users to manually encrypt their very own USB flash drives.
To back as much as a BitLocker encrypted destination, the drive has to be unlocked. You can't eject a drive that's being encrypted. If you would like to decrypt your hard disk, all you have to do is turn off BitLocker. So before you begin to encrypt the hard disk, you have to do some particular TPM operations, which we are going to discuss in detail a bit later. With BitLocker, you make a digital hard disk, and encrypt it.
It's possible to select the method by which the drive needs to be unlocked, either with a password or an intelligent card. A partially encrypted drive can still be obtained in Windows but it cannot serve as a backup destination for a BitLocker job. When you choose the encrypted drive, you'll be prompted to join the password.

It's possible to encrypt more than 1 drive at one time, reducing the whole time necessary to encrypt your set of prepared drives. The BitLocker key can likewise be stored on a USB drive. Ever since your USB drive ought to be locked away, you'll be prompted for the PIN, but again, another fine option if necessary. Note, it is going to take a while particularly if it's a huge drive.
Your drive will then be secure with BitLocker. You can pick the drive that you need to encrypt with BitLocker. It's possible to select several various ways of unlocking the drive. You're able to choose how much of the drive you would like to encrypt. In precisely the same process it's possible to decrypt more drives if you would like. If you must be in a position to access a BitLocker-to-Go-protected drive on a Vista or XP system, you are able to but with a few caveats. You are able to also encrypt different drives than only the system drive.
In order to facilitate the process of producing the system volume Microsoft provides a tool known as the BitLocker Driver Preparation Tool. It may either be run as a graphical tool or run from a command prompt with a variety of command-line options to perform the required task. The bitlocker tool wants a reboot after producing the partition anyway.
An unusual icon near the hard disk can reveal an issue. You will notice the screen below asking if you prefer to run the BitLocker check. If a blank screen appears and the computer doesn't restart after you apply the SDR disk, make sure that the boot drive has the required number of free space. After the window is shaken again, all of them are restored, very similar to desktop preview. Following that, your computer should reboot and as soon as you log in again you'll observe the BitLocker window.
If necessary, the choice is there. On the next page you will be given the choice of running a BitLocker Check. Well, cancelling isn't the ideal word as there is not any choice to cancel but only Decrypt'. If you selected the sensible card option, you'll be prompted to insert the intelligent card. When it's already being used, pick the second option Encrypt entire drive. Please be aware that anybody may use the recovery key to access the drive, even in case they do not know the password entered in the former step, so please don't disclose it to others.
Anyone with local accessibility to a Windows machine on the opposite hand may exploit the matter.
youtube
1 note
·
View note
Text
[ad_1] Maximum folks have some fairly delicate information on our PCs. Whether or not it’s our tax returns, monetary information, password lists (significantly, simply use a password manager already), or simply information you don’t need any individual to look below any cases, all of us have our causes for in need of just a little extra safety. Which means that it’s time to get into encryption, which is the place a power, report, or folder is encoded (encrypted) so to make it unreadable to any individual excluding the individual with the appropriate key to decrypt it. The upside is that any one making an attempt to get entry to it with out the password will fail, and the drawback is that should you lose the encryption key (most often a password), no matter you had encrypted can be long past perpetually, until there’s a solution to get well it. Happily, in Home windows you have got choices on how to do that for completely no price in any way. Home windows 10/11 Professional customers have encryption equipment constructed into the OS; whilst customers of the House variant should use a loose third-party software. Whether or not you need full-drive encryption, or only a safe area to stay your essential information, this sort of equipment will are compatible the invoice. The way to use Bitlocker for full-drive encryption Home windows 10 or 11 Professional gives two integrated encryption equipment: There may be this simple tool, which can be utilized to encrypt any report—then again, in our trying out we had problems with it, so we suggest the use of the opposite choice, Bitlocker. Bitlocker gives full-drive encryption simplest, then again, however fortunately you'll make a choice from encrypting all the power, or simply the gap that’s getting used. Encrypting a whole power does incur a efficiency penalty, but when it’s your paintings pc and the whole lot you're running on is to your C:/ power, it’s a excellent technique to believe. It’s additionally a excellent choice for exterior drives, as maximum folks have misplaced a couple of of the ones over the process our lives, and lord is aware of what we had on them after we did so. Putting in place Bitlocker is somewhat painless, so apply alongside. For those who simply sort the phrase Bitlocker in Home windows seek it’ll seem, or you'll in finding it within the Regulate Panel indexed as Bitlocker Control. While you open it, you’ll be offered with a listing of your hooked up garage gadgets, each interior and exterior. We’re going to put in it on our exterior power, F. Josh Norem/IDG After you’ve enabled Bitlocker at the power of your selection, Microsoft will ask you ways you need to free up the power, both by the use of a password or with a Sensible Card; we selected a password. If you select a Sensible Card you’ll want a USB power, which can be paired with a PIN code to free up the power. Josh Norem/IDG Subsequent, Microsoft will ask you ways you need to revive the restoration key, which might save your in the back of should you ever put out of your mind your password, or lose your Sensible Card. We selected to have the restoration key out there by the use of our Microsoft Account, as that appears to be probably the most safe approach of storing it, and without a doubt smarter than printing it out! Josh Norem/IDG One of the vital remaining steps is deciding how a lot of the power to encrypt: it all, or simply the used area. We selected simply the used area just because it will have to lead to sooner power efficiency. Josh Norem/IDG You’ll even have to make a choice which encryption mode you need: one who works with more moderen PCs, or one who’s appropriate with older variations of Home windows. Since we simplest have Home windows 10/11 PCs in our area, we selected the more moderen model. Josh Norem/IDG We’re all set now, so move forward and click on Get started Encrypting. On our 256GB check power, the encryption procedure took only a few seconds. As soon as it’s whole, your information is now encrypted.
Josh Norem/IDG Going ahead, putting the now-encrypted power leads to the mistake noticed underneath, as an alternative of simply robotically opening find it irresistible does for exterior garage. Josh Norem/IDG You’ll additionally get a pop-up from Home windows asking you to sort the encryption password, or the restoration key. Fortunately, Home windows provides you with the choice of robotically unlocking on a undeniable PC, which is to hand should you’re the use of it so much on a house PC versus a pc. Josh Norem/IDG For those who’re the use of Home windows House, or simply need an encrypted folder You probably have the House model of Home windows, you'll nonetheless get in at the encryption recreation with Veracrypt, which is a loose software that may encrypt a folder, power, or partition. This to hand instrument permits you to mount an “encrypted digital disk” in Home windows, MacOS, and Linux. While you input your password the “disk” is fastened and your information seem, however whilst you shut this system, the disk unmounts and the information are not out there. We didn’t check the disk or partition encryption, so those directions simplest observe to making an encrypted folder. Let’s leap in, lets? To get began, obtain the loose software and fireplace it up. To start out, you’ll wish to create the encrypted quantity, so click on on Create Quantity. Josh Norem/IDG At the subsequent display screen we selected Create an encrypted report container, as we’re simply on the lookout for a repository for our delicate paperwork and media. Josh Norem/IDG Subsequent we selected Usual Veracrypt quantity because it’s high quality for nearly all of house customers. Josh Norem/IDG Subsequent you have got to make a choice the positioning for this report, so believe the dimensions of the “folder” you'll create, and ensure your garage tool has sufficient room to carry it. We made a folder on considered one of our laborious drives classified “Veracrypt” since we’re excellent at hiding issues, after which typed the identify of the report into the discussion field that gave the impression, leading to what you spot within the screenshot. Additionally word you'll create this quantity on a detachable power too. Josh Norem/IDG Subsequent you have got a large number of encryption choices, however simply make a choice AES and click on via. AES-256 encryption is thought of as the most powerful type of encryption and can't be cracked with brute energy, so it will have to paintings on your functions. Josh Norem/IDG Now make a decision how giant you need your container to be. You'll be able to’t return and make it larger later, so shoot for the moon, assuming you have got sufficient room. We made up our minds to make ours 1GB. Josh Norem/IDG With that data inputted, this system is able to create the quantity to your power. Don’t be afraid via the entire “hacker” having a look stuff at the display screen, simply click on Layout and also you’re off to the races. Josh Norem/IDG As soon as the method is finished, it is going to display you that the quantity is in a position. Josh Norem/IDG You'll be able to now navigate to the place the container is solely to make sure its life and notice its report measurement, if this is essential to you. You’ll word that clicking on it does not anything, as it's a must to use the Veracrypt program to if truth be told open it, so let’s do this now. Josh Norem/IDG Now it’s time to get entry to our encrypted quantity. Open Veracrypt and make a choice Make a selection Document from the primary menu, then navigate to the folder the place it’s situated. You’ll additionally want to make a choice a quantity letter from the record equipped, so make a choice one that isn't in use like X or M, one thing like that. When you’ve selected the quantity letter, and navigated to the report, click on Mount. Josh Norem/IDG After that completes you’ll see the similar window with the trail in your report in blue.
Double-click that and the quantity will open. You'll additionally see the similar quantity seem in This PC as neatly, should you favor that approach. Josh Norem/IDG Et voila—listed below are our encrypted information! Those are relatively delicate cat pictures, clearly, however be at liberty to throw the rest you need in there, realizing it’s about as safe as it may possibly in all probability be for now. Josh Norem/IDG One ultimate word: So long as the quantity is “fastened,” it's out there. In order that way should you open it up, put some information in it, then simply stroll away out of your PC, any individual with bodily get entry to to it may possibly additionally have a look at the information. To finish the method, it's a must to click on Dismount at the major display screen of Veracrypt to close the door to your encrypted folder. When you’ve dismounted the quantity, it is going to not be out there with out the encryption password. Josh Norem/IDG To encrypt or to not encrypt? If you wish to encrypt your power to forestall unauthorized get entry to, it’s constructed proper into Home windows Professional variations, so it's price it on one thing that would possibly get “smashed and grabbed” from a automobile, similar to a pc. To your desktop PC that by no means strikes, the advantages are arguable. We do like having an encrypted folder by the use of Veracrypt, then again, for all of our tax returns and equivalent paperwork. Simply be completely positive you stay the password someplace protected, since you'll by no means get again into that safe “disk” should you lose it. [ad_2] #encrypt #information #Home windows
0 notes
Text
Windows11 24H2 will enable BitLocker encryption by default, including Home Edition
Windows11 24H2 will enable BitLocker encryption by default, including Home Edition
Microsoft plans to enable BitLocker encryption by default during the Windows 11 24H2 installation process. This will have two impacts on users: one is affecting the performance of the hard drive, and the other is that if the user does not have the decryption key, related data may be lost.
We noticed the change while testing the installation of Windows 11 24H2 using the newly designed installer, and thankfully users can disable Device Encryption in the Privacy & Security section of Settings.

According to reports, Windows 11 24H2 brings an improved installer. The new installation process no longer starts with a "blue window" but is similar to an in-place upgrade, except that BitLocker encryption of the drive may be performed in the background during the new installation process.
This may not only affect Windows 11 Pro and above, but also Home editions, which may surprise some.
Using BitLocker to encrypt drives is not new on Windows 11 PCs, with some OEMs already implementing it on Pro machines. Of note, there are reports that the default software-based BitLocker encryption on Windows (XTS-AES 128) can cause significant performance degradation even on some of the fastest SSDs, such as PCIe Gen4 NVMe SSDs. Furthermore, unsuspecting users may be completely unaware that their device is encrypted, and if the key is lost or not saved correctly, the encrypted data may not be recovered.
And if you need Windows 11, You can buy it from keyingo.com, it is much cheaper than the Microsoft store !
1 note
·
View note
Text
A (long) PSA about flash drives(and BitLocker)
If you use a flash drive and use a Windows/Microsoft computer, use BitLocker to lock your flash drive with a password. When you do so, your data is safe and only you can access it. The process takes a little while, but it’s worth it.
I did it on one of my flash drives, and it makes me feel more protected in case I accidentally drop my flash drive somewhere or someone jacks it from me.
Be sure to use a password that only you know, as if you don’t do so then others can get into your files with ease and steal/damage/corrupt/etc all that you have on your drive.
Here’s how you do it(steps -1, 0, and 0.5 probably only apply to me and maybe a couple other people, but I’m putting them here just in case):
Step -1: Be sure to decrypt your device first if you encrypted your files,,,,(Hello my name is Ruby and I’m not super good at technology,,,)
Step 0: Wait for your files to be decrypted,,,, Be Patient,,,
Edit: Step 0.5: Actually I guess if you save the key to your Microsoft account you won’t have to do this,,,
Step 1: Plug in your flash drive
Step 2: Right click on your flash drive’s name in the list of files on the left hand side.
Step 3: Click “Turn on BitLocker”(it might say someone different for you, but that’s what it says for mine)
Step 4: Set up a password
Step 5: Decide where you want your recovery key to go(I saved my second flash drive to my Microsoft account, but you can also print it and/or save it to a file)
Step 6: Choose to either encrypt the used disk space only(“faster and better for new PCs and drives”) or encrypt the entire drive(“slower but best for PCs and drives already in use”)
Step 7: Chose the encryption mode you want to use: new(“best for fixed drives on this device”) or compatible (“best for drives that can be moved from this device”)
Step 8: Click “Start encrypting” and wait for it to be done. Do not remove the drive until it says you can or else the encryption will not be completed.
Step 9: Follow any more instructions it gives you
Step 10: Your drive is now protected
TL;DR If you use a flash drive and a Windows/Microsoft computer, use BitLocker to protect your flash drive with a password and protect your files from being stolen.
#long post#ruby words#tutorial#bitlocker#microsoft#computers#flash drives#flash drive#computer#windows#encryption
3 notes
·
View notes