#diffusion workflow
Explore tagged Tumblr posts
Visit Tumblr Blog
Explore Tumblr blogs with no restrictions, modern design and the best experience.
Last Seen Tumblr Blogs


Fun Fact
Tumblr’s reach among the 26-to-35-year-olds in the US is 11%.
Text


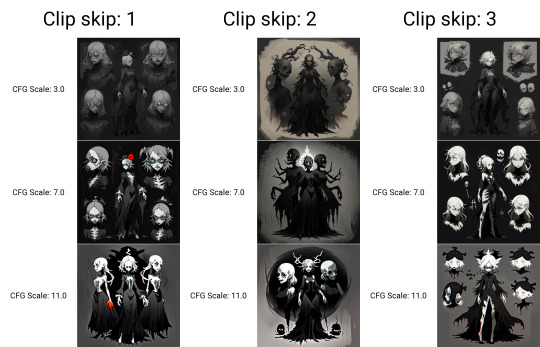
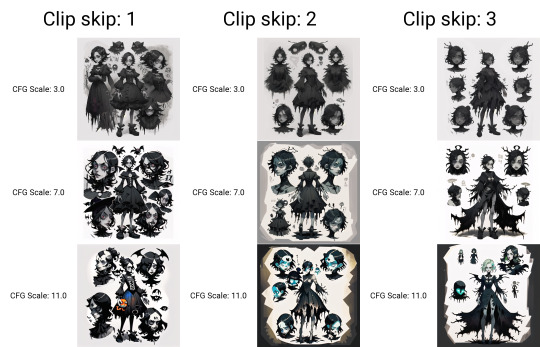
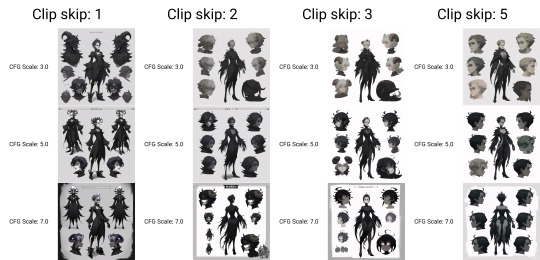
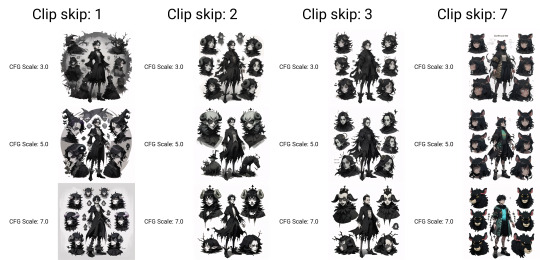
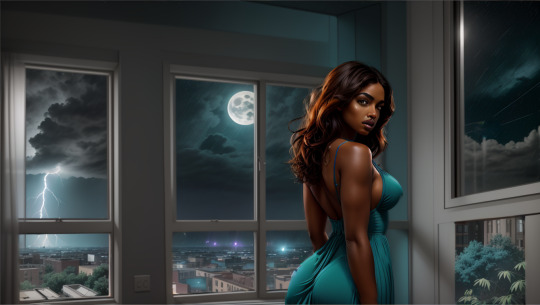
Workflow for generating 25 images of a character concept using Automatic1111 and Control Net image diffusion method with txt2img;
Enable Control Net , Low VRAM, and Preview checkboxes on.
Select the Open Pose setting and choose the openpose_hand preprocessor. Feed it a good clean source image such as this render of figure I made in Design Doll. Click the explodey button to preprocess the image, and you'll get a spooky rave skeleton like this.


Low VRAM user (me, I am low VRAM) tip: Save that preprocessed image and then replace the source image with it. Change the preprocessor to none, and it saves a bit of time.
Lower the steps from 20 if you like. Choose the DPM++SDE Karras sampler if you like.
Choose X/Y/Z plot from the script drop down and pick the settings you like for the character chart about to be generated. in the top one posted I used X Nothing Y CFG scale 3-7 Z Clipskip 1,2,3,7,12


Thanks for reading.
#automatic1111#stable diffusion#synthography#ai generated images#ai art generation#diffusion workflow#ai horror
3 notes
·
View notes
Text
Anatomy of a Scene: Photobashing in ControlNet for Visual Storytelling and Image Composition
This is a cross-posting of an article I published on Civitai.
Initially, the entire purpose for me to learn generative AI via Stable Diffusion was to create reproducible, royalty-free images for stories without worrying about reputation harm or consent (turns out not everyone wants their likeness associated with fetish smut!).
In the beginning, it was me just hacking through prompting iterations with a shotgun approach, and hoping to get lucky.
I did start the Pygmalion project and the Coven story in 2023 before I got banned (deservedly) for a ToS violation on an old post. Lost all my work without a proper backup, and was too upset to work on it for a while.
I did eventually put in work on planning and doing it, if not right, better this time. Was still having some issues with things like consistent settings and clothing. I could try to train LoRas for that, but seemed like a lot of work and there's really still no guarantees. The other issue is the action-oriented images I wanted were a nightmare to prompt for in 1.5.
I have always looked at ControlNet as frankly, a bit like cheating, but I decided to go to Google University and see what people were doing with image composition. I stumbled on this very interesting video and while that's not exactly what I was looking to do, it got me thinking.
You need to download the controlnet model you want, I use softedge like in the video. It goes in extensions/sd-webui-controlnet/models.
I got a little obsessed with Lily and Jamie's apartment because so much of the first chapter takes place there. Hopefully, you will not go back and look at the images side-by-side, because you will realize none of the interior matches at all. But the layout and the spacing work - because the apartment scenes are all based on an actual apartment.
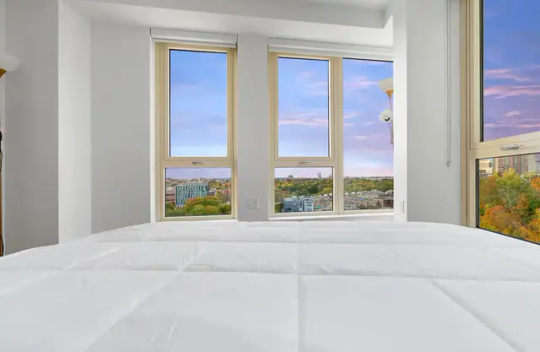
The first thing I did was look at real estate listings in the area where I wanted my fictional university set. I picked Cambridge, Massachusetts.
I didn't want that mattress in my shot, where I wanted Lily by the window during the thunderstorm. So I cropped it, keeping a 16:9 aspect ratio.
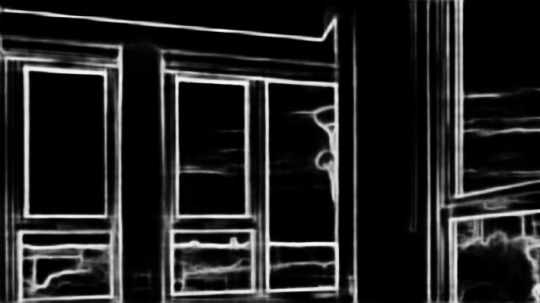
You take your reference photo and put it in txt2img Controlnet. Choose softedge control type, and generate the preview. Check other preprocessors for more or less detail. Save the preview image.
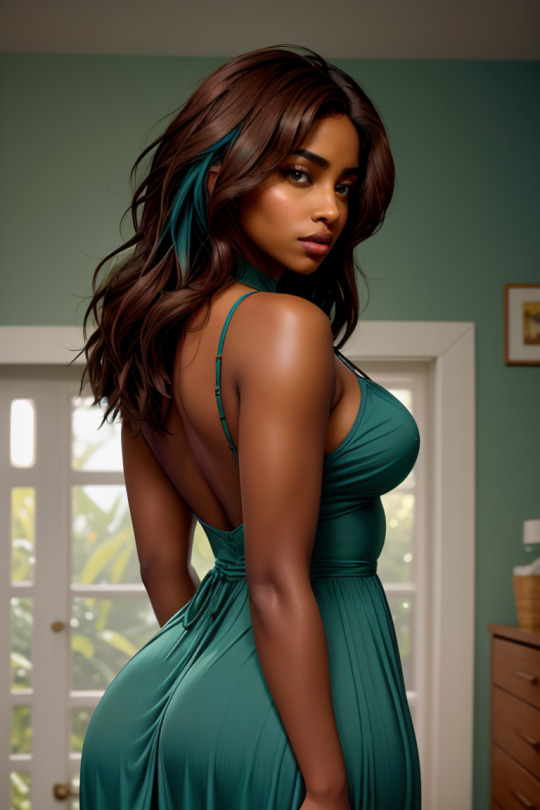
Lily/Priya isn't real, and this isn't an especially difficult pose that SD1.5 has trouble drawing. So I generated a standard portrait-oriented image of her in the teal dress, standing looking over her shoulder.
I also get the softedge frame for this image.
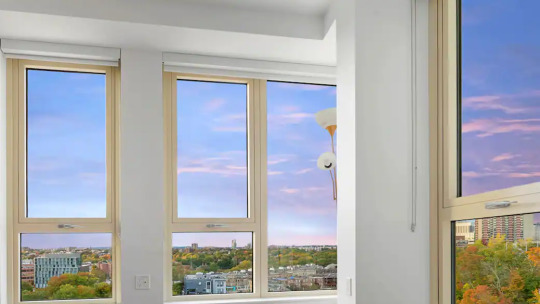
I opened up both black-and-white images in Photoshop and erased any details I didn't want for each. You can also draw some in if you like. I pasted Lily in front of the window and tried to eyeball the perspective to not make her like tiny or like a giant. I used her to block the lamp sconces and erased the scenery, so the AI will draw everything outside.
Take your preview and put it back in Controlnet as the source. Click Enable, change preprocessor to None and choose the downloaded model.
You can choose to interrogate the reference pic in a tagger, or just write a prompt.
Notice I photoshopped out the trees and landscape and the lamp in the corner and let the AI totally draw the outside.
This is pretty sweet, I think. But then I generated a later scene, and realized this didn't make any sense from a continuity perspective. This is supposed to be a sleepy college community, not Metropolis. So I redid this, putting BACK the trees and buildings on just the bottom window panes. The entire point was to have more consistent settings and backgrounds.

Here I am putting the trees and more modest skyline back on the generated image in Photoshop. Then i'm going to repeat the steps above to get a new softedge map.
I used a much more detailed preprocessor this time.
Now here is a more modest, college town skyline. I believe with this one I used img2img on the "city skyline" image.
#ottopilot-ai#ai art#generated ai#workflow#controlnet#howto#stable diffusion#AI image composition#visual storytelling
2 notes
·
View notes
Text

Workflow for content adjustment using Stable Diffusion and other tools
0 notes
Text
separation anxiety | S.R.
spencer's first case back from paternity leave involves children, so a concerned party reaches out to you for help
who? spencer reid x fem!reader category: fluff content warnings: mom!reader, dad!spencer, vaguely described breastfeeding, word count: 1.28k a/n: this is technically the reid family from cryptic, but you don't have to read cryptic in order to understand this fic.

Your book rested in your lap as you pinched the thin paper of the novel between your index finger and your thumb. You had one foot on the ground, and the other was on the bottom of your daughter’s stroller, effectively rocking the stroller in two-four time so the infant would stay asleep.
Just because the A-Team wasn’t around didn’t mean there weren’t people working in the BAU. A crying baby would certainly disrupt the workflow in the bullpen – even if the baby belonged to a member of the BAU. Although, you had already fed her – mostly covered – at Spencer’s desk, so maybe you were past the point of no return.
You and baby Nellie had just been staring at each other at home – she was doing tummy time – when your phone went off. A mysterious text from Derek Morgan had popped up on your phone screen.
Derek Morgan: Got a sec?
It wasn’t that you and Derek never texted, it’s just that it was usually under the realm of “on my way” messages and, more recently, baby pictures, but you usually communicated indirectly using a massive group chat that was created by none other than Penelope Garcia.
So, when you answered and he asked if you’d be able to meet the team when they arrived at Quantico, you hesitantly said yes. He explained more once they were on the jet, the case that they had been on involved young children, and there was a little girl that had struck a particular chord with your boyfriend – who was on his first case back from paternity leave.
Eleanor was three months old, and you weren’t sure who’d have a harder time being away from one another – her or Spencer. You hadn’t considered how Spencer would feel when confronted with a case involving children now that he was a father. Quite frankly, you had hoped that he would’ve had more time before he needed to face a situation like that.
You waited, still using your foot to rock Nell’s stroller as the cover diffused the fluorescent light, you could hear her moving now, likely having woken up from her nap, but if she wasn’t crying, you saw no reason to stop her from playing with the colorful toys that dangled above her.
Sighing, you peered up from your book to see the elevator opening on the sixth floor, revealing the team behind the steel doors. Morgan clocked you first, winking as he passed through the glass doors to the bullpen.
Spencer hadn’t noticed the two of you yet, so you slowly opened the cover of the stroller and picked your daughter up, holding her gently to your chest. The infant fussed a bit while she was being moved, effectively gaining the attention of her father, whose face lit up at the sight of his family waiting for him at his desk.
Pushing past the rest of the team, who had also noticed the small being in the room by this point, Spencer approached his desk, haphazardly dropping his bag on the metal surface before pressing a soft kiss to your lips. Before even bothering to separate your lips, he was taking the baby from your arms.
“Hey,” he murmured, pulling away from you slowly as he secured the baby in his arms, bending his neck to place his lips on the crown of Nell’s head, “I missed you, angel girl.” His voice was gentle as you looked on fondly, she reached out a small hand and gripped the collar of his shirt. “How are you?” He asked, turning his attention back onto you.
You smiled at the two of them, using a cloth to wipe the drool from her chin before Spencer took it from you, deftly draping it over his shoulder in case he needed it shortly. “Good,” you answered, “tired,” you added.
Across the bullpen, Emily waved at Eleanor, grinning broadly as she walked over to her desk with JJ. To her enjoyment, the baby responded by letting out a coo and smiling before turning her attention to her dad, nuzzling her face in his chest, “Did I miss anything?”
Raising your eyebrows, you shrugged, leaning back and sitting on Spencer’s desk, “She pushed herself up on her arms yesterday.” It wasn’t a massive milestone – you were still grateful that Spencer had been present for her first real smile.
“Oh, yeah?” He responded, proudly looking down at his daughter, who had moved on from nuzzling and was now trying to see just how much of her hand she could fit in her mouth. “Did you know that babies usually go through a sleep regression right before they learn a new skill?” He asked, directing the question at Nell, “That must be why your mama looks so tired.”
You waved him off, crossing your arms in front of your stomach, “She’s lucky she’s so cute.”
The familiar click-clack of heels notified you that Penelope Garcia had made it to the party, likely signaled by another member of the team, “The cutest little girl in the world!”
Even though every member of the team had held your daughter at one point or another, you weren’t entirely comfortable with her being handed off like a hot potato. This, combined with Spencer’s aversion to germs, led to an unspoken rule: wait until one of her parents offered to let you hold her.
“Did you want to take her for a bit?” You offered, looking over at Spencer as you did. He needed time with her, it wasn’t your intention to deprive him of that, but you needed to check in with him without the distraction of the baby. Handing her off, you spoke up, “Watch your earrings,” you tapped on your earlobe, “She will grab them.”
As Garcia held the baby, she made her way around the bullpen, allowing Eleanor to make grabby hands at everyone and everything.
Keeping an arm around his waist, you looked up at your boyfriend, “Are you alright?” You asked, keeping your voice low as there was no sense in airing your concerns to the now bustling office.
Spencer’s smile faltered ever so slightly, “They were just kids. There have been kids before, but now…”
“Now you’re a dad,” you finished for him. “It’s not just something that you could see happening to someone else; it’s something you could see happening to yourself.” Pinching his side slightly, you smirked at him knowingly, “You know, your levels of empathy and sensitivity increase when you become a parent. Your brain adjusts to make yourself a better parent.”
Rolling his eyes slightly, Spencer raised his eyebrows at you, “You know, I vaguely remember telling you something very similar last week when you were crying at an ASPCA commercial.”
You reached up to ruffle his hair, “Nice try at sarcasm, babe, but you and I both know you never vaguely remember anything.”
“How did you know to come here? That I’d need to see her?” Spencer asked, watching as Penelope continued to parade around the BAU, now taking her up the stairs and through the roundtable room. “Was it a mother’s intuition?” He suggested, taking up a lighter tone.
Turning around, your eyes followed Garcia as she walked with Eleanor, “I was contacted by a concerned party.”
Spencer followed your gaze, “I’ll thank Garcia when she gives our baby back.”
You hummed, “Actually, it was Derek, he-“ Your voice cut off abruptly, “Oh, Penny, I told you she’d grab them!” You called from Spencer’s desk, but Garcia was already on her way to return Eleanor, holding one hand to her ear as she handed the baby back to Spencer.


#criminal minds#spencer reid#criminal minds fanfic#spencer reid fanfic#criminal minds fanfiction#spencer reid x reader#spencer reid x you#written by margot#criminal minds fluff#spencer reid fluff#spencer reid fanfiction#spencer reid fic#criminal minds fic#spencer reid x fem!reader#spencer reid hurt/comfort#criminal minds hurt/comfort#spencer reid imagine#spencer reid one shot#spencer reid oneshot#spencer reid blurb#dad!spencer#spencer reid dilf agenda
3K notes
·
View notes
Note
Hi Andy! out of curiosity would you be able to give any tips on, and this is the best way I can think to describe this 💀, rendering the elf glow ears? Like the glow of a light source where skin is thin i guess?
It's something that I've been trying to figure out how to do for ages in procreate, and is something I've always really liked in yours as well as others work when it comes to elves! If not thank you anyway, take it easy
hi!! i'm so sorry this took a while to get to.... I drew up a little step by step including what layer modes i usually use, but it's not foolproof and will need some colour tweaks on a per-drawing basis until u find your stride with it.
the term for this is subsurface scattering!!! its how light penetrates translucent surfaces and bounces around inside/diffuses back out into a 'glow'.... that orange radiance is Blood and Cartilage.
some videos i've enjoyed on the topic (1) (2) (and there r many more to do with 3D rendering, if you're interested in going down the rabbit hole... i think i took off running with glowy ears after learning abt subsurface scattering in my 3D animation course back in 2018. ITS SO FUN)
i'm using my own shorthand for. everything i drew here. but i hope it makes sense for visualizing a quick workflow in procreate!!!!
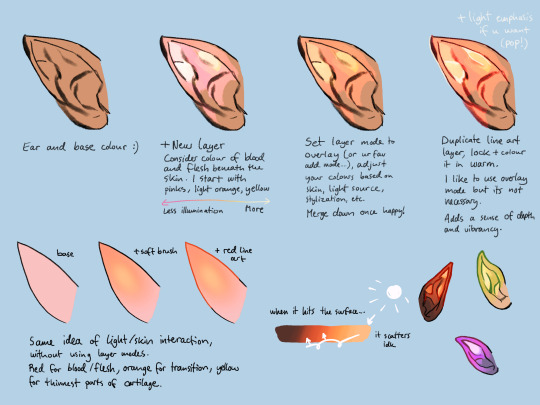
i personally use a mix of layer modes, depending on the piece, usually overlay, screen, or colour dodge... It is honestly something i should devote some proper study time to (paint from observation without layer modes - its Good to be able to better understand colour interaction this way) - but this is how I've been doing it for the last few years!
transcript under the cut:
from left to right:
Ear and base colour :)
+ New layer Consider colour of blood and flesh beneath the skin. I start with pinks, light orange, yellow Less illumination <--> More
Set layer mode to overlay (or ur fav add mode...), adjust your colours based on skin, light source, stylization, etc. Merge down once happy!
Duplicate line art layer, lock + colour it in warm. + Light emphasis if u want (pop!) I like to use overlay mode but its not necessary. Adds a sense of depth and vibrancy.
base + soft brush + red line art Same idea of light/skin interaction, without using layer modes. Red for blood/flesh, orange for transition, yellow for thinnest part of cartilage.
When it (light) hits the surface... it scatters idk
184 notes
·
View notes
Text
Asuka Langley Soryu
This one made using my new 3D workflow (and Stable diffusion and After Effects).
Visit my Patreon for her H video.
#asuka langley soryu#neon genesis evangelion#evagelion#bodysuit#ai waifu#anime style#2d pocket girls#dancing girl#so hot and sexy#90s anime#anime gif#ai
147 notes
·
View notes
Text
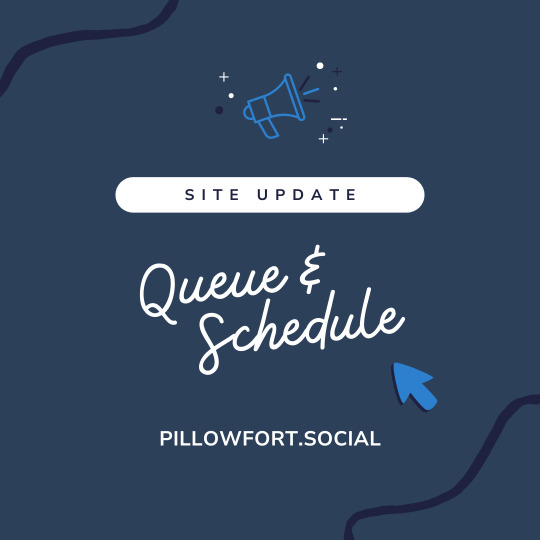
Site Update - 2/9/2024

Hi Pillowfolks!
Today is the day. Post Queueing & Scheduling is finally here for everyone. Hooray! As always we will be monitoring closely for any unexpected bugs so please let us know if you run into any.
New Features/Improvements
✨ *NEW* Queue & Schedule - One of the most highly requested features has finally arrived at Pillowfort. Users can now effortlessly Queue or Schedule a post for a future time.
Queue helps keep your Pillowfort active by staggering posts over a period of hours or days. Just go to your Settings page to set your queue interval and time period.
How to add a post to your queue:
While creating a new post or editing a draft, click on the clock icon to the right of the “Publish” button and choose “Queue.” Then click “Queue” when you’re ready to submit the post.
Schedule assigns a post a specific publishing time in the future (based on your timezone you’ve selected in Account Settings). How to schedule a post:
While creating a new post or editing a draft, click on the clock icon to the right of “Publish” and choose “Schedule.” Enter the time you wish to publish your post, click on “Submit” and then click “Schedule.”
How to review your queued & scheduled posts:
On the web, your Queue is available in the user sidebar located on the left side of the screen underneath “Posts.” (On mobile devices, click on the three line icon located on the upper left of your screen to access your user sidebar.)
Note: the “Queue” button will only display if you have one or more queued or scheduled posts.
A CAVEAT: It is not currently possible to queue or schedule posts to Communities. We do intend to add this feature in the future, but during development it was determined that enabling queueing & scheduling to Communities would require additional workflow and use case requirements that would extend development time when this project has already been delayed, and so it was decided to release queue & scheduling for blogs only at the present time. We will add the ability to queue & schedule to Communities soon after the Pillowfort PWA (our next major development project) is complete.
✨ End of Year Fundraiser Reward Badges: End of Year Fundraiser Rewards Badges will begin to be distributed today. We'll update everyone when distribution is done.

✨ End of Year Fundraiser Reward Frames: As a special thank you to our community for helping keep Pillowfort online we have released two very special (and cozy!) Avatar Frames for all users.
As for the remaining End of Year Fundraiser Rewards - we will be asking the Community for feedback on the upcoming Light Mode soon.

✨ Valentine’s Day Avatar Frame: A new Valentine’s Day inspired frame is now available!
✨ Valentine’s Day Premium Frames: Alternate colors of the Valentine’s Day frame are available to Pillowfort Premium subscribers.

✨ Site FAQ Update - Our Site FAQ has received a revamp.
Terms of Service Update
As of today (February 9th), we are updating our Terms of Service to prohibit the following content:
Images created through the use of generative AI programs such as Stable Diffusion, Midjourney, and Dall-E.
An explanation of how this policy will be enforced and what exactly that means for you is available here: https://www.pillowfort.social/posts/4317673
Thank you again for your continued support. Other previously mentioned updates (such as the Pillowfort Premium Price increase, Multi Account Management, PWA, and more) will be coming down the pipeline soon. As always, stay tuned for updates.
Best, Staff
#pillowfort.social#pifo#pillowfort#queue#schedule#site update#new release#dev update#valentines#ai policy#tos#premium frames
136 notes
·
View notes
Text
Level-5, Fantasy Life:i and Generative AI Stable Diffusion.
The Developer of Fantasy Life: i, Level-5. Just announced a lot of delays for their upcoming games at Level 5 Vision 2024: To the World's Children.
In this presentation, a lot of the games showed off BEAUTIFUL and unique looking art styles and character designs. They stand out from what a lot of current anime games were offering.
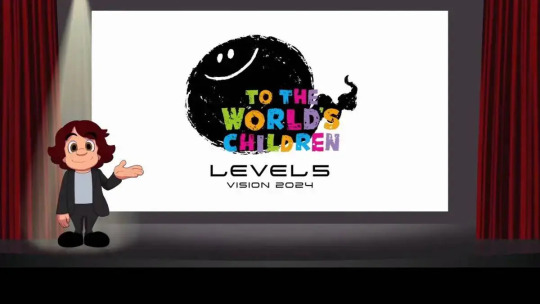
I watched it live on stream and my stream community enjoyed seeing it all. However the very next day?
We learned through this article posted above, that the developer had started to embrace using Stable Diffusion, a form of Generative AI, for the Art Assets in three of its games. Megaton Musashi, Yokai Watch, and Inazuma Eleven are shown in the official government presentation.
As someone who is very passionate about Fantasy Life i?
Seeing the company you grew up loving embrace a form of Generative AI that doesn't collect the data of their original works without explicit consent is HEARTBREAKING.
However, I want to be as clear and accurate as possible.
There is very clear evidence that Level 5 is embracing Generative AI for the games listed in the video. There is no clear evidence that these techniques were used in the development of Fantasy Life: i. This post is being shared with you for your awareness.
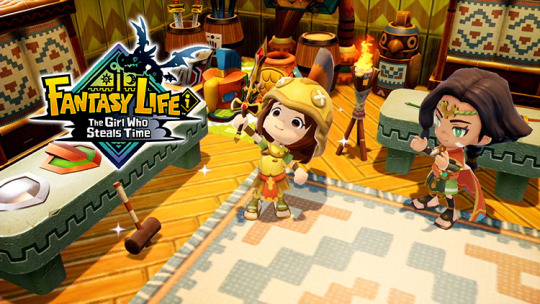
Fantasy Life for the 3ds is one of the most magical games I've ever played.
The game had so much charm that I showed a minimum of 6 different friends, and upon just watching me play it? They immediately went to buy the game themselves.
It was so charming, so simple yet aesthetically pleasing that anyone could appreciate it for what it was.
This game was developed by Level-5.

The fact that Level-5 was the developers is what got my eye on this game in the first place. Ever since Dark Cloud 2 for the Playstation 2 I fell in love with what these developers can do.
Dark Cloud, Ni no Kuni, Rogue Galaxy, I fell in love with the developers ages ago and what they do meant a lot to me.
It feels awful that I cannot feel comfortable supporting the developer as a whole anymore.
I don't fault anyone if they choose the purchase the game still because ultimately, i know the game means a lot. Part of me still wants to experience the game.
However, its clear that Level 5 is one of the developers who plan to fully integrate Gen Ai into their development cycle going forward and I wouldn't be surprised it's why they have so many delays in all their games. As they may be adapting to a new workflow.
As someone who heavily endorsed this game as a streaming vtuber, I felt it was only fair I spread this information. Thank you.
Link to the article will be on my following tumblr post for full context.
#fantasy life i the girl who steals time#fantasy life#nintendo#vtuber#level 5#yokai watch#inazuma eleven#stable diffusion#megaton musashi
40 notes
·
View notes
Text
I've managed to build up an entire workflow of AI image generation.
I start with a large proprietary model like Dall E or Midjourney, which are good at a lot of concepts, but tend towards PG content boundaries and fewer knobs to control the specifics. This can get me to a good starting point, like the following image.
I then take that image and play around with it in Stable Diffusion's Img2Img generator, playing with the style Loras I've made until I get something I like. Often that includes pushing it into a properly mature image. In this case, I've kept it Tumblr safe though.
Whether or not this counts as an improvement is debatable, but I enjoy putting a spin onto the output that makes it more clearly my own.
12 notes
·
View notes
Note
i have so many questions like how did you do the hair cards ? how do you apply them? did you do the UVs in Zbrush? how was the retopology for the pants, especially around the folds? what program do you use for retopo? was sculpting the mesh of the sword and texturing it super hard??? i'm impressed with your work i need to learn so much more
Hi! this is a great tutorial going over the type of hair cards I used for this project: https://www.artstation.com/artwork/xD0bPm
to simplify the process universally: 1. analyse your references and determine which type of strands make up the hairstyle you want to do 2. generate the textures in a program of your choice, I simulate the hair strands in Maya using x-gen and bake the opacity and normals onto cards in Substance Painter where I also do a simple diffuse and roughness map (think normal high to low poly workflow) 3. apply the textures to your cards in your 3D program and start placing them on your character in layers, starting from the lowest 4. set up a shader in your rendering program of choice and frequently test your groom, I'm using marmoset toolbag 4! I did the Retopo/UVs for everything in Maya since that's the program I was taught and most comfortable in, I don't think Zbrush is great for UVs but with plugins Blender comes close to the utilities Maya has!
Most of the retopology was based on the topology of the underlying body mesh since it's mostly tight-fitting items that need to deform exactly the same way to avoid clipping. The folds took a while to retopo and it's again mostly the same topology as the body underneath but adding detail/faces by using the cut tool along the flow of the folds without disturbing the overall edgeflow! :)
The sword was less sculpting than you would assume, I've started making my own IMM brushes to use for ornaments and similar things so it's mostly just placing things around and making it look good together! I found that doing ornaments that way leads to a cleaner result and it's easier to iterate, compared to attempting to sculpt that level of detail
The textures of the sword are still sort of early in the process, the bake is doing a lot at the moment and I want to add more signs of wear and damage to the metal as well as the hilt
Thanks for the questions! I love talking 3D so feel free to hit me up if you want more explanations, just keep in mind that I am a recent grad so there's a lot of things I myself am still learning!
6 notes
·
View notes
Note
Insanley good looking hunks you make! Must take hours. do you create them all from start?
It's a mix (and I should point out my starting points)...I either start with pure text of an idea, my own sketch, or a random photo off the web, that's not necessarily the look I'm looking for, but more about the staging and pose. Most of my images are pin-ups or portraits. Anything involving action or more than one person gets difficult. I'll bring it into Photoshop and nudge things around and correct fingers and limbs, and run it through the AI another time or 2 before finally polishing it Lightroom-ish for the final.
17 notes
·
View notes
Note
Hi, do you know of any good up-to-date guides on getting stable diffusion/inpainting installed and working on a pc? I don't even know what that would *look* like. Your results look so cool and I really want to play with these toys but it keeps being way more complicated than I expect. It's been remarkably difficult to find a guide that's up to date, not overwhelming, and doesn't have "go join this discord server" as one of the steps. (and gosh github seems incredibly unapproachable if you're not already intimately familiar with github >< )
The UI I use for running Stable Diffusion is Invoke AI. The instruction in it's repo is basically all you'll need to install and use it. Just make sure your rig meets the technical requirements. https://github.com/invoke-ai/InvokeAI Github is something you'll need to suffer through, unfortunately, but it gets better the longer you stew in it. Invoke goes with SD already in it, you won't need to install it separately. I do inpainting through it's Unified Canvas feature. The tutorial I watched to learn it is this: https://www.youtube.com/watch?v=aU0jGZpDIVc The difference in my workflow is that I use the default inpainting model that goes with Invoke.

You can grab something fancier off of civit.ai if you feel like it. For learning how to train your own models you'll need to read this: https://github.com/bmaltais/kohya_ss Don't try messing with it before you get acquainted with Invoke and prompting in general, because this is the definition of overwhelming.
Hope this'll be a good jumping off point for you, I wish you luck. And patience, you'll need a lot of that.
34 notes
·
View notes
Text
20 Best AI Art Generators in 2025: Create Art like never be same.
The world of AI art generation is exploding, offering incredible tools for both beginners and seasoned professionals. From whimsical cartoons to photo-realistic masterpieces, the possibilities are endless. But with so many AI art generators flooding the market, choosing the right one can feel overwhelming. This comprehensive guide explores 20 of the best AI art generators, providing detailed reviews to help you find the perfect fit for your skill level and artistic goals. This list covers the best AI image generators for beginners and professionals, helping you pick the right AI art tool.
Table of Contents
What to Look for in an AI Image Generator
Top 10 AI Art Generators for Beginners
1. Canva’s Magic Media
2. Leonardo AI (Free Plan)
3. NightCafe Creator
4. Deep Dream Generator
5. StarryAI
6. Playground AI
7. Craiyon (formerly DALL-E mini)
8. Artbreeder
9. DALL-E 2 (limited free credits)
10. Bing Image Creator
Top 10 AI Art Generators for Professionals
11. DALL-E 3
12. Adobe Firefly
13. Midjourney
14. Stable Diffusion
15. RunwayML
16. NightCafe (Advanced Features)
17. Deep Dream Generator (Pro Features)
18. Lexica.art
19. Imagine.art
20. Pixelmator Pro (AI features)
Conclusion
What to Look for in an AI Image Generator
Before diving into specific tools, let’s consider key factors when choosing an AI art generator:
Ease of Use: How intuitive is the interface? Is it beginner-friendly, or does it require a steep learning curve?
Accuracy: How well does the generator interpret prompts and translate them into visuals? Does it minimize “hallucinations” (unintended or bizarre elements)?
Creativity: Does the generator produce unique and imaginative results, or are the outputs predictable and repetitive?
Customization Options: Does it offer controls over style, resolution, aspect ratio, and other parameters? Are there robust editing tools?
Speed: How quickly does the generator produce images? Faster generation times significantly improve workflow.
Pricing: Is the service free, subscription-based, or credit-based? What is the value proposition for the cost?
Privacy Policy: How does the generator handle user data and generated images? Does it use user content for training its models?
Top 10 AI Art Generators for Beginners
1. Canva’s Magic Media
Canva’s Magic Media is a fantastic entry point for beginners. Its intuitive interface and straightforward prompts make it incredibly user-friendly. While it might lack the advanced features of professional-grade tools, its simplicity and ease of use are major strengths. Canva also boasts a strong privacy policy, ensuring your images remain private and are not used for training purposes. A great option for those wanting to quickly create fun and simple images.
2. Leonardo AI (Free Plan)
Leonardo AI offers a surprisingly generous free plan, providing ample generation credits and access to several features. While the free plan lacks advanced editing tools (those are paywalled), it’s an excellent way to experiment with AI art generation without financial commitment. Its prompt improvement tool can be invaluable for beginners still learning how to craft effective prompts. Learn more about Leonardo AI here.
3. NightCafe Creator
NightCafe offers a user-friendly interface with various styles and algorithms. It’s known for its community features, allowing you to share your creations and get feedback. The pricing model is credit-based, providing flexibility for users with different needs. A good choice for those wanting creative freedom and community engagement.
4. Deep Dream Generator
Deep Dream Generator is a well-established platform with a range of artistic styles and options. Its easy-to-understand interface is perfect for beginners, and the results are often visually striking. While the free tier is limited, the paid options provide ample creative space. Explore Deep Dream Generator here.
5. StarryAI
StarryAI is a mobile-first option that’s incredibly accessible. You can create art using simple text prompts and receive ownership of the generated images. The free plan is very limited, but the paid options offer better value and more generation options. Ideal for those seeking ease of access on the go.
6. Playground AI
Playground AI shines with its ease of use and focus on accessibility. While it might not match the sophistication of some other tools, its simplicity and lack of complex settings make it ideal for beginners. Its straightforward interface makes the process fun and easy to navigate.
7. Craiyon (formerly DALL-E mini)
Craiyon, formerly known as DALL-E mini, is a free and fun tool for experimenting. Though the results might not be as polished as those from other generators, its accessibility and whimsical style make it a worthwhile addition to this list. It’s a great place to get started and develop your prompt writing skills.
8. Artbreeder
Artbreeder offers a unique approach to AI art generation, focusing on creating and evolving creatures and landscapes. Its intuitive interface and ease of use make it a solid choice for beginners interested in exploring more organic and fantastical imagery.
9. DALL-E 2 (limited free credits)
While DALL-E 2’s sophisticated capabilities lean more towards professionals, its limited free trial allows beginners to sample its power. This allows a great opportunity to learn from a top-tier model before committing to a paid subscription. Try DALL-E 2’s free credits here.
10. Bing Image Creator
Integrated into Bing’s search engine, Bing Image Creator offers convenient access to AI art generation. Its ease of use and integration with other Bing services makes it a user-friendly option for those already familiar with the platform.
Top 10 AI Art Generators for Professionals
11. DALL-E 3
DALL-E 3, from OpenAI, sets a new standard for AI art generation. Its ability to understand complex and nuanced prompts, coupled with robust editing features, makes it a powerful tool for professionals. While the $20/month ChatGPT Plus subscription might seem expensive, the quality and capabilities justify the cost for many professionals. Explore DALL-E 3 and its capabilities here.
12. Adobe Firefly
Adobe Firefly seamlessly integrates with the Adobe Creative Cloud ecosystem, making it a natural choice for professional creatives already using Photoshop, Illustrator, and other Adobe products. Its artistic styles and refinement tools are tailored for professional workflows, ensuring a smooth transition into the world of AI art. The fact it does not train on user content is also a significant advantage for professional projects where copyright and ownership are paramount.
13. Midjourney
Midjourney, though only accessible via Discord, is a favorite among many professionals for its unique artistic styles and ability to generate highly detailed and imaginative images. Its upscaling and editing tools are also quite powerful, providing fine-grained control over the final output. However, it’s important to note that the image generation happens on a public Discord server, meaning your work is visible to others unless you choose the more expensive privacy options. Visit Midjourney’s website here.
14. Stable Diffusion
Stable Diffusion is an open-source model, offering a high degree of customization and control. While it requires more technical expertise to set up and use, this flexibility is a significant advantage for professionals who need to fine-tune the model to their specific needs. Its openness allows for community-driven improvements and extensions.
15. RunwayML
RunwayML is a powerful platform that combines various AI tools, including text-to-image generation, video editing, and more. Its comprehensive suite of tools and its professional-grade features make it a go-to platform for many professionals in the creative industry.
16. NightCafe (Advanced Features)
While NightCafe is suitable for beginners, its advanced features, such as high-resolution generation and access to various AI models, make it a viable option for professionals. The more control offered allows for fine-tuning and optimization for professional results.
17. Deep Dream Generator (Pro Features)
The professional options of Deep Dream Generator provide high-resolution outputs and a range of advanced settings not available in the free version. This allows for greater control over details and creative direction, which is vital for professionals.
18. Lexica.art
Lexica.art serves as a powerful search engine for Stable Diffusion images. This allows professionals to browse and find existing images that can be further modified or used as inspiration. While not a generator itself, it’s a valuable tool for professionals working with Stable Diffusion.
19. Imagine.art
Imagine.art is an AI art generator that is known for its ability to produce high-quality, photorealistic images. The platform uses a proprietary algorithm to create images, which it calls ‘Hyper-Realistic AI Art’, and the resulting images are of a very high standard. However, the platform’s ease of use makes it a viable option for both beginners and advanced professionals.
20. Pixelmator Pro (AI features)
Pixelmator Pro, a professional-grade image editing software, offers robust AI-powered features that augment its traditional tools. This integration allows professionals to seamlessly blend AI art generation with traditional editing techniques within a familiar and powerful application.
Conclusion
The best AI art generator for you will depend on your skill level, artistic goals, and budget. This comprehensive guide has provided a wide range of options catering to both beginners and professionals. Remember to consider the factors discussed earlier to make an informed decision. Experiment with several tools to discover which best suits your workflow and creative vision. Whether you are a casual user or a seasoned professional, the world of AI art offers unparalleled opportunities for creativity and innovation.
For more insights and updates on the ever-evolving world of AI and technology, check out www.updatevalley.com
2 notes
·
View notes
Text


still adjusting the spec map so its not blinding in some lights but its almost thereee. tinkering w body sculpt still too, but a little at a time so it dosnt mess too much w animations. also think i gotta adjust textures as well, im so used to a realistic pbr workflow n matching the stylization is a bit of a challenge. normal map too strong for fabric texture i think. gotta study some of the texture maps from the game up close
but very happy w the base texture/diffuse n retopo, even though i still hate working w something so lowpoly. but good practice n i do need to put in more effort into optimization in general


#her arms hehe... i keep forgetting how tiny they made her in game#still wanna bulk her up more but normal map is gonna help a lot too#mesh is too lowpoly starting to have areas that might get too pointy#jackie makes stuff#think im gonna redo her body sculpt think i messed a bit too much w the placement of her wrist n elbow so anims r looking weird#but tbh good excuse to make her much beefier so i dont mind#still need to make full tanktop tshirt n long sleeve version
3 notes
·
View notes
Note
I’m learning Blender and curious what your workflow is with all of your various tools? I love the lighting in your work especially and would love to try to replicate that
Congrats on your learning journey! For lighting it'll depend on your rendering engine and those settings/capabilities. Blender has Cycles/Eevee, Cycles can get *close* to what I do but does indeed fall short in a side by side for refraction and caustics when compared to Octane or Redshift. I use the latter two mentioned. Octane has a version for Blender - currently learning Blender myself and am using Octane instead of Cycles.
Otherwise for general lighting advice: good base HDRI to get a nicely lit base scene, then spam area lights (colored or neutral) where wanting things to pop / bloom / edge light. Adding in volumetrics will usually help diffuse lighting a bit to be more ambient as well.
Hope this helps!
5 notes
·
View notes
Text
a substance painter tip for those who texture objects...(and clothing)
instead of exporting multiple PBR textures and rebaking them again in blender, may i offer an alternate solution?
instead of exporting with the PBR metallic roughness template, try exporting it out using the 2d view template.


long technical explanation under the cut
girl, why am i doing this? i like spending hours and hd space on these maps?
1 - sims 4 does not use PBR materials so exporting PBR maps (roughness, specular, diffuse, ao, normal) and rebaking them all in blender is a waste of time.
2 - you've already baked mesh maps in substance. you already have a normal, thickness, curvature, ambient occlusion, and id map. 2d view just bakes all that shit into one diffuse map that you can bring into photoshop (or s4s) and you can recolour off of that vs baking each colour in blender. we are saving TIME and saving your GPU.
3 - baking textures through substance is a lot easier on your computer than blender cycles.
4 - blenders PNG output has a diff colour profile than photoshop. so if you bring it into photoshop, your bakes look dull and terrible. it looks dull in game too. maybe that's the look you're going for, but i find recolouring a clean grey base is a lot easier than recolouring something that already has colour information. substance painter maintains the colour profile from photoshop so you're already working in that adobe environment. and your base for your recolour looks consistent within both programs.
5 - if you don't want to use just a 2d view map, you can create your own template in substance painter. my template consists of 1) diffuse texture 2) an ao map (for shadow), 3) an id map if i used multiple materials (sims 3 ppl know what this is) and 4) my normal or if i want more detail, i do normal maps through this site or photoshop, or njob. i layer those maps in photoshop for added detail. from there i add my swatches and export each out as png. in the "my project" tab in substance, you can click each of the mesh maps and export it out manually as well.
i can explain this if it doesn't make sense but don't spend hours fooling around with nodes in blender when you already have a powerful texturing program at your disposal. learn to use it in a way that speeds up your workflow!
#you don't know how many times i get questions about ppl being completely lost wiht that tutorial#there are better on s4s forums#or myshuno sun's page has a wealth of info
54 notes
·
View notes