#double knitting tutorial
Explore tagged Tumblr posts
Visit Tumblr Blog
Explore Tumblr blogs with no restrictions, modern design and the best experience.
Last Seen Tumblr Blogs


Fun Fact
In 2020, 27% of US Tumblr users had an annual household income of over $100,000.
Text
youtube
The long awaited double knitted twisted rib bind off method is finally here! Big shout out to the genius in my fibre community who developed this method for me and graciously allowed it to be shared. Happy knitting!
#craft#crafts#wip#maker#knit#knitting#knitting tutorial#tutorial#bind off method#knit bind off#double knitting bind off#twisted rib speciality bind off#Luck bind off method#bind off twisted rib#double knit#double knitting#double knitting tutorial#hand knit#knitting methods#knitting yarn#knitspiration#hand knitted#knitblr#knitters of tumblr#knit tutorial#Youtube
86 notes
·
View notes
Text
Once again, the genius of the TECHKnitting blog continues to amaze me!
This double-knitting cast on is genius - it keeps your double-knit project (the technique, not the yarn-weight! 😂 from flaring at the cast on edge!
Plus, it answers why double-knit fabric doesn't flop open! (Answer: that pesky curl of stocking stitch fabric is actually working in our knitterly favour - I learned a thing today!)
18 notes
·
View notes
Text
Took me an hour and a half and 4 tries but we’re finally getting somewhere with double knitting!!
#I only have 26 stitches on my needles it’s not even a lot I just struggled and then thought I’d cracked it but the tutorial I was following#didn’t say to swap which colour you’re knitting or purling with just kept with the same for colour a and colour b so then I had to undo it#AGAIN but we’re finally there#and yes one of the attempts did involve me just shoving half my cast on stitches off the needle and trying. frantically to get them back and#failing miserably#and I’m not even doing the swatch I wanted I wanted to do a cat but didn’t realise you need to double the stitches for graphs cuz 2 stitches#is effectively one with the 2 colours#but yeah we’ve learnt a lot today and have got somewhere with my experiment so that’s cool!!#kiera talks craft
1 note
·
View note
Text
The C(r)ozier Cowl (with pattern!)


I FINALLY DID IT, and I'm so incredibly pleased with how it turned out (it's also maybe the warmest scarf I've ever knit, the Terror costume design people knew what they were doing)
Details and pattern below the cut, along with more pics!
Details:
This infinite loop cowl is a knit recreation of the scarf/cowl worn by Captain Francis Crozier in the first season of the tv show The Terror (2018).
The choice of yarn is, in my opinion, very important to the accuracy of the result. The pattern is quite simple, so getting the right yarn makes a big impact. My suggested yarn is below.
This is knitted in seed stitch at a very tight gauge, using a worsted weight yarn on size 4 needles. This produces a gauge consistent with the scarf from the show (did I measure Jared Harris’ eye and use it to calculate gauge from a photo of Crozier wearing the scarf? MAYBE SO). It makes the knitting a little hard on the hands, but the resulting fabric is DELIGHTFUL—super dense, and since the cowl is knit as a tube it's double thick and, in my experience, nearly entirely windproof. THIS IS A VERY WARM COWL!
After looking at too many screenshots, I ultimately determined that the article in the show is in fact a scarf (you can see the edge VERY briefly in one shot). However, I have designed my version as a tube cowl, as it more easily reproduces the look of the article as worn in the show (doubled over and in a continuous loop around the neck with no edges visible). You could produce a scarf instead by knitting this flat instead of in the round—cast on the same number of stitches with a long tail cast on, and then only knit/repeat row 1 (consider adding a seldvege edge).
If you have questions or want tips, or just want to show me what you made, hit me up!! I’d love to chat.
Materials:
3 skeins (approx. 660 yards) Cascade 220 Heathers in color 2445 Shire (google it to find purchasing options, or ask your local yarn store to order it!)
Size 4 needles; either 16 inch circulars or double-pointed
Stitch marker
Yarn needle
Instructions:
Provisional CO 72 stitches on size 4 16-inch circular (or double pointed) needles to work in the round. Place marker.
Row 1: k1 p1
Row 2: p1 k1
Repeat until cowl measures approximately 54 inches (4.5 feet; 137 cm) or desired length.
Unpick provisional cast-on, placing live stitches on any spare circular needles or dpns. Kitchener stitch ends together (tutorial for doing so in pattern here).
Wear as a single or double loop.
Now go have some glorious homoerotic tension with your second in command!


#the terror#knitting#francis crozier#my knitting#knitting pattern#I have been wearing this scarf constantly since i finished it#it's incredibly warm and i also love the extremely subtle nod to the show#it makes me feel like an undercover super fan every time i step outside
776 notes
·
View notes
Text
Double Crochet
Bob Reynolds x gn!reader
Not beta'd and I don't give permission for my work to be reposted, copied, translated or put through an AI machine.
Tags/warnings: just fluff, cuddling, mentions of a first kiss
Summary: After bumping into you at the store, you teach Bob how to crochet.
word count: 1.3k
Dividers by @/cafekitsune
Bob Reynolds Masterlist | Main Masterlist | Pick Your Fic

Double knit. Chenille. Alpine.
Wool. Wool. Wool.
Too many choices, too many projects, too little time. You're stood staring at the wall of Wool trying to remember what you actually went to the store for. Was it wool? Probably not. You already had too much in your room at the tower that you were surprised you didn't have wool coming out of your ears. What started as an innocent hobby had become your hoard - a dragon's next of fluffy comfort you had yet to spin into something worthwhile.
How many granny squares did you need for a jumper? What about that pattern you started two months ago?
You grimace to yourself. No. You didn't need more.
...but then again.
Your fingers brush the baby-soft chenille thoughtfully. Something could be made from this. Easily. It's a beige - easily manipulated into an animal of some kind. Probably. Or there's an electric blue that could be a potential... thing.
"Hey, Y/N."
You almost launch the ball of wool you're holding at Bob out of fright. He had a nasty habit of appearing out of thin air, and you weren't sure if it was a by-product of the shadowy Void or his quiet mouse-like nature.
Mouse.
"Hey, Bob." You try to sound cheery but your brain is busy trying to remember if you have any patterns for mice plushies. "Wasn't expecting to bump into you here."
"I just wanted some snacks." He jingles his crisps in his hands and eyes the wool your cradling curiously. "You knit?"
"Oh, uh, no I crochet." You wiggle the wool between your hands. "I was meant to come in here for something else and got distracted."
"You crochet? That's so cool!" Bob's face lights up with the sweetest, infectious smile that has you melting to the floor like ice cream on a hot day. "What do you make? Could... Could you... show... me?"
His voice tapers with his usual shy, self-consciousness and you can't find it in your heart to tell him no.
"I don't have any pictures of my recent stuff." You half admit, not wanting to give away the fact you haven't picked up a hook in months. "But when we get back to the tower I can show you?"
"Sure!"

Having Bob look upon your creations felt strangely intimate. He handled each one like it was made of glass, cooing and gushing over your plushies and patterns on granny squares.
"They're so cute. How do you do it?" He looks impressed and intrigued behind his smile; it's genuine interest in your hobby and it makes you giddy.
"Um, well you can find patterns and tutorials online." You say, digging your toes into your rug and twisting your ankle shyly. You were a hair's breadth away from blushing and twirling your hair like a cartoon bunny.
"Could you teach me?" His blue eyes are irritatingly round sweet and you find yourself struggling to say no. You don't even want to think about the kicked-puppy look he would shoot you with if you turned him down.
Thus, you were resigned to nod your head and gulp out a: "Sure."
Bob is surprisingly quick to learn the basics. You sit close to him and run through basic stitches, demonstrating them and praising him when it finally clicks for him. It was worth every moment spent to see his tongue poke out in concentration when he follows your instructions and his face light up with joy when he successfully completed a stitch. Over the course of two days, you're practically joined at the hip, chatting and crocheting side by side but when a new mission demands a few days of your time you offer Bob free reign of your wool stash.
You help him pick out some patterns from your archive to help him practice and keep him busy while you're away and urge him to keep you updated on his progress and to ask any questions he might have. Not that any come - Bob almost ignores all of your texts and you can't help but feel a little affronted; like you'd done something wrong somehow.
Downtime during your mission is spent crocheting your plushie mouse. You'd decided when you started teaching Bob to crochet you would make it for him as a gift, doubly so now that you thought you'd upset him somehow.
The final touches were done minutes before the quinjet touched down on the roof and you were already speeding off and ignoring Bucky's summons for a debrief so you could find Bob, give him your gift and apologise for upsetting him somehow.
Entering through the doors and turning your first corner, you slam right into Bob, making your search rather short.
"Bob!"
"Y/N!"
You both go quiet, smiling sheepishly, and you see he's got his arms behind his back. You hold up your mouse plushie, feeling your cheeks grow warm and you can't quite meet his eyes.
"I made this for you. I'm sorry if I upset you recently, what ever I did I-"
"You didn't upset me!" He cuts you off, pulling a plushie of his own from behind his back. It's a little wonky, the eyes don't match up and there's a few holes from missed stitches but...
It's the cutest damn bunny you've ever seen.
"I was just focused on making you this... abomination." He chuckles slightly, holding the bunny in his hands like it's a cursed object and your heart has a pitter patter to rival an excited heavy metal drummer.
"I love him!" You squeal, making Bob look up.
"Really?"
"Yes!" You hold out your mouse to swap him for the bunny and Bob takes it with a grin, running his fingers over the soft wool.
"I'm going to call him Fred." You announce, holding the bunny comically high over your head like he was Simba.
"Fred?" Bob's nose scrunches in disbelief despite his smiling. "What should I call mine?"
"You can rename yours, if you want... I've been calling him Bob Junior for a while." You smile sheepishly as Bob blinks at you.
"Junior? After me?"
"Duh after you." You roll your eyes playfully but you chest feels tighter than before. "I was making him for you and it just kinda stuck."
Bob's cheeks are bright red now, and he brings the gift you made closer to his chest. "No that's... No, I like it too."
Later that night (after Bucky finally caught you and dragged you back for a debrief) whilst watching a movie in your room, you and Bob placed your double-crochet creations next to eachother on the bedside table.
"They look perfect together." You say cosying up under your comforter. Bob nods but says nothing so you continue unperturbed. "They look like they're holding hands too!"
You're pulled back suddenly into a firm chest and let out a small squeak. Bob immediately apologises when you look up and looks like he's about to combust on the spot.
"Sorry! I - erm..." He gives you a sheepish look. "They look like they're cuddling and I thought that we..."
He swallows thickly and his eyes flit around your room nervously. That pitter patter in your heart returns and you smile, sidling up closer to him instead. Bob stiffens then relaxes, letting his arm drape around you - even if he is still shaking like a chihuahua.
"If you wanted life to imitate art, you should have just said so." You tease softly, laying your head on the space inbetween his neck and shoulder.
That night marks the beginning of many more in his arms, sometimes crocheting, sometimes watching a movie, always chatting. What you and Bob have builds slowly, and whilst you ruin your first kiss by covering the eyes of your plushies, he doesn't seem to care. Your love took practice and even though it may be a little misshapen like Fred, it was still beautiful.
End
A/N: if you haven't seen this post, @buckyys-babydoll and I are trying to boost engagement across fics in the writing community. If you liked this fic, please reblog - you dont have to leave a comment. You can leave a reaction image, gif or emoji(s)!
Support writers. Support artists. Support the fandom.
Love ya! 🫶🏻
Taglist - add yourself here
@looking1016 @jeremyrennermakesmesmile @almostglitterybear @blackhawkfanatic @peaches1958 @purplefluffycows @ryubyy @steviebbboi @leeemabean @brianochka
#bob x you#bob x y/n#bob x reader#bob reynolds#bob thunderbolts#bob reynolds x reader#bob reynolds x you#bob reynolds x y/n#bob reynolds fluff
141 notes
·
View notes
Text
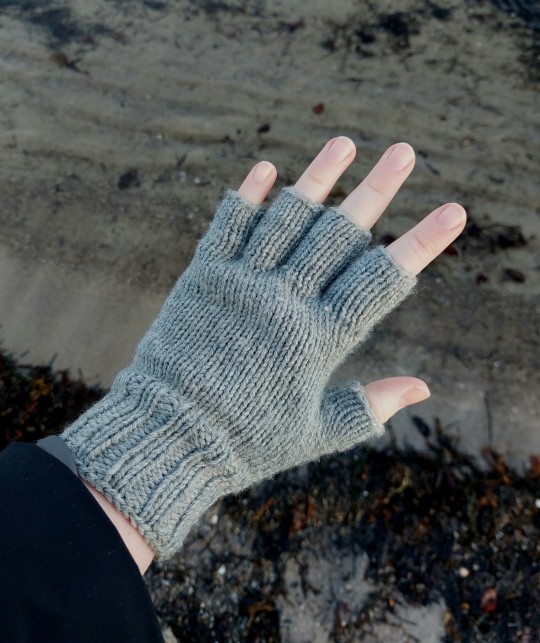
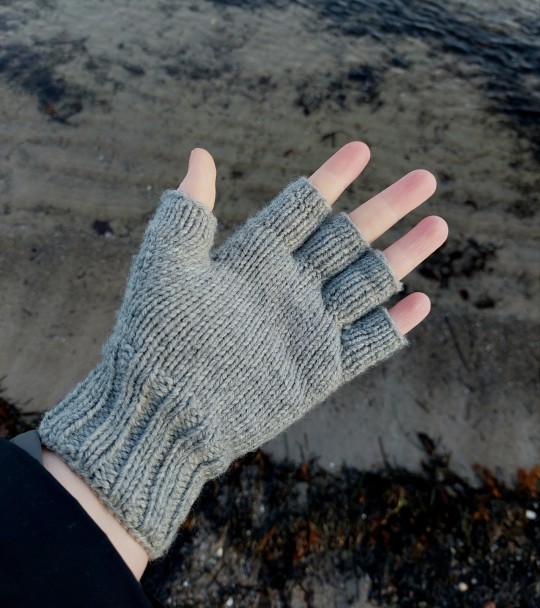
I made a pattern for the terror gloves!!
Please note I'm not a professional and this is just for funsies, sorry for my clunky english but knitting terminology is a whole other beast lmao
I hope you can make some sense of this
Full tutorial under the cut
Terror Gloves Tutorial
Disclaimer: I’m not a professional and I’ve never written a knitting pattern before, I just made this up as I went tbh, basing it on a german tutorial I used for regular fingerless gloves I had made a couple of times already, the fingers I made up on my own. Unfortunately, I don’t have the time to make another pair to document the process for you as of right now, so you’ll have to work off of the pattern alone. Sorry for all the weird terminology, translating german knitting vocab to english fried my brain real good lads.
��I’d say this is a beginner to intermediate level project, you should know how to purl and knit and how to make left leaning and right leaning increases. For the latter one I’ve linked a tutorial on YouTube at the part where it comes up in the pattern.
All that being said: I hope you enjoy making these gloves! Feel free to @ me on tumblr if you’d like to show them off :D
What you need:
- Yarn that requires you to use size 4 needles (3,5mm in the german/european system, the UK doesn’t carry the equivalent of this size for some reason, so use a size 10 or 9 depending on how tight you’re knitting); the color is obviously up to you, I used a grey close to the one most of the boys are sporting. I also used a 100% wool yarn, but I know those can be pricy so feel to use whatever is available to you :) I used about 50g, maybe a little more for my pair
-> Please note that I didn’t make a test swatch since I’ve used the base pattern of these gloves before and know that this size of needle works for me. I’d say I my tension when knitting is normal – tight so if you knit more loosely maybe choose smaller needles
- Size 4 double pointed needles (3,5 german/european, 10/9 UK)
- Safety pins
- Darning needle to weave in the ends
- Scissors
Tutorial:
- Cast on 11 stitches on four of your five double pointed needles
-> If you have smaller hands you might need to start with 10 instead of 11 stiches on each needle
- Join in the round and start the pattern for the ribbing that will make the glove a little tighter around your wrist, which means purl 2, knit 2, until the end of the row
- Repeat the purl – knit pattern for 20 rows
- Knit 10 regular rounds
- Now for the thumb: Knit 1, pick up 1 new stitch (it doesn’t matter if it’s left or right leaning), knit 1, place a safety pins on the needle behind that stitch so you can keep track of your increase section (tutorial for increases)
- Knit the rest of the round normally, as well as the round that follows
- Knit 1, make 1 left leaning increase, knit 1, make 1 right leaning increase, knit 1, slide the safety pin over
- Knit the rest of the round normally, as well as the round that follows; from now on the pattern will be one row with increases, one row without increases
- So in the next round with increases you will knit 2, make 1 left leaning increase, knit 1, make 1 right leaning increase, knit 2, slide the safety pin over
- Continue with this for 14 rounds (7 with and 7 without increases) until you have 15 stitches in the section framed by the safety pin
-> If you have small hands you might need to stop before reaching 14 rounds, your work should just about cover the first bone (going upward from the base) in your thumb. Maybe stop at 10 or 12 rounds, make sure you end on one without any increases
- After your last “no increases” round, before you start with the next round put the 15 stitches for the thumb on hold by sliding 7 of the stitches onto one safety pin, the other 8 onto another; you will not continue to work with these stitches (for now)
- Continue like normal and start knitting the rest of the stitches on the needle, making sure to join tightly to avoid a gap and finish the round
- Knit 11 regular rounds or until you reach the base of your pinky finger; you should have 42 stitches on all of your four needles right now
- We will start by knitting the pinky finger: For this knit normal until you’re at the second needle and have 5 stitches left on it
- Put all but 10 stitches (the ones on the second needle and the first 5 on the third needle) on hold by placing them ideally on two big safety pins or several smaller ones
- Knit normally until you reach the end of the second needle; here you will take a third needle and pick up 2 more stitches, one from the side the second needle is on, one from the side the first needle is on, so ideally, you’re keeping the gap that’s going to form between the fingers as small as possible
-> If you have small hands, you might only have to pick up 1 stitch or none at all; if you find that that’s the case split the 10 stitches onto three needles so they’re easier to work with and continue as written down below
- This was the first round; knit 9 more or until your work almost reaches the second bone in your pinky finger or just until you decide that it’s enough (feel free to try the gloves on as you go!), cast off and cut the yarn
- For the ring finger, pick up 10 stitches from the ones you put on hold, once again two needles with 5 stitches
- Join the yarn in the same place you started with the pinky finger
- Knit the first needle, then pick up 2 stitches on a new needle as I described it for the pinky finger
- Knit the 5 stitches on the second needle, then use yet another needle to once again pick up 2 stitches. You now have 14 stitches on 4 needles
-> If you have small hands, you might only have to pick up 1 stitch per new needle or just one stitch on one new needle
- Knit 14 more rows like this or until your work almost reaches the second bone in your ring finger or once again until you decide that it’s enough, cast off and cut the yarn
- The middle finger works exactly the same: Pick up 10 stitches from the safety pins, pick up 4 new stitches on two new needles, knit 15 rounds or however many, cast off and cut the yarn
- For the pointer finger you should have 12 stitches left since we started off with 42 in total (30 already “used” leaves 12) which means we only need to pick up 2 new stitches on one new needle (whether you pick them up on the side facing the thumb or the one facing the other fingers is up to you; I picked the one facing the thumb but picking the other one will probably look better)
-> If you have small hands, you might only have to pick up 1 stitch or none at all
- Knit 14 rounds or however many, cast off and cut the yarn
- Now to finish off the thumb: Put the stitches back onto your needles, 7 on one needle, 8 on another; now taking up a third needle slide the last stitch on the second needle onto it, pick up 2 new stiches around the base to make sure there’s minimal gaping, then pick up the first stitch on the first needle. You should now have a total of 17 stitches, split on three needles (6, 7 and 4 stitches) forming a triangle
- For the first round, join the yarn into the first stitch on the first needle; knit normally until you reach the third needle: Here you knit the first 2 and the last 2 stitches together, leaving you with 2 stitches on that needle
- Repeat this for the next round and knit the remaining 2 stitches on the third needle together, leaving you with 1 stitch on that needle (it can be finicky handling this third needle but it makes working the rounds a lot easier)
- Knit 5 rounds or until your work reaches over the second bone in your thumb, cast off and cut the yarn
- Weave in the ends; you might have to go back in with extra yarn if the holes between the fingers are too big for your liking
Yay!!! You finished it, congrats!! :D
233 notes
·
View notes
Text
gio officialpenisenvy's DIY packer tutorial
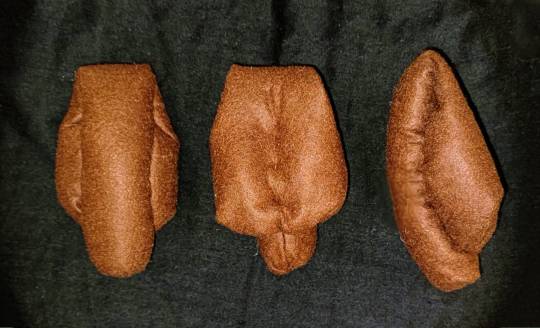
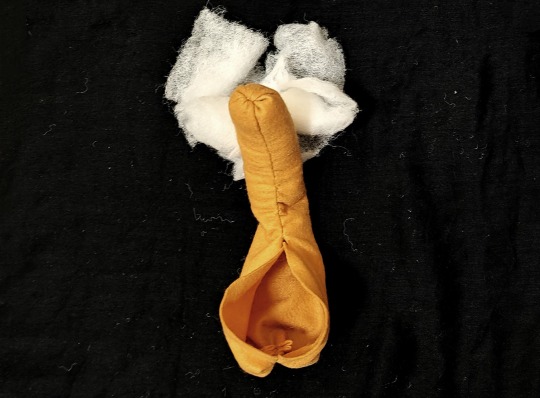
are you transmasc and tired of shoving socks down your boxers? did you lose your penis in a freak accident and wish you could have your bulge back? do you know the basics of sewing and want to find out how to make a packer? you've come to the right place! i have been making and selling packers for a year, and this is my tried and true method for hand-sewing a packer in roughly half an hour, to results such as these:
MATERIALS NEEDED: felt in your choice of colour (if you want to use fabric, go for a jersey knit so it won't fray, and use more stuffing to make up for the lack of structure), sewing thread in your choice of material and colour, stuffing of any kind (i use acrylic batting, you can use an old pillow, cotton balls, fabric scraps cut into tiny pieces...)
SEAMS USED: a backstitch or running backstitch is the only seam you really need to know; i employ a gathering stitch and a whipstitch as well for aesthetic purposes, but if you only know how to backstitch you can absolutely make a slightly uglier version of this packer. if you're an absolute beginner, here is a helpful tutorial: just double up the thread and knot it for a stronger seam.
STEPS:
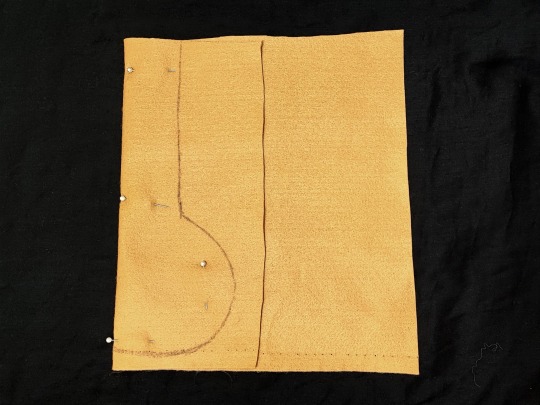
cut a piece of fabric approx. 25x25cm or 10x10in wide and fold it in half vertically, then draw a shape on the fold like the one pictured above, with the widest point measuring roughly 12cm or 5in and the smallest point (the shaft) measuring roughly 5cm or 2in
carefully pin the fabric and cut out the pattern along the shape you've drawn, leaving a small seam allowance of approx. 1/2cm or 1/4in (if you feel unsure in your ability to follow a small seam allowance, you can cut it larger and trim it to size later; if you're using fabric, a larger seam allowance is recommended)
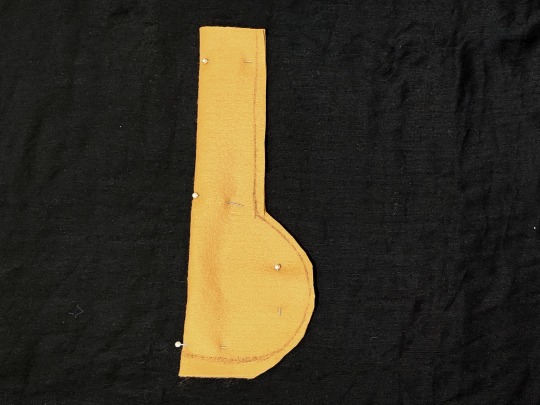
sew alongside the seam of the shaft with a tight backstitch or running backstitch; you can tug on the thread after every stitch, so the seam will pucker up and give the shaft a more natural curved-inwards effect
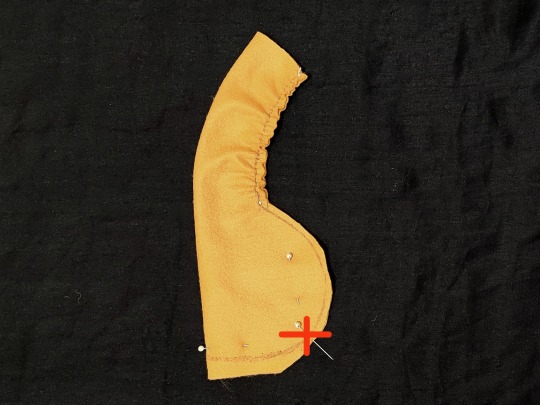
close the top part of the shaft (the head) and the bottom part of the sac (roughly up to the marked X in the picture) with a tight and multiply-reinforced gathering stitch, almost like a drawstring effect; you can use a backstitch here, but it won't look as natural

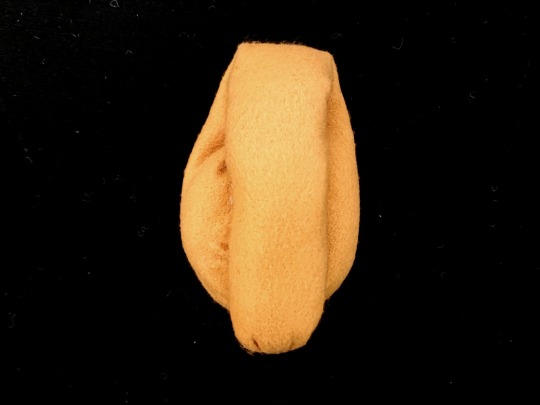
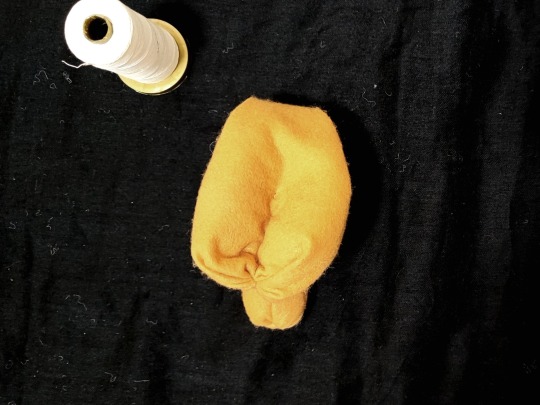
turn the packer inside out and put your stuffing inside the shaft, packing it quite full (but not so full it has no give, as real soft penises are somewhat squishy); this might be tricky to do if you have short fingers like me, so you can use a pen or your scissors or any other thin elongated tool to help you get to the tip
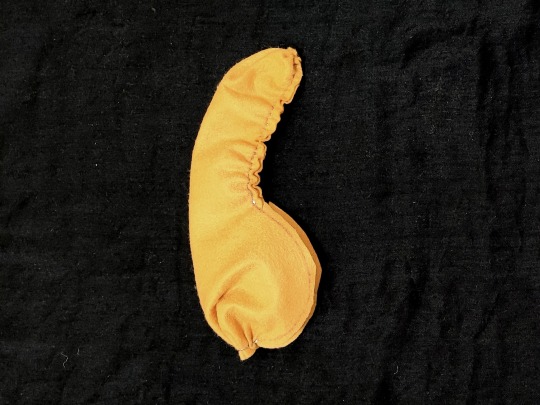
stuff the sac a bit less than the shaft, and try to make two balls with your stuffing (you can see i have cut out two strips of batting in the first picture) so they look like two separate testicles
sew the sac closed: i used a whipstitch and pulled the thread tight so the fabric would gather and pucker like a real sac, but you can use a ladder stitch or a backstitch at your preference
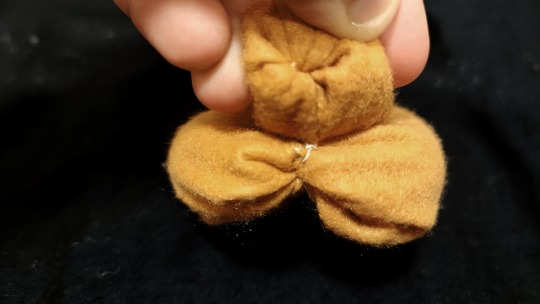
to further separate the testicles, sew a few stitches down the middle of the sac, so the two balls will lay separate with a flat seam in the middle (pictured above you can see how the stitches should look from the back)
optionally, you can secure the very tip of the shaft to the very bottom of the sac with a few stitches, so the packer will stay folded and won't run the risk of opening up (of course, you can skip this step if you want your shaft and your sac to be able to separate like a real penis)
and here you have it, your packer is finished! you can wear it in your underwear directly on your skin, or sandwiched in between two pairs of underwear, or however you prefer. direct contact with water should be avoided as much as possible; the packer doesn't need to be cleaned daily, but a spritz with rubbing alcohol will kill most germs and get rid of any funky smells, and if it gets stained you can spot-treat it with a little water and soap and make sure it dries thoroughly.
#transmasc#ftm#trans diy#trans resources#ftm packer#sewing#ok to rb#mine#long post#(didn't put this under a readmore so it can still be fully visible in case i delete or move blogs)
92 notes
·
View notes
Text
The Ingrid Sweater - Finished Object!
I can’t believe I’m saying this, but I have finished my Ingrid Sweater! My knitting magnum opus! Details and experience below the cut! (Spoiler alert: I love it!)


Cast On: 10 January 2025; Cast Off: 28 April 2025.
There was a little break before blocking because I went away and then had to wait for it to dry, but as of today…it’s all done! After 141 days! Just in time for hot weather - a big squishy sweater made from...
Materials: Sandes Garn’s Double Sunday in taupe (the recommended yarn) held with a strand of Isagar Eco Line Alpaca 1 in ecru, which I found in a charity shop and wanted to save for something special. Stitch markers, needle point protectors, a measuring tap, scissors and scrap yarn for safety lines were all used.
Needles: I went a bit higher than the recommended needle size and used 5mm for the body and sleeves, 4mm for the collar and cuffs and hem). I used my set of Knit Pro interchangeable needles in metal, which are definitely okay although can unscrew here and there.
Size: S for the body, XS sleeves (so picked up less stitches).
Pattern: The Ingrid Sweater by PetiteKnit linked here. I’ve had my eye on the Ingrid Sweater since before I started knitting. I never believed I could knit, so it was always something I appreciated the beauty of without thinking I’d get to own one. Almost 18 months since I started knitting, I’m completely jazzed to report that I was WRONG! 💃And I’d highly recommend this pattern as a first textured jumper. The pattern itself is written clearly, and it’s supplemented by video tutorials (vital for me!) I consider myself an ambitious/confident beginner rather than intermediate, and the pattern’s ranking suggests it’s for advance knitters, but don’t let that put you off! It took me five months because I couldn’t devote much time to it each day, not because of its difficulty – especially once I’d got through the yoke and was working in the round. This is my first PetiteKnit pattern and I understand the appeal.
Experience and Thoughts and Feelings: The hardest parts ended up being the German short rows because of a miscalculation on my part, and the first time I attempted the diamond section, but if I recall it’s because I’d miscounted the stitches I needed. Both times I had to unravel, and big love to the friends online and irl who had to deal with me when I was going through that...It’s vital to have the correct number of stitches for the diamond part, so my main tip would be to check often, and make sure you add safety lines at appropriate intervals. I was somewhat intimidated by the sleeves because I’d read so many reports of people struggling to get the diamond section perfect, but I think it looks fine! It’s just that one section of the diamonds is wider than the others, but it’s on the part of the sleeve you don’t really see. I was pleasantly surprised by how stress-free the sleeves ended up being, having assumed they’d be insurmountable.
This is also my first successful attempt at a folded collar! I’d tried previously but knitted my knitting needles into the collar and had to cut them out. Which I’m pretty sure nobody has ever done before in the history of knitting. This time – thanks again to YouTube tutorials – I was able to do it without any issue, and I’m so glad I got back onto the horse that threw me. I was going to try a simple ribbed collar and call it a day, but this looks a lot more polished (by my standards).
All in all, completing this project is one of the things I’m proudest of in my life. I genuinely thought I was too stupid to knit, but I persisted and proved to myself that I’m capable of things I thought impossible. Would I knit this again? Yes! There’s some other pieces I want to make first (and I want to try colourwork!! Eeek!), but it’s good fun and so motivating to have different sections in the pattern you want to get to. I’m knitting something purely stockinette at the moment, and although it’s nice to have a breather, I miss having the right amount of complexity that keeps it engaging. I’m already dreaming of one of these in pink, held with mohair! So happy!!! I love it!!!

#Ingrid Sweater#Knitting#finished object#knitted#beginner knitter#cig knits#cig knitting#cig personal
45 notes
·
View notes
Text
Double knitting selvage
Turn the work, twist the yarns, slip 1st stitch knitwise, slip 2nd stitch purlwise and continue in normal double knitting.
Practice your double knitting with the Annaplexis coasters.
41 notes
·
View notes
Text
Solaprunk Worldbuilding 1 - Eco-Cities

I've been working on worldbuilding a solarpunk setting for a slice of life story I'm writing and thought I'd share some of my ideas to maybe inspire other people!
In this world there is no government, no rules, no pressures or bad people. Just society working together after a global crash. A second chance to do things right this time.
(Mind the spelling mistakes)
Although far and few in between, big cities and towns still exist in this universe. However, they've all worked hard to keep it as eco-friendly as possible and still choose to live alongside and work with nature rather than fight it.
Trash and recyclingcans can now be found almost everywhere, giving no one an excuse to litter. Community composters are also a thing.
Skyscrapers, now skeletons of the old world, are draped in thick ivy vine walls, native flowering vines, moss panels, and vertical hydroponics that wrap around the metal and glass bones. These help regulate temperature, absorb CO2, and create habitats fors birds and insects.
Former office buildings and shopping centers like malls have been repurposed into shared living spaces, community markets, workshops, and event areas. Floors have open walls and breeze tunnels to reduce reliance on cooling systems. Those can be shut during colder months.
In taller districts, tree houses extend from reclaimed buildings, blending organically with planted rooftop forests. Rope bridges and wind-activated elevators made if recycled parts help people travel between vertical spaces.
Cities are completely walkable and don't require transportation. Streets are narrow and shaded with plant canopies. Most paved areas are soft permeable cobblestone or moss-tile paths that allow rain to soak through instead of pooling or flooding.
Painted murals double as maps - bold, hand-painted designs show landmarks, walking trails, tram routes, and local art projects. Updated regularly by volunteers.
Giant sculpted trees or mushrooms function ad rainwater collectors, solar lanterns, or even mist sprayers during hot days. Children often climb on them or gather nearby to play. They can also provide shade.
Metal "bike trees" hold dozens if free-to-use bikes, all maintained by volunteers. Bikes come in all colors and sizes, some decorated with flowers or art to reflect the community's personality.
Solar Trams glide quietly on narrow tracks. They're sleek but not flashy, designed with recycled metals and glass. Inside, seats are made from reclaimed wood, each with a small solar lamp or charging port. Solar Buses work in a similar fashion.
Public Plazas now have eco-escalators that are powered by pedaling like on a bike.
Interactive screens at intersections and stops show local events, weather and climate, community votes or messages, and tutorial videos on composting, repair, herbal medicine, or art-making. Digital marketing and advertisements are no more.
Most people carry small, solar-powered devices that have replaced phones called "Data Stones" - slate-like digital notebooks that sync to the city's mesh network. People use them for Journaling, mapping, music, or community messaging, but never for mindless scrolling. Digital use is intentional, not addictive.
The internet exists, but it's localized. Instead of one global net, each town or city has a mesh intranet. Communities upload and share stories, tech guides, magazines, songs, and documentaries- all accessible for free.
At every city node is a "Commons Booth"-a repurposed phone booth now used for small trades, gifts, or lost-and-found. You might find a hand-knit hat, seeds, poems in a bottle, hand-bound journals, or a small bag if dried herbs for tea.
Public parks host weekly workshops: mushroom log inoculation, fixing Guardianers, upcycling old tech, dyeing fabrics with natural materials, and crafting musical instruments from trash.
Fireflies are protected and welcomed into urban life with dedicated "nightlight gardens"- small glowing sanctuaries that bloom under moonlight (usually a mix of regular and bioluminescent plants). People sit quietly here, reading or singing. Festivals are celebrated not with fireworks, but light dances, candlelit parades, or bioluminescent art. It's also a romantic place for a date.
Children and adults alike use "Learning Loops"- open-air circles of benches and tree stumps near gardens and community spaces where mentors teach based on skills, not age. There's no formal school system. Learning is woven into life.
On a certain day each month, citizens volunteer to teach something for free-sailing knots, solar repair, compost chemistry, storytelling, mediation, bird language. The city slows down that day. It's treated like a holiday.
In addition to tire-posted Little Libraries (where people can take a book and leave one in it's place), entire alleys have been converted into "Book Gardens"- free libraries under pergolas or vines, surrounded by reading hammocks and native wildflowers.
Local businesses and shops are still a thing, but are not kept up by money. Money has no use in this world anymore. Businesses upkeep it themselves and will happily trade their wares for something in return. For example, a bakery can trade a cake for something in return like a jar of jam or something else. It's like that everywhere.
Citizens enjoy solar-charged cooking stoves, clean water from centralized purification systems, access to upcycled tech, 3D-printed tools, and digital artist hubs.
Markets overflow with herbs, handmade instruments, mushroom leathers, fermented goods, and hand-bound books from across the region. Some city dwellers specialize in creating high-tech eco-dafe goods to trade with the countryside.
Most people live in co-housing clusters or share entire floors of old skyscrapers converted into lush indoor gardens and social spaces. They might not know everyone, but each block has caretakers and community gatherings.
They're alive with creativity and innovation. Mural projects, street musicians using windows instruments powered by movement, and holographic poetry displays powered by pedals or solar generators.
With more people comes more variety in skills. It's common to find classes in herbalism, robotics, or solar carpentry happening daily in public courtyards.
The ideas are free to use for whatever you want or use for inspiration! All I ask is that you CREDIT ME! And feel free to send me an ask on more details to this lovely world :)
#plants#solarpunk#solar energy#ecofriendly#worldbuilding#writeblr#writing#writers on tumblr#a better world is possible#comfort#my solarpunk world
38 notes
·
View notes
Text
There aren’t any tutorials showing how to do a twisted rib in the double knitting technique, so I thought I’d show it off.
It’s a little bit tricky because of the weird colour control, but as long as you follow the pattern & remember to split the yarn colours on the second set of stitches you can easily fall into a nice rhythm.
#craft#crafts#maker#knit#knitting#hand knit#knitting yarn#knit cowl#knitting cowl#double knitting#knitting technique#twisted rib#twisted rib technique#double knit twisted rib#ribbing#wool#yarn art#yarn#yarnblr#yarnaddict#yarn crafts#yarnlove#hand knitted#knitblr#knitters of tumblr#knitwear#knitspiration#new technique#technique
261 notes
·
View notes
Text
I never thoughts about grafting in purl stitches before, but, as always, the TECHKnitting blog shows me something new and fascinating - this time, how to form purl stitches for grafting!
0 notes
Text
So you want to print and distribute a free zine...
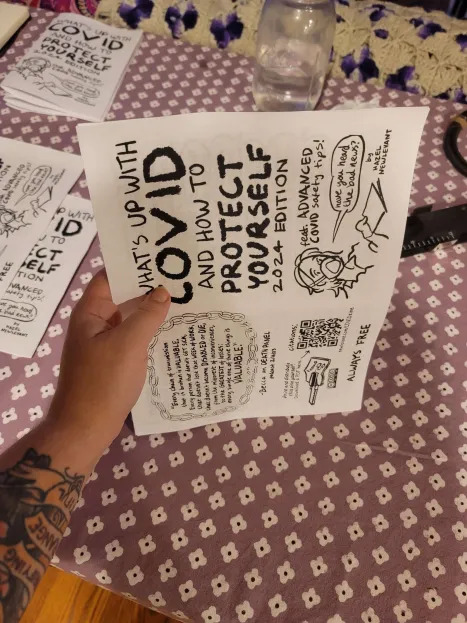
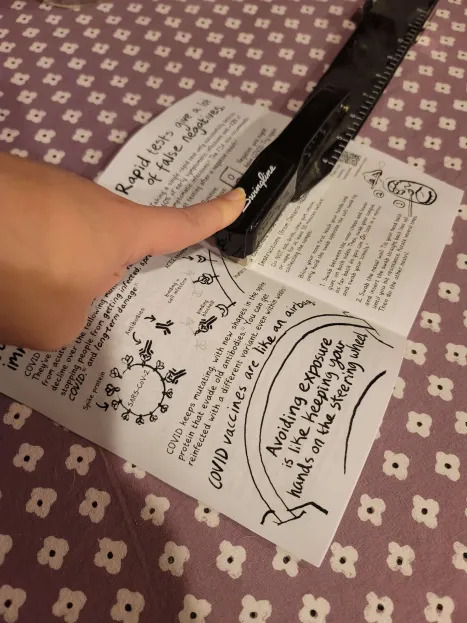
I wanted to throw together a short tutorial on how I print zines using this excellent COVID safety zine by @newlevant as an example.
Printing
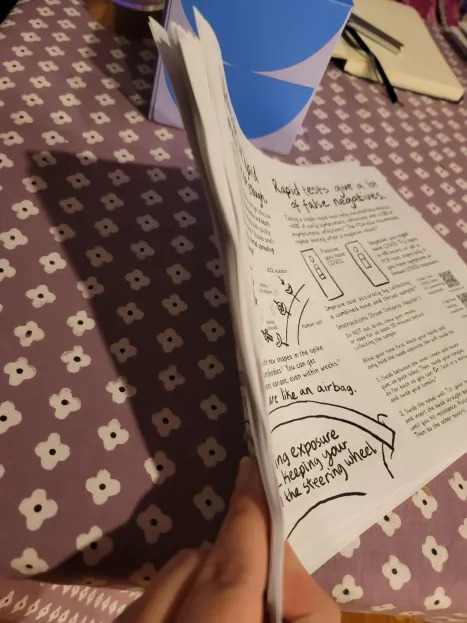
First make sure you are clicking on the printable file. When you open it, it should look slightly jumbled. I always look for seeing the front cover and the back cover on the same page.
Then click "print" (usually a printer icon) and open "more settings".
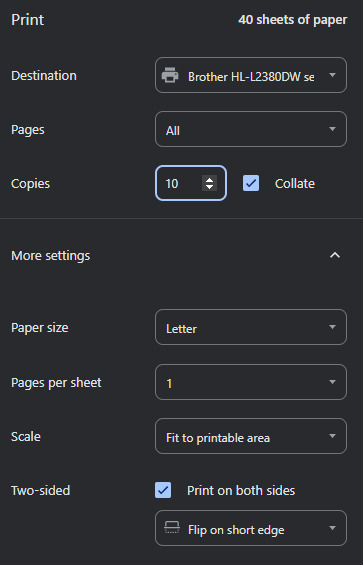
The key things people tend to get wrong when they try printing zines is they forget to make sure that it is double sided and flips on the short edge. If you tried printing one and it came out looking wonky, make sure to check this.
Also, it will make your life infinitely easier if you use the collate option should you have it available to you.
Fit to printable area is a helpful setting to have on if you're printing zines who use a different paper standard than you. This zine didn't for me but I leave this on out of habit.
When you've got this all set up - print as many copies as you want to assemble.
Assembling
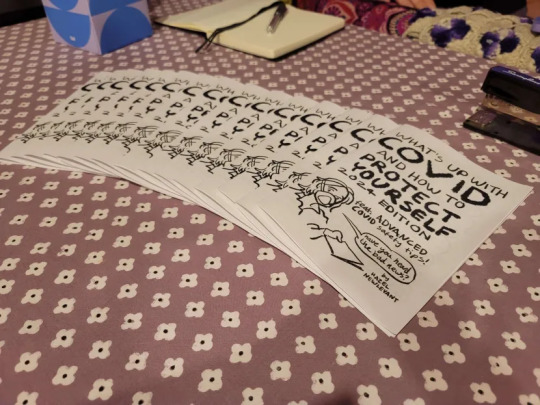
When you get them out of the printer they'll look like this. Just a big old stack. I highly recommend parsing out each individual copy before you try assembling any. I have made that mistake before.
This is how I stack mine.

I like to leave the cover side up as it makes for a clearer division as I'm assembling.
As you're flipping through these to parse and stack them, check them over for any issues with printing. I ran out of printer toner on the first three so I'm glad I checked.
Imperfections are fine but you're looking for anything that makes critical information unreadable.
To assemble a copy, get them lined up by tapping them on the table along a short and a long edge.
Both hands is a lot easier but I was trying to take a picture lol
Then fold them hamburger style and smooth down the spine as best you can. If you have a bone folder or similar use that.
Again, let go of perfection. We are looking for good enough here. Minor errors here should not make info unreadable so don't sweat the small stuff.

I recommend doing all your folding in one go to prevent errors. Or at least it really helps me.
Now it's time to staple. You will see my fancy stapler in the background - you do not require it and I would not recommend it. Unhinging a normal stapler is way easier to use in my opinion and this one gets jammed fairly easy. Use what you've got.
If you don't have staples, but you do have sewing supplies - check out this tutorial for a way to bind it with thread.
If you have no staples and no thread, you don't have to staple every zine. Smaller ones (~5 pages or less) do fine with no staple. They can be a little tougher for some people to use and don't hold up as well being taken in and out of places so I would consider that when thinking of where to leave them. They're still well worth printing and putting out.

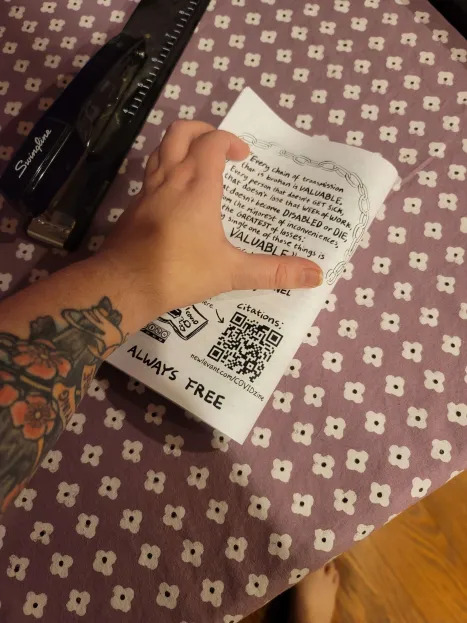
This zine is small enough that one staple in the center should be enough to keep it together.
I opted to staple in two places - one about an inch in from either edge - mostly out of habit. It does add a little stability and will make them a little better for putting in Little Free Libraries and other places where they'll be removed and placed back.
Here is my partner looking over the zines to make sure my stapling didn't cut off any important information in each copy. It's a little tedious but it's pretty important. A quick flip through can mean the difference between someone getting the info you want them to have or not.
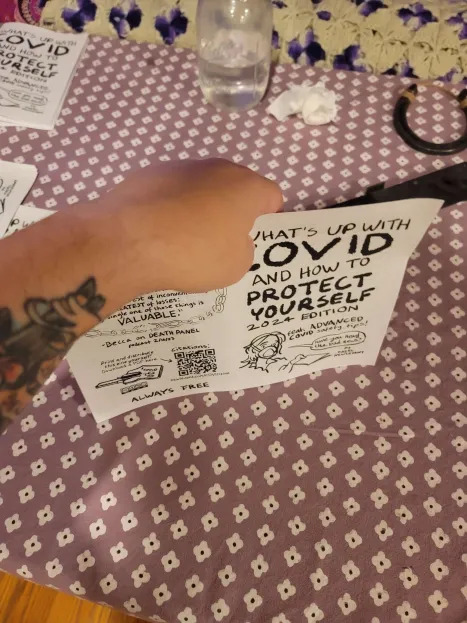
And here's the finished product
I made 15. I'm pretty privileged and have been making zines for over a decade now so it's almost like knitting or crochet for me. Feel free to make fewer copies or just one for yourself. It still counts.
I will stick some in each car and my bag. I have some medical appointments coming up so I will for sure be leaving some of these in the waiting room.
I'm also going to keep an eye out for Little Free Libraries and other place where people are looking for something to read. I might also toss some on the tables of a coffee shop I pop into sometimes (masked, take out only) and the library to pick up books (also masked).
I tend not to give them to specific people, even people I know, because people are way more open to information they've picked up themself than something it feels like someone is pressuring them to read. But if people bring it up in conversation, I'll be sure to offer a copy to anyone who is interested.
Hope this is helpful!
Go out there and print!
169 notes
·
View notes
Text
Popsicle got a winter hat.

Who's exited to go outside play in the snow? Who is?

Fuck. No, its freezing balls. Going home. Now.

Getting warmed up under a fluffy blanket while observing the falling snow will have to do. We don't want for Popsicle to catch a cold, do we?


Some better shots of the hat in question.
And the pattern since @lolliepops-rox asked.
First. I am very new to knitting. Like. Very new. this is like 3rd thing i done in total. So i have no clue what I'm doing or how knitting patterns should be written
K - knit stitch. either through the back or front loop. You figure out which one you need at the moment. just make sure it doesn't twist on itself. P - purl stitch. Also either through the back or front loop as needed. best of luck figuring it out.
yarn I'm using is yarnart jeans plus
my smuppets head is 32 cm around but the hat is kinda loose. not visibly too big but loose. falls of easily
i am working this on 5mm circular needles with magic loop since the hat is kinda tiny
also I'm writing the instruction for how i knitted it which i did kinda on the left side? the inside part of the hat was facing me when knitting. That happened cuz of the way i wanted the starts of the work to face and it had to be folded so I ended up making it kinda inside out. it didn't cause much issues i think? if you want to make it the other way just replace all K with P and all P with K the pattern
cast on 60 (split for 30 on each needle. check knitting magic loop tutorial if unsure how to do that)
10 rounds of "KKPP"x 15 (whole round of just KKPP. This makes double ribbing(? is this what it's called?)
2 rounds of only "P" (this makes nice fold for the rim)
8 rounds of "KP" x 30 times (whole round of just KP)
19 round of turns of "PP KPKP" x10 and "PP PKPK" x10 (here we do 1 round of "PP KPKP" and next one of "PP PKPK" and then again the other one. make sure the 2 PP are always on top of each other and for the rest it's always P on top of K and K on top of P. This makes a moss stitch(?) interrupted by a pillar of 2 knit stitches when looking from the right side. Currently as we're working it's interrupted by pillars of purl stitch cuz were working on the inside)
for the last 4 rounds we are taking the "PP KPKP/PP PKPK" and we are reducing the amounts of stitches. I did it in a way that I'm merging last stitch of the moss stitch under the first stitch of the purl stitch that makes the pillar (I do that by just working throw 2 stitches at the same time). this was very annoying to do cuz to make sure they are not twisted I was doing purl stitches from the back on 2 stitches. If there's a better way of doing it I don't know of it yet.
at the end we're left with 20 purl stitches. we close them by cutting of end of the yarn leaving a long enough tail and going throw all the loops. All of them. tighten it to close it and then go throw all the loops again. secure as you see fit. (remember that if you do it as I did and the brim is folding inside then the side you're facing is the inside of the hat. So make sure you're hiding the yarn on the correct(inside of the hat) side)
turn the hat around and fold the brim. Tada. You got a hat. You can make a pom pom (mine is 5.5cm) and sew that on the top. Hope this pattern is readable. If you have any questions hit me up.

photo of the hat flat down. maybe it'll help with figuring out what is going on in the pattern.
#smuppets#knitting#homestuck#dirkselbows.art#Also GEEE is that some bulbous rump on that first photo 0///0#and that photo in middle. Who did that. whos suffocating the smuppet?#OH that was me .///.#but yea best luck for anybody who tries to follow this pattern. I have no clue what i was doing here
20 notes
·
View notes
Text
You ‘octopi’ my thoughts (octopus hat) - Free Knitting Pattern
My sister wanted an octopus hat, so I created her one!

As you can see, this carnivorous octopus has only left a skull behind…
Materials -4mm circular needles -4mm double-pointed needles -Stitch marker -Main colour yarn (100g DK, shown here in King Cole Riot DK, colour way ‘Cool’) -Contrast colour yarn (about 20g DK, shown here in some unlabeled light yellow) -Tapestry/yarn needle for seaming -Small amount of stuffing for eyeballs and octopus body
Abbreviations St(s) = Stitch(es) CO = Cast on K = knit P = purl Inc = Increase by your preferred method K2tog = Knit 2 stitches together P2tog = Purl 2 stitches together MB = Make Bobble – K stitch in contrast colour, turn, increase st to 3 sts, turn, K3tog, slide back onto left needle, K in main colour
Pattern notes The hat, tentacles and ‘body’ is worked in seed stitch. This is a stitch where there first row is worked as K1P1, the following row is worked as P1K1, essentially you K your P stitches and P your K stitches to create a tightly woven reversible bumpy fabric. (Google it for tutorials etc)
Throughout the pattern you will have to increase and decrease the number of stitches. Try to increase/decrease in the K1P1 pattern as best you can – you will end up with two K/P sts next to each other, but that fine, in the next increase/decrease you will be back to K1P1 the whole way round.
Gauge 6sts by 6 rows per inch in seed stitch

Tentacles (top side) make 8 For the tentacles, you work each tentacle flat and then cut the yarn at the end and leave sts on a spare needle to be used for the bottom edge of the hat.
CO3sts in main colour and work in seed stitch 1-4 – seed stitch 5 – Inc 1 at at beginning of row, keeping pattern correct, continue in seed stitch (4sts) 6-12 – seed stitch 13 – As row 5 (5sts) 14-24 – seed stitch 25 – As row 5 (6sts) 26-40 – seed stitch 41 – As row 5 (7sts) 42-60 – seed stitch 61 – As row 5 (8sts) 62-86 – seed stitch
Tentacles (bottom side) make 8 For these tentacles, you work each tentacle flat and then BO the yarn at the end. You can chose to knit these pieces separate to the main colour tentacles and sew them together at the end, as I have, or work the two pieces together using intersia to change colours. Up to you guys!
CO3sts in contrast colour, work in stockinette stitch (K row followed by P row) starting with a K row. 1-2 – stockinette 3 – K1, MB, K1 4 – P row 5 – Inc 1 at at beginning of row, K to end (4sts) 6 – P row 7 – K2, MB, K1 8-10- stockinette 11 – K2, MB, K1 12 – P row 13 – As row 5 (5sts) 14 – P row 15 – K1, MB, K1, MB, K1 16-18 – stockinette Repeat last 4 rows once more 23 – K1, MB, K1, MB, K1 24 – P row 25 – As row 5 (6sts) 26 – P row 27 – K1, MB, K2, MB, K1 28-30 – stockinette Repeat last four rows 2 more times 39 – K1, MB, K2, MB, K1 40 – purl 41 – As row 5 (7sts) 42 – K1, MB, K3, MB, K1 43-46 – stockinette Repeat last four rows 3 more times 59 – 42 – K1, MB, K3, MB, K1 60 – P row 61 – As row 5 (8sts) 62 – P row 63 – K1, MB, K4, MB, K1 64-66 – stockinette Repeat last four rows 5 more times (86 rows in total) BO all sts
Hat In main colour, CO 39sts, working in seed stitch, work across the 8 sts on each of the 8 tentacles (64sts) that were left on the spare needle. Join in the round, careful not to twist sts. 103sts. Work in seed stitch until work measures 5cm from the CO edge. Decrease 2 sts evenly across hat (I decreased sts 1&2, 52&53) to give 101 sts. Now decrease for the crown: Dec row: *work 8 sts in seed st, K/P2tog* to last st, K/P1. (91sts) Work 2 rows seed stitch. Dec row: *work 7 sts in seed st, K/P2tog* to last st, K/P1. (81sts) Work 2 rows seed stitch. Dec row: *work 6 sts in seed st, K/P2tog* to last st, K/P1. (71sts) Work 2 rows seed stitch. Dec row: *work 5 sts in seed st, K/P2tog* to last st, K/P1. (61sts) Work 2 rows seed stitch. Dec row: *work 4 sts in seed st, K/P2tog* to last st, K/P1. (51sts) Work 2 rows seed stitch. Dec row: *work 3 sts in seed st, K/P2tog* to last st, K/P1. (41sts) Work 2 rows seed stitch. Dec row: *work 2 sts in seed st, K/P2tog* to last st, K/P1. (31sts) Work 1 rows seed stitch. Dec row: *work 1 sts in seed st, K/P2tog* to last st, K/P1. (21sts) Dec row: *K/P2tog* to last at, K/P1. (11sts) Cut yarn and thread through remaining sts.
‘Body’ In main colour, CO 71sts, join in the round careful not to twist sts. 1 – K 1 row 2 – *K6, inc1* to last st, K/P1. (81sts) 3-8 – work in seed stitch 9 – *work 7 sts in seed st, inc1* to last st, K/P1. (91sts) 10-20 – work in seed stitch 21 *work 7 sts in seed st, K/P2tog* to last st, K/P1. (81sts) 22-25 – work in seed stitch 26 – *work 6 sts in seed st, K/P2tog* to last st, K/P1. (71sts) 27-30 – Work in seed stitch 31 – *work 5 sts in seed st, K/P2tog* to last st, K/P1. (61sts) 32-35 – Work in seed stitch 36 – *work 4 sts in seed st, K/P2tog* to last st, K/P1. (51sts) 37-38 – Work inseed stitch 39 – *work 3 sts in seed st, K/P2tog* to last st, K/P1. (41sts) 40-41 – Work in seed stitch. 42 – *work 2 sts in seed st, K/P2tog* to last st, K/P1. (31sts) 43 – Work in seed stitch. 44 – *work 1 sts in seed st, K/P2tog* to last st, K/P1. (21sts) 45 – Work in seed stitch. 46 – *K/P2tog* to last at, K/P1. (11sts) Cut yarn and thread through remaining sts.
Eyeballs (make 2) In contrast colour, CO3 sts and divide across 3 dpns, work in the round. 1 – Inc every st (6sts) 2 – K 3 – *Inc1, K1* to end (9sts) 4-6 – K Stuff eyeball lightly 7 – *K1, K2tog* to end (6sts) 8 – *K2tog* to end (3sts)
Eyelids (make 2) In main colour, CO12sts and work flat. 1-10 – work in seed stitch. BO all sts.
Assembly Sew tentacle bottom sides underneath the tentacle top sides (see photo), making sure to pull thread tight to encourage the tentacles to curl. Sew octopus body onto the back of the hat, I lined up the CO edge of the body at the start of the decreases, then pulled and tacked a few of the body sts onto the top of the crown to emphasise the bulb like shape. Stuff very lightly, again to emphasis it’s shape. Attach eyeballs to hat (use photo as a guide) then partially cover these with the eyelids (again see photo).
Wear and enjoy!
Pattern copyright of foxymitts.co.uk
20 notes
·
View notes
Note
*skadadles towards ya* hai loomy :3
Could ya do your favorite mepad ship headcanons? :] (any ship is fine btw im probably the biggest mepad shipper out here 💔)
Also I'm working on a little gift for ya >:3
Here's a sneak peek :)
[Sorry I forgot to crop the screenshot 😭]

Hi Star!!^^ Welcome back, and thank you for sending in your requesr!! :]
Once again I am so so so grateful for the art, thank you so much!!! <3 <3 In honour of it have Mepad in love with so many people. Mepad harem. Extra headcanons in exchange for making me something so sweet and sparking joy.
[Micpad] Whenever there happens to be any sort of physical affection between the two of them, there's a little spark! Nothing painful of course, just a little love buzz between two electronics. Their systems tend to get a little over-active around each other, yeah? This could also apply to Lightpad (Lightbulb x Mepad), if you'd like.
[Toipad] Toilet tried to teach Mepad how to knit once! It didn't go very well because he doesn't have hands nor does he actually know how to knit, he just wanted to impress Mepad. They end up watching armless knitting tutorials together on Mepad and have a very lovely time together <3.
[Basepad] Big guys with only kickers! <3 I think they'd start talking after the nickloon double whammy in s2 ep11, yeah? Baseball's been mostly hanging out with his alliance + Balloon and now said alliance + Balloon is very much gone. Baseball is so grumpy and upset, and Mepad very clearly was having feelings during said double whammy despite claiming otherwise, so it would make sense that he'd want to at least check on Baseball, since Suitcase at the very least has Knife to check up on her.
[Tacopad] Yeah I'm surprised it took me until #4 to do a tacopad too. Anyway, if someone ever mocks Taco's accent, Mepad will bravely make a stand with her and change his voice settings to make himself British. Taco nearly spits out her tea hearing it for the first time. After the initial argument he helps her with, british Mepad likely becomes reserved for when he and Taco are alone, for flirting purposes.
[Lightpad] Please imagine Mepad laying flat on the ground, face-up. Now imagine Lightbulb standing on top of him. Now imagine him having one of those piano apps pulled up, and letting her hop around and dance on his screen play some music! It's usually nonsensical notes with no sense of rhythm, but she always looks so happy to play that it makes him happy too.
[Floorpad] You KNOW these two would bitch about working for Mephone. Regardless of how much they like him as a person, working for him isn't an easy task, especially given his communication skills, or rather lackthereof. They'd spend a lot of time cloud watching as well, Floory just looking up as normal and Mepad laying flat on his back.
[Saltpad] He can fix her he can teach her boundaries we just need to believe in him. Anyway, she paints his little robot toes every week. She gossips to him while she does so and he reminds her to be kind to others and steers her in that direction gently enough that it doesn't upset her. She'll paint her nails and toes to match him as well.
[Paperpad] Accidental first kiss/meet-cute consisting of Paper getting blown away unexpectedly and eventually being caught by Mepad. With his face. On Paper's face. It is very flustering for Paper in the moment and only flustering for Mepad once he replays the event in his mind a few days later and realises why Paper had gotten so embarrassed.
[Juicepad] Happens in a similar way as payjay honestly. Mepad is an assistant by design, so him assisting OJ with hotel duties is quite natural for him. Mepad being able to get anywhere instantly is a big help for OJ. Laundry delivery takes seconds rather than minutes, he can actually get some sleep since Mepad doesn't do so and can cover for him, etc.
[Marshpad] He stays in contact with her once she quits and moves to the mansion, yeah? Little forbidden romance aspect, with Mepad having disobeyed Mephone to let her leave. May help him stand up to Mephone sooner, like when Toilet is fired. She'd help him a lot with seeing the emotional toil the game can have the contestants as well.
#inanimate insanity#loomy's answers#ii taco#taco ii#mepad ii#ii mepad#toilet ii#ii toilet#ii mic#mic ii#lightbulb ii#ii lightbulb#the floor ii#ii the floor#salt ii#ii salt#paper ii#ii paper#oj ii#ii oj#ii marshmallow#marshmallow ii
15 notes
·
View notes