#earring tutorial
Explore tagged Tumblr posts
Visit Tumblr Blog
Explore Tumblr blogs with no restrictions, modern design and the best experience.
Last Seen Tumblr Blogs


Fun Fact
Tumblr Inc. is funded by 13 investors.
Text
FINALLY MADE THE STAR DROP EARRINGS!!!!!! ✨✨✨


AAAJDJAKKALA
I'll switch out the backings with some nickel free ones whenever I can
Here are the beads I used (both sets from Michael's). I bought the Creatology ones just for the stars �� I've been looking EVERYWHERE for beads like those! They're not super purple, but it works!!!
I'm so excited to wear these!!!


#stardew valley#stardew fanart#stardew fandom#Stardew diy#Stardew valley diy#diy stardew valley#earrings#diy earrings#Stardew tutorial#diy tutorial#earring tutorial#earring ideas#stardew valley earrings#stardew valley crafts#Stardew valley gifts#Stardew valley earring#stardrop#stardrop earrings#sdv crafts#sdv diy#sdv earrings#sdv stardrop
24 notes
·
View notes
Text
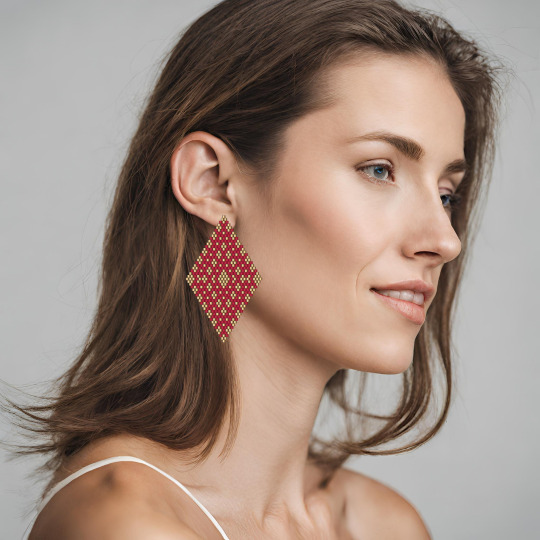
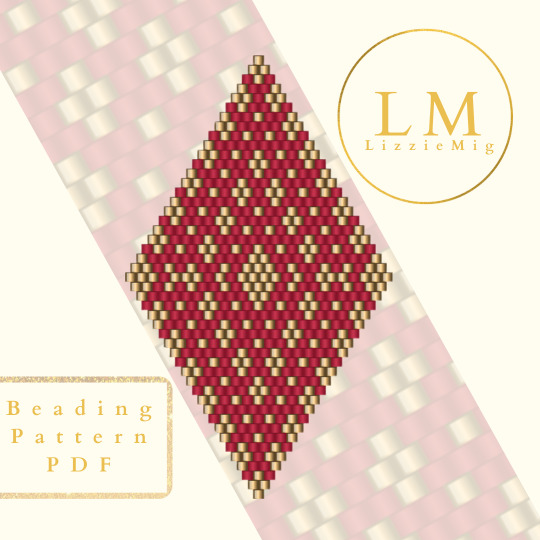
Brick stitch earring pattern, the 24kt Rosa! This gorgeous earring pattern was designed using Miyuki Delica seed beads. Follow the link to find this pattern and more! https://www.etsy.com/shop/LizzieMig
#bead weaving#beading#seed bead jewelry#peyote stitch#loom bead#beading tutorial#diy earrings#earring tutorial#jewelry design#jewelry making#earring
1 note
·
View note
Text
Tutorial: Hanging beads earring
I wanted to do some earrings to go with the hanging wire necklace I did a tutorial for in a previous post, and I figured I would make this a tutorial too. This is a really simple, beginner project if you're just getting started with making jewellery.

What you need:
Headpins jewellery findings. These need to be long enough to hold your beads with about a centimeter of extra wire to attach at the end. I've used different pins for this than for the necklace because the necklace ones weren't quite long enough - you can see the pins next to each other in the photo.
Earring hooks. I've used simple hooks here, but you can use whatever earring findings you prefer.
Beads of your choice. I'm using the same rainbow acrylic beads as the previous project.
Pliers with a fine, round end.

If you've already seen the necklace tutorial, you'll notice that this is a much shorter list of items than that project.
Step 1: Put the beads on the headpin, starting with the one you want at the bottom, ending with the one you want at the top. Make sure you have enough wire left over at the top to make the loop to attach to the earring hook - about a centimeter is what you should be aiming for.

Step 2: Take hold of the end of the pin with the pliers and turn the pliers so that the wire bends in a circle around the plier point. Don't close the loop completely - you want to leave a small gap between the end of the loop and the rest of the pin.

Step 3: Put the loop at the end of the earring hook through that gap and into the loop you've created on your headpin.

Step 4: Put the pliers back into the loop you created in step 2 and twist a bit more to close the gap. If you have a little bit more wire, you can keep turning this until the loop reaches the top bead, with might result in a little bit of overlap in the loop.

Step 5: You have now completed your first earring. Repeat steps 1 to 4 to complete the pair.

I checked the timestamps on my photos after making this pair of earrings and there was seven minutes between the photo of the equipment you need and the photo of the completed earrings. That was with me not in any great rush and stopping to take photos of every step of the way. If I wasn't documenting the steps for a tutorial, I could make a pair of earrings like this in under five minutes. This is what makes them such a good beginning project - you don't need a lot of equipment and you can make something that looks good very quickly. And if something goes wrong partway through while you're learning, you haven't wasted loads of time and can try again.
If I'd planned ahead about this, I would have done this tutorial first as part 1 because it's the simpler one and then followed up with the necklace as part 2.
1 note
·
View note
Text
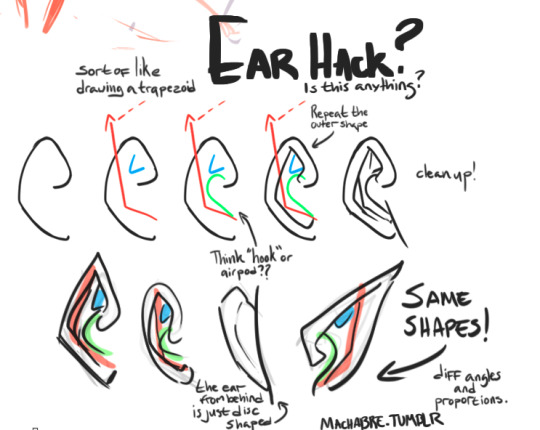
hmmm been thinking about stylizing ear shapes to draw super quick and brainless ears. Uploading it on the slim possibility it helps someone other than myself
disclaimer: not a teacher, not a pro artist or anything.
#art tips#drawing ears#drawing tutorial#first 'tutorial' I've uploaded lmao so no promises it's anything#art hacks#wipsnpractice#you know wht my ass needs to study? eyes and noses fuck they are so hard to dial in cleanly im jealous of any1 who can just. Draw an eye#fcknn sorcery
216 notes
·
View notes
Text
Doing an ear test after having attempted a failed ear experiment. Maybe another mask, but with this one we’re attempting to curve it out more to give it a 3D effect. Gonna explain this in the tutorial along with the delayed snarl mechs.
#art#mask#coywolf#werewolf#coyote#wolf#shark mask#cardboard#snarl#snarling#animal#animal art#cardboard art#cardboard mask#animal mask#kinetics#tutorial wip#wip#test#mechanics test#snarling werewolf#snarling wolf#wolf snarl#werewolf snarl#coyote snarl#cardboard craft#paper craft#the ears are always a pain
88 notes
·
View notes
Note
the way you draw ears, TOP (in my life I will be able to do something like this) (pd: i love u Sleepy)
Hi! Thank you so much HIHIHI 🥰
Anyway, here's how I draw ears! There's anatomy stuff but you don't have to know the names. But let's take reference from real life ok.
🎨👂How I Draw Ears 👂🎨

Ears look complex, but not really. It's just designed to collect sounds, hence the swervy shape.

oKAY but this is just the side view of the face. What about ears from other angles and I just can't find any good reference from a specific angle?
Search for Ears 3D Models! There's a lot out there, but I use this ear 3D model ArtjomsZenins on Sketchfab. (I love sketchfab so much they have web viewer so I don't have to download the 3d model to see it)

There it goes! Hope this helps and happy drawing ears 🥰👂
#sleepy answers#sleepy's tutorials#ear#drawing#art tutorial#art tips#art help#anatomy#drawing tips#drawing help#tutorials
200 notes
·
View notes
Text
does anyone else ever think about thanos styling his hair to look like horns (but they also kinda look like cat ears if you believe) and that he probably spends a long time in front of the mirror carefully styling his hair around and twisting and pinching the strands until it is perfect and symmetrical and then uses an offensive amount of hair gel and hairspray to get it to stay like that. or is it just me going crazy


#i just KNOW he watched a youtube tutorial on how to do that hairstyle#please i love him so much like wtf do you mean he has cat ears hairstyle#he's soooooo#thanos#choi su bong#player 230#thanos squid game#squid game#squid games
42 notes
·
View notes
Text
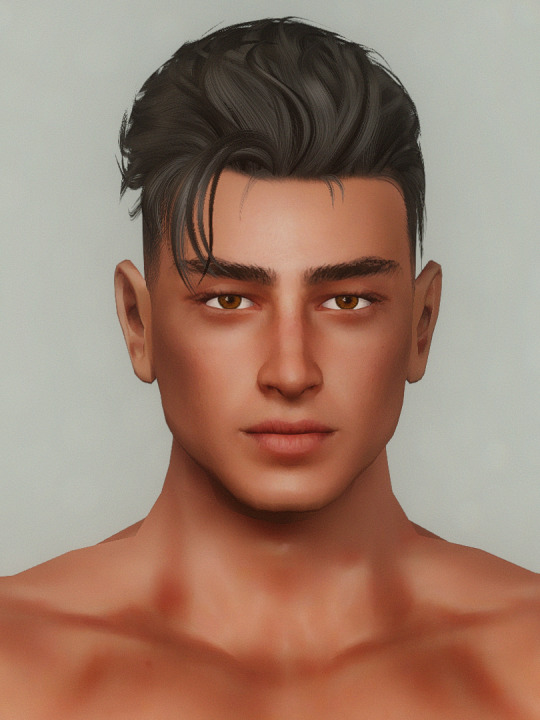

a pretty male sim i made with @sourlemonsimblr thorns male skin a long time ago, i updated his face a wee bit... i love his hooded eyes it's such a unique detail...
#a clean shaven guy for once OMG#ts3#the sims 3#he looks like those guys who thirst trap on tick tock#he needs a dangly earring OMFG#he films mewing & looksmaxxing tutorials
107 notes
·
View notes
Text

Name Day Boys!
In my story Rhagerys and Aemond share a name day. I chose to make it March 8 (Ewan’s birthday). So today is their day 🥳.
Rhagerys was born between the hours of 10-12. The Hour of the Gods.
Aemond was born between the Hour of the Lion (12-2 pm).
The Hours are created by the talented @em-writes-stuff-sometimes. I use the whole day hours she created a lot in my story.
This isn't the first time I’ve drawn these two (I’m slowly getting that picture done). It is the first time I’ve done so in a serious manner. All my other pictures of these two are memes 😅.
#This is more so for me to feel more confident in my abilities#I really wanted to take a crack at drawing these two#I’ve become that entrenched in HotD and in my OC#I don’t own a drawing tablet#So this is all free hand on copy paper#This is my first time drawing Aemond in full#I loved drawing his eyepatch#I fought for my life drawing the hair by his ears#As well as Rhagerys’s nose (I love Matt’s nose but I had troubles)#Also for anyone that has drawn braids for me 🫡#I stared at the tutorial picture for so long as I drew and redrew them#I’m happy with the outcome and know I’ll get better as I practice#Aemond Targaryen my little war criminal#My HotD OMC#OC art#HotD#Art#Ship: My knight (Rhagerys) x My dragon (Aemond)
12 notes
·
View notes
Text
hi hello everyone! ok so i'm looking for some diy inspo tbh, i've searched on pinterest and tik tok but idk they're all the same!
i keep collecting random stuff to make accessories and to modify clothes, but i feel completely creatively blind atm
just give me random alt-ish diy suggestions pls!
#diy projects#diy craft#diy fashion#diy#diy punk#diy inspo#diy emo#diy earrings#diy room decor#diy tutorial#diy tips#diy ideas#diy patches#diy pins#diy pants#diy plush#diy accessories#diy shirt#diy stickers#diy sewing#diy scene#diy stuff#diy shoes#diy decor#diy goth#diy home decor#diy jewelry#diy keychain#diy clothes#diy bracelet
6 notes
·
View notes
Text
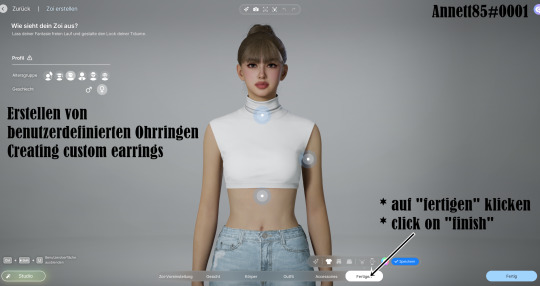
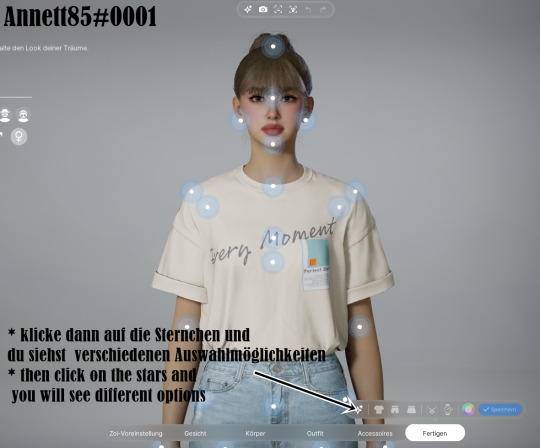
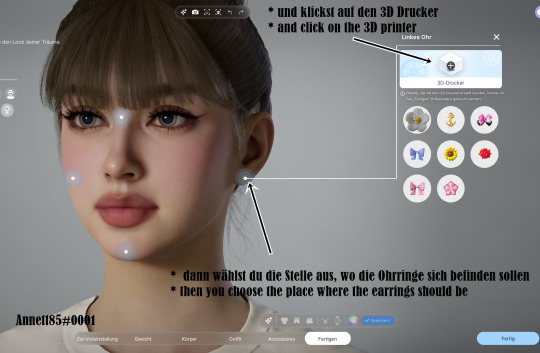

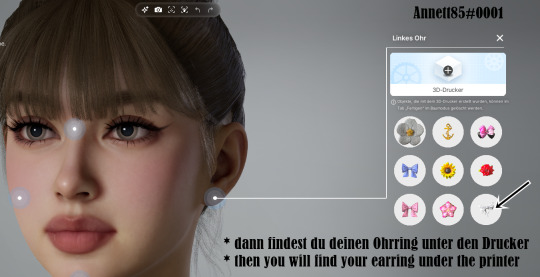
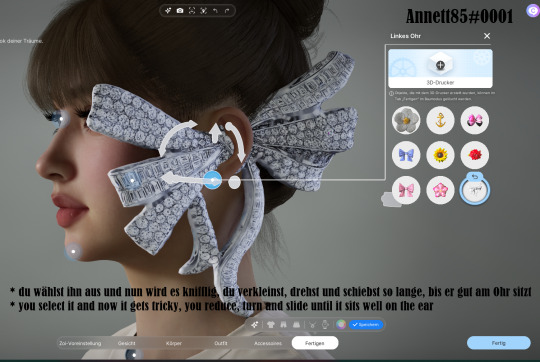

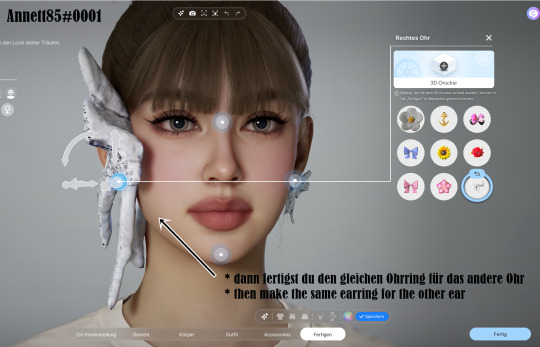

Create custom earrings
DOWNLOAD by Canvas - Annett85#0001
7 notes
·
View notes
Text

This is my son he has every disease
#another needle felt project!#i looked up a tutorial on how to make a nice round ball but then for whatever reason did not do the same for limb attachment#so now as well as the arms and ears being too long they're frankenstein'd on his head#BUT as a first time attempt at making an actual doll thing#it's not too bad#his malshaped figure gives him charm#this was also really fun to do! i feel at ease with it#...not saying that it's *easy*. it isn't lol#but i'm more comfortable with this type of medium than i initially thought i'd be#jigglypuff#needle felt#ravinoforre
13 notes
·
View notes
Text
after only 16 days of having my piano, i have learned:
-Saria’s Song from The Legend of Zelda (right hand fully, working on both)
-Zelda’s Lullaby from (you guessed it) The Legend of Zelda (right hand fully, was working on both and got the first half down but the second half does not sound correct and idk why <3)
-Für Elise (both hands fully learned \o/)
i cannot read sheet music.
#never give up on your dreams I’ve wanted to play piano since i was a child#i am teaching myself through video tutorials and by ear#the biggest problem i have run into is the fact that my hands are small#but with stretches and practicing it gets easier#i can also play the start of the mission impossible theme#jules rambles
8 notes
·
View notes
Text

Day one:
snow
#isat#in stars and time#Agathe#Tutorial kid#This was actually really fun to make. I need to draw characters in the snow more often#Also yes that is one of those plush hats with the moving ears
14 notes
·
View notes
Text
2024 Tumblr Top 10
1. 315 notes - Jul 15 2024

2. 133 notes - Jul 29 2024

3. 123 notes - Nov 5 2024

4. 117 notes - Sep 7 2024

5. 115 notes - Aug 24 2024
6. 113 notes - Sep 24 2024

7. 108 notes - Dec 6 2024

8. 103 notes - Jul 21 2024

9. 102 notes - Nov 28 2024

10. 101 notes - Aug 5 2024

Created by TumblrTop10
19 notes
·
View notes
Text
Cosplay ear fins tutorial
I made ear fins for an Eridan cosplay, and a lot of people asked how I made them. I haven’t seen anyone else doing the same method I used, so I thought I’d share.
I started out with some wire. I don’t know the exact gauge off the top of my head, but I don’t think it particularly matters as long as it’s thick enough to hold its shape but thin enough to shape with your hands/pliers. Cutting up a sturdy wire coat hanger would probably give you workable material.
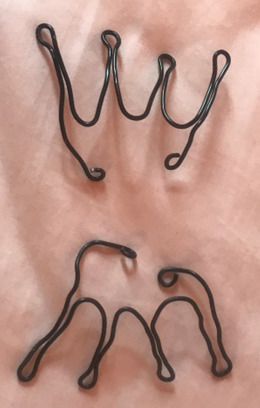
Here are the bases I made. I put some paper over my ears first and sketched a loose outline to get the size I wanted, but I didn’t end up following it too closely. It was mostly a lot of trial and error. I decided on four tines for each ear fin, but you could do a different amount or longer tines if you want. I used round nose and needle nose pliers to shape the wire, but I mostly used my hands and you could probably do this project without pliers if you don’t have them. The ends are curled to avoid stabbing myself in the ear with wire. You want the ear fins to go in front of your ears, and then the wire at the ends loops around the back of your ears to hold them in place. Getting this right took a lot of trying them on and adjusting them, but I eventually got them to where they would stay on without any adhesive but didn’t squeeze my ears too badly.
Next, cut up some old pantyhose/tights to get nylon material. You don't need too much material for this, so sock-style pantyhose would be enough. I happened to have some old tights with holes in them so I just cut out some non-holey pieces. I used black tights since it was the closest I had to gray. You’ll color over these later, but try to get a base shade as close to your desired ear color as possible to make things easier later on. I wouldn’t recommend buying new tights in the exact color you want since that’s expensive and wasteful, so you’ll probably be choosing between black, beige, and maybe white, but just keep in mind that you’ll have to color over it and the coloring method isn't completely opaque. Like, don't use black tights if you want white ears.
Stretch the nylon over the wire bases. I used a roughly square piece of nylon for each ear and folded it in half, then scrunched the excess to pull it tight and used binder clips to hold the material in place. Then use a thread in the color you want the ears to be and sew along the whole open edge of the nylon, anchoring it to the wire frame as shown below. Keep the nylon stretched tight over the tines while sewing so it has those divots in between tines. Cut off excess material and sew the raw edges down.
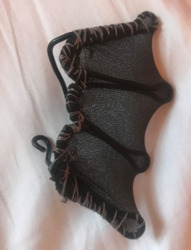
Try the ears on again and adjust as needed.
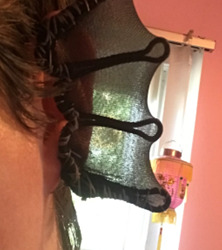
Paint the fabric with Mod Podge (I used matte but I think other finishes would work too.) Take extra care to spread the Mod Podge around the sewn edges to really glue things in place. Wait for the Mod Podge to dry on the nylon. This creates a hard, chalkboard-like surface that you can color on, but keeps some of the transparency of the nylon. I used a combination of chalk, pastels, and eyeshadow powder to color the ears. If you’re going for ears that match your skin tone, foundation powder would probably work. I was just using whatever art supplies I had around, but any powdery pigment should do the job.
I started with white chalk all over the surface to lighten the black color into grey. Then I used white pastel to make highlight lines on the top of each tine and black pastel to make shadow lines below each tine. This added some definition and made the tines look more three dimensional. I filled the spaces between tines with some purple pastel, which I blended into the grey shade with my finger. I then put a layer of shimmery purple eyeshadow over it to give it a nice sheen.
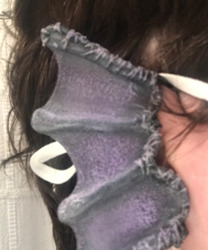
Once you’re done coloring the ears, seal the whole thing with some hairspray and you’re ready to go! You could probably also add some earrings to them if that’s the look you’re going for.

Here’s my final result! I was able to wear a mask with them and they were relatively comfortable to wear all day. Let me know if you have any questions and if you try this tutorial, definitely send me pictures of the results!
#cosplay#cosplay tutorial#cosplay tips#mermaid#sea dweller#eridan ampora#feferi peixes#the condesce#meenah peixes#homestuck cosplay#my posts#ear fins#undyne
127 notes
·
View notes