#beading tutorial
Explore tagged Tumblr posts
Visit Tumblr Blog
Explore Tumblr blogs with no restrictions, modern design and the best experience.
Last Seen Tumblr Blogs


Fun Fact
In 2020, 27% of US Tumblr users had an annual household income of over $100,000.
Text
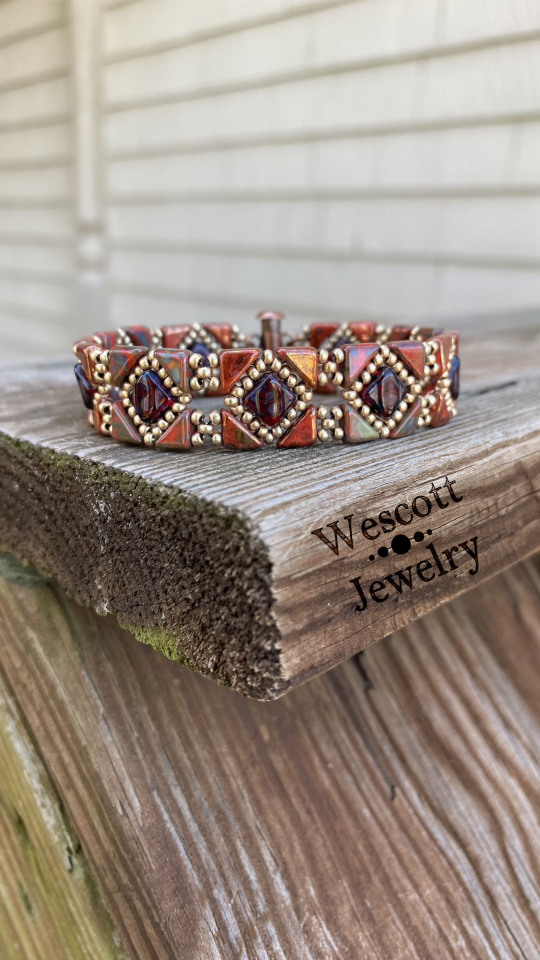


I finally listed this Backsplash Bracelet! It's hard to tell, but the Silky beads in the center are actually a dark ruby red and not black. It looks so killer in the light. You can sorta see it in the first photo!
This is one of my favorite of my original designs. I just never really got over how well the Silky beads and Tango beads fit together. If you're a fellow beadweaver, I do also have a pattern/tutorial available in my shop as well!
#beadweaving#beadwork#beading#beaded bracelet#beaded jewelry#handmade jewelry#beadweaving tutorials#beading tutorial
34 notes
·
View notes
Text

Peyote bracelet pattern that uses 24kt gold beads! Perfect for most occasions, you can find this pattern here https://www.etsy.com/shop/LizzieMig
#bead weaving#beading#seed bead jewelry#peyote stitch#beaded bracelet#beading tutorial#bracelet making#bracelet tutorial#diy bracelet#loom bead
8 notes
·
View notes
Text


Made more tiger sharks!!!
735 notes
·
View notes
Text
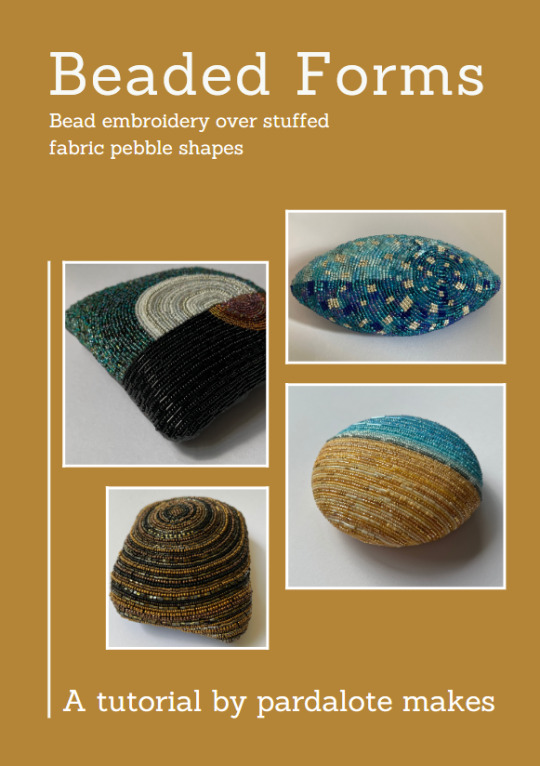


A tutorial!
I've just published a step-by-step tutorial showing how I make my beaded forms. It's 18 pages of juicy instructions, hints and tips and closeup photos AND over half an hour of video that demonstrates my beading process.
It's AUD$8 (about USD$5) and on my webshop here: https://www.pardalotemakes.com/shop/patterns
332 notes
·
View notes
Text

The prep for the Pomegranate curtain is pretty much done!
Onto the construction!
#wip#beading#honestly the filming and editing the tutorial will be the hardest part of the darn thing#but getting the beads colored makes me very excited for everything to come together
84 notes
·
View notes
Text

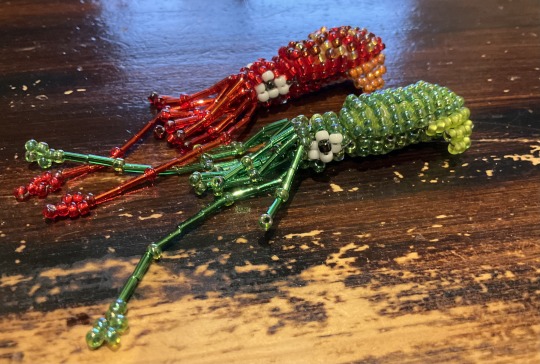
Made a pair of lil squid fellas to sit on my desk :)
I didn’t like any of the squid patterns I found on the internet so i ended up making my own, and after some trial and error I ended up with these little guys. They’ve both even got little beaks! I’ve attached the pattern I made below if anyone wants it haha.
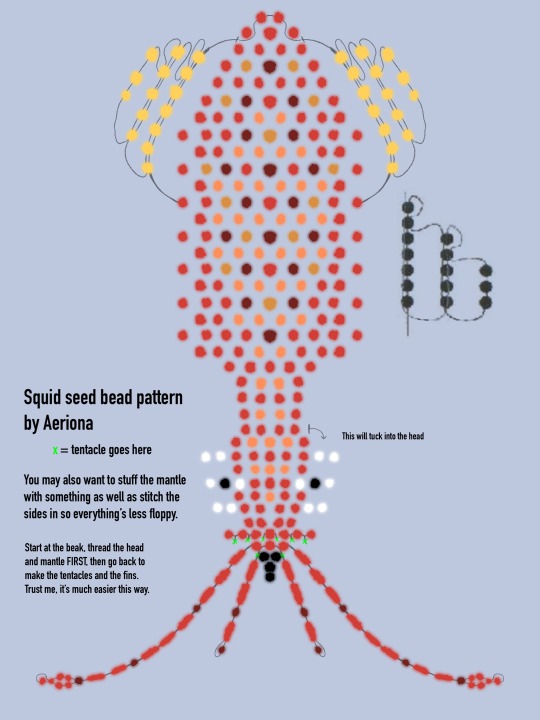
I used size 8 miyuki rocaille/round beads, some bugles and 0.28mm thread, but pretty much any size or shape should work. Hell, you could even use pony beads if you’re crazy enough.
If your thread’s long enough you can even do the whole thing in one go, I’d personally recommend that as it means you have less knots to tie up :).
#Surprise craft tutorial jumpscare#I love these little guys so much i had to share them with the world#My art#squid#beadwork#glass beads#seed beads#pattern#bead pattern#tutorial#crafts#craftblr
307 notes
·
View notes
Text
Questions For More Experienced Kandi Makers
Been trying to make an x base for a while now but I'm having some trouble with the string ending up being too loose to hold itself up. I've tried using fishing line in the hopes that it would be able to hold it up but I haven't been able to get it to work so far.
Oh, and another thing, any advice for someone learning how to do a peyote stitch and read patterns? I've tried watching some tutorials on YouTube but I can't seem to get the hang of it. I'm a bit of a slow learner lol.


#proshippers dni#crafting#art and craft#craftblr#crafts#agere crafts#kandi bracelet#kandi kid#kandi tutorial#kandi#scene art#scenemo#scenecore#scene kid#emo scene#2000s emo#emo#y2k#2000s#middle agere#agere middle#middle regression#advice#artists on tumblr#kandi beads#agere#age regression#2000s scene#disabled artist#endo safe
20 notes
·
View notes
Text
@yourstrulynameless
i finally found time (and the willpower to use markers) to make a keychain using ur tutorial so here it is!!! ignore the fucked up desk it’s been through a lot

im lacking in creativity (….and fancy beads) but HIM!!! hes goofy because i was going to never end up making it if i waited for a better, more thought out idea to magically kiss my forehead
i also wanted to add the recommendation of using tape to remove the top plastic caps on the things. (i couldnt get clear tape to work, but anything w more adhesive seemed to do the trick for the ones that were really stuck) i was not talented enough to pry it off- and tape worked very nicely to get them off with no scratches!!!
additionally i learned: i am NOT talented and wire cutters are indeed 110% the Wrong Tool. but they worked with my nonexistent skill level and im proud i managed to Not cut any of the eye pins into pieces
(this probably should be a reblog but finding the tutorial is going to be the death of me of i have to hunt it down again on mobile)
#valorant cypher#art#diy keychain#him!!!#thsnk u for the tutorial so much#it gave me the motivation to impulse buy craft supplies and then sit over beads giggling about cypher
11 notes
·
View notes
Text

I made a kandi charm of the stupid triangular baby <3333 Lalalalala or whatever
#Baby bill#baby bill cipher#book of bill#this is my first time making a kandi charm without like a guide#well I mean I used a template for the shoes but still I usually watch video tutorials for em#he’s like the size of my hand and he used all my yellow pony beads it’s so fucked up#He’s on my purse now lol
32 notes
·
View notes
Text
24kt Angelique, available now @ https://www.etsy.com/shop/LizzieMig
#bead weaving#beading#seed bead jewelry#peyote stitch#loom bead#beading tutorial#beaded bracelet#bracelet making#bracelet tutorial#diy bracelet
3 notes
·
View notes
Text
Tutorial: Hanging beads earring
I wanted to do some earrings to go with the hanging wire necklace I did a tutorial for in a previous post, and I figured I would make this a tutorial too. This is a really simple, beginner project if you're just getting started with making jewellery.

What you need:
Headpins jewellery findings. These need to be long enough to hold your beads with about a centimeter of extra wire to attach at the end. I've used different pins for this than for the necklace because the necklace ones weren't quite long enough - you can see the pins next to each other in the photo.
Earring hooks. I've used simple hooks here, but you can use whatever earring findings you prefer.
Beads of your choice. I'm using the same rainbow acrylic beads as the previous project.
Pliers with a fine, round end.

If you've already seen the necklace tutorial, you'll notice that this is a much shorter list of items than that project.
Step 1: Put the beads on the headpin, starting with the one you want at the bottom, ending with the one you want at the top. Make sure you have enough wire left over at the top to make the loop to attach to the earring hook - about a centimeter is what you should be aiming for.

Step 2: Take hold of the end of the pin with the pliers and turn the pliers so that the wire bends in a circle around the plier point. Don't close the loop completely - you want to leave a small gap between the end of the loop and the rest of the pin.

Step 3: Put the loop at the end of the earring hook through that gap and into the loop you've created on your headpin.

Step 4: Put the pliers back into the loop you created in step 2 and twist a bit more to close the gap. If you have a little bit more wire, you can keep turning this until the loop reaches the top bead, with might result in a little bit of overlap in the loop.

Step 5: You have now completed your first earring. Repeat steps 1 to 4 to complete the pair.

I checked the timestamps on my photos after making this pair of earrings and there was seven minutes between the photo of the equipment you need and the photo of the completed earrings. That was with me not in any great rush and stopping to take photos of every step of the way. If I wasn't documenting the steps for a tutorial, I could make a pair of earrings like this in under five minutes. This is what makes them such a good beginning project - you don't need a lot of equipment and you can make something that looks good very quickly. And if something goes wrong partway through while you're learning, you haven't wasted loads of time and can try again.
If I'd planned ahead about this, I would have done this tutorial first as part 1 because it's the simpler one and then followed up with the necklace as part 2.
1 note
·
View note
Text


Her name is jelly bean!!!!
#kandi#bead animals#in case you cant tell shes a cat#my kandi#i put the tutorial i used for her in the replies!
67 notes
·
View notes
Note
do you think you could make some users with the songs from the band big thief? thank you anyway 🫶🏻


𖦁ׅ ࣪ ׂbeaded
#beaded jewelry#beaded bracelet#glass beads#perler beads#beadwork#inspo#fave ever#save#waow#art inspo#muse inspo#outfit inspo#rentry inspo#nail inspo#carrd inspo#fashion inspo#tutorial#pink#pink tumblr#pink vibes#pink pilates princess#pink pink pink#pink packs#pinkcore#soft pink#pastel#hot pink#flowers#hydrangea#roses
13 notes
·
View notes
Text
I posted this on my TikTok and it blew up so I’m posting it here so more people can see it bc Kandi people might want it! The tut is 13mins long the link is at the bottom to YouTube
For the TUT
youtube
#kandicore#my kandi#kandi making#kandi bracelet#kandi kid#kandi#kandi cuff#kandi beads#kandi inspo#kandi tutorial#tutorial#bracelet#toys#dog toys#crafts#c#Youtube
8 notes
·
View notes
Text
I just bought a SHIT ton of beads and i want to try and make kandi and the pixel art looking stuff. I’m not very educated in it, could you guys give me some tips?
#kandicore#kandi#kandi kid#kandi bracelet#kandi cuff#kandi making#my kandi#kandi beads#emo scene#scene kid#2000s scene#scenecore#scenemo#scene#scene girl#emo#2000s emo#emo girl#emocore#emo aesthetic#emo kid#kandi stim#bracelet#colorful#tutorial#tips#roguesblog
35 notes
·
View notes
Text
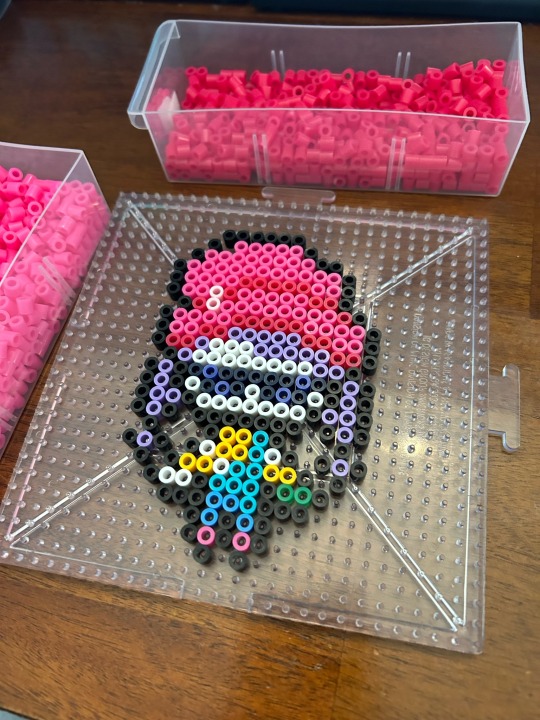
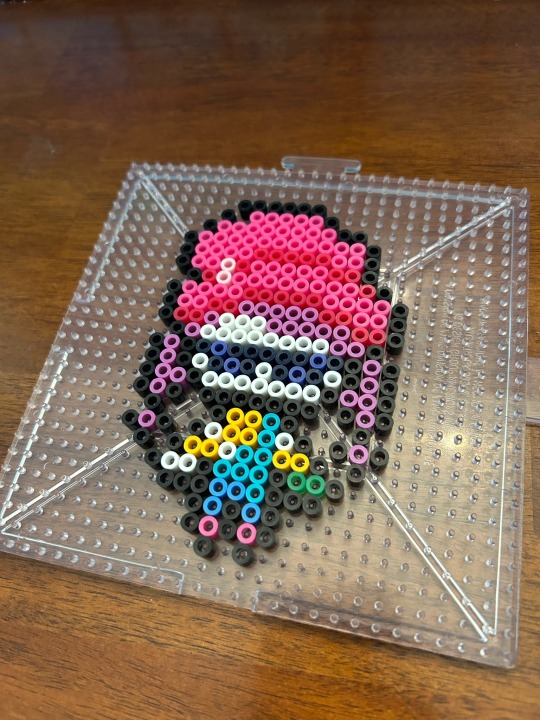
More pixel coaches (and how I make them!)
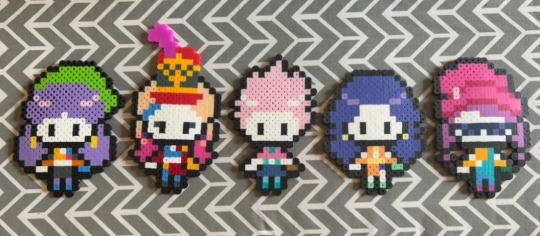
From left to right: Niki (Soy Yo), Moxie (Hollaback Girl), Maps, Fun, and Talk Extreme
I wasn’t going to stop after 100! People have been big fans of these little things and wanted to know how I make them. So I took pictures of the process of creating them. (The full process is under this cut.)
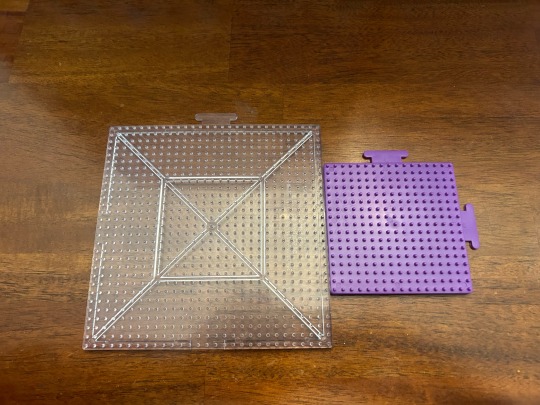
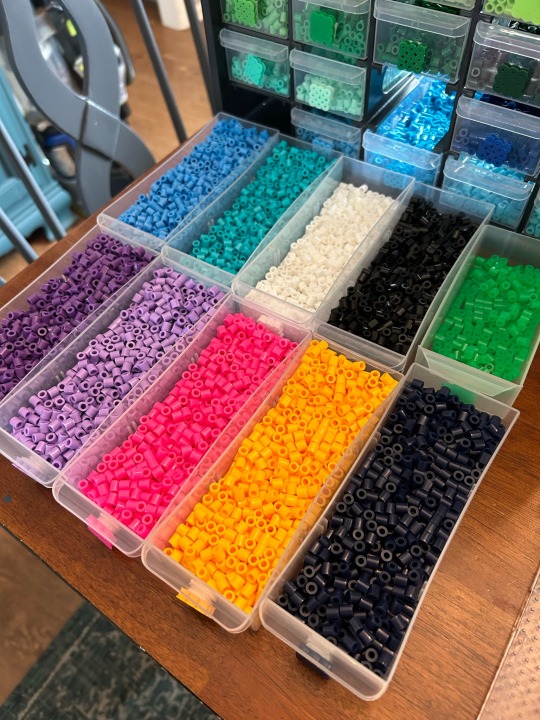
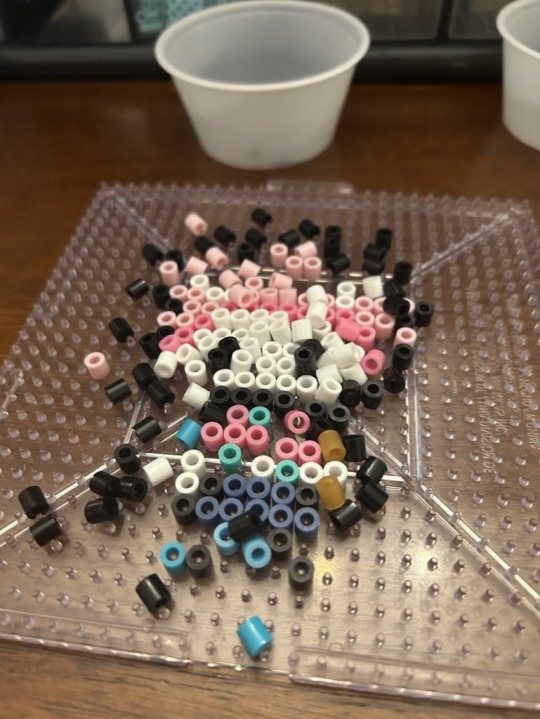
I use Perler beads to make these coaches. They can be found in just about any craft store, or on the official website. I use a large square 29x29 pegboard, although occasionally I connect smaller 17x17 pegboards if the design needs more space, like what I did here with Moxie.

Every design starts out with this simple base right here:
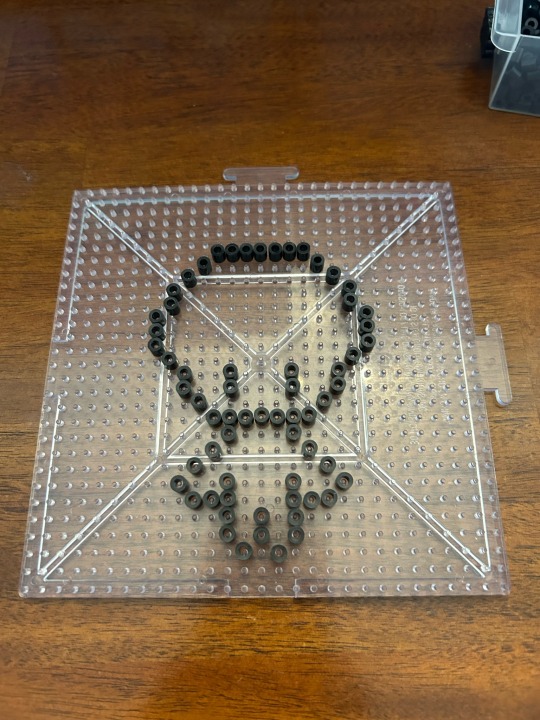
Then I figure out who I want to make and look up references. I choose the color palette from the images and pull out some colors that I might use. Sometimes these can change.
Next, I change the outline of the base, adding and removing beads to shape it into a new figure. Once that’s done, I begin to add color, beginning with the outfit. I outline certain parts that will be filled in with color. Sometimes I look back at previous coaches for help— for example, I looked at Troublemaker for help for the beanie.
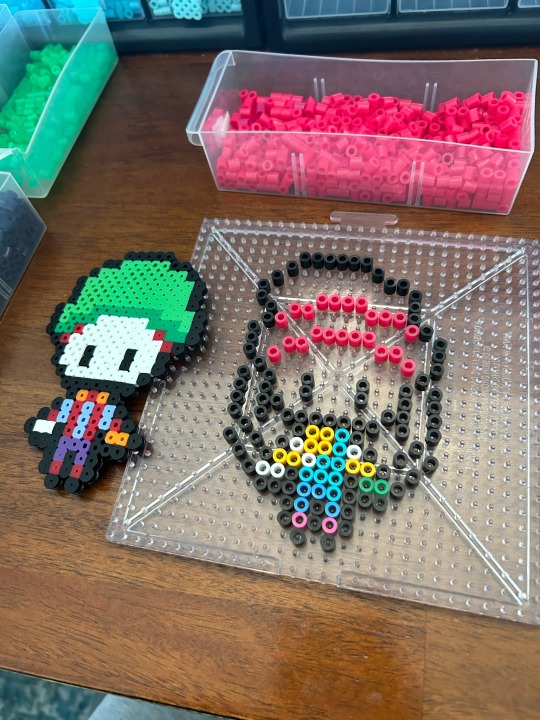
Once the colors are all set, I do one last look-through and change aspects that I feel need changing. For example, I decided to change Talk Extreme’s hair color, since I believed that there was another color that looked more like the original. The way my storage system works lets me take color samples directly off the storage drawers (they’re held there with the power of Velcro) and compare them to the design in front of me. I recommend making a color key for your perler beads, it’s very useful!
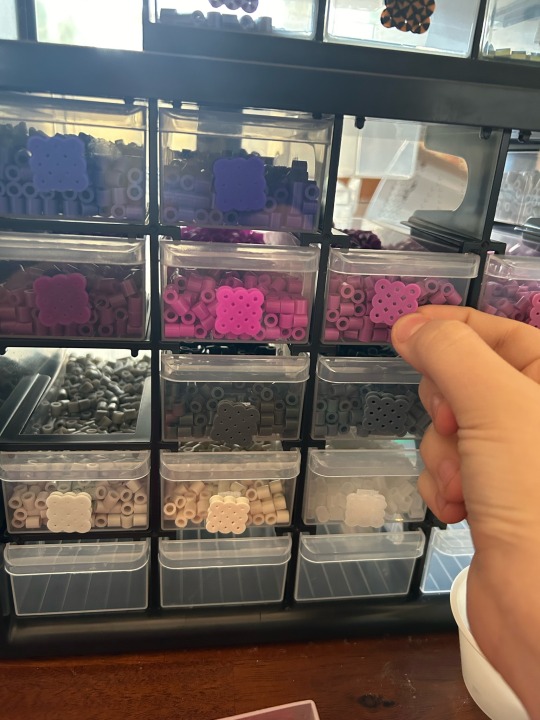

(A brief note: it's important to be aware of what your hands and/or sleeves are doing around the board. Accidents can happen, such as when I dropped my phone onto the pegboard and messed up a 90% done Maps…)
Once the design is finalized, it's time to fuse the beads. I use parchment paper and a basic clothes iron on a normal, non-steam heat setting. It's important to iron in slow circles so that every bead gets melted properly. Certain colors also melt more quickly than others. Once the design starts to show through the paper and the beads' holes become small, it's time to peel the design off the paper and flip it over in order to iron the other side. The back side doesn't need as much time as the front, since the beads are already hot. Depending on the size and complexity of the design, ironing can take 2-5 minutes.
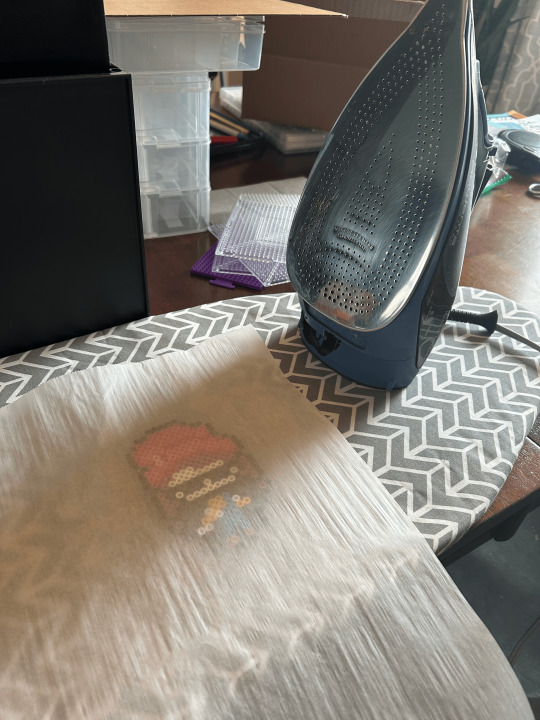

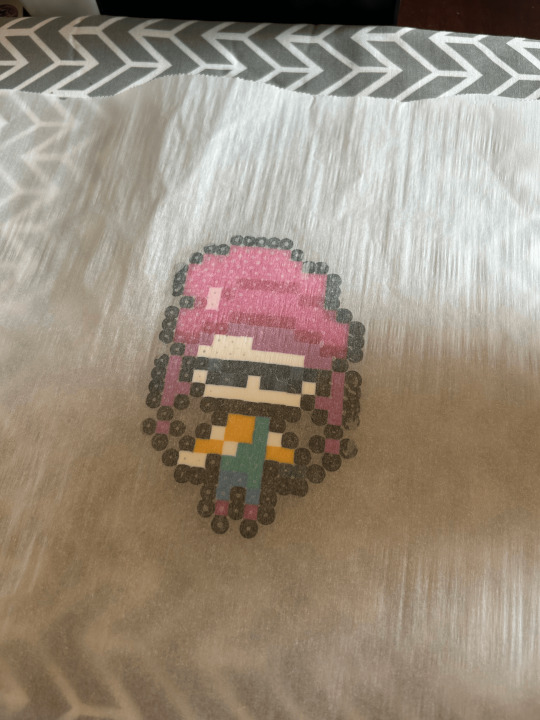

When that side is done, I peel it off, and congratulations, it's done! It's pretty hot, though, so I set it down to cool. Once the plastic has cooled down to a reasonable temperature, it's ready to display.
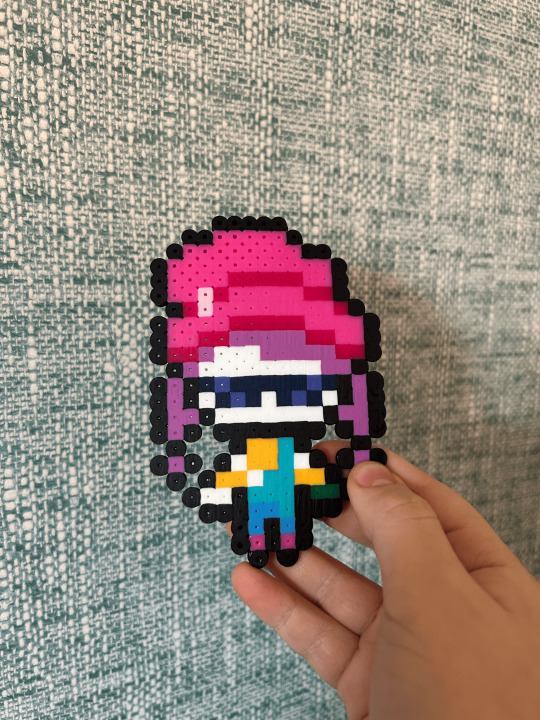
And that's how it's done! The full process can take from 20 mins to almost an hour. I might make digital versions of some of the coaches to use as references for people to make them at home. Who would you want the pattern for the most? I'll be saving these all under the tag #pixel coaches, so if you want to see who I've already made, check that tag out!
#just dance#just dance fanart#perler beads#perler bead creations#tutorial#pixel coaches#very happy with how this turned out
43 notes
·
View notes