#especially w this reshade preset !!
Text

masha !
#ts4#ts4 cas#ts4 simblr#simblr#show us your sims#i’m going to post the dl for her and sugar tomorrow but#i just needed to share how pretty she is 😞#especially w this reshade preset !!#also GOODNIGHT 🫂🫂
155 notes
·
View notes
Note
Hope you landed well in the new year.
Since I tried reshade again, I've only been using The Moods, but I want to try other presets, specifically created by other people, but I have concerns about using more that one at a time. Particularly when it comes to duplicate files, I'm trying to wrap my mind around what I should be paying attention to when I'm tossing duplicates. I know I should only keep one of any number of files with the same name, but I'm trying to fully understand why.
For example, qUINT has a bloom.fx file, but it is prefixed with qUINT_, so I assume this means it's a bloom.fx configured to support the qUINT array of shaders and should not conflict with another bloom.fx or [name]_bloom.fx file. But say, both creatorA and creatorB include non-prefixed bloom.fx in their zips. Can I safely assume (w/o opening both files in NP++ to side-by-side compare) that those files are the same as the bloom.fx in the "Shaders" folder? Meaning they can be tossed, or should I make a habit of using NP++ to compare?
And in the event I find they are different, does that indicate an "updated" or "outdated" bloom.fx or one that should have been prefixed to avoid confusion?
You may end up answering this in the process of answering the above, but I just want to make sure I understand correctly that reshade, when applying a preset, any file relied on by another file is called or executed by it's name and not simply the configuration within the file (like a search engine returning a result because the search term(s) appeared within the page content and was not just the name of the page)?
As I mentioned, I'm trying to wrap my head around this and I may be overthinking it, so my apologies for talking in circles if this question reads that way. Thanx in advance.
Hi there!
You can use as many presets as you want alongside each other, you just have to make sure you have all the shaders you need for each of them.
What I find the easiest thing to do when I'm installing ReShade is to install the latest version with every single shader pack it offers, and then make a backup somewhere of all those shaders. Then I go into my installation and remove the many, many hundreds that I don't need. But I've got them all in backup should I need to replace any of them for a new preset. This way I'm not reinstalling ReShade over and over, I'm not redownloading packs all the time, I've got everything ready to go.
It's good to get into the habit of doing this whenever you update to a new version of ReShade, because then you'll always have the correct shaders for previous versions. Since ReShade 4 most shaders will work in all newer versions. There are lots of ReShade 3 shaders that still work fine too (most of them, in fact). But if you're going back and using older versions of ReShade, some of the newer shaders aren't backwards compatible, especially if you're using ReShade 3 (ReShade 4 changed how one of the slider settings works and that function doesn't exist in ReShade 3 so it stops working - however the function used in ReShade 3 still does work in ReShade 4 and 5, which is why version 3 shaders will work in later versions).
You're right that shaders with different file names shouldn't conflict with one another. So bloom.fx will work alongside quint_bloom.fx as per your example. But two shaders with the same file name probably will conflict. If someone is including shaders in their download (which they shouldn't unless they're specifically edited, have permission, or are no longer publicly available) it's always possible it's the exact same shader as you already have installed when you did your big initial install.
Your reshade-shaders file is full of shaders and textures that all your presets can utilise. Let's say you've got 50 shaders installed. You'll see those shaders in the big list in the ReShade menu, and they'll be there no matter which preset you load up. That's the pool of shaders available. When you load a preset, the order of that list will change and the shaders the preset author used will move to where they placed them in the load order (load order is important for ReShade because shaders will look and act different depending on what goes before or after them) and they'll be toggled on if needed. The liftgammagain.fx used by Preset A is the same one used by Preset B*. The shader is unmoving and universal - the presets (the ini files with the preset name) are where the settings telling those shaders what to do are found.
*there are some very rare exceptions, for example if a preset creator decides to edit a shader directly to make it perform differently then they may provide their edited version, but they should make this clear in their instructions and should have edited it and also given it a new name so it doesn't conflict - for example, I use multiple MXAO files alongside each other, and they simply won't work without editing and renaming so they don't conflict, so they all have different file names and have been edited inside the shader, so it's obvious to the user that they're different
I hope that answers your question. If not drop me another ask and I'll try my best!
6 notes
·
View notes
Text


@nectar-cellar posted some pics that reminded me that I've always thought it'd be fun to have a Sims game in black and white, to make it seem like you're watching an old TV show. It dawned on me that I could actually do that easily with Reshade. Duh.
So, I'm messing around making a B&W preset, and this is where I'm at right now. There's a slight tint to them because I wanted it to look like black and white pics toned with selenium, which can give different color tones depending on the strength of the solution. Overall, I wanted something nice and sharp and high contrast, but in the game I discovered that it's kind of hard to have the sharp and high contrast without also having super strong speckling and color-banding, especially on walls and skins. (You can see the speckling on the wall in the first pic.) So,I'm trying to strike a balance between what I'd really like to have and what actually works in the game. :) Or at least what I'm able to make work, given that I'm far from a Reshade expert.
20 notes
·
View notes
Photo


Drapetimania: (2/2)
Afraid of what they'll say
So I push them away
I'm acting so strange
They're so pretty, it hurts
I'm not talking 'bout boys, I'm talking 'bout girls
They're so pretty with their button-up shirts
next / previous / first / most recent
transcript and links under the cut
Emmy: Mm. Ollie.
Emmy: Olive.
Olive: Hm?
Emmy: Val’s gonna be here soon. We’re gonna get caught! -giggles-
Olive: Fine, fine! I can pry my lips away from my beautiful girlfriend’s neck for five minutes so we can hang out with our friends, fine.
Emmy: Wait--girlfriend?
Olive: Uh--Um. Did you hear that? I think Val’s here--
Emmy: Nope! Your mom would have called for us. Olive Marie Allyn, did you just call me your girlfriend?
Olive: W-well... maybe! I don’t know! I know we agreed not to label anything for right now, and—
Emmy: I think I’m a lesbian.
Olive: Oh!
Emmy: -giggles- Yeah. Oh. I’m really frustrated with myself with how long it’s taken me to figure it out, especially now that it feels so obvious. I was never happy with any of my boyfriends...I thought I was. But I like being with you. And I realized I wasn’t happy. So.
Olive: I’m not just another one of your boyfriends?
Emmy: Absolutely not. Never.
Olive: So...
Adeline: Girls! Val and Carter are here!
Emmy: Girlfriends?
Olive: Girlfriends.
--
Olive: How the fuck did you guys get each other’s numbers so fast?
Val: Carter and his mom live like two doors down from me.
Carter: It was easy to just pick her up after I got off. Now let’s do something stupid.
Val: Um, no???
--
farmhouse lot by @softpine
reshade preset by @intravertt
#ts4 story#ts4#sims 4#sims 4 story#simblr#the sims 4#allyns#saudade#olive allyn#emmy hatfield#carter delong#val goode#adeline allyn
11 notes
·
View notes
Note
Do you mind if I ask what reshade presets you use, and where to get them? Or did you make your own? Your stuff always has such wonderful colors, especially the "a summer to remember" edit!
Hi! Thank you so much!! ; w;
I photoshop all my screens, I’m sorry! I play on PS4 so I can’t use reshade. This one was mostly a LOT of selective color layers and some channel/curves. I used gradients to help balance the sky and then used a brush for the stars.

#now im showing you how weirdly i edited people in#doesnt look as bad when you dont know what it was before LMAO#queenqueso#asks
14 notes
·
View notes
Photo

HELLO EVERYONE ok i’m finally doing this after like 84 years lmao
SO yeah several people in the past few months have asked me about my editing process and i said that i’d hopefully do it after gen 2 stuff and since i’m taking a break from gen 2 and wanna stall bc returning to gen 1 will be painful, ya girl got her ass to go through with it. keep in mind, this tutorial is for people who already know the basics of photoshop. if you don’t there’s many tutorials online that’ll help beginners. i’m gonna be editing a pic of val and chance all dressed up and ready to crash a prom to get lit with their homies maggie and eli
*rosanna pansino voice* LET’S GET STARTED
so i use reshade and i believe the version i have is 3.0.7 or something idk but it’s 3.0 and i switch between 3 presets that are my own. the one i use the most started with pickypikachu’s cinematic preset as a base.
now, i know not everyone has reshade, but there’s still a way you can mimic the DOF effect with photoshop. when my stubborn ass edited everything myself all i did was duplicate the photo, apply field blur and adjust the bokeh lighting, added a layer mask and with a brush using the color black, i “colored” in what i didn’t want to be blurry and BOOM ya got that DOF goodness
so for DOF i use either the marty mcfly shader or the matso shader and even both, like in this case. i also love that sweet mxao bc ooh yess them SHADOWS. but unfortunately bc i’ll never ever let go of alpha hair and you’ll have to rip them away from my cold dead hands, ya get this shit.

the dof and shadows cutting through the hair making it look ugly and blurry and just all around BLECH

so when taking screenshots, i take two photos. one with the dof and mxao and another without those shaders
now i open both pics in photoshop and layer the photo with the effects over the one without
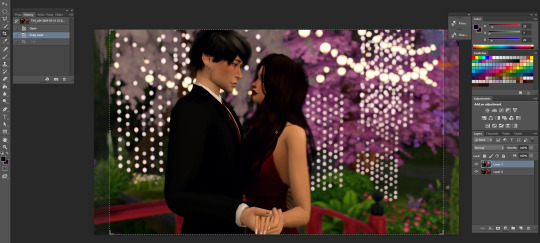
ok this is totally optional and you don’t have to do it but i like to crop my photos and the preset for my cropping dimensions is 1150 x 705 bc that’s what i’m going to resize my photos to (w/ 300 resolution). again, totally optional, you don’t have to do this part but i do.
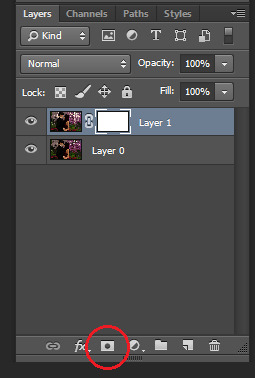
so now i add a layer mask to the top layer
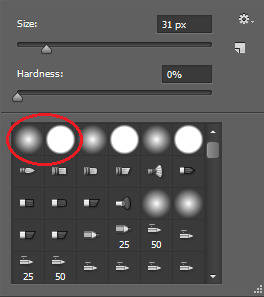
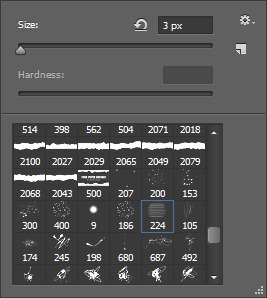
next i select the brush tool and choose whatever brush i wanna use. i usually switch between these two brushes depending on what i need at the moment. and make sure the color you’re painting with is black.
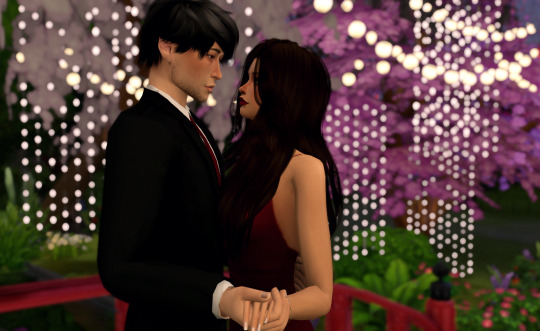
and now just “paint” over the ugly parts to erase them. depending on your photo this can sometimes take a while, but hey ya get that dof and beautiful alpha hair. i also take this time to erase some of the blurriness that forms around my sims from the dof effect


right click on the layer and select “merge down” and i’m left with this. obviously, you see some parts that aren’t blurred anymore but i just fix it with the blur tool at 100% opacity, zoom in on the unblurred edges and blur them in with whatever brush i choose. i personally choose the one with hard edges and i make sure the brush size is very very small. this part’s also a lil time consuming so ya gotta be patient.
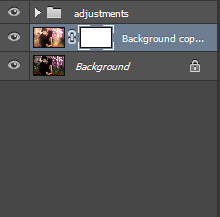
doesn’t that look better? now it’s time to get to the actual editing lmao. first, click layer > background layer to make it a background. this is necessary for me bc of the photoshop action i use.
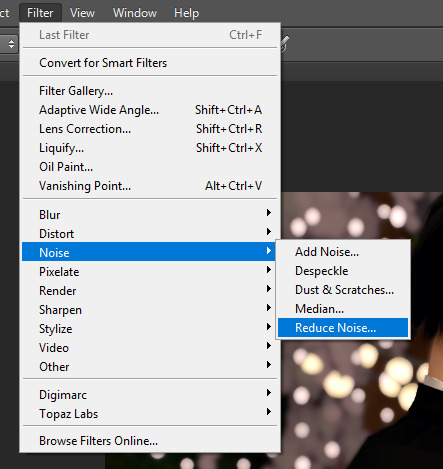
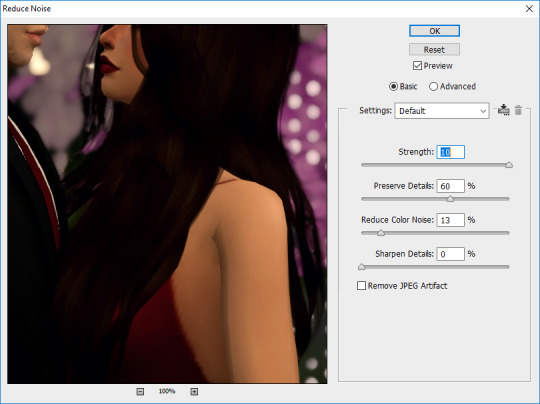
so in order to give my pics that “crisp” look, i first reduce noise and these are my default settings

then i do topaz clean
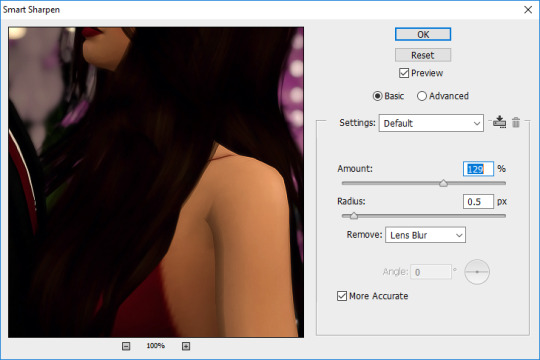
then smart sharpen
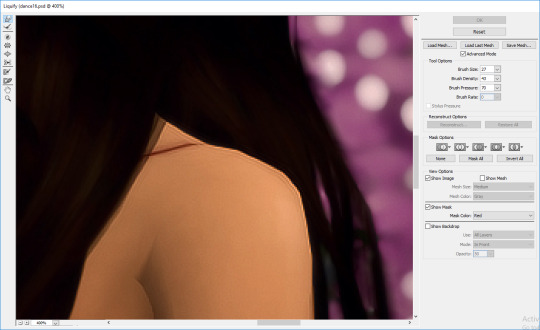
then i use the liquify tool bc sometimes there’s jagged edges on the shoulders, elbows, chins, etc. that i wanna smooth out. i also use this to adjust facial expressions, like for this i wanna make the smiles curve up a lil bit more bc chalerie are in love and happy

now this is the part where i kinda nitpick bc i’m a perfectionist lmao like i clean up some lines on val’s arms and fix that weird spot on the collar of chance’s shirt, all that small stuff people wouldn’t notice but I DO so i fix it

alright now it’s time for me to draw hair! again, this is optional and i understand not everyone has a tablet or likes drawing hair so skip this if it ain’t your thang. first add a new layer for the hair.
i like to add extra hair to make it more full or fix clipping and “highlights” to kinda emphasize the lighting effects i’ll do later and i usually go with a lighter color of the hair for the highlights OR i do the color of the lighting. in this case i’m just going with a very light brown color. this brush is from this set by castrochew and i have the opacity at 100% and size at 3 px.

this is what it looks like after i draw all the hair. and for the highlights i always reduce the layer opacity to 50-60% or even less than that depending on how subtle i want them to be. after that, i merge them all down.

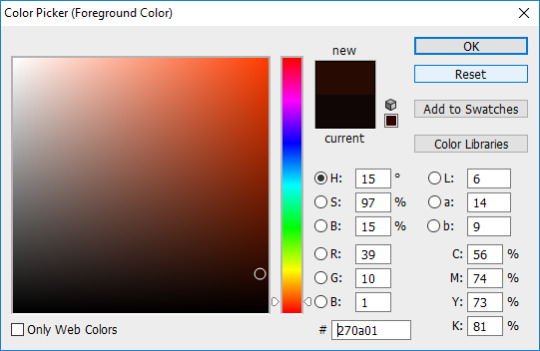
now it’s time to do all the shading and highlighting. make sure you do it all as separate layers, too. even tho i use mxao it still doesn’t do enough for me, so i always add shadows and i recommend you use dark brown for the shadows as black is a a bit too dark especially when you’re adding shadows around the faces. like y’all don’t want it to look like your sims put mud on their face. trust me guys i contour my face.

now take a hard edge brush and draw where you wanna add shadows

apply gaussian blur and erase any excess “shadows” then reduce the layer opacity to your liking. now keep doing that in other areas where you wanna add shadows. it all depends on the picture and i really just use my general knowledge of how lighting and shadows work. remember, make sure each shadow and highlight you add is a separate layer!

for highlights, use a light color, a soft edge brush, change the brush opacity to 60% and change the layer mode to “soft light”. like with the shadows, just paint whatever you wanna highlight, gaussian blur, reduce layer opacity, etc. then after you’re done shading and highlighting, merge all the layers down.

then to enhance the highlights even more i use the dodge tool with the exposure at 25% and paint over all the highlighted areas

so this is how it looks after i did all the time consuming stuff and now it’s time to play with COLOR YEAHHHHHH
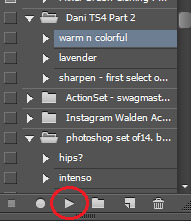
this is the action i’ve been using forever and it’s a ride or die, always got my back, never fails me, always there when i need it. all i gotta do is click on that and press the “play” button and everything’s beautiful and colorful and all my problems seem to go away and suddenly the your lie in april soundtrack is playing the background
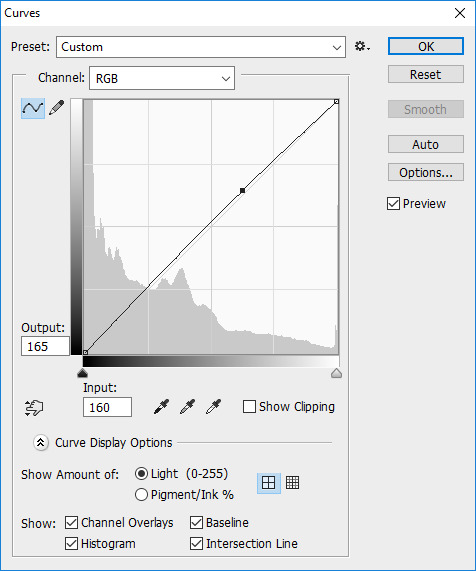

but most of the time i untick the “curves” layer from the action as it can be too bright for me and i just adjust the curves of the image to what i prefer.
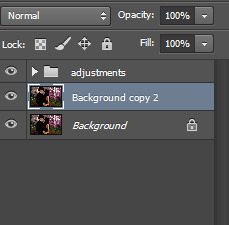

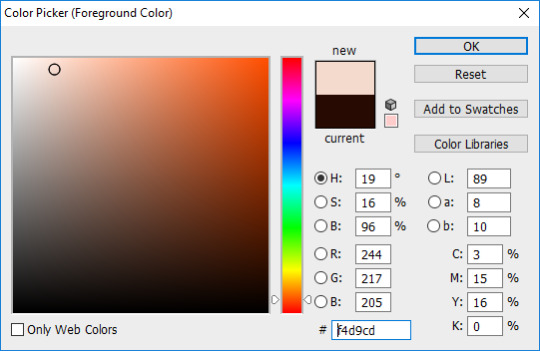
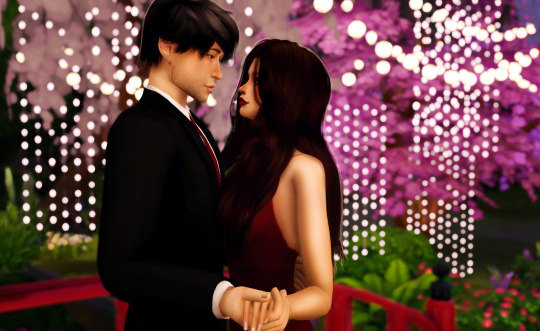
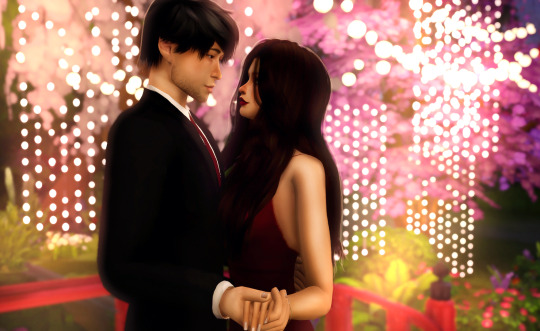
now it’s my favorite part! time to add that good-ass LIGHTING and since i went crazy with the lights for the background, it’s gonna be fun to do this one hehehe. ok so first duplicate your image and then choose the color of the lighting you want. for this pic, i want the lighting to be a nice light warm yellow/orange color

now for the brush mode, choose “linear dodge (add)” and change the opacity to 35%-45% or hey even higher if ya wanna go bright as fuck. and get a soft edge brush and make it big. like fucking BIG. you see the size i put it at? yeah, make it big bc we want that beautiful shit EVERYWHERE
YEAH DAS DAT SHIT I LIKE. keep painting over areas ya wanna see glow and even paint over the same area twice to make it brighter. hell, don’t just stop at one color. add other colors of light if ya want. add some pinks or blue or purple, adjust the brush size, go crazy. BLIND EVERYONE.

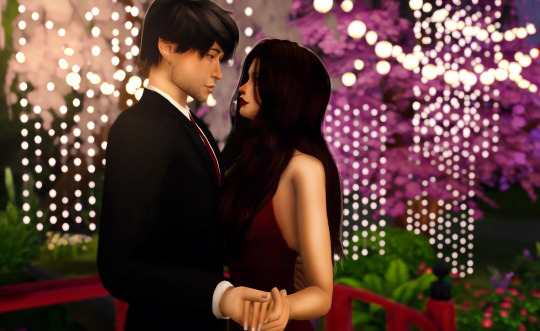
buuuuuuut with all the sweet lighting, it tends to make your pretty pic look all washed out and also lighting doesn’t always work that way. and that’s why i told y’all to duplicate your image bc we’re gonna add a layer mask again and with a soft edge brush you gotta erase some of that lighting. change the brush mode back to normal, put the opacity at 100% and make sure your brush is black and get rid of what you need to. but what’s good about this is you don’t have to be perfect and it’s ok if there’s still some lights on your sims bc now it looks like the light is shining on them awwww. now merge that layer down
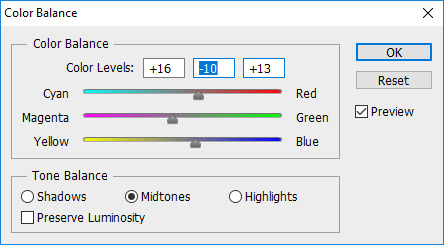
now color balance! i like to enhance the red, magenta, and blue most of the time but as always it all depends on the photo and what your preference is.

all that’s left to do now is change the image size. i change the resolution to 300 ppi (it doesn’t really do anything but like it’s become a habit of me to do it so i do it idk) and make sure if you’re making your image smaller, you apply “bicubic sharper” so your image stays sharp when you change the size

AND THIS IS THE FINAL PRODUCT.
so this is my editing process and i hope some of you learned some stuff from this. also please keep in mind that i also encourage y’all to do your own spin on things when you edit. i’m all for taking tips from others and learning cool new tricks but develop a style that fits YOU. eventually you’ll find it and i know that you’ll end up creating something amazing that shows how unique and lovely you are.
anyways, i’m so glad i finally got this done. love you guys 💖💖💖
#the sims 4#sims 4#ts4#simblr#tutorial#aliya's editing tutorial#giving it that tag so i can make a link on my blog#i really hope i explained things well#like i don't do tutorials#but here ya go#now i gotta edit the other photos for this photoshoot byyyyeee
90 notes
·
View notes
Note
Can you do an editing tutorial please?? Thank you!! I love the way how your screenshots look ❤️
first of all thank you sm! it’s all under the cut babeyyy
my editing is pretty basic but i use the following:
photoshop cc (here if u want it)
this psd for coloring and brightness
this action for smoothness bc i’m not smart enough to deal w topaz clean
this reshade preset (i messed around w the saturation and stuff a lil but its really only important for shadows and dof)
OK we’re ready!!! let’s get this party started so when im in game i’ll take a pic with reshade on! (im stupid and i forgot to take a pic without reshade but here’s what the picture will look w/ reshade haha). if u have a mac or u don’t wanna use reshade here’s a good tutorial about how to fake dept of field!!

alrighty so i’ll put on the psd listed above, and, depending on the picture, decrease the opacity to like 20-50% in this one the opacity of the opacity was like 45% if u need help with psds i think i watched this tutorial when i was learning lol

OK so then i flatten my image going to layer>flatten image then i run the butter action! it makes all the textures really smooth and i use it almost religiously

okay so after that i sometimes add my own light leaks (especially if they’re outdoor photos) i make a new layer using ctrl+shift+n and use a big ol brush and draw some white scribbles! i then do a nice gaussian blur on that layer so it doesn’t look so harsh

okay so after that im gonna flatten my image again (layer>flatten image) and then do a nice smart sharpen (filter>sharpen>smart sharpen)! here are my settings (i’m p sure these r the default ones)

okay we’re almost done! then i crop my image to the 4:5 option (or 5:4 whichever the landscape one is)

and i KNOW i should resize them but i never do so they’re always blurry on dash. i would recommend like an 800 px width maximum for optimum crispiness but if u don’t want to that’s cool too. sometimes i add noise (filter>noise>add noise) and the amount is like 1.8 or something :D anyways here’s my final picture!!

#asks#s4 editing#im so sorry im terrible at explaining at stuff it's a lot easier than im making it seem to be#<3
28 notes
·
View notes
Text
Tips for Screenshots!
hey everyone! i thought i would share some tips on taking screenshots and a little bit on editing. i’m not the best of the best but i am a photographer irl so that helps a lot! also, you don’t HAVE to do any of these. by no means am i saying i’m perfect or i always take the perfect screenshot, (sometimes i’m lazy) these are just the tips that i utilize!
psa i used unedited screenshots for my examples so if you want to see the finished product go look at my gameplay
basics
always make sure your headline effects are turned off! turning off the headline effects removes your sim’s plumbob and thought bubbles. you can have these turned off at all times by using mccc (mc command center) but you can also use the cheat: headlineeffects[on/off] i also like to turn the hover effects off, (the glow that occurs when you move the cursor over your sim) but i use mccc for that. i don’t know the cheat, sorry.
make sure your walls are all up and set the building level to the highest level. this way, there aren’t chunks of your building missing in the background of your screenshots. also when taking shots inside of a building, there will be a ceiling instead of the building being open to the sky.
andrew’s pose player and teleport any sim is the mod to use to get your sims to pose a certain way and in a certain place. this is especially helpful if you are a storyteller. you can find these here. (you have to download poses separately)
i’m sure most of us know about tab mode, but if not, here are the keys:
[tab] key = “Free Camera Mode”
[w, a, s, d, q, e] = Moves your camera (hold down [shift] to move faster)
[z & x] = Zoom
[c] = captures and saves a screenshot
[0] = pause and unpause
[1,2,3} = change speed
click and move mouse to change the tilt of the camera
[page up] = floor up
[page down] = floor down
rule of thirds or centering
use the rule of thirds as a basis so that the eye immediately is drawn towards your subject, or you can center your subject! this is just a guideline- not a rule that has to be followed!!!! for example:


b is following the rule of thirds and a is not
(PSA i did the lines super quick so they are all fucked up)
be level with your sims
when i take screenshots of my sims, i always get down to their level. especially when you are trying to tell a story, you want it to appear like you exist in the story, rather than taking screenshots of a game you are playing (if that makes sense) for example:


unlike the bottom photo, the top photo is not level with the sims
do not overexpose
lighting is everything! i always change all the lights in the house to “neutral white” or just “warm white” to get rid of the icky yellow color (warmest white) i also sometimes will dim the lights or turn off lights for screenshots. (make sure headline effects are back on if you want to change the color and dimness of lights)

this is overexposed and blown out to where you can’t really see the details of the screenshot. (also warmer lighting)
use this mod by @luumia for eliminating blue indoor shadows!
utilize your background
play with your background! a scenic background is more appealing to the eye than a toilet. (this doesn’t always have to be the case, as some screenshots have to be taken in the bathroom for story purposes) also, a nicely decorated building is always great! there are some great builds here on tumblr!
play with your angles
this is where you can be creative and have fun! when i am creating a gameplay post, i like to take different angles of the same pose. it is more interesting to look at different angles then the same screenshot repeatedly. i will take wide angle shots, shots where i am peaking behind a wall or a plant, close up shots, shots of their feet, etc.
editing your screenshots/using reshade
i use photoshop for my edits. you can also use gimp but i have no idea how to use that.
i’m going to admit that my edits aren’t always the best out there. reshade is beautiful, but it isn’t my cup of tea. downloading different reshade presets can cut back on your editing process. if you want an intense dof (depth of field aka the blurry background) you may want to try reshade. i personally did not like the way it looked in my game.
check to see if you need to crop the image to omit any unwanted/ugly objects out of the outer frame.
you can use a psd or action for sharpening your image. i know people use topaz clean. i personally use smart sharpen for all of my images.
edit the screenshot to your aesthetic. you can use a psd or action for this as well, or you can edit it how you want. making your shots brighter and more saturated will help them pop.
resize your image. i resize my width to 1000. whatever you prefer.
save your edited screenshot as PNG!
i hope i helped some of you out! let me know if you have any questions! i’m going to reiterate that this is not a set of rules that you have to follow! these are just tips that have helped me when creating my gameplay. you can use this as a base and then when you feel comfortable enough to start getting creative, you can start to experiment!
as far as figuring out what aesthetic you like, you just gotta try things out and learn what you like and what you dislike!
have a wonderful day! <3
#ts4#s4#thesims4#ts4 screenshots#s4 screenshot#sims4#maxis match#ts4 screenshot#s4 screenshots#ts4 tips#s4 tips
64 notes
·
View notes
Text
2.5D zDepth Animations Tutorial
Due to the popularity of this post, I decided to write a simple tutorial for whoever wants to try the same thing with their favorite game. This method will work with every title that supports ReShade and Depth Buffer (and pretty much every static image you want to animate).
What is ReShade?
It’s more or less a mod that alters the original graphics, adding in more effects (like lens flare), different tones and fixing bad looking edges.
What is the 2.5D/Parallax effect?
2.5D is a method used by many editors to animate a completely still picture, from simple sceneries to characters. This creates a sort of 3D depth on your pictures, used a few times by many professionals to bring famous paintings and advertisements to life.
Note: This tutorial is mostly about scenery animation faking a camera movement and adding in a 3D space between layers. For the Parallax animation on characters I’ll write a separate guide.
What you need:
• The game (duh) (in this case I’ll use Assassin’s Creed Syndicate as example)
• ReShade (I find myself more comfortable with a previous version, because I somehow cannot achieve the same results with ReShade 3+ at the moment. This should easily work with the latest version too, but for any problem or if you want to follow the guide better, grab ReShade 2.0.4f from here)
• An editing program like Adobe Photoshop, anything that allows you to separate parts on layers and fill empty areas.
• Adobe After Effects
A basic editing knowledge is required, along with a good understanding regarding Adobe programs in general. If you make graphics and gifs you’re already a step ahead, but you actually don’t need to be familiar with AE to do the animation.
The tutorial will include four parts:
1) In-game screenshot w/ Depth activated
2) Editing/preparation for AE
3) Compositing
4) Animating
Part 1: In-game Screenshot with Depth Buffer
1) If you are using ReShade 3+ you can follow this tutorial regarding its installation, otherwise copy the ReShade folder, ReShade.fx and ReShade64.dll (or ReShade32.dll if the game is 32bit) into the main game path (where the exe is, so to speak), then rename ReShade64/32.dll as dxgi.dll.
2) With ReShade 2 go to ReShade directory > Presets > Default and drag Shaders_by_CeeJay.cfg into Notepad, then scroll down to the very last line where you see a shader called DisplayDepth. Next to #define USE_DisplayDepth change the value from 0 to 1. With ReShade 3 press Shift+F2 and look for the same name, if you properly downloaded it along with the other shaders of choice it will most likely be already activated. It is highly recommended to set a hotkey for this effect so that you can easily turn it on and off in game (for example, #define Depth_ToggleKey VK_F12).
3) Open Pipeline.cfg and look for the line #include EFFECT(CeeJay, DisplayDepth). Select it, cut it away and then paste it to the very top before any other shader listed. This will allow you to obtain smooth shapes instead of jagged edges (you should also play around with AA options, specifically SMAA and/or FXAA, both included in CeeJay.cfg). Sadly I’m not sure how the setup works in ReShade 3+.
4) Now that your options are properly set you can start the game. Find an area you like and want to shoot, then press F12 (or any other key you chose for it). If the game has a photo mode or custom made free camera tools, you should totally use those for the best results. You can check this post for a few listed titles and all their respective links.

ReShade allows you to automatically store your screenshots directly into the game’s folder by simply pressing the print screen key. This is how the scene looks normally, without UI and with the free camera activated.
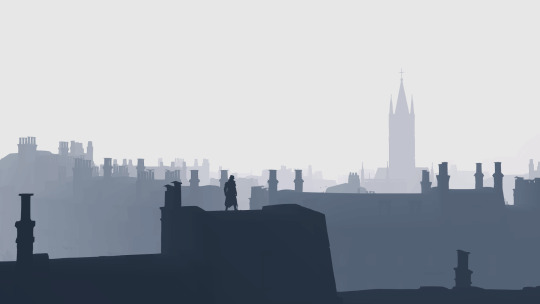
This is what happens when you turn DepthBuffer on.
Note: If all you get with Depth is a fully white or black screen, chances are you need to “reset” by simply entering the fullscreen mode (and switch back to borderless/windowed if that is what you usually like playing with). ReShade usually reloads whenever you apply a modification to the settings, but if even after this the effect doesn’t show up it probably means the game has no DepthBuffer support (or there is some incompatibility somewhere, which may be related to other shaders).
Part 2: Editing
1) Grab your depth screenshot and open it with your editing program of choice, I use Photoshop. In order to animate this, you have to create different layers (renaming them for an easier use in AE, but that is up to you) being sure each hole is covered, or else the empty part will definitely show up in your animation.
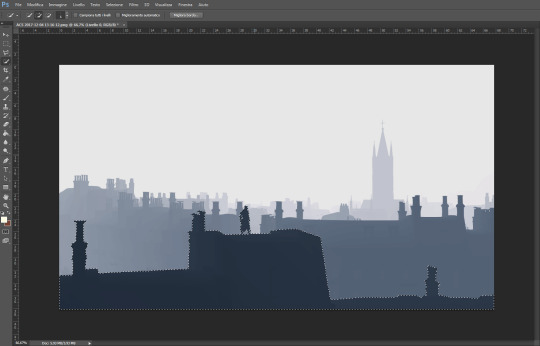
2) Make a selection around the areas you want to separate, I’m starting with what is close to the “camera”. Try to be as precise as possible to keep most of the details, especially around the character. Once you’re satisfied with your selection press CTRL+X to cut it out and then paste it into the same position, a new layer for it will be automatically created.
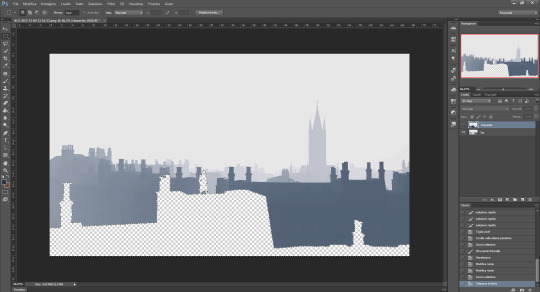
3) If you hide the layer you’ve just made, you will obviously notice an empty shape on the background right where you cut it. The easiest way to fill that properly is by selecting the layer (CTRL+LMB on it), inverting selection and going to Modify > Fill > Content-Aware.
As you can see the empty area has been filled completely, but a few fixes are required. You can use the clone stamp tool or the healing brush, in this case I choose the latter because it makes the process quicker.

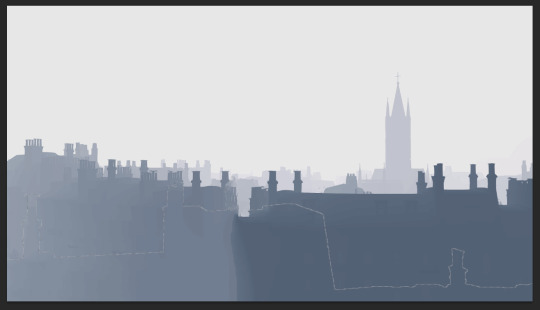
It can be a bit tedious in some places... especially if there are a lot of buildings or trees, depending on your scene. Photoshop covered the outline using the existing content to generate the missing parts as I dragged the brush over it, but you may want to use the clone tool as well and even draw here and there where the brush failed.
Repeat the process for all the other layers you want to separate and then rename everything to know what you’re gonna edit in AE (again, this is optional). You can also make the back layer bigger to hide imperfections behind the other layers, which won’t be too visible while animating. Further edits will be done in AE later anyway.
Part 3: Compositing
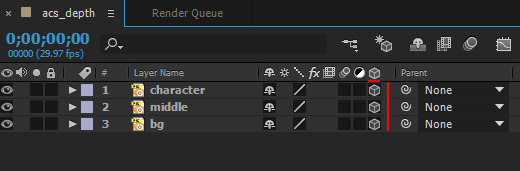
1) Save the PSD file and load Afer Effects. I’m currently using the CC 2015 one, but even if you have an older version this method will work without problems.
Go to File > Import > File and select your PSD.

Be sure the importer is set on Composition and Editable Layer Styles is checked, this is essential if you want to work on each layer.
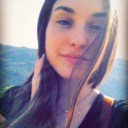
2) Double-click on the left to preview the PSD and convert every single layer into 3D. To do so simply check the third square on the right, under the cube icon:
Now we need to add a Camera. Go to Layer > New > Camera and leave the options untouched (the default configuration should be okay for this).
3) Right under your preview you should see a button called Active Camera. Switch to Custom View 1 to move the layers and create depth between them.
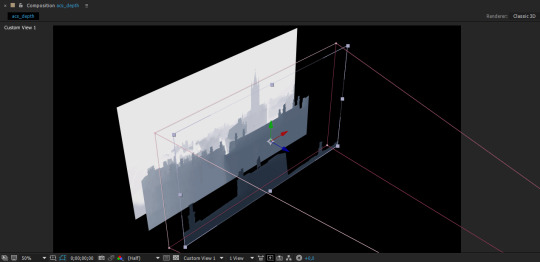
All you have to do is select each layer in the lower panel and move it using the blue arrow (z direction) to push it backward or forward. Use the order you’ve got as reference for the best result, then change the view to Active Camera again when you’re done.
4) Now that you have changed the original positions you need to fix their size to fit the composition. Select all layers at once, press S and activate the little watch icon that appears followed by the effect name (Scale). You will see three values then; place your mouse over the 100,0% one and drag it to the right or left in order to resize the layer(s). Use the directional arrows to also move them up or down eventually.
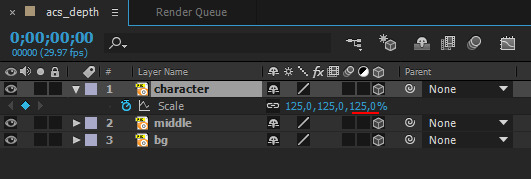
The stopwatch is absolutely fundamental, because it tells where to place each frame in the timeline. Whenever you apply an effect or any modification you need to be sure it’s recorded at the very start, this way it will affect the entire sequence and you won’t risk to only see it taking action in a few frames later instead.
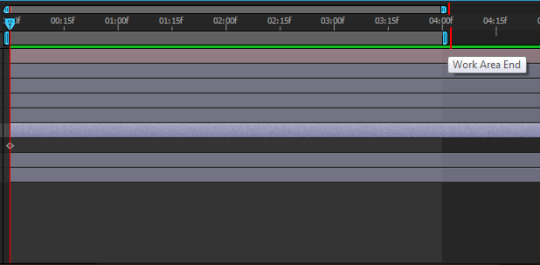
5) You can move the upper bars in your timeline to change the final time. A few seconds for this kind of animations will suffice, I always set it around 4s.
Part 4: Animating
1) Now we can finally animate, woo!!
It is highly recommended to make all the planes bigger than the composition, so that you can move them around without risking to get empty spaces. In this case we want to fake a camera movement with a sort of 3D perspective, like the gifs I’ve posted in that photoset.
Let’s start from the first layer. Click on it and press P (position) to store the current location on the first frame, then move the time indicator at the end of your sequence. I want the main layer to slide horizontally, thus I will move the red arrow on X axes.

As soon as your first animation is stored, another frame will be generated at the end of the timeline. After Effects automatically creates all the frames between the first and the last one, if you are happy with it select the second layer and do the same, then the third and repeat.
You can also use the R (rotation) key to add more realism. Remember to ALWAYS check the stopwatch on frame 1 before doing anything else.
You can preview the animation with space bar, the rendering times change according to the amount of virtual memory installed on your PC.
For a nice camera shake you can follow this tutorial.
2) Once you’re happy with your animation you’re ready to export it. You can pick a simple video option, but that usually requires a second rendering in Sony Vegas or any other program for video editing to fix the bad-looking fps drop. I suggest you to export in frames instead, especially if you plan to make gifs. Go to Composition > Add to Render Queue, a new panel will appear on the bottom. Click on Lossless and pick PNG Sequence next to Format, then on Not yet specified (output to) and select a destination on your computer. Press Render, wait and it’s done!
Again, the rendering times will highly depend on your RAM and composition size. The bigger, the slower; if you play in 4k you should reduce the screenshot size to a common 1920x1080 at least, even smaller after that for the final gif (tumblr has a 3MB limit).
Result:

Questions? Send me a note!
#my graphics#ac syndicate#assassin's creed syndicate#assassin's creed#jacob frye#tutorial#depth buffer#zdepth#after effects#animation#guide#graphics#camera shake#reshade#2.5d#2.5d animation#parallax animation#parallax effect
29 notes
·
View notes
Last Seen Blogs

umhelat
The City of Um-Helat

mahoro-n
mahoro

kazuchaos
Welcome to my eternity
mahoro-n
mahoro
namelessjoan
Joan Rose