#fdisk Command
Explore tagged Tumblr posts
Visit Tumblr Blog
Explore Tumblr blogs with no restrictions, modern design and the best experience.
Last Seen Tumblr Blogs


Fun Fact
Tumblr was acquired by Yahoo for $1.1B in 2013.
Note
as a certified Arch Transfem™, i am a big command line enjoyer. i generally prefer to use my keyboard for anything possible on my system, i have vimium installed on my browser, etc...that said...
i would be rotting in the cold hard fucking dirt before i willingly use a non-gui tool to partition a disk. fdisk can suck my cock and balls and the arch install image should include a desktop environment specifically for gparted.
enjoy
31 notes
·
View notes
Text
WIP Wednesday Thursday
Tagged by the wonderful @totally-not-deacon
I tag... um... hmmm fuck.... I genuinely cannot think of anyone who would really want to do this, the only one I can think of is currently on a sabbatical
I have finally gotten off my ass and begun writing again! What a wonderful thing! Have some All Around the Mulberry Bush teasers
__________________________________________
The lock clicked ominously as you dead-bolted it; Shades already shut, router turned off, unplugged and covered in foil for good measure, phone powered down in the other room. The wireless card removed from your test laptop. You were not taking any chances tonight.
You put the tupperware lid down on the table, pulling your gloves over your wrists with a snap.
“Safety first,” You muttered as you adjusted the straps of your goggles so they were snug against your face.
You’d already gone ahead and installed SystemRescue as your OS on your test laptop just for the occasion. Sure, you may not have been as familiar with Arch Linux systems as you were with Debian or Ubuntu based distros, but nothing else came with such a robust lineup of repair tools preinstalled. And the likelihood that something would infect this PC with malware was incredibly small.
You could do this.
There was nothing to be afraid of.
In fact, Fazbear should be afraid of you.
You adjusted your mask so that it wasn’t fogging up your goggles, and turned your test computer on. You’d already learned your lesson when you’d extracted the drive from the crusty old laptop… there was no way in hell you were letting that thing touch your crappy little coffee table again. Gingerly you placed it on the tupperware lid, plugging it into the cable.
Of course your computer didn’t detect it….
You sighed, pulling up the command terminal.
Well, it was showing up in lsusb….
That was something at least.
Nothing in fdisk or lsblk….
Diligently you tapped away at your keyboard, trying out a few commands.
You reseated the cable a few times, leaving it unplugged as you typed in the command to load the usb storage before you plugged it back in.
“C’mon babygirl….”
You licked your lips as you heard the hard drive whir to life.
You were a goddamn wizard.
It still wasn’t loading, but there was no doubt that the disk was corrupted. So you pulled up TestDisk and began the slow process of recovery.
You created a log, documenting everything you were doing.
Someone had to.
You opened up the drive. Multiple partitions…. More things to go wrong.
No.
More things to go right.
5 notes
·
View notes
Note
What's your biggest hyperfocus and how did you discover it?
I had to think on this for a minute because I wasn't sure if it was true anymore. If it wasn't this then it would be something like MLP or motorcycles (it was tempting to say motorcycles!).
I think it's fair to still say personal computers, though. I'm not sure about when my first contact with them was, but I know a major development was when my dad bought our first PC, an IBM AT clone. (I think I still have most of the parts for it!) I would have been like, 7-9 years old at the time and I was fascinated with it. I ended up breaking it as a kid, because I was trying to figure out what all the DOS 4.0 commands did by running them... when I got to FDISK I rendered it unbootable by pressing buttons. A friend of my father's recovered the situation (I think he used Norton Utilities to recreate the partition table).
I can name pretty much every PC that we had as a family or I had personally:
-Aforementioned IBM AT clone (8088 with a Tatung Hercules monitor, DOS 4.0) -386SX that came from who knows where (Went straight from orange Hercules to VGA colour!!! Windows 3.1) -Tandy 1000HX (long term loan from a friend) -Cyrix 586 (dogshit computer - had fake onboard cache, a common scam at the time, crashed constantly. Windows 95) -468DX4 (think I built this from scrounged parts. Win95, slower than the other PC but way more stable) -Pentium II 233 (also built from scrounged parts. First PC I overclocked, gaining 33 mHz! So fast!!! Windows 2000... but later got repurposed as a Linux-based router) -AMD Duron 800 (built with NEW parts - parents gave me a budget to built a family computer. Windows ... 98? XP? Probably changed multiple times) -AMD Athlon XP 1600 (built with NEW parts - I truly don't remember where I got the money in highschool to put it together, but it was probably every penny I had) -AMD Athlon 64 X2 4400+ (admittedly I didn't remember this offhand... but I did have the physical CPU lying around to check. bought off the shelf very cheap as old stock for my parents to use. Windows Vista. Later upgraded to an Phenom X4, also for very cheap. This PC still lives running Windows 10 today!) -Intel Core 2 Duo Q6700 (built in a cute Shuttle XPC chassis. Eventually burned out a RAM slot because apparently it wasn't rated for 2.0V DIMMs. Windows 7) -Intel Core i5-2500K (I used this computer for YEARS. Like almost a decade, while being overclocked to 4.4 gHz from nearly the first day I had it. Windows 7/10) -AMD 5800X (Currently daily driver. Windows 10)
Not mentioning laptops because the list is already long and you get the point.
I actually did attempt to have a computer related career - in the mid 2000s I went to a community college to get a programming diploma, but I dropped out halfway. There was a moment, in a class teaching the Windows GDI API, where I realized that I had no desire to do that professionally. I did learn things about SQL and OS/400 that randomly came in handy a few times in my life. I did go back and successfully get a diploma in networking/tech support but I've never worked a day in that field.
Unprofessionally though, I was "that guy" for most of my life - friend of a friend or family would have a problem with their PC, and I would show up and help them out. I never got to the point where I would attempt to like, re-cap somebody's motherboard, but I could identify blown caps (and there was a time when there was a lot of those). As the role of PCs has changed, and the hardware has gotten better, I barely ever get to do this kind of thing these days. My parent's PC gathers dust in the corner because they can do pretty much do everything they need on their tablets, which they greatly prefer.
Today though... I used to spend a lot of time reading about developments in PC hardware, architectural improvements, but it doesn't matter as much to me anymore. I couldn't tell you what the current generation of Intel desktop CPUs use for a socket without looking it up. A lot of my interest used to be gaming related, and to this day the GPU industry hasn't fully recovered from the crypto boom. Nearly all of the games I'm interested in play well on console so I just play them there. I still fiddle with what I have now and then.
It is fun to think back on various challenges/experiences with it I've had over the years (figuring out IRQ/DMA management when that was still manual, Matsushita CD-ROM interfaces, trying to exorcise the polymorphic Natas virus from my shit). Who knows, maybe I'll get to curate a PC museum of all this shit someday haha.
2 notes
·
View notes
Text
Linux CLI 29 🐧 fsck, mkfs and dd commands
New Post has been published on https://tuts.kandz.me/linux-cli-29-%f0%9f%90%a7-fsck-mkfs-and-dd-commands/
Linux CLI 29 🐧 fsck, mkfs and dd commands

youtube
a - fsck command fsck is used to verify the intergrity of a file system It checks for error( corrupted inodes, bad sectors, or broken file system structures) It can attempt to fix those errors before you check a filesystem you have to unmount it with umount sudo fsck -N /dev/sda → displays what it will do without doing anything sudo fsck /dev/sda → performs the check sudo fsck -n /dev/sda → perform a check but do not repair sudo fsck -f /dev/sda → forces a check -a → repairs errors automatically -v → verbose mode -t → test for bad sectors b - mkfs command mkfs → Make File System mkfs is used to create and format file systems write sudo mkfs and use TAB key to show the supported filesystem types Create a file system on a partition sudo mkfs -t ext4 /dev/sda or sudo mkfs.ext4 /dev/sda Note that mkfs creates a new filesystem on existing partition or drive It does not resize or delete it. For this task you can use fdisk c - dd command dd → Data description dd is used to copy and convert data from one place to another syntax → dd if=inputfile [bs=blocksize] [count=numcopies] Of=outputfile if → input file, where to read data from bs → sets the block size, default is 512 bytes (optional) count → specifies how many blocks will be transferred. All is default (optional) of → output file, where the data will be transferred to d - dd command examples dd If=input.txt Of=backup.txt → copy a file dd If=/dev/sda bs=4M count=10240 of=image.img → create an image file from /dev/sda dd If=/dev/sda Of=/dev/sdc → clone a disk to another dd if=/dev/sda1 of=~/sda1partition.img → backup a partition dd if=sda1partition.img of=/dev/sda1 → restore the previous backup and if you need to create an CD-ROM ISO dd if=/dev/cdrom of=tgsservice.iso bs=2048
0 notes
Photo

(via How To Reload Partition Table In Linux Without System Reboot?)
#Reload Partition table#Linux#partprobe command#hdparm command#partx command#fdisk command#check partition table change
0 notes
Text
How to install Windows 1.0, get the mouse to work and make the display look good (NON-VIDEO TUTORIAL)
This tutorial is for those who don't like watching videos and/or do not have a good enough internet connection to watch a video tutorial.
You will need:
Virtual Machine software. I recommend VirtualBox, as it costs nothing, has all features free to begin with, including online snapshots and is overall pretty good.
Software capable of altering the contents of floppy disks. (PowerISO seems to work best for me).
The ability to mount virtual hard drives (ImDisk may be needed).
Windows 1x installation floppies. (download)
Windows 2x installation floppies. (download)
MS-DOS 3.30 installation floppies. (download)
Instructions:
Part 1: Installing MS-DOS:
Open your Virtual Machine Software and create a new Virtual Machine. Set the OS to Windows 1.0, or if you can't do that, Windows 3.1. You can allocate a generous amount of memory and hard drive space from here. I gave my VM 86 MB RAM and 1 GB storage space.
Note: Make sure your hard drive is a *.vhd hard drive. This will make your life easier and possibly eliminate the need for ImDisk.
Run the VM. You will get a message saying it can't read from the boot medium or something to that effect.
Mount Disk 1 of MS-DOS 3.30 and restart the VM.
You will boot into MS-DOS on the floppy drive. Run the following commands:
fdisk - this allows MS-DOS to recognise your virtual hard drive as a hard drive, with a drive letter and all, allowing you to format it and copy files to it:

"format c:" without quotes). It's simple - just say yes when it asks whether you're sure you want to do so.
"sys c:" (without quotes). This command is not very necessary, but it makes the hard drive bootable. Without running this command, you would have to insert a bootable disk (such as the first MS-DOS disk) every time you booted up this VM in order to continue. So running this command saves time.
Copy all files from the mounted floppy disk to the hard drive. In other words, "copy a:\ c:\"
Insert MS-DOS Disk 2 and repeat the previous step.
Now you can install Windows.
Part 2: Installing Windows:
There are two ways you can install WIndows. The traditional method and the patched method. The traditional method lets you install a vanilla copy of Windows, but it is very lacking in terms of drivers. (i.e. if you try to install Windows 1.0 with the original floppies the mouse will not work). The patched method uses a driver patch that includes a better display driver, but the installation method is quite different.
Part 2a: Installing Windows the traditional way:
Windows 1x does not support PS/2 mice, which is the type of mouse most VM software, including VirtualBox, typically use. To get around this, you will need to inject the mouse driver from Windows 2x, which does have PS/2 mouse support.
To do this, first open Windows 2x's Disk 1 in a program capable of editing floppy drives and copy MOUSE.DRV to a folder of your choice.
Then open Windows 1x's Disk 1 and replace it's MOUSE.DRV with the one from Windows 2x. Save.
If you're having troubles doing this, you can download the Disk 1 I prepared earlier. It comes with the other installation disks as well, excluding the printer disk.
On your Virtual Machine, mount the first and modified Windows 1x floppy disk and run "setup". Switch to your floppy drive by running "a:" if need be.
Continue through the setup, then select the following options:
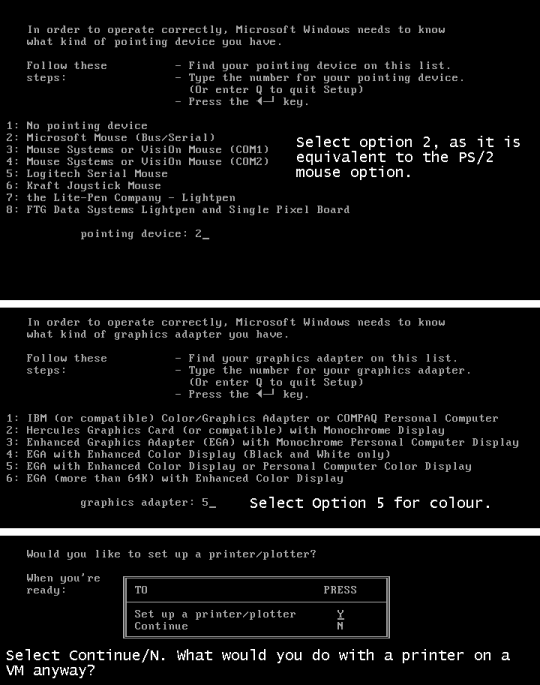
After the setup is complete, you are likely to get an error saying something like "Insert disk with \COMMAND.COM in drive A and strike any key when ready" Remove any floppy drives and restart the VM.
To enter Windows you will need to change the current DOS directory to the Windows directory. To do this, run "cd c:\<windows directory>" or "chdir c:\<windows directory>"
Run "WIN" to start Windows 1.0
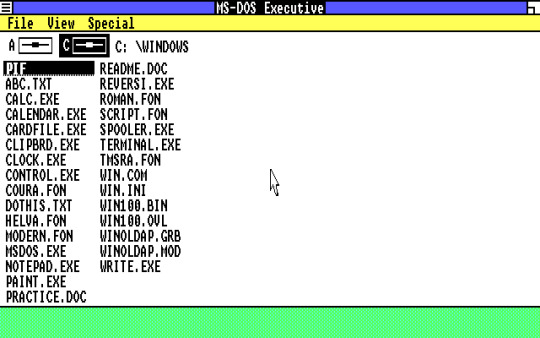
And you're in! You did it! But unfortunately, the screen looks quite squished. Yuck! Which leads to...
Part 2b: Installing Windows using a driver patch:
You will need the driver patch in question in order to be able to use this method. Download it from here.
Extract the VGA utility to a folder of your choice. Then open all Windows 1.0 installation floppies and copy the files over to the same folder.
I have already done this for you. Download it here if you want.
Mount the virtual hard drive for your Windows 1.0 VM (MAKE SURE THE VM IS NOT RUNNING WHEN YOU DO THIS). To make things easier, you can locate your VM's hard drive by copying the file path provided in Settings -> Storage:
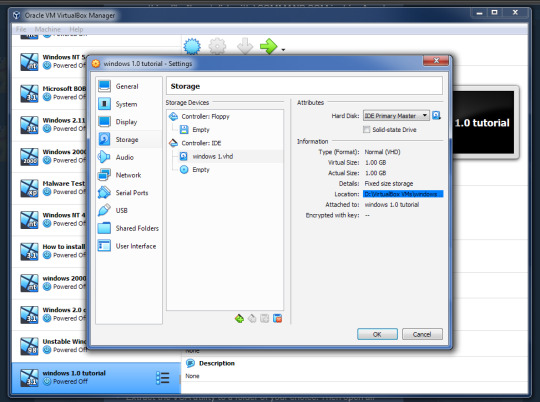
Copy the folder containing the setup files and driver patch to the virtual hard drive. Make sure that its name is eight characters or less, because yes, that was a filename restriction that existed back in those days. MAKE SURE THAT YOU HAVE NO SNAPSHOTS OF THIS VM WHEN YOU DO THIS OR IT WILL NOT WORK.
Eject the virtual drive BEFORE starting up the VM.
In the VM, run "SUBST A: C:\<setup folder>" This tricks the VM into thinking that there is a floppy drive containing all these files. Why? Because Windows 1x does not support setup from the hard drive itself.
Run "a:" to switch to the "floppy drive", then run "win1vga" (without quotes). This will cause the driver patch to install the VGA utility. WARNING: It may not patch the mouse driver, so I recommend using the modified setup disk from Part 2a.
Run "VGASETUP". This is the modified setup that accomodates for the driver patch.
The setup will be slighty different from Part 2a, so select the following options:
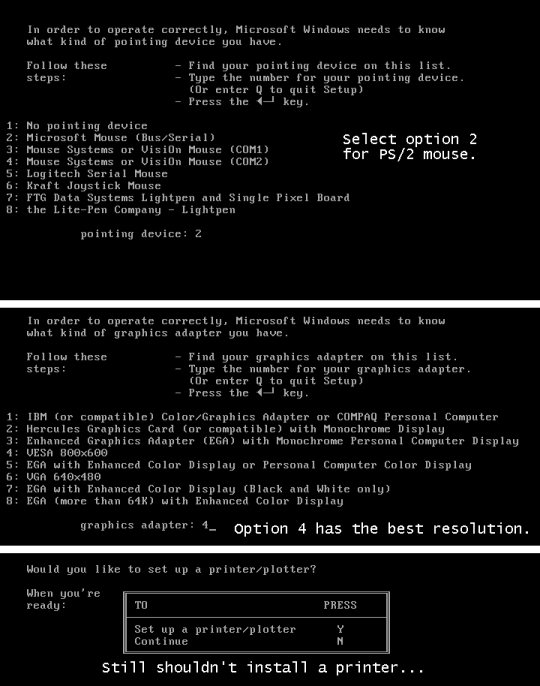
This time, you won't have to swap out the floppy disks, because all the files needed are on the same "floppy disk".
After the setup is complete, you can run "WIN" to win!
It looks SO MUCH better now, doesn't it? Though this setup may cause the mouse to get stuck at the edges. Again, you will have to change the directory to the Windows directory the next time you start this VM (explained in Part 2a).
Now you know how to install Windows 1.0. There's not a lot you can do on there. It is an old OS and the first of its kind after all. You can change the colours, run programs like WRITE, PAINT and REVERSI. But fortunately for you, there are actually plenty of apps that you can run on Windows 1.0.
There are two sites that I recommend getting these programs from:
WinWorld: Contains a ton of random programs. Some of these have versions that can run on Windows 1x, such as ZSoft PC Paintbrush (which lets you draw in COLOUR!).
ToastyTech: Has a page dedicated to programs for Windows 1x and 2x. This site also links the driver patch used in Part 2b of this tutorial.
PLEASE NOTE: Some of the progams here are not compatiable with Windows 1x and can only run on Windows 2x. These programs will CRASH Windows and/or even DOS and you may need to reboot the VM in order to use it again. Get a VM with Windows 2.0 or later to run these programs.
#The Nostalgia Zone#old software#old windows#nostalgia#windows#ms-dos#windows 1.0#tutorial#non-video tutorial#written tutorial
2 notes
·
View notes
Text
DOWNLOAD CANON A630 WINDOWS 7 DRIVER
Uploader: Juicy Downloads: 6963 Download Type: http File Size: 23 Mb File Format: exe Operating Systems: Windows NT/2000/XP/2003/2003/7/8/10 MacOS 10/X Price: Free Date Added: 04 November, 2019 File Name: canon a630 windows 7 driver File Version: 716161767

What's New: - Fixed issue whereby IPv6 in IPv4 tunnelling doesn’t work. - Bug Fixes- [WebAccess](canon a630 windows 7 driver [WebAccess]) Fixed a bug where files were not accessible via WebAccess if UPnP is enabled for the WebAccess settings. - Fixed issue whereby(canon a630 windows 7 driver whereby) string translation incorrect for QoS Page. - Bug - [Folder Setup] Fixed a bug where an NTFS-formatted USB drive became inaccessible. - Web Service] Fixed a bug where the upload speed may become slow when cloud storage is configured. - Fixed TPM 1.2 state will(canon a630 windows 7 driver will) affect TPM2.0 function. - Fixed USB storage information issue. - Fixed HK ISP DHCP connection issue. - Fixes(canon a630 windows 7 driver Fixes) Set Boot Sector Virus Protection to enabled,use Fdisk /MBR command under dos mode,it can't popup warning message. - Fixes issue with Twonky media server(canon a630 windows 7 driver server) not being visible from all DLNA/UPNP clients on the network. Users content: Do not install this driver for the Creative Sound Blaster Audigy LS or Sound Blaster Audigy SE audio device. Audio Boost 4 PRO: Isolated audio with 2x audio processors & Nahimic 2+ for the most immersive gaming experience. BIOS Update: Update USB code. M.2 SHIELD FROZR: strengthened built-in M.2 thermal solution. Instructions: - Download the update file « update. Firefox plug is busy easily when viewing the live streaming with 1920x1080. OLED can indicate rebuild progress. A temporary workaround is to disable the AMD Gaming Evolved "In Game Overlay". - Battlefield 4 may experience crashes when using Mantle. Solved failure of heavy-loaded USB printer. Support 28W CPUIt is highly recommended to always use the most recent driver version available. https://goodsoftwarescollectionn7w.hatenablog.com/entry/2020/03/15/004346 Supported OS: Microsoft Windows 8 Enterprise (64-bit) Microsoft Windows 8.1 Enterprise (32-bit) Microsoft Windows 8 Pro (64-bit) Windows 7 Notebook 8.1/8/7 64-bit Windows 10 Windows Vista 32-bit Microsoft Windows 10 (32-bit) Microsoft Windows 8.1 Pro (32-bit) Windows Server 2012 R2 Windows Server 2003 64-bit Windows 8 Notebook 8.1/8/7 32-bit Windows 8.1 Windows Vista 64-bit Windows XP 64-bit Windows XP 32-bit Microsoft Windows 8.1 (64-bit) Windows Server 2016 Microsoft Windows 10 (64-bit) Microsoft Windows 8.1 Enterprise (64-bit) Microsoft Windows 8 (32-bit) Microsoft Windows 8 Pro (32-bit) Windows 8.1/8/7/Vista 32-bit Windows Server 2012 Windows 8.1/8/7/Vista 64-bit Windows Server 2008 R2 Microsoft Windows 8.1 (32-bit) Windows 7 64-bit Windows Server 2003 32-bit Microsoft Windows 8 (64-bit) Microsoft Windows 8.1 Pro (64-bit) Windows Server 2008 Microsoft Windows 8 Enterprise (32-bit) Windows 2000 Windows 7 32-bit Searches: canon a630 windows 7 C61v; canon a630 windows 7 driver for Windows Server 2003 32-bit; canon a630 windows 7 C CO613-6; canon a630 windows 7 CO6130; canon a630 windows 7 driver for Notebook 8.1/8/7 32-bit; windows 7 a630 driver canon; canon a630 windows 7 driver for Microsoft Windows 8.1 Pro (64-bit); canon a630 windows 7 driver for Windows 8; canon a630 windows 7 driver for Microsoft Windows 8 (64-bit); canon a630 windows 7 COGVI6130; canon a630 windows 7 Cvh613-vhc Compatible Devices: Hard Drive; Wifi router; Video Projector; Videocard; Soundcard; Ipad To ensure the integrity of your download, please verify the checksum value. MD5: 756f6773b1c715932ba65fb22083ebbd SHA1: 842d31b3d1250d876370c5b89b71c4e4f7233f7c SHA-256: cdd16353a67c724d78daf4cc0eff6a4133e05dba71ec7d6deac4007c1131069c
1 note
·
View note
Text
External command os13
External command
External command वे कमाॅड होते हैं। जिन्हें चलाने के लिये विशेष फाईल की आवश्यकता होती है। उस फाईल का प्रथामिक नाम (primary name) वही नाम होता है। जो नाम कमाॅड का होता है। लेकिन द्वितीयक नाम(secondary name)EXE,COM,BAT हो सकता है।
EXAMPLE :-chkdsk,label,edit,diskcopy ,append
LABEL Command
इस कमाॅड की सहायता से drive के label and serial number को देख सकते है। और बदल भी सकते हैं।
View On WordPress
#Append Command#CHKDSK Command#Edit Command#FDISK Command#FORMAT Command#Move Command#Partition Create करना#Partition Delete करना#Sort Command
0 notes
Text
The method of creating two partitions by SD card (FAT32, EXT4).
Insert SD card in the computer, the device should be sdb1
1) Display the mount path, mount/dev/sdb1
The following information pops up:
Mount: /dev/sdb1 is already mounted or/run/media/root/B243-A3BC busy
/ dev/sdb1 is already mounted on/run/media/root/B243-A3BC
2) Unloading sdb1 equipment
Umount/run/media/root/B243-A3BC
3) mkfs.ext4/dev/sdb1
4) fdisk/dev/sdb, press’m’, enter command
First partition
Command (m for help): D // / If only one partition is deleted directly, if there are more than one partition, there will be a number, choose the partition you want to delete.
Command (m for help): n // / Add new partitions
Partition type:
P Primary (2 primary, 0 extended, 2 free)
E.extended
Command (m for help): P // / General Option p
Partition number (1-4, default 1): 1// Add by default from the first partition
First sector (2048-15523839, default 2048): // This is where the memory starts, such as 8G memory, there will be 11523839 sectors, starting from 2048, that is, 2048*512=1M. This is the SD card for storing information.
Last sector, +sectors or+size {K, M, G} (2048-15523839, default 15523839): +200M// divided 200M to the first partition.
Command (m for help): t // / Select a format for partitions, Linux or FAT32
Selected partition 1 // Select the first partition and format it
Hex code (type L to list codes): B // do FAT32
To the second partition
Command (m for help): n // / and then partitioned into Linux systems
Partition type:
P Primary (1 primary, 0 extended, 3 free)
E.extended
Select (default p): p
Partition number (1-4, default 2):
Use default value 2
First sector (6293504-15523839, default 6293504):
Use default value 6293504
Last sector, + sectors or +size {K, M, G} (6293504-15523839, default 15523839): // Size is returned directly and the rest is given to the Linux partition.
Use default value 15523839
Command (m for help): w//save
5) Reformatting after partitioning, mkfs.fat/dev/sdb1, mkfs.ext4/dev/sdb2
6) Pull out the U-disk and insert it back into the U-disk. View the partition [root@localhost~] # df-hT
Filesystem Type Size Used Avail Use% Mounted on
/ dev/mapper/cl-root XFS 37G 6.3G 30G 18%/
Devtmpfs 1.4 G 0 1.4 G 0%/dev
TMPFS 1.4 G 180K 1.4 G 1%/dev/shm
TMPFS 1.4 G 8.8 M 1.4 G 1%/run
Tmpfs, tmpfs, 1.4 G, 0.4 G, 0%/sys/fs/cgroup
/ dev/sda1 XFS 1014M 172M 843M 17%/boot
VBox SF 62G 52G 9.9G 84%/media/sf_share
TMPFS 285M 12K 285M 1%/run/user/0
/ dev/sr0) iso9660 57M 57M 0 100%/run/media/root/VBOXADDITIONS_5.1.26_117224
/ dev/sdb2 ext4 7.0G 33M 6.6G 1%/run/media/root/0e2dc96f-779f-41ca-b868-74e3f17b1948
/ dev/sdb1, vfat, 200M, 0%/run/media/root/3F47-F43D
Finish!
Ps:
FAT32: (i.e. Vfat) A 32-bit file allocation table supports 128GB maximum partition, 4GBext4 log file system, 1EB (1024*1024TB) and 16TB single file. Continuous writing can reduce file fragmentation. Rhel6 default file system.
you must to know how to repair damaged sd card without formatting. so you should create two partitions, It���s more safe.
1 note
·
View note
Text
Linux CLI 28 🐧 fdisk command
New Post has been published on https://tuts.kandz.me/linux-cli-28-%f0%9f%90%a7-fdisk-command/
Linux CLI 28 🐧 fdisk command

youtube
a - fdisk fdisk is used to manage partition tables on HDD/SDD/devices You can create, delete, resize partitions... change their types or even check their status fdisk -l → lists the partition tables of your devices fdisk -l /dev/sda → lists the partition tables for sda device fdisk -s /dev/sda → prints the size of sda partition fdisk /dev/sda → press m → shows all the disk commands b - create, delete and change partition type with fdisk to create partition: fdisk /dev/sda → press n → press p for primary or extended → choose the partition number → enter first and last sector for this partition → w to write the changes to delete partition: fdisk /dev/sda → press d → select partition number → w to write the changes to change partition type: fdisk /dev/sda → press t → then L to list the partition types → enter the partition number you want → w to write the changes to quit without writing the changes: q You can also create new empty partition table : b → for GPT, o → MBR, G → for SGI and s → Sun
0 notes
Text
This guide will show you how to extend or resize an ext2/3/4 and XFS File System without LVM at runtime. This could be a root partition configured with ext2/3/4 or XFS filesystem but without any LVM configured. In our previous tutorial, we looked at How to extend root filesystem using LVM on Linux. Step 1: Check your current root disk capacity For this demonstration, I have a CentOS 7 VM with below partition scheme. $ lsblk NAME MAJ:MIN RM SIZE RO TYPE MOUNTPOINT sr0 11:0 1 1024M 0 rom vda 253:0 0 10G 0 disk └─vda1 253:1 0 10G 0 part / As seen from the output, the root filesystem is on /dev/vda1 partition without LVM. Step 2: Extend your OS root disk I will extend my root block device to 30GB. I use KVM virtualization technology, so this guide works for me: How to extend/increase KVM Virtual Machine (VM) disk size For KVM I can check virtual disk path using the command below: $ sudo virsh domblklist centos7 Target Source ------------------------------------------------- vda /var/lib/libvirt/images/centos7.qcow2 sda - $ sudo fdisk -l /var/lib/libvirt/images/centos7.qcow2 Disk : 10 GiB, 10739318784 bytes, 20975232 sectors Units: sectors of 1 * 512 = 512 bytes Sector size (logical/physical): 512 bytes / 512 bytes I/O size (minimum/optimal): 512 bytes / 512 bytes $ sudo qemu-img resize /var/lib/libvirt/images/centos7.qcow2 +20G Image resized. If you’re on a different Virtualization platform, refer to its documentation for how to extend OS virtual disk. Step 3: Grow VM partition Start your VM and ssh as a user with sudo privileges. The first thing to do is to confirm the new disk size. $ lsblk NAME MAJ:MIN RM SIZE RO TYPE MOUNTPOINT sr0 11:0 1 1024M 0 rom vda 253:0 0 30G 0 disk └─vda1 253:1 0 10G 0 part / We can see the disk has grown by 20GB, from 10GB to 30GB. The next action is to expand the partition (Partition 1) in our example, to the maximum size the disk provides. Install cloud utils package For those new to growpart, it is a Linux command line tool used to extend a partition in a partition table to fill available space. This command is provided by cloud utils package. On Ubuntu / Debian system, run: sudo apt -y install cloud-guest-utils gdisk For CentOS / RHEL / Fedora server, run: sudo yum -y install cloud-utils-growpart gdisk Help page can be viewed by passing -h argument $ growpart -h growpart disk partition rewrite partition table so that partition takes up all the space it can options: -h | --help print Usage and exit --fudge F if part could be resized, but change would be less than 'F' bytes, do not resize (default: 1048576) -N | --dry-run only report what would be done, show new 'sfdisk -d' -v | --verbose increase verbosity / debug -u | --update R update the the kernel partition table info after growing this requires kernel support and 'partx --update' R is one of: - 'auto' : [default] update partition if possible - 'force' : try despite sanity checks (fail on failure) - 'off' : do not attempt - 'on' : fail if sanity checks indicate no support Example: - growpart /dev/sda 1 Resize partition 1 on /dev/sda Now use growpart to extend your partition. $ sudo growpart /dev/vda 1 CHANGED: partition=1 start=2048 old: size=20969472 end=20971520 new: size=62912479,end=62914527 This will resize partition 1 on /dev/vda. Validate the change. $ lsblk NAME MAJ:MIN RM SIZE RO TYPE MOUNTPOINT sr0 11:0 1 1024M 0 rom vda 253:0 0 30G 0 disk └─vda1 253:1 0 30G 0 part / Step 4: Resize / partition to fill all space The last step is to resize the file system to grow all the way to fill added space For ext4 file system, use resize2fs
$ sudo resize2fs /dev/vda1 resize2fs 1.42.9 (28-Dec-2013) Filesystem at /dev/vda1 is mounted on /; on-line resizing required old_desc_blocks = 2, new_desc_blocks = 4 The filesystem on /dev/vda1 is now 7864059 blocks long. If your filesystem is XFS, it can be grown while mounted using the xfs_growfs command: sudo xfs_growfs / Confirm new size using df -h $ df -hT | grep /dev/vda /dev/vda1 ext4 30G 1.2G 27G 5% / Congratulations!, you have successfully resized an ext2/3/4 or XFS root partition on Linux without LVM.
0 notes
Text
Linux iso usb maker

So instead I propose # dd count= if=/dev/sdb of=win7.img Note, this copies the whole device! - which is usually (much) bigger than the files copied to it. Check the boot checkbox, then close.Īfter all that, you probably want to back up your USB media for further installations and get rid of the ISO file. Open gparted, select the USB drive, right-click on the file system, then click on "Manage Flags". or use the standard GUI file-browser of your systemĬall sync to make sure all files are written. Mount ISO and USB media: # mount -o loop win7.iso /mnt/iso
or (if syslinux is installed), you can run sudo dd if=/usr/lib/syslinux/mbr/mbr.bin of=/dev/sdb.
on newer Ubuntu installs) sudo lilo -M /dev/sdb mbr ( info) Write Windows 7 MBR on the USB stick (also works for windows 8), multiple options here: # cfdisk /dev/sdb or fdisk /dev/sdb (partition type 7, and bootable flag) Delete all partitions, create a new one taking up all the space, set type to NTFS (7), and remember to set it bootable: Grub is installed there!)Ĭheck what device your USB media is assigned - here we will assume it is /dev/sdb. Or alternatively, make sure lilo is installed (but do not run the liloconfig step on your local box if e.g. Install ms-sys - if it is not in your repositories, get it here. This works with the Windows 7 retail version. Basically, the missing step was to write a proper boot sector to the USB stick, which can be done from Linux with ms-sys or lilo -M. Use of livecd-iso-to-disk on any distribution other than Fedora is unsupported and not expected to work: please use an alternative method, such as Fedora Media Writer.OK, after unsuccessfully trying all methods mentioned here, I finally got it working. Even if it happens to run and write a stick apparently successfully from some other distribution, the stick may well fail to boot. Livecd-iso-to-disk is not meant to be run from a non-Fedora system. livecd-iso-to-disk on other Linux distributions If your test boot reports a corrupted boot sector, or you get the message MBR appears to be blank., you need to install or reset the master boot record (MBR), by passing -reset-mbr when writing the stick. If you get this message from fdisk, you may need to reformat the flash drive when writing the image, by passing -format when writing the stick. Partition has different physical/logical endings If you get the message Need to have a filesystem label or UUID for your USB device, you need to label the partition: dosfslabel /dev/sdX LIVE. Information: Don't forget to update /etc/fstab, if necessary.

Number Start End Size Type File system Flagsġ 32.3kB 1062MB 1062MB primary fat16 boot Sector size (logical/physical): 512B/512B Welcome to GNU Parted! Type 'help' to view a list of commands.
Difference between Fedora and Red Hat Enterprise Linux.
Installing, Configuring and Troubleshooting MySql/MariaDB.
Creating Windows virtual machines using virtIO drivers.
Installing virtual operating systems with GNOME Boxes.
Getting started with virtualization (libvirt).
Upgrading Fedora using the DNF system upgrade.
How to Set NVIDIA as Primary GPU on Optimus-based Laptops.
How to join an Active Directory or FreeIPA domain.
Getting started with Apache HTTP Server.
Managing keyboard shortcuts for running an application in GNOME.
Controlling network traffic with firewalld.
Displaying a user prompt on the GNOME login screen.
Understanding and administering systemd.
Performing administration tasks using sudo.
Configuring networking with NetworkManager CLI (nmcli).
Disabling the GNOME automatic screen locking.
Setting a key shortcut to run an application in GNOME.
Configuring Xorg as the default GNOME session.
Configuring X Window System using the nf file.
Installing Chromium or Google Chrome browsers.
Installing plugins for playing movies and music.
APT command equivalents on Fedora with DNF.
Securing the system by keeping it up-to-date.
Adding or removing software repositories in Fedora.
Finding and installing Linux applications.

Creating and using a live installation image.
0 notes
Link

2DayGeek: fdisk stands for fixed disk or format disk is a cli utility that allow users to manage disk partitions in Linux.
0 notes
Text
Should the hard disk led be on

Should the hard disk led be on Pc#
Should the hard disk led be on download#
Verify that Solaris2 fdisk has been created on the same disk. 100 Should this become the active partition? If yes, it will be activated each time the computer is reset or turned on. (or type "c" to specify the size in cylinders). Specify the percentage of disk to use for this partition (.continued from previous display) SELECT ONE OF THE FOLLOWING:Įnter Selection: 1 Select the partition type to create:ĩ=DOS16LBA A=x86 Boot B=Diagnostic C=FAT32 Cancel (exit without updating disk configuration)Įnter Selection: 3 Specify the partition number to delete (or enter 0 to exit): 1 Are you sure you want to delete partition 1? This will make all files and programs in this partition inaccessible (type "y" or "n"). Exit (update disk configuration and exit)Ħ. Change between Solaris and Solaris2 Partition IDsĥ. However, you should review the important information in Restrictions of the EFI Disk Label before attempting to apply an EFI label.įor additional information about EFI disk labels, managing disks with EFI labels, EFI disk label restrictions, and troubleshooting problems with EFI disk labels, refer to the Solaris 10 Systems Administration Guide at:ĬODE EXAMPLE 4-1ĞFI to SMI Disk Label Conversion # fdisk /dev/rdsk/c0t7d0p0 Total disk size is 30400 cylindersĤ. Now, let me clarify here - different types of storage have different durability. You can use the format -e command to apply an EFI label to a disk if the system is running the appropriate Solaris release. Answer (1 of 30): Can you leave external hard drives on all the time Well, I do. During this time, the system is basically in idle state. Viewed 447 times 1 With ubuntu installed on my PC, the hard disk red LED is constantly on, it gets turned off for a couple of seconds but then goes on again for a longer time.
Should the hard disk led be on download#
You can download the EFI specification at: Ask Question Asked 2 years, 3 months ago. The Extensible Firmware Interface GUID Partition Table (EFI GPT) disk label provides support for physical disks and virtual disk volumes. Solaris 10 provides support for EFI Labels for disks that are larger than 1 terabyte on systems that run a 64-bit Solaris kernel. EFI selection and loading of the operating system, which removes the need for a boot loader.Delegation of networking and memory management issues to the firmware instead of the OS.EFIs provides the following capabilities: It is responsible for the power-on self-test (POST) process, booting the operating system, and providing an interface between the operating system and the physical hardware.
Should the hard disk led be on Pc#
Extensible Firmware Interface (EFI) is an Intel standard used as a replacement for the PC BIOS.
1 note
·
View note
Text
Layouteditor user group

Layouteditor user group upgrade#
Layouteditor user group verification#
Layouteditor user group password#
Linux Execute Scheduled Tasks In A Loop (crontab Command).
Linux Execute Tasks Regularly (at Command).
Linux Run Background Commands Away From The Terminal (nohup Command).
Linux Resume Suspended Work in Background (bg Command).
Linux Restore Background Commands To Foreground (fg Command).
Linux Display The Jobs That Current Terminal Puts Into The Background (jobs Command).
Linux Kick User By Terminal Number (pkill Command).
Linux Kill A Specific Group Of Processes (killall Command).
Linux Change Process Priority (nice And renice Command).
Linux List Information About Files Called Or Opened By A Process (lsof Command).
Linux Display Process Tree (pstree Command).
Linux Continuously Monitor Process Running Status (top Command).
Linux Display Running Processes (ps Command).
Linux Query Disk Quota (quota And repquota Command).
Linux Set Disk Quota Non-interactively (setquota Command).
Linux Modify User (Group) Disk Quota (edquota Command).
Linux Turn Off Disk Quota Limits (quotaoff Command).
Linux Turn On Disk Quota Limit (quotaon Command).
Linux Scan FileSystem And Create A Quota File (quotacheck Command).
Linux Virtual Memory And Physical Memory.
Linux Format Hard Disk (mke2fs Command).
Linux Partition Large Capacity Hard Disk (parted Command).
Linux Partition Hard Disk (fdisk Command).
Linux Display FileSystem Information (dumpe2fs Command).
Linux Detect And Repair Filesystems (fsck Command).
Linux Unmount Filesystem (umount Command).
Linux Mount Files Outside The Linux System (mount Command).
Linux Count The Disk Space Occupied By A Directory Or File (du Command).
Linux Display File System Hard Disk Usage (df Command).
Linux System Permission Management (sudo Command).
Linux Display File And Directory Permission Attributes (lsattr Command).
Linux Modify File And Directory Permission Attributes (chattr Command).
Linux Stick BIT (SBIT) Special Permission.
Linux Create/Modify File And Directory Default Permissions (umask Command).
Linux Modify The File Or Directory Permissions (chmod Command).
Linux Modify The Owner And Group Of File And Directory (chown Command).
Linux Modify The Group Of File And Directory (chgrp Command).
The Importance Of Linux Permission Management.
Linux Switch The Effective Group Of Users (newgrp Command).
Linux Add User To Or Remove User From Group (gpasswd Command).
Linux Delete User Group (groupdel Command).
Linux Modify User Group (groupmod Command).
Linux Add User Group (groupadd Command).
Linux Switch Between Users (su Command).
Linux View User's UID And GID (id Command).
Layouteditor user group password#
Linux Modify User Password Status (chage Command).
Linux Modify User Information (usermod Command).
Linux Change User Password (passwd Command).
Linux Adding A New System User (useradd Command).
Linux Source Package Installation And Uninstallation.
Linux Extract RPM Package File (cpio Command).
Layouteditor user group verification#
Linux RPM Package Verification And Digital Certificates.
Layouteditor user group upgrade#
Linux RPM Package Installation, Uninstallation And Upgrade (rpm Command).Linux Find File Contents (grep Command).Linux Display The Ending Content Of File (tail Command).Linux Display File Content (less Command).Linux Display The Beginning Content Of File (head Command).Linux Display File Content by Paging (more Command).Linux Vim Batch Comments And Custom Comment.Linux Unzip ".bz2" File (bunzip2 Command).Linux Compress A File Or Directory to ".bz2" (bzip2 Command).Linux Unzip ".gz" File (gunzip Command).Linux Compress A File Or Directory to ".gz" (gzip Command).Linux Unzip ".zip" File (unzip Command).Linux Compress A File Or Directory to ".zip" (zip Command).Linux Move File Or Directory (mv Command).Linux Delete A File Or Directory (rm Command).Linux Copy File And Directory (cp Command).Linux Create Hard/Soft Links To File (ln Command).Linux Create File And Modify File Timestamp (touch Command).Linux Remove Empty Directory (rmdir Command).Linux Create A Directory (mkdir Command).linux View Files In A Directory (ls Command).
1 note
·
View note
Text
Unetbootin vs etcher

Unetbootin vs etcher install#
Unetbootin vs etcher portable#
Unetbootin vs etcher iso#
Unetbootin vs etcher windows 7#
iso file, and select Open With Disk Image Writer. Linux distributions running GNOME can easily make a live CD through nautilus and gnome-disk-utility. Popsicle is a Linux utility for flashing multiple USB devices in parallel, written in Rust.Īnd known to work nicely for EndeavourOS ISO.Īvailable as popsicle-bin from the AUR Using GNOME Disk Utility Or even cp: su cp /path/to/endeavouros-x86_64.iso /dev/ sdXĪnd exactly tee can do it too: su tee /dev/ sdx But keep in mind and check your command 3 times before executing, as putting something wrong will possibly destroy personal data! GUI’SĪll GUI writers can be installed using yay -S packagename as mentioned below: Using cat (with progress) su cat /path/to/endeavouros-x86_64.iso | pv > /dev/ sdX
Unetbootin vs etcher install#
To write the Live Install image to your USB run the following command: sudo dd bs=4M if=/path/to/endeavouros-x86_64.iso of=/dev/sdX conv=fsync oflag=direct status=progressīut indeed Linux has possibilities without ending:
Unetbootin vs etcher iso#
Note: the USB drive may not be mounted when writing an ISO to it! So make sure you umount it first: sudo umount /dev/sdX To view a list of all drives currently attached to your system run this command: sudo fdisk -lĪnother command to show information about the drives: lsblk -f The most common path of a USB drive is /dev/sdb BUT yours might be different depending on your system. NOTE: The USB drive is specified as /dev/sdx and not /dev/sdxX. Just change the paths to the correct paths for your system. The dd command will almost always result in a working Live USB. We are going to focus on only the two recommended methods which are dd from the command line and SUSE Image Writer from the GUI. There are many methods of creating Live USB images using Linux. When comparing rufus vs etcher, the slant community recommends rufus for most people.Latest release Create Live USB From Linux Rufus is one of the fastest utilities in the category to complete create a bootable usb.
Unetbootin vs etcher windows 7#
Twice As Fast As Unetbootin, Universal Usb Installer And Windows 7 Usb Download Tool. A user may directly download popular linux distros. Well, poweriso is not a dedicated, bootable usb creator, but it’s more like an image.
Unetbootin vs etcher portable#
This Is A Free And Portable Universal Usb Installer And Can Be Used To Create Live Bootable Disks. I'd like to know which one of these method is safe and or any other better methods to create bootable usb to use existing iso file. The user interface of etcher is quite simple to use, and it supports all sorts of system images like dmg, iso, img, etc. I Believe Is Speaking About The Option For Persistent Storage When Creating A Live Usb For Linux Os's Like Ubuntu, Mint, And More. If you have multiple partitions in usb, rufus wipes all of them to restore the image. How To Install Google Play Store On Xbox One 2022 Rufus (Windows) When It Comes To Creating A Bootable Usb Drive In Windows, Rufus Is Undeniably The Best One Out There.Įtcher flash os images to usb drives & sd cards menu. Twice as fast as unetbootin, universal usb installer and windows 7 usb download tool. Select image > select drive > flash image. The name says it all, universal usb installer is a windows bootable usb tool that lets you create almost any type of bootable usb. Rufus comes with a wide variety of tools that can be easily accessed by anyone. This is a free and portable universal usb installer and can be used to create live bootable disks. Etcher for windows (x86|圆4) (installer) windows: Source: Source: Etcher flash os images to usb drives & sd cards menu. Etcher for windows (x86|圆4) (portable) windows. I believe is speaking about the option for persistent storage when creating a live usb for linux os's like ubuntu, mint, and more. Install Ubuntu 20.04 Dual Boot WindSource: Select image > select drive > flash image.
0 notes