#feather esp8266
Explore tagged Tumblr posts
Visit Tumblr Blog
Explore Tumblr blogs with no restrictions, modern design and the best experience.
Last Seen Tumblr Blogs


Fun Fact
Post activity is at the highest at 4:00 pm EDT; notes peak at 10:00 pm EDT.
Text
DIY Gate Sensor for Home Assistant
#Adafruit Feather#automation#binary sensor#DIY#door#electronics#ESP8266#gate#GPIO#Home Assistant#make#making#microcontroller#notification#sensor#smart home
0 notes
Text
Hug-sensing IoT Parihug toy (w Xyla Foxlin)
Here’s how to make your own telepresence hug toy. Each circuit connects to the Arduino IoT Cloud and translates your hug into a soothing vibration on the other toy. Xyla Foxlin originally developed this project as a crowdfunded product, and we collaborated to bring this DIY version to life. To make this project, you will need 2x of each: MPRLS ported pressure sensor Feather HUZZAH ESP8266…

View On WordPress
2 notes
·
View notes
Text
RP2040 USB host to program ESP chips through CDC chips
Historically, we've tested and programmed our Feather ESP8266 (https://www.adafruit.com/product/2821) and ESP32 boards (https://www.adafruit.com/product/3405) from a Raspberry Pi. We'd connect over USB and run esptool.py, which works fine but has more things that can go wrong: power flickering, SD card failures, etc. It's better to fully program it with a Pico RP2040 brain board. We can do that now because TinyUSB has support for USB CDC Serial chips (https://github.com/adafruit/Adafruit_TinyUSB_Arduino/tree/master/examples/DualRole/CDC/serial_host_bridge) like the FT232, CP210x, and WCH9102! We upload the stub and test firmware, then listen on the CDC for the self-test output. It works really fast and is much easier to manage.
#Adafruit#ESP8266#ESP32#RaspberryPi#esptool#USB#TinyUSB#PicoRP2040#FirmwareProgramming#CDCSerialChips
1 note
·
View note
Photo

New Post has been published on http://sswitv.com/make-your-own-youtube-subscriber-counter/
Make Your Own YOUTUBE Subscriber Counter
This tutorial will give you step by step instructions on setting on your very own LIVE Digital YouTube Subscriber Counter
youtube
#gallery-1 margin: auto; #gallery-1 .gallery-item float: left; margin-top: 10px; text-align: center; width: 50%; #gallery-1 img border: 2px solid #cfcfcf; #gallery-1 .gallery-caption margin-left: 0; /* see gallery_shortcode() in wp-includes/media.php */
#7 segment#ada friut#adafruit#api counter#Arduino#arduino projects#clock#comment fabriquer un compteur d'abonner youtube#custom youtube counter#digital#DIY#ESP8266#Feather Huzzah#how to#live#make your own you tube counter#make your own youtube subscriber counter#real time#seven-segment FeatherWing display#step by step#subscriber counter#tutorial#you tube subscriber counter#youtube play button#Youtube Subscriber clock
1 note
·
View note
Text
Arduino Simplex Noise Library
I’ve been experimenting with controlling servos through the data collected via ultrasonic sensors and getting them to interpret their surroundings. To help with getting a more animalistic movement through the servos I’ve been thinking of using Simplex Noise by Ken Perlin to help with the movement.
To help with this in the Arduino IDE I’ve ported over and created an Arduino SimplexNoise library.
youtube
Arduino Simplex Noise Library on Github
#arduino#esp8266#feather#adafruit#huzzah#feather esp8266#art#processing#robotics#algorithms#robot#servo#ultrasonic#mfa#ocad#ocadu#noise#arduino library#library
0 notes
Text
Day 2 - Installing the software and getting familiar with the sensor and with the effector used in the experiment
Our main microcontroller was Adafruit feather HUZZAH, for its ESP8266 microchip that allows WIFI communication.
We used the "velostat" as a pressure and bending sensor.

After presenting all the available materials for the workshop and also the basic tools they would need for electronic prototyping, we showed the sensor and effector that we were going to use next. We explained how they work and we installed the necessary software to program and control their behavior.
0 notes
Text
[STUDIO] - Mechanics
Since my blog has mostly been about my contribution which has not included how the dress actually works, I wanted to include a few words from Liv about the circuitry and programme. Just so there was some sort of insight into the functionality:
“The circuit consists of:
Adafruit Feather HUZZAH ESP8266 board
12V power source
5V voltage regulator to power the board
3x 12V amber LED strips
3x NPN transistors to control the strips through the board’s general input/output pins

We chose the Adafruit Feather HUZZAH ESP8266 for its compact size and WiFi chip. For a wearable garment, a small footprint is crucial. The WiFi chip lets the dress react to the donation data live while also allowing it to be wireless.” - Olivia

“For display purposes, we set up a phone to simulate the online donation form in which the user can choose an amount to donate with buttons. For the event itself, when a donation payment goes through the paystation API will send an XML document containing the donation amount to the web server run by the feather board. When this data is received, a method is run which turns the LED strips on for a short period of time. The amount donated dictates which method is run and so how many of the LED strips are turned on.” - Olivia

While I’m talking about the functionality, I realised that I hadn’t yet shared how the three different stages of activation look like as depending on the size of the donation. These shots were taken before the fibres were fully insert into the skirt and are merely pinned in place at this point in time but still show the effect.

Left: $25 activation
Middle: $100 activation
Right: $250+ activation
2 notes
·
View notes
Text
11/6/21 LED Backlit sign notes
NEW BOARD NEW LIST NEW DIAGRAM AND IT ALL WORKS RIGHT
electronics list
Adafruit Feather HUZZAH ESP8266 (link)
Adafruit TXB0108 Bi-directional 8-channel level shifter (link)
1m black 30 pixel/m Adafruit RGB Neopixel SK6812 LED strip - outer LEDs (link)
1m black 60 pixel/m Adafruit RGB Neopixel LED SK6812 strip, inner LEDs cut into individual lights & soldered together (link)
notes:
the HUZZAH is running WLED & i’ll use the WLED interface to control my lights from desktop or phone - may or may not make a custom UI for the WLED interface depending on how insane i feel
inner LEDs on GPIO2 (pin 2)
outer LEDs on GPIO1 (pin TX)
breadboard diagram
imgur link

1 note
·
View note
Text
Shopping for Santa: My IADNTBBDIWI-list!

In the last few weeks I spent most of my precious spare time to do some home improvement. I repainted the living room, which means I had to move away all the furniture including my desk. So no tinkering for me these two weeks. To fulfill my maker desires, I did a lot of window shopping on Ali Express and E-bay. And since X-mas is just around the corner, I hereby present you my IADNTBBDIWI-list! (I Absolutely Don't Need That, But Boy Do I Want It!)
TS100 Soldering Iron

I've owned lot of different soldering irons since I first started soldering 30 years ago. When I stumbled onto the TS100, I absolutely didn't expect I could fall in love with a piece of burning hot metal. The TS100 is a 65W Digital soldering iron with an on board OLED display. It's feather light, and has internal processor that could have easily sent the Apollo 11 to the moon while running in low power mode. Not only does it look sexy, it is lightning fast in terms of heat up time.
The form ware is open source, allowing you to tweak it to your needs. You don't think you need an soldering iron with open source firmware? And what if I tell you you can run Tetris on it? That definetly makes soldering 0201 SMD packages way more challenging.
If you buy it, keep in mind it comes without a a power source in most cases. I just used an old Laptop power supply, which works wonders. I also recommend buying a conical tip, but that is op to your own preference.
TS100 on AliExpress - TS100 on eBay
DPS3005 Digital Power Supply

The DPS series are Constant Current / Constant Voltage programmable power supplies. They are a great starting point if you want to built your own bench top power supply. Just like the TS100 soldering Iron, you can upgrade the firmware to tweak it to your needs. The large color display will make your workbench look like Tony Stark's mane cave.
The downside is that it comes without an AC power supply and since it needs an 6 - 40V input voltage, you need to find a powerful power source yourself. You could use an old ATX power supply for this, but that would limit the voltage to 12 volts.
None the less, the DPS3005 is definitely on my IADNTBBDIWI-list!
DPS3005 on AliExpress - DPS3005 on eBay
ANENG AN8008 Multimeter

Of course, I already own a digital multimeter. But just like with soldering irons, I somehow always feel I need more. If you follow some of the big electronic engineering blogs, I'm sure your came across this one. Not because it has some exotic features, but simple because it's a really decent multimeter for a ridiculous low price.
If you don't already own a digital multimeter, go stand in front of a mirror, and ask yourself how you survived up until now. And then order the ANENG AN8008. If you do own a multimeter, simply put this one on your IADNTBBDIWI-list.
ANENG AN8008 on AliExpress - ANENG AN8008 on eBay
Mastech MS8910 Smart SMD Tester

Speaking of multi meters ... If you are into SMD soldering, this nice compact digital SMD tester really comes in handy. It measures resistance, capacitance and continuity. Works fully automatic and is lightning fast (compared to my regular digital multimeter).
If you are indeed into SMD soldering, you might actually need this one. Otherwise, it's a great tool for your IADNTBBDIWI-list.
Mastech MS8910 on AliExpress - Mastech MS8910 on eBay
ES120 Electric Motion Control Screw Driver

This piece of beautiful engineering is from the same creators as the TS100 soldering iron. It's a chargeable cordless motion controlled screw driver. Again, with OLED display. You just turn the screwdrive in the desired direction, and with the help of an accelerometer the screwdriver will do the rest. When you have ever opened up an iPhone (or anything similar), this is what you want.
Is it indispensable? Absolutely not. Do you want it. YES OF COURSE!
As soon as you own this screwdriver, just ask your Siri, Alexa or Cortana to respond to the name "J.A.R.V.I.S." and you are ready to fight the bad guys in your Mark 42 armor.
ES120 on AliExpress - ES120 on eBay
Wemos Lolin ESP32 OLED
A post shared by Michael Teeuw (@michaelteeuw) on Aug 8, 2017 at 1:32pm PDT
If you play around with Arduinos, or are a regular on my blog, you've probably heard of the ESP8266 and it's successor the ESP32. These two Wifi enabled microcontrollers allow you to connect your digital toilet scale to the web. Because who doesn't want to tweet the mass of your last bowel movement.
Anyway, the super powerful ESP32 is now conveniently packaged by WeMos on a breakout board with an on board OLED. For less than 10 dollars, you can now show the number of likes and retweets your current bowel movement recieved in real time! Boy, what a time to be alive!
Lolin ESP32 OLED on AliExpress - Lolin ESP32 OLED on eBay
Sonoff

Don't feel like soldering? But want to automate your home? Check out the Sonoff product line. Dirt Cheap remote switches. To control your home using your smartphone. The coolest part, is that the modules are powered by an ESP8266, allowing you to flash it with your own firmware.
With these units there is no reason to leave your coach: "J.A.R.V.I.S. make me some coffee!"
Sonoff on AliExpress - Sonoff on eBay
LCR-TC1 Transistor and Diode Tester

If you are like me, and order a lot of cheap parts from AliExpress, components might end up in a asorted components drawer from time to time. You could use the printed type number on the package to find out what type of component it is. But using a gimmicky little device with a color display is simply more fun.
Will it change your life? No. Will it make your workbench look even more incomprehensible for non technical people? Hell yes. And that is what we all want.
LCR-TC1 on AliExpress - LCR-TC1 on eBay
I'm sure I'm missing out on a lot of good stuff. Make sure to post your personal favorites in the comments down below. Together we can point Santa in the right direction!
PS. Feel free to subtly send a link to this blog post to your significant other Santa ... ;)
#IADNTBBDIWI#TS100#DPS3005#AN8008#ANENG#MASTECH#MS8910#ES120#WEMOS#LOLIN#ESP32#OLED#SONOFF#LCRTC1#christmas#electronics#shopping#santa#xmas#gadget#aliexpress
6 notes
·
View notes
Text
Make an HTTP request to get weather info with Zerynth

In this esp32 tutorial, we'll make an HTTP request to openweathermap. org in order to get weather conditions of a specific city with Zerynth.
Things used in this project
Hardware components DFRobot FireBeetle Esp32 Software apps and online services Zerynth Studio
Story
youtube
In this tutorial, we'll see how to make an HTTP request in order to get the weather condition of a specific city.We’ll use Zerynth Studio to program the microcontroller-based board in Python.Zerynth simplifies and speeds up IoT development allowing programming in Python or hybrid C/Python the most popular 32-bit microcontrollers and connecting them to the leading Cloud Infrastructures like AWS, Google Cloud, Microsoft Azure, IBM Watson, Ubidots, and many more.
Required Material
You need a board. You can select one of the 32-bit microcontroller devices supported by Zerynth . We’ve chosen the FireBeetle Esp32 by DFRobot (read Zerynth documentation here).You also need:
Zerynth Studio,
a powerful IDE for embedded programming in Python that enables the IoT. You can download it here.
Assembling
No assembling required.
Programming
Once you have installed Zerynth Studio
and created a Zerynth user , you have to register and virtualize the board.
Clone and uplink the Zerynth example " HTTP Weather
" as shown in the video. Open the Serial Monitor to see the weather conditions of your city.You can create your personal account at
http://openweathermap.org/price
to obtain your personal API key and enjoy discovering the weather conditions of the cities of the entire world.
Code
################################################################################ # Zerynth Weather # # Created by Zerynth Team 2015 CC # Authors: G. Baldi, D. Mazzei ################################################################################ # import streams & socket import streams import socket # import json parser, will be needed later import json # import the wifi interface from wireless import wifi # import the http module import requests # the wifi module needs a networking driver to be loaded # in order to control the board hardware. # THIS EXAMPLE IS SET TO WORK WITH ESP8266 WIFI DRIVER # uncomment the following line to use the espressif esp8266 wifi driver (NodeMcu v2, Adafruit Feather Huzzah, Wemos d1 Mini, ...) from espressif.esp8266wifi import esp8266wifi as wifi_driver # uncomment the following line to use the BCM43362 driver (Particle Photon) # from broadcom.bcm43362 import bcm43362 as wifi_driver # uncomment the following line to use the ESP32 driver (Sparkfun Esp32 Thing, Olimex Esp32, ...) # from espressif.esp32net import esp32wifi as wifi_driver streams.serial() # init the wifi driver! # The driver automatically registers itself to the wifi interface # with the correct configuration for the selected board wifi_driver.auto_init() # use the wifi interface to link to the Access Point # change network name, security and password as needed print("Establishing Link...") try: # FOR THIS EXAMPLE TO WORK, "Network-Name" AND "Wifi-Password" MUST BE SET # TO MATCH YOUR ACTUAL NETWORK CONFIGURATION wifi.link("Network-Name",wifi.WIFI_WPA2,"Wifi-Password") except Exception as e: print("ooops, something wrong while linking :(", e) while True: sleep(1000) # let's try to connect to openweathermap.org to get some weather info # for this example to work you need a openweathermap API key # if you don't have one, you can get one for free here: http://openweathermap.org/price # type here your API key! # or you can use ours...however, if our calls quota is exceded # the example won't work :( api_key = "bd4ba90e2b397e24a925e436a9d8fed9" for i in range(3): try: print("Trying to connect...") # to get weather info you need to specify a correct api url # there are a lot of different urls with different functions # they are all documented here http://openweathermap.org/api # let's put the http query parameters in a dict params = { "APPID":api_key, "q":"Pisa" # <----- here it goes your city } # the following url gets weather information in json based on the name of the city url="http://api.openweathermap.org/data/2.5/weather" # url resolution and http protocol handling are hidden inside the requests module response = requests.get(url,params=params) # if we get here, there has been no exception, exit the loop break except Exception as e: print(e) try: # check status and print the result if response.status==200: print("Success!!") print("-------------") # it's time to parse the json response js = json.loads(response.content) # super easy! print("Weather:",js["weather"][0]["description"],js["main"]["temp"]-273,"degrees") print("-------------") except Exception as e: print("ooops, something very wrong! :(",e)
0 notes
Photo

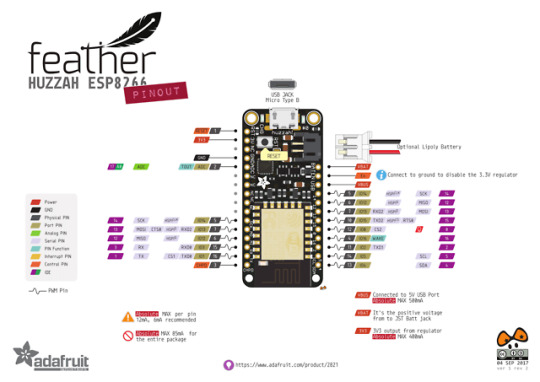
Adafruit Feather HUZZAH
Measures 2.0" x 0.9" x 0.28" (51mm x 23mm x 8mm) without headers soldered in
Light as a (large?) feather - 6 grams
ESP8266 @ 80MHz or 160 MHz with 3.3V logic/power
4MB of FLASH (32 MBit)
3.3V regulator with 500mA peak current output
CP2104 USB-Serial converter onboard with 921600 max baudrate for uploading
Auto-reset support for getting into bootload mode before firmware upload
9 GPIO pins - can also be used as I2C and SPI
1 x analog inputs 1.0V max
Built in 100mA lipoly charger with charging status indicator LED
Pin #0 red LED for general purpose blinking. Pin #2 blue LED for bootloading debug & general purpose blinking
Power/enable pin
4 mounting holes
Reset button
PINOUTS
GND - this is the common ground for all power and logic
BAT - this is the positive voltage to/from the JST jack for the optional Lipoly battery
USB - this is the positive voltage to/from the micro USB jack if connected EN - this is the 3.3V regulator's enable pin. It's pulled up, so connect to ground to disable the 3.3V regulator
3V - this is the output from the 3.3V regulator, it can supply 500mA peak (try to keep your current draw under 250mA so you have plenty for the ESP8266's power requirements!)
TX - output from the module and is 3.3V logic
RX - input into the module and is 5V compliant (there is a level shifter on this pin)
I2C SDA = GPIO #4 (default)
I2C SCL = GPIO #5 (default)
SPI SCK = GPIO #14 (default)
SPI MOSI = GPIO #13 (default)
SPI MISO = GPIO #12 (default)
9 GPIO: #0, #2, #4, #5, #12, #13, #14, #15, #16
A = Analog Pin
more info and pins: https://learn.adafruit.com/adafruit-feather-huzzah-esp8266/pinouts
///////////////////////////////////////////////////////////////////////////////////////////////////////////
I am working on etextiles and physical computing again to incorporate them into my work around rituals, technology, and resistance/community/resilience/survival
I am exploring the Feather Huzzah as it is small, lightweight, and is wifi-enabled. I will be working to adapt this to Kaho’s work around wearables and soft buttons for the guest lecture I am doing for Scott Fitzgerald’s class at NYU and also towards my own work of course.
0 notes
Photo

Feathers!
It’s a reference to the magnetoreception and the ability of birds to forecast the weather!
0 notes
Text
Makerfocus ESP8266

One of the recommended products that came up recently for me on Amazon was a set of 2 Makerfocus ESP8266 NodeMCU boards for $15.99. I’m familiar with the chip from using the Adafruit Feather HUZZAH with ESP8266 WiFi that came with AdaBox003. That board runs for $16.95 though.
The reviews for these were good and any issues people had were resolved quickly by the seller. I figured it was worth the…
View On WordPress
0 notes
Link

via Adafruit Industries – Makers, hackers, artists, designers and engineers! https://ift.tt/326YHmS
0 notes
Text
Arduino: running hard to stand still
Arduino: running hard to stand still - panic and timeout problems when flashing #ESP8266 boards
Thermometer in my office
Don’t you hate it when something that was working stops? You can safely bet that it’s because, somewhere along the way, something has been ‘improved’.
I needed to make a change to the code running on a couple of IoT room thermometers. These are built around the Adafruit Huzzah ESP8266 board (the non-Feather version). And they’ve been running flawlessly for months.
However…
View On WordPress
0 notes
Text
Magic MIDI To MP3 Converter Alternate options And Similar Software
Which allows you to take any midi file, add it, have every midi instrument be replaced with a better quality soundfonts (essentially recordings of real devices enjoying the varied notes ordered which may then be read and utilized by a software program), and then feed it back to you in MP3 format. Click 'Browse' to pick out a midi file from your laptop's arduous drive. Our Free online audio converter assist you to convert your audio MIDI extension file to MP3 format simple and quick simply Upload your MIDI file after which select MP3 from conversion list, after the conversion is completed you may download the transformed audio file immediately or by e-mail. That is why we scoured the net to compile the 13 best free audio modifying apps , in your inventive — and frugal — pleasure. Applications vary from Digital Audio Workstations (DAWs) to audio cutters, normalizers and file-converters. There's one drawback (a minimum of for me) with these "convert MP3 to MIDI" packages - they are written for Geeks - which I am not. I've tried intelliscore and amazingmidi and easily cannot get something to work. And when I try to get some assist, the Geeks' replies are much more complicated. Select the converted file and select: File > Present in Finder (Mac) or Show in Home windows Explorer (on Windows). You can even proper-click on on the file to get this window. See Win 98 and Win 2000 to obtain software appropriate with earlier variations of Home windows. Navigate to File > Export Audio, a small window will pop up. Choose the output format as Different uncompressed recordsdata and set Choices. Afterwards, choose SDS (Midi Sample Dump Normal) from "Header" tab and decide your own encoding. Lastly, click on Save button. MP3 is a wave format while MIDI is channel-primarily based and going from the previous to the latter precisely with a machine is nearly not possible. You may need to rely on either different people or yourself to make the MIDI by ear. Quod Libet - Quod Libet is a GTK+-based audio player written in Python. It permits you to make playlists based on regular expressions. It enables you to show and edit any tags you need within the file. And it allows you to do this for all of the file formats it helps - Ogg Vorbis, FLAC, MP3, Musepack, and MOD. It permits a wide range of digital musical devices, computers and other gadgets to connect and talk with one another. MIDI can form a hyperlink to transmit up to sixteen channels of knowledge, every of a separate device. See the names of the chords and key present in your WAV or MP3 file. Record a melody and intelliScore transcribes MP3 to MIDI while suggesting complementing chord names. It is simple to convert MIDI files to MP3 or midi to mp3 converter online no limit vice versa There are lots of on-line converters to make use of. They're free and easy to use. When people give music to you, generally its in MIDI format. That is good as a result of it does not retailer sound knowledge, but only note (like which sound at which time) data. Not only does this make MIDI's tiny, it makes them usable for the creation of sheet music. What an ideal musical add-on to your Feather! That is why we spun up this tremendous FeatherWing, perfect to be used with any of our Feather Boards! Music playback testing working with ATmega32u4, ATSAMD M0, www.magicaudiotools.com ESP8266, WICED Teensy three, and nRF52 Feathers. MIDI playback works with all Feathers but you could must take away the 'Wing throughout programming and likewise for USB-Serial Feathers just like the ESP8266 and nRF52 you may end up re-utilizing the principle Serial console for MIDI which will be complicated. Not utterly true. In the Superior pull-down menu on iTunes there is a choice "Convert" and that's precisely what it is for - to remodel midi or different recordsdata to a unique file kind. I've reworked info before and it really works. (That's the solely issue I take advantage of iTunes for.) I simply can't get my midi recordsdata into iTunes this time. A note about fonts: MuseScore doesn't embed text fonts in saved or exported native format recordsdata. If you would like your MuseScore file to be considered by different MuseScore users, ensure you are using the constructed-in FreeSerif or FreeSans font households on your text, or a font that the other parties have put in too. If a system does not have the fonts laid out in your original file, MuseScore will use a fallback option, which can trigger your rating to look in another way. Convert Any Video to Over 1,000 Formats. You will take pleasure in higher high quality of audio due to constructed-in MP3 normalizer. It enhances too quiet audio recordsdata or their components like music, speech data and voices in films' soundtracks robotically. On the identical time it will not change already adjusted audio quantity. Browse for the WAV file you wish to convert. Click "Open" upon getting positioned the file.
0 notes