#fetch data from api and show in table
Explore tagged Tumblr posts
Visit Tumblr Blog
Explore Tumblr blogs with no restrictions, modern design and the best experience.
Last Seen Tumblr Blogs


Fun Fact
When “GIF” was named word of the year in 2012, Oxford Dictionaries U.S.A. credited Tumblr for pushing the word.
Text
Fetch data from api and show in table with jquery dataTable plugin.
#react#react js#jquery dataTable plugin#fetch data from api#fetch data from api and show in table#get data from api and show in table#javascript#frontend#webtutorialstack
0 notes
Text
Best Football APIs for Developers in 2025: A Deep Dive into DSG’s Feature-Rich Endpoints

In 2025, the demand for fast, reliable, and comprehensive football data APIs has reached new heights. With the explosion of fantasy leagues, sports betting, mobile apps, OTT platforms, and real-time sports analytics, developers are increasingly relying on robust data solutions to power seamless user experiences. Among the top providers, Data Sports Group (DSG) stands out for offering one of the most complete and developer-friendly football data APIs on the market.
In this blog, we’ll explore why DSG’s football API is a top choice in 2025, what features make it stand apart, and how developers across fantasy platforms, media outlets, and startups are using it to build cutting-edge applications.
Why Football APIs Matter More Than Ever
Football (soccer) is the world’s most-watched sport, and the demand for real-time stats, live scores, player insights, and match events is only growing. Whether you're building a:
Fantasy football platform
Live score app
Football analytics dashboard
OTT streaming overlay
Sports betting product
...you need accurate, timely, and structured data.
APIs are the backbone of this digital ecosystem, helping developers fetch live and historical data in real-time and display it in user-friendly formats. That’s where DSG comes in.
What Makes DSG's Football API Stand Out in 2025?
1. Comprehensive Global Coverage
DSG offers extensive coverage of football leagues and tournaments from around the world, including:
UEFA Champions League
English Premier League
La Liga, Serie A, Bundesliga
MLS, Brasileirão, J-League
African Cup of Nations
World Cup qualifiers and international friendlies
This global scope ensures that your application isn't limited to only major leagues but can cater to niche audiences as well.
2. Real-Time Match Data
Receive instant updates on:
Goals
Cards
Substitutions
Line-ups & formations
Match start/stop events
Injury notifications
Thanks to DSG’s low-latency infrastructure, your users stay engaged with lightning-fast updates.
3. Player & Team Statistics
DSG provides deep stats per player and team across multiple seasons, including:
Pass accuracy
Goals per 90 minutes
Expected Goals (xG)
Defensive stats like tackles and interceptions
Goalkeeper metrics (saves, clean sheets)
This is invaluable for fantasy football platforms and sports analytics startups.
4. Developer-Centric Documentation & Tools
DSG’s football API includes:
Clean RESTful architecture
XML & JSON format support
Well-organized endpoints by competitions, matches, teams, and players
Interactive API playground for testing
Detailed changelogs and status updates
5. Custom Widgets & Integrations
Apart from raw data, DSG offers:
Plug-and-play football widgets (live scores, player cards, league tables)
Custom dashboard feeds for enterprise customers
Webhooks and push notifications for developers
This speeds up development time and provides plug-and-play features for non-technical teams.
Common Use Cases of DSG's Football Data API
a. Fantasy Football Apps
Developers use DSG data to:
Build real-time player score systems
Offer live match insights
Power draft decisions using historical player performance
b. Sports Media & News Sites
Media outlets use DSG widgets and feeds to:
Embed real-time scores
Display dynamic league tables
Show interactive player stats in articles
c. Betting Platforms
Betting platforms use DSG to:
Automate odds updates
Deliver real-time market changes
Display event-driven notifications to users
d. Football Analytics Dashboards
Startups use DSG to:
Train AI models with historical performance data
Visualize advanced stats (xG, pass networks, heatmaps)
Generate scouting reports and comparisons
Sample Endpoints Developers Love
/matches/live: Live match updates
/players/{player_id}/stats: Season-wise stats for a specific player
/teams/{team_id}/fixtures: Upcoming fixtures
/competitions/{league_id}/standings: League table updates
/events/{match_id}: Real-time event feed (goals, cards, substitutions)
These are just a few of the dozens of endpoints DSG offers.
Final Thoughts: Why Choose DSG in 2025?
For developers looking to build applications that are scalable, real-time, and data-rich, DSG’s football API offers the ideal toolkit. With global coverage, detailed statistics, low latency, and excellent developer support, it's no surprise that DSG has become a go-to solution for companies building football-based digital products in 2025.
If you're planning to launch a fantasy app, sports betting service, or football analytics platform, DSG has the data infrastructure to support your vision. Ready to get started? Explore DSG's Football Data API here.
0 notes
Text
How to Plan for Your Big Mobile App Launch?

Have you ever thought what number of users may hit your mobile app once it goes public? As soon as the mobile app launches to the App Store or Play Store, it's available for the general public to download and begin using. But is your app capable of managing a sudden influx of installations and traffic? Any mobile app must be developed in a way so that it can manage high traffic for your big mobile app launch.
A mobile app usually contains the subsequent factors:
Mobile App Development
The mobile app is often developed using Native or Hybrid technology. Each technology has pros and cons.
Web Admin Panel Development
The Web admin panel allows the admin users or managers to work out the activities of users who are using the mobile app.
The admin panel is specially developed employing web technology (PHP, Laravel, etc.) and shows all the activities recorded from the app.
Web Services
Web services are called middle layers and are accustomed to communicate the information flow between the mobile app and also the web admin together with a database.
All dynamic content is updated or fetched from the database using web services.
When we speak about managing a large user base, all the factors mentioned above must be developed in an exceedingly way so performance doesn't fall when hundreds or thousands of users hit the app.
The subsequent points must be reviewed and managed while developing a mobile app to manage heavy traffic:
Backend Server (Hosting server)
Improving the performance of the app depends on the performance of the server that hosts your database and Web Services (APIs). The server needs to be capable of managing the traffic easily. It needs to contain the hardware and the applications that are installed on the server.
Database Transactions
A well-structured database helps with:
Saving space by removal of redundant data
Providing data access faster
Keeping data accuracy and integrity
The other important part is how we manage transactions with the database. Can we write queries that are slow to retrieve data? Can we create multiple joins while retrieving data from the database? Your query writing skills can completely change the performance of your app.
It’s important to put in writing queries that help:
Specify the sphere name from which to urge data (Don’t use select * from a table after you need access to only some columns)
Use short queries rather than multiple joins (Multiple joins within the queries can take a protracted time to fetch data)
Search on the indexed columns
Long processes in Background tasks
From a user engagement point of view, it’s always good to place long-running tasks within the background thread, so that the UI thread doesn’t get blocked. it'll help app users continue acting on their app activities without anticipating data to be processed on the forepart.
Make fewer calls to APIs
Making lots of API calls takes up lots of the method within the background. If there are fewer calls to the APIs it'll help run the mobile app effectively. APIs communicate with the database using the queries mentioned above. So each call to an API will get a knowledge result set. looking at the scale of knowledge, and therefore the time taken by the queries, this might slow the app response. So until there's a desire, don't make calls to APIs.
Contact Treevibes Technologies iOS Mobile App Company in Chennai to induce started on your big mobile app launch.
Optimized code
Code quality also plays a key role in app performance. There are several points one should keep in mind while writing code.
Avoid Creating Unnecessary Objects: Unnecessary objects cause the rubbish collector to be called unnecessarily, which successively eats resources needed to spice up the performance of the application.
Avoid Background Services: Background services should be avoided to stay running unless required, as they keep occupying the resources throughout their execution.
Use Standard Libraries: rather than implementing the identical functionality in your code, use the already available resource.
Use Optimized Data Containers’
Use Cache: Objects which are expensive to form should be implemented in the cache. For instance, if you've got to display some images from the web, then you ought to hold them in memory to avoid downloading them several times.
Conclusion
Treevibes Technologies Android App Development Company in Chennai is created by experienced app developers. We use Native and Hybrid technologies for developing mobile apps. As for that app we launched, after the launch, our client was thrilled because he heard little or no from users. No news is nice news after you do a giant mobile app launch. The app worked of course and therefore the next phase will begin soon.
Contact Treevibes Technologies Mobile App Development Company in Chennai to induce started on your big mobile app launch.
We create complex web and mobile applications. We assemble expert Indian developers – ranked among the highest in their field – and India-based, American relationship managers, who provide stateside context for clients’ needs and expectations. This mix creates a replacement reasonably contracted development that doesn’t trade quality for cost.
#mobile app development company in chennai#android app development company in chennai#mobile development company in chennai#ios app development company in chennai#ios mobile app company in chennai#mobile application development in chennai#flutter mobile app development company in chennai#leading mobile application developers in chennai#e-commerce app development company in chennai#best mobile app company in chennai#game development company in chennai#treevibes technologies
3 notes
·
View notes
Text
Top Directory Listing WordPress Themes 2020

A directory website usually contains big amounts of information, has a set of particular features, and uses a specific layout to present that information. All this poses some unique challenges when building such a site.Where you can add your Listing & publish with all information.
So in this post, we’re making your job easier and listing some of the best WordPress directory themes out there. They all come with awesome features and engaging designs, so check them out, and maybe you’ll find the one that fits your needs perfectly.
LISTO – DIRECTORY LISTING WORDPRESS THEME

Listo is the listing directory Theme for Word Press. Use Listo if you want to start you’re your business like Yelp, Yellow Pages, White Pages. This Theme is perfect for local businesses owners and promoters or any kind of web directory.
Directory & Listing WordPress Template Frontend, User dashboard and Admin panel Most advanced directory and listing theme.This is advanced and user-friendly directory Theme. This Theme mainly focused for Local Business Directory, Online Business Directory, Local Listing and all kind of Directory Services. Template powered with Bootstrap 3.0 and Materialize Framework and Integrated 360-Degree View on Business listings.
EASY SETUP PROCESS TO GET YOU STARTED IN MINUTES.
Kickstart in just few clicks with an easy setup wizard.
Includes required plugins, one-click demos and dummy content.
Theme Features
3 Home Pages
4 Blog Styles
6 Listing Posts Styles
7 Banner Styles
4 Search Styles
Powerful Admin Panel
User Dashboard
Import demo site with One-Click
Stripe and Paypal Integration
User Submit listing
Submit reviews & add images in the Comment section
Home Page Banner Background
Home Page Header Map
Homepage Video background
Responsive Ready
Extensive typography options
Featured Listing
Featured Ads
Edit Listing Short code
Submit Listing Short code
Category Short Codes
Testimonials shortcode
Demo + Theme -» GET IT HERE
Cplus – Directory Listing WordPress Theme

A beautiful directory theme, with a clean and modern look, a full-width header (with a search form), category listings, video embeds, user reviews, and multiple customization options.
Cplus is a clean and modern WordPres directory and listings Theme designed and developed keeping in mind Local Business and mobile use first. It comes with several layout versions and SASS files.
AUTOFILL THE PRIMARY BUSINESS DETAIL WITH GOOGLE API.
Super easy and fast to add new business listings from front-end.
Avoid human errors by fetching primary data with Google API.
Directory and listing WordPress theme that enables you to build a powerful website without knowing a single line of code. Aside from having a collection of beautiful predesigned listing templates, the theme also comes with some amazing features & users can create their own listings, reports, wishlists, claim items, and much more. Each location you choose to feature can be pinned on a map, and depending on your style preferences, you can customize Google Maps the way you like it best. The theme is fully intuitive and enables you to build a remarkable directory and listing website in utmost ease!
Features:
Responsive design,
ad banners,
unlimited price packages,
SEO friendly,
Google Maps,
color customizer,
user management.
Demo + Theme -» GET IT HERE
vLocal – WordPress Directory Listing Theme

A clean and simple WordPress directory theme with a full-width map header and an easy-to-follow content organization. It comes with an advanced search form, where you can look for a specific thing using various filtering methods. The theme also comes with a review system and customizable lists.
Here comes Vlocal, a city directory and listing theme that enables you to set up a directory website quickly and easily.
Vlocal Multi-purpose Responsive Themes is a Content Driven Portal that is ideal for a listing of any kind of entity or activity on a Local or Global basis.
USER DASHBOARD TO GET BUSINESS-CRITICAL KPI
Every listing owner gets their own dashboard to get insightful data.
From getting daily user views, leads and rating stats to low-rating alerts.
Features:
Dedicated mobile app view,
SEO ready,
Google Maps,
list ratings and reviews,
Google fonts,
color customizer,
advanced search form,
20+ directory extensions.
Demo + Theme -» GET IT HERE
BListing – Listing Directory WordPress Theme

A playful and modern WordPress theme for local or global directory sites. It has a full-width header, an intuitive search form, and a clean design. It also lets you use video backgrounds. Overall, a beautiful and friendly theme.
Blisting is Multi-purpose WordPress Theme is an absolutely unique premium WordPress theme, it is the result of our hardworking development team and constant feedback from users and buyers. This theme is built in cooperation with you! Your users will never have access to the WordPress dashboard, everything is done at front-end. You can, register, login, edit your profile, submit listings and Filtering and sorting search results so much more from the front-end without having to visit the WordPress dashboard.
MOST ADVANCED INTELLISENSE BASED ARCHIVE SEARCH SYSTEM
Instant live suggestions for keywords, categories, listing name, and more.
Location search is City (region) based which can be added manually or Google API.
Features:
WooCommerce integration,
the advanced filtering system,
Google Maps,
easy layout controls,
widget-based sections,
drag-and-drop page builders,
multiple styling presets.
Demo + Theme -» GET IT HERE
BLISTOVILLE – REAL ESTATE DIRECTORY WORDPRESS THEME

BlistoVille is the listing directory Theme for Word Press. Use BlistoVille if you want to start you’re your business like Yelp, Yellow Pages, White Pages. This Theme is perfect for local businesses owners and promoters or any kind of web directory.
Set online directory portal of any type – companies, shops, restaurants, real estate, websites and all others in the this category, Directory WordPress themes.
This theme has tons of features to meet your needs as your competitors have, BlistoVille is SEO friendly & Easy to one-click install and customize.
Theme Features
Powerful Admin Panel
User Dashboard
Import demo site with One-Click
Payment Integration ( Generate revenue)
User Submit listing
Submit reviews
Home Page Banner Background
Homepage Video background
Responsive Ready
Extensive typography options
Demo + Theme -» GET IT HERE
Blisto – Business Directory Listing WordPress Theme

Blisto is the listing directory Theme for Word Press. Use Blisto if you want to start you’re your business like Yelp, Yellow Pages, White Pages. This Theme is perfect for local businesses owners and promoters or any kind of web directory.
Have a specific item or a large number of them? Directory wordpress theme is your one-stop selling point for either one or all of them. It offers unlimited directory types. Add as many as you want. A complete package for a perfect demonstration of online business.
This theme has tons of features to meet your needs as your competitors have, Blisto is SEO friendly & Easy to one-click install and customize.
Theme Features
Powerful Admin Panel
User Dashboard
Import demo site with One-Click
Payment Integration ( Generate revenue)
User Submit listing
Submit reviews
Home Page Banner Background
Homepage Video background
Responsive Ready
Extensive typography options
Featured Listing
Featured Ads
This won’t be the first time you look for a directory theme, but it will be the last time. Because with Theme you have more than you could ever want or need.
Whether you know it or not, many of the websites you visit are powered by directories.
When you buy a house – real estate sites show listings.
When you buy a car – car sites show listings.
When you pick a restaurant – ratings sites show listings.
When you book a vacation – travel sites show listings.
Your site will be a thing of beauty. Let’s be honest, the problem with most of those sites, while highly functional, is that many of them aren’t very pretty. It’s why the beautiful ones are so popular, because they match great photography with fantastic functionality.
Get Started Quickly
Want to build a reservation system quickly, We have you covered with integrations to the industry’s best booking services. We support Open Table, Resurva, WooCommerce Bookings currently.
You plug in your account information, and our theme will link up the systems. The result will be the fastest and best-looking reservation site you’ve ever built.
Google Will Love You
Have you noticed that when Google returns searches, sometimes there are ratings next to listings and sometimes there aren’t? We won’t bore you with schema details, but we can tell you that your site, because of the way we’ve coded Theme. will show up the right way. Google will love you, and so will your prospective customers.
Your Revenue Is Waiting for You
Because of the variety of WooCommerce payment gateways and extensions, you could just as easily build:
A Gift Certificate Site
A Restaurant Guide
A Membership / Association Site
The potential is limitless, simply based on what you can imagine.
Powerful Plugin Integration
Let’s talk about all the functionality that you can combine with this theme. The theme integrates with the following plugins right out of the box:
Gravity Forms
NinjaForms
Contact Form 7
FacetWP
WooCommerce
WooCommerce Product Vendors
WooCommerce Subscriptions Extension
WooCommerce Bookings Extension
WooCommerce Payment Gateway Extensions
Theme was continuously updated with new features, it was getting better and better. Over the two years Directory WordPress theme received almost 100 free updates, which is remarkable.
Demo Theme Details
Listfly – Directory Listing WordPress Theme
Listfly is the listing directory Theme for Word Press. Use Listfly if you want to start you’re your business like Yelp, Yellow Pages, White Pages. This Theme is perfect for local businesses owners and promoters or any kind of web directory.
Featured Paid and Free Listings
Directory WordPress theme offers does not stop on giving you option to add unlimited categories, but it goes far beyond that.Listings of different genres like Free, Paid, featured can be added. If a listing is not free to add, you can charge users against it and can add value to your business. Directory multipurpose is not a theme but your personal business assistant indeed.
Offering listings of number categories is an obvious handy feature of Directory WordPress Themes.. However, it does not end here, you can add listing with expiration date. Once the date is reached, the listing will expire itself keeping you safe from hustle of removing it or handling it. If you want it back, refresh it and it will be back.
ou’re able to easily set up an online directory portal listing categorized items of any type – companies, shops, websites and so on. We’ve spent quite a long time developing the theme as many things were changed several times to make it right.
Theme was continuously updated with new features, it was getting better and better. Over the two years Directory WordPress theme received almost 100 free updates, which is remarkable.
Theme Features
Top notch modern & flexible design
Frontend listing submission
Advanced ajax search
Paid listing packages
Paid listing subscriptions
Unlimited price packages
Listing events
Listing coupons
Listing reports
Listing claims
Listing reviews
Fully Responsive Design
Drag&Drop Page Builder
Over 30 elements to build your website
Google Fonts
Mega Menu
Sidebar Manager
SEO Tools
Google Rich Snippets
Geolocation support in km and miles
Frontend registration for guests
Guests can administer their own listings
Ability to get pointer on the map from address
Administrator can define packages and set the price
Wide / Narrow layout style
Advertising spaces
Contact form on listing detail page
Listing by location or category
Featured items
Listing sorting
You can easily Backup all your data and admin settings
Many portfolio layouts that can be used on any page.
Widgets ready sidebar & footer
Image & Template caching for better performance
Google Analytics & Google Maps integration
Custom CSS field for your own styles
Demo + Theme -» GET IT HERE
#Directory Listing Wordpress Theme#Best Directory Listing Wordpress themes#Top Directory Listing Wordpress themes#WP Directory Themes#Business Directory Listing WP Theme#Business Directory Listing WordPress Themes#Best free WordPress Directory themes#Best Premium WordPress Directory themes#Free Directory WordPress Themes
1 note
·
View note
Photo

How to Create Your Own AJAX WooCommerce Wishlist Plugin
In this tutorial we will create lightweight wishlist functionality for WooCommerce using AJAX, WordPress REST API, and SVG graphics. WooCommerce doesn’t come with wishlist functionality as standard, so you’ll always need to rely on an extension to do the work for you. Unless you build it yourself for complete control..
Wish Upon a Star
Wishlist functionality will allow users to mark certain products, adding them to a list for future reference. In some eCommerce stores (such as Amazon) multiple wishlists can be created, and these can be shared with others, which makes them ideal for birthdays or weddings. In our case, the WooCommerce wishlist we’re going to create will enable customers to easily revisit products they’re considering.
Our wishlist functionality will add a heart icon to the product thumbs, which when clicked will add the product to a wishlist in a table.
Click the heart icon to add a product to the wishlist
Take a look at the demo for a proper idea of how it works.
1. Create the Plugin Structure
Let’s start by building our plugin. Create a folder with the name “wishlist” and a PHP file with the same name. Add the following snippet to the PHP file:
/* Plugin Name: Woocommerce wishlist Plugin URI: https://www.enovathemes.com Description: Ajax wishlist for WooCommerce Author: Enovathemes Version: 1.0 Author URI: http://enovathemes.com */ if ( ! defined( 'ABSPATH' ) ) { exit; // Exit if accessed directly }
We won’t go into detail about the plugin creation process, but if you are new to plugin development I highly recommend this amazing new course by Rachel McCollin:
WordPress
Introduction to WordPress Plugin Development
Rachel McCollin
Add the Plugin Functions
Let’s sketch out our plan so we know what to build:
Add wishlist toggle to products in loop and single pages using WooCommerce hooks
Create wishlist table shortcode to hold the products added to the wishlist
Create wishlist custom option in the user profile
All the plugin code will go inside the init action for the plugin, as we first need to make sure that the WooCommerce plugin is active. So right after the plugin details add the following code:
add_action('init','plugin_init'); function plugin_init(){ if (class_exists("Woocommerce")) { // Code here } }
And now let’s enqueue our plugin scripts and styles.
Add the following code to the main plugin file:
function wishlist_plugin_scripts_styles(){ wp_enqueue_style( 'wishlist-style', plugins_url('/css/style.css', __FILE__ ), array(), '1.0.0' ); wp_enqueue_script( 'wishlist-main', plugins_url('/js/main.js', __FILE__ ), array('jquery'), '', true); wp_localize_script( 'main', 'opt', array( 'ajaxUrl' => admin_url('admin-ajax.php'), 'ajaxPost' => admin_url('admin-post.php'), 'restUrl' => rest_url('wp/v2/product'), 'shopName' => sanitize_title_with_dashes(sanitize_title_with_dashes(get_bloginfo('name'))), 'inWishlist' => esc_html__("Already in wishlist","text-domain"), 'removeWishlist' => esc_html__("Remove from wishlist","text-domain"), 'buttonText' => esc_html__("Details","text-domain"), 'error' => esc_html__("Something went wrong, could not add to wishlist","text-domain"), 'noWishlist' => esc_html__("No wishlist found","text-domain"), ) ); } add_action( 'wp_enqueue_scripts', 'wishlist_plugin_scripts_styles' );
Here we enqueue the main style.css file and the main.js file for the plugin, also we pass some parameters to the main.js file to work with:
ajaxUrl – required to fetch some data from WordPress, like current User ID
ajaxPost – required to update user wishlist
restUrl – required to list the wishlist items in the wishlist table
shopName – required to add wishlist items to the session storage for non-registered or non-logged-in users
And some strings instead of hardcoding them into the js file, in case they need to be translatable.
So for now create a css, and js folder and put the corresponding files inside those folders: style.css in the css folder and main.js in the js folder.
2. Hook the Wishlist Toggle
Right inside the init action add the following code:
// Add wishlist to product add_action('woocommerce_before_shop_loop_item_title','wishlist_toggle',15); add_action('woocommerce_single_product_summary','wishlist_toggle',25); function wishlist_toggle(){ global $product; echo '<span class="wishlist-title">'.esc_attr__("Add to wishlist","text-domain").'</span><a class="wishlist-toggle" data-product="'.esc_attr($product->get_id()).'" href="#" title="'.esc_attr__("Add to wishlist","text-domain").'">'.file_get_contents(plugins_url( 'images/icon.svg', __FILE__ )).'</a>'; }
Here we add a wishlist toggle to each product in the loop and to each single product layout, using the woocommerce_before_shop_loop_item_title and woocommerce_single_product_summary hooks.
Here I want to point out the data-product attribute that contains the product ID–this is required to power the wishlist functionality. And also take a closer look at the SVG icon–this is required to power the animation.
3. Add SVG Icons
Now create an images folder in the plugin folder and put the following icon.svg in it:
<svg viewBox="0 0 471.701 471.701"> <path class="heart" d="M433.601,67.001c-24.7-24.7-57.4-38.2-92.3-38.2s-67.7,13.6-92.4,38.3l-12.9,12.9l-13.1-13.1 c-24.7-24.7-57.6-38.4-92.5-38.4c-34.8,0-67.6,13.6-92.2,38.2c-24.7,24.7-38.3,57.5-38.2,92.4c0,34.9,13.7,67.6,38.4,92.3 l187.8,187.8c2.6,2.6,6.1,4,9.5,4c3.4,0,6.9-1.3,9.5-3.9l188.2-187.5c24.7-24.7,38.3-57.5,38.3-92.4 C471.801,124.501,458.301,91.701,433.601,67.001z M414.401,232.701l-178.7,178l-178.3-178.3c-19.6-19.6-30.4-45.6-30.4-73.3 s10.7-53.7,30.3-73.2c19.5-19.5,45.5-30.3,73.1-30.3c27.7,0,53.8,10.8,73.4,30.4l22.6,22.6c5.3,5.3,13.8,5.3,19.1,0l22.4-22.4 c19.6-19.6,45.7-30.4,73.3-30.4c27.6,0,53.6,10.8,73.2,30.3c19.6,19.6,30.3,45.6,30.3,73.3 C444.801,187.101,434.001,213.101,414.401,232.701z"/> <g class="loading"> <path d="M409.6,0c-9.426,0-17.067,7.641-17.067,17.067v62.344C304.667-5.656,164.478-3.386,79.411,84.479 c-40.09,41.409-62.455,96.818-62.344,154.454c0,9.426,7.641,17.067,17.067,17.067S51.2,248.359,51.2,238.933 c0.021-103.682,84.088-187.717,187.771-187.696c52.657,0.01,102.888,22.135,138.442,60.976l-75.605,25.207 c-8.954,2.979-13.799,12.652-10.82,21.606s12.652,13.799,21.606,10.82l102.4-34.133c6.99-2.328,11.697-8.88,11.674-16.247v-102.4 C426.667,7.641,419.026,0,409.6,0z"/> <path d="M443.733,221.867c-9.426,0-17.067,7.641-17.067,17.067c-0.021,103.682-84.088,187.717-187.771,187.696 c-52.657-0.01-102.888-22.135-138.442-60.976l75.605-25.207c8.954-2.979,13.799-12.652,10.82-21.606 c-2.979-8.954-12.652-13.799-21.606-10.82l-102.4,34.133c-6.99,2.328-11.697,8.88-11.674,16.247v102.4 c0,9.426,7.641,17.067,17.067,17.067s17.067-7.641,17.067-17.067v-62.345c87.866,85.067,228.056,82.798,313.122-5.068 c40.09-41.409,62.455-96.818,62.344-154.454C460.8,229.508,453.159,221.867,443.733,221.867z"/> </g> <g class="check"> <path d="M238.933,0C106.974,0,0,106.974,0,238.933s106.974,238.933,238.933,238.933s238.933-106.974,238.933-238.933 C477.726,107.033,370.834,0.141,238.933,0z M238.933,443.733c-113.108,0-204.8-91.692-204.8-204.8s91.692-204.8,204.8-204.8 s204.8,91.692,204.8,204.8C443.611,351.991,351.991,443.611,238.933,443.733z"/> <path d="M370.046,141.534c-6.614-6.388-17.099-6.388-23.712,0v0L187.733,300.134l-56.201-56.201 c-6.548-6.78-17.353-6.967-24.132-0.419c-6.78,6.548-6.967,17.353-0.419,24.132c0.137,0.142,0.277,0.282,0.419,0.419 l68.267,68.267c6.664,6.663,17.468,6.663,24.132,0l170.667-170.667C377.014,158.886,376.826,148.082,370.046,141.534z"/> </g> </svg>
If you are new to working with SVGs I highly recommend you read these amazing tutorials on the subject:
SVG
How to Hand Code SVG
Kezz Bracey
SVG
SVG Viewport and viewBox (For Complete Beginners)
Kezz Bracey
Our SVG animation has 3 states:
Default: the heart path
Process: loading group (g tag)
End: check group (g tag)
If you now go to your shop page you will see the unstyled SVG icons piled on top of each other:
Let’s add some styling to fix this mess! Open the style.css file and paste the following code:
.wishlist-toggle { display: block; position: absolute; top: 16px; left: 16px; z-index: 5; width: 24px; height: 24px; outline: none; border:none; } .wishlist-title { display: none; } .entry-summary .wishlist-toggle { position: relative; top: 0; left: 0; display: inline-block; vertical-align: middle; margin-bottom: 8px; } .entry-summary .wishlist-title { display: inline-block; vertical-align: middle; margin-right: 8px; margin-bottom: 8px; } .wishlist-toggle:focus { outline: none; border:none; } .wishlist-toggle svg { fill:#bdbdbd; transition: all 200ms ease-out; } .wishlist-toggle:hover svg, .wishlist-toggle.active svg { fill:#000000; } .wishlist-toggle svg .loading, .wishlist-toggle svg .check { opacity: 0; } .wishlist-toggle.active svg .check { opacity: 1; } .wishlist-toggle.active svg .heart { opacity: 0; } .wishlist-toggle.loading svg .loading, .wishlist-table.loading:before { animation:loading 500ms 0ms infinite normal linear; transform-origin: center; opacity: 1; } .wishlist-toggle.loading svg .heart { opacity:0; } @keyframes loading { from {transform: rotate(0deg);} to {transform: rotate(360deg);} }
The logic here is as follows:
Initially we show the heart path of our SVG.
When the user clicks on it we will hide the heart path and show the loading path.
Once the loading finishes we will show the checkmark indicating that the product was successfully added to the wishlist.
We will toggle the loading state via JavaScript later; the loading animation is a simple transform rotate. So for now if you refresh the page (don’t forget to clear the browser cache as sometimes old styles are cached) you will see a nice heart icon with each product.
This toggle currently does nothing, so we’ll sort that out. But for now let’s keep with our plan.
4. Create Wishlist Table Shortcode
Add the following code in the init plugin action:
// Wishlist table shortcode add_shortcode('wishlist', 'wishlist'); function wishlist( $atts, $content = null ) { extract(shortcode_atts(array(), $atts)); return '<table class="wishlist-table loading"> <tr> <th><!-- Left for image --></th> <th>'.esc_html__("Name","text-domain").'</th> <th>'.esc_html__("Price","text-domain").'</th> <th>'.esc_html__("Stock","text-domain").'</th> <th><!-- Left for button --></th> </tr> </table>'; }
This is a very simple shortcode that you can add to any page, and the wishlist items will appear inside it. I won’t describe the shortcode creation process, but if you are new to this, I highly recommend reading this amazing tutorial:
Plugins
Getting Started With WordPress Shortcodes
Rohan Mehta
Make a Wishlist Page
Now from inside the WP admin create a page called “Wishlist” and put the [wishlist] shortcode inside it. Now if you go to the wishlist page you will see an empty table.
Did you notice the loading class on the table? We will remove the loading class with JavaScript later, once the wishlist items are ready to be appended to the table. But for now open the style.css and add the following code:
.wishlist-table { width:100%; position: relative; } .wishlist-table.loading:after { display: block; width: 100%; height: 100%; position: absolute; top: 0; left: 0; content: ""; background: #ffffff; opacity: 0.5; z-index: 5; } .wishlist-table.loading:before { display: block; width: 24px; height: 24px; position: absolute; top: 50%; left: 50%; margin-top:-12px; margin-left:-12px; content: ""; background-image: url('../images/loading.svg'); background-repeat: no-repeat; background-size: 100%; z-index: 6; } .wishlist-table td { position: relative; } .wishlist-table a.details { padding:4px 16px; background: #000000; color: #ffffff; text-align: center; border:none !important } .wishlist-table a.wishlist-remove { display: block; width: 24px; height: 24px; position: absolute; top: 50%; left: 50%; margin-top:-12px; margin-left:-12px; background-image: url('../images/remove.svg'); background-repeat: no-repeat; background-size: 100%; z-index: 6; border:none; opacity:0; } .wishlist-table td:hover > a.wishlist-remove { opacity:1; }
Add the loading.svg image to the images folder:
<svg xmlns="http://www.w3.org/2000/svg" xmlns:xlink="http://www.w3.org/1999/xlink" viewBox="0 0 471.701 471.701"> <path d="M409.6,0c-9.426,0-17.067,7.641-17.067,17.067v62.344C304.667-5.656,164.478-3.386,79.411,84.479 c-40.09,41.409-62.455,96.818-62.344,154.454c0,9.426,7.641,17.067,17.067,17.067S51.2,248.359,51.2,238.933 c0.021-103.682,84.088-187.717,187.771-187.696c52.657,0.01,102.888,22.135,138.442,60.976l-75.605,25.207 c-8.954,2.979-13.799,12.652-10.82,21.606s12.652,13.799,21.606,10.82l102.4-34.133c6.99-2.328,11.697-8.88,11.674-16.247v-102.4 C426.667,7.641,419.026,0,409.6,0z"/> <path d="M443.733,221.867c-9.426,0-17.067,7.641-17.067,17.067c-0.021,103.682-84.088,187.717-187.771,187.696 c-52.657-0.01-102.888-22.135-138.442-60.976l75.605-25.207c8.954-2.979,13.799-12.652,10.82-21.606 c-2.979-8.954-12.652-13.799-21.606-10.82l-102.4,34.133c-6.99,2.328-11.697,8.88-11.674,16.247v102.4 c0,9.426,7.641,17.067,17.067,17.067s17.067-7.641,17.067-17.067v-62.345c87.866,85.067,228.056,82.798,313.122-5.068 c40.09-41.409,62.455-96.818,62.344-154.454C460.8,229.508,453.159,221.867,443.733,221.867z"/> </svg>
This is the same loading SVG separated from the main icon.svg. We could use SVG sprites, but I decided to stick with a separate loading SVG.
Now, if you go to the wishlist page and refresh it you will see an empty table with loading on it. Nice, let’s move further.
5. Wishlist Custom Option in the User Profile
Our wishlist functionality will work both for logged-in users and guest users. With logged-in users we’ll store the wishlist information in the user’s metadata, and with guest users we’ll store the wishlist in the session storage.
You can also store the guest users’ wishlist in local storage, the difference being that session storage is destroyed when the user closes the tab or browser, and local storage is destroyed when the browser cache is cleared. It is up to you which option you use for guest users.
Now add the following code to the init action:
// Wishlist option in the user profile add_action( 'show_user_profile', 'wishlist_user_profile_field' ); add_action( 'edit_user_profile', 'wishlist_user_profile_field' ); function wishlist_user_profile_field( $user ) { ?> <table class="form-table wishlist-data"> <tr> <th><?php echo esc_attr__("Wishlist","text-domain"); ?></th> <td> <input type="text" name="wishlist" id="wishlist" value="<?php echo esc_attr( get_the_author_meta( 'wishlist', $user->ID ) ); ?>" class="regular-text" /> </td> </tr> </table> <?php } add_action( 'personal_options_update', 'save_wishlist_user_profile_field' ); add_action( 'edit_user_profile_update', 'save_wishlist_user_profile_field' ); function save_wishlist_user_profile_field( $user_id ) { if ( !current_user_can( 'edit_user', $user_id ) ) { return false; } update_user_meta( $user_id, 'wishlist', $_POST['wishlist'] ); }
Again, in order to remain within the scope of this tutorial, I won’t explain how to work with user metadata. If you are new to this I highly recommend reading this amazing tutorial:
WordPress
How to Work With WordPress User Metadata
Tom McFarlin
All we do here is create a text field input that will hold the wishlist items comma-separated IDs. With show_user_profile and edit_user_profile actions we add the structure of the input field, and with personal_options_update and edit_user_profile_update actions we power the save functionality.
So once the wishlist is updated it will save to the database. I you go to your profile page you will see a new text field added to it. Add whatever value you want and hit save to test if the update functionality works. With admin CSS you can hide this field if you don’t want users to see it. I will leave it as is.
6. Turn it On!
Now we are ready to power everything up!
Open the main.js file and put the following code in it:
(function($){ "use strict"; })(jQuery);
All our code will go inside this function.
Now let’s gather the required data and create some variables:
var shopName = opt.shopName+'-wishlist', inWishlist = opt.inWishlist, restUrl = opt.restUrl, wishlist = new Array, ls = sessionStorage.getItem(shopName), loggedIn = ($('body').hasClass('logged-in')) ? true : false, userData = '';
As you might remember when we enqueued our main.js script we passed some parameters to it. Here, with JavaScript, we can collect these parameters.
Next, we will create an empty wishlist array that will contains wishlist items. We will need the session storage data with our shop name (the ls variable stands for local storage), and we will need to know if the user is guest or logged-in.
Let me explain the logic here: whenever the user visits the shop page we will need to know if he or she is logged-in or is a guest-user. If the user is logged-in we will need to check if he or she has wishlist items, and if so highlight these items. If not we need to see if there are any items in the session/local storage and highlight those.
Why this is done like this? Imagine, if the user first visits the website as a guest, adds items to the wishlist, and then decides to login. If the user does not have items registered in the profile wishlist, we will need to show the ones that he or she added before login, that are stored in the session/local storage.
So let’s do that step by step:
If User is Logged-in
Fetch current user data with AJAX
If success update the wishlist
Highlight the wishlist items
Remove the session/local storage
If fail show error message in the console for the developer
if(loggedIn) { // Fetch current user data $.ajax({ type: 'POST', url: opt.ajaxUrl, data: { 'action' : 'fetch_user_data', 'dataType': 'json' }, success:function(data) { userData = JSON.parse(data); if (typeof(userData['wishlist']) != 'undefined' && userData['wishlist'] != null && userData['wishlist'] != "") { var userWishlist = userData['wishlist']; userWishlist = userWishlist.split(','); if (wishlist.length) { wishlist = wishlist.concat(userWishlist); $.ajax({ type: 'POST', url:opt.ajaxPost, data:{ action:'user_wishlist_update', user_id :userData['user_id'], wishlist :wishlist.join(','), } }); } else { wishlist = userWishlist; } wishlist = wishlist.unique(); highlightWishlist(wishlist,inWishlist); sessionStorage.removeItem(shopName); } else { if (typeof(ls) != 'undefined' && ls != null) { ls = ls.split(','); ls = ls.unique(); wishlist = ls; } $.ajax({ type: 'POST', url:opt.ajaxPost, data:{ action:'user_wishlist_update', user_id :userData['user_id'], wishlist :wishlist.join(','), } }) .done(function(response) { highlightWishlist(wishlist,inWishlist); sessionStorage.removeItem(shopName); }); } }, error: function(){ console.log('No user data returned'); } }); }
If User is Guest
Fetch wishlist from the session/local storage
else { if (typeof(ls) != 'undefined' && ls != null) { ls = ls.split(','); ls = ls.unique(); wishlist = ls; } }
As you may have noticed here we have double-AJAX and some helper functions. So first let’s create the actions of the AJAX requests, and after that I will explain our helper functions. I won’t describe in detail the AJAX functionality in WordPress, but if you are new to AJAX and WordPress, I highly recommend reading this amazing tutorial on it:
Plugins
A Primer on Ajax in the WordPress Frontend: Understanding the Process
Tom McFarlin
Our first AJAX request gets the user id and the user wishlist data from WordPress. This is done with a custom AJAX action added to the plugin code file:
// Get current user data function fetch_user_data() { if (is_user_logged_in()){ $current_user = wp_get_current_user(); $current_user_wishlist = get_user_meta( $current_user->ID, 'wishlist',true); echo json_encode(array('user_id' => $current_user->ID,'wishlist' => $current_user_wishlist)); } die(); } add_action( 'wp_ajax_fetch_user_data', 'fetch_user_data' ); add_action( 'wp_ajax_nopriv_fetch_user_data', 'fetch_user_data' );
The most important part here is the action name (fetch_user_data)–make sure it is the same for AJAX and for functions wp_ajax_fetch_user_data and wp_ajax_nopriv_fetch_user_data. Here we’re preparing JSON formatted data with user ID and user wishlist data.
Our next AJAX request updates the user wishlist if there were already wishlist items from session/local storage. Take a close look at the url option–see it is different.
The logic is the same as for the first action–the difference is that here we don’t return or echo any data, but we update the wishlist option for the current user.
function update_wishlist_ajax(){ if (isset($_POST["user_id"]) && !empty($_POST["user_id"])) { $user_id = $_POST["user_id"]; $user_obj = get_user_by('id', $user_id); if (!is_wp_error($user_obj) && is_object($user_obj)) { update_user_meta( $user_id, 'wishlist', $_POST["wishlist"]); } } die(); } add_action('admin_post_nopriv_user_wishlist_update', 'update_wishlist_ajax'); add_action('admin_post_user_wishlist_update', 'update_wishlist_ajax');
And if our user is a guest we will need to check if there are any wishlist details in the session/local storage.
Helper Functions
Before we move to the events part I want to explain our helper functions
Array.prototype.unique = function() { return this.filter(function (value, index, self) { return self.indexOf(value) === index; }); } function isInArray(value, array) {return array.indexOf(value) > -1;} function onWishlistComplete(target, title){ setTimeout(function(){ target .removeClass('loading') .addClass('active') .attr('title',title); },800); } function highlightWishlist(wishlist,title){ $('.wishlist-toggle').each(function(){ var $this = $(this); var currentProduct = $this.data('product'); currentProduct = currentProduct.toString(); if (isInArray(currentProduct,wishlist)) { $this.addClass('active').attr('title',title); } }); }
The first helper function makes the array unique, by removing duplicates, the second one checks if the given value is present in the given array. The next function executes when an item is added to the wishlist and the last one shows items that are in the wishlist.
Add Toggle
Now let’s add a click event to the wishlist toggle to power the actual functionality. On each toggle click event the animation is triggered and if the user is logged-in the wishlist update action fires with AJAX. If the user is a guest the item is added to the session/local storage.
Now if you go to the shop page, refresh the browser, and click on any wishlist toggle you will see it is working!
$('.wishlist-toggle').each(function(){ var $this = $(this); var currentProduct = $this.data('product'); currentProduct = currentProduct.toString(); if (!loggedIn && isInArray(currentProduct,wishlist)) { $this.addClass('active').attr('title',inWishlist); } $(this).on('click',function(e){ e.preventDefault(); if (!$this.hasClass('active') && !$this.hasClass('loading')) { $this.addClass('loading'); wishlist.push(currentProduct); wishlist = wishlist.unique(); if (loggedIn) { // get user ID if (userData['user_id']) { $.ajax({ type: 'POST', url:opt.ajaxPost, data:{ action:'user_wishlist_update', user_id :userData['user_id'], wishlist :wishlist.join(','), } }) .done(function(response) { onWishlistComplete($this, inWishlist); }) .fail(function(data) { alert(opt.error); }); } } else { sessionStorage.setItem(shopName, wishlist.toString()); onWishlistComplete($this, inWishlist); } } }); });
7. List Items in Wishlist Table
Now it is time to list our wishlist items in the wishlist table we created earlier.
Add the following code into main.js at the very bottom of our wrapper function:
setTimeout(function(){ if (wishlist.length) { restUrl += '?include='+wishlist.join(','); restUrl += '&per_page='+wishlist.length; $.ajax({ dataType: 'json', url:restUrl }) .done(function(response){ $('.wishlist-table').each(function(){ var $this = $(this); $.each(response,function(index,object){ $this.append('<tr data-product="'+object.id+'"><td><a class="wishlist-remove" href="#" title="'+opt.removeWishlist+'"></a>'+object.image+'</td><td>'+object.title["rendered"]+'</td><td>'+object.price+'</td><td>'+object.stock+'</td><td><a class="details" href="'+object.link+'">'+opt.buttonText+'</a></td></tr>'); }); }); }) .fail(function(response){ alert(opt.noWishlist); }) .always(function(response){ $('.wishlist-table').each(function(){ $(this).removeClass('loading'); }); }); } else { $('.wishlist-table').each(function(){ $(this).removeClass('loading'); }); } },1000);
Here we are using the WordPress REST API to get the products by ID in the wishlist array.
For each of the products we get we are adding a table row with the required data to display. We need the product image, title, stock status, button and price.
Here we have two options for the REST API:
using the WordPress REST API
using the WooCommerce REST API.
The difference here is that product data is already present in the Woocommerce REST API, but an API key is required. With the default WordPress REST API product data is absent by default, but can be added, and no API key is required. For such a simple task as a wishlist I don’t think that an API key is needed, so we will do it by extending the default WordPress REST API to return our product price, image code and the stock level.
Go to the main plugin file and at the very bottom add the following code:
// Extend REST API function rest_register_fields(){ register_rest_field('product', 'price', array( 'get_callback' => 'rest_price', 'update_callback' => null, 'schema' => null ) ); register_rest_field('product', 'stock', array( 'get_callback' => 'rest_stock', 'update_callback' => null, 'schema' => null ) ); register_rest_field('product', 'image', array( 'get_callback' => 'rest_img', 'update_callback' => null, 'schema' => null ) ); } add_action('rest_api_init','rest_register_fields'); function rest_price($object,$field_name,$request){ global $product; $id = $product->get_id(); if ($id == $object['id']) { return $product->get_price(); } } function rest_stock($object,$field_name,$request){ global $product; $id = $product->get_id(); if ($id == $object['id']) { return $product->get_stock_status(); } } function rest_img($object,$field_name,$request){ global $product; $id = $product->get_id(); if ($id == $object['id']) { return $product->get_image(); } } function maximum_api_filter($query_params) { $query_params['per_page']["maximum"]=100; return $query_params; } add_filter('rest_product_collection_params', 'maximum_api_filter');
All this does is create new fields for REST API and extends the maximum items limit per request. Again, if you are new to this subject I highly recommend reading this series.
For now, if you go to your wishlist table and refresh the page you will see the list of items that are added to your wishlist.
8. Removing Items From Wishlist
We are almost done; only the remove functionality remains. So let’s create that! Add the following code at the very bottom of the wrapper function in the main.js file
$(document).on('click', '.wishlist-remove', function(){ var $this = $(this); $this.closest('table').addClass('loading'); wishlist = []; $this.closest('table').find('tr').each(function(){ if ($(this).data('product') != $this.closest('tr').data('product')) { wishlist.push($(this).data('product')); if (loggedIn) { // get user ID if (userData['user_id']) { $.ajax({ type: 'POST', url:opt.ajaxPost, data:{ action:'user_wishlist_update', user_id :userData['user_id'], wishlist :wishlist.join(','), } }) .done(function(response) { $this.closest('table').removeClass('loading'); $this.closest('tr').remove(); }) .fail(function(data) { alert(opt.error); }); } } else { sessionStorage.setItem(shopName, wishlist.toString()); setTimeout(function(){ $this.closest('table').removeClass('loading'); $this.closest('tr').remove(); },500); } } }); });
Once the remove icon is clicked (make sure you have a remove.svg in the images folder, you can use whatever icon you want), we need to check if the user is logged-in. If so, we then remove the item ID from the wishlist using AJAX with the user_wishlist_update action. If the user is a guest we need to remove the item ID from the session/local storage.
Now go to your wishlist and refresh the page. Once you click on the remove icon your item will be removed from the wishlist.
Conclusion
That was quite a project! A simple, but comprehensive wishlist feature for your WooCommerce stores. You are free to use this plugin in any project; you can extend, modify it and make suggestions. I hope you liked it. Here is the link to the source files on GitHub. And here is the demo.
Learn More WooCommerce Theme Development
At Tuts+ we have a great collection of tutorials and courses to learn WooCommerce development. Check out these four great courses to get started!
WooCommerce
Up and Running With WooCommerce
Rachel McCollin
WordPress
Developing a WooCommerce Theme
Rachel McCollin
WordPress
Go Further With WooCommerce Themes
Rachel McCollin
WordPress
How to Make Your Theme WooCommerce Compatible
Rachel McCollin
by Karen Pogosyan via Envato Tuts+ Code https://ift.tt/2WTWfiG
1 note
·
View note
Text
Monitoring using Sensu, StatsD, Graphite, Grafana & Slack.
At Airwoot, we are in the business of processing & mining real-time social media streams. It is critical for us to track heartbeat of our expansive distributed infrastructure and take timely action to avoid service disruptions.
With this blog post, we would like to share our work so far in creating an infrastructure watchdog and more. We started with following objectives:
Monitor everything under the radar and thereby learn how the system breath.
Use the monitoring framework to collect data and power an internal dashboard for identifying trends.
Alert anything that need attention to appropriate handlers (engineering and client servicing teams).
Let’s dive.
Monitoring Framework
Sensu
Sensu is a feature-packed distributed monitoring framework that executes health checks for applications/services and collects metrics across all connected Sensu clients, which then are relayed to a Sensu server. The checks’ results can be handled differently based on their severity levels. We choose Sensu out of the many monitoring tools available for the following reasons:
ability to write checks and handlers for check failures in any language.
large number of community plugins available and good documentation.
easy horizontal scaling by adding more clients and servers.
it acts as a “monitoring router” that publishes check requests and collects results across all Sensu clients. The results along with their context are directed to custom defined handlers for taking actions based on the criticality of results.
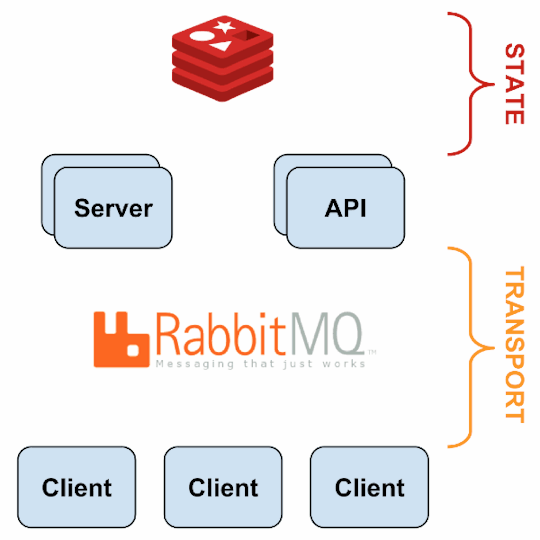
Source: Sensu Documentation - https://sensuapp.org
Sensu has three main components that are executed as daemon processes.
1. sensu-server runs on one or more machines in the cluster and acts as the command center for monitoring. It performs following actions:
schedules periodic checks on clients
aggregates the checks’ results and adds context to them to create events
events can be filtered and passed on to custom defined handlers for taking actions
2. sensu-client can subscribe to group(s) of checks defined on the sensu-server or can have their own standalone checks. sensu-client communicate with the server using the RabbitMQ.
3. sensu-api has a REST interface to Sensu’s data like connected clients, active events, and check results. It also has capabilities to resolve events, remove connected clients, and issue check requests.

Sensu Entities
StatsD
StatsD is a push-based network daemon that allows a statsD client to collect custom metrics and export them to a collecting server. The catch here is that StatsD uses lightweight UDP protocol for relaying metrics to the metric store, so a slow metric receiver shall not affect application’s performance. We used the Python client for statsD to collect application level metrics.
There are three main data types in statsD:
1. Counters are simply time correlated count of events taking place per unit time. There are incr and decr methods for altering the value of a counter. We extensively used counters to track brand-wise documents from social channels like Twitter and Facebook. Here’s a code snippet for tracking mentions of a brand on it’s Twitter handle:
https://gist.github.com/tanaysoni/76a6de3d7ab3e52b2860
These mentions’ metrics can be displayed at arbitrary time aggregations. Here’s how we did in our Grafana dashboard.

Grafana dashboard showing hourly brands’ mentions on Twitter calculated using StatsD counters.
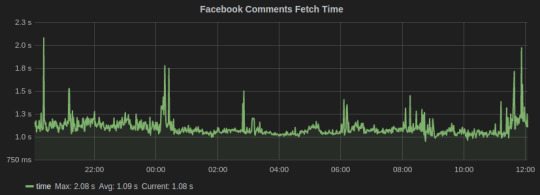
2. Timers collect numbers times or anything that may be a number. StatsD servers then calculate the lower bound, upper bound, 90th percentile, and count of each timer for each period. We used timers to track the time in fetching social media conversation from Facebook and Twitter. Here’s the graph for the task that fetches comments on brands’ Facebook page:
Facebook Comments
3. Gauges are a constant data type that are not subjected to averaging. They will retain their value until changed. We used gauges for computing the delays and queue lengths in our systems.
This is an excellent blog that explains these metrics in detail.
Graphite
Graphite is a database for storing numeric time series data. We use StatsD for collecting metrics, which are then stored in Graphite. There are three software components of Graphite:
1. carbon is a daemon that listens to the time series data. It has a cache that stores values in memory and subsequently flush them to disk at a regular interval. It has configuration files that define the storage schema and aggregation policies for the metrics. It tells whisper the frequency and the history of datapoints to store. We have configured carbon to store most our metrics in a frequency of 10 seconds and for a month’s time. Here’s an example config:
[storm_stats] # name of schema pattern = ^storm_stats.* # regex for matching metric names retentions = 10s:30d # frequency:history for retention
2. whisper is a database library for storing the metrics. The location of whisper files can be set from the carbon-conf file.
3. graphite webapp is the default web-based graphing library provided by graphite, but we used the more powerful Grafana dashboard.
New Relic
Infrastructure monitoring of all EC2 instances including memory, CPU, disks capacity and IO utilization. Many out-of-the-box solutions are available, so we decided not to reinvent the wheel. We have been using New Relic for a while now and it has worked perfectly(well almost!), so decided to stick with it.
New Relic has a quick step-wise guide for setting up. The problem we faced with New Relic is with their “Fullest Disk” alerts which are triggered when disk space of the fullest disk mounted on the machine being monitored is beyond alert thresholds. This fullest disk alert once open prevents alerts for the remaining disk from being triggered.
We solved this problem using Sensu disk check plugin which allows to select the disk(s) to be ignored from the check.
Supervisor
We run all the critical processes on Supervisor. It only has support for processes that are not daemonizing, i.e., they should not detach from the terminal from which they have been started. There are many process control features provided by Supervisor including restart on failures, alerts when set number of restart attempts fails, redirect output of processes to custom log directories, and autostart process on machine reboot.
We have instrumented a Sensu plugin that notifies on Slack if a process crashes. Here’s the code:
https://gist.github.com/tanaysoni/486ef4ad37ea97b98691
Monitoring of Services
Apache Kafka
The official monitoring doc is a good starting point for exploring metrics for monitoring Kafka. We use an open-source plugin released by Airbnb for sending the Kafka metrics to a StatsD server.
We have found the following metrics to be useful that we track,
Request Handler Idle Time, which tells us the average fraction of time request handler threads were idle. It lies in the range of 0-1, and should be ideally less than 0.3.
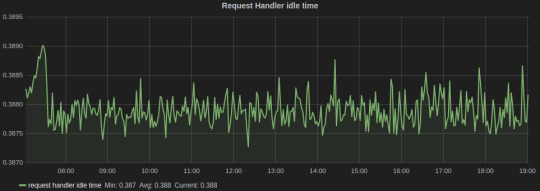
Grafana dash for Kafka
In the above graph, the legends Min, Avg, and Current are added by Grafana. The average value for the entire graph is just under 0.4, which tells us that it’s time to scale our Kafka cluster.
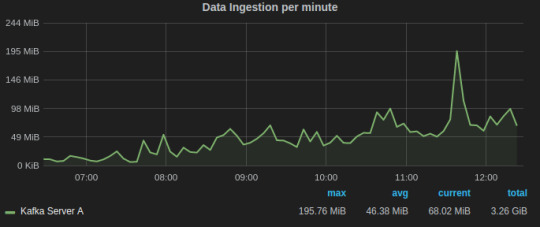
Data/Message Ingestion across all topics helps us to track and comprehend the load on the Kafka servers and how it varies with time.
Grafana dash for Kafka request handler idle time
Alerts for Kafka
A Kafka instance runs Zookeeper and Kafka-Server processes. We run them through Supervisor which automatically restarts a process if it crashes and notifies on Slack via Sensu Supervisor check.
Apache Storm
We use Storm to process data that is consumed from Kafka clusters. The command center of our Storm clusters is the Storm UI, which is provided as a daemon process in the official Storm distribution. This blog is a good documentation for Storm UI.
We run all Storm process under Supervisor, which is instrumented with Sensu to alert Slack if any process is not in the running state.
There could be instances when all Storm daemons are running, but the topology might have crashed due to a code-level bug. For this scenario, we have written a Sensu plugin that parses the output of “./storm list” to check if given topology is deployed and activated.
Since, we do stream processing using Storm and Kafka, an important metric is Kafka consumer lag which tells how far is the consumer from the producers. It is essentially the queue length of tuples yet to be consumed by the Storm. There are also Sensu alerts on consumer lag that notifies on Slack if it goes beyond a threshold.
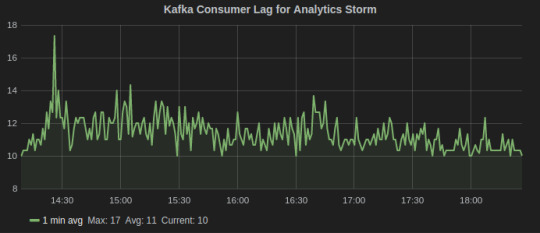
Consumer Lag metric for Kafka-Storm
Gunicorn
Gunicorn comes with a StatsD instrumentation that tracks all the metrics and sends to a StatsD client over UDP. Run Gunicorn with following command line arguments specifying the location of statsD server and an optional prefix to be added to the name of metrics.
gunicorn [ --statsd-prefix sentimentAPI.gunicorn_1] --statsd-host=localhost:8125
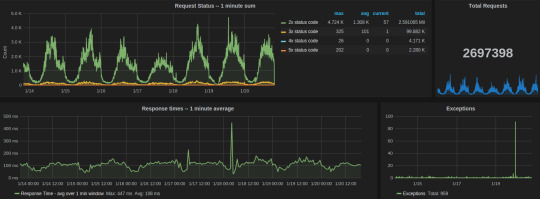
We used the following aggregations and transformations in Grafana for the Gunicorn dashboard:
Request status
series sum for all 2xx, 3xx, 4xx, and 5xx response codes
table of avg, current, and total legends help to summarize data for the given time interval
total count of exceptions in the given time range
response time average over one min window
Celery dashboard of last week
MongoDB
MongoDB has in-built set of utilities for reporting real-time statistics on database activities. We leveraged them to built Sensu plugin that periodically parse output from them to sent to a graphite server. These Graphite metrics are graphed on our Grafana MongoDB dashboard.
The two most important utilities are mongostat and mongotop.
mongostat tracks the load on the servers based on database operations by type including insert, update, query, and delete.
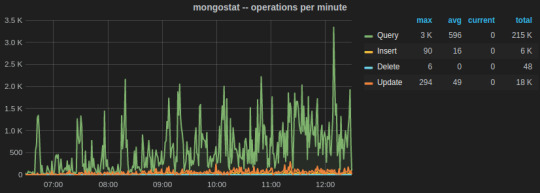
mongotop collect and reports real-time statistics on current read and write activity on a per collection basis. We wrote a Python script to send mongotop metrics to statsD client at an interval of 10 seconds.
https://gist.github.com/tanaysoni/780c4c68447cda8a0a38
Below is a Grafana dash of metrics for a collection graphed over a week time. The peaks and lows corresponds to the business hours, i.e., the reads from the collection were more during the business hours.

Sensu plugins for MongoDB monitoring
Sensu community has metrics and checks for MongoDB.
PostgreSQL
We are primarily tracking the number of connections including active, idle, and idle in transaction on PostgreSQL. For this, we created a Sensu plugin that runs periodically to fetch data from pg_stat table and output as Graphite metrics that are relayed by Sensu. Here’s the code:
https://gist.github.com/tanaysoni/30dabf820c500a58b860
PostgreSQL also provides built-in Postgres statistics collector, whose data can be relayed to a Graphite database using Postgres Sensu plugins.
Celery
Celery is an integral part of our system. Increase in the queue length beyond threshold is a critical state which the team should be informed of.
We have written a Sensu plugin which fetches the queue length of Celery every minute, which is then relayed to GraphiteDB by Sensu. If the queue length is above our warning thresholds, the team is notified on Slack.
Here’s how the Grafana dashboard for Celery looks like.
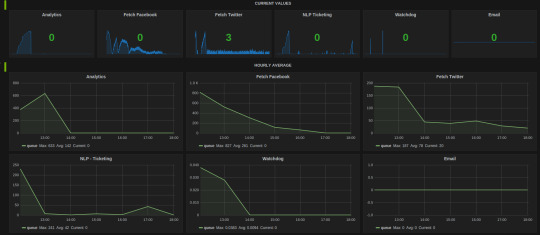
The hourly average summarization in Grafana smooths out the peaks(when bulk tasks get assigned by Celerybeat) to comprehend the load on the Celery cluster. It gives insight as to when to scale the Celery cluster to add more workers.
2 notes
·
View notes
Text
Mastering iOS Development: A Comprehensive Guide for Beginners and Professionals
Welcome to our comprehensive guide on mastering iOS development! Whether you're a beginner looking to delve into the world of iOS app development or a seasoned professional aiming to enhance your skills, this article will serve as your ultimate resource. We'll cover everything you need to know, from the basics of iOS development to advanced techniques and best practices. So, let's dive in!
Table of Contents
Understanding iOS Development
Setting Up Your Development Environment
Swift Programming Language
Xcode: The Integrated Development Environment (IDE)
User Interface Design and Development
Data Persistence
Networking and Web Services
Core Data and SQLite
Working with APIs
Testing and Debugging
App Distribution and Submission
Performance Optimization
Advanced Topics in iOS Development
Continuous Learning and Improvement
Conclusion
1. Understanding iOS Development
iOS development is the process of creating applications for Apple's mobile devices, such as the iPhone, iPad, and iPod Touch. To become a proficient iOS developer, it's crucial to have a solid understanding of the iOS platform, its frameworks, and the app development life cycle. This section will provide you with a comprehensive overview.
2. Setting Up Your Development Environment
Before you can start building iOS apps, you need to set up your development environment. This involves installing Xcode, Apple's official IDE, and configuring it for iOS development. We'll guide you through the installation process and show you how to create your first iOS project.
3. Swift Programming Language
Swift is Apple's modern programming language designed specifically for iOS, macOS, watchOS, and tvOS development. In this section, we'll explore the fundamentals of Swift, including variables, data types, control flow, functions, and object-oriented programming principles. By mastering Swift, you'll have a strong foundation for iOS app development.
4. Xcode: The Integrated Development Environment (IDE)
Xcode is the primary tool used by iOS developers for building, testing, and debugging applications. We'll take an in-depth look at Xcode's features, including its interface, project structure, code editor, and various debugging tools. Understanding Xcode is essential for efficient and productive iOS development.
5. User Interface Design and Development
Creating visually appealing and user-friendly interfaces is paramount in iOS app development. This section will cover the UIKit framework, Auto Layout, Interface Builder, and other essential components for designing and developing engaging user interfaces. We'll also discuss UI best practices and accessibility guidelines.
6. Data Persistence
Most apps require data persistence to store and retrieve user information. We'll explore different techniques for data persistence in iOS, such as Core Data, SQLite, and UserDefaults. You'll learn how to work with databases, handle data models, and perform efficient data operations within your apps.
7. Networking and Web Services
In today's interconnected world, networking and web services integration are essential for many iOS applications. We'll delve into URLSession and Alamofire frameworks, showcasing how to make network requests, handle responses, and parse JSON data. You'll gain the necessary skills to create apps that communicate with web servers and consume APIs.
8. Core Data and SQLite
Core Data is Apple's powerful framework for managing object graphs and persisting data. In this section, we'll explore Core Data's concepts, including entities, attributes, relationships, and fetching data. We'll also compare Core Data with SQLite, another popular database solution for iOS development.
9. Working with APIs
API integration is a critical aspect of iOS app development. We'll guide you through the process of working with RESTful APIs, authenticating requests, handling errors, and managing data models. You'll learn how to leverage APIs to enrich your app's functionality and provide a seamless user experience.
10. Testing and Debugging
Ensuring the quality and reliability of your apps is paramount. In this section, we'll cover various testing techniques, including unit testing, UI testing, and performance testing. We'll also explore Xcode's debugging tools and techniques for troubleshooting and resolving common issues.
11. App Distribution and Submission
Once you've built your app, it's time to distribute it to users. We'll walk you through the process of creating distribution certificates, provisioning profiles, and App Store Connect submissions. You'll gain a comprehensive understanding of the app distribution workflow and how to publish your app on the App Store.
12. Performance Optimization
Optimizing app performance is crucial for delivering a smooth and responsive user experience. We'll discuss techniques for improving app performance, such as reducing memory footprint, optimizing code execution, and leveraging profiling tools. By optimizing your apps, you'll ensure they run efficiently on iOS devices.
13. Advanced Topics in iOS Development
In this section, we'll explore advanced topics that go beyond the basics of iOS development. We'll cover topics like Core Animation, Core Graphics, advanced networking, concurrency, and integrating third-party libraries. These topics will empower you to create more sophisticated and feature-rich iOS applications.
14. Continuous Learning and Improvement
iOS development is a rapidly evolving field. To stay ahead, it's essential to cultivate a mindset of continuous learning and improvement. We'll provide you with resources, tips, and strategies for staying up to date with the latest iOS technologies, frameworks, and industry trends.
Conclusion
Congratulations on completing our comprehensive guide on mastering iOS development! We've covered a wide range of topics, from the fundamentals of iOS development to advanced techniques. By now, you should have a solid foundation to kick-start your iOS development journey or take your existing skills to the next level. Remember to practice regularly, engage with the iOS developer community, and never stop learning!
1 note
·
View note
Text
Ruby on Rails API Development- Example of Rails API
When a developer says that they are using Rails as the API, it indicates that they are using Ruby on Rails Development to build the backend, which is shared between the web application and native applications. Let’s see how you can develop an API using RoR.
What is an API application?
Application Programming Interface, or API, allows complement to interact with one another. One can request from the Rails app to fetch information by providing URLs.
What is Ruby on Rails?
The best part about Ruby on Rails is that it is open-source software. Users can utilize Ruby on Rails to develop applications or collaborate to bring change to their code.

Example: Ruby on Rails API Development Steps
Step 1: API creation using Rails
To initiate the creation of an API, one must first write the below-written code in the terminal of any chosen directory. Using the code written below will create an API named secret_menu_api
$ rails new secret_menu_api –-api --database=postgresql
You must type the below-written code in the terminal to open the API menu.
$ cd secret_menu_api code
Step 2: Enabling CORS (Cross-Origin Resource Sharing)
CORS enables other people to access the API. To prevent other people from accessing the API, one can disable the CORS. To open the cors.rb file, you need to open the file explorer where the Rails API created now is present.
config > initializers > cors.rb
You must uncomment the lines and change the code from origins ‘example.com’ to origins’*’.
Rails.application.config.middleware.insert_before 0, Rack::Cors do allow do origins '*' resources '*', headers: :any, methods: [:get, :post, :put, :patch, :delete, :options, :head] end end
Open Gemfile by scrolling down from the explorer file. Uncomment gem ‘rack-cors’ in line number 26.
# in Gemfile gem ‘rack-cors’
Open the terminal and run
$ bundle install
Step 3: Create a Controller, Model along with a table with
$ rails g resource Post title description
After using the command, it will then generate the below-mentioned files.
Model [Post]:
app > models > post.rb
Controller:
app > controllers > posts_controller.rb
Route:
config > routes.rb
Database Migration Table:
db > migrate > 20230127064441_create_posts.rb
Step 4: Attributes of Post Model
Title of the post
Description of the post
Specifying attributes
Add the following Code into db > migrate > 20230127064441_create_posts.rb:
class CreatePosts < ActiveRecord::Migration[6.0] def change create_table :posts do |t| t.string :title t.text :description end end end
Migrating the table
$ rails db:migrate
If the data has been migrated successfully, then you will be able to see the following:
== 20230127064441 CreatePosts: migrating ============================= -- create_table(:posts) -> 0.0022s == 20230127064441 CreatePosts: migrated (0.0014s) ====================
Step 5: Defining display, index, destroy, update, and create actions.
Here are the implications of the actions:
Index: It will display all the posts present in the database.
Show: It will display the specific(given as an id) post.
Create: It will make the post’s instance.
Update: It will update the post-item instance.
Delete: It will delete specific post items.
Now copy and then paste the below code in secret_menu_intems_controller.rb.
Now let’s write API magic over here.
app > controllers > posts_controller.rb
class PostsController < ApplicationController def index posts = Post.all render json: posts, status: 200 end
def show post = post.find_by(id: params[:id]) if post render json: post, status: 200 else render json: { error: “Post Not Found” } end end def create post = Post.new( title: params[:title], description: params[:description] ) if post.save render json: post else render json: { error: “Error on creating a record” } end end
def update post = Post.find_by(id: params[:id]) post.update( title: params[:title], description: params[:description] ) render json: {message: “#{post.title} has been updated!”, status: 200} end
def destroy post = Post.find_by(id: params[:id]) if post post.destroy render json: “#{post.title} has been deleted!” else render json: { error: “Post Not Found” } end end end
Step 6: Creating routes for index, create, show, delete, and update actions.
Routes receive HTTP requests that come from the client side. We have to forward it using the correct actions. To configure the route, copy the following code and paste it into the route.rb.
# config > routes.rb
Rails.application.routes.draw do resources :posts, only: [:index, :show, :create, :update, :destroy] end
Step 7: Seeding the data
Now in the database, create secret menu item instances.
# db > seed.rb
post1 = Post.create(title: "Better way to improve Ruby on Rails coding", description:"Lorem Ipsum is simply dummy text of the printing and typesetting industry.")
post2 = Post.create(title: "perfect Combination of Angular + Ruby on Rails", menu_description:"Lorem Ipsum is simply dummy text of the printing and typesetting industry.")
Seeding the data
$ rails db:seed
Verify if seeding was correctly done:
$ rails c
# It will now show a console
2.6.1 :002 >
Now you can extract all the instances of secret menu items by typing SecretMenuItem.all
2.6.1 :002 > Post.all Post Load (0.1ms) SELECT "secret_menu_items".* FROM "posts"
=> #<ActiveRecord::Relation [#<Post id: 1, title: "Better way to improve Ruby on Rails coding", description:"Lorem Ipsum is simply dummy text of the printing and typesetting industry.">, #< Post id: 2, title: "perfect Combination of Angular + Ruby on Rails", menu_description:"Lorem Ipsum is simply dummy text of the printing and typesetting industry.">]>
If all the instances are visible, then the seeding was done correctly.
Check Your Magic
- Start rails server.
- Go to your preferred browser(Or you can check into POSTMAN also).
- Pass the following line into the browser URL
Conclusion
The digital world is becoming more and more API-driven, and API development is the prime need for effective and faster digitization. Developing APIs in Ruby on Rails is the first choice for businesses as it not just creates faster APIs but also in a secure and scalable way.
Being one of the top Ruby on Rails development company, our RoR developers develops APIs for our customers from various industry segments.
Feel free to get in touch with us to explore new ways and possibilities with API and RoR Development.
Note: This Post Was First Published on https://essencesolusoft.com/blog/ruby-on-rails-ror-api-development
0 notes
Photo

Using the BitMEX REST API Specification and Clients Authentication Limits Request Rate Limits Viewing Your Request Rate Limit Increasing Your Request Rate Limit Order Count Limits Order Minimum Size Limits WebSocket Limits Behaviour Efficiency HTTP Keep-Alive Overload Filtering Timestamp Filters OrderBookL2 Using the BitMEX REST API For working code and examples, please see our HTTP Connectors on GitHub. If you are logged in, you may access the API Key Management interface. For a list of endpoints and return types, view the REST documentation in the API Explorer. Specification and Clients The BitMEX API conforms to the Swagger spec for REST endpoints. Any Swagger-compatible client can connect to the BitMEX API and execute commands. An updated list of available clients is listed here. Examples of basic communication to our API are in our api-connectors repository. Note that all Bitcoin quantities are returned in Satoshis: 1 XBt (Satoshi) = 0.00000001 XBT (Bitcoin). Authentication To access private endpoints, a permanent API key is required. Details about authentication via API Key are available via a separate document. Limits Request Rate Limits Requests to our REST API are rate limited to 300 requests per 5 minutes. This counter refills continuously. If you are not logged in, your ratelimit is 150/5minutes. Be very careful about the number of errors your tools throw! If a large number of 4xx or 5xx responses are delivered in a short period of time, your IP may be banned for an hour. Multiple bans in a short time will result in a week ban. Viewing Your Request Rate Limit On each request to the API, these headers are returned: "x-ratelimit-limit": 300 "x-ratelimit-remaining": 297 "x-ratelimit-reset": 1489791662 Use these headers to determine your current limit and remaining requests. At the UNIX timestamp designated by x-ratelimit-reset, you will have enough requests left to retry your current request. If you have not exceeded your limit, this value is always the current timestamp. If you are limited, you will receive a 429 response and an additional header, Retry-After, that indicates the number of seconds you should sleep before retrying. Increasing Your Request Rate Limit If you are running up against our limits and believe that you have a legitimate need, please email us at [email protected] to discuss upgrading your access limits. Before increasing your rate limits, we require that your programs at least: Use the WebSocket feeds to avoid polling data. Use our bulk order, bulk amend, and bulk cancel features to reduce load on the system. Due to how BitMEX does real-time auditing, risk checks, and margining, orders submitted, amended, and canceled in bulk are faster to execute. For this reason, bulk actions are ratelimited at 1/10 the normal rate! Bulk cancels, regardless of count, always only count as one request. When emailing us about a ratelimit increase, please include: Your application’s purpose and intended growth Your desired rate limit Acknowledgement that your program is using the API efficiently, as mentioned above. Order Count Limits To keep an orderly market, BitMEX imposes limits on the number of open orders per account. These limits are: Maximum 200 open orders per contract per account; Maximum 10 stop orders per contract per account; When placing a new order that causes these caps to be exceeded, it will be rejected with the message “Too many [open|stop] orders”. Order Minimum Size Limits We intentionally set the contract sizes of BitMEX products at low values to encourage traders both large and small to trade on BitMEX. However, some traders abuse this and spam the orderbook or trade feed with many small orders. Accounts with too many open orders with a gross value less than 0.0025 XBT each will be labeled as a Spam Account. If you are marked as a Spam Account: Orders below 0.0025 XBT in value will automatically become hidden orders. Hidden orders do not show in the orderbook and always pay the taker fee. Post-Only spam orders will be Rejected instead of being hidden. Too many spam orders may be grounds to temporarily ban an account from trading. Spam Account designations are re-evaluated and lifted automatically every 24 hours if user behavior has changed. WebSocket Limits WebSocket Limits are documented on the WebSocket API page. Behaviour BitMEX monitors the behaviour of accounts on the platform, including those using the API. Efficiency Accounts that consistently make a disproportionate number of order-management API requests per notional of XBT executed place unnecessary load on the system and may be banned. For example, if your account is making thousands of new/amend/cancel order API requests each day, yet not trading at all, your account may be banned. As a general guideline, you should target to make no more than 300 order management API requests per 1 XBT notional executed. To help keep your trading activity efficient, you may: Switch off the automated system that is using the API. Increase traded volume, by tightening your quotes or crossing the spread if necessary. Reduce the number of requests made. HTTP Keep-Alive BitMEX does not support placing or canceling orders via WebSocket, only via HTTP. Our servers support HTTP Keep-Alive and cache SSL sessions. If you keep a connection alive, you will get websocket-like latency, obviating the need to use the websocket for transactional communication. Our Keep-Alive timeout is 90 seconds. Overload Due to growth in the crypto space, BitMEX is currently under extremely high load. To help improve responsiveness during high-load periods, the BitMEX trading engine will begin load-shedding when requests reach a critical queue depth. When this happens, you will quickly receive a 503 status code with the message "The system is currently overloaded. Please try again later." The request will not have reached the engine, and you should retry after at least 500 milliseconds. We will keep clients updated as we improve peak capacity on the trading engine. Filtering Many table endpoints take a filter parameter. This is expected to be JSON. For example, the filter query {"side":"Buy"} can be url-encoded and sent to the trade endpoint (click to run). Most values can only be filtered by simple equality. Timestamps, which are all UTC, can be queried in many ways: Timestamp Filters The following fields can be passed in the "filter" param as JSON key/value pairs: Key Description Example Example Description "startTime" Start timestamp. "2014-12-26 11:00" On or after 11:00am on 26 December 2014. "endTime" End timestamp. "2014-12-26 13:00" On or before 1:00pm on 26 December 2014. "timestamp" Exact timestamp. "2014-12-26 12:00" Exactly noon on 26 December 2014. "timestamp.date" Exact day. "2014-12-26" The entire day of 26 December 2014. "timestamp.month" Exact month. "2014-12" The entire month of December 2014. "timestamp.year" Exact year. 2014 The entire year of 2014. "timestamp.mm" Month of year. 12 December of each year. "timestamp.dd" Day of month. 26 26th of each month. "timestamp.ww" Day of week. 6 Friday of each week. 0 = Sat, 1 = Sun "timestamp.time" Exact time. "12:00:00.000" Exactly noon of each day. "timestamp.second" Exact second. "12:00:00" The entire second from noon of each day. "timestamp.minute" Exact minute. "12:00" The entire minute from noon of each day. "timestamp.hh" Hour of day. 12 12th hour of each day. (i.e. noon) "timestamp.uu" Minute of hour. 30 30th minute of each hour. "timestamp.ss" Second of minute. 15 15th second of each minute. For example, the .BVOL7D index is calculated and published on the trade feed every 5 minutes. To filter to just noon on Fridays, send the payload: {"symbol": ".BVOL7D", "filter": {"timestamp.time":"12:00", "timestamp.ww":6}} (Click to run) OrderBookL2 A special note on the orderBookL2 table, which is the canonical table for orderbook updates and the only way to retrieve all levels: This orderbook is keyed by a unique ID, not price, so that all levels are unique across all symbols. This may be unintuitive at first but ensures that each level across the entire system is uniquely keyed. Therefore, when you retrieve an orderBookL2 update, it may look like this: {"table":"orderBookL2","action":"update","data":[{"symbol":"XBTUSD","id":8798952400,"side":"Sell","size":8003}]} Notice that this does not include the price, which you should already have set on the level. The process for handling updates, inserts, deletes, and partials on this stream is exactly the same as any other stream and requires no special handling. However, some tooling may make assumptions about book entries, like keying them by price. In that case, there are a few ways to handle this: Keep a local hashmap of ids you’ve seen to their price. When you receive an update or delete, look up the price in this map. This is simple but will consume some memory. Use the following formula to reverse-engineer the ID: ID = (100000000 * symbolIdx) - (price / instrumentTickSize) price = ((100000000 * symbolIdx) - ID) * instrumentTickSize Definitions: symbolIdx is the index of the instrument in the list of instruments instrumentTickSize as the instrument’s tickSize property. Due to in-flight changes of tickSize on some XBT contracts, an override may need to be applied. See below. This can be written as: // This is a compatibility change as the tick sizes of live instruments changed in-flight. If you are listing // these instruments, you must use their original tick as part of your calculations. If not, this can be ignored, // and you can use `instrument.tickSize` directly. const LEGACY_TICKS = {"XBTUSD":0.01}; function instrumentTickSize(instrument) { return legacyTicks[instrument.symbol] || instrument.tickSize; } // You should have a copy of the full instruments list on startup. // Fetch from: https://www.bitmex.com/api/v1/instrument?columns=symbol,tickSize&start=0&count=500 const instrumentsList = fetchInstrumentsFromBitMEX(); function getInstrumentAndIdx(symbol) { const instrument = instrumentsList.find((i) => i.symbol === symbol); const instrumentIdx = instrumentsList.indexOf(instrument); return [instrument, instrumentIdx]; } // To get a price from an ID: export function priceFromID(id, symbol) { const [instrument, instrumentIdx] = getInstrumentAndIdx(symbol); return ((100000000 * instrumentIdx) - id) * instrumentTickSize(instrument); } // And reversed: export function IDFromPrice(price, symbol) { const [instrument, instrumentIdx] = getInstrumentAndIdx(symbol); return (100000000 * instrumentIdx) - (price / instrumentTickSize(instrument)); } Applied to our update above, where the ID was 8798952400, you should get a resulting price of 10476: price = ((1e8 * symbolIdx) - ID) * instrumentTickSize 10476 = ((100000000 * 88) - 8798952400) * 0.01
3 notes
·
View notes
Text
Learn the Laravel Array Helper Function
Are you looking to optimize your Laravel workflow? If so, then you’ve come to the right place. In this article, We will show you the Laravel Array Helper Function and how it can help make your coding experience that much better. The Laravel Array Helper Function is an extremely powerful tool that allows developers to access, manipulate and iterate through arrays in a clean and efficient way. We’ll discuss what it is, why it’s useful and how you can use it to maximize your productivity levels. So without further ado, let’s get started!

What is the Laravel Array Helper Function?
The Laravel array helper function is a great way to manage your arrays. It can help you keep track of your array keys and values, and even sort them by key or value. You can also use it to merge two or more arrays together, and even do some basic math on your arrays.
The Different Types of Arrays
Arrays are data structures that store one or more values in a single variable. There are many different types of arrays, each with their own advantages and disadvantages. The most common type of array is the linear array, which stores values in a single row or column. Laravel Arr Helper are easy to create and use, but they are not very efficient for large amounts of data.
The next most common type of array is the two-dimensional array, which stores values in a table with rows and columns. Two-dimensional arrays are more efficient than linear arrays for large amounts of data, but they are more difficult to create and use.
The last type of array is the three-dimensional array, which stores values in a cube with rows, columns, and layers. Three-dimensional arrays are the most efficient for large amounts of data, but they are the most difficult to create and use.
What are the Benefits of Using the Laravel Array Helper Function?
There are many benefits to using the laravel helper arr function. Some of these benefits include:
-Laravel is a great tool for managing arrays and objects. The Array Helper function makes it easy to work with arrays in Laravel.
-The Array Helper function can be used to fetch data from an external API. This is helpful if you need to display data on your website that is not stored in your database.
-The Array Helper function can be used to sort data. This is helpful if you need to display data on your website in a specific order.
-The Array Helper function can be used to filter data. This is helpful if you need to display only certain data on your website.
You Can Also Check - Out :
laravel eloquent where child
laravel parent child relationship
How to Use the Laravel Array Helper Function
Laravel's array helper function is a great way to quickly manipulate arrays of data. In this article, we'll show you how to use the array helper function to perform various tasks.
First, let's take a look at how to use the array helper function to sort an array. To sort an array, simply pass the array as the first argument to the array_helper function. The second argument is the sorting order, which can be either "asc" or "desc". For example, to sort an array in ascending order, you would use the following code:
array_helper( $array, 'asc' );
To sort an array in descending order, you would use the following code:
array_helper( $array, 'desc' );
Now that we know how to sort an array using the array helper function, let's take a look at how to search an array for a specific value. To search an array for a specific value, we'll use the in_array function. The in_array function takes two arguments: The first argument is the value that you're searching for; The second argument is the array that you want to search. For example, let's say we have an array of numbers and we want to know if 5 is in that array. We could use the following code:
in_array( 5, $numbers ); //Returns true or false
Conclusion
We have discussed the Laravel array helper functions and how they can be used in a variety of scenarios. We hope this information has been helpful for you as you dive into using the Laravel framework to build powerful web applications. Remember, if you are ever stuck, our team at Webappfix is here to help! Good luck on your journey with Laravel!
0 notes
Text
How to create a dynamic table in React with API data
How to create a dynamic table in React with API data
In this post, I will show you how to create a dynamic table filled with API data. We are going to fetch some sample data, create the table and fill it with the data. App structure You can use create-react-app or online IDE to create the following file structure. Fetch data with async … await we are going to use async …await to fetch data from API asynchronously. You need an async function,…

View On WordPress
0 notes
Text
How Web Workers Work in JavaScript – With a Practical JS Example
In this article, I will walk you through an example that will show you how web workers function in JavaScript with the help of WebSockets.
I think it's helpful to work with a practical use case because it is much simpler to understand the concepts when you can relate them to real life.
So in this guide, you will be learning what web workers are in JavaScript, you'll get a brief introduction to WebSockets, and you'll see how you can manage sockets in the proper way.
This article is quite application/hands-on oriented, so I would suggest trying the example out as you go along to get a much better understanding.
Let’s dive in.
Table of contents
Prerequisites
Before you start reading this article, you should have a basic understanding of the following topics:
What are web workers in JavaScript?
A web worker is a piece of browser functionality. It is the real OS threads that can be spawned in the background of your current page so that it can perform complex and resource-intensive tasks.
Imagine that you have some large data to fetch from the server, or some complex rendering needs to be done on the UI. If you do this directly on your webpage then the page might get jankier and will impact the UI.
To mitigate this, you can simply create a thread – that is a web worker – and let the web worker take care of the complex stuff.
You can communicate with the web worker in a pretty simple manner which can be used to transfer data to and fro from the worker to the UI.
Common examples of web workers would be:
Dashboard pages that display real-time data such as stock prices, real-time active users, and so on
Fetching huge files from the server
Autosave functionality
You can create a web worker using the following syntax:
const worker = new Worker("<worker_file>.js");
Worker is an API interface that lets you create a thread in the background. We need to pass a parameter, that is a <worker_file>.js file. This specifies the worker file the API needs to execute.
NOTE: A thread is created once a Worker call is initiated. This thread only communicates with its creator, that is the file which created this thread.
A worker can be shared or used by multiple consumers/scripts. These are called shared workers. The syntax of the shared worker is very similar to that of the above mentioned workers.
const worker = new SharedWorker("<worker_file>.js");
You can read more about SharedWorkers in this guide.
History of web workers
Web workers execute in a different context, that is they do not execute in a global scope such as window context. Web workers have their own dedicated worker context which is called DedicatedWorkerGlobalScope.
There are some cases where you can't use web workers, though. For example, you can't use them to manipulate the DOM or the properties of the window object. This is because the worker does not have the access to the window object.
Web workers can also spawn new web workers. Web workers communicate with their creator using certain methods like postMessage, onmessage, and onerror. We will look into these methods closely in the later sections of this article.
Brief Introduction to Web Sockets
A web socket is a type of communication that happens between two parties/entities using a WebSocket protocol. It actually provides a way to communicate between the two connected entities in a persistent manner.
You can create a simple web socket like below:
const socket = new WebSocket("ws://example.com");
Over here we have created a simple socket connection. You'll notice that we have passed a parameter to the WebSocket constructor. This parameter is a URL at which the connection should be established.
You can read more about web sockets by referring to the Websockets link in the prerequisites.
Use Case Description
NOTE: Context, Container, and Class diagrams drawn in this blog post don't accurately follow the exact conventions of these diagrams. They're approximated here so that you can understand the basic concepts.
Before we start, I would suggest reading up on c4models, container diagrams, and context diagrams. You can find resources about them in the prerequisites section.
In this article, we are going to consider the following use case: data transfer using web workers via socket protocol.
We are going to build a web application which will plot the data on a line chart every 1.5 seconds. The web application will receive the data from the socket connection via web workers. Below is the context diagram of our use case:
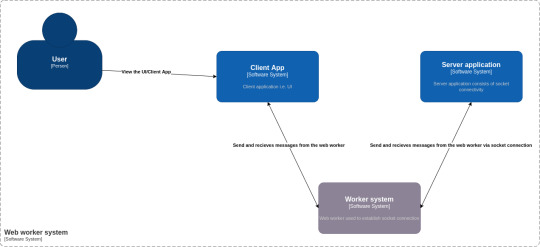
Container Diagram
As you can see from the above diagram, there are 4 main components to our use case:
Person: A user who is going to use our application
Software system: Client App – This is the UI of our application. It consists of DOM elements and a web worker.
Software system: Worker system – This is a worker file that resides in the client app. It is responsible for creating a worker thread and establishing the socket connection.
Software system: Server application – This is a simple JavaScript file which can be executed by node to create a socket server. It consists of code which helps to read messages from the socket connection.
Now that we understand the use case, let's dive deep into each of these modules and see how the whole application works.
Project Structure
Please follow this link to get the full code for the project that I developed for this article.
Our project is divided into two folders. First is the server folder which consists of server code. The second is the client folder, which consists of the client UI, that is a React application and the web worker code.
Following is the directory structure:
├── client │ ├── package.json │ ├── package-lock.json │ ├── public │ │ ├── favicon.ico │ │ ├── index.html │ │ ├── logo192.png │ │ ├── logo512.png │ │ ├── manifest.json │ │ └── robots.txt │ ├── README.md │ ├── src │ │ ├── App.css │ │ ├── App.jsx │ │ ├── components │ │ │ ├── LineChartSocket.jsx │ │ │ └── Logger.jsx │ │ ├── index.css │ │ ├── index.js │ │ ├── pages │ │ │ └── Homepage.jsx │ │ ├── wdyr.js │ │ └── workers │ │ └── main.worker.js │ └── yarn.lock └── server ├── package.json ├── package-lock.json └── server.mjs
To run the application, you first need to start the socket server. Execute the following commands one at a time to start the socket server (assuming you are in the parent directory):
cd server node server.mjs
Then start the client app by running the following commands (assuming you are in the parent directory):
cd client yarn run start
Open http://localhost:3000 to start the web app.
Client and Server Application
The client application is a simple React application, that is CRA app, which consists of a Homepage. This home page consists of the following elements:
Two buttons: start connection and stop connection which will help to start and stop the socket connection as required.
A line chart component - This component will plot the data that we receive from the socket at regular intervals.
Logged message - This is a simple React component that will display the connection status of our web sockets.
Below is the container diagram of our client application.
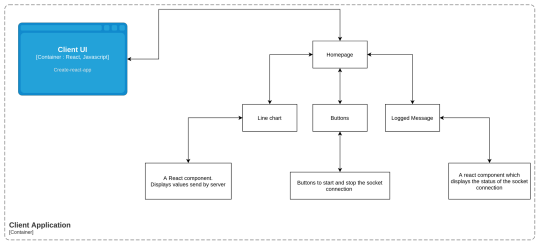
Container Diagram: Client Application
Below is how the UI will look:
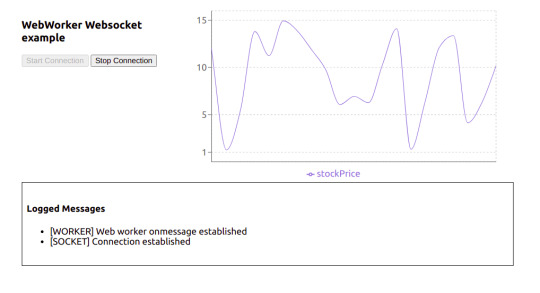
Actual UI
To check out the code for the client UI, go to the client folder. This is a regular create-react-app, except that I have removed some boilerplate code that we don't need for this project.
App.jsx is actually the starter code. If you check this out, we have called the <Homepage /> component in it.
Now let's have a look at the Homepage component.
const Homepage = () => { const [worker, setWorker] = useState(null); const [res, setRes] = useState([]); const [log, setLog] = useState([]); const [buttonState, setButtonState] = useState(false); const hanldeStartConnection = () => { // Send the message to the worker [postMessage] worker.postMessage({ connectionStatus: "init", }); }; const handleStopConnection = () => { worker.postMessage({ connectionStatus: "stop", }); }; //UseEffect1 useEffect(() => { const myWorker = new Worker( new URL("../workers/main.worker.js", import.meta.url) ); //NEW SYNTAX setWorker(myWorker); return () => { myWorker.terminate(); }; }, []); //UseEffect2 useEffect(() => { if (worker) { worker.onmessage = function (e) { if (typeof e.data === "string") { if(e.data.includes("[")){ setLog((preLogs) => [...preLogs, e.data]); } else { setRes((prevRes) => [...prevRes, { stockPrice: e.data }]); } } if (typeof e.data === "object") { setButtonState(e.data.disableStartButton); } }; } }, [worker]); return ( <> <div className="stats"> <div className="control-panel"> <h3>WebWorker Websocket example</h3> <button id="start-connection" onClick={hanldeStartConnection} disabled={!worker || buttonState} > Start Connection </button> <button id="stop-connection" onClick={handleStopConnection} disabled={!buttonState} > Stop Connection </button> </div> <LineChartComponent data={res} /> </div> <Logger logs={log}/> </> ); };
As you can see, it's just a regular functional component that renders two buttons – a line chart, and a custom component Logger.
Now that we know how our homepage component looks, let's dive into how the web worker thread is actually created. In the above component you can see there are two useEffect hooks used.
The first one is used for creating a new worker thread. It's a simple call to the Worker constructor with a new operator as we have seen in the previous section of this article.
But there are some difference over here: we have passed an URL object to the worker constructor rather than passing the path of the worker file in the string.
const myWorker = new Worker(new URL("../workers/main.worker.js", import.meta.url));
You can read more about this syntax here.
If you try to import this web worker like below, then our create-react-app won’t be able to load/bundle it properly so you will get an error since it has not found the worker file during bundling:
const myWorker = new Worker("../workers/main.worker.js");
Next, we also don’t want our application to run the worker thread even after the refresh, or don’t want to spawn multiple threads when we refresh the page. To mitigate this, we'll return a callback in the same useEffect. We use this callback to perform cleanups when the component unmounts. In this case, we are terminating the worker thread.
We use the useEffect2 to handle the messages received from the worker.
Web workers have a build-in property called onmessage which helps receive any messages sent by the worker thread. The onmessage is an event handler of the worker interface. It gets triggered whenever a message event is triggered. This message event is generally triggered whenever the postMessage handler is executed (we will look more into this in a later section).
So in order for us to send a message to the worker thread, we have created two handlers. The first is handleStartConnection and the second is handleStopConnection. Both of them use the postMessage method of the worker interface to send the message to the worker thread.
We will talk about the message {connectionStatus: init} in our next section.
You can read more about the internal workings of the onmessage and postMessage in the following resources:
Since we now have a basic understanding about how our client code is working, then let's move on to learn about the Worker System in our context diagram above.
Worker System
To understand the code in this section, make sure you go through the file src/workers/main.worker.js.
To help you understand what's going on here, we will divide this code into three parts:
A self.onmessage section
How the socket connection is managed using the socketManagement() function
Why we need the socketInstance variable at the top
How self.onmessage works
Whenever you create a web worker application, you generally write a worker file which handles all the complex scenarios that you want the worker to perform. This all happens in the main.worker.js file. This file is our worker file.
In the above section, we saw that we established a new worker thread in the useEffect. Once we created the thread, we also attached the two handlers to the respective start and stop connection buttons.
The start connection button will execute the postMessage method with message: {connectionStatus: init} . This triggers the message event, and since the message event is triggered, all the message events are captured by the onmessage property.
In our main.worker.js file, we have attached a handler to this onmessage property:
self.onmessage = function (e) { const workerData = e.data; postMessage("[WORKER] Web worker onmessage established"); switch (workerData.connectionStatus) { case "init": socketInstance = createSocketInstance(); socketManagement(); break; case "stop": socketInstance.close(); break; default: socketManagement(); } }
So whenever any message event is triggered in the client, it will get captured in this event handler.
The message {connectionStatus: init} that we send from the client is received in the event e. Based on the value of connectionStatus we use the switch case to handle the logic.
NOTE: We have added this switch case because we need to isolate some part of the code which we do not want to execute all the time (we will look into this in a later section).
How the socket connection is managed using the socketManagement() function
There are some reasons why I have shifted the logic of creating and managing a socket connection into a separate function. Here is the code for a better understanding of the point I am trying to make:
function socketManagement() { if (socketInstance) { socketInstance.onopen = function (e) { console.log("[open] Connection established"); postMessage("[SOCKET] Connection established"); socketInstance.send(JSON.stringify({ socketStatus: true })); postMessage({ disableStartButton: true }); }; socketInstance.onmessage = function (event) { console.log(`[message] Data received from server: ${event.data}`); postMessage( event.data); }; socketInstance.onclose = function (event) { if (event.wasClean) { console.log(`[close] Connection closed cleanly, code=${event.code}`); postMessage(`[SOCKET] Connection closed cleanly, code=${event.code}`); } else { // e.g. server process killed or network down // event.code is usually 1006 in this case console.log('[close] Connection died'); postMessage('[SOCKET] Connection died'); } postMessage({ disableStartButton: false }); }; socketInstance.onerror = function (error) { console.log(`[error] ${error.message}`); postMessage(`[SOCKET] ${error.message}`); socketInstance.close(); }; } }
This is a function that will help you manage your socket connection:
For receiving the message from the socket server we have the onmessage property which is assigned an event handler.
Whenever a socket connection is opened, you can perform certain operations. To do that we have the onopen property which is assigned to an event handler.
And if any error occurs or when we are closing the connection then, we use onerror and onclose properties of the socket.
For creating a socket connection there is a separate function altogether:
function createSocketInstance() { let socket = new WebSocket("ws://localhost:8080"); return socket; }
Now all of these functions are called in a switch case like below in the main.worker.js file:
self.onmessage = function (e) { const workerData = e.data; postMessage("[WORKER] Web worker onmessage established"); switch (workerData.connectionStatus) { case "init": socketInstance = createSocketInstance(); socketManagement(); break; case "stop": socketInstance.close(); break; default: socketManagement(); } }
So based on what message the client UI sends to the worker the appropriate function will be executed. It is pretty self-explanatory on what message which particular function should be triggered, based on the above code.
Now consider a scenario where we placed all the code inside self.onmessage.
self.onmessage = function(e){ console.log("Worker object present ", e); postMessage({isLoading: true, data: null}); let socket = new WebSocket("ws://localhost:8080"); socket.onopen = function(e) { console.log("[open] Connection established"); console.log("Sending to server"); socket.send("My name is John"); }; socket.onmessage = function(event) { console.log(`[message] Data received from server: ${event.data}`); }; socket.onclose = function(event) { if (event.wasClean) { console.log(`[close] Connection closed cleanly, code=${event.code} reason=${event.reason}`); } else { // e.g. server process killed or network down // event.code is usually 1006 in this case console.log('[close] Connection died'); } }; socket.onerror = function(error) { console.log(`[error] ${error.message}`); }; }
This would cause the following problems:
On every postMessage call made by the client UI, there would have been a new socket instance.
It would have been difficult to close the socket connection.
Because of these reasons, all the socket management code is written in a function socketManagement and catered using a switch case.
Why we need the socketInstance variable at the top
We do need a socketInstance variable at the top because this will store the socket instance which was previously created. It is a safe practice since no one can access this variable externally as main.worker.js is a separate module altogether.
Communication between the UI and the socket via web worker
Now that we understand which part of the code is responsible for which section, we will take a look at how we establish a socket connection via webworkers. We'll also see how we respond via socket server to display a line chart on the UI.

End-to-end flow of the application
NOTE: Some calls are purposefully not shown in the diagram since it will make the diagram cluttered. Make sure you refer to the code as well while referring to this diagram.
Now let's first understand what happens when you click on the start connection button on the UI:
One thing to notice over here is that our web worker thread is created once the component is mounted, and is removed/terminated when the component is unmounted.
Once the start connection button is clicked, a postMessage call is made with {connectionStatus: init}
The web worker’s onmessage event handler which is listening to all the message events comes to know that it has received connectionStatus as init. It matches the case, that is in the switch case of main.worker.js. It then calls the createSocketInstance() which returns a new socket connection at the URL: ws://localhost:8080
After this a socketManagement() function is called which checks if the socket is created and then executes a couple of operations.
In this flow, since the socket connection is just established therefore, socketInstance’s onpen event handler is executed.
This will send a {socketStatus: true} message to the socket server. This will also send a message back to the client UI via postMessage({ disableStartButton: true}) which tells the client UI to disable the start button.
Whenever the socket connection is established, then the server socket’s on('connection', ()=>{}) is invoked. So in step 3, this function is invoked at the server end.
Socket’s on('message', () => {}) is invoked whenever a message is sent to the socket. So at step 6, this function is invoked at the server end. This will check if the socketStatus is true, and then it will start sending a random integer every 1.5 seconds to the client UI via web workers.
Now that we understood how the connection is established, let's move on to understand how the socket server sends the data to the client UI:
As discussed above, socket server received the message to send the data, that is a random number every 1.5 second.
This data is recieved on the web worker’s end using the onmessage handler.
This handler then calls the postMessage function and sends this data to the UI.
After receiving the data it appends it to an array as a stockPrice object.
This acts as a data source for our line chart component and gets updated every 1.5 seconds.
Now that we understand how the connection is established, let's move on to understand how the socket server sends the data to the client UI:
As discussed above, socket server recieved the message to send the data, that is a random number, every 1.5 seconds.
This data is recieved on the web worker’s end using the socket's onmessage handler.
This handler then calls the postMessage function of the web worker and sends this data to the UI.
After receiving the data via useEffect2 it appends it to an array as a stockPrice object.
This acts as a data source for our line chart component and gets updated every 1.5 seconds.
NOTE: We are using recharts for plotting the line chart. You can find more information about it at the official docs.
Here is how our application will look in action:
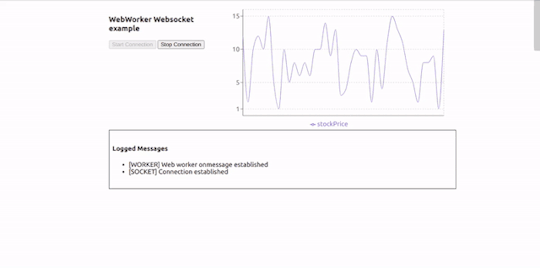
Working Example
Summary
So this was a quick introduction to what web workers are and how you can use them to solve complex problems and create better UIs. You can use web workers in your projects to handle complex UI scenarios.
If you want to optimize your workers, read up on the below libraries:
Thank you for reading!
Follow me on twitter, github, and linkedIn.
If you read this far, tweet to the author to show them you care.
1 note
·
View note
Text
Version 324
youtube
windows
zip
exe
os x
app
tar.gz
linux
tar.gz
source
tar.gz
I had a great week. The downloader overhaul is almost done.
pixiv
Just as Pixiv recently moved their art pages to a new phone-friendly, dynamically drawn format, they are now moving their regular artist gallery results to the same system. If your username isn't switched over yet, it likely will be in the coming week.
The change breaks our old html parser, so I have written a new downloader and json api parser. The way their internal api works is unusual and over-complicated, so I had to write a couple of small new tools to get it to work. However, it does seem to work again.
All of your subscriptions and downloaders will try to switch over to the new downloader automatically, but some might not handle it quite right, in which case you will have to go into edit subscriptions and update their gallery manually. You'll get a popup on updating to remind you of this, and if any don't line up right automatically, the subs will notify you when they next run. The api gives all content--illustrations, manga, ugoira, everything--so there unfortunately isn't a simple way to refine to just one content type as we previously could. But it does neatly deliver everything in just one request, so artist searching is now incredibly faster.
Let me know if pixiv gives any more trouble. Now we can parse their json, we might be able to reintroduce the arbitrary tag search, which broke some time ago due to the same move to javascript galleries.
twitter
In a similar theme, given our fully developed parser and pipeline, I have now wangled a twitter username search! It should be added to your downloader list on update. It is a bit hacky and may be ultimately fragile if they change something their end, but it otherwise works great. It discounts retweets and fetches 19/20 tweets per gallery 'page' fetch. You should be able to set up subscriptions and everything, although I generally recommend you go at it slowly until we know this new parser works well. BTW: I think twitter only 'browses' 3200 tweets in the past, anyway. Note that tweets with no images will be 'ignored', so any typical twitter search will end up with a lot of 'Ig' results--this is normal. Also, if the account ever retweets more than 20 times in a row, the search will stop there, due to how the clientside pipeline works (it'll think that page is empty).
Again, let me know how this works for you. This is some fun new stuff for hydrus, and I am interested to see where it does well and badly.
misc
In order to be less annoying, the 'do you want to run idle jobs?' on shutdown dialog will now only ask at most once per day! You can edit the time unit under options->maintenance and processing.
Under options->connection, you can now change max total network jobs globally and per domain. The defaults are 15 and 3. I don't recommend you increase them unless you know what you are doing, but if you want a slower/more cautious client, please do set them lower.
The new advanced downloader ui has a bunch of quality of life improvements, mostly related to the handling of example parseable data.
full list
downloaders:
after adding some small new parser tools, wrote a new pixiv downloader that should work with their new dynamic gallery's api. it fetches all an artist's work in one page. some existing pixiv download components will be renamed and detached from your existing subs and downloaders. your existing subs may switch over to the correct pixiv downloader automatically, or you may need to manually set them (you'll get a popup to remind you).
wrote a twitter username lookup downloader. it should skip retweets. it is a bit hacky, so it may collapse if they change something small with their internal javascript api. it fetches 19-20 tweets per 'page', so if the account has 20 rts in a row, it'll likely stop searching there. also, afaik, twitter browsing only works back 3200 tweets or so. I recommend proceeding slowly.
added a simple gelbooru 0.1.11 file page parser to the defaults. it won't link to anything by default, but it is there if you want to put together some booru.org stuff
you can now set your default/favourite download source under options->downloading
.
misc:
the 'do idle work on shutdown' system will now only ask/run once per x time units (including if you say no to the ask dialog). x is one day by default, but can be set in 'maintenance and processing'
added 'max jobs' and 'max jobs per domain' to options->connection. defaults remain 15 and 3
the colour selection buttons across the program now have a right-click menu to import/export #FF0000 hex codes from/to the clipboard
tag namespace colours and namespace rendering options are moved from 'colours' and 'tags' options pages to 'tag summaries', which is renamed to 'tag presentation'
the Lain import dropper now supports pngs with single gugs, url classes, or parsers--not just fully packaged downloaders
fixed an issue where trying to remove a selection of files from the duplicate system (through the advanced duplicates menu) would only apply to the first pair of files
improved some error reporting related to too-long filenames on import
improved error handling for the folder-scanning stage in import folders--now, when it runs into an error, it will preserve its details better, notify the user better, and safely auto-pause the import folder
png export auto-filenames will now be sanitized of \, /, :, *-type OS-path-invalid characters as appropriate as the dialog loads
the 'loading subs' popup message should appear more reliably (after 1s delay) if the first subs are big and loading slow
fixed the 'fullscreen switch' hover window button for the duplicate filter
deleted some old hydrus session management code and db table
some other things that I lost track of. I think it was mostly some little dialog fixes :/
.
advanced downloader stuff:
the test panel on pageparser edit panels now has a 'post pre-parsing conversion' notebook page that shows the given example data after the pre-parsing conversion has occurred, including error information if it failed. it has a summary size/guessed type description and copy and refresh buttons.
the 'raw data' copy/fetch/paste buttons and description are moved down to the raw data page
the pageparser now passes up this post-conversion example data to sub-objects, so they now start with the correctly converted example data
the subsidiarypageparser edit panel now also has a notebook page, also with brief description and copy/refresh buttons, that summarises the raw separated data
the subsidiary page parser now passes up the first post to its sub-objects, so they now start with a single post's example data
content parsers can now sort the strings their formulae get back. you can sort strict lexicographic or the new human-friendly sort that does numbers properly, and of course you can go ascending or descending--if you can get the ids of what you want but they are in the wrong order, you can now easily fix it!
some json dict parsing code now iterates through dict keys lexicographically ascending by default. unfortunately, due to how the python json parser I use works, there isn't a way to process dict items in the original order
the json parsing formula now uses a string match when searching for dictionary keys, so you can now match multiple keys here (as in the pixiv illusts|manga fix). existing dictionary key look-ups will be converted to 'fixed' string matches
the json parsing formula can now get the content type 'dictionary keys', which will fetch all the text keys in the dictionary/Object, if the api designer happens to have put useful data in there, wew
formulae now remove newlines from their parsed texts before they are sent to the StringMatch! so, if you are grabbing some multi-line html and want to test for 'Posted: ' somewhere in that mess, it is now easy.
next week
After slaughtering my downloader overhaul megajob of redundant and completed issues (bringing my total todo from 1568 down to 1471!), I only have 15 jobs left to go. It is mostly some quality of life stuff and refreshing some out of date help. I should be able to clear most of them out next week, and the last few can be folded into normal work.
So I am now planning the login manager. After talking with several users over the past few weeks, I think it will be fundamentally very simple, supporting any basic user/pass web form, and will relegate complicated situations to some kind of improved browser cookies.txt import workflow. I suspect it will take 3-4 weeks to hash out, and then I will be taking four weeks to update to python 3, and then I am a free agent again. So, absent any big problems, please expect the 'next big thing to work on poll' to go up around the end of October, and for me to get going on that next big thing at the end of November. I don't want to finalise what goes on the poll yet, but I'll open up a full discussion as the login manager finishes.
1 note
·
View note
Photo

The Wix Code Database and Data Modeling
This article was created in partnership with Wix. Thank you for supporting the partners who make SitePoint possible.
One of the cool features of Wix Code is the ability to separate your site’s design and layout from its content. This means you can create and maintain your information in a database and then have your pages dynamically retrieve and display this information in whatever way you like.
Let’s take an in-depth look at what you can do with the Wix Code database, including the types of information you can store, ways you can manipulate data with code, and how you can dynamically display the information on your site.
Throughout this article, we’ll use a simplified example of an art school that stores and displays information about its courses and teachers.
The Wix Code Database
Like all databases, the Wix Code database is made up of individual tables, which we call collections. In our example of the art school (see image below), we have two collections, one each for the courses and teachers.
You can create as many collections as you need and populate them with a near unending amount of data. A robust permissions model means you have complete control over who can access your information and what they can do with it.
You can work directly in your Live data, which is the information your visitors see when they view your pages. You can also work with Sandbox data, so you can try stuff out without affecting your live site. You can sync between them at any time.
Populating Collections
You have several options for populating your collections. You can manually enter data directly in the Wix Content Manager, either to your Live data or your Sandbox data.
If you’re an Excel ace, you can do all the work in Excel (or whatever spreadsheet program you prefer), save your sheet as a CSV file, and then import it into the Wix Code database. In fact, you can create your entire collection this way, schema and all. You can import to your Live data or your Sandbox data.
You can also export your Wix data to CSV files. If you make sure to include the built-in ID system field, you will be able to modify your content in your spreadsheet and then re-import it into your Wix Code database so that each record, or what we call item, is updated.
A third option is to build a form to capture user input and store it in your database.
Using External Databases
If you already have a database somewhere, you might be thinking that you don’t want to recreate it in Wix. The good news is that you don’t have to. As long as your database exposes an API, you can access it from your Wix site.
For simple applications, you can use the wix-fetch module—an implementation of the standard JavaScript Fetch API—to access your external database with an HTTP request and use that data in your Wix site’s pages.
You can also pair the wix-fetch module with another Wix module, wix-router, that lets you control the routing of incoming requests. Using the functionality provided by both of these modules, you can create SEO-friendly dynamic pages that show different data depending on the URLs used to reach them.
For example, you can design a single member profile page that can be used by all of your site’s members.
Using wix-router and wix-fetch you can write code that pulls information from incoming requests for the profile page, queries an external database to retrieve the information for the page, and then injects that data into the profile page. You can even add security to your page by using the wix-users module.
So if you create another page for users to update their profile pages, you can check who is trying to access it and only allow users to update their own profiles.
Data Hooks
You can add hooks to actions on your collections using the wix-data API.
For example, in our Teachers collection, we have two separate fields: First name and Last name. To make displaying names on our pages easier, we also want to have one field that has both names together. To do this, we can add a beforeInsert hook to our Teachers collection that hooks into the insert action, reads the contents of the First name and Last name fields, and then concatenates them and populates the Full name field.
Modeling Your Data
Now that we’ve covered the database itself, let’s talk about modeling your data in the Wix Code database.
Collection Schemas
Like all databases, each collection has a schema to define its fields. All standard field types are supported, including text, image, boolean, number, date and time, and rich text.
There is also a field type specifically designed for URLs. It automatically formats the URL into clickable links that you can add to your pages. For example, teachers in your school could supply the URL of their portfolio website, and you could include that link on their dynamic page.
You can also use the document field type to store a wide range of file types. You can allow your users to download files stored in your collections (such as reading lists for each course) or to upload their own files.
ID Fields and Primary Fields
Each collection has an _ID field, which is the primary key for that table. Collections also have a primary field (indicated by a lock icon), which is the display key for each item.
When you create joins using reference fields (see the next section), the values come from the primary field. The reference itself uses the _ID field, of course. If you plan on using reference fields, it’s a good idea to make sure the data you store in the primary field is unique.
Reference Fields
Reference fields create a connection between collections that is defined in the collection schema itself. This is similar to foreign keys in relational databases.
Each reference field points to a specific collection. The value that is displayed in the reference field in each item in the collection is taken from the value of the primary field of the referenced collection.
In our example, we created a reference field in our Courses collection that points to our Teachers collection so that we can indicate who teaches each class.
The advantage of reference fields is three-fold. First, they help maintain data integrity because their value is taken directly from the referenced collection. Second, they help eliminate data duplication, which we all know is the enemy of good database design. And third, when we create our page layouts, reference fields let us access information in the referenced collection as well as in the main collection we are using. This allows us to create master-detail pages, such as a list of all the courses taught by each teacher.
Creating Pages from Your Content
Of course, storing and maintaining data is nice, but the real point of having a website is displaying content to visitors. So let’s talk about how that works with Wix Code.
Back to our art school example. We have two different types of information: courses and teachers. So you could start by designing a page layout to display all the information about each of the courses. Then you might want to create a master-detail page that lists all of your teachers and the courses they teach.
Continue reading %The Wix Code Database and Data Modeling%
by SitePoint Team via SitePoint http://ift.tt/2Et6z8h
1 note
·
View note
Link
Introduction
Page Speed is a pretty big deal these days.
Since Google changed Googlebot's algorithm to highly favour fast, mobile-friendly websites, it has become more important to have a fast website. If that's not bad enough, users will typically spend less time, and convert less, the slower your website's experience is.
What is Page Speed
Page Speed is the amount of time it takes to completely load content on your webpage.
There could be dozens of reasons for any given user for why your page is slow. Your users could be on the train, passing through a tunnel with a weak signal, or their internet could just be slow.
By following best practices, we can at least mitigate the issue by ensuring we've done the best job we can.
10 Page Speed Improvements
Now that you know what it is, I'm going to teach you what you need to look at to speed up your page.
Note: these are listed in order of difficulty. At some point, you will need a developer to help optimise your site.
Table of Contents
#1 - Use a CDN
#2 - Enable GZIP compression
#3 - Use smaller images
#4 - Reduce the number of requests your page makes
#5 - Avoid redirects where possible
#6 - Reduce Time to First Byte
#7 - Reduce and remove render blocking JavaScript
#8 - Minify your CSS and JS
#9 - Remove unused CSS
#10 - Keep track of your site's speed
#1 - Use a CDN
CDN stands for Content Delivery Network. Using a CDN effectively gives you access to hundreds of little servers across the world that host a copy of your site for you, massively reducing the time it takes to fetch your site. If you're not using a CDN, every request to your website (including images, CSS and JavaScript), gets routed across the world, slowly, to your server.
According to 468 million requests in the HTTPArchive, 48% were not served from a CDN. That's more than 224 million requests that could have been more than 50% faster, if they spent a few minutes adding a CDN to their site.
Be sure to check you've configured your CDN correctly - cache misses in your CDN mean the CDN has to ask your origin server for the resource, which kind of defeats the purpose of using a CDN in the first place!
#2 - Enable GZIP compression
On some CDNs, GZIP compression will just be a checkbox labelled "enable compression". It'll roughly half the size of the files your users need to download to use your website, your users will love you for it.
#3 - Use smaller images
This means both reducing the resolution (such as from 4000x3000 pixels your camera outputs to 1000x750 for the web), and reducing the size by compressing the file.
If your site uses WordPress, there are plugins that will do this automatically for you as you upload images.
I personally use TinyJPG to compress images as I write blog posts.
#4 - Reduce the number of requests your page makes
The goal is to reduce the number of requests necessary to load the top part of your page (known as "above the fold content").
There are two ways of thinking here, you can either:
Reduce the number of requests on the page as a whole, by removing fancy animations, or images that don't improve the site's experience
Or, you can defer loading content that isn't a high priority through the use of lazy loading
#5 - Avoid redirects where possible
Redirects slow down your site considerably. Instead of having special subdomain for mobile users, use responsive CSS and serve your website from one domain.
Some redirects are unavoidable, such as www -> root domain or root domain -> www, but the majority of your traffic shouldn't be experiencing a redirect to view your site.
#6 - Reduce Time to First Byte
Time to First Byte is the amount of time your browser spends waiting after a request for a resource is made, to receive the first byte of data from the server.
There are two parts:
Time spent on the server
Time spent sending data
You can improve time spent on the server by optimising your server-side rendering, database queries, API calls, load balancing, your app's actual code, and the server's load itself (particularly if you're using cheap web hosting - this will impact your site's performance).
You can greatly reduce time spent sending data by using a CDN.
#7 - Reduce and remove render blocking JavaScript
External scripts (particularly those used for marketing) will often be written poorly, and block your page from loading until it is finished running.
You can reduce this effect by marking external scripts async:
<script async src="https://example.com/external.js"></script>
You can also delay the loading of your marketing scripts until your users start scrolling:
window.addEventListener( 'scroll', () => setTimeout(() => { //insert marketing snippets here }, 1000), { once: true } );
#8 - Minify your CSS and JS
Minifying means using tools to remove spaces, newline characters, and shortening your variable names. Typically this would be done automatically as part of your build process.
For JavaScript
To minify your JavaScript, check out UglifyJS.
For CSS
To minify your CSS, check out cssnano.
#9 - Remove unused CSS
Since Chrome 59 (released in April 2017), it's been possible to see unused JS and CSS in Chrome DevTools.
To see this, open the DevTools, show the console drawer (the annoying thing that appears when you hit Esc), click the three dots on the bottom left hand side, and open "Coverage".
Hitting the button with a reload icon will then refresh your page, and audit the CSS and JS for usage.
Here's what it looks like when you audit the starting page in Google Chrome:

#10 - Regularly track your site's speed
It's much easier to fix problems with your site's speed within moments of slowing your site down. On top of that, if you make reviewing your site's speed a habit, it becomes a much smaller task to fix things that are slow.
There are free tools to monitor your website's speed, two of the most popular being WebPageTest and Google Lighthouse. The downside to these tools is that you need to remember to run them before and after you make a change.
0 notes
Text
Oracle APEX: Making Google Maps respond to Faceted Search
“One of my work projects elicited the need to have a map that responded to changing search criteria. I thought it would be a great opportunity to mix APEX’s new Faceted Search feature with Google Maps. I’ll try to walk you through how I accomplished it. [Disclaimer: you’ll need an API Key from Google in order to render the maps.]
The APEX Faceted Search feature was introduced with version 19.2. Out-of-the-box, you can have a region for your search criteria (i.e. facets) and another region, a report, that refreshes automatically to reflect the new search filters. Carsten Czarski wrote a blog post showing how you can have multiple regions (charts, reports, etc.) react to changes to the faceted search. I used his approach, with some tweaks, in combination with the Google Maps JavaScript APIs.
The simplified (silly) use-case here is a list of NCAA (FBS) college football stadiums. With the faceted search, you can filter a report region by conference, state, and seating capacity. There is also a Google Map with a marker for each matching stadium. You can try it out here:
https://apex.oracle.com/pls/apex/bhill_roadling/r/blog3/blog-stadiums-search
I am limiting the number of times the Google Map can be rendered because there is a cost associated with it. Here are some screen shots in case we’ve hit our quota or the page doesn’t work for some other reason:

First, you’ll need a data set - I got mine from here. I loaded it into a table called BLOG_STADIUMS, which is defined as:
CREATE TABLE "BLOG_STADIUMS" ( "ID" NUMBER GENERATED ALWAYS AS IDENTITY MINVALUE 1 MAXVALUE 9999999999999999999999999999 INCREMENT BY 1 START WITH 1 CACHE 20 NOORDER NOCYCLE NOKEEP NOSCALE NOT NULL ENABLE, "STADIUM" VARCHAR2(255), "CITY" VARCHAR2(50), "STATE" VARCHAR2(50), "TEAM" VARCHAR2(255), "CONFERENCE" VARCHAR2(50), "BUILT" NUMBER, "DIV" VARCHAR2(50), "LATITUDE" NUMBER, "LONGITUDE" NUMBER, "CAPACITY" NUMBER, "EXPANDED" NUMBER, PRIMARY KEY ("ID") USING INDEX ENABLE ) /
Then I created a new APEX app which automatically built the Faceted Search page. For more info on how to build one from scratch, see this post by Carsten Czarski. I tweaked the facets a bit to match the screen shots above. At this point, I have everything but the Google Map, and it was very easy to get this far.
Here’s the outline for getting the filtered data into Google Maps:
Retrieve the filtered data set
Format it with JSON
Use an an Ajax Callback process to retrieve the JSON data
Use JavaScript to parse the JSON and call the Google APIs to render the map
Use a Dynamic Action to refresh the map when the facets change
Retrieve the Filtered Data Set:
Per Carsten’s blog post (the one I referenced first), we create a new type in the database for a single row of the result set:
CREATE OR REPLACE EDITIONABLE TYPE "TYP_STADIUM_ROW" as object (id NUMBER, stadium VARCHAR2(255), city VARCHAR2(50), state VARCHAR2(50), team VARCHAR2(255), conference VARCHAR2(50), built NUMBER, div VARCHAR2(50), latitude NUMBER, longitude NUMBER, capacity NUMBER, expanded NUMBER ) /
Then we create another new type as a table of that object:
CREATE OR REPLACE EDITIONABLE TYPE "TYP_STADIUM_TABLE" as table of typ_stadium_row /
Then we create a pipelined function to get the filtered result set from our search results report region:
create or replace FUNCTION fn_get_stadium_search_data(p_page_id IN NUMBER, p_region_static_id IN VARCHAR2) RETURN typ_stadium_table PIPELINED IS l_region_id NUMBER; l_context apex_exec.t_context; TYPE t_col_index IS TABLE OF PLS_INTEGER INDEX BY VARCHAR2(255); l_col_index t_col_index; --------------------------------------------------------------------------- PROCEDURE get_column_indexes(p_columns wwv_flow_t_varchar2 ) IS BEGIN FOR i IN 1 .. p_columns.COUNT LOOP l_col_index(p_columns(i)) := apex_exec.get_column_position(p_context => l_context, p_column_name => p_columns(i)); END LOOP; END get_column_indexes; --------------------------------------------------------------------------- BEGIN -- 1. get the region ID of the Faceted Search region SELECT region_id INTO l_region_id FROM apex_application_page_regions WHERE application_id = v('APP_ID') AND page_id = p_page_id AND static_id = p_region_static_id; -- 2. Get a cursor (apex_exec.t_context) for the current region data l_context := apex_region.open_query_context(p_page_id => p_page_id, p_region_id => l_region_id ); get_column_indexes(wwv_flow_t_varchar2('ID', 'STADIUM', 'CITY', 'STATE', 'TEAM', 'CONFERENCE', 'BUILT', 'DIV', 'LATITUDE', 'LONGITUDE', 'CAPACITY', 'EXPANDED')); WHILE apex_exec.next_row(p_context => l_context) LOOP PIPE ROW(typ_stadium_row(apex_exec.get_number (p_context => l_context, p_column_idx => l_col_index('ID' )), apex_exec.get_varchar2(p_context => l_context, p_column_idx => l_col_index('STADIUM' )), apex_exec.get_varchar2(p_context => l_context, p_column_idx => l_col_index('CITY' )), apex_exec.get_varchar2(p_context => l_context, p_column_idx => l_col_index('STATE' )), apex_exec.get_varchar2(p_context => l_context, p_column_idx => l_col_index('TEAM' )), apex_exec.get_varchar2(p_context => l_context, p_column_idx => l_col_index('CONFERENCE')), apex_exec.get_number (p_context => l_context, p_column_idx => l_col_index('BUILT' )), apex_exec.get_varchar2(p_context => l_context, p_column_idx => l_col_index('DIV' )), apex_exec.get_number (p_context => l_context, p_column_idx => l_col_index('LATITUDE' )), apex_exec.get_number (p_context => l_context, p_column_idx => l_col_index('LONGITUDE' )), apex_exec.get_number (p_context => l_context, p_column_idx => l_col_index('CAPACITY' )), apex_exec.get_number (p_context => l_context, p_column_idx => l_col_index('EXPANDED' )) ) ); END LOOP; apex_exec.close(l_context); RETURN; EXCEPTION WHEN NO_DATA_FOUND THEN apex_exec.close(l_context); RETURN; WHEN OTHERS THEN apex_exec.close( l_context ); RAISE; END fn_get_stadium_search_data; /
The function has 2 parameters: 1 for the APEX page number and 1 for the region’s static ID. My faceted search is page 3, and I set the static ID of my search results region to “searchResults”. The function uses APEX_REGION and APEX_EXEC to get the individual values from the report region, then assembles them into a collection of the type we built above.
At this point, we could create a new chart region in our APEX page that queries this pipelined function instead of our BLOG_STADIUMS table. A query would look something like this:
SELECT id, stadium, city, state, team, conference, built, div, latitude, longitude, capacity, expanded FROM table(fn_get_stadium_search_data('3', 'searchResults'))
Format it with JSON:
In order to use the data with Google Maps, we need to format it with JSON. Something like this will work:
{"map_boundaries": {"center_latitude": 30.61009758, "center_longitude": -96.34072923, "east_longitude": -96.34072923, "north_latitude": 30.61009758, "south_latitude": 30.61009758, "west_longitude": -96.34072923 }, "stadium_data": [{"built": "1927", "capacity": "102,733", "city": "College Station", "color": null, "conference": "SEC", "div": "fbs", "expanded": "2015", "id": "00004", "latitude": 30.61009758, "longitude": -96.34072923, "stadium": "Kyle Field", "state": "Texas", "team": "Texas A&M" }, {"built": "1924", "capacity": "100,119", "city": "Austin", "color": null, "conference": "Big 12", "div": "fbs", "expanded": "2009", "id": "00008", "latitude": 30.2836034, "longitude": -97.73233652, "stadium": "Darrell K Royal–Texas Memorial Stadium", "state": "Texas", "team": "Texas" } ] }
Notice that the JSON contains “map_boundaries” data. We’ll use that data to (1) determine where to center the map, and (2) calculate a zoom level.
Here’s the code for a function that will build that:
create or replace FUNCTION fn_get_stadium_data_json RETURN CLOB IS l_json_data CLOB; CURSOR c_stadiums IS WITH stadiums_cte AS (SELECT id, stadium, city, state, team, conference, built, div, latitude, longitude, capacity, expanded FROM table(fn_get_stadium_search_data('3', 'searchResults')) ) SELECT JSON_OBJECT('map_boundaries' VALUE (SELECT JSON_OBJECT('west_longitude' VALUE min_lon, 'east_longitude' VALUE max_lon, 'south_latitude' VALUE min_lat, 'north_latitude' VALUE max_lat, 'center_latitude' VALUE NVL((min_lat + max_lat) / 2, 39.8333), 'center_longitude' VALUE NVL((min_lon + max_lon) / 2, -98.5833) RETURNING CLOB) FROM (SELECT LEAST( MIN(latitude), 90) AS min_lat, LEAST( MIN(longitude), 180) AS min_lon, GREATEST(MAX(latitude), 0) AS max_lat, GREATEST(MAX(longitude), -180) AS max_lon FROM stadiums_cte ) ), 'stadium_data' VALUE (SELECT JSON_ARRAYAGG(JSON_OBJECT('id' VALUE TO_CHAR(id, 'FM00000'), 'stadium' VALUE stadium, 'city' VALUE city, 'state' VALUE state, 'team' VALUE team, 'conference' VALUE conference, 'built' VALUE TO_CHAR(built, 'FM0000'), 'div' VALUE div, 'latitude' VALUE latitude, 'longitude' VALUE longitude, 'capacity' VALUE TO_CHAR(capacity, 'FM999G990'), 'expanded' VALUE TO_CHAR(expanded, 'FM9990'), 'color' VALUE CAST(NULL AS VARCHAR2(12)) RETURNING CLOB) RETURNING CLOB) FROM stadiums_cte ) RETURNING CLOB) AS json_stadium_data FROM dual; BEGIN --============================================================================================================================ -- Get all of the stadium data and put it in a PL/SQL collection. --============================================================================================================================ OPEN c_stadiums; FETCH c_stadiums INTO l_json_data; CLOSE c_stadiums; RETURN(l_json_data); END fn_get_stadium_data_json; /
Notice that it calls the other function we built. I’m sure the SQL could be simpler, but it works.
Ajax Callback Process to Retrieve JSON:
On page 3 of my APEX app, I created an Ajax Callback process with these properties:

The name is “refreshMap” and it wraps our previous function with “htp.p”.
Use JS to Parse the JSON and Call the Google Map APIs:
Now that we have the data formatted with JSON, and we have a way to retrieve it via JS, we just need to do that and use the APIs to render the Google Map. We’ll declare a JS function called “initMap” that will use the APEX JS API “apex.server.process” to execute the Ajax Callback Process we created above. When the callback is successful, we’ll execute some JS to calculate an appropriate zoom level for the map, and then we’ll call google.maps.Map to render it. Finally, we’ll loop through the JSON data and create a marker for each stadium. I added some code to display a little info window when the mouse hovers over a marker. [The info window works pretty well on Safari, but seems real twitchy in Chrome. I’ll post any fixes I come up with.]
Here’s the code for the “Function and Global Variable Declaration” page property:
function initMap() { apex.server.process('refreshMap', // Process or AJAX Callback name {}, // No page items to pass/set {success: function (pData) {// Success Javascript var data = pData; //.substring(1, pData.length - 3); var json_data = JSON.parse(data); var GLOBE_WIDTH = 256; // a constant in Google's map projection // Calculate Zoom level based upon longitudes var pixelWidth = $("#map").width(); var west = json_data.map_boundaries.west_longitude; var east = json_data.map_boundaries.east_longitude; var angle1 = east - west; if (angle1 < 0) {angle1 += 360;} var zoom1 = Math.floor(Math.log(pixelWidth * 360 / angle1 / GLOBE_WIDTH) / Math.LN2); // Calculate Zoom level based upon latitudes var pixelHeight = $("#map").height(); var south = json_data.map_boundaries.south_latitude; var north = json_data.map_boundaries.north_latitude; var angle2 = north - south + 3; var zoom2 = Math.floor(Math.log(pixelHeight * 360 / angle2 / GLOBE_WIDTH) / Math.LN2); // Choose the lower of the 2 Zoom levels var zoom = Math.min(zoom1, zoom2); // If the zoom is calculated to infinity, then set it to 4. This will occur when no stadiums are found. if (zoom === Infinity) {zoom = 4;} var map = new google.maps.Map(document.getElementById('map'), { zoom: zoom, center: {lat: json_data.map_boundaries.center_latitude, lng: json_data.map_boundaries.center_longitude }, mapTypeId: 'terrain', mapTypeControl: false, streetViewControl: false } ); var myLatLng; var marker; var infoWindow = new google.maps.InfoWindow(); $.each(json_data.stadium_data, function(index, element) { myLatLng = {lat: element.latitude, lng: element.longitude}; marker = new google.maps.Marker( {position: myLatLng, map: map, title: element.stadium }); // Open the InfoWindow on mouseover: google.maps.event.addListener(marker, 'mouseover', function(e) { infoWindow.setPosition(e.latLng); infoWindow.setContent("<table class=\"infoContent\"><tr>" + "<td class=\"infoContentLabel\">Team: </td>" + "<td class=\"infoContentData\">" + element.team + "</td>" + "</tr><tr>" + "<td class=\"infoContentLabel\">Stadium: </td>" + "<td class=\"infoContentData\">" + element.stadium + "</td>"+ "</tr><tr>"+ "<td class=\"infoContentLabel\">Location: </td>"+ "<td class=\"infoContentData\">" + element.city + ", " + element.state + "</td>" + "</tr><tr>"+ "<td class=\"infoContentLabel\">Capacity: </td>"+ "<td class=\"infoContentData\">" + element.capacity + "</td>" + "</tr><tr>"+ "<td class=\"infoContentLabel\">Built: </td>"+ "<td class=\"infoContentData\">" + element.built + "</td>" + "</tr></table>"); infoWindow.open(map); }); // Close the InfoWindow on mouseout: google.maps.event.addListener(marker, 'mouseout', function() { infoWindow.close(); }); }); }, dataType: "text" // Response type (here: plain text) } ); }
Now we need to load the Google Maps API JS and provide them with an API key. To do this, we add this JS code to the “Execute When Page Loads” page property:
(function(d, script) { script = d.createElement('script'); script.type = 'text/javascript'; script.async = true; script.onload = function(){ // remote script has loaded }; script.src = 'https://maps.googleapis.com/maps/api/js?key=<yourKeyHere>&callback=initMap'; d.getElementsByTagName('body')[0].appendChild(script); }(document));
And finally, I added this to the “Inline” CSS page property:
/* Always set the map height explicitly to define the size of the div * element that contains the map. */ #map { height: 600px; } .infoContentLabel { font-weight: bold; }
Dynamic Action to Refresh the Map
The last step is to get the map to refresh dynamically when the facets change. Create a new Dynamic Action named “When Search Changes” that fires on the “After Refresh” event for the search results region (the name is “Stadiums”, the static ID is “searchResults”). It has one TRUE action - Execute JavaScript Code with the following code:
initMap(); //setTimeout(function(){ initMap(); }, 750);
Note: The “Facets Change” event seemed to cause a race condition between the map region and the search results region. Sometimes it would show the latest info, sometimes it wouldn’t. I was able to use a JS timeout of about .75 seconds to work-around that, but I found that just refreshing the map after the refresh of the search results worked better.
0 notes