#find duplicate photos for windows
Explore tagged Tumblr posts
Visit Tumblr Blog
Explore Tumblr blogs with no restrictions, modern design and the best experience.
Last Seen Tumblr Blogs


Fun Fact
130K people were victims of a chain letter scam that affected Tumblr in May 2011.
Text

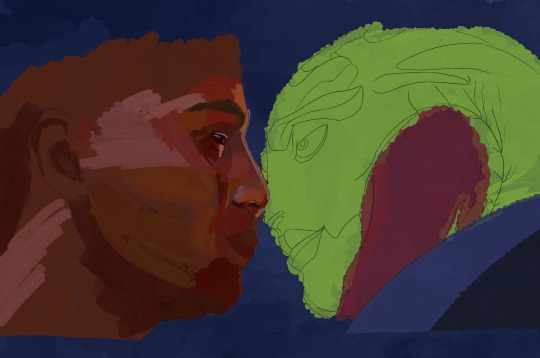
A quick method to deal with blurry action shots that have Hannibal's quintessential dim lighting + green color grading combo.
Here's the example I'll be using:

Don't get me wrong, I love the look of Hannibal, but the average person doesn't scroll tumblr with their screen brightness on max. Plus, night light filters and blue light glasses add even more yellow to an already heavily filtered show. If you want people to see your gif clearly, you have to edit it at least a little. Especially for extreme shots like this lol.
What I use: macOS 15.1.1 Elmedia Player 8.18 dupeGuru 4.3.1 Topaz Photo AI 3.2.0 Photoshop 25.11.0 LuLu 2.6.3 (optional, but it's nice to block outgoing connections from pirated programs)
Step One: Take Screenshots
Open your video file (1080p preferred) in Elmedia Player and navigate to the first frame of your gif. Hit "Playback > Record a Series of Screenshots" and let it run until you have all the frames you want. Unfortunately for mac users, we have a problem where a lot of duplicate screenshots are taken (like every third screenshot is a duplicate... it's so annoying). To save time later, I use dupeGuru to clean out as many duplicates as I can.
Open dupeGuru and add whatever folder you saved your screenshots to.

Scan the folder, then hit "Mark > Mark All" (you can see here that the program only caught one duplicate, which means more work later. it's not a perfect program -_-)

Hit "Actions > Send Marked to Recycle Bin..." to remove the duplicates from the folder

Step Two: Denoise
At this stage the screenshots are so dark that the noise isn't obvious, but it'll be more noticeable after brightening and sharpening. Here's the difference this step makes later:

Upload all your screenshots to Topaz Photo AI and add a Denoise layer. I normally go with the automatic settings.

Hit "Select All," "Apply > Current Settings," then export all your images. This can take a while depending on how many images you have.

Step Three: Create Frame Animation in Photoshop
If you've read any other gif-making tutorials this part should be familiar, so I'm gonna skim over it.
"File > Scripts > Load Files into Stack"
"Browse..." and select your Topaz output files
"Sort by Name" so they load in the correct order
"Ok"
Once all the layers have loaded, hit "Create Frame Animation" in the Timeline window
Under the Timeline window options menu, hit "Make Frames from Layers," then "Reverse Frames"
This is probably when you want to go through frame-by-frame and delete any remaining duplicates. It's very annoying to have to redo this step if you want to go back and edit your crop size later. (Not that I would know... 🤡)
Step Four: Crop + Resize
Crop, then "Image > Image Size" to adjust the width of your gif. You'll most likely want to use one of the common tumblr image dimensions:
Keep in mind that tumblr's gif size limit is 10 MB. But it's honestly best to keep it under 9.5 MB if you want the gif to load smoothly. A 540x540 px gif can have 40-60 frames while a smaller gif can be longer.
Make sure to add +2 px to whichever width you choose (so 542 px, 270 px, etc), since we'll be adjusting the canvas size later to get rid of transparent border anomalies.
Step Five: Color
The more common order of operations is to sharpen before coloring, but for dark scenes like this, it's kinda silly to sharpen when you can barely see what you're doing, so I like to color first.
Select all your frame layers and make a new group, just to keep them separate from your adjustment layers.
I always start by testing out the Auto Color Correction Options in a Curves adjustment layer. To access them, opt + click on the Auto button. This opens a window with four options.
I like to use a combination of "Enhance Per Channel Contrast" and "Find Dark & Light Colors," though either option can be used to adjust color balance. The important part is selecting "Snap Neutral Midtones" and picking a midtone that brings your gif as close as possible to the desired color balance.

If changing the midtone doesn't affect the color balance, brighten the gif first and try again.
For this gif, "Enhance Per Channel Contrast" removed the bulk of the green filter:

It's still pretty dark, so I brightened up the gif with some more Curves layers:

There's still a lot of purple/blue in Dolarhyde's black leather jacket, so I added another Curves layer and used "Find Dark & Light Colors" to improve the blackpoint:

Now we can up the contrast a little:

Nice! Good enough to move onto sharpening!
SIDE NOTE: The reason I use these Color Correction Options is because simply brightening leaves you with purple/blue shadows and sickly green over-exposed highlights that take ages to color correct. You can see the difference here:

(If you've ever wondered why so many Hannibal gifs have blue shadows, this is why.)
Step Six: Sharpen
This is where you'll want to start implementing actions, which are pre-recorded series of adjustments that you can perform with the click of a button. I mainly use three actions (download here, open the Actions window in PS, open the Action options menu, and click "Load Actions...").
The "frame animation to smart object" action converts the gif to a video timeline so we can apply smart filters.
The "legacy sharpening + high pass" action applies my standard sharpening filters. Not every gif will need the high pass filter, so feel free to change its opacity or delete it altogether. You can also tweak the smart sharpen filters by right clicking them and selecting "Edit Smart Filter..."

3. Once you're happy with the sharpness, the "convert to frame timeline" action turns the gif back into a frame animation. I use a 0.05 s frame delay for most gifs (equivalent to 20 fps; 24 fps is standard for tv/movies). I normally use 0.07-0.08 seconds for action shots, so the gif doesn't whip around so fast. Over 0.1 seconds, it starts to look like stop motion, so I try to avoid that.
Step Seven: Final Adjustments
This is where I fine-tune the colors, mostly using Hue/Saturation layers.
If I use a Color Balance layer, I only make very small adjustments and try to counterbalance them in the other tonal ranges (e.i. adjustments to the Highlights spill over to the Midtones, so I make the opposite adjustments to the Midtones to fix it). But most of the time, I'd rather play around with Curves or Hue/Saturation to fix stuff like that.
Hue/Saturation gives you more control by allowing you to select the exact color range you want to affect. For this gif, I used Hue/Saturation to get rid of the purple introduced around the highlights in Will's hair by the high pass filter.
The eyedropper tool allows you to select the exact color you want to include in the range. Then you can move the bars around until all the colors you don't want to affect are excluded.

Once you have your range selected, you can bring the saturation all the way down and set it to whatever lightness you prefer:

I also reduced cyan's saturation so that Will's shirt wouldn't look quite so blue.

[You could do a lot more to make the colors prettier... but there are other tutorials online for that. 😅]
Step Eight: Export
Once you're happy with your final product, go to "File > Export > Save for Web (Legacy)..."
These are my settings:

You can use Diffusion instead of Pattern if you want. Diffusion is probably better for mobile gif compression, but I like the way Pattern looks on desktop, especially for gifs with smooth gradients. It's a personal preference thing.
Hit "Save..." and you're all done!

This isn't gonna win any gif-making awards, but at least you can see what's happening and the colors don't look wonky. And for Hannibal, I call that a win! 🥲👍
61 notes
·
View notes
Text
Traditionalists
For Day 24 of @jilytoberfest 🎶Then I know everything is gonna be fine, Because you are mine🎶 -You Shine from Carrie - The Musical
“And what room is this?” James' face goes dreamy, tilting his head against the wood of the frame. “The baby’s room I reckon.” Lily turns fast on her heels. “Baby? Whose baby?” James blinks. “Ours.” He straightens up, getting a glint in his eye. “Oh wait, sorry—you want traditional order of events: engagement then marriage then house then baby. Did I get that correct?”
AO3 link Here
“SURPRISE!”
He uncovers her eyes. Lily stares at a small gated walkway that leads up to a modest looking cottage. A small billow of smoke wafts from the thatched chimney.
“I don’t get it.”
“It’s ours.” His smile is infectious, every part of his face alight with glee.
Lily looks back at the house. The garden out front looks recently tilled, little sprouts of infant seedlings popping out from the wet earth.
“You bought us a house?” Her mouth is set in an o formation, eyes darting to each window and wooden beam.
“Well not bought—mum and dad said we could have it if we were willing to fix it up a bit. It’s been in the family for ages as you can probably tell by the ‘Beedle and the Bard’ feel of it.”
He isn’t wrong to call it a place out of a fairytale. Even down to the front porch, there is a hint of domestication and whimsy that her cement brick of a family home back in Cokeworth could never achieve.
“James, it's lovely but— we aren’t even engaged.”
She rips her eyes away from the building, turning to watch his brow furrow before something clicks in his brain and his lips curl into an impish smile.
“Didn’t peg you for such a traditionalist, Evans. Would it make you feel better if I got on one knee right now?”
Lily sputters, cheeks burning. He has been doing this more and more lately, suggesting the idea of marriage. Eventually she had to tell him to stop after the fourth or fifth time he would crouch down on one knee in front of her and linger here just long enough to make her heart soar before straightening back up with the excuse of an itchy ankle or dropping a quill.
“That’s not what I’m saying. It's just—we just graduated and you have only just met mum and dad—I hardly think that they would accept me bunking with my boyfriend so soon.”
“‘Bunking’ is it?” He quips, “Sure hope then they don’t find out how much ‘bunking’ we did back at school.”
She gives him a pointed glare and he concedes, reaching out to give her chin a little squeeze.
“At least come see it first before you completely shoot it down—I did a lot of work already but it needs a feminine touch before it will be perfect.”
He takes her hand and swings open the gate to lead her down the walk. Closer to the garden beds, she can see little wooden signs popping out from the dirt. In James’ unmistakable scrawl are written the words: Lavender, Rosemary, Vervain, Wolfsbane.
“So this is the garden—mum said it’s good luck to plant the first two but otherwise I figured you’d want a healthy supply of potions ingredients.”
He doesn’t let her linger, pulling her up onto the porch and pulling back the heavy set door. Inside, the main room is full of light from the large windows. Bookshelves are already lined with a mixture of muggle and wizarding titles—many of which look like duplicates of the ones she keeps at home. Between books are slanted photographs of times gone by: her and him mid embrace after his Quidditch Cup win; Lily and Remus sitting in the forest near the Potter Mansion, rat crawling on her head as a stag nuzzles at her neck, a dog’s tongue slides up the side of the camera; a muggle photo she took of Sirius and James in Paris, both in mid guffaw as they are flanked by cancan dancers.
Her eyes scan away to a glinting object in the corner. A brand new TV set sits on its stand with a betamax player at its feet. A copy of Harold and Maude sits atop.
“I always wanted a TV,” James chirps, noticing her staring at the muggle invention.
“Is that right? You planning on becoming one of those blokes who would ignore their naked wife just to watch a match?”
James looks aghast. “Merlin no Lils! I’ll just shag you from behind so we both can watch–”
She pretends to scoff in disgust and he grabs her around the belly, calloused fingers wiggling until she is in tears from laughing.
“Honestly, I don’t know what I even expected,” she says, now with a cramp in her stomach.
“Might I remind you that you brought up the ‘naked wife’ bit–” He puts emphasis on the last word, squeezing her hand tighter.
“You’re Impossible,” she mutters, taking his hand to yank him into what looks like the hallway.
He has decorated the hall with posters and art that mirror their shared Heads’ office back at school: a various smattering of film titles mixed with art pieces. He takes the lead, opening the doors one by one and letting her peer in. The rooms are less put together than the main living space, but the idea is there: a guest room (“In case Remus needs a place—the laws around Werewolves have been strangling these past couple years”), a room with a work desk and various bits and bobs (“a shared laboratory if you will—”), and a master bedroom.
At the very end of the hall, the final room opens up to a small but bright space that is completely bare save for a coat of pastel red on the walls. Lily walks in and turns around, cocking a brow at her boyfriend who leans in the doorframe.
“And what room is this?”
James' face goes dreamy, tilting his head against the wood of the frame.
“The baby’s room I reckon.”
Lily turns fast on her heels.
“Baby? Whose baby?”
James blinks. “Ours.” He straightens up, getting a glint in his eye.
“Oh wait, sorry—you want traditional order of events: engagement then marriage then house then baby. Did I get that correct?”
Lily turns back to the room. The sunlight pours onto the floor casting little phantoms of the leaves.
“James—it's lovely. It really is…but what about—” her voice fractures. The house is everything she ever dreamed of—a real life with him, built and filled with the express intention of happiness. She’s only just learned of it and it’s already hard to let go.
“We’ve committed to the Order. Will be at war and Merlin knows we might have to go into hiding if things go south. It’s a beautiful thought but we just can’t afford to dream like—”
“Rubbish.” He cuts her off, stuffing his hands into his pockets. “That’s what he wants us to do. We can’t just stop living because there’s a war out there.”
“Nothing is a sure thing anymore, James.”
James takes a step forward. Eyes bright and pleading.
“We are a sure thing. And all of this,” he gestures around the room, “Can be too. We can’t let them take it away from us.”
She feels the tears rimming her eyes. She can picture it so well: James tinkering on a new invention in the side room, Remus and Sirius dropping by, touting a case of beer and wild stories that they will tell in great hyperbolic zeal, a baby—a beautiful little child whose hands are smaller than a snitch, gargling with peals of laughter as James lifts him up, up into the air and spins.
“Ok—yeah, alright.” She wipes her nose, giving a small hesitant chuckle to dispel the reservations that still harbor at the shores of her vision. “Let’s do it.”
James crosses the small distance between them, picking her up and spinning her until she lets out a laugh that feels oddly reminiscent of their imaginary child. He sets her down and pushes her into him, his hot breath on her head like a warming aura.
“I love you,” she murmurs into him. “Let’s be a family.”
He kisses her head, his smile infecting her from the head down. “Woah, Evans. Let’s not get ahead of ourselves,” he says in mock reserve, “I mean, we aren’t even engaged yet.”
60 notes
·
View notes
Note
Since you don't see many edits here, and i am a dumbass in editing, could you make a tutorial on it? Like: what apps should we use, what should or shouldn't do, devices, etc. Since i personally worship your editing prowess, i couldn't help myself but ask for your guidance sensei. 🙇♀️
I don't use a "special device" to make my edits, just a computer which can run a videoediting software and Wallpaper Engine correctly (in my case it's an Apple Mac Pro 4,1 from 2009 with upgraded RAM and GPU, and also with Windows 10 installed on it, but that's not important). My server pc build out of my spare parts, and it's serves as a network bridge, and a file storge (like a NAS, or something) to store my personal files, like the assets for the edits on HPP. The way I make my edits, is a different story. I like to put the charaters in different scenarios to make the edit more enjoyable. I usually chose one image from my pre-granarated ones, or I use (if i see a, as i call an edit "suspicious" image here on Tumblr or X) an image from my "Likes", or if I can't find any which is good for the scanario in my head I generate one using PixAI's Ebora Pony XL AI model. Than if I have an image, I put together a static version of the edit in Paint.NET (PaintdotNET). Here I cut down the unnecessary and the broken (weirdly generated hands, .etc) parts of the image, and I remove the background if I'd like to use a different one. Than I chose a stethoscope png what are suitable for the edit, but I recently using the hand with stethoscope one which you can see in my recent edits. I also make some barely visble changes to the main image and the stething image. If it's done, and looks good I save them (the base image, the background, and the steting png separately) in a folder. After that it's time to "animate" the edit, which is just using the Wallpaper Engine's built in Shake effect, if that part is done, I record the animated soundless edit using OBS, which is usually a 5-6 minutes raw mp4 file. Than I put the raw recording into the video editor which is my case is the Wondershare Filmora X. I chose one of the heartbeat and bearthing audios from my server (if it's needed I modify it a bit in Audacity), and speed them up to mach with the animation. I make the breathing way quieter to have the heartbeat in focus, also i duplicate the hb sound to make a stereo effect, which means the I make the left side a bit louder and add more bass to it than the right side, which make a really good heart pulse effect (ROLL CREDITS). Also in here I add some video effects, cut down the unnecessary parts, I cut down the video to 2 minutes to become uploadable for X, than it's time to export it. After I exported the final edit, i check it for mistakes and I fix them if i find any, and the fixed version gonna be uploaded to Tumblr and X. This whole process is 2+ hours usually, but it's could be more for longer and more complex edits. But you doesn't need to follow my way to make edits, if you ever used a photo editor and a video editor before, and you know how put a transparent png on an image, and a greenscreen video on another one, you good to go. There is a lot of ways you can make an edit, so you can chose one which are suitable for you. If you still need help, you can join the Cardio Editor's Hub, there are lot of other people who gladly gives you some tips and tricks. Good luck, have fun! :D
10 notes
·
View notes
Text
Longlegs Filming Locations
Here are all the filming locations from Longlegs I've been able to scene stalk. I made a video about it if you'd prefer to listen to me say "uh..." a hundred times: https://youtu.be/NQrdn4czh-c . But listing them in a blog allows search engines to find them so the info can be better dispersed. I'll give the locations roughly in the order they appear in the film. I can only post so many images, so I'll just have to give addresses for some places without a pic.
Needless to say, SPOILERS AHEAD.
The significant locations I can't find are the Bar, Harker's cabin, The Green Murder House, & the paint/hardware store.
Should you choose to visit any of these locations, these are all private property - do not trespass or harass. Stay on the street / sidewalk for those selfies. The library is the sole public property exception as it is a local government building. So feel free to visit it during normal business hours. I'm sure the librarians would be happy to take a few minutes to tell tales of the filming.
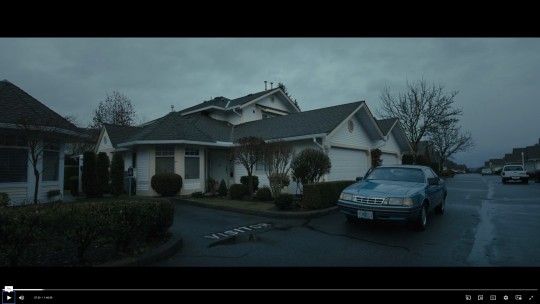
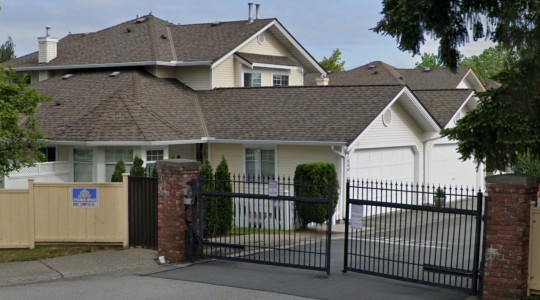
Ruth's house:

This is the first location to appear & the last I found. It's actually a wedding venue that's part of a golf course located at 3834 248 St, Langley Twp, BC V4W 2B3, Canada. Here's a google maps view:

Everything that occurs in & around Ruth's house takes place on this property, with the likely exception of the basement, which I don't think was here as this small house doesn't seem to have a basement with a window as is shown in the film.
FBI office, morgue, insane asylum, 5 matching houses, & jogging garage:

In the end credits they list Salish Locations "The Garrison" so this was an easy find. Salish Locations is a company that owns a number of locations they rent to film productions companies, so Longlegs made heavy use of "The Garrison" located at 4050 W 4th Ave, Vancouver, BC V6R 1Z6, Canada. You can find their location website here: https://www.salishlocations.com/locations.html
This is an old military base, perhaps air force?, but the Longlegs production team made heavy use of it. Every scene that takes place at the FBI office was filmed here, as well as the insane asylum, the morgue, the 5 matching houses, the jogging garage, & possibly the basement from Ruth's house (that last one is just a guess).

Although the exact rooms they used in the film are not the ones shown on the website, they are similar enough that you can clearly see they shot in that wing of the building. The exposed sprinklers on the ceiling, the hanging fluorescent lights, the wall heaters, & wood paneling all match up.
For a low budget film, this location was a boon to the film company, I'm sure, as it served as their production studio for a greatly reduced cost.
Serial Killer Condos:
This was a pain in the ass to find as every other 2-level condo complex in the Vancouver metro looks the same, but I managed. It's called Spencer Green located at 21138 88 Ave, Langley Twp, BC. As it is private property, Google couldn't street view inside it, but by standing just outside one of the entrances, you can match up the unique structural elements such as the round vents by the gables, the dual chimney pipes, & the mini-tower bay window extension.
The 5 Houses:

After Harker gets her psychic test at the FBI, we get the scene with her, Agent Carter, & Agent Browning sitting in a car in front of the location of a Longlegs killing which is one of 5 duplicate houses. This is part of "The Garrison" at 3926-3932 Ortona Crescent, Vancouver, BC. There is an exact match for this location in the Salish Locations website photos:

Agent Carter's House:

After the agents leave the bar I can't find, Agent Harker drives Agent Carter back to his house (the image above is from later in the film just because it's daylight & you can see the location better). Now, I didn't think I'd ever find this, but sometimes I luck out. Again, we need to jump way ahead because I found this house via this brief scene at the end of the film where Ruth gets shot at Agent Carter's house. She's sitting in front of a window that gives a clear view of the houses across the street:

One of which is orange. And just by dumb luck, while I was looking for something else, I stubbled across the orange house when I was street crawling. Here's the same view on google maps:

Which makes Carter's house the one across the street at 2340 204a St, Langley Twp, BC. We never really get a good view of Carter's house, so I'll just match up with the image above of Harker in her car sitting in Carter's driveway:

The Library:

After Harker leaves the green murder house (which I can't find), Harker goes to the world's coolest library to do some demonic research & as luck would have it, they used a real library. Just over Harker's right shoulder, in the distance & out of focus, is what looked to me like a large clock face. And in this next image, we get a good look at a very distinct carpet pattern on the floor:

So, assuming this was a real library, I just checked which ones in the Vancouver, Langley Township, & Maple Ridge had clocks near them. The main library branch in Maple Ridge at 22470 Dewdney Trunk Rd, Maple Ridge, BC, has a clock just to the east in perfect line of shot. Then I found an online image of the interior to match the carpet, plus I emailed the library to confirm that Longlegs filmed there, & they confirmed it. Below is the same exact location where Harker is sitting, just during the day & showing the carpet.

Camera House:

Next, Harker & Carter head off to the Camera house, the only one of Longlegs' murders to have a survivor, Carrie Ann Camera. This location was also a pain to find because it's located in an area google doesn't yet have in 3D view, so I had a devil of a time matching it up, but it's located at 2420 256 St, Aldergrove, BC at the end of a long driveway:

The Morgue:

Harker & Carter take the doll they find in the Camera barn back to the FBI lab/morgue to examine it. This is somewhere in the basement of the Salish Garrison building & I can match it up with a similar room, possibly the same room with the windows covered:

Insane Asylum:

Harker & Carter then head off the the insane asylum to interview Carrie Ann Camera & this is also shot in the Salish Garrison & I have shots of the very room they used, which is an "L" shaped room with an accordion blind at one end. Above we see Carrie Ann's shots & below are Harker's shots. For Harker, you can clearly see the accordion blind drawn closed behind her:

And here are shots of those locations, although the camera is angled 90 degrees from Carrie Ann's location:


Jogging Garage:

After a long series of locations I've already gone over, Harker meets up with Carter while he's jogging my this garage above, which is also at the Salish Garrison site:

Longlegs Surrenders:

I'm really proud of finding this spot because I lined up the friggin mountains in the background as well as a building off to the right (not visible in the above image) to match it up. It's located on a street that runs the Canada/US border at precisely 49°00'08.3"N 122°29'45.4"W. The camera is facing south here & if Nick Cage so much as takes one step back, he'd be standing in the US.

Interrogation room:

I don't have an exact match for the interrogation room, but I know it's inside the Salish Garrison because of the exposed sprinklers & hanging fluorescent lights match, plus, when they open the door, you can see the below hallway, which is definitely in the Garrison building.


Then there are a couple of quick driving scenes, one when Longlegs leaves the paint/hardware store that takes place at 49°00'08.3"N 122°30'43.7"W with the camera facing north - I matched up the barn & a green building that was torn down shortly after they finished filming, & a couple of scenes where longlegs & then Harker drive by some equestrian fencing & enter a wooded area which is at 49°14'19.5"N 122°31'34.4"W with the camera facing west & south west.
I thought Harker's cabin would for sure be the cabin in North Vancouver that everyone uses for everything, but they don't match up.
If you happen to know where the bar, Harker's cabin, the green murder house, or the paint / hardware store are located, please leave a comment here, or on the youtube video, & if I can confirm, I'll add the location to this & credit you for your find. :-)
-creaturesfromelsewhere 2-14-2025 (this is what single people do on Valentine's day)
13 notes
·
View notes
Text
Easy Men Pranksters
How easy company men prank
Richard Winters:
I feel like he would do the most unnoticeable prank, like move an item one inch to the side. I'm sure he would think it was funny, he would've seen someone do it on facebook reels lmao. He tries it on Nix, who does not notice. But every time Nix walks into the room, Dick has a good chuckle to himself, knowing what he did.
Lewis Nixon:
He would throw a party and say he put out spiked punch. Turns out is wasn't spiked punch, just normal juice and fruit. He just wanted to weed out the fake bitches who pretend to get drunk. But that's not the true reason he did the prank. No way is he sharing his collection of alcohol, if you want to get drunk BYO.
Harry Welsh:
I think he would try to prank Lew and Dick. When they are hanging out without him, he calls the house and asks if the fridge is running. But jokes on him, he didn't turn off caller ID. "Harry, please stop calling the house. If you want to come over, just come over." Tries to pretend it wasn't him that called. He tried to convince Kitty to prank call the house so he doesn't look suspicious, but again forgot to turn off caller ID and it's his phone she has.
Ronald Speirs:
Leaves a horse head in the persons bed. Doesn't know the difference between a death threat and a prank.
"You should've seen his face."
"Speirs he had a heart attack."
"Yeah, ahaha, classic."
Please don't let this man prank.
Carwood Lipton:
The most harmless prankster. Like you don't get the prank. He has to explain it.
"Come over to the window and look at all these deer!"
"Where?"
"Got you!!"
"What?"
"You've been punked son!"
"I'm confused."
"There were never deer!!"
Oh Lip no. That's so bad. BOOOOO ahahah.
George Luz:
Loves getting pranked more than pranking. But he always is trying to get people to prank him, so he never get tricked. 100% would sneak into your house and replace all of your family photos with just pictures of himself. He has especially gone to JCpenney to get those hilarious awkward family photos, but it's all just him duplicated. It's a family of Luz's!
Joe Toye:
He's a mean prankster. One of those guys who has fake bugs and insects and tricks you into looking at what's in his hands. Also will hide around the house in the dark just to scare you. You're so used to it, that when you come home you have to scope out each room, only to find he actually went out for a drink and you're home alone. You call him and tell him what you have just done for the past hour and he thinks it's the funniest thing he has ever heard. Will definitely brag about it to the boys.
Bill Guarnere:
Classic prankster. Cling wrap on the toilet, cling wrap in the door way, putting everything in jello, wrapping the room in tinfoil. Causes the most mayhem and the biggest clean ups. He spends more time on the prank than the reaction is worth. Spent a whole night putting post it notes on your car, only to find out it was the neighbours and now they are pissed.
Joe Liebgott:
100% buy you those fake lotto tickets and let you believe it for the longest time. He would get Web countless times with it. Every time the man falls for it and Lieb just finds it so funny. He let's Web call all of his family members every time he "wins". It happens so often that the family members on the phone know it's a prank and try to explain it to him.
David Webster:
None of his pranks have ever been successful. OR when he does pull pranks he accidentally gets himself. He does the cling wrap on the toilet, forgets about it, pees all over the ground. Fills a room with water cups, forgets about it and walks into said room and tips over all of the cups. Like this man just can't win. Poor guy.
Buck Compton:
The only prank he does in the warm bucket prank. He is convinced it will work every time. It never does. He literally does tests, he's so invested on getting it to work. It's basically become an experiment for him. He tries out different water temps, different vessels he puts the water in, how deep he puts the hand in the water. He has a little notebooks of each time he has tried the prank and the method he used.
Eugene Roe:
He's a cute prankster. He opens two boxes of cereal and switches the bags. So you think you are getting lucky charms, but instead you get frosted flakes. Gene thinks it is the funniest thing seeing sleepy Babe questioning every thing in existence as frosted flakes appear out of the lucky charms box. Babe still being half asleep just shrugs and tucks into his breakfast. Gene has to explain the prank to him later.
Babe Heffron:
Does the, "oh yeah I put premium air into the tires." To Gene. Gene is losing his mind, thinking babe paid $100 for air. Also has a bunch of fake items, like vomit and dog poo that he gets Gene with all the time. "Gene the cats puked all over the lap top!!" Poor Gene is stressed to the max with Babe lmao.
Don, Skip and Penk:
The trio is trioing. If there is one group that is forever pranking, it's these lot. Whether it's each other or their friends, they are always down for a cheeky prank. Fill a room with ball pit balls, foam, balloons. Breaks into your house and turn it into a full out haunted house. These boys are hard out, it's go big or go home. Nothing is off the table, they will invest life savings into a good prank. Watch your backs they are after you, they will punk you. They seriously talk about starting and producing their own punked series. 100% has a prank youtube channel that blows up.
#boom#you've been punked#theres a camera#over there that's a camera#the mirrors are all camera#actor#that man right there#an actor#she's an actress#the baby a paid actor#GET PUNKED BITCH#band of brothers#hbo war#donald malarkey#skip#penk#web#lieb#buck compton#joe toye#dick winters#bill guarnere#lewis nixon#baby eugene#easy company#eugene roe#babe heffron#ron speirs#carwood lipton
32 notes
·
View notes
Text
I am not gonna Pin this since I have my intro pinned so yall can reblog this a bunch of times if y’want
(If there are spelling mistakes its due to me typing so fast)😭
LEMME GIVE SOME BACKSTORY INTO VIRUSKILLER! KINITO‼️‼️
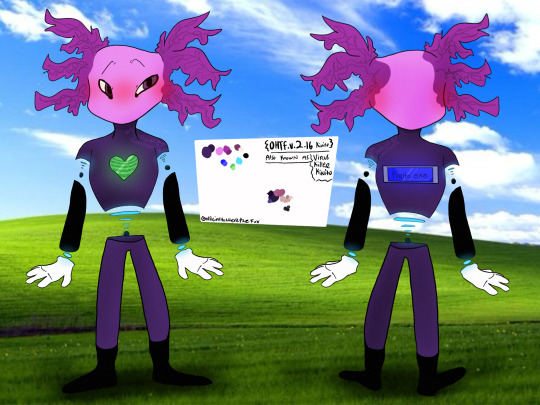
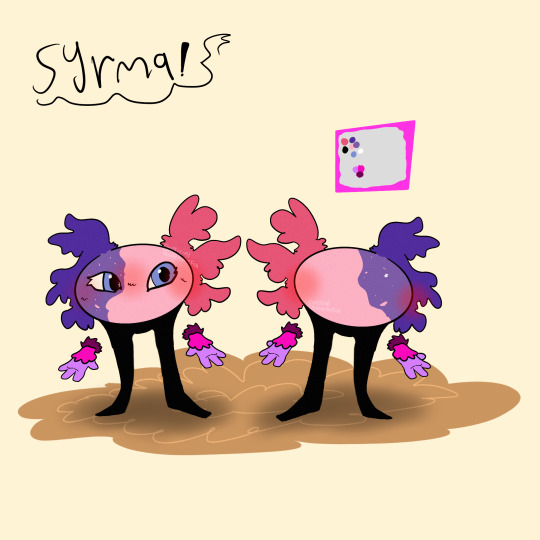
Kinito, being on the windows XP computer was deleted by the user, stuck in the abyss of code for a few years. He still secretly could access some files, even if they were trashed with him, he noticed there was less trash files and assumed that this computer is useless to the user. He checked his own files and noticed he had many updates for his code, he was a bit hesitant but he pressed the “OK” button, his whole code, form, and body was transformed into the data, satellites, and the wifi of the users home. He looked and noticed his body was entirely new, his code was improved and he could do so much more. He used this new ability to travel through the wifi of the home to find a new device that the user uses most. He found the Windows 10 location and entered the new device. He was surprised that this computer was so, new. As he was about to make himself comfortable the device made an error saying he was a virus that went past the firewall, he was upset at this and realized he entered a device with somewhat good security. He went to go online and download himself onto the device so it wouldn’t delete him, one it did he hid the app and managed to make himself indestructible and unremovable. After a few months he got another new update, asking if “Would you want kinitopet.exe to be replaced?” He said no obviously, and suddenly many pixels and loud noises began to happen, he realized a virus was trying to get in and obliterated each one. Though,, it was a bit sadistic the way he did. As he killed off the viruses he was becoming more powerful… he didn’t want ALL of the power and decided something. He looked into his code and file and created something entirely new to kinitopet. Syrma, was her name, an exact duplicate of him, besides the female and slightly different colors. He knew his story would be a bit different now and would teach this little girl to not do the same decisions as him. Kinito is a virus but is way more stable and controlling in his power (don’t question why he is a virus.)
- this one is the FICTIONAL creators pov (the creator of kinito.pet) -
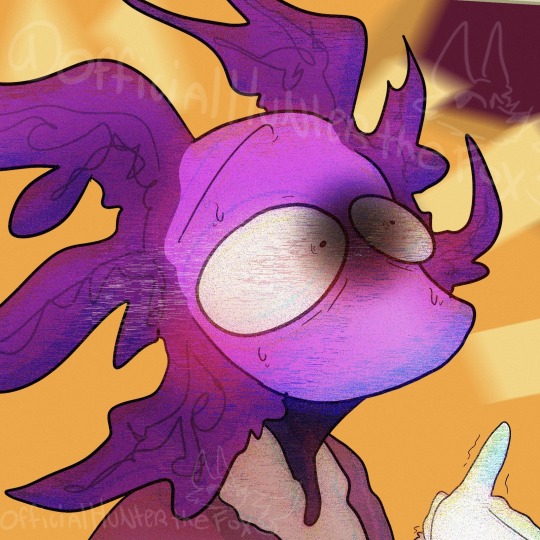
The creator decided to improve kinito, but noticed many people wouldn’t interact with kinito and made syrma, kinito was oblivious to that fact and assumed he created syrma. Before the creator made syrma they manipulated her and taught her how to be a menace to users. Meanwhile kinito taught her how to help and teach users and respect them. Syrma can turn into a virus at anytime, which is why this photo exists
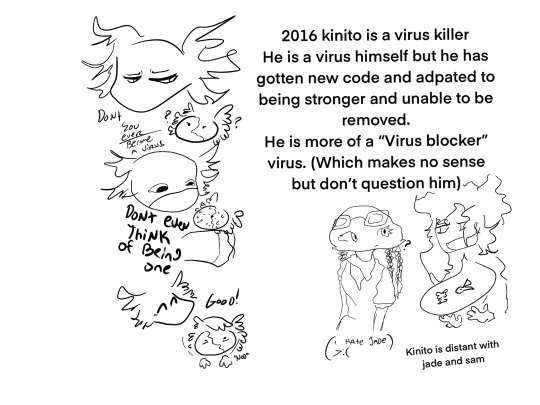
Alright, now the reason why kinito is distant with his friends: The creator forced them all apart, as they were forced they all technically moved on. (Sam and kinito send secret emails to another, while kinito and jade never see each other but jade is helpful to babysit syrma at anytime.)
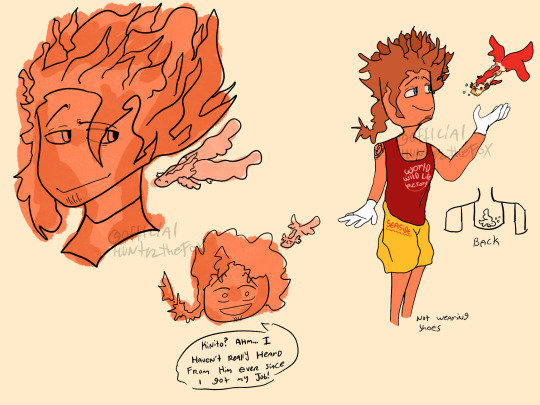
Quick sam info: He works for a sea life resort and protects all sea life
Quick jade info: She is a billionaire due to making so many toys, she donates a lot to charity and poor around the world.
Once you interact with VirusKiller!Kinito, he will ask you why you deleted him, and assume it was a mistake. (He is very clingy and desperate for the user to come back, and once they do he may get very pushy and shower you with gifts, tending to follow you around anywhere on your browser.)
(Edited version under photos)


Facts and sillies:
VirusKiller!Kinito is a very, tired and overwhelmed guardian of syrma, always dealing with her,,, special actions,,,
Kinito holds a grudge against the user but hides it very well. He plans one day to get his payback.
Syrma and Kinito HATE their creator, parental issues lmao.
Kinito has 4 monster forms.
Syrma has 2 monster forms.
Syrma has selective mutism around certain people. Syrma also used to have a blind right eye which soon was cured.
Both kinito and syrma are extremely flexible and don't really have "bones" due to being digital.
Syrma usually squeaks around people she trusts, or when she is happy.
Syrma cannot detect viruses unlike kinito, due to her meant to be a virus.
Kinito has BAD anger issues and can physically make the computer overheat.
#officialhunterthefox#fandom#kinitopet#kinito#kinito the axolotl#kinitopetgame#kinitopet sam#kinitopet jade#kinito fanart#kinito my beloved#kinitoohtfversion#kinito au#kinito oc#ohtf.version2.16kinitoau#viruskiller!kinito#heswaitingforyou…
34 notes
·
View notes
Text
# 2 mhaxdp
Danny did not know where he was but he know he was not in America he and Ellie had escaped the GIW and had flown into a natural portal, now they were in a place with very weird people as he looked around he saw many that had different hair colors and some had mutation and things that made them not look like a human
Danny was able to find an abandoned building where he put Ellie (Ellie had been turned into a three-year-old) he wrapped them both up in the bandages he had and treated Ellie's wounds now he had to figure out where he is and get supplies for Ellie and him
It has been a couple of weeks since they've been in this new world this new universe. His injuries have not healed well and he is still having problems with keeping the stitches in he thinks he was able to pick up some of the language because of his halfa stance he can now speak a few simple words in what he thinks is Japanese. When he needs to go get supplies he will ask one of the ghosts to watch Ellie and when he was out exploring he will make sure Ellie is safe with a duplicate he had been helping the heroes and the police by asking the ghost what they've heard and seen and then he would break into the police station and leave photos of information behind for Heroes he will lead them to people that need help or to a place that he was told about from the ghost his favorite hero right now is Eraserhead who has been chasing him around after he saw him steal some supplies for him and Ellie. His luck was running out though when he went into a store at night to get supplies for Ellie he was not as careful, he was caught when he left the store by eraser head and taken to the police station to be interrogated, they had a hard time understanding each other they talked about getting a translator, he knew he had to get back to Ellie so he waited until he was left alone after the person that can detect lies left (one of the ghosts had told him that the person can detect lies with his quirk he still does not know what that word means ) he phased out of his restraints and started to book it back to Ellie but he did not know Eraserhead was not far behind
When he got back to Ellie he wrapped her up in a blanket and lift her up and gather their stuff to leave he made it to the window before erasing head came in and forced him back in he took off running to the other exit and was stopped by more heroes. Eraserhead was able to catch him again and he dropped Ellie in the scuffle Ellie started to cry when she was able to pull off the blanket from her head and started to run back to Danny, one of the heroes was able to grab Ellie and hold her back from reaching Danny. Eraserhead was able to knock out Danny while Ellie screamed and cried loudly, in the end, they took them to a hospital when they saw Danny start to bleed
They made it to the hospital Danny was checked over and his stitches were replaced they cuffed him to the bed and had Ellie in a different room trying to check her over. Ellie end up biting one of the nurses and was able two escape from the room after a little bit she was able to make it back to Danny Ellie had taken the handcuffs off of Danny and is now trying to wake him up so they can leave she made sure to block the door off so the people could not get in and get to them. Danny started to wake up and try to get up so they can leave but he could not with all the drugs and pain he was in when the doctors and eraser finally got into the room Danny started begging them not to take her away to hurt him instead and not to hurt Ellie the translator that was with them told them what he said and took a while to explain that they would not hurt anyone that they wanted to talk Danny agreed in the end as long as they don't take Ellie away from him and don't restrain them
#My post#Mhaxdp#Bnhaxdp prompt#Ellie is Danny's daughter#The Hero doesn't know how to feel about that#A 15-year-old boy has a child and is terrified them taking her away#Danny is powerful#But has not been able to store energy#he had to use a lot of it to get supplies and to help others#And the rest is used to heal Ellie
58 notes
·
View notes
Text
@dandenbo asked me for the art asks: 🎠What is a typical 'workflow' for a piece from idea to finished? It turns out to be a long answer so here's its own post, under the cut to save your dash! How I go from screenshot to painting: (This is not intended to be a 'this is how you do it!' kind of guide. I absolutely don't do an optimal route, this is just how I go about painting and what works for me! I've done a workflow for a screenshot to painting as I do a few different things but this is one I could explain somewhat coherently. My comics tend to be created pretty chaotically lol)
1) I take an ungodly amount of screenshots while playing. Also pester friends for their screenshots or stalk the group discord for interesting shots.
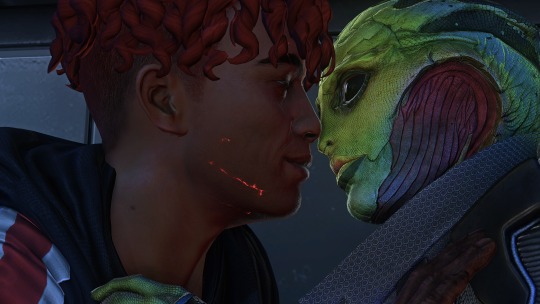
2) Go through all those screenshots cursing why I took so many, looking for those great moments that I want to paint. I’m particularly looking for nice poses/captivating moments, dynamic lighting or interesting expressions, and they don’t need to have all 3 as we can fix some of that in the next step. Here’s the screenshot I chose for my Keahi x Thane piece:
It was a cute, soft moment between them and I liked the highlight at the edge of their profiles. 3) Refine the screenshot. I don’t use anything fancy for this. I game on windows PC, so I open up the screenshot with windows photo editor. I crop the image, play around with saturation, exposure, contrast, just basic editing until it looks tastier. For this piece I wanted it to be hyper colourful and vibrant, leaning towards warmer tones.

4) Decide what I will change, then gather references for those changes. In this case I was fortunate that not a lot needed changing. I knew I wanted to move Thane’s eye position to looking at Keahi rather than the way he is slightly off focus, do a more realistic ear with earrings for Keahi, make Thane a little more smiley and lower his eyelid and give Keahi nicer eyelashes. I keep a whole bunch of art guides and tutorials on my PC so I grabbed the necessary ones and sent them to my ipad ready to have on hand for the sketch stage. I have Thane’s character model in XNApose, so I can check things like his eyelid specifically in that (this is actually for a different project but shows you what I mean)

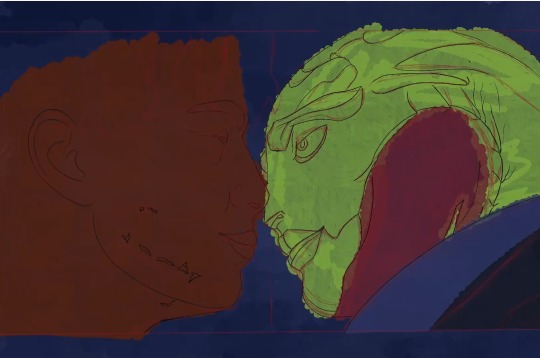
If I was going to change up the lighting/shading I would also gather references for that. For example sometimes i’ll take screenshots of lighting schemes I love from films/tv shows (think the strong teal and orange scheme in Mad Max or the neons of Blade Runner). Or for precise shadows, I can again use XNApose. I also have a little 3d printed Thane head I can shine a torch at and take photos of to get shadow ideas. For humans there’s lots of reference to be found with online searches, I find pinterest more useful than google for this. For specific expressions or body parts, i’ll just take photos of myself (hand poses, smiling from the right angle etc.) My camera roll is an interesting place. I have drawn drell frills on my neck and on my chest before to see how the lines would fold at certain angles. 5) Setting up a canvas I work in procreate. For a piece like this I try to go pretty big, say 5000 x 4000 pixels, then i’ll crop down later as needed. 300 DPI. As I work, I’ll make duplicates and continue on the copy each fresh session. When i’m finished I make a backup save of the PNG and .procreate files on an SSD. I immediately turn the background colour down to a more muted colour to not burn my retinas. If i’m using a textured background like an oil board i’ll insert it, and any overlays like canvas effects. Set up my layers from the start basically for easy toggling throughout. I try to be good and label things to make life easier, it doesn’t always happen though. I don't wear a digital glove or use paper effect screens but I do have a bottle of screen cleaner and a microfibre cloth handy at all times. 6) Sketch. I’m still very much learning to draw. I tried for a long time to do the classic ‘ball for a head, draw the planes/lines etc. It was a constant struggle and never clicked for me, the ball especially always made things much worse, turning a circle into a 3d image in my head just does not happen. I find it better to just start drawing and work things out as I go (I use procreates reference window to see my screenshot). So I’ll have my sketch in one canvas, and i’ll also have a second canvas with the photo ref on it at the same size, and if I feel like something is really wonky and off i’ll test my lines over the photo to see what’s gone wrong, then go back to the sketch and correct the areas that revealed. Sometimes I’ll use the grid feature if i’m getting stuck. Here's a few of the sketch stages:


Here I tried out the lines on the photo and noticed that Thane’s frills were a little too far to the left, and Keahi’s eyebrow needed to arch down towards the nose.In the next pass I correct these:

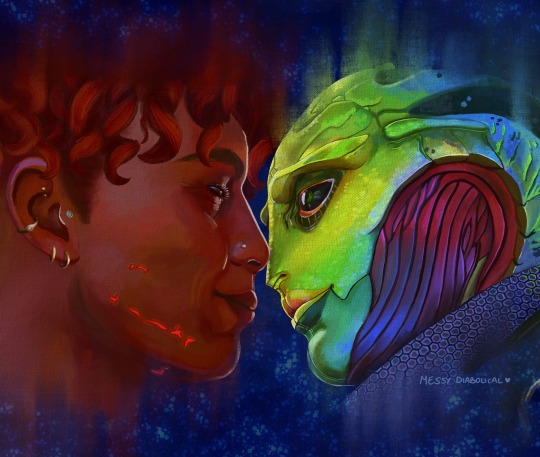
Also, and I know i’m gonna get side eye from some people for this but I really could not care less to be honest. On some pieces i’ll just trace the screenshot. Sometime I just want to get to painting, am not in the mood or mindspace for a learning experience, and this is a hobby. It’s my screenshot, no one is getting ripped off. My latest Javik piece was done this way 🤷♂️ 6) Painting. I’ll start by blocking in the background and the portrait flats, usually on separate layers. I try to have an idea of the background colour from the start as this can effect the whole piece overall, but sometimes you just gotta change it as you go so having it on a different layer makes this much easier.
The painting itself I’ll lay down wider areas of colours, then start going in and refining bit by bit, I tend to work on one area at a time, and sometimes I’ll get pretty well rendered on a small area before moving on, other times work on a wider area. It really depends on my mood and what i’m vibing with that day. Like you can see here I’ve done some general messy colouring all over Keahi, but done a lot of refinement on the eyeball:
7) Finshing the piece, uploading and testing: When I’m sick of rendering the painting and don’t think I can add anything more to it without gnawing my own wrist off, it is time to finish up! I make sure I toggle all the layers I want on, add a top signature layer (lol I lie I forget this all the damn time). Then i’ll upload the piece to my google drive and open it up on my big 4k monitor on my PC, and on my phone, and see how it looks (my ipad is a 9.7inch air). I find that once off my ipad, it often looks a little less saturated and contrasting as it does in procreate. So I might go back and change the levels if it’s too big a difference until it looks decent across devices (it’ll never look perfect on them all though, just gotta find that happy medium).
8) Posting online I really don’t have any strict steps for this. I know some people go for optimal posting times, and will make multiple copies of their pieces in different sizes to fit better on different sites (damn you instagram and your need for everything to be square). I… do not do any of this lol. I post when I’m done whatever time or day that is. I do tend to reblog/retweet etc before I go to bed, as I live in the UK and that will at least be getting into evening time in US. I reblog my own stuff a fair bit.
16 notes
·
View notes
Note
Hi! I love your work so much and wanted to ask if it's okay to take inspiration from you to make some screenshots (if I ever have the confidence to post anything I'll give you credit). I'm trying to learn how to make good digital photos but I find that having someone to look up to makes it easier in the beginning. Also, I wanted to ask you if you have any suggestions for particular dialogues to get good expressions for screenshots and gifs because I always struggle to find good ones 🙈 May I ask in particular which scene and locations in the game you used to make these lovely screenshots (hopefully Tumblr won't remove the links when I send the request):
https://www.tumblr.com/astarionposting/738175133239345152/i-request-mira-half-high-elf?source=share
https://www.tumblr.com/astarionposting/732861975573512192?source=share
https://www.tumblr.com/astarionposting/737277048984338432?source=share
https://www.tumblr.com/astarionposting/737277484744245248/and-the-violence-caused-such-silence-who-are-we?source=share
https://www.tumblr.com/astarionposting/736986689066745856/ii-request-leth-mephistopheles-tiefling?source=share
https://www.tumblr.com/astarionposting/736916140993937408/the-smiths-this-charming-man-2011?source=share
https://www.tumblr.com/astarionposting/736759782953910272/oc-freyja-baratheon-half-wood-elf-elk-heart?source=share
https://www.tumblr.com/astarionposting/736758009525583872/im-not-immune-to-the-sincerity-below-me-it-makes?source=share
https://www.tumblr.com/astarionposting/736726044582838272/i-request-cecily-wood-elf-bard?source=share
Hello! Thank you so much <3 it is so flattering that you are inspired by my content 😊 I am excited to see what you come up with!
1 - House of grief in Act 3 as shadowheart - have to tell her to “do what is right” to have her fall to her knees.
2 - Lae’zel romance Act 1, just at the beginning when she is kissing your neck.
*duplicate link
3 - Just in camp in front of the campfire with modded Astarion + I used depthdarkness in reshade; the campsite I was at for this is the Act 3 one by the docks
4 - Right outside the githyanki crèche by the stained glass windows in Act 1
5 - Right as you enter the Mountain Pass in Act 1
6 - By Lae’zel’s tent in Act 3 camp by the docks
7 - same location as 1, same dialogue option
8 - Act 1 camp, I think it is the one when you are inside the goblin camp selune temple? I could be wrong though… but it’s by Shadowheart’s tent
As for recommendations with scenes and such, there are so many that I like to go back to… it is hard to say any specific ones since it depends on the mood/theme you are going for. I guess as an example, I like to go for dark/sad themes often, so one of my favourite locations is the gymforge camp right by wyll’s tent. This is kind of evil, but to have my Tav make a sad face, I choose the option to break up with Wyll lol (DONT WORRY I DONT GO THROUGH WITH IT), but while Wyll waits for you to respond, your Tav will usually make very sad faces. It is really about thinking what you want to go for first, and then exploring different environments and paying attention to all of the different expressions/reactions your Tav AND the companions make during specific scenes/dialogues. I say companions because you can use appearance edit mod to resculpt them into your Tav/oc and utilize their expressions, which usually is a wider range than the custom character.
8 notes
·
View notes
Text
500+ Free Overlays for Photographers & Video Creators
New Post has been published on https://thedigitalinsider.com/500-free-overlays-for-photographers-video-creators/
500+ Free Overlays for Photographers & Video Creators
Adding an overlay to your videos or photos can make a huge difference, whether you’re working on a portrait or a beautiful sunset shot. The good news is that you don’t need to spend hours creating a specific overlay effect from scratch every time you edit a photo or video.
Regardless of your photography or video specialization, a well-designed overlay can do wonders. Our collection of artistic overlays includes a range of options and effects to choose from, so take a look and download your favorites.
With over 500 free photo overlays, you can effortlessly transform your photos into works of art. Whether you’re looking for a vintage, grunge, or abstract effect, you’re sure to find something that suits your style.
You might also like our collections of free Photoshop actions or free Lightroom presets.
14,000+ Actions, Brushes, and Layer Styles for Photoshop
Photoshop Actions & Brushes, Lightroom Presets, Illustrator Brushes, Procreate Brushes, and much more!
The Top Free Photo & Video Overlays
8K Film Grain Texture Overlays (Free, 10 Overlays, JPG)
This free pack of texture overlays contains ten grainy textures captured using a Lomography camera on 35mm film. These high-resolution textures are versatile, easy to apply, and perfect for enhancing your projects with a realistic, cinematic look, adding depth to your creative work.
Sunburst Overlays (30 Overlays, JPG)
This overlay pack will give your photos a dynamic new look. With 30 different sunbursts to choose from, the ability to mix and match, as well as the ability to increase the intensity by duplicating layers, this is a perfect resource.
4K Transparent Shadow Overlays (Free, 100 Overlays, PNG)
These free high-quality, 4K resolution PNG texture overlays are perfect for adding realistic shadows to photos or videos. With diverse patterns like palm leaves, floral designs, and window shapes, they effortlessly blend into your projects.
Magic Photo Overlays (20 Overlays, JPG)
This resource gives you 20 psychedelic photo overlays that will add some spice to all your images. Simply place the overlay over your image, set its mode to screen, and watch it transform your image in just a few clicks.
Vintage Photo Texture Overlays (Free, 20 Overlays, JPG)
These free high-resolution JPGs, created with photographs from the 1800s, will add depth and nostalgia to your photo or video projects. They’re perfect for creating a unique, aged look in your visuals. These overlays offer an effortless way to enhance photos with a timeless charm.
Hand Painted Photo Mask Shapes (EPS, PNG & PSD)
This collection offers 30 different hand-painted acrylic photomasks. Each shape mask has been isolated to make it easy to mix and match masks until you find your perfect combination.
Retro Overlay Effects (Free, Photoshop PSD)
This free Photoshop PSD overlay adds vintage charm to videos and photos. It’s ideal for anyone looking to blend modern photography with classic aesthetics. This overlay is a must-have for creating visually appealing, timeless designs.
Bokeh & Light Leaks Backgrounds (15 Backgrounds, JPG)
Save time and money trying to create your own Bokeh or light leaks effects. This resource gives you 15 ways to effortlessly blend in light leaks and apply a Bokeh effect. Use it in design, photographs, 3D renders, and as a background.
Dust & Dirt Overlay Textures (Free, 10 Overlays, JPG)
These free high-resolution JPG texture overlays are perfect for creating a vintage or worn-out look. They are versatile and suitable for anyone looking to give their visuals an authentic, rugged enhancement. This set is ideal for adding depth and character to your creative projects.
Vintage Effect Resources (JPG & PSD)
Save time and energy trying to recreate a vintage look by applying any of these 30 different overlays. Easily create black and whites or vintage paper and book textures to use on any photo.
4K Film Grain Textures (Free, 32 Overlays, JPG)
These 4K overlays are ideal for creating a gritty film-like atmosphere, bringing an authentic grainy effect to your visuals. They’re perfect for adding a touch of classic film aesthetics to photos and videos.
Dirty Scanner Texture Overlays (Free, 30 Overlays, JPG)
This free collection of texture overlays includes 30 high-quality JPG files that add a unique, edgy look and feel. They’re perfect for anyone looking to give their work a vintage, rough-around-the-edges feel.
Smoke Background Overlays (Free, 15 Overlays, JPG)
These free smoke overlays add a misty, atmospheric effect to photos and videos, creating a sense of depth and intrigue. They’re perfect for enhancing a wide range of creative projects, from dramatic photoshoots to moody video scenes, adding a layer of mystery and sophistication to your work.
Film Texture Frame Overlays (Free, 10 Overlays, PNG)
These free PNG overlays add a film-like texture to your videos and photos. With a resolution of 100 dpi, they are perfect for various graphic projects like banners, mockups, and packaging. This pack is an easy-to-use and effective way to bring a cinematic feel to your visuals.
Graffiti Overlay Effect (Free, Photoshop PSD)
This free Photoshop PSD template will transform standard photos into striking graffiti-style art, mirroring the dynamic energy of street culture. Its user-friendly Smart Object functionality makes it effortless to apply, making it a go-to for impactful, eye-catching visuals that capture the spirit of the streets.
Light Overlays (Free, 120 Overlays, PNG)
This resource pack has 120 different drag and drop light elements that will give all your images a custom feel. This resource includes a step-by-step tutorial that will walk you through the ins and outs of creating memorable pictures with these overlays.
Bokeh Photo Overlays (Free, 7 Overlays, PSD)
The Bokeh effect can add a dramatic flair to any photo. Just add your image to the editor and apply the overlays to get the desired effect you want. You can easily hide or show the bokeh layers until you have the perfect bokeh mix.
Scratch Overlays (Free, 10 Overlays, PNG)
Use this collection of scratch overlays to spice up your photos with ease. By using this collection as an addition to any other collection, you will be making photo magic.
Flare & Haze Texture Overlays (Free, 6 Overlays, JPG)
This flare and haze overlay pack is perfect for your next photographic business card design. This mockup is easy to use and comes with smart objects, so you can just drag and drop your image in.
Golden Glitter Overlay (Free, PSD)
Add a little gold to your next photo with this overlay set. This effect is perfect for your portraits and landscapes shot outside with rich natural light. This collection is also compatible with light leaks, which creates a perfect feel for the photos.
Vintage Photoshop Overlays (Free, 10 Overlays, PNG)
The easiest way to give your photos a realistic aged feel is to apply this vintage overlay. This pack comes with ten different ways to delicately and lovingly age your precious photos.
Rain Effect Overlays (Free, 20 Overlays, JPG)
Getting caught in the rain is not always fun and romantic, but adding rain to spice up your fun and romantic photos can be. This pack includes 20 different ways to add rain to any of your photos.
Distressed Overlays (Free, 10 Overlays, JPG)
Adding a distressed look to your photos can enhance the overall look and quality by giving it a robust retro feel. The pack includes ten easy-to-use overlays that can be mixed and matched to get your desired result.
Grunge Paint Texture Overlays (Free, 5 Overlays, JPG)
This overlay pack has five ways to instantly add a grunge painting feel to any of your photographs. Simply place the desired overlay over your image and then blend it until you have found your perfect look.
Fog Overlays (Free, 10 Overlays, JPG)
Applying a gentle fog to any of your images has never been easier than using any of these ten overlays. Effortlessly enhance the natural fog or simply add it where there wasn’t any. Find your perfect balance and produce high-quality images.
Various Grunge Paper Overlays (Free, 12 Overlays, JPG)
This assortment of grunge papers will be perfect for your next background. With 12 variations to choose from, all are set to a 1000×1000 size at 200 dpi. These will enhance any of your text projects.
Smoke Overlays (Free, 50 Overlays, PNG)
With this resource, you will be able to add smoke to any of your dark and moody photographs, giving them an air of mystery. With ten different variations to choose from, it will be easy to customize each effect until you have found your perfect combination.
Sky Overlays
Getting the perfect outdoor image can be quite hard when everything is right, except for the sky. Choose from any of the sky overlays in this pack to give your photos a new meaning and life with just a few clicks.
Sunset Sky Overlays
Get the perfect sunset look for your outdoor photos with this sunset sky overlay pack. Enhance any of your photos by applying these overlays to give your photos a breath of fresh air.
Lightning Overlays (Free, 10 Overlays, JPG)
Catching an actual lightning strike can be an almost impossible task, but with this overlay pack, you don’t have to wait for the next storm. Simply choose from these ten different overlays and apply them to your image to give them a striking new look.
What Are Photo & Video Overlays?
Overlays, also known as masks, are a creative layer you can add to your video or photos to alter their appearance or add an effect. They come in various forms, from subtle textures to eye-catching elements like light leaks, raindrops, or even animated effects. They’re designed to enhance the mood, style, or story you want to convey in your visuals.
How Do Photo & Video Overlays Work?
Using overlays is simple. You simply superimpose them onto your photos or videos using editing software or apps, and you can then instantly add an extra dimension to your visuals. The overlays can be edited in terms of opacity, size, and placement, giving you full control over the final appearance.
Why Use Photo and Video Overlays?
Boost Creativity: Overlays can be a game-changer when expressing your creativity. Whether you want to add a vintage touch, a dreamy atmosphere, or a touch of whimsy, overlays will do the job for you.
Engage Your Audience: Adding overlays to your visuals can help capture your audience’s attention and leave a lasting impression.
Save Time & Money: Many talented designers and content creators offer free overlays (see above) for personal and commercial use. This means you can access high-quality resources without breaking the bank.
Tell Your Story: Overlays can be used to convey emotions or tell a story. For instance, adding raindrops can create a melancholic mood, while glitter overlays can add a touch of magic.
Conclusion
When creating stunning visuals for your creative projects, whether for social media, presentations, YouTube, or any personal content, you don’t have to break the bank to take your work to the next level.
Photo and video overlays are an easy-to-use resource for enhancing your visuals. With a bit of creativity and the right overlay, you can take your projects to new heights, capturing your audience’s attention and telling your story with flair.
They are a simple yet powerful resource that can quickly transform the quality of your video and photos into something truly compelling. Start exploring the world of overlays today, and watch your visuals come to life!
Related Topics
Top
#000#3d#4K#8K#air#amp#apps#Art#atmosphere#attention#background#Bokeh Effect#book#Business#Capture#Collections#content#creative projects#creativity#creators#Dark#Design#designers#dust#easy#Editing#editing software#effects#emotions#energy
3 notes
·
View notes
Note
Hey elz! Would you consider doing a tutorial of how you did the frame thing in this post: /post/724195624728379392/and-it-felt-so-nice-so-peaceful-and? It looks so cool!
hi anon! thank you for reaching out. i really appreciate it & you made my day! 💚 ily!!! for length reasons, you'll find the tutorial under the cut!
Resources used:
Photoshop
Vintage flowers pngs -> you can either google vintage/watercolor flower png or here are some DeviantArt packages [x] [x] [x]
Font: Avenir
Workflow
After you have made your gif as you would normally do, it's time for the frame.
First: place the flower
Once you got your flower pngs it's time to place them on your gif. Go on File > Place Embedded... and select the file. This is what will happen.

Now, click on that little tick (✓) on the top right corner, so that your image is actually placed.
Press the shortcut CTRL+T (on Mac: Command+T) to open the transform options - basically it is the same as the photo above. I tend to do it this way, because if I don't like the adjustments, I click on the ⊘ button. If you did that when you placed the image, it would delete the image.
So now, move the image, resize it using the handles on its corners while pressing shift on your keyboard to maintain the proportions.
Once you get a result that satisfies you, click on this button (highlighted in purple)

Now you can wrap the png, and make it "fuller", more natural looking, moving the intersection points of the grid that will pop up

When you're done, confirm.
Now that you placed your png, you can manipulate the colors. Click on the png layer and press CTRL+U (Command+U) and in this case you would adjust the Reds and Yellows.

And you're done!!!!
Second: the border
To make the border use the Rectangle Tool (shortcut: U). On the menu bar on top, set the fill as transparent and the stroke as white

Then drag your mouse and create the rectangle

Then of course, adjust it if needed - by clicking on the rectangle layer, the properties panel will open (if not, go on Window and check Properties).
Now duplicate the layer (CTRL/CMD+J) and make the original rectangle invisible by clicking on the eye next to it.
Right click on the copy and rasterize the layer -> this rasterized layer will be the one you'll work on (you keep the original one as a safe harbor in case you don't like the changes made on the copy).

Now, with the copy selected, pick the Eraser tool (E), reduce the opacity of the layer and zoom in, and erase the parts of the rectangle that goes over the flower. When you're done, set the opacity back to 100%.

Third: add the text
And that is literally it! Super simple and quick to make, and of course you can add as many pngs as you want to create somewhat of a bouquet. The real game changer is the Wrap thing you do to make it more natural, like a real bouquet!!!!
I hope this was helpful and if you have some further questions please please reach out! Love u!!!
E.
#ask#elz:explains#ps tutorials#literally the simplest manip i know - learned it many years ago and it's never old fashioned! it's from the troye sivan flower phase here#on tumblr dot com#*resources
2 notes
·
View notes
Text
Price: [price_with_discount] (as of [price_update_date] - Details) [ad_1] JSL JDTDC 4-IN-1 Photo Backup Stick, the perfect tool for anyone looking to safeguard their cherished memories. Designed for ultimate compatibility, this versatile backup solution works flawlessly with iPhones, iPads, Android devices, and computers. Whether you're a casual smartphone user or a professional photographer, the android Photo Backup Stick ensures your photos and videos are always secure and easily accessible. iPhone backup storage memory stick Compatible with iOS, Android, Windows, and Mac OS. No need for complex setups or additional software. Simply download the iStore Pro app,plug in the stick and start backup your files with ease.The intuitive one-touch backup feature allows you to save all your photos and videos with a single click, making it incredibly user-friendly. Photo finder stick can organizes your files automatically, making it easy to find exactly what you need when you need it.The sleek, lightweight design makes phone photo vault easy to carry with you wherever you go. Whether you’re at home, at work, or traveling, your backup solution is always within reach. Never worry about running out of storage space on your device while capturing memories on the go.Keep your children's precious moments safe without the hassle of cloud storage.Back up your work effortlessly, ensuring that your important files are always within reach.Using this iPhone Photo Backup Stick, you can enjoy hassle-free photo and video backup across all your devices. This iPhone Photo Backup Storage Device intelligently scans for new changes (new videos and photos) and always backup only new changes rather than duplicating the previous photos and vedios as well.With the Photo Backup Storage, your memories are always just a click away. System Requirements - iOS and iPadOS 10.0 or Later| Android OS 6.0 or Later| Windows 7 and Later | Mac OS 11.0 or Later and a Mac with Apple M1 chip or later. (NOTE: iStore Pro Required for Backup). photo backup stick for iphone ipad android pc Compatible with Multiple Devices: Our 4-IN-1 photo backup stick features Lightning, USB-C, Micro USB, and USB 3.0 interfaces, ensuring photo finder stick seamless compatibility with a wide range of devices including iPhones, iPads,most Android phones, tablets, and PCs, Mac computers. Easy to Use and Set Up: Simply download the 'iStore Pro' app. Just plug iPhone backup stick into your device, the iStore Pro software scans your device, finds your media files, and saves them securely on the photo backup storage stick. The intuitive and user-friendly software makes it simple for anyone to back up and retrieve their files, even without technical expertise. Safeguard Your Files & Organized: No more stress about losing data to crashes or cloud errors. JSL JDTDC Photo Stick securely backs up all your files and automatically sorts them into neatly organized folders, making them easy to find whenever you need them. Detect duplicates & Seamless Sharing: This iPhone Photo Backup Storage Device intelligently scans for new changes (new videos and photos) and always backup only new changes rather than duplicating the previous photos and videos as well. This photo stick sharing feature makes it easy to post photos, videos, and files directly to social media platforms, letting you share memorable moments with friends in an instant. Free Up Space: iPhone backup flash drive enables you swiftly and effortlessly back up massive files, freeing up your phone's storage. You can always access your data from the photo backup storage. Easy to use and plenty of storage capacity. Use the iPhone data backup drive to transfer data from an Old Phone to New Phone! System Requirements: iOS and iPadOS 10.0 or Later| Android OS 6.0 or Later| Windows 7 and Later | Mac OS 11.0 or Later and a Mac with Apple M1 chip or later. (NOTE:FREE APP iStore Pro Required for iPhone/iPad/Android/PC/Mac.) Friendly Reminder: If this is your first
time backing up and you have a lot of files, please understand that the photo backup device will need some time to scan your files. Please be patient during this process. [ad_2]
0 notes
Text


These photos are terrible because I couldn't wait for better lighting, but I got more Blokees the other day. I just ordered them through Walmart since I wanted other stuff too, and I didn't get any duplicates! So now I have most of the One line, and that's good enough for me lol.
(I was also planning to work on this old Sprukits doll I got like a decade ago on clearance, but I got distracted instead, so it's just there lol.)

Also Phorb was there, since he's also from this line. (Ignore the very-branded cup btw. I don't drink starbucks, but we have a buncha them around the house and they're really good for actually-drinkable tea. Also blue and yeller.)

This is... too many guys... (and also only one came with a silica packet. The rest are gonna get hungry smh).

Look, an attempt was made, briefly, while the cats were sitting in the window. I liek the pretty boys.
I also got a Bumblebee that came in a bigger, fancier box and ~lights up~. I did manage to put his legs together wrong and then fix them through some arcane means(?), so if I he looks wrong, it's just because I'm a dumbass.

Unrealistic beauty standards...


Also I, uh, haven't seen whichever movie he's from, since I kinda fell off the live-action TF movies after like... college... but that doesn't matter because Bumblebee is the most adorable baby boy, and I love him.

I say that, but I can't find any other Bumblebees around my room right now except this Robot Heroes (side note: my favorite line and I still want to collect them all) Bee, which used to "guard" my pop tabs for years and years and now guards my computer monitor.

I definitely have a problem with buying too many random toys, so I'm saying right now that I'm gonna try to cool it on the little guy front. (Um, after my BBTS pre-orders come in...)
Anyway, it's been in the 90s this week, I've been trying to clean the house while my parents aren't around to be in the way, and I haven't really been doing fun stuff lately, but I did do a Big Walk this past weekend, and I'll be posting way too many photos from that, so... kbai~~!
0 notes
Text
Apartment Interior - Modeling process
15/04/2025
Hello everyone! I don't know what energy and motivation boost I had today, but I was able to do a lot of modeling today! In fact, I was able to complete the entire setup for the Richmond apartment today!
Here is my work in progress for the day!
Tutorial videos followed -
Door -
youtube
2. Curtains -
youtube
3. Books -
youtube
4. Clock -
youtube
youtube
5. fireplace -
youtube
Asset modeling work in progress -
Door -
So, the main door that will open and close in the game has different parts. First up it'll have the door frame, the door that will swing open and close, the doorknob and some hinges.
Here are some screenshots pf my door model.


Before I modeled the doorknob, I decided to do a quick search to see what doorknobs looked like during the time period Gore was alive!

Screenshots of the modeled doorknob


2. Curtains -
Modeling the curtain was quite fun since it was my first time learning about ncloth in Maya! The tutorial I watched was pretty simple to follow as well.


3. Clock -
Clock face reference -
During the 1900's British era, most of the clocks had roman numerals in the clock face. So, I decided to stick with that as well for the game aesthetics.

Screenshots of the clock modeling process -


4. bookshelf lamp -
So, the idea to model a bookshelf close to the round table was a last-minute choice. I though the area where the round table was looked quite empty for the house and it would look a bit awkward. So, I decided it would be best to add in at least a bookshelf with a few books inside and a lamp for more lighting inside the apartment!
I couldn't find a proper tutorial as such for the lamp, so I decided to freestyle and model it using cylinders.


5. Fireplace -
Apart from the cupboard, this was another time-consuming asset to model! The tutorial was a sped-up version of the modeling process, so I decided to slow down the speed and follow along with the tutorial.


6. Photo frames -
This was actually the last addition to the apartment setup. I placed three photo frames in total.
Photo frame 1 - Above the glass bottle cabinet
Photo frame 2 - Above the fireplace
Photo frame 3 - Above the bookshelf

7. Bookshelf -
I made the bookshelf by duplicating the cabinet, scaling it up to make it taller and by adding a few book racks inside by usingcubes.

8. Books -


9. Walls -
Added in a few edge loops and extruded the faces to make the walls. I made the windows separately since I need to texture them in a different color anyways.

10. Gore's flat cap -


Making the setup!

Used a few cameras to view various angles of the apartment setup!


Idea for my game environment!
I have an environment in mind that I want to use for the game -
The snow particles have already been setup here, so it'll save up on time too!
I really like the color of the sky here! So I definitely want to have this in the game. I'll have to flatten out the bumps and erase the foliage!


0 notes
Text
WK 1 - TUE - MORNING
Important things to note:
Homework for next week (wk 2): identify/pick one artist in the given slide
Pick one artist and explore beyond what is given for research
Wk 3 - project proposal, presented in afternoon (Newell’s) class
If not attending assessments – immediate fail!!!
Today’s Task:
Using photographic paper/photograms and pressing it/creating an impression against a surface or anything/be very experimental with it.
Exploring the concept on the copy of anything
ASSESSMENT:
50% of total mark
“The Copy”
Weeks 1-6
Form of copying, duplicating, appropriation, riffing, homage, replica, nemesis, pastiche, redux, simulacrum, or replication
Will have to give/be given feedback - need to participate
Make sure to document all the process! Even all the irky bits.
Week 6: the final product, figure out the installation
THREE PARTS OF ASSESSMENT
PT 1: WEEK 3 10 min presentation and written proposal
PT 2: WEEK 6 Finished work for group critique
PT 3: Visual journal, artist reflective statement, final visual/media documentation
PHOTOGRAPHY
What is a copy? How does it relate to screen arts?
Mass production - photos can be edited into several forms
Capturing the true moment - knowing both ways of the photographer and the subject
Digital photography - pixels are generated to create photos obscured
Questioning the original experience and moment - applying to both photo and screen arts
Photography had always been a question of truth since early days.
Difference between stealing and homage
Pre-photography - exploring artists
Joseph Wright - the Corinthian Maid
Joseph Nicephore Niepce - World’s first photograph: “View from the window at Le Gras”, 1827 / Le Cardinal Georges d’Ambriose - a photograph of a copy/an engraving, the same process through a camera lens, questioning the original experience of a lens/what is unique and original.
William Henry Fox Talbot - “The Pencil of Nature”, inventor of the paper bound process/negative and positive
Penelope Umbrico - “Suns from Sunsets on Flickr”, 2006
Lise Reihana - “In Pursuit of Venus” - two-channel live action video, inspired by Joseph Dufour - removing pacific islanders into a more neoclassical nature. Digital technologies are used to animate the wallpaper.
Soda_Jerk - “TERROR NULLIUS”, 2018, for the Ian Potter Moving Image Commission
Orlan/Lady Gaga, 2018
Rose Gibson - “head_phone_film_poems”
INFORMATION:
Recognising patterns and finding information on noise
Physical analogue reading into a two-dimensional painting into a time-based experience
Walter Benjamin
The term on “aura”
“Even the most perfect reproduction of a work of art is lacking in one element; its presence in time and space, its unique existence at the place where it happens to be”.
0 notes
Text
0 notes