#free boolean generator
Explore tagged Tumblr posts
Visit Tumblr Blog
Explore Tumblr blogs with no restrictions, modern design and the best experience.
Last Seen Tumblr Blogs


Fun Fact
Tumblr has a 66 index score for customer satisfaction in the US.
Text
KIP'S BIG POST OF THINGS TO MAKE THE INTERNET & TECHNOLOGY SUCK A LITTLE LESS

Post last updated November 23, 2024. Will continue to update!
Here are my favorite things to use to navigate technology my own way:
A refurbished iPod loaded with Rockbox OS (Rockbox is free, iPods range in price. I linked the site I got mine from. Note that iPods get finicky about syncing and the kind of cord it has— it may still charge but might not recognize the device to sync. Getting an original Apple cord sometimes helps). Rockbox has ports for other MP3 players as well.
This Windows debloater program (there are viable alternatives out there, this one works for me). It has a powershell script that give you a little UI and buttons to press, which I appreciate, as I'm still a bit shy with tech.
Firefox with the following extensions: - Consent-O-Matic (set your responses to ALL privacy/cookie pop-ups in the extension, and it will answer all pop-ups for you. I can see reasons to not use it, but I appreciate it) - Facebook Container ("contains" Meta on Facebook and Instagram pages to keep it from tracking you or getting third party cookies, since Meta is fairly egregious about it) - Redirect Amp to HTML (AMP is designed for mobile phones, this forces pages to go to their HTML version) - A WebP/AVIF image converter - uBlock Origin and uBlacklist, with the AI blacklist loaded in to kill any generative AI results from appearing in search engines or anywhere.
Handbrake for ripping DVDs— I haven’t used this in awhile as I haven’t been making video edits. I used this back when I had a Mac OS
VLC Media Player (ol’ reliable)
Unsplash & Pexels for free-to-use images
A password manager (these often are paid. I use Dashlane. There are many options, feel free to search around and ask for recs!). There is a lot that goes into cybersecurity— find the option you feel is best for you.
Things I suggest:
Understanding Royalty Free and the Creative Commons licenses
Familiarity with boolean operators for searching
Investing in a backup drive and external drive
A few good USBs, including one that has a backup of your OS on it
Adapter cables
Avoiding Fandom “wikias” (as in the brand “Fandom”) and supporting other, fan-run or supported wikis. Consider contributing if its something you find yourself passionate or joyful about.
Finding Forums for the things you like, or creating your own*
Create an email specifically for ads/shopping— use it to receive all promotional emails to keep your inbox clean. Upkeep it.
Stop putting so much of your personal information online— be willing to separate your personal online identity from your “online identity”. You don’t owe people your name, location, pronouns, diagnoses, or any of that. It’s your choice, but be discerning in what you give and why. I recommend avoiding providing your phone number to sites as much as possible.
Be intentional
Ask questions
Talk to people
Remember that you can lurk all you want
Things that are fun to check out:
BBSes-- here's a portal to access them.
Neocities
*Forums-- find some to join, or maybe host your own? The system I was most familiar with was vbulletin.
MMM.page
Things that have worked well for me but might work for you, YMMV:
Limit your app usage time on your smartphone if you’re prone to going back to them— this is a tangible way to “practice mindfulness”, a term I find frustratingly vague ansjdbdj
Things I’m looking into:
The “Pi Hole”— a raspberry pi set up to block all ads on a specific internet connection
VPNs-- this is one that was recommended to me.
How to use computers (I mean it): Resources on how to understand your machine and what you’re doing, even if your skill and knowledge level is currently 0:
This section I'll come back an add to. I know that messing with computers can be intimidating, especially if you feel out of your depth. HTML and regedits and especially things like dualbooting or linux feel impossible. So I want to put things here that explain exactly how the internet and your computer functions, and how you can learn and work with that. Yippee!
849 notes
·
View notes
Text


Cis* ( Cis with an asterisk ) and Tris* ( Tris with an asterisk ) flags
These represent the same Boolean search operation as my Trans* ( Trans with an asterisk ) flags do, where an asterisk is used to find all content with the same prefix, regardless of suffix.
More simply, Trans* includes everyone under the Trans- umbrella- similar to how Queer is a broad / inclusive community term. These function similarly, but with the Cis- and Tris- prefixes !!
( You can read more about the history of the Boolean / Trans Asterisk ( including some common misconceptions ) and usage in Nonbinary / Genderqueer symbols and Gender Neutral / Inclusive Language in this post here. )
Made using this general Cis flag by @ryanyflags ( since it can be used for the general prefix already ) and a simplified version of these Tris flags by julietianboy.
The Tris simplification ended up being a little close to Ryany's existing Tciaspec flag, so I apologize for that. I just wanted to keep them simple since the Asterisk symbol in the middle can make it look cluttered very quickly. The anon who requested this also clarified that Cis* here is differentiated from Asteriskgender.
Free for anyone to use anywhere as always !! Anon only requested Cis* but I wanted to make Tris* to round it out, since Tris is often forgotten. Please no arguing on here. I will delete it as I have no energy and the posts linked in this should clarify everything. Thank you !!
These are being posted from Bug's drafts. If there are any mistakes please let me know so we can correct them.
#cis#cis*#tris#tris*#mogai flag#liom flag#mogai#liom#mogai pride#liom pride#mogai friendly#liom friendly#mogaisafe#liomsafe#mogai community#liom community#cis with the asterisk#tris with the asterisk
17 notes
·
View notes
Text
one finding of rotating sengen in a cave behind a waterfall is the elasticity of dcst's characters on account of they are basically video game characters. which was already obvious, but it's interesting to think about from the perspective of picking up dolls to play with rather than just passively watching the skit-laden game of snake that dcst's cast entails.
characters whose traits are their skills. sure, they have personalities, and even backstories as necessary. but their story roles are tied to their clear niches. they operate on rules and set interactions. parameters to their characterization that are like the writing equivalent of memorable, exaggerated silhouettes. they are vehicles to deliver demonstrations of science, so all the mushier nuances of their psychology (not to be confused with gen's Demonstrations Of Mentalism) are left to extrapolation.
not that they or the story of dcst itself have no Heart. dcst's writing is competent enough to include those Empathy Hooks, those Vulnerable and Relatable moments that give sufficient motivation to the characters (for being what they are in the type of storyworld that they're in). dr. stone isn't a purely mechanistic progression story in the same way that a video game isn't purely numerical and boolean variables served straight to the player.
but it is a story that is about what it's about, and by the Fandom Theory Of Gap-Filling, that means free real estate to explore narratives that are not bound to a borderline edutainment maxim of "everything is in service of showing off a facet or application of science."
(of course, that's not to say canon topic/tonal compliance isn't a factor in fanworks or even some authors' Whole Shit, but i cannot be addressing every tangential countercounterpoint or i'll be caveating in circles here.)
what i'm getting at is. there are only so many ways one can go, in the scenario of writing character-driven stories based on a source material where the extent of the ostensibly most popular character's backstory is: he's been on TV and wrote a half-assed book once. which is to say, there are so many ways one can go. the blorbo is your oyster. within reason. or not within reason. go crazy go stupid. to each their own.
and to each their own indeed. that's the fun, watching everyone's different interpretations of the same characters based on the same information. i like the way this one post frames it. studied stars in our communal observatory that is fandom.
though that's drifting out into general fandom concepts. on top of all of this basically being a long way of pointing out that these are cartoon characters from a nonsenseworld story and therefore involve some squaring the disparities when going for a different level of realism or style of character writing. which is barely a phenomenon, let alone one specific to this fandom.
but that's because this has actually been a bunch of idle musing, only short essay-like by length rather than by aiming towards any particular meaningful purpose or conclusion. :P
though if i wanted to tack on some relevance, then i might as well bring it back to the prompting topic mentioned in the first sentence and then never again:
a top question in the face of limited data for our shipping scientists is how does a notoriously unsentimental character succumb to the sentiment of romantic love?
and the answer, it turns out, is ohhh, do the people crave the gap moe. they crave it. they want to melt that boy. in whatever way that means to them, such that the result is they get to see that shaky-handed, cotton candy-handing canon soft side, but peeled open instead of rationed out into Acceptable Masculinely Stoic Intervals.
i enjoy a melting myself (i don't know if one could be a sengenner if they didn't to some degree), though i like it best when it feels earned. not because otherwise is Doing It Wrong, but because it's just more satisfying that way. but of course what feels "earned" is going to be another point of contention among All We Astronomers, and it's not something i've even necessarily identified for myself yet.
which is, again, part of the fun and what has me intrigued thinking about all this. sengen is a bouncy ball i keep throwing at the wall, and it keeps coming back to me at another angle. two characters who could fall in love in twenty subtly different equally plausible ways.
#doc rock#dcst#uhh i need a sengen tag.#hmm.#once i saw a sengen fanart with the caption “galo sengen” and that hitched itself to my mental associations for the rest of time#That Cannot Be My Sengen Tag but acknowledging the temptation is the least i can do. or i guess the most i can do.#i almost want to call them “brain boys” if not for the fact that that's too similar to [brain stem]#even though at this rate i am going to be talking about the brain boys more than i ever do about [brain stem]#how about...#mohs endpoints#get it? like hard and soft sciences? and also. stones??#WHATEVER MAN intelligibility is more of a byproduct around here anyway.
2 notes
·
View notes
Text
there's a cat in your frustum! (on Viewfinder)
I never quite planned for indie game reviews to be a regular thing on this blog. But here we are... I've been playing a bunch of games lately and it turns out there's usually a bunch to say about 'em.
Most recently: Viewfinder! It's a puzzle game with a unique mechanic based on forced perspective tricks. You hold up a photo (or some other picture), and it replaces everything behind the photo with the scene depicted in the photo, slicing through whatever was already there. That's rather abstract to describe in words, so watch the trailer and you'll get it instantly...
youtube
In technical terms, the shape that is being replaced is something called a frustum - a shape very familiar to computer graphics programmers, since it's what a camera sees, relevant to techniques like frustum culling. So this is essentially a puzzle game where you can store view frustums in the near clip plane. If you aren't a graphics programmer, that description is probably more rather than less confusing.
The effect in Viewfinder is absolutely a technical marvel. Without any hitch or frame drops, it calculates boolean operations on everything your photo touches - even dynamic physics objects. When you slice through an object, it fills in the plane of intersection with a texture in a natural looking way. I never saw any of the glitchy stuff that can happen when calculating booleans. And while one thing I've learned since becoming a game dev is that mesh operations are much faster than I tended to assume, it's still incredibly impressive to see this kind of calculation done so quickly. I really want to find a GDC talk where they talk about how they did it.
As the game progresses, you get a camera which lets you take photos anywhere in the level. The number of photos you can take is a limited resource, but it is still a ton of freedom. So how does that translate into puzzles?
Well... unfortunately the puzzles in this game are on the whole a bit on the easy side. Most of the time, you're using the camera to do three operations: create a platform to cross a gap, rotate something to be upright, or duplicate an object such as a battery. Later levels introduce additional mechanics, such as propagating a sound around a level or dealing with objects that aren't affected by the camera. In general, though, it's of the Portal school of puzzle design: a tour of a mechanic, which subtly or overtly prods you towards the intended solution so it rarely takes long to solve, but that solution tends to have an 'oh that's cool' aspect to it.
There's nothing wrong with this approach, we all love Portal, and moreover some levels (the watermelon optional level for example) definitely require some clever playing with assumptions. It's a tricky line to walk: you don't want the solution to require you to find one obscure spot in the level to get the right photo. But I did find myself wishing for less obvious levels - the optional levels get closer but there aren't many of them. That is a minor complaint though: it's a charming little tour through a variety of iterations of perspective trick.
Besides the main camera-slicing trick, another device they like to play with is suddenly creating a piece of geometry with the camera's perspective projected onto it, so it is as if (e.g.) a stairway suddenly turns into a painting of a stairway on a wall. It's very charmingly done. The same goes for the levels where e.g. paintings and drawings are used instead of photos (renders) for the camera trick, playing with a variety of shader effects, or perspective-reframing tricks.
The story... ok, as usual, I'm going to spoil the shit out of this, you're warned!
So this game could easily have been a bunch of narrative-free levels to give you a chance to play with the mechanic, but there is a story structuring this game, which has you delving into a simulated environment built by a group of scientists in pursuit of a weather-controlling machine to save the world from Fantasy Climate Change.
I say Fantasy Climate Change because the main way it's represented - in the brief section where you duck out of the simulation to establish the frame story - is that the sky is red now. This is killing all the plants, to the point that the oxygen in the atmosphere is starting to decline. How exactly the large, populated city outside your window is being fed in such circumstances is unclear! Hydroponics or something.
Anyway, it's a story about the foolishness of seeking a simple one-and-done solution. The scientists - who you encounter through the familiar devices of audio logs, post-it notes and journal pages - believed they were on course to change the world. Gradually their efforts came to frustration. The leader is convinced that she must find a perfect solution which doesn't require complicated mass coordination; she has a falling out with the others, particularly the character who works on biochar. At the end, you are forced to destroy the simulation in order to escape it, but somehow you exit holding an actual physical plant. Don't think about it too hard.
What's frustrating about all this is like... it's clearly trying to be a story that's Saying Something. There are many aspects which are very solid. The vocal performances are generally quite good. The environment design works well to convey each character (even if the post-its can be a bit heavyhanded). There's a focus on small moments - it's a very chill and relaxed game tonally throughout. It's not something they half-assed.
But that doesn't stop it from being painfully didactic, and like... poorly connected to what the game is actually about. Like, the connection to central photo mechanic is this idea of nostalgia, of holding too tight to a past we should move on from, right. But that has approximately fuck all to do with building a machine to change the climate. You know from the outset that they failed because, well, if they succeeded, you wouldn't be in this mess would you? And in a way the game is too chill - it can't really sell you on the mounting frustration and anxiety of the scientists as their ambitions fail to pan out.
There is an attempt to connect the puzzle mechanic to the story, with Cait drawing parallels between your ingenious use of the camera (he praises you a whole lot for solving the puzzles) and the similar ingenuity shown by the scientists. Only... there is no structural parallel here. Even when the camera starts to become buggy, destroying the things it photographs, this becomes another puzzle solving tool. You never reach the kind of impasse which the story is about - it seems like a missed opportunity.
And the actual device the game revolves around - the camera and other perspective tricks - ends up being almost entirely peripheral to the game's story. To the scientists, the camera is a curiosity or even an annoyance, tangential to their main work. Which is funny because the game is very excited about the camera and wants to show you all its tricks.
In short, it's all a bit odd. It feels like an early draft, which could use some more baking to really sing. Not enough to really spoil what is otherwise a very good game with an exceptionally cool central mechanic, but it did leave me feeling a little nonplussed at the final scene.
I don't want to be too hard on it. Writing game stories is hard. The game I'm working on currently is not planned to have a story, but at one point we considered it - and I wrote something absolutely insane and overambitious, of course. But writing something which achieves a satisfying thematic resolution is no small feat. I appreciate that they made the effort at all. Instead... just want to think about why it didn't work for me in the hopes of coming up with something better when it is my turn for real.
[Next up on 'first person puzzlers which fuck around with 3D space' we have Manifold Garden.]
#Youtube#computer games#viewfinder#this spent days as a draft in an open tab. i'm kicking it out so i can properly shut down my computer lol
6 notes
·
View notes
Text
Essay Research Database Matrix National Institute of Health's Intramural Database Resources Location: http://intramural.nih.gov/index.tml Description: The stated objective of the NIH Intramural Database is to collect and disseminate data gathered from research projects conducted by the Intramural programs of the Institutes and Centers of the National Institutes of Health. This includes studies commissioned by the National Cancer Institute (NCI), the National Institute of Mental Health (NIMH), and dozens of other national health research institutes. The database also employs a variety of human bio specimen data to index its database holdings, allowing search parameters to be refined according to blood type, cell, or genomic lines. The NIH Intramural Database is relevant to my topic of interest because it contains dozens scholarly articles on the subject of clinical nursing, including several which pertain solely to the concept of teaching simulation in nursing schools. The National Database of Nursing Quality Indicators (NDNQI®) Location: https://www.nursingquality.org/Default.aspx Description: The National Database of Nursing Quality Indicators (NDNQI®) is the United States' sole national database in terms of documenting nursing quality measurement and archiving this data for hospital use. By collecting and evaluating unit-specific nursing data from American hospitals, the NDNQI provides comparative data to expedite quality improvement processes. The NDNQI is relevant to my topic of interest because it contains a wealth of material on nursing-sensitive measures which reflect the structure, process, and outcomes of nursing care, including Nurse Turnover Rate, RN Education/Certification, and Nursing Skill Mix. Building a knowledge base in regards to these factors of the nursing profession in the early stages of my development as a nursing student will allow me to anticipate obstacles and act with initiative, rather than simply react to exigent circumstances. BioMEd Central Location: http://www.biomedcentral.com/ Description: BioMed Central is an independent research aggregator committed to providing instantaneous access to peer-reviewed biomedical research material, free of charge and without restriction. The database allows for general search queries, Boolean searches, or the convenient Subject Gateways feature which organizes the collected research according to generalized topics. Within BioMed Central's primary portfolio there are over 100 scholarly journals, ranging from subject selective to highly inclusive topics, including the outcomes of community nursing, and evidence-based practice questionnaires among nursing students. The BioMed Central database is relevant to my topic of interest because it contains several subject-specific articles on the topic of bipolar disorder and nursing education. In addition, the database's convenient search parameters allow for the retrieval of additional information regarding current medical issues which may inform and enhance the educational process. By using the BioMed Central database to expand one's base of knowledge, nursing students can effectively guide their own exposure and mastery of contemporary nursing lessons. The Cochrane Library Location: http://www.thecochranelibrary.com/view/0/index.html Description: The Cochrane Library is a comprehensive archive which utilizes high-quality, independently researched evidence collected within a system of six (6) healthcare premised databases: The Cochrane Database of Systematic Reviews, the Cochrane Central Register of Controlled Trials, the Cochrane Methodology Register, the Database of Abstracts of Reviews of Effects, the Health Technology Assessment Database, and the NHS Economic Evaluation Database. By applying a variety of detailed search parameters, users of The Cochrane Library are able to identify relevant research materials on a diverse array of subjects, including diagnostic tools, the results of medication trials, and treatment theories. The Cochrane Library is relevant to my subject of interest because it contains a multitude of journal articles, research studies, and literature reviews pertaining to bipolar disorder. A simple search for bipolar disorder using The Cochrane Library returned an interactive list of 7,694 results, from an empirical study on the Tiagabine in the maintenance treatment of bipolar disorder to a literature review focused on Interventions for helping people recognise early signs of recurrence in bipolar disorder. A diverse selection of research material such as this will always be useful as the literature on bipolar disorder continues to evolve. HighWire Location: http://highwire.stanford.edu/lists/freeart.dtl Description: Provided by Stanford University, HighWire is touted as the largest archive of free full-text scientific material in existence, as the archive currently assists with the online publication of over 2,300,000 articles which are free to view in their entirety. In addition to the typical search function that most large databases offer, HighWire's main page comes in the form of a scrollable, alphabetical list showing the archive's library of journal titles, with the majority focusing on medical and scientific topics. HighWire contains a total of 1,746 highly respected research journals, and in the vast majority of cases users are granted full access to the articles contained therein. The database's search function is also highly customizable, providing advanced research tools like Instant Index and Citation Map, while also including a convenient button to link HighWire searches to the widely used PubMed database. The HighWire database is relevant to my subject of interest because it provides instant access to thousands of articles on the connection between bipolar disorder and nursing education, as well as journals which can be used to complement primary research. Psychological, psychiatric, child development, and other journals can be very useful resources when searching for supplementary material that connects to my field of study, and purely medical databases often omit these holdings from their subject-specific holdings. Read the full article
0 notes
Text
Final Project - The Models cont.
Next I'm going to be showing off the electronics. This is a smaller category, but I want to leave the more boring stuff (the main building blocks of the scene) till last.
…………………………………………………………………………………………………………...
Electronic Models
Again, we'll be going in alphabetical order, with notes under each with my thought processes. The C's:

Both my computer and my drawing tablet come together in C. This was one of the first models I made in 3DS! I was particularly proud of the wire work here. As you can see, the tablet screen is OVERALLY detailed, to make up for the off computer screen (which is very shiny in scene). It holds a piece of my actual art on the fake canvas! On the laptop itself, as well an X-Men sticket, the keyboard also holds a secret message, which I thought would be a funny little easter egg! "Not A Real Keyboard I'm Afraid, No Way Lol." I can imagine if I ever made this an actual game, I would love to find something like this.
The H's:

Only the headphones for H! This model was really tricky to get right, but texturing it was rather easy! It's a mock of a pair of my gaming headphones, but I added some cute little horns on top, with some height maps to make certain aspects (the stripes and the skull) stand out. I also added some weather on the inside of the headphone and headband.
The M's:

Another solo category. I free-handed the classic Fallout 4 load screen and added some particle texturing to make it look old and weathered (as well as some fake screen glint). I also used corner edge wear generator on the base!
The P's:

I was incredibly proud of this power-board when I first made it. The wire, the wall socket– it was all perfect! Een the holes are booleaned to have actual depth! I couldn't believe I actually made it to be honest, and it looked even better textured! Though I wish I had raised the wall socket up just a little. I also added my phone, which I often keep plugged in when I'm drawing. You can see I decided to recreate my Green Goblin lockscreen! That would counter the rather black colour palette, and I though it was cute.
The T's:

My good old tower. It's a rather simple design, so I decided to spice it up a little with vents on either side and an extruded face on either side. I also made a Sims 2 CD to go on the disk-tray. This is more of a homage to how I used to religiously play Sims on the family computer as a child, and that making this little diorama scene was much like playing Sims.
The S's:
This was THE first model I made when I was practicing. I decided to include it (just without it's stand) in the final scene. I added the joystick covers I own, with the little pawprints on, as well as tried to convey the scuffed nature of the console, since it's a hand-me-down. Drawing the game screen on the inside was super fun! I think it looks almost like a screenshot, especially from far away, put I actually drew that myself! …………………………………………………………………………………………………………...
0 notes
Text
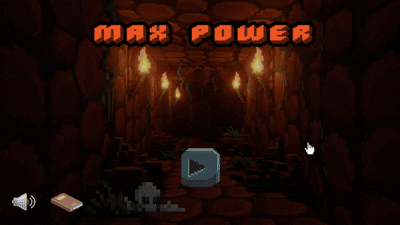
Platformer Development Update
{Week 4} (Would be Week 3 but Cyclone Alfred had other plans...)
This week marked the first hands-on development sprint for Max Power, my 2D action-platformer centered around progression and upgrades. I focused on building out the game’s core mechanics and foundational systems using GDevelop.
What I Worked On:
Core Mechanics: Max now runs, jumps, and responds to gravity within the “Dungeon Arena.” Movement feels responsive and sets the stage for tight platforming.
Coin Pickup System: Coins increase a global PlayerCoins variable, designed for use in future upgrade scenes. Coins persist between sessions, laying groundwork for long-term progression.
Enemy AI: Basic enemies use simple AI to track Max’s horizontal position and move toward him continuously.
Health & Damage System: Max has 3 health points, a health bar UI, and now takes knockback on hit. An invincibility window prevents repeated damage spam. If health hits zero, a death animation plays and the game resets.
Custom Start & Instruction Scenes: Designed a stylized title screen with animated buttons that transition into gameplay or an instructions page. The instructions scene outlines controls and objective flow, helping onboard players clearly and quickly.
Challenges Faced:
Implementing Boolean checks for death states and damage cooldowns required a workaround using the health bar’s internal values.
Enemy damage initially stacked all at once—this was solved using event timers and invulnerability states.
Scenes Built: Start Menu, Instructions, and Dungeon Arena. Tools Used: GDevelop, Piskel, royalty-free assets.
Full asset references listed below.
CraftPix.net. (2024, October 28). Free RPG Battleground Asset Pack. https://craftpix.net/freebies/free-rpg-battleground-asset-pack
Blender Artists. (2021, February 19). Pixel Dungeon 3D. https://blenderartists.org/t/pixel-dungeon-3d/1286296
Pixilart. (2025). 2D Stone Platform Bottom. https://www.pixilart.com/art/2d-stone-platform-bottom-f3a5875622b5509
RVros. (2018). Animated Pixel Adventurer. Itch.io. https://rvros.itch.io/animated-pixel-hero?download
CraftPix.net. (2024, October 8). Free Orc, Ogre and Goblin Chibi 2D Game Sprites. https://craftpix.net/freebies/free-orc-ogre-and-goblin-chibi-2d-game-sprites
CraftPix.net. (2025). Free Currency Loot Vector Icons. https://craftpix.net/freebies/free-currency-loot-vector-icons
Freepik. (2022). Pixel Art Muted Speaker Icon. https://www.freepik.com/premium-vector/pixel-art-muted-speaker-volume-icon-vector-icon-8bit-game-white-background_28763381.htm
Icons-for-Free. (2019). Cross Icon. https://icons-for-free.com/cross-131982518918328745
Vecteezy. (2025). Pixel Art Book Icon. https://www.vecteezy.com/vector-art/9726611-pixel-art-book-notebook-vector-icon-for-8bit-game-on-white-background
Backgrounds.gallery. (2025). Open Book Background. https://backgrounds.gallery/backgrounds/753/207420-Open%20Book
FontMeme. (2025). Pixel Fonts Generator. https://fontmeme.com/pixel-fonts
0 notes
Text
Custom Bins with CaDoodle
This tutorial assumes a basic familiarity with Zack Freedman's Gridfinity system and no familiarity with CAD software. Here's what you'll need:
Inkscape is a Free And Open Source vector illustration program. Vectors aren't really images themselves so much as a running list of defined points and lines on a coordinate plane that a computer can then display as an image. Because these are simply points on a plane, digital vector images can scale infinitely. These points also map to physical
CaDoodle is a Free And Open Source CAD program loosely based on Autodesk's tinkerCAD. Using boolean operations, you can build out basic shapes. CaDoodle can also use OpenSCAD plugins, and has the Gridfinity plugin available to use out of the box.
Start by tracing the objects you want in the orientation you want onto a piece of paper, keeping your pencil as straight as possible (I've used a pen for this entire process so that you can actually see it, but you really should use a pencil). If you have a flat bed scanner, simply put your object on the scanner. This will give you a far more accurate shape to work with and skip the scaling process.
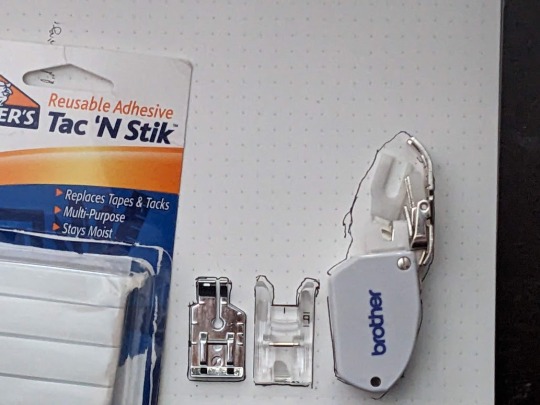
You may find that a little sticky tack to hold each object in place will help. For the two smaller presser feet, I've tried to get as close as possible to the edges. The walking foot, however, has a moving arm that feels so delicate and I don't want to mess it up so I just got the general shape.

I also marked the hole in the center of the small foot on the far left, and I marked where that arm sits on the presser foot. I then removed the feet from the paper and went over the messier lines, refining them a bit into something neater. After that, I held my phone as level as I could and photographed the tracings. The dots on my paper are 5mm apart, so I can use that to scale the photo later.

I also made sure to take a BUNCH of reference photos with calipers for every object.
Next, it's time to load up Inkscape. I paste my photo of my traced lines into inkscape and use the Measure tool (M) to check on those dots

They're about 15mm apart, so the photo needs to be shrunk to 33.33% of its original size to get them down to 5mm apart. Use the Selection tool (S) and click on the photo. Then, at the top of the screen, you'll have some controls for altering the size of this object.

Changing the units from "mm" to "%" will have you working in percentages. Making sure the padlock icon between the W and the H numbers is closed will ensure that the whole picture scales evenly at the same time. Then enter 33.33%, and press enter. After this, I'm able to check the distance between dots both horizontally and vertically at all four corners of the image and confirm that it's scaled properly. If you used a flatbed scanner, you'll be able to skip this step. Next, select the Pen tool (B) on your keyboard and begin tracing one object.

Click on corners to pivot. Cut off rounded edges with a straight line, as we're going to go back and curve them after the shape is closed. Once you're done, you can select the Node tool (N) to refine the shape. Dragging individual nodes moves them, while clicking and dragging on lines will cause them to curve.
After your tracing looks the way you want it, go to Edit>Preferences>Behavior>Steps and change the "Inset/Outset by" setting to 0.5mm:

Close this window and select your shape. Then, go Path>Outset. This expands the entire path by half a millimeter so your object has some wiggle room. This step is optional, of course, and some people prefer the aesthetic look of a perfect fit, but for your first bins this will increase the chances of your finished product being usable.

At this point you can continue tracing other shapes on the same document if you wish. MAKE SURE YOU SAVE your file as an .SVG as you go.
Next, open CaDoodle. At this point I recommend that you create a fresh CaDoodle document by clicking on the CaDoodle logo in the upper left corner and selecting "New Doodle." Next, click the "Import" button in the upper right corner and select your .svg file that you made in Inkscape. CaDoodle will then load up all your shapes for you, each of which can be moved around independently. They'll even keep whatever colors you were using in Inkscape!

The objects we're working with represent holes. You don't want the recess your object sits in to encompass it completely, because you won't be able to get it out again easily. Set each object's thickness to match the thickness of the object you're storing, minus about 5 to 10 millimeters, by clicking on the height node at the center of the object and either dragging, or manually entering a number.

Then, generate a Gridfinity bin. In the right-hand pane, choose "OpenSCAD_Plugins" from the drop-down, and click on the Gridfinity bin to drop one into your document. A default bin will then generate.

You have tons of options here but we're just going to use the default bin for simplicity-- 42x42x42mm, with no dividers.
Next, select your shape. Right now this shape is a solid that will be printed as-is, and that's useless to us. Click on the "hole" property to turn it into a negative we can cut out of the bin.

Next, either press C on the keyboard or click the magnet icon in the upper right to activate Cruise. This will let you place your shape directly on top of the surface of the bin.
Next, select the black cone icon above the Z axis node. This value should be equal to the height of your gridfinity bin (so 42mm for 6 z-axis units, or in my case 14mm for 2 z-axis units).

Subtract the thickness of your object from this number to sink it into the bin. Mine was 5mm thick, so I want this value to be 37

Finally, with your object still selected, hold down shift and click on the bin. Then, click on the "GROUP" button in the upper right corner, or simply press "G" on the keyboard.

And that's it. This bin is ready to export as an .stl

You can also use the basic shapes in CaDoodle to add finger holes or create recesses for less specific objects. For example, a short cylinder on its side is all I need for a spool of thread, and will serve my purposes better than a custom shape.
0 notes
Text
How to get better at doing research-Zolarink
Improving your research skills involves developing a systematic approach and utilizing strategies that help you efficiently gather, analyze, and synthesize information. Here are several tips to enhance your research capabilities:
1. Clarify Your Research Question
Define the scope: Be specific about the topic or problem you're investigating. A clear and well-defined research question will guide the direction of your work.
Narrow your focus: If the question is too broad, break it down into manageable subtopics or aspects that you can explore in detail.
2. Use Reliable and Varied Sources
Start with academic databases: Use platforms like Google Scholar, JSTOR, PubMed, or subject-specific databases. They provide peer-reviewed journal articles, books, and other scholarly materials.
Evaluate sources: Assess the credibility of the source by checking the author's qualifications, publication date, and the publisher’s reputation.
Diversify your sources: Combine academic papers with books, expert interviews, reports, and other trusted materials to get a well-rounded perspective.
3. Develop Efficient Search Strategies
Use advanced search techniques: Use Boolean operators (AND, OR, NOT), quotes for exact phrases, and asterisks for wildcard searches to narrow or broaden results.
Refine keywords: Experiment with different search terms and synonyms to cover all possible avenues of research.
Search in multiple languages: If applicable, check for sources in different languages to get additional perspectives.
4. Organize and Manage Information
Use reference management tools: Software like Zotero, EndNote, or Mendeley helps you organize your references, store PDFs, and automatically generate citations.
Take organized notes: Keep track of key ideas, quotes, and their sources. This makes it easier to cite later and avoids losing valuable information.
Create an outline: Draft a rough outline of your research to visualize the structure and flow of your final work.
5. Critical Thinking and Synthesis
Analyze the evidence: Don’t just accept information; question its validity, assumptions, and relevance to your research question.
Look for patterns and connections: Compare findings across sources, identify common themes or contradictions, and explore new insights or gaps.
Synthesize, don't summarize: Rather than simply summarizing the material, integrate it into a cohesive narrative that addresses your research question from various angles.
6. Stay Current
Monitor recent publications: Follow leading journals, academic conferences, and news in your field to stay updated on the latest research and trends.
Use citation tracking: Identify key papers in your area of research, and track which later papers have cited them to uncover additional relevant studies.
7. Be Systematic and Consistent
Establish a routine: Dedicate regular time slots for research to maintain focus and progress steadily.
Break down tasks: If the project feels overwhelming, break it into smaller tasks like literature review, data collection, analysis, and writing.
8. Seek Feedback
Consult with experts: If possible, talk to faculty members, colleagues, or professionals who are experienced in the topic.
Peer review: Share your work with others to get constructive feedback. Fresh eyes often catch mistakes or suggest new directions.
9. Improve Writing and Communication
Write as you research: Draft as you go along, rather than waiting until you have everything. This helps clarify your thoughts and often leads to deeper insights.
Be clear and concise: When writing up your research, avoid jargon unless necessary. Write for a general audience, explaining technical terms clearly.
Revise and refine: Editing is key in research writing. Ensure that the structure is logical, arguments are supported, and the writing is free of errors.
10. Develop Persistence and Patience
Expect setbacks: Not every search will be fruitful, and not every lead will pan out. Patience is essential in research.
By honing these skills and habits, you'll gradually become a more efficient, effective, and thorough researcher. The key is consistent practice and adapting your methods to the specific challenges of each new research project.
Please take some time to visit: https://www.zolarink.online/
0 notes
Text
29.09.24
forgot to update my blog
barely studied because i was feeling so shit
today i made progress through unit 2 of my compsci module - binary conversion, boolean values, logarithmic scale, bytes, moore's law
i am comfortable enough with the process of converting binary into decimal numbers however i dont think it will be something i generally will be using like... ever, so i guess i can use it as a cool party trick to seem super mega smart :D
i need to finish unit 2 before october 4th so i can immediately work on my assignment once it becomes available. once thats finished i can put my focus into completing the statistics paper.
i want a mimo pro subscription so i can continue working on my cooooooooding, ive found that its the easiest way for me to understand python but its actually unbearable with the free version lol. but very mindful and demure of me to learn the difference between wanting something and needing something, so it isnt urgent and can wait (i also cant afford it rn so theres that lmao)
tomorrow im aiming to study for 6 hours. i also have to fit a 20 min pilates workout into there at some point..
0 notes
Text
HTML or XHTML: Which Syntax Will Give You Fewer Headaches?
When diving into web development, one of the first decisions you'll face is whether to use HTML or XHTML. Both are markup languages essential for creating web pages, but they come with different rules and characteristics. This guide will explore the nuances of HTML and XHTML, helping you decide which syntax might offer you fewer headaches.

Introduction
When building websites, the choice between HTML and XHTML can significantly impact your development process. Both HTML (HyperText Markup Language) and XHTML (eXtensible HyperText Markup Language) are crucial for structuring web pages, but they come with different sets of rules and features. Understanding these differences can help you avoid common pitfalls and select the syntax that best fits your needs.
What is HTML?
Definition
HTML stands for HyperText Markup Language. It is the standard language used to create and design web pages. HTML provides the basic structure of web documents by using a system of tags and attributes to define elements on the page.
History and Evolution
HTML has been around since the early days of the web. Since its inception in 1991 by Tim Berners-Lee, it has evolved through several versions. HTML5, the latest version, introduced new elements and APIs to better support modern web applications.
Basic Structure
A typical HTML document starts with a <!DOCTYPE html> declaration, followed by an <html> element that contains a <head> and a <body>. Within these sections, you can include various elements like headings, paragraphs, links, and images.
What is XHTML?
Definition
XHTML stands for eXtensible HyperText Markup Language. It combines the flexibility of HTML with the strict syntax rules of XML (eXtensible Markup Language). XHTML aims to improve web standards and ensure consistent rendering across different browsers.
Differences from HTML
While XHTML is similar to HTML, it enforces stricter rules. For example, XHTML documents must be well-formed XML documents, meaning they must adhere to precise syntax rules such as proper tag closure and case sensitivity.
Basic Structure
An XHTML document also begins with a <!DOCTYPE html> declaration but requires all tags to be properly closed and nested. It follows a more rigorous syntax compared to HTML.
Key Differences Between HTML and XHTML
Syntax Rules
HTML is more lenient with syntax rules. For example, tags can be left unclosed, and attribute values can be omitted if they are boolean. XHTML, on the other hand, requires all tags to be closed and attributes to be quoted.
Case Sensitivity
HTML is not case-sensitive. Tags and attributes can be written in any combination of uppercase and lowercase letters. XHTML requires all tags and attributes to be in lowercase.
Tag Closure
In HTML, some tags like <br> or <img> don’t require closing tags. XHTML mandates that all tags must be closed, either with a separate closing tag or a self-closing slash (e.g., <br />).
Advantages of HTML
Flexibility
HTML's flexibility allows for faster development and easier adjustments. Developers can write less strict code without worrying about compliance issues.
Browser Compatibility
HTML has broad compatibility with various browsers. Older browsers and newer ones alike generally support HTML, making it a safe choice for many projects.
Ease of Use
For beginners, HTML is easier to learn and use. Its less strict rules mean fewer errors during development.
Advantages of XHTML
Strict Syntax Rules
XHTML’s strict syntax rules help ensure that documents are well-formed and free of errors. This can lead to more predictable rendering and easier debugging.
Compatibility with XML
Since XHTML is based on XML, it integrates well with other XML-based technologies. This can be beneficial for projects that require data interchange between different systems.
Error Handling
XHTML provides better error handling due to its stricter rules. Errors are often easier to identify and fix compared to HTML.
Common Issues with HTML
Browser Inconsistencies
HTML’s lenient syntax can lead to inconsistencies in how different browsers render the same page. This may require additional testing and adjustments.
Deprecated Elements
Some HTML elements and attributes have become outdated. Using these can lead to issues with modern browsers and may impact future-proofing your website.
Common Issues with XHTML
Strict Compliance Requirements
The strict rules of XHTML can be challenging, especially if you’re used to HTML’s more relaxed approach. Small mistakes, like forgetting to close a tag, can cause your entire document to fail.
Potential for More Errors
Due to its stricter nature, XHTML can lead to more frequent errors during development. This requires more careful coding and validation.
When to Use HTML
Simple Projects
HTML is suitable for straightforward projects where the flexibility and ease of use outweigh the need for strict standards.
Legacy Systems
For maintaining older websites that were originally built with HTML, sticking with HTML might be easier and more practical.
When to Use XHTML
Complex Projects
If you’re working on a complex project that requires rigorous data handling or integration with other XML-based technologies, XHTML might be the better choice.
XML-Based Applications
For applications that need to comply with XML standards, XHTML provides the necessary structure and error handling.
Best Practices for Using HTML and XHTML
Writing Clean Code
Regardless of the syntax you choose, writing clean and organized code is crucial. It makes your code more readable and maintainable.
Validating Your Code
Use validation tools to check your HTML or XHTML code. This helps catch errors early and ensures your code meets the standards.
Staying Updated with Standards
Web standards evolve, so stay informed about the latest developments in HTML and XHTML to keep your skills and code current.
Conclusion
Choosing between HTML and XHTML depends on your project requirements and personal preferences. HTML offers flexibility and ease of use, while XHTML provides strict syntax rules and compatibility with XML. Consider the complexity of your project, the need for strict standards, and your own comfort level with these languages when making your decision.
FAQs
What are the main differences between HTML and XHTML?
HTML is more flexible and less strict with syntax, while XHTML enforces stricter rules and is XML-based.
Can I mix HTML and XHTML in the same document?
No, mixing HTML and XHTML in the same document can lead to errors. Stick to one syntax for consistency.
Which is better for mobile web development?
Both HTML and XHTML can be used for mobile web development, but HTML5 is often preferred due to its modern features and flexibility.
How do I transition from HTML to XHTML?
To transition, start by ensuring your HTML is well-formed and follows XHTML rules. Use validation tools to check for compliance.
Are there any tools to help with HTML or XHTML validation?
Yes, tools like W3C Markup Validation Service and HTML Tidy can help validate and clean up your code.
1 note
·
View note
Text
How reliable is Google Scholar?
Google Scholar is a widely used and valuable tool for academic research, but like any database, it has its strengths and limitations. Understanding its reliability requires consideration of several factors:
Comprehensiveness: Google Scholar's vast database covers a wide range of academic disciplines and sources, including peer-reviewed papers, theses, books, conference proceedings, and preprints. This breadth can be advantageous for interdisciplinary research but may also lead to occasional inclusion of non-peer-reviewed or lower-quality sources.
Citation Metrics: Google Scholar calculates citation metrics such as the h-index and i10-index based on its database. While these metrics provide insights into an author's impact and productivity, they may not always accurately reflect scholarly influence, as they can be influenced by self-citations, variations in citation practices across disciplines, and other factors.
Accessibility: Google Scholar's user-friendly interface and free access make it widely accessible to researchers, students, and the general public. However, this accessibility means that not all content in Google Scholar is peer-reviewed or of equal scholarly rigor. Users should critically evaluate the sources they find, considering factors such as author credibility, publication venue, and peer review status.
Search Algorithm: Google Scholar's search algorithm prioritizes relevance and citation count, which can be beneficial for finding influential works but may also lead to some bias toward older, highly cited papers. Users should employ advanced search features and Boolean operators to refine their searches and retrieve more precise results.
Coverage and Updates: Google Scholar continuously crawls the web to index new content, but it may not capture every scholarly publication or update immediately. Some disciplines or languages may also be underrepresented in Google Scholar's database. Researchers should complement their searches with other databases and resources to ensure comprehensive coverage.
Overall, Google Scholar is a valuable tool for academic research, but users should approach it with a critical eye, carefully evaluating the relevance, quality, and reliability of the sources they find. It is most effective when used in conjunction with other scholarly databases and resources to ensure thorough and rigorous research.
0 notes
Text
Java String Operations: Unraveling the Magic
An IntroductionStrings are the fundamental building blocks of all computer languages. They save text, characters, and even our personal sentiments for the digital universe. Strings in Java are more than simply a collection of letters; they are flexible objects with special abilities. Buckle up as we journey through the wonderful world of string operations!
Creating Strings Before we go into the details, let's look at how strings are created. There are two methods for creating a string object:
1.String Literal: Imagine string literals as miniature magic spells. When you declare a string with double quotes, Java examines its mysterious "string constant pool." If the identical spell (string) already exists there, it will provide you a reference to it. Otherwise, a new magical instance is summoned. For example: '''java String s1 = "hello"; // Makes a reference to the existing "hello" spell. String s2 = "hello"; // Reuse the same spell (no new instance) '''
2. Using the 'new' keyword: Sometimes we need new spells. When you use 'new' to generate a string, Java creates a new instance in ordinary heap memory. The literal is still present in the continuous pool. For example: '''java String s3 = new String("world"); // Creates a new instance on the heap '''
Common String Operation
Now that we have summoned So, let's use our wands (or keyboards) to perform some magic:
1. Concatenation: Joining strings is similar to mixing potions. Use the '+' operator to merge them. '''java string fullName = firstName + " " + lastName; // "Harry Potter" '''
2. Length: Interested in the length of your incantation? The 'length()' technique reveals the following: '''java int spellLength = fullName.length(); // 12 '''
3. Comparison: To determine whether two spells are equal, use 'equals()' or 'compareTo()': '''java boolean sameSpell = s1.equals(s2); // True integer spellComparison = s1.compareTo(s2); '''
4. Substring: Extract a piece of the spellbook: '''java string potion = fullName.substring(6); // "Potter" '''
5. Replacing Ingredients: Replace ingredients with'replace()'. '''java: String newSpell = fullName.Replace "Harry" with "Hermione Potter".
6. Splitting Spells: Split a large spell into a series of smaller ones. '''java String[] words = fullName.split(" "); // ["Harry", "Potter"] '''
Why String Magic Matters
- Immutability: Strings, like ancient scrolls, do not alter once written. This immutability assures that your magical code remains stable. - String Pool: The constant pool conserves memory by reusing existing spells. Efficiency at its best! - StringBuilder and StringBuffer: These classes come in handy when mutable spells are required (for example, dynamic incantations).
Conclusion
Strings in Java are more than just words; they are the incantations that define our digital magic. Whether you're concatenating, comparing, or separating, keep in mind that each string tells a story made up of characters and bytes.
So go forth, young wizard, and use your strings wisely. May your code be bug-free and your magic enchanting! 🌟✨
if you want to know more about this topic or any other topic you can visit analyticsjobs.in or click here
0 notes
Text
#truth table generator#truth table generator logic gates#truth table calculator#logic gate generator from truth table
0 notes
Text
MCM; Light Client Mod
Recently, I was playing on a server, and creating a farm, but I just couldn't stop jumping - for some reason, I just got an urge to lay my thumb on the jump key. So, unlike a normal person, who would most likely ignore the urge, I decided to create a mod to solve the issue.
I have previously worked a little bit using Fabric to mod, although I've never fully completed anything. During the process of rediscovering the setup process, I learned that Fabric's site has a page which allows you to generate a template for your mod, which kickstarts development. Therefore, using this tool, I downloaded the template, and opened up the folder as a project using IntelliJ IDEA, which is my chosen java development environment.
Firstly, it is worth noting that Fabric provides two separate entrypoints - one for the client, and one for the server (note that minecraft runs a server in singleplayer, but it is locally executed behind the scenes; I would postulate that this is what makes opening a singleplayer world to the LAN so easy while in-game).
Since this mod is only going to interact with the client's controls/input, and nothing needs to be noticed server-side, none of the server-side java code is necessary. However, deleting the full "main" module of the project isn't going to work for us, because the "fabric.mod.json" file is a part of the resources there, and defines the location of both the client and server entrypoint files. Deleting this, and other files in that region of the file structure, will cause the mod to stop working entirely.
Therefore, the first order of business is to remove the serverside entrypoint, as that just adds bloatware to what really only needs to be a small clientside mod. This, I did by entering the "fabric.mod.json" file, and removing the "entrypoints/main" key-value (the value should be a list/array of entrypoints, and should contain just one to begin with). This leaves a single client entrypoint.
Furthermore, since the template project comes with a default mixin, references to this must also be removed. To do this, I went into the "<modname>.mixins.json" file, which should be adjacent to "fabric.mod.json", and removed all references within the "mixins" list. After this, the "main/java" directory was deleted.
Now that the server/main-side of the mod has been removed, work can begin on the proper body of the mod. The plan is to add a key which allows the player to toggle an option, allowing and disallowing the player to jump on farmland. To do so, we need a keybinding, a variable to toggle, and a way of interfering with the player's motion. The toggleable variable, obviously will be a boolean (true/false) type. To interfere with the player's motion, something called a "mixin" will be used.
Mixins are used to inject our own code into existing methods in the game's code. In this case, we want to inject a little bit of code which checks whether the player is on top of farmland, and, if so, then make sure the player can't jump. Therefore, we need to find which method controls the player's jumping/motion.
Now, if you don't like the odd tangent, feel free to skip ahead to the next paragraph, where all the answers are give. Fair warning. To find which method we should use to stop the player from jumping, we need to see how the code which controls their motion. Thankfully, most of what we need to know can be found in the game's sources, which are viewable as decompiled .class files. To find the relevant files, go to ".gradle/loom-cache/minecraftMaven/net/minecraft/minecraft-clientOnly-<charsHere>/1.20.2-net.fabricmc.yarn.<blablabla>/minecraft-clientOnly-<blabla>.jar/net/minecraft/client/input". Here, there should be a couple files: "CursorMovement", "Input", "KeyboardInput", and "KeyCodes". Obviously, since we're looking to affect jumping, the relevant file will be either "Input", or "KeyboardInput". Viewing the code, while "Input" doesn't contain much of anything, "KeyboardInput" extends from "Input", and accesses which keys are currently being pressed inside the "tick" method.
Given this, our project plan is pretty well laid out: create a variable, create a keybind, create a mixin to "KeyboardInput.tick". Great! Let's start with the variable and keybind:
Assuming you've been anywhere near a java file before, declaring a variable should be pretty easy. This could easily be done in any custom file, but since it's pretty much the only thing we're going to store, I'm just going to define it in the "<modname>Client.java" file (this should be the client entrypoint defined in "fabric.mod.json"). In this case, I've made the variable "public static boolean allowFarmJump = true;".
Since this is a simple little mod, and I'm currently the only person who's going to be using it, I'm not going to bother storing the current value between sessions. The variable is going to be static, just to make things a little easier when accessing it from other files. I've also decided to make its default value "true", but this is mostly a preferential decision on my part.
Next: the keybind. Fabric's documentation is pretty short and sweet on the matter, but it does contain a little bit hidden away that I didn't notice at first: "This tutorial assumes you have the key bindings API, if not add "fabric-key-binding-api-v1": "*" to the "depends" block in your fabric.mod.json file".
After adding the key bindings API, it's time to add the keybinding itself. Using the KeyBindingHelper described in the docs, I created and registered a KeyBinding with the translation key "key.<modname>.toggle", default key of "backslash" (GLFW.GLFW_KEY_BACKSLASH), and category of "key.categories.movement" (this is the category used by vanilla's "Movement" controls category, where I want this to display).
After registering the keybind, I continued to go through the docs and added the "END_CLIENT_TICK" listener + while loop on the keybinding (remember to replace the "keyBinding" in the example code with the name of your own keybinding variable). In the while loop, this is where the "allowFarmJump" variable is being toggled ("allowFarmJump = !allowFarmJump;"). I also added feedback in the form of text appearing above the hotbar: "client.inGameHud.setOverlayMessage(Text.literal("Farm jumping set to: %b".formatted(allowFarmJump)), false);".
At this point, the variable toggling and feedback message are running fine, but we haven't actually implemented anything to prevent the player jumping on farmland. This is where the mixin comes into play:
Under the "client/java/<modpackage>/mixin/client" directory, open the example mixin. Of course, this is currently injecting into the wrong class and method, so change the "@Mixin" decorator argument to "KeyboardInput.class". Then, modify the "@Inject" method decorator to "@Inject(at = @At("TAIL"), method = "tick", locals = LocalCapture.CAPTURE_FAILHARD)". This will take the code inside the decorated method and inject it at the end of the KeyboardInput.tick method. Then, make the mixin class extend from "Input" (this is so that the "jumping" property can be accessed).
Now, inside the mixin method, we need to set the jumping variable to "jumping ∧ (allowFarmJump ∨ playerFlying ∨ ¬onFarmland)" (this notation may be unfamiliar: "∧" represents a logical AND, "∨" represents a logical OR, and "¬" represents a logical NOT). The reason for the added check with regards to whether the player is flying accounts for the possibility that the player might be in creative or spectator mode. If this were the case, and jumping were disabled, flying up would be similarly disabled.
Collecting all the required values, the assignment expression we're left with should look something along these lines: "jumping &= AntiFarmJumpClient.allowFarmJump || MinecraftClient.getInstance().player.getAbilities().flying || !(MinecraftClient.getInstance().world.getBlockState(MinecraftClient.getInstance().player.getBlockPos()).getBlock() instanceof FarmlandBlock);".
Note the assignment operator "&=", which is basically like "+=" or "*=", etc. except instead of adding or multiplying, it performs an AND operation (this is a bitwise operator, but it works on booleans as long as both sides are of the same type).
Having successfully intercepted and modified the jumping controls, when the program runs this time, the keybinding should now allow you to stop the jump key working while on top of farmland, unless the player is flying. Note that to build the mod to a .jar file, you need to run the "build" gradle task (these are found at the top of the right-hand sidebar, for me). This builds the jar file and outputs it to the "build/libs/" directory. The correct file is the one without the "-sources" at the end.
Feel free to give feedback on how this could be improved in future, or ask questions!
Fabric
0 notes
Text
Understanding Tableau Data Types: A Key to Smarter Data Visualization

Tableau is widely recognized as one of the most powerful tools for turning raw data into insightful, interactive visual stories. But to unlock its full potential, it’s crucial to understand how Tableau classifies data. This classification, known as data types, forms the backbone of accurate analysis and compelling visualizations.
Whether you’re a beginner just starting out or an experienced user looking to refine your skills, grasping Tableau classes data types will help you create dashboards that are not only visually appealing but also meaningful and error-free.
In this article, we’ll break down the six main data types Tableau uses, explain why each one matters, and share practical tips to make your data work smarter, not harder.
What Are Data Types in Tableau?
Data types are categories that describe the nature of the data Tableau is handling. These types tell Tableau how to interpret, display, and calculate your data, which directly influences the quality and accuracy of your analysis. Imagine trying to calculate average sales from a list of customer names instead of numbers—it simply wouldn’t work. That’s why understanding data types is essential.
1. Text (String) Data Type
Text, or string data, includes any combination of letters, numbers, or symbols that Tableau treats as words rather than values.
Think of customer names, product codes, or email addresses. These fields help you categorize and label your data, making it easier to group and filter information.
For example, when you create a report showing sales by customer region, you’ll use string data to define those regions.
Tip: String fields in Tableau are case-sensitive, so “USA” and “usa” might be treated differently. Be mindful when cleaning and sorting this data to avoid confusion in your dashboards.
2. Number (Whole and Decimal)
Numbers are the backbone of most data analysis. Tableau distinguishes between whole numbers (integers) like counts or quantities and decimal numbers (floating points) such as prices or ratings.
For instance, your sales volume might be a whole number (100 units), while average customer ratings would be decimals (4.3 stars).
Accurate identification of numeric data ensures that calculations such as sums, averages, and percentages work properly in your visualizations.
Tip: Double-check whether Tableau recognizes your numeric fields correctly. Mistaking a decimal for a whole number can cause incorrect aggregations and skew your insights.
3. Date and Time Data Type
Date and time data allow Tableau to track when events happen, enabling rich analysis based on timelines.
Examples include order dates, timestamps, or customer sign-up dates.
Using date/time data, you can uncover trends, spot seasonal patterns, or compare performance over months and years.
Tableau also simplifies time-based grouping by automatically categorizing dates into years, quarters, months, or days, so you can drill down or roll up your analysis with ease.
Tip: If your date fields aren’t behaving as expected, check their format in the source data or within Tableau, as improper formatting can limit your ability to analyze trends effectively.
4. Boolean Data Type
Boolean fields have just two possible values: TRUE or FALSE.
This type is useful when working with yes/no questions or binary conditions—like whether a customer is new, if a payment was received, or if an account is active.
In Tableau, Boolean fields can drive filters or logical calculations, allowing you to create focused views or highlight specific segments.
Tip: You can create custom Boolean fields using calculated fields, for example: [Sales] > 1000 to identify high-value transactions.
5. Geographical Data Type
One of Tableau’s standout features is its ability to map data geographically.
When you assign geographic roles like Country, State, City, ZIP Code, or Latitude/Longitude, Tableau automatically generates maps that provide spatial context to your analysis.
This type is perfect for regional sales analysis, customer distribution, or any scenario where location matters.
Tip: Tableau tries to auto-detect geographic roles but sometimes requires manual adjustments. Verify that your location data is accurate and formatted correctly to avoid mapping errors.
6. Cluster or Mixed Data Type
Occasionally, Tableau encounters fields that don’t fit neatly into one category. This “mixed” or “cluster” type often happens when data comes from raw or unstructured sources.
For example, a calculated field combining text and numbers or a field with inconsistent data entries.
While this flexibility can be helpful, mixed data types can slow down your analysis or cause unexpected errors.
Tip: To keep your workflow smooth, try cleaning or splitting mixed fields into simpler, more consistent data types before using them in your visualizations.
Why Knowing Tableau Data Types Makes a Difference
Understanding how Tableau categorizes your data isn’t just academic—it directly impacts your ability to analyze accurately and efficiently. When you correctly define data types:
You avoid calculation mistakes that can mislead decision-making.
Your dashboards load faster because Tableau optimizes queries based on the data’s nature.
Your visualizations become clearer, matching the right chart type to your data.
For example, plotting customer names on a line chart won’t make sense, but using date/time fields there reveals trends over periods. Similarly, trying to sum Boolean values without proper context could lead to confusion.
Practical Tips for Managing Tableau Data Types
After working with these six data types, here are some practical steps to ensure you’re getting the best results:
Always review and clean your data before importing it into Tableau. Consistent formatting helps Tableau assign the correct types.
Use calculated fields thoughtfully to create new Boolean or numeric fields for advanced filtering and segmentation.
Regularly verify geographic data roles for accuracy, especially when dealing with custom regions or international datasets.
When dealing with mixed or messy data, take the time to split or transform fields into clean, single data types.
Conclusion:
Data types are the foundation of effective data visualization in Tableau. When you understand what each type means and how to work with it, you empower yourself to create clearer, more accurate, and insightful dashboards.
If you’re ready to deepen your Tableau skills, practice working with these data types on your own datasets. The more familiar you become, the more you’ll unlock Tableau’s true power to turn data into knowledge.
0 notes