#gmnd
Text
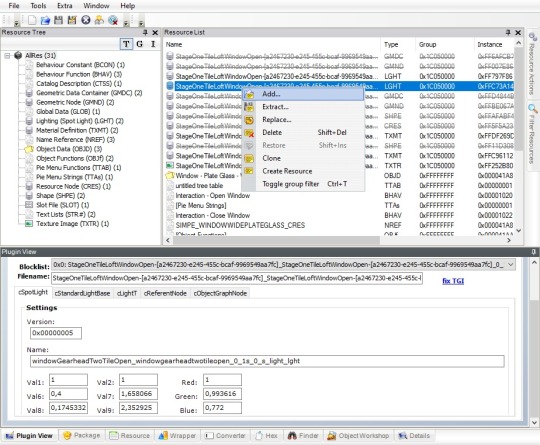
Maxis Meshes Spreadsheet - Updated
Maxis Meshes Spreadsheet
Added a new spreadsheet with tabs for CRES/SHPE/GMND/GMDC/TXMT/TXTR Maxis resources.
20 notes
·
View notes
Text
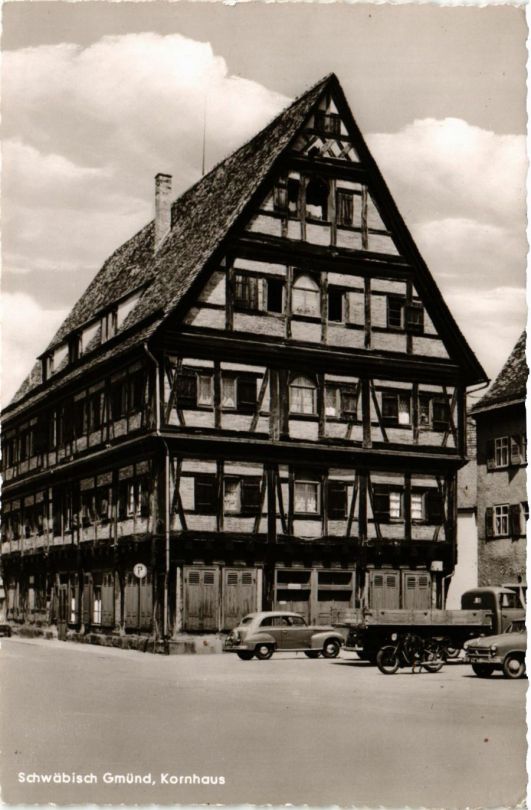
Timber framed house called Kornhaus in Schwäbisch Gmünd, Baden-Württemberg, Germany
German vintage postcard
#house#schwbisch#tarjeta#timber#postkaart#german#sepia#called#historic#wrttemberg#kornhaus#photo#postal#briefkaart#framed#photography#gmnd#baden-württemberg#vintage#ephemera#baden#ansichtskarte#old#postcard#postkarte#carte postale#germany#schwäbisch
7 notes
·
View notes
Text

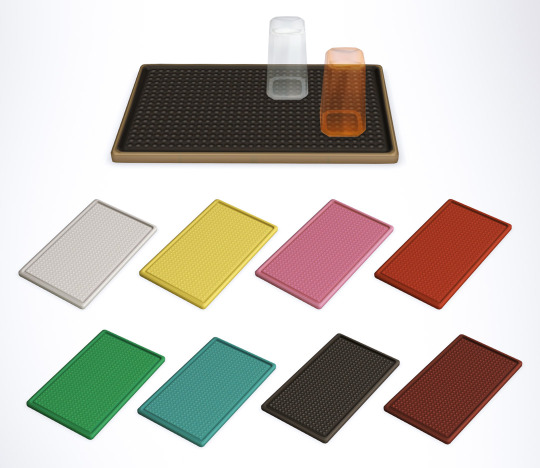
Not much to say other than I'm glad I finally managed to finish these but I still need more bar stuff :S
Bar Decor Set
Download: SFS | BOX
13 decorative objects plus bar mat (tray) and Bar OMSP (single slot, bar worktop height) . Reasonable polycount and texture size (512x256px or smaller, mostly 256x256 px).
Updated : 04.05.2024 - Fixed NonSlip Bar Mat, now it can be placed on all surfaces. 08.04.2024 - edited bar worktop OMSP so it doesn't block bar functions. Added second OMSP for lower bar shelf.


*Flavoured Syrup features simlish versions of RL product labels.
I used fonts: Simlish Western, Immajer-Simlish, CherryVanilla.
More pics under the cut:
*This is for The Sims 2
If you've downloaded the WIP version please update the files.
Retro Blender mesh and Red recolor was edited, drinking straw box is unchanged.
New stuff: flipped version of straw box (repo), two types of shakers, jiggers & ice tongs, mixing glass, small six pack and separate bottles, glass with straws and empty glass. There's also a bar mat - has 9 placement slots.
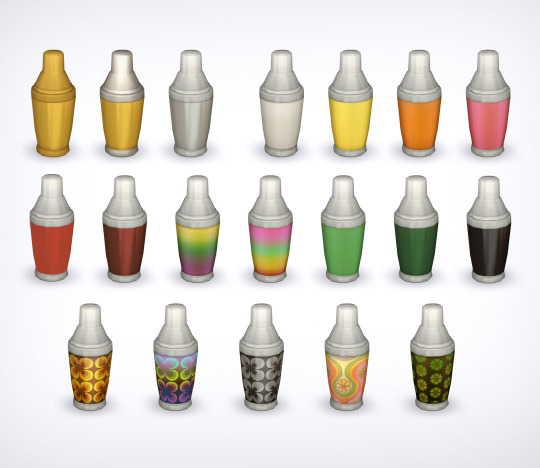


Enjoy!
-----------------------------------------------
Boring technical notes for CC creators:
My Syrup bottle has two recolorable subsets - the cap and Label - both opaque, but there's also a transparent 'Glass' subset with its own TXMT. When switching Label recolors, the glass color changes along with it.
It's possible thanks to 'tsDesignModeSlaveSubsets'. It allows you to have two different TXMTs linked together.
You add 'tsDesignModeSlaveSubsets' to GMND just like you would tsMaterialsMeshName, but the difference is you link recolorable subset to an extra subset inside your mesh. So in case of my bottle:
label = (String) glass
The important thing is to have TXMTs inside your file named as follows:
[CRES name]_[unique subset name]_[suffix shared between subsets]
For example:
[CRES name]_glass_bottle for the glass, [CRES name]_label_bottle for the label and so on.
When creating a recolor for both subsets, it should contain three TXMTs.
718 notes
·
View notes
Text
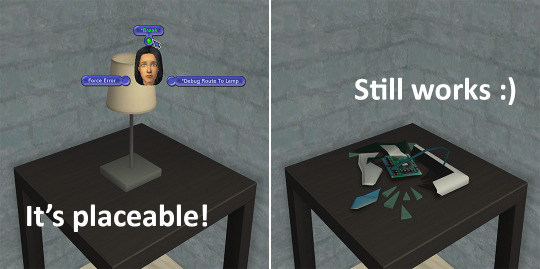
Cleaning Table Lamps of Debris
If you take almost any CC table lamp and open it with SimPe, you might notice that there's an additional object included with it, a pile of debris looking like this:
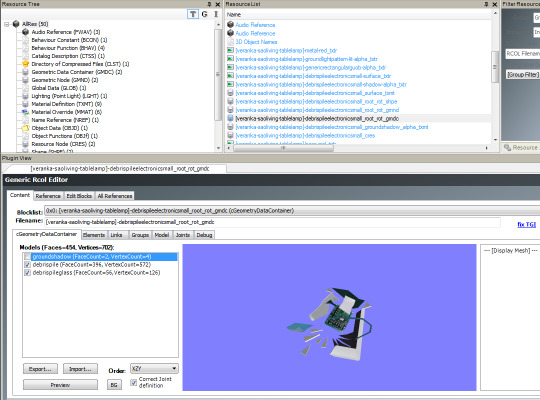
It's used if the lamp breaks, which I've personally never seen happening outside of forcing it. In any case, there's no sense to include this object with every single custom table lamp. I put a quick tutorial under the cut for how to get rid of it.
Just to show where it's used, here's me breaking the example lamp with the debug option, with the debris still inside the file:

A pretty pile of junk.
The first step to remove the debris from the file is to delete every resource with 'debrispileelectronicsmall' in its name.

That's one CRES, a GMND, a GMDC, a SHPE, and two TXMTs and TXTRs. A lot of junk, indeed.
But if you only do that, this is what happens:

The lamp becomes unplaceable. I assume this is why creators are so keen to keep the debris in the file. Luckily, the additional step needed to make it right is very simple.
Under text lists, there's one called 3D Object Names. If you open it you'll see that the last line has 'debrispileelectronicsmall' in its name.

In this example the line was 0x1C050000![veranka-saoliving-tablelamp]-debrispileelectronicsmall. Whatever it is, simply change it to debrispileelectronicsmall instead.
That makes it use the same debris object that all the in-game table lamps share if this lamp happens to break. The lamp will also remain properly placeable.
Here's me breaking the lamp again, with that line edited and without the debris in the file:
174 notes
·
View notes
Text
THE LINDASIMS2 RESEARCH AND EXPERIMENTATION: PART ONE
No idea how to really make one of these posts. Most Sundays I'd wake up and post my own CC. But not this Sunday.
DISCLAIMER: This is not really a callout post. This is a warning to anyone who intends to download Lindasim's stuff. And a genuine one. I have nothing personal against Linda, this is only what I've found from my own deep dive into Linda's files. I have no proof that what I've found is stuff that Linda herself did, but the stuff does exist. And it's terrible.
WARNING: Some of these images contain racial slurs that may make you uncomfortable.
You can find the nails file I use for my 'research' post here. It's part of the reuploaded March 2021 set and from what I can see that entire set is a giant mess.
Credits go to @dystopianam and aga on @acottonsock's server for providing the links to the files I needed to inspect.
Continue to read if you really want to know what you download when you download Linda's files.
OPENING THE FILE
Obviously, step 1 to any research regarding Sims 2 CC is... opening the file. And at first glance, this may seem completely normal to a CC newbie. It's from 'Base cc #333', 'LS_ACC_TF_AF_nail_M1_4swatches', 'LS_ACC_AF_nail_1v290321_mesh'.

I mean, it looks like any normal Sims 2 file, right? It's a mesh!
Until you open one of DeeDee's own accessory files.

Yeah... notice how there's a TON of stuff that isn't present in the other two?
Now, at first, I gave this the benefit of the doubt. Maybe, I thought, this was just another sign of my lack of knowledge regarding Sims 2 CC. It's been awhile since I've done my own accessories. But let's move on to the next part of my research...
THE 3DID REFERENCING FILES
There are 57 3DID Referencing Files in this nails mesh files. And maybe I'm ignorant, but I'm pretty sure sims don't have 57 fingers.
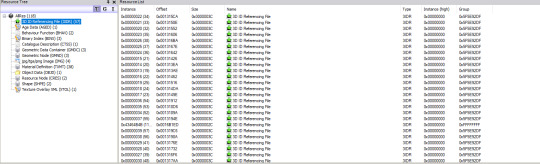
I didn't have time to actually see where they're pointing to... but... why the heck are they in a mesh file?
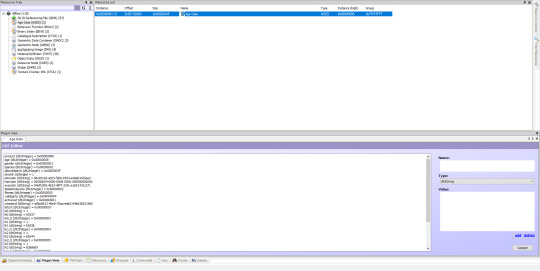
THE AGE DATA
This was what originally stood out to me the most. Why the heck is there AGE DATA in a nail accessory?
THE BHAVS
In @dystopianam's post, they mentioned the game reading some of Linda's files as mods. Well, I found the reason why.
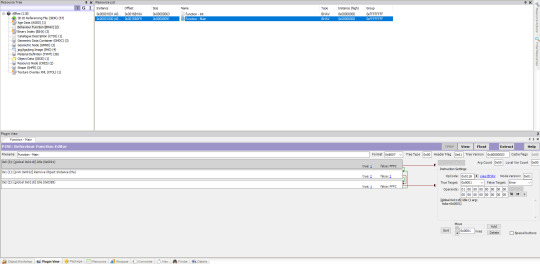
There are... BHAVs? In a mesh file? For those who don't know, BHAVs literally alter the game's code or add new code. From what I can guess these BHAVs probably have something to do with the sim embedded in this file?
THE CATALOG DESCRIPTION
This was the icky part. And why I was hesitant to make this post.
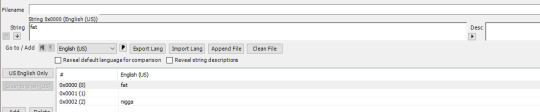
Yep, turns out that whoever made this file is a big fat racist. Also fatphobic. Also probably aware that catalog descriptions shouldn't be in accessory files. Most of the ones I've seen were for objects or... sims. But this one isn't.
THE GMDC AND ASSOCIATED MESH ELEMENTS
Okay, through all of this, I was under the impression that the GMDC, GMND, CRES, and SHPE would be the most boring elements to inspect. I... was wrong.
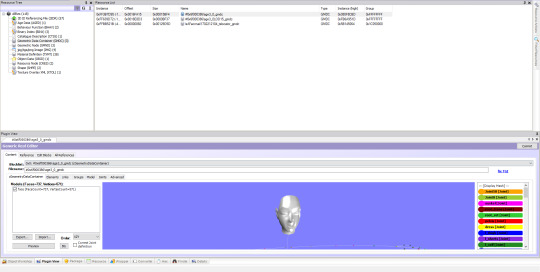
Yep, the sim has a face. No clue what their name is but they are more present in this file than I expected.
THE JPG IMAGES
It's the hero you've all been waiting for... LIGHTNING MCQUEEN himself!!
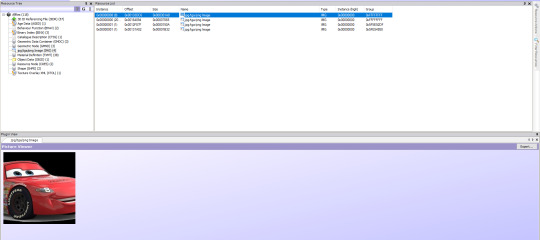
Yep, he's here too! He's real! And he doesn't just accompany hairs, I can tell you that much, because these are nails!
Apparently these were based on Bruno's files? (From MTS), since there's a Bruno JPG slipped in there.
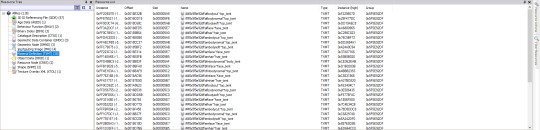
THE MATERIAL DEFINITIONS
There are 38 random material definitions. IDK why they're here. They're just... vibing.
THE OBJD (OBJECT DATA)
I was baffled to see this here. Why's there an object in here, I wondered. Until I realised the game sees this as a person. So, yep. That's the moment I realised there's an actual sim in here.

There's a bit more stuff in this file (most notably the Texture Overlay XML) that wouldn't fit in this post because of the 10 images limit... but fun fact, our secret sim has grey eyes! Wow!
THE CONCLUSION
Phew, that was a rollercoaster!
I didn't dare actually loading the game with these files (mostly out of fear that secret sim will haunt my dreams forever...) but as you can see in this post, the reuploaded files from Linda are completely fucked. No way around it. These aren't nail files, they're probably nail files merged with a whole-ass sim.
I'm not too knowledgeable on the subject of sims or BHAVs, but this is what Part 1 of my research has yielded and it's made me pretty fucking terrified. How long have people been downloading this 'leaked' stuff only for it to corrupt their game? It makes me wonder how many neighborhoods were lost to 'corruption' that was actually reuploaded Lindasims2 files...
For now, if you have thought about sailing the seven seas to get Linda's Sims 2 CC, I would recommend reevaluating that idea. Unless you want your game to be destroyed like @dystiopianam's and several others.
aga was kind enough to link me to some pre-2020 files of Linda's and they seem OK (so far...) but I would also not recommend supporting Linda on Patreon until we have proof that these files weren't corrupted by her, but by whoever reuploaded them to SimFileShare.
Also, it's not just the mesh file that's corrupted, in case you thought that. Nope, the recolor files have also been given the hidden sim treatment.
I can't really get my thoughts straight right now and really wanted to make this post before I forgot or the hidden sims came to murder me in bed, but for now, cheerio. I'll be back with more 'what the heck is in these files' ASAP!
#lindasims2#s2cc#sims 2 cc#ts2 cc#important info#the lindasims research and experimentation#how do u tag these sorts of posts#sims 2 research#sims 2 alert
287 notes
·
View notes
Text

Saturday, February 17th at 13:00 (GMT -6)- Subset Boulevard
This workshop is about adding subsets to objects. The workshop includes:
• What are subsets?
• Adding resources: the GMDC
• Adding resources: the SHPE
• Adding resources: Adding/cloning a TXTR
• Adding resources: Adding/cloning a TXMT
• Adding resources: the GMND
• Adding resources: the MMAT
• Rebuilding the scenegraph
• Testing & troubleshooting
The workshop starts on Saturday, February 17th at 13:00 (GMT -6). As always, materials will be provided in the workshop resource post.
To join Sims 2 Shenanigans, click here: https://discord.gg/tkNzjgsSTS
Already joined and interested in the event? To RSVP or check the event thingy for your local time, click here: https://discord.com/events/904954828940275753/1196523988852158524
17 notes
·
View notes
Text

Okay I have all these edited colors of mohd14's Motorola Razr cellphone default ready to go, but I need to figure out how to make it recolorable.
@2fingerswhiskey did the Nokia default and they said they used the omgsims2 phone default as a base to make the recolors possible (that's also what @episims did too from what I gather)...
idk anything about modding, or creating objects from scratch, or using SimPE much outside of changing textures & repositorying, but I extracted the CRES/SHPE/GMND/etc. of the Razr and added them to the omgsims2 mesh file.
It worked, in that the Razr shows as the phone when I use that edited file, but it's still not recolorable.
Based solely on context clues, I think the MMAT is at least part of what makes recolors possible, but I don't know what I need to do with those. I tried to use the Object Workshop to create a recolor, and it creates a completely empty package file.
13 notes
·
View notes
Photo

“LoscheDay” Gifts
These days we are celebrating a very special date... you know!
When I tried to build a very special shirine, I discovered a very annouysng bug of a base game table lamp, that I’d plan to use in the unusual way (as outdoor ground light). There was a weird shadow, squared and snapable.
This is unacceptable!!! So, I made a fix:
Base Game Lamps shadow and bounding mesh fixes
There are not just a lamp, but three bg lamps that have such issues:
- Shoji Table Lantern
- GentleGlow Table Lamp
- Lunatech Spare Fixture in "Grass"


The shadow issues are caused by the error in node settings (GMND - tsNoShadow block - Items in SimPE). The subsets for the shadow and the lightglow textures have the wrong values, that's why the lamps' outdoor shadows are shaped as squares. Perhaps these lamps are rarely used outdoors, but they could.

The grabability of objects is moderated by the boundig mesh tunings. In the game you can touch/snap the objects by the “hand”, and sensetive area for it is setted by 3d data in the bounding mesh control (GMDC -> Mesh section in SimPE). The bounding meshes of these lamps include the redundant parts (the shadow subset). Well.. it’s annoyng. So in this part the fixes are the same as in @simnopke "Paper Moon" Lamp Glow Fix. If you appreciate the benefits of the nopke’s fix, you will also find my fixes useful.
Conflicts: None that I know of. The mod will conflict with default replacement meshes of Shoji Table Lantern, GentleGlow Table Lamp, or Lunatech Spare Fixture in "Grass", and GMND tuning mods for them (like CEP, but there is no need for it).
DOWNLOAD
Enjoy!
305 notes
·
View notes
Text
Merging my AL windows with a repo-changed version by revolvertrooper
Received a message from @ladysilverwolf-sims asking if the edited AL-window add on sets by fway that I posted are compatible with this edit by revolvertrooper. They are not compatible, so I made this tutorial for them to show them how to merge it for their own use :)
We are going to extract the resources that might be edited in revolvertroopers version, and move those over to my edit. I say might, because I haven't closely inspected and figured out exactly what he edited, cause I'm not a repo expert and I think it's unnecessary energy when it's only a few seconds extra to just grab them all. This edit is tedious, because there's a lot of windows, but all you need is patience and good organization of files. Pick a window, open revolvertroopers version of it in SimPE. We are going to be grabbing the GMDC, GMND, SHPE and CRES. I recommend sorting by group, as that will automatically put them near the top of the resource list.

You can technically right click here and click export all of them at once, but when there's only 7 I personally prefer to do them one by one. Doing many at once creates folders and you got to navigate file tree to where you want to save, doing one by one opens whatever folder you last visited with SimPE so you are automatically in the right place after the fist one, which I find preferable. So in the picture above I highlighted just to show you the ones we are going to export. To start, I right click the first one, and click extract.

This opens up a window, to select where I want to extract it to. Navigate to wherever you want to save them, and click save. Leave the name as is, it doesn't matter.
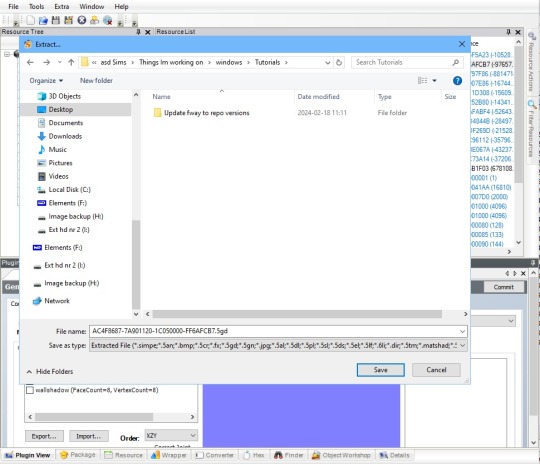
Repeat the above step for all GMND's, GMDC's, SHPE's and CRES resources. In this particular window there are 2 of the gmdc, gmnd and shpe, and one cres, so 7 total. I believe all fways has those numbers, but if there's a different number on some window just know that you should extract all :)
Once you have finished extracting them, head over and open the exact same window in my edited set. This where you need to be organized, and make sure you are doing the same window. We are going to start by deleting the GMDC, GMND, SHPE and CRES in my edited version because we want to use revolvertroopers edited ones instead. Right click on the one you are going to delete, and pick delete.
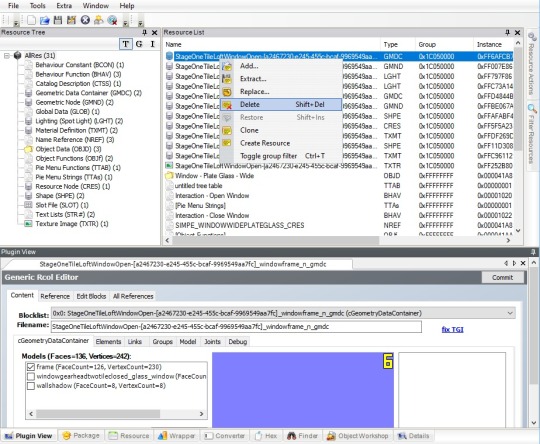
When deleted, the resource will show slightly faded, and with a line running through it. Repeat the above step for all the GMDCs, GMNDs, SHPEs and CRES.
Once we have finished deleting, we are going to add the resources we extracted earlier. Right click anywhere within resource list, and pick Add.
This will open up a window for you to navigate to what you want to add. Navigate there if it doesn't open automatically in the right place, highlight all of the resources you extracted earlier. If you've looked at them in windows explorer you'll have seen it's 14 files, and here it's only 7. That is normal, we only see the XML file when we add. Highlight them, and click open. I recommend you clean out extracted files between each window, or use different folders, so you do not risk adding files from the wrong version of the window.

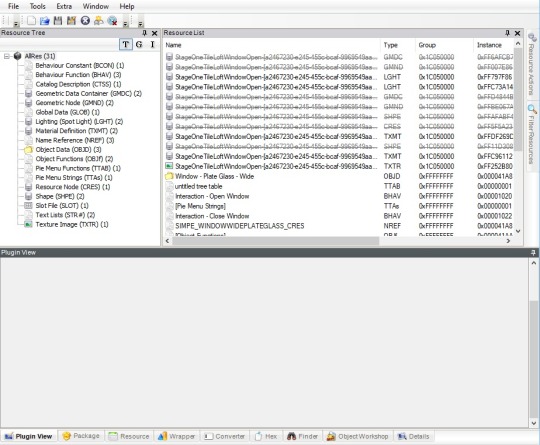
Once added, you'll see a bunch of new things on your list that show in cursive text, and under Resource Tree to the left you'll notice the number of files in the categories have doubled. That's because we haven't saved after deleting, so while the old parts are deleted they aren't fully removed yet. That is normal.
We've deleted the old, we've added the extracted fixed ones by revolvertrooper, and the last thing we need to do now is simply to save. Click save, or save as if you want to save it in a separate version. When you have, you should see that the cursive lines are no longer cursive, and the deleted struck through ones are gone. The totals listed under resource tree are back down to 2 GMDC, 2 GMND, 1 CRES and 2 SHPE.
That's it :) Rinse repeat for every window in the set. If you followed along correctly, and you made sure to do the same window, you should now have a version with revolvertroopers repo changes, and my edits. If you find issues when you test in game, the most likely issue is that you mixed up the windows and imported the wrong one.
The other alternative if you were using revolvertroopers edits, would be to replicate whatever recolors you have of the closed AL window to the open AL window. To me that's less tedious, and I'd rather have double the recolor files than do the above for every window, but we all have our preference and if you want to keep your files to a minimum, now you know how :)
3 notes
·
View notes
Text


documenting the growing pains! very pleased so far. my first new object (after JWoods tutorial table). There was a lot of trial and error here - I followed the tutorial for many steps, but due to the object I started with I had to clean up a lot of extra stuff, in a messy and learn-by-doing way.
This is going to be a cellar door, also known as a basement door or a bulkhead door. I wanted it for my Philadelphia-inspired rowhouses.
I began by cloning from this decorative roof piece because it took up about the right amount of space. Then I followed the tutorial to replace the mesh part. However, this item had a second mesh part for the roof's surface, as you can see -- I had to go in and delete that.
Next, the roof piece is actually slaved to other parts of its set for textures. So I had to learn about the scenegraph and referencing a little more in-depth to remove those references.
(In between photo 2 and 3, I crashed my game because of the GMND; when I deleted the extra parts under "Edit Blocks", I did not even out the Datalist Extension Reference under "Content > cObjectGraphNode". Thanks to a forum post with a similar problem last year, I learned!)
Then I threw in this haphazard texture just to orient myself and figure out how to orient my desired texture.
Next I pulled the texture from the foundation wall for the concrete base of the object. And I downloaded some free photoshop patterns from borysses on deviantart, for the door.
Next I will plan out and add detail to the door. But I am very happy with my progress today.
1 note
·
View note
Text
Leptospirosis warning as deadly disease that can kill dogs and owners spreads across Australia
New Post has been published on https://petn.ws/gmnd
Leptospirosis warning as deadly disease that can kill dogs and owners spreads across Australia
Leptospirosis is a bacterial disease of humans and animals. It is caused by bacteria in urine from infected animals including mice, rats, cattle, pigs and dogs. What are the symptoms? Common initial symptoms of leptospirosis include fever, severe headache, sore muscles, chills, vomiting, and red eyes. Symptoms usually come on suddenly. These symptoms can mimic […]
See full article at https://petn.ws/gmnd
#DogNews
0 notes
Text
Repository Wizard - Updated
Repository Wizard V2.5
Added _{index}_{age}{gender} into split package names - to cope with creators who don't give their GZPS resources unique names!
Added support for multiple meshes in the same .package file. There is a new drop-down list after the chosen mesh .package file to select the required mesh.

Added support for distributed meshes (eg Maxis meshes, or user meshes that use Maxis GMND/GMDC resources). with the above new drop-down, it is now possible to pick Maxis meshes from the game files (eg Sims06.package)
Fixed a bug when selecting the Downloads folder (and not a sub-folder within it)
Fixed a bug in Standalone mode where it was assumed the required mesh(es) were in the same .package file as the recolours / default replacements.
29 notes
·
View notes
Text
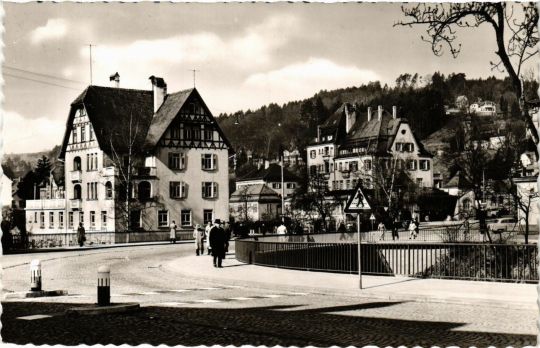
Town scene in Schwäbisch Gmünd, Baden-Württemberg, Germany
German vintage postcard
#gmnd#historic#photo#briefkaart#vintage#sepia#schwbisch#photography#carte postale#scene#postcard#postkarte#schwäbisch#postal#tarjeta#ansichtskarte#old#ephemera#baden-württemberg#postkaart#town#baden#german#wrttemberg#germany
9 notes
·
View notes
Text

Have you ever wished for unpotted version of the magnificent Laganaphyllis Simnovorii? This little DIY kit makes it possible - it includes invisible pot recolors and an overlay object.
Cowplant recolors
& stump / roots overlay
Download (SFS)
Stump is 780 poly, has 'view' interaction enabled (it can be switched off) - two versions included, the repositoried one requires this amazing Cowplant mod by @episims (comes with GMND fix - original Cowplant GMND is broken so it's impossible to make functional repositories)


Enjoy!
*This is for The Sims 2
479 notes
·
View notes
Text
BU Meshing Mini Tutorial and Kit
Here’s a thing I wish I’d had last year (and yesterday), a very quick mini tutorial and “kit” for making new meshes for baby clothes. This tutorial assumes you know how to make a new mesh, link it, etc. I’d call this an intermediate level project. No photos, but there is a download to save you a little time and hassle. The download contains the file parts you’ll need to build a mesh, plus a “dummy” mesh and texture to clone in Body Shop.
DOWNLOAD KIT (SFS)
Kit includes: dummy mesh and texture with two subsets (body and noblend), extracted mesh parts for BU_bodydiaper, and BU_bodynaked.5gd
Instructions:
Make whatever it is you’re making in Milkshape. You know how to do this part. (If you don’t, go learn and then come back here.) BU_bodydiaper.5gd in the kit is the body base I like to use, so outfits shaped around it are filled out like there’s a diaper under them. If you’re doing something skintight, you’ll want to use BU_bodynaked.5gd (in the “extra” folder of the kit).
Use Body Shop to create a new project. The dummy texture is in Toddler Everyday, the hover text says “kalux BU dummy” and it will be invisible. It’s supposed to be invisible. Export your project
Open SimPE and create a new package. DO NOT use the Body Mesh Tool “extracting stage”. We’re doing this part the old way. Instead, right click in the Resource List and add all four mesh parts from the Mesh Parts folder of the kit. Make sure you have one of each; GMDC, GMND, CRES, and SHPE.
Fix Integrity, Save As, replace the GMDC, etc. Do the rest of the mesh and texture creating and linking as you normally would.
Test it in game and in Body Shop. Your new creation should be invisible on toddlers in Body Shop, but should show up in-game on babies. (You need the mod, of course.)
Make however many textures you’re making. When you’re done, you’ll want to hide them from the toddler section. Open your linked texture package in SimPE. Open the Property Set. Change the age value from 0x00000021 to 0x00000020. You’ll have to do this for each texture, but you can also do a whole batch with the Clothing Scanner (Scan Folders) in Tools in SimPE.
That should be it. If you need clarification or help (not with basic meshing), please ask.
If you use the kit to make something you share, I’d like credit, but I’d *love* to be tagged so I can see (and download) what you made.
42 notes
·
View notes
Note
Hi! I'm the same anon of this question :) (https://loosiap.tumblr.com/post/687656442968375296/heya-loosi-i-dont-know-if-you-take-requests-or), sorry if the question made you uncomfortable it wasn't my intention >.< Rudhira doesn't accept requests to add ages to her defaults and I'm pretty bad with Simpe honestly :S Although I do wish you could do some tutorial (preferably written) and sorry once again for making you uncomfortable! Have a nice day ❤️
Ok I changed my language setting to english for this lol. My brain and english is all over the place but I hope you understand everything. End result is quite messy and big but I think it’s good enough for personal use. You should be able to follow this little tutorial even if you’re afraid of SimPe
Step 1) If you play Sims 2 I’m pretty sure you have SimPe, if not then download it. Another program you need to download for this is Hair Binner: link. You also need to download CC hair that was used to make default you want to edit (you need mesh file and 4 natural colours).
Step 2) Make a new folder on your desktop and name it however you want but with _ or other punctuation mark in the front (so it’s faster to find in simpe and hair binner later). Put hair default and CC hair that was used to make it in this folder.
Step 3) Open SimPe and open mesh file that you placed in your work folder

In "Resource Tree" there’s going to be 4 categories: GMDC, GMND, CRES and SHPE. Click on first and in "Resource list" localize gmdc for ages you want to add. There should be information what age it is in name: for toddlers you will see somewhere in name pu/p/pf/pm; for children cu/c/cf/cm; for teens t/tf/tm and for adults af/am

Right click on chosen file then “Extract...” and save it in your working folder. Repeat with each category and each wanted age
Step 4) Open Hair Binner

Now you need to click check next to ages you want to add and next to “decustomize” option (both hair you want are base game so don’t change anything else). Then click “...” button next to each colour and find coresponding colour from cc hair that you saved in your working folder. Once you do this click “Bin” and let program do its magic. When program will open another window that says that it’s done binding click ok and close program.
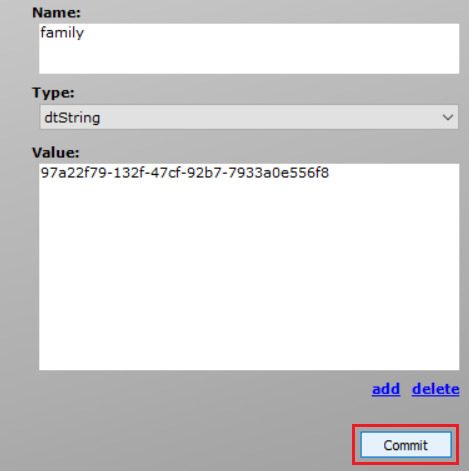
Step 5) Open hair default in SimPe. Click on "Property Set (GZPS)" from "Resource Tree", then in "Resource list" click on any property. Make sure you have "Plugin view" open, you should see something like this:

Find family and copy its value.
Right click anywhere under “Resource list” and “Add...”.

find your extracted mesh parts from your working folder, click on them and then click "open" to add them, then do the same to add binned colours (you might need to chose "all files" to be able to see them)

Now you just need to paste family number that you copied before into property files that have appeared after you added binned colours. Click “commit” every time!
Once you’re done click File and Save to save your edited default. Place it in your Download folder and open BodyShop to check if everything is working correctly.
That’s it! Repeat for second default.
8 notes
·
View notes
Last Seen Blogs

neetcanons-for-everyone
Osomatsu-san Headcanons And Imagines!

jarbites-blog
Untitled

loielyn
calculated adrenaline

poorlydrawnterezi
chalk scribbles everywhere

kciretep
baby you were my picket fence