#homesteadquaranteam
Text
Edible Cookie Dough for One

Hello folks, I’m back with another recipe for @homesteadchronicles QuaranTEAM!! This time - edible cookie dough for one!! In all honesty, this technically isn’t my recipe though. See, I have an issue with a lot of the normal edible cookie dough recipes on Pinterest, because they never taste the same as my usual cookie dough recipe. So I took my normal recipe, the standard Tollhouse Chocolate Chip Cookies recipe that you can find on the back of all their chocolate chip bags, and scaled it down. And of course, modified it to make it edible. And after all that math (gross math... the things I do for cookie dough...) I got this!!! A single portion of cookie dough thats safe to eat and tastes just like the normal stuff!!! So here we go!!
Recipe: Edible Cookie Dough for One
Time: Three minutes (plus five if microwaving flour, you’ll see) || Yield: 1 serving
Ingredients
4 tbsp flour
1 tbsp granulated sugar
1 tbsp brown sugar
1 tbsp butter
1 tbsp milk
1/8 tsp salt
1/8 tsp vanilla
Chocolate chips
Method
Melt the butter in the microwave
In a microwave safe bowl, nuke the flour on high for five minutes. **Technically this can be skipped, but raw flour can contain E-coli. Doing this eliminates the risk, so if you want to be safe, or are preparing this for kids, don’t skip this. If you feel like living on the edge, ignore it.
While the flour is microwaving, mix all other ingredients in with the melted butter. Add flour last.
Add chocolate chips. You will note no amount is listed, because I am firm believer that the amount of chocolate is up to you.You feel that shit in your heart.
And that’s it!! Enjoy!!
#my recipes#sort of#recipes#cookie dough#edible cookie dough#cookies#cottagecore#quaranteam#homesteadquaranteam#baking
2K notes
·
View notes
Text
Recipe: Fried Rice
Make the best fried rice you’ve ever had with things you already have in your fridge!
You’re gonna need:
2 tablespoons high-heat vegetable oil (hemp and olive oils are bad for this recipe!! They burn too easy. Use coconut, avocado, sesame, or canola oil instead!)
3 cups leftover rice (Day old rice makes the best fried rice!)
2 cups frozen veggies (basically anything! I use soybeans, carrots, and peas.)
2 tablespoons soy sauce
2 teaspoons five spice
salt and pepper, to taste
leftover protein (optional! leftover chicken is great for this!)
an egg (also optional!)
Got your stuff? Let’s get started!
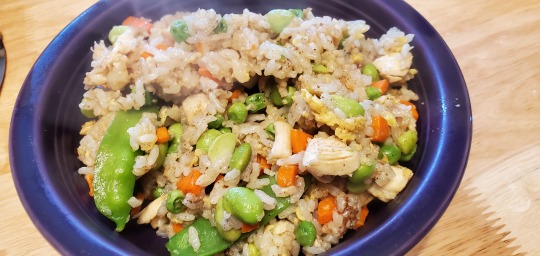
In a large pan over medium-high heat, heat your oil. You’ll know you oil is up to temp when it starts to ripple and pull away from the middle of the pan. When your oil is hot enough, dump in your rice and start immediately stirring it around, breaking up chunks as you go.
Once your rice is even distributed across your pan, dump in your veggies and stir to evenly combine them into the rice:

If you’re using a leftover protein like chicken or steak, make sure you chop it up nice and small, and you can add that at the same time!
If you’re using an egg, start pushing your rice off to the side to give yourself a nice area of clean pan. Prepare the egg like you’re going to scramble it, and pour it into the empty space. It’s okay if some of the rice and veg gets in there! It’s all gonna get mixed together anyway!

Cook your egg until it’s almost completely set, then mix it right back into your rice to finish cooking! This is what a lot of Chinese restaurants do with their fried rice, and it’ll give you some delicious scrambled egg goodness throughout.
Next, add in your soy sauce, five spice powder, and salt and pepper! Adjust these seasonings to your liking. Stir to evenly combine everything, and once it tastes the way you’d like it to, turn off the heat and feast!

You did it, you made your own pan of fried rice!
92 notes
·
View notes
Text

Have you heard the word? Today, we are launching our “QuaranTEAM” initiative - an online gathering where artists, writers, musicians, bakers, playlist makers and creatives of all sorts share their work to encourage, inspire and include those stuck in isolation! Wanna know who’s involved?
Please welcome our QuaranTEAM members!
º @homesteadchronicles
• @lynnafred
º @alittleyellowdinosaur
• @quarantinednano
º @perringwrites
• @fatal-blow
º @khymnal
• @imaginelly
And more still to come! Maybe even you? Reach out to me if you’d like to help!
But this would be nothing without somewhere to house it all. That is why I am repurposing my Discord Server, aptly named “The Homestead”, so that all can come to find a welcoming community of creatives, see the products of the QuaranTEAM’s creativity, and spread their own work as well! Consider yourself invited to your new home - especially if you’re sick of sitting in your own home.
To join our community, just click the link below and I’ll welcome you on in :)
JOIN THE HOMESTEAD: https://discord.gg/8tSFBcX
Whether you decide to join us now or not, please help us impact more people by spreading the word! Invite friends you know need a pick-me-up, share this with those you know who have been down in the dumps since the quarantine started. Let’s work together to bring hope to the people around us!
Be sure to track the tag “#homesteadquaranTEAM” for more updates :)
#writeblr#artblr#writers of tumblr#writers on tumblr#writers#artists on tumblr#artists of tumblr#artists#writing#art#discord#discord server#quaranTEAM#homesteadquaranTEAM
61 notes
·
View notes
Text
Home Canning Basics and FAQs
Lets jump right into it, shall we?
Basic equipment and ingredients
JARS! (mason jars are the most recognizable, but any GLASS jar will work)
Lids- must be metal! With a rubber seal
Boiling Pot- big enough for your jars to fit upright completely covered in water
Pots/pans/knives/etc- for cooking what you are canning, no you can’t use your boiling pot
Something to get your jars out of the water- you can buy special holders, I just use a couple of plastic spaguetti forks
Spacer- so your jars don’t clack against each other, you can buy one or use a kitchen towel
FAQs
Can I reuse jars? How about lids?
Technically, yes. BUT you need to make absolutely sure that the seal is safe. In practice, this means that you can almost always recycle your jars, and almost never your lids. For the jars you need to run your finger over the edge to check for even the smallest chipping, if it is chipped discard it. For lids you need to check the rubber seal; almost all lids once they have been used leave a dent in the seal, which means that, since you want it to be airtight (you do) it will not be usable
Can meat/poultry/fish be canned?
Technically, yes. HOWEVER you need special equipment to do it. It’s called a pressure canner and, honestly, they are not that hard to get, but they can get pricey and since almost no one has one I wont be giving instructions for it
Can I can veggies?
Technically, yes (you see the pattern yet). You can use a pressure canner (as with meat) or you can pickle it. Vegetables (except tomatoes and green tomatoes, which, fruit) do not naturally have the acidity needed to keep by the boiling method of canning. We will talk about acidity in the next post
I don’t like the flavor of/am allergic to lemon/vinegar/acidic ingredient, can I change it?
Technically yes, BUT only to something stronger. You cannot reduce the acidity level of a recipe without making it unsafe. From weakest to strongest go: natural lime/lemon juice-apple cider vinegar-white vinegar-concentrated lemon juice-citric acid. Natural lemon juice is actually often stronger than vinegar, but since you have no way to control its acidity it’s safer to consider it weaker. We will touch on this again
Will altitude affect my boiling time?
Yes, I will give altitude adjustments on all recipes I share, but a good rule of thumb is to add 5mins of boiling per 1000ft
13 notes
·
View notes
Text
Streaming
Doing some work for Patreon and listening to MBMBAM if y’all wanna pop in and say hi uwu
3 notes
·
View notes
Text
Bread Baking for Beginners: Sandwich Bread

Hello there folks we’re back!! I’m so sorry this is so late but we’ve been... having a few weeks. Regardless, here it is, part two to the Bread Baking for Beginners series, as part of @homesteadchronicles ‘s QuaranTEAM project! (see Part One: Tips and Tricks here!). Admittedly this is probably the last for now because I’m out of yeast and can’t get more. WhoopsTM. I’ll hopefully do some desert recipes though. For now, we’ve got a super easy recipe for homemade sandwich bread! I like this recipe because it’s a little less fluffy, which might sound less good, but it’s better when you’re cutting slices for sandwiches. When it’s sliced, this bread very closely resembles the texture of the sandwich bread I normally buy, slightly close textured but still with that bread elasticity, and it’s even got the soft crust to go with it! And best of all - other than yeast and maybe flour, you’re bound to have all the ingredients at home already!
Since we are out of everything right now and stores are wiped out, I had to use a cup of whole wheat flour when making it and taking photos, so the color is a bit darker. The texture and method will be very close, so just ignore this fact, I just wanted you to be aware when yours doesn’t look quiet right. Now, this gets long since I’m including a ton of pictures, so it’s under the cut, but... enjoy!

Recipe: Basic Sandwich Bread
Yields: 2 loaves. // Time: About 3 hours. All but 30 minutes of those are proving/baking and can be spent elsewhere.
Ingredients:
2 cups warm water
1 1/2 tbsp yeast
1/4 cup sugar
1 1/2 tsp salt
1/4 cup vegetable oil
6 cups all purpose or bread flour.
Process:
1. Mix yeast and sugar with the warm water and let rest for 5-10 minutes, or until it gets nice and foamy.

2. Add in the rest of the ingredients, keeping the salt and oil separate from the yeast (I suggest plopping in the flour, then the rest). Let mix with a dough hook until it comes together. it will look gross and like it needs more moisture to start, but keep at it.

3. Knead the dough for 10-15 minutes. You can either do this with the machine (in which case it will likely be less time), or by hand. I go indepth with kneading in the tips and tricks post, so I won’t here. If kneading by hand then use olive oil to grease it. The dough WILL BE DRY and TIGHT. It’s supposed to be. Don’t be tempted to add more water unless it truly won’t come together.
Here is the dough before it is kneaded...

...And after. The whole wheat flour makes it look kind of hard to see, but the dough is much, much smoother and stretches easily.

4. Plop the dough back into the bowl, and cover with cling film and a towel. Place in a warm spot for an hour and fifteen minutes, or until it grows over double in size.

5. Punch down the dough once or twice, then split into two and put into two lightly greased loaf tins. Cover again and let rise for about 45 minutes, or until they fill the tin and start to pass the top. About 30 minutes into this prove, preheat the oven to 350 degrees Fahrenheit.
6. Throw into the preheated oven for 25-30 minutes. You’ll know they are done because they’ve got a nice golden color and when you tap them they sound hollow.
7. Let cool for 10 minutes or so in the tin, then take them out and let them finish cooling. (or take them out right away because you are impatient, it’ll probably be fine) Don’t slice the bread until it’s ENTIRELY cool, or otherwise you won’t get neat slices. In the first photo of the texture inside, it’s all crumbled like that because my family got greedy and started attacking it before it was cooled/properly sliced. If you want really nice slices, wait a day or put it in the fridge to really cool. You won’t get any crumbling or falling apart if you wait, and it’ll be 100% easier to cut thin sandwich bread slices!
Enjoy my friends!!!
#homesteadquaranteam#bread baking for beginners#bread baking#bread#cottagecore#baking#my recipes#recipes
128 notes
·
View notes
Text
Copycat Starbucks Syrups

Hello hello folks it’s time for another episode of “Elliot is way too into tea and not giving big businesses money” for @homesteadchronicles QuaranTEAM thingie. Yes I’m still doing it. A part of me wanted to do the donut recipe I made yesterday but since I want to do fairly simple recipes we are doing this instead.
So let’s get into this. Starbucks as well as all coffee shops use syrups to flavor your drinks. We know this. But did you know they take 3 ingredients and like 3 minutes to make? Yea. And then, lo and behold, you’ve got no need for Starbucks anymore bc you can do exactly what they do. We love that. Today I’m giving you this power to say fuck you starbucks, and trust me it’s worth the 3 minutes bc dang it feels good. Plus, sugar syrups are much better than adding plain sugar, as it mixes more evenly, no graininess, all that shit, plus it’s flavored which is the main plus here. You can make this with any flavoring, or with none, and I’ll teach you how to do both in this post (tho I’m using vanilla in the ingredients as a stand in). So Let’s do this.
Ingredients
1 cup sugar
1 cup water
3 tsp vanilla
Method
Warm all ingredients in a small pot on medium low temperature, stirring continuously until all sugar is fully dissolved. Do NOT let boil or burn. Once it’s fully dissolved it’s done. Pour into mason or pump jar and boom there you go.
This will make anout 1 mason jar worth of syrup, but you can adjust the amount you make. Keep it in an equal water to sugar ratio and you’re golden. Store it in the fridge, and it should last about a month or so. You can adjust this recipe by adding more sugar to water, up to a 2:1 sugar to water ratio (I find it doesn’t dissolve properly beyond that) if you prefer it sweeter, tho it messes up the pump stuff below. You can also add any other extract flavoring in place for the vanilla, like I mentioned! You’re going to want to use extract tho not anything else bc then you have to strain it and ugh it’s annoying. For a plain sugar syrup, use the higher sugar to water ratio and no flavoring.
So how much do you use? Well either go by taste of course, or you can go by the “pumps”. 1 pump is about 1/2tbsp or so. small hot drink is 2 pumps, medium is 3, and so on. I can’t remember for iced drinks, but I think it’s adding 1 extra pump to that? So 3 for a small size, 4 for a medium, etc. this is at least what we did at the cafe I worked at, and it seems to be the standard. At home I just go by taste.
So there you go, everything you need to make your own mini Starbucks out of your kitchen. Go wild my friends.
#quaranteam#homesteadquaranteam#tea#starbucks#recipes#my recipes#well its like a universal revipe youll see the exact same proportions fuckin everywhere#so tefhnically not mine but whatever#tea party#starbucks lovers#sugar syrup
53 notes
·
View notes
Text
Recipe: Applesauce
Applesauce is my second favorite comfort food, and making it is very, very easy. It’s also wickedly customizable, and you can put almost any spices you want in it! I make mine with cinnamon, ginger, nutmeg, allspice, and vanilla, but you don’t have to use all of these (or any of them at all!)

So, let’s get started! You’re gonna need:
Apples! I’m using four of them for this little recipe.
A couple tablespoons of water. You don’t need a lot.
Spices. Cinnamon, allspice, and nutmeg are always good ones.
Vanilla extract
Brown sugar
A pinch of salt. Trust me on this one.
Your applesauce is going to turn out different depending on what kind of apples you use in it. Hard, less juicy apples are going to make a thick, chunky applesauce. Softer apples will break down more, creating a more consistent texture. For this, I’m using one Braeburn apple, two Empires, and a Golden Delicious. The braeburn is a really hard apple that won’t break down a whole lot, while the empires are really juicy apples that’ll add a lot of sweetness and break down to make a really soft cooked apple. The golden delicious is a great all-purpose apple that’s going to add a lot of flavor and is kind of medium firmness; it won’t be as hard as the braeburn or as soft as the empires. A mix of apples definitely makes the best tasting applesauce, but anything will do well! Experiment and see what your favorite mix is!
Peel and core your apples, roughly chopping them. The way I usually core my apples without a corer is to chop them into eights and slice the core right out of them, like this:


Once you have your apples cored and chopped, put them in a heavy bottomed pot. The pot does matter; thin pots have a higher chance of scorching what you’re cooking in them, while heavier bottomed pots are better at diffusing and evening out the levels of heat!
So once your apples are in the pot, put them over a medium-low heat. (For electric stovetops, this would be about a 3 or 4.) Listen for the apples to start to sizzle, then add the water. Turn your heat down just a little and stir the apples occasionally, letting them break down.

Now that the apples are starting to break down and get soft, it’s time to add our spices and our vanilla (if you’re using vanilla.) I tend to use natural vanilla flavor for things that’re being cooked, like cakes and sauces, and use vanilla extract only for things that I’m not cooking, like icings. I think it produces a better flavor in the end result, but use what you have on hand. Cooking is a journey and there’s no judgement here. You can see what seasonings I used here:


I used a quarter teaspoon each of allspice, nutmeg, and ginger, and a half teaspoon of cinnamon. I also used a packed teaspoon of brown sugar. Brown sugar gives a more full, caramel-like flavor over white sugar, but again: use what you have on hand.
Stir your spices, vanilla, and sugar in, and let your applesauce cook for another twenty or so minutes. Just before you serve it, mix in a dash of salt. Salt is a flavor enhancer, and will make the other flavors in your applesauce really pop. My great grandmother used to use a pad of butter in her applesauce, because she said that the fat and the salt did a lot for the flavor and body of the applesauce. She wasn’t wrong, but I typically just use the salt.
And there you have it, you’ve made applesauce! Eat it warm, or save it for up to three days in an airtight container in the fridge! You can scale this to be as big or as small as you want, once you figure out what you like best. There’s no hard and fast rules for applesauce.

95 notes
·
View notes
Text
Accidental Pretzel Bread Loaf Recipe

Story time folks! I know how much we all hate these at the start of recipes but trust me this is relevant i swear. See i was trying to make a recipe from scratch for plain white bread (most recipes i make here are combinations of 3-4 recipes with a unique method and a load of winging it, but i wanted to do something without even looking at other recipes). But when it came out and we all ate it... the white bread tasted EXACTLY like a pretzel. like, identical. Now, I have no idea why anyone would want a bread loaf that tastes like a pretzel intentionally, but my family fucking loved this thing, and it’s just too tasty of an accident to not share. So here it is - my accidental pretzel bread loaf recipe for the latest installation of the “Wait This Is Still A Thing” QuaranTEAM for the @homesteadchronicles! And this time i actually remembered to take photos of the tricky steps, so look at that!
Recipe: Accidental Pretzel Bread Loaf || Time: 3 hours || Makes: 1 loaf
Ingredients
2 1/2 tsp yeast
1c water, warm to touch
2 tbsp sugar
3 tbsp butter, melted
2 1/2 to 3 cups flour
1 egg
Method
Mix warm water, yeast, and sugar together and let sit for 5-10 minutes, or until it smells yeasty and is foaming on top. See photo below.
Add in flour, and then on top of the flour pour the melted butter and salt. This is because salt can kill yeast, and butter retards it and prevents a good rise if it touches directly. Start with 2 1/2 cups of flour, and if the dough is too sticky then add more slowly.
Mix until dough is coming off the sides of the bowl, and then take out and knead for 10-15 minutes, or until dough looks smooth and bounces back at the touch. If you’d like to do this the easy way, mix the dough in the stand mixer for 5 - 10 minutes on a medium speed after the dough comes off the sides of the bowl. See photos below.
Place dough back in bowl and cover with plastic. Leave in a warm spot to prove for 1 hour and 30 minutes, or until doubled in size.
Give the dough a good punch, then place it in a well greased loaf tin. Do your best to shape it so it’s a good log and fills the tin as best it can.
Cover in plastic and prove for another 45 minutes, or until the dough reaches the top of the tin. (Note: Mine took 45 minutes, but I had it outside in direct sunlight in 82 degree weather. If you are proving in a room temp kitchen, it may take longer)
Preheat oven to 350 degrees. Place an inch deep baking sheet in to warm up with the oven on the bottom shelf
Once the second prove is over, beat an egg well and brush over the top of the bread.
Place dough in oven, and AFTER that pour a few cups of cold water into the hot pan. Close the door immediately after so that the steam stays inside
Bake for 35-40 minutes. Do NOT open the oven door before the 30 minute mark or the steam will escape. You want the bread to be a nice golden brown and to sound hollow when you tap it.
Enjoy!
Photos Below Cut

Step One: Nicely foaming and activated yeast


Step Four: Before and after kneading
#quaranteam#homesteadquaranteam#bread#bread making#recipes#my recipes#baking#bread baking#bread baking for beginners#cottagecore#cottage core#cottagelife
28 notes
·
View notes
Text
Bread Baking For Beginners: Tips and Tricks
As part of @homesteadchronicles QuaranTEAM thing, I’m hoping to post a bit of a series on bread baking, to hopefully show you all that it’s actually... not that hard. I don’t know where the idea that baking your own bread is some luxury thing that only highly skilled professionals can do, but it’s a lie! Anyone can bake bread! Even if you are a busy person, you can bake bread, because most of the time the bread is rising and you can do anything else. If I can bake bread weekly in college with a full course load, you can too.
We’ll be starting off with some basic tricks and advice that’ll apply to all bread recipes regardless of type. I’ll also touch on some of the science of bread, aka the Why of what you do these things, and clarify some of the vocabulary. AKA this is going to get long. Let’s go!
Making The Dough
First things first, you’ve got to make the dough, which is fairly easy. But, here are some good tips to keep in mind.
Buy your yeast in a jar. They are like $6, and will last you a long while. Keep the yeast in the fridge, and it will be good for months. Most recipes ask for a packet of yeast, which is about 2 1/2 teaspoons! (A note - you can make your own yeast and cut that cost, but we won’t get into that since this is for beginners)
Start your yeast before adding the rest of the ingredients. Use warm (NOT boiling) water or milk, add the yeast and any sugar the recipe calls for, and let it sit for about 5 minutes, or until you see foam (It looks a bit like sea foam for reference).
Keep salt separate from direct contact with the yeast. I usually put the flour in first, then add the salt and any butter or eggs asked for on top of that. Salt will kill the yeast that you just spent time getting all happy, which we don’t want!
If you have a stand mixer, use a dough hook (the one that looks like Captain Hook’s hand). If you don’t have a stand mixer, use your hands, not an electric mixer or wooden spoon. Spatulas and wooden spoons just make it harder, and a hand mixer will clog in seconds.
Kneading
It seems to me that, other than time, kneading is the biggest concern beginner bread makers have, but it’s not a nightmare. Now, the reason you knead bread isn’t actually because of the yeast, but because you want to build up the gluten strands. This is why bead pulls apart all nice and has that tension when you pull that you expect (whereas cakes and pastry crumbles, because you don’t build up gluten). It seems complicated, but it actually isn’t at all, especially if you have a stand mixer.
If you have a stand mixer, just let the thing run for about 5 minutes and that’s it.
If you don’t and have to knead by hand, there’s a bunch of techniques. The one I use is to take the lump of dough, stretch it out with the base of my palm, roll it back up, turn it to the side, so the now longer side from rolling it is pointing away from me, stretch it again, and repeat. I recommend this method for beginners.
If you have to hand mix it, then keep this in mind - If you added olive oil, use OIL to grease your hands and surface. If you did NOT add olive oil (or another type of oil) then use FLOUR. This has to do with whether a dough is enriched (has eggs, butter, or milk) or standard (no eggs, milk, or butter). Just in general, don’t use anything to knead that you haven’t already added in.
You should need for about 5 - 10 minutes as a general rule of thumb, but there are a few ways to check that it’s read to prove.
The Window Pane Test - This is a test to make sure you’ve built up enough gluten. Stretch a chunk of dough between your thumbs and pointer fingers. If you can stretch it so you can see light through it, without the dough breaking, then you’ve got enough gluten. This test isn’t a be all end all - if you stop kneading before it passes the test, then you’re bread won’t automatically suck, it’s just a good way to double check it’s just right.
The dough looks smooth. Dough goes through a lot of stages when making bread. When you first start mixing, it tends to look weird, all separated and nasty. Once it’s mixed into a dough, it’s lumpy and sticky. Once it’s properly kneaded, the dough will look smooth and won’t stick to your hands or the bowl, which is what you want
If you press your finger into it, and it bounces back, that’s another good sign.
Proving
Ahh the easiest part of baking bread. The leave it in the corner and do something else phase. Proving bread allows the yeast to work it’s magic and grow, giving bread those beautiful air bubbles that make the texture so light and perfect. You almost always will have two proves, the first one when it’s in ball form, the second after you’ve shaped the thing. Between the first and second prove, though, always punch down your dough before shaping it. “But Elliot,” you say, “I just got all those air bubbles in there! Why would I get rid of them? You just said we need them!” Right you are. But punching down the dough allows it to have structure. Doughs that don’t get punched down tend to spread out all over the place and be a bit of a mess, and if you don’t punch it down then shaping it gets difficult. So just give the thing a few wallops before making it into it’s final shape.
The timing of the proves varies per recipe but in general, about 45-60 minutes for a first prove, and 30 or so minutes for a second is usually good. This WILL vary depending on the type of bread you are making. If you’ve added eggs, butter, or milk (an enriched bread remember), it will need a longer prove, since those slow down the rise of the yeast (we call it retarding the yeast), if you are making a bread that needs bigger air bubbles, like ciabatta, you’ll probably need longer too, stuff like that. So follow your recipe! Just a couple of tips for the best proves -
Let the bread prove in a warm spot. This makes the yeast happy, happy!
Cover the dough while proving, either with a plastic bag, ceran wrap, or if nothing else is available, a slightly damp towel. Covering the dough keeps a crust from forming, which will hinder the prove.
Shaping and Baking
This is all fairly explanatory stuff that relies mostly on the recipe and type of bread you’re making, but I wanted to touch on it briefly. Namely, it’s okay if the bread looks ugly. Trust me, most of my baking looks like crap. But it all tastes good, and that’s what matters. If you do want perfect looking bread, here’s a few tips
Use a wash. There are three types of washes - Egg white, egg with milk, and milk. Egg washes will give a darker color to the bread and make them nice and shiny, and milk washes make them soft, which is useful when making burger buns or other dinner rolls.
If you want a nice crust, use steam with an egg wash. Steam creates that beautiful, crunchy crust. Professional bread ovens have a steam injector, but you can create the same affect by putting a pan with sides in the oven as it’s preheating, and then pouring cold water in as you put in the bread. Just remember to keep the door closed until it’s ready to come out!
Remember that the bread will rise a bit more in the oven. The heat will give the yeast one final burst of action before it dies, so don’t be surprised if your nicely shaped cinnamon rolls suddenly start overflowing the pan and become truly massive (which has happened to me). This can also be good to know with the second prove - if the bread/rolls/whatever starts looking big during the second prove, even if it’s only been 15 minutes, throw the thing in the oven because it will get massive. Once you put bread in the oven, it’s all in the hands of the gods.
Slice the bread once it’s cooled if you want precise, clean cuts like for sandwich bread. If you don’t, eat it warm with butter and experience the beauty that is freshly baked bread.
In Conclusion...
I really hope that these tips can help you start baking bread with a bit more confidence. It is possible, and it’s really not all that hard. You could ignore 99% of these tips and your bread would probably be just fine as long as you kneaded it at least a little (unless it’s no knead bread!) and proved it. Bread is not inaccessible. It’s not something that only the most AestheticTM of Cottagecore people can do. You could do it. Yes you, and you could save a shit ton of money doing it! One bag of flour can make six loaves of sandwich bread, and a jar of yeast lasts months, so overall cost is so much lower long term. Plus, it’s really hard to stress about quarantine with fresh baked bread and butter, all I’m saying here. Hopefully the first recipe, a basic sandwich bread, will be up by the weekend, and I’ll reblog the other recipes I’ve posted in between then. Happy baking!
#homesteadquaranteam#quaranteam#baking#bread#bread baking#cottagecore#my recipes#recipes#bread making#bakers
48 notes
·
View notes
Text
Recipe Tutorial: Cooking with Dried Beans

Dried beans are your best friend. They’re cheap, they last for-fucking-ever, they’re versatile, and they’re so much better than canned beans!
And, really, they don’t take a lot of extra time to prepare. Let’s look at using dried beans, and I’ll walk you through two ways to prepare them: overnight soak and quick soak.
If you’ve got time, the overnight soak is the best way to prepare your beans. Roughly a half cup of beans will give you the equivalent of two cans of beans. They get pretty big when they cook, and that’s okay! That’s what we want.
Overnight method:
So the night before, put your beans in a pot and cover with with at least four inches of water. Cover them and stick them in the fridge overnight.
The next day, when you’re ready to prepare your beans, drain the water from them, rinse them off, and put new water in the pot, once again covering them with at least four inches of water. You’ll notice that your beans are bigger than they were last night, and they’re going to double again in size as you cook them.
Put your beans over a medium high heat and let them come up to a boil. I also recommend putting some aromatics in the water, so the beans can soak up some of their flavor. Bay leaves, thyme, onion, garlic, and peppercorns (whole!) are great for this. You’ll see that I used green and red peppercorns here, but that’s because they float and make for a nice picture. Use what you have!

Once your beans come up to a rolling boil, turn them down to a simmer, cover them, and let them simmer for about 45 minutes, checking them occasionally for a stir and to add additional water if you need to. After your 45 minutes is up, check your beans to see if they’re done.
You can do this one of two ways: taste one! They should be tender and creamy. If they’re still a little crunchy, they’re not quite done yet. The other way is to gently blow on the bean. If the skin splits and pulls back, then your beans are ready!
Drain the water from the beans again, and discard your aromatics. Now your beans are recipe ready for whatever you’re doing!
Quick Soak:
Rinse and put your beans in a pot with your aromatics (bay leaves, thyme, peppercorns, garlic, etc.,) covering them with at least four inches of water. Put the pot on to boil over medium-high heat, and once the water comes up to a boil, let them boil in the water for 5-6 minutes.
Next, turn off the heat and let the beans soak in the hot water for one hour. Now your beans are ready to use! I find that this doesn’t give the tastiest result, but sometimes you forget about your beans! That’s okay, we’re all human here.
38 notes
·
View notes
Text
Apple Crumble Pie Recipe

Hello friends Elliot is back with another recipe for @homesteadchronicles QuaranTEAM!! For today’s recipe, we’ve got a fun little combination I threw together. My family can’t decide whether apple crumble or apple pie is better (my vote is for pie tbh), so I decided, fuck it, lets make everyone happy. And boy did it work! It’s also an excellent way to use old apples that are starting to go bad and that no one will eat. We usually have a lot of those (especially now with no school lunches needing to be packed) so I’ve got this and another recipe in my back pocket for using them.
Anyways, this recipe is super easy to throw together and is awesome tasting, so lets get started!

Recipe: Apple Crumble Pie
Time: 1 hour || Yield: 1 standard size pie, about 8 slices.
Ingredients:
1 premade pie crust (or homemade pie crust if you’re feeling extra)
Filling:
7 small apples (or maybe 4 big ones? enough to fill the pie tin basically)
1 tbsp cinnamon
1/2 tsp nutmeg
1/3 c brown sugar
1/3 c granulated sugar
1/4 c flour
1 tbsp lemon juice
Crumble:
1/2 c flour
1/2 c oats
1/2 c brown sugar
1 tbsp cinnamon
6 tbsp melted butter
Method:
1. Preheat oven to 375 degrees Fahrenheit.
2. Slice apples, keeping the skin on or peeling it (either is fine, it’s your preference. I prefer keeping the skin on because I like the bite, but if you prefer softer apples, I suggest peeling them). Mix all filling ingredients together, making sure to thoroughly coat all apple slices
3. Line UNGREASED, clean pie tin with pie crust and throw in all the apples, making sure they are evenly spread out. If you grease the pie tin, you risk the crust sliding down the sides. It won’t stick, don’t worry, pie crust has enough butter in it for that already.

4. Put pie in the oven for 15 minutes to begin baking while you prepare the topping. Mix all topping ingredients together. It should form a crumbly, bread crumb like texture (slightly more so than in my photos, we only had 4 tbsp of butter so the one in the photos was more powdery. Darn this quarantine for making all ingredients hard to get!!).
5. After the 15 minutes, take out the pie and spread the crumble over the top. Put back in the oven for 25-30 more minutes, or until the crust and crumble look browned and you can hear the filling bubbling. You can eat this cooled or fresh from the oven, depending on how you like your apple pie.
Enjoy!!
#my recipes#apple pie#apple crumble pie#cottage core#apple crumble#recipes#baking#homesteadquaranteam#quaranteam#dessert#pie#pie recipe#cottagecore
37 notes
·
View notes
Text
Recipe: Taco Seasoning
So, to kick off @homesteadchronicles‘ wonderful QuaranTEAM idea (which you can read about here!) I’ve decided to lend my part by posting a few recipes a week, things that are both simple to make but really satisfying.
So I figured I’d start with something simple that, I promise, will save you a lot of money in the long haul: Taco Seasoning.

I use taco seasoning all the time in my apartment, so I just assume that everyone else does, too, and it’s made with a handful of spices that almost everyone has at home already!
You’re gonna need:
2 Tablespoons Chili Powder
1.5 Teaspoons Cumin
1/2 Teaspoon Onion Powder
1/2 Teaspoon Garlic Powder
1/2 Teaspoon Oregano or dried Cilantro
1/2 Teaspoon Salt
1 Teaspoon Paprika (but don’t sweat it if you don’t have it)
1/4 Teaspoon Cayenne or Chipotle pepper (optional)
In a small glass bowl, combine ingredients together. Store it in an airtight glass container or use immediately. This recipe makes the equivalent of one packet, but it’s really easy to scale up to make extra for later!
41 notes
·
View notes
Text
Recipe: Crockpot Rice and Beans
Hey, remember that Taco Seasoning recipe? Well, whip it out because you’re gonna need it for this easy Crockpot Rice and Beans!

You’re gonna need:
2 cans of beans, rinsed and drained
1 can of Ro-Tel tomatoes
1 Cup of white rice
1 Tablespoon Taco Seasoning
1 Teaspoon Onion Powder
2 Bay Leaves (optional)
2 Cloves garlic, smashed
2 cups broth or water
2 packets Goya Sazon (optional)
Put your dry ingredients into the crockpot first, and stir them around briefly to incorporate them together. (If you don’t have Sazon, that’s okay! It gives the finished product a nice orange color, but it’s not necessary at all and won’t affect the end result.)
Next, add your beans, tomatoes, and broth. Give the mixture another stir to make sure that everything’s evenly mixed.
Set your crockpot on low and let it go for 2 hours. Check it and give it a stir at this time, adding another 1/2 cup of water or broth if it needs it. Cover again and let cook for another hour. Once the liquid is gone and the rice is tender, you’re golden!
This is great as a side dish, used in burritos, or just eaten on its own!
21 notes
·
View notes
Text
My Favorite Pinterest Recipes
SO for todays installment of @homesteadchronicles QuaranTEAM we’ve got... Elliot being Lazy. Sorry folks, I just finished finals and I’m to tired to bake. But, I think this is still interesting enough to count. See I love Pinterest recipes. They are an excellent place to start (note - start) when creating my own recipes, but I rarely use the full recipes I find because so many times something is fundamentally wrong with them and it throws the whole thing off. I don’t know why this always seems to happen, but it does. So I thought today, I’d share some Pinterest recipes that I actually use frequently, because they are genuinely good. Save you the effort of digging through them, wasting ingredients, and trying to find something decent. So here we go - Elliot’s favorite, tried and true Pinterest pins, with bonus tips on how to make them actually good, since some of these skip a few steps. I include photos so this gets long, sorry.

How To Do This and That’s Subway Copycat Double Chocolate Chip Cookies
A few things the recipe doesn’t note - you need to press down the cookies. Unlike most chocolate chip cookies that you can lump and they spread out, the dough is too dry to do that, so you’ll need to press them down or otherwise they are super dry as a lump. Other than that, they are amazing, and actually a great copycat recipe

Cafe Delight’s Best Fudgy Cocoa Brownies
Yea I know how annoying it is to have them all say “best ever” but these are actually the best. They are AMAZING and I use this recipe all the damn time. Genuinely, these are great brownies, and really easy.

The Merchant Baker’s Brown Sugar Maple Glazed Bacon
Okay I’m sure bacon wasn’t what you expected on this list, but their method of letting the bacon heat up with the oven is genuinely the best thing ever. Like, best bacon I’ve ever made, so if you like candied bacon, use this recipe i stfg.

Life Straight Up’s Apple Crisp Shortbread Bars
These are so so good I love them (and also the second recipe in my backpocket for using old apples, along with the apple crumble pie i posted a while ago.) Though a note - do NOT make them the day before you want to eat them, they get super soggy.

Gimme Some Oven’s Rosemary Focaccia Bread
Okay this shit is the best, I make it regularly once it hits the fall and it’s just so good. Great crust, great crumb, great taste. My suggestion though - add about a tablespoon or so of chopped rosemary into the dough after the first prove. Sprinkling it on top doesn’t give you enough flavor in my opinion, but my family is also big on rosemary so it’s up to you. Still tastes great regardless.
--
That’s all I got of the ones I use on a regular basis (there’s a lemon bars one but for whatever reason I can’t find it, I think it’s another of my bastardized ones...). I hope one of these looks good to you! *side note - some of these have affiliate links. I am in no way affiliated or being sponsored by any of these blogs, just a fan of their recipes!) Coming up soon, I want to bring in some of my old family recipes and possibly some of my tea drink recipes.
Vote for what you want next via asks, replies, or whatever I guess:
sweet carrot cake
blondies
tea lattes
molasses cookies
Or my pick of Italian cookies (aka whatever recipe I can weasel out of my nana)
I can also do red sauce, pizza dough, or something savory for a change if you want. Let me know what yall want to see!
#quaranteam#homesteadquaranteam#i also can do crochet patterns ive made#kinda just up to yall#pinterest recipes#recipes#baking#cottagecore#bread#cookies#chocolate
16 notes
·
View notes
Text
Copycat Dunkin Donuts Iced Matcha Latte Recipe

Yes, your eyes dont deceive you, that up there is not actually from Dunkin Donuts, but from my house. In an old Dunkin Donuts cup, because your bitch never throws out a good plastic cup, my friends. But since I don’t believe in spending more money than necessary, I thought I’d share with you how I make this nearly identical tasting iced matcha latte for this installment of @homesteadchronicles QuaranTEAM. Yea, i didn’t forget about it, I’ve just been busy. Who knew publishing a book all on your own was so difficult... you can check out @elliot-orion if you want to hear more about that! Anyways enough shameless self promo, onto the recipe!
Recipe: Iced Matcha Latte || Time: 3 minutes || Makes: 1 drink
Ingredients
1/2 cup or so of ice cubes
2 or 3 times your usual amount of matcha power for an 8oz cup
Water
Half and half
about 3-4 tbsp of granulated sugar
Quick Explanation of Ingredients
Matcha - different people prefer different strengths with matcha power, and the amount you use varies on how much you are making. Typically they advise 1-2 tsp for a normal 8oz mug, but personally I like very strong matcha and use at least 2 tsps, sometimes more, and for this I use well over a full tbsp, so adjust based on your own taste and how large your cup is.
Milk and Water - Essentially, you want a 3:1 water to half and half ratio, adjusted as needed for your blender and cup. I make this by eye and based on what my single serving blender can hold (which is less than a medium DD cup), which is why i’m not adding measurements. It really is more of a ratio than anything exact, as it depends on how much you want to make and your blender.
Sugar - yes its a fuck ton of sugar, no i’m not kidding, I mean the big ones. Matcha is hella bitter to begin with so you usually need lots of sugar, and to make it taste like Dunkin Donuts you need even more, since they sweeten it with highly sugary syrups. You can lessen it as you like, but it won’t be like DD then.
Method
Add your ice cubes to a large enough cup.
Add all other ingredients to blender and blitz until matcha and sugar are fully mixed in and there is no graininess.
Pour over ice and enjoy!!
I hope yall enjoy not spending a shit ton of money on lattes this summer! If you’re not used to matcha, then I highly advise picking one up. It’s a taste you either adore or despise, and is very earthy and delicious. Or as my friend who hates it says - “it tastes like grass.’ (Hey can’t please everyone.) it’s got tons and tons of health benefits, but t’s highly caffeinated and an excellent alternative to coffee, if you either don’t like coffee (like meeeee) or want to switch to something healthier. So i do recommend you trying a small or kid sized version from DD or other place at some point, just to see if you like it.
If you decide you like it, or already do like matcha, but don’t know where to buy it, try David’s Tea or this one from Amazon. You can also look at this teahouse, it’s a small local business near me that I adore (run by a brother and sister who immigrated from China and are both incredibly sweet), if you’d rather support a local business than a big company! I’ve tried all of them, and they are extremely high quality and decent prices for matcha, plus David’s tea has fun flavors, and the Green Teahouse has a fantastic raspberry matcha!!
Alright, alright i’ll shut up, that’s enough of me being a huge tea fan. Enjoy the recipe!!
#quaranteam#homesteadquaranteam#matcha#tea#tea latte#latte#recipe#teashop#coffeeshop#cafe#I just had to make a plug for the green teahouse im so sorry#i love them and they finally have an online store and im so happy#plus supporting local is excellent#even if you cant visit#recipes#my recipe
9 notes
·
View notes
Last Seen Blogs