#how i2c protocol works
Explore tagged Tumblr posts
Visit Tumblr Blog
Explore Tumblr blogs with no restrictions, modern design and the best experience.
Last Seen Tumblr Blogs


Fun Fact
Tumblr has been providing a Korean-language service since 2013.
Text
How i2C protocol works....
#mobicationhub #mobicationhub9509959090 #Protocol #reelsfypシ #i2c #institute #phonerepair #mobilerepaircoursejaipur #mobilerepairing #working #1monthcours #laptop
#i2c protocol#i2c protocol tutorial#protocol#spi protocol#communication protocols#i2c protocol vs spi protocol#communication protocol#how i2c protocol works#i2c protocol - inter integrated circuit protocol#i2c communication protocol#i2c protocol working#serial communication protocol#inter integrated circuit protocol#inter-integrated circuit protocol#i2c bus protocol#i3c protocol#what is i2c protocol#basics of i2c protocol#spi protocol tutorial
0 notes
Text
Understanding the Functionality of Samsung Refrigerator PCB Main Assembly

Samsung refrigerators have become essential appliances in modern households, offering innovative features and advanced technologies to ensure food preservation and convenience. The (Printed Circuit Board) PCB Main Assembly serves as the brain of the refrigerator, coordinating various functions and ensuring optimal performance.
Components of the Refrigerator PCB Main Assembly
The Refrigerator PCB Main Assembly consists of several essential components, each playing a crucial role in the refrigerator's operation.
Microcontroller: It is the central processing unit (CPU) and the computer performs programmed instructions to coordinate communication between the components.
Sensors: The ambient parameters (temperature, humidity, door status) supply critical information for regulation.
Relays: You control the flow of electricity to the compressor, fan motors, and defrost heater.
Capacitors: It will help you store the electrical energy and help to regulate voltage, and guarantee that the PCB is operating reliably.
Resistors: Protect sensitive components from harm by limiting the flow of electricity across certain circuits.
Diodes: Allow current to flow exclusively in one direction to avoid reverse polarity and safeguard components from damage.
Connectors: Facilitate electrical connections between the PCB and other refrigerator components to ensure seamless integration.
Working Principle PCB Main Assembly
The PCB Main Assembly operates on a set of programmed instructions that determine its behavior depending on sensor input and user command. The micro controller continuously monitors sensor input such as the reading of the temperature from the refrigerator compartment, and freezer. The microcontroller controls the transition of the compressor on, or off or the speed of the fan and also the defrost cycles based on the sensor data as to how to keep the temperature and humidity at the optimal level. In addition to the other refrigerator components, for example, display panel and user interface, the PCB Main Assembly provides feedback and enables users’’ interaction. The PCB Main Assembly incorporates safety features of overload protection and temperature sensors to protect the refrigerator from damage and to protect the user.
Communication Protocols
Data can be communicated to other components through microcontrollers by communication protocols like UART (Universal Asynchronous Receiver Transmitter), SPI (Serial Peripheral Interface), and I2C (Inter Integrated Circuit).
UART is used to transfer real-time data from a microcontroller to external devices like display panels and temperature sensors.
There is a power of communication SPI and I2C for the communication of integrated circuits associated with the PCB Main Assembly for efficient data transfer and synchronization between components.
Troubleshooting and Maintenance
Common issues with the Samsung Refrigerator PCB Main Assembly include sensor failures, relay malfunctions, and power supply issues, which can affect the refrigerator's performance.
To solve PCB Main Assembly problems, we can use diagnostic methods, like running self-tests and checking the error code.
The assembly can stay longer depending on the main, such as cleaning dust and debris from the PCB and securing appropriate ventilation.
The PCB Main Assembly is an important component of the Samsung refrigerator systems since it organizes several functions to contribute to the overall efficiency of the refrigerator and food preservation. Fore-knowledge of the PCB Main Assembly and the way it is constructed can assist users in likely managing problems in their fridges.
2 notes
·
View notes
Text
Embedded Systems Course Online – Learn with Technoscripts
Embedded systems are the silent force behind many of the machines & devices we rely on every day. From a simple digital watch to complex automotive control units, embedded systems are quietly doing their job. With the world becoming more tech-driven, learning embedded systems is no longer just an option, it's a necessity for those aiming to work in core electronics & automation.
Technoscripts has created an online embedded systems course tailored for learners who want to build skills from scratch or enhance what they already know. The course is structured with a balance of core theory & hands-on experience, aiming to develop practical skills that actually work in real-world applications.
Why Learn Embedded Systems?
Everywhere you look in industries, homes, vehicles there’s some form of embedded technology at work. These systems are built to carry out specific tasks efficiently. Unlike general-purpose computers, they’re programmed to do one job, & do it well.
Industries such as automotive, telecommunications, healthcare, robotics, & agriculture are using embedded systems in their daily operations. These industries grow, so does the need for professionals who can design, program, & maintain such advanced embedded systems & technologies. If you understand how these small computers operate within machines, you open up a wide range of job and placement opportunities across various sectors.
What This Course Offers
This course is built for learners at all levels. Whether you’re a student from an engineering background or a working professional looking to switch fields, you’ll find the modules easy to follow yet detailed enough to build real skills with our embedded systems course online.
The course includes:
Programming with microcontrollers like 8051, PIC, & ARM
Basics of embedded C & real-time operating systems
Sensor & peripheral interfacing
Understanding & using communication protocols like UART, I2C, SPI
Debugging techniques & h&s-on project development
Each module is created for practical exercises so learners don’t just understand the theory they apply it for industrial use.
Flexible Learning, Expert Guidance
One of the biggest advantages of our course is flexibility. You can attend classes from anywhere, revisit recorded lectures anytime, & ask questions during live sessions. Our trainers are experienced engineers with actual industry exposure. This ensures that you are not just learning concepts but also how they’re used in professional life and career in future.
Who Can Join?
This program is ideal for:
Final-year engineering students
Diploma holders in electronics or related fields
Professionals in IT or electronics wanting to upskill
Anyone interested in electronics & embedded technology
What You’ll Walk Away With
After completing the course, you’ll be able to build embedded projects on your own, & understand how various components work together, & write programs that run on microcontrollers. You’ll also receive a certificate, project experience, & most importantly, the skills that companies actually look for.
Technoscripts also offers placement support for eligible candidates through a dedicated placement cell that connects you with hiring companies in embedded development & R&D roles.
Why Choose Technoscripts?
Courses shaped by real industry needs
Live project work during training
Personal mentorship & doubt-solving
Flexible class timings for working professionals
Certification & job assistance after course completion
Start Learning Today
If embedded systems excite you, & you’re ready to begin your learning journey, now is the time. With Technoscripts’ online embedded systems course, you don’t need to be in a classroom to gain valuable knowledge, you just need the right platform.
For more details or to enroll, visit our website or connect with our admissions team today.
0 notes
Text
Why India’s Drone Industry Needs Periplex: The Hardware Tool Drones Didn’t Know They Needed
As drones fly deeper into critical roles — from agricultural intelligence to autonomous mapping, from disaster response to military ops — the hardware stack that powers them is undergoing a silent revolution.
At the center of that transformation is Periplex — a breakthrough tool from Vicharak’s Vaaman platform that redefines how drone builders can interface with the real world.

What is Periplex?
Periplex is a hardware-generation engine. It converts JSON descriptions like this:{ "uart": [ { "id": 0, "TX": "GPIOT_RXP28", "RX": "GPIOT_RXN28" } ], "i2c": [ { "id": 3, "SCL": "GPIOT_RXP27", "SDA": "GPIOT_RXP24" }, { "id": 4, "SCL": "GPIOL_63", "SDA": "GPIOT_RXN24" } ], "gpio": [], "pwm": [], "ws": [], "spi": [], "onewire": [], "can": [], "i2s": [] }
…into live hardware interfaces, directly embedded into Vaaman’s FPGA fabric. It auto-generates the FPGA logic, maps it to kernel-level drivers, and exposes them to Linux.
Think of it as the “React.js of peripherals” — make a change, and the hardware updates.
Real Drone Applications That Truly Need Periplex
Let’s break this down with actual field-grade drone use cases where traditional microcontrollers choke, and Periplex thrives.
1. Multi-Peripheral High-Speed Data Collection for Precision Agriculture
Scenario: A drone is scanning fields for crop health with:
2 multispectral cameras (I2C/SPI)
GPS + RTK module (2x UART)
Wind sensor (I2C)
Sprayer flow monitor (PWM feedback loop)
ESCs for 8 motors (PWM)
1 CAN-based fertilizer module
The Periplex Edge: Microcontrollers would require multiple chips or muxing tricks, causing delays and bottlenecks. With Periplex:
You just declare all interfaces in a JSON file.
It builds the required logic and exposes /dev/pwm0, /dev/can0, etc.
Zero code, zero hassle, zero hardware redesign.
2. Swarm Communication and Custom Protocol Stacks
Scenario: Swarm drones communicate over:
RF LoRa (custom SPI/UART)
UWB mesh (proprietary protocol)
Redundant backup over CAN
Periplex lets you:
Create hybrid protocol stacks
Embed real-time hardware timers, parity logic, and custom UART framing — none of which are feasible in most MCUs
Replacing Microcontrollers, Not Just Augmenting Them
| Feature | Microcontroller | Periplex on Vaaman | |---------------------------|----------------------------|------------------------------------| | Number of peripherals | Limited (4–6) | Virtually unlimited (30+ possible) | | Reconfiguration time | Flash + reboot | Real-time, dynamic reload | | Timing precision | Software-timer limited | FPGA-grade nanosecond-level timing | | AI compatibility | Not feasible | Integrated (Gati Engine) | | Sensor fusion performance | Bottlenecked | Parallel FPGA pipelines |
Developers Love JSON, Not Register Maps
No more:
Scouring 400-page datasheets
Bitmasking registers for I2C configs
Writing interrupt handlers from scratch
Just declare what you need. Let Periplex do the work. Peripherals become software-defined, but hardware-implemented.
Built in India, for India’s Drone Revolution
Vaaman + Periplex isn’t just about tech. It’s about self-reliance.
India’s defence, agriculture, and logistics sectors need secure, reconfigurable, audit-friendly hardware — not black-box SoCs from questionable supply chains.
Periplex is the hardware engine for Atmanirbhar Bharat in drones.
TL;DR
Periplex lets drones adapt hardware to the mission — instantly.
It replaces tangled microcontroller logic with clean, structured JSON.
It unlocks use cases microcontrollers can’t touch: AI at the edge, dynamic reconfiguration, secure protocol stacks, and more.
And it’s built into Vaaman, India’s first reconfigurable edge computer.
Ready to Get Started?
Explore Vaaman on Crowd Supply Reach out for Periplex SDK access: [email protected]
Raspberry Pi
Drones
Drones Technology
Jetson Orin Nano
Technology
0 notes
Text
Understanding the Role of a Pressure Transducer in Modern Industries
Introduction
A pressure transducer is a critical device used across various industries to measure and convert pressure into an electrical signal. These instruments play a vital role in ensuring system efficiency, safety, and accuracy in applications ranging from automotive to aerospace. This article explores the working principle, types, applications, and advantages of pressure transducers, providing a comprehensive understanding of their significance.
What Is a Pressure Transducer?
A pressure transducer, also known as a pressure sensor, is a device that detects pressure and converts it into an analog or digital electrical signal. The output signal can be used for monitoring, control, or data recording purposes. These devices are essential in environments where precise pressure measurement is crucial for operational success.
How Does a Pressure Transducer Work?
The working principle of a pressure transducer involves several key components:
Sensing Element: Detects the applied pressure (e.g., diaphragm, piezoelectric crystal).
Transduction Mechanism: Converts the mechanical pressure into an electrical signal (e.g., strain gauge, capacitive element).
Signal Conditioning Circuitry: Amplifies and processes the signal for accurate output.
Output Interface: Delivers the signal in a usable format (e.g., 4-20mA, 0-10V, digital protocols like I2C or SPI).
When pressure is applied, the sensing element deforms, causing a change in resistance, capacitance, or voltage, which is then converted into a measurable signal.
Types of Pressure Transducers
Different applications require specific types of pressure transducers, each designed for unique operational conditions.
1. Strain Gauge Pressure Transducers
Uses a strain-sensitive element bonded to a diaphragm.
Pressure causes deformation, altering electrical resistance.
Common in industrial and automotive applications.
2. Capacitive Pressure Transducers
Measures changes in capacitance due to diaphragm movement.
Highly accurate and suitable for low-pressure applications.
3. Piezoelectric Pressure Transducers
Utilizes piezoelectric materials that generate voltage under pressure.
Ideal for dynamic pressure measurements in aerospace and defense.
4. Optical Pressure Transducers
Uses fiber-optic technology to detect pressure-induced changes in light properties.
Immune to electromagnetic interference, making them useful in harsh environments.
Key Applications of Pressure Transducers
Pressure transducers are widely used across multiple industries due to their versatility and reliability.
1. Industrial Automation
Monitors hydraulic and pneumatic systems.
Ensures safe operation of machinery by detecting pressure anomalies.
2. Automotive Industry
Measures fuel, oil, and tire pressure for optimal vehicle performance.
Used in engine management and braking systems.
3. Medical Equipment
Critical in ventilators, blood pressure monitors, and dialysis machines.
Ensures patient safety by providing accurate pressure readings.
4. Aerospace & Defense
Monitors cabin pressure, fuel systems, and hydraulic actuators.
Essential for flight safety and performance optimization.
5. Oil & Gas Industry
Used in drilling, pipeline monitoring, and refinery processes.
Detects pressure changes to prevent leaks and equipment failure.
Advantages of Using Pressure Transducers
The adoption of pressure transducers offers numerous benefits, including:
High Accuracy: Provides precise measurements for critical applications.
Durability: Designed to withstand harsh environments (e.g., extreme temperatures, corrosive media).
Versatility: Available in various types to suit different industrial needs.
Real-Time Monitoring: Enables immediate detection of pressure fluctuations.
Compact Design: Fits into tight spaces without compromising performance.
Choosing the Right Pressure Transducer
Selecting the appropriate pressure transducer depends on several factors:
Pressure Range: Ensure the device covers the required measurement range.
Output Signal: Match the output (analog, digital) with the system requirements.
Environmental Conditions: Consider temperature, humidity, and exposure to chemicals.
Accuracy & Resolution: Higher precision is needed for critical applications.
Installation Requirements: Check compatibility with mounting and connection setups.
Maintenance and Calibration
To ensure long-term reliability, pressure transducers require regular maintenance:
Periodic Calibration: Ensures measurement accuracy over time.
Cleaning & Inspection: Prevents contamination and mechanical wear.
Signal Verification: Confirms the output remains consistent with expected values.
Future Trends in Pressure Transducer Technology
Advancements in sensor technology continue to enhance pressure transducer capabilities:
Miniaturization: Smaller, more efficient designs for portable and IoT applications.
Wireless Connectivity: Enables remote monitoring and data logging.
Smart Sensors: Integration with AI for predictive maintenance and diagnostics.
Improved Materials: Enhanced durability for extreme environments.
Conclusion
The pressure transducer is an indispensable tool in modern industries, providing accurate and reliable pressure measurements for diverse applications. Understanding its working principles, types, and selection criteria ensures optimal performance in any operational environment. As technology evolves, these devices will continue to play a pivotal role in automation, safety, and efficiency across multiple sectors.
By leveraging the right pressure transducer, industries can achieve greater precision, reduce downtime, and enhance overall system performance. Whether in manufacturing, healthcare, or aerospace, these sensors remain a cornerstone of pressure measurement technology.

1 note
·
View note
Text
raspberry pi pc
Yes, a Raspberry Pi would indeed work much better than an Arduino for implementing a system where two "computers" are communicating and learning from each other. The Raspberry Pi is a full-fledged single-board computer (SBC), which means it has far greater processing power, memory, and capabilities compared to an Arduino. This makes it much more suitable for complex tasks like data processing, machine learning, and communication between two devices.
Key Differences Between Arduino and Raspberry Pi for This Task:
1. Processing Power:
Arduino: Limited to simple microcontroller tasks (e.g., simple sensors, I/O operations, small control tasks). It has very little computational power and memory (e.g., 2 KB of RAM, 32 KB of flash memory).
Raspberry Pi: Has a powerful CPU, much more memory (e.g., 4 GB or 8 GB of RAM on newer models), and can run a full Linux-based operating system (e.g., Raspberry Pi OS). This makes it suitable for tasks like running machine learning models, more complex algorithms, and networking tasks.
2. Communication:
Arduino: Can communicate using simple protocols like Serial, I2C, or SPI, which are ideal for small-scale, low-speed communication between devices.
Raspberry Pi: Has multiple communication options including Ethernet, Wi-Fi, and Bluetooth, along with more advanced serial protocols. It can communicate over a local network or even the internet, making it ideal for real-time communication between two "computers."
3. Storage and Software:
Arduino: Does not have a storage system other than its limited onboard memory (though you can use SD cards for small amounts of storage). The code running on an Arduino is typically bare-metal (no operating system), and it can only run a single program at a time.
Raspberry Pi: Has access to a large amount of storage (via microSD card or external storage), and runs a full operating system, allowing you to install software libraries, run multiple processes simultaneously, and use advanced tools and frameworks for communication and learning (e.g., TensorFlow, OpenCV, etc.).
4. Machine Learning and Data Processing:
Arduino: You can implement simple algorithms (like decision trees or basic pattern recognition), but it’s not suited for real-time machine learning or complex data analysis.
Raspberry Pi: Can run machine learning models, handle large datasets, and run frameworks like TensorFlow, PyTorch, scikit-learn, etc. This makes it much more capable of "learning" from data, making decisions, and adapting based on feedback.
5. How a Raspberry Pi PC System Could Work Better
Given that Raspberry Pi is a full-fledged computer, you can implement the original idea of two computers communicating and learning from each other in a much more robust way. Here’s how you can achieve that:
Hardware Setup for Raspberry Pi PCs:
Two Raspberry Pi boards (e.g., Raspberry Pi 4, Raspberry Pi 3, or even Raspberry Pi Zero for smaller setups).
Display, keyboard, and mouse for local interaction, or run everything remotely via SSH (headless).
Networking: Use Wi-Fi or Ethernet to connect the two Raspberry Pi boards and enable communication.
Optional: Camera, microphone, sensors, or other input/output devices for more advanced interaction and learning tasks.
Communication Between Raspberry Pi PCs:
You can use several methods for communication between the two Raspberry Pi boards:
TCP/IP Communication: Set up a client-server model, where one Raspberry Pi acts as the server and the other as the client. They can communicate over a local network using sockets.
MQTT: A lightweight messaging protocol suitable for device-to-device communication, commonly used in IoT.
HTTP/REST APIs: You can use a web framework (e.g., Flask, FastAPI) to create APIs on each Raspberry Pi, allowing them to communicate via HTTP requests and responses.
WebSocket: For real-time bidirectional communication, you can use WebSockets.
Software/Frameworks for Machine Learning:
You can install frameworks like TensorFlow, Keras, or scikit-learn on the Raspberry Pi to allow for more advanced learning tasks.
Use Python as the programming language to communicate between the two Pi boards and implement machine learning algorithms.
Raspberry Pi can interact with real-world data (e.g., sensors, cameras, etc.) and learn from it by running algorithms like reinforcement learning, supervised learning, or unsupervised learning.
6. Example Use Case: Two Raspberry Pi PCs Learning from Each Other
Here’s an example scenario where two Raspberry Pi boards communicate and learn from each other using TCP/IP communication and basic machine learning (e.g., reinforcement learning).
Raspberry Pi 1 (PC1): This board makes a decision based on its current state (e.g., it guesses a number or makes a recommendation).
Raspberry Pi 2 (PC2): This board evaluates the decision made by PC1 and sends feedback. PC2 might "reward" or "punish" PC1 based on whether the decision was correct (e.g., in a game or optimization problem).
Feedback Loop: PC1 uses the feedback from PC2 to adjust its behavior and improve its future decisions.
Example Architecture:
PC1 (Raspberry Pi 1):
Makes a guess (e.g., guesses a number or makes a recommendation).
Sends the guess to PC2 via TCP/IP.
Receives feedback from PC2 about the quality of the guess.
Updates its model/behavior based on the feedback.
PC2 (Raspberry Pi 2):
Receives the guess or recommendation from PC1.
Evaluates the guess (e.g., checks if it’s close to the correct answer).
Sends feedback to PC1 (e.g., positive or negative reinforcement).
Basic Python Code for TCP Communication:
On both Raspberry Pis, you can use Python’s socket library to establish a client-server communication:
PC1 (Server) Code:
import socket import random # Create a TCP/IP socket server_socket = socket.socket(socket.AF_INET, socket.SOCK_STREAM) server_socket.bind(('0.0.0.0', 65432)) # Bind to any address, port 65432 server_socket.listen(1) print("PC1: Waiting for connection...") connection, client_address = server_socket.accept() print("PC1: Connected to PC2") while True: # Simulate a decision (e.g., guessing a number) guess = random.randint(1, 100) print(f"PC1: Guessing number {guess}") # Send the guess to PC2 connection.sendall(str(guess).encode()) # Wait for feedback from PC2 feedback = connection.recv(1024).decode() print(f"PC1: Received feedback: {feedback}") # Adjust behavior based on feedback (simple learning mechanism) if feedback == "correct": print("PC1: Correct guess!") else: print("PC1: Incorrect guess, trying again.") # Wait before making another guess time.sleep(2)
PC2 (Client) Code:
import socket # Create a TCP/IP socket client_socket = socket.socket(socket.AF_INET, socket.SOCK_STREAM) client_socket.connect(('PC1_IP_ADDRESS', 65432)) # Connect to PC1 while True: # Receive the guess from PC1 guess = int(client_socket.recv(1024).decode()) print(f"PC2: Received guess {guess}") # Evaluate the guess (simple decision: correct if guess is 50) if guess == 50: feedback = "correct" else: feedback = "incorrect" # Send feedback to PC1 client_socket.sendall(feedback.encode()) print(f"PC2: Sent feedback: {feedback}")
7. Expanding This System
Advanced Communication: If you're looking for real-time interaction, you can explore using WebSockets or MQTT for more efficient, bidirectional communication.
Machine Learning: You can train models on both Raspberry Pi devices, where one device sends data to the other for training, and they both improve over time.
Distributed Systems: With two Raspberry Pis, you can build a distributed system where each Pi runs part of the computation, and they collaborate to solve more complex tasks.
Conclusion:
Raspberry Pi is definitely a better choice for the task of two computers communicating and learning from each other, as it offers the computational power, memory, and flexibility needed for machine learning, real-time communication, and more advanced systems. The Arduino is more suitable for simple tasks and small embedded systems, whereas the Raspberry Pi can handle much more complex processing, communication, and learning systems.
If you want to build a more advanced learning system, I would recommend using Raspberry Pi boards. Would you like to dive deeper into a specific part of the setup or need help with more advanced machine learning on Raspberry Pi?
Creating a Raspberry Pi-based PC involves setting up a Raspberry Pi board to function as a full desktop computer, capable of running an operating system, connecting to the internet, and supporting peripherals like a keyboard, mouse, and display. Unlike an Arduino, which is used for embedded systems, a Raspberry Pi is a full-fledged computer, making it much easier to set up as a personal computer.
Here’s a step-by-step guide on how to turn a Raspberry Pi into a fully functional PC.
What You Need:
Raspberry Pi Board (e.g., Raspberry Pi 4, Raspberry Pi 3, or Raspberry Pi Zero)
MicroSD Card (at least 8 GB, recommended 16 GB or more) for the operating system
Power Supply (5V 3A USB-C for Raspberry Pi 4, or appropriate power for other models)
HDMI Cable and a Display (HDMI-compatible monitor or TV)
Keyboard and Mouse (USB or Bluetooth, depending on your preference)
Internet connection (Ethernet cable or Wi-Fi)
USB storage (optional, for additional storage)
MicroSD card reader (for flashing the operating system)
Step-by-Step Guide:
1. Prepare the MicroSD Card with Raspberry Pi OS
First, you'll need to install the operating system on your MicroSD card. The most common and recommended OS for Raspberry Pi is Raspberry Pi OS (formerly Raspbian).
Download Raspberry Pi Imager: Visit Raspberry Pi’s official website and download the Raspberry Pi Imager for your computer (Windows, macOS, or Linux).
Install Raspberry Pi OS:
Open the Raspberry Pi Imager, select "Choose OS", and select Raspberry Pi OS (32-bit) (recommended for most users).
Select your MicroSD card as the target.
Click Write to flash the OS onto the SD card.
Enable SSH or Wi-Fi (Optional): If you plan to use the Raspberry Pi headlessly (without a monitor, keyboard, or mouse), you can enable SSH or configure Wi-Fi before inserting the SD card into the Pi:
After flashing, insert the SD card into your computer.
Open the boot partition and create an empty file named "ssh" (no extension) to enable SSH.
For Wi-Fi, create a file called wpa_supplicant.conf with your Wi-Fi credentials: country=US ctrl_interface=DIR=/var/run/wpa_supplicant GROUP=netdev update_config=1 network={ ssid="Your_SSID" psk="Your_Password" }
2. Set Up the Raspberry Pi
Insert the SD card into the Raspberry Pi.
Connect your HDMI cable from the Raspberry Pi to the monitor.
Plug in your keyboard and mouse via the USB ports.
Connect the power supply to the Raspberry Pi.
3. First Boot and Raspberry Pi OS Setup
When you power on the Raspberry Pi, it should boot into Raspberry Pi OS.
Follow the on-screen instructions to:
Set up your language, timezone, and keyboard layout.
Set up your Wi-Fi connection (if not already done).
Update the system by running sudo apt update and sudo apt upgrade in the terminal.
4. Install Additional Software
Once your Raspberry Pi is running, you can install additional software based on your needs. For example:
Web Browsing: The default browser is Chromium, but you can install others like Firefox.
Office Suite: Install LibreOffice for document editing, spreadsheets, and presentations.
Command: sudo apt install libreoffice
Development Tools: If you want to use the Pi for programming, you can install IDEs like Thonny (for Python) or Visual Studio Code.
Command: sudo apt install code
Media Software: You can use VLC for media playback or Kodi for a home theater system.
5. Optimize Your Setup
To make your Raspberry Pi run smoothly and feel more like a desktop PC:
Increase Memory Allocation: If you're using a Raspberry Pi 4, you can allocate more memory to the GPU via sudo raspi-config.
Enable Auto-Login: To skip the login screen on boot, you can configure auto-login:
Run sudo raspi-config.
Select Boot Options → Desktop/CLI → Desktop Autologin.
Configure Performance Settings: You can tweak performance settings like CPU overclocking or enabling hardware acceleration for graphics in the Raspberry Pi configuration tool (raspi-config).
6. Optional: Adding a Large Storage Device
If the 8 GB or 16 GB of storage on the SD card isn’t enough, you can plug in a USB hard drive or USB flash drive to expand your storage. You can also configure the Raspberry Pi to boot from a USB drive (for faster performance compared to an SD card).
7. Set Up Remote Access (Optional)
If you prefer to control the Raspberry Pi from another computer:
SSH: You can access the Raspberry Pi's terminal remotely via SSH (if enabled during setup). To connect, use a tool like PuTTY (Windows) or the terminal (Linux/macOS):
Command: ssh pi@<raspberrypi-ip-address>
VNC: You can use VNC for remote desktop access.
Enable VNC using sudo raspi-config.
Download and install RealVNC on your computer to access the Raspberry Pi’s graphical desktop remotely.
8. Using Your Raspberry Pi as a Full PC
Once you’ve completed the setup, your Raspberry Pi will be ready to use like a regular desktop computer. You can:
Surf the web, check emails, and use social media with browsers like Chromium or Firefox.
Write documents, create spreadsheets, and presentations using LibreOffice.
Code in multiple languages (Python, Java, C++, etc.).
Play media files with VLC or stream content using Kodi.
9. Advanced Uses: Building a Raspberry Pi "Server"
If you want your Raspberry Pi to act as a server or take on additional tasks, you can configure it for various roles:
Home Automation: Set up a Home Assistant or OpenHAB server for smart home automation.
Web Server: You can install Apache or Nginx and run a web server.
Command: sudo apt install apache2
Cloud Server: Set up Nextcloud or ownCloud to create your own cloud storage.
Conclusion
Creating a Raspberry Pi PC is a great way to repurpose the Raspberry Pi as a low-cost, energy-efficient desktop computer. Whether you're using it for everyday tasks like browsing, programming, or media consumption, or even more advanced tasks like running servers or learning about Linux, the Raspberry Pi is incredibly versatile.
If you need help with specific configurations, software installation, or troubleshooting, feel free to ask!
0 notes
Text

Top 10 Skills You’ll Learn in an Embedded System Development Course in India
Today, with advanced technology in every field, the world has taken a big step toward creating new industries and innovations. It is one of the most challenging and exciting fields, and it's worth investing in by enrolling in an embedded system development course in India. The knowledge and skills gained are useful for outstanding performance in various domains such as IoT, robotics, and automotive technology. Here, we look at the top 10 skills you would learn in an embedded system development course, including a fascinating project initiative, TechnosCOE.
1. Familiarity with Microcontrollers and Microprocessors
Microcontrollers and microprocessors are the foundation base for embedded systems. Courses include architecture, functioning, and programming, with hands-on experience in popular controllers such as Arduino, PIC, and ARM, which form the backbone of most embedded applications.
2. Programming Languages
One of the main emphases of an embedded system development course in India is acquiring skills in programming languages such as C and C++. These skills are essential to writing firmware and developing applications for embedded systems. It also makes some courses introduce Python for scripting and debugging purposes to improve a student's versatility.
3. Real-Time Operating Systems (RTOS)
The creation of efficient and reliable systems is based on the understanding of how RTOS works. These courses cover the principles of multitasking, scheduling, and inter-process communication. By mastering RTOS concepts, students can develop systems for industries such as telecommunications and healthcare.
4. Circuit Design and PCB Development
These contain custom circuitry designs and a printed circuit board (PCB). The knowledge gained from developing circuitry robust and efficient within Eagle and Altium Designer gives immense value toward the prototyping and product development phase.
5. Sensor integration and data acquisition
Modern embedded systems interact with the physical world through sensors. Courses teach students how to integrate sensors, process their data, and use it in meaningful ways. Applications include temperature monitoring, motion detection, and environmental sensing, among others.
6. IoT (Internet of Things) Development
IoT has changed the face of industries, and at the center of this change is the concept of embedded systems. Students are taught to design devices that are internet-enabled, which can talk to other devices, and perform analytics in real-time data. The same skill can be applied to smart home automation and industrial applications.
7. Embedded Linux
Training on Embedded Linux is generally a part of an embedded system development course in India. It is a highly versatile and widely used open-source software in the world of embedded systems. A student learns how to develop applications, configure the kernel, and build custom distributions for different types of devices.
8. Debugging and Testing Techniques
Debugging is a key tool in embedded system development. Students become experts in using tools like JTAG debuggers and oscilloscopes to identify and debug those issues. Techniques on testing address all the requirements for the performance and safety of the system.
9. Communication Protocols
Understanding communication protocols is very important to the embedded engineers. The curriculum covers some popular protocols such as I2C, SPI, UART, CAN, and Ethernet, which are usually used in applications such as car systems and automation in industrial places.
10. Project Management and Documentation
Beyond technical skills, students also learn project management techniques and documentation practices. These soft skills ensure that they can efficiently collaborate with teams, manage timelines, and maintain accurate records of their work.
Role of TechnosCOE in Embedded Learning
Most embedded system courses include real-world projects that allow students to apply their skills practically. TechnosCOE is one such project, an initiative designed to bridge the gap between theoretical knowledge and practical application. TechnosCOE offers students opportunities to work on cutting-edge projects involving IoT, robotics, and smart devices.
This initiative focuses on teamwork, innovation, and problem-solving, ensuring learners are industry-ready. Through the TechnosCOE, students are exposed to real-world challenges and learn how to apply embedded system principles to develop effective solutions.
Why Choose an Embedded System Development Course in India?
India is turning out to be a fast-growing hub for embedded technology. Industries like automotive, healthcare, and consumer electronics will have a vast number of opportunities. Embedded system development courses offered in India will ensure expert faculty members, state-of-the-art labs, and industrial collaborations. They also offer internship and placement support, which proves to be perfect for career growth.
Conclusion
The course on embedded system development course in India not only gives the students technical expertise but also prepares them for dynamic and rewarding careers. Mastering microcontrollers to developing IoT solutions, these skills are invaluable in today's technology-driven world. Initiatives like TechnosCOE further enhance the learning experience, making these courses a worthwhile investment for aspiring engineers.
0 notes
Video
youtube
Industrial Sensor's Data Parameter Monitoring and Control System Over CAN BUS Using Arduino | Industrial Parameter Monitoring System Using CAN Bus | Monitoring and Control System for Industrial Parameters Using Can Bus | Monitoring of temperature using smart sensors | Industrial Parameter Monitoring Using CAN Protocol | Industrial Sensor's Data Parameter Monitoring and Control System Over CAN BUS Using Arduino | Industrial Parameter Monitoring System Using CAN Bus | Monitoring and Control System for Industrial Parameters Using Can Bus.***********************************************************If You Want To Purchase the Full Working Project KITMail Us: [email protected] Name Along With You-Tube Video LinkWe are Located at Telangana, Hyderabad, Boduppal. Project Changes also Made according to Student Requirementshttp://svsembedded.com/ https://www.svskits.in/ http://svsembedded.in/ http://www.svskit.com/M1: 91 9491535690 M2: 91 7842358459 We Will Send Working Model Project KIT through DTDC / DHL / Blue Dart / First Flight Courier ServiceWe Will Provide Project Soft Data through Google Drive1. Project Abstract / Synopsis 2. Project Related Datasheets of Each Component3. Project Sample Report / Documentation4. Project Kit Circuit / Schematic Diagram 5. Project Kit Working Software Code6. Project Related Software Compilers7. Project Related Sample PPT’s8. Project Kit Photos9. Project Kit Working Video linksLatest Projects with Year Wise YouTube video Links157 Projects https://svsembedded.com/ieee_2022.php135 Projects https://svsembedded.com/ieee_2021.php 151 Projects https://svsembedded.com/ieee_2020.php103 Projects https://svsembedded.com/ieee_2019.php61 Projects https://svsembedded.com/ieee_2018.php171 Projects https://svsembedded.com/ieee_2017.php170 Projects https://svsembedded.com/ieee_2016.php67 Projects https://svsembedded.com/ieee_2015.php55 Projects https://svsembedded.com/ieee_2014.php43 Projects https://svsembedded.com/ieee_2013.php1100 Projects https://www.svskit.com/2022/02/900-pr...***********************************************************1. Weather Station: DHT11 Temperature and Humidity Sensor Arduino 2.4″ TFT LCD Touch Shield - SPFD54082. Control FAN Speed and LIGHT using TV Remote3. Smart Crop Protection From Wild Animals With Alert Using Arduino | Field Sensor Monitoring with WiFi4. How to Transfer Data From One USB Hard Drive to Another USB5. IoT based Precision Agriculture6. IOT BASED SMART BLOOD BANK SYSTEM7. Blood Bags Weight Monitoring Using 2 load cells8. GSM Motor Pump controller (Mobile Motor Starter) | Automatic Mobile Starter | Mobile pump starter9. Bus Boarding System for Visually Impaired Passengers10. Design and Implementation of RFID-based Fuel Dispensing System11. Cable Fault Detection System with SMS Notification using Arduino, GSM and GPS12. 2.4'' TFT Touch Screen Restaurant Menu Ordering System Using Arduino13. IoT Based Air, Water, Noise, Dust, Humidity, Gas, CO and Temperature Monitoring System using Arduino14. IOT BASED SMART GARBAGE MONITORING SYSTEM USING NODEMCU GSM GPS ULTRASONIC15. i2c lcd with nodemcu | Interface I2C LCD Using ESP8266 NodeMCU | I2C LCD on NodeMCU With Arduino IDE16. GPS GSM Based Underground Cable Fault Detection with Arduino17. Electric Shock GPS Hand Glove Developed to help Women's Safety
0 notes
Text
Emertxe Embedded Systems Online Course – A Gateway to a Thriving Career
Are you looking to kickstart your career in embedded systems but don't have the time to attend traditional classroom-based courses? Emertxe's Embedded Systems Online Course offers the perfect solution to gain in-depth knowledge and practical experience in this rapidly growing field from the comfort of your home.
Why Choose Emertxe’s Embedded Systems Online Course?
Emertxe is a leading provider of embedded systems training, offering specialized online courses designed to bridge the gap between academic knowledge and industry requirements. With its embedded systems online program, you can gain expertise in key areas such as microcontrollers, real-time operating systems (RTOS), device drivers, communication protocols, and much more.
Here’s why Emertxe’s embedded systems online course stands out:
1. Industry-Recognized Curriculum
Emertxe’s course content is developed in collaboration with industry experts and aligned with the latest trends and technologies in embedded systems. The online embedded systems program includes everything from the basics to advanced topics, ensuring that you are well-prepared for industry challenges.
2. Hands-on Learning Experience
Emertxe’s online embedded systems course focuses heavily on practical learning. You will work on real-time projects, assignments, and simulations that help solidify your understanding and improve your problem-solving skills. Emertxe’s online platform makes it easy to access tutorials, lab sessions, and code examples anytime, anywhere.
3. Experienced Trainers
Learn from highly qualified instructors who have hands-on experience in embedded systems development. Emertxe’s trainers are industry veterans who share their insights and guide you through the complexities of embedded system design and implementation.
4. Flexible Learning Pace
One of the key advantages of the Emertxe embedded systems online course is the flexibility it offers. You can learn at your own pace, revisit lessons whenever needed, and balance your studies with personal and professional commitments.
5. Job Placement Assistance
Emertxe provides placement assistance to its students. With its strong industry connections and a network of partner companies, Emertxe helps students get placed in top tech companies. Graduates of the online embedded systems program are highly sought after for roles such as Embedded Engineer, Firmware Developer, and Hardware Design Engineer.
Key Topics Covered in Emertxe’s Embedded Systems Online Course
Introduction to Embedded Systems: Learn the fundamentals of embedded systems, including their applications in various industries like automotive, consumer electronics, healthcare, and more.
Microcontroller Programming: Get hands-on experience in programming microcontrollers like ARM and AVR to build embedded solutions.
Real-Time Operating Systems (RTOS): Dive into RTOS concepts such as task scheduling, inter-process communication, and memory management to design responsive embedded systems.
Embedded C and C++ Programming: Master the core languages used in embedded systems programming and develop efficient, resource-constrained applications.
Device Drivers and Communication Protocols: Learn to develop device drivers and implement protocols like UART, SPI, I2C, and CAN to ensure seamless communication between components in embedded systems.
Embedded Linux: Explore the power of Linux in embedded systems and understand how to work with Linux kernel, drivers, and file systems.
Career Opportunities After Completing Emertxe’s Embedded Systems Online Course
Graduating from Emertxe’s embedded systems online program opens the doors to a wide range of career opportunities. The demand for skilled embedded systems professionals is soaring in sectors like automotive, aerospace, telecommunications, and consumer electronics. Emertxe’s curriculum equips you with the expertise needed to take on roles such as:
Embedded Systems Engineer
Firmware Developer
Embedded Software Developer
Hardware Engineer
Embedded Systems Consultant
How to Enroll in Emertxe’s Embedded Systems Online Course
Enrolling in the Emertxe embedded systems online course is simple. Visit the Emertxe website, select the online course option, and follow the easy steps to complete your registration. With flexible payment plans and a dedicated support team, Emertxe ensures that the entire process is smooth and hassle-free.
Final Thoughts
Emertxe's embedded systems online course is the perfect way to build a solid foundation in embedded systems while balancing your existing commitments. With a comprehensive curriculum, hands-on projects, and job placement assistance, Emertxe ensures that you are ready to take on exciting career opportunities in embedded systems development.
Ready to kickstart your career in embedded systems? Visit Emertxe Embedded Systems Online Course and enroll today!
0 notes
Text
5 Insider Tips for Mastering IoT Architecture in Embedded Systems

As we navigate the complexities of IoT architecture in embedded systems, we’ve identified five crucial tips that can significantly streamline our approach. By integrating security from the very beginning and embracing collaborative methods, we set a solid foundation for success. We’ll also need to emphasize comprehensive testing and ensure scalability for future growth. But what’s the one element that ties all these strategies together? Let’s explore how these insights can elevate our projects and lead to more effective outcomes.
Understand Hardware and Software Interplay

In mastering IoT architecture within embedded systems, we must recognize the crucial interplay between hardware and software. Understanding this relationship is essential for developing efficient, reliable systems.
Embedded systems typically consist of a microcontroller unit (MCU), which acts as the brain, supported by components like memory, timers, and communication ports. The architecture is layered, with physical hardware at the base, system software managing tasks, and application software tailored for specific functions.
Effective communication protocols, such as UART, SPI, and I2C, are vital for interaction between these layers, allowing data to flow seamlessly. We need to ensure that our hardware supports the software requirements, optimizing performance while managing resources.
Real-time operating systems (RTOS) play a key role in task management, particularly for time-sensitive applications.
Prioritize Security From the Start

Prioritizing security from the start is crucial for the success of IoT systems. We need to adopt a security-by-design approach that integrates robust measures early in the development cycle.
As we all know, successful IoT products tend to attract malicious attackers, making it essential to protect our assets from various vulnerabilities. By focusing on security from the beginning, we can better safeguard our devices and user data.
Here are some key aspects to consider:
Understand Attack Surfaces: Every interaction point—from devices to servers—poses risks, so we must address vulnerabilities across the entire system.
Implement Anti-Tampering Techniques: Employ methods to detect and respond to potential attacks, ensuring the integrity of our devices and data.
Ensure Communication Security: Utilize secure protocols like TLS to protect data in transit and maintain trusted connections.
Embrace Agile Collaboration Methods

Agile collaboration methods can transform how we approach IoT architecture in embedded systems. By adopting Agile methodologies, we create an environment that emphasizes flexibility and responsiveness. Instead of following rigid plans, we break projects into manageable increments, allowing us to deliver working software frequently. This iterative approach fosters collaboration among cross-functional teams, ensuring everyone is aligned and contributing to the project’s success.
We should consider frameworks like Scrum or Kanban, which promote continuous improvement and encourage adaptive planning. Daily stand-up meetings keep us focused and aligned, while regular sprint reviews help us assess our progress and make necessary adjustments. This method not only enhances product quality but also boosts team morale and productivity.
While we embrace Agile, we must also be aware of the challenges specific to embedded systems. Real-time constraints and regulatory requirements can complicate adoption. However, by investing in specialized tools and maintaining effective communication, we can overcome these hurdles.
Ultimately, Agile collaboration enables us to prioritize high-value features and adapt to evolving stakeholder needs, leading to a more successful IoT architecture in our embedded systems.
Focus on Testing and Validation

Effective collaboration sets the stage for robust testing and validation in IoT architecture.
As we dive into this crucial phase, we must understand that IoT devices present unique challenges. Our testing strategies need to encompass both hardware and software elements to ensure seamless functionality.
Here are three key focus areas for our testing efforts:
Integrated Testing Strategies: We should prioritize testing components like sensors, applications, and network communication, ensuring they work together before deployment.
Test Automation: Given the scale and complexity of IoT environments, automating our testing processes will save time and increase reliability.
Security Testing: Validating security mechanisms is non-negotiable. We must verify access controls, authentication, and encryption to protect our devices from vulnerabilities.
Ensure Scalability and Maintainability

Recognizing the critical role of scalability and maintainability in IoT architecture, we must design our systems to adapt seamlessly as demands grow. Scalability is essential for transitioning from prototype to production, much like how e-commerce platforms scale during peak times. To achieve this, we need a robust infrastructure that includes cloud solutions and versatile hardware capable of operating across various networks.
We can’t overlook the integration of hardware, software, and connectivity right from the start. If we ignore these aspects, we risk facing a staggering 75% failure rate seen in many IoT projects due to inadequate planning. Collaborating with expert providers can simplify the scaling process, allowing us to leverage IoT Platform-as-a-Service solutions to enhance our scalability.
Security is another critical factor; as we scale, we must implement ongoing security measures and effective device management strategies. This includes ensuring over-the-air updates and maintaining compliance with necessary certifications.
Frequently Asked Questions
What Specific Tools Can Help With Iot Architecture Design?
When we design IoT architecture, we can leverage tools like AWS IoT, Azure IoT Hub, and MQTT for communication. Using these tools helps us streamline development, enhance scalability, and ensure secure data handling in our projects.
How Do I Choose the Right Communication Protocol for My Project?
When choosing the right communication protocol for our project, we should consider factors like data rate, range, power consumption, and scalability. Let’s evaluate our specific requirements to ensure we select the most suitable option.
What Are Common Pitfalls in Iot Development to Avoid?
In our IoT development journey, we must avoid common pitfalls like neglecting security, overlooking scalability, and underestimating testing. By being proactive and prioritizing these aspects, we can create robust, efficient systems together.
How Can I Effectively Manage Iot Device Updates?
To effectively manage IoT device updates, we should implement automated systems that streamline the process. By scheduling regular updates and testing them thoroughly, we can enhance security and performance while minimizing downtime for our users.
What Metrics Should I Track for Iot System Performance?
To track IoT system performance, we should monitor metrics like latency, throughput, device uptime, and error rates. These indicators help us identify bottlenecks and enhance user experience, ensuring our systems remain efficient and reliable.
Conclusion
In conclusion, mastering IoT architecture in embedded systems requires us to integrate key strategies from the outset. By understanding the interplay between hardware and software, prioritizing security, and embracing agile methods, we can build robust systems. Let’s not forget the importance of thorough testing and validation, as well as planning for scalability and maintainability. By following these insider tips, we can create innovative and secure IoT solutions that stand the test of time.
Sign up for free courses here.
Visit Zekatix for more information.
#artificial intelligence#courses#edtech company#embedded systems#academics#nanotechnology#embeded#online courses#robotics#zekatix
0 notes
Text
Navigating the World of Embedded Systems: A Simple Guide
Embedded systems are the unsung heroes of modern technology, working silently behind the scenes in devices we use every day, from smartphones to washing machines. Understanding the basics of embedded systems, their design development life cycle, and the core concepts of electronics designing can demystify this intricate world.
What is Embedded System?
An embedded system is a specialized computing device designed to perform dedicated functions within a larger system. It is embedded (built-in) as part of a larger product rather than being a standalone computer.
Examples:
Smartphones, washing machines, medical devices, and automotive control systems are common examples.
They range from simple, like a microwave controller, to complex, like the navigation system in a car.
Characteristics:
Typically, they have real-time computing constraints, meaning they must respond within a specific time frame.
Often operate with minimal user intervention, performing predetermined tasks autonomously.
Embedded Design Development Life Cycle:
Requirements Analysis:
Define the purpose and functionality of the embedded system.
Understand user needs and system constraints.
System Design:
Plan the system architecture, hardware, and software components.
Determine communication protocols and interfaces.
Hardware Design:
Develop the physical components of the system, including the microcontroller, sensors, and actuators.
Consider power consumption, size, and environmental conditions.
Software Design:
Write the embedded software that controls the system.
Develop algorithms, implement functionalities, and ensure real-time responsiveness.
Integration and Testing:
Combine hardware and software components.
Test the embedded system for functionality, performance, and reliability.
Deployment:
Install the embedded system into the final product or device.
Ensure compatibility with the overall system.
Maintenance and Updates:
Address any issues that arise post-deployment.
Implement software updates or improvements as needed.
Electronics Designing Concepts:
Circuit Basics:
Understand voltage, current, and resistance.
Learn how to design basic circuits using components like resistors, capacitors, and transistors.
Digital Electronics:
Grasp the fundamentals of digital logic gates (AND, OR, NOT).
Learn binary and hexadecimal numbering systems.
Microcontrollers:
Understand the role of microcontrollers in embedded systems.
Learn to program microcontrollers using languages like C or assembly.
Sensors and Actuators:
Explore various sensors (temperature, proximity, etc.) and actuators (motors, solenoids).
Understand their principles of operation and integration into circuits.
Communication Protocols:
Learn common communication protocols like UART, SPI, and I2C.
Understand how devices communicate within an embedded system.
Power Supply Design:
Comprehend power requirements and design efficient power supply circuits.
Consider factors like voltage regulation and power consumption.
Embarking on the journey of embedded systems and electronics designing involves grasping these fundamental concepts. Whether you're a curious tech enthusiast or aspiring engineer, navigating this world becomes more accessible when breaking it down into manageable points.
Embedded Box is your gateway to a transformative learning experience in the dynamic field of embedded systems. Dive into their exclusive Embedded System Pay After Placement Course, where they prioritize your success. The dedicated instructors are industry experts, providing personalized guidance to nurture your skills. You get to gain an in-depth understanding of embedded systems, the driving force behind countless technological innovations. The curriculum goes beyond the basics, offering specialized tracks like Embedded Training Online and an Automotive Embedded Course, keeping you ahead of the curve. What is better than a path to success with their strong network of reputed companies, guaranteeing promising placements in the industry. Embedded box stands by their commitment with a robust 100% job guarantee, ensuring your skills seamlessly meet the demands of the real-world job market. You get to choose the convenience of online classes, allowing you to tailor your learning experience to fit your schedule. Whether you're a tech enthusiast or an aspiring professional, our Embedded System Pay After Placement Course is designed to propel you into a successful career in embedded systems.
#embeddedsystems#embeddedcourses#embeddedsysytem#embedded training system#embeddedd#embeddedcourse#embeddedsystem#embeddedsystemcourse#embeddedtraining#embedded
0 notes
Text
Embedded Systems Course in Pune with Placement
If you’re in Pune and serious about a career in embedded systems or IoT, there’s a good chance you’ve heard the name Technoscripts. Since 2007, this institute has helped thousands of students and professionals move beyond theory and into real embedded jobs. Whether you’re a fresher aiming to break into the core electronics field or someone looking to switch domains, Technoscripts has built a reputation for being one of the most reliable places to start that journey.
Let’s take a closer look at what makes this place different — and why so many students recommend it.
A Strong Foundation in Embedded Systems Training
Technoscripts didn’t just pop up recently. It’s been around for over 18 years, which means they’ve seen the industry change and evolve — and they’ve updated their training along with it. From basic microcontroller programming to more advanced topics like RTOS, device drivers, and IoT, their curriculum is built to match what companies are actually looking for.
The institute runs its classes in Shivaji Nagar, Pune, and offers both online and offline batches. So whether you’re a college student, a working professional, or someone in between, you can find a batch that fits your schedule.
Learning by Doing — The Practical Approach
One of the biggest reasons students choose Technoscripts is the hands-on learning. Here, you won’t just be sitting through theory lectures. You’ll get your hands dirty — working with sensors, microcontrollers, and various protocols like UART and I2C.
Each course includes at least two live projects, which gives you actual project experience. These aren’t just dummy projects either — they’re built to mimic what engineers work on in the real world. That experience becomes a big plus when you start applying for jobs.
And because the batches are small, you get personal attention. Trainers are not just teaching from slides — they’ve worked in the industry and know how things really work. Students often say the trainers are supportive, clear with concepts, and genuinely interested in helping you learn.
Course Options That Fit Different Goals
Whether you’re just starting out or looking to specialize, Technoscripts has courses for every level.
Embedded Systems Course in Pune with Placement — This is their flagship course. It runs for about 4 months and covers everything from C programming and 8051 microcontrollers to ARM, PIC, and wireless technologies. It’s designed to get you job-ready.
IoT Training — One of the first IoT-focused courses in India, this one teaches you how to build smart, connected devices. It’s ideal if you want to get into future-focused tech.
Automotive Embedded, MATLAB, and AUTOSAR — These are great if you’re targeting specific sectors or want to move into niche roles.
Post Graduate Diploma in Embedded Systems — Perfect for beginners, this course gives you a solid foundation and gradually builds up your skills with lab-based learning.
Solid Placement Support That Actually Works
A lot of institutes say they offer placements. Technoscripts actually delivers. Their placement team is active, always coordinating interviews, helping with resumes, and preparing students with mock interviews and soft skills sessions.
They have ties with several companies, from big MNCs to core embedded startups. That means more chances for students to land roles that actually match their training. You’ll find Technoscripts students placed in companies working on automotive, medical, and industrial applications.
The feedback is consistent — students who put in the effort get placed.
“I got placed in Spark as an Embedded Developer. The training was hands-on and the support from the placement team was excellent,” says one student.
“Technoscripts is the best training institute in Pune. I got placed in a good company and learned so much through practical projects,” says another.
Industry Exposure and Certifications That Matter
Technoscripts doesn’t operate in a vacuum. They keep their training relevant by partnering with companies, organizing guest lectures, and even arranging internships and industry visits.
They also provide NASSCOM®-certified training, which adds weight to your resume and helps during hiring processes.
Their courses are regularly updated to include trending technologies like STM32 microcontrollers, Embedded Linux, and IoT protocols, so you’re not learning outdated stuff.
Flexible Learning Options for All Schedules
Not everyone has the same timetable. That’s why Technoscripts offers:
Regular batches
Fast-track programs
Weekend classes
Early morning & evening options
Live online training with project kits
Even if you’re working full-time, you can still attend and learn at your pace.
A Supportive, Student-First Atmosphere
Beyond the tech and tools, what really makes Technoscripts stand out is its student-friendly environment. The faculty is approachable, and the vibe is encouraging. They even host webinars, meetups, and project expos to keep the energy going.
One student said it best:
“The atmosphere here is very healthy. There are regular live projects, webinars, and opportunities to apply what you learn.”
A Few Areas to Improve — And They’re Listening
Like any place, Technoscripts isn’t perfect. Some students have said they’d like even more extracurricular activities or career-focused workshops. The good part? The institute listens. They’ve been adding more events and soft skills sessions over time to give students a well-rounded experience.
Final Thoughts
Technoscripts Embedded Institute isn’t just about teaching you how to blink an LED. It’s about building a career in embedded systems, step by step — with practical skills, real projects, and strong placement backing.
Whether you’re looking for your first core job, planning to switch domains, or just want to build something real, Technoscripts can be your launchpad.
If you’re serious about embedded systems, this is a great place to start.
0 notes
Text
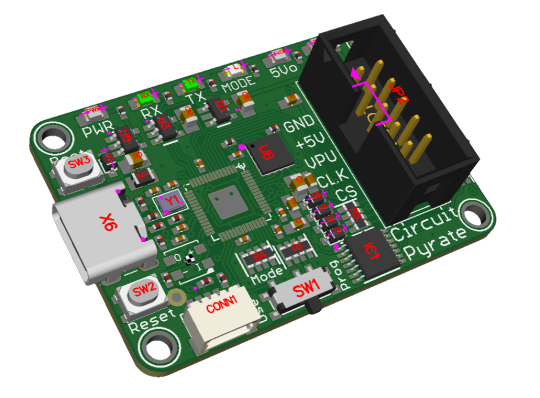

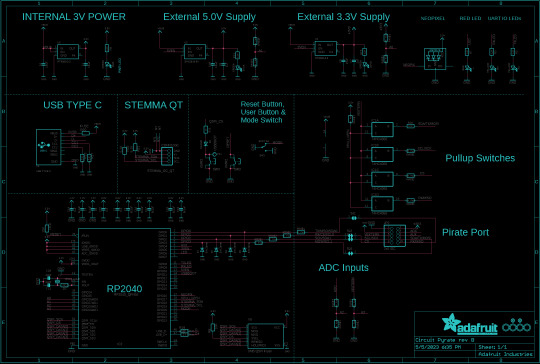

yaaarrr! a Circuit Pyrate is ready to be your best mate on the hacking seas
⚓️🏴☠️🤖🔧💻🔗🐍🔋📚💡🔌✨🌐💬📌🔄🔍💼📊
we recently sold out of our stock of Bus Pirates https://github.com/BusPirate/Bus_Pirate and when we booked a reorder we found it's currently unavailable with no ETA for re-stocking. it made us think about revisiting this design, perhaps using an RP2040 instead: with native USB and CircuitPython and PIO it might be easier to add new protocols! we did do a "Circuit Pyrate" draft many years ago but it was based on the SAMD21 and we quickly ran out of space - another thing the RP2040 would excel at.
parsing data is something that Python does very well, and tannewt already has VT100 control code support for the REPL status bar, so we're having a go at re-implementing the UX in native python by instantiating a secondary 'data only' CDC UART endpoint https://learn.adafruit.com/customizing-usb-devices-in-circuitpython/circuitpy-midi-serial#usb-serial-console-repl-and-data-3096590 The default REPL can then be enabled or disabled with the onboard slide switch.
here's our draft that uses the same sizing and header location but of course all different parts. two challenges: the RP2040 is not 5V-tolerant like the PIC24J but it's also not guaranteed for high speeds, so we put a 1K+3.6V zener diode on the 4 GPIO pins that ought to let it work OK with 3 or 5V devices. secondly, the pin mux distribution for I2C and UART doesnt match the same as the original chip so we may have to PIO bitbang those interfaces. we're going to have to do a bunch of pin twiddling to find out the limitations of this design. we add a separate Stemma QT port, NeoPixel, and LEDs for both power outputs. fun fact, did you know that the bus pirate is CC-0 http://dangerousprototypes.com/docs/Bus_Pirate_v3.6#License a rarely seen license for OSHW!
our current pondering is how to best mimic the 5V tolerant inputs of the PIC24J - the 1K + 3.6V zener will definitely do the job but can slow down the IO quite a bit on those high speed SPI lines. because we want full bidirectional support for each pin and be able to enable/disable optional 10K pullups to 3V (internal) or 5V (external) we can't us the TXS0104 series: has built in un-disableable pullups. this app note has a few tips we're perusing https://ww1.microchip.com/downloads/en/DeviceDoc/chapter%208.pdf - #11 looks like it may work..any suggestions?
8 notes
·
View notes
Note
What's a good starting point for learning this stuff? Most of my computer knowledge is being able to assemble the parts together, doing network and and system diagnostics, and just fiddling with OSes. (And the one time I used Backtrack + Reaver to hack my friend's wifi lol.) But Idk how to write code (I've tried tutorials but they never seem to stick.) or figure out how the actual circuitry itself works.
That actually is how many people get started.
As for writing code? I was taught how in school. There are many different approaches here, from picking it up through python on a linux command line environment, to playing with BASIC on a 8-bit microcomputer from the 1980s, to messing with C. There really isn’t one right answer, and I’m sure my followers have a variety of suggestions for how best to approach that.
Circuitry... if you haven’t figured it out by now, I approach this stuff from a vintage computer angle, which ends up having a similar approach to a microcontroller if you separated the chip out into the various components within: CPU, RAM, ROM, graphics, serial/parallel I/O controllers, etc. This user port on a C64 can feel similar to the digital I/O on an arduino for example. There was a time when a Radio Shack 100-in-One style kit would be a great answer to this, but times have changed, and most people don’t build analog circuits from scratch any more. I still do but that’s just how I roll.
We live in an era where arduinos are incredibly inexpensive, and provide a mix between a C-like language and simple circuitry where you can learn the hardware and software aspects hand in hand. Plus, you can learn the newer device control protocols beyond just serial, like I2C and SPI, and really put some cool stuff together that ends up being practical with not all that much effort as it used to require. Not to mention, once you find yourself restrained by the limitations of the arduino IDE, you can always leave it behind for higher performance options that grant you greater fine control over your microcontroller. Then Parallax Propellers, ARM Cortex M0′s, ESP32′s, etc. all become options depending on the type of performance you need to achieve.
I hope that answers your question in a helpful way.
14 notes
·
View notes
Text
Understanding Arduino Shields: What They Are and How They Work
Arduino is a popular microcontroller platform that has gained immense popularity among electronics enthusiasts and hobbyists. It is easy to use, affordable, and offers a range of capabilities that can be used to build a wide range of projects. One of the key reasons for the popularity of Arduino is the availability of add-on boards called shields that can be used to expand the capabilities of an Arduino board.
In this article, we will explore what Arduino shields are, how they work, and popular types of Arduino shields.
What Are Arduino Shields?
Arduino shields are add-on boards that can be connected to an Arduino board to add additional functionality. They are called shields because they sit on top of an Arduino board like a shield, with pins that align with the headers on the Arduino board.
There are different types of Arduino shields available, each designed to perform a specific function. For example, there are shields for adding WiFi connectivity, Ethernet connectivity, GPS functionality, motor control, and more. Some shields are designed to provide a specific input or output function, while others are designed to provide more complex functionality, such as LCD or Ethernet connectivity.
How Do Arduino Shields Work?
Arduino shields work by connecting to the Arduino board using the header pins that are aligned with the Arduino’s headers. They typically use one of several communication protocols, such as SPI or I2C, to communicate with the Arduino board. This allows the Arduino to communicate with the shield and control its functions.

Popular Arduino Shields and Their Functions
There are many different types of Arduino shields available, each designed to perform a specific function. Here are some popular Arduino shields and their functions:
Ethernet Shield: The Ethernet shield is used to add Ethernet connectivity to an Arduino board. This allows the Arduino to communicate with other devices over a local network or the internet.
2. LCD Shield: The LCD shield is used to add a display to an Arduino board. It typically includes a backlit LCD display and a few buttons for user input.
3. Motor Shield: The motor shield is used to control DC motors and stepper motors. It typically includes several motor driver circuits and can be used to control multiple motors simultaneously.
4. WiFi Shield: The WiFi shield is used to add WiFi connectivity to an Arduino board. This allows the Arduino to communicate with other devices over a wireless network.
5. GPS Shield: The GPS shield is used to add GPS functionality to an Arduino board. It typically includes a GPS module and an antenna and can be used to track the location of an object.
6. Sensor Shield: The sensor shield is used to interface with various sensors and other input devices. It typically includes headers for connecting to sensors and other input devices and may include some basic signal conditioning circuitry.
How to Choose the Right Arduino Shield
When choosing an Arduino shield, it is important to consider several factors, including compatibility with your Arduino board, required functionality, and cost. Different shields are designed to work with different types of Arduino boards, so it is important to ensure that the shield you choose is compatible with your board.
You should also consider the functionality that you require. If you need to add Ethernet connectivity, for example, then you will need to choose an Ethernet shield. If you need to control motors, then you will need to choose a motor shield. Finally, you should consider the cost of the shield. Some shields can be quite expensive, so it is important to choose a shield that fits within your budget.
Conclusion
Arduino ecosystem that allows users to add new functionality to their projects easily. They are designed to be simple to use and allow users to rapidly prototype and build projects without needing to design custom circuitry. With the wide range of shields available, there is a shield for almost any project that you can imagine.
In this article, we have discussed what Arduino shields are and how they work, as well as some of the popular types of shields and their functions. We have also discussed some important factors to consider when choosing the right shield for your project.
We hope that this article has given you a better understanding of Arduino shields and how they can be used to expand the capabilities of an Arduino board. We encourage you to try using Arduino shields in your projects and explore the possibilities they offer for rapid prototyping and building innovative projects.
1 note
·
View note
Text
Benefits on i3C Basic IP
i3C is a relatively new technology that stands for "Improved Inter-Integrated Circuit." It is a communication interface that has been designed to improve upon the already existing I2C standard. The i3C Basic IP is the core technology that enables this improvement, and in this blog, we will explore the i3C Basic IP and its advantages.

First, let's briefly review what the I2C protocol is. I2C is a two-wire communication protocol that allows multiple devices to be connected to the same bus. It is commonly used to communicate between microcontrollers, sensors, and other low-speed peripherals. However, I2C has some limitations. For example, it only supports a single master and requires external pull-up resistors. Additionally, the I2C bus can be slow and power-hungry due to its constant polling of devices.
Enter i3C. i3C is backward compatible with I2C, meaning that it can work with existing I2C devices. However, it also includes new features that improve upon the limitations of I2C. One of the most significant advantages of i3C is that it supports multiple masters on the same bus, allowing for more complex system designs. i3C also includes a dynamic address assignment feature, eliminating the need for external pull-up resistors and making the bus more power-efficient.
So, what is i3C Basic IP, and how does it fit into this? i3C Basic IP is the core technology that enables i3C's improved features. It is a pre-designed block of digital circuitry that can be integrated into an SoC (system-on-chip) or ASIC (application-specific integrated circuit) design. This IP provides the basic functionality of i3C, including multi-master support, dynamic address assignment, and faster transfer speeds.
One of the significant benefits of i3C Basic IP is that it can significantly reduce design time and costs. Rather than having to develop custom circuitry to support i3C, a designer can simply license the i3C Basic IP and integrate it into their design. This saves time, reduces the risk of errors, and can result in a more cost-effective design.
In conclusion, i3C Basic IP is the technology that enables the i3C protocol's improved features. It provides basic functionality such as multi-master support and dynamic address assignment, making it a valuable addition to any SoC or ASIC design. By simplifying the integration of i3C into a design, i3C Basic IP can save time and reduce costs, making it an attractive option for designers looking to take advantage of i3C's benefits.
0 notes