#how to activate wordpress plugin from cpanel
Explore tagged Tumblr posts
Visit Tumblr Blog
Explore Tumblr blogs with no restrictions, modern design and the best experience.
Last Seen Tumblr Blogs


Fun Fact
Users from the US are the majority of Tumblr visitors.
Text
WordPress Update Problems? Here’s How to Fix Them (No Tech Skills Needed)

Keeping your WordPress website up to date is critical for security, speed, and access to new features. But let’s face it—when an update fails, it can feel like the whole site is crashing down, especially if you don’t have a technical background.
Don’t panic.
Most WordPress update errors are easy to fix with a bit of guidance. In this beginner-friendly guide, we’ll break down why updates fail and what you can do to resolve them—no developer required.
🛑 Why Do WordPress Updates Fail?
WordPress runs on a system of interconnected parts: the core platform, themes, and plugins. If one of these components doesn’t align properly during an update, things can break.
Here are some of the most common causes:
📡 Poor internet connection that interrupts the update
🔌 Conflicts between plugins
🎨 Theme incompatibility
💾 Insufficient server memory or time limits
🔐 Incorrect file and folder permissions
🧩 Corrupted or incomplete update files
The first step toward fixing any problem is understanding where it’s coming from.
🛠️ How to Fix WordPress Update Errors (Step by Step)
✅ 1. Back Up Your Site First
Before trying anything, create a full backup of your website using a plugin like UpdraftPlus or BackupBuddy. This gives you a safety net in case something goes wrong during the troubleshooting process.
✅ 2. Clear Your Cache (It Might Be That Simple)
Sometimes, your browser or caching plugin is the culprit—not the update itself.
Clear your browser cache (Ctrl+Shift+R or Command+Shift+R on most browsers)
If you use a caching plugin (like WP Super Cache or W3 Total Cache), clear your site cache too
Now try updating WordPress again.
✅ 3. Use Troubleshooting Mode to Find Plugin Conflicts
Conflicting plugins are a frequent reason for failed updates.
You can use the Health Check & Troubleshooting plugin to safely test your site:
Install and activate the plugin
Enable troubleshooting mode—this disables all plugins temporarily (just for you)
Try updating again
If it works, re-enable plugins one by one until the error returns
That last plugin activated is your likely culprit.
✅ 4. Check Your Hosting Settings
Shared hosting plans often limit memory and execution time, which can stop updates mid-process.
Ask your host:
What’s the PHP memory limit? (It should be at least 256MB)
What’s the maximum execution time? (Aim for 300 seconds)
Can they increase these limits for better stability?
Sometimes, simply switching to a better hosting plan solves everything.
✅ 5. Try a Manual WordPress Update
If automatic updates aren’t working, a manual update might do the trick.
Here’s a simple guide:
Download the latest WordPress version from WordPress.org
Unzip the files on your computer
Use FTP software like FileZilla to connect to your website
Replace the wp-admin and wp-includes folders with the new ones
Do not touch the wp-content folder (it holds your themes and plugins)
Open your site—if needed, it will ask to update the database. Just click the button
Done right, this is a safe and effective fix.
✅ 6. Adjust File Permissions (If You’re Getting Permission Errors)
WordPress needs the correct file permissions to update itself.
Use a plugin like WP File Manager or ask your hosting provider to set:
Folders to 755
Files to 644
These permissions allow WordPress to work smoothly without opening security risks.
✅ 7. Stuck in Maintenance Mode? Here’s How to Exit
Sometimes an update gets interrupted, leaving your site stuck in maintenance mode with this message:
“Briefly unavailable for scheduled maintenance. Check back in a minute.”
To fix this:
Log into your hosting account (e.g., cPanel or via FTP)
Go to the root folder of your WordPress site
Delete the file named .maintenance
Refresh your site—it should return to normal
This is one of the easiest fixes on the list.
💬 When You Should Call in the Experts
If you’ve tried everything and the update still won’t work—or if you're unsure about any step—it’s perfectly okay to ask for help.
Here’s who you can turn to:
Your web hosting support team
A WordPress specialist
Or a reliable web development company like Websenor
✅ Final Thoughts: Keep WordPress Simple with Websenor
WordPress update errors can seem intimidating, but most are fixable with a calm, step-by-step approach—even if you're not a tech expert. The key is to:
Back up first
Rule out the simple causes
Test safely before changing live settings
Know when to ask for help
If managing updates or troubleshooting problems ever feels like too much, Websenor is here to take the weight off your shoulders. Our team specializes in WordPress maintenance, bug fixing, and website performance tuning—so you can focus on growing your brand while we handle the backend.
Let Websenor be your WordPress safety net. With us, your website stays secure, updated, and stress-free.
0 notes
Text
Complete Beginner’s Guide to Setting Up WHMCS on WordPress
Integrating WHMCS with your WordPress site can dramatically improve your hosting business’s efficiency by automating client management, billing, and support. Whether you’re a seasoned hosting provider or just starting, setting up WHMCS on WordPress doesn’t have to be intimidating. This step-by-step beginner’s guide will walk you through the process of integrating WHMCS into your WordPress site, making it easier to manage your hosting services and improve client satisfaction.
By the end of this guide, you’ll be able to integrate WHMCS seamlessly with WordPress, allowing for a more efficient and professional hosting operation. Let’s dive in!
What Is WHMCS?
Before diving into the integration process, let’s first understand what WHMCS is.
WHMCS (Web Host Manager Complete Solution) is a comprehensive billing and client management software designed specifically for hosting businesses. It allows you to automate:
Client Registration
Billing and Invoicing
Domain Management
Support Ticketing
WHMCS is widely used in the hosting industry due to its robust features and seamless management tools. By integrating WHMCS into WordPress, you can deliver a unified, professional experience for your clients.
Why Integrate WHMCS into WordPress?
WordPress is one of the most popular platforms for building websites, and combining it with WHMCS creates a powerful, streamlined environment for hosting providers. Integrating WHMCS into WordPress offers several key benefits:
Seamless User Experience: Clients can manage their accounts, view invoices, and submit support tickets all within the same interface.
Better Client Management: Automate tasks such as billing, domain registration, and service provisioning.
More Flexibility: WordPress gives you access to a vast range of themes and plugins to customize your hosting site, making it more user-friendly.
Reduced Overhead: By automating administrative tasks, you free up time to focus on growing your business.
Now that you know the advantages, let’s get into how to set up WHMCS on WordPress.
Step 1: Install WordPress on Your Hosting Server
If you haven’t done so already, your first step is to install WordPress on your hosting server.
If you’re unfamiliar with the process, here’s a quick breakdown:
Log into your cPanel (or hosting account dashboard).
Look for the WordPress installer.
Follow the prompts to install WordPress on your chosen domain.
Once WordPress is installed, you’ll have access to your WordPress dashboard where you can manage your site’s content and plugins.
Step 2: Install WHMCS on Your Server
The next step is to install WHMCS. While there’s no official WordPress plugin for WHMCS, you can still integrate it manually or by using third-party plugins. Here’s how to set it up manually:
Download WHMCS from the official WHMCS website.
Upload the WHMCS files to your hosting server using FTP or the file manager in your cPanel.
Create a database for WHMCS through your cPanel or hosting control panel.
Follow the installation instructions provided by WHMCS, entering the database details when prompted.
Once installed, you’ll be able to access your WHMCS admin panel via yourdomain.com/admin.
Step 3: Install a WHMCS WordPress Plugin
Once WHMCS is installed on your server, the next step is to integrate it with your WordPress site. The easiest way to do this is by using a WHMCS WordPress Plugin, which allows you to embed WHMCS functionality directly into your WordPress site.
To install the plugin:
Go to the WordPress Dashboard
Navigate to Plugins > Add New
Search for a WHMCS integration plugin (for example, a WP WHMCS sync plugin).
Click Install Now and activate the plugin.
The plugin will prompt you to enter your WHMCS URL and API credentials, allowing WordPress and WHMCS to communicate seamlessly.
Step 4: Customize the Design and Layout
After installation, you’ll need to ensure that your WHMCS system integrates smoothly with the look and feel of your WordPress site. The best way to do this is by using a WHMCS WordPress theme or customizing the layout to match your branding.
Most WHMCS plugins offer basic theme integration, but you can further enhance the design by:
Customizing your WordPress theme to match your branding.
Adding WHMCS templates to WordPress using the plugin’s settings.
Customizing the client area and billing pages to ensure they align with your brand identity.
You want to make sure that users have a consistent experience between your WordPress site and WHMCS.
Step 5: Configure WHMCS Settings
With WHMCS now integrated into WordPress, it’s time to configure it according to your hosting business needs. Here’s a quick overview of the settings you should adjust:
Payment Gateway Setup: Add payment gateways like PayPal, Stripe, or others to allow clients to pay for their hosting services directly through your website.
Email Templates: Set up automated email notifications for things like invoices, account changes, and service renewals.
Client Area Configuration: Customize the client dashboard to provide a clean, user-friendly interface.
Product and Service Setup: Create hosting plans, domain registration options, and any other services you wish to offer.
This configuration will help you automate client management, billing, and service provisioning without any manual effort.
Step 6: Test the Integration
Before launching your website, make sure everything is working properly. Test:
Client registration and account creation – Does the process flow smoothly?
Billing and invoicing – Are invoices generated and sent correctly?
Support tickets – Can clients submit tickets and receive responses?
Testing is crucial to ensure that the integration is seamless, and clients have a positive experience on your website.
Step 7: Ongoing Maintenance
After the setup, you’ll need to regularly maintain your WHMCS WordPress Plugin integration. This includes:
Updating the plugin to ensure compatibility with new WordPress versions.
Monitoring for bugs or issues that may arise as you expand your services.
Backing up your data regularly to avoid loss of critical information.
This ongoing maintenance ensures that your integration continues to run smoothly and efficiently.
Subtly Promote WP WHMCS Sync Plugin
Setting up WHMCS on WordPress is an excellent way to improve the efficiency of your hosting business, but managing multiple systems manually can still be time-consuming. For those looking to take the integration to the next level, consider using a WP WHMCS Sync Plugin.
A WP WHMCS Sync Plugin simplifies the integration by automatically syncing your WordPress site with WHMCS. This plugin allows you to keep your client data, billing information, and product offerings in perfect sync without having to manually update each system. Plus, with the right synchronization, you can ensure that your clients receive real-time updates on their account status, services, and invoices.
By automating the process further, you can focus more on growing your business and less on administrative tasks.
Conclusion
Setting up WHMCS on WordPress is a powerful way to streamline your hosting business and improve client satisfaction. By following this step-by-step guide, you’ll have everything you need to integrate WHMCS with WordPress seamlessly.
To make the process even smoother and more efficient, consider using a WP WHMCS Sync Plugin to automate syncing between WordPress and WHMCS. This plugin can save you time, reduce errors, and allow you to focus on providing exceptional services to your clients.
0 notes
Text
Fix Hacked WordPress Website Fast: 129 Million Daily Cyberattacks!
Fix Hacked WordPress Website Fast
There’s nothing more nerve-wracking than Fix hacked WordPress website. Whether it’s your business site or an individual blog, the harm can overpower. The uplifting news? You can assume command and recuperate your site by following the right advances!
In this blog, we’ll walk you through what to do to Fix hacked WordPress website — from quick activities to long haul security.
Keep mentally collected and Move Quickly
The initial step is to try to avoid panicking. It’s not difficult to overreact, yet fast, lucid activity is vital. Try to follow each step cautiously to keep away from additional harm to your site or information.
Take Your Site Disconnected
Quickly put your site in support mode. This keeps guests from interfacing with your hacked site, which could spread malware or create additional issues. You can undoubtedly do this by means of your facilitating supplier or by utilizing a module like WP Support Mode.
Change All Passwords
Begin by changing every one of your passwords:
WordPress administrator clients
FTP and data set accounts
Facilitating and cPanel passwords
Ensure the new passwords are solid and remarkable 🔑. Feeble qualifications are in many cases the main driver of site breaks

Examine for Malware
Utilize a confided in security module like Wordfence, Sucuri, or MalCare to play out a full malware examine. These modules will assist you with recognizing tainted documents and potential weaknesses that prompted the hack.
Most facilitating suppliers additionally offer implicit malware examining instruments — make certain to run these outputs too to cross-check for issues.
Reestablish Your Site from a Reinforcement (If Accessible)
In the event that you’ve been consistently backing up your site (as you ought to!), right now is an ideal opportunity to utilize it. Reestablish your site to a spotless variant from a reinforcement taken before the hack happened. However, before you do, examine the reinforcement to guarantee it’s liberated from malware to stay away from re-contaminating your site.
Check for Unknown Users or Changes
Make a beeline for your WordPress dashboard and survey the Clients segment. Programmers frequently make unapproved administrator accounts, so eliminate any new or dubious clients right away 👤.
Likewise, pause for a minute to survey any uncommon changes in satisfied, settings, or modules. Search for whatever doesn’t have a place.
Update WordPress Core, Themes, and Plugins
Obsolete programming is quite possibly of the most widely recognized way programmers get to your site. Update your WordPress files, themes, and plugins to the most recent variants. In the meantime, erase any unused or superfluous modules and subjects to lessen the assault surface.
Clean Hacked Records
On the off chance that malware is distinguished during your sweep, clean the impacted documents. Use plugins like Sucuri or MalCare to make it simpler.
Secure Your Site Post-Recovery
When your site has returned to ordinary, now is the right time to expand security to forestall future hacks. How it’s done:
Introduce a security module like Wordfence or Sucuri to screen your site and block dubious movement. Empower two-factor verification (2FA) for all administrator records to add an additional layer of safety (helps to fix hacked WordPress website)🔐. Utilize an Internet Application Firewall (WAF) to channel and impede vindictive traffic. Limit login endeavors and implement areas of strength for a strategy for all clients.
Check with Your hosting Provider how to work fix hacked WordPress website
It’s smart to tell your facilitating supplier about the hack. At times, the break might have happened through the server. Your host might offer security observing, cleanup administrations, or extra direction on getting your site 🏢.
Have you ever faced any issue on how to fix hacked WordPress website? Share your experience and recovery tips in the comments below!
Visit us for any issues: [email protected], wehostify.com.
#digital marketing#on page seo#local seo#ppc ads#adwords#google adwords#ppc#ppc agency#ppc campaign#ppc company in india#fix hacked wordpress website#best digital marketing company in gujarat
1 note
·
View note
Text
Changing Your WordPress Login URL

Changing your WordPress login URL is a smart move to enhance your website’s security. It helps to protect your site from unauthorized access and brute-force attacks. Here’s a comprehensive guide on how to change your WordPress login URL effectively.
How to Change Your WordPress Login URL: The default WordPress login URL is easy to guess, making it a target for hackers. By changing it, you add an extra layer of security. Let’s explore the methods you can use to change the login URL.
Change WordPress Admin Login URL Without Plugin
If you prefer not to use plugins, you can change the WordPress admin login URL without a plugin. This involves editing your site’s files directly. Here’s how you can do it:
Backup Your Site: Always start by backing up your website to prevent any data loss.
Edit the .htaccess File: You can use cPanel to access and edit your .htaccess file. Add the following code to redirect the wp-admin URL:
RewriteRulenew−login$/wp−login.php[NC,L]𝑅𝑒𝑤𝑟𝑖𝑡𝑒𝑅𝑢𝑙𝑒𝑛𝑒𝑤−𝑙𝑜𝑔𝑖𝑛$/𝑤𝑝−𝑙𝑜𝑔𝑖𝑛.𝑝ℎ𝑝[𝑁𝐶,𝐿]
Replace”new−login”withyourdesiredloginURL.𝑅𝑒𝑝𝑙𝑎𝑐𝑒”𝑛𝑒𝑤−𝑙𝑜𝑔𝑖𝑛”𝑤𝑖𝑡ℎ𝑦𝑜���𝑟𝑑𝑒𝑠𝑖𝑟𝑒𝑑𝑙𝑜𝑔𝑖𝑛𝑈𝑅𝐿.
How to Change WP-Admin URL in cPanel
To change the wp-admin URL in cPanel, follow these steps:
Access cPanel: Log in to your cPanel account.
File Manager: Open the File Manager and navigate to your site’s root directory.
Edit wp-login.php: Rename the wp-login.php file to something unique.
Update Links: Update links pointing to the old wp-login.php to reflect the new URL.
Change WordPress Login URL with Wordfence
Wordfence is a popular security plugin that can also help you change the WordPress login URL with Wordfence. Follow these steps:
Install Wordfence: Install and activate the Wordfence plugin.
Login Security: Go to Wordfence > Login Security.
Custom Login Page: Set your custom login URL.
Using WPS Hide Login
WPS Hide Login is a straightforward plugin for changing your login URL. Here’s how to use it:
Install the Plugin: Go to Plugins > Add New and search for “WPS Hide Login”. Could you install and activate it?
Configure Settings: Go to Settings > WPS Hide Login and enter your new login URL.
Save Changes: Save the changes and your login URL will be updated.
Change WordPress WP-Admin URL Programmatically
You can change the wp-admin URL programmatically by adding code to your theme’s functions.php file. Here’s a sample code snippet:
function custom_login_url() {function custom_login_url() { returnhomeurl(′/new−login−url/′);𝑟𝑒𝑡𝑢𝑟𝑛ℎ𝑜𝑚𝑒𝑢𝑟𝑙(′/𝑛𝑒𝑤−𝑙𝑜𝑔𝑖𝑛−𝑢𝑟𝑙/′); }} addfilter(′loginurl′,′customloginurl′);𝑎𝑑𝑑𝑓𝑖𝑙𝑡𝑒𝑟(′𝑙𝑜𝑔𝑖𝑛𝑢𝑟𝑙′,′𝑐𝑢𝑠𝑡𝑜𝑚𝑙𝑜𝑔𝑖𝑛𝑢𝑟𝑙′);
Replace “/new-login-url/” with your desired login URL.
How to Find WordPress Admin URL from Database
If you’ve forgotten your custom login URL, you can find the WordPress admin URL from the database:
Access phpMyAdmin: Log in to your hosting account and open phpMyAdmin.
Navigate to wp_options: Look for the wp_options table and find the login_url row.
Retrieve URL: The value in this row is your current login URL.
How Do I Change the URL of My WordPress Site After Login?
To change the URL of your WordPress site after login, follow these steps:
Settings: Go to Settings > General.
Update URLs: Update the WordPress Address (URL) and Site Address (URL) fields.
Save Changes: Save the changes and your site URL will be updated.
Should I Change My WordPress Login URL?
Should I change my WordPress login URL? Absolutely. Changing your login URL reduces the risk of brute force attacks and unauthorized access, enhancing your site’s security significantly.
Conclusion
Changing your WordPress login URL is a crucial step towards securing your website. Whether you use plugins like Wordfence and WPS Hide Login or prefer manual methods through cPanel or code snippets, ensuring your site’s safety is paramount. Follow the steps outlined above to successfully change your WordPress login URL and secure your site.
0 notes
Text
Why is it Important to Keep Your PHP Version Updated?
The WordPress ecosystem is built on the PHP programming language. PHP is continuously being developed to improve security and make code execution faster among many other improvements.
PHP End of Life
At some point, a version of PHP will become obsolete which is referred to as the “end of life” of that version. This means that version of PHP will no longer receive any security fixes.
Unfortunately, many websites are still running on outdated PHP versions. All these websites are at risk.
According to WordPress statistics, 18.5% of WordPress sites are still running on PHP 5.6 or lower. Support for PHP 5.5 ended on December 2018. Another 34.7% of WordPress sites are running PHP 7.2, 7.1 and 7.0. Support for PHP 7.2 ended November 20,2020. That would make 53.2% of WordPress sites vulnerable to PHP exploits.

Source: WordPress.org
Why are Majority of WordPress Sites Running Outdated Versions of PHP?
Many users most likely don’t even know what PHP version they have since updating it is more complex than updating themes and plugins. Many non-technical WordPress users are wary of touching their hosting settings or cPanel. And for good reason. one wrong click on cPanel could cause your site to go down if you don’t know what you are doing. This seems to be the biggest barrier to adoption of newer PHP versions.
Some hosts are also slow to adopt and offer newer PHP versions. We recommend WPEngine and Siteground as they are quick on the uptake when it comes to PHP version offerings.
Why You Should Update
Better Security
The main reason that you should update your PHP is for security. As we have already mentioned, older PHP versions are no longer getting security fixes. That means known vulnerabilities are not being fixed on that version which leaves your site open to attacks.
Site Speed
Newer PHP versions will execute code faster so that means faster page load speeds. Faster page load speed means better user experience and good SEO signals. Site speed is an SEO ranking factor. So if you want to hit page one of Google search results, invest in site speed.
Ongoing Support
If you are running the latest PHP versions, you are protected from the latest known vulnerabilities. People work to fix security vulnerabilities in PHP when they come to light. The same goes for known bugs.
How Do You Check Your PHP Version?
Now you’re curious how to update your PHP version. First off, you have to find out what version of PHP you are using. There are several ways to check your PHP version. You can actually check on your WordPresh Dashboard.
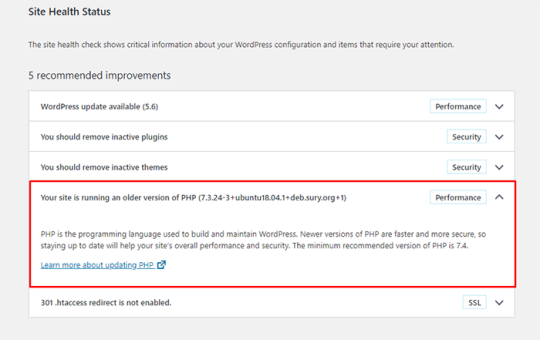
Site Health Page
The Site Health page that you can access from your WordPress Dashboard contains a plethora of useful information that you can address to keep your site secure. You can reach it by going to Tools and then clicking on “Site Health”. Or you can just append your domain with:

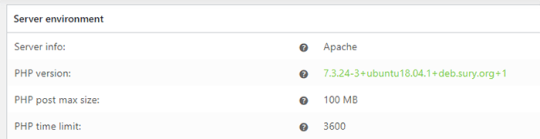
WooCommerce Status Page
If you are using WooCommerce, you can also click on WooCommerce and then on Status. You can see your PHP version when you scroll down to the “Server environment” table.
There are other ways to view your PHP version but these are the easiest methods for WordPress users.
You Know What Version of PHP You are Running, Now What?
If you not running an outdated version of PHP, then you don’t need to do anything. If you find that your PHP version is outdated, there are a few things you need to do before you update your PHP version.
Create a staging environment. You can test all your updates here before updating your live site. You will, essentially, also need to test the PHP upgrade on a staging environment so this is a necessary step.
Create a backup of your site.
Update your WordPress core.
Update all your themes and plugins. If you are using premium themes and plugins, make sure you have an active license for everything so you can receive automatic updates.
Remove unused plugins.
Find and remove abandoned plugins. This could get complicated if your site relies heavily on an abandoned plugin. We have a separate guide for removing abandoned plugins.
Now You’re Ready to Upgrade Your PHP
We recommend letting a developer upgrade your PHP version in case something goes wrong or at least have a developer at your beck and call before you proceed.
How you upgrade your PHP depends on your hosting provider so you should consult your hosting provider’s documentation. You will most likely need to navigate cPanel or your hosting account’s dashboard. Some hosting providers will actually require you to create a support ticket to request a PHP upgrade.
Make sure you are testing the PHP upgrade on a staging environment first so you can sort any issues in a controlled environment.
Have your hosting provider’s contact information at the ready so you can reach out to them right away if you encounter a problem.
If you need technical help with any of the steps leading to the PHP upgrade or the actual upgrade, you can contact us.
If you have any questions, you can also let us know in the comments.
0 notes
Text
How to Set Up a WordPress SSL Certificate
Finding your way around the internet can be challenging, especially when keeping your online identity safe. Welcome to the world of SSL certificates, a significant security measure that is no longer a choice but a must-have for any serious website owner.
How to Set Up a WordPress SSL Certificate is a post that will walk you through this process.

What does SSL mean?
Safe Sockets Layer, or SSL, is a system that protects all of the data sent between a browser and a web server. It protects the information they send each other from hackers and other cyberattacks and keeps it private.
HTTPS stands for Hypertext Transfer Protocol Secure. It is the safest form of HTTP, the standard way to send data over the internet. The padlock in your browser's search bar tells you that the connection is an HTTPS connection that SSL encrypts. This adds an extra layer of security.
A "Not Secure" message in the address bar means that the website does not have an SSL certificate or has an expired or incorrectly set certificate. As a warning, this lets people know that hackers could steal any information they enter on the site.
What do you need to get an SSL certificate set up in WordPress?
Most of the time, your web host gives SSL keys to your websites. So, before you start:
Ensure your site still needs the SSL certificate you need to set up.
You should check to see if your web host:
Free SSL validation is offered.
Offers paid SSL certification as part of its hosting plans
Allows you to add SSL certificates from third-party providers
If your SSL certificate has expired or, very rarely, your WordPress site doesn't have one, you will need to add one.
2. Take a full site backup
Additionally, we suggest using a backup tool to make a copy of your WordPress site before installing an SSL certificate in WordPress. It's also easy to recover; you can set it to back up at regular times and more.
Websites that use WordPress can now get SSL certificates either by hand or with a tool. This article tells you how to install a third-party or self-signed certificate. The plugin is more accessible, but you should follow the other steps instead.
How to install an SSL certificate in WordPress using a plugin
Use a dedicated SSL plugin like Really Simple SSL to install free third-party certificates from Let's Encrypt on your WordPress site. This is especially useful if your web host does not provide an SSL certificate.
Step 1: Activate the Really Simple SSL plugin from the WordPress plugins section.
Step 2: Open the Really Simple SSL dashboard by navigating to Settings and SSL.
Step 3: Select the Install SSL Certificate option.
This displays the System Status pop-up, determining whether your website matches the minimum requirements for installing the certificate.
If there are no problems, click save and continue.
Step 4: Fill out the domain wizard with site information.
Most of the information in this part is pre-filled based on the previous step's system status check.
Once finished, click save and continue.
Step 5: In the Hosting area, provide your web host's URL and admin credentials.
Continue by clicking the Save button.
Step 6: In the directory pop-up, double-check the findings.
Simple SSL verifies your credentials at this step.
If there are no problems, click save and continue.
Simple SSL should now install an SSL certificate from Let's Encrypt on your WordPress site. Keep your credentials ready in case you are logged out of your site.
How to manually install an SSL certificate in WordPress (via cPanel)
To install SSL certificates on web hosting services such as MyResellerHome, use cPanel. Using cPanel to upload an SSL certificate is a reasonably easy operation, and its UI is nearly identical across web providers. The instructions outlined here apply to all cPanel’s and web hosting.
Getting an SSL certificate for WordPress is a recommended read.
Step 1: Go to the Security section of your site's cPanel and click on SSL/TLS.
Step 2: Select Generate, View, Upload, or Delete SSL Certificates.
Step 3: Fill out the Upload a New Certificate area with your certificate information.
Step 4: To add the certificate to your site, click Install after it appears in the Certificates on Server section.
How to Install an SSL Certificate in WordPress Using the Web Server
Obtain an SSL certificate from a CA and manually install it on your WordPress site using the mechanism required for your web server—Apache or nginx.
However, we do not suggest this strategy because it increases the likelihood of things crashing on your website. Furthermore, manual SSL installation is time-consuming and entails multiple procedures. It will necessitate changes to core files and the site database, where errors could be disastrous to your site.
After all that work, you'll have to manually redirect your site from HTTP to HTTPS, which is required for SSL installation.
The use of a plugin such as Really Simple SSL, which simplifies and expedites the process of installing SSL certificates on your website, allows you to avoid the risks that are associated with these situations.
What should I do after putting in an SSL certificate in WordPress?
After adding an SSL certificate to your WordPress site, you should check that it is set up correctly across the whole site.
Change your site's URL from http:// to https:// in the central part of your manager dashboard.
Add the https:// URL to your site's information. Use a tool like BetterSearchReplace (BSR) to make it easy and quick.
Once you've installed and activated the BSR plugin, go to your dashboard and click on "Tools" to get to the BSR homepage. Type the HTTP URL of your site into the Search for box and the https URL into the Replace with box. Uncheck the box next to Run as dry run, then click Run Search/Replace → to select all the tables.
Change your site's URL in Google Analytics, Google Search Console, and its sitemap to inform Google about the changes. This ensures that Google can find and show your site in search results.
Run your site's URL through the Qualys SSL test site to ensure that your SSL certificate is set correctly and that the results show that it is.
Check your site's license often to ensure it's renewed on time. This is very important so that you can handle expiring certificates since Google is slowly switching from SSL certificates that are valid for one year to ones that are valid for 90 days.
Extra safety steps to keep your WordPress site safe
Adding an SSL certificate to make your WordPress site safer is only the beginning. It only encrypts the traffic going to and from your site. It doesn't protect it from the many threats that are out there. Because of this, you must take extra steps to keep your site safe from all kinds of dangers.
Add a security tool to your site and your SSL certificate. Because it has a strong firewall and good bot protection, it keeps your site safe from threats, and its malware scanning and removal tools always ensure it stays clean.
Tell people to change their passwords often and ensure they are strong.
Use two-factor authentication (2FA) or other vital security steps to make your login safer.
Check user accounts and permissions often to prevent people from changing your WordPress site without your permission.
Bots and people who aren't supposed to be there can't start brute-force attacks if you limit the number of times people can log in to your site.
Regularly update your WordPress core, plugins, and styles to prevent people from exploiting any security holes.
How to fix problems with the SSL installation on your WordPress site
Some things might get in the way of you adding an SSL certificate to your WordPress site to make it safer. Don't worry, though. We will discuss some of the most common problems that might arise during this process and how to solve them.
You might be getting one of these errors: HTTP 429.
That's too many requests; more domains should be allowed, or the certificate must suit your chosen domain. They show up when the SSL certificate information doesn't match what's on your WordPress site. If you need any corrections in your SSL certificate information, get a new one from the CA.
Do you get a warning message that says "Expired SSL Certificate"?
You guessed it—an SSL certificate that has expired—is the root of this issue. If you just installed an SSL certificate and now see this error, check the times the certificate was activated and when it expires. This mistake usually happens because the date is wrong or not likely to happen. Also, since Google is moving toward SSL certificates that are good for 90 days, you must check your site's expiration dates and ensure you renew them on time.
Are you getting an error that says NET:ERR_CERT_INVALID or NET:ERR_CERT_COMMON_NAME_INVALID?
If you see this error, your browser thinks the SSL certificate for your WordPress site is inaccurate. There are many reasons for this, but the most common ones are wrong domain names or times of activation or expiration. Check these facts and have the CA fix them when they reissue your certificate.
Are you getting an ERR_SSL_PROTOCOL_ERROR or an ERR_SSL_VERSION_OR_CIPHER_MISMATCH error?
An incorrectly set-up or written SSL certificate, a problem with the certificate's digital signature, or an outdated encryption algorithm could all be to blame for this error. You should go back and fix any mistakes in your SSL settings.
If the issue still appears, try a fresh copy of your browser or a different browser to see if that fixes it. There are other things that the Qualys SSL test can tell you about your SSL certificate. Make sure that the SSL certificate is not affected by a firewall plugin by turning it off and then reloading the website. The worst-case scenario is that you might be required to obtain a new certificate.
Are you getting "Not Secure" messages on your site or login page?
If your browser tells you that your WordPress login page or site is "Not Secure," it means that your browser can't find an SSL certificate or, if one is there, it has expired or isn't set up correctly. You can get a new SSL certificate or use a tool like Really Simple SSL to fix the one you already have. Next, you need to change all HTTP URLs to their HTTPS versions and move them. Lastly, clear your browser's files and let Google know your site has changed.
Conclusion
Setting up a WordPress SSL certificate ensures that your website is safe and trustworthy. In addition to keeping your information secure, it also helps your site's SEO rankings. You might think the process is challenging at first, but if you carefully follow the steps in this piece, you can do it. Remember that a safe website builds trust among users and makes surfing more enjoyable. Be sure to add an SSL certificate to your WordPress site.

Janet Watson MyResellerHome MyResellerhome.com We offer experienced web hosting services that are customized to your specific requirements.
Facebook Twitter YouTube
0 notes
Text
Ready-to-Use Website Service

You can add this service to your basket at the bottom of the page. Just scroll to the end of the product description. Ready-to-Use Website Service Supported CMS Platforms: - WordPress - Joomla - HTML5/CSS3 Website Discover the Fantastic Benefits Service! - Fast and Hassle-Free I understand that time is of the essence. With an estimated turnaround time of 7 to 10 business days, you'll have your revamped website up and running in no time. - Comprehensive Package This service includes theme installation on your web hosting, configuration according to your theme's requirements, activation of essential plugins, seamless demo content replacement, and personalised theme customisation. I'll even set up contact forms and maps to enhance user engagement. - Professional Touch I will work closely with you to add your branded logos and tailor the colour scheme to match your corporate identity. Plus, I'll populate up to five web pages and create ten engaging blog posts to get your website ready for success. How Does the Ready-to-Use Website Service Work? - Collecting Information I kick off by gathering the necessary details from you. After confirming your order, I'll get in touch to request access to your hosting account and domain. Don't worry if you don't have hosting yet; I offer various hosting packages or I can guide you to find a suitable hosting package. - Content Collaboration To make your website truly unique, I'll need your content – images, texts, and content placement preferences. You can easily share this information with me via email or a file-sharing service. If you have any questions, I will be there to assist you every step of the way. - Completion and Review Once I have all the data, I will swing into action. I'll install your chosen template, customise it to perfection, and ensure everything works seamlessly. You can track your project's progress all the way and enjoy three free revisions to fine-tune the details. - Take Control After final approval, I'll provide you with the login credentials to access your website's admin panel. Now, you can take the reins, manage your site and make further customisations whenever you need. To Provide this service, I’ll Need - cPanel access plus FTP and MySQL credentials for your hosting (your hosting provide will be able to give you this information) - Your logo (preferably in .SVG format) - Information on the colours you'd like to change in the template, complete with RGB codes - Content (images and texts) for your web pages and blog posts - Clear content placement instructions Top Reasons to Try This Website Customisation Service - No technical expertise required: If you're new to CMS platforms and hosting, I've got your back. I will handle the complexities, ensuring a hassle-free experience. - Speedy launch: Within just a few business days, you'll have a fully operational website, customised to your liking. - SEO optimisation: I'll optimise your site for search engines, helping you climb higher in rankings and attract more visitors. - Personalised support: I will be your guide, from initial discussions to final delivery. You're never alone in this journey. Ready to elevate your online presence? Take the first step towards a stunning website with this Ready-to-Use Website Service. Get started now! Please Note: - This service is valid for one website. Advanced coding and layout modifications are available for an additional fee. - Timely provision of logo, content, and images is crucial to meet project deadlines. - Delivery times may vary due to production department load or unforeseen circumstances. - You'll have two free revisions available, valid for 30 days from delivery. Ready-to-Use Website Service FAQ: What does Ready-to-Use Website Service include? This service encompasses template installation, logo integration, colour scheme adjustments, contact form activation, and content addition to up to five web pages along with the publication of ten blog posts. How long will it take to complete Ready-to-Use Website Service? This service is typically completed within 7 to 10 business days, provided that content and instructions are provided promptly. Can you deliver template installation and content integration faster? Yes, I offer expedited services for an additional fee. Contact me to discuss your specific requirements. Can I order the Ready-to-Use Website Service even if I do not have all the content ready yet? Absolutely! You can provide content at your own pace, and I'll start work once everything is ready. I also offer a Content Writing Service to expedite the process. Will you install a template on my hosting? Yes, I can install the template on your existing hosting, provided it is compatible with your chosen theme. If you don't have hosting, I offer hosting services or I can assist you in selecting and registering one. Do I have to check that my hosting is compatible with a template? Yes, it's essential to ensure your hosting meets your template's requirements. Different hosting providers have varying specifications, and I can assist you in making the right choice. What should I do if I need to add more content pages? Additional customisation services are available for an extra fee. Reach out to me for assistance and pricing details. Will you customise my online store if I have an eCommerce template? This service focusses on website customisation and does not include store configuration or additional functionality integration. Contact me for specific eCommerce requirements. How can I provide my logo and content for the website template customisation services? Once you've made your payment, I will reach out to guide you on content submission. You can choose a convenient method, such as email or file-sharing services. What if I do not like the final result? After completion, you have three free revisions to ensure your satisfaction with the installation and customisation. Will you help me if I have an existing site (for example, on WIX or Squarespace) but want to migrate to WordPress? Absolutely! I can seamlessly migrate content from your existing site to your new WordPress template. Simply select a template, provide instructions, and I'll handle the rest, including optimisation for search engines. If you need additional functionality, I can manually add features to your new website. * Timeline assumes that the client already has all the information and content available when the project kicks off. Delays in receiving any of the required information and content will inevitably delay the project beyond my control and for which I cannot be held responsible. Read the full article
0 notes
Text
What is Bluehost?
Bluehost is a web hosting company that hosts over 2 million websites. It was conceived of by Matt Heaton in 1996 and officially launched as Bluehost in 2003.
They offer some of the best web hosting, including options like cheap shared hosting, WordPress hosting, VPS hosting, dedicated hosting, cloud hosting, Woo Commerce hosting, and a lot more types of hosting and domain services.
How to Set up a Bluehost Login and Account:
To become a Bluehost affiliate, you’ll need to own a website. And there isn’t a better way than building a Bluehost website.
1. Visit Bluehost and select Shared Hosting.
Bluehost Shared Hosting plan:
Shared Hosting is one of the most popular hosting packages because it provides an affordable way to get your website online. Shared Hosting works by allowing multiple users to share space on a single server maintained by the hosting provider (Bluehost). A Shared Hosting package can include multiple offers or combinations of features as offered by their hosting provider. Bluehost Shared Hosting is perfect for blogging, hobbies and small business websites.
2. Select a Bluehost Shared Hosting plan that the needs of your website:
3. Register a new domain name or add domain name to own to Bluehost:
Log in to your Bluehost control Panel.
Click the Domains tab from the left-side navigation.
Click the Purchase Domain option from the sub-navigation.
Enter the domain name you would like to register, then click Check.
Click the cart icon next to an available domain, then click Next.
Review the Registration Settings and click add to cart.
Apply payment details and checkout.
Or, if you have a domain name with another service, follow the steps to set up your Bluehost shared hosting with that URL.
4. Add your Bluehost login information.
You may also log in using your Google profile and account details. You’ll use this Bluehost login moving forward..
5. Review your Bluehost package information:
You have the option to include additional features such as SiteLock in your plan. If you do not wish to pay for these features, be sure to uncheck the boxes.
6. Enter your payment information and submit:
After you complete these steps, you use your Bluehost login and launch your website using the Bluehost hosting plan of your choice.
Bluehost Affiliate Program Review:
When customers start blogging or launch their new website, they would definitely need a web hosting program. Finding a great web hosting program is not that difficult as there are multiple such programs in the market.
One of the best and WordPress-recommended host is Bluehost.
This has been a tremendously helpful hosting company for hundreds of sites of customers and gives support when you begin to build your website.
Therefore, if you are looking for getting amazing affiliate programs, then experts have recommended Bluehost in unison.
You can use Bluehost to increase the visibility of your website and also, your visitors will see which hosting site you use. You can successfully earn huge from their referrals.
There are a good number of ways to make money with Bluehost.
Customers can earn money by promoting Bluehost’s services in your websites, social media platforms, and in personal interactions.
In this Bluehost affiliate program review, you will learn more about how to make more money by its affiliate program.
You will also get information on different cases related to Bluehost such as their commissions, payment method, sign-up process etc..
What Type of Products Are Featured?
Bluehost has been very popular by the indentation of their speedy hosting services as compared to other budget hosting companies.
Dented against many companies in the market that offer high commission rates, none of them has been able to beat Bluehost and bloggers, webmasters, and internet marketers make a beeline for Bluehost.
They offer a wide range of hosting options such as shared servers, virtual private servers, and dedicated servers across different offers and rates.
Each of its services differs in the following aspects:
Storage space for images and files
Number of websites you can host
Email storage limits
Spam experts assigned to you
Domain privacy
Number of email accounts
Shared and dedicated servers
There is a number of packages and you can select the one which attain your needs the most.
Their entry level package is available at $2.95 which is very affordable for even the most basic of users.
Commission Structure for Bluehost Affiliates:
Bluehost web hosting affiliate programs have been offering highest commissions, paying commissions to the theme of $65 per sale to the affiliates.
In 2015 itself, Bluehost reportedly paid over $ 5 million to its affiliates. This amount is just for a single sale through the affiliate account.
Therefore, if you have made ten sales in your affiliate account, the commission will amount to $650.
This means if you make 30 sales in a month, your commission will reach the figure of $1950.
If you are making 5–10 sales per month, Bluehost might even increase your sales bounty to over 100–125$+.
People can easily sign up for Bluehost Affiliate programs and you must have a PayPal Account to get paid.
If you are a new partner, then you will also have to provide tax information.
Payment Method for Bluehost Affiliates
Each affiliate program offered by hosting websites comes with different agreement terms regarding how you earn and when you earn.
Bluehost’s affiliate terms are simple as any customer who clicks on your affiliate links will have 90 days’ time to sign up on the Bluehost package.
Once the customers purchase the package and maintain their site for a period of 90 days, you become entitled to a commission.
Bluehost will pay you only after you have reached a minimum of $ 100 in your account. Your payment will be directed into your valid PayPal account.
Ensure that you have an active and valid PayPal account otherwise, a fee will be deducted for invalid accounts.
The referral amount through Bluehost can be compared to other programs which offer either a set or ranging amount which is approximately between $50–100 USD.
Bluehost provides 24/7 customer service with its packages where you can resolve all the queries and get any kind of support needed.
Whether a simple question on-site setup or a more advanced HTML issue on the code is needed, Bluehost has been found to be ready to lend any sort of help.
Steps for Joining Bluehost Affiliate Program as follows:
Click on the Affiliate Option at the top of the Bluehost website
Or scroll down to the extremely bottom on the website.
Select Affiliates and start registering for Affiliate program with Bluehost
Becoming a Bluehost affiliate is a simple three-step process.
Make a registered affiliate account at Bluehost.
Choose the tested creative and put them on your website or blog.
Get Commission for every sale that is generated through your website.
If you still have any queries with respect to the program or Affiliate Support, you can call directly or send an email at [email protected].
What are the laws of Taxation?
Once you have logged into your Bluehost Affiliate Panel, you will be asked to fill a tax form which is necessary for getting payments.
Bluehost has a different process of filing the tax form for each country. But generally, there are two types of tax forms:
W-9 Form: For US Citizen or Business (Resident Alien, Corporation, etc.)
W-8BEN Form: For non-U.S. Persons
Indian affiliates of Bluehost need to follow these steps
Go to the W-8BEN form.
Enter the EIN number.
Leave all the fields under the “Claim of Tax Treaty Benefits” blank.
Then write your complete name under the Signature Field and submit the tax form.
Things to do after Joining Bluehost Affiliate ProgramStep 1.
Go to the Bluehost.com website and click on “Shared Hosting” under hosting.
Step 2.
Browse the web hosting package and select the one depending upon your preferences.
Step 3:
Then, register a new Domain Name.
Step 4:
Now, add your account details and preferred domain name. If you want, you can select additional “add-ons”. Proceed ahead by clicking on “continue”.
Review your hosting package details.
Now enter your payment information.
Agree on the terms and conditions and click on “submit”.
Why Bluehost Affiliate Program is Popular:
Bluehost is a popular brand, among the users as well as non-users. Today, bloggers are rapidly referring to Bluehost in their websites. There is an impressive and extraordinary array of advantages associated with using the Bluehost affiliate programs.
One of the main reasons, popularity of Bluehost affiliate programs is its broad spectrum of service available for the users and that too at affordable prices. A large number of new as well as intermediate web designers is becoming the Bluehost affiliates due to their wide range of services.
Whenever you get stuck in the process or face any issues, they have 24×7 customer service to fix your issues.
Bluehost also uses the latest cPanel which brings you robust plugins, analytics tools, SEO tools at your disposal. Therefore, entry-level users will find it extremely easy to navigate the configurations.
Another advantage is that users do not have to pay anything to become a Bluehost affiliate. There is only minimum investments and greater returns at Bluehost.com.
How to Make More Money with Bluehost Affiliate Program
Do you want to increase your Bluehost Affiliate Earnings? Follow these simple steps and you can make it big on with Bluehost affiliate program.
Make sure that you use banners on your blog. There are ample free banners available on Bluehost’s Affiliate section.
Affiliates can also write high-quality Bluehost affiliate reviews on their blogs and include the Bluehost Affiliate link in your posts.
You could also think of giving prizes to new customers.
You can make use of social media such as Facebook, Twitter, Google+, etc. to publicize your affiliate campaign.
If you are interested and want to try Bluehost as your best solutions for your web hosting platform, you can use my Affiliate link to join Bluehost
https://www.bluehost.com/track/technomasters/
Thank you!!!
1 note
·
View note
Text
Shared Web Hosting For WordPress

WordPress is a well-liked blogging service. WordPress may also be used like a very effective website creation tool or Cms for countless sites. It's popular since it is easy.
You will find huge amounts of styles to select from, the majority are free and could be completely customized and installed rapidly. Additionally for this there are millions of plugins to boost hospedagem para wordpress abilities to select from. Many of these have the freedom and may be used to, among other activities, give a gallery, contact page or Google sitemap to your website.
The benefits of shared web hosting
Shared web hosting is really a standard hosting service where lots of websites reside on a single server. It's a adequate solution for a lot of small- to medium-sized websites and it is certainly the least expensive hosting solution.
Shared web hosting
A possible trouble with shared web hosting is that if the host puts a lot of sites on a single server. At these times the websites with that server is going to be slow. But fortunately, a great host won't do that.
One other issue with shared web hosting is the potential of having your email blacklisted. As you are discussing the server with countless people, it'll just take one bad cent who's delivering out junk e-mail to tar everybody delivering mail from that server with similar brush. The reply to this really is to route the mail through Google Apps for Business.
How to find a good shared host for wordpress
Initially you need to find a number that may supply the minimum needs for WordPress. They are PHP 5.2.4 or greater and MySQL 5. or greater. Further for this it's suggested that you employ a Linux host running the mod_rewrite Apache module (that is required for Search engine optimization-friendly URLs).
The easiest method to select a good shared host is to choose a number that's suggested by other WordPressers available. I've spent considerable time using the WordPress community during the last 5 year and hosts like JustHost, Bluehost and HostGator are continually pointed out as solid reliable shared hosts.
Apart from that here are a few more criteria to base them on:
Reliability: try to look for a number with higher uptimes. I can be difficult to obtain these details reliably however, you really don't wish to be coping with outages on the server regularly
Responsive 24/7 Technical Support: maybe you want to have the ability to contact support by telephone immediately or you would like online support?
Server software: you might want a number that provides cPanel along with a one-click WordPress install service like Fantastico
Space/CPU/Bandwidth: you're going to get that which you purchase so far as these factors are worried but it is good to take into consideration these
Cost: try to make sure you understand the exact monthly or yearly cost you have to pay. You might prefer to search around for coupons or purports to acquire some money off to begin with.
Selecting a shared host for the WordPress website is a very important decision to create. However if you simply select a reliable company with a lot of expertise with WordPress you will not go far wrong.
1 note
·
View note
Text
How to Fix WordPress Update Issues: A Beginner-Friendly Troubleshooting Guide

Keeping your WordPress site updated is one of the most important things you can do for its security, performance, and stability. But when updates fail, especially if you’re not a tech expert, it can be confusing and even a little scary.
Don’t worry—you don’t need to be a developer to fix most update issues. This easy-to-follow guide will walk you through the most common reasons WordPress updates fail and how to resolve them step by step.
Why Do WordPress Updates Fail?
WordPress is made up of several parts: the core software, plugins, and themes. These components must work in harmony. If even one of them is outdated or incompatible, it can cause an update to fail.
Here are the most common causes:
Slow or unstable internet connection
Conflicts between plugins
Theme compatibility problems
Low server memory or resource limits
Incorrect file or folder permissions
Corrupted update files or interruptions
Understanding the cause is the first step toward resolving the problem effectively.
Beginner-Friendly Fixes for Update Errors
1. Always Start with a Full Backup
Before making any changes, backup your website. This protects your content in case something goes wrong. Use a plugin like UpdraftPlus or BackupBuddy to back up both your files and database.
2. Clear Your Browser and Site Cache
Sometimes, updates fail to reflect because of cached data.
Clear your browser cache.
If you're using a caching plugin (like W3 Total Cache or WP Super Cache), clear the site cache too.
Then try running the update again.
3. Use Troubleshooting Mode to Isolate Plugin Conflicts
Conflicting plugins can prevent updates.
Try this:
Install the Health Check & Troubleshooting plugin.
Activate troubleshooting mode. This temporarily disables plugins for your session.
Attempt the update.
If it works, re-enable each plugin one at a time to identify the troublemaker.
This method keeps your live site running while you test behind the scenes.
4. Check Your Hosting Resources
Many shared hosting plans have low default memory limits, which can block updates.
Ask your hosting provider:
Is the PHP memory limit set too low? (It should be at least 256MB.)
Is the maximum execution time long enough?
Can they increase these limits or offer a more suitable plan?
Upgrading your hosting plan or tweaking server settings can solve many update problems.
5. Try a Manual WordPress Update
If the auto-update fails, doing it manually can work just as well.
Steps:
Download the latest version from WordPress.org.
Unzip the file on your computer.
Use FTP software like FileZilla to access your site.
Upload the new wp-admin and wp-includes folders—replace the old ones.
Do not delete the wp-content folder—this holds your themes and plugins.
Visit your site to complete the update. You might be prompted to update the database—click the button if so.
Manual updates sound technical, but they’re very manageable if you follow the instructions carefully.
6. Correct File Permissions
Improper file or folder permissions can block updates.
Use a plugin like WP File Manager or ask your hosting provider to:
Set folders to 755
Set files to 644
These are standard settings that let WordPress update files without compromising security.
7. Stuck in Maintenance Mode? Here’s the Fix
If your website says “Briefly unavailable for scheduled maintenance,” the update was interrupted and left the site in maintenance mode.
Fix it by:
Logging into your hosting panel (like cPanel or using FTP).
Navigating to the root folder of your WordPress site.
Deleting the file named .maintenance.
Reloading your website.
This should return your site to normal instantly.
When to Call in a Pro
If you’re not comfortable trying these fixes yourself, or nothing seems to work, it’s perfectly okay to get help. You can contact:
Your web hosting support team
A freelance WordPress developer
Or a professional maintenance company like Websenor
It’s smart to get expert help when your site supports your business or brand and downtime could cost you visibility or sales.
Conclusion: WordPress Made Simple with Websenor
WordPress update failures can be frustrating, but they don’t have to derail your website. With some basic troubleshooting and a calm approach, even non-tech users can fix most issues quickly and confidently.
Start with a backup, clear your cache, test for plugin issues, and make sure your hosting setup is strong. These steps solve most update-related headaches.
If you're unsure where to start or don’t want to risk anything on your own, Websenor is here to help. As a trusted web development and maintenance company, we specialize in making WordPress stress-free for businesses, bloggers, and startups.
With Websenor by your side, you can leave the technical issues to us—and get back to growing your website the smart way.
0 notes
Link
Get help for Plugin Installation, upload & uninstallation errors in your WordPress website. Call 8886061808 (US Toll free) to get urgent help for WordPress plugin issues.
#woocommerce installation failed#wordpress plugin install update failed#wordpress installation failed#destination file already exists wordpress#wordpress uninstall plugin hook#can't delete plugin wordpress#how to remove elementor from wordpress#delete wordpress plugin from cpanel#wordpress all plugins deactivated#how to activate wordpress plugin from cpanel#how to remove plugin from wordpress#uninstall wordpress plugin command line#Troubleshooting for wordpress plugin#wordpress plugin installation failed destination folder already exists
0 notes
Photo

What does one do once you need a website?
Do you get out the trusty old HTML editor, roll up your sleeves, and start writing the HTML code from scratch? Well, if you've got the skill to try to to it, and you've got the time to try to to it, and you've got the patience to try to to it, then that's a method to urge it done. Or maybe you only get out the trusty old checkbook and write someone a hefty check to try to to it for you. Well, if you've got the cash, then that's definitely the simplest thanks to rolling in the hay. And then, once you need something added or changed, you'll get out the old checkbook again.
What if you would like it yesterday, not a couple of days or weeks or months from now?
What if you would like an internet site that's easy to feature pages and content to, and you would like to be ready to roll in the hay yourself, quickly and simply and without having to urge out that trusty old HTML editor, or the old checkbook for that matter?
What if you would like an internet site that search engines love, and you would like to start out getting some traffic without spending a fortune on SEO then waiting and waiting to ascertain the traffic?What if you would like an internet site that you simply can change the design and feel of with just a couple of clicks of a mouse, and if you do not just like the New Look, you'll change it back with just a couple of more clicks?
Well, partner, it sounds to me such as you are in need of WordPress! More specifically, you would like to find out just how powerful WordPress really is! What quite wordpress website am I talking about once I say "powerful WordPress"?I'm pertaining to WordPress "jazzed up" with all of the 100's and 100's of themes and plugins that are available to show plain old WordPress into a thing of beauty as far as internet sites go.
And before you roll your eyes and say that WordPress is simply for blogs, you better take a better look. In fact, WordPress, alongside all of the readily available plugins and custom themes, can do exactly about anything you would like, and it can roll in the hay either at no cost or very low cost, and it can roll in the hay very quickly. You can have a WordPress site installed, configured with basic settings, and a few popular plugins and themes installed, in only a couple of hours, and for zero cost. How's that for fast and cheap?
- you'll create a WordPress site that's a standard WordPress blog.
- you'll create a WordPress site that's suitable for the littlest business right up to the most important corporation.
- you'll create a WordPress site that's a membership site where members buy your content.
- you'll create a WordPress site that's an online storefront to sell your products.
- you'll create a WordPress site that's a content management system.
- you'll create a WordPress site that's a mixture of any or all of the above.
You can install plugins that do SEO for you, backup your database for you, create Google compliant sitemaps for you, handle product sales and delivery for you, handle membership signups for you, and on and on and on. Do you begin to urge the thought that I prefer WordPress and think WordPress may be a good way to make an internet site? So, exactly what's WordPress, and the way are you able to catch on for free?
You can determine all about WordPress, and download it for free of charge, at WordPress.org/. WordPress is an open-source blog software package that anyone can download and install for free of charge. If your hosting provider has cPanel with Fantastico, and most do, then you'll install it during a matter of minutes from there. If not, you'll install the files manually.
WordPress makes it easy for anyone to line up, manage and maintain an internet site, and you'll roll in the hay without being a complete geek.
What if you grind to a halt and wish help? Simply attend WordPress.org/support/ and you'll find active forums filled with people able to assist you to solve your problem. How easy is that? Since WordPress is open-source, it's free. That's always a pleasant little benefit. Since it's open-source it also features a thriving community of developers (geeks) constantly improving the software and creating those plugins I discussed. WordPress allows you to quickly and simply create pages, which are basically content that's static, and not open for comments, and not organized by time.
WordPress allows you to quickly and simply create posts, which are basically the blog a part of WordPress, and that they are usually organized by time-of-post, are usually open for comments, and that they are the content to create out the meat of your site. With WordPress, there are hundreds and many free themes available so you'll easily manage your site's look and feel. Check them out and download them for free of charge at WordPress.org/extend/themes/.There also are some really great looking professionally designed themes available for purchase, most at very reasonable prices. These are well well worth the money if you would like a very professional-looking internet site.
1 note
·
View note
Text
what is website malware, How it can Affect? Why Google Hates it?

All About Website Malware and Reason Why Google Hates it too much Many people come with the question “what is malware and how can it affect my website”? The expression "malware" covers a wide range of noxious programming intended to hurt a PC or arrange, and even a website. Malware can be installed on your machine without your insight, frequently through misleading links or downloads posing as something alluring or out of dread. Thus, nowadays, you must be cautious about what you click and download. Clicking new links can open you to vindictive programming and websites. This product could contain programs that scan your PC or track what keys you type, in pursuit of individual information and your passwords.
Does anybody really know "What is Website Malware"
Numerous websites experience the ill effects of malware quite frequently and more often than not it wasn't something the proprietor of the website fouled up, the site coincidentally got hacked through an open passage. Thus, be certain that you totally trust a website before clicking on it or downloading records from it.
We suggest that you just download from sources you trust, and drift over links to check the location before you click. If all else fails, utilize believed bookmarks for significant sites or program scanning expansions like McAfee for Chrome.
Can Website Malware Affect the Computer?
Numerous website proprietors are surprised with the inquiry "how do websites get infected with malware"
When a PC has been compromised by malware, digital criminals can endeavour to get to your own information by logging your keystrokes or monitoring your PC's activity. Your PC could likewise be controlled to visit websites or perform different activities without your insight. The impacts of malware run from brief irritation to finish PC crashes with the Blue Screen of Death (BSoD) to more elevated level identity robbery events. Be that as it may, its likewise basic you should realize how to find malware on your website.
The different types of malware include, but are not limited to:
Viruses
Worms
Spyware
Adware
Trojan ponies
Rootkit
Backdoors
Keyloggers
Ransomware
Redirectors
Malware can be tough to evacuate, and no single program is ensured to catch and tidy up everything, so indeed, you must be incredibly cautious about which sites you visit and what you download.
What Are Some Malware Warnings and How Can I Deal with Them?
To ensure web surfers, Google is continually working to distinguish and blacklist risky pages and domains. Numerous well-known applications (Google Search, Google Chrome, Firefox, Safari, and so forth.) utilize Google's malware database to caution their clients to avoid possibly destructive sites. The majority of blacklisted sites are in reality legitimate websites into which programmers have inserted noxious content by exposing a vulnerability and manipulating records or envelopes.
Frequently, the site proprietors are having trouble, both in cleaning up their sites, just as in removing malware warnings that truly sway their sites' traffic and notoriety.
To find out what's off with your site or some other site, you can basically counsel a Google's Safe Browsing demonstrative page. From the indicative, you first need to determine what Google precisely blacklisted. This information can assist you with narrowing down your inquiry to explicit segments of your site.
On the off chance that your site is blacklisted or set apart as "This site might be hacked" in Google's query items (SERPs), you can, for the most part, find additional insights concerning your concern in the "Security Issues" segment of Google Search Console, already Webmaster Tools. The subtleties may include site pages where Google identified malware or spam, kind of malware and instances of the vindictive code to find and expel from the documents.
How Can I Clean My Site From Malware?
When you've recognized the wellspring of the issue, you should realize how to deal with website malware. You should simply to tidy up your site and make a move to forestall re-infection. The least demanding approach to clean a site is to reinforcement the latest restore point of the web records and database, place on a testing server and begin the cleaning procedure.
During this time is the point at which you ought to make the genuinely necessary protection strides to significantly diminish re-infection or re-injection of malware.
Look for noxious documents shrouded somewhere down in directories that may look legitimate
Remove documents that look suspicious (in the event that you built up the site, at that point you will know immediately)
Remove any backdoor contents that might be lingering in organizers or parts of different documents
Before uploading the cleaned form of the website, begin changing passwords from any realized passages, for example, database login, SSH/SFTP, FTP, CMS Admin logins for WordPress, Drupal, Joomla, Magento, and so forth
If using a database or CMS like WordPress, Drupal, Joomla or Magento to give some examples, ensure you have their center forms state-of-the-art, alongside any of their expansions or plugins refreshed
Overwrite the current infected website documents and database with the new cleaned rendition
At that point change server-level passwords for your cPanel and then your domain registrar and even your Mail IDs that may have a record of the old and/or new login subtleties
Application user utilizes automated tools and can refresh vindictive content on compromised sites each day. Thus, in the event that you don't verify the site, it might be blacklisted again very soon, or may not pass the initial malware audit from Google.
It is imperative to investigate the issue and recognize the security gaps that left the website defenceless to assault. You will have a superior handle about what caused your particular issue and what ought to be done to anticipate it. Each case is distinctive as these malware bots and programmers are evolving similarly as quick as the web itself.
How to Request a Malware Review from Google?
Once you clean your site it's presently time to demand a proper audit from Google. You should be signed in to your Search Console account and on the left side, click on "Security Issues" in request to consider them to be as shown above with the malware listed.
Scroll to the bottom and check the case "I have fixed these issues" and snap the red "REQUEST A REVIEW" button to get a little spring up window.
Be sure to detail your strategies in cleaning the website inside the portrayal box and request Google to survey the solicitation as quickly as time permits. As far as we can tell, on the off chance that you or your designer has done everything right, at that point Google commonly discharges the blacklisting notice within that day or before breakfast.
NOTE* You won't get a notice from Google letting you realize the site has been discharged, so make certain to check the domain frequently. In the event that it continues for a considerable length of time with the notice still visible, attempt again.
Once no malware is discovered, Google will expel the warning from your site. These additional means are required on the off chance that you need to rapidly have your site displaying online typically again for those browsing using Google Search and Chrome, Firefox and Safari. Without manual instruction, it might take a little while before your site's status is cleared when Google makes its path back to continue indexing new sites and pages published to the web each second.
Finally, You Must Act Quickly! Malware can happen whenever, so it is significant that you are always checking your website for any issues that might be available and, all the more critically, keep your email related to your Google Search Console record to get sees as they are found. On the off chance that a website security issue was to reappear, make certain to make a move at the earliest opportunity in request to downplay your site's downtime and Google glad to show your URL to your customers and potential customers. Connecting with New York, USA based Digital marketing agency can help you in the most ideal manner in giving leeway.
Read more:- How can Paid Search Engine Marketing be an effective Strategy for B2B?
1 note
·
View note
Text
Best Affiliate Programs
Best Affiliate Programs
Finding the best affiliate programs can sometimes be daunting. A lot of the times inside of the Fresh Affiliates Community, this question gets asked a lot. Luckily for you, I have compiled what I think the best affiliate programs are categorised by niche. Enjoy!
Popular Niches
Here are some of the most popular niches that people try to be affiliates for. Inside each niche are a tonne of affiliate programs to choose from. If you have any others you’d also like to recommend, feel free to let me know in the comments and I’ll add them in!
Coming soon…. 50+ High Paying Affiliate Programs 50+ Financial Affiliate Programs 50+ Travel Affiliate Programs 50+ Food Affiliate Programs 50+ Art & Craft Affiliate Programs 50+ Fashion Affiliate Programs 50+ Beauty & Makeup Affiliate Programs
All Other Niches
If you find that the niche you are looking for an affiliate program for isn’t listed above, there’s more. Below are another 50+ affiliate programs for other niches on the internet both B2B and B2C.
Please note: I have tried to provide as much value as possible in this website. As it’s based in the affiliate marketing space, it does also contain affiliate links for programs mentioned. If you decide to follow through and purchase items, I may earn a referral bonus which you can learn more about here.
Our Favourite Affiliate Marketing Course
Affiliate Secrets 2.0
If you're serious about affiliate marketing and you want to start building your empire and increasing residual, you need Affiliate Secrets 2.0. Spencer went from complete newbie to top affiliate in multiple companies in less than 2 years and he shares his exact strategies how he did it.
More on Affiliate Secrets
Best Affiliate Programs – Softwares & Services
Landing Page & Funnel Affiliate Programs
Clickfunnels: 30%-40% recurring monthly – sticky cookie When it comes to landing page and funnel software, Clickfunnels is without a doubt the household name. Russell Brunson designed and created Clickfunnels specifically for marketers. It has an amazing user experience and is built with a load of features including: drag & drop funnels, upsells & downsells, membership functionality, timed sections and a built in checkout system.
Now the part that makes it very lucrative, Clickfunnels has what Russell calls a sticky-cookie. A little bit different to traditional sticky-cookies but essentially it means if you get a referral join Clickfunnels, any purchase of any product they make with that account, you’ll get commission for. Clickfunnels offers a new compensation plan ranging from 20% recurring commissions for new affiliates up to 40% for super affiliates or early adopters. They also have a dream car incentive for those who refer 100 active members.
Inside the Clickfunnels Affiliate Centre, there are many affiliate resources all attached to funnels ready for affiliates to use. Things like the ‘Dotcom Secrets’ or ‘Expert Secrets’ books, or the Affiliate Bootcamp, or the One Funnel Away challenge are all side offers that eventually lead to courses and the Clickfunnels membership. All of the products provide massive value (and I have a lot of them) so selling Clickfunnels products is an easy opportunity.
Leadpages: 30% recurring monthly – 30 day cookie If you’re a WordPress user or you’re wanting to have an easy to use Landing Page builder, then Leadpages may be the option for you. The majority of time, bloggers use Leadpages on their websites as they have ‘Lead Boxes’ which are Leadpages Popup’s or widgets you can host on your site. The main difference between Clickfunnels and Leadpages is, Leadpages is just that. It’s single pages that you manually have to connect together, while Clickfunnels you can collate all the pages in one connected funnel.
The Leadpages Affiliate Program offers 30% recurring commissions and has a 30 day cookie. Leadpages also offers some additional training for it’s affiliates which is great to see!
Landingi: 15% recurring monthly – 365 day cookie Another smaller but powerful contender in the Landing Page & Funnel scene, is Landingi (“lan-din-gi”). The company itself is still relatively small and un heard of, but that doesn’t reflect on the actual product. Landingi has in my opinion the easiest to use drag and drop builder, and the most accurate in terms of what you design and what it looks on desktop and mobile. As for landing pages, each Landingi page has an optin page and a thank you page built into the set which makes it easy to navigate through your library.
In terms of the Affiliate Program, Landingi isn’t as generous as the others. They offer 15% recurring commissions with an incentive that your referrals also get a 15% discount. This makes it definitely worth it’s value and a great opportunity for your audience.
BuilderAll: 100% on first sale, 30% recurring monthly – sticky cookie I tried using BuilderAll for a month and found it to be very strange. It has very similar features to Clickfunnels but the drag and drop builder is a lot harder to use. To be honest, it was my least favourite builder I have used, but it may have become easier to use since then. The main reason people use it, is it is a very cheap software, so literally anyone can use it. It also has a product called Mailingboss which is apparently $50 for lifetime use.
In terms of BuilderAll’s affiliate program, they offer their affiliates 100% commission on the initial referral, then 30% on the recurring payments.
Thrive Architect: 25% recurring monthly – 365 day cookie Unlike all the other softwares listed above, Thrive Architect is actually a plugin that you install to your existing WordPress website and you create the designs inside your pages. Some would find this more favourable, while others not so much. The builder is easy enough to use and a lot of people actually use the builder for their websites pages. Hosting the builder inside WordPress can bring a lot of additional issues like website speed and security, but if you know WordPress well, this won’t be an issue.
The Thrive products offer 25% recurring monthly commissions with a 365 day cookie, which is an insane length of cookie time. This product is great for bloggers and SEO guru’s.
Join the 30-day OFA Challenge!
One Funnel Away Challenge
This challenge is taking the world by storm. The One Funnel Away Challenge is a 30 day program created to help you create your own minimum viable product (MVP) and scale your way to success. The OFA team interviewed 30 millionaires and asked them what would do in 30 days if they lost it all. This book reveals their answers.
Join the OFa challenge
Website Hosting Affiliate Programs
BlueHost: $65 per sale – 60 day cookie Bluehost is without a doubt the industry leader when it comes to hosting. Their product is the fastest on the market, the support is amazing and their compensation plan for affiliates is great too. Bluehost offers a range of products but the main are the hosting plans which range from $2.95 per month to $25.99 per month. They do offer a discounted rate for all new packages which make it an incredible seller.
The compensation plan for Bluehost starts at $65 per new referral and you can apply for higher commission rates and a special offer for your readers. I personally use the Plus Package and it is my #1 recommendation.
SiteGround: $50-$100 per sale – 30 day cookie Bluehost’s strongest competitor in the hosting world, is Siteground. I’ve worked with Siteground on a few projects with friends and it has performed well. I do have to admit though, there are a lot of restrictions. We constantly had issues with ‘running processes’ as well as ‘disk space usage’ as they had limits on it. After switching to the Plus Package, there were no limits at all
Siteground Affiliates can earn $50 per referral, and if they refer more than 5 people in a month, they bump up to $75 per sale. If they refer more than 10, they go to $100.
HostGator: $125 per sale – 60 day cookie Hostgator is another original gangster that has been around for a very long time. They were the first hosting company I ever used and I have also helped build a company using Hostgator too. To be honest, the product isn’t that good. We constantly had problems, like constantly. We had to keep upgrading and were always on the line to support. It was a LOT of hassle, we ended up moving.
They do have a great affiliate program though, $125 per sale. I would definitely try Hostgator and get your own opinion before you promote them to anyone else.
Fastcomet: $50 per sale – 180 day cookie I used Fastcomet for 4 years and it was great for what it did. I had an unlimited website plan with them. The servers are a little slow but it is a much more affordable option to website hosting. The cPanel has no restrictions and the customer support are very active and really wish to help with any problems.
The Fastcomet Affiliate program offers $50 per new referral with a 180 day cookie.
Namecheap: 20%-35% per sale – 180 day cookie For someone who is really bootstrapping their business, Namecheap is also a good platform they could use. They are extremely competitive with pricing for domains and hosting, and their service isn’t that bad. You can definitely expect much longer loading times than Bluehost, but they still do ok.
Namecheap offer their affiliates 20% commissions for referrals to Domains, Whoisguard, Private Email and Premium DNS sales as well as 35% for Hosting Packages and SSL Certificate sales.
Our Favourite Affiliate Marketing Books
Dotcom Secrets
If you're new to the online world, or you're struggling as an entrepreneur. Dotcom Secrets breaks down the simplicity of building an online business. It includes everything from how to find a profitable niche to how you should present yourself. You'll also learn about the infinitely valuable tool sales funnels.
Get Dotcom Secrets
Expert Secrets
Expert Secrets is the second book by Russell Brunson in which he talks about how you are an expert, you just don't know it. He then teaches you how you can use your current experience to create an educational product, build a tribe and create a mass movement of loyal fans. It's an amazing book!
Get Expert Secrets
Email Marketing Affiliate Programs
Getresponse: 33% recurring monthly – 120 day cookie When it comes to email marketing, I always head straight to Getresponse for all my email marketing needs. They have all the bells and whistles when it comes to functionality, including automation, landing pages and they even have entire funnel sections. This makes it extremely useful for a range of customers including ecommerce stores, small businesses and entrepreneurs. It’s also one of the cheapest softwares available.
The best part though, is their competitive affiliate compensation plan. You can either choose to get paid 33% on all recurring payments for customers you refer, or you can get paid $100 for every new customer you bring. Not only do you get paid more, but you also get a 120 day cookie, which is double what the majority of others offer.
ConvertKit: 30% recurring monthly – 60 day cookie ConvertKit is one of the most popular options for bloggers and email marketers as they have great tools for wordpress and are easy to use. I personally haven’t used ConvertKit much, but it is used by a lot of influential people like Pat Flynn, so you know it has to be good.
The ConvertKit compensation plan gives it’s affiliates 30% of all recurring payments and they give a 60 day cookie duration.
Active Campaign: 20%-30% – recurring monthly Active Campaign is probably the 2nd most popular in the list. Active Campaign is used more in the Social Media Marketing and digital marketing industries. They have all the same features as ConvertKit and they’re actually a little more desirable to use. They also have a flexible pricing plan so you can pay for the tools you use, and leave out the ones you don’t.
Now, the Active Campaign is a little different to the other affiliate compensation plans, as they use performance based tiers. You start off on the ‘Silver Tier’ which means you will earn 20% on all commissions. If you are able to bring in $500 of monthly active accounts, you then get bumped up to the ‘Gold Tier’ which gives you 25% commissions. Finally if you are able to generate $2000 of monthly active accounts, you move to the ‘Platinum Tier’ which means you get a full 30% on all subscriptions.
Aweber: 30% recurring monthly – 365 day cookie Aweber is one of the original gangsters when it comes to Email Marketing. I started using Aweber in 2014 and back then, everyone was using it. I have to admit though, their service has been left behind in the current times. Aweber falls behind in terms of features compared to the others listed, and their rules are very strict.
Aweber offer their affiliates 30% recurring commissions for any sales they bring into Aweber.
Moosend: 30% recurring monthly – 60 day cookie Finally in comes Moosend. Moosend is a new contender to the digital marketing space, but they’re coming in hot. Being a new condenter, they are also the cheapest, but that doesn’t mean they’re the worst. In fact they have great features just like the other companies like including automation, autoresponders and they even have landing pages like Getresponse. They are also heavily focused into e-commerce and have a bunch of great tools you can add to your carts like abandoned checkout tags.
Moosend is the cheapest of the lot, but they are still coming in strong with 30% recurring commissions with a 60 day cookie.
Protect Your Personal Data with this Browser
The Brave Browser
Sick of surfing the internet seeing ads everywhere you go? Then you need the Brave Browser. Built on the Google framework, the Brave Browser has been named the safest browser available. Stop seeing ads everywhere and protect your personal information with the free Brave Browser.
Get the Brave Browser
WordPress Based Affiliate Programs
Elegant Themes (Divi): 50% per sale + recurring – 180-day cookie When it comes to WordPress themes, Divi is by far my favourite of the lot. With an active community of Divi users over the world, it’s even easier to get new ideas and support. Infact this website is built with Divi! As for the Elegant Themes affiliate program, they offer 50% recurring commissions for all referrals and they give a 180-day cookie.
WP Rocket: 20% per sale – unknown cookie duration Everyone needs fast websites. WP Rocket is the number #1 caching plugin for WordPress which makes this a simple sell. If someone’s website is slow, get WP Rocket. It’s as easy as that. They offer 20% per sale through the ShareASale affiliate platform.
Woocommerce: 20% recurring – unknown cookie If you have built your website on WordPress and you sell products, memberships or services, Woocommerce might be perfect for you. With over 39 million downloads, Woocommerce is a powerhouse of a tool! The Woocommerce Affiliate Program offers 20% on all sales.
Memberpress: 10%-30% per sale – 60 day cookie If you have a WordPress membership site and it’s not Woocommerce, it’ll most likely be Memberpress. Memberpress is an easy to use membership theme with all the bells and whistles to make your membership site run smoothly. They also offer 30% recurring commissions for users, and 10% for non-users with a 60-day cookie.
Envato Market: 30% per sale – 30 day cookie Envato Market is a huge platform full of custom builds by developers that are for sale. If you ever wanted to find something in particular on the internet, my first choice is always Envato Market. Their affiliate program offers 30% commission on all initial purchases with a 30-day cookie.
Subscribe to the Affiliate Marketers Newsletter!
If you're looking to start ahead of the industry with up-to-date trends, techniques, software reviews and strategies that will help you succeed as a marketer, join the other 1000's of marketers who receive the FA Newsletter!
Success!
Name
Email
SUBSCRIBE
We take your privacy seriously. No spam. See our terms & privacy here.
/* Divi Lover Slim Optin Form */ /* Optional - copy the CSS to page options, theme options or child theme stylesheet */ @media (min-width:981px) { .dl-slim-optin2 .et_pb_newsletter_description { width: 30%; } .dl-slim-optin2 .et_pb_newsletter_form { width:70%; } } .dl-slim-optin2 .et_pb_newsletter_field, .dl-slim-optin2 .et_pb_newsletter_button_wrap { flex-basis:32.5%; } .dl-slim-optin2 .et_pb_newsletter_footer { margin-top:0; } .dl-slim-optin2 .et_pb_module_header { padding-bottom:0; } @media (max-width:980px) { .et_pb_column_4_4 .dl-slim-optin2 { display:block; } .dl-slim-optin2 .et_pb_newsletter_description, .dl-slim-optin2 .et_pb_newsletter_form { width: 100%; padding: 0; } .et_pb_column_4_4 .dl-slim-optin2 .et_pb_newsletter_description { text-align:center; margin-bottom:10px; } .dl-slim-optin2 .et_pb_newsletter_footer { text-align:center; } } @media (max-width:600px) { .dl-slim-optin2 .et_pb_newsletter_field { flex-basis:49%; } .dl-slim-optin2 .et_pb_newsletter_button_wrap { flex-basis:100%; } } @media (max-width:479px) { .dl-slim-optin2 .et_pb_newsletter_field{ flex-basis:100%; } } /* END */
Best Affiliate Programs
Hopefully, if you have gone through this article, you have found an affiliate program that suits your needs. One thing to remember, it doesn’t matter about the price points if the product doesn’t help its customer achieve anything. That is why I always recommend trying a product before becoming an affiliate of the company and promoting it.
If you’ve got any additions to the list, or you have any questions or comments, let me know below and if you’re new to the affiliate marketing game, make sure you check out our community!
The post Best Affiliate Programs appeared first on Fresh Affiliates.
source https://freshaffiliates.net/best-affiliate-programs/
1 note
·
View note
Text
How to Create a WordPress Website with the Shopify Extension and Cloudflare on Hostinger
How to Create a WordPress Website with the Shopify Extension and Cloudflare on Hostinger
Introduction: Creating a website that seamlessly integrates WordPress, the popular content management system, with the Shopify extension and Cloudflare’s robust performance and security features can provide a powerful and efficient online presence. In this blog post, we will guide you through the process of setting up a WordPress website with the Shopify extension and Cloudflare on Hostinger, a reliable web hosting provider.
Step 1: Setting Up Hosting on Hostinger 1. Sign up for a hosting plan with Hostinger and complete the registration process. 2. Access the Hostinger control panel (cPanel) and locate the “Auto Installer” or “Softaculous” option. 3. Select WordPress from the available applications and proceed with the installation process by following the provided instructions. 4. Configure your WordPress installation by entering the necessary details such as website name, admin username, and password. Ensure to choose a secure password.
Step 2: Installing the Shopify Extension 1. Log in to your WordPress admin dashboard by visiting “yourdomain.com/wp-admin” and entering your credentials. 2. Navigate to the “Plugins” section and click on “Add New.” 3. Search for the “Shopify” plugin, developed by Shopify Inc. 4. Click “Install Now” and then activate the plugin.
Step 3: Setting Up Shopify Integration 1. Once the Shopify plugin is activated, locate the new “Shopify” menu item in your WordPress admin dashboard. 2. Click on “Connect an existing Shopify store” or “Create a new Shopify store” if you don’t have one yet. 3. Follow the prompts to connect your Shopify store or create a new one. You will need to provide your Shopify store credentials to complete the integration. 4. After the integration is successful, you can configure various settings, such as product display, cart behavior, and checkout options.
Step 4: Configuring Cloudflare on Hostinger 1. Sign up for a Cloudflare account at cloudflare.com and add your website to your Cloudflare dashboard. 2. Change your domain’s nameservers to the Cloudflare nameservers provided. 3. On the Cloudflare dashboard, configure the desired security and performance settings, such as SSL/TLS encryption, caching, and firewall rules. 4. Once the configuration is complete, wait for the DNS changes to propagate, which may take some time.
Step 5: Designing and Customizing Your Website 1. Choose a suitable WordPress theme from the vast collection of free and premium themes available. 2. Customize your website’s appearance by adding a logo, adjusting colors, and configuring menus and widgets. 3. Install and activate additional plugins to enhance the functionality of your website, such as SEO optimization, contact forms, and social media integration. 4. Create and organize your website’s pages, add engaging content, and upload your products if you have an online store.
Conclusion: By following the steps outlined in this blog post, you can create a WordPress website with the Shopify extension and leverage Cloudflare’s performance and security benefits on Hostinger. This integration allows you to harness the flexibility of WordPress, the robust e-commerce capabilities of Shopify, and the advanced caching and security features of Cloudflare. Take the time to explore and optimize your website further to create a compelling online presence that engages and satisfies your visitors.
Written by Kevin K. Roozrokh Follow me on the socials: https://linktr.ee/kevin_roozrokh Portfolio: https://KevinRoozrokh.github.io Hire me on Upwork: https://upwork.com/freelancers/~01cb1ed2c221f3efd6?viewMode=1
0 notes
Text
Classic Website Customization Service
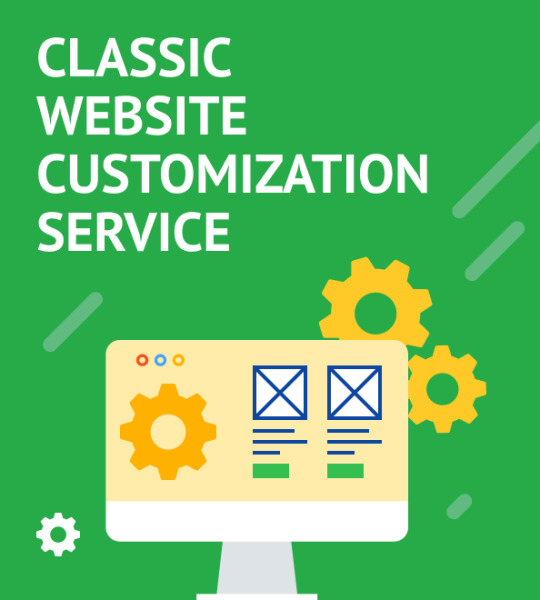
You can add this service to your basket at the bottom of the page. Just scroll to the end of the product description. Supported CMS Platforms: - WordPress - Joomla - HTML5/CSS3 Website Key Services I Offer: Fast Theme Installation on Your Web Host Don't let technicalities slow you down. I will swiftly install your chosen theme on your web host, ensuring a seamless launch. Publishing 10 Captivating Blog Posts Engage your audience with fresh, relevant content. I'll schedule 10 compelling blog posts to keep your site buzzing with activity. Website Personalisation with Branded Logos and Colour Schemes Make your mark with a unique identity. I'll infuse your website with branded logos and tailor the colour scheme to match your vision. Contact Forms and Maps Setup Stay connected with your audience. I will set up contact forms and integrate maps, enhancing user interaction. Speedy Turnaround Experience the magic within 7 to 10 business days*, and watch your website transform before your eyes. What's Included in My Classic Website Customization Service: Theme Installation on Web Hosting Get started swiftly by providing us with your hosting and FTP access details or let us assist you in selecting the best hosting solution. Hosting Setup to Match Your Theme I'll ensure your hosting perfectly complements your chosen theme, creating a seamless user experience. Default Plugin Activation and Setup Activate essential plugins to supercharge your website's functionality, ensuring a smooth operation. Demo Content Replacement Your content takes centre stage. I'll replace the demo content with your provided text and images, filling up to five web pages and ten blog posts. Theme Customization I'll add your logo and personalize the colour scheme to align with your brand's identity. Website Contact Details Setup Enhance user engagement with professionally designed contact forms and optional map integration. 3 Revisions Enjoy peace of mind with three minor revisions, valid for 30 days after project delivery. How My Classic Website Customization Service Works: Step 1: Collecting Information 🕒 from15 mins Upon confirming your order, I will reach out to gather the necessary details. I'll need access to your hosting account and the content for your pages and blog posts. I will be your guiding light throughout the process. Step 2: Completing Classic Website Customization 🕒 7 - 10 Business Days* Once I have all the required data, I'll install and customize your chosen template, keeping you in the loop at every stage. Step 3: Reviewing & Finishing Up 🕒 from 15 mins After customization, you can review and approve the results. Two free revisions are at your disposal if you wish to make changes. I'll provide you with login details to access the admin panel, allowing you to take control of your website. To Provide Classic Website Customization Service, I Need: - cPanel plus FTP and MySQL access to your hosting - Logo (preferably in .SVG) - Colour preferences - Content (images and texts) for pages and blog posts - Detailed content placement instructions 4 Top Reasons to Try Classic Website Customization Service: - If you're new to CMS platforms and hosting servers, fear not. I will handle the technicalities, delivering a fully operational website within days, not weeks. - The process is straightforward: provide hosting access, send us your content and instructions, and watch your website come to life in 7 - 10 business days.* - This Classic Website Customization Service encompasses theme installation, contact form activation, logo integration, content creation, and SEO optimization to boost your search engine ranking. - You'll have me by your side to ensure a smooth journey. If you don't have hosting, I can offer you hosting at a great price or if you prefer, I can assist you in selecting the right one. Please Note: - The service covers one website. - Advanced coding and layout modifications can be arranged for an additional fee. - Timely provision of requested information is essential to meet project deadlines. - Project kick-off or delivery time may vary slightly due to workload or unforeseen circumstances. - Three minor revisions are included, valid for 30 days after project delivery. Classic Website Customization FAQ: What does Classic Website Customization Service include? This service encompasses template installation, logo addition, colour scheme customization, contact form activation, and content creation for up to 5 pages and 10 blog posts. How long will it take to complete Classic Website Customization Service? Expect completion within 7 to 10 business days, contingent on timely content provision. Three free revisions are included. Can you deliver faster? Yes, for an additional fee, I can expedite your site's launch. Contact me to discuss your options. Can I order if I don't have all the content ready? Absolutely, you can provide content at your own pace, and I'll start when everything is ready. Need help with content? Ask me about my Content Writing Service. Will you install a template on my hosting? Yes, I can install it on existing hosting or help you select and register a compatible one if needed. Do I have to check my hosting compatibility? Yes, ensuring your hosting matches template requirements is crucial. I can guide you in making the right choice. What if I need more content pages? I offer additional customisation services for a fee. Contact me for details. Can you customise my online store? This service doesn't cover store configuration. Ask about the All-in-One Store Setup for eCommerce themes. When will you contact me? After payment, I will guide you on content submission, offering various options. What if I'm not satisfied with the final result? Three minor revisions are available for 30 days after project delivery to ensure your satisfaction. Can you help me migrate from another platform to WordPress? Certainly, I can migrate content and add functionality from other CMS platforms to WordPress. Reach out to discuss the details. * Timeline assumes that the client already has all the information and content available when the project kicks off. Delays in receiving any of the required information and content will inevitably delay the project beyond my control and for which I cannot be held responsible. Read the full article
0 notes