#how to change wordpress password in cpanel
Explore tagged Tumblr posts
Visit Tumblr Blog
Explore Tumblr blogs with no restrictions, modern design and the best experience.
Last Seen Tumblr Blogs


Fun Fact
In 2020, 27% of US Tumblr users had an annual household income of over $100,000.
Text
Find the step-by-step guide to easily find your WordPress admin username and password from cPanel. Let’s get started & retrieve it!
#how to find wordpress username and password in cpanel#how to get wordpress username and password from cpanel#how to check wordpress username and password from cpanel#how to change wordpress username and password from cpanel
0 notes
Text
ALIBABA HOST – SECURE, FAST, AND FLEXIBLE HOSTING FOR ALL YOUR NEEDS
Introduction
In the ever-evolving digital world, hosting isn’t just about putting your website online—it’s about speed, security, flexibility, and control. Whether you're managing a WordPress blog, launching an adult web site hosting platform, or exploring open-source control panels like VestaCP, Alibaba Host is your trusted partner for professional-grade hosting services.
This article explores how to manage essential features like WP change password, the specifics of adult hosting, and answers common questions like what is VestaCP—all with the reliability and support of Alibaba Host.
How to Change Password for WordPress (WP Change Password) the Easy Way
Security is at the core of every successful website. If you’re running your site on WordPress and want to tighten account safety, it’s essential to know how to change password for WordPress.
With Alibaba Host’s powerful cPanel and WordPress Toolkit integrations, WP change password is as easy as:
Logging into your cPanel account from Alibaba Host.
Navigating to the WordPress Toolkit or Softaculous Installer.
Selecting your WordPress installation and clicking the “Change Admin Password” option.
Entering a new, secure password and saving the changes.
No manual database edits or plugin installations are required. Whether you're recovering access or updating for routine security, you can change password for WordPress in under a minute.
For added safety, consider enabling two-factor authentication and running regular malware scans—all supported within Alibaba Host’s advanced security features.
Robust, Discreet, and Secure Adult Web Site Hosting
Looking for reliable adult web site hosting? Alibaba Host offers a safe, private, and high-performance hosting environment tailored for adult content creators, cam sites, fan platforms, or high-traffic video portals.
With adult hosting, you get:
Offshore hosting locations to ensure privacy and freedom of content
Powerful SSD servers with high uptime and blazing speeds
Anonymous payment methods including crypto for added discretion
Strong content delivery support with global CDN integration
Compliance with legal and security standards for adult content
Alibaba Host does not discriminate against adult content—as long as it’s legal, it’s welcome. Whether you're launching an adult blog or streaming site, Alibaba Host ensures your platform is stable, scalable, and private.
What is VestaCP – A Lightweight Hosting Control Panel for Beginners and Experts
If you’re wondering what is VestaCP, it’s one of the most efficient and user-friendly control panels used in the hosting world today. Alibaba Host supports installations of VestaCP on VPS and Dedicated servers, allowing users to manage websites, email, DNS, and databases through a clean and intuitive web interface.
Key features of VestaCP include:
Easy domain, DNS, and FTP management
One-click app installations (including WordPress, Joomla, etc.)
Firewall, backups, and SSL support built-in
Lightweight architecture that runs fast even on low-resource VPS
For developers and tech-savvy users looking for a budget-friendly cPanel alternative, VestaCP is a powerful choice. And with Alibaba Host, VestaCP comes pre-installed or installable with just a few clicks.
Why Choose Alibaba Host for WordPress, Adult, or VPS Hosting?
Alibaba Host offers more than just server space—it offers peace of mind. Here’s what sets the platform apart:
99.9% Uptime Guarantee
Full root access with VPS and Dedicated plans
24/7 customer support with real experts
Offshore privacy protection for sensitive industries
Flexible billing with monthly, annual, and crypto options
One-click installations for WordPress, Magento, PrestaShop & more
Whether you need to quickly perform a wp change password, launch a secure adult hosting platform, or explore tools like VestaCP—Alibaba Host equips you with the speed, tools, and reliability needed to succeed online.
Conclusion
From beginners launching their first WordPress site to professionals scaling global adult platforms or managing VestaCP servers—Alibaba Host is built to serve every digital ambition. If you're searching for answers like how to change password for WordPress, what is VestaCP, or need dedicated adult web site hosting, you’ve come to the right place.
👉 Ready to power your web presence with speed and security? Visit https://alibabahost.com/index.html and experience the difference today.
0 notes
Text
How to Move Your WordPress Site from Localhost to a Live Server
Developing a WordPress site on localhost is a great way to build and test your website in a controlled environment. However, the real challenge arises when it's time to move the site from your local server to a live hosting environment. If not done correctly, you could encounter broken links, missing images, or even database errors.
In this blog, we'll guide you through a step-by-step process to successfully move your WordPress site from localhost to a live server.

Step 1: Choose the Right Hosting Provider
Your first step is to select a reliable web hosting provider that meets your website’s needs. Look for:
Server Speed: Fast servers for better performance.
Uptime Guarantee: At least 99.9% uptime to ensure availability.
Ease of Use: User-friendly dashboards and tools.
WordPress Support: Hosting optimized for WordPress websites.
Popular options include Bluehost, SiteGround, and WP Engine.
Step 2: Export Your Local WordPress Database
The database is the backbone of your WordPress site. To export it:
Open phpMyAdmin on your local server (e.g., XAMPP or WAMP).
Select your WordPress database.
Click on the Export tab and choose the Quick Export method.
Save the .sql file to your computer.
Step 3: Upload Your WordPress Files to the Live Server
To move your files:
Compress Your WordPress Folder: Zip your local WordPress installation folder.
Access Your Hosting Account: Use a file manager or an FTP client like FileZilla.
Upload the Files: Transfer the zipped folder to your hosting server's root directory (usually public_html).
Unzip the Folder: Extract the files once uploaded.
Step 4: Create a Database on the Live Server
Now, set up a new database on your live hosting server:
Log in to your hosting control panel (e.g., cPanel).
Navigate to the MySQL Databases section.
Create a new database, database user, and password.
Assign the user to the database with full privileges.
Step 5: Import the Database to the Live Server
Open phpMyAdmin in your hosting control panel.
Select the new database you created.
Click the Import tab.
Choose the .sql file you exported from your localhost.
Click Go to import the database.
Step 6: Update the wp-config.php File
To connect your site to the live database:
Locate the wp-config.php file in your WordPress installation.
Open the file in a text editor.
Update the following lines: define('DB_NAME', 'your_live_database_name'); define('DB_USER', 'your_live_database_user'); define('DB_PASSWORD', 'your_live_database_password'); define('DB_HOST', 'localhost'); // Keep this unless your host specifies otherwise.
Save the file and upload it to your server via FTP.
Step 7: Update URLs in the Database
Your localhost URLs need to be replaced with your live site URLs.
Use a tool like Search Replace DB or run SQL queries in phpMyAdmin.
In phpMyAdmin, run the following query: UPDATE wp_options SET option_value = 'http://your-live-site.com' WHERE option_name = 'siteurl'; UPDATE wp_options SET option_value = 'http://your-live-site.com' WHERE option_name = 'home';
Step 8: Test Your Live Website
Once everything is uploaded and configured, check your website by entering its URL in a browser. Test for:
Broken Links: Fix them using plugins like Broken Link Checker.
Missing Images: Ensure media files were uploaded correctly.
Functionality: Verify forms, buttons, and features work as expected.
Step 9: Set Up Permalinks
To ensure proper URL structure:
Log in to your WordPress admin dashboard on the live site.
Go to Settings > Permalinks.
Choose your preferred permalink structure and click Save Changes.
Step 10: Secure Your Live Website
After migrating, secure your site to prevent vulnerabilities:
Install an SSL Certificate: Most hosting providers offer free SSL certificates.
Update Plugins and Themes: Ensure everything is up to date.
Set Up Backups: Use plugins like UpdraftPlus for regular backups.
Conclusion
Moving your WordPress site from localhost to a live server may seem daunting, but by following these steps, you can ensure a smooth and error-free migration. A successful move allows you to showcase your site to the world, engage your audience, and achieve your goals.
Start today and take your WordPress project live with confidence!
0 notes
Text
Blogging provides an opportunity to share your interests, expertise and life story with the world. The internet has provided a way to monetize the content whether through ads, affiliate links or selling something through your blog, allowing many to actually earn money from their work. Others simply make their own website to get the word out. Regardless of your reasons for wanting to blog, here’s how to start a WordPress blog in five easy steps. Select a Domain Name Create a list of possible domain names. Each name should communicate the purpose or focus of the blog or be clearly related to you as a person. Buying a domain is rather cheap and most domain registrars won’t charge more than a few pounds. Others, like GoDaddy, will give you a discount on the first domain name you register with them, so take advantage of this. Also, you may choose to keep your domain private or go for WHOIS protection. WHOIS protection is rather cheap as well, so if you want to keep all the domain information private, you could go for this option. You should also consider buying variations of your name using various extensions if you want to make sure your domain remains unique. Set Up a Web Hosting Account The web hosting account is where your website will be located. You’ll want to shop around for website hosting services as prices range from free to cheap. While most free hosting sites will have some sort of caveat such as having to show ads, there are some decent free options as well. However, if you have limited means, you’d be better off using a cheap hosting provider like HostGator for instance. While most will offer shared hosting, unless you become a sensation overnight, this should be more than enough for now. Install and Configure WordPress If you’re going to run a WordPress blog, you’ll need to install WordPress on the web host if it isn’t already provided for you. Many web hosts have WordPress pre-installed, and all you have to do is configure it. However, in most cases, you will be charged extra for this service. If you like the added convenience, go for it, but installing WordPress yourself is very easy and straightforward. If you want to install WordPress yourself, you’ll need to go to the cPanel or control panel and install WordPress from inside the web host’s control panel. Or you may decide to install it by downloading the latest version of WordPress from their website and installing it through FTP. However, it’s usually better to have it installed directly through the your cPanel. All you have to do is head on to your cPanel and click on the “Install WordPress” icon. On the next screen, you will be given a couple of simple options like your Site’s title or name, your username and password. Make sure to not use the default “Admin” as a username as it will make your site more vulnerable to attacks. Next, all you have to do is agree to the terms and condition and click install. The rest will be done for you. Now you get to configure the WordPress blog. First, pick the theme; this determines the background colours, stylistic elements and background graphics. Know that you can change the theme or add to it later. WordPress is incredibly customizable. If you go to the Settings Menu in the sidebar, you’ll see a lot of options. Note that you don’t have to worry about most of those settings, and if you don’t know what you’re doing, leave them on the default settings. One of the most important settings for new bloggers is the Site Title & Tagline. This is probably your website name or brand name, though for personal blogs, it may be your name. The tagline is optional, but it is a great way to further define your blog’s purpose or intent. The Default Post Category and Post Type section lets you determine how your blog will look. How many prior blog posts will be shown on the home page? When someone looks at the home page, will they see your last 10 full blog posts or a summary of the last 20 blog posts? This is the page where you can make those selections.
The “Discussion WordPress Settings” section lets you determine the level of reader engagement. This is where you can let people post comments, allow for link notifications from other blogs, or require someone to register with your blog to comment. Common tactics to limit comment spam include requiring comments to be manually approved, requiring someone to log in to post a comment and turning off comments on articles more than two weeks old. Start Blogging Once your blog is set up, you can create your first post. Remember that your first blog post can be a simple introduction to the world. You can create longer, more complex posts later. In fact, you want to create a few short posts to make sure the content looks the way you want it to on the blog. Is the text easily read on the background theme you’ve selected? When your blog is new and rarely viewed is when you want to test things. Take this time to practice importing images and seeing what pasted affiliate links look like. Start Attracting an Audience The simplest way to start attracting an audience is to use the social media buttons embedded in WordPress blogs. If you’re already logged into your social media accounts, just pressing the social media sharing button for that particular platform will post a link to the blog post under your account, sharing it with all of your friends. If you have multiple social media accounts, post the blog through all of them. One useful piece of advice: after you post the link to your social media account, like it, give it a heart, or vote it up. Those who didn’t see or ignored the social media update that you posted a new blog may see that you “liked” it. In short, liking your own blog post increases the odds your existing connections will notice it and visit it. Adding a call to action to like and share the blog makes readers more likely to share it. WordPress stands out for the strong search engine optimization features it has already built in. Learn how to use hashtags and tags on WordPress blog posts as search engine optimized keywords to attract more traffic. The key is to keep blogging, learning and improving. WordPress is an incredibly popular blogging platform due to how easy it is to set up, use and customize. It is also very SEO friendly and has tons of tools that will help you optimize for search engines even with limited knowledge of search engine optimization.
0 notes
Text
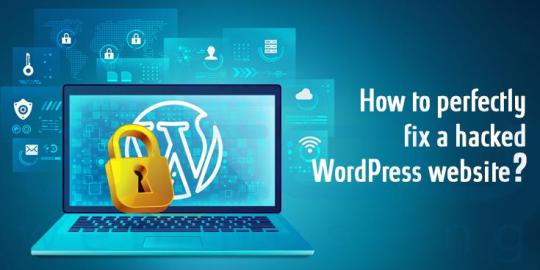
Fix Hacked WordPress Website Fast: 129 Million Daily Cyberattacks!
Fix Hacked WordPress Website Fast
There’s nothing more nerve-wracking than Fix hacked WordPress website. Whether it’s your business site or an individual blog, the harm can overpower. The uplifting news? You can assume command and recuperate your site by following the right advances!
In this blog, we’ll walk you through what to do to Fix hacked WordPress website — from quick activities to long haul security.
Keep mentally collected and Move Quickly
The initial step is to try to avoid panicking. It’s not difficult to overreact, yet fast, lucid activity is vital. Try to follow each step cautiously to keep away from additional harm to your site or information.
Take Your Site Disconnected
Quickly put your site in support mode. This keeps guests from interfacing with your hacked site, which could spread malware or create additional issues. You can undoubtedly do this by means of your facilitating supplier or by utilizing a module like WP Support Mode.
Change All Passwords
Begin by changing every one of your passwords:
WordPress administrator clients
FTP and data set accounts
Facilitating and cPanel passwords
Ensure the new passwords are solid and remarkable 🔑. Feeble qualifications are in many cases the main driver of site breaks
Examine for Malware
Utilize a confided in security module like Wordfence, Sucuri, or MalCare to play out a full malware examine. These modules will assist you with recognizing tainted documents and potential weaknesses that prompted the hack.
Most facilitating suppliers additionally offer implicit malware examining instruments — make certain to run these outputs too to cross-check for issues.
Reestablish Your Site from a Reinforcement (If Accessible)
In the event that you’ve been consistently backing up your site (as you ought to!), right now is an ideal opportunity to utilize it. Reestablish your site to a spotless variant from a reinforcement taken before the hack happened. However, before you do, examine the reinforcement to guarantee it’s liberated from malware to stay away from re-contaminating your site.
Check for Unknown Users or Changes
Make a beeline for your WordPress dashboard and survey the Clients segment. Programmers frequently make unapproved administrator accounts, so eliminate any new or dubious clients right away 👤.
Likewise, pause for a minute to survey any uncommon changes in satisfied, settings, or modules. Search for whatever doesn’t have a place.
Update WordPress Core, Themes, and Plugins
Obsolete programming is quite possibly of the most widely recognized way programmers get to your site. Update your WordPress files, themes, and plugins to the most recent variants. In the meantime, erase any unused or superfluous modules and subjects to lessen the assault surface.
Clean Hacked Records
On the off chance that malware is distinguished during your sweep, clean the impacted documents. Use plugins like Sucuri or MalCare to make it simpler.
Secure Your Site Post-Recovery
When your site has returned to ordinary, now is the right time to expand security to forestall future hacks. How it’s done:
Introduce a security module like Wordfence or Sucuri to screen your site and block dubious movement. Empower two-factor verification (2FA) for all administrator records to add an additional layer of safety (helps to fix hacked WordPress website)🔐. Utilize an Internet Application Firewall (WAF) to channel and impede vindictive traffic. Limit login endeavors and implement areas of strength for a strategy for all clients.
Check with Your hosting Provider how to work fix hacked WordPress website
It’s smart to tell your facilitating supplier about the hack. At times, the break might have happened through the server. Your host might offer security observing, cleanup administrations, or extra direction on getting your site 🏢.
Have you ever faced any issue on how to fix hacked WordPress website? Share your experience and recovery tips in the comments below!
Visit us for any issues: [email protected], wehostify.com.
#digital marketing#on page seo#local seo#ppc ads#adwords#google adwords#ppc#ppc agency#ppc campaign#ppc company in india#fix hacked wordpress website#best digital marketing company in gujarat
1 note
·
View note
Text
13 Routine Maintenance Tasks that You Should Do on WordPress and WooCommerce

Maintaining a WooCommerce store is a lot of work. There are a lot of routine maintenance tasks for WordPress and WooCommerce that need to be done on a regular basis. In this post, we list down the most important tasks that you should do on your WooCommerce store.
1. Create Regular Website Backups

2. Update WordPress, WooCommerce, Themes and Plugins
Updating all elements of your WooCommerce store should be done on a regular basis. Do this weekly if you have the time. If not, monthly updates are good enough. Updates include updating WordPress Core, themes, WooCommerce and all other installed plugins. Remember to backup up your site before proceeding with updates since updates could cause your website to break. If you have a development site, it would be best to test the updates first on this staging environment. Then, do some user testing to make sure that there are no errors.
After that, you can proceed to update your live site. When that’s done, you will need to do another round of testing. Some important elements to test include checkout, add to cart, contact form emails, opt-in forms and other customizations that were done on the site.
3. Update WooCommerce Template Files
After updating WooCommerce, you will sometimes get an error notifying you of outdated WooCommerce template files. This just means that your theme has not updated to include the latest WooCommerce template files. In some cases, this could cause some formatting issues on your store. If there are no errors on your store, you can simply wait for your theme to release an update that includes the most recent template files. Or you can also fix this manually by following the steps in this documentation from WooCommerce.
4. Change User Passwords
It is important to use strong passwords. However, it is just as important to change passwords on a regular basis. There are times when security breaches can go undetected for a long time. Changing your password regularly blocks out these security breaches that you might not realize are there. You should change your password for WordPress admin, FTP, database and cPanel. And a pro-tip, never use “admin” as your username. This is the first username that hackers try out when brute forcing into websites.
5. Optimize Your Product Images
We’ve always emphasized the importance of optimizing images for your WooCommerce store to keep your site running fast.
If you have uploaded any product image that is more than 100KB in size, it might be a good idea to replace that image with an optimized product image. To learn more, you can check out our blog post on how to optimize images.
6. Approve and Respond to Product Reviews

7. Approve and Respond to Blog Comments
If you have a blog that is made to drive customer engagement, then your blog will most likely attract comments. Same with product reviews; don’t delete the negative comments. Rather, address them positively. Remove any spam comments as this will negatively impact the user experience of your blog. If you are using Akismet: Anti Spam plugin, this will block out most spam comments. However, some spam comments can still get through and you will need to manage them manually.
8. Test Your Contact Forms and Email Opt-in Forms
Every now and then, you will need to make sure that your contact forms and email opt-in forms are working. Just fill in your forms and send. If you receive it in your email, then you’re all good. But if you don’t, there’s something wrong and you need to do something about it. Have your developer look into it.
9. Optimize Your Database
Over time, your database accumulates a lot of gunk and you need to clean it to make sure your website runs fast. Before you go about this task, make sure you create a backup. You can choose to clean your database manually if you are comfortable and familiar with working on your database. Otherwise, you can use a plugin to do the optimizations for you. Notable plugins include WP-DBManager and WP-Optimize. You can check out our guide on how to clean your database.
10. Test Your WooCommerce Store’s Speed
If you have not yet made optimizations to your WooCommerce store’s speed, you should consider doing it now. Site speed has become increasingly important for WooCommerce store owners. Google now considers site speed as a ranking factor for SEO. Also, if you have a slow site, this will negatively impact the customer’s experience on your site. It is easy for your customers to buy instead from your competitors. You can test your site speed on Google’s Page Speed test and Google will provide you with recommendations on how you can improve your site’s speed. Other notable tools that you can use to test your site are Pingdom Website Speed Test and GTmetrix.
11. Scan Your Site for Malware
One way to keep on top of your website’s security is to regularly test your site for any malware. If you are connected to Google Search Console, it will let you know if malware is detected on your site. If your site has been found to have any form of malware, Google Chrome will actually alert your visitors that your site is dangerous. This can have devastating effects on your traffic and conversion rate.
No one will want to enter their payment information on a site that has malware. In extreme cases, Google may block your site from appearing in the Google search results page. You want to prevent this from happening. It would be best to invest on your site’s security by installing a security plugin such as Sucuri Security and WordFence. Even if you have those plugins installed, it is still a good idea to a manual scan. You can scan your website at Sucuri’s Website Malware and Security Scanner, or at SiteGuarding. If any manual scans detect anything malicious, you can contact your developer to fix the issue. You should get it fixed before Google applies any penalties. Wooassist also offers a security hardening service to improve the security of your site so you can prevent this from happening.
12. Fix Broken Links

13. Test Your Checkout Process
Last but definitely not the least; you should regularly test your checkout process. If you suddenly experience loss of sales, it’s a good idea to test your checkout. There might be an error that prevents your customers from checking out. Testing also gives you a feel of what your customers go through so you can optimize your checkout. Once you’ve determined that your checkout has problems, you can check out our post on how to fix the most common checkout problems in WooCommerce.
Final Notes
By doing these tasks on a regular basis, you can keep yourself on top of any issues that may occur on your WooCommerce store. If you find yourself overwhelmed by the all these, you can hire someone else to do it. You can also contact us and our team will be glad to assist with any of these tasks.
Are there any other routine maintenance tasks for WordPress and WooCommerce you think should be done on a regular basis? Do you have any suggestions? Let us know in the comments.
0 notes
Video
youtube
How To Find WordPress Username and Password in cPanel 🔥 - Reset or Chang...
1 note
·
View note
Text
How To Change cPanel Password
How To Change cPanel Password If you want to learn how to change your cPanel password, then you should go through the tips mentioned in this tutorial. Now, let us first introduce cPanel to those who have no idea. Well, cPanel is an efficient software that uses very sophisticated features that allow users to carry out their business activities smoothly without any problems. So you see that…

View On WordPress
0 notes
Video
youtube
How To Find Wp Password & Username From Cpanel | Reset or Change WordPress Password https://www.youtube.com/watch?v=YS1ykWaSEUE #wppassword #cpanel #wordpress #learnwordpress #howto1minute #cpaneltutorial
0 notes
Text
Must-Have WordPress Plugins

You can add this service to your basket at the bottom of the page. Just scroll to the end of the product description. Supported CMS Platform: - WordPress Discover the Must-Have WordPress Plugins Package! Unlock the full potential of your WordPress website with a curated selection of must-have WordPress plugins. I will not only install these essential plugins but also optimise your site for SEO, enhance its functionality, and make it more user-friendly. Say goodbye to website woes and hello to an enhanced online experience. Essential WordPress Plugins You Need: - Boost SEO with a top-notch optimisation plugin. - Gain valuable insights with the Google Analytics plugin. - Enjoy advanced site editing capabilities. - Optimise your images effortlessly. - Enhance navigation with a sitemap plugin. - Secure your site with a login page URL change plugin. - Customise your admin panel to your liking. - I handle the seamless installation of all these plugins on your website. How “Must-Have WordPress Plugins” Work: 1. Gathering Information 🕒 from 15 minutes Once you've confirmed your order, I'll reach out to you via email to collect the necessary access details to your site's admin panel and hosting account. If you have your access details ready, this step takes just 15 minutes. If your template isn't installed yet, I can install your WordPress template for you as well. 2. Plugin Installation 🕒 1 to 2 business days* Within the next 1 to 2 business days, I will install and activate all the must-have WordPress plugins included in your package. I ensure everything functions flawlessly and I will keep you informed of the progress throughout the project. 3. Review and Finalization 🕒 from 15 minutes Once the plugin installation is complete, I will notify you. You can then review the plugins' performance and approve the final results. If there are any adjustments needed, you can let me know, and I'll provide up to three free revisions. Requirements for Must-Have WordPress Plugins Installation: - cPanel and FTP + MySQL access - WordPress Admin panel login and password What You'll Gain with Must-Have WordPress Plugins. Are you ready to turbocharge your WordPress website? This expertly curated plugin package will make your site faster, more functional, and SEO-optimised. You'll experience improved content editing, image optimisation, and enhanced admin panel customisation. Security measures are also in place to protect against hackers. I meticulously analysed common issues faced by site owners to bring you these essential plugins, all thoroughly tested on various templates and websites to ensure they perform as intended. - Streamline blog editing with advanced post editors. - Optimise images effortlessly. - Enhance the shopping experience with Google Analytics. - Boost your site's ranking with our top-notch SEO plugin. In summary, this package offers a suite of plugins to enhance SEO, content management, image optimization, and admin panel customization. Your site will be more secure and resilient than ever. Please Note: - This service is valid for one website. - Template installation is not included but can be added for an extra fee. - I install and configure the plugins on your website, without sharing installation files. FAQ: Which specific WordPress plugins are used? I constantly evaluate and update the plugins to ensure you receive the best available extensions so it would not be possible for me to put the full list here. But I am happy to discuss my current “Essential WordPress plugins” list with you beforehand, just reach out to me anytime. Will you install a template for me? Template installation is not included, but it can be bought separately on my site. Can I request added plugins? Yes, more plugins can be installed for an extra fee. Contact me via email or give me a call to discuss pricing. The pricing varies depending on the plugin, some plugins can be complicated and others simple, so it is best to discuss it beforehand. What if I only need one plugin from the package? This service is a bundled solution, but I would be happy to discuss the installation of your plugin, just reach out to me to chat about it. Don't miss out on this opportunity to supercharge your WordPress website. Take action now and experience the difference! * Timeline assumes that the client already has all the information and content available when the project kicks off. Delays in receiving any of the required information and content will inevitably delay the project beyond my control and for which I cannot be held responsible. Read the full article
0 notes
Text
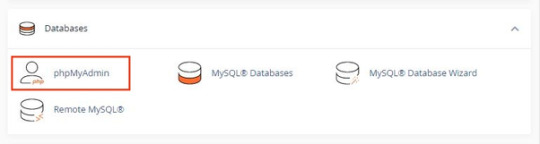
How to Add Admin User to the WordPress Database with phpMyadmin
Adding an Admin User to the WordPress Database With phpMyAdmin becomes necessary when a hacker has locked your website, you have lost access to the WordPress admin panel, or you have forgotten credentials. Here we use the HostBet Shared Hosting cPanel account screenshot.
Step 1: Open the cPanel account Dashboard
Step 2: Navigate to phpMyAdmin in the Databases section.
Step 3: Click on phpMyAdmin.
Step 4: Once you’re on the phpMyAdmin dashboard, you need to select your WordPress database.
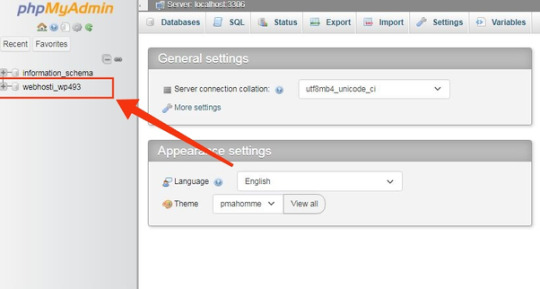
This will open the WordPress database. You will be making changes to the wp_users and wp_usermeta tables.

First, add a user to the wp_users table.
Step 5: First, you need to navigate the wp_users table and click on it. This will open the users currently listed in the table.

Please note that there is one user ID in our demo website table 1. You need to add a new user using a new unique ID, so we’ll use the 2 numbers.

Step 6: To create a new user, you need to click on the “Insert” tab.

Step 7: Add the following information to the fields on the Insert form:

ID: pick a unique number (in our example, we’ll use 2)
user_login: the username that will be used for login
user_pass: add a strong password, and make sure to select MD5 in the function from the drop-down menu (see the screenshot below)
user_nicename: the user’s full name or nickname ( you can write according to yourself)
user_email: the user’s email address
user_url: your website address
user_registered: select the date and time the user was registered using the calendar
user_activation_key: leave blank
user_status: set this to 0
display_name: the user’s full name or display name
Step 8: Once you have finished, click on the ‘Go’ button to add the new user.
Next adding a user to the wp_usermeta table.
Step 1: To add a new user, you need to navigate to wp_usermeta, click on it, and then click on the “insert” tab (same as the previous steps).
Step 2: Next, you need to add the following information to the Insert form:

unmeta_id: leave this blank
user_id: the user ID you used in the previous step
meta_key: this should be wp_capabilities
meta_value: insert this: a:1:{s:13:”administrator”;s:1:”1″;}
Step 3: After that, you need to find fields for the second row.

unmeta_id: leave this blank
user_id: the user ID you used in the previous steps
meta_key: you need to enter wp_user_level
meta_value: 10
Step 4: Once you finished typing the information into the fields, click the ‘Go’ button. that’s it. You Have successfully added new users.
0 notes
Text
[ad_1] It was guys wanna back with another exciting video and in this video guys I'm going to show you how you can create a free Amazon affiliate website with WordPress so that you can make some cash with those free website so that's basically what we're gonna do here we will connect Amazon affiliate account With our WordPress website in order to import products directly from Amazon into our WordPress website so like I said we will create free website with free domain and free hosting if you want to buy a paid hosting or paid to mean you can do that as well and the rest of The work will be the same so if you want to give a try you can do that as well so anyways enough talking and let's get started let me show you guys how you can create a free Amazon affiliate website if you need to channel make sure to Subscribe or you can turn on notification by clicking this notification bell icon and you won't miss my new uploads and also you can leave in like if you've been enjoying these videos so guys let's get started and let's create a free Amazon affiliate website go to Google and perform a Google search for bite host so open up this website in a new tab meanwhile perform another Google search for free nom and open up this website in a new tab this website gonna provide us free hosting and here we can get a free domain so let's get it and here you need To sign in so I'm gonna quickly sign in so guys I recommend you to login why I email sometime Shousha login doesn't work so now go to services register a new domain here you can type your domain now click on check availability so there's these are the free domain and These are the paid one so in our case we needed freedom in then click on get it now and then click on checkout now click on it choose DNS now click on use your own DNS now change the time period twelve month free so does leave this phase as it is now we Need name server of this website let's go back here let's sign up for hosting click on sign up for plan here you can type your domain this is gonna be subdomain don't worry you can type anything you want we will replace this domain with our domain to complete this Registration process now give you a real email now we need to check the email so guys as you can see they send us the verification email now verify our account by clicking on this link so guys as you can see account has been created successfully now we can access our CPanel by going to this link this is your username of your cPanel you can copy and you can paste here and enter your password here and login quickly so guys this is the cPanel now let's scroll down and then click on add-on domains under the domain section so where as These are the name server we need to copy them now let's go back to this freedom website and paste here paste down here as well and let's change this number 1 to 2 and then click on continue let's move on to the rest of the work so here you can type your billing Information if you like otherwise check this box and click on complete order let's go to client area go to the services my domain so guys this is the domain that we just get it for free let's copy this now go back to the cPanel and paste your domain right here And make sure guys you don't have any space in the beginning or in the end of the domain and then click on add domains so guys they show us error this is just because we just added the name server and name server some time takes time to Reflect and that's why they show us this error message if the same thing happens to you then don't be panic try this process 5 minute or 10 min later you will be good to go let's go back to the home and let's try again and let's see this domain right Here click on add domain okay guys as you can see now we successfully added the custom domain let's go back go back to the home now we need to install WordPress let's scroll down click on software class Apps installer so these are the script that we can install on
This hosting so we need wordpress then click on install so guys here it says choose the main choose your custom domain do not choose subdomain delete this here you can give a name to your site you can call whatever you like here you can change the description of your Site here you can type username now type your password now here you need to enter your real email address now scroll down then click on install so as WordPress installed successfully now we can access our WordPress dashboard by going to this link so guys our first step is done now Let's move on to the next one which is we needed Amazon affiliate account let's go back to the google type Amazon so guys I'm from India so address is a Amazon taught in if you live in another country address might be different so let's open up Amazon let's Close these tab so guys you need to scroll down now how you need to click on become an affiliate so guys here you need to sign up you can join the Amazon affiliate program by clicking on this link I already have account on this so I'm gonna login So because as you can see I just log in with my Amazon account once you log in now let's leave the space as it is let's go back to the dashboard let's go to the appearance theme then click on add new now search here Astra now install this Theme now click on activate now go to plugins add new now such here Astra not install this Astro starter sites Install Now then click on activate now go to the appearance then click on astrocytes now you want to go to beaver builder so guys here you can choose any theme you like But theme should be included fook must plug-in scroll down so I'm going to choose this theme so guys as you can see this is the demo of this theme so we need to install these plugins as well click on install plug-ins so it'll take some time so I'm going to speed this Video up a few moments later now click on import this site and click on OK now it will import all the demo data of this website now it will import the media from this demo website so it will take some time so I'm going to speed this Video up so as you can see now we done here now click on View site so guys this is the website that we just build now click on customize because if you scroll down you can see we don't have Buy Now button here let's add that butter let's Go to the layout cuckoo Mars shop and then check this eyeball I can and now you can see the add to the Cart button and click on publish now close the customization let's go back to the dashboard let's go to the plugins click on add new Then click on upload plug-in so here we need to upload a plug-in so let's go back to the Google and here search for Busan Busan lite version open up this website and then download this plugin I already have this plug-in so I'm not gonna download this again let's go back To the cPanel now look for FTP account open this up so guys now we need the FTP client so I'm gonna use FileZilla to upload that plug-in so let's open FileZilla if you don't have FileZilla you can download FileZilla go to the google type FileZilla open up this first Website and download files Allah client you can download for Mac or you can download it for Windows according to your Windows version if you have 64-bit you can download 64-bit if you have 32-bit you can download 32-bit so once you download and install this into your Computer then open this up so I'm going to open my FileZilla so guys this is the FileZilla so as now we need to login into our webserver in order to login we need a hostname username and password and pout now let's go back to the cPanel This is the information of our FTP let's copy this one by one so I'm going to add all these information into my FTP client which is FileZilla then click on Quick Connect so as you can see now we inside our server now let's go to your domain now click on Etsy Docs inside the htdocs we need to open WP content then open plugins so here we need to drag and drop our plugin that we just
download so guys this is the plug-in that we download and this is the zip file we need to extract it right Click extract here so guys now we have this folder if you open this up these are the plug-in files now let's step back and we need to drag and drop this entire folder right here this uploading takes some time so I'm going to speed this video up and I will come back once It done one hour later so guys we almost done all right now plugin is upload successfully now let's go back to the dashboard now go to the plugins and then click on install plug-ins scroll down and you can see who's on light plugin now click activate now ologist config This plugin click on get started this is a set of result not asking what kind of site is so I'm going to select online store click Next this is a fresh install click Next here I'm going to choose the second option the next click Next click Next next So guys here we need to enter the access key ID of Amazon affiliate account and secret key so let's go ahead and open Amazon affiliate account now here go to the tools then click on products advertising API so as you can create your access key by clicking on this add Credential button so this is your access key now copy the access key by ctrl a select all copy let's go back to this plugin paste right here let's go back to Amazon again copy your secret key control a copy let's go back to this plug-in and paste here and next you need Your affiliate ID let's go back to your Amazon affiliate account so this is your Amazon affiliate ID go to your accounts your email and then click on manage your tracking ID now copy this let's go back here so I am from India I'm going to paste just in this section and then I'm Going to change the country India right here and I'm going to change this to India and then you can click on check Amazon AWS keys if this doesn't work for you guys then make sure you have account on Amazon AWS let me open up a new tab When you go to the Google type AWS Amazon and then open up this website aws.amazon.com here you need to create account when you create account it will ask you for credit card or debit card and it will charge you only 2 rupees to Indian rupees and that's almost a free Once you have account on this website then you won't face any sort of error now click on check Amazon AWS key ok as you can see it says WooCommerce Amazon a fill it was able to connect to Amazon with Pacific AWS key Pierre and associate ID and now click on finish Now close this now dismiss this notice so guys as you can see now we inside the Busan plugins dashboard first of all this is a free version with the free versions you get limited features if you have paid version you get tons of other features with it so there's now let's Just import products from Amazon in order to do that let's click on insane import mood here you can type a keyword like you can type chart and I'm gonna choose shirt for men select the category peril and I'm gonna scroll down I'm gonna click on launch search and this Will do some process here and this is the result that we have here so again guys this is a free version of this plug-in if you have a paid version then you can import many product in one click anyways once we have these products you can select Pacific one or you can select All of them scroll down and then click on import products and it will take just few seconds as you can see because these are only ten products now close box go to the store let us go to the t-shirt and polos open this up and these are the T-shirts so let's try this out so I'm going to click on a select option now select the color which is black available select the size and then click on Add to Cart and let's see what's going to happen and then click on View card alright don't worry about the Currency you can change it under the WooCommerce settings now click on proceed to checkout so guys as you can see we just redirect an Amazon with this plugin so how cool it is right so this way you can add tons of products on your website let's go
Back to the dashboard or I guess now let me show you the paid version of this plug-in so there's this is the paid version of this plugin if you buy this you will get six month of sport and variety of features you can see right here and you can see the sale many People are using this plug-in to increase their revenue if you are serious about this you can buy this otherwise you can use the free version of this plugin alright guys I think we done everything here we created our amazon affiliate website or I guess that's the end of This video guys I hope you enjoy if you did enjoy this long video then you can hit the like button and don't forget to subscribe to my channel so that being said goodbye and see you next time [ad_2] #free #Amazon #affiliate #website For More Interesting Article Visit : https://mycyberbase.com/
0 notes
Text
How to Create a WordPress Website with the Shopify Extension and Cloudflare on Hostinger
How to Create a WordPress Website with the Shopify Extension and Cloudflare on Hostinger
Introduction: Creating a website that seamlessly integrates WordPress, the popular content management system, with the Shopify extension and Cloudflare’s robust performance and security features can provide a powerful and efficient online presence. In this blog post, we will guide you through the process of setting up a WordPress website with the Shopify extension and Cloudflare on Hostinger, a reliable web hosting provider.
Step 1: Setting Up Hosting on Hostinger 1. Sign up for a hosting plan with Hostinger and complete the registration process. 2. Access the Hostinger control panel (cPanel) and locate the “Auto Installer” or “Softaculous” option. 3. Select WordPress from the available applications and proceed with the installation process by following the provided instructions. 4. Configure your WordPress installation by entering the necessary details such as website name, admin username, and password. Ensure to choose a secure password.
Step 2: Installing the Shopify Extension 1. Log in to your WordPress admin dashboard by visiting “yourdomain.com/wp-admin” and entering your credentials. 2. Navigate to the “Plugins” section and click on “Add New.” 3. Search for the “Shopify” plugin, developed by Shopify Inc. 4. Click “Install Now” and then activate the plugin.
Step 3: Setting Up Shopify Integration 1. Once the Shopify plugin is activated, locate the new “Shopify” menu item in your WordPress admin dashboard. 2. Click on “Connect an existing Shopify store” or “Create a new Shopify store” if you don’t have one yet. 3. Follow the prompts to connect your Shopify store or create a new one. You will need to provide your Shopify store credentials to complete the integration. 4. After the integration is successful, you can configure various settings, such as product display, cart behavior, and checkout options.
Step 4: Configuring Cloudflare on Hostinger 1. Sign up for a Cloudflare account at cloudflare.com and add your website to your Cloudflare dashboard. 2. Change your domain’s nameservers to the Cloudflare nameservers provided. 3. On the Cloudflare dashboard, configure the desired security and performance settings, such as SSL/TLS encryption, caching, and firewall rules. 4. Once the configuration is complete, wait for the DNS changes to propagate, which may take some time.
Step 5: Designing and Customizing Your Website 1. Choose a suitable WordPress theme from the vast collection of free and premium themes available. 2. Customize your website’s appearance by adding a logo, adjusting colors, and configuring menus and widgets. 3. Install and activate additional plugins to enhance the functionality of your website, such as SEO optimization, contact forms, and social media integration. 4. Create and organize your website’s pages, add engaging content, and upload your products if you have an online store.
Conclusion: By following the steps outlined in this blog post, you can create a WordPress website with the Shopify extension and leverage Cloudflare’s performance and security benefits on Hostinger. This integration allows you to harness the flexibility of WordPress, the robust e-commerce capabilities of Shopify, and the advanced caching and security features of Cloudflare. Take the time to explore and optimize your website further to create a compelling online presence that engages and satisfies your visitors.
Written by Kevin K. Roozrokh Follow me on the socials: https://linktr.ee/kevin_roozrokh Portfolio: https://KevinRoozrokh.github.io Hire me on Upwork: https://upwork.com/freelancers/~01cb1ed2c221f3efd6?viewMode=1
0 notes
Text
How to Change Your WordPress Password [ A Guide ]
How to Change Your WordPress Password [ A Guide ]
It is very much common for WordPress users to ask how to change their password. If for any reason you are one of these WordPress users, you are very much welcome. In this article, you’ll get a complete and comprehensive guide on How to Change Your WordPress Password. However, before going further, it is important to highlight some important points just so you can understand this guide. First, you…

View On WordPress
#how to change local wordpress password#how to change wordpress admin password#how to change wordpress password in cpanel#how to find wordpress username and password#how to get wordpress username and password from database#wordpress reset admin password#wordpress reset password function
0 notes
Video
youtube
How to change WordPress admin password from dashboard and cpanel
0 notes
Text
Easiest way to make your own blog and site
If you’re reading this page it means that you’re ready to start a travel blog. Congratulations! You’re probably totally overwhelmed by the amount of information you have to read.This article will show you how to set up a self-hosted blog with Bluehost with the help of screenshots. Bluehost is a wed hosting company
Step 1:
Go to Bluehost This is an obvious step, you can click on the link above and go to Bluehost homepage. Setting it all up might seem overwhelming, but once you look at the screenshots below, you’ll see that Bluehost isn’t

Step 2:
Select which plan do you want. Realistically speaking the Basic plan is only for a CV type page, not a blog.

Step 3:
Register your domain, or buy a new domain. A domain is the URL of your blog. Think about it for a while, because you can’t change it later. All Bluehost plans include a free domain, so there’s no need to buy it elsewhere.

Now, enter your contact information and extra you’d like to purchase. While you can get the extras later, I HIGHLY recommend Site Backup Pro. You don’t want to lose all your work.
Step 4:
Now, you’ll be transferred to the part no one likes: payment. Just remember that Bluehost charges you for the full 36-month agreement, upfront, similar to most hosts.

Bluehost will find recommendations on more domains available for you with a different extension. You don’t need to purchase these, but if you’re worried that another blogger will create a similar name you might spend a few extra bucks.
Step 5:
A system will ask you to select a password that you’ll be using to log in to your website.

Step 6:
This step is optional as you can either select a theme that Bluehost offer, or install your own. You can also skip this option and deal with it later.

Step 7:
Here you can choose to either:
Start Building your website on WordPress
Go to your Bluehost account (cpanel)
If you pick the first option, your WordPress dashboard will look like the screenshot below.

Step 8:
You’re almost set. You can choose to launch your site or display a ‘Coming Soon’ page and launch whenever you’re ready.

Step 9 :
Once you’re ready to launch you’ll see this:

I wish I Helped . Best wishes ❤️❤️
2 notes
·
View notes