#how to clean your Cricut mat
Text
7 Cricut Maker 3 Leather Projects to Enhance Your Style

Hey, are you looking for some unique Cricut Maker 3 leather projects? Look no further than this guide! In this post, I am going to tell you the best DIY projects that you can create with leather. About 3 weeks ago, I finished my Cricut leather projects. I have aimed to make a few projects so that I could write this blog diligently. But do you know what was the most difficult part of this project? Cutting intricate designs on leather. Yes, it might not be easy to cut, but they require patience during both cutting and weeding such designs.
Without any further delay, let’s get straight into this blog to find out the most amazing ideas for creating leather Cricut projects.
1. Bracelets
Do you love bracelets? If so, you must give it a shot! When I was looking for ideas for Cricut Maker 3 leather projects, it had been on my mind for a long time. Finally, I gave it a try and saw how beautiful it looked. If you have any friends you want to give this bracelet to, it would be great!
2. Hair Accessories
Do you want something for your hair? You might wonder what I can make for my hair or other beauty stuff. Well, this leather accessory is also made with leather. As you can see, it might look a little tedious, but it is a piece of cake. Start diving into your Crafting journey and create what you need the most.
I gave it a flower shape, and if you are a little bit familiar with Cricut Maker 3 Setup, then it is a breeze for Maker 3 to cut such designs.
3. Earrings
I love leather earrings, as they enhance my beauty and are easy to create. Beginners who are looking for the best Cricut Maker 3 leather projects should try them out! Why? Because they are really easy to make. I also wanted to make them a little unique, so I added some glittery effects. This is what I needed, and hence, I made them.
4. Keychains
If you want personalized keychains, then here I have something for you! Whether you are a novice crafter or a pro, this keychain is easy to make. All I did was add some texts with different font styles to my Design Space.
Finally, after finishing my design, I started my Cricut Maker 3 and cut all the words Daddy and Daniel to make keychains. I handed it to my dad, my brother, and my dinner.
5. Crossbody Bag
Today, everyone wants to use a body bag, and what if you have a personalized one? Sounds like a great idea, no? I created this simple bag for myself as I am not much into personalized stuff. But you can have one if you want. The process of making this bag is easier, and you will need iron-on vinyl to make such a beautiful crossbody bag.
6. Monogram Keyring
Looking for super easy-to-make Cricut Maker 3 leather projects? Here is the monogram keyring that is most widely useful, and it would be great if you could give it a shot! This is a great beginner project, and any beginner should try to make something unique. I also used paint to color it to make it look stunning! Lastly, you can see the result in the picture, like how elegant it looks.
7. Cord Organizers
Every one of us uses earphones or a charger, but sometimes managing those clumsy wires is boring and tedious. So, I decided to create something that could organize my cords or wires. Here, you go with leather cord organizers, which I created using my Cricut. There are many cuts that I had to make, and I preferred my Cricut Maker to cut them as they are faster and provide precise cuts, making them look professional rather than handmade.
FAQs
Can I cut leather with Cricut Maker 3?
Yes, leather can be easily cut with Cricut Maker 3. It can also cut other materials such as fabric, paper, and balsa wood without any problem. In order to cut the leather, you have to use a knife blade, and the thickness of the leather should be up to 2.4 mm or 3/32 mm thick. However, you have to use a clean cutting mat with a sharp blue edge for better results.
What are the essential Cricut tools for cutting leather?
There are some common tools that you can use to cut leather. They are as follows:
Utility knife: This sharp knife is considered a versatile tool for cutting your leather.
Rotary cutter: This is a tool that comes with a wheel-shaped blade. Ideal for long and straight cuts.
Leather shears: A kind of specialized scissors idea for cutting thick and tough leather.
Round knife: It is a popular tool that is most widely used for cutting leather.
How thick can I cut leather with Cricut Maker 3?
If you want to cut the leather on Cricut Maker 3, you can cut up to 7 oz thick. The best thing about the Maker 3 machine is that it cuts anything precisely. In addition, cutting the leather is a breeze. You will also have to use a knife blade for all these leather Cricut projects.
Wrapping Up
As you went through the 7 Cricut Maker 3 leather projects, you might have found them easy to make. The best thing about these leather projects is that they are beginner-friendly. So, you will not need to worry about the complexity of the projects; just turn on the Cricut Maker 3 and prepare the leather that you want to cut. After cutting, the result will be fantastic and will stand out!
For more information and visit: www.cricut.com/setup login
cricut.com/create
Cricut Design Space App
Source: Cricut Maker 3 Leather Projects
#Cricut Maker 3 leather projects#leather Cricut projects#cricut design space download#Cricut maker setup#cricut maker 3 setup#Cricut Design Space Login#Cricut Design Space App#Cricut New Machine Setup
2 notes
·
View notes
Text
How to Set up Cricut Machine with Steps
Setting up your Cricut machine is a straightforward process that opens the door to endless crafting possibilities. Begin by unpacking your Cricut and placing it on a flat surface. Connect the power, turn it on, and link it to your computer or mobile device. Download and install Cricut Design Space, the hub for your creative projects. Create or sign in with your Cricut ID to access a world of designs.
If required, calibrate your machine for precise cuts. Load your chosen material onto the cutting mat and let the Cricut work its magic by following the simple on-screen instructions. Within minutes, you’ll witness your designs come to life. The setup is intuitive, allowing you to focus on what you do best – crafting with precision and creativity. Welcome to the world of Cricut, where your imagination knows no bounds!
Setting up your Cricut machine is a breeze, and soon you’ll be crafting to your heart’s content. Follow these simple steps to get started:
Unboxing: Begin by carefully unpacking your Cricut machine set up and accessories. Take a moment to marvel at the sleek design and the possibilities it holds.
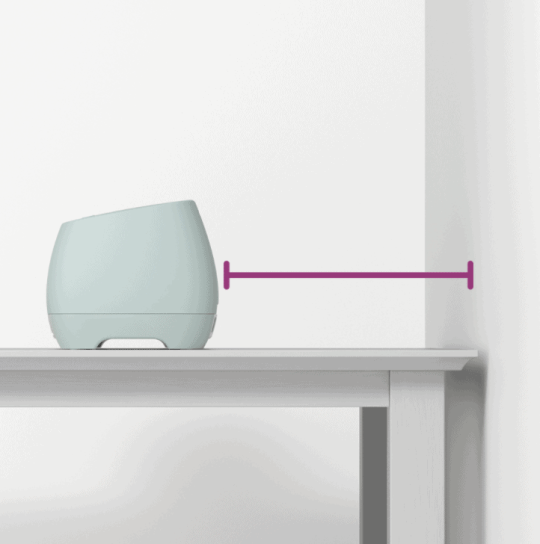
Place Your Machine: Find a clean, flat surface to set up your Cricut machine. Ensure there’s ample space for the materials and projects you’ll be working on.
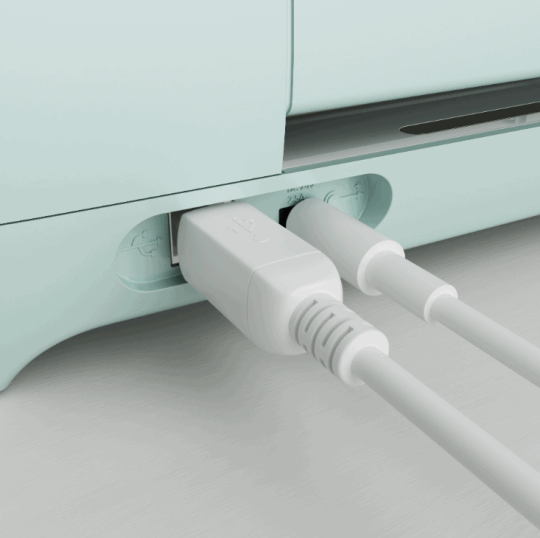
Connect Power: Plug in the power cord and turn on your machine. The power button is usually located on the side. Watch as it comes to life, ready to bring your creative visions to reality.
Connect to Computer or Mobile Device: Depending on your Cricut model, connect it to your computer or mobile device using a USB cable or Bluetooth. Make sure your device’s software is up-to-date for seamless communication.
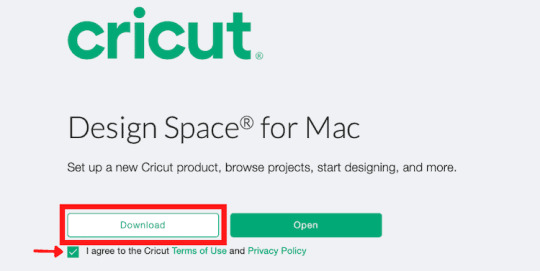
Install Design Space: Download and install Cricut Design Space from official website Cricut.com setup on your computer or mobile device. This is the platform where you’ll create and customize your projects.
Create a Cricut ID: If you don’t already have one, create a Cricut ID. This will be your gateway to a world of designs and inspiration.
Calibrate Your Machine (if required): Follow the on-screen instructions to calibrate your Cricut machine. This step ensures precision in your cuts.
Load Materials: Place your chosen material (vinyl, paper, fabric, etc.) on the cutting mat and load it into the machine. Adjust the settings in Design Space accordingly.
Design and Cut: Open Design Space, create or choose a design, and click “Make It.” Follow the prompts to load the cutting mat into the Cricut machine, and let the Cricut work its magic.
Admire Your Creation: Once the cutting is complete, carefully remove your project from the mat. Admire the clean cuts and intricate details, knowing that the world of limitless crafting possibilities is now at your fingertips.
With these simple steps, you’ve successfully set up your Cricut machine and are ready to embark on a creative journey like never before. Happy crafting!
Source:How to Set up Cricut Machine
#cricut machine setup#set up cricut machine#Cricut design space download#design.cricut.com#cricut explore air 2 setup#www.cricut.com/setup login#how to set up cricut maker#how to set up cricut machine
3 notes
·
View notes
Photo

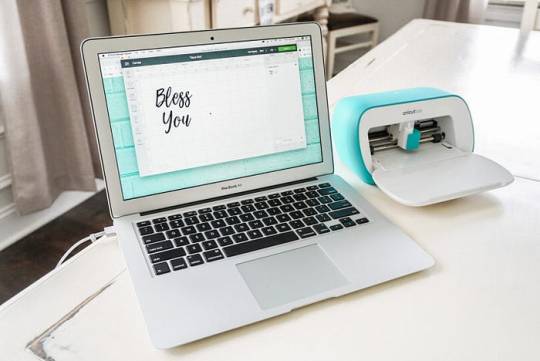
You'll be thinking, "Why didn't I think of that?!" after reading this list of genius cricut hacks for your cutting machine including how to clean your mats, sharpen blades, and tips and tricks on how to weed. Every Cricut beginner needs to read these! #cricut #svg #cricutexploreair2 #craftcreations
0 notes
Text
How to Use Vinyl on Cricut: Create DIY Projects With Me!
Do you want to learn how to use vinyl on Cricut? It’s good to start learning something new. And I can walk you through all the steps included in using vinyl on your Cricut. With vinyl, you can create a beautiful project with your Cricut machine anytime.
I’m a Cricut enthusiast and work full-time to make the best pieces of craft. As much as I have used Cricut, I have closely observed how it works. With this guide, I want to share my learnings with all my readers who are interested in crafting and want to create something.
Do you know what vinyl is? These are flexible materials that are used to transfer designs onto your materials. You can use them to create personalized projects. Let’s get started with this blog post to learn the procedure closely.
What Tools and Supplies Do You Need?
Before you get started with the guide, you’ll have to gather up some necessary materials. Once you’re ready with these materials, you can start with a further guide to create a beautiful craft. Let’s see the list of materials here.
● Cricut machine
● Weeding tool
● Brayer
● Cricut StandardGrip mat
● Scraper
● Transfer tape
● Adhesive vinyl
Finally, you can start with the process and create the best piece of craft with your one and only Cricut machine.
How to Use Vinyl on Cricut to Make a Personalized Craft?
In this section, I’ll tell you some basic steps to get started. Once you have learned the steps clearly, you can experiment with your material and make a similar one. So, without further delay, let’s jump to the final process and learn how to use vinyl on Cricut for beginners.
Step 1: Create a Design in Cricut Design Space
To start, you’ll need to launch your Cricut Design Space software and hit the New Project option. Now, you’ll need to add an image or a text that you want as a final outcome. As Design Space offers you a huge library of images and pre-made designs, it’s quite easy to design anything. Also, you can upload an external file to Canvas.
You can explore all the features of the Design Space. Once you’re satisfied with the design, hit the green “Continue” button.
Step 2: Load Your Vinyl on the Cricut Mat
In this step, you need to place the Cricut StandardGrip mat on a clean, flat surface. Also, take off the plastic covers from the sheet. Now, load the vinyl on your mat, aligning the vinyl with the Cricut mat’s grid lines. Once the vinyl is fixed in place, smooth it down with a scraper tool.
This step will remove all the air bubbles between your Cricut mat and the vinyl.
Moving forward, load your mat into the Cricut machine. Plus, align the edges of your mat with the grid lines. Finally, hit the Load button to load your mat into the machine.
Step 3: Select the Material
I hope you’re learning how to use vinyl on Cricut well with this guide. Moving forward with the next step, choose a material to be cut. For instance, which type of material vinyl you are using - Temporary, permanent or anything else.
To do this, continue with the on-screen prompts to select the Base Material. After that, select the vinyl settings from the options. In case you don’t see your material on the list, hit Browse All Materials to check out the full list.
After selecting the right material, just hit the Go button to start the cutting process.
Step 4: Weed Out Excess Vinyl
Once you get your cut vinyl, it’s time to hit the Load button to unload your Cricut mat. Now, you’ll get the vinyl in the shape you wanted. Remove the excess of vinyl from it using a weeding tool. This tool will remove all the tiny leftovers gracefully leaving the original design untouched.
This method is crucial to give a good finishing to your final project. Once you’re ready with the further steps. Let’s check all of them.
Step 5: Prepare Your Blank
You’ve come here after a long way. So, now you need to prepare the surface of your project with a rubbing alcohol and cotton. This step removes all the dirt, dust and lint from the surface leaving a smooth surface for final vinyl transfer.
Here, I’m using a mug. Let’s wipe it with alcohol and cotton. Let it dry, and continue with the vinyl transfer.
Step 6: Apply Transfer Tape to Your Vinyl
In this step, cut a transfer tape slightly larger than your vinyl design. Next, peel off the paper backing from the transfer tape. Then, apply the transfer tape on your vinyl design in alignment with the grid lines to keep the design straight.
After that, burnish the transfer tape on your vinyl using a scraper tool. This step will help you transfer your vinyl design smoothly.
Step 7: Peel off the Transfer Tape
In this step, carefully peel off the transfer tape from your vinyl’s backing. Ensure that the transfer tape is lifting away smoothly from the backing paper. If it doesn’t happen, you may need to burnish the transfer tape once again.
Step 8: Apply Your Vinyl Design to the Final Project
It’s the final step for transferring your vinyl to the final project. Check if your design is aligned properly on your transfer tape. Once the design is in the correct position, press the vinyl to stick it to the final project. Also, you can use a scraper to burnish the design. Apply the scraper tool all over the vinyl design.
Step 9: Take off Your Transfer Tape
You know how to use vinyl on Cricut. Now, in the final step, just gently peel off the transfer tape away from your project. Ensure that you pull it away at an angle of 45 degrees. Then, the transfer tape will be removed, and the design will be left.
After that, your personalized project is over. Moreover, you need to wait for 24 hours before washing it.
FAQs
How to Place Permanent Vinyl on a Cricut Mat?
Check out the steps below to place a permanent vinyl on your cutting mat:
Getting started with placing the vinyl on a Cricut StandardGrip mat.
Design your project on Cricut Design Space and load it into the machine.
Hit the Go button and finish the vinyl loading.
What Kinds of Vinyl Are Available for Cricut?
There are mainly two types of vinyl- Adhesive and Heat Transfer Vinyl. The adhesive vinyl comes for standard projects that only need transfer of vinyl to the project’s surface. On the other hand, a heat transfer vinyl is suitable for the iron-on projects that demands application of heat to transfer design.
Which Vinyl Should I Use for My Cricut Projects?
Well, it completely depends on the type of your project. If you need a temporary project, you should use removable vinyl that can be removed when you don’t need it anymore. On the other hand, if you want a more professional-looking and high-quality project, you should go with a permanent vinyl type.
Read more: install cricut design space app
cricut.com/setup mac
Cricut Design Space
Cricut.com setup windows
Source: how to use vinyl on Cricut
#how to use vinyl on Cricut#Cricut.com setup windows#Cricut Design Space#cricut.com/setup mac#cricut explore 3#www.cricut.com setup login#cricut explore air 2#cricut.com/setup
0 notes
Text
How to Make Window Decals With Cricut: A Step-by-Step Guide
For the past few weeks, I have been attending driving classes and have never missed a single class. I got rejected multiple times due to small mistakes, but it was worth it. After making mistakes and learning many new things, the authority finally granted me the license. Right now, I am on top of the world, with lots of plans for long-haul drives running in my mind.
As per family tradition, my parents gave me their personal car and bought a new car for themselves. Now, I am going to modify my vehicle by renovating the color, seat cover, engine, and so much more. If you are also planning to make some changes to your four-wheeler, then check out this guide.
Here, you will learn about the main materials used in this project and the steps that are part of how to make window decals with Cricut.
What Cricut Materials Are Required to Create Window Decals?
You will agree that creating the ideal window decal is only possible with the correct Cricut crafting supplies. If you have too many options but need help to stick to any one of them, explore this section. It will introduce you to supplies that you need to buy before getting started with the crafting process:
Cricut cutting machine
Cricut account
Cricut StandardGrip mat
Permanent Vinyl
Transfer Tape
Scraper & Weeding tool
After adding all the crafting materials mentioned earlier to your art room, creating decals for your window will be a child’s play.
How to Make Window Decals With Cricut?
Inside this part of the blog, you will get to know the exact steps you need to take while creating a decal of any size & shape. Also, you need to be very careful while going through the below details:
Step 1: Upload an Image to Cricut Design Space
Get started with making decals on Cricut by turning on your PCs or mobile devices. After doing that, download and install the Cricut software and create your account. Now, open the search engine and look for the perfect image for your project. After finding the suitable image, right-click > tick the Save image and download the image on your device.
Following this, open the installed app, click New Project > Uploads > Upload Image, and drop your downloaded image on the next page. At this point, select the image type as Simple and choose the area that won’t be part of the final cut. After making the necessary changes, tap the Save as Cut Image option.
Next, go back to the Uploads page, select your image from the Recent Uploads section, and tick the Insert Image option. Conclude the first step of how to make window decals with Cricut by hitting the Make It option.
Step 2: Cut Your Decal on the Cricut Machine
In addition to the process, cross-check that the design has been placed properly on the mat and then tick the Continue option. Then, click the Browse All Materials option and select the material that you are going to use for his craft. After that, check the pressure and load the blades into your Clamp.
Following this, unbox your Cricut material and place it on your cutting mat. Afterward, turn on your cut-die machine and insert the mat into the machine. Now, turn on your craft plotter and let it complete the cutting process. Following this, turn off your cutting machine and unload the mat. With the completion of cutting the design, it’s time to move on and proceed toward preparing the design for the decal.
Step 3: Prepare & Apply the Decal on Your Car
At this point in how to make window decals with Cricut, remove the extra piece of vinyl from the mat using your weeding tool. Next, cut a portion of transfer tape and apply it to the top of your decal design. The transfer tape will keep your vinyl in its place without slipping or stretching.
Then, clean the area where you want to apply the decal with a glass cleaner. You can also use baby wipes or alcohol-free wipes to clean that particular area. If you still see dirt, debris, or extra grease on the glass, clean the window again using the same method.
Gently remove your vinyl backing paper to release the whole image from the sheet without any bubbles or space between the surfaces. Also, settle the vinyl in a rolling motion, covering the area. This method guarantees proper placement and fewer air bubbles compared to other methods.
Equally important, remove the leftover bubbles using the Cricut scraper tool and peel off the transfer tape from your design. Carry on with how to make window decals with Cricut method by cleaning the design with a dry towel. Now, leave it for a few seconds and praise yourself for redesigning your car.
See, it was so easy to create DIY window decals from a Cricut cutting machine. You can also give them as a present or sell them by putting your stall at any upcoming fair. Apart from that, they will look much better when created in big sizes, different shapes, and a variety of colors.
Frequently Asked Questions
Question: Which Cricut Vinyl Should I Use While Designing Decals?
Answer: Cricut lovers can choose between two types of vinyl: removable and permanent. The most famous is permanent vinyl, which has a strong adhesive that makes it more sticky. It is ideal for outdoor uses and gives the surface extra shine. You shouldn’t get worried, as it can be removed very easily by peeling it from the corner of the design.
Question: Is It Safe to Wash Cricut Permanent Vinyl?
Answer: Yes, it is absolutely safe to wash Cricut permanent vinyl, as it is waterproof and long-lasting. You can certainly extend its life span by cleaning it via handwash rather than using a dishwasher or a carwash. Your permanent vinyl will remain on the surface for almost 50 washes or more than that if washed properly.
Question: Which Cricut Machine Can I Use to Make Window Decals?
Answer: Cricut machines that can help you make customized window decals are the Explore series, Maker series, Joy series, and Venture series. You will undoubtedly need to use different materials and cutting mats while making this DIY project out of any of these craft plotters.
Source :- https://cricutsetupprocess.wordpress.com/2024/05/07/how-to-make-window-decals-with-cricut-a-step-by-step-guide/
Cricut setup log in
www.cricut.com setup login
Cricut Maker machine
design.cricut.com/setup
cricut.com setup mac
cricut new machine setup
cricut explore 3 setup
0 notes
Text
What is the Best Way to Clean Cricut Mat: 3 Different Methods
Are you tired of searching for the best way to clean Cricut mat? Then don’t worry at all because I have got your back. If you are a crafter, you will agree that the Cricut cutting mat is crucial in creating something new. Crafters use this crafting supply to stick their materials together when making DIY projects. They also come in 4 different ranges and colors.
The mat starts losing its stickiness at a certain point due to an excess amount of dirt, debris, and leftovers. To extend its life, users should know how to clean them. No doubt, cleaning mats can be a little of a tedious task, and doing it by yourself will save you money. Besides, you will also learn new things you weren’t aware of, and that can help you create unique crafts.
This blog will teach you about different methods that will instantly bring back the shine to your Cricut cutting mat.
Method 1: Light-Duty Cleaning
If you are making simple projects out of scrapbook paper, vellum, or sticker paper, then referring to these methods will be your best choice. You can use them after finishing every project to ensure that the mat doesn’t lose its stickiness. Take a look at the below section, and you might find the best way to clean Cricut mat:
Scraper Tool
You can use this tool to remove the leftover pieces of materials after the cutting process is complete. To properly clean the mat, you need to pull its edges over its surface, and it will instantly scrub away the unwanted materials from the mat. Apart from removing the material, many DIYers use this crafting item to stick the material correctly on the surface of the mat.
Lint Roller
Apart from the scraper tool, the DIYer can also use a lint roller as one of the hacks to clean the Cricut cutting mat. Just grab the roller handle and start rolling over the mat, covering the entire area. Most crafters prefer the lint roller to remove small materials such as hairs, fuzz, etc.
Baby Wipes
Besides a scraper tool or a lint roller, the crafter can use baby wipes to clean the mat. It is the best way to clean Cricut mat as it is simple and complete within a few minutes. First, you need to take a piece of wipe in your hands and gently move your hands, covering the entire area of the mat. After doing that, repeat the same step, ensuring you don’t put too much pressure on the mat.
Method 2: Medium-Duty Cleaning
If you make any customized project using medium-weight material like heavy cardstock, adhesive vinyl, or HTV, then you need to clean the mat using dish soap and a sponge. Go through the below steps and learn how to dislodge the remaining pieces of medium-weight materials from the Cricut mat:
Method 3: Heavy-Duty Cleaning
In case you are making any craft out of leather, wood, or other fabric, then there is only one way for you to clean the mat, i.e., awesome spray. It will surely be the best way to clean Cricut mat. To make you look new again out of this item, then have a look at the below steps:
As a result of the best way to clean Cricut mat, you have all the methods that will make your Cricut cutting mat look new again.
Frequently Asked Questions
Question: How Can I Extend My Cricut Mat Life?
Answer: To extend your Cricut cutting mat’s lifespan, clean the mat regularly. Besides, you should use the correct method while cleaning it, such as a scraper tool, lint roller, and baby wipes. Keep the mat inside the plastic sheet after cleaning it and protecting it against dirt or debris. You can also increase the mat life by using it with compatible cutting machines & materials.
Question: How to Clean Cricut Fabricgrip Mat?
Answer: Most crafters choose the Fabricgrip cutting mat when making any project out of any fabric, such as leather or cotton. This Cricut mat is a little delicate, so softly removing the material is essential. To remove the material, gently use tweezers, lift the small pieces, and sleep them at the corner of the table.
Question: How to Make Cricut Mat Sticky Again?
Answer: Read the following steps to make your mat sticky again:
Visit: cricut.com/setup
www.cricut.com/setup login
cricut design space app
cricut explore air 2 download
design.cricut.com/setup
install cricut design space app
Source: https://cricutdesignapp.wordpress.com/2024/03/02/what-is-the-best-way-to-clean-cricut-mat-3-different-methods/
#install cricut design space app#cricut.com sign in#setting up your cricut maker#cricut new product setup#cricut explore air 2#design space setup#digital design#cricut.com/setup explore air 2 setup#cricut.com/setup#cricut maker 3 bundle#cricut explore 3#design space cricut#download cricut design space#cricut design space app#cricut.com/setup mac#www.cricut.com/setup login#cricut design space setupp#cricut design space login#cricut design space download#cricut design space for mac#cricut design space setup#install cricut explore air 2#cricut explore air 2 setup#inctall cricut explore air 2#install cricut explore air 2 setup#design.cricut.com/setup#design.cricut.com
0 notes
Text
How to Use Cricut Explore 3: Get Started With Your First Craft
My childhood friend Emma recently purchased a Cricut Explore 3 to start crafting. Like you, she was confused about how to use Cricut Explore 3. We keep in touch, so she calls me for help. I'm always eager to help; I teach her everything from setting up and connecting the Cricut machine to downloading Cricut Design Space. I also enjoyed her first project; it was fun.
If you have left your machine untouched since buying and are wondering how to get started, I will guide you through it step-by-step, just like I did for Emma. I was once a beginner like you, but with continuous learning, I have done many projects with my Cricut machine. Follow the instructions in this blog, and you will feel comfortable in no time. Let's get started!
How to Setup a Cricut Explore 3 on Your Device?
Now that you have your Explore 3, before you learn how to use Cricut Explore 3, it must first be set up properly so you can start crafting.
Step 1: Unpacking the Machine and Turn It On
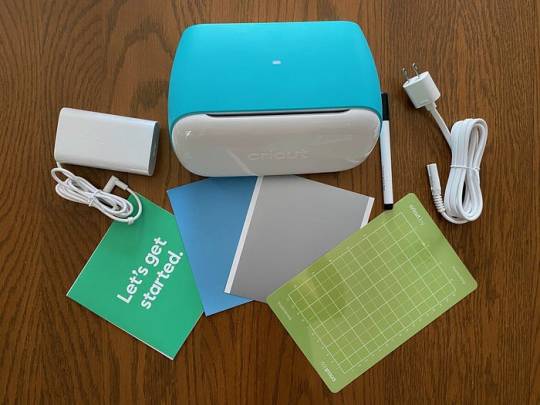
If you haven't opened the box yet, open it up and locate the power cable and the Cricut Explore 3 machine.
After this, place the machine on a clean and flat surface and ensure that there is 2 feet of free space behind the machine.
This time, plug the round end of the power cable into the back of the Cricut Explore 2 machine and the other end into a power source.
Turn on the machine and the power button simultaneously.

Step 2: Connecting Cricut Explore 3 to a Computer
The Cricut Explore 3 comes with a USB port and also supports Bluetooth connectivity. We can use any method for connection.
For a USB connection, plug one end into the computer and another one at the back of the Explore 3 around the power cord.
Step 3: Download Cricut Design Space
Installing Cricut Design Space is essential when you first start learning how to use Cricut Explore 3, as it is integral to the setup.
Open the computer and go to the cricut.com site; it will automatically recognize the computer, whether it is a Mac or Windows or not.
After that, tick the box to agree to Cricut's terms and conditions and click "Download."
Moreover, open up the downloaded file, follow the on-screen prompts, and install the Cricut software.
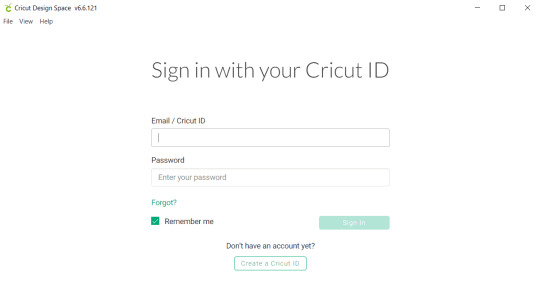
Next, launch the Cricut application and create a Cricut profile. If you have already done so, simply log in.
Step 4: New Machine Setup in Design Space
No matter which Cricut machine you have, it needs to be set up in the Cricut application before use.
Once the Cricut applicationis installed, click the Menu icon.
Next, click New Product Setup and select the Cricut cutting machine.

Now, a new page will open that asks you to select the machine and tap on the Cricut Explore 3.
Follow the on-screen steps, then update if there is any new update, and click Continue to complete setup.
How to Use a Cricut Explore 3 to Make a Mug?
Finally, the setup for the Cricut Explore 3 is complete, and it is connected. Now, let's dive into how to use Cricut Explore 3 by creating a project.
Step 1: Supplies and Tools Required
Given below are the essential Cricut tools and materials you will need to get started with your project.
Cricut vinyl
Cricut Explore 3
Weeding tool
Transfer tape
A blank item (I choose a mug)
Step 2: Use the Cricut Software and Create a Design
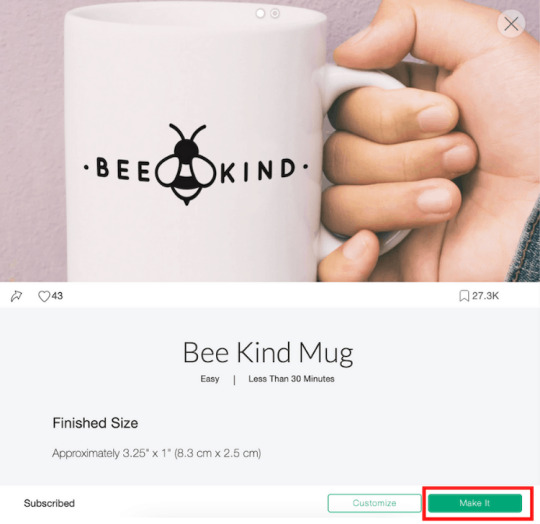
Open the Cricut app, click on the New Project, and look for the "Bee Kind" design in the search bar. Since it is your first project, I recommend skipping any customization. Simply drag and resize the design, then click Make It.
Step 3: Select Your Material
Now, the Cricut software will ask you to choose the load type "Without Mat" and click done.
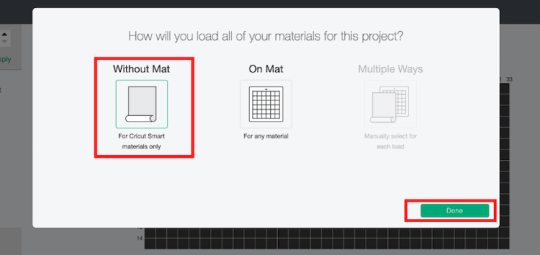
Also, insert the smart vinyl into the machine, ensuring the fine point blade is installed in clamp B.
Then, return to the Cricut app and click the Continue button.
Step 4: Start Cutting Your Design
When your design and all the settings are complete in Design Space, it is time to click the Go button and start cutting. Once the machine finishes cutting, hit the Load button to remove the smart vinyl.
Next, trim and weed out the excess vinyl that is not required.
Then, cut the transfer tape to fit the size of the design you have cut out. Peel the white backing away from the transfer tape and place the sticky side down on your vinyl decal.
Finally, peel back the transfer tape and apply it to the blank object (mug) to lift it up; it's as simple as that.

Final Words
The Cricut Explore 3 is a popular machine capable of cutting over 100 materials, making it ideal for various projects like t-shirts, vinyl decals, stickers, cards, and more. Before diving into any projects post-purchase, it's crucial to understand how to use the Cricut Explore 3. I have provided all the information from setup to the first DIY project, assuming you have completed it and are now comfortable using your machine.
Frequently Asked Questions
What can I make with my Cricut Explore 3?
The following projects are beginner-friendly, stunning, and easy to make with the Cricut Explore 3.
Labels
Decals
Personalized apparel
Mugs
Wooden sign
Banners
Bookmarks
Frame
Cupcake toppers
T-shirt
Coasters
How to use Cricut Explore 3 without a mat?
You can follow these simple instructions to use the Cricut Explore 3 without a mat:
First, create a design in the Cricut app and select the load type "Without Mat."
After that, load the material onto your machine and press the Start button.
Finally, complete the on-screen instructions to complete the vinyl cutting process.
How to connect Cricut Explore 3 to a computer or mobile phone?
Follow the steps below to connect the Cricut Explore 3 to a computer or mobile phone:
Ensure that the Explore 3 is turned on.
Open the Bluetooth settings on your computer or mobile phone.
Wait for your system to detect the Explore 3.
Select the machine, and if asked for a PIN, type 0000, then select Connect.
#How to use a Cricut Explore 3#How to use Cricut Explore 3#cricut explore air 2#cricut software#cricut
0 notes
Text
How to Use Design Space for Cricut: Beginner’s Guide
My daughter loves reading, and I appreciate her hobby as it helps her collect information. To honor her hobby, I will give her a customized bookmark that I made. It will be a symbol of love and appreciation for taking her hobby so seriously and still valuing it. I have created numerous DIY crafts for a long time, and this blog will teach you all how to use Design Space for Cricut.
Cricut Design Space is an easy-to-use and easy-to-learn design software that allows crafters to give their ideas the proper form. The Cricut app provides tons of images, text fonts, and ready-to-use projects for free. Besides, this software is compatible with all the Cricut cutting machines & Heat Presses.
If you have recently downloaded the Cricut app and want to make your first project, check out the information in the section below.
Step 1: Create a Bookmark Design on the Cricut App
Let’s start the process of how to use Design Space for Cricut by making a customized bookmark by going to the Shapes tool and choosing a square. After selecting the shape, change its dimensions, and it will get into a proper bookmark shape. Next, press the Images and type Splash inside the search section, and a gallery of those designs will appear. Select any design from the library and tick the Add to Canvas option.
Now, resize the design and place it on the bookmark design. After that, press the Text option and write the text inside the box. Then, change the text size, color, font, and style and set it inside the bookmark. To cover the gap between the letters and words, select Weld and place them closer to each other. After covering up the spaces, go to the Flip tool and tick the Flip Horizontal option.
Step 2: Stick the Material on Your Cricut Cutting Mat
In this step of how to use Design Space for Cricut, remove the plastic cover from the vinyl and place the material on the cutting mat. Cover all the sides of the material with painter’s tape so that the material doesn’t slip from its place.
Afterward, move your Cricut Brayer tool upward and downward to settle the material in its place. Now, turn on your crafting machine and load your Cricut cutting mat into the cut-die machine. When the cutting process is complete, stick HTV on the same mat and turn on the Cricut machine again.
After cutting the material, take your weeding tool and remove extra vinyl from the Cricut mat. Following this, slowly weed out the HTV from the design using the weeding tool and keep the final design at the other end of the table.
Step 3: Preheat Your Cricut EasyPress Mini Tool
In learning how to use Design Space for Cricut, remove the sheet from the acrylic blank and clean it with baby wipes. After doing that, place your bookmark design on the blank. Now, preheat your EasyPress Mini at the lowest temperature settings.
After that, cover the entire bookmark with a Teflon sheet and slowly cover the craft by putting a little pressure on it. If you come across that the design needs to be adequately shifted on the blank, then wait for a few seconds and use EasyPress Mini again for perfect heat transfer.
Step 4: Show Your Final Bookmark
After transferring the design, follow these steps to complete the project:
Finally, you can share your DIY craft after collecting and learning how to use Design Space for Cricut crafts.
Following the same steps, you can make other personalized acrylic projects from the Cricut app. However, you must take the correct steps while making any do-it-yourself project and use the compatible Heat Press; otherwise, you might ruin the project and injure yourself.
Frequently Asked Question
Question: Can I Make Money With DIY Acrylic Bookmarks?
Answer: You can make money by selling the customized acrylic bookmark to the audience. To make this craft, I need to use the correct supplies and understand the needs of my audiences and what is trending in the market. Moreover, I can also sell them at a moderate price online.
Question: Does Cricut Work on Acrylic?
Answer: Yes, it’s 100% that the Cricut works accurately on acrylic material until the material is in the correct position. If it slips from the mat during the cutting process, your whole project will get ruined, including the blank. Moreover, the acrylic lasts up to a year or more, depending on how carefully you keep it.
Question: What Cricut Tools Should I Use While Making Acrylic Bookmarks?
Answer: The list of Cricut tools that you need to make perfect customized acrylic bookmarks are as follows:
Visit: cricut.com/setup
install cricut design space app
cricut setup explore air 2
cricut.com setup mac
design.cricut.com/setup
cricut design space setup
www.cricut.com setup login
Source: https://explorenewmachine.com/how-to-use-design-space-for-cricut-beginners-guide/
#design.cricut.com/setup#cricut explore air 2#cricut.com/setup#install cricut design space app#install cricut explore air 2#install cricut design space#cricut space#design.cricut.com#design#cricut#cricut setup#cricut project ideas#science#www.cricut.com/setup#www.cricut.com/setup login#cricut.com setup mac#cricut design space setup#cricut design space login#cricut design space download#cricut design space app#cricut design space for mac#cricut design space#cricut explore air 2 setup#cricut new product setup#cricut new product device#cricut create connect to computer#cricut new machine setup#setting up your cricut maker
0 notes
Text
How to Make a Monogram on Cricut: A Step-by-Step Guide
Isn’t it amazing to always be eager to learn how to make a monogram on Cricut? Then, you will be a part of the journey where you will get all the information, from basics to the end. I have done thousands of DIY projects over the past few months, but designing custom-made monograms is close to my heart. From wine glasses to hats, you can combine them, making them look more casual and trendier.
There are many models of Cricut machines that you can customize to your liking. Besides the cutting machine, essential supplies will make this project more manageable. Apart from that, you can also create and sell your respective monograms in the market and start your own business.
To get the best results out of the Cricut machine, keep reading this blog until the end and avoid jumping into any section while going through it.
Step 1: Start By Designing a Monogram Design
Begin by choosing the Text toolbar and entering your initial inside. Afterward, go to the Fonts section, press System, and type monogram inside the Search box. Now, click the monogram system you want to choose, and it will directly appear on your canvas.
Following this, increase your monogram size and select the Ungroup option. Afterward, tick the Shapes tool and choose anyone from the list. Next, put the shape on top of your monogram design, select both, and then tap the Slice option at the bottom side of your screen. Then, repeat those steps and slice down the remaining monogram designs.
Once the first step of your how to make a monogram on Cricut is finished, tick the Make It button present at the top right side of your canvas. After a few seconds, you will connect to the preview page and check that the design and the alignment are perfect on the mat. Now, choose the compatible material and tools for the cutting process and tick the Continue button.
Step 2: Cut Your Monogram Design
At this point of the process, unbox your Cricut products and then turn on your cut-die machine. After that, remove the plastic sheet from your material and place it on the Cricut cut mat with the scraper or brayer tool. Following this, start loading your cutting material into your craft plotter.
Step 3: Weed Out the Monogram Design
After the cutting process, in this section on how to make a monogram on Cricut ends, unload your mat from the cut-die machine. Now, remove your weeding tool and remove the extra material from the design. However, you need to be very careful while using the tool because small mistakes can damage your design.
Step 4: Transfer the Design to Your Glass
At completing this step, clean your glass with baby wipes in a circular motion. After adequately clearing the design, shift it to the glass and cover it with the transfer tape. To properly change the design on the glass, use a scraper tool to remove any space between the glass and the design.
Step 5: Cover Your Design With Etch Cream
In this step, while performing how to make a monogram on Cricut, remove the tape from your design and cover it correctly with the etching cream. Now, you must wait at least 05 minutes and clean it with baby wipes or keep it under the cold water. You must ensure the water isn’t too hard; otherwise, it might inappropriately clean the cream.
Step 6: Show Your DIY Monogram
Finish making this do-it-yourself monogram by removing the remaining pieces of the cream with tweezers, baby wipes, or an alcohol-free wipe. Next, you need to wait for a few minutes, and your monogram is all set to be used for various purposes. Moreover, you can also upload your project images on an online platform and share your creativity with people worldwide.
Frequently Asked Questions
Question: What Are the Different Types of Monograms That Can Be Made With Cricut?
Answer: Since Cricut is a multi-tasking cutting machine, the various monogram projects are as follows:
Question: What Are Some Styles of Monograms Available in Cricut Design Space?
Answer: While using the Cricut Design Space app, you will come across various monogram styles that will be available for DIYers. The names of the styles are as follows:
Question: How to Make a Monogram on Cricut Design Space?
Answer: Read the below steps to know about the steps of making monograms with Design Space:
Visit: cricut.com/setup
www.cricut.com/setup login
install cricut design space app
cricut.com setup mac
design.cricut.com/setup
Source: https://cutting-setup.com/how-to-make-a-monogram-on-cricut-a-step-by-step-guide/
#cricut.com/setup#cricut.com/register#cricut.com design space#cricut.com sign in#cricut.com/create#cricut.com setup mac#cricut.com setup download#install cricut design space app#install cricut explore air 2#cricut design space app#cricut explore air 2 setup#cricut create connect to computer#cricut new product setup#setting up your cricut maker#cricut explore air 2
0 notes
Text
How to Use a Cricut Joy: Quick and Easy Guide
A few days ago, I went to my cousin’s house and saw a new Cricut Joy collecting dust in the corner. Being a crafter myself, I couldn’t resist asking her why. She replied that she was confused about how to use it. With a smile, I offered to help. From unboxing the machine to setting it up, I guided her through each step, even teaching her how to create her first project.
Then, I realized that some beginners may not have even opened the box and could use my assistance. That’s why I have prepared this guide for you all. Just like I helped my cousin, I will tell you how to use a Cricut Joy from scratch. However, it is necessary to follow this guide till the end because every piece of information is important for using your Cricut Joy.
Step 1: Unboxing the Cricut Joy
If you have already unboxed your Cricut Joy machine, you can continue to the second step below. If not, let’s take a look at what you’ll find inside the box:
Welcome card
Cricut Joy machine
Power adapter
Fine Point pen (0.4 mm)
StandardGrip mat
Sample of smart vinyl
Around 50 pre-made projects
Free Cricut Access for 30 days
Step 2: Setting up Your Cricut Joy Machine
Setting up a Cricut Joy is a crucial step in learning how to use a Cricut Joy machine effectively. Let’s start by setting up the machine first.
Prepare Your Cricut Cutting Machine
Place the Cricut Joy machine on a flat and clean surface near the electric outlet.
Assemble the machine’s power cord and insert one end into the machine and the other end into the electrical outlet.
After that, turn the power button on, and a light will illuminate the machine.
Connecting a Cricut Joy to Your Computer
The Cricut Joy does not have a USB cord, so you have to connect the cutting machine to a computer via Bluetooth.
Turn on the Cricut Joy machine 10–15 feet away from your desktop computer.
Next, locate the Bluetooth option, turn it on, and wait for the computer to detect your machine.
Now, select Cricut Joy from the list, and if asked for a PIN, enter 0000 and hit Connect.

Downloading and Installing Cricut Design Space
Downloading and installing Design Space on your desktop computer is necessary to complete the process of how to use a Cricut Joy machine.
Go to cricut.com/setup, agree to Cricut’sterms and conditions, and download the file.

After downloading Design Space, locate the file you see on the screen and install it.
Once the software is installed, launch it, create a Cricut ID and password, and sign in.
Note: If you want to access Cricut Joy from mobile (Android or iOS), download the Cricut app from the Play Store or App Store.
Adding Your Cricut Joy Machine in Design Space
Once you have installed and signed into the Cricut software, it’s time to set up the Cricut Joy. To do this, launch the Cricut software, click on the drop-down menu, and select New Machine Setup > Cricut Cutting Machine > Cricut Joy. Also, make sure the connection is established.
Step 3: Using a Cricut Joy to Make a Project
You will need to cut vinyl with Cricut Joy to personalize a wooden tissue holder. Here’s what you need for this project:
Cricut smart vinyl
Unfinished wooden tissue box
Cricut Joy machine
Computer or transfer tape
Design
Create a Design in Design Space
Open the Cricut Design app and select the New Project tab.
After that, use the Text function and a text and change its font.
Once you have the design ready to cut, click the Make It option to move on to the next page.
Then, select the mat page. There is no need to mirror this project. Click Continue.
From the All Browse Material option, search for vinyl and select it as a material.
Now, load the green vinyl into Cricut Joy without using a mat.
Cut & Weed Out the Vinyl Design
Once everything is ready, go back to Design Space and hit Continue to begin cutting.
Once the machine completes cutting, it automatically stops. Now, unload the smart vinyl and weed out unwanted designs.

Next, cut the transfer tape to the size of the vinyl and apply it to the design.
Apply Your Design
Frequently Asked Questions
What can you make using a Cricut Joy?
Cricut Joy is a smart, compact, and portable machine that can be used to create different projects. Below, I have listed some of the Cricut Joy projects.
Vinyl mug
Greeting cards
DIY pillow
Leather earrings
Wall art
Tumblers
Cake toppers
Stickers
Labels
Banners
T-shirts
Jewelry
How does Cricut Joy work?
The Cricut machine works with the user-friendly Cricut Design Space or Cricut Joy app. Users need to install one of these and start a project. Also, the Cricut Joy connects to devices via Bluetooth. Once everything is set up, the user designs it and sends it to the machine. Finally, the Cricut Joy will cut or write according to the selected settings.
Do I need a computer to use a Cricut Joy?
That’s not necessarily true; you can also use your mobile device to use Cricut Joy. All you need is a device where you can download and install Cricut Design Space to command the Cricut machine. However, all of this can also be done from a mobile phone or tablet. So, it depends on the user’s preference and their comfort level.
Conclusion
The Cricut Joy is a beginner-friendly crafting tool that is compact yet versatile. Setting up the Cricut Joy and learning how to use it may not be too difficult for beginners. I have discussed everything in detail in the blog post above. If you followed the instructions exactly, you can now use your Cricut Joy without any hassle.
Read more: install cricut design space app
cricut.com/setup
cricut.com/setup mac
Cricut New Machine Setup
Source: how to use a Cricut Joy
#how to use a Cricut Joy#Cricut New Machine Setup#cricut software app#cricut design space download#cricut explore air 2#cricut.com/setup#cricut project ideas#design.cricut.com/setup#cricut.com/register#cricut.com#cricut.com/create
1 note
·
View note
Text
Cricut Iron On Vinyl Instructions: Quick & Easy Guide
If you’re new to the world of Cricut and want to upgrade your crafting with iron-on vinyl, then this quick and easy tutorial is for you. Cricut iron on vinyl is a thin, flexible pre-cut sheet or roll of vinyl with an adhesive backing that is activated after heat and pressure. You can create beautiful personalized T-shirts, makeup bags, pillowcases, wine bags, and more from iron-on vinyl.
In this guide, I am going to show you detailed Cricut iron-on vinyl instructions to help you explore other possibilities for the Cricut machine. Don’t worry; I have written this tutorial for beginners in mind — I will walk you through the entire process in depth from start to finish. Plus, I will discuss the essential supplies, how to make a design, how to cut iron on vinyl, and so much more. So, let’s get started.
Essential Tools and Materials for Designing a T-shirt
Gathering enough supplies is the most important instruction for making any Cricut iron-on vinyl project.
A Cricut cutting machine
Weeding tool
Cricut Easy Press
Everyday iron-on vinyl
Base material (T-shirt, tote bag, etc)
Cricut cutting mat
Heat Press mat
Cricut Design Space
Cricut Guide
Butcher paper
Step 1: Create or Upload a Design in the Cricut App
The first thing you need to keep in mind for any Cricut iron-on project is a digital design that allows you to cut iron on vinyl. You use the design and apply it to the desired surface.
First, download a design in SVG format from the internet and make sure it is compatible with Cricut Design Space.
Unzip the SVG file, open the Cricut app, and click on New Project.
Also, hit the Upload button on the left sidebar and upload the file to the canvas.
Next, drag and resize the design to fit the surface. I chose a shirt as the surface to demonstrate the Cricut iron on vinyl instructions.
When the design is ready for iron on vinyl, click the Make It option.
Step 2: Select Your Materials
Now is the right moment to choose the materials and configure the settings one by one in the Design Space.
On the prepare screen, toggle the “Mirror” option and press the Continue button.
Click Browse All Material on the next make-screen and search for iron on vinyl. Note: If you have Cricut Explore Air 2, turn the wheel to custom.
Step 3: Cut & Weed Out Iron On Vinyl
As soon as you select iron as the material, it’s time to cut out the design.
First, place the vinyl on the Cricut cutting mat and insert the mat into the machine.
You have to press the flashing Go button to start cutting your design on the vinyl.
Once the machine stops cutting, remove the mat and the negative parts from the design using the weeding tool.
Step 4: Preparation for Applying Heat
Once your design is ready, it is time to learn Cricut iron-on vinyl instructions and prepare everything to apply the heat.
Initially, visit the Cricut Heat Guide and get accurate timing & temperature info.
Set up the workspace, place the Easy Press mat on a clean surface, and preheat it.
Now, lay down the shirt on the heat press mat and preheat it for 5 seconds to remove the wrinkles.
Step 5: Place the Vinyl on Your Shirt
These are the final Cricut iron on vinyl instructions that need to be followed to complete the process.
First, center the vinyl design on the shirt you just cut out, and be sure to place the shiny vinyl side up.
Now, place butcher paper over the design and apply heat to the vinyl following the Cricut heat transfer guide. I use light pressure at 315F for 30 seconds.
Finally, leave the surface (shirt) until it cools, then peel off the plastic transfer sheet.
Frequently Asked Questions
Question 1: How do I use a Cricut iron on vinyl?
The following are brief step-by-step instructions for using the Cricut vinyl.
Create or upload a design in Cricut Design Space.
Select vinyl as the material and other cut settings.
Cut and weed out the design.
Place the heat press on your design.
Question 2: How long should you leave the Cricut iron on vinyl?
Once you apply heat to the Cricut iron on vinyl, it penetrates the surface, and the time and temperature depend entirely on the Cricut Heat Guide instructions. For better results, apply moderate pressure with the iron for 25 to 30 seconds. As for how long to leave the iron on vinyl, the answer is simple: until the surface has cooled.
Question 3: What materials should you avoid while using Cricut iron on vinyl?
Before deciding how to use Cricut iron on vinyl, it is important to know its compatibility with various materials. Iron on vinyl is suitable for use on cotton, polyester, blends, and burlap canvas. But, it is not compatible with fabrics like nylon and spandex. Therefore, refrain from using iron on vinyl on such fabric surfaces.
Final Words
Crafting with a Cricut machine is both adventurous and challenging, offering many opportunities. One such difficult task is cutting and applying heat iron on vinyl with Cricut to create popular DIY projects like T-shirts, tote bags, cards, banners, keychains, and makeup bags. If you are here, you’ve already navigated through the step-by-step Cricut iron-on vinyl instructions necessary to achieve the desired output.
Source: Cricut iron on vinyl
Cricut iron on vinyl instructions
Visit here for more Information: Cricut.com/setup
Cricut explore 3
#Cricut iron on vinyl#Cricut iron on vinyl instructions#cricut.com/setup#cricut explore 3#design space cricut#cricut maker 3 vs explore 3#2024
1 note
·
View note
Text
How to Make a Cricut Mat Sticky Again: A Comprehensive Guide
Do you want to learn how to make a Cricut mat sticky again? This guide will show you how to clean your mat and get its stickiness back. I remember the day one of my friends, Alex, called me and asked me to help him regain mat stickiness. I said, “We have to meet so that we can figure it out.” When he finally came to my home with his mat, I helped him clean it. I also advised him to use cleaning agents and scrapers wherever required. In addition, I told him to use a Cricut scraper to remove the scraps after every project.
Well, I have known Alex since childhood, so I am not sure whether he will follow my tips or not as he is kind of a lazy person. But I believe you are not like him, so it would be better if you do something that helps your mat restore its stickiness. There is nothing much to do, just simple tips that I will be sharing in this write-up. Let’s get started!
3 Tips to Protect Cricut Mat Stickiness
Do you think we can permanently restore the stickiness? The answer is No. The Cricut mat can withstand up to 50 cutting uses. However, I would like to share some tips so that you can understand how to make a Cricut mat sticky again.
So, there are basically three tips I have mentioned below:
1. Clean Mats Using a Lint Roller/Scraper
Here, you can use a Cricut scraper or an older credit/debit card. A plastic gift card will also work so that you can remove the scraps from the mat easily.
2. Frequently Replace the Plastic Protector Sheet
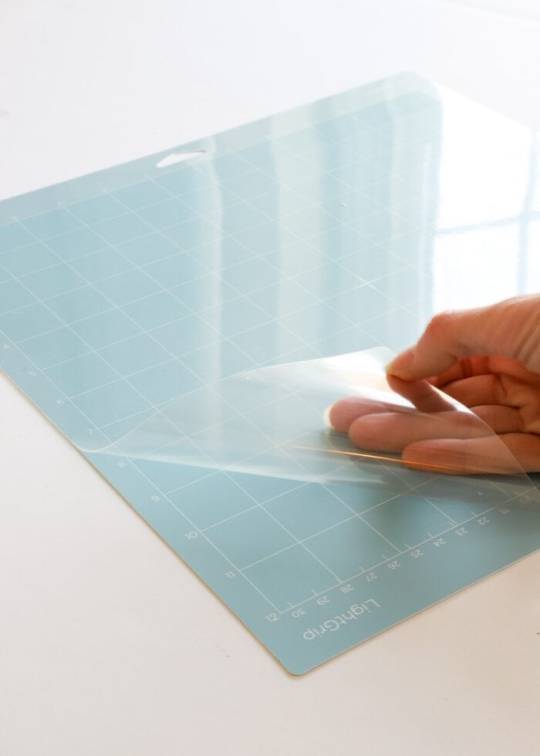
Cricut mats come with a transparent protective sheet that you can remove while using them and then reapply on the mat after every use. This protective layer protects your mat from dust and debris when not in use.
3. Use the Right Mat With the Suitable Material
Using the right materials is a must. Simply put, you should use the LightGrip mat for delicate papers and the FabricGrip mat for clothes or fabric. Plus, StrongGrip should be used for heavy-duty materials only.
How to Clean Cricut Mat With Baby Wipes or a Lint Roller?
Now, let me teach you how to make a Cricut mat sticky again. To teach this, I will give you the instructions step-by-step. Let’s first start gathering the supplies:
Step 1: Gather Supplies
Here are the essential supplies that you will need for cleaning your mat. Make sure you collect all of them to get your mat stickiness back:
Lint Roller
Plastic Cricut Scraper Tool
Dish Brush
Dawn Dish Soap
La’s Awesome Cleaning Spray
Alcohol-Free Baby Wipes
Step 2: Clean After Finishing Your Project
Whenever I do a project on my Cricut cutting mat, I always ensure that I clean it after every use. As a result, my mat lasts longer. So you can also clean it using the Cricut scraper.
Using this tool, you can take off the small pieces of extra materials, fuzz, and hairs.
3. Use the Right Mat With the Suitable Material
Using the right materials is a must. Simply put, you should use the LightGrip mat for delicate papers and the FabricGrip mat for clothes or fabric. Plus, StrongGrip should be used for heavy-duty materials only.
How to Clean Cricut Mat Using Dish Soap and Awesome Spray?
Don’t worry if the above methods don’t work for you! I have another two methods below. To learn the procedure of how to make a Cricut mat sticky again, try the below-mentioned methods carefully:
Method 1: Using Dish Soap
In this method, I use dish soap and warm water. I like to use mild dish soap such as Blue Dawn for better results.
First, you need to clean the mat using a scraper.
After that, you have to lay the mat on a flat surface.
Then, take a dishcloth or soft brush to rub the surface gently.
Now, rinse in warm water and leave it in the air for a while to dry.
Method 2: With Awesome Spray
Follow the steps below to clean the mat with awesome spray:
Spray the liquid.
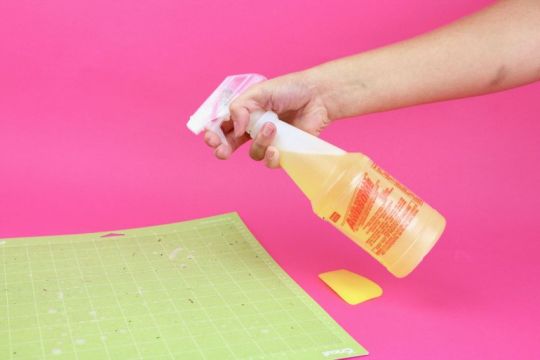
Then, leave it for a while.
Also, use the scraper to remove the extra material from the mat surface.
Rinse with warm water and let the mat dry in the air.
Final Words
In this write-up, I am explaining how to make a Cricut mat sticky again in a simple manner. All the stepwise methods will help you clean your Cricut mat. Be it a light grip mat or a strong grip mat; you should always start from the scraper and then move accordingly to the last steps to use dish soap and awesome spray.
FAQs
Question 1: Why is my Cricut mat losing its adhesive ability?
Answer: It is because you are not cleaning it, or maybe it has been used more than required. Repetitive use and debris can reduce the mat’s stickiness over time. However, you can extend the life of your mat; all you need to do is clean it using the right materials. To clean, you have to use a cleaning agent and a Cricut scraper.
Question 2: What is the lifespan of a Cricut mat?
Answer: Your Cricut mat can be used up to 50 times, meaning you can cut anything on it 50 times. Meanwhile, you should regularly clean your mat after every use. The better you keep it clean, the more sticky the mat will be. Also, sometimes, it depends on the materials that you have cut on it. For example, felt materials always leave some debris, and removing that is a tedious task.
Question 3: What glue can I use to make my Cricut mat sticky again?
Answer: If you want to regain the stickiness of your mat, you should use the Zig 2 Way Glue Pen. You can also use removable tape, such as painter’s blue or washi tape. Ensure the tape is wide enough to cover the outer edges of your cutting mat.
Source Url :- how to make a Cricut mat sticky again
Visit here for more Information :- Cricut Design Space
cricut explore air 2
cricut accessories
cricut heat press
cricut joy app
cricut explore 3
#Cricut Design Space#cricut explore air 2#cricut accessories#cricut heat press#cricut joy app#cricut explore 3#cricut explore air 2 accessories#cricut design space not working
0 notes
Text
Cricut Mini Setup: Easy Steps for a Smooth Start

Are you searching for a guide on how to do a Cricut Mini setup? If so, you are in the right place. I remember the day when I bought my Cricut EasyPress Mini machine to make some stunning iron-on projects. I really like the product, and I get a sense of satisfaction after working on Cricut.
Once you are done with your setup process, you can easily start over and create your first project without any hassle. I have created a lot of crafts, and since I have set it up multiple times, I will show you how to perform this step-by-step. In my opinion, the setup will be easier than that of other Cricut models. Let’s get started as soon as possible if you are all set to start.
Important Things to Remember Before Cricut Mini Setup
Before you set up your Cricut EasyPress Mini, you should know some important facts that will prevent you from making any type of mistake. Below, I have given you the basic instructions. Let’s delve into it:
Ensure you use the machine at room temperature. Also, all your materials should be fully dried before usage.
Once you are done with your project, you have to return it to your machine, which is its safety base. You can use the selected materials form to create a firm pressing surface.
The machine moves continuously over your design when you transfer.
Now, you should have design sizes for the app with the machine, which are finely engraved over the smallest area to a surface area of about 2x the heat plate.
Step 1: Cricut Mini Setup Instructions
In order to run the Cricut EasyPress Mini machine or make a project using this machine, you have to set it up. You have to make sure you do the setup is correct:
Open your Browser and go to the Cricut Heat Guide’s official page (Cricut.com/setup).
Then, you have to select Cricut EasyPress Mini, which is provided in the Heat Guide section.
Now, you have to choose your material from the list under Heat Transfer Material: Everyday Iron-on/Lite/Metallic, Express Iron-On, etc.
After that, you have to choose the Base Material from the list, such as Nylon, polyester, Burlap, etc.
After choosing them, press the button Apply.
Also, you will need to preheat your machine to medium temperature.
Next, you need to place the material on a clean mat.
Finally, you have to let the loaded material preheat for at least 5 seconds.
Step 2: Prepare the Work Surface
Once your Cricut setup is done, you will need to prepare your work surface. Follow the steps I have mentioned below to check.
Place your chosen material facing down and ensure the liner side faces up.
Take out the heat-resistant tape, place it, and avoid the image area.
After that, you have to move the machine further with firm pressure in medium settings for at least 25 seconds.
Now, you have to flip the material and press your machine for a minimum of 15 seconds.
Finally, you have to remove the first liner when it is still warm.
Then, you have to resolve the second liner and make sure it is cool down now.
In addition to setting up your Cricut EasyPress machine, you should also know a little bit about the temperature settings. In the next section, we’ll see how to do it.
Different Types of Temperature Settings
In this Cricut Mini setup or machine, you will have three temperature settings: Low, Medium, and High. The temperature setting also depends on the user’s preference per project. DIYers should be perfect for this instruction, as I have already explained.
Let’s understand these three types of temperatures and their purposes:
Low Temperature: This setting uses lightweight, delicate, heat-sensitive synthetic fabrics. You can also use it for delicate heat transfer vinyl, such as foil iron-on.
Medium Temperature: suitable with most fabrics and heat transfer vinyl.
High Temperature: This setting is basically for infusible projects.
Wrap Up
The Cricut EasyPress Mini is easy to use and setup, but one needs to understand something before creating a project. I have already mentioned these above, and you can go through them and make sure you follow each point accurately. Once you understand this, you will need to perform the setup process. I have explained this in simple steps for the Cricut Mini setup. Let’s start with your Cricut EasyPress machine now.
FAQs
What projects can I create using Cricut EasyPress Mini?
With this Cricut heat press, you can create many projects, such as shoes, stuffed animals, custom clothes, and other accessories, where other EasyPress machines are hard to reach. In short, Cricut EasyPress Mini is one of the best tools for clothing, home decor, and accessories, like bags, hats, comping hats, bandanas, and more.
How do you press shoes using Cricut EasyPress Mini?
You will have to learn the following steps for pressing shoes into the machine:
First, you need to roll up the sock so that the tip of your shoe makes it a little stiffer.
Then, you have to place the heat transfer design into your desired location
After that, save it with your heat-resistant tape.
Once done, press your material as per the instructions in the Heat Guide.
Which is better Cricut EasyPress Mini or regular iron?
The Cricut EasyPress Mini is one of the smallest and is specially designed to reach the toughest areas of the project. It distributes the heat evenly, making the transfer easy. While the regular iron cannot distribute the heat evenly, I would hardly prefer it. However, we can still use it when there are no other options like this mini press machine. Plus, the Cricut Mini setup is required to run this machine, and setup is not required for the regular iron.
Source: Cricut Mini Setup
#Cricut EasyPress Mini#cricut design space app#cricut easypress 3 app#Cricut EasyPress Setup#Cricut machine setup#Cricut Mini Setup
0 notes
Text
How to Clean Cricut Mats: Easy Ways to Restore Stickiness
Hey, Cricut enthusiasts! Are you looking for an easy guide on how to clean Cricut mats? Here, I will explain everything about cleaning Cricut cutting mats in a few simple steps. When I first noticed debris or dirt on my mat, I was unsure about cleaning methods. I didn’t really know how to clean a mat. Also, there are 4 types of mats: LightGrip (Blue), StandardGrip (Green), StrongGrip (Purple), and FabricGrip (Pink). But do you know that we can’t clean all mats with the same methods? Yes, it’s true!
In other words, you cannot clean the FabricGrip mat using soap or any other cleaning agent that you use for mats. Hence, it is essential to understand the cleaning methods for each. Cleaning your cutting mat is really crucial as it can save you money from buying a new one. And who doesn’t save money, so it becomes mandatory to take care of your mat.
Check out this blog, where I will show you how to clean all types of Cricut mats.
What Will You Need for Cleaning Cricut Cutting Mats?
So before we shift our focus to how to clean Cricut mats, we need to gather some supplies or tools. These supplies are most important for cleaning the mats. So, look at the following items I will use throughout the cleaning process.
Here are the items to clean the mats:
Plastic Cricut Scraper Tool
Alcohol-Free Baby Wipes
Dawn Dish Soap
Dish Brush
Lint Roller
La’s Awesome Cleaning Spray
Ensure you have all these essential items before proceeding further.
How to Make Cricut Mat Sticky Again: Top 3 Methods
Okay! So, here comes the next topic where I am going to teach you how to clean Cricut mats. So, before I take you through each step of cleaning the mat, you should know the type of cleaning methods.
Advertisement
There are three cleaning methods that we will be talking about. They are light-duty, medium-duty, and heavy-duty cleaning methods. So, let’s start with the first method of cleaning – light duty.
Method 1: Light-Duty Cleaning Method
I always prefer this method after every project. As a result, it prevents my mat from losing its stickiness, making it more durable. Now, the question is, what do I need for light-duty cleaning?
To know the answer, refer to the below points carefully:
You will need a scraper tool to scrape off the large pieces or debris of spare materials.
You will also want to use a lint roller to remove the smaller pieces of leftover materials.
Since baby wipes are cheap, you can also try them, but you have to clean the mat in a circular motion.
After cleaning it, let it dry before using it.
Method 2: Medium-Duty Cleaning Method
Then comes the medium-duty cleaning method, which I use when the above method doesn’t work! So, let’s see how to clean mats with dish soap:
Take some mild dish soap and warm water.
Then, use the scraper tool to remove excess material adhered to your mat.
After that, take a soft dish brush and rub the surface gently in a circular motion.
Finally, after cleaning, you need to let it dry in the air.
Method 3: Heavy-Duty Cleaning Method
Let me show you how to clean Cricut mats with heavy-duty methods. I will use Awesome Spray, a cleaning agent.
Let’s see how to use this spray for cleaning mats:
First, you have to spray the mat with cleaning spray.
Now, leave it for 5 to 10 minutes to make it dry.
After that, you should use the scraper tool to remove the extra vinyl or materials.
Rinse your mat with lukewarm water.
Next, leave it to dry.
The above methods will be helpful in cleaning your cutting mats. However, you can start with the light-duty cleaning method and then proceed head accordingly until the mat is fully cleaned.
Conclusion
Now, I have explained how to clean Cricut mats, so you can start from the gentlest method to the heavy-duty cleaning methods. Clean until your mats get cleaned. There are many tools for cleaning, such as a scraper, lint roller, baby wipes, dish soap, awesome spray, and more. Start with the scraper, remove the large amount of excess materials, and then move on to using cleaning agents. Ensure your mat doesn’t lose stickiness while cleaning it vigorously. Be gentle while cleaning.
FAQs
Question 1: How to make Cricut mat sticky again?
Answer: If you are cleaning Blue LightGrip, Green StandardGrip, and Purple StrongGrip mats, then you need to start with tools like a scraper, lint roller, and baby wipes to clean them. You must use advanced cleaning methods if these tools do not help you. For this, you will have to use dish soap, Awesome spray, and other cleaning agents. Whereas, for the pink mat, never try the above methods because pink mat adhesive is quite delicate. However, you can use tweezers to remove the larger pieces.
Question 2: How can I clean my Cricut FabricGrip mat?
Answer: While cleaning your pink Cricut mat, do not try to scratch it with a scraper or other tools. Since its adhesive is delicate, do not use heavy-duty cleaning methods. Instead, I recommend using the tweezer tool to remove a large piece of material. In short, the pink mat has its own different method.
Question 3: How do I clean felt off from a Cricut mat?
Answer: Cleaning felt materials from a cutting machine is tough due to its fuzzy texture. In addition, it leaves a lot of lint and debris on your mat. No matter how you cut the material, it will surely get some debris. To clean felt from the mat, you must try backing the felt sheet aligned with freezer paper and then stick the paper down onto your mat. This will prevent your field from sliding and protect your mat from links and debris. Lastly, when you have done the cutting, you can peel the freezer paper off.
Source :- https://designaccessoriesmart.wordpress.com/2024/02/05/how-to-clean-cricut-mats-easy-ways-to-restore-stickiness/
0 notes
Text
How to Use Cricut Joy: Ultimate Guide for Beginners
I have done crafting with all Cricut machines and have had great experiences with Cricut Joy. I first got this portable machine when the Cricut machine launched it. It was easy for me to set up and use it, as I had been using other Cricut machines for a long time. If you are a complete newbie with this machine and are eager to learn how to use Cricut Joy, then it may be overwhelming for you at first.
In this blog post, I will cover everything about this machine, from setup to getting started creating your first project. So, get ready and unbox your machine, follow the instructions in the guide below, and enjoy the features of the Cricut Joy.
How to Setup Cricut Joy on Your Device?
If you are using Cricut Joy for the first time, you will need to set it up before you start a craft with this compact and powerful machine. Therefore, let’s complete the Cricut Joy setup.
Step 1: Download & Install Cricut Design Space
Unbox your Cricut Joy, place it on a clean surface near the power switch, and plug the machine into the power outlet. Then follow these steps:
Step 2: Login to Your Cricut Account
Once the Cricut app is installed, it will show up on your screen. Now, to access it, we have to log in with Cricut ID and password.
Step 3: Setup Your Cricut Joy Machine
The Cricut Joy is still being prepared. We need to add it to the Design Space and connect it to Bluetooth.
How to Use Cricut Joy for Creating a Project?
The project I’m going to tell you about is a plant pot pun; we will be personalizing one of the ceramic plant pots with the Cricut Joy. You will need the supplies mentioned below:
Step 1: Design Your Project
Step 2: Select the Material Settings
In the new step, we will be on a page of the software.
Step 3: Load the Vinyl and Cut
As I mentioned in the above step, we do not use the Cricut mat, so we use the roll of smart vinyl directly into the machine.
This time, back on the computer screen, click the Continue option on the software. Finally, let your Cricut Joy do all the work from here.
Step 4: Weed Out Your Design
After the machine has cut the design, first take off the vinyl roll from the machine and cut it with your design using scissors. Now, use the weeding tool to remove the negative and unwanted parts from the vinyl and leave the individual letters with the clear backing.
Step 5: Apply the Design on the Selected Surface
Now, place the vinyl design on the plant pot and use the finger and scraper tool to stick it. Then, lift the corner of the transfer tape and slowly separate it from the pot. And here is your final result on the surface.
Final Words
There was no portable crafting machine on the market until the Cricut Joy. And once Cricut launched it, crafting from anywhere has become much easier and more convenient. But before you start using this machine, you need to learn how to use Cricut Joy, as discussed above in this guide. First, download and install the software and complete the setup of the machine. Then, test the machine by creating a project.
Source: https://cricutcreate.wordpress.com/2024/01/29/how-to-use-cricut-joy-ultimate-guide-for-beginners/
#cricut.com/setup#cricut.com sign in#cricut.com/create#cricut.com design space#www.cricut.com/setup login#cricut new machine setup#install cricut design space#install cricut design space app#cricut explore air 2#cricut design space login#cricut.com setup mac
0 notes
Text
Cricut Venture Cutting Machine: Setup, and How to Use It!
Whether you're thinking about purchasing a Cricut Venture cutting machine or you already have one, this will be the best guide for every type of crafter. I will be talking about the largest and most powerful machine in Cricut's history. I have been actively using it since Cricut launched in 2023.

Through this guide, you will learn how to set up and use this Cricut Venture. We'll start with the unboxing. This is a crafting machine that can cut over 100 materials up to 75 feet at commercial speeds. And it can also cut a single image up to 12 feet. So, without wasting any time, let's start.
Unboxing the Brand-New Cricut Venture
To get started with the Cricut Venture machine, you have to start by unboxing it. Also, check if it contains all the complementary items. Here is a list of necessary materials and accessories you'll get along with a brand-new Cricut machine.
A Welcome Guide
Cricut Venture
USB-C cable
Mat support extension
50 plus ready-to-make projects
black and white removable vinyl
Roll supports and cleaning tools
Fine point blade
How to Set Up a Cricut Venture Cutting Machine?
After unboxing the machine, you can start setting it up by using appropriate methods. I will show you step-by-step instructions on how to set up this big machine. Follow each step carefully to avoid silly mistakes and save time.
Step 1: Install Your Cricut Machine
Before we begin the technical setup of the Cricut Venture, we need to prepare a proper area to house the machine. When this happens, place the machine on a no-stick surface near the power switch. Also, plug your Cricut machine into the power switch and turn it on.
Step 2: Download and Install Cricut Design Space
Because the Cricut Venture is an electronic machine, we have to install the Cricut software.
First of all, connect your computer to the Internet and visit cricut.com/setup.
After that, download Design Space by reading and agreeing to Cricut's terms and conditions.
Furthermore, follow the on-screen prompts and install the software.
Step 3: Cricut Design Space Login
Once you finish the Cricut Design Space download and install, log in to that account using the correct credentials.
This time, start your Cricut app and click "Create Cricut ID." Now, a page will open in front of you where you have to fill in your full name, email ID, and country code.

Then, agree and confirm Cricut's terms and click Create ID.
Now, wait for a while, and you will get a message.
Finally, use your Cricut login credentials with Design Space.
Step 4: Add the Cricut Machine to the Design Space App
In this step, you should add your Cricut Venture cutting machine to the app. Follow these steps to add your machine to your app:
Turn on Bluetooth on your computer and connect to the Cricut Venture. If asked for a PIN, mention 0000.
Now, open the Cricut app, visit the menu, and click on New Machine Setup.

Here, you will be shown the options for Cricut Heat Press and Cricut cutting machine.
You have to click on the cutting machine and select Cricut Venture.
Once you complete all these steps, you can go ahead and start your first cut with the Cricut Venture machine.
How to Use the Cricut Venture for Your First Cut?
Now, we will create a vinyl project using the Cricut Venture to show you how to use it. Here are the essential supplies and tools you will need for your project.
A Complete Guide
Cricut Venture itself
SVG file
Transfer tape
Plain t-shirt
Weeding tool
Smart iron-on materials
HTV vinyl
Step 1: Upload SVG File on the Design Space App
First, download and unzip an SVG of your vinyl design online.
Go to your Cricut app, click the Upload button, browse the file, and upload it to the canvas.

Now, drag and resize the design according to the size of your surface.
Finally, click on the Make It option to go to the next page.
Step 2: Choose the Base Material
Now, you will move to a new page; here, you will be asked how you will load your material and what will be its width. I have selected without mat and width 25 in for this project.

Also, remember to turn off the Mirror option and click on the Continue button.
Then, we'll be on the "Browse All Content" page, selecting Smart Iron-On and leaving the pressure Default. Next, move to the Cricut Venture.

Step 3: Prepare Your Cricut Venture Cutting Machine
Venture and Cricut are different from machines; we have to prepare them before using them.
First, lift the lever on the left side of the machine. Since we are using 25-inch vinyl, move the arm end of the machine.
Afterward, lift the material guides on the left and right, and kindly close the center.
Now, with the shiny side down, push the bundle of smart vinyl into the back of the machine.
Finally, push down the lever and lock the arm.

Step 4: Start the Cutting Process
Now, we are completely ready to cut iron. On the front of the Cricut Venture, you will find three buttons: Load, Start, and Pause.
When the Load button begins to blink, press it so that the machine can measure the material's size.
Once the machine has completed the measurement, the Start button will start blinking. Press that button, and the Venture will think for a moment and then start cutting.
Once the cutting is done, take off the blade and cut the used vinyl.
Vinyl is sticky on the back, and that is why use the weeding tool and weed out the unwanted parts.
Step 5: Press Your Design with the Cricut Heat Machine
To put the design on my shirt, I am going to use the Auto press; you can also use your heat press. For this, use the Cricut Heat Guide to prepare your shirt, place the design in the center, and apply heat.

Final Words
We have covered everything about the Cricut Venture cutting machine briefly. It is a smart machine that can cut material at a high speed of 25 inches per second. To use this machine, we need to set it up by setting up the Design Space, which is explained in detail in the guide above. Also included a detailed project instruction from design to cut and more.
0 notes
Last Seen Blogs

hervcles
HERACLES

vladas-eye-bags
¥_¥

tonnypopo
Tonny

nanna-melissa
NannaMelissa

hereisthearchive
raw toast.