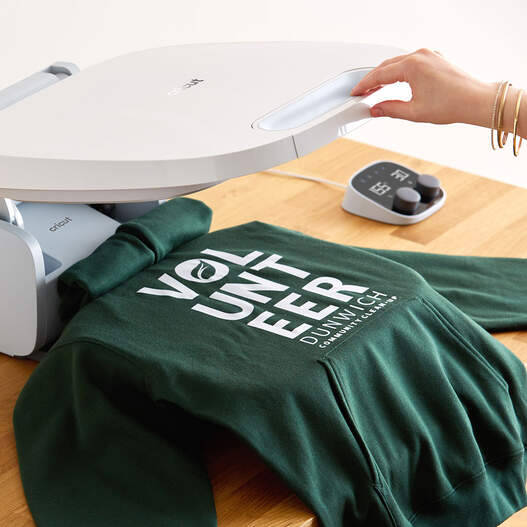
#cricut easypress 3 app
Text
How to Make a Personalized Cricut Water Bottle: Top 3 Ideas

The Cricut water bottle is more than just an accessory for hydration, as it’s a great way to show off your creativity and personal style. If you are interested in learning how to make a water bottle with the Cricut machine, I have prepared this blog post just for you. In this blog, I will first share with you 3 unique water bottle projects that are very popular and expensive in the market, which I made myself with some supplies and a Cricut machine.
Next, I will show you step-by-step how you can make such bottles in only a short time. Once you learn it, you will be able to make many things like bottles, glasses, and cups. Now, I can’t wait to start this guide.
3 Most Popular Cricut Water Bottle Ideas
The following are the trending water bottle ideas that you should try to show your creative side. Bottles are very easy to style and don’t take much time. If you are a person who loves exploring new ideas, you are going to love these three ideas.
Berg Water Bottle
Whether you’re a working professional or in college, you can make this project with your Cricut. This is a water bottle from a very popular brand, Berg, which you can prepare yourself at your home. I made this because I had to give it to my clients at the crafting office. To make this, buy a plain water bottle, cut out several permanent vinyl berg designs with a Cricut, and attach.
Cricut Water Bottle With Vinyl
My daughter wants to serve the country as a professional nurse, and I keep giving her small gifts to keep her motivated. She loves to personalize things, so I gifted her a personalized water bottle. To make this, I need a Cricut machine and vinyl. You can also make this by simply cutting your design on vinyl.
Sports Water Bottle
If you are also a sports lover, like to go to the gym and also do workouts. It is your responsibility to keep yourself hydrated, and for this, you need a water bottle that will excite you. This Cricut allows you to personalize a plain water bottle according to you.
To make this first, go to the Design Space, create a stencil design, choose the correct material setting, and cut it out.
How to Make a Water Bottle With Your Cricut Machine?
After sharing my top Cricut bottle ideas with you, I’ll now walk you through the complete step-by-step process of how to make a custom Cricut water bottle.
Step 1: Collect All the Tools and Supplies
The first thing you have to do is gather all the essential materials you will require for your project.
A Step by step instruction
Cricut cutting machine
Permanent adhesive vinyl
Transfer tape
Cutting mat
Scraper tool
Blank water bottles
A computer with Design Space installed
Downloaded SVG file
Step 2: Upload Your SVG File on the Design Space
First, we connected our Cricut machine to our computer and opened the Design Space.
Now, click on the New Project on this software.
After this, press the Upload icon on the left-hand corner of your screen.
Then, browse and find the SVG file from your computer system.
Next, import the file, write a name and tag for it, and select Upload.
Here, I am making more than 3 Cricut water bottle designs, so I have selected multiple designs.
Now, measure your bottle and resize your design accordingly using the edit tool.
Step 3: Choose the Appropriate Material Settings
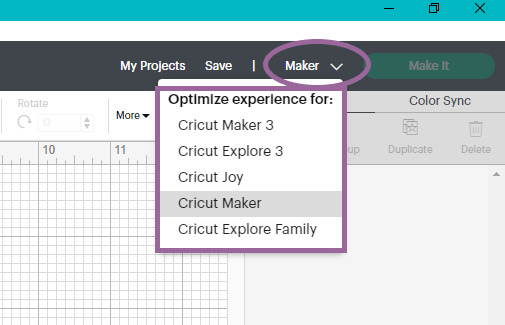
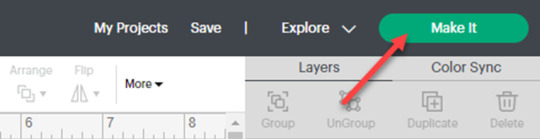
The design we will make on the bottle must be curved; for this, click on the design and use the curve tool. Once everything is prepared according to plan, click on the Make It option.
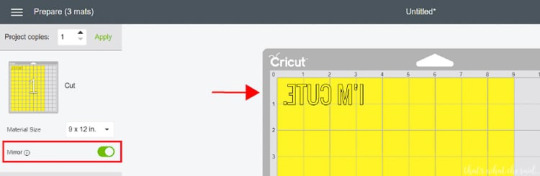
Now, you will be on a new page, mirror the design here, and click on Continue.
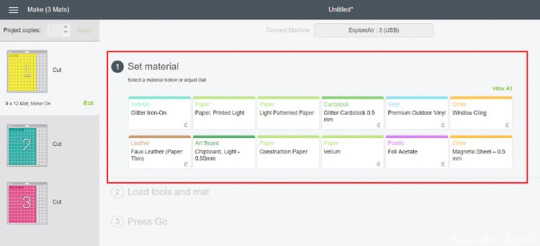
Subsequently, set the material as permanent vinyl and maintain the default pressure setting.
Step 4: Cut the Design
Now leave your computer as it is, take your permanent vinyl, and lay it on the Cricut mat with the shiny side down. And after that use the roller to fit it correctly.
Moreover, press the Load button on the machine and load the mat. Then go back to your computer and click on the Continue option. After this, the Go button of your machine will start flashing; click on it.
Step 5: Weed Out Your Design & Prepare a Bottle
Once the design is cut, click the unload button on the machine, unload the sheet, and remove the sheet from the mat. Now, use the weeding tool to remove negative parts from the design.
Finally, clean your bottle and dry it using your towel.
Step 6: Apply the Design to Your Bottle
Furthermore, cover the vinyl design with a small piece of transfer tape and peel away the backing paper.
Finally, apply the vinyl to the water bottle using a scraper tool. This will look straight on our curved water bottle. After this, use the scraper and run it on the bottle.
Final Words
Personalized bottles can be used as gifts for family and friends or for corporate, graduation programs, and other special events. And the bottle of your choice will not be available in the market, even if it is available, the price will be very high. And that’s the problem the Cricut water bottle solves. You can make it as per your requirement with Cricut; it can be either permanent or temporary.
For more information visit: cricut.com/setup
cricut.com/register
cricut easy press 3 setup
how to set up cricut easypress 3
#Cricut water bottle#Cricut water bottle ideas#Cricut.com/setup#Cricut design space download#Cricut design space login#www.cricut.com/setup login#cricut easypress 3 app#cricut.com/register
3 notes
·
View notes
Text
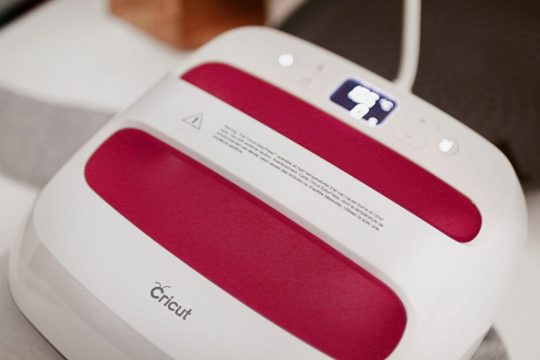
Cricut EasyPress
Cricut EasyPress 2 Heat Press Machine (9 in x 9 in), Ideal for T-Shirts, Tote Bags, Pillows, Aprons & More, Precise Temperature Control, Features Insulated Safety Base & Auto-Off, Raspberry
For More Details /Order on Amazon Link
#cricut easypress#🚀 Keyword Tool Pro#Do you need this information?#Keyword Tool Pro provides search volume data for English keywords.#cricut easypress mini#cricut easypress 2 vs 3#cricut easypress mini how to use#cricut easypress 3 tutorial#cricut easypress 2 12x10#cricut easypress 2 temperature guide#cricut easypress vs heat press#cricut easypress 2 unboxing#cricut easypress 2 9x9#cricut easypress mini t shirt#cricut easypress app
1 note
·
View note
Text
Cricut Heat Press: Get Fast and Perfect Heat Transfer Results
Are you considering starting a craft business but need clarification about choosing the best among many variations? Choosing the right Cricut Heat Press is tricky since most of this decision rests on what one wants to make. If you know the answer to this question, your confusion is half removed already.
This guide will help you learn about every variation of a heat press and how to set them up. Let's get right into it and make your business journey decision easier!
What Is a Cricut Heat Press?
These machines are used for applying heat transfers to different types of products, such as T-shirts and mugs. They quickly apply heat transfer vinyl and infusible ink to a range of fabrics, along with other materials like mugs, shoes, and hats. These tools feature precision temperature control for consistently successful transfers compared to a household iron. These machines do heat transfer work by consistently maintaining a certain temperature required for both materials.
Different Types of Cricut Heat Press Machines
Cricut offers many heat press machines. With so many options, one has the flexibility to choose whichever machine is best for them. Some of the most popular ones are in the section below:
Cricut EasyPress
It was the first of Cricut's heat machines released in 2017. With its 9 in x 9 in heat plate, this amazing tool is speedy, convenient, and produces lasting heat transfer results, even after regular washes.
Cricut EasyPress 2
Cricut EasyPress got its updated version in 2018, which is suitable for a variety of iron-on projects. It allows users to choose various products in 3 sizes: 6 in x 7 in, 9 in x 9 in, and 12 in x 10 in, giving more flexibility to users. It was an upgrade to the original model and, therefore, is faster and can bear higher temperatures than its predecessor.
Cricut EasyPress Mini
In 2019, Cricut added a new member to the heat press family: a mini version of EasyPress. This latest model is perfect for transferring heat to unusual and hard-to-reach places like caps, hats, shoes, and more. With its precision tip, it is also ideal for working around zippers and buttons.
Cricut EasyPress 3
This is the latest in Cricut's series of heat presses. To use this product, one needs to install the app and connect it via Bluetooth. This model comes with a ceramic-coated heat plate. It also has an auto-off feature and an easy-to-grip handle. It works with nearly all major brands of iron-on, infusible ink, and sublimation materials.
Cricut Mug Press
This machine allows you to make custom-designed mugs with compatible ceramic mugs and infusible ink. You can use their Maker, Explore Air 2, or Joy to cut projects and apply them on a blank mug.
As this machine requires no manual temperature or pressure settings, customizing infusible ink-compatible mugs with unique art or text makes it easy to create a perfect sublimation mug anytime. One can also use this machine for infusible ink products, and it serves as the ideal choice for any cutting machine or heat press.
Cricut Hat Press
This unusual machine is perfect for designing hats. It comes with a heat plate, allowing heat up to 400ºF for consistency. Also, the machine comes bearing a hat-pressing form, which is best for making a firm pressing surface for almost any hat. Compatible with the app, one can send the suggested settings directly to your press and get the steps from your mobile device with the help of Bluetooth.
It also has an auto-off feature, which lets users not worry about the fabric getting destroyed. Its comfortable grip and safety base make it easier to use. It works with almost all major iron-on (HTV) brands, infusible ink, and sublimation products and can serve as the best thing for all cutting machines.
Cricut Autopress
This one-of-a-kind Cricut Heat Press machine is ideal for professionals and has a large ceramic-coated heat plate (15" x 12"). With edge-to-edge heating, it can raise the temperature up to 400 degrees and is the most advanced machine of all. It can adjust materials up to 2 inches thick and auto-releases when the transfer is done.
This amazing machine allows users to transfer designs on T-shirts, tote bags, pillows, and more. Like others in the Cricut Heat Press series, it also works with iron-on, infusible ink, and sublimation materials.
Download Cricut Heat App on a Mobile for Using Your Machine
One can download and install the app on their mobile device, which will reduce the manual work and burden of operating the press machine. To get the software, you must go to the Google Play Store (if you are using an Android device) and App Store (for iOS devices). Let's start the process with your Android device here:
The following steps are for downloading the app on Android. Please follow them word by word, as failing to do so will result in insufficient results.
Hop on to the Play Store app from your home screen or by searching for it.
Once inside the app, search for the Cricut Heat app and click the Search button. If you find the app, select the Install button and wait for the installation to finish.
This EasyPress 3 comes with warranty details, a user guide, and some test materials. After buying the product, one needs to download the app onto your mobile phone. Once you have downloaded it, follow the steps on your screen to set up the EasyPress 3. The firmware updates for your machine will be completed at the same time. If a Bluetooth icon appears on your machine, then it means that your app and the machine are now ready to use.
Along with the app, the heat press can also be used manually using the buttons on the machine. If you want to change the temperature manually, look for a wave button on the machine, press it once, and use the plus or minus keys to increase or decrease the temperature until the desired temperature is reached.
Now, press the heat button once more to set that particular temperature. The timer changes the same way, but in order to do that, you must press the stopwatch button instead. Upon reaching the desired heat and temperature, the play button on the app will turn green, and a beep will sound.
How to Control Cricut Heat Press Using Cricut Heat App?
You can also use the heat press machine through the app. First, make sure that the machine is on, and then open the app. Now, follow the steps below:
After opening the app, look for your machine model, and it will automatically connect via Bluetooth to your phone.
Once you connect it, you can move on to select a new project.
After opening it, search for the drop-down menu, which lets you set the transfer material type and what material you should apply to.
After selecting these, click the Next button. Upon tapping it, a project overview screen will appear, telling you about the details, the settings to press your project and the materials.
Also, you will need to send those settings to your device by hitting the send settings button on your heat press machine.
The next screen will tell you how long it will take for your heat press to reach the desired temperature. Set those things onto the machine and wait for it to reach that temperature. Once done, your machine's play button will turn green and make a beep sound.
How to Use a Cricut Heat Press: Quick and Easy Steps
After learning about the settings for your press machine, now it is time to know how you can use the machine by following these steps:
First, turn the machine on and look for a comfortable, flat, heat-resistant surface. (You must not use any ironing board that can be easily damaged.)
Now, set the time and temperature required by reviewing the Cricut Help Guide for your project.
Next, press the timer/watch button as per your suggested time. The orange light shows a rising temperature, while the green light means that you have reached the threshold temperature.
Once the temperature is reached, place your machine on the fabric for a time, as suggested by the app. It is crucial that the shiny, clear carrier face up.
After that, you will need to apply the heat.
Also, you must put your machine on the base material and then press the Go button in order to start the timer.
Now, hold the press machine and apply the amount of pressure.
To remove the carrier sheet, you can use the Cricut Heat app.
Following the above steps, one can have a seamless, hassle-free experience setting up and using their heat press machines.
Final Thoughts
Cricut Heat Press machines are wonderful for starting your craft business. After reading this blog, one can have a general idea about which heat press to start your business with and how to set them up. With these various machines available, you are now aware of how to start your iron-on project.
Visit here to Know More:" Cricut.com/setup
Twitter
Pinterest
0 notes
Text
How to Use Iron on Vinyl Cricut: Easy Guide and Helpful Tips
Do you want to make beautiful designs on your T-shirts? Are you interested in learning how to use iron on vinyl Cricut? If yes, you have come to the right place! Here, I am going to explain how to use iron-on vinyl with a Cricut machine and a heat press. By the end, you will know exactly how to customize your T-shirts and many more.
Iron-on vinyl, also known as heat-transfer vinyl, has a heat-activated adhesive and can be used on a variety of materials, like fabric, paper, metal, and wood. To transfer the vinyl onto your material, you will need a heat press machine. Let’s get started and explore everything you need to know!
What Supplies Do You Need for Using Iron-on Vinyl?
You need to know how to use iron on vinyl Cricut to work on your DIY projects. But before that, you need to know the materials you will need. In order to use iron-on vinyl on your base materials, you will need some supplies. The most important tools are the press machine and the cutting machine, but you need other things as well.
Here are the things you will need to use iron-on vinyl:
Cricut machine
Fine-Point blade
StandardGrip mat
Weeding tool
Heat Press machine
Cricut Heat app
T-shirt
How to Use Iron on Vinyl Cricut: 7 Easy-To-Follow Steps
Once you collect all the required supplies to use the iron-on vinyl, you can proceed to use it for your projects. Here, you will see the example of Little Bearbags created with iron-on vinyl. Here are the steps you have to follow in order to make projects using vinyl.
Step 1: Design Your Project on Design Space
Just like any other Cricut project, the first thing you have to do is start creating a project using the Design Space app on your phone or computer. Next, you have multiple options to create, choose, or upload any design on the software. At the same time, you can use the tools on the app to customize your design however you wish.
After the design is finalized, you have to click on Make It, and it will send it to your machine.
Step 2: Reverse the Design on the Cricut App
In the way of learning how to use iron on vinyl Cricut, one thing is important: you have to reverse the design before you send it for cutting. This is essential because when you put the iron-on vinyl on your machine, you put the shiny parts downward. Currently, it means getting cut on the vinyl. You will need to use the mirror tool to reverse the design. So, the end result is exactly how you would want.
Step 3: Select the Correct Settings for Cutting
After reading the design and reversing it on the Design Space software, you must choose the current material settings for the cutting. After that, you have to go to the material settings and select your material. To be precise, go to the Custom Material menu and select the exact iron-on you are using.
Step 4: Load and Cut the Vinyl Into Your Machine
Now, you will need to place iron-on vinyl on a machine mat. While doing so, remember to put the shiny part of the vinyl towards the downside and the dull part facing up.
After placing the vinyl on a mat, put it inside the machine and press the Load button. Then, click the Go button, and the machine will start cutting the design.
Step 5: Weed the Design from Iron-on Vinyl
Once the machine finishes cutting the design, you have to remove all the unwanted parts of the design. To do this, you can use a weeding tool, as removing it from your hand will not give you satisfactory results.
The surprising part is that iron-on vinyl weeds very beautifully without putting a lot of effort. Once you have completed the weeding, you should trim all the letters from your design.
Step 6: Set the Time/Temperature on Your EasyPress Machine
Before applying heat to the design, you will need to set the time & temperature for the EasyPress machine. Setting up the time and temperature is important as various materials and base materials require different temperatures and timing to get if transferred.
Cricut now has an application specifically designed to manage the press machine. Here, you can set the temperature and time according to your convenience.
Step 7: Use Your Cricut Heat Press Machine
Finally, you can use the press machine on your base material. Before using it, you will have to preheat the machine. Once it reaches the desired temperature, you should preheat the base without the material on it. You should heat the base for 5-15 seconds. This will prepare the material for fusing well. Once everything is set, you must apply the press machine to your material.
After heating the design, you should flip it and heat it from the other side as well. Once the design is placed on your base material, you will need to peel off the transfer sheet, and you have successfully used the iron-on vinyl to make your design.
FAQs
How Can I Use Iron-on Vinyl?
Using the iron-on material on any fabric is easy. This is a process you have to follow:
First, put your iron in the cotton or linen setting.
If you are using the steam iron, keep the steam setting off.
Then, you have to preheat the material for 10-15 seconds.
After that, place your design on the material.
Now, apply heat on all the parts for 50 seconds
Don’t apply more or less pressure on the machine.
After heating, let the material cool, and your design is ready.
How Much Temperature Is Good for Iron-on Vinyl?
You should apply it to your iron-on vinyl, depending on the material you are using. If you are using any regular material, the average temperature must be 315°F. If you are using a foil iron-on, the temperature has to be 295°F. If you are using a glitter iron-on, you will have to apply a temperature of 330°F.
Do I Need to Mirror Iron-on Vinyl?
Yes, you do! Before you use the heat transfer vinyl, you need to mirror it. When you put the vinyl inside the Cricut cutting machine, you should put the dull side of the material to face the cutting blade. This will cause the shiny side of the vinyl to face the mat, helping the vinyl retain its shine.
Source :- https://crricut.wordpress.com/2024/08/17/how-to-use-iron-on-vinyl-cricut-easy-guide-and-helpful-tips/
design.cricut.com/setup
cricut maker 3 accessories
cricut explore air 2 accessories
cricut new machine setup
0 notes
Text
How to Activate Cricut Easy Press 3: A Comprehensive Guide
Do you want to make heat-transfer projects but don’t know how to activate Cricut Easy Press 3? Don’t panic—I will be your guardian for this guide. In addition to developing crafting machines, Cricut has introduced various heat press models to its customers. My favorite is Cricut EasyPress 3, which is designed to achieve next-level heat transfer results long after multiple washes.
Also, this Cricut model has press speed, an iron feature, and built-in Bluetooth technology. Cricut EasyPress 3 is compatible with iOS and Android devices and needs to be set up by crafters to create various projects. Moreover, you can connect this machine to your smartphone wirelessly. From now on, this blog will teach you how to activate and pair devices to help you make DIY projects.
How to Pair Cricut Easy Press 3 to Smartphones?
Subsequently, this Cricut heat press has Bluetooth Low Energy technology (BLE), allowing mobile devices to pair while using the Cricut Heat app. Take a look at the below steps to learn about the wireless pairing process between this Cricut machine and smartphones:
First, you must check that your device’s Bluetooth is on to make it discoverable.
If the Bluetooth is off, turn it on and pair it with your machine.
Now, open the Cricut Heat app and sign in by following the on-screen guidelines.
If you have activated your machine, it will appear in the My Presses section.
Also, if you have numerous presses activated, then choose one to connect.
Afterward, if you still need to activate this machine, tap the Set up New Press.
Here, your app will display your device as connected, and the machine is listed in your device’s Bluetooth section.
Finally, when you turn off the press, the Bluetooth automatically disconnects.
Wasn’t considering this method for wirelessly pairing this Cricut machine with mobile devices easy? This method allows you to operate EasyPress 3 as your choice and transfer the design to the chosen blank.
How to Activate Cricut EasyPress 3?
This section of the blog outlines the steps needed to activate this Cricut product on smartphones. This Cricut heat press uses Bluetooth Lite technology to activate with other devices. With the help of these steps, you will get the answers to activate Cricut EasyPress 3 on mobile devices:
Begin the process by opening the App Store or Google Play Store and installing the Cricut Design app.

Now, sign in or create your Cricut account by entering the required details.

Afterward, start unpacking your Cricut machine and remove other items.
Following this, plug the press into a nearby wall socket and turn it on.
At this time, you will notice the word APP appearing on your device screen.
Equally important, pair your device wirelessly and check that both devices are within 7 feet of each other.
Next, open the Cricut Heat app and tick the Set Up option.
Equally important, choose the model from the list on your screen and click the Continue option.
Now, you are supposed to wait till the connection between the devices is going on.
After a few minutes, tap the Terms & Conditions checkbox and click Activate.
In the end, you will see a message sharing that your wireless activation process has been done.
Wasn’t this segment on how to activate Cricut Easy Press 3 helpful for you? By utilizing these steps, you will be able to activate this Cricut product in the future while creating any HTV projects on the blanks.
How to Adjust Cricut EasyPress 3 Settings Using Cricut Heat App?
With the help of the installed Cricut Heat app on your phone, you can easily modify this Cricut product time & temp settings. Below are the steps you need to take to adjust the Cricut EasyPress 3 settings:
Let’s begin by plugging the machine wire into the wall socket.
Afterward, hold the power button for a few seconds and switch on your Cricut EasyPress 3.
Launch the Cricut Heat app and open the My Heat Presses dropbox.
Under the dropbox, choose Cricut EasyPress 3 and then Start New Project.
Now, choose the Transfer Material > Base Material and the surface you will use.

Following this, click the Next button at the bottom of the app.
Once you have selected it, tap Send Settings to EasyPress, which isvisible inside the blue box.

Now, you must stay calm until the press reaches the decided temperature.
Final Words
Consequently, this how to activate Cricut Easy Press 3 guide assists you with the content you need to take while performing the activation and pairing process. You must activate your EasyPress 3 and pair it with your iOS and Android devices. Moreover, you need to be very cautious throughout the entire method. Afterward, you will be able to create several projects, such as tote bags, aprons, wine bags, and more.
Frequently Asked Questions
Question: How Can I Adjust My Cricut EasyPress 3 Temperature Manually?
Answer: Check out the below steps to manually adjust your Cricut machine’s temperature:
First, switch on your Cricut machine and use the + or – button to increase or decrease the temperature.
Second, change the temp to Celcius by holding the Temperature button for a few seconds.
Click the Time button and adjust the timing depending on the material type.
Question: How to Update Cricut EasyPress 3 Firmware?
Answer: You can update your Cricut EasyPress 3 firmware through the Cricut Heat app available on your mobile devices. Take a look at the pointers given below to learn about the process:
Start by plugging your Cricut heat into the nearby wall pocket.
Now, tick the power button and turn it on.
Afterward, check that your Cricut EasyPress 3 is connected to your mobile devices.
Then, you need to sign in and select your model from the My Presses section.
Lastly, the Cricut product firmware will start updating automatically.
Question: How Can I Activate My Cricut EasyPress 3 on Phone?
Answer: Check out the below steps for wirelessly activating Cricut EasyPress 3 on smartphones:
First, you are supposed to install the Cricut app on your device and sign in.
Second, plug the machine into the wall socket and turn it on.
After that, open the app on your mobile device and tick the Set Up option.
Now, choose the model from the list and wait a few minutes.
At last, click the Activate option, and the activation will come to an end.
Read more: cricut.com/setup mac
install cricut design space app
Cricut Design Space
Source: how to activate cricut easy press 3
#how to activate cricut easy press 3#Cricut Design Space#install cricut design space app#install cricut explore air 2#cricut explore 3#cricut.com/setup#cricut new machine setup#cricut.com/setup mac
0 notes
Text
Which Is the Top Rated Cricut Machine of 2024?
Ready to bring your crafting ideas to life with Cricut? If you have been looking for the top rated Cricut machine that is beloved worldwide for its exceptional crafting capabilities, look no further. Welcome to my ultimate guide, where I will not only introduce you to one or two top machines but also provide detailed coverage of more than five models.
For the past six years, I have dedicated myself to crafting full-time and discovered every Cricut model along the way. With this wealth of experience, I am confident that I can provide you with the right tips based on my journey. Also, I will include expert recommendations for each machine. Let's not delay any longer and dive deep into the Cricut machine lineup, starting from the top down.
1. Cricut Maker 3
Many of you are looking to upgrade from your old Cricut machine, while others are beginners starting their crafting journey. For both groups, the top rated Cricut machine I highly recommend is the Cricut Maker 3. This versatile machine meets the needs of both experienced crafters and newcomers.
The Cricut Maker 3 has cutting-edge technology and many features. It is the fastest cutting machine in the Cricut lineup, capable of cutting over 300 materials ranging from thin paper to thick wood and 2.4mm fabric. While it comes with a price tag of around $399, the investment is well worth it in the long run.
Features:
2. Cricut Explore 3
This Explore 3 is a top rated Cricut machine that offers great value and plenty of advanced features. It is a more affordable alternative to the Cricut Maker 3. This updated version of the Explore Air 2 can cut over 100+ materials and works with Smart Materials, allowing cuts up to 12 feet in length without a mat. At just $279, it's a compelling option.
Features:
3. Cricut EasyPress 3
Once you start making projects with the Cricut machine, you'll get to work with HTV and iron on vinyl to create different items like t-shirts, tote bags, coasters, blankets, and more. To use this, you will need a Cricut Heat Press machine. The ideal choice for beginners is the Cricut EasyPress 3, available in two sizes: 12X10 inches and 9 x 9 inches. Prices vary according to size, starting at $149.
Features:
4. Cricut Joy Xtra
The latest top rated Cricut machine, the Cricut Joy Xtra, was launched on September 7, 2023, and has gained popularity due to its advanced features. It is an upgraded version of the Cricut Joy that offers a larger size for DIY projects, up to 8.5 x 11 inches, and compatibility with Smart Materials up to 4 feet long. Priced at $199, it offers additional features like the Print Then Cut feature, making it perfect for sticker making compared to the $149 Cricut Joy.
Features:
5. Cricut Mug Press
Whether you're planning to start a Cricut business or simply enjoy making mugs or tumblers for your loved ones, a Cricut Mug Press is essential. This machine enables you to easily create unique and memorable designs that offer a niche for your business endeavors. Also, it connects to the Cricut Heat app to ensure the accurate transfer of infusible ink designs onto mugs.
Features:
Final Words
If you are committed to making your dream DIY projects at home, investing in a Cricut machine is worthwhile. I have guided you through the top rated Cricut machine, including three cutting machines, one heat press, and one mug press. Choose the one that fits your style and needs best.
Visit: cricut.com/setup
www.cricut.com setup login
cricut.com setup mac
Source: https://cricutdesig.wordpress.com/2024/03/13/which-is-the-top-rated-cricut-machine-of-2024/
#cricut.com sign in#cricut.com/setup#cricut.com/create#cricut.com design space#cricut design space#cricut.com/register#cricut design space download#design.cricut.com/setup#cricut design space login#www.cricut.com/setup login#install cricut design space app#install cricut design space#cricut setup#cricut.com setup mac#cricut.com setup download
1 note
·
View note
Text
How to Use Design Space for Cricut: Beginner’s Guide
My daughter loves reading, and I appreciate her hobby as it helps her collect information. To honor her hobby, I will give her a customized bookmark that I made. It will be a symbol of love and appreciation for taking her hobby so seriously and still valuing it. I have created numerous DIY crafts for a long time, and this blog will teach you all how to use Design Space for Cricut.
Cricut Design Space is an easy-to-use and easy-to-learn design software that allows crafters to give their ideas the proper form. The Cricut app provides tons of images, text fonts, and ready-to-use projects for free. Besides, this software is compatible with all the Cricut cutting machines & Heat Presses.
If you have recently downloaded the Cricut app and want to make your first project, check out the information in the section below.
Step 1: Create a Bookmark Design on the Cricut App
Let’s start the process of how to use Design Space for Cricut by making a customized bookmark by going to the Shapes tool and choosing a square. After selecting the shape, change its dimensions, and it will get into a proper bookmark shape. Next, press the Images and type Splash inside the search section, and a gallery of those designs will appear. Select any design from the library and tick the Add to Canvas option.
Now, resize the design and place it on the bookmark design. After that, press the Text option and write the text inside the box. Then, change the text size, color, font, and style and set it inside the bookmark. To cover the gap between the letters and words, select Weld and place them closer to each other. After covering up the spaces, go to the Flip tool and tick the Flip Horizontal option.
Step 2: Stick the Material on Your Cricut Cutting Mat
In this step of how to use Design Space for Cricut, remove the plastic cover from the vinyl and place the material on the cutting mat. Cover all the sides of the material with painter’s tape so that the material doesn’t slip from its place.
Afterward, move your Cricut Brayer tool upward and downward to settle the material in its place. Now, turn on your crafting machine and load your Cricut cutting mat into the cut-die machine. When the cutting process is complete, stick HTV on the same mat and turn on the Cricut machine again.
After cutting the material, take your weeding tool and remove extra vinyl from the Cricut mat. Following this, slowly weed out the HTV from the design using the weeding tool and keep the final design at the other end of the table.
Step 3: Preheat Your Cricut EasyPress Mini Tool
In learning how to use Design Space for Cricut, remove the sheet from the acrylic blank and clean it with baby wipes. After doing that, place your bookmark design on the blank. Now, preheat your EasyPress Mini at the lowest temperature settings.
After that, cover the entire bookmark with a Teflon sheet and slowly cover the craft by putting a little pressure on it. If you come across that the design needs to be adequately shifted on the blank, then wait for a few seconds and use EasyPress Mini again for perfect heat transfer.
Step 4: Show Your Final Bookmark
After transferring the design, follow these steps to complete the project:
Finally, you can share your DIY craft after collecting and learning how to use Design Space for Cricut crafts.
Following the same steps, you can make other personalized acrylic projects from the Cricut app. However, you must take the correct steps while making any do-it-yourself project and use the compatible Heat Press; otherwise, you might ruin the project and injure yourself.
Frequently Asked Question
Question: Can I Make Money With DIY Acrylic Bookmarks?
Answer: You can make money by selling the customized acrylic bookmark to the audience. To make this craft, I need to use the correct supplies and understand the needs of my audiences and what is trending in the market. Moreover, I can also sell them at a moderate price online.
Question: Does Cricut Work on Acrylic?
Answer: Yes, it’s 100% that the Cricut works accurately on acrylic material until the material is in the correct position. If it slips from the mat during the cutting process, your whole project will get ruined, including the blank. Moreover, the acrylic lasts up to a year or more, depending on how carefully you keep it.
Question: What Cricut Tools Should I Use While Making Acrylic Bookmarks?
Answer: The list of Cricut tools that you need to make perfect customized acrylic bookmarks are as follows:
Visit: cricut.com/setup
install cricut design space app
cricut setup explore air 2
cricut.com setup mac
design.cricut.com/setup
cricut design space setup
www.cricut.com setup login
Source: https://explorenewmachine.com/how-to-use-design-space-for-cricut-beginners-guide/
#design.cricut.com/setup#cricut explore air 2#cricut.com/setup#install cricut design space app#install cricut explore air 2#install cricut design space#cricut space#design.cricut.com#design#cricut#cricut setup#cricut project ideas#science#www.cricut.com/setup#www.cricut.com/setup login#cricut.com setup mac#cricut design space setup#cricut design space login#cricut design space download#cricut design space app#cricut design space for mac#cricut design space#cricut explore air 2 setup#cricut new product setup#cricut new product device#cricut create connect to computer#cricut new machine setup#setting up your cricut maker
0 notes
Text
How to Make Custom Shirts With Cricut: A Step-by-Step Guide
I am obsessed with my Cricut machine and create projects on it every day. You can call it my hobby or my big passion for crafting. Recently, I have made dozens of custom shirts with my Cricut Maker machine, and you can create some on your own, too. Following this guide, your guesswork will be reduced to zero, as I will share some of the easiest steps on how to make custom shirts with Cricut.
If you are interested in my tutorial, I would recommend you continue it till the end so as not to miss anything important. I have been creating unique stuff with my Cricut for more than 6 years now; it has been a beautiful journey for me.
Whether you are a beginner or a well-trained Cricut user, this post will help you get some ideas for starting something new. I hope you found this blog helpful and that you will come back for more Cricut-related blogs like this one. Let’s start learning how to design shirts with Cricut for beginners.
Which Is the Best Cricut for Making Shirts?
When you are making a custom shirt, you will have this doubt about which machine to choose. My answer would be to choose anyone you have. Whether you have Cricut Maker, Joy, or Explore, you can choose anyone with your iron-on vinyl to make a perfect custom shirt.
However, you will need to insert the fine point blades to cut this type of vinyl. I hope you got an answer to it. Let’s move forward with this guide on making your custom shirt.
How to Make Custom Shirts With Cricut Machine?
When you are clear about which machine to use and what design you wanna make, let’s get started with my steps. Well, you will need a few things before you move your hands on the desktop. So, gather up all the listed things here.
Cricut Explore Air 2
EasyPress 2
EasyPress mat
Shirt apparel
Weeding tool
Brayer tool
Scissors
Standard mat
Premium vinyl
Are you ready with all these? So you’re good to go. When you are ready, head to your Cricut Design Space and show some of your creativity. And follow all the steps carefully.
Step 1: Go to the Cricut Design Space App
In the first step, you should go to your Design Space and pick a design to print on your shirt. As the Cricut app is full of ready-to-make designs, fonts, images, and templates, you won’t have to hustle to make a design. I am using my Explore Air 2 machine; you can use a machine you’re familiar with.
Step 2: Adjust Your Design
Once you are ready with your final design, you can take some time to make that fit for you. For example, you can change the design’s color. On the Cricut Design Space canvas, you will get a few options on the right-hand side, from where you can choose your favorite color for the shirt.
Step 3: Change Vinyl Color
Here, you need to change your vinyl color as your shirt’s color may not be a good match with the vinyl’s color. In order to keep the color vibrant and not blend them, you have an option to change the color of your iron-on vinyl. To do this, you should click on the Layers option on the canvas. After that, you can click on the white box with the Layer option and pick a color for your vinyl.
Step 4: Final Your Design
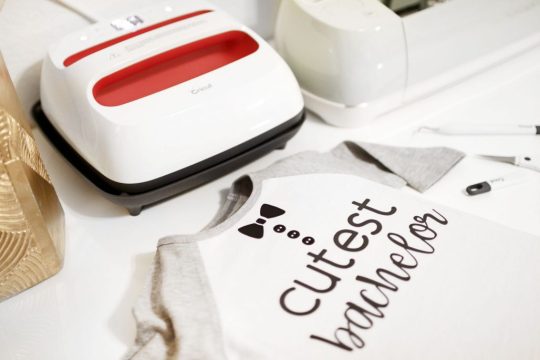
If you find the color combo not as expected, you can change it. Once you have done all the updates, you are ready to save your design. You need to hit the Save button along with the name of your project to remember what this design is about. I am making a design that says “Cutest Bachelor.” Let’s check more steps on how to make custom shirts with Cricut.
Step 5: Load Your Material (Iron-on Vinyl)
In this step, you are ready to cut your project with your special Cricut machine. Don’t forget to load your vinyl on a Cricut cutting mat and then into the Cricut machine. Once you are done, you can start the cutting. Also, select the correct size of your mat on your machine so that your design fits the cutting mat. And the most important thing is to align the iron-on vinyl correctly to get an expected cut.
Step 6: Cut Your Design
When your design is ready, and you have checked all the settings, you can allow your Cricut machine to perform a cut for you. Once you hit the Go button on your machine, it will show you a preview of your final design. If you are satisfied with it, click the Continue button to get a cut. Once the design is fully cut, unload your cutting mat.
Step 7: Weed Out the Excess Vinyl
When you have a cut in your hand, take a weeding tool and take out excess vinyl to make the design clear and ready to be ironed. You can use your hands too, but a weeding tool is more convenient. Now, you have finally come to the main part of how to make custom shirts with Cricut.
Step 8: Ready Your EasyPress
When your design is ready, you can set your Cricut EasyPress to cotton or linen to get the desired results. So, now you need to put your weeded design on the shirt apparel and use a Cricut EasyPress 2 to heat it. However, before that, you must use a brayer tool to remove lint and fibers from the shirt’s fabric. Once you do that, for the next steps.
Step 9: Preheat Your Shirt
When your apparel is ready, use your EasyPress to preheat it for 15 seconds with moderate pressure to remove the moisture and wrinkling. For the final heating, you should consider a Cricut Heat Guide that will help you find the best setting for your design. After that, use the temperature and pressure accordingly.
Step 10: Apply Heat to Your Shirt
And the last step is to just apply the heat as the Cricut guide suggests. Use a towel to place on your vinyl design, and apply heat for 30 seconds. Using a towel will prevent your iron-on from getting damaged. Viola, you have just designed a perfect custom shirt with your Cricut.
Conclusion
You were all wondering how to make custom shirts with Cricut. And with my blog, you might have found this process a bit easier than before, I guess. Don’t worry; if you follow the instructions carefully, I can bet you can make a fabulous shirt.
However, be mindful of the heating setting as it can ruin your project and waste everything. It’s always better to use a household iron while making your first project. When you get familiar with the process, you can take one step ahead with an EasyPress.
Source Url :- how to make custom shirts with Cricut
Visit here for more Information:- · cricut design space log in
· cricut machine
· cricut machine setup
· how to make custom shirts
· step-by-step guide
· install cricut design space
#how to make custom shirts with Cricut#CRICUT DESIGN SPACE LOG IN#CRICUT MACHINE#CRICUT MACHINE SETUP#STEP-BY-STEP GUIDE#INSTALL CRICUT DESIGN SPACE
0 notes
Text
How to Make Custom Shirts with Cricut: A Step-by-Step Guide
I am obsessed with my Cricut machine and create projects on it every day. You can call it my hobby or my big passion for crafting. Recently, I have made dozens of custom shirts with my Cricut Maker machine, and you can create some on your own, too. Following this guide, your guesswork will be reduced to zero, as I will share some of the easiest steps on how to make custom shirts with Cricut.

If you are interested in my tutorial, I would recommend you continue it till the end so as not to miss anything important. I have been creating unique stuff with my Cricut for more than 6 years now; it has been a beautiful journey for me.
Whether you are a beginner or a well-trained Cricut user, this post will help you get some ideas for starting something new. I hope you found this blog helpful and that you will come back for more Cricut-related blogs like this one. Let’s start learning how to design shirts with Cricut for beginners.
Which Is the Best Cricut for Making Shirts?
When you are making a custom shirt, you will have this doubt about which machine to choose. My answer would be to choose anyone you have. Whether you have Cricut Maker, Joy, or Explore, you can choose anyone with your iron-on vinyl to make a perfect custom shirt.
However, you will need to insert the fine point blades to cut this type of vinyl. I hope you got an answer to it. Let’s move forward with this guide on making your custom shirt.
How to Make Custom Shirts with Cricut Machine?
When you are clear about which machine to use and what design you wanna make, let’s get started with my steps. Well, you will need a few things before you move your hands on the desktop. So, gather up all the listed things here.
Cricut Explore Air 2
EasyPress 2
EasyPress mat
Shirt apparel
Weeding tool
Brayer tool
Scissors
Standard mat
Premium vinyl
Are you ready with all these? So you’re good to go. When you are ready, head to your Cricut Design Space and show some of your creativity. And follow all the steps carefully.
Step 1: Go to the Cricut Design Space App
In the first step, you should go to your Design Space and pick a design to print on your shirt. As the Cricut app is full of ready-to-make designs, fonts, images, and templates, you won’t have to hustle to make a design. I am using my Explore Air 2 machine; you can use a machine you’re familiar with.
Step 2: Adjust Your Design
Once you are ready with your final design, you can take some time to make that fit for you. For example, you can change the design’s color. On the Design Space canvas, you will get a few options on the right-hand side, from where you can choose your favorite color for the shirt.
Step 3: Change Vinyl Color
Here, you need to change your vinyl color as your shirt’s color may not be a good match with the vinyl’s color. In order to keep the color vibrant and not blend them, you have an option to change the color of your iron-on vinyl. To do this, you should click on the Layers option on the canvas. After that, you can click on the white box with the Layer option and pick a color for your vinyl.
Step 4: Final Your Design
If you find the color combo not as expected, you can change it. Once you have done all the updates, you are ready to save your design. You need to hit the Save button along with the name of your project to remember what this design is about. I am making a design that says “Cutest Bachelor.” Let’s check more steps on how to make custom shirts with Cricut.
Step 5: Load Your Material (Iron-on Vinyl)
In this step, you are ready to cut your project with your special Cricut machine. Don’t forget to load your vinyl on a Cricut cutting mat and then into the Cricut machine. Once you are done, you can start the cutting. Also, select the correct size of your mat on your machine so that your design fits the cutting mat. And the most important thing is to align the iron-on vinyl correctly to get an expected cut.
Step 6: Cut Your Design
When your design is ready, and you have checked all the settings, you can allow your Cricut machine to perform a cut for you. Once you hit the Go button on your machine, it will show you a preview of your final design. If you are satisfied with it, click the Continue button to get a cut. Once the design is fully cut, unload your cutting mat.
Step 7: Weed Out the Excess Vinyl
When you have a cut in your hand, take a weeding tool and take out excess vinyl to make the design clear and ready to be ironed. You can use your hands too, but a weeding tool is more convenient. Now, you have finally come to the main part of how to make custom shirts with Cricut.
Step 8: Ready Your EasyPress
When your design is ready, you can set your Cricut EasyPress to cotton or linen to get the desired results. So, now you need to put your weeded design on the shirt apparel and use a Cricut EasyPress 2 to heat it. However, before that, you must use a brayer tool to remove lint and fibers from the shirt’s fabric. Once you do that, for the next steps.
Step 9: Preheat Your Shirt
When your apparel is ready, use your EasyPress to preheat it for 15 seconds with moderate pressure to remove the moisture and wrinkling. For the final heating, you should consider a Cricut Heat Guide that will help you find the best setting for your design. After that, use the temperature and pressure accordingly.
Step 10: Apply Heat to Your Shirt
And the last step is to just apply the heat as the Cricut guide suggests. Use a towel to place on your vinyl design, and apply heat for 30 seconds. Using a towel will prevent your iron-on from getting damaged. Viola, you have just designed a perfect custom shirt with your Cricut.
Conclusion
You were all wondering how to make custom shirts with Cricut. And with my blog, you might have found this process a bit easier than before, I guess. Don’t worry; if you follow the instructions carefully, I can bet you can make a fabulous shirt.
However, be mindful of the heating setting as it can ruin your project and waste everything. It’s always better to use a household iron while making your first project. When you get familiar with the process, you can take one step ahead with an EasyPress.
#how to setup cricut maker#How to design shirts with cricut for beginners#Best cricut for making shirts#How to Make Custom Shirts with Cricut
0 notes
Text
How to Use a Cricut to Make Shirts: A Step-by-Step Tutorial
Hey! Do you know how to use a Cricut to make shirts? When I say Cricut, I mean Cricut Design Space and cutting machine. Yes, the term ‘Cricut’ is related to both of them. Design Space is a design software that provides us with a platform to create unique designs, and a cutting machine is a tool that cuts out your design.
Here are two questions that arise in my mind. The first is how to use the Cricut Design app to create a design, and the second is how to use a Cricut cutting machine to cut designs. In this blog, I will answer both questions individually. so, get your Cricut machine and install the Design Space on your computer or mobile phone. And then, let’s learn how to make custom shirts using Cricut. Now, let’s delve into this blog!
What Cricut Tools and Materials Do You Need for Your Craft?
Before I teach you how to use a Cricut to make shirts, let’s learn about the supplies I use to make shirts on Cricut. I have provided some of the best and most basic tools or materials you must use while working on the shirt project.
Here are the supplies I used in my Cricut project:
● Cricut Explore 3
● EasyPress Mat
● Cricut EasyPress 2
● Material Trimmer
● Smart Iron-On, White
● T-Shirt Blank
● Weeding Tool
How to Use Cricut Design Space to Create a Shirt Design?
First of all, I will teach you how to use Design Space for creating a design. To make it easier for you, I will show you how to create a design from scratch. Don’t worry; the design is going to be very simple, as I will be adding the text-based design only.
Let’s get started!
First of all, you will need to open a Design Space on your computer.
Then, go to the My Project (shown in the picture below)option to start a new project.
Afterward, move to Canvas and navigate tothe Text (on the left sidebar) menu to add the text.
Now, you will need to add the text that you like.
You can also change the font of your text. For this, you just need to click on the Dropdown menu from the top screen saying Font.
Hence, choose the font you like. Here, I have chosen Trade Gothic LTD Bold for my T-shirt project
But here I am, not just adding the text but also curving it. So, if you want to curve your text, select the text first and then hit the Curve option from the top of the screen.
Once you are done with your design, you have to press the Make It button to begin cutting. But wait!
Have you mirrored your design? If not, you can simply turn the Mirror toggle button on. Once done, move to the next section, where you will use a Cricut machine to cut the design on iron-on vinyl.
How to Use a Cricut to Make Shirts?
Here comes the exciting part in which I will walk you through each step to cut design on HTV material. To cut the vinyl design on Cricut, follow the following instructions:
Make sure you have selected your compatible materials on Design Space.
Now, place your vinyl on the cutting mat. Use the brayer tool to ensure the vinyl is properly adhered to the mat.
After that, load the mat into your Cricut cutting machine.
Next, you need to press a Flashing Arrow button on your machine to start cutting. Once the cutting is done, you have to unload your mat.
Then, start weeding your design.
Afterward, you must place the shirt on an EasyPress mat and preheat it using Cricut EasyPress 2.
After preheating, place the weeded vinyl on a shirt and press the Heat Press with the recommended timing and pressure.
Finally, here you have learned how to use a Cricut to make shirts by creating a simple project.
FAQs
Question 1: What types of shirts should I use for Cricut?
Answer: If you use a Cricut iron-on, you can’t transfer your iron-on vinyl to any shirt. For this, you will need a shirt made of 100% cotton or polyester—however, a combination of 50% cotton and 50% polyester will also be suitable. Therefore, whenever you are going to add your vinyl design to your blank shirt, you must use a high-quality blank shirt. Using a good quality shirt will ensure the smooth transformation of your shirts.
Question 2: Can I use Cricut vinyl on shirts?
Answer: Yes, absolutely, you can use the vinyl on shirts. In fact, Cricut machines are very compatible and cut the vinyl smoothly without any interruption. In simpler terms, all the cutting machines are compatible with cutting the vinyl. So you can easily cut the vinyl on the T-shirts. The Cricut Maker 3 machine is one such machine that can cut over 300+ materials easily in one go, including vinyl.
Question 3: How long does permanent vinyl last on fabric?
Answer: If you use permanent vinyl on your fabric or clothes, it will last up to 5 to 15 years. It also depends on what type of brand you are using for your vinyl. However, many other crafters recommend using heat transfer vinyl (HTV), which is thin and durable. In addition, it is easily stretchable, making it ideal for your fabrics.
Conclusion
Now, you might have understood how to use a Cricut to makeshirts with this step-by-step tutorial. In this blog, I have added the essential supplies needed for this project. Moreover, I have divided the whole tutorial into two sections. In the first section, I explain how to create a design on Design Space. Meanwhile, the second section is all about placing the vinyl on a cutting mat and cutting it on your Cricut. That’s all in this blog. Good luck with your project!
Source Url : How to Use a Cricut to Make Shirts
#designcricutcomsetup#cricutcom#cricutcomsetup#cricutdesignspacedownload#cricutdesignspace#cricut design space
0 notes
Text
Cricut Mini Setup: Easy Steps for a Smooth Start

Are you searching for a guide on how to do a Cricut Mini setup? If so, you are in the right place. I remember the day when I bought my Cricut EasyPress Mini machine to make some stunning iron-on projects. I really like the product, and I get a sense of satisfaction after working on Cricut.
Once you are done with your setup process, you can easily start over and create your first project without any hassle. I have created a lot of crafts, and since I have set it up multiple times, I will show you how to perform this step-by-step. In my opinion, the setup will be easier than that of other Cricut models. Let’s get started as soon as possible if you are all set to start.
Important Things to Remember Before Cricut Mini Setup
Before you set up your Cricut EasyPress Mini, you should know some important facts that will prevent you from making any type of mistake. Below, I have given you the basic instructions. Let’s delve into it:
Ensure you use the machine at room temperature. Also, all your materials should be fully dried before usage.
Once you are done with your project, you have to return it to your machine, which is its safety base. You can use the selected materials form to create a firm pressing surface.
The machine moves continuously over your design when you transfer.
Now, you should have design sizes for the app with the machine, which are finely engraved over the smallest area to a surface area of about 2x the heat plate.
Step 1: Cricut Mini Setup Instructions
In order to run the Cricut EasyPress Mini machine or make a project using this machine, you have to set it up. You have to make sure you do the setup is correct:
Open your Browser and go to the Cricut Heat Guide’s official page (Cricut.com/setup).
Then, you have to select Cricut EasyPress Mini, which is provided in the Heat Guide section.
Now, you have to choose your material from the list under Heat Transfer Material: Everyday Iron-on/Lite/Metallic, Express Iron-On, etc.
After that, you have to choose the Base Material from the list, such as Nylon, polyester, Burlap, etc.
After choosing them, press the button Apply.
Also, you will need to preheat your machine to medium temperature.
Next, you need to place the material on a clean mat.
Finally, you have to let the loaded material preheat for at least 5 seconds.
Step 2: Prepare the Work Surface
Once your Cricut setup is done, you will need to prepare your work surface. Follow the steps I have mentioned below to check.
Place your chosen material facing down and ensure the liner side faces up.
Take out the heat-resistant tape, place it, and avoid the image area.
After that, you have to move the machine further with firm pressure in medium settings for at least 25 seconds.
Now, you have to flip the material and press your machine for a minimum of 15 seconds.
Finally, you have to remove the first liner when it is still warm.
Then, you have to resolve the second liner and make sure it is cool down now.
In addition to setting up your Cricut EasyPress machine, you should also know a little bit about the temperature settings. In the next section, we’ll see how to do it.
Different Types of Temperature Settings
In this Cricut Mini setup or machine, you will have three temperature settings: Low, Medium, and High. The temperature setting also depends on the user’s preference per project. DIYers should be perfect for this instruction, as I have already explained.
Let’s understand these three types of temperatures and their purposes:
Low Temperature: This setting uses lightweight, delicate, heat-sensitive synthetic fabrics. You can also use it for delicate heat transfer vinyl, such as foil iron-on.
Medium Temperature: suitable with most fabrics and heat transfer vinyl.
High Temperature: This setting is basically for infusible projects.
Wrap Up
The Cricut EasyPress Mini is easy to use and setup, but one needs to understand something before creating a project. I have already mentioned these above, and you can go through them and make sure you follow each point accurately. Once you understand this, you will need to perform the setup process. I have explained this in simple steps for the Cricut Mini setup. Let’s start with your Cricut EasyPress machine now.
FAQs
What projects can I create using Cricut EasyPress Mini?
With this Cricut heat press, you can create many projects, such as shoes, stuffed animals, custom clothes, and other accessories, where other EasyPress machines are hard to reach. In short, Cricut EasyPress Mini is one of the best tools for clothing, home decor, and accessories, like bags, hats, comping hats, bandanas, and more.
How do you press shoes using Cricut EasyPress Mini?
You will have to learn the following steps for pressing shoes into the machine:
First, you need to roll up the sock so that the tip of your shoe makes it a little stiffer.
Then, you have to place the heat transfer design into your desired location
After that, save it with your heat-resistant tape.
Once done, press your material as per the instructions in the Heat Guide.
Which is better Cricut EasyPress Mini or regular iron?
The Cricut EasyPress Mini is one of the smallest and is specially designed to reach the toughest areas of the project. It distributes the heat evenly, making the transfer easy. While the regular iron cannot distribute the heat evenly, I would hardly prefer it. However, we can still use it when there are no other options like this mini press machine. Plus, the Cricut Mini setup is required to run this machine, and setup is not required for the regular iron.
Source: Cricut Mini Setup
#Cricut EasyPress Mini#cricut design space app#cricut easypress 3 app#Cricut EasyPress Setup#Cricut machine setup#Cricut Mini Setup
0 notes
Text
How to Cut Heat Transfer Vinyl on Cricut Maker: Easy Guide
Hey crafters! Hope you are doing well! Today, I have come up with an interesting topic on how to cut heat transfer vinyl on Cricut Maker. If you are going to make your first project or just want some clarity on the use of HTV, you have come to the right blog!
A few years ago, when I was new to crafting, I was unable to figure out between vinyl and infusible ink sheets. Also, I used to think that I could use all types of materials on any project. But, I learned that the right material can really give an outstanding result. I learned everything about materials while making different types of projects. When I created the project myself, I could really see the difference, and I could decide which one to use in my project.
Besides, I will show you how to cut iron-on using Cricut Maker with step-by-step instructions. To learn more about this, let’s delve into this blog.
Step 1: Choose a Cricut Machine in the Design Space
As you already know, this blog is about how to cut heat transfer vinyl on Cricut Maker, so I am going to choose the Cricut Maker in the Design Space app. For this tutorial, the Cricut software is a must. Without this software, we can’t make a single cut on any materials.
To select this machine in your Cricut Design app, follow the instructions given below:
First, open the Design Space app.
Then, you need to go to Canvas.
Navigate to the upper right corner and click onthe Dropdown arrow.
Next, select the machine you want to use.
For example, here I am choosing Cricut Maker.
Step 2: Add the Design
There are many options available to add the design. You can either create one or upload an SVG file. You can easily get this file from Cricut Access. Once you are ready with your design, you can resize it according to your project.
Step 3: Preparation Before the Cutting Process
Now, we have to do some preparation; then, I will teach you how to cut heat transfer vinyl on Cricut Maker. So far, you might have created your design, and now it is ready to be cut. But there is one thing you should not forget, which is Mirroring the design. Yes, mirroring a HTV design is a must.
Once you have mirrored the image, you need to hit the Continue button.
After that, you will need to set the material. As you proceed ahead, you will see a list of custom materials. Select the materials you are going to use. For example, I am choosing iron-on vinyl, i.e., heat transfer vinyl.
After that, you have to place the material on the mat. While placing it on the mat, make sure the shiny side is facing down on the mat.
Finally, you need to load the mat by pressing the flashing arrow button. Once done, you are ready to learn how to cut heat transfer vinyl on Cricut Maker in the next section.
Step 4: Cut the Cricut Heat Transfer Vinyl
Here, you need to ensure that you have installed the fine-point blade in your Maker cutting machine. Once the tool is inserted, you can press the flashing C button on your Maker machine to begin cutting the heat transfer vinyl.
So, that’s how easy it is to cut the heat transfer vinyl on Cricut. After cutting it, you can easily place it on your blank shirt. But, you will need a Heat Press, such as a Cricut EasyPress. This tool will help you preheat the project and transfer the vinyl onto the project.
FAQs
Question 1: Can I cut the heat transfer vinyl using my hand?
Answer: Yes, you can cut the heat transfer vinyl with your hand, and you don’t need any type of cutting machine such as Cricut Maker, Explore, or Joy series. All you need to use is a pair of scissors or a craft knife. However, cutting it using your hands is only useful when your designs are not that intricate. For intricate designs, I would suggest you use a digital cutting machine.
Question 2: Should I mirror heat transfer vinyl?
Answer: Yes, you should always mirror your heat transfer vinyl whenever you are going to cut it on Cricut. In addition, you will need to place the materials facing the downside on the mat and cut it from the back with your design. After that, press it with the transfer sheet upside down on your blank shirt. As a result, it will adhere to your shirt or other blank properly.
Question 3: What is the advantage of using heat transfer vinyl?
Answer: There are numerous advantages of using these materials, as they provide a high degree of stretch and rebound. Due to this, it is suitable for apparel and other items that are flexible, such as clothes or sports jerseys. Also, there are multiple color options available so that you can customize your clothes or items accordingly.
Final Words
You might have cleared your concept of how to cut heat transfer vinyl on Cricut Maker. In this blog, I have included a total of 4 steps to explain the process of cutting iron-on vinyl, which is also known as heat transfer vinyl. Also, the HTV provides its own benefits and is very suitable for fabrics or sports jerseys. In addition, the Cricut Maker can easily cut the iron-on vinyl using the fine-point blade. So, follow easy steps and learn to cut heat transfer vinyl for Cricut.
#How to cut heat transfer vinyl on Cricut Maker#Cricut heat transfer vinyl#heat transfer vinyl for Cricut#Install cricut design space app#www.cricut.com/setup login#cricut.com/setup#cricut design space login#cricut explore air 2#cricut.com sign in
0 notes
Text
How to Use Cricut Mini Press: Beginners Tutorial
Have you added the latest heat press machine in the Cricut family to your crafting collection? Are you wondering how to use Cricut Mini Press to make iron-on projects? If the answer is yes, then you have reached the right place. I even bought this Cricut machine some time back, and I love it. This is the most amazing tool I have got in quite some time.
Cricut Mini Press is not the real name of this machine. Its actual name is Cricut Easy Press Mini. However, among its users, it is famous for its Mini Press name. As the name suggests, it is a compact machine that easily fits in your hand, and you can carry it around in your bag. So, learn a little more about this Cricut heat press machine.
About Cricut EasyPress Mini
Before you learn how to use Cricut Mini Press, you should first learn about the machine.
Key Features
It comes with a protective base, so you don’t have to worry about something getting burned while the machine is on.
There is a button in the machine designed to control its heat level. When you start it to prepare, an orange light lits up, and when the machine is ready to work, the light turns green.
This machine has an auto shutdown feature. If you are worried that you might forget to turn off the machine, you don’t have to worry about it. If you leave the machine on and don’t use it for 13 minutes, it will automatically shut itself off.
Dimensions
If we talk about the dimensions of the machine, the heat plate of the machine is 3.25 inches long and 1.9 inches wide.
The maximum size of the design is recommended to be 4 x 3.5 inches. The other size you can use on the machine should be 1.7 x 5.25 inches.
The height of the machine is 4 inches. Now you can understand how small it is, and you can take it wherever you want and use it however you want.
How to Use Cricut Mini Press: 4 Simple Steps
Before you start working on the machine, you should know the procedure that you have to follow. So, these are the things you have to do before you start working.
Step 1: Heating the Cricut EasyPress Mini
First, you have to plug the machine into a wall outlet. Then press the power button and turn the machine on.
Then, leave the machine in heating mode. It will continue to heat until it reaches its desired temperature. Although it is a small machine, it gets heated very quickly. Therefore, you should not use anything other than the machine to heat it while it is on.
Step 2: Select Your Material
You can set the machine to a low, medium, or high temperature according to your use.
Then, you must select the iron-on vinyl on your machine along with the base material and tap on apply.
Step 3: Set the Time and Temperature
There is no timer on the machine to set how long you have to keep heating the material. So, you have to check the time yourself. Always check the time before you start heating and determine how long you need to heat for. You have to stop it when the time is up.
Step 4: Moving the EasyPress
When you are using the machine, you will need to be careful about its speed. You should not apply too much pressure. At the same time, you do not have to run the machine too fast or too slow. These things can cause marks or lines on the material. You have to run it at normal speed, as you would on a computer mouse or electric iron.
How to Use Cricut Mini Press to Print on a T-Shirt?
Now, you have all the information you need to use Cricut EasyPress Mini. Now, you can work on your iron-on projects. To work on a project, you should be doing the following steps:
To begin a project, you must first go to the Design Space app and choose a design.
After you select the design, customize its size and shape as you want. You can also create a design or upload it on the Cricut app.
Once your design is ready to cut, you will need to cut the design into an iron-on vinyl with the help of a machine.
When your design is ready after cutting, you have to prepare the machine for heat transfer. Set the heat temperature and wait for the machine to heat up. When the green light is up, the machine is ready for heat transfer.
Now, put the design on the t-shirt with the help of a mat and apply the heat with the machine.
After that, wait until the design cools down. This is very important. If you try to peel the protective sheet without letting it cool, the material might come off the fabric, and all your work will be ruined.
In the last step, your t-shirt design is done.
Conclusion
In conclusion, I would say learning how to use Cricut Mini Press is not difficult. After reading the blog, you will feel the same. In this post, you learned about the machine from the beginning. I also wrote about the important things to keep in mind while using the Cricut machine. When you have all the essential info, you can proceed to work on your iron-on projects and create beautiful designs on your clothes with the help of this Cricut EasyPress Mini machine.
FAQs
What Can I Do with a Cricut EasyPress Mini?
With the Cricut EasyPress machine, you can create beautiful designs on shirts, coasters, bags, hats, caps, and so much more. This heat transfer tool is used to adhere a final cut from a Cricut cutting machine onto your desired items. You can use materials like heat transfer paper, iron-on/heat transfer vinyl, and infusible ink sheets and pens with this heat press machine.
Do I Need Cricut Design Space to Use Cricut EasyPress Mini?
Cricut Design Space is very important when working on any Cricut project. For example, while the EasyPress machine transfers the design to an item, you need the Cricut Design app to cut the material on a Cricut machine. You may also need it to adjust the heat on the Cricut EasyPress Mini according to your requirements.
How Long Do I Have to Apply Heat on a Shirt?
The duration of time you need to apply heat for a transfer depends on several factors. It depends on the type of material you are using. Harder materials will take longer, whereas smoother materials will take less time. The duration also depends on the type of shirt. A dark shirt may take as long as 90 seconds, while a light shirt will only take about 45 seconds.
Source: how to use Cricut Mini Press
Visit here For More Information: Cricut heat press
Pinterest
0 notes
Text
cricut setup for windows and mac
Crafting is one of those hobbies that people of every age follow. To provide flawless results and an enjoyable experience in crafting, Cricut offers various impressive heat pres and cutting devices. Some of the popular cutting machines it offers are the Cricut Maker 3, Cricut Explore 3, Cricut EasyPress 3, Cricut Autopress, and more. With the help of these machines, anyone can create stunning DIY projects without any professional help. Also, for new users, the app offers various written content and video tutorials. Visit the cricut.com/setup website now to get more information.
cricut com setup explore air 2
design.cricut.com/setup
cricut setup for windows and mac
0 notes
Text
How to Use Cricut Maker for DIY Crafting Magic?
Again, I am ready with my new tool, Cricut Maker. Using this machine, I am going to teach you how to use Cricut Maker to create your own shirt in a couple of minutes. At one time, I was also a beginner, and it was not easy for me to learn it. Somehow, I learned it from the internet. However, it took me a lot of time to gain practical expertise on this tool but believe me, it was worth learning.
Moreover, the machine is very easy to use, and it has a simple setup process, which I have already covered in this blog. My intention in writing this blog is for beginner crafters who have just bought the machine and want to learn how to use it from the beginning. So, are you ready to join me on this journey of learning about the Cricut Maker from the ground up? If yes, let’s get started!
The Process to Setup a Cricut Maker Machine
When I got my new Maker machine, I was too excited to unbox it. But after unboxing, I had to set it up. In the beginning, I was nervous as hell! I really didn’t want to make any mistake that would cause a technical problem. But the Cricut’s guide finally helped me. In addition, the setup is also easy for different platforms like Windows, iOS, Mac, and Android.
To learn how to setup Cricut Maker on computer and mobile device, follow the instructions given below:
First of all, plug the power cable into the back of the machine and connect it to the power source.
Next, you have to connect the machine to the computer. Here, you can either use a USB cord or Bluetooth feature.
Now, open a browser such as Chrome and search for cricut.com/setup.
On the next page, you will need to download the Design Space and then install it.
Here, you can simply follow the instructions available to you on the screen and set up your account.
Finally, you will be notified about the completion of the Cricut setup.
As soon as we complete our setup, we are always prompted to perform a test cut. This is easy, and you can do it by following the steps given to you on the screen.
What Supplies Will I Need to Make a Custom Shirt?
Before I teach you how to use Cricut Maker, let’s discover some of the essential Cricut supplies needed for making a shirt. Here is what you need to make your own shirt on Maker:
Iron-on Vinyl Material
Cotton Blank T-shirt
Cricut Maker (or any other cutting machine)
LightGrip cutting mat (or Standard Grip mat)
Weeding tools
EasyPress
EasyPress Mat
I have specifically chosen the cotton shirt, which has smooth textured and high-quality cotton. It really works well with Iron-on vinyl.
Important Note: I would recommend pre-washing your blank shirt before applying the vinyl on it. In this way, your vinyl won’t crack if the shirt shrinks. In addition, pre-washing will help you remove the dirt or any impurity that can hinder the ability to adhere to vinyl on the shirt.
How to Use Cricut Maker for the First Time?
So, are you ready to learn the process of making a shirt on the Maker machine? If yes, follow the steps one by one:
Step 1: Create a New Design or Upload
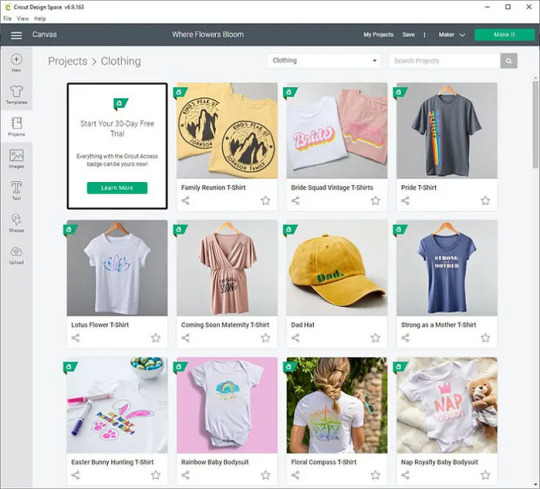
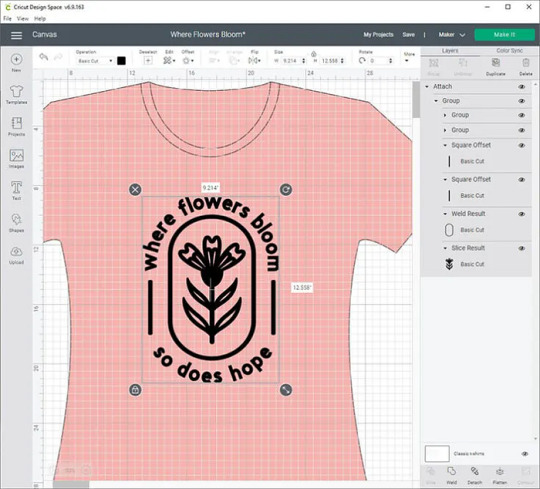
Step 2: Load the Vinyl and Cricut Mat
Now, you need to place the material on the mat for cutting. For this, you need to load the vinyl onto the mat. Make sure you are using the mat that has lost its stickiness a little bit. After that, you have to use the brayer tool to flatten and adhere the vinyl to the cutting mat.
Remember: The shiny side of the vinyl should be facing down. For patterned vinyl, the pattern side should be down.
Once done, you are ready to tap on the Load button to start the loading process of the cutting mat into the Maker machine. Next, you will need to send your design to the Cricut Maker.
Step 3: Send Your Design to the Cricut Machine
Navigate to the Cricut app and click on the Make It button in the top-right corner.
Next, select the toggle button to turn on the Mirror.
Afterward, you will be moved to the next screen, where you need to choose the base material. Choose the Everyday Iron-on from the list.
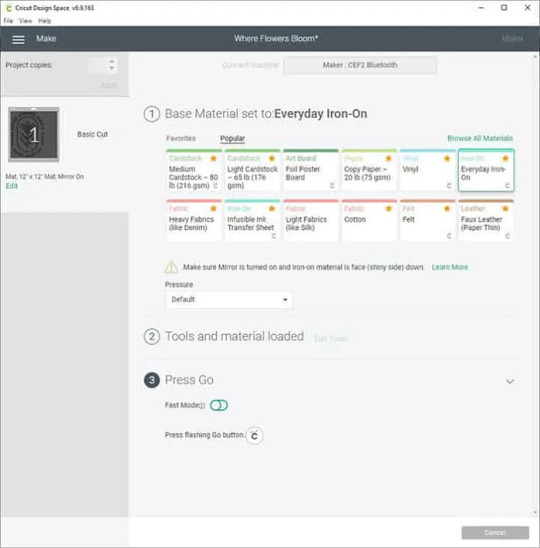
Step 4: Cut and Weed Out the Design
After choosing the material, you need to load the Fine-Point blade and the mat.
To start cutting, you need to press the Go button to cut the design.
Once cutting is done, unload the mat and weed the design using the weeding tools.
Step 5: Transfer Your Design
This is the step where your EasyPress comes into play. Preheat the blank shirt and then place your design on it. After that, set the recommended temperature and press gently on the design.
Wrapping Up
In this blog, I have explained to you how to use Cricut Maker along with the full setup process. This guide not only explores the setup process but also how to make a shirt using it. The process is easy for both setup and shirts. However, this guide can also help you if you want to add your design to a tote bag or any other fabric. The process will be almost the same for every project.
FAQs
Question 1: How to use smart vinyl with Cricut Maker?
Answer: Smart Materials doesn’t require you to use a cutting mat, making it easy to use. Below are the steps given that explain the usage of vinyl.
First, you need to load the material and ensure a 10-inch gap behind the machine.
Next, try to position the material. For example, keep the color side facing up.
Then, feed the material into the guides.
Now, you have to press the Load button and gently push the material forward.
Finally, it’s time to apply the vinyl on the clean, blank surface.
Question 2: How to use Cricut Maker for stickers?
Answer: Find the steps below to create amazing stickers using the Maker machine.
First, you need to create a sticker design on Design Space.
After that, print the image using a compatible printer.
Once you have printed the image, set the materials on the Cricut app.
Next, you should load the mat into the cutting machine.
After that, press the Go button to cut stickers.
Once the sticker is cut, unload the mat and remove the stickers.
Question 3: How to use pens with Cricut Maker?
Answer: In order to use the pens with Cricut Maker, you have to follow the instructions provided below:
First, you need to place the laser copy paper on a LightGrip mat and then load it.
On Design Space, create the design that fits your blank and assign a Cricut pen color.
Also, you must Mirror your design.
Then, browse all materials and then choose Copy Paper.
Insert your Infusible Ink Pen into Clamp A and hit the flashing Go button.
Once the design is done, you can unload the mat.
Read more: install cricut design space app
how to setup cricut maker
Cricut Design Space Login
Source: how to use Cricut Maker
#how to use Cricut Maker#Cricut Design Space Login#cricut design space#cricut.com/setup#cricut.com/create#how to setup cricut maker#install cricut design space app#cricut new machine setup#cricut.com sign in#www.cricut.com/setup login#cricut setup
0 notes
Text
Which Cricut EasyPress Is Best for Elevating Your DIY Crafting?
If you are looking to buy a Cricut EasyPress machine, would this blog be beneficial to you? As a Cricut crafter, I have used various Cricut machines over the years. As a result, in this blog, I am going to help you pick the right EasyPress machine to achieve the next level of crafting experience.
Before selecting a Cricut heat press machine, you must understand its features, properties, and prices. Apart from this, choosing a heat press tool depends on the purpose of use. But don’t worry; I will tell you everything in this blog to help you select the suitable machine for you. So, let’s get started without any further ado!
1. Cricut EasyPress Mini
The Cricut EasyPress Mini tool is a compact and easy-to-use machine. This machine offers the perfect start for the beginner to step into the crafting world. Plus, the machine has a smart tool that makes it easy to handle and get flawless results while making a project. Also, this machine is the most affordable heat press machine the Cricut brand offers.
In addition, with the help of this machine, users can work on various shoes, stuffed animals, and more. This tool offers high voltage and 3 heat settings, giving long-lasting results while working with iron-on products. To offer the utmost safety to the users, it comes with auto shut-off features and an insulated safety base.
2. Cricut Autopress
Cricut Autopress is a great option available for the crafter who wants to create commercial projects. This machine comes in 15 in x 12 in (38 cm x 30 cm) size and is best for creating bigger projects such as banners, hoodies, curtains, pillowcases, and many others. Plus, this heat press machine comes with various brilliant features, such as a ceramic-coated heat plate, Zero Effort™ operation for easy use, temperatures up to 400 °F (205 °C), auto-off after 13 minutes of inactivity, and many more.
In addition, the machine has an innovative design to offer the utmost comfort and DIY crafting experience to the users. It also has a control pod that gets the full understanding of the right temperature and timer to get awesome results.
3. Cricut EasyPress 2
The EasyPress 2 machine is the second iteration of the EasyPress series of the brand. This machine is great for crafters who want an advanced heat press machine without spending a massive amount of money. This machine is available in three different sizes and is best to use for projects like banners, blankets, T-shirts, sweatshirts, and more.
In addition, the machine offers precise temperature control for up to 400℉ (205°C). As a result, the machine gives effortless, fast, and flawless results. Besides that, this machine also includes numerous other features that ensure great iron-on projects and offer the utmost safety to users.
4. Cricut EasyPress 3
EasyPress 3 is the most advanced and latest machine in the EasyPress series. The machine comes with a variety of crafting features that provide a hassle-free crafting experience. There are two models of this machine that include the same features but differ in size. This machine offers flawless results working with various iron-on (HTV), Infusible Ink & sublimation products.
Also, the EasyPress 3 works with smartphones for easy control. You can download the Cricut Heat app to your machine and connect it using Bluetooth. With the help of this machine, you can easily start a crafting business and make extra bucks by selling products online.
Conclusion
In the above content, you got to know in-depth information about various Cricut heat press machines. These Cricut EasyPress machines are among the most popular versatile crafting tools. The smart features, specs, and innovative designs offer a great deal of comfort and fun. When it comes to their cost, then EasyPress Mini is the cheapest heat press machine of the brand, which costs only $39.99. On the other hand, if you want to get the most advanced machine, the Cricut Autopress, then it comes at $599. So, you can choose to buy any of these machines that fit your budget and the features you are looking for.
Frequently Asked Questions
Can Cricut EasyPress Do Sublimation on the Apparel?
This EasyPress machine is among the most sought-after and cutting-edge crafting tools available. This machine works perfectly with iron-on and infusible ink and a plethora of other products. Also, these tools provide sublimations on apparel and other products. With the help of heat transfer vinyl, users can sublimate the design on various objects, such as shirts, jackets, shorts, and other clothing items.
What Cricut EasyPress Machine Should I Get as a Beginner?
There are a plethora of Cricut heat press machines you can get to start your crafting journey. Here are some of the best options you can buy as per your budget and use.
How to Reset Cricut EasyPress Mini?
These are the easy steps to reset the EasyPress Mini machine.
Visit: install cricut design space app
cricut.com/setup
design.cricut.com/setup
cricut.com setup mac
www.cricut.com setup login
Source: https://cricutcreate.wordpress.com/2024/02/15/which-cricut-easypress-is-best-for-elevating-your-diy-crafting/
#cricut.com/setup#cricut design space download#cricut explore air 2#cricut software app#cricut project ideas#cricut new machine setup#www.cricut.com/setup login#install cricut design space app#install cricut design space
0 notes
Last Seen Blogs

juddthesluttychicken
Judd the Chicken Stud

the100000dollarclub-blog
Untitled

king-vidra
Serene

yipblog
Yip Blog

captainditrag
Captain Ditrag's Movie Reviews & Singing Videos