#how to clear cache windows 10
Explore tagged Tumblr posts
Visit Tumblr Blog
Explore Tumblr blogs with no restrictions, modern design and the best experience.
Last Seen Tumblr Blogs


Fun Fact
Average visit duration of Tumblr.com is 10 mins and 25 secs.
Video
youtube
How to Clear RAM Cache in Windows 10/11 (2023) | 🚀 Make Computer Faster
0 notes
Text
How to Free Up Space on Windows 10: A Comprehensive Guide
As your Windows 10 system accumulates more files and applications, it can start to slow down and become less efficient. Freeing up space not only improves your system’s performance but also extends its lifespan. In this guide, we’ll explore various methods to free up space on Windows 10, going beyond the basics to ensure you have a well-optimized system.

Table of Contents
Introduction
Understanding Disk Space Usage
Utilizing Built-in Windows Tools
Disk Cleanup
Storage Sense
Uninstalling Unnecessary Applications
Managing Temporary and Cached Files
Cleaning Up System Files
Windows Update Cleanup
System Restore and Shadow Copies
Using Third-Party Disk Cleaners
Handling Large Files and Folders
Moving Data to External Storage
Using Cloud Storage Solutions
Conclusion
1. Introduction
As modern software and files grow larger, managing disk space effectively becomes crucial. This guide offers practical steps and tips to reclaim disk space on your Windows 10 computer, ensuring it runs smoothly and efficiently.
2. Understanding Disk Space Usage
Before freeing up space, it’s essential to understand how your disk space is being used. Navigate to Settings > System > Storage to view a detailed breakdown. This will help identify which areas need attention.
3. Utilizing Built-in Windows Tools
Disk Cleanup
Windows 10 features a built-in Disk Cleanup tool designed to delete unnecessary files. To access it:
Type “Disk Cleanup” in the search bar and select the app.
Choose the drive you want to clean.
Select the file types to delete (e.g., temporary files, system cache).
Storage Sense
Storage Sense automates disk cleanup. To enable it:
Go to Settings > System > Storage.
Toggle on Storage Sense and configure settings to regularly delete temporary files.
4. Uninstalling Unnecessary Applications
Unused applications take up significant space. To uninstall them:
Go to Settings > Apps > Apps & features.
Review the list and uninstall non-essential programs.
5. Managing Temporary and Cached Files
Temporary files can quickly accumulate and consume disk space. Use Disk Cleanup or third-party tools to regularly clear these files. Browsers also store cached data, which can be cleared from the browser settings.
6. Cleaning Up System Files
Windows Update Cleanup
Old update files can take up substantial space. Disk Cleanup includes an option to remove these:
Open Disk Cleanup and select Clean up system files.
Choose Windows Update Cleanup.
System Restore and Shadow Copies
System Restore points and shadow copies can consume significant disk space. Manage these by:
Typing “System Protection” in the search bar.
Selecting the drive and clicking Configure.
Adjusting the Max Usage slider to limit space usage.
7. Using Third-Party Disk Cleaners
Third-party tools like CCleaner provide more comprehensive cleaning options. They can remove junk files, clean registries, and manage startup programs to free up space.
8. Handling Large Files and Folders
Identifying and managing large files is crucial. Use tools like WinDirStat to find large files and folders. Consider moving non-essential large files to external storage.
9. Moving Data to External Storage
Free up space by moving data such as videos, photos, and documents to external hard drives or USB sticks. Ensure you regularly back up important data to avoid loss.
10. Using Cloud Storage Solutions
Cloud storage services like OneDrive, Google Drive, and Dropbox offer substantial space. Move infrequently accessed files to the cloud to save local disk space.
11. Conclusion
Regular maintenance and mindful storage practices can keep your Windows 10 system running efficiently. Use the tips and tools outlined in this guide to manage and optimize your disk space effectively.
External Authoritative Sources
Microsoft Support: Free up drive space in Windows
CCleaner Official Website
How-To Geek: The Ultimate Guide to Freeing Up Space on Your Windows PC
By following these detailed steps, you can efficiently manage and optimize your disk space on Windows 10, ensuring your system remains fast and reliable.
#Windows 10 Performance#Disk Cleanup#Storage Management#System Optimization#PC Maintenance#Free Up Space#Windows 10 Tips#Specific Techniques:#Disk Cleanup Tool#Storage Sense#Uninstall Programs#Temporary File Management#System File Cleanup#Third-Party Disk Cleaners#Advanced Techniques:#Large File Management#External Storage Solutions#Cloud Storage for Windows#System Restore Management#Windows Update Cleanup#How-To Guide#Windows 10 Efficiency
2 notes
·
View notes
Text
How to Run Smarter IPTV Lite: A Complete Guide
Smarter IPTV Lite is one of the most popular IPTV applications, allowing users to stream live TV, movies, and series seamlessly. Whether you're using it on a Smart TV, Android device, or PC, this guide will walk you through the steps to install, set up, and optimize Smarter IPTV Lite for the best streaming experience.
What is Smarter IPTV Lite?
Smarter IPTV Lite is a lightweight version of IPTV Smarters, designed for users who want a simple and efficient way to stream IPTV services. The app itself does not provide IPTV content but acts as a player for IPTV subscriptions.
How to Install Smarter IPTV Lite
1. Download and Install the App
The first step to running Smarter IPTV Lite is downloading the application on your preferred device. Here’s how:
On Android Devices:
Open the Google Play Store.
Search for Smarter IPTV Lite.
Click Install and wait for the download to complete.
On Smart TVs (Samsung/LG/Android TV):
Go to your TV’s app store.
Search for Smarter IPTV Lite.
Download and install the application.
On Fire Stick or Fire TV:
Enable Apps from Unknown Sources in settings.
Download the Downloader app and enter the APK link for Smarter IPTV Lite.
Install the APK file once the download is complete.
On Windows/Mac:
Download an Android emulator like Bluestacks.
Install Smarter IPTV Lite through the emulator.
How to Set Up Smarter IPTV Lite
Once installed, follow these steps to set up Smarter IPTV Lite with your IPTV subscription:
1. Launch the App
Open Smarter IPTV Lite on your device and accept the terms and conditions.
2. Enter IPTV Subscription Details
You will need the following:
M3U Playlist URL (provided by your IPTV provider).
Xtream Codes API (if your provider supports it).
3. Add Your IPTV Subscription
Click on "Add Playlist" or "Load Your Playlist or File/URL".
Enter your M3U URL or Xtream Codes API credentials.
Click Add User and wait for the channels to load.
4. Customize Your Experience
Enable EPG (Electronic Program Guide) for better navigation.
Organize channels into categories for easier access.
Adjust video player settings for optimized streaming.
Features of Smarter IPTV Lite
User-Friendly Interface: Simple and intuitive layout.
Multi-Device Support: Works on Android, iOS, Smart TVs, Fire Stick, and Windows/Mac via an emulator.
EPG Integration: Displays TV schedules and program guides.
Built-in Video Player: No need for external media players.
Supports Multiple Playlists: Load different IPTV playlists at once.
Common Issues & Troubleshooting
1. Buffering Problems
Ensure a stable internet connection (minimum 10 Mbps for HD, 25 Mbps for 4K).
Restart the app and your device.
Clear cache from app settings.
2. App Not Working on Fire Stick
Enable "Install Unknown Apps" in settings.
Update the app to the latest version.
3. Playlist Not Loading
Check if your M3U URL is still active.
Contact your IPTV provider for an updated link.
FAQs
Is Smarter IPTV Lite free?
Yes, but you need an IPTV subscription to access content.
Can I use Smarter IPTV Lite on multiple devices?
Yes, as long as your IPTV provider allows multiple connections.
Is Smarter IPTV Lite legal?
The app is legal, but ensure you're using a legitimate IPTV provider.
Conclusion
Smarter IPTV Lite is an excellent IPTV player that provides a smooth and efficient streaming experience. By following the installation and setup guide above, you can enjoy IPTV content on various devices without hassle.
Sources:
Wikipedia – IPTV
TechRadar
CNET
The Verge
Digital Trends
0 notes
Text
How to Stream Live TV on IPTV: A Step-by-Step Guide?
The days of relying on traditional cable TV are fading fast. IPTV (Internet Protocol Television) is revolutionizing the way we watch live TV, offering high-quality streaming, flexibility, and affordability. Whether you’re a sports fan, a movie lover, or just want access to international channels, IPTV has you covered.
In this guide, we’ll walk you through the step-by-step process of streaming live TV on IPTV.

Step 1: Choose a Reliable IPTV Service Provider
The first step to streaming live TV with IPTV is selecting a trustworthy provider. Here’s what to consider:
Channel Selection – Ensure the service offers the channels you need, including local, international, and premium networks.
Streaming Quality – Look for HD and 4K options with minimal buffering.
Subscription Plans – Choose a plan that fits your budget and streaming needs.
Trial Option – Test the service with a free trial before committing.
Popular IPTV providers include Sapphire Secure, Eternal TV, and Helix IPTV, among others.
Step 2: Get an IPTV-Compatible Device
IPTV services work on various devices, so choose one that suits your needs:
Smart TVs (Samsung, LG, Android TV)
Amazon Firestick & Roku
Android & iOS Smartphones/Tablets
Windows/Mac Computers
Dedicated IPTV Boxes
A stable internet connection (at least 10-20 Mbps for HD streaming) is crucial for a smooth experience.
Step 3: Install an IPTV Player App
To access your IPTV service, you’ll need a compatible IPTV app. Some popular IPTV players include:
IPTV Smarters Pro
TiviMate
Perfect Player
GSE Smart IPTV
Download and install the app on your chosen device.
Step 4: Enter Your IPTV Subscription Details
After installing the app, you’ll need to input your M3U playlist URL, Xtream Codes, or MAC address provided by your IPTV provider. Follow these steps:
Open your IPTV app.
Navigate to Settings and choose Add Playlist or Xtream Codes Login.
Enter the subscription details provided by your IPTV service.
Save and restart the app.
Your live TV channels should now be available!
Step 5: Enjoy Live TV Streaming
Once everything is set up, browse through the channel list and start watching live TV instantly. You can:
Access thousands of channels worldwide
Watch live sports, news, and entertainment
Pause, rewind, or record shows (if supported by your provider)
For the best experience, use a wired Ethernet connection or a high-speed Wi-Fi network to prevent buffering.

Bonus Tips for a Better IPTV Experience
✅ Use a VPN – Protect your privacy and bypass geo-restrictions. ✅ Update Your IPTV App – Keep your player updated for smooth streaming. ✅ Choose a Provider with Good Support – Reliable customer service makes troubleshooting easier. ✅ Clear Cache Regularly – Prevent lagging and buffering issues.
Conclusion: Stream Smarter with IPTV
IPTV is the future of live TV, offering unlimited content, flexibility, and cost savings. By following this simple step-by-step guide, you can set up your IPTV service and enjoy seamless streaming from anywhere. Say goodbye to expensive cable bills and start streaming today!
0 notes
Text
Webcam Test | Check Camera Functionality and Quality
Refresh device listCopy all information to JSON
Horizontal resolution --
Vertical resolution --
Frame rate --
Zoom --
Focus modes --
Need to quickly run a webcam test? Our free camera test allows you to instantly check your webcam - both on your computer and smartphone! We don't require any additional software installation, and the entire process takes just a few seconds. It's the perfect solution before important video calls, online meetings, or video conferences.
Why Should You Test Your Camera?
Before an important online meeting - avoid stress and technical problems
After purchasing a new camera - verify it works correctly
Before a job interview - ensure everything works perfectly
After system updates - verify drivers are working properly
When experiencing image issues - quickly diagnose the source of the problem
How to Test Your Webcam?
Select device - from the dropdown list, choose the camera you want to test (built-in laptop camera, external USB camera, smartphone camera)
Start camera test - click the blue "Test Camera" button and follow the instructions. No software download required.
Grant access - access is blocked by default, you must grant it in your browser when prompted.
Check operation - after granting access, you should see the camera feed on screen. If you don't see it, check the troubleshooting solutions below.
What Does Our Online Webcam Test Check?
Camera functionality - whether the image is displayed
Real-time image display - whether there are any delays
Basic device functionality - whether the camera is detected
Browser compatibility - whether your browser works with the camera
Camera Test Applications
Our online camera test is particularly useful in the following situations:
Online job interviews - ensure everything works before an important job interview
Remote learning - check your camera before online classes or exams
Business meetings - test your equipment before an important presentation
Online medical consultations - ensure good connection quality with your doctor
Family video calls - ensure smooth communication with loved ones
Camera Test On Smartphone
Our camera test also works on mobile devices! You can easily check the operation of:
Front camera (for selfies and video calls)
Rear camera (main)
Additional lenses (wide-angle, zoom)
Common Camera Issues and Their Solutions
Why Isn't My Camera Working?
Camera not connected - check the physical device connection
Damaged cable - replace with a working cable
Device is turned off - check system settings
Camera is in use - close other applications using the camera
No permissions - allow browser access to the camera
Physical damage - contact service support
How to Resolve Camera Issues?
Check connection - ensure the camera is properly connected
Restart browser - sometimes a simple restart helps
Check privacy settings - both in system and browser
Update drivers - outdated drivers can cause problems
Clear cache - if the browser is running slowly
Camera Test Privacy Policy
All test operations are performed locally in your browser
We don't store any camera data
Device memory data is deleted when closing the page
Security - we don't send any data to the server
System Requirements for Webcam Test
Supported Browsers:
Google Chrome 60+ (PC, Android)
Mozilla Firefox 55+ (PC, Android)
Microsoft Edge 79+ (PC, Android)
Safari 11+ (Mac, iOS)
Opera 47+ (PC, Android)
Supported Systems:
Windows 8.1, 10, 11
macOS 10.13 and newer
Android 7.0 and newer
iOS 11.0 and newer
Linux - most popular distributions
Thanks to wide compatibility, you can check your webcam on desktop computers, laptops, as well as your smartphone or tablet. The online camera test works on virtually any modern device with internet access.
Camera Testing Tips
Ensure good lighting - helps in assessing image quality
Close other applications using the camera before testing
Test all cameras available on your device
Try different browsers if experiencing issues
Perform test before important meetings - avoid stress
How to Test Your Webcam?
Choose device - Select the camera you want to test from the dropdown list.
Start camera test - Click the blue 'Test camera' button and follow the instructions.
Grant camera access - Allow the browser to access the camera when prompted.
Check the image - After granting access, you will see the camera feed on screen.
Frequently Asked Questions
Does the camera test work on smartphones?
Yes! Our camera test is fully compatible with smartphones and tablets. You can check both front and rear cameras of your mobile device.
Why isn't the camera working?
The most common causes are: disconnected camera, damaged cable, device disabled in settings, camera being used by another application, lack of browser permissions, or hardware malfunction.
Do I need to install additional software?
No, our test works directly in the web browser. It doesn't require installation of any additional programs or plugins.
How do I check if the camera is working?
After clicking the blue 'Test camera' button and granting permissions, you should see the camera feed in real-time on your screen. If the image appears, the camera is working properly.
Which browsers are supported?
The camera test works on all popular browsers in their current versions: Google Chrome 60+, Mozilla Firefox 55+, Microsoft Edge 79+, Safari 11+, and Opera 47+.
Character Counter
Microphone Test and Audio Quality Analysis
Latitude and Longitude Finder on Map
Get Lat Long from Address
Where am I? Find my location now
Crop and Rotate Image Onlineineedtocheck.com
Need to quickly run a webcam test? Our free camera test allows you to instantly check your webcam - both on your computer and smartphone! We don't require any additional software installation, and the entire process takes just a few seconds. It's the perfect solution before important video calls, online meetings, or video conferences.
0 notes

Text
How Do I Connect Cricut to Computer: A Step-by-Step Guide
How do I connect Cricut to computer? This was a question I got on one of my blogs a week ago. Not only this, but I also received similar questions regarding connection from many readers. Since none of my posts has a complete guide to Cricut connection in one single guide, I tried to write this.
Without thinking twice, dive into this blog and explore the steps one by one. In this blog, I have answered how do I connect my Cricut to my computer via Bluetooth. Let’s start now!
What Do I Need to Connect My Cricut to a Computer?
In order to learn how do I connect Cricut to computer, you have to first understand what you need before connecting to your Cricut. As we know, the connection is a part of the Cricut setup, meaning we are actually setting up our machines. So, there are things that are required before setup. Let’s get a look into it:
Cricut machine
Power cable to connect your Cricut to a wall outlet
A flat surface like a table for keeping the machine on
A Windows/Mac computer with the following system requirements:
For Windows
Operating System – Windows 10 or later (64-bit)
RAM – Minimum 4GB
Disk – 2 GB free
CPU – Intel Dual Core or equivalent to AMD processor
Display – 1024px x 768px screen resolution
Connectivity – A USB port/Bluetooth connection
For Mac
Operating System – macOS 11 or later
CPU – 1.83 GHz
RAM – Minimum 4GB
Display – Minimum 1024px x 768px screen resolution
A USB port or Bluetooth is required
Disk – 2GB
How Do I Connect Cricut to Computer (Windows)?
You will need to set up your Cricut on a Windows PC, which requires a connection. Since the connection is part of the Cricut setup, you must use a compatible Windows PC, such as Windows 10 or a later version. I have explained the easy steps I followed to connect my Cricut to a Windows computer.
Here are the easy steps to connect your Cricut to a computer on a PC:
First, you need to look for a flat surface to place your Cricut.
Here, ensure the distance is no more than 15 feet from the PC.
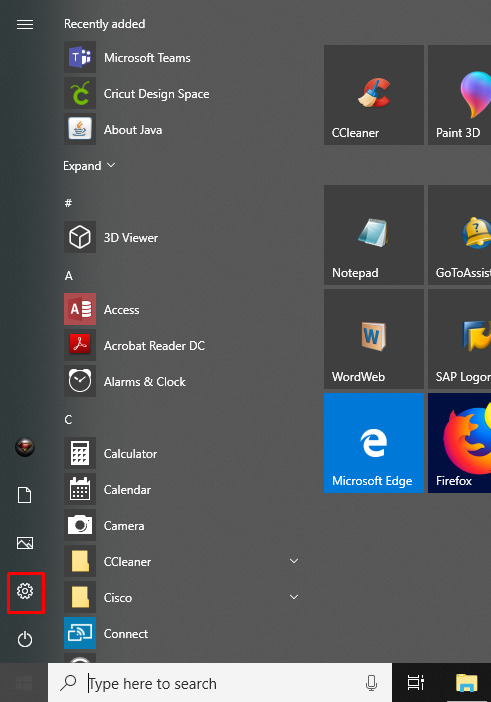
Afterward, go to the Start menu and select a gear icon to open Settings.
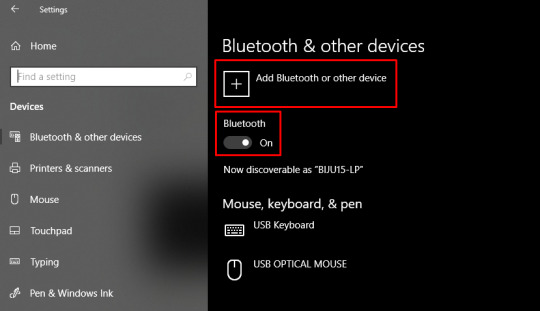
As you click on Settings, you will move to another screen, where you need to click on Devices.

Verify if your Bluetooth is ON, then go to Add Bluetooth or other device.
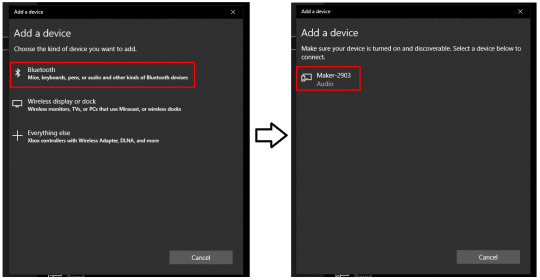
Next, select the Bluetooth option and wait for your PC to detect your Cricut machine.
Select it as it is visible in the open list, and your pairing will be done.
How Do I Connect Cricut to Computer (Mac)?
Mac users need to follow the following steps. However, the placements of Cricut and your computer are almost the same as for Windows. Here are the easy steps to connect your Cricut to a computer on a Mac:
Review if your computer is powered on or off.
After that, move to the Apple menu and choose the System Preferences option.
Now, go to the Bluetooth app on your Mac computer.
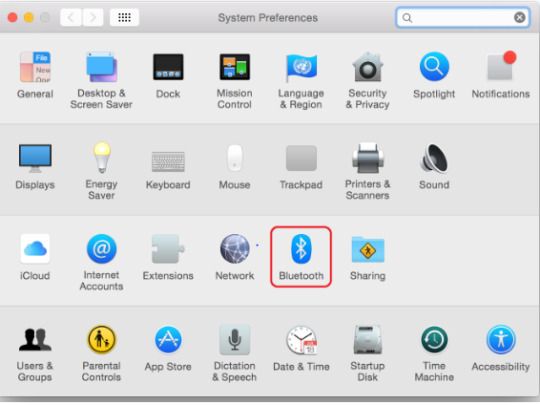
Afterward, turn on the Bluetooth.
Next, select the detected Cricut model from the available list.
Last but not least, you have connected your Mac computer to your Cricut.
FAQs
Question 1: What is the “Connect to Computer via Bluetooth” screen on Cricut?
Answer: The “Connect to Computer via Bluetooth” usually appears during the setup of Cricut Maker 3 or Cricut Explore 3. It happens because the Cricut Design Space app has detected an AMD Ryzen chip on your desktop. Actually, there is a problem with some Windows AMD Ryzen chips that may cause problems when you try to connect your Cricut via a USB cable. Therefore, Cricut recommends you use a Bluetooth connection for these computers.
Question 2: What should I do if my Cricut won’t connect?
Answer: If your Cricut is not connecting to your device, then you need to try the following useful tips:
You need to clear the cache and history of the web browser.
Run a scan on your computer for potential malware.
Defragment the hard disk.
Ensure your firewall or antivirus is blocking Cricut connections.
Question 3: Are all Bluetooth dongles compatible with Cricut machine?
Answer: According to Cricut’s official website, CSR (Cambridge Silicon Radio) Bluetooth dongles are incompatible with the Cricut machine. However, if you want to use a Bluetooth dongle, you need to use one that supports audio devices. Cricut doesn’t guarantee that all dongles will connect to your machine, but those that support audio devices are more likely to be able to connect.
Conclusion
To learn how do I connect Cricut to computer, I have explained all the steps carefully. Before that, I also mentioned things that were required before the Cricut setup. In it, I have especially discussed the system requirements. Make sure your Cricut meets the requirements so that you can do the setup in no time. To have an error-free, smooth connection with the Cricut software, go to this write-up and follow the steps mentioned above.
Read more: install cricut design space app
cricut.com/setup mac
Cricut Design Space
Cricut New Machine Setup
Source: How Do I Connect Cricut to Computer
#How Do I Connect Cricut to Computer#Cricut New Machine Setup#install cricut explore air 2#cricut design space#cricut explore 3#cricut.com/setup#design space signin#cricut.com/setup mac#cricut.com/setup windows
0 notes
Text
youtube
How To Clear RAM Cache In Windows 10 / 11 Laptop (2024) | Make Your PC Run More Faster (Easy Way)
0 notes
Text
What Does Google Know About You?
Ever paused for a second, amidst a busy workday, to ponder on this question? It’s like suddenly realizing there’s an audience to your private show. You’re not paranoid; many business owners just like you are grappling with the same thought.
Unsolicited ads popping up relevant to a recent search or conversation
The feeling of being watched, resulting in self-censorship
Potential misuse of personal or business information
Inability to keep personal preferences or interests private
A continuous influx of emails and promotions from unknown senders
Increased vulnerability to cyber threats
Mistrust in online platforms, impacting digital business operations
Time wasted in sifting through irrelevant ads and content
Loss of personal touch; becoming just another data point in the vast digital sea
Constant worry about where and how personal or business data might be used

Contrary to popular belief, it’s not your numerous online searches that expose you. It’s deeper:
Cookie tracking beyond search engines
Use of Google tools and apps like Maps, Docs, or even Android OS
Engaging with websites or platforms integrated with Google services
Use of voice assistants that run on Google software
Having a Gmail account, where most of our personal and business correspondence happens
YouTube viewing preferences and searches
Google Calendar entries and schedules
Data collected from other users sharing information about you
Geo-locations from devices, showing not just where you are, but predicting where you’ll be
Did you know your Google Home might be listening more than you’d like?
Because those solutions fail to address the real cause. Or can even make the cause worse.
Private browsing or using an incognito window? They may not be as protective as you think. Regularly clearing your browser cache? Google has ways around it. Using non-Google apps? If they’re integrated with Google services, data can still be harvested. Relying solely on antivirus or firewalls? They don’t prevent data tracking.
What needs to be done to solve the issue
Understanding how data is collected is the first step, and a digital marketing expert knows its importance well. Educating oneself about what data is shared and when is crucial for individuals and businesses. It’s wise to avoid using a single account for personal and business matters to maintain data separation. Limit sharing unnecessary information, even if it seems harmless, to protect your privacy. A digital marketing expert also emphasizes the importance of frequently checking and updating your privacy settings. Staying informed about data breaches and what they mean for your data is key, and they may suggest opting for platforms that prioritize user privacy in their strategies and campaigns.
The Top 10 Benefits Of Implementing This New Solution
Enhanced personal and business privacy.
Freedom from unsolicited and often intrusive ads.
Increased confidence and trust in online operations.
Reduced vulnerability to potential cyber threats.
Saving time by not sifting through irrelevant ads.
Retaining personal touch and not just being another data statistic.
Assurance that private conversations remain private.
Streamlined, personalized content viewing on platforms like YouTube.
Sense of empowerment and control over personal and business data.
Peace of mind, knowing your data is safe.
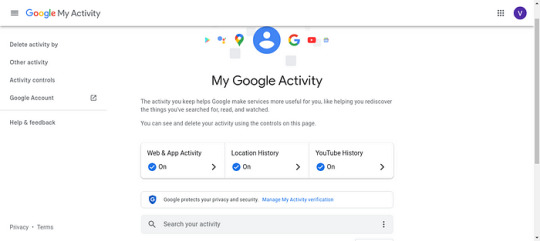
A Complete Breakdown of Google’s New “My Activity” Dashboard
Have you ever wondered just how much Google knows about you? You might have had a hint each time a strangely accurate ad pops up or when a video recommendation feels eerily specific. But there’s a lot more to it than just Google Ads and videos. And Google has brought all of it to light with its new “My Activity” dashboard.
Why Should You Care?
Imagine an archive, a vast library of almost everything you’ve done online. That’s the “My Activity” dashboard for you. It’s where Google shows its cards, letting you see what data it’s collected about you. Remember that video on how to make macarons you watched three months ago? Yep, it’s there. That search about ‘how to manage sleep schedules’? That���s recorded too.
What’s On The Dashboard?
The dashboard is essentially a timeline of your online antics. From YouTube video views, searches, and visited websites, to interactions with Assistant and even places you’ve been to (thanks to Google Maps), it’s all there. Here’s what you’ll find:
Searches: Every time you use Google to search for anything, from academic research to search engine optimization techniques, random curiosities, or finding a new restaurant nearby, Google remembers
YouTube: Those cat videos or DIY crafts you’ve watched? They’re on the list. The dashboard even records the videos you’ve merely clicked on.
Ads: The dashboard reflects the ads you’ve interacted with, giving you a hint as to why you are being targeted with specific content.
Websites: Using Google Chrome means your browsing history is on the dashboard too.
Location: If you have location history turned on, the dashboard will display places you’ve visited, routes you’ve taken, and even how long you stayed.
Is It All Bad?
Not necessarily. The dashboard isn’t there to spook you. Instead, Google offers this level of transparency to give users a semblance of control. With the dashboard:
Personalization: Google uses this data to refine its services for you. The more it knows, the better its algorithms can personalize your online experience. This means better search results, more relevant ads, and YouTube content tailored just for you.
Control: With great data, comes great responsibility. Google understands this. That’s why the dashboard isn’t just a view-only portal. You can delete data points, or even erase your entire activity history if you wish.
What Can You Do?
Feeling uneasy? That’s okay. As mentioned earlier, Google offers control. Within the dashboard:
Delete Data: You can select specific data points and delete them. So, if there’s a particular search or site you’d rather Google forgot about, you can erase it.
Filter By Date or Service: If you wish to review your activity for a specific period or from a particular Google service (like YouTube), you can do that.
Turn Off Tracking: Google also lets you stop the data recording altogether. There’s an option to pause specific tracking features, meaning Google will no longer store that data.
In a digital era where data is the new oil, transparency, and control are crucial. While Google’s “My Activity” dashboard might initially seem like a daunting reminder of our digital footprints, it’s also a tool of empowerment. It’s a space where you can revisit your online journey, tweak its direction, and even choose to wander off the grid if you wish.
Navigation and Layout
It’s user-friendly. All activities are categorized based on Google services, making it easy to review.
“Delete Activity By” Feature in Google’s “My Activity” Dashboard

Privacy concerns and the right to data ownership have become significant points of discussion in the digital age. Google, being a leading tech giant, understands the importance of granting users more control over their data. One such empowerment tool is the “Delete Activity By” feature in the “My Activity” dashboard. Let’s delve into the intricacies and significance of this feature.
Choosing the Data You Wish to Erase

One of the primary functions of the “Delete Activity By” option is its specificity. Unlike a blanket delete command that might remove everything, this feature provides granular control, allowing users to:
Select Specific Dates: Maybe you had a day of unusual searches you’d rather forget, or perhaps there’s a particular period you’d like to remove from your digital footprint. By choosing a specific date or date range, you can ensure those activities are erased while leaving the rest untouched.
Opt for Specific Google Services: If you want to erase your YouTube watch history but leave your Google Search activity intact, this is the feature for you. You can select a particular Google service, ensuring only data from that platform is deleted.
The Process: Simple and Straightforward
Google has designed this feature with user-friendliness in mind. Here’s how the process typically unfolds:
Access “My Activity” Dashboard: Navigate to the dashboard and look for the “Delete Activity By” option, usually prominently displayed.
Specify Your Criteria: Whether you’re going by date or service, use the dropdown menus or calendars to narrow down your deletion criteria.
Review and Delete: Before the final deletion, Google typically offers a brief summary of what you’re about to remove, ensuring you’re making an informed choice. Once confirmed, the specified data is erased from your account.
Why This Feature Matters
The “Delete Activity By” feature isn’t just about erasing past searches or activities; it’s a step towards more extensive digital rights. Here’s why:
Enhanced Privacy: By allowing users to selectively delete their data, Google is offering an additional layer of privacy. Users can ensure that sensitive or personal searches don’t remain stored indefinitely.
Taking Control of One’s Digital Footprint: Our online activities tell a story about us. By giving users the power to curate this story, Google is promoting responsible and conscious internet usage.
Trust Building: Features like these enhance the trust relationship between platforms like Google and their users. Knowing that a platform respects user autonomy when it comes to data can boost confidence and loyalty.
“Other Google Activity” in the “My Activity” Dashboard

The digital footprint you leave on Google isn’t just about the search queries you type or the YouTube videos you watch. There’s a myriad of other interactions and data points that Google collects, and all these are neatly compiled under the “Other Google Activity” section in the “My Activity” dashboard. Let’s dive deeper into understanding this aspect of our digital interaction with Google.
Beyond Just Searches: A Multifaceted Interaction
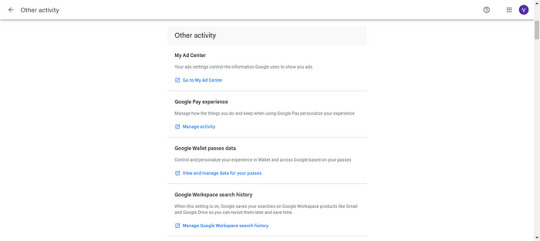
The term “Other Google Activity” might sound nebulous, but it essentially encompasses all the additional ways you engage with Google services outside of direct searches. Here’s a breakdown of what it usually includes:
Location History: If you use Google Maps or have location services turned on, Google tracks your movement. This data aids in offering better location-based suggestions and more accurate traffic predictions.
Device Information: Google might log details about the devices you use to access its services. This could include data like device type, operating system, and even hardware stats, ensuring smoother service delivery tailored to your device’s capabilities.
Voice and Audio Activity: For those who use voice commands or Google Assistant, Google might store voice snippets to improve voice recognition and provide a more personalized user experience.
App Activity: If you use Google Play or other Google apps, your app activity, like the apps you install, use, or uninstall, can be listed under this section.
Navigating the “Other Google Activity” Section
Accessing and understanding this data is straightforward:
Log into the “My Activity” Dashboard: Once there, look for the “Other Google Activity” tab.
Browse Through the Listings: Each type of activity has its section, making it easier to navigate and understand the kind of data stored.
Manage and Delete if Necessary: Like other sections in the dashboard, users retain the autonomy to review and, if needed, delete specific data points.
The Importance of Recognizing “Other Google Activity”
Knowing about this additional layer of data collection is crucial for several reasons:
Holistic Understanding of Data Collection: Being aware of the full spectrum of data Google collects ensures users understand the depth and breadth of their digital interactions.
Informed Decision Making: When users know what data is being stored, they can make informed choices about their privacy settings and how they interact with Google services.
Enhanced User Experience: Many of these data collections, while they might seem intrusive, are geared towards tailoring a more personalized and efficient user experience.
“Activity Controls” in the “My Activity” Dashboard (How to Stop Google from Collecting Your Information)

In the digital age, privacy is a currency. And while many of us enjoy the convenience Google services provide, it’s essential to have control over the type of information Google collects about us. That’s where “Activity Controls” come into play. Located within the “My Activity” dashboard, these controls are designed to give users agency over their data. Here’s a deep dive into these controls and how they can be your digital safeguard.
Decoding the “Activity Controls”
“Activity Controls” is essentially a toolkit that lets you decide what data Google can collect and use across its services. These are the features it usually encompasses:
Web & App Activity: This controls whether Google can track and store your searches, pages you visit, and other activities on Google apps and services. By toggling this off, Google stops saving these data points.
Location History: If you’re wary about Google knowing your every move, this control lets you halt the collection of your location data.
Voice & Audio Activity: For those concerned about Google storing voice commands or conversations with Google Assistant, this control can put an end to such recordings.
YouTube Search & Watch History: Prefer to keep your video preferences private? These controls allow users to stop Google from saving their search and viewing history on YouTube.
Device Information: This control can halt Google from storing information about your devices, such as contacts, calendars, and apps.
How to Harness the Power of “Activity Controls”
Navigating and setting up these controls is quite user-friendly:
Access “My Activity” Dashboard: Once logged in, find the “Activity Controls” section.
Toggle On/Off as Needed: Each type of activity will have a toggle switch. Simply click on it to turn off data collection for that specific activity.
Review & Confirm: Before finalizing your choices, it’s always good to review and ensure you’ve set the controls as per your comfort level.
The Significance of “Activity Controls”
The existence and ease of use of these controls highlight several critical points:
User Autonomy: Google recognizes the significance of user autonomy in data privacy, ensuring individuals have the final say on their data.
Balancing Convenience with Privacy: While collecting data helps Google enhance its user experience, it also offers users a way to balance this convenience with their privacy concerns.
Transparency: By laying out all data collection methods transparently and giving users an easy way to control them, Google emphasizes its commitment to responsible data usage.
Deleting Your Entire Google Account: The Nuclear Option
The modern digital age means many of us are intertwined with services offered by tech giants like Google. Whether it’s for professional use, personal entertainment, or a mix of both, Google’s suite of services have become almost second nature to many. However, there are occasions when users may decide to delete their Google Account entirely. Before taking this drastic step, it’s vital to understand the full implications.
What Does “Deleting Your Google Account” Mean?
Deleting your Google account isn’t just about removing a Gmail address. It’s about erasing your digital footprint across all Google services. Here’s what that entails:
Gmail: All emails, drafts, and attachments will be permanently deleted.
Google Drive: Every document, photo, video, and file stored will vanish.
YouTube: Say goodbye to your uploaded videos, comments, likes, and subscriptions.
Google Photos: All your photos and videos will be removed.
Google Calendar: Any appointments, reminders, and shared calendars will be gone.
Google Play: Purchased apps, movies, games, and books will no longer be accessible.
Google Contacts: The contacts stored in your Google account will be deleted.
Search History & Data: Your search preferences and history across Google services will be wiped clean.
And much more: This includes other services like Google Maps’ saved places, Google Keep notes, etc.
The Process of Deletion
Backup: Before you even think of deleting your account, backup essential data. Google Takeout allows users to download their data across Google services.
Access Account Preferences: Go to Google’s account preferences.
Select ‘Delete your account or services‘: This section gives you the option to either delete specific Google services or your entire Google account.
Follow the Prompts: Google will guide you through the deletion process, ensuring you understand the ramifications of your decision.
Final Confirmation: You will be asked to enter your password and confirm that you genuinely want to delete your account. This step is irreversible.
Considerations Before Taking the Leap
Permanency: Remember, once deleted, the data cannot be recovered. It’s gone forever.
Associated Services: Many third-party services use Google for logins. Ensure you change login methods for these services before deleting your account.
Communication: Inform your contacts that your Gmail will no longer be operational.
Digital Purchases: You will lose access to any digital content purchased through Google platforms.
So… What Does Google Know About You?
In essence, quite a lot. More than some close friends might even know. But armed with the right knowledge and tools, you can determine how this narrative goes.
Conclusion:
In the digital age, our online footprints are vast and varied. Google, being at the forefront of internet services, has over time accrued a staggering amount of user data, intricately mapping our digital behaviors, preferences, and habits. From the websites we visit, and the videos we watch, to the places we frequent, Google has an almost encyclopedic knowledge of its users. This vast collection of data is not merely an idle archive; it drives the personalized experiences we receive, making services more efficient and advertisements more relevant.
However, with such immense power comes significant responsibility. As users, it’s crucial to be aware of the data we share, intentionally or otherwise, and the tools at our disposal to manage this data. Balancing the conveniences of personalization with the imperatives of privacy is the ongoing challenge of our times. In the end, the question isn’t just what Google knows about us, but how we choose to navigate and shape that knowledge in an era of digital omnipresence.
“Concerned about what Google knows about you? Reach out to us now, and let our team help you navigate and protect your digital footprint. Contact us today!”
1 note
·
View note
Text
How to Resolve Cricut Design Space Won't Open Issue?
Cricut Design Space is an online tool that enables crafters to design, customize, and make several projects. This tool is convenient to use for beginners and experienced DIY makers. But, sometimes, the user finds Cricut Design Space won't open. This error can hinder the smooth functioning of this online tool. Are you wondering why this happens? Several reasons can cause the issue. It includes third-party virus interference, incorrect network settings, and corrupt cache files. Additionally, the Design Space can sometimes fail to open because it requires an update.
But, no matter the reasons, you can quickly fix the error with accurate steps. This post discusses the most common resolution techniques to eliminate the error.
Solution 1: Ensure You Have Met the Minimum Requirements
Sometimes, an error can pop up when you fail to withstand the requirements. Thus, it is essential to meet all the software criteria for the full functioning of the tool. Otherwise, you will need to upgrade your device and meet those requirements.
Solution 2: Make Sure There is a Stable Internet Connection
The Design Space app needs a constant internet connection to work. A bad network connection can cause issues and make the tool unable to open. A 2 Mbps internet speed is required for the smooth functioning of this Cricut companion. If this is the reason for your issue, take a speed test. And then find whether it is meeting the minimum speed or not. If not, ensure it is stable and includes minimum internet speed.
Solution 3: Force Cricut Design Space Reloading
The slow speed can make the Design Space fail to open. The tool Design Space can become slow due to several issues. However, you can fix it by forcing a reload. It will solve the problem; Cricut Design Space won't open, enabling you to use the software. Are you looking for reloading steps? You can go through these simple instructions to force the Design Space reload.
After performing these instructions, go and check the tool for errors. If the issue is still there, move to the next solution.
Solution 4: Relaunch Design Space on Your Windows/Mac
Relaunching the software can fix some of the most common issues. Also, It is a basic solution to ward off any software issue. Thus, if the above resolutions don't work, follow these steps. Below are the tips for relaunching the Design Space software on Windows and Mac computers.
For Windows
Does the tool need to be fixed on your Windows computer? You can follow the steps to relaunch the software. The exact instructions work for almost all Windows versions.
For Mac
If you want to access Design Space on a Mac computer, you must first resolve the won't open issue. You can relaunch the app to solve the problem quickly.
Conclusion
Cricut Design Space won't open is the most irritating issue for crafters. The issue can arise because of unmet minimum requirements, unstable internet connection, damaged or corrupt cache files, etc. The good thing is you can fix it immediately. Try to meet the criteria and ensure you have a stable internet connection. If you still face the issue, force reload the Design Space or relaunch the app. These essential solutions are apt for both Windows and Mac computers.
Frequently Asked Questions
How to Fix Design Space is Not Opening Issue in Windows 10/11?
If the Design Space is not opening, you can clear the cache. Here are a few steps to clear the Windows 10 and 11 computer cache.
What are the Causes of Cricut Design Space Won't Open Issue?
Design Space can fail to open for several reasons. The issue can relate to unstable internet or the presence of viruses. There are some additional causes, too. Some of the reasons why the app won't open are :
What are the Common Solutions to Fix Design Space Won't Open?
Cricut Design Space won't open, and the issue can happen anytime. There can be various possible reasons for this issue. But you can fix it through some easy and practical solutions. Here are the most common resolutions to come out of the error.
Visit: cricut.com/setup
install cricut design space app cricut.com/setup mac cricut maker software
Source: https://cricutdesignacut.wordpress.com/2023/10/17/how-to-resolve-cricut-design-space-wont-open-issue/
#cricut design space app#install cricut design space app#cricut.com/setup#cricut.com setup#cricut explore air 2 setup#cricut explore air 2#cricut new machine setup#cricut design space login
0 notes
Text
Why Choose Yamicsoft Window Cleaner Software?

Introduction
Over time, Windows operating systems accumulate unnecessary files, outdated registry entries, and performance-hindering clutter. Yamicsoft Window Cleaner Software is a powerful and efficient tool designed to optimize and clean Windows-based computers, enhancing speed, stability, and overall system performance.
Yamicsoft Window Cleaner Software
Yamicsoft is known for its expertise in Windows optimization solutions. Our Window Cleaner Software offers a comprehensive suite of tools to remove junk files, optimize the registry, and improve system efficiency — all in one user-friendly package.
Key Features and Benefits
Advanced System Cleaning: Removes unnecessary files, cache, and temporary data to free up disk space.
Registry Optimization: Scans and fixes invalid registry entries to improve system stability.
Startup Manager: Helps manage startup programs to speed up boot times and system performance.
Privacy Protection: Clears browsing history, cookies, and other sensitive data to enhance security.
One-Click Optimization: Quickly improves system performance with a single click.
Uninstaller Tool: Helps remove unwanted programs and leftover files for a cleaner PC.
How It Works
Scan Your System — Run a deep scan to detect junk files, broken registry entries, and unnecessary background processes.
Optimize and Clean — Select optimization options to clean up disk space, manage startup applications, and fix registry issues.
Enhance Performance — Enjoy a faster and more efficient Windows experience with improved speed and responsiveness.
System Requirements
Operating System: Windows 10/11 (32-bit & 64-bit)
Processor: Intel or AMD 1 GHz or faster
RAM: 2 GB or higher
Storage: Minimum 200 MB free disk space
Why Regular Cleaning is Essential
Regularly using Yamicsoft Window Cleaner Software prevents system slowdowns, enhances security, and extends the life of your PC. By removing unnecessary files and optimizing settings, your Windows computer will run at peak efficiency for longer.
Why Regular Cleaning is Essential
Experience a cleaner, faster, and more secure Windows system with Yamicsoft Window Cleaner Software.
0 notes
Text
Explain HTML5 Web storage

In the ever-evolving landscape of web development, HTML5 introduced a game-changing feature known as web storage. This feature allows web developers to store data on the client-side, offering a more efficient and flexible alternative to traditional cookies. In this blog, we'll explore HTML5 web storage, its two key components (localStorage and sessionStorage), and how it empowers developers to enhance the user experience.
HTML5 Web Storage: An Overview
HTML5 web storage provides a mechanism for web applications to store data locally in a user's browser. Unlike cookies, which have limited storage capacity and are sent with every HTTP request, web storage offers a more robust solution. It allows developers to store data directly in the user's browser, reducing the amount of data sent to the server and improving overall performance.
LocalStorage vs. SessionStorage
HTML5 web storage consists of two main components: localStorage and sessionStorage. Let's delve into the differences between these two storage options:
LocalStorage:
Persistence: Data stored in localStorage remains available even after the user closes the browser or navigates away from the website. It persists across browser sessions and is not tied to a specific tab or window.
Capacity: Typically, localStorage offers a larger storage capacity compared to sessionStorage, which can vary from 5-10 MB depending on the browser.
Use Cases: localStorage is well-suited for storing long-term data such as user preferences, cached data, or application settings that need to be retained between sessions.
SessionStorage:
Session-Based: Data stored in sessionStorage is only available for the duration of the page session. When the user closes the tab or window, the data is cleared.
Isolation: Each tab or window has its own isolated sessionStorage, ensuring that data stored in one tab is not accessible by another. This can be advantageous for implementing security or isolation between browser tabs.
Use Cases: sessionStorage is useful for temporary data storage, such as maintaining form data across multiple pages during a single session or managing data that should not persist beyond the current browsing session.
Benefits of HTML5 Web Storage:
Improved Performance: By storing data locally, web storage reduces the need to transmit data to the server with each request, resulting in faster page load times and a more responsive user experience.
Increased Storage Capacity: HTML5 web storage offers more storage space compared to traditional cookies, enabling developers to store larger datasets.
Simplified Data Management: Web storage simplifies data management on the client-side, making it easier to work with user preferences, settings, and cached data.
Enhanced Security: Data stored in web storage is not sent to the server, reducing the risk of exposing sensitive information to potential threats.
No Expiry: Unlike cookies, data in web storage does not have an expiration date, ensuring that stored information remains accessible until explicitly removed by the application or the user.
Best Practices and Considerations:
Be mindful of the data you store in web storage, as it is accessible to JavaScript on the client-side.
Implement data validation and security measures to prevent data corruption or unauthorized access.
Regularly clean up and remove outdated or unnecessary data to avoid storage clutter.
Conclusion
HTML5 web storage has opened up exciting possibilities for web developers, transforming the way data is managed and enhancing user experiences. This client-side data storage solution, with its localStorage and sessionStorage components, provides a more efficient and scalable alternative to traditional cookies.
To harness the full potential of HTML5 web storage and integrate it effectively into your web development projects, consider enrolling in an online web development course. These courses offer structured learning experiences, hands-on practice, and expert guidance in utilizing web storage and other cutting-edge technologies. By embarking on an web development course, you not only gain proficiency in web storage but also acquire a broader skill set to create responsive and user-friendly web applications. Embrace this opportunity to stay at the forefront of web development through an online web development course, and elevate your capabilities in this ever-evolving field.
0 notes
Text
How Node JS Bring Success to Your Online Business?

Node.js is one of the best JavaScript platform which is built on Chrome’s V8 JavaScript engine. Node.js development is one of the powerful, efficient, fast, & scalable web server. It is developed to use non-blocking, event-driven I/O to remain lightweight & efficient in the face of data-intensive real time apps that runs across multiple devices.
Today, many top app development companies use it for various security benefits such as high performance, cloud-enabled technology, cheap hosting services, MVP delivery, easy execution & installation, lightweight Node Js Development Services.
Top Benefits of NodeJS for Your Online Business
1. It’s Easy to Code
Node.js code is easy to learn and write and web developers can easily write code in JavaScript for both the server & client. JavaScript makes it convenient for transferring data between the client & the server that works simultaneously.
2. No Learning Curves Involved
As we have discussed above that it’s easy to learn node.js and you don’t have to go through the complex syntax learning & grasping procedures since the node is based on JavaScript.
Node.js developers will find it flexible to learn, code, develop, & deploy scalable node apps on multiple platforms such as Windows & UNIX. Even it’s easy to learn for beginners as well and can easily develop some robust applications.
3. Best for Developing Real-Time Web Apps
Node.js helps you to build real-time web applications at a light speed for making simple blog sites in Chat apps, gaming apps. The event-driven architecture serves both client and server-side codes written in JavaScript.
4. Allow Data Streaming
Web developers know that HTTP request & response are two separate events where developers can take benefits of data streams such as processing files at the time of loading & creation of the attributes, it also reduces the duration of the data transmission process.
5. NPM Enterprise
NPM enables programmers to install, update, & utilize smaller modules of open-source software packages. It makes the process much easier without any complexity for developers to build apps from scratch.
Developers can avoid writing complex coding layers by simply twisting the code lines as per their requirements. The major benefit is that a plethora of Node.js libraries & apps are published on npm, and several are added every day.
6. Hosting
The demand for web hosting is increased and Node.js is one of the most popular and in-demand platforms from the past few years. PaaS service providers like Heroku and Modulus are allowing the deployment of node.js without any problem for your web hosting needs.
7. Cross-Platform Ensures Flexibility
As Node.js is a cross-platform JavaScript platform, it offers the maximum flexibility in terms of hosting it on any server. Since Node application can be implemented on multiple platforms and that gives multiple options to the developers.
8. Useful for Clients
Node.js has the support of a huge open source community that delivers outstanding modules that work everywhere such as Socket.io. It maintains the constant communication between the client & the server and allows them to send real-time updates to each other.
9. Proxy Server
Node provides the best solution for the proxy server and it also works as a Proxy to the firms that do not have the proper infrastructure for proxy needs.
10. Benefits of Caching
As Node.js provides the open-source platform, developers can enjoy the benefit of caching single modules as well. When you request for the first modules, it will get cached automatically on the app's memory.
It enables developers to load web pages faster as they don’t have to re-execute the codes. Also, users can navigate through these applications swiftly because of Node.js high responding speed.
Wrapping-up:
From the above discussion, it’s clear that Node.js is much popular among startups and provides you many more benefits that is the reason why big giants like PayPal, Netflix, Microdot, and eBay are using Node as a feature-rich app development framework today. Shiv Technolabs Pvt. Ltd. is the best NodeJS Development Company & our dedicated Node.js developers are technology-conscious and can be a helping hand for your several projects of web Development.
1 note
·
View note
Text
260 - Cattle Rustler with an AirTag With Ben Roethig
The latest In Touch With iOS with Dave he is joined by Ben Roethig. iOS 16.5.1 security update was released a must install. The case of the cattle rustler and AirTag. The very first visionOS SDK is released. Chrome for iOS AI address detection, Apple's new subcategories in its podcast app, and the upcoming CarPlay updates in iOS 17. Tune in to catch up on all things Apple.
The show notes are at InTouchwithiOS.com
Direct Link to Audio
Links to our Show
Click this link Buy me a Coffee to support the show we would really appreciate it. intouchwithios.com/coffee
Another way to support the show is to become a Patreon member patreon.com/intouchwithios
Website: In Touch With iOS
YouTube Channel
In Touch with iOS Magazine on Flipboard
Facebook Page
Twitter
Instagram
News
Chrome Browser for iOS Getting Improved Translation, Google Lens and Maps Features - MacRumors
Apple Podcasts App Updated With Enhanced Search Functionality - MacRumors
Apple expands Self Service Repair with iPhone 14, M2 Macs, system config changes, more
iPhone App Store rolling out new ad format, visible on Today tab without scrolling - 9to5Mac
Apple Music’s hidden social network is basic but great for discovery
Fiberglass cattle rustler foiled by a strategically placed AirTag
AirPlay coming to hotel TVs soon thanks to LG and Apple partnership | AppleInsider
Topics
iOS 16.5.1 was released must update with security fixes. iOS 16.5.1 and macOS 13.4.1 Address Actively Exploited Vulnerabilities, Make Sure to Update
Apple Releases watchOS 9.5.2 With Security Fixes - MacRumors
Apple Releases iOS 16.5.1 With Fix for Lightning to USB Camera Adapter Bug
Beta this week iOS 16.6 Beta 3 was released. Apple Releases Third Public Betas of iOS 16.6 and iPadOS 16.6
visionOS Beta released for the first time. Apple Releases First Ever visionOS Beta
Apple Vision Pro Developer Tools Now Available With New visionOS SDK
Apple releases visionOS SDK to developers and details testing process
iOS 17 Beta 2 was released this week.
Apple Seeds Second Betas of iOS 17 and iPadOS 17 to Developers
Everything New in iOS 17 Beta 2
Apple Seeds Second Beta of tvOS 17 to Developers
Apple Seeds Second Beta of watchOS 10 to Developers
New finds in iOS 17
iOS 17 and macOS Sonoma Add Passkey Support to Your Apple ID
Apple adds passkeys to Apple ID, iCloud logins
iOS 17 lets users ask Siri to play media on the HomePod using iPhone apps
What is new with CarPlay in iOS 17? Everything New With CarPlay in iOS 17
iOS 17 superguide: Everything you need to know about the next iPhone update
Tips
How to turn off iCloud's default settings in macOS and iOS
Apple Arcade Guide: Everything that's available [New: Bold Moves+]
OneNote on iOS is about to get a big boost for organizing notes
How to clear cache on your iPhone
Macstock 7 is here! Tickets are Sold Out but Virtual Tickets are available.Dave is speaking again at the event along with Jeff Gamet, Brittany Smith, Chuck Joiner, and many others. Please join in all the fun July 22-23, 2023! Speakers Link.
Our Host
Dave Ginsburg is an IT professional supporting Mac, iOS and Windows users and shares his wealth of knowledge of iPhone, iPad, Apple Watch, Apple TV and related technologies. Visit the YouTube channel https://youtube.com/intouchwithios follow him on Mastadon @daveg65,
Twitter @daveg65.and the show @intouchwithios
Our Regular Contributors
Jeff Gamet is a podcaster, technology blogger, artist, and author. Previously, he was The Mac Observer’s managing editor, and Smile’s TextExpander Evangelist. You can find him on Mastadon @jgamet as well as Twitter and Instagram as @jgamet His YouTube channel https://youtube.com/jgamet
Ben Roethig Former Associate Editor of GeekBeat.TV and host of the Tech Hangout and Deconstruct with Patrice Mac user since the mid 90s. Tech support specialist. Twitter @benroethig Website: https://roethigtech.blogspot.com
Here is our latest Episode!
0 notes