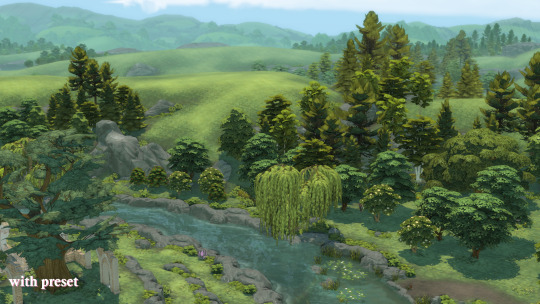
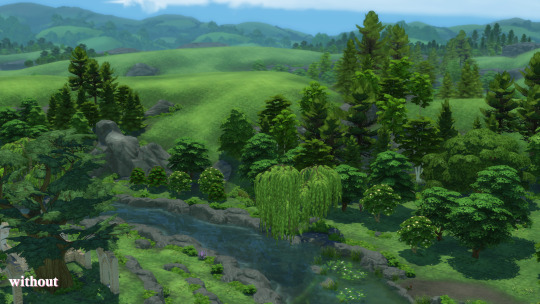
#how to download reshade on sims 4
Text
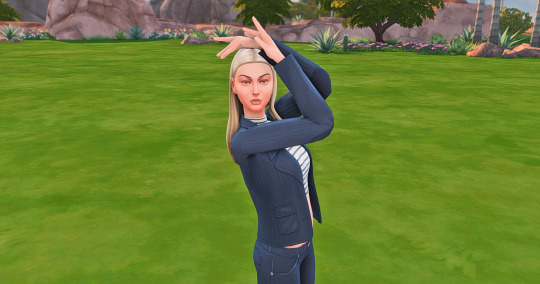
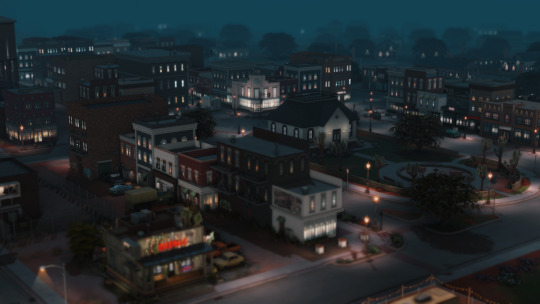
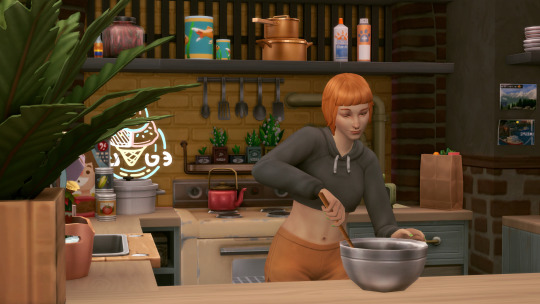
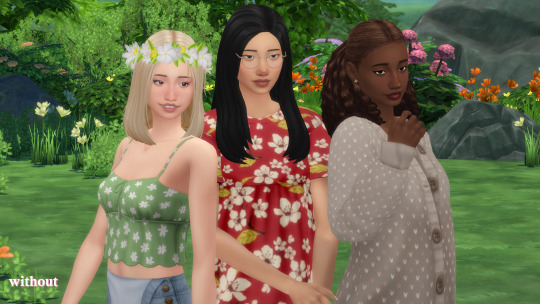
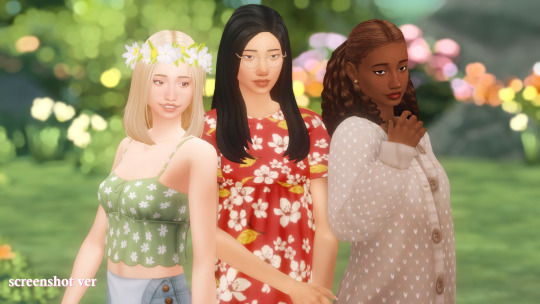
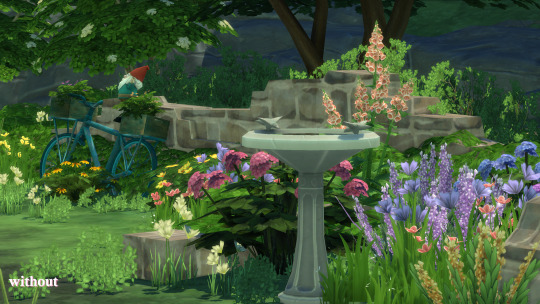
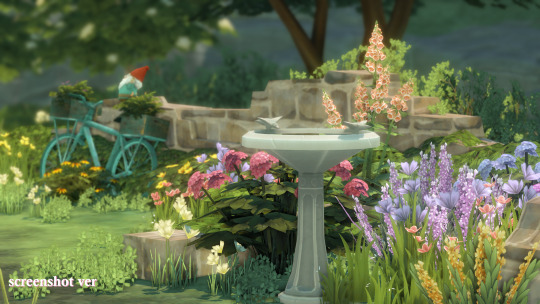
RESHADE PRESET: AMAZING BY FEFYLA
DOWNLOAD ON MY BLOG:
#how to install reshade on sims 4#how to download reshade on sims 4#how to download reshade sims 4#how to install reshade sims 4#sims 4 reshade#the sims 4#sims#mods#cc#reshade#preset#sims 4#sims 4 lighting mod#reshade tutorial#sims 4 reshade mod#how to install reshade#sims 4 reshade tutorial#the sims#sims 4 tutorial#reshade mod tutorial#sims 4 reshade preset#sims 4 how to#reshade preset#the sims 4 mods
2 notes
·
View notes
Text
okokok this is starting to turn into something i think :')
#i forget how i used to edit screenshots and need to download reshade#ts4 build wip#ts4 build#ts4#the sims 4#not so forgotten temple#the forgotten temple#my builds#built for so long i lost track of time it was and now very much need to go to sleep hahaha
73 notes
·
View notes
Text

The Hazel Collection:
The Hazel collection draws inspiration from country/bohemian fashion - frills, denim, and obnoxiously large jewellery. This 9-piece collection fits beautifully into the worlds of Henford-on-Bagley and Chestnut Ridge for that casual everyday countryside attire.
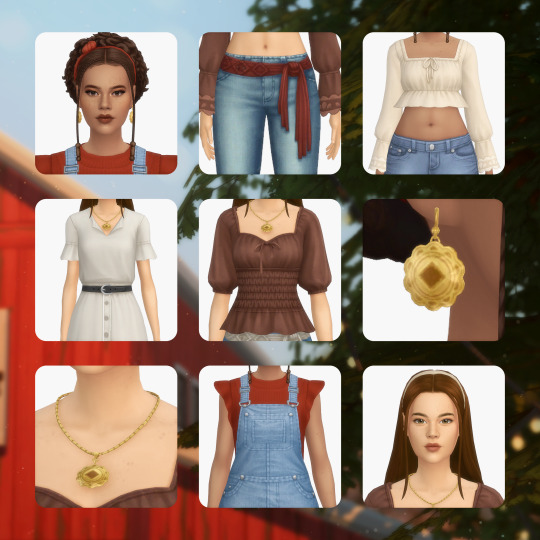
Information about each item is below the 'keep reading'.
Download Here | Patreon | Twitter
Item Information (left to right):
1. Drew Hair:
BGC, 24 EA Swatches, All LOD’s, Hat Compatible, All Maps.
Headband comes in Daisy palette, found in left brow ring category.
2. Honey Jeans:
BGC, 15 Swatches, All LOD’s, All Maps.
3. Piper Top:
BGC, 20 Swatches, All LOD’s, All Maps.
Comes in my Daisy palette.
4. Maple Dress:
BGC, 20 Swatches, All LOD’s, All Maps.
Comes in my Daisy palette.
5. Gracie Blouse:
BGC, 20 Swatches, All LOD’s, All Maps.
Comes in my Daisy palette.
6. Macie Earrings:
BGC, 12 Swatches, All LOD’s, All Maps.
Swatches come in @caelhinn Porcelain Gleam.
7. Dylan Necklace:
BGC, 12 Swatches, All LOD’s, All Maps.
Swatches come in @caelhinn Porcelain Gleam.
8. Sally Overalls:
BGC, 15 Denim Swatches, All LOD’s, All Maps.
Accessory sweater file found in gloves category and comes in my Daisy palette.
9. Mya Hair:
BGC, 24 EA Swatches, All LOD’s, Hat Compatible, All Maps.
Headband comes in Daisy palette, found in left brow ring category.
Watch how I make this hair in this video on my YouTube channel!
Credits and Miscellaneous stuff:
Lot used in the preview is by @captain-silvera and can be found here.
Reshade used in the preview is an edited version of Lithium by @gunthermunch.
Both shoes worn by the sims in the preview are from the Horse Ranch expansion pack.
Honey jeans are named after and inspired by @honbeafairy
Please let me know if you encounter any issues with the items in this collection via a direct message on Tumblr, including a picture of your error. Hope you enjoy, and make sure to tag me if you use my custom content!
#r#mycc#ts4#ts4cc#ts4mm#ts4ccmm#ts4mmcc#ts4 hair#ts4cc hair#ts4mm hair#ts4mmcc hair#ts4ccmm hair#s4#s4cc#s4mm#s4ccmm#s4mmcc#s4 hair#s4cc hair#s4mm hair#s4ccmm hair#s4mmcc hair#ts4 clothing#s4 clothing#sims4#maxismatch#thesims#thesims4#customcontent#oakiyo
3K notes
·
View notes
Text
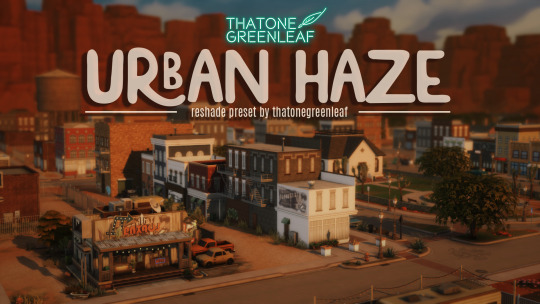


~urban haze~ reshade preset!
I've been using this preset on my twitch for a bit now, and i've finally gotten around to releasing it!! I'm very happy with it and I currently use it for everything😅
Urban haze has a focus on realistic lighting with a slight hazy and warm feel. Less blue in shadows, darker nights, deeper afternoon shadows, saturated sunsets, balanced greenery. Use it in any world, I've tested them all :)
__________________________________________
How to download:
♥ Download Reshade: (I use reshade 5.7.0, I can't say how this preset will behave with other versions of reshade, or G-shade.)
♥ During Reshade Installation, select The Sims 4, choose DirectX9 as the rendering API.
♥ Effect Packages to install: standard effects, sweetFX by CeeJay, qUINT by Marty McFly, color effects by prod80, and Legacy effects.
♥ Download urban haze below, drop it in your Sims 4 installation's "Bin" Folder
♥ Open the Sims 4, Disable edge-smoothing in your graphics settings if it's not already, In the reshade menu, set RESHADE_DEPTH_INPUT_IS_REVERSED= to 0 in global preprocessor definitions if it's not, and MXAO_TWO_LAYER= and MXAO_SMOOTHNORMALS= both to 1 in qUINT_mxao's preprocessor's definitions.
♥ If you're struggling with installation, I suggest you check out @kindlespice's installation tutorial! It was made for reshade 4.9.0 but the instructions remain the same.
__________________________________________
Notes:
♥ Both Depth of field shaders are off by default, you can enable them using their shortcuts: ctrl + Q (MagicDOF), ctrl + W (MartyMcFlyDOF) or enable them manually.
♥ MXAO.fx also has a shortcut (ctrl + R) bc sometimes the DOF blur makes the shadows weird, most of the time it's fine!
♥ Could potentially be gameplay friendly, depending on your GPU! The MXAO and DOF shaders will be the most performance heavy, feel free to adjust to your liking.
♥ The pictures above were taken with this preset and no further editing, but I do use a few lighting mods that will affect how my game looks:
♥ NoBlu by Luumia
♥ NoGlo by Luumia
♥ twinkle toes by softerhaze
URBAN HAZE RESHADE PRESET ↠ download on sim file share!
Follow me on twitch!
Support me on patreon!
TOU: do not redistribute, reupload, or claim my cc/CAS rooms/presets as your own! recolour/convert/otherwise alter for personal use OR upload with credit. (no paywalls)
538 notes
·
View notes
Text
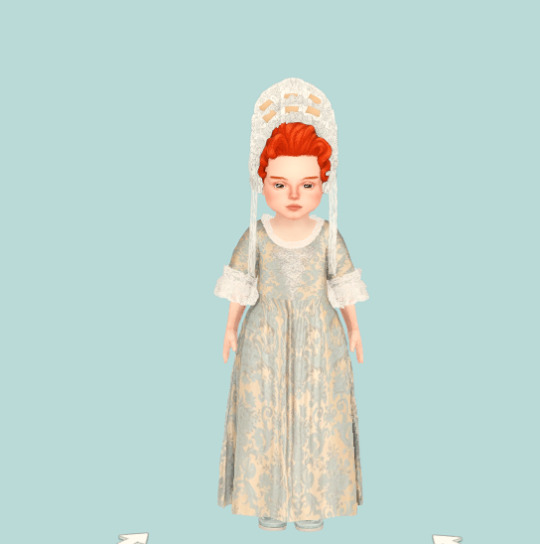
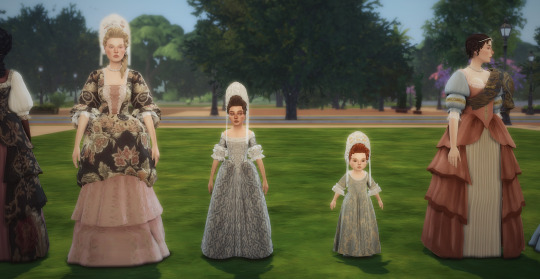
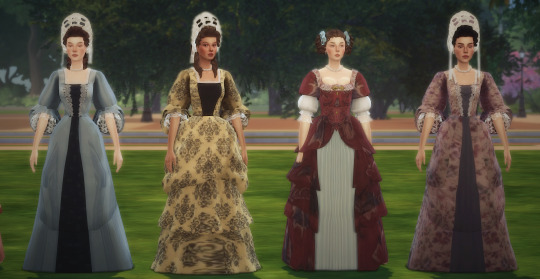
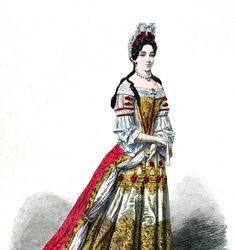
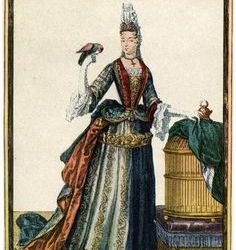
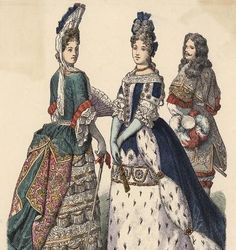
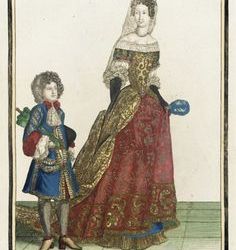
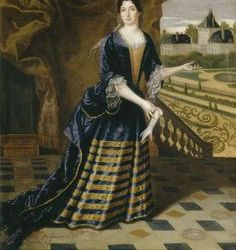
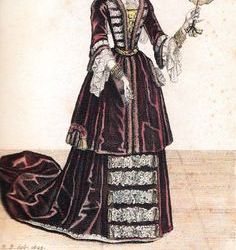
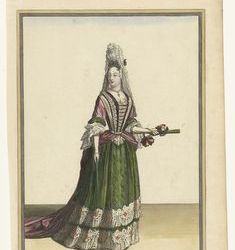
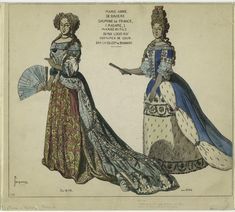
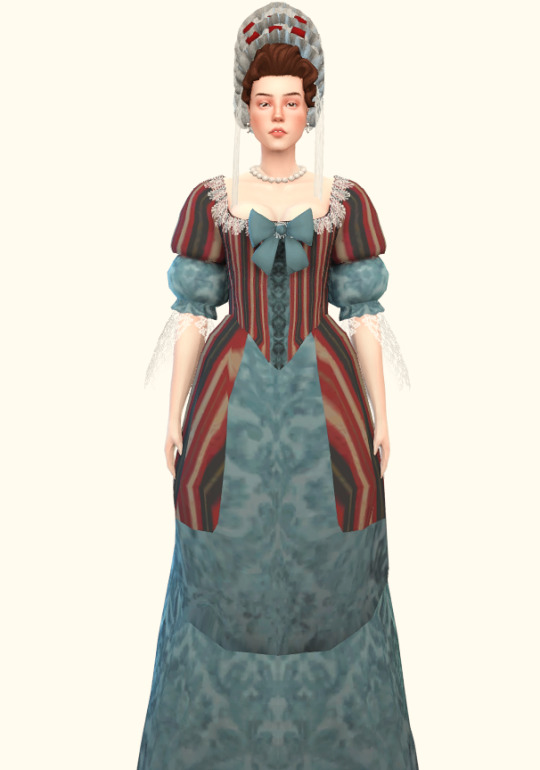
My Fair Lady: Late Baroque Era Set

(no fancy thumbnail this time, sorry) ♫ < baroque music
Please READ ALL OF THIS before downloading. I will not answer an ask if it was answered here. Read.
This is a late 17th-century/early 18th-century Baroque Set. You will get 25 items for women, girls, and toddlers! Towards the bottom, I will give you tips to start a Baroque Era Save (people to find on gallery and men/boy attire).
I would like to thank @the-melancholy-maiden @linzlu @sychik @batsfromwesteros @vintagesimstress @cringeborg @acanthus-sims @stereo-91 and sims 2 creator maya40 for the stuff I've used to make all of this. I'm sure there are more creators but I cannot recall their names off the top of my head. DM me if you see a piece of your mesh here so I can give proper credit. I would also like to thank @belleophile for testing these items for me.
The stuff in this set can work for the late 1660s-early 1710s.
WHAT YOU GET: You will get 3 hat hairs, 1 for each age I listed above, 2 Fontanges for adults that work with the hat slider mod, 4 adult hairs, an adult baroque hair comb piece, 1 adult baroque sash accessory used for court and portraits, 1 ribbon hair piece to go with a hair, and 13 dresses (2 1670s/1660s mantuas, 1 1680s-1710s Habit used for Hunting or Riding, 1 1690s-1710s court dress used for court occasions, 1 1690s-1710s jeweled portrait dress and 1 1660s-1670s portrait dress with sash, and finally 7 1690s-1710s mantuas used for everyday, formal, and seasonal wear. I've included 1 dress for a child and 1 dress for a toddler as well).
SMALL NOTICE ABOUT THE PIECES: The hairline on the hairs will not behave correctly if you have head shape presets on the sim. I've tried fixing that but no luck. If I manage to fix it, I will update it. The Hat Hairs are found in the HAT category and are not compatible with hairs you MUST download the hair files that I'll be including with them. This being said, if you remove sim clothing while they have the hat hair on, it removes the hair override too. It's strange, but just put the hat back on and it should fix. The comb, and ribbon accessory are also found in the hat category. The Sash is found in the GLASSES category. The 1660s-1670s Mantuas are not compatible with shoes, leggings, or socks. I've removed these options in CAS tools so you shouldn't have to worry about clipping. The Barbara 1670s Dress has a sash meshed onto it, and because of this does not behave well with bigger bodies. The same applies to the Henrietta 1670s Dress, as the pearls don't behave with bigger bodies. Same with the Sarah 1670s Dress jewels. The 1690s-1710s Mantuas will have small gaps if the sim is plus-sized. I have tried to fix these issues, but no luck. The hat hair fontange looks a bit gray without reshade or a lighting mod. @northernsiberiawinds has some good lighting mods. Other than that, it's fine. Below, is how it will look white with a lighting mod.

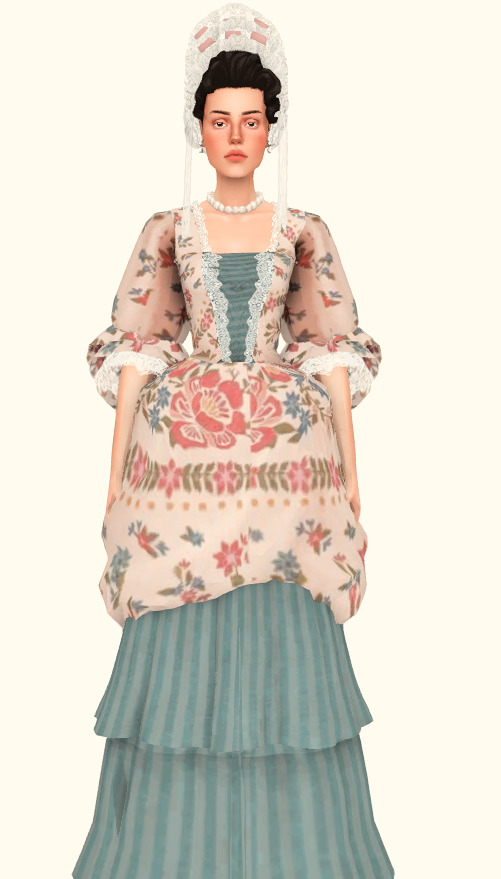
Everything has AT LEAST 20 swatches. Some things have more. There are only a few things that don't have this many swatches.
Here are some pics up close of what you are getting.
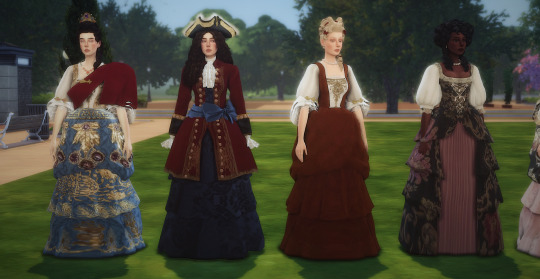
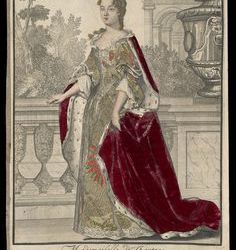
Here are some pics/fashion plates from this era.


Did I forget the 1680s mantua..? Oh no! Luckily, I've included this surprise 1680s dress you'll be getting as well for reading all of that. So 26 items! (here you can see hat hair fontange without lighting mods installed)
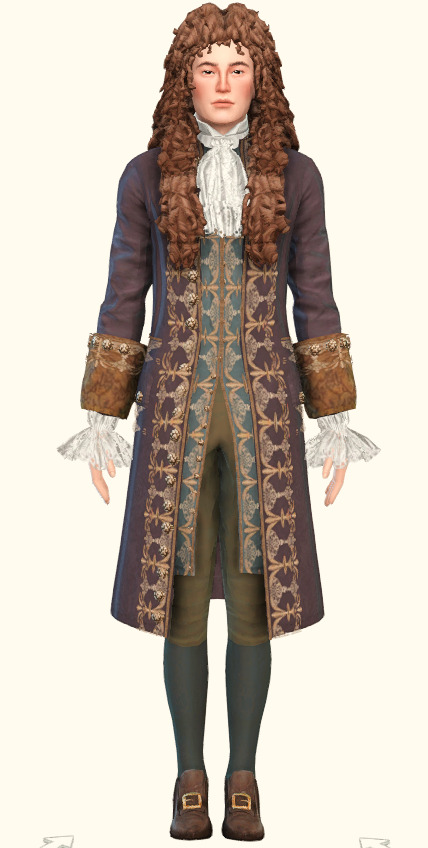
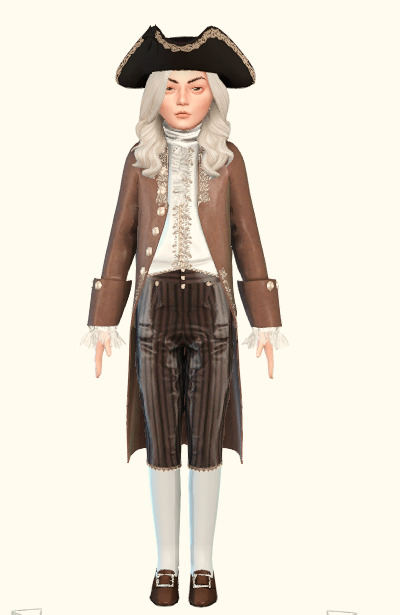
BAROQUE SAVE TIPS: These dresses will work for winter, summer, and traveling wear. Just add a fichu for summer wear or a shawl. For winter wear just add some long gloves and a cape. For men's stuff from this era, @stereo-91 has recolored some acanthus outfits which can be found here. I'll show you how they look below. I also recommend going to his gallery (ROTAMETERS91) as he has AMAZING builds for this era. For a little boy, @acanthus-sims has some stuff that can work.


DOWNLOAD
#baroque ts4#baroque sims 4#sims 4 baroque#sims 4 decades#my cc#historical cc#ts4 cc#historical sims 4#sims 4 historical#historical sims#sims 4 cc#the sims cc
360 notes
·
View notes
Text

Advice on how to achieve aesthetically pleasing gameplay photos!
UPDATED: 4/22/2024
I made this post earlier today and people were interested in the comments! Which made me more excited to make this post~
this is just some advice from me! this isnt a tutorial or anything of that sort, but I will be linking some things that could be helpful for editing gameplay! :D
First things first, I want to say that I use a graphics overhaul, lighting mods check my resources page for what reshade i use if ur interested.
I use these lighting mods & graphics override specifically:
sunblind
graphics overhaul
Lotharihoe's ootd* curseforge download :)
Northern siberia winds in-game better lighting mod (bright base)
these are some other lighting mods you can try out as well!
Luumia's NoBlu & NoGlo
these are some other lighting mods like sunblind
how to install lighting mod
I just wanted to add these things in since we're talking screenshots + I wanted to share for the no reshade ppl <3
Now we can move on to the advice!

I love the simple style of gameplay editing so much, but for me I love creating an ambience with my posts and put the audience inside of my gameplay. I also enjoy storytelling with gameplay more than just the "usual" gameplay post (when it comes to me). I am currently playing the globetrotter challenge with my sim Daichi. I really went all out with the editing for that gameplay. For this one its very much a virtual collage of my sim doing things. Trying new things and getting inspired by others is always fun and cool! Remember when u do take inspo: link to the inspiration and @ the simmer that inspired u!!

In my other save (my cozy save) I also take creative liberties there.


its more of a cozy vibe & silent story-telling (storytelling w/o the dialogue). for my cozy save i take inspiration from @/stellarfalls. er gameplay really helped me find my niche thing in the way i play the game tbh!
Angles/Screenshots
When you're taking your screenshots, angles are important. Depending on the shot, you're putting emphasis on a specific thing. This post is very helpful and talks about different types of angles/shots and what they mean. Check it out especially if you want to play around with the way you take screenshots!
Here’s some editing tips from @stellarfalls !!
simmingstars editing tips
Reshade
If I want to create a moody or dreamy ambience I can use reshade. Looking for a reshade that will fit the overall vibe is a must or you can make your own~
i know not everyone is able to use reshade because they're not on windows. I highly recommend using photoshop actions to create that ambience you're looking for.
*These can be used in photopea, but it cant read topaz clean. If you want to achieve topaz clean in photopea, check this post out! just something i'd like to add in case people are new to all of this + dont use photoshop. Lastly, I want to say if you decide to edit photos on photopea, it does tend to crash if you upload a big number of photos and slows down. I usually upload like 6 or 8 and then save and repeat the process. Its kinda annoying, but ive been using photopea for a while now so im used to it. My mac users, use early-grapes butter action if you want things to look cleaner and less harsh!! + the other ps actions down below. I used these a lot when I was a mac user. Of course, that comes with extra steps, but I feel its worth it in the end.
I like these photoshop action packs bc theres tons of stuff in here that can help create a reshade like look:
intramoon's ps action dump
wooldawn's ps acton dump
smubuh's photoshop actions
early-grape's butter action
hazelminesims's ps actions
Templates!
I loveeeeeee templates so much!! theres so many out there to use for gameplay. It really adds more to gameplay posts! This can be dust/dirt, film burn, that cute camera template etc etc. templates are really fun to use and play around with~
I usually go on deviantart to find templates to use! if you want to check out my deviantart account you can find it here! I favorite a lot of things I can use for gameplay screenies.
Gifs
making gifs is cool because it brings the gameplay "to life" ~
EZgif is a free website that converts videos to gifs. You'll need a recording program like OBS (which is also free).
i like making gifs when i want to capture a (cute) moment (kisses, hugs, cooking etc etc). Its also cool to capture the weather in game like when its snowing or raining.
Little details
Some people really go all out on editing gameplay posts like adding hair strands and adding more details to sims faces (catchlights, tears, blushing, etc). You dont really have to do this, but I want to mention it anyways! I want to try doing this at some point because I enjoy editing my gameplay posts/photos in general and adding tiny details is fun to me lol. It adds realism to posts, but it isnt necessary!
Procreate is a really good program that you can get if you have an ipad. its 10$ and thats, that. You dont have to make any payments. You can also animate on procreate too if you're down for that!
Find inspiration in other simmers!
the sims community on tumblr is filled with such talented people! Theres lots of gameplay simmers who dont do your typical gameplay posts that you can check out and learn from!!! Ive always struggled with getting the right angles when taking screenies. I looked at other simmers and how they take screenshots & it was really helpful for me since I noticed I would take too many over the shoulder photos on my sims lol.
I think thats all the advice I have! I hope this was helpful and if you have any questions please send me an ask or dm! :D
305 notes
·
View notes
Text
How to install TS3 for the ✨chronically TS4✨

Getting back into TS3 posed a challenge for me as compared to TS4. It's a 10+ year old game and of course requires some extra TLC as compared to TS4. So I hope this guide will help y'all to get everything set up cleanly and smoothly! It took me three separate tries and if I can help the next person struggle less, then that's great. Happy simming!
You'll need a copy of TS3 and these resources:
The Sims 3 Performance & Bug Fix Guide 2023 by anime_boom
This lovely post from TS3 community extraordinaire @nectar-cellar
How Use CCMagic YouTube video by @florydaax
No Intro mod edited for 2023 (original by retired creator EllaCharmed)
The original mod from Ella does not work for current patch 1.69. I fixed it in s3pe with the help of some commenters on MTS so that it does actually remove the intro. If the creator happens to see this and would like this modified version removed, let me know.
How to clear cache by Carl's Guide
Got everything pulled up? Great! You're ready to start.

1. Download a FRESHLY INSTALLED copy of TS3 to your computer. If you're able, I'd highly recommend having all the packs you're wanting to own already so you don't have to do all of this again.
If you are redownloading the game for any reason (like me bc I was struggling lol), remove the existing TS3 folder in your documents and save it somewhere so you can keep all of your mods or worlds there. Back up any reshade stuff from the bin folder. Completely uninstall the game through the EA app/Steam. You may lose your saves and sims due to a change in script mods through this tutorial. This cannot be avoided, trust me I tried. But it's worth it for a smooth game.
2. Do a test launch so that the game generates a new TS3 Folder in your documents. DO NOT, I REPEAT DO NOT INSTALL ANY SIMS 3 PACKS THROUGH THE LAUNCHER! NO WORLDS, NO CLOTHES, NO HAIR COLORS, NOTHING. This will be very important later on when you merge your CC using CCMagic. If you need worlds or other CC there are alternative ways to obtain them.
3. CLEAR THE GENERATED CACHE
4. If you use EA and open to test anywhere between steps (which you shouldn't really need to after step 1 of the Bug Fix Guide) or after playing at any point, open up task manager and ensure that you end the tasks "EA" and "EA Background Services" before continuing. It doesn't really use much memory but I noticed that it caused stutters if it's open when launching using your shiny brand new Smooth Patch. It will look like this:

5. Begin following the steps in the Performance & Bug Fix guide. The first thing you'll do is set up your mods folder. Follow those steps exactly as they are in the guide, except use the No Intro mod I linked above instead of the one you get in that folder if you actually want the intro removed.
6. Continue to FOLLOW ALL REQUIRED STEPS IN THE GUIDE UNTIL YOU'RE DONE. I mean it, all of them one by one. Heck, if you're open/able to do the bonus and optional ones, I'd suggest doing those too.
7. Once you've completed that, go check out nectar-cellar's excellent post for tips and a fix to make the smooth patch to compatible with Master Controller. I will not be providing an edited version of this as LazyDutchess who created the Smooth Patch is still active and I want to respect their work.
8. If you've made it this far, you're doing great sweetie. Do another test launch through the patcher and if everything runs correctly it means you've done everything RIGHT. You're ready to start playing or downloading mods if you want!
If you do start downloading mods merging them will 100% be a must do if you want to maintain any sanity. You can use CCMagic to do so. I linked that handy lil video above!
Keep in mind script mods, overrides, patterns, and CC counters should NEVER be merged. Always check the creator's notes, yada yada. And always clean up your cache on a regular basis. Have fun y'all!

420 notes
·
View notes
Text


summer daze. gshade preset
i know i say this about every preset i put out but this is truly my favorite preset i've ever made. i've been using this as my personal gameplay preset for months now and finally perfected it enough to release. i hope you all love it as much as i do.
preset made using gshade version 4.2.2 (unsure if it is compatible with reshade).
INSTALLATION TUTORIAL: anything not mentioned in these videos i unfortunately can’t help with but this video shows how to install gshade + presets.
How to Make The Sims 4 Look Better! (GShade Install + Tutorial/Presets/Lighting Mods)
IMPORTANT: i use lighting mods/terrain overrides in my game. without those there is a chance your game may look different then mine. i will link all lighting mods/terrain overrides below.
sunblind, no blu, no glo, tech-hippie terrain override
TOGGLE KEYS: ADOF on/off (shift + 3)
FILE LOCATION: C:\Program Files (x86)\Origin Games\The Sims 4\Game\Bin\shade-presets\custom (origin users)
C:\Program Files\EA Games\The Sims 4\Game\Bin\gshade-presets\Custom (ea app users)
TOU: do not reupload and claim it as your own. do not use it as a base, tweak, it and try to claim it as your own. tweaking for personal use is completely fine. i hope you enjoy this preset. if you use it make sure to tag me so i can see 🤭
download (free)
@mmfinds @emilyccfinds @mandy-ccfinds @harperelya @maxismatchccworld @sssvitlanz
#gshade#ts4#sims 4 cc#sims 4 download#ts4 download#the sims 4 cc#gshade preset#the sims 4 download#ts4 cc#ts4 cc finds#ts4cc#s4cc#s4 cc#ts4mm#sims 4 custom content#my cc
558 notes
·
View notes
Text
INSTALLING// GShade + ReLight for The Sims 4
I've been getting a lotta asks about how I got the up to date GShade working with ReLight ( ALPHA ), so here's a mostly quick tutorial, that will hopefully get it working properly for you too!
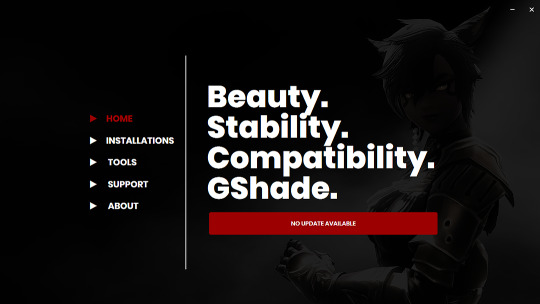
Firstly, download and install GShade, unless you've already got it installed, then just be sure it's up to date.
Click, or right click pics below and open in a new window to see them in more detail.
Now I don't currently have it installed into any of my games, bc I mainly use Reshade 2, so if you need to know how to do that, you're in luck!
I'll walk you through it.
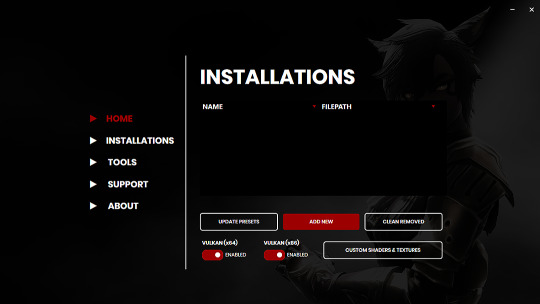
Click Add New.
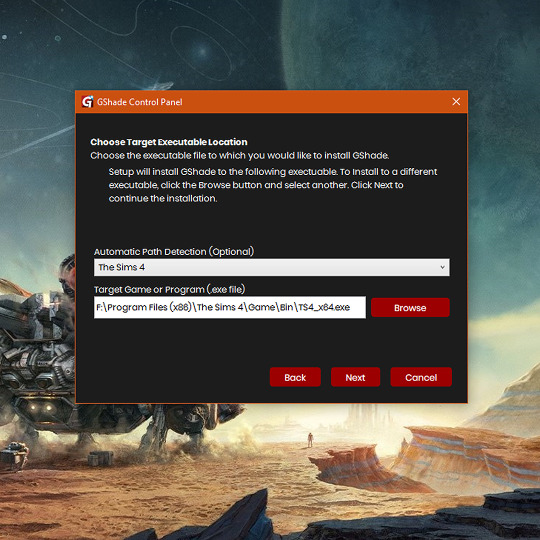
Then locate your TS4_x64.exe, and click Next.
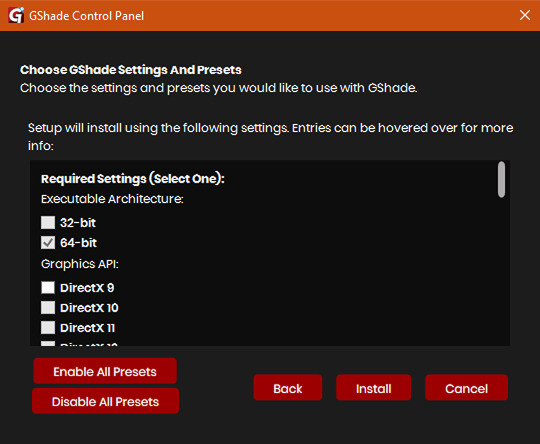
This will open another window with a bunch of ticked boxes, and tbh I didn't mess with any of these. Many them are greyed out anyway, and it all works fine for me.
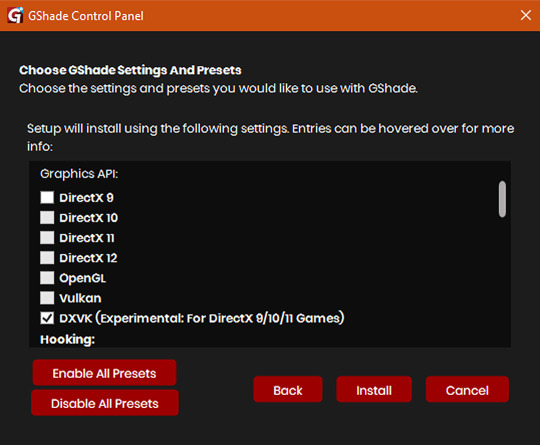
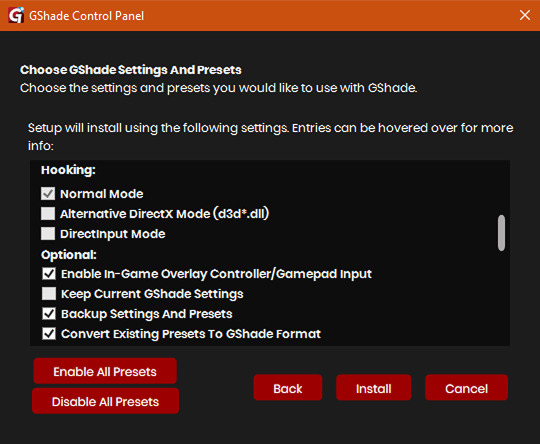
So if yours look like this, then you should be fine too.
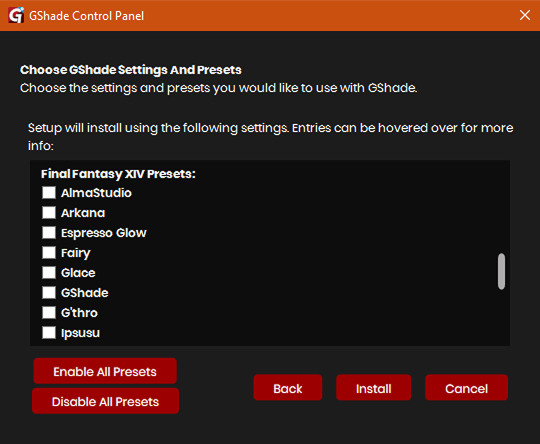
Lastly, at the bottom you can preload some presets if you like, but it's purely up to you. They aren't required.
When done, click Install.
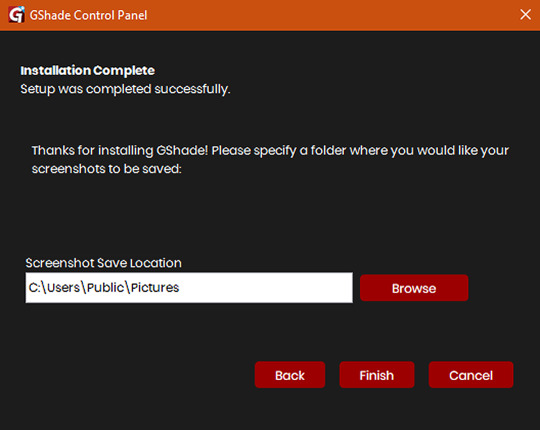
There will be another window that asks you where you'd like to save your pictures. Once again, this is purely up to you, click Browse to locate your preferred folder, or if you use programs like Nvidia for screenshots, just ignore it, and click Finish.
Then when it asks if you're okay with the chosen location, click Yes.
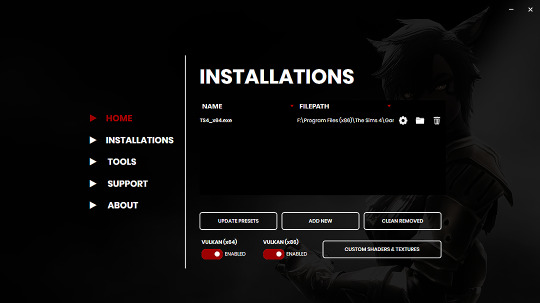
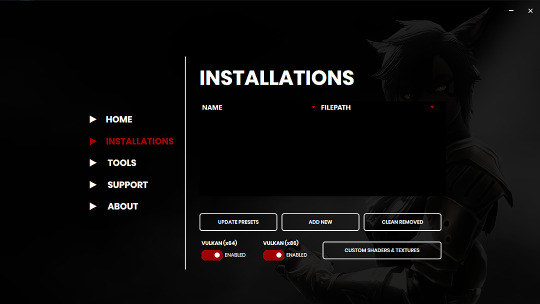
Once you've finished, TS4_x64.exe should show up in the Installations tab of your GShade installer, which means you're part way there!
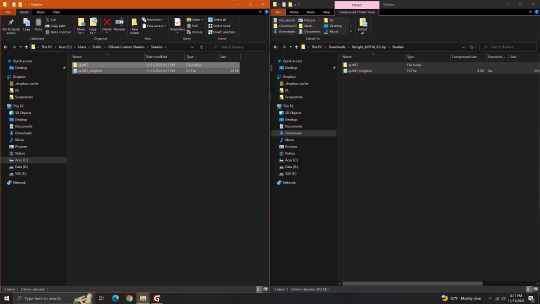
Now, click on the Custom Shaders & Textures button at the bottom, this will open the folder where you need to install ReLight.
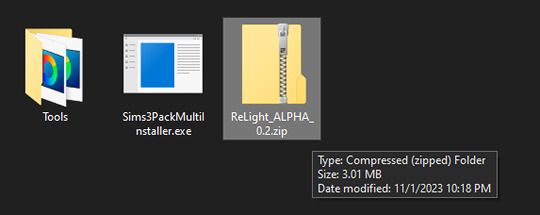
Locate your ReLight_ALPHA_0.2 download. Mine was in my Downloads folder.
Double click it, or unzip it, and you'll find a couple folders inside it.
Click or right click pics below and open in a new tab for more detail.
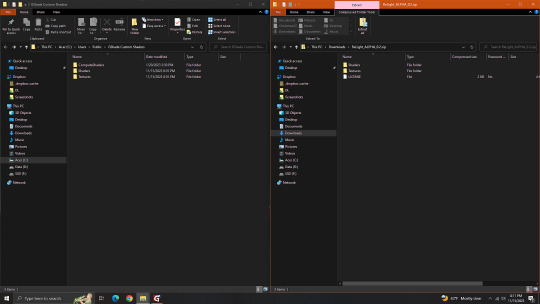
Here's a side by side comparison of the GShade Custom Shaders folder we just opened, and the ReLight_ALPHA_0.2 folder we unzipped and opened, so you can see how there are two identically named folders.
The goal is to put whatever is in the Shaders folder of the ReLight folder, into the Shaders folder of the Custom Shaders folder, and then repeat this process again for both Textures folders, until they end up looking like this...
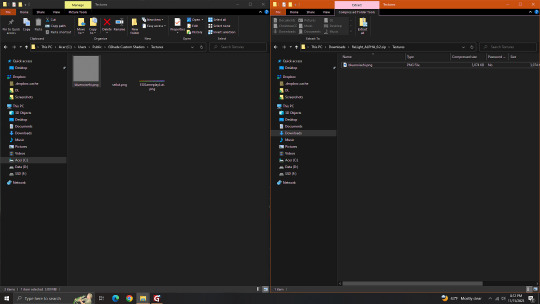
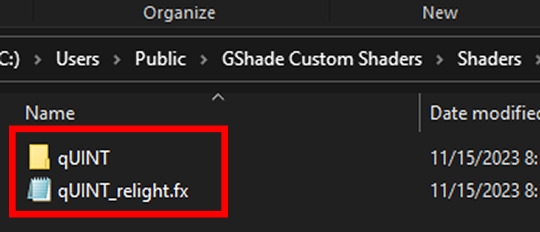
In conclusion, your GShade Custom Shaders > SHADERS folder should have these two files in it...
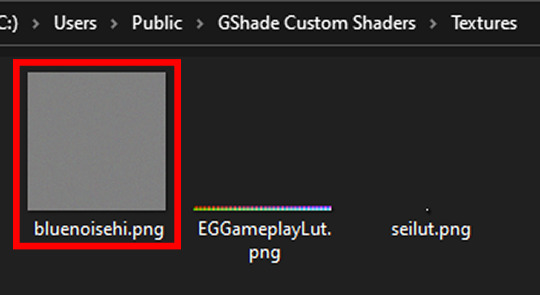
While your GShade Custom Shaders > TEXTURES folder should have this .png in it...
Good? Now let's turn on The Sims 4.
When you've opened you game, load your save ( idkw, but the GShade UI won't open in the menu screen ), then hit Shift + Backspace on your keyboard to open up the GShade UI.
You can choose to go through the tutorial, or skip it. Either way just keep clicking continue or OK until you get to the Home panel.
Now, I've got a preset already, if you've got one too, good, activate it, if you don't there should be like a default one you can use until you create one or get one.
Main goal at this moment is to find ReLight in the list of shaders, and activate it so we know it works.
Tick the Performance Mode box at the bottom, and scroll down 'til you find this...

This list should be alphabetized so just scroll down to the Q's, then tick the box beside it.
Then click Active to Top, and scroll back to it.
One thing I would suggest is binding it to a key ( right click while hovering over it ), this will make it easier to find if you lose it again, since clicking Active to Top also recalls any shaders that are bound, even if their box isn't ticked ( isn't active ).

I've bound mine to F8, but it's up to you what you wanna use, I only suggest it be F6 or above, since The Sims 4 already uses F1-F5 I believe.
Oh, and whenever you're done messing around with it, be sure to untick Performance Mode, so your computer won't beat your ass.
272 notes
·
View notes
Text


Sims 4: Bloodlines Loading Screen By Losieee

Salutations kindred 🦇
I did a something little different than usual, i created a custom loading screen! I wanted it to fit the style of both Vampire the Masquerade: Bloodlines and Sims 4. So i mixed their aesthetics to create the perfect loading screen when playing with my Sims 4: Bloodlines builds.
This will also pair perfect with the upcoming Sims 4: Bloodlines save file im working on. But it is gonna be a while before i am ready to share that, so stay patient friends.
This is my first mod creation EVER so pls message me if you run into any problems!
Check out my Sims 4: Bloodlines builds!
How to install
Download the .package file
Drag the .package file into your sims 4 mods folder
Open the game, and the loading screen should appear.
You should only have one loading screen in use at the time!!
Credits/Resources
S4Studio, JPEXS Flash Decompiler, Procreate, VTM:B Unofficial Patch, Bloodlines VPK Tool
Loading screen tut

Download (SFS free)
RESHADE @mooonivys
If you use my loading screen and upload screenshots, videos, edits or anyhting else, please @ me! I love to see them!
Please do not claim my content as your own, reupload my content or modify my content.
#sims 4 bloodlines#sims 4#ts4#simblr#sims 4 mod#sims 4 vampire the masquerade#sims 4 vtm#sims 4 vtmb#vtmb#vampire the masquerade bloodlines#sims 4 vampire the masquerade bloodlines#ts4 mod#ts4 loading screen#sims 4 overrides#sims 4 default replacement#ts4 simblr#vampire#santa monica#sims 4 cc#ts4 cc#ts4 vtm#ts4 vtmb#vtm#sims#loading screen ts4#sims 4 loading screen
87 notes
·
View notes
Text
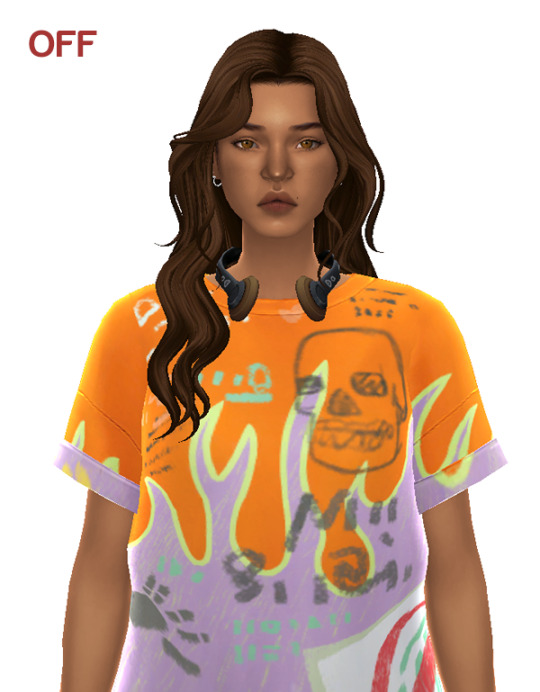
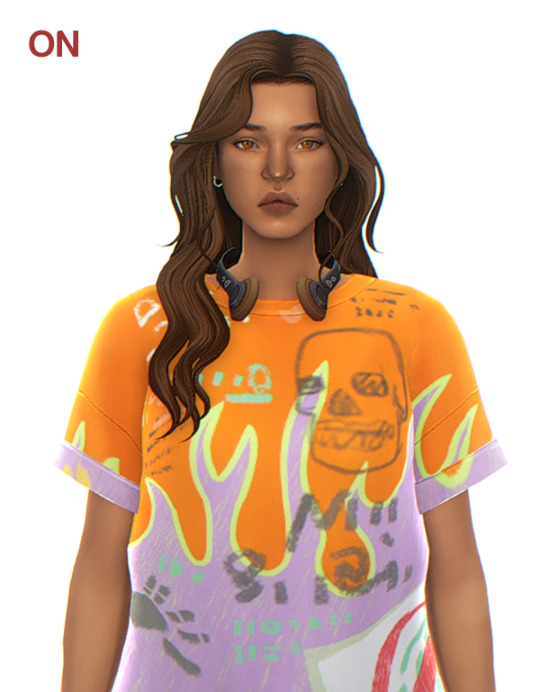
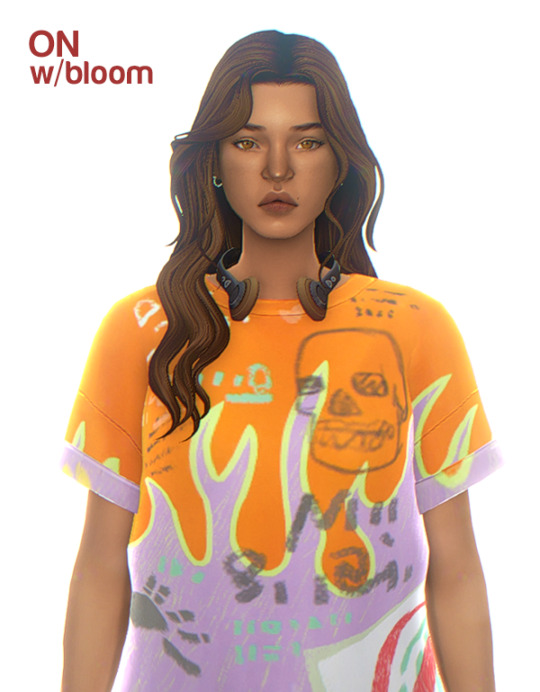
soundless - a reshade preset (CAS version)
I've never had a decent ID photo, but my sims do.
Important things:
No one asked for this, but I'm dropping it anyway.
Lighting mods: right now, I use @vyxated's cas light Front Glow v1, but I think I was using @sforzcc's CAS light 4 in the preview. I think it looks good in both.
Background: I only like it with white background. Can't show you how it looks with other colors, but I tried black and didn't really like it. I'm also not sure how it looks with scenery backgrounds (feel free to let me know if you try it).
Bloom looks good for close-ups, it eats the sim when you zoom out (with white background, that is).
Don't claim as yours, but otherwise do whatever you want with it.
download (SFS)
feel free to tag me if you use it so i can see!
*let me know if you have any questions/problems
332 notes
·
View notes
Photo


UPDATE March 2023: These will no longer be supported/updated to reshade. If you download it for reshade, things WILL look different
__________
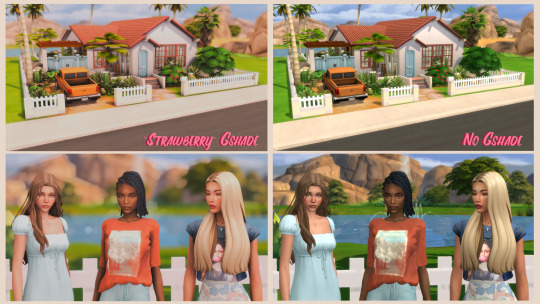
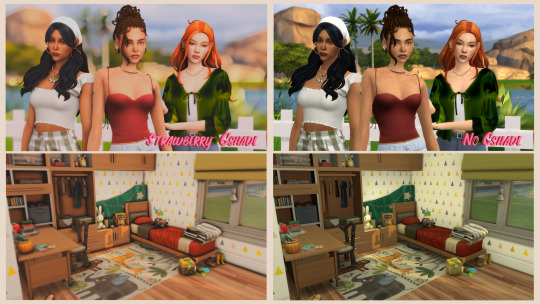
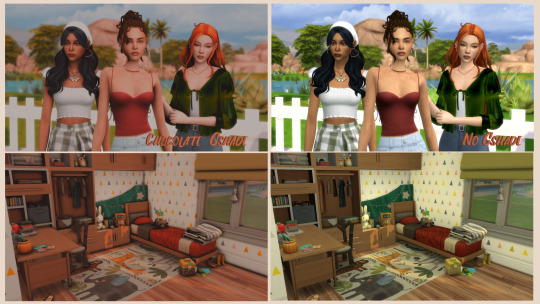
“Neapolitan” Gshade preset collection comes with 3 different presets, depending on what you want the vibe to be! (Click on the pics to enlarge the previews of them, I really strugglebus with formatting on tumblr, so bear with me! The pics are unfortunately not as sharp as they actually are, trust me, the presets look better in game) I named it Neapolitan because it reminded me of the trio of ice cream flavours I ate as a kid all the time. It also suits the vibe of each one, so that helps!
“Strawberry” Is the preset I use currently for my own gameplay. It is vibrant and pops the colours just enough so it doesn’t burn your eyes out, but retains a bright and cheerful vibe.
“Vanilla” Lives up to its name by being just the right amount of different from the original EA vibes but slightly brighter and adds a pop of more vibrancy and smoothness.
“Chocolate” has a moody, almost autumnal vibe. It leans more warm, mysterious and I’m surprised by how much I like it in-game; since I tend to go brighter and vibrant. I should’ve taken screenshots of it in a forested area, but this already took my whole afternoon so, the previews are what they are lol
I am VERY picky about Gshade presets, and so I made sure that the things that bother me the most I fixed when I made these presets. They are as follows:
1) Not heavily blue-green, like EA’s ugly lighting
2) Neutralizes the overly yellow tones in EA’s whites
3) Doesn’t make sims look basketball orange
4) Doesn’t make sims of colour (especially black sims!) look washed out
5) Are gameplay-friendly, and don’t bleach out the UI in game so it’s unreadable
6) Are the vibe
ONE MORE IMPORTANT THING before the download: If you go into your game and you’re like “???? why is this preset making my game a little slow?” PLEASE go and click on your MXAO settings and turn the quality down. My computer by some miracle can handle it on ultra, but it can make your computer slow if it can’t handle it. It is easily fixable by turning it to Medium or lower depending on what your computer can run.
Also, I used ADOF for the screenshots, which is a depth of field shader, I turned it off, so if you want it on in your game, just type it in the search bar and turn it on :)
TOU: Do whatever, just make sure you link back here and don’t claim as your own. You can edit them to your preference, but please don’t re-upload them without giving credit to the original.
Okay, I’ll shut up now, have fun!
DOWNLOAD
2K notes
·
View notes
Photo
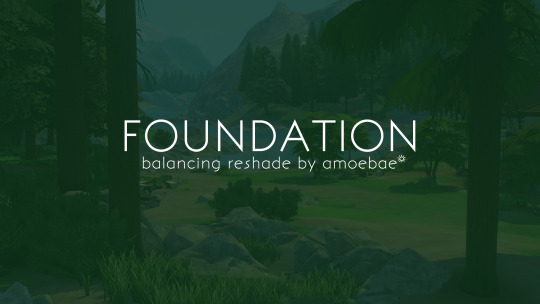


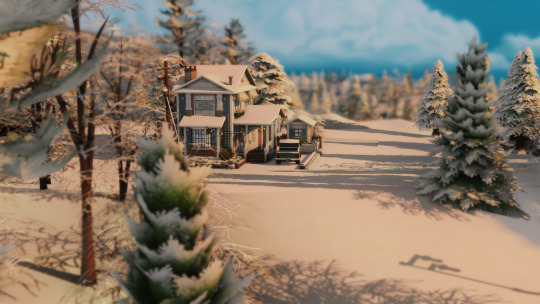
FOUNDATION - balancing reshade for TS4 by amoebae
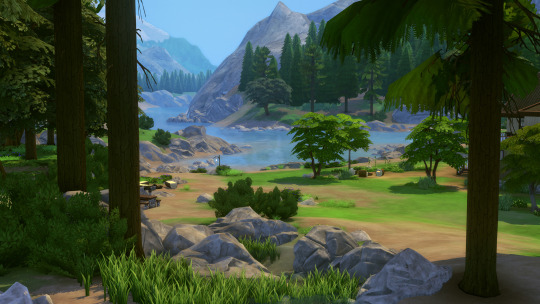
The Sims 4 suffers from very strong blue shadows in a lot of worlds, and generally has a blue or teal-green haze cast across the screen. This means things that should be white are blue or teal, greys have a blue tone to them, and shadows look out of place. I've generally tried to counteract this and make things more neutral in most of my presets, but it's annoying to have to do it each time from scratch, and I've never found a really good method that still preserves everything else that happens to be coloured blue.
Until now!
Foundation at its core is a simple multilut that removes the blue/green haze and neutralises shadows and things that should be neutral to begin with. It doesn't alter any other colours or contrast so menus stay usable and clear. The result is a game that looks exactly like the Sims game you know and love, but more balanced.
You can see an album of example screenshots here, including lots of splitscreen comparisons showcasing what the multilut does: https://imgur.com/a/Ic271u1
---
You can use the Foundation multilut alone, you can drop it into a preset you already use, or you can use it to build your own preset around.
- If using the Foundation multilut alone:
while playing the game open the ReShade menu and choose from one of the 5 luts included in the Foundation multilut depending on which looks better for your current world/neighbourhood/season/time of day/weather
- If using the Foundation multilut with an existing preset:
open the ReShade menu and drag the multilut so it's either above or below your current used shaders - if you drag it above them it'll neutralise the blue cast *first* and your other settings will apply afterwards; if you drag it below them it will also neutralise blues in your current settings
- If using the Foundation multilut to build your own preset around:
I recommend keeping the Foundation multilut above any other colour grading shader effects in the load order so that you're working on a properly balanced base
If you want to use the Foundation multilut alone because you like how the game usually looks but just want to banish those obnoxious blues, I've built a full ReShade preset around it if you want something a bit extra.
The only colour grading is the Foundation multilut, but it adds in other 'bells & whistles' shaders like MXAO, RadiantGI, DoF, Adaptive Fog, Depth Haze, SMAA, Sharpening, Deband, and several flavours of Bloom to choose between. You can play the game with just the Foundation multilut enabled, and turn on any of the other effects when you want to take more polished screenshots.
This preset is ideal for someone who likes how TS4 looks but wants a better version of that. It's also ideal for CC creators who want to take nice screenshots of their CC but don't want to alter how it looks in a vanilla game.
---
Ultimately, Foundation is meant to be a tool to help you get the best from your game, whether you just want to play with colours looking how they're meant to, or if you want to build your own preset without having to do battle with the blue shadows and colour casts all the time.
You have two download options:
Just the Foundation multilut (includes the multilut png and the corresponding shader that requires the Prod80 package)
or the Foundation ReShade preset (includes the multilut, the amoe - Foundation.ini preset file, and some additional shaders/textures you'll need)
There are full installation instructions included in both downloads.
DOWNLOAD NOW @ PATREON (free)
---
Find me here:
pictureamoebae @ tumblr
amoebae @ twitter
amoebae @ patreon
amoebae's TS4 screenshots @ flickr
amoebae's cc, builds and ReShade presets in one place @ flickr
amoebae's amoebas discord server
#reshade#reshade for ts4#ts4 reshade#ts4cc#ts4 cc#s4cc#s4 cc#ts4 lighting mod#the sims 4#ts4#sims 4#s4#the sims#sims#foundation reshade#my ts4 cc
935 notes
·
View notes
Text


Countdown to Halloween Day 4: CAS Background
As is with most of the things I will be uploading for this countdown, this was my first time making a CAS background and I'm super happy with how it came out! Minus some pixelation when you go into detail mode, this background looks great for CAS screenshots and just an overall aesthetic feel for your game.
If you take any photos, please tag me so I can see!
THINGS TO NOTE:
You can only have ONE CAS background .package file in your Mods folder at one time so if you have any other background overrides, you must remove them in order for this one to work.
These photos were taken in the styled room in game so lighting, sizing and positioning of Sim and objects will be different in the actual background.
I took these photos with a my own Reshade preset but CAS background is filter free so shading will look different depending on your setting and presets.

Always available for free download on my Patreon! You can find that here.
T.O.U
-Please do not reupload my content and claim as your own.
-Do not upload behind paywall

Twitter TikTok Instagram Patreon
#the sims 4#the sims community#ts4#ts4 gameplay#ts4 maxis match#ts4cc#ts4 custom content#sims 4 cc#simblr#cas backgrounds#sims 4 cas#ts4 cas#sims 4#ts4ccfinds#ts4 screenshots#ts4 build#countdown to halloween#halloween sims content#halloween sims
162 notes
·
View notes
Text
Baldur's Gate 3 Screenshot Tutorial
Hi, I decided to make a more in-depth guide for my twitter followers, as I'm super limited in characters and formatting options over there.
For this tutorial, I'll explain how you can enhance your screenshots. I'll divide it into five parts: ReShade, making your screenshots high resolution, camera mods, photography basics, and post-processing. By the end of following all of these steps, you should have something way better than the start!
I recommend going through this tutorial downloading things step-by-step for the first three parts, as it'll help you to quickly identify where you've gone wrong if you have any issues.
1. ReShade
ReShade is a post-processing tool that allows you to change the look of a game with an array of different effects and adjustments to use. It can be a lot to wrap your head around at first, so I recommend starting off by finding a ReShade preset that speaks to you from this page if you're not already familiar with using it. The mod authors should explain how to download it.
I find 22:20 of this YouTube video to be helpful to introduce ReShade if you're completely new to it. This video is for the Sims 4, but ReShade typically works the same across different games.
Now that ReShade is downloaded, we can get depth of field working within the ReShade. This step is optional. Depth of field refers to what will be in focus in your screenshot, and what will be blurred. It's essentially simulating shooting with a camera, like so:

To get this effect working, you need to follow this tutorial within the ReShade menu.
2. Making Your Screenshots High Resolution
Typically, Baldur's Gate 3 is ran in 1920x1080 resolution, or standard HD (unless you have a higher resolution monitor and are running the game in 4k, in which case, you can ignore this step if you'd like). This is definitely an acceptable quality, but if you'd like to capture any detail, you're not going to get much out of this. To get a better quality image, there are two ways to achieve this. The first method is through hotsampling. Hotsampling is briefly running a game in a much higher resolution than your monitor supports, allowing you to capture screenshots with incredible detail, then bringing it back down to a native playable resolution.
To hotsample, you'll either need to use the BG3 camera tool, or SRWE. For either of these hotsampling tools, it's important that you've downloaded ReShade, or they will not work.
Once you have either of these downloaded, make sure your game is running in windowed mode. If you have more than one monitor, you need to change your display to show only on one screen. Or again, this will not work.
Next, you're going to want to make sure you have a key set for taking screenshots in ReShade, as well as making sure you like the folder where your screenshots are set to be saved. You can find this in the settings tab. Once you have those set, you're ready to take really HD screenshots!
To do that, you want to set your game's resolution to 2x, or even 3x what it's currently displayed as. Once it's set, your game screen is going to look giant and probably run way off your monitor. This is a sign it's working! Once it looks like this, press the screenshot key you set earlier within ReShade, and there you go, a nice big screenshot should be in the folder you set!
If you don't want to do hotsampling, and if you have a Nvidia graphics card, you can download their their app, which can take resampled screenshots. It won't be as high quality as hotsampling, but still better than standard HD.
3. Camera Mods
There are two camera mods that I know of for BG3. One is paid, the other is not.
The first one is the Native Camera Tweaks mod. This mod allows you to move the camera around more freely as you're traversing the world, but in cutscenes you'll still be stuck.
The second one is the paid one, but it allows for total freedom within the game, even during cutscenes. This tool is also very helpful for hotsampling. Within this tool, it's very useful to configure your own controls for moving the camera around in game, as well as setting a key you'll remember for pausing the game so you can set up a screenshot. I changed the movement keys to be wasd and the keys to change the angle of my camera side to side/up and down to the arrow keys.
4. Photography Basics
Taking screenshots in a game is a lot like doing photography irl tbh lol, same rules mostly apply. You of course want to do the basics like making sure your subject is in focus, it's not too dark or too light. But some other tips for people not very familiar with taking photos to take note of are:
Make sure if you're taking a photo of a person, the top of their head is within frame
Try and either make sure someone is front and center, or in the rule of thirds
Pay attention to the lighting, sometimes it's too bright or too dull. Sometimes it's unflattering in certain angles. Lighting will always make a huge difference
5. Post-Processing
You can now leave your screenshot as is, or edit it further with a photo editing software! I recommend using Photopea, as it offers basically everything Photoshop does without the insane price tag. From here you can do whatever you feel is best to enhance your image.
And that's all! If you have any questions, feel free to ask, and if you get stuck anywhere in this tutorial, don't feel bad. A lot of this stuff is just trial and error, but if you're very persistent with it, I promise you'll get these working. Also I would just like to mention that a lot of this stuff applies to taking screenshots in a lot of games! So you can take this knowledge with you elsewhere <3
If you happened to follow all this, please send in an image of your Tav you took!
101 notes
·
View notes
Text
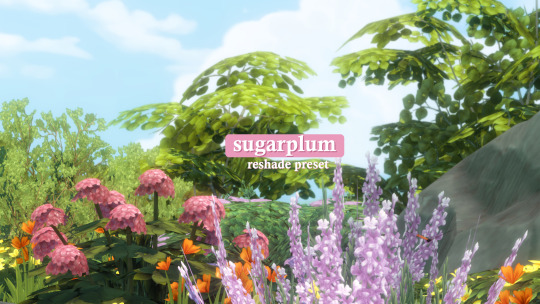


Plumbie's Sugarplum Preset
After hours of working on this preset, I'm so excited to release it to the public! Lo and behold, the Sugerplum ReShade preset.
I wanted this preset to feel warm and cosy, perfect for playing the game snuggled up in blankets on a rainy day. The Sims 4 has such beautiful nature, so I also focused on bringing out its beauty, no matter what season.
There are two versions of this preset: the gameplay, cas, and the screenshot one. The screenshot version adds the Pirate Bloom and ADOF effects, adding an auto-blurred background and a dreamy filter over the game, perfect for capturing those special moments in your sims' lives.
How To Install:
In order for this preset to work, you will need the GShade Shaders (do not worry, this is not GShade). @misslollypopsims has made an incredible tutorial on how to install ReShade and the GShade Shaders: How To Install ReShade.
Before You Download This Preset:
This preset was made with the latest version of ReShade and has not been tested on other versions.
Make sure you have edge smoothing turned off in the game settings for the mxao effect to work.
You have the GShade Shaders (once again, not GShade itself).
Keep in mind this is my first ever ReShade preset, so it will have flaws. If you notice any, please feel free to dm me.
TOU:
Please do not reupload this preset without my permission.
Feel free to make edits to it for personal use, but if you want to share it with the public, make sure to tag me in the post.
Patreon Download (free)
SimFileShare Download: ver 1 & ver 2
170 notes
·
View notes
Last Seen Blogs
thisbookisonfire
misc.


honeypro
. ⋆ HoneyPro ⋆ .

satirlardakaybolankiz
satürnaşığı
qoverqmusic
Quantity over Quality