#sims 4 reshade tutorial
Explore tagged Tumblr posts
Visit Tumblr Blog
Explore Tumblr blogs with no restrictions, modern design and the best experience.
Last Seen Tumblr Blogs


Fun Fact
US Tumblr user growth rate is estimated to slow down to 4.1%.
Text
Transform Your Sims 4 Game with These Visual Mods: Easy Reshade Setup, Lighting & Overrides✨ + CC Links
youtube
Today I'll be showing you some of the best beginner-friendly mods to make your Sims 4 game look stunning! 😍 From ReShade to lighting and visual overrides, these easy-to-install mods will transform your Sims game! You can really customize these things to make your sims game uniquely yours! 😊🤍
Download Here: https://www.patreon.com/posts/114334048
#my youtube video#my youtube channel#myyoutubevideos#myyoutubechannel#mods#gameplay mods#sims 4 lighting#sims 4 visual overrides#sims 4 default overrides#default overrides#sims 4 lighting mods#sims 4 reshade tutorial#sims 4 beginners guide#sims 4 beginner tutorial#sims 4 mods intall#the sims 4 mod install#the sims 4 reshade tutorial#ts4 reshade presets#sims 4 reshade#Youtube
14 notes
·
View notes
Text

~hide build/buy lot outlines with reshade~
do I need to explain more? 😁
⚠️ this is not a mod to put inside your mods folder ⚠️
Instead, this utilizes a Reshade/Gshade add-on to remove the lot outlines and being able to do so whenever you want with just a shortcut. Requires Reshade/Gshade and the Shader Toggler add-on. Works on both DX9 and DX11.

Download the latest update on the main tumblr post below:
Patreon post here
#sims 4#ts4 resources#ts4 reshade#t: shader toggler#t: reshade add-ons#hide cas ui#vyx.resources#reshade tutorial#1 hour later... in a true me fashion 😂#just had to double triple check everything works fine
426 notes
·
View notes
Text
PXL'S Anatomy of Screenshots
So you want to take better screenshots? There are multiple factors to consider, and if you don't enjoy tweaking reshade settings for every image, my ultimate method may not be for you. That being said, there are tips and resources in this guide that are applicable to everyone and you can select to explore those that are useful to your specific situation.
Disclaimer: I am not claiming to be an expert, nor am I offering to provide troubleshooting on an individual basis. This is a general guide and if you are unfamiliar with any of the concepts, please use the mighty power of the internet to find tutorials. I promise everything that I have learned over the years has been published and documented a thousand times better than I ever could.
There are five factors to address:
Your computer's inherent capabilities
The game's limitations
The mods you're using
Reshade
Post Processing
Graphics Card Settings & Drivers:
Become familiar with your graphic options. If you don't have a dedicated graphics card (i.e. a desktop or gaming laptop, these features may be unavailable and you should skip.)
I have an AMD Radeon Pro card which is designed for workstation level systems. It's overkill for sims, but useful for 3D rendering and modelling work. I have changed the following settings for DirectX 9 applications:
anti-aliasing - enhance application settings
anisotropic filtering - enabled
anisotropic filtering level - 16x
texture filtering quality - high
surface format optimization - high
Consider overclocking your graphics card to unlock it's full potential. DO NOT pursue this venture unless you are ok with the risk of burning out your card prematurely. I use at present, overclocked Bootcamp Drivers from BootcampDrivers.com obviously, if you're not playing on an intel based mac through Bootcamp, this is irrelevant to you.
None of these settings are useful until you address the default games limitations, which leads nicely into the next factor.
Addressing The Sims 4's Graphic Limitations:
Everyone should be familiar at this point with lighting mods, 4k, textures, disabling ssao, etc. but, I'm still going to spell it out. None of this is new information and has been covered many a time by various players ad nauseum.
remove ugly blue toned lighting in the world by choosing a lighting mod from @softerhaze here
overhaul your graphics.cfg file (i use a custom blend with features specific to me), however @simp4sims has done a ridiculous amount of work in providing a simple to install file that can be found here - read through their tutorials!! they have provided an excellent oversight of exactly what this does and why it matters
improve the indoor lighting for your sims - previously i used @luumia's no blu, no glo - recently i switched to @northernsiberiawinds better in game lighting mod here, though i have tweaked some of the settings to suit my own personal preferences
i don't use the HQ mod, i don't find that it makes enough difference for the amount of effort it requires to convert CAS CC
It should go without saying, but tweaking your graphics config file is absolutely useless if you can't play TS4 at it's maximum in game graphic settings!
The Mods You're Using:
Now that you've put in all this work into getting the game ready to make use of quality mods where do you start? Well, the CC you install matters. Whatever your preference, whether it be maxis-match, alpha or somewhere in between, priority should be given to using items textured in 2k or 4k resolutions, and specific attention should be paid to using wall and flooring textures with bump maps, and or high quality resolutions (this is important later for reshade if you intend to learn about ray tracing).
I will separately post a guide to creators with crispy textures because that is it's own novel.
Reshade:
Phew. Still with me?
There are many many many reshade presets out there, most are alike, but none employ ray tracing, and that is because a) it needs to be manually adjusted for every screenshot, b) they are paid shaders, and c) this requires advanced knowledge of reshade and a decent enough graphics set up that won't overheat - games running native ray tracing recommend a minimum VRAM of 8GB (please note RAM and VRAM are not the same) - i therefore do not recommend pursuing this option if your system does not meet those minimum requirements.
Start here to understand what ray tracing for reshade is. In my opinion, the shaders are well worth the price of $5 for the amount of work that has gone into creating them by the talented Pascal Gilcher. That link is a comprehensive starting point into expanding your knowledge of reshade and it's capabilities.
I have always created my own reshade presets from scratch, and while the core colorization settings I utilize remain largely the same, using ray tracing and re-light means every screenshot needs to be manually adjusted (lights repositioned, bounce and AO factors adjusted, etc) before being captured. @pictureamoebae just published a very timely post discussing the re-light shader and you can read it here.
Post Processing
Reshade does 99.99% of the work that traditionally would be accomplished in a photo editing software like photoshop. Occasionally, I need to adjust exposure manually, add depth of field manually, or color correct. Beyond that I use it to scale images to fit the resolution and file size limits of various platforms. Conceptually this reduces the amount of uncontrolled loss encountered when platforms like tumblr auto compress files that are too large. In reality, tumblr still makes images crappy compared to how they appear in my file folder.
optimize your images for various social media platforms using this guide
fix exposure or colorization issues using a software like photoshop
I hope that this gives you a starting point into expanding your methodologies. My process is continuously evolving and I find this aspect of the game most entertaining. For others who don't enjoy this process, it's probably not worth it!
Thanks for reading ❤ PXL
462 notes
·
View notes
Text
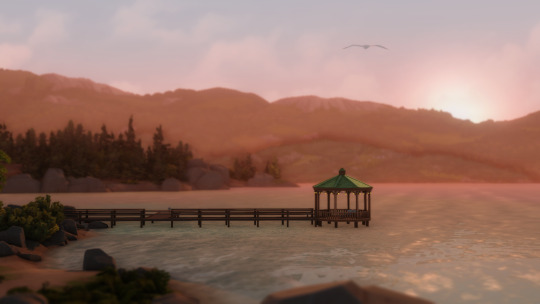
test screen shots for a preset ive been tweaking for a whole year ;-; i think im finally happy w/ it!
#copperdale + sunblind is so sexy#umm idk if ill release this i feel like its so generic since theres so many reshades out there itd be like reinventing the wheel ya know?#but also i love it and i wanna make a reshade overview yt video for it and then maybe an in depth 'how to make a preset' tutorial#ill add it to my list of things i wanna do but never hv time for#ts4 scenery#sims 4#s#simblr#also im finally in a building mood again so gameplay is on a short pause sorry yall idk how to multitask lol
97 notes
·
View notes
Text
How to take screenshots edit (when it's just not your thing)

Alright-y!
So, I have over the years learned how to use reshade and to edit my pictures. I am really not a natural on these things, so this is very much to help others who are as aesthetically challenged as I am. I have to have certain "rules" to follow, because I can rarely just see if a picture will turn out well or not.
We all need to realize where I started. We're talking using FRAPS to take screenshots and then running holy colours batman! to get some sort of effect.
Now, I'm not one to buy fancy stuff and to pirate certain programs isn't really my thing either. So we mend and make do!
Also, I am by far very good at taking screenshots and edit, but I have learned things and hope that it might be useful for someone!
A word on light
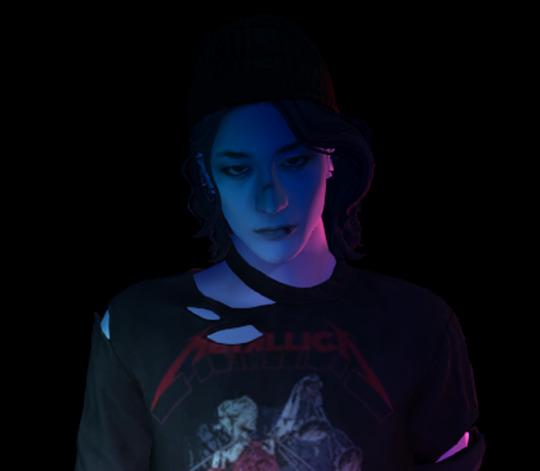
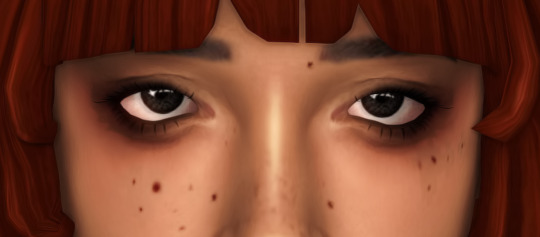
One thing I've learned is to work with is light. Where the light is is where the focus will go. This doesn't mean that a person has to be in the spotlight, but if they aren't - try to make that a more conscious choice. I am no pro at this, but I have to say that some of my favorite screenshots are where the light is just good. It focuses the eye or it just give a vibe.


(and yes, for some reason all of my faves are of Agnes, which is a bit annoying since Amanda is my fav-character, lol)
This is also where reLight comes in handy. Yes, it's behind a paywall but there are ways that you will have to figure out yourself.
Great tutorial here on reLight by @pictureamoebae! (if you want to really understand reshade, do check out their tumblr. So many helpful tips and tricks!)


Posing
Posing is fun! I don't fully story-tell with my sims, most of it is gameplay. But I do like to pose for family pictures or to enhance something that is going on.
What you need is Andrew's Pose Player and Teleport Any Sim or Wicked Whims.
Now, I haven't figured out how to use WW for children and younger to pose, so I use both. And I like @ts4-poses to find poses. Eventually, you'll find your favorite creators and can follow them directly.


Angles and vibes
Here's a trick. Work with angles. I am a master of pictures with zero vibe, just a face. Those can be ok, and sometimes that's what you have - but try to angle your shot a little.
Or add clutter, focus on that and let something out of focus happen in the background.
Or just go higher, take the screenshot from above.
Or don't focus on your sim at all, focus on something else that adds to the story/post.


Take the screenshot
The light is good, the angle great, the poses are in place and now, we need to take the actual screenshots.
I am a huge fan of reshade, I use version 4.9.1 because that works for me and the presets I use. No need to update reshade unless it becomes too old.
It can be really difficult to to find a preset that you like. I mostly use birdie by @monasims, tawhay by @windslar and paperbacks by @literalite. But I have tried many.
I like this youtube-tutorial on how to make your own preset, which also helps if you wish to modify one that you've downloaded. I do always recommend learning how to use ADOF and CinematicDOF to help focus the image on what you want to capture. I also strongly recommend @pictureamoebae's Foundation.
To take pictures, use the tab-key to leave the UI behind and use Q and E to go down/up in your game and then the mouse to angle. I use print-screen to take my screenshot, but that's something you set up when installing reshade so that's different for everyone.
And now you have your screenshot and it's time to open an editing program. Cheap as I am, I open GIMP.
Let's edit!
I don't use many steps. Since I can't use fancy photoshop actions I have to make all the steps by myself and well - I am human and therefor lazy.
Resize and start to think of a post
First things first. I cut my pictures to work for the tumblr ratio. I actually don't resize them smaller anymore - because when I change layout on my tumblr I just feel as if it messes it up. Now, I don't have a huge screen and my screenshots aren't massive, so it's not necessary either.
My images will be 1017x1017, 1525 x 1017 or 678 x 1017.
Once this is done, I also try to look at how they will go together. If I want a post of just squares I need to have an even number of images. Sometimes I want a landscape image as a sort of heading, or one in the middle with squares around it. It depends on what I want to convey.
This is by no means something that comes natural to me - I am aesthetically challenged after all. Sometimes, I just have 5 images and have to make do.

Resized
Topaz Clean
Yup, it's awesome. No, it doesn't come with GIMP. Yes, there are ways to work around this. You will have to find those ways on your own.
But I have to say, it does makes wonder for the images. I have completely stolen @sojutrait 's settings because I really like her style and therefor - I copy. I have added a bit more sharpening, but otherwise it's completely hers.

Topaz Clean:ed
Curves
Curves my beloved! I use curves for two things! Take out the yellow (aka increase the blue) and to brighten/darken the image!
I do sometimes matte the image too and here's a good tutorial for GIMP users on how to use curves in GIMP (for a matte look)

Less yellow/more blue

Brighten the brights (but I did not brighten the darker parts)
Layers, curves and increase the light where needed
Now, remember that we need light? Sometimes, a screenshot just doesn't have the right light. So I duplicate the layer, use the free marking tool around what I wish was brighter and put that on a new layer.
Then I use curves to lighten the layer with what I want to brighten and to make darker the layer with what I want to put less focus on (here's an ok youtube video on the subject).
Below, you can see the effect on my images.


Sharpen
Pretty basic. I subtly sharpen the image again. Even if I use the sharpening in topaz clean I do like to add an extra touch before it's time to save and move on.

So sharp!
PSD and UI
I do like to use psd's now and then. I mainly use @windslar's psd-collections and @deathbypufferfish's Build-a-Sim Icon Pack.
It's mostly to help give some info about the post or when my sims age up and I want to show their traits.
I do use the UI-info sometimes. If I do, I go into Game Options in the game > Accessibility > UI-scale and just drag that up a bit. Then I copy/paste that part onto the image I'm using.


Done!
That's pretty much it. Thing is, to post good edits you have to actually take good screenshots. As annoying as it is, it's like cooking: it all comes down to the ingredients. I hate cooking Yes, editing does help but I think my main journey has been to learn to take better screenshots from the start.
The picture below is from resized to done.
Hope this might help someone! I will probably learn more and more as I continue to post, but this is where I am so far in my journey!
3 notes
·
View notes
Text
so what reshades are we using guys???? ƈ ͡ (ुŏ̥̥̥̥ ‸ ŏ̥̥̥̥) ु
am i doing it wrong or what bc i can't get this shit to work right
#ts4#ts4 reshade#reshade#sims 4#i'm struggling#i followed a yt tutorial but does the version matter?????
3 notes
·
View notes
Text
Alternativa de ReShade para o The Sims 4! (Tutorial)
Aqui um pequeno tutorial de como ter um efeito Reshade no The Sims 4 se você tem um computador que não aguenta nem o The Sims 4, imagina o Reshade k
Claro que não tem tudo que o ReShade possui, mas vai dar um up nas cores e luz no jogo que eu acho que melhora a gameplay 100%!
(Esse tutorial é para aqueles que usam Processador Intel especificamente, mas tenho certeza que dá pra aplicar em outros processadores também!!)
1 - Clique com o botão direito do mouse na área de trabalho - Propriedade gráfica:

2 - Assim que aparecer o Painel de Controle HD INTEL, vá para Telas.

3 - Depois, antes de tudo, vá para o menu Cor na parte superior.

4 - É nesse menu que, mexendo nas barras abaixo que a mágica acontece. Você pode clicar no quadrado de arco-iris, no quadrado vermelho, no quadro verde e o quadrado azul para serem editados um por um até que um te satisfaça. Além da configuração Avançadas que fica logo abaixo de Cor que tem mais algumas opções para mexer, caso você queira.
Aqui tem as configurações básicas que eu uso:


5 - Depois que você editou, bastar clicar em Aplicar e depois em Perfil, salvando essas configurações com o nome que você quiser. No meu caso eu coloquei para o The Sims, mas da pra aplicar pra outros jogos também.

Existe a opção de restaurar padrões a qualquer momento também.
Enfim, espero ter ajudado e infelizmente não da pra tirar print com essas configurações, se não eu até mostraria uns prints aqui de como o jogo fica, porém as configurações só funciona para a sua própria tela.
1 note
·
View note
Text
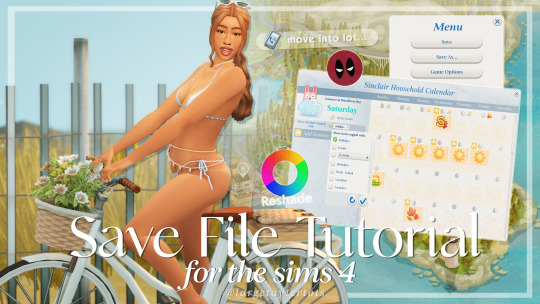
Save File Tutorial For The Sims 4 Here are my must-have steps for creating a new save file.
How To Install Custom Content/Mods
CAS Mods Stand Still in CAS by mizoreyukii More Traits in CAS by thepancake1 and mizoreyukii PreferencesPlus by helaene This mod requires 3 other mods in order to work. See the required mods at the bottom of the download post. Instant CAS Story Preferences by vicky sims More Columns in CAS by weerbesu
Map Replacement
Fanart Map Replacementsby dershayan
Mods MC Command Center by deaderpool Tags: #MCCC_Bypass or #MCCC_Include UI Cheats Extension by weebersu Phone Case Replacement by apricotrush
Calendar School Holiday Tradition by littlemssam Go Swimming Holiday Tradition by kiarasims4mods Sunbathe Holiday Tradition by kiarasims4mods Fall Fun Holiday Tradition by renegadesims Family Dinner Holiday Tradition by kiarasims4mods Winter Fun Holiday Tradition by kiarasims4mods Light Incense Holiday Tradition by littlemssam Eat Pizza Holiday Tradition by kiarasims4mods Hug Parent Holiday Tradition by kiarasims4mods Gift a Parent Holiday Tradition by kiarasims4mods More Holiday Icons by littlemssam
Lighting Mods Sunblind mod by softerhaze - (Installation Tutorial) NoBlu V2 by luumia (I use the darker version) NoGlo by luumia Reshade - (Installation Tutorial) GShade - (Installation Tutorial)
youtube / tiktok / twitch / patreon / gallery id: largetaytertots
617 notes
·
View notes
Text
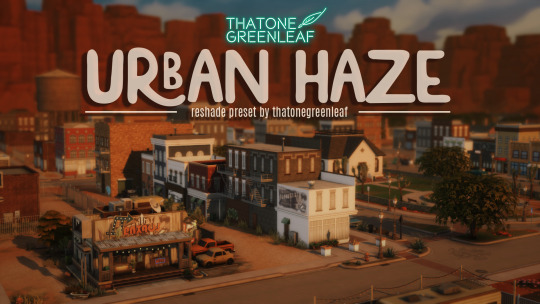

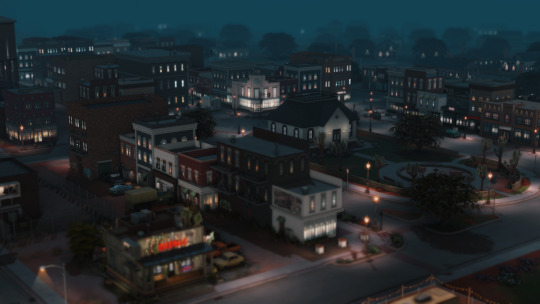
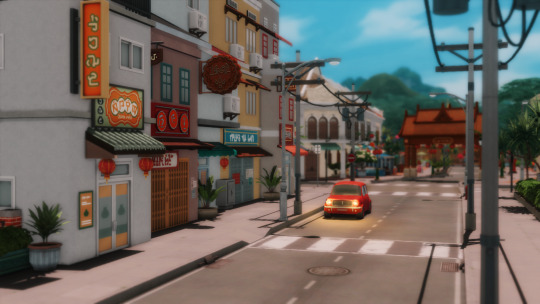

~urban haze~ reshade preset!
I've been using this preset on my twitch for a bit now, and i've finally gotten around to releasing it!! I'm very happy with it and I currently use it for everything😅
Urban haze has a focus on realistic lighting with a slight hazy and warm feel. Less blue in shadows, darker nights, deeper afternoon shadows, saturated sunsets, balanced greenery. Use it in any world, I've tested them all :)
__________________________________________
How to download:
♥ Download Reshade: (I use reshade 5.7.0, I can't say how this preset will behave with other versions of reshade, or G-shade.)
♥ During Reshade Installation, select The Sims 4, choose DirectX9 as the rendering API.
♥ Effect Packages to install: standard effects, sweetFX by CeeJay, qUINT by Marty McFly, color effects by prod80, and Legacy effects.
♥ Download urban haze below, drop it in your Sims 4 installation's "Bin" Folder
♥ Open the Sims 4, Disable edge-smoothing in your graphics settings if it's not already, In the reshade menu, set RESHADE_DEPTH_INPUT_IS_REVERSED= to 0 in global preprocessor definitions if it's not, and MXAO_TWO_LAYER= and MXAO_SMOOTHNORMALS= both to 1 in qUINT_mxao's preprocessor's definitions.
♥ If you're struggling with installation, I suggest you check out @kindlespice's installation tutorial! It was made for reshade 4.9.0 but the instructions remain the same.
__________________________________________
Notes:
♥ Both Depth of field shaders are off by default, you can enable them using their shortcuts: ctrl + Q (MagicDOF), ctrl + W (MartyMcFlyDOF) or enable them manually.
♥ MXAO.fx also has a shortcut (ctrl + R) bc sometimes the DOF blur makes the shadows weird, most of the time it's fine!
♥ Could potentially be gameplay friendly, depending on your GPU! The MXAO and DOF shaders will be the most performance heavy, feel free to adjust to your liking.
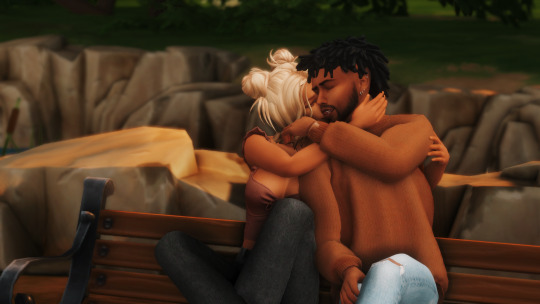
♥ The pictures above were taken with this preset and no further editing, but I do use a few lighting mods that will affect how my game looks:
♥ NoBlu by Luumia
♥ NoGlo by Luumia
♥ twinkle toes by softerhaze
URBAN HAZE RESHADE PRESET ↠ download on sim file share!
Follow me on twitch!
Support me on patreon!
TOU: do not redistribute, reupload, or claim my cc/CAS rooms/presets as your own! recolour/convert/otherwise alter for personal use OR upload with credit. (no paywalls)
1K notes
·
View notes
Text
STICKY POST: ULTIMATE(ISH) GUIDE(S) TO SIMS 4 CC-MAKING; OR, A COMPREHENSIVE COMPENDIUM OF TUTORIALS, INSTRUCTIONAL MATERIALS, & FELLOW COMPILATIONS OF A LIKEWISE NATURE
In which I list a fuckton of tutorials, guides, and lists of such, each written, curated, and crafted by people far more talented than I.
More will be added as I find them.
---
@teanmoon's CC Guides - Includes tutorials on cloning, uv_1, weights, bump and specular maps, bi-color hair, and a Blender Cheat Sheet. High poly 'creators' have little excuse to churn out high poly, non-optimized garbage when they can lean on bump maps. (I know those can only do so much for more complex meshes, but for objects, texture maps can do SO much heavy-lifting).
@vintagesimstress's CC Guides - Includes tutorials on using Blender to create objects and clothing, especially for people who are just getting started.
@eliavah's uv-1 adjustment tutorial. Haven't tried this myself yet, but after glancing through it, it's something I will surely want to keep bookmarked.
@simlaughlove's CC Tutorials List - Includes many tutorials handily laid out by category on everything from object texturing to CAS morphs.
@thefoxburyinstitute's Nav Page - This blog is nonstop Sims 4 resources for e v e r y t h i n g. READ THIS POST FIRST as a guide on how to actually... nav.
@simsresourcehub's Tags List - What it says on the tin.
Transferring Weights in Blender 3.3.1 - Over at Sims4Studio forums.
@trillyke's List of Tutorials - Good ones!
@sims4tutorials - *GRAND GESTURES*
@katverse's Huge List of Tutorials - Tutorials on eeeverything.
@thatsimslady's Massive List of Tutorials - 31 pages????? Damn.
@kouukie's Sims 4 CAS with Marvelous Designer Tutorial - YouTube video!
@rusticottage's Gifmaking Tutorial - I love Sims gifs tbh.
@cowplant-pizza' Boes' Editing Masterlist - Includes stuff for Reshade, PSDs, PS Actions, and how to use them.
@melonsloth's Deco Sim Tutorial - Using SimRipper
@depthofpixels's Deco Sim Tutorial - Using SimRipper
@azuhrasims' Guide to Posing Sims - Includes how to pose sims, and handy workarounds! Super great for beginners and longtime users.
@radioactivedotcom's Guide to Posing - Includes additional posing resources. NOT for beginners.
@madameriasims4's Add a Flame to Your Basegame Candle - Great for mood lighting and historical gameplay!
@syboubou's Making a Lamp Start to Finish - a video tutorial
MORE BELOW:
Adding Lit DST to Fireplace
New image ref for default overrides
Make an RGB Spec for Objects
Bake a shadow onto your object in Blender
Linking all bedding to a single frame
Cutouts for Doors/Windows/Archways
Making objects see-through/glass
Making lamps light correctly
Give an object transparency (add an alpha)
Make a candle w/ multiple flames
Change LOD viewing distance
932 notes
·
View notes
Text

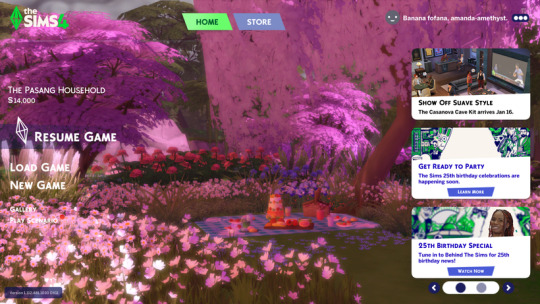
Hey! I'm Amanda | Not WCIF | 18+ (Sometimes NSFW)
Find me on YouTube: Here Main series on YouTube: The Aspiring Artist | Rotational Gameplay All posts related to The Aspiring Artist can be found here. Casual gameplay posts on my blog are separate from the storyline on YouTube. All of my Sims 4 posts | All of my reblogs | Other nsfw posts CAS Mods Cas background | Cas lighting (Studio flat) | Controlled Position Mod | More Cas Columns (6 columns) Game Lighting Mods In-Game Lighting (Dark) | Sunblind Gshade/Reshade I make my own Gshade presets. They are not available for download. However, here are some that I would recommend if you are looking for a preset: Boho dreams (Neecxle) | Birdie (Sforzinda) | Lithium (Gunthermunch) | Luminescent (HazelMine) | Raices (Folkbreeze) | Almond (Glimersims) | Kaleidoscope (Okruee) | White Willow (Tianaberrie) | Serenity (Misslollypopsims) | Neapolitan (Midsummermoon) Photo Resources I use SRWE for a lot of my screenshots. I take some of them on a higher resolution monitor without hotsampling. I use Krita for photo editing and sometimes Canva. I usually crop my photos and resize them for faster uploading. Check out this tutorial if you're new to hotsampling. Check out this FAQ for help with understanding reshade. Video Resources I use OBS to record my videos and Filmora to edit. I also recommend Davinci for a free editing alternative. I use this mic for narrated episodes. Essential Gameplay Mods I don't use a lot of mods because I strongly dislike updating them. But these are the ones that I consider essential for my game: Basemental Drugs (21+) | Wicked Whims (18+) | MCCC I do have other gameplay mods installed, but I don't consider most of them to be necessities. MCCC and WW handle nearly all of the background "tuning" in my game. Other Mods The other mods I have installed: UI Cheats Extension | RPO (I only use modules 1 and 14) | Somnik and Severinka Custom Foods | Control Any Sim | No Zzz | No Music Notes | Hidden Highlight | Tool | No Romantic Satisfaction Decay | Seasons Tuner | Kiss and Grind Defaults/Overrides My current default skin can be found here , default eyes here, default feet here, and default teeth here. I mostly use these skintones. Default phone | Default phone two | Default phone three | Toothbrush | Headphones | Male animation replacer (18+) | Terrain override I don't use custom loading screens, menu/map overrides etc. Some Commonly Used CC I use a lot of eyes from these creators found here and here. I typically use skins, skin details, and other genetics from these creators found here, here, and here.
138 notes
·
View notes
Note
Hey! Hope you're having a lovely day! I was wondering if you could share how you take your in-game pictures? (or maybe if you have some tips on how to...) They always look really good!
Hey! Thank you! Hope you too :3
I think I could share some basis 🤔
1) Ultra settings only!
2) SRWE – is your best friend if you want to take high quality screenshots. Without it in-game screenshots are pretty blurry on the distance 😔
Here is the YouTube tutorial.
3) HQ mod? You don’t actually need it, SRWE and ultra settings are enough (especially for maxis match and maxis mix style).
4) You totally need to check out better in-game lighting mod by northernsiberiawinds! It’s really awesome! Escpecially for outdoor screenshots 🌻
5) ReShade and GShade are your friends too! I regret I ignored it before 😅 For now I'm using GShade.
Here is the YouTube tutorial.
6) For making outdoors screenshots I normally put my sims in the shadow areas. The lighting there is less bright and more smooth. I add shadows in the scene by just putting random tree with tool by tmex.

7) For in-door screenshots I highly recommend to use the achino lamps (only recently discovered that they are free now). They also make lighting much smoother and cooler.
srwe + ghade + achino lamps (click picture for better quality)
no srwe + no gshade / srwe + gshade (click pictures to feel the difference)

8) And don't hesitate to use diffents shadows, reflections for your sims to avoid adding them in photoshop or any editing program you use.
Here is some links: 1 | 2 | 3 | 4 | 5 | 6
Hope it helps 🤗
142 notes
·
View notes
Text
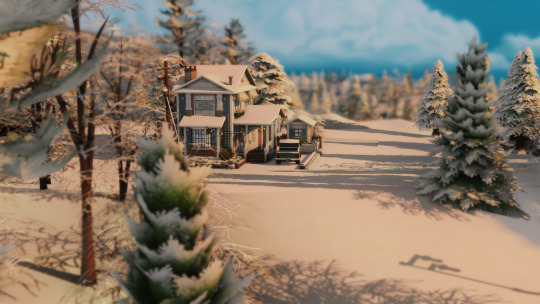
Main Menu Background Overrides
A handful of main menu background overrides. Only changes the backgrounds, nothing else. Unedited (no reshade) in game nature screenshots.
Beach
Forgotten Grotto

Jungle
Sylvain Glade
Snowy Mountain
Henford 1

Henford 2

Blue Green Gradient

Bright Rainbow Gradient

Gold Gradient
Pastel Blue Gradient

Pastel Green Gradient

Pastel Orange Gradient
Pastel Pink Gradient

Pastel Rainbow Gradient

Pastel Yellow Gradient
Rainbow Gradient

Picnic (last one for real, made for a tutorial)
Dark Heart
Dark Romance

Sidenote: Sixam is too dark to make a good background, in my opinion, until someone makes a lighting mod for the main menu so that the sims aren't so bright.
You can only have one main menu background.
Updates:
Update: two more have been added, Henford 1 & 2
Update 2: added 10 more, gradients this time. There were more, but they didn't turn out well. That's the end. Any more will have to be a commission.
Update 3: added Picnic, made for a tutorial, and that is for real the end.
Update 4: for real for real, the absolute end now. These two (Dark Heart and Dark Romance) are meg's fault. One is one of the backgrounds for my PlumbBuddy theme and the other is one I considered and rejected for that because it wasn't exactly what I wanted.
Jan 28, 2025: With today's patch, EA has introduced live menu updates for events. Meaning that they override these overrides. Lunar Britney's 2025 Main Menu Readjusted has been updated to fix that, so if you don't want to see an inflatable couch on the original background, grab the update of that.
Tutorial on how to make your own here https://www.patreon.com/posts/120129902
Download: https://www.patreon.com/posts/main-menu-120064755
Thank you so much to meat-ice-creammm for finding and sharing the background images, so that we don't have to live with what EA gave us.
102 notes
·
View notes
Text
🧾️ complete resource list ↓
about me: brooklyn, black, chicago, she/her pronouns, 20+, wcif unfriendly | socials
♡ all old helios overlays - do NOT delete logo, tag when using. (﹩canva pro)
✰ computer pc specs:
- mpg b550 gaming plus - nvidia geforce gtx 1660 - samsung 990 pro 2tb ssd - amd ryzen 9 5900x 12-core processor - 64 gb ripjaws ram - dell s275h 27” monitor - acer nitro 27" monitor
✰ frequently used software & sites:
- adobe premiere pro - blender 3.6 & 4.3 - canva pro - procreate - rni films - sims 4 studio - blenderkit - cgtrader - freepik - epidemic sound - google docs - notion - character creator 4 - rigmodels
✰ visual defaults
cas bg override: ffb3da by northernsiberiawinds ui override: pink ui override by vyxated loading screen override: dynamic loading screen by simmatically main menu override: refreshed main menu by simmatically
✰ favorite cc creators (cas, anim, build):
tina-sims, simstrouble, northern siberian winds, arethabee, badddiesims, belloallure, brandysims, busra, caio-cc, camuflaje, ceerproductions, charonlee, darte77, daylife-sims, gegesims, golyhawhaw, bbygyal123, greenllamas, grimcookies, kikovanity, mmsims, mssims, nucrests, sheabuttyr, seoulsoul, sentate, savage-sims, thisisthem, whoopsims, woosteru, simkoos, sims3melancholic, rimings, simtury, moood, cecesimsxo, kiricheu, plumbobsnfries, obscurus, madlen, luumia, lazyeyelids, jius, bergdorf, yuyulie, frxsk0, afrosimtricsims, wingssims, pinbox anye, awingedllama, arnie, blarrfy, breeze motors, budgie, charlypancakes, cluttercat, coupsims, dreamteamsims, felixandre, illogicalsims, khd, kkb, lilaccreative, littledica, leaf-motif, lory sims, myshunosun, pierisim, platinumluxesims, plush pixels, simagination, syboutlette, ddaeng, tuds, cowbuild, peacemaker, pixelplayground, sixam, the townie architect, max20, suga-simz, flirtyghoul, conceptdesign97sims, lazysimmies, hanraja, e404p, steven studios, grindana, rascal, sovasims, vms, misims, crispycucumber, utopya, kikichain, kingblackcinema, greynaya, cherry pie, yummy-o-tummy
✰ visual mods i use:
reshade 6.0 (all presets are personal) sunblind mod by softerhaze better in-game lighting by northernsiberiawinds (extra dark saturated) out of the dark by lotharihoe
✰ faq:
no lykaia cast members are available for download no lykaia sets are up for download no custom lykaia cas items are available for download lykaia is heavily influenced and inspired by greek mythology i only use my own reshade presets i am wcif unfriendly
cc making tutorials i use, simblrs i love, how i plan episodes, render tutorial, my blender theme
187 notes
·
View notes
Text
INSTALLING// GShade + ReLight for The Sims 4
I've been getting a lotta asks about how I got the up to date GShade working with ReLight ( ALPHA ), so here's a mostly quick tutorial, that will hopefully get it working properly for you too!
Firstly, download and install GShade, unless you've already got it installed, then just be sure it's up to date.
Click, or right click pics below and open in a new window to see them in more detail.
Now I don't currently have it installed into any of my games, bc I mainly use Reshade 2, so if you need to know how to do that, you're in luck! I'll walk you through it.
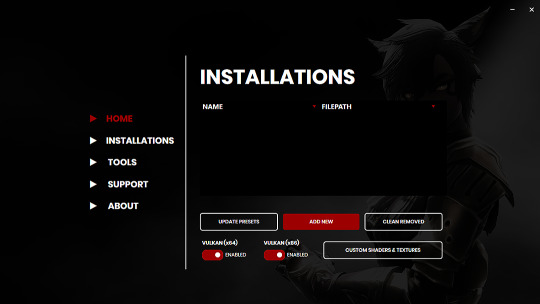
Click Add New.
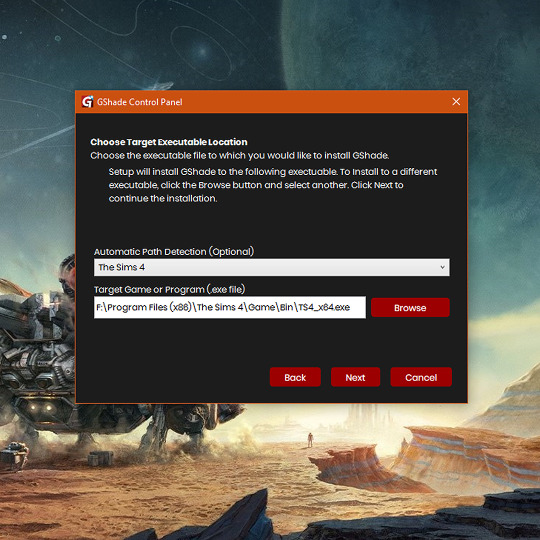
Then locate your TS4_x64.exe, except if you're fully updated, in which you'll need to locate your TS4_DX9_x64.exe, but only if you plan to opt out of using DX11, then click Next.
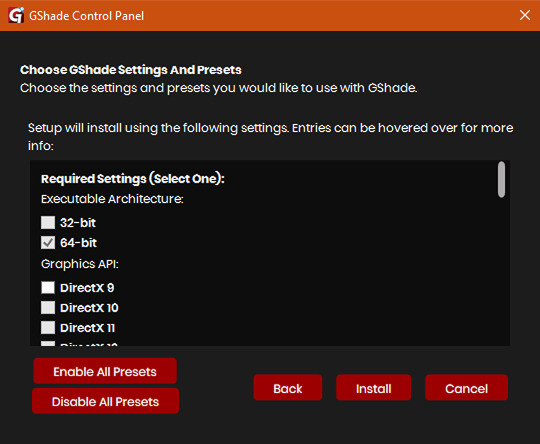
This will open another window with a bunch of ticked boxes, and tbh I didn't mess with any of these. Many them are greyed out anyway, and it all works fine for me.
So if yours look like this, then you should be fine too.
Lastly, at the bottom you can preload some presets if you like, but it's purely up to you. They aren't required.
When done, click Install.
There will be another window that asks you where you'd like to save your pictures. Once again, this is purely up to you, click Browse to locate your preferred folder, or if you use programs like Nvidia for screenshots, just ignore it, and click Finish. Then when it asks if you're okay with the chosen location, click Yes.
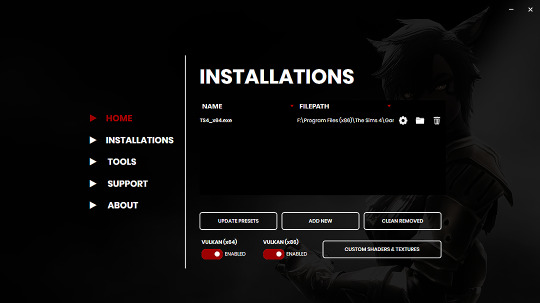
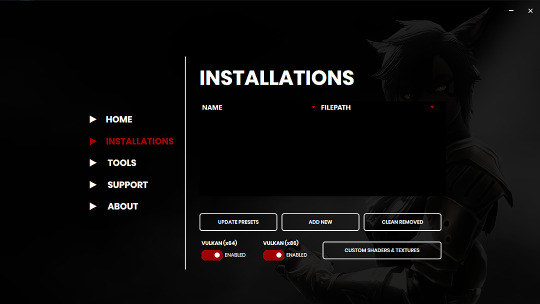
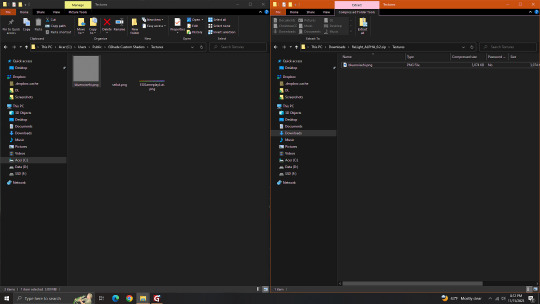
Once you've finished, TS4_x64.exe should show up in the Installations tab of your GShade installer, which means you're part way there! Now, click on the Custom Shaders & Textures button at the bottom, this will open the folder where you need to install ReLight.
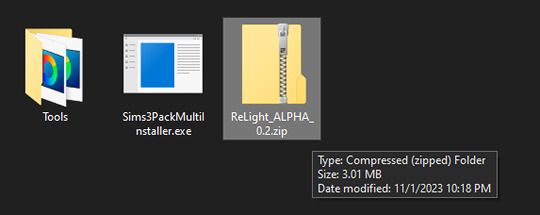
Locate your ReLight_ALPHA_0.2 download. Mine was in my Downloads folder. Double click it, or unzip it, and you'll find a couple folders inside it.
Click or right click pics below and open in a new tab for more detail.
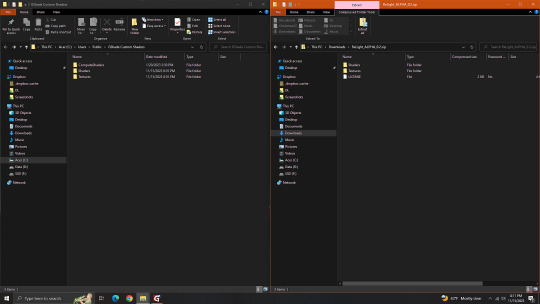
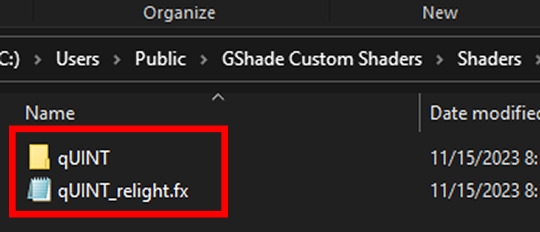
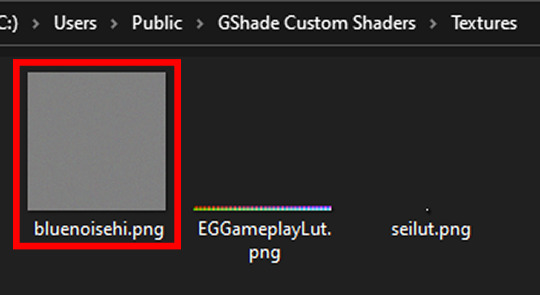
Here's a side by side comparison of the GShade Custom Shaders folder we just opened, and the ReLight_ALPHA_0.2 folder we unzipped and opened, so you can see how there are two identically named folders. The goal is to put whatever is in the Shaders folder of the ReLight folder, into the Shaders folder of the Custom Shaders folder, and then repeat this process again for both Textures folders, until they end up looking like this...
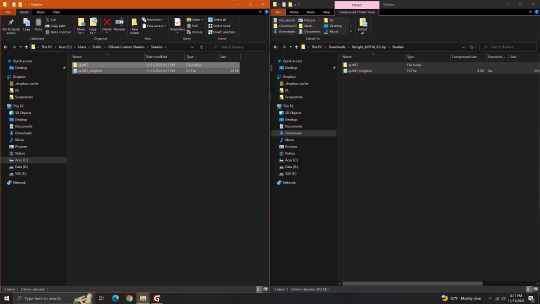
In conclusion, your GShade Custom Shaders > SHADERS folder should have these two files in it...
While your GShade Custom Shaders > TEXTURES folder should have this .png in it...
Good? Now let's turn on The Sims 4.
When you've opened you game, load your save ( idkw, but the GShade UI won't open in the menu screen ), then hit Shift + Backspace on your keyboard to open up the GShade UI. You can choose to go through the tutorial, or skip it. Either way just keep clicking continue or OK until you get to the Home panel. Now, I've got a preset already, if you've got one too, good, activate it, if you don't there should be like a default one you can use until you create one or get one. Main goal at this moment is to find ReLight in the list of shaders, and activate it so we know it works. Tick the Performance Mode box at the bottom, and scroll down 'til you find this...

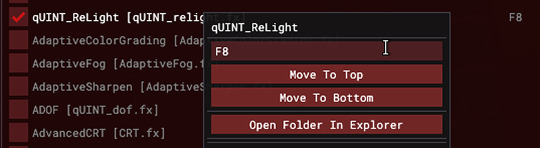
This list should be alphabetized so just scroll down to the Q's, then tick the box beside it. Then click Active to Top, and scroll back to it. One thing I would suggest is binding it to a key ( right click while hovering over it ), this will make it easier to find if you lose it again, since clicking Active to Top also recalls any shaders that are bound, even if their box isn't ticked ( isn't active ).

I've bound mine to F8, but it's up to you what you wanna use, I only suggest it be F6 or above, since The Sims 4 already uses F1-F5 I believe.
Oh, and whenever you're done messing around with it, be sure to untick Performance Mode, so your computer won't beat your ass.
516 notes
·
View notes
Text
mutt's guide to using dsr on ts4, with pictures!!!
ok so, dsr is a thing available for nvidia gpus that allows you to take veeery high resolution screenshots of games without much trouble, like this
it's an alternative to srwe, as it plays nicer with a lot of reshade shaders and is just, generally more nice to use! let me teach you how to use it - full tutorial with pictures for every step under the cut (im sorry its too long without the cut)
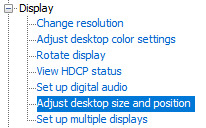
step 1: right click your desktop and open the nvidia control panel
step 2: go here (adjust desktop size and position)
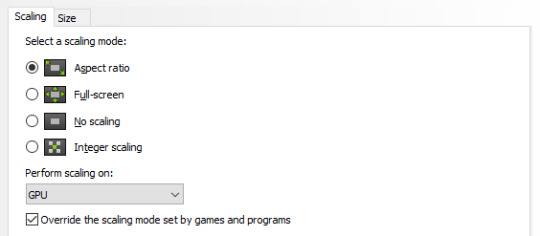
step 3: make sure your settings are set as follows! this is important
step 4: now, go here (change resolution)

step 5: under change resolution, click on this button (highlighted with a red square)
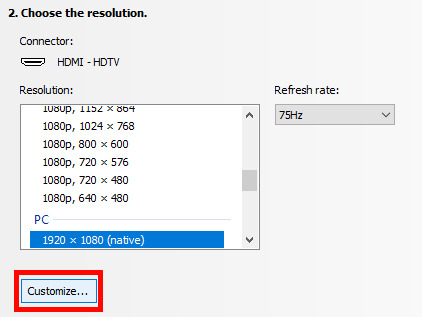
step 6: in the windows that appears, make sure that "enable resolutions not exposed by display" is ticked! this is very important! (again, highlighted in red - it should look like this)
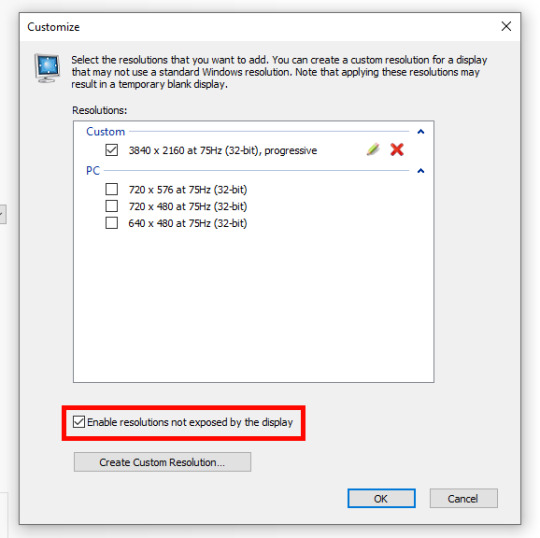
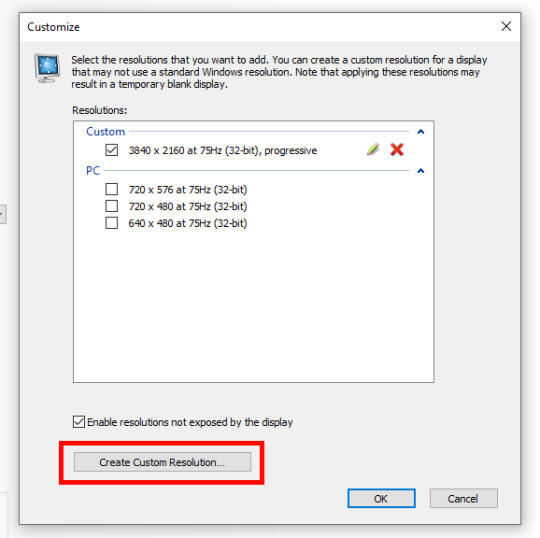
step 7: now, click on "create custom resolution"
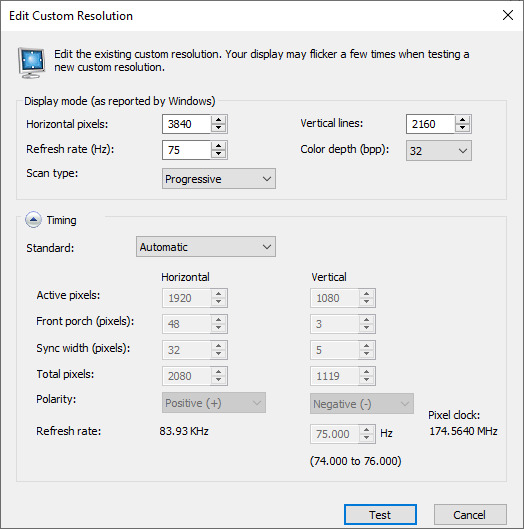
step 8: this is where you set your desired resolution, and where i get a bit rambly; so, in my opinion, there is ZERO reason to go above normal 4K for TS4, as it's generally not a really high-poly game and it has rather simple graphics. you can fuck around a lot here, but if you don't feel like it, here are my settings - this will give you 4K screenshots. NOTE: THE REFRESH RATE DOESN'T NEED TO BE 75! SET IT TO WHATEVER THE REFRESH RATE OF YOUR MONITOR IS!
step 9: now, click on test
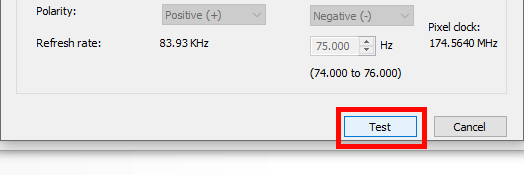
step 10: let the thing load, and after it's done, a window like this should pop up.. but yknow, in your language. click on "yes" (or accept or ok!! idk mine's in russian; basically, the button highlighted here!)
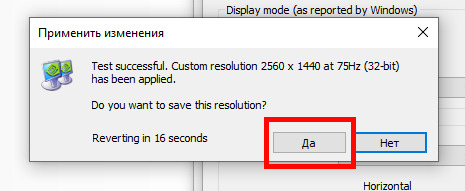
step 11: click "ok" in the window that pops up! like this! afterwards, close the nvidia panel

step 12: open the sims 4 and go into game options, then into graphics
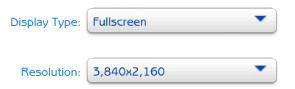
step 13: set your "display type" as "fullscreen", like this

step 14: under "resolution", select whatever resolution you setup earlier; in my case it's 4K, so if you used the same resolution, your settings should look like this
step 15: click on apply changes!
AND UR DONEE!! WAHOOIEE!! now, take your screenshot using reshade, and then go back into sims settings and set it back to what you usually play at, then apply changes!
every time you need to take an HD screenshot, simply open game settings and use your custom resolution! that's it, have fun :3
#sims 4 tutorial#ts4 tutorial#sims 4 screenshots#ts4 screenshots#sims 4 screenshot tutorial#ts4 screenshot tutorial#sims 4 hotsampling#ts4 hotsampling#srwe#nvidia#dsr#tutorials
757 notes
·
View notes