#how to export sims
Explore tagged Tumblr posts
Visit Tumblr Blog
Explore Tumblr blogs with no restrictions, modern design and the best experience.
Last Seen Tumblr Blogs


Fun Fact
Hackers stole 65M passwords from Tumblr in 2013.
Text
want to draw so bad but the iPad is full to the point that exporting crashes things and God I Hate This Device So Much
#i pay for cloud storage + have it set to back up on its own and it doesn't mean SHIT because theyre PROCREATE FILES#do you know how miserable it is to have to export things. one by one. on corn wifi to drive#because its the only way to get it to my computer#and i have. such an unmedicated attention span. a. psd taking literally ten minutes to transfer -#that i have to sit and watch because it fails half the time and cancels if i close the window -#might as well be a personal assassination attempt. im in hell. i miss you so bad pc hard drive#unfortunately i cabt use THAT until i have a screen and the secondhand ones i can afford get bought because i cabt drive#and i am lowwwww priority lmao#im losing my marbles living like this. if you see me sinking snother hundred hours into the farming sim of the week#know its because im fucking haunted#patch me through to palaven command
14 notes
·
View notes
Text
guys milkshape is really scary. is anyone else scared. are there any 4t2 conversion tutorials that work for versions of blender 3.0+
#i’m fighting for my life. all of the menu options have changed and i cannot get this hair to export with the materials#making sims 2 cc is fun because every tutorial has screenshots of programs that haven’t looked Like That since 2008#and now no one is making new tutorials bc everyone already knows how to make cc!!!!!!!!!!#i fear i may have just got here too late. it’s over for me and i’m not gonna make it. unless someone has a tutorial i can follow please god#spirit box
10 notes
·
View notes
Text
Jade Pingree is the all business (and pretty rude) head of the Barkersville Companion Club. Celina is a rich, fabulous, trend-setting social butterfly. Her good opinion means a lot in town.
#ts2#the sims 2#ts2 render#ts2 pets gba#barkersville#jade pingree#celina hawbaker#I'm a ts2 pets gba apologist now#had fun playing it recently! I just wish it was good#ts2 blender#if I knew how to export pets and rig them I would've gladly included them too fdhsifohdso
18 notes
·
View notes
Text
when the modding tools comes out for bg3 im gonna be soooo annoying oh man. i wanna make so many animations for dav and shadow
#imagine if we have the ability to export their rigs like in sim ripper#and then you can make poses and SCREENSHOT THEM IN GAME AUUUGH 😭#i will never be normal again if that happens#i want to pose dav and shadow so bad i want everyone in a group hug#imagine if u can add your own npcs THE STINKVERSE COULD ALL BE IN MY GAME 😭😭 id cryyyyy#idk how the modding tools will work at all but i have high hopes!#the devs made it seem like it will be a pretty powerful engine so we will seeeeeeeeeee
7 notes
·
View notes
Text
Any posers have tips for getting the mouth in a puckered position like you're saying "ooh"? I can get a sort of jaw unhinged expression, but that's not exactly what I was going for...
#i am also very bad at posing hands lmaooooooo#i can't figure out how to get the fingers to curl the way i want on the default ea rig#i'm trying to learn on that for now before i switch back to vyxated's rig because... idk#but i remember the hand setup being a lot better on that#luckily i don't think i'll be focusing on the hands when i actually use it in-game#however i was able to pose multiple sims and export each of their poses correctly without much hassle so that's something :)
5 notes
·
View notes
Text
TUTORIAL
How to FIX CUSTOM EYELASHES after update 1.108.349.1020 The Sims 4
YOU NEED:
Sims 4 Studio @sims4studioofficial
Blender (I use Blender 2.79)
Instruction manual:
Opening the eyelashes that need to be repaired in Sims 4 Studio

2. Go to the "Categories" section - Item "Outfit Type" - "Eyelashes"

3. Click "Apply to All Swatches" - Click "Yes"

4. Now we need to assign the correct color to the Vertex in Blender. Go to the "Mesh" category and export the eyelash mesh

5. Open the Mesh in Blender and switch to the "Vertex Paint" mode

6. Select the display mode "Wireframe" or press the "Z" key

7. If the eyelashes are broken, they will have the wrong color. Now we need to assign the correct color

8. Click on the palette icon

9. Go to the HEX item and enter the color code. Color Number: 007F3F

10. After you entered the color code. Click "Paint" - "Set Vertex Color"

11. After that, the color of the eyelashes will change. Save the file and close the Blender

12. Go back to SIms 4 Studio and import the mesh

13. Saving the package file

14. Checking the result in the game
718 notes
·
View notes
Note
how long does a comic generally take you to make?
coming up with the idea/script: usually a background task i dont know how long this takes. my beautiful mind just says words recreationally
making a super vague thumbnail sketch: like 1-10 minutes this is super quick <3
opening the sims 4 or pinterest bc i realised i should probably make or find a reference and then getting distracted bc i have to edit all my boards or redo all my sims: roughly 7 billion hours
actually drawing/lining/colouring/shading: like 1-3 hours unless it's a) a commission, b) i'm really trying to be clean or 3) is just massive/several pages, in which case it takes Forever
lettering n stuff: however long you think it is triple it. the text boxes and speech bubbles are like stray cats with rabies and never ever want to work with me
repeatedly realising i actually made a mistake in one panel and having to re-export it 4 times: another 5-30 minutes maybe more
#thanks for the ask!#askbox closed#usually its closer to the 1 hour mark if its simple n only has a few panels and i remember how to draw
285 notes
·
View notes
Text
Yet Another Package Editor

Download the latest version here
YaPe is a modern package editor for DBPF (.package) files
Features:
Edit any package - FAST
List and edit resources in a package
Filter resources by type
Easy editors for several resource types
Supports opening ANY DBPF-coded .package, .dat, or .sc4 file
Easily reduce texture size, add/remove/recreate mipmaps, change texture format
Import textures by dragging, export DDS
Native on Windows and Linux
Why make yet another package editor?
Simply said, because SimPe can be kind of cumbersome especially on Linux, and package editors other than SimPe (s3pe, s4pe, iLive's Reader etc.) do not support Sims 2 resources.
To illustrate, I timed someone shrinking a texture (convert RawARGB32 -> DXT1, shrink 2x) in both SimPe and YaPe:
SimPe + GIMP: 1m 30s
YaPe: 10s
Originally this started as just a way to easily test if my DBPF library was doing the correct thing, but over time it has grown to become a half-decent editor suitable for more general use.
Tutorial / usage tips
Here I will explain how to shrink and convert textures in YaPe because that's what I imagine most people will use this program for right now, but of course you can use it for other things as well.
Let's get started by getting the program to look the way you want to: use the options in the top left to change the scale of the interface and switch between dark and light mode.
Now drag a package file into the program (don't worry about closing the sims except when you save the package), a list of resources in the package will be visible. You can find out what the abbreviations mean by hovering your mouse over them; in general I try to add tooltips like this to buttons or options that are unclear.
Don't be afraid to mess around and make changes! The changes you make are never saved unless you press the save button, so if you simply drag your package file into YaPe again without saving you will get your original package back (there is currently no undo function, but it is a planned feature).

All these resources are great, but we're only interested in the textures for this tutorial so let's set a filter. Right click on a texture (TXTR) and select "Filter on type".

Great! Now you can only see the textures we're interested in. You can disable this filter by unticking the "filter" option at the top.

Now click on the "TXTR" to open the texture, it will open a new tab in the lower half of the window by default. If your window is not very big (like mine is for this tutorial) you might have trouble seeing the texture and all the options. You can drag the tab around and put it somewhere else in the program, I'm going to put it on the right and make it a little bigger so we can see what's going on.

Okay, now we can see all the options, and well... there's a bunch of them. We'll go over some of the options that you'll likely want to use but feel free to experiment of course.

First, let's have a look at the texture viewer at the bottom: you can zoom in on the texture by holding control and scrolling, and you can change which mipmap is displayed by clicking the radio buttons above the texture.

But wait, this texture does not have enough mipmaps to show up in game! (post by @pforestsims) Let's fix that right this instant by clicking the "Add missing mipmaps" button in the middle.

Okay, now the mipmaps will show up in game, which is good... except that this mipmap is really blurry. (post by me) Luckily we can fix this really easily, just click the "Recalculate all mipmaps" button.

Much better!... except that we've created a new hidden problem: the leaves will disappear when zooming out in game (blog by lisyarus) but even this problem can be fixed. We can actually preview what the texture will look like when zoomed out by switching the format to DXT1 since DXT1 has binary transparency, just like alpha tested textures like leaves and grass.

Right, so the leaves have a bunch of holes that don't look right when zooming out, let's change that. Above the "Add missing mipmaps" button there is the "Preserve transparency" slider: try changing it to something like 120-170 and click "Recalculate all mipmaps", you can see that the transparency changes, if it's still too thin/transparent set the value higher and recalculate again and so on.

Have a look at all the mipmaps (zoom levels) and once you're satisfied with the transparency change the format back to DXT5.

This texture will now look great in game! But it is also quite large, so we can reduce the size 2x smaller without sacrificing very much in terms of looks (sorry to all the cc authors who love their large textures). Click the "Remove largest texture" button, which will make it so that the first mipmap becomes the largest texture effectively reducing the size by 2x. Like mentioned it does use the first mipmap so make sure to fix any blurry mipmaps first.
You can repeat the same process for the other textures in the package, and then we're done. Save the package by clicking the save button in the top bar, and have a look in game at your beautiful textures.
Another option is to drag images/textures you've made somewhere else into the program (with special support for dds files), for a full lists of supported image formats you can look here. (image-rs documentation) The image/texture will currently go into the firsts open texture resource tab because of UI framework limitations.
Here's a look at some of the other editor currently implemented:


Enjoy :)
195 notes
·
View notes
Text
The Sims 3 Material Painter Final Version
UPDATE
I've updated the painter, and with it, included some new things as well as a fully interactive tutorial on how to use it.
NEEDED Prerequisites:
Blender 4.2+
Blender Paint System Addon - HERE (you can donate to the original creator, or get it for free, great little plugin!)
THE TUTORIAL
The tutorial is extensive, done in numbered steps, and is UI and workflow oriented, allowing you to click on any relevant UI element to learn more about it, and how it relates to the complete workflow. There's an additional, advanced chapter, for people who are interested in learning more about blender texture painter's functionality and techniques.
PAINTER ADDITIONS
The Painter has been slightly fixed, with multiplier's lines and depth shading being shifted to the correct depth, and with AO being more pronounced. This will make multiplier output even more accurate. Added some new minor tweaks to UI and Color Palettes to accommodate for the tutorial.
DOWNLOAD
Get updated templates with new files HERE!
If you only want to access the tutorial, you can do it HERE.
You can access the original post below:
Been working on a tool that easily creates The Sims 3 material maps based only on a few texture layers, most of it derived from height data. This was done long time ago, but very sloppily, and it was not at all approachable.
Discovering THIS free blender add-on that lets you plaint layers in it, made me return to this project and finalize it for release.
The tool can export:
- Multiplier, RGB+A
- Normal Map, RGB+A
- CAST Map, RGB+A
- Specular Map
- Overlay, RGB+A

OLD VERSION BELOW!
//~~Get it HERE, and please, make sure to get THIS blender plugin, it's NEEDED for this to work. Blender 4.2+ is also needed for these to work together.~~//
#thesims3#thesims#sims3#thesims3cc#the sims 3#sims3mods#ts3#sims 3#sims3tools#thesimstools#simsc#simscreation#sims creator#blender#blender3d
206 notes
·
View notes
Text
Transferring animations between rigs (e.g. adult to child)
The steps below describe how to transfer an animation from an adult rig to a child rig but the method should be applicable for any transfer between human rigs.
However, I haven't tested other constellations. Let me know if you have any other tips, suggestions, corrections or run into any issues.
Many thanks to thepancake1 for helping figuring out the details that are not obvious at all 💛
I posted this little guide in Creator Musings for someone wondering about it but sharing it here as well.

Step 1)
Export the adult sim animation you want to transfer (=your source) to Blender.
Open a blend file with a child rig (=your target).
Append the adult rig with the animation to the child rig in Blender (File > Append > Select the blend file > folder "Object" > select rig and mesh there)
Select the animation from the adult rig for the child rig (select the child rig in the Outliner menu > select the scene tab in the properties panel below > in "S4S AnimationTools" select the adult animation as the "active animation")
This will get the job mostly done, but the animation will be offset and jumping around, as you see below. To correct for that you will need to set up several constraints as described in step 2.


Step 2)
As you see below the height of the ROOT_bind of the adult sim and child sim differ by about a factor of 0,7:

You can check the exact location in Edit mode:
The ROOT_bind of the child rig is located at 0.6920, the ROOT_bind of the adult rig at 1.0112 on the Z axis, which gives a factor of 0.6920/1.0112=0.6843354430379747

With that information you now need to do the following:
In the Dope Sheet menu, select "Action Editor" and press "New Action" there to make a copy of the selected animation for the child rig.
In the Dope Sheet Summary open the ROOT_bind and disable the location channels but keep the rotation channels enabled (the latter matters if the ROOT_bind is also rotated in an animation). The setting should look like this:

In the Transform menu (now in Pose mode) type in -0,6920 on the X axis for ROOT_bind (thus resetting its position to 0 in the animation; can't properly explain why X axis is chosen here instead of Y but it has something to do with how local rotations of a bone are determined according to pancake).

Create a "Copy Location" constraint for ROOT_bind of the child rig targetting it to the ROOT_bind of the adult rig (this is done in the Properties panel > Bone Constraints), set Influence to 0.6843354430379747 (factor calculated above). (Edit/Correction: Previously I recommended to create another "Copy Location" constraint separately for the "Z" axis and to check "Offset" there. However, upon further testing, this doesn't seem to be necessary. Leaving info here just in case.)
You might then also need to add a "Copy Rotation" constraint for ROOT_bind of the child rig targetting it to the ROOT_bind of the default rig (Influence can stay at 1 here).

The animation should now play as expected:

Step 3)
All you need to do now is bake the animation (thus applying all the constraints you set up). Select Pose > Animation > "Bake Action...", then check "Visual Keying" and "Clear Constraints" in the pop up. The animation will now work stand alone and you can delete the adult rig.
Alternatively, if you use Pancakes animation tools, you just need to export the clips, the constraints will be applied automatically.
288 notes
·
View notes
Text
Why I started using DXT1 texture format for TS2 CC again (sometimes)
In the past I discouraged ppl from using it. But it has one benefit, which TS2 CC creators shouldn't ignore: DXT1 textures are about half the size of DXT3. In TS2 DXT1 is only used for textures without transparency.
There are two facts about textures that some ts2 cc creators and cc hoarders are probably unaware of:
Lossless compression (compressorizer etc) significantly reduces file sizes, but it does NOT help texture memory, because texture files get uncompressed before being stored in GPU texture memory cache
Byte size does NOT equal resolution. For example: Raw32Bit texture takes up around four times more space in texture memory cache than DXT5
DXT3 2048*2048 px takes up ~4MB, but DXT1 2048*2048, thanks to its harsh 8:1 compression, takes up only ~2MB of texture memory cache, which is an equivalent of two makeup textures 512*512 px Raw32Bit format (TS2 makeup creators' favourite :S ).
@episims posted a comparison of DXT formats here - but please note Epi compared texture sizes after those were compressorized. Also, I believe the DXT1 preview actually shows glitches that are not visible in the game.
To change texture format in SimPe you need to install Nvidia DDS utilities, which can be downloaded here (SFS). Also, Yape package editor is much faster and easy to use.
*This is about GPU texture memory. As far as I know, it's unclear how internal TS2 texture memory works - does it benefit from lossless file compression or not? No idea. But IMO we don't have a reason to be optimistic about it :/ What we know for sure is - the easiest way to summon pink soup in TS2 on modern systems, is to make the game load large amounts of texture data (large for TS2 standards anyway) in a short amount of time.
DXT1 built in SimPe with Nvidia DDS Tools tend to look bad - but as I had learned very recently, SimPe DXT1 preview (and export) is broken! It displays some artifacts that are not actually visible in game!
The only way to correctly view DXT1 created in SimPe outside of the game is the new YaPe package editor. You need to switch the texture format preview to AltRGB24 (Raw24Bit).
DXT formats use lossy compression which affects texture quality - this compression matters for texture memory.
DXT1 512*512*4 (4 bytes per pixel) / 8 (divided by 8, because of 8:1 compression ratio) = ~131 KB
DXT3 512x512 px (4:1 compression) = ~262 KB
Raw32Bit 512x512 px = ~1MB
2048x1024 px DXT1 texture takes up around as much texture memory as 1024x1024 px DXT3 or DXT5 (non transparent*) = ~1 MB
*Flat (non transparent) DXT3 size is the same as DXT5.
Fun fact: flat DXT1 and DXT5 built in GIMP look identical, and also not much better than SimPe DXT1 (in game!).
DXT5 has 4:1 compression just like DXT3 but it can store more data in alpha channel, and that allows for much better looking transparency (if smooth alpha is present, size is increased). As I already mentioned, DXT1 does not support alpha transparency.
I don't want my game to look like crap, but if texture looks OK as DXT1, then why not use it. Aside from hood decor, I've been reconverting some wall and floor textures for myself to DXT1 recently, instead of resizing.
Some ppl might cringe on seeing 2048x2048 skybox textures but to me large texture is justified for such a giant object. I cringe at Raw32Bit makeup.
I'm slowly turning all Raw32 makeup content in my game to DXT5 (no mipmaps). I've edited enough of those to know, that quite often the actual texture quality is not great. If a texture has been converted to DXT3 at some point, alpha channel is a bit choppy. "Upgrading" such texture to Raw32 doesn't do anything, other than multiplying texture size by four. I don't know how 'bout you, but I only use one or two skyboxes at a time, while my sims walk around with tons of face masks on them, so it's a real concern to me. And don't make me start on mip maps in CAS CC. My game certainly doesn't need 33% larger hair texture files :S
*note - another thing I've "discovered" after writing this post, SimPe DDS Builder can actually make crisp mipmaps as long as you set Sharpen to "None".
Note2: Raw8Bit (bump maps) / ExtRaw8Bit (shadows etc) are also uncompressed formats, but don't contain color data and weight around as much as DXT3.
/I've taken out this part from a long post I'm writing RN /
129 notes
·
View notes
Text

Custom CAS Background and Stylist Room Background Tutorial: How to Make Your Own
Before I begin this tutorial I would like to credit CherieDawn67 at Modthesims for figuring out how to replace the background meshes and textures. My mod is only possible due to her hard work.
I must also credit @mspoodle1 for fixing the lighting/weather issues in the first version of this mod, and recompiling the mod to allow further customization.
---
01. Open up my CAS Room or Stylist Room package file in S3PE. Take note of the following IMG resources:
Create a Sim room's background: instance 0xBBF74B40103CCD80
Create a Pet room: instance 0xF1977DAF066F6F09
Create a Bot room: instance 0x7DB75D780535AF71
Stylist room: instance 0xA7E661A96D5DBCD6
Right-click on any of them and export the image as a ".dds" file. The background image is a 2048x2048 px DDS DXT5 image file.
Technically you could use a 1024x1024 px texture instead but the image quality in-game will be lower.
02. Open the image in the graphics program of your choice.
03. Find an image that is 2048 px wide, and around 1024 px in height. It should be in landscape orientation. Could be a texture extracted from a TS4 CAS background, a photo, artwork, a scenery screenshot from another game like Skyrim/Baldurs Gate/GTA/etc. Whatever you want. You could even take your own screenshots for this.
04. Paste your image over my image, being mindful of the borders. Anything beyond the borders will not be visible in the camera's field of view.
05. Save and export this image as a DDS DXT5 image.
06. In S3PE, right-click on the IMG resource. Replace it with the image you created in the previous steps.
Make sure you are replacing the correct instance as mentioned in Step 01. Since each room uses its own dedicated image, you could have different backgrounds for each Create-a-Sim/Create-a-Pet/Create-a-Bot room. Since the Stylist room is a separate package, you could have a unique background in there as well.
07. Save and close S3PE.
08. Plop the edited CAS Room Default or Stylist Room Default in your Overrides folder and have a look in-game. You must have the Ambitions EP installed in order for the stylist room to do anything.
The default replacement background should not affect your CAS camera mods, CAS lighting mods, or CAS standing poses.
360 notes
·
View notes
Text
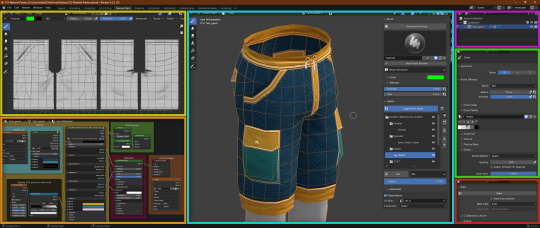
CC Creation Tutorial: Smooth Seams in Blender

In this tutorial, I will show you how to make your mesh seams smooth inside Blender (no Milkshape required!) and walk you through the process step by step. We will make a perfectly smooth mesh and transfer the normal data from that mesh to our main mesh using the Data Transfer modifier.
I am using Blender 3.6 in this tutorial (though you should be able to follow along using other versions as well)
You do not need to have much previous knowledge to follow this tutorial, but I assume you know some basics in Blender like how to select, things, navigate around, etc, and know how to import the meshes and put them into Blender.
For this tutorial, I exported the Sims 3 afbodyEP4DressPromBigBow mesh with TSR Workshop. You can use any clothing mesh you like though, and works on any meshes, not just Sims 3 ones.

This is our mesh. You can already tell that it has the dreaded seams on the neck and the rest of the body.

First, we need to make a copy of the mesh (in Object mode, select the mesh and hit Ctrl+D Shift+D to duplicate it, then hit Esc to stop it from moving around).
Rename the mesh (I added Seamless to the mesh name).
Make sure the original mesh is hidden (click the eye symbol) and select the Seamless mesh.
Press the Tab key to go into Edit Mode.

Now we select the parts that we want to have smooth seams. Let's select everything that is skin (you can select a litte piece of the mesh and then press Ctrl+L to select the entire piece)!

Now, press M and in the menu, choose By Distance. (in older versions, this is called Remove Doubles).
This will remove all double vertices at the seams on the selection we made.

It will show you how many vertices it removed. The skin looks nice and smooth!
Let's switch back to our original mesh: Make sure you deactivate the eye on the Seamless mesh and activate the eye again on the main mesh. Then, select the main mesh.

Now, let's add a data modifier to our main mesh. Click the blue wrench icon in the vertical list of the properties panel and then onto Add Modifier, then choose Data Transfer from the list.

As the source, we choose our Seamless mesh.

Also toggle on Face Corner Data and click the Custom Normals button.
Hold on, there is a message saying that we should enable Auto Smooth in Object Data Properties. Let's do that next! (if the message does not appear for you, maybe Auto Smooth is already on).

Click the green inverted triangle button and in the Normals section, toggle on Auto Smooth.

Now we can switch back to the modifier tab by clicking the blue wrench icon again.
But hang on, what happened to our mesh? There are now black spots over the dress and shadows on the legs!

This is due to the Data transfer modifier's Mapping setting. If we change it to Topology, our mesh goes back to normal again. Phew!

Now that the normals look good, we can start the transfer of our new smooth normals from the seamless mesh to our main mesh. To do that, we hit the Generate Data Layers button. This button works destructively, so you cannot undo what it did, just FYI.

Note: On newer versions of Blender, Generate Data Layers may not be enough to transfer the normals and you may need to apply the modifier instead.
You can toggle the modifier's visuals on and off with the little screen icon to see the results after you click Generate Data Layers to see if it stuck. If it did not (and you see the seams of your base mesh when toggling it off), try to apply it instead.

I switched from textured to solid shading because the differences are just more noticeable in this mode. This is how our mesh looks now with the modifier turned off.
Because we clicked the transfer button, the normals have been permanently applied to our mesh. The skin is smooth now, and so is the dress (even though we did not smooth that one, hmm...)

If we toggle the modifier back on, suddenly the dress has seams again! What's going on there? I'm not exactly sure why, but Auto Smooth seems to be doing some smoothing on the dress mesh as well.
I am not sure if this is normal behavior or not, but let's pretend that this did not happen and the modifier in fact did not smooth the dress.
Maybe we just forgot to smooth some areas on the Seamless mesh that we noticed only later on. That's no problem. We simply modify our Seamless mesh again!

So let's swap back to the seamless mesh and select it (remember to click the eye icons so only the Seamless mesh is visible).

Let's select the main dress parts and press M -> merge by distance on them. We cannot smooth the whole dress all at once, because then that would remove some seams that we want (like those for the backfaces and the middle section of the dress where the bow is attached).
If we remove the wrong seams, we ruin our normals and will have black splotches.

Now, let's select the backfaces and areas we left out before and repeat this process: M -> merge by distance.

Look at how perfect our Seamless mesh is looking now! Now, let's transfer those beautiful normals to our main mesh.
Select the main mesh and toggle the eye icons again, to hide our Seamless mesh and reveal our main mesh.

Once again, we will use the Generate Data Layers button in our Data Transfer modifier. If you have previously applied the modifier, just add the modifier again to the main mesh and use the settings shown here.
And that's it, you are done! You have a perfectly smoothed mesh that you can export now.

Final Note: it is best to transfer the normals at the very end of your meshing process because any action that recalculates the normals can reset our custom-made smooth normals again.
Of course, you can simply use the Generate Data Layers button again to re-add them, but it saves you time to only do this step at the end.
I almost forgot to say: You still have to use Mesh Toolkit to fix the seams on the edges of your mesh and do the usual shenanigans.
188 notes
·
View notes
Text
How to convert Sims 4 3D CAS Rooms to Sims 3

Disclaimer: If you’re not familiar with Blender/TSRW/UVs then this tutorial may not be for you. If you don’t have Sims 4 Studio which needs the Sims 4 base game (or don’t know how to extract the meshes without it) this tutorial may not be for you. Honestly it’s pretty straight forward, but there’s a lot of trial and error and going in game and out of game checking placement, etc. I use Blender 4.1 for this, but you should still be able to do the same things in the older versions. I'm trying to make this as easy as possible. I’m here to answer any questions though 💕 Tutorial below
Things you’ll need:
Blender (whatever version you prefer)
Sims 4 Studio
TSRW ( I use version 2.0.86)
My Christmas CAS Room here
My TSRW work file here
Tutorial:
Find a Sims 4 CAS room that you like and open it up in Sims4Studio. This is the one I'll be using for the tutorial.

In the Texture tab, export the textures. The only textures that matter are the first 3 diffuse. Go to the Meshes tab and export the mesh, it will save as a .blend file. After that you can close out of Sims4Studio.


Open my Christmas CAS Room in TSRW. You'll get this message. Hit ignore and don't send. We only need this file as a reference to resize the SIms 4 CAS room. Export the mesh as an obj, name it whatever you like. You can close TSRW for now.

Open Blender and open the .blend file you exported from Sims4Studio. Make sure to delete studio_mesh_0 as it's just the shadow map and we don't need that. This is what mine looks like after fixing the textures.

Then import the wavefront obj you just exported from TSRW. Again we're just using this as a size reference.
This is what it looks like after I added the obj. I scaled, moved, and rotated the room to match up as close as I could with my reference mesh. When you have it lined up to your liking you can delete the reference mesh. I usually import the sims 3 body to see where my sim would be in CAS as well so feel free to do that too.

Now we have to separate the objects that use transparency in the scene to their own group. The transparent objects will always be located on studio_mesh_1. I usually do this in UV mode. Make sure UV Sync Selection is on. Where the red arrow is, that's the UV Selection button. It's blue so that means its on.

Tip: If you're using the same Blender version I am (I'm not sure if the older versions below Blender 3.0 do this) you can disconnect the alpha in shader editor and then you can easily see what uses transparency because it has a black background like the plants. Don't worry about the one outside the window as that's on the backdrop image and doesn't show in CAS.
Important: Also, make sure you delete the back of the mirror frame or it will show through the mirror in game. I usually select it in the UV editor as well and delete it.

After selecting all the objects that use transparency, I go to the 3D viewport window and press P, then selection. Now they're on their own layer as you can see. That's a very important step so please don't miss it.

Sims 4 CAS Rooms don't have a closed room like ts3 and if you don't add walls/ceiling with planes you'll be able to see that it in CAS. You can do this in any way you're comfortable with. If you don't understand how to do it feel free to ask me. For this tutorial I will not be doing this perfectly lol I've done enough rooms and I'm just trying to teach here 😩

Okay now last is renaming groups to import into TSRW. Make sure it's in this exact order and uses the exact group numbers.
Group 0 - Mirror
Group 1 - Windows/Curtains
Group 2 - View outside the window
Group 3 - Walls
Group 4 - Objects with transparency
Depending on the CAS Room you convert, yours may not have a mirror you know. You can delete groups in TSRW, experiment, feel free to ask me questions as well.
After renaming the groups, select only the groups you renamed and export as an obj. Make sure that object groups is checked so that they can stay in groups.

Open TSRW and open the testroom_cas.wrk file.
After opening the file you'll see this exact room in this tutorial lol because I had to test some things first 😅

Import the CAS room you converted from ts4. You'll get these two messages. Click yes on the first and no on the second.
Disclaimer: Make sure you reduce polygon sizes or it won't import and give you an error


Import your textures (yours may be different than mine depends on the converter) but most have been the same that I've seen. Group 0 is the mirror it doesn't require a texture. Group 1 and Group 4 usually have the same texture.
Disclaimer: TSRW an be finnicky with textures sizes, I havent gotten any issues since using the 4GB patch, but just in case. Texture sizes from ts4 can run pretty big 4096x2048 even 8196x4096. I would resize to no bigger than 2048x1024 in my opinion, but whatever works for you.
After export to sims3pack or export as package file. Make sure you compress your files and you should be good to test your CAS room in game.

This is the finished product. Should look something like this or better lol considering this was quick 😅
If you would like to make your own from the original ts3 cas room, I would suggest watching this Youtube video (it's for TS4 but it still applies and is helpful) and the link to the original ts3 cas room is here. Since we can convert ts4 to ours you could probably just build your own and go from there as well.
Thanks to @mookymilksims for testing things for me and converting her own. If you would like to try this tutorial out and experiment with room placements using @boringbones Ultra wide CAS mod which changes the field of view in cas so that you can see the whole cas room, it is here. I didn't use it for mine, but that's only because I found out about it after from Mooky lol and I'm tired of converting them 😅 but feel free to ask me any questions if you need help 😊
#ts3#tutorial#sims3#I hope this helped#been procrastinating finishing this 🙃#cas room tutorial#sorry if it's long#tried to be thorough and make sure everything was correct#my tutorials
172 notes
·
View notes
Text
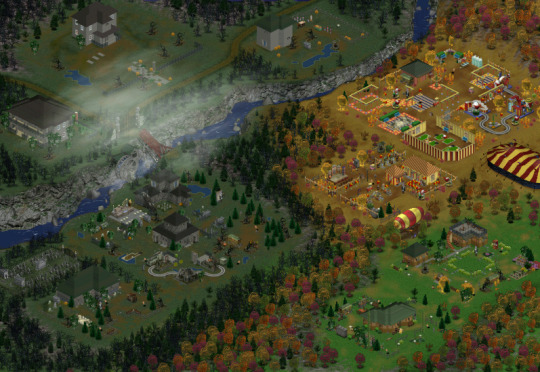
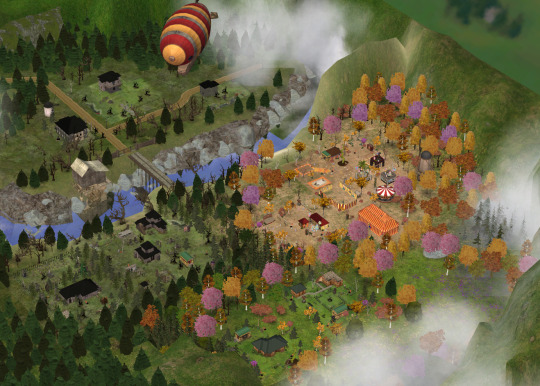
🌉 TS1t2 Neighborhoods Conversion Project

🌁 This project is a recreation of The Sims 1 Neighborhood as complete as possible, with remade lots AND sims. The are already several neighborhoods done, and a first subhood including all remade playable families 👭
🏘️ What started as a « little addition » project turned out to be more... ambitious. After creating a MagicTown section in the Kalisa’s OldTown neighborhood, I thought I could also renovate the entire neighborhood, to make it look more like it was in The Sims 1.


🚎 TS1 Unleashed OldTown recreation🐕


🚕 TS1 Hot Date Downtown recreation 💕
🔮TS1 Makin' Magic MagicTown recreation 🎃
🌆 There is already several neighborhood download options, but each one requires to download the custom neighborhood decorations, the lot master-meshes required for the lots, as well as the installation of the lots with their custom content. Otherwise, the installed district and its lots will not display correctly. These downloads are intended for experienced simmers, who know how to use and organize their custom content. If you are new to the Sims 2 community and don’t find enough informations in my download posts check my related post
📸 A lot of the pictures may seem weird or cluttered, but it was important for me to show the actual game shot. Also, the terrains have roads that may seem mismatched, but this is to show that there are no overlays installed on the roads in the exported terrains, leaving you the choice of what you want to install. I have shaders but I don't use Gshade or ReShade. Besides showing the construction of the lots themselves, I also try to show the possible day/night decor settings possibility so you can imagine how to integrate it into your storytelling.
💡 In case anyone wants to suggest it, I'm already looking into adding a StudioTown section from the Superstar expansion to the map. And I'm studying the possibility of a vacation neighborhood base on the TS1 Holidays expansion. But work hasn't started yet, and perhaps there aren't enough conversions done in that direction at this point.
🏘️ ☆ 🏚️ ★ 🛠️ ✮ 🏡 ★🧍☆ 💼 ★ 💐 ☆ 💍 ✮ 💓 ★ 🍼 ☆ 🏊♂️ ☆ 🪦 ★
🧭 Lost ? To much posts ? Try the Navigation Page ! 🗺️ Where to start ? How Do I do ? Step by Step !
#sims 2#sims 2 custom hood#sims 2 simblr#sims 2 lots#ts1t2 neighborhood project#sims 2 decor#sims 2 pictures#sims 2 build#sims 2 gameplay#sims 2 uberhood#the sims 2#ts2 simblr#ts2#sims 2 storytelling#sims 2 screenshots
114 notes
·
View notes
Text
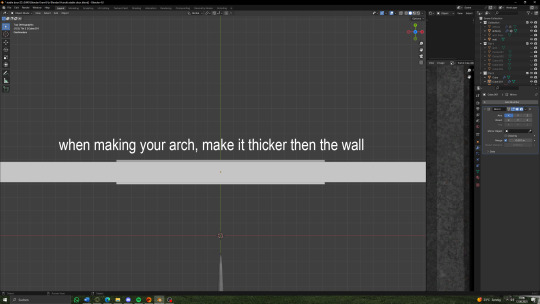
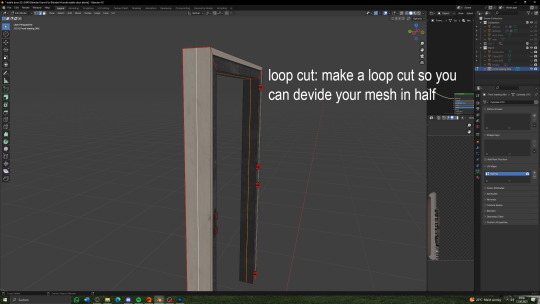
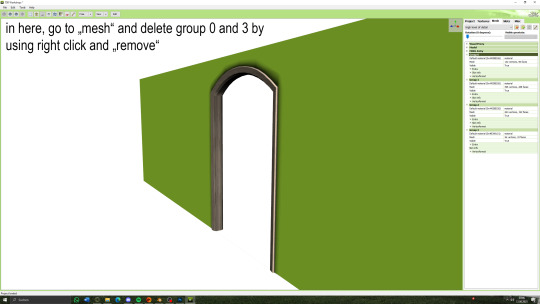
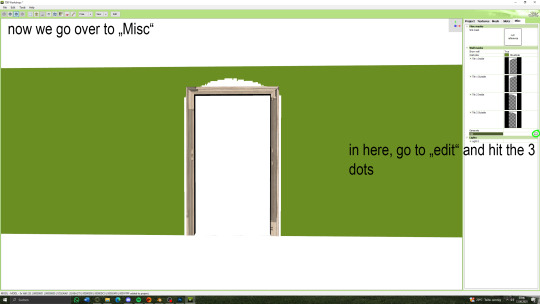
I am here to bless you all with a sims 3 cc tutorial! If you know me from discord, you'd know that I am a CC creator for the equestrian side of sims! Since there are only a hand full of tutorials for creating CC (and most of them are pretty old) I put together some for you! A while back I made a few on different things! Drop by at my website to have a look <3 There are tutorials on how to set up your game to play with horses (RPG) as well as tutorials for making CC objects (both in the older version of blender and for the newer). There are a few more so maybe have a look (they concetrate on the equestrian side of sims). On my webside you can also find my older CC!! Since there was some major cc theft I have decided to publish my cc on discord only, sorry! But maybe I'll be back publishing on my website <3 Okay, back to what I was going to show you-- I have put together on a tutorial for making arches! This should also work for windows, but you'll need to know how to make glass with that too! But, no worries, I will put together a tutorial for that too in the future! Now enjoy the tutorial but please kepp in mind that I am no professional in all of this and this just worked for me but it may not be the perfect way haha <3

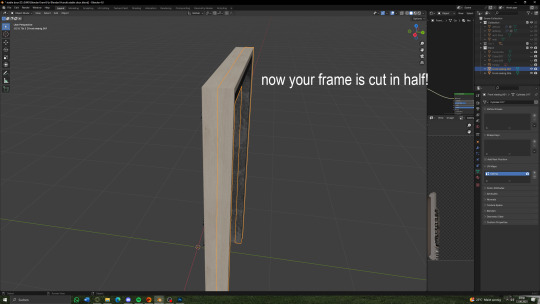
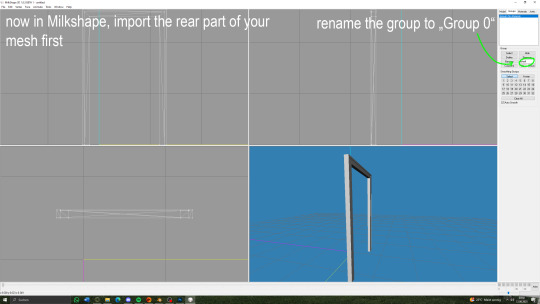
you can export the mesh in TSRW under „mesh“ and then the box with the red arrow. Open it yia Milkshaepe and export as .obj in blender


(there will be a seperate tutorial for the glass!)

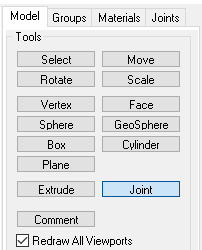
under "model" hit joint


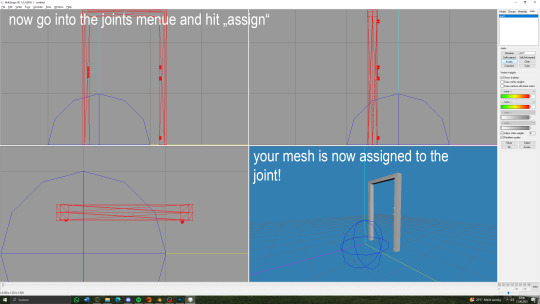
you can now export your mesh to .wso!


59 notes
·
View notes