#how to sew for beginners
Text
youtube
You can learn How to Sew by Hand for Beginners in this DIY video tutorial. Hi I'm Donna Wolfe from Naztazia. You can create new sewing projects with just a needle, thread, and fabric.
In this video I'll show you how to select a sewing needle, sewing thread, scissors, thimble, pins, and more. Plus you'll learn how to thread the needle, make a knot, sew the running stitch, sew the whip stitch called the overcast stitch, as well as sew a hem. You'll learn how to rip out or remove your stitches. Finally, you'll learn how to sew on a button.
Please click on the red SUBSCRIBE button to get notified of brand new videos from Donna Wolfe from Naztazia! Or click here to automatically subscribe: https://www.youtube.com/subscription_...
Other social media links:
Website: https://naztazia.com
Facebook: https://facebook.com/naztazia
Pinterest: https://pinterest.com/naztazia
Instagram: https://instagram.com/naztazia
#naztazia
Pattern, text, photos, video © 2020 Naztazia® Music written and performed by Donna Wolfe
#naztazia#solarpunk#sewing#how to#how to sew#diy#do it yourself#hand sewing#Donna Wolfe#sewing for beginners#how to sew for beginners#Youtube
6 notes
·
View notes
Text
Cloaks for all! A cloak sewalong for beginners
Step 1: Cutting/the pattern


The pattern of this cloak consists of three pieces. A (half) circle for the body and then two pieces for the hood.
We'll start with cutting the cloak itself:
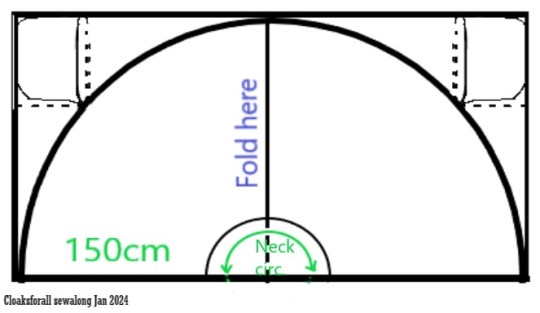
The longest cloak you can make will (with this pattern) be the length of the shortest side of your fabric. If you want it shorter, measure from your neck over your shoulder down over your arm to find the length you want, that will be the radius of your cloak circle. My fabric is 150cm wide, so my circle radius and cloak length are both 150cm.
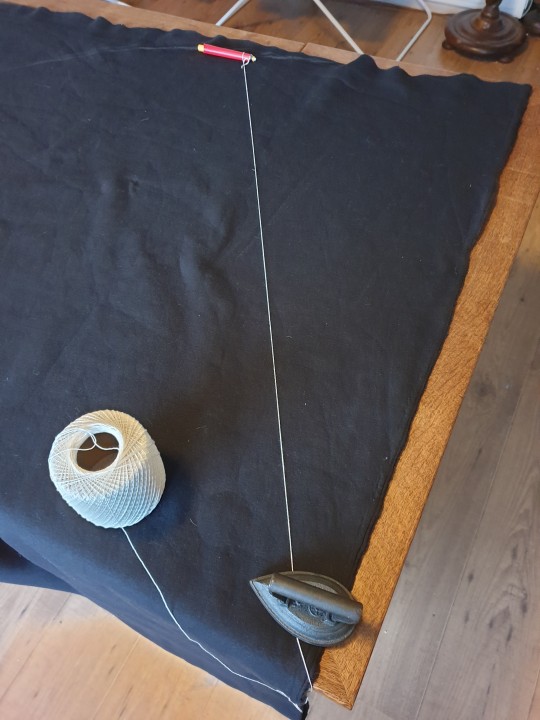
You're gonna want to clear a large piece of floor for this one.
Cut the cloak
Fold your fabric in half (short side to short side). Now you mark a quarter circle. Get a 150cm piece of string, tape the end to your surface at the folded corner. Circling the piece around will give you an easy way to draw a circle with your chalk.
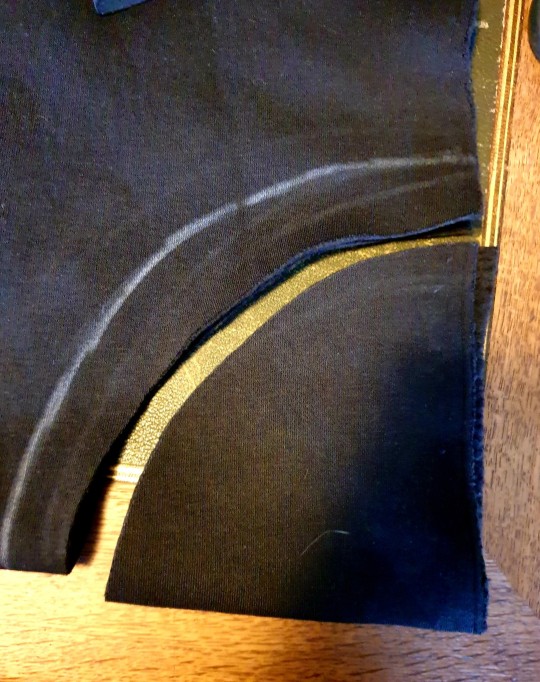
Cut the half circle you just drew while the fabric is still folded.
2. Cut the neckhole
You'll need your neck measurement. (make sure to leave breathing room).
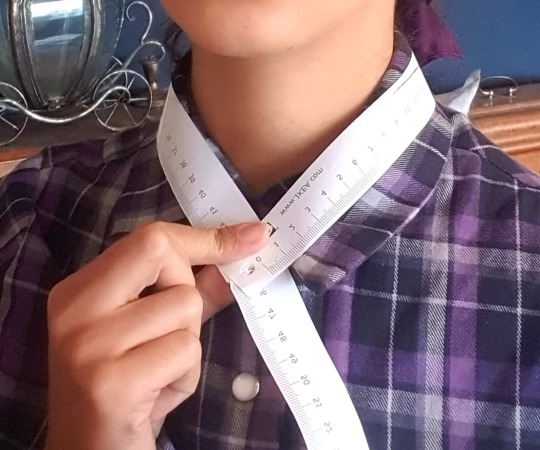
You can either do math about it, or lay your tape measurement on your fabric in a circle and cut slightly smaller than half your neck measurement.
3. Cut the hood
For the hood, you have to make sure it is bigger than your head. Start with the largest rectangle that is left from your fabric. Curve the top right corner with some chalk.

The height of the hood controls how oversized it is. Measure from your collarbone over your head to your other collarbone and you'll have the minimum size. My hood is 45 cm high.
(Optional: hollow out the left line and curve the right bottom corner)
Putting a hoodie on this rectangle to get a nice shape makes it a lot easier.
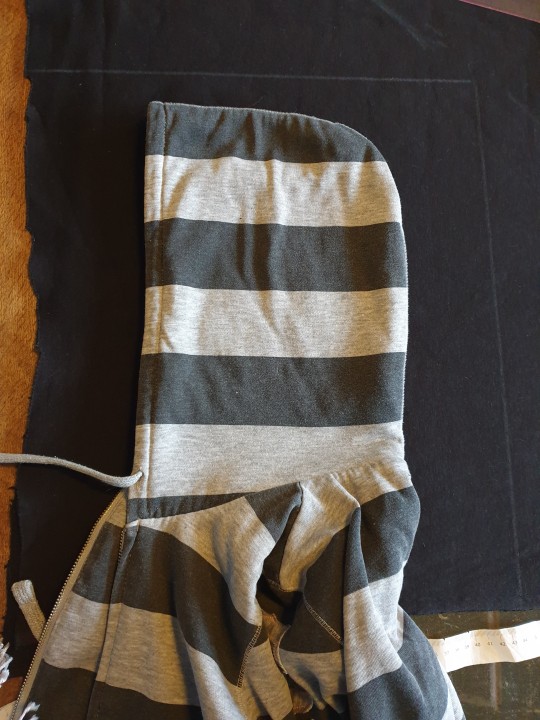
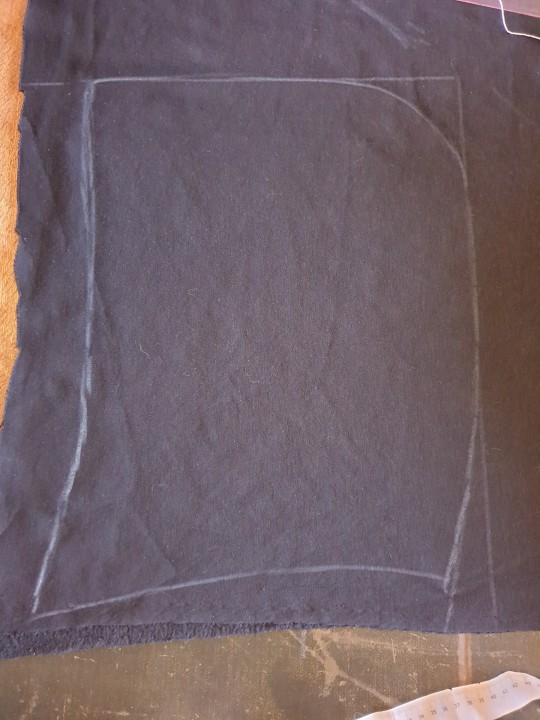
Draw the hood shape and cut two (this can be done while the fabric is folded double).
That's it for step 1. Tomorrow we start sewing!
#cloaksforall sewalong#cloaksforall#cloaksforall step 1#image id in alt#wow i may have underestimated how long is takes to write really thorough instructions...#sewing#this is meant for beginners#so i hope this is clear#feel free to ask questions
172 notes
·
View notes
Note
hi! this is embarassing but i'm trying to learn how to embroider, and i wanted to ask: how many threads are we supposed to put in the needle hole? i wasn't sure wehre to find this information...the tutorials show one thread but the thread from the embroidery spool is so big and won't fit when i try to thread it through the fabric :(
How many embroidery floss strands
It's okay, we all have to start somewhere.
A lot of us feel like everything we do has to be perfect on our first try, but that's just not realistic. It leads to us feeling embarrassed about messing up, and then giving up altogether.
Mistakes are an important part of learning any skill, and so is asking for help when you run into trouble.
And you know what? Asking questions you're embarrassed about is really brave, so good job on sending this ask in the first place!
Embroidery floss:
Most embroidery floss consists of six separate strands. (This may vary depending on which type you use.)
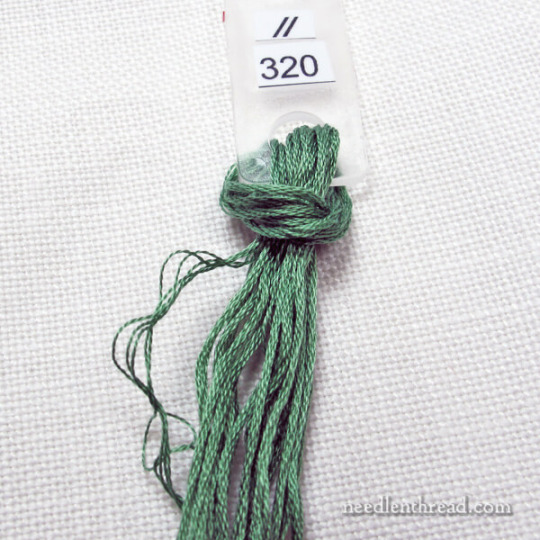
(Image source) [ID: a bunch of green embroidery floss looped around a plastic tag labelled "320", lying on a white piece of fabric. One of the floss threads has been loosened up, showing the different threads it consists of. Text: "needlenthread.com".]
By having multiple strands at your disposal, you can choose how many to use. Using all six will give a bolder look than using just one strand. It's kind of similar to drawing: lines made with a big marker will look different than those of a fineliner.

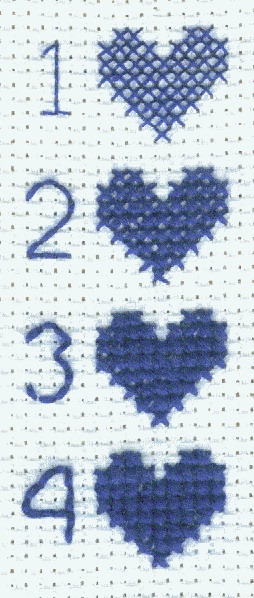
(Image source) [ID: six short lines in stem stitch embroidered in light blue floss. Each line is numbered from one to six, indicating how many strands of floss were used per line. Text: "How many strands of thread to use? stitchfloral.blogspot.com".]
And just like how a fineliner or a bold marker will result in different effects, the amount of strands you use will effect what your embroidery looks like.
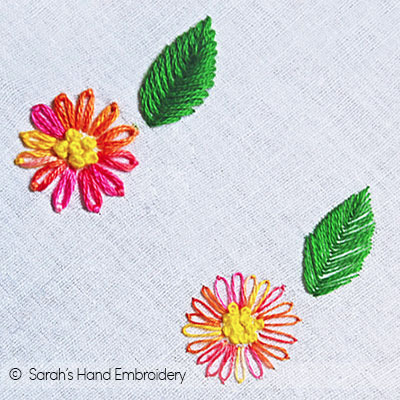
(Image source) [ID: two sets of an embroidered red and yellow flower paired with a green leaf. The set on the left has been embroidered with six strands of floss while the set on the right has been embroidered with only one strand of floss. Text: "© Sarah's Hand Embroidery".]
How many strands to use depends on the look you're going for and the fabric you're working on.
How many threads?
So, how do we decide how many strands to use? Ask yourself the following questions:
What visual effect do you want to achieve? A bold design, or something more delicate?
How much thread do I have? Can I afford to use six at the same time, or should I use my floss sparingly?
Do I want my embroidery to lay flat on the fabric, or do I want something raised?
Do I want to work fast and bold, or slow and detailed?
What's the most comfortable amount of strands to work with for me personally?
What's my fabric like? Can it handle six strands, or would that result in damaging it? Does my thread count match the needle I want to use?
Which amount of floss is the most appropriate choice for the stitch I'm using?
If you're unsure, try your stitch and strand combination on a scrap of spare fabric first and see what it looks like before tackling your project. Make sure to use a needle that's appropriate for your fabric and thread, too.
(Image source) [ID: four cross-stitched blue hearts on white canvas. Each heart is labelled one to four and was stitched with a different amount of thread, resulting in different fabric coverage.]
Conclusion:
How many strands to use depends on your project, your design, and your fabric. It can be hard to choose how many to use at first, but this is something you get a feel for the more you practice.
For more information, check out these strand guides by Needle 'n Thread, Crewel Ghoul, Sarah's Hand Embroidery Tutorials, Stitch Floral, and Better Cross Stitch Patterns.
#wasteless crafts#ask#embroidery#embroidery floss#embroidery 101#embroidery for beginners#diy#fibre arts#fibre crafts#thread count#how many strands#tutorial#how to#sewing#cross stitch#crafts
1K notes
·
View notes
Text

link
#sewing#sew#diy fashion#pattern#pattern making#free sewing pattern#pdf pattern#how to#video#sewing for beginners
145 notes
·
View notes
Text
The right cargo pocket of my favorite camo pants tore recently. (I had a waterbottle in my pocket and stepped out of a trailer, which was just too much stress I guess.) The pocket ripped away from the pants, leaving a hole, and the button also tore straight through the buttonhole.
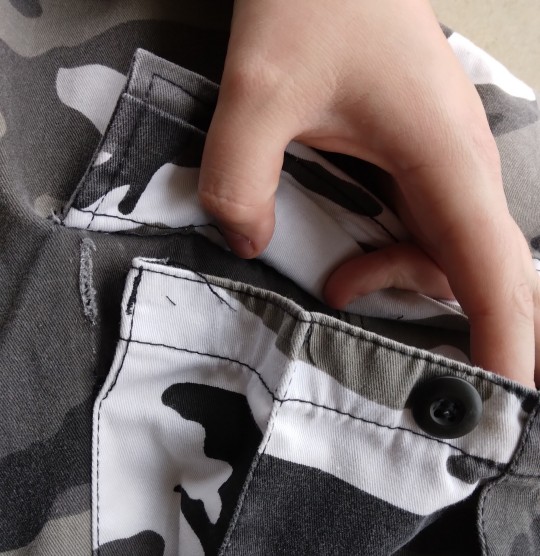
I fixed the buttonhole by hand. I started by tacking a few stitches across the rip to hold it together. I unpicked this horrible-awful-itchy-bad label from another pair of pants. It got folded in half lengthwise and used like hem binding to patch and support the ripped part.

Next was the hole in the pants. That was a machine-stitching job that I did today. Today I also had a migraine. Migraine brain should not have been allowed to operate machinery, but the pants have been on my floor for a week and I couldn't take it anymore.
I put a piece of brown canvas behind the rip and used my machine's mending stitch to go back and forth over and over the rip. It holds up fine. I trimmed back the canvas. We'll see if it stays put like denim patches do or if it disintegrates.

Then all I had to do was machine-sew the pocket back in place. Voila! Usable pants!

#sewing#diy#cj sews#beginner sewing#diy patches#patches#mending#solarpunk#it's not waste until you waste it#use it up wear it out make it do or do without#I knew those awful bad scratchy itchy tags would be good for something!#Also I think tags cut out of clothing would be an AWESOME detail on a battle jacket.#Whether it's a visual commentary on hating fast fashion#or on the sheer number of sizes that one person wears (if you cut out the size tags)#or on how labels are hostile to sensory issues#I've just been saving offcut labels in my Cabbage Bag for eventual things that need stuffing#but now I wanna do something with them.
16 notes
·
View notes
Text
8 notes
·
View notes
Note
Would you consider making a blorbo crochet pattern (I can't remember off the top of my head if you even crochet. If you don't, I'm sorry!) I just got back into crochet and I fucking need it so badly thank you.
I do crochet! I don't do it much anymore, but a blorbo would not be difficult to crochet at all, I should be able to make a pattern for one pretty quickly, sometime this week maybe?
#ask away!#it's a very simple pattern if you want to try sewing it#but it'll also be an easy crochet pattern to write#and maybe like advanced beginner to actually crochet#if I can figure out how to make the legs smaller I might make a mini keychain blorbo pattern
11 notes
·
View notes
Text
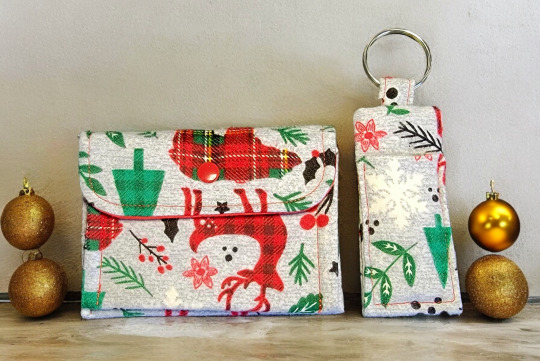
Chapstick Keychain Holders

One of my favorite accessories I have ever owned is a leather chapstick holder I got for Christmas one year. It has a keyring so I can attach it to my keys and even bought a couple after to have as backup. So when I started to sew, I figured everyone would love a chapstick holder with a keyring, but... I have only sold one.
And believe me, I made quite a few of these...

I even tried a different design the first time, which I really liked but couldn't remember how I did it!

So as the year came to an end, I made a bunch matching wallets and chapstick holders for family members, who loved them. Here is one of the examples that I made. The fabric is flannel and was from left over PJ material that I had made our little cousins. But the other wallets and holders I created were made from cotton I bought from Hobby Lobby / Joann's or from fat quarters picked up from other stores in the area that sell fabric (Walmart, local stores, etc).
After this, I decided to stick a digital item on my Etsy page to help people make their own chapstick holders. And it's ended up being a top seller of mine.

This PDF I have created is for beginner and advanced crafters who are interested in a step-by-step tutorial on how to make the chapstick holder on their own. Not only does the document have the walkthrough, but the pattern is included as well.
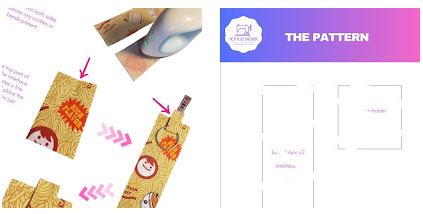
So far the feedback has been great regarding this PDF, so if you're interested in purchasing this tutorial, you can find it HERE.
If you're looking to check out the chapstick holders that I've created, you can find them in my Handmade Keyrings section.

#etsy#merch#smallbusiness#etsysmallbusiness#pattern#how to#keychain#chapstick#sewing#sewist#beginner sewist#etsyseller#etsyshop#handmade
3 notes
·
View notes
Text
Has anyone ever struggled with large spools of thread but not sure how to use it on your sewing machine?
Here's an important tool tip for you. Thread Stands!
youtube
#sewing#sew#thread#sewing machines#sewing machine tools#sewing tips#how to sew#sewing for beginners#Youtube
2 notes
·
View notes
Text
over the past few days I've switched from watching lots of cleaning videos (which was good because they made me want to clean - though that effect is still there for now) to sewing videos (which is very very bad because now I want to sew more and get a sewing machine that actually works right (I got mine used for like 50€ and it's very basic and a lot of things just keep breaking/not working (which is probably at least in part because I don't know enough about using it correctly)))
#I'm not good at sewing#I don't know what I'm doing at all#but it's sooo much fun (until my stupid sewing machine breaks and I have to spend the rest of the day figuring that out)#I really want to learn how to make clothes and stuff but I won't even try with this sewing machine#now to be clear it's an alright sewing machine and it mostly works fine if you just want to sew a straight line on thin non-stretchy#fabric and never change the yarn.#*thread (I keep mixing those up because they're the same word in German so it's very confusing)#but anything even slightly more complicated or anything with thicker fabric does not work. I've tried so many needles and settings and#solutions I found online#and it just never works consistently#I'm not spending money to get it fixed professionally. no matter how little it would cost it's not worth it#unfortunately I've already found a beginner computer sewing machine and it's expensive (though much less expensive than I would have#thought) and I don't know if I'll be able to get it anytime soon but I really want it 😔😔😔#but ugh the thought of not having to thread the needle anymore and not putting the bobbin in in the front and fixing all the problems that#come with that is sooo nice#oh yeah my machine also refuses to work with thicker/stronger thread. I've figured out that it does work most of the time if it's just the#bobbin thread.#but like. I don't want to spend hours learning how to fix this stupid machine all the time! I want to learn how to use it to sew!#so yeah this isn't going to work long term.#ugh my dad's ex (the most awful person I've ever met) was a trained seamstress. damn I should have made her teach me 😔 then she would've#been good for something at least instead of just giving me a bunch of additional trauma 🙃#(but yay at least it seems like I finally don't associate sewing with her and feel terrified just thinking about it anymore!)#personal
3 notes
·
View notes
Text
youtube
Showing how to easily and reliably tie a knot in your thread for when you start sewing by hand.
+++++++++++++++++++++++++++++++++++++++++++++
And you can find me here!
Instagram: https://www.instagram.com/stitch_my_s...
Twitter: https://twitter.com/stitchmystyle
Facebook: https://www.facebook.com/stitchmystyle
Blog: http://www.stitchmystyle.com
#Stitch My Style#solarpunk#sewing#how to#how to sew#how to sew for beginners#diy#do it yourself#how to tie a knot#Youtube
3 notes
·
View notes
Note
How do you draft a sewing pattern with DUCT TAPE?????
I didn't have a dress form so I put on an old shirt and duct taped myself and then drew the seam lines onto myself in sharpie and then cut it off. I was 13
#and then i made the dress out of a bedsheet from goodwill#if you learn sewing properly you start with like. a pillowcase. a beginner pattern.#no one told me that though#i love being self taught it's why i know how to make a corset but not how to put in an invisible zipper
33 notes
·
View notes
Text
How to bind a neckline with bias tape
One easy and neat way to bind a neckline when making your own clothes is by using bias tape.
This Sew Guide article will show you six different ways to bind a neckline with bias tape.
Don't have any bias tape? Check out my bias tape 101 post to learn how to make your own. It's a great way to reuse fabric scraps!
#wasteless crafts#bias tape#neckline#sewing techniques#sewing#sewing 101#sewing for beginners#binding necklines#fashion#fast fashion#slow fashion#sustainable fashion#zero waste#zero waste crafts#fibre arts#fibre crafts#diy#how to#tutorial#reduce reuse recycle#stash buster#fabric scraps#bias
146 notes
·
View notes
Photo
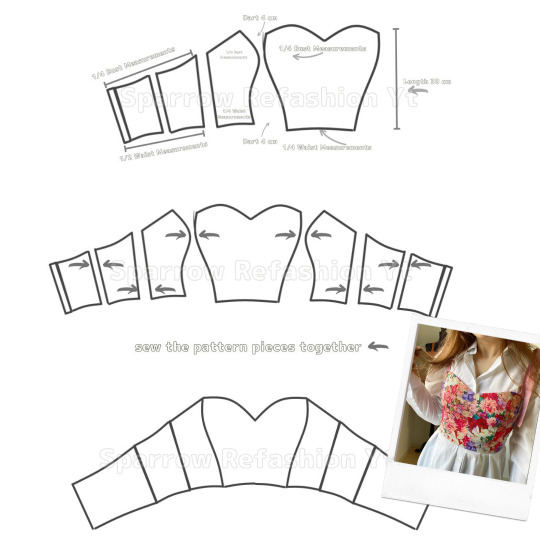
tutorial
#diy sewing#free sewing patterns#sewing patterns#bustier top#how to bustier#bustier#modern sewing#sewing for beginners#how to sew#sewing for beginner#pattern#diy fashion#slow fashion#sewing clothes#sewing project
158 notes
·
View notes
Note
you're like, SUPER CRAFTER
seriously
Hahah THANK YOU, CITIZEN! 😉💖
ahhhh noooo tho, I just have ADHD so I have done a little bit of everything but nothing long enough to be super at it 😅
#what have i done? digital art. acrylic painting. sculpting. i had a mini food phase. a resin phase. keychains. prop replicas. SFX silicone#life casting. embroidery. cross-stitch. pixel art. rug hooking. hand-dyeing. custom minis. plushies. clothes. basketry.#I'm good at... uh... embroidery maybe? tho not an expert by any means#and I still feel like a failure bc I don't know knitting or crochet or weaving.... and I've never done baskets outside of a class....#and my sewing skills are completely beginner. AND idk about visible mending (or any kind of mending tbh)#I'M A CRAFTING FRAUD#beading i had a jewelry phase too how could i forget
9 notes
·
View notes
Note
Why is your art so good- like bro-
ASJKSHSKDJKSJ


THANK YOU SO MUCH FOR SAYING THAT <33333 :DDDDD!!!!!
#disco speaks!#ask#thanks for the ask!#nice things!!!#but also like I have spent the past six or eight years working on my art#I’ve taken numerous art classes in middle school and high schooll#*school#practice constantly (both from imagination and from references) watch a bunch of tutorials I am on like my third sketchbook of this year#last year I filled eight sketchbooks#i got into an art program at a university and have taken like ten or more classes from there over the last year#i try to learn and work in a lot of different mediums#i read books look at comics and other artists to learn their techniques#it helps to learn about different periods of art history so that past knowledge can help you presently#yeah#i am alright in most mediums like clay; wire; plaster; pastels; acrylic paint; gouache; watercolor (I need to work on this more tbh);#charcoal; colored pencil; graphite pencil; markers; paint markers#digital illustration and animation#i try to experiment with things often#i am definitely a beginner in sewing. learning about forms and how they work in 3D really helps a lot#it helps that I like geometry and physics because those two things help with forms and learning how motion and forces affect the subject#matter. plus I’ve drawn a fuck ton of robots which are 3D forms applied to a 2D medium#i might do a master post of tutorials and stuff that I’ve picked up or saved over the years if anyone wants it
16 notes
·
View notes
Last Seen Blogs

geegexgoode
geege🥺
muekura
nothingness.

flaming-shapeshifter
This place is not a place of honor
tragiby
.