
Just a tired mama trying to find time for her hobbies and enjoy a hot cup of tea. ☕
Don't wanna be here? Send us removal request.
Statistics
We looked inside some of the posts by not-too-shoddy and here's what we found interesting.
Average Info
Notes Per Post
8
Likes Per Post
6
Reblog Per Post
2
Reply Per Post
0
Time Between Posts
1 month
Number of Posts By Type
Text
11
Photo
3
Last Seen Tumblr Blogs


Fun Fact
12.7% of mobile users access Tumblr.
Text
"The Beverly Tote"
Recently I took two bag tutorials and put them together to make my own tote style. I've decided to call it "The Beverly Tote".

So far I have three styles with more to come!
There is the Sunflower tote, the Cow print, and a succulent style that has a nice white pleather accent on the bottom and top of the bag. The styles may vary as I create more of these totes. Some may have pleather accents, others may have an accent underside, and there may also be a design within the zipper pocket.
The mouth of the bag is held by a magnetic snap and the size is pretty decent. 14.5" x 13" is the size of each one and the straps are made to allow the tote to sit six inches from the underarm.
༶•୨♡୧•༶
These totes have an outer pocket. It's not deep, but it's a small pocket for a quick drop off of your phone or keys.
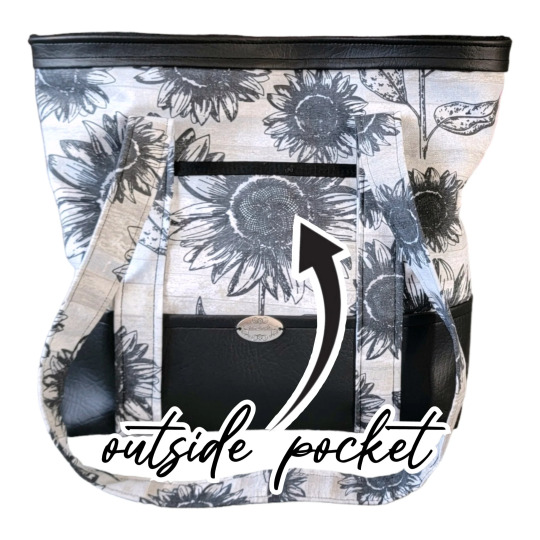
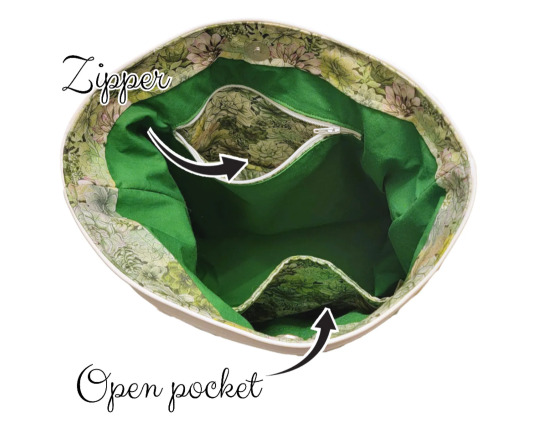
Inside there are two pockets. There is a zipped pocket on the backside and towards the front an open pocket.
If you're interested in purchasing any of these totes, you can find them on my Etsy shop.
Sunflower
Cow
Succulent Green
.
.

#etsy#smallbusiness#merch#etsyseller#etsyshop#etsysmallbusiness#beginner sewist#handmade#sewing#tote#bag#green#succulent#plants#cow#cow print#sunflower#black and white
0 notes
Text

Awesome! Thank you to everyone who has bought something from my Etsy ! 💚
(as I made this, I made a sale so make that 301!!)

#etsyshop#etsy#smallbusiness#merch#etsyseller#etsysmallbusiness#beginner sewist#handmade#sewing#thank you#milestone
0 notes
Text
I have a lot of Harry Potter fabric and I'm trying to get rid of it the somehow. I've made keychain wristlet lanyards, mini pouches, zipper bags, and bookmarks; and decided I was going to make a quilt like duffle bag. That should take up a good portion of fabric.
So I got to work...
༶•୨♡୧•༶
After cutting each strip for the bag, I sewed them together and put padding on the other side to give the (somewhat) quilt thickness. Once together, I sewed my diamond pattern onto the fabric panel changing the color of each thread to match the house colors.

From there, I cut up more pieces to create the straps. Both ends of the straps would be the faux leather I was using and the rest of the strap would match the Hogwarts house color theme.

Once pieces of the straps where sewn together they were ready to go on the bag.

There was just one problem...

These straps are hiding the crates on Hufflepuff and Ravenclaw. I went to fix them immediately and in the process, I ripped the fabric....

I had to come up with a plan and thought of using the faux leather as an accent design on the bag and sewed it onto the bottom of the bag.

After that, I moved the straps over, messed around with rivets, then slapped a 'handmade' token on the panel.

Then I was ready to add the zipper!

By this time two nights ago I was tired, so I out the project to the side to rest up.
Today I spent the rest of my time piecing the design together. The sides are the most frustrating part because I feel like the patterns side panels are too small compared to the panels. So it caused a lot of dimples on my corners. I was debating on no longer doing the duffle bag and going straight to a tote, but I pushed forward and did what I needed to do to get the duffle bag design done.
This took over 16 hours to finish, but I think it came out great!

It's currently available on my Etsy shop.
🌐 https://nottooshoddy.etsy.com/listing/1739410553
And is UNOFFICIAL Harry Potter merchandise. Please note that there are imperfections on this bag (dimples).
.

#harry potter#etsy#smallbusiness#merch#etsyseller#etsyshop#etsysmallbusiness#beginner sewist#handmade#sewing#Hogwarts#duffle bag#gryffindor#slytherin#hufflepuff#ravenclaw#bag#tote#shoulder bag#red#blue#yellow#green#faux leather
1 note
·
View note
Text
Yesterday I decided I wanted to use a mini duffle bag instead of my pebble backpack I've been using since last year when I made it. So I pulled up a saved pattern of mine and loaded up the YouTube video.
The instructions the patterns link took me to was rough to follow and even though the YouTube tutorial wasn't the best, it helped me through with the steps to where I don't think I'll need the video again for if I want to make a bag to sell.
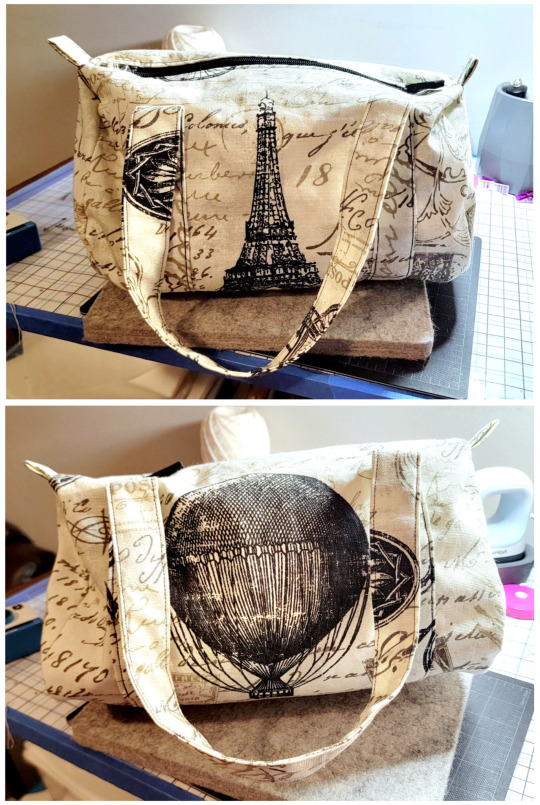
So to start this project, I stared at my tub of fabrics for a good while before deciding on my only yard of cotton duck fabric with the Eiffel Tower and a hot air balloon.

I figured out an interior fabric and cut the pieces down to the size the pattern asked for. I made sure to center out the tower and balloon on the main panels since those were the focal points I wanted on the bag and cut the rest of the pieces with the script and other objects around.

And then I began...
First I put the straps together folding the long edges in by not even a half inch then folding the strap in half and sewing both edges. They seemed short at first but once the bag is together, the top of the bag falls down into it's duffle bag shape.

Once the straps were done, I put the inside pocket together on the inside lining and pinned the straps to the main panels. To do this I sewed the bottom on, went to one side, across the top 3 inches away from the top of the panel, then back down to the bottom.
And was off to the zipper!

The zipper was tricky but not attaching it... It was finding a zipper that I wanted to use. I didn't want the typical zipper I've been using that's moreso for wallets, I wanted a hefty zipper that had a good pull. But I didn't have any so I went in search through the house.
First I took a zipper off a waterproof bag I had. It was long but honestly once it was off the bag - it was flimsy. From there I searched some more and came across an old case I never used anymore. The zipper was heavy with a nice pull that matched the style of this bag, but it was somewhat short. But I could deal with that. There's a three quarter gap between the zipper ends and the bag edges, but I've seen it before on bags and could deal.
So I attached fabric tabs to both ends of the zipper (mainly to keep the zipper pull on the teeth and it also makes it look nicer) and attached the zipper to the panels.

I pressed the folds and top stitched.
Working the side panels was the hardest part to be honest. The video showed a quick little way, but the full explanation I found absent and had to figure it out myself and a couple tries later I managed to attach all four side panels to my panels of exterior and interior fabric.

Once completed and double-checking that there were no holes on the attachments I pulled the bag through the gap left in the lining, checked for the sides imperfections again, and sewed that opening.

The bag was ready and I have to say... I'm pretty impressed with my work.
l'Il be making a sunglass case soon since
everything is so loose inside this bag and
probably a bag organizer too.
I'm debating on making another and selling
on my Etsy Shop so keep an eye open for
that!

In the meantime, happy sewing!
.
.

#etsy#smallbusiness#merch#etsyseller#etsyshop#etsysmallbusiness#beginner sewist#handmade#sewing#paris#eiffel tower#hot air balloon#duffle bag
0 notes
Text
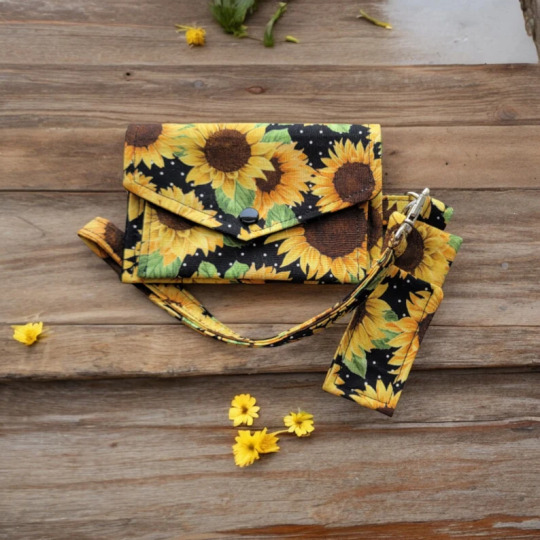
Sunny Summer!
Summer is almost here and what better way than to shine your day with sunflowers!
Here is one of my combo items for sale. It consists of a flip wallet with 3 card slots, a chapstick holder (tested with Burts Bees), and a wrist lanyard.
If you wish to purchase this set, please visit my ETSY shop!

#etsy#smallbusiness#merch#etsyseller#etsyshop#etsysmallbusiness#beginner sewist#handmade#sewing#sunflower#flower#floral#chapstick#lanyard#wallet
1 note
·
View note
Text


I've been making corner bookmarks since I started sewing in the summer of 2023 and one of the biggest sellers were my Harry Potter bookmarks. With it being a little slow on the sales with Etsy, I've been working on other handmade items with the same fabric design.

One thing I worked on was a fold wallet with a wrap around zipper. It was tough... not gonna lie. The hardest part was sewing the entire wallet together and accepting it has its flaws.

With this wallet, I made the long pocket where cash would be kept the Ravenclaw house. Where the cards can be kept, unused the Slytherin design. The change pocket is Gryffindor and the back pockets are Hufflepuff.
I learned to make the fold wallet from a YouTube video I found. Sherry Handmade is the creator of the video.
The last thing I have been working on is making lanyards for keys. They are about six inches, minus the keyring hardware; they are wristlet size.

I'm debating on making matching chapstick holders and a snap wallet and sell as a bundle, but for now I'll just be keeping it as just the lanyards.
Latest Harry Potter merch on my store are these Hogwart house teabag bookmarks:

.
.

Another design that I have worked with are the Harry Potter chibi designs Walmart sells! With this fabric, I created two different mini zipper pouches.

These were fun to make and pretty simple. I had created a How To on how to make these pouches. You can find that digital item HERE.
༶•୨♡୧•༶
If you're interested in buying any of these items, see the links below...
• Corner Bookmark - Etsy, MakerPlace
• Fold Wallet - MakerPlace
• Lanyard - MakerPlace
• Teabag Bookmarks - Etsy
• Mini Zipper Pouch - Etsy
༶•୨♡୧•༶
Digital items coming soon to Etsy:
How to Make Corner Bookmarks
How to Make Wristlet Lanyards

#harry potter#smallbusiness#etsy#merch#etsyseller#etsyshop#etsysmallbusiness#beginner sewist#handmade#sewing#MakerPlace#Michaels#Hogwarts#hogwarts houses#gryffindor#slytherin#hufflepuff#ravenclaw
0 notes
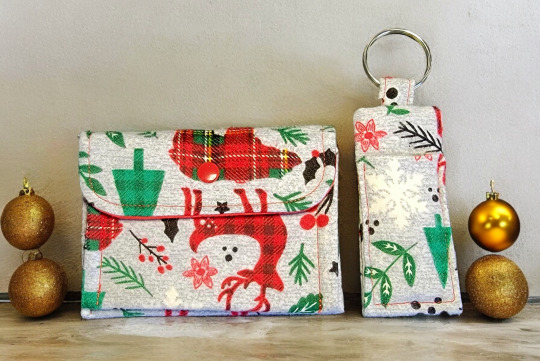
Text
Easter Gifts

The Dino nuggets I've seen all over Etsy and the sewing Facebook groups I'm in are not particularly considered Easter gifts. Sure you gift them for a birthday, or as a get well soon gesture, and maybe even for just no reason at all- but Easter?
Let me explain...
I've got 5 little cousins who are boys. With girls it's easy to make gifts for them: wallets, purses, dolls. But what do you make boys that's not the basics you find when you Google this question? And by basics, I mean pillow cases, capes, shorts, ties. It took me a while to figure it out and then I remembered these dino pillows/stuffed animals. Now, they may not be super excited over them, but at least they'll look cool on the bed after it's made. And they're unique.
So how do you go about making them?
There are two patterns you can choose from that I used:
JaneMagicCraft
Patterns for Pirates
Or you can draw your own layout and work off that like I did with the bunny peep I made my daughter for Easter:

To put the dinosaurs together, I laid my fleece down and on the inside of the fabric I traced out my dinosaur's shape. I cut the block of fabric - not in the shape of the dino but rather a square or rectangle - and do the same for the second piece of fabric. Pin or clip the two pieces together with the right sides - the fluffy side - facing each other.
If you're using the templates from either site, begin the stitch where they've marked it. The underside of the dinosaur is better because it won't show where you've stitched if closing the hole gets messy (like it did in my case...). Leave a nice amount of room with this opening so you can turn your dinosaur right side out and begin to stuff. But before turning the dinosaurs out, make sure to cut along the shape and knotch where there are sharp turns in the pattern - usually between the legs and under the tail.
I didn't use polyfil, which I should look into if I want to make more stuffed creatures. I used a pillow's stuffing to fill all my dinos up and used my machine to stitch the opening closed.
The whole process is pretty easy. The only part that I would say that was a bit tricky was the bottom thread constantly making a nest of thread because I was pulling the fabric. It looked like a complete mess but it didn't prevent the dino from opening on the seams. I also didn't stuff these to the brim. Just enough to remain comfortable when snuggling.
Once they're finished, they're ready to start gifting. Three out of the five boys got their nugget dinos yesterday and love them.
Bonus gifts:
Next to these dino nuggets, I also included a crayon and mini notebook holder, as well as a mini bag that maybe they'll use to store cool rocks they stumble across.

And that's it! That's my gifts to the boys in the family!
Stay tuned for more!

#etsy#smallbusiness#merch#etsyseller#etsyshop#etsysmallbusiness#beginner sewist#handmade#sewing#dino#dinosaur#crayon#coloring#easter#bunny#peep
0 notes
Text
Spacey!

A while back I had created a wristlet and honestly, as a beginner sewist, it was tough to do. The fabric was easily damaged with the needle piercing through it and it took a lot of tries and many sheets of fabric to get the wristlet put together. But the tutorial* I was following was great!

This wristlet / mini purse is a great size. It's long enough to hold my Samsung Galaxy S21 Ultra with an Otterbox case and there are 6 card slots and a money slot (or skinny phone slot).
After I made this purse, I decided to create a wallet that matched the same fabric as the wristlet. The tutorial** I followed was the same creator (Tendersmile Handmade) and was another first for me in my sewing adventure. This wallet has a clip and two card slots inside. It's long enough to hold cash and is held together with a snap button.

Fast forward a few months and I found an awesome pattern on Etsy called the Pebble Bag (a pattern by Kandoupatterns). I've made a few bags in this style and will post about them on this blog at some point. But I wanted to use the last of my fabric and make a Pebble Bag that matched the wristlet and wallet I had made previously.
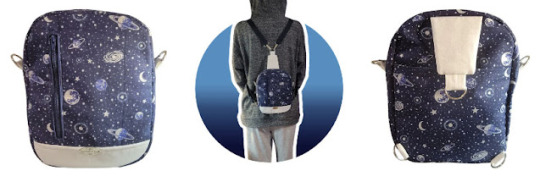
The Pebble Bag's straps are designed to remove and change between each ring to create a different way to wear; and there are four different ways to wear this bag:
crossbody
backpack
shoulder
sling
•୨♡୧•
If you are interested in making these items yourself, here are the links to the tutorials I follow:
*Tendersmile Handmade: Clutch Wallet
**Tendersmile Handmade: Card Holder & Key Ring
***Jess OklaRoots: Pebble Bag Tutorial
If you are interested in buying these items from me, you can find them on my Etsy:
Spacey Wristlet Purse
Spacey Keychain Wallet
Spacey Pebble Bag

#smallbusiness#etsysmallbusiness#etsy#etsyshop#etsyseller#youtube#space#blue#planets#saturn#moon#stars#smallbussinessowner#pebble#wallet#clutch#purse#wristlet#tutorials
1 note
·
View note
Text
Chapstick Keychain Holders

One of my favorite accessories I have ever owned is a leather chapstick holder I got for Christmas one year. It has a keyring so I can attach it to my keys and even bought a couple after to have as backup. So when I started to sew, I figured everyone would love a chapstick holder with a keyring, but... I have only sold one.
And believe me, I made quite a few of these...

I even tried a different design the first time, which I really liked but couldn't remember how I did it!

So as the year came to an end, I made a bunch matching wallets and chapstick holders for family members, who loved them. Here is one of the examples that I made. The fabric is flannel and was from left over PJ material that I had made our little cousins. But the other wallets and holders I created were made from cotton I bought from Hobby Lobby / Joann's or from fat quarters picked up from other stores in the area that sell fabric (Walmart, local stores, etc).
After this, I decided to stick a digital item on my Etsy page to help people make their own chapstick holders. And it's ended up being a top seller of mine.

This PDF I have created is for beginner and advanced crafters who are interested in a step-by-step tutorial on how to make the chapstick holder on their own. Not only does the document have the walkthrough, but the pattern is included as well.
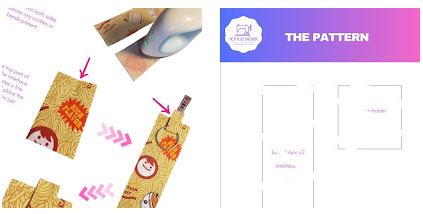
So far the feedback has been great regarding this PDF, so if you're interested in purchasing this tutorial, you can find it HERE.
If you're looking to check out the chapstick holders that I've created, you can find them in my Handmade Keyrings section.

#etsy#merch#smallbusiness#etsysmallbusiness#pattern#how to#keychain#chapstick#sewing#sewist#beginner sewist#etsyseller#etsyshop#handmade
3 notes
·
View notes
Text
Tarot Card Case
A month or so ago, a tarot card case pattern came across my Etsy feed. The pattern creator was RootsStonesAndBones and the pattern was on sale. I was interested in making something new that didn't consist of wallets and fabric bookmarks, so I picked it up and found a tutorial on YouTube. This video tutorial was very hard to follow. The visual was hard to watch and the quality of the video was also difficult to understand what was going on.
I decided to make this case and try my best to follow along. Since I'm a beginner in sewing, I still need assistance with how things should look. I have basic knowledge and concepts on how pieces should lay to make sense when it's finished, but I still need a step by step to thoroughly understand. So with the video and, mainly, the instructions given by RootsStonesAndBones, I was able to make my first tarot card case.

The fabric choices were fun with this one. I had gone with a mystics design for the flap and the inside fabric are tiny moons. I had gone with the sash enclosure instead of the button style the PDF follows because of a few reasons...
I really don't know how to sew a button hole yet.
The sash just has a better look to it in my opinion especially if you're looking to hold your tarot cards in it.
After finishing this case, I decided I was going to post a how to on how to make it. I wanted to make the video clearer than how it was presented in the YouTube tutorial I had found. Give a better visual of what to do. Make it more approachable, if you will. I spent hours making my next case and ensuring the video made sense for anyone to follow. I grouped the clips together, and made three 8 minute or longer TikTok videos. The reason behind this too was because I wanted basic editing and a way to put all three videos together by only using "Create Movie" feature on my Samsung. And it worked.

On my TikTok, you can find this walkthrough in three parts:
Part One
Part Two
Part Three
(Don't mind the silly grandma voice. 😆 I was playing around with their features.)
After merging them into one video (almost 30 minutes long!), I uploaded the video to my YouTube channel as "unlisted", as it doesn't go with what is posted on this channel. Eventually I will move it to a sewing channel under Not Too Shoddy, but for now this will do. You can view that video HERE.
I'm hoping to do more tutorials like this in the future. So if your interested, stay tuned!
୨♡୧
For Valentine's Day, I had taken a smaller version of this pattern and created little cases for my daughter's daycare class. We put a small container of Play-Doh in the case, a colored pen, and two lollipops inside. On the sash outside, I had written each child's name on it. The pouch probably wound up in the trash seeing how they're just 3-4 year olds, but at least they looked good! (I made her teachers a coin/chapstick holder.)

I hope this walkthrough helps.
Enjoy sewing!

#smallbusiness#etsy#merch#etsysmallbusiness#tarot#holder#tarot case#tarotcards#pouch#handmade#etsyshop#etsyseller#womenownedbusiness#check it out#beginner sewist#sewing#sewist#tutorial
0 notes
Photo

🆕 Set of watermarks are in my Etsy store!
These watermarks come in 2 sizes: small squares and large squares. The actual size of the grids is 3760x3860 and they both have a slight glow on them for extra protection on your items!
Plus, they are ONLY 50 cents!!
This is a digital item only found on my Etsy store - excluded from Redbubble and TeeSpring.
★ Check it out on ETSY! ★

#onlineshop#smallbusiness#merch#artwork#teespring#redbubble#etsy#products#comeonman#supportsmallbusinesses#watermark#50cents#protectyourwork#donotcopy#glow#grid
0 notes
Photo


🆕 TWO NEW ITEMS ARE ON ETSY❗ 1️⃣ ITEM: The Traditional Usui Reiki Manual Are you a Traditional Usui Reiki Master who is looking to teach but have no idea what steps to take? Look no further. This manual I created is made to help you teach students your lineage of Reiki. Compiled and authored by Shody - a Reiki Master since 2014 - this manual is a complete breakdown of the class she taught for 4 years along with additional help for the teacher. This file contains Shody’s symbols she was taught, a background in Reiki, how to perform Reiki on others, and suggestions for the teacher along with #class activities that will get the students involved during their journey into learning Reiki. This file DOES NOT attune anyone and Shody does not claim to be a doctor of any sort, just a person who wishes to help other Reiki Masters find a path comfortable enough to start teaching. 2️⃣ ITEM: Traditional Usui Reiki Certificates 4 Level I Certificates - Printed seal - No printed seal - Co-teacher with printed seal - Co-teacher without printed seal 4 Level II Certificates - Printed seal - No printed seal - Co-teacher with printed seal - Co-teacher without printed seal 4 Level III Certificates - Printed seal - No printed seal - Co-teacher with printed seal - Co-teacher without printed seal

#traditionalusuireiki#reiki#class#certificates#featureditems#teespring#onlineshop#smallbusiness#merch#artwork#etsy#spiritual#healing#usui#chakras#energy#calledbackhome
0 notes
Photo


Digital Course ... Introducing ELDER-FUTHARK RUNES
This hyperlinked PDF offers a crash course in how to read Elder-Futhark Runes. Within this PDF you will find a little history on the markings, ways to read them, and the meanings of each rune. This is a class I once taught in a friend's shop and has helped those readers out over the years, so now I am offering it to you!
Pages are hyperlinked for quick jumps throughout the PDF and is built for Notability and Goodnotes (iPad) and any compatible notetaking app on Android - make sure the app uses hyperlinked PDFs if you want that quick jump around.
★ Check this course out on Etsy! ★

1 note
·
View note
Text

Just a tired mama trying to find time for her hobbies and enjoy a hot cup of tea. ☕
•୨♡୧•
In the summer of 2023, I decided to take the leap and purchase a sewing machine. I picked up the Brother SE630 and found a few tutorials online. I began to sew what I could right away. My first few items were a Mom and Me dress, a few wallets, chapstick holders, and eventually I began to make bags. I am still learning and hope to expand my expertise in this field.

Along with sewing, I enjoy writing, playing videogames, and taking care of my little ones. You'll see I go by a few names online: a pen name as well as a gaming tag; but I mainly go by Shody. You'll find my social links here where you can access my Etsy page and the rest of my work including my books, redbubble items, and more!

#redbubble#spring#merchandise#etsy#small business#online shop#artist#support artists#designs#art#sewist#sewing#beginner sewist#shoddy#small shop#handmade#womanownedsmallbusiness#etsyshop#etsyseller
1 note
·
View note