#html div tag
Explore tagged Tumblr posts
Visit Tumblr Blog
Explore Tumblr blogs with no restrictions, modern design and the best experience.
Last Seen Tumblr Blogs


Fun Fact
Tumblr’s website traffic is steadily declining.
Text
i love it when federal sites haven't updated their code since like. 2003 or something
#i click on a link and i'm greeted with an early 2000s-esque page layout (read: all the contents of the page are#jammed onto the left side. just for starters) and i'm like '???' and i start inspecting the page source and the first line literally reads#<Script language=“JavaScript”> and i'm just. y'all aren't even gonna update it to read <!DOCTYPE html>???????#OR ANY OF THE OLDER <!DOCTYPE> TAGS IN GENERAL?????#AND THE FIRST LINE STARTS ON LINE 5 FOR SOME FUCKING REASON#THEY HAVE AN ENTIRE DIV CLASS FOR A 'WHAT'S NEW' BOX COMMENTED OUT IN THE CODE INSTEAD OF JUST ERASING IT ENTIRELY#AND THE CODE IS LIKE 'LAST UPDATED/REVIEWED JUNE 5 2007' AND I JUST????????? WHAT. WHATTTTTT#THERE'S A CLEAR LINK TO JQUERY 3.5.0 WHICH WAS RELEASED IN LIKE 2020 IIRC SO WHAT THE FUCK IS THE REST OF THIS ALL ABOUT??????#WHY AM I SEEING SHIT LIKE '<p><b>Your session has expired.</p></b>'??????#THAT'S NOT EVEN GETTING INTO EVERYTHING ELSE!!!! GODDAMN!!!!!!!!
5 notes
·
View notes
Text
Programming really does feel like a swing set between the gates of heaven and the depths of hell sometimes.
#programming#aaaaaaaaaaaa#html#my beloathed#i love it but good GOD#dies in div tags#”what do you mean I needed to add a period.”#anyways
0 notes
Text
Okay I lied this is fun too
Planning and drawing a mock-up of a website >>>>> coding the website
#i still think it's a little torturous but all good things should be#guess who has 4 different sized divs..NEXT TO EACH OTHER!!!!#it took me more than an entire hour of trial and error to figure out how to do that 😭#again pls if you know how to code in html feel free to shoot any advice my way <3#adhdari.txt#web stuff#< if you wanna blacklist me talking about working on this website that's the tag I'll use for anything related
1 note
·
View note
Text
Fade to Black Macro

Demo
I have finally turned my fade to black transitions into a somewhat easy to use macro!! :) I am not sure if this has been done before!
Customizable fade times
Built to be compatible with backward and forward buttons (mostly!)
Works across all screen sizes
Note: This is only for SugarCube.
Setup
Copy and paste this Pastebin to your Story JavaScript.
Copy and paste this Pastebin to your Story Stylesheet.
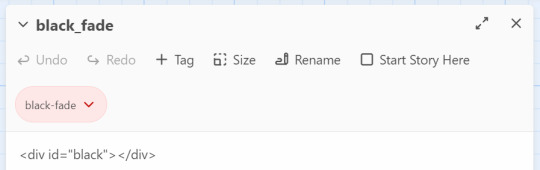
Make a new passage titled exactly as "black_fade". Add the passage tag, "black-fade". Inside, write <div id="black"></div>. Super important! Copy below identically.
After this, your installment of the macro should be complete!
Usage
In the passages where you will be fading from and where you will be fading to, tag it as "passage-fade". For example, I want to transition from "p1" to "p2" with a black fade. Thus, both p1 and p2 should have the tag.
In the passage where you will be fading from, write <<fadestart>>.
Use the <<link>> macro to link to your destination. Inside the link macro, use <<passagefade "[passage name]" [fade time]>> where [passage name] is the passage you want to go to, and fade time is how long the black fade will be in miliseconds. (1000ms = 1s). However, do NOT put the passage you will be going to in the <> macro itself. See below:

Here, I want to go to the passage "p2". Do NOT write <<link "Next passage" "p2">><</link>>. Do not provide the destination passage in the link macro itself. The macro <<passagefade>> will handle it for you if you specify the passage name in the first argument.
Once you do all this, you should be able to sit back and happily use it as you please!
Problems?
Make sure you have the passage "black_fade" titled exactly like that.
Also make sure it has <div id="black"></div> and nothing more!
Make sure "black_fade" is tagged with "black-fade".
Make sure you used <<fadestart>> in the passage you are transitioning from.
Make sure you are correctly using the macro <<passagefade>>. You specify time in miliseconds; it should not have "ms" or "s" included in the argument. It should just be the number (e.g. 4000 for 4 seconds).
Make sure the passages you are fading from and to are tagged with "passage-fade".
There may be CSS/HTML that is interfering with the look of the fade!
There may be other JavaScript code interering with the current code.
If you are having problems, please let me take a look at your Stylesheet or let me know what template you are using! However, I highly recommend looking at the playable and downloadable demo.
(This macro is free to use, free to copy for all commercial and non-commercial projects with no additional fees. Credit is appreciated!)
#interactive fiction#twine#sugarcube#twine coding#sugarcube coding#sugarcube resources#twine coding resources#fade to black macro#ftb macro#coding resources
279 notes
·
View notes
Text
Convert HTML to Image: A Step-by-Step Guide ✨

Do you want to turn some HTML code you've made that's on your website and have a way to convert it into an image for you to save?
Well, look no further! I too wanted to do the same thing but funny enough, there weren't any straightforward tutorials out there that could show you how! After hours of searching, I finally discovered the solution~!
This is an old tutorial I made 🐼

💛 Set your environment
Before we dive into the conversion process, I'll assume you already have your HTML code ready. What you want to learn is how to turn it into an image file. You should have a good grasp of HTML and JavaScript. For this tutorial, we'll use the following HTML code example:

We won't include the CSS code, as it doesn't affect this tutorial. The JavaScript file (script.js) at the bottom of the body element is where we'll add the functionality for the conversion.
Your page should resemble the following:

As you can see, the "Click me" button will handle the conversion. We aim to convert everything within the div.info-div into an image.
💛 Using the html2canvas JavaScript Library
The html2canvas library allows you to take screenshots of webpages and target specific elements on a screen. Here are the steps to include the library in your project:
The steps to put the library in your project:
Visit the html2canvas website for more information.
Copy the CDN link from here

and include it in a script tag in your project's head tag in the HTML file:

That's it for including the library on the HTML side. Now, let's move on to the JavaScript code.
💛 JavaScript Functionality
Here's the JavaScript code to handle the conversion:

In this code, I want to turn the whole div.info-div into an image, I put it into a variable in const div = document.querySelector(".info-div");.
I also put the button into a variable in const button = document.querySelector("button");
I added a click event listener to the button so when the user clicks the button, it will follow the code inside of the event listener!
You can find similar code like this in the documentation of the html2canvas library:

What is happening here is:
We add the div (or what the element we want to take an image of) into the html2canvas([element]).then((canvas)
Added the image file type url to a variable = const imageDataURL = canvas.toDataURL("image/png"); - You can replace the png to other image file types such as jpg, jpeg etc
Created an anchor/link tag, added the href attribute to imageDataURL
The download attribute is where we will give the default name to the image file, I added "dog.png"
Perform the click() function to the anchor tag so it starts to download the image we created
And that's it!
💛 The End
And that's it! You've successfully learned how to turn your HTML into an image. It's a great way to save and share your web content in a unique format.

If you have any questions or need further clarification, please comfortable to ask. Enjoy converting your HTML into images! 💖🐼
#my resources#coding#codeblr#programming#progblr#studying#studyblr#programmer#html#html css#javascript#neocities#coding tips#html5 tutorial#html tutorial
155 notes
·
View notes
Note
Hello there!! First off, I love your work- your creative voice is developed and your art style is delicious. V much an inspiration 😁
Anyway, I've been having trouble with embedding images in my fics, and since you write and draw I thought you might have some tips. I've exhausted Reddit and Ao3's FAQ has been no help. I'll take anything, html tips, better hosting sites for images, etc.
Thanks in advance!!
hiii thank you so much!! AO3 uses limited HTML, so for future referencing you can use any general html guide (w3school etc) to check how to write your code correctly.
this page is the most straightforward reference for embedding pics on ao3
since ao3 cannot host images, you need to upload your pic somewhere before embedding it. i use postimages.org
in the html editor, insert your image with the code:
<img src="URL GOES HERE">
SRC is the source of the image, aka the url. you can resize an image using WIDTH and/or HEIGHT. and if you want to get fancy, you can add hover text using TITLE and alt text with ALT. so, if you wanted to resize a square down to 100px, that would look like this:
<img src="URL" width="100">
you can also align your image as left, right, or centered on the page. just place your image within a <div> tag like so:
<div align="center"> <img src="URL"> </div>
41 notes
·
View notes
Text
after months of groveling i got an infant's grasp on basic html & css and am proud to share my neocities website!!! i'll be updating this often with projects and other stuff i'm up to.
there's still a lot wrong with it but i fixed up the more obvious and obnoxious details. thnx substack & w3school because oh my god. i will never experience anything like troubleshooting lines of nonsensical code for 3 hours just to find out i didn't close a div tag.
have a live look here!
#.jrnl#neocities#it's a weird url ik it's gonna be hard to get to but that's another important problem for later#i rmr talking about making a site for years and ITS HERE!! ITS HERE!!!#i forgot to mute the video..... it just makes the irl speed of this funny its so janky
13 notes
·
View notes
Text
Low key tearing up because I found yet another screen reader inaccessible ebook website. I just want to read. Is that too much to ask? All I want is to be able to open a website and be able to read it.
Making text screen reader accessible is the easiest thing in the world. You have to do literally nothing. It’s text. Screen readers are literally build to read text on a screen.
If you’re a total noob who knows nothing about HTML and you just put your text in your document, nothing else, it’s accessible. You put it in a <p> tag? Accessible. Span? Div? All accessible. You can fucking echo it in a PHP file and it will be accessible.
Text is literally accessible by default. How do all these people manage to fuck it up so bad????? I wouldn’t be able to do that if I tried!
The only consistently accessible literature website, if you can call it that, is AO3. Fan fiction is great. I love fan fiction, but I don’t want to read only fan fiction. There’s a long list of books I want to read – fiction, but especially non fiction.
And there’s a long list of websites where these books are available, both legitimate and piracy. And yet! And yet I cannot read them, because I am disabled. Because I do not read with my eyes, but with my screen reader. Because nobody cares about us enough to even consider us when building and formatting a website. Because nobody cares about us enough to do a single manual test or run a free accessibility checker extension.
I just want to read. Is that too much to ask?
#vent#accessibility#screen reader#actually disabled#visually impaired#accessibility tag#I'm the OP#ableism#software development
16 notes
·
View notes
Note
can you make a stardew valley one?

Stardew Valley fandom tag !
Live exampled at my blog - https://fandomtags.tumblr.com/
Commissions are open! Send me an ask.
Code is below -
Put this in the .css section .fandomtag1 { position: fixed; top: -20px; z-index:999; left: 20px; -webkit-transition: all 0.4s ease-in; -moz-transition: all 0.4s ease-in; } .fandomtag1:hover { position: fixed; top: 0px; left: 20px; -webkit-transition: all 0.4s ease-in; -moz-transition: all 0.4s ease-in; }
Put this in the html section <div class=“fandomtag1”> <a href=“https://fandomtags.tumblr.com/”> <img src=“https://64.media.tumblr.com/1a62c13ed5002084a22d0567964fb183/0e1bc854d799c145-83/s100x200/756c07d56fdb431d230fca127f950fd958fd8bca.pnj”> </a> </div>
#fandom#fandomtags#fandom tags#tumblr theme#tumblr theme code#tumblr themes#free theme#free themes#blog fandom tag#fanfic#one direction#fandom things#sdv#stardew valley#stardew
13 notes
·
View notes
Text
PODFICCER (and fic author) RESOURCE: things i learned about HTML today
-> from this reference work on ao3: A Complete Guide to 'Limited HTML' on AO3 by CodenameCarrot (please go leave a comment if you find anything here useful !!!)
EDIT: OMG Y'ALL I HAVE BEEN HAVING SO MUCH NERDY GEEKY FUN TWEAKING MY PODFIC HOW-TO GUIDE WITH THIS STUFF
headings, blockquote, div

----

-----
html currently allowed by ao3 html sanitizer

a. abbr. acronym. address. b. big. blockquote. br. caption. center. cite. code. col. colgroup. details. dd. del. dfn. div. dl. dt. em. figcaption. figure. h1. h2. h3. h4. h5. h6. hr. i. img. ins. kbd. li. ol. p. pre. q. rp. rt. ruby. s. samp. small. span. strike. strong. sub. summary. sup. table. tbody. td. tfoot. th. thead. tr. tt. u. ul. var.
-----
in-line (text) formatting tags supported by ao3


-----
OMG LOOK AT THIS !!! IDK WHEN I WOULD EVER USE THIS BUT LOOK HOW COOL !!!

-----
paragraphs & p formats: archiveofourown.org/works/5191202/chapters/161901154#AddParagraphs

-----
omg I'VE ALWAYS WONDERED HOW TO GET THAT LINE BREAK THINGY IN THE MIDDLE OF THE PAGE !!!

-----
end post
#podfic resource#podficcer resource#fic author resource#ao3 writer resource#ao3 fanfic#ao3#html resource#html reference#html#reference#resource#html tutorial#basic html guide#CodenameCarrot
6 notes
·
View notes
Text
Instead of doing a Six Sentence Sunday today, I think I'll do a short tutorial on copying over fanfic from FFnet to Ao3.
So you've got some old fics on FFnet and you'd like to back them up to Ao3, given the instability of FFnet. And for whatever reason you don't have the original files for the fics, or maybe you have edits to the FFnet versions that you don't want to lose that the OG files don't have. Whatever the reason, you're looking to directly copy over your fic from FFnet to Ao3. And you're looking for a relatively easy way to do so, but Ao3's import functionality doesn't work with FFnet web pages.
Never fear! It's actually a fairly easy process to get your fic copied over from FFnet.
First, head over to FFnet and open up the fic you want to port over to Ao3. You don't need to log in if you don't want to, just so long as the fic in question is yours and you can access the page, then you're good.
In a separate tab, open Ao3 and login, then choose the option for posting a new work.
Now back on the FFnet tab, you should be able to directly copy over the title, summary, fandom, and what little tagging was available on that site onto the relevant Ao3 fields in the tab you have for a new fic. You'll also want to take note of the published date on FFnet and back date the new work in the Ao3 tab.

FFnet may not have a lot of useful tag data, but it's pretty easy to replicate and build off that in Ao3.
Now for the hard part. Which is still pretty easy. Getting the fic body, plus any notes in the fic itself, copied over to FFnet.
While getting around FFnet's lockdown on the text of the fics they host is fairly simple - I'm pretty sure it's entirely css based - you don't really need to do that in order to get the body of your fic copied. And, honestly, even if you do have a work around in place to allow copying of the fic's text... you will probably find the following method a lot easier still.
In the body of the fic, right click the first line of the fic, which should bring up a menu with a bunch of options. On Firefox or Chrome you want the inspect option.

This'll bring up the dev tools with the html inspection tab open and, if you give it a few seconds to load, the specific line you right clicked to inspect should become the visibly selected section of the html.
The selected section of the html should be a paragraph (or <p>) element. You're going to want to right click the div (<div>) element that encapsulates that paragraph and the rest of the paragraphs in the fic body. This'll bring up another browser menu with the option to copy, which will bring up a flyout menu when you select it. From that flyout menu, you want the select the option for Inner HTML.

You have officially copied the html for the fic body. And you can dump that entirely in html format straight into Ao3's html work text editor. Then switch it to rich text for easier editing if you want to fix any spelling, grammar, formatting, or aesthetic issues. I typically try to fix at least the line breaks since it took a long while before FFnet adopted real line breaks and so there are a lot of fics where I have various combinations of dashes, em-dashes, equals signs, and other characters as line breaks. I figure, if I'm bringing the fic to Ao3 then I can try to make it more screen reader friendly in the process.
You can also move fic notes around in order to move pre/post fic notes out of the fic body or basically whatever you want to the fic. Maybe re-read it to determine any additional tagging you want to add now that your fic has access to Ao3's much more robust tagging system.
But that's it. You can hit post and have your fic with all it's original notes, and a back dated post date to reflect when it was actually written, all available on Ao3 now.
It's a pretty quick process, all told, and the only real bottleneck you might encounter is any time spent in re-editing the fic between migrating and posting. Even chaptered fics are fairly easy to migrate with this process, since the bulk of the work in publishing a new chapter is just copying the inner html and then moving any notes to the appropriate location before hitting post.
Anyway, for my fellow fic writers looking to move your old FFnet fics to a more stable archive, I hope this process helps a lot.
#kitkatt0430 rambles#fanfiction archiving#migrating from fanfiction.net to ao3#ao3#ffnet#fanfiction.net#tutorial
13 notes
·
View notes
Note
would you be willing to share a neocities tutorial?
WELL basics i know of CSS/HTML (and i must stress this is BASICS, i am also a n00b) that would have saved me a LOT of headache is the code will have a <head> and <body> section
the <head> section will contain the CSS styling, and the <body> contains the actual content of the site. for example, to create the boxes containing text, this is a <style> tag within my <head> section, containing the CSS specifications for the default font color and size, as well as the box's size and border.
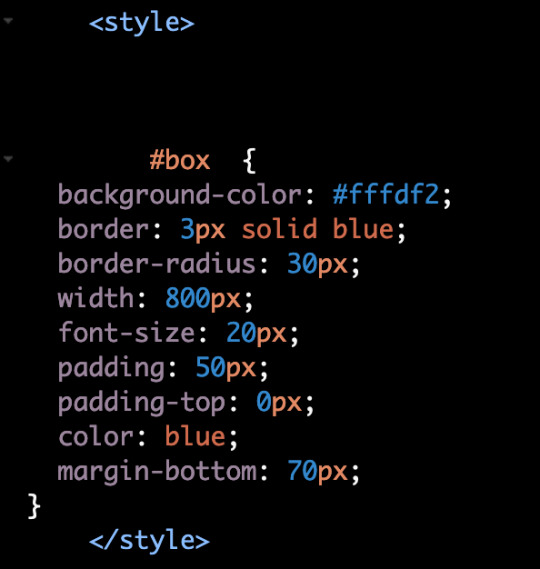
then, in the <body> section i can put <div id="box"> tag, telling the code "hey, this part of the CSS is what i want this to look like"
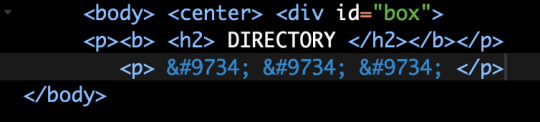
mines all super messy because i patchworked it together/wrote it from scratch and know nothing about html lol. last time i did anything like this was coding my deviantart page in 2014. but this was the biggest hurdle for me that was making me not understand what was going on
#there are some free layout builders and better written tutorials elsewhere on the internet i am sure...#dia answers
27 notes
·
View notes
Text
You know what, I'll bother making this post. It's long overdue.
PSA: Please don't install uBlock Origin rules for Tumblr that use :nth-of-type(), and please remove or fix any you have installed. They can and will hide the wrong things. I'll show you a few alternatives below.
First, an example of how we get here. I've used the uBlock Origin element picker to try to hide the "Get a Domain" sidebar item:
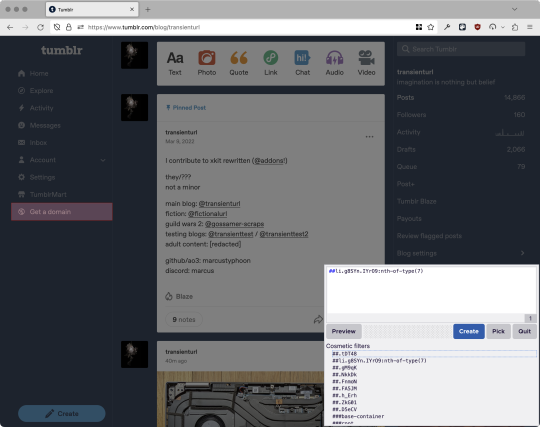
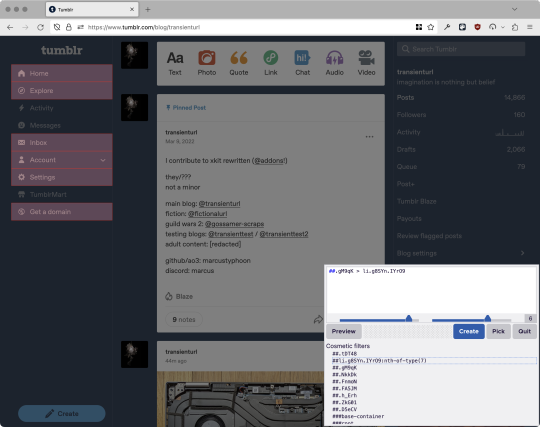
With some different adjustments of the sliders, it gave me these two snippets, one of which targeted a whole bunch of sidebar items, and the other of which selected the right one. Great, right? Read on.
www.tumblr.com##li.g8SYn.IYrO9:nth-of-type(7) www.tumblr.com##.gM9qK > li.g8SYn.IYrO9
As you can see, these both target a particular kind of sidebar item via "li.g8SYn.IYrO9"—fine—and as you can probably guess, the second one counts them all up and hides the seventh it finds.
This is bad, because what it actually hides depends on exactly how many sidebar items there are! Users can "snooze" Tumblr Live, which will make an item appear or disappear, and users with/without Ad-Free subscriptions will have or not have another. I have seen many, many people accidentally hide their activity, messages, inbox, etc using someone else's rule that's supposed to hide Live. Worse, some rules intended for e.g. recommended post carousels that use nth-of-type translate to something like "hide item number three on the dashboard no matter what it is," which will lead to a seemingly random post on your dashboard disappearing!
This isn't a problem specific to Tumblr, of course—I personally think uBlock Origin should never autogenerate these rules—but Tumblr has a ton of elements that aren't in fixed positions, so I feel comfortable wording that PSA the way I did. On a very static site, those rules might be fine. Here they almost always aren't.
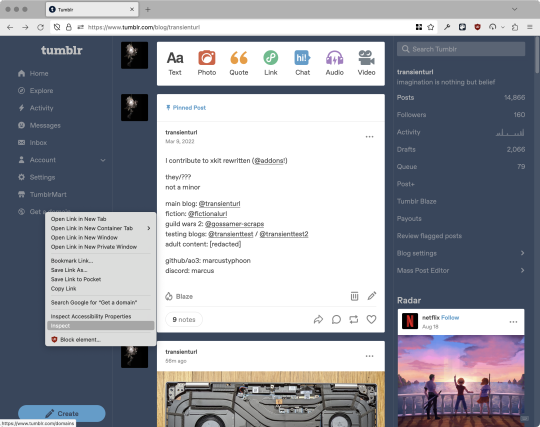
So how do we fix this? First of all, as a developer of XKit Rewritten (check out @addons!), I must suggest you check if it has a feature to do what you want. Plenty of times it won't, though, and if not, we want to make a rule that hides an element based on what it is, not where it is. Here are three ways to make a robust rule:
First, I'll right-click the element I want and use the inspect element tool in my browser's developer tools to look at the element I really want (Firefox and Chrome/Edge/Opera have different but overall similar interfaces for this):
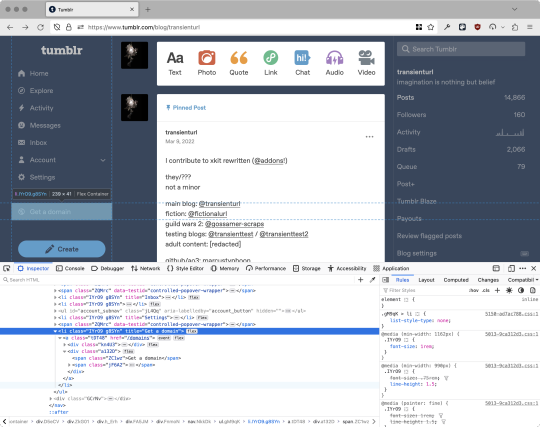
The HTML looks, for reference, like this (Tumblr sucks at code blocks but I'll try):
<li class="IYrO9 g8SYn" title="Get a domain"> <a class="tDT48" href="/domains"> <div class="kn4U3"> <svg> <use href="#managed-icon__earth"></use> </svg> </div> <div class="a132D"> <span class="ZC1wz">Get a domain</span> <!-- other unimportant stuff removed--> </div> </a> </li>
What's something unique about this element, preferably about the outermost element, and preferably contained within the <angle brackets> (HTML tags)? In this case, we have it easy: title="Get a domain" is definitely unambiguous and fulfills all of those three. If you're very familiar with web design using CSS, you'll know how to target that; if you've vaguely heard of CSS, you may be able to look at a reference sheet of CSS selectors, see [attribute=value], and figure it out, and if neither is true, I'll spoil it for you and say that we just put it in square brackets in this case.
So—taking the rule uBlock Origin made, removing the :nth-of-type() and replacing it with our better selector—here's our first working, bug-free uBlock Origin rule:
##li.g8SYn.IYrO9[title="Get a domain"]
Okay, great. But what if we didn't have that attribute to target? What if our top-level element looks the same as the other ones? What if we want this rule to work if we change our Tumblr language to Spanish? Let's move on to :has().
:has() is a CSS selector (supported in uBlock Origin even in browsers where you can't use it for web development yet, i.e. Firefox), that lets you check the contents of an element for whatever is in the parentheses. Let's assume that Tumblr would never make two sidebar items with the same icon, and target that href="#managed-icon__earth" property:
##li.g8SYn.IYrO9:has([href="#managed-icon__earth"])
Yep, that works too!
Finally, what if we couldn't use either of those because we need to target the content of the page that's not contained within the <angle brackets>? We can take a look at the uBlock Origin documentation and find that it has something for that too: :has-text(). You can do very powerful things with this (e.g. you can sort of implement Blacklist entirely using uBlock Origin using something like article:has-text), but it doesn't perform well and can pretty easily be used incorrectly, so I'd suggest you avoid it when possible.
However, let's try using it here to target the "Get a domain" label text:
##li.g8SYn.IYrO9:has-text(Get a domain)
And that also works!
With these techniques, you should be able to target any specific thing you'd want to hide without using any fragile positional selectors. If you're going to share your uBlock Origin rules with others, please make use of this! If you're just using your rules for yourself, then hopefully I've given you enough information so that you can understand what a rule does and decide for yourself if it's worth bothering to fix (menu item order might not change that often, so maybe you're fine with certain rules being a bit prone to breakage; if your rule hides the first post in your timeline you really do need to fix that one!)
-
And, of course, a note for you web developers out there: :has() isn't natively supported in Firefox quite yet, so you can't really use it (I would not recommend using JQuery's simulated version—it's not quite the same). And :has-text() is just not a thing for CSS at all. Just use javascript at that point! Edit: No longer true in 2024; style away!
Final note: any rule with a random 5-character string like g8SYn will eventually break when Tumblr rebuilds its CSS map, though they haven't done that in ages. But when they do: no, it's not "Tumblr devs breaking our rules because they hate us." (Yes, I hear that sentiment a lot in contexts when it almost always makes zero sense.) If you're fairly experienced with CSS you can sometimes make Stylus/uBlock Origin rules that don't reference any, but it's usually convoluted and more trouble than it's worth.
81 notes
·
View notes
Note
hi there!! there isn’t a need to publish this ask I literally just am so curious if you had any resource or tutorial regarding your neocities! I’m sorry if this is so out of the blue but I saw your site and really adored the layout!! I’m specifically just wondering about the method you used for your blog posts - I’ve found some recommended ways to do it but i feel like yours is integrated really well imo :) also if you’re not comfortable answering or anything that’s totally fine lol pls don’t feel obligated. lastly your art is so gorg!!!
i'm finally going to answer this ask...!! it's going to be a very long read so i'll keep it all under this cut
i know you are specifically curious about the blog posts page but i figured this was a great time to thoroughly explain my website layout too since i had another person asking about it (i'll put that at the bottom though) :D
please bear with me btw because i... i have never made a tutorial like this before LOL
--
blog posts guide

1. scrollbox
i made a super low effort format for my blog entries. i honestly just wanted it to be a super simple scrollable box with all of my entries being in one general place. CSS to do this, i created an all encompassing <div class> that had the styling property of overflow.
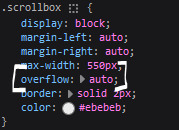
fyi, i also added a <div class> within the scrollbox class that would handle the padding but TBH i'm not sure... i needed to make an entire class for that LOL REFERENCES - scroll box
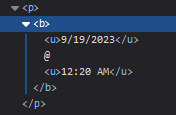
2. date & time
HTML ok honestly i just used a <p> element and made it bold....
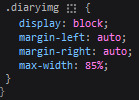
3. images (optional)
HTML i don't always attach an image to my entries but when i want to, i use this <div class> that sits below my date & time. i style it with an <img class> that i created and add an <alt text> too to make it more accessible!
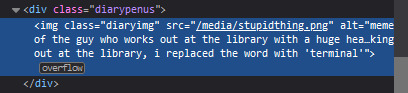
CSS this is what the <img class> looks like. i like my images centered and on their own "line."
4. status
HTML again, another <div class> specifically made for the status. i just made the font size smaller to visually differentiate it from the actual entry itself.

5. blog entry text
HTML my blog entries are simply typed up between <p> tags and i use <br> to start a new line... it literally just looks like this LOL....

THAT'S ALL...>!!!!!! :)
--
website guide

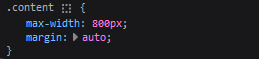
1. general page layout
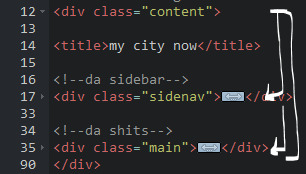
HTML in order to establish where i want all of my blog's content to lie, i created a <div class> specifically to store it all.

CSS the styling for it is pretty simple! just setting a max-width to limit the size of everything that will be in it and also centering the page with the margin.
2. sidebar
HTML my sidebar just comprises of a heading tag and navigation links.
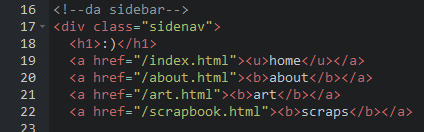
CSS this is all personal taste aside from the fixed position
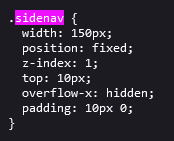
REFERENCES - fixed sidebar - responsive sidebar
3. main content
HTML because everything is stored in the <div class="content">, the sidebar and the page contents are limited to the constraints of the it.
that is all pt. 2...... bless <3
#THANK U FOR ASKING BTW!!!!#it brings me so much joy when people ask me . things and i then get to answer these things#i am so sory if this is somewhat incomprehensible or a pain to read through IF YOU HAVE ANY NEEDS FOR CLARIFICATION... JUST ASK ME..!!!!#textoffun#inbox
32 notes
·
View notes
Note
Hello, wanted to say I read and loved the demo. Very well done. I just had a few questions, would love to know what Twine Template you use, especially at the beginning. Where you have the character creator, I love that the box around your selection changes to say/match what you chose. Such as depending on what skin color I choose it changes to signify that. Would love to know if you would share how you did that. I look forward to future updates! Best of luck.
Thank you! 🤍
I'm using the default template for SugarCube, if I remember correctly. Glad that you liked the box effect, it was my solution to reducing the number of passages whilst still allowing the validation of user input in character creation.
I did it through a combination of HTML tags and SugarCube native macros. Technical stuff under the cut:
Here is an example for eye color:
<fieldset class="charbox"><legend id="chareyes" class="chartxt">$p.appearance.eyes</legend> <div class="charoptions">Your eyes are: <<link "hazel">><<set $p.appearance.eyes to "hazel">><<replace "#chareyes">>$p.appearance.eyes<</replace>><</link>> <<link "brown">><<set $p.appearance.eyes to "brown">><<replace "#chareyes">>$p.appearance.eyes<</replace>><</link>> [rest of the options removed for brevity]</div> </fieldset>
The fieldset and the legend HTML tags together form a single box, a so-called legend, which I declare per attribute such as name, skin color, etc. You need a fieldset to make legend work iirc, but legend is where that text is displayed and it is positioned on the box frame by default. Important here is to give a unique ID to the legend tag ("chareyes" in this case), as we are interested in manipulating the text shown in it depending on our box.
In the sample above, the options I present for the eye color are listed within the Twine <<link>> tags. For these links there is no target passage to go to. Instead, you can see it is coded to do two things upon clicking the respective option. One, setting a game variable to the selected color.
<<set $p.appearance.eyes to "brown">>
Two, triggering a replace command to change the value shown in the legend to the description of the selected eye color according to the variable we have set in the same line. This is the bit you are asking about:
<<replace "#chareyes">>$p.appearance.eyes<</replace>>
Replace triggers without changing passages, so this way you can adjust multiple variables on a single "page". You'd obviously need to adjust the corresponding CSS classes to make it look the desired way, but the mechanics are serviced with just this idea above.
Hope this helps!
12 notes
·
View notes
Note
Hi, sorry to interrupt, but I was looking at your fics, which are really good, and I came across something that I see in a lot of other fanfics and I don't know how to do it. How did you manage to set it indented?
hello! thank you for reading my fics, it means a lot!
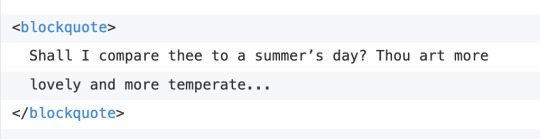
I need to know what you mean by "indented." do you mean something like this summary?
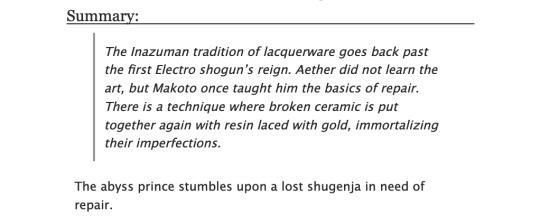
tumblr editor calls this "indented" for some reason, but what it's really called are "blockquotes." you don't need fancy css for this since it's available with just html. you can code it using the blockquote tag.

on the other hand, maybe you mean indenting as in adding spacing like in this chat?
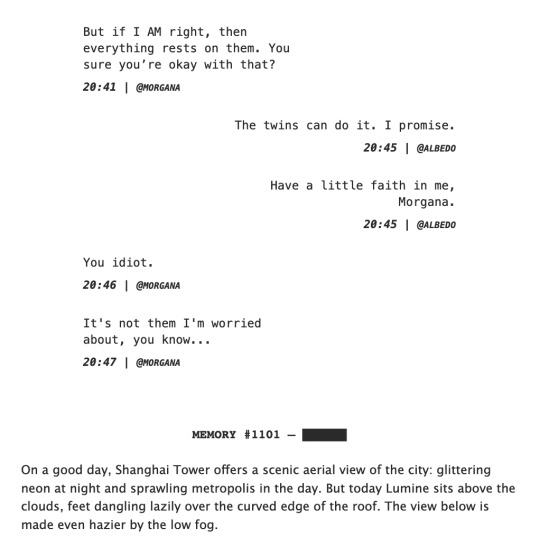
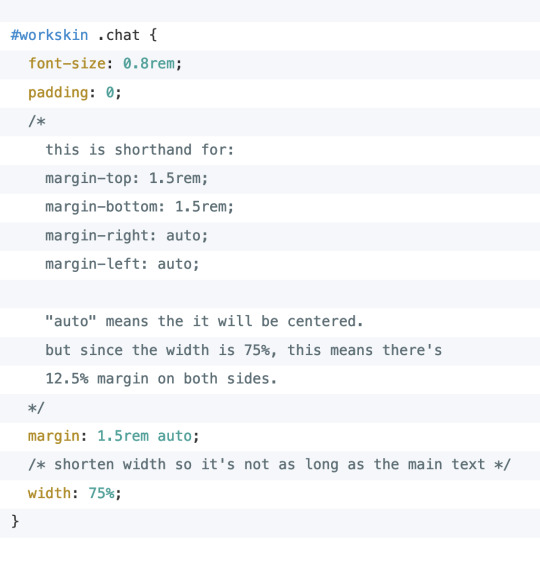
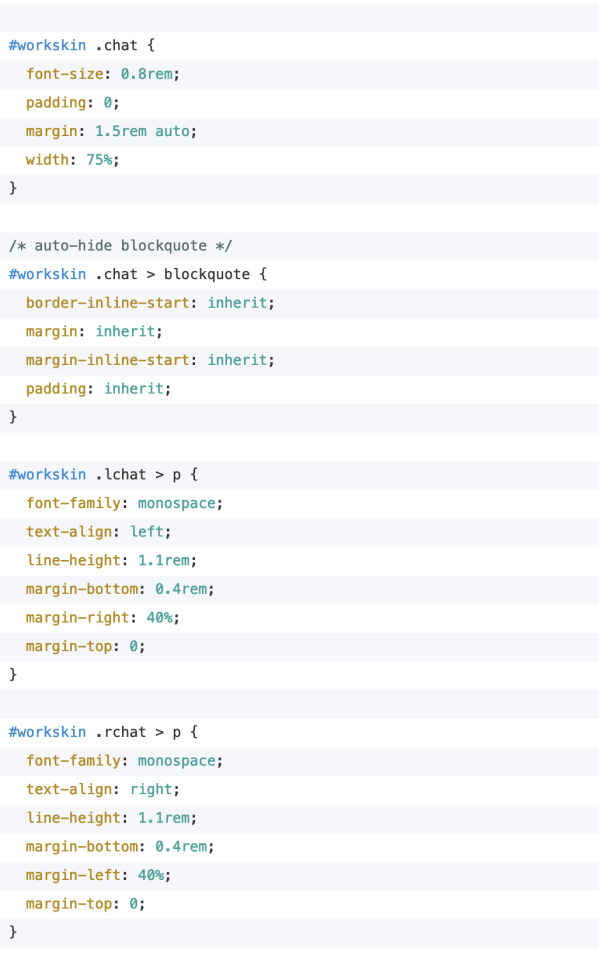
in this case, then yes you do need to add css to your workskin. here are the relevant parts of the code.
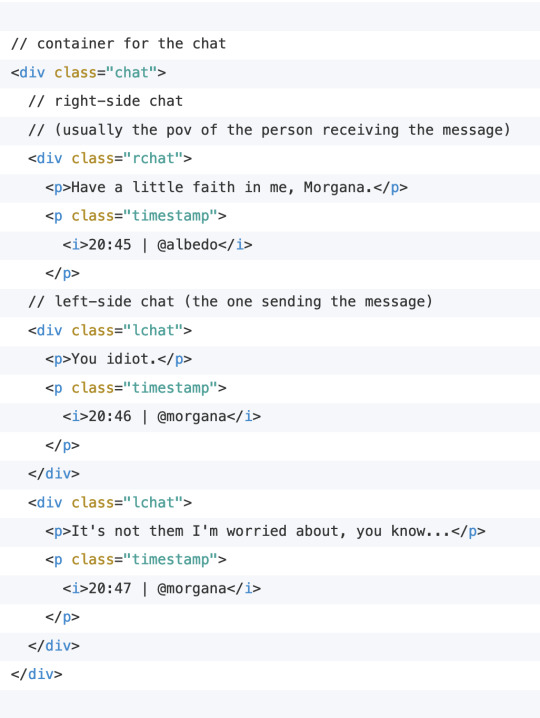
so the important things here are:
put your elements inside a container with the .chat class (or any other class name of your choosing)
make sure .chat has margin set to auto and width set to less than 100%.
I hope I was able to answer your question! I'm not sure if there are other examples of indenting that I used in fics; if you meant something else, just let me know so I can answer the question properly! 🙇🏻
the rest of my workskin code is always available to use as a reference (copy paste if you want): AO3 demo, html code, css code.
something extra under the cut:
bonus:
the above is a modified version of what I'm doing. I actually combined both methods in one, but that gets a little bit more complicated and it's probably more than what you need. I'll add the full code here under the cut if anyone's interested.

to note:
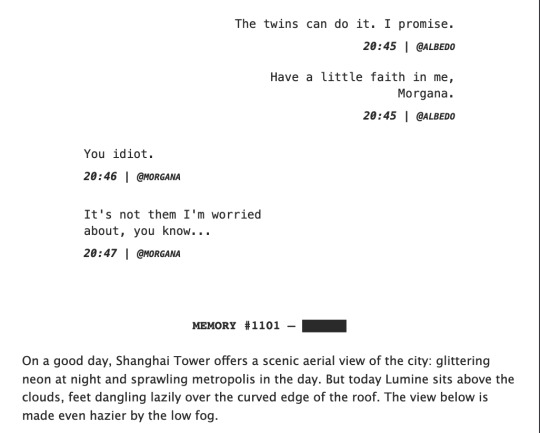
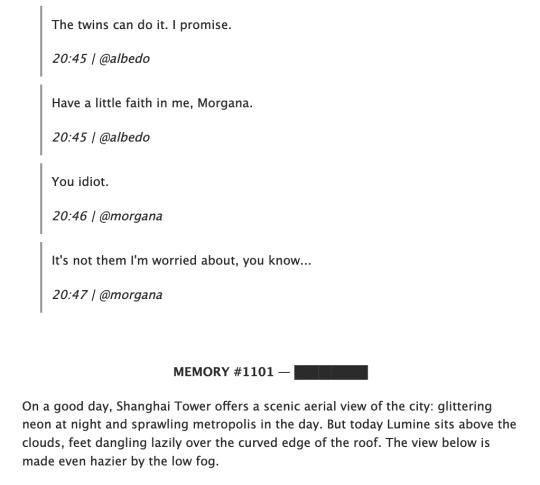
notice that I replaced the div containers with blockquote in the html. however, with workskins turned on, you won't see it! that's because I'm hiding it specifically when workskin is turned on.
but if someone reads my fic with workskins turned off (the "hide creator's style" button AO3 provides at the top of the fic), then none of my styling will show up. I still want to make the grouping of the chat text and timestamp clear though, so I put them in blockquotes for this purpose.
here's how it looks like with and without workskins. I want to make sure that my fics are readable even if someone turns off workskins, or if they download my fic as an epub/pdf (which IIRC removes all the css styling as well).
14 notes
·
View notes