#html y css
Explore tagged Tumblr posts
Visit Tumblr Blog
Explore Tumblr blogs with no restrictions, modern design and the best experience.
Last Seen Tumblr Blogs


Fun Fact
25% of US internet users with an annual income of $80-100K use Tumblr.
Text
Devout like the moonlight — pack trama, rol, baúl de personaje y ficha
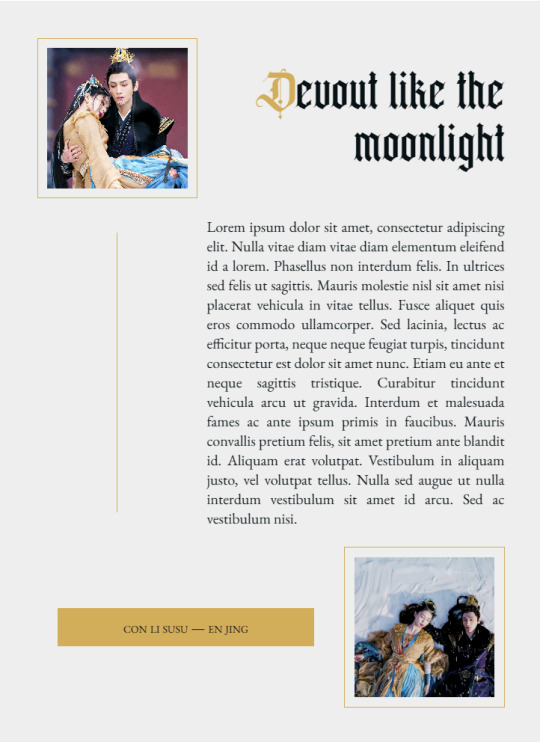
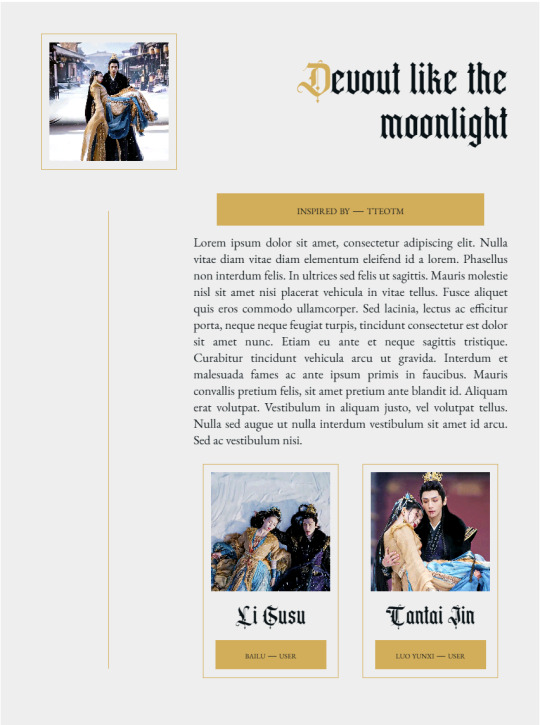

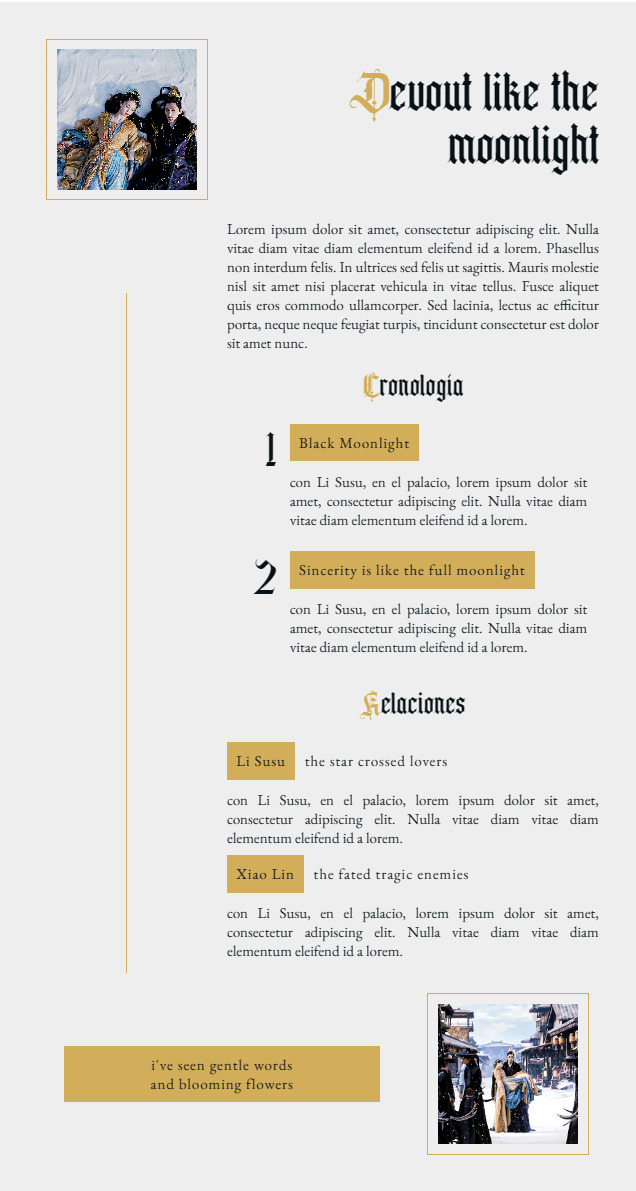
PREVIEW — DESCARGA
Se puede cambiar el color dorado, viene donde en el código. Si usan varias en un mismo tema, el color de acento siempre debe ser el mismo para todos los participantes.
CSS externo.
Las imagenes se autoajustan siempre.
No quiten el crédito.
La fuente es Arcane Gold, el link de la webfont viene de mi propio dropbox.
En la cronología les recomiendo que numeren del 1 al 9, luego el cero y vuelvan a empezar. No se rompe, pero visualmente es más bonito si sólo tienen un número.
Se pueden agregar más personajes al code de la trama, tantos como sean necesarios.
A cambio, aunque sea, de dos kofi les agrego atributos a la ficha.
Gifs de Til The End of The Moon.
No tiene scrolls, no tiene hovers ni nada. Se sabe que no me gustan esas cosas, jaja. De hecho, vi varios de mis códigos y dije: tienen demasiadas cosas, quiero hacer algo que tenga muchos espacios.
#recursos rol#elalmacenrp#tablillas#codes#pack trama y post#pack ficha y baul#ficha rp#code rpg#tantai jin#html y css
97 notes
·
View notes
Text
Las Tablas en HTML5: Una Estructura Fundamental
¿Qué es una tabla? En HTML5, una tabla es una estructura que organiza datos en filas y columnas, proporcionando una forma clara y concisa de presentar información. Es ideal para mostrar listas de datos, bases de datos simplificadas o cualquier conjunto de información que requiera una organización visual. Importancia y Aplicaciones Presentación de datos: Tablas son perfectas para mostrar datos…
#CSS Grid#filas y columnas#Flexbox#layouts simples.#listas de productos#organizar datos#resultados de búsquedas#tablas HTML
0 notes
Text
Edgaring time!
Tutorial on how to make your own responsive Edgar :D I will try to explain it in really basic terms, like you’ve never touched a puter (which if you’re making this… I’m sure you’ve touched plenty of computers amirite??? EL APLAUSO SEÑOOOREEES).
If you have some experience I tried to highlight the most important things so you won’t have to read everything, this is literally building a website but easier.
I will only show how to make him move like this:
Disclaimer: I’m a yapper.
Choosing an engine First of all you’ll need something that will allow you to display a responsive background, I used LivelyWallpaper since it’s free and open-source (we love open-source).
Choosing an IDE Next is having any IDE to make some silly code! (Unless you can rawdog code… Which would be honestly impressive and you need to slide in my DMs and we will make out) I use Visual Studio!!!
So now that we have those two things we just need to set up the structure we will use.
Project structure
We will now create our project, which I will call “Edgar”, we will include some things inside as follows:
Edgar
img (folder that will contain images) - thumbnail.png (I literally just have a png of his face :]) - [some svgs…]
face.js (script that will make him interactive)
index.html (script that structures his face!)
LivelyInfo,json (script that LivelyWallpaper uses to display your new wallpaper)
style.css (script we will use to paint him!)
All of those scripts are just literally like a “.txt” file but instead of “.txt” we use “.js”, “.html”, etc… You know? We just write stuff and tell the puter it’s in “.{language}”, nothing fancy.
index.html
Basically the way you build his silly little face! Here’s the code:
<!doctype html> <html> <head> <meta charset="utf-8"> <title>Face!</title> <link rel = "stylesheet" type = "text/css" href = "style.css"> </head> <body> <div class="area"> <div class="face"> <div class="eyes"> <div class="eyeR"></div> <div class="eyeL"></div> </div> <div class="mouth"></div> </div> </div> <script src="face.js"></script> </body> </html>
Ok so now some of you will be thinking “Why would you use eyeR and eyeL? Just use eye!“ and you’d be right but I’m a dummy who couldn’t handle making two different instances of the same object and altering it… It’s scary but if you can do it, please please please teach me ;0;!!!
Area comes in handy to the caress function we will implement in the next module (script)! It encapsulates face.
Face just contains the elements inside, trust me it made sense but i can’t remember why…
Eyes contains each different eye, probably here because I wanted to reuse code and it did not work out and when I kept going I was too scared to restructure it.
EyeR/EyeL are the eyes! We will paint them in the “.css”.
Mouth, like the eyeR/eyeL, will be used in the “.css”.
face.js
Here I will only show how to make it so he feels you mouse on top of him! Too ashamed of how I coded the kisses… Believe me, it’s not pretty at all and so sooo repetitive…
// ######################### // ## CONSTANTS ## // ######################### const area = document.querySelector('.area'); const face = document.querySelector('.face'); const mouth = document.querySelector('.mouth'); const eyeL = document.querySelector('.eyeL'); const eyeR = document.querySelector('.eyeR'); // ######################### // ## CARESS HIM ## // ######################### // When the mouse enters the area the face will follow the mouse area.addEventListener('mousemove', (event) => { const rect = area.getBoundingClientRect(); const x = event.clientX - rect.left; const y = event.clientY - rect.top; face.style.left = `${x}px`; face.style.top = `${y}px`; }); // When the mouse leaves the area the face will return to the original position area.addEventListener('mouseout', () => { face.style.left = '50%'; face.style.top = '50%'; });
God bless my past self for explaining it so well, but tbf it’s really simple,,
style.css
body { padding: 0; margin: 0; background: #c9c368; overflow: hidden; } .area { width: 55vh; height: 55vh; position: absolute; top: 50%; left: 50%; transform: translate(-50%,-50%); background: transparent; display: flex; } .face { width: 55vh; height: 55vh; position: absolute; top: 50%; left: 50%; transform: translate(-50%,-50%); background: transparent; display: flex; justify-content: center; align-items: center; transition: 0.5s ease-out; } .mouth { width: 75vh; height: 70vh; position: absolute; bottom: 5vh; background: transparent; border-radius: 100%; border: 1vh solid #000; border-color: transparent transparent black transparent; pointer-events: none; animation: mouth-sad 3s 420s forwards step-end; } .face:hover .mouth { animation: mouth-happy 0.5s forwards; } .eyes { position: relative; bottom: 27%; display: flex; } .eyes .eyeR { position: relative; width: 13vh; height: 13vh; display: block; background: black; margin-right: 11vh; border-radius: 50%; transition: 1s ease } .face:hover .eyeR { transform: translateY(10vh); border-radius: 20px 100% 20px 100%; } .eyes .eyeL { position: relative; width: 13vh; height: 13vh; display: block; background: black; margin-left: 11vh; border-radius: 50%; transition: 1s ease; } .face:hover .eyeL { transform: translateY(10vh); border-radius: 100% 20px 100% 20px; } @keyframes mouth-happy { 0% { background-color: transparent; height: 70vh; width: 75vh; } 100% { border-radius: 0 0 25% 25%; transform: translateY(-10vh); } } @keyframes mouth-sad { 12.5%{ height: 35vh; width: 67vh; } 25% { height: 10vh; width: 60vh; } 37.5% { width: 53vh; border-radius: 0%; border-bottom-color: black; } 50% { width: 60vh; height: 10vh; transform: translateY(11vh); border-radius: 100%; border-color: black transparent transparent transparent; } 62.5% { width: 64vh; height: 20vh; transform: translateY(21vh); } 75% { width: 69vh; height: 40vh; transform: translateY(41vh); } 87.5% { width: 75vh; height: 70vh; transform: translateY(71vh); } 100% { width: 77vh; height: 90vh; border-color: black transparent transparent transparent; transform: translateY(91vh); } }
I didn’t show it but this also makes it so if you don’t pay attention to him he will get sad (mouth-sad, tried to make it as accurate to the movie as possible, that’s why it’s choppy!)
The .hover is what makes him go like a creature when you hover over him, if you want to change it just… Change it! If you’d rather him always have the same expression, delete it!
Anyway, lots of easy stuff, lots of code that I didn’t reuse and I probably should’ve (the eyes!!! Can someone please tell me a way I can just… Mirror the other or something…? There must be a way!!!) So now this is when we do a thinking exercise in which you think about me as like someone who is kind of dumb and take some pity on me.
LivelyInfo.json
{ "AppVersion": "1.0.0.0", "Title": "Edgar", "Thumbnail": "img/thumbnail.png", "Preview": "thumbnail.png", "Desc": "It's me!.", "Author": "Champagne?", "License": "", "Type": 1, "FileName": "index.html" }
Easy stuff!!!
Conclusion
This could've been a project on git but i'm not ready and we're already finished. I'm curious about how this will be seen on mobile and PC,,, i'm not one to post here.
Sorry if I rambled too much or if i didn't explain something good enough! If you have any doubts please don't hesitate to ask.
And if you add any functionality to my code or see improvements please please please tell me, or make your own post!
98 notes
·
View notes
Text

Codember2024 - Whisper
Buenas a todos, para este challenge del codember2024 organizado por @elalmacen-rp e inspirándome en los susurros, he creado este código para que los administradores puedan publicar las noticias del foro por sus tramas o novedades de los personajes.
El mismo cuenta con tres partes de código: el CSS, el JS (el cual cuenta las páginas e indica la página actual y además permite el cambio de página) y el HTML (donde se encuentra toda la información).
Dentro del HTML encontrarán mucha información, pero lo más importante es que cada sección es una página y cada artículo hace referencia a las notas que se ven en el html.
Os dejo los códigos comentados con notas para mejor edición, agradezco like/reblog si van a utilizar los mismos.
Ante cualquier duda, mis ask están abiertos.
Códigos
Nota: en codepen no se puede apreciar el cambio de página, además de que he agregado los iconos de flaticons en vez de los de fontawesome.
96 notes
·
View notes
Text
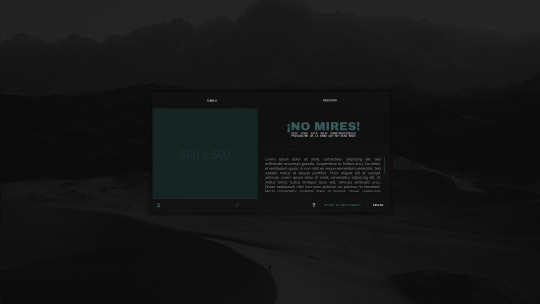
CÓDIGO #137 | No Mires: The Return of the King
LEE LAS INSTRUCCIONES O NO TE FUNCIONARÁ. Links en dichas instrucciones.
♦ Pon los créditos en la descripción del código, al final de tu texto. Vienen puestos por defecto, no los modifiques. ♦ Todos los colores y fuentes son modificables. Si no sabéis cambiar algo, preguntadme por ask y os echaré una mano. ♦ Las fuentes utilizadas son Archivo Black, Open Sans y Space Mono.
Este es un código que sirve para esconder tu foro a invitados, como su predecesor, No mires 1.0. Ya sea porque tu foro es un foro privado o porque estás todavía terminándolo, si no te gusta tener a mirones cotilleando esta es la mejor manera de hacerlo. A diferencia del 1.0, No mires TROTK (o No mires 2.0) sí permite el registro de nuevas cuentas, por lo que es ideal para foros privados. Esto además funciona perfectamente ya tengáis la activación en sin activación, usuario o administrador. El diseño incluye tanto la caja de presentación como, en caso de tener los registros permitidos, la zona de registro. Todo está integrado y los invitados no verán absolutamente nada del diseño de tu foro.
Explicación de cómo instalarlo/editarlo bajo el cut.
TEMPLATES:
Dirígete primero a tu template overall_header. Al final del todo, inserta la siguiente línea:
<div id="nomiresSafe">
Ahora, dirígete a tu template overall_footer_begin. Justo antes de esta línea (la primera, deberías tenerla cerca del comienzo de tu template):
<!-- END html_validation -->
Vas a poner un <div>, sin cerrar. En su lugar, lo vas a cerrar después de dicha línea. Quedaría:
<div> <!-- END html_validation --> </div>
CSS:
Inserta este CSS al final de tus estilos en Visualización -> Imágenes y Colores -> Colores & CSS. Revisa las variables para modificar lo que corresponda.
JS:
Inserta este JS en una nueva hoja marcada para todas las páginas en Módulos -> HTML & Javascript -> Gestión de los códigos Javascript.
Revisa las variables: tienes cinco de personalización, y dos de funcionamiento. De esta última sección, sólo 1 de ellas (NMacceptSignUp) deberías editar; si pones un 0, no permitirás registros, si pones un 1, aceptarás registros.
Eso es todo, tu módulo de No Mires: The Return of The King debería estar funcionando a la perfección. ¡Gracias por usarlo!
71 notes
·
View notes
Text
Tutoriel Installation 🛠️⚙️🔧
Je vois que certaines personnes galèrent avec la mise en place du thème que j'ai partagé (notamment pour héberger le css). Alors voici un tutoriel d'installation pas à pas, avec captures d'écran, pour vous permettre de le mettre en place correctement 💗 ⚠️ Pour rappel, le Blank Theme dispose de ses propres explications, que vous retrouverez juste ici. ⚠️ Veillez à bien avoir configuré votre forum comme l'indique le Blank Theme juste ici. ⚠️ Le forum doit impérativement être en version ModernBB.
1️⃣Pour mettre en place tes templates.
Nous allons commencer par copier les templates depuis le github. Ici, ce sont les différentes parties d'HTML qui nous intéressent.


Nous allons progressivement les coller dans les diverses sections de forumactif (voir screen ci-dessous). 📌Exemple ici avec le template images_list que je vais copier depuis le github : 📁HTML (templates) > 📁general >📄images_list.

Et coller dans le template images_list de forumactif (qui s'obtient en allant décocher l'utilisation des blogs au préalable)


Les noms des HTML sont exactement les mêmes du github vers forumactif donc vous ne pouvez pas vous tromper. Vous avez juste à copier d'un côté et coller de l'autre, en n'oubliant pas à chaque fois de sauvegarder à droite en cliquant sur le symbole disquette💾(ouais, j'vais rentrer dans les détails à ce point).

Quand l'ensemble de tes HTML ont été copiés et collés correctement (général, poster & messages privés, profil), tu vas pouvoir passer à l'hébergement de tes divers CSS.
2️⃣Pour enregistrer ton css afin de l'héberger.
Je t'invite à aller sur le github mais dans la section CSS cette fois-ci. L'ensemble des CSS devront être enregistrés sur ton ordinateur puis hébergés en dehors de forumactif car ils sont trop longs. 📁 CSS > 📄CSS_global

Tu peux copier le code et le coller dans un logiciel qui permet d'éditer du code. Pour moi, ce logiciel sera Notepad++, parce que j'aime me faire du mal, mais sachez qu'il existe aussi SublimeText. Ces logiciels sont gratuits ✅ et indispensables pour pouvoir enregistrer vos feuilles en format .css (comme on le ferait pour une image en format .png ou .jpg quoi).


Quand j'ai copié mon css depuis github et que je l'ai collé dans mon logiciel d'édition de code, je n'ai plus qu'à lui donner un petit nom en sauvegardant (chez moi ça sera CSS_global) et à l'enregistrer en .css (Cascade Style Sheets File).

3️⃣Pour héberger ton css en dehors de forumactif après l'avoir enregistré sur ton ordinateur.
Ca y est, à cette étape, tu as normalement l'ensemble de tes CSS (global, instagram, messenger, page d'accueil etc...) d'enregistrés individuellement sur ton ordinateur. Tu peux désormais aller les héberger en dehors de forumactif. Pour cela, j'utilise personnellement Archive Host (parce que j'aime vraiment me faire du mal) mais, tu peux très bien utiliser Dropbox. Il te suffit juste de créer ton compte. Tu arriveras ensuite sur une page où tu pourras ajouter tes fichiers et les stocker dans un dossier. J'aime que mes documents soient rangés donc, je te conseille de créer un répertoire et de l'appeler par le nom de ton forum (comme ça, si t'en as plusieurs, impossible de te tromper !).


C'est ici que je vais y ranger mes feuilles de CSS préalablement enregistrées. Je clique sur ➕Ajouter des fichiers puis sur ⬆️Démarrer l'envoi quand j'y ai ajouté ceux que je voulais.


Ca y est ! Ta feuille de CSS est désormais hébergée. Mais ce n'est pas terminé. Il faut maintenant relier ton forum à cette feuille. Et pour cela, rien de plus simple :

En survolant ta feuille de CSS avec ta souris, une flèche va apparaître en haut à droite ⬇️, clique dessus puis sur 🟦 Informations et Codes.

Cette fenêtre va s'ouvrir. Je t'invite à cliquer sur l'URL à côté de Principal et de la copier. C'est le lien de ta feuille depuis Archive Host. Tu vas ensuite aller la coller dans ton overall_header sur forumactif. Mais pas n'importe où !


Ici, les URL vers mes feuilles de CSS sont collées les unes après les autres juste en dessous de <!-- CSS Externes -- > ET sous cette forme : <link href="URL ARCHIVE HOST ICI" rel="stylesheet" type="text/css" charset="utf-8"> Il faut absolument que ces feuilles se trouvent avant la balise </head>. Tu verras, dans le code HTML de l'overall_header (à la ligne 20) j'ai laissé cet endroit vide, tu auras juste à les coller en dessous.


N'oublies pas de sauvegarder ! Et voilà. C'est tout. Rien de plus simple 💗 Cela te demande juste d'installer un logiciel d'éditeur de code (gratuit) et de te faire un compte sur Archive Host ou Dropbox (gratuit aussi). Si là encore vous êtes paumés.és (parce que ce n'est pas impossible malgré les screens et explications pas à pas), n'hésitez pas à m'envoyer un petit mp. 🌈
66 notes
·
View notes
Text
graduated with a bachelor's degree which means i now have a lot more free time than i normally know what to do with. already i'm starting to feel The Urge to do boring adult shit like writing resumés and CVs and looking for copy editing gigs. of course i don't want to give up geek shit like this blog and its related pages entirely. it's brought both myself and the people following it a lot of good, and i'd be a fool to throw all of that away.
i want to get back into fooling around with html/css but i currently find the idea of using welcome to welcome home to do so very... tedious and unappealing, lol. again, i'm very proud of the work i've done and i probably will pick it back up with the next update, but it's also very Familiar. editing for it feels very same-y. i need a change of scenery!
all this to say: 1. i hope to see you all again next update, and 2. keep your eyes peeled for a more personal/portfolio-adjacent site in the near future... 👁️👁️
41 notes
·
View notes
Note
Hi!! I just reed the last chapter of EMC and by the gods!!! I LOVE IT!! The newspaper format?!? FUCKING AMAZING!!! I do want to ask how you did it? I knew you could do many things in ao3, but that?! You're so creative!!!
🥰🥰🥰
Thank-you so much!! As the texts in ECM would probably suggest, I really love mixing up the narrative with these kinds of things (I did something similar in my other fic, A Permanent Fixture).
I used Work skins and CSS for the formatting - nothing ground-breaking! Just fonts. That and using the H1, H2 and H3 headings in AO3's html. I will not claim anything more than slightly above average skills at this stuff!!
This is the CSS I used for the fonts with the work skin:
#workskin .News-name { font-size: 200%; font-family: Old English Text MT, Copper Plate Gothic Bold, Rockwell Extra Bold, serif; }
#workskin .font-serif { font-family: Georgia, Cambria, Constantia, Palatino, serif; }
Here's AO3s guidance on work skins
Here's a bunch of tutorials on the amazing things you can do with skins!
Honestly it took me ages! Mostly because there was a lot of hit 'preview', check, hit 'edit', change CSS/HTML, rinse and repeat while growing increasingly more irate.
I tried a billion times to do something with the images: I wanted them aligned with the text, but also needed the caption to float with it. However my abilities are relatively limited and AO3's HTML coding is equally limited so in the end I gave up and just added the captions onto the image in paint lmao. Paint these days lets you save with transparencies, which is a nice thing to know! But that's why the font in the captions is big and looks a little funny.
If you want to know how to get text to wrap around an image, then you do this:
<img src="IMAGE URL" alt="TITLE OF YOUR IMAGE" width="x" height="Y" align="right/left" />
(the underlined bit is what you add to put in the alignment)
It's not perfect: the text sticks tightly to the image when it wraps, which is why they're both aligned to the right so it was harder to notice, but it works well enough. I know you can use CSS and work skins to give the image a bit of a border, but by that point I was getting the shits and figured it was good enough lol.
I would note that skins sometimes don't work on things like phones (for instance, on my phone the Old English font doesn't appear for the name of the newspaper)!
Hope this is helpful!
#existential crisis mode#work skins ao3#they're cool#but also very conducive to me tearing out my hair
21 notes
·
View notes
Text
The Debuggers Assemble
Sebastian Stan x Reader Unhinged One Shot (Feat. The Avengers)

Summary : Behold! The 2nd version of this chaotic and unhinged story of Seb as a wannabe coder and this one features the Avengers!
A/N: This is just another stress induced story I came up with as I try to debug actual code on my project XD Hope you guys like it.
Warning: none at all, just an all out funny, unhinged and ridiculous story, somewhat like a sitcom XD
Word count: 1.7k words
Read more Sebastian and Bucky one shots here
---
It started as a normal Tuesday. Y/n was working on a client's website, surrounded by empty soda cans, a half-eaten granola bar, a cup of coffee that had been refilled countless times, and the dim hope that this web application project wouldn't kill her. She was almost done when she hit a wall—an infuriating wall in the form of a bug so elusive it might as well have been a mythological creature.
"What in the name of Jeff Bezos is wrong with you?!" she yelled at her laptop, slamming her hands on the desk.
"BOOM, BABY!"
She jumped, nearly knocking over her coffee as Sebastian burst into the room like Kramer from Seinfeld. He was wearing an Avengers bathrobe, a Viking helmet, and inexplicably wielding a hockey stick.
"Seb," she said, already exhausted by his mere presence. "What are you doing?"
"Helping," he said, dramatically tossing the hockey stick aside. It hit a lamp, causing it to crash to the floor.
"You're not helping. You're breaking my furniture."
"Pfft. Material possessions are temporary. But debugging is eternal."
"No," she said firmly. "Not this time. You're not touching my laptop. The last time you helped, the TV turned on by itself, showed me a cooking tutorial in Portuguese, and called me by name."
Sebastian gasped, clutching his chest like she'd insulted his honor. "You loved that tutorial. You said the flan recipe looked great."
"That's not the POINT!"
"Come on," he said, sitting next to her and grinning like a kid who just found a pack of fireworks. "I'm serious. Let me help."
She gave him a withering look. "Do you even know what CSS stands for?"
"D'uh. It's..." He paused, clearly making something up on the spot. "Cool, uh... Code... Stuff."
Y/N smirked. "What about HTML? Know what it is?"
"Of course I do," he said confidently. "It's... um... Hot Tacos Make Life better?"
She stared at him, deadpan. "Seb, I bet you don't even know what Javascript is."
"No, but I know about.. scripts?" He answered innocently and she rolled her eyes.
"Seb, just leave me alone and do whatever it was you were going to do with this.. outfit." She said, gesturing towards his Viking helmet.
But Sebastian ignored her, dragging his chair closer to her. "No way. I can help. I've acted as a hacker in movies. I know all about... coding stuff."
"Seb, no you haven't, and do NOT touch my laptop." She warned.
"Relax, babe. Let me at least look at it."
She reluctantly slid the laptop toward him. "Fine. But if you break something, you're sleeping on the couch."
Sebastian cracked his knuckles, grinning. "Alright, let's see what we've got here."
He squinted at the code for a solid thirty seconds like it was written in ancient Greek. "So, what's the problem?"
She sighed. "The JSON data isn't parsing correctly."
"JASON? Who's Jason?"
She groaned. "JSON. JavaScript Object Notation. It's a way to structure data."
Sebastian's face lit up. "Got it. So, it's like... Legos?"
"Sure, whatever helps you sleep at night." she rolled her eyes.
Sebastian cracked his knuckles and typed furiously.
—
<script>
let data = {
name: "Sebastian",
talent: "Acting",
debuggingSkill: "undefined"
};
console.log("Fixing everything like a boss"); // Motivational
data += "magic sauce"; // This'll work, right?
alert("IT WORKS... probably.");
</script>
—
He hit "Save" and refreshed the page. The screen went completely white, then flashed red like it was possessed.
"What did you do?!" she screamed.
"Magic sauce!" Sebastian said, pointing at the code.
"Magic sauce?! That's not a thing!"
"Not with that attitude," he muttered.
"Just give it back." She said, trying to grab the laptop back but he held it tight.
"No, no, babe. Let me try something else." He insisted, holding the laptop hostage.
She sighed, "Fine, just one more thing and if it doesn't work, give it back to me."
"Okay, okay, hold on. This will work. I can feel it!" He said enthusiastically, his fingers typing furiously.
—
<script>
let data =[ {
name: "Y/n",
character: "beautiful",
debuggingSkill: "powerful"
},
name: "Sebastian",
character: "chaotic",
debuggingSkill: "questionable"
},];
let love = data["Y/n"] + data["Sebastian"];
console.log("Y/n, you're the light of my life, and this code is dedicated to you.");
alert("Success, just like us.");
</script>
—
"Seb, that's not how you call JSON data." She protested but she couldn't keep a smile from escaping from her lips.
"Sometimes you have to go outside the box. Besides, love fixes everything." He said, winking at her and she rolled her eyes. He then pressed enter with a dramatic flourish.
The website blinked. The error message was gone, the navigation bar worked, the grid was perfect, the contact form sparkled like it had been kissed by the gods.
Sebastian turned to her with a smirk. "Told you. Love fixes everything."
Y/n's jaw dropped. "Wait... did you just—"
Before she could finish, the screen exploded into chaos. Every element on the page multiplied, filling the screen with hundreds of buttons labeled "Love you, Y/n" and an animated gif of a dancing cat in a tuxedo.
Sebastian leaned back, hands behind his head. "Well, it's the thought that counts."
She buried her face in her hands. "This is a nightmare."
"Okay, okay," he said, "Time to bring in the big guns."
Before she could grab the laptop back, Sebastian's hand flew over it again.
—
function callTheAvengers() {
alert("Avengers, assemble. We have a coding emergency.");
}
callTheAvengers();
—
"Seb, that's not gonna work." She protested.
"Wait for it." Sebastian said, raising his index finger to silence her and he hit the refresh button dramatically.
"Just give me the laptop back before I hit you with the hockey stick." She threatened.
"Babe, please. Trust me. Wait for it." He insisted and sure enough, suddenly she could hear the sound of a jet overhead. She glanced out the window and nearly fell out of her chair. The actual Quinjet was descending in the middle of their suburban street.
The neighbors were peeking out their windows in confusion, one even snapping pictures. "Sebastian, what did you do?!"
He smirked, "You saw the code, I called the Avengers."
Before she could protest, there was a knock at the door. Sebastian jumped up and opened it with a flourish.
Standing there were Steve Rogers, Tony Stark, Thor, Natasha Romanoff and Bruce Banner.
"We heard there was a coding emergency," Steve Rogers said seriously, stepping inside.
Y/n slapped her forehead. "Oh my God, I can't believe this is happening."
"What's the situation?" Tony asked, sunglasses on with a latte in hand.
Y/n sighed. "It's just a stupid JSON error."
"Ugh, JSON," Tony said, grimacing. "The silent killer of sanity. Move over."
Natasha Romanoff rolled her eyes. "Why am I even here? I don't code."
"Neither do I!" Thor announced, holding aloft his Mjolnir. "But I shall bring thunderous ideas!"
"Don't touch anything!" Y/n cried.
Bruce Banner set up his laptop. "Let's divide and conquer."
Sebastian handed everyone a keyboard which came out of nowhere and connected to nothing.. "Alright, team, let's do this."
Tony was the first to dive in.
"Alright, Y/n, let me show you how it's done." He typed on her laptop furiously:
—
<script>
function fixJSON() {
let billionDollars = true;
if (billionDollars) {
console.log("Hire someone else to fix it.");
} else {
console.log("Do it yourself, cheapskate.");
}
}
fixJSON();
</script>
—
"Tony," Y/n said, glaring, "that doesn't even make sense."
"It makes sense if you're a billionaire," he quipped. He hit refresh and the website turned all red and an iron man logo blinked in the middle.
Y/n slapped her forehead. "This is a nightmare."
"Here, let me try." Bruce Banner said. His approach was more... scientific.
"I think we need to test various inputs."
—
<script>
let gammaInput = [1, 2, "Hulk"];
let result = gammaInput.map(x => x + " smash");
console.log(result);
</script>
—
He hit refresh and the code ran. The screen displayed: '["1 smash", "2 smash", "Hulk smash"]'.
"Great, Bruce," Y/n said dryly. "Now my website is smashing things."
"You're welcome," he replied, adjusting his glasses.
Natasha sighed and leaned over. "Let me show you how to be efficient."
—
<script>
let secretSpyHack = () => {
console.log("Bug? What bug?");
};
secretSpyHack();
</script>
—
"That didn't do anything," Y/n pointed out.
Natasha shrugged. "Neither did I."
"Alright, alright, my turn." Steve said and he started typing with the enthusiasm of a soldier going in for battle.
—
function captainAmericaFix() {
let website = "running on freedom and justice";
let bugs = "punched out by the good ol' stars and stripes";
console.log("This code stands for something bigger.");
}
captainAmericaFix();
—
The website loaded. Patriotic music blared as an eagle soared across the screen, dragging the American flag behind it.
Y/n put her head on the desk. "I'm going to scream."
Thor stepped forward. "Stand aside, mortals! BEHOLD! I SHALL WRITE CODE AS MIGHTY AS MJOLNIR!"
He slammed Mjolnir onto the desk, causing the laptop to spark.
"Thor, no!" Y/n cried but Thor was already typing furiously.
—
<script>
let hammer = "Mjolnir";
function summonThunder() {
return hammer + " strikes!";
}
console.log(summonThunder());
</script>
—
He hit refresh and the website now displayed nothing but lightning bolts and the phrase "FOR ASGARD!" in Comic Sans.
Sebastian was laughing hysterically, tears streaming down his face. "This is the best debugging session ever!"
All of a sudden Peter Parker swung in through the window. "Hey, I heard there's a coding emergency?"
Tony groaned. "Of course the kid's here."
"Don't worry, I've got this!" Peter said, taking her laptop.
—
<script>
let webFix = bug => 'Spidey fixed ${bug}!';
console.log(webFix("JSON error"));
</script>
—
The website turned into a Spider-Man fan page.
Y/n buried her face in her hands. "I'm doomed."
"Enough!" Sebastian shouted, standing on a chair. "It's time for my genius to shine."
"Seb, NO!" she screamed.
"Seb, YES!" he yelled, typing with reckless abandon.
She glared at him as he continued to type nonsense but he suddenly stopped.
"Wait, I think you just missed a comma here." Sebastian said, deleting everything he typed before and adding the comma into her code.
He hit "Enter." The page refreshed. Miraculously, everything worked perfectly.
The room went silent. Even Tony looked impressed.
"How, how did you know?" She asked, her jaw dropped.
"Sometimes JSON is finicky like that." Sebastian shrugged.
Tony looked over his shoulder. "I was just about to say that."
As the Avengers packed up and left (after Tony insisted on taking credit for everything), Sebastian sat beside Y/n, who was still staring at her now-functioning website.
Sebastian leaned back on the chair, looking smug. "Told you I'd fix it."
"That was just beginner's luck." she shrugged.
"Oh come on, babe. What I did was genius." He insisted.
"I wouldn't say genius, but I think you know enough JSON now to be able to debug code."
"Yeah.. who's Jason again?" He asked, eyebrows furrowed and she threw a pillow at him.
"You're lucky I love you." She commented and he smiled as he pulled her by her waist and leaned in to kiss her.
For the rest of the day Sebastian strutted around the apartment, still wearing the Avengers bathrobe, Viking helmet and adding sunglasses while carrying a hockey stick and singing "We Are The Champions".
Y/n just stared at him and rolled her eyes, accepting her fate that she was dating a chaotic but somehow genius boyfriend and she wouldn't trade him for anything.
#sebastian stan#sebastianstan#sebastian stan fanfic#sebastian stan fanfiction#sebastian stan x reader#sebastian stan x y/n#sebastian stan x you#sebastian stan x female reader#sebastian stan fluff#sebastian stan one shot
24 notes
·
View notes
Text
currently using tumblr on my scool computer


i love low quality pixel red <3
also idk why but my tyoing on the kebourd is more lobotomised then m y usual typing ,anybe cus im a programmer and i have to type fast
"programmer" ala im in school for programing but all were doing now is html and css
honestly im just bored cus im done with my assigements and its the end of the year yk the grades are already in
indie game red ahh face
8 notes
·
View notes
Note
we, as a system, need some help. we've been blurry a lot lately and need a way to front trigger the guys with their shit more together (/silly)
i was thinking that maybe i could describe the alters briefly and get some ideas for stuff they might enjoy doing that could trigger them to front as well. i guess like. comforts for them so they can get up in front? anyways ill write short stuff abt them and feel free to just skip whoever you cant think of anything for!!
Miki (he/it): introject but source irrelevant. alien sent to earth to scope if it's liveable. loves space related stuff in general, and bouncy, silly music.
Jotaro (he/him): introject of jotaro kujo, from part 3 and 4 of jjba. source connecting relatively high. ageslider (17-30ish) with a passion for marine life. can seem cold and uninterested but does really enjoy taking to people. sometimes hearing his name makes him front. technically a physical pain handler
Y (she/her): optimist alter and fun haver. she loves 2000s webcore stuff and decorating simplyplurals. pink thing. loves cutesy stuff and daydreaming
thats it for now tbh these are our most responsible guys.. uh. sorry for the long ask, and thanks in advance for the help!
I’ll do my best!

Miki - bubbles, kinetic sand, lego building, nature observing/journaling, people watching, outfits with chrome details, face painting
Jotaro - aquarium visits, watching source media (maybe with friends?), paper models of marine life (you can also use these as decor!)
Y - learn to code html/css and build a personal website (here is a good tutorial to start with!!), if that’s a bit too much to do you can also try out strawpage. try out nicher computer programs (ukagakas might be fun?), play childhood games
Hope these help! Sorry for the long wait :(!
- mod lei
10 notes
·
View notes
Text
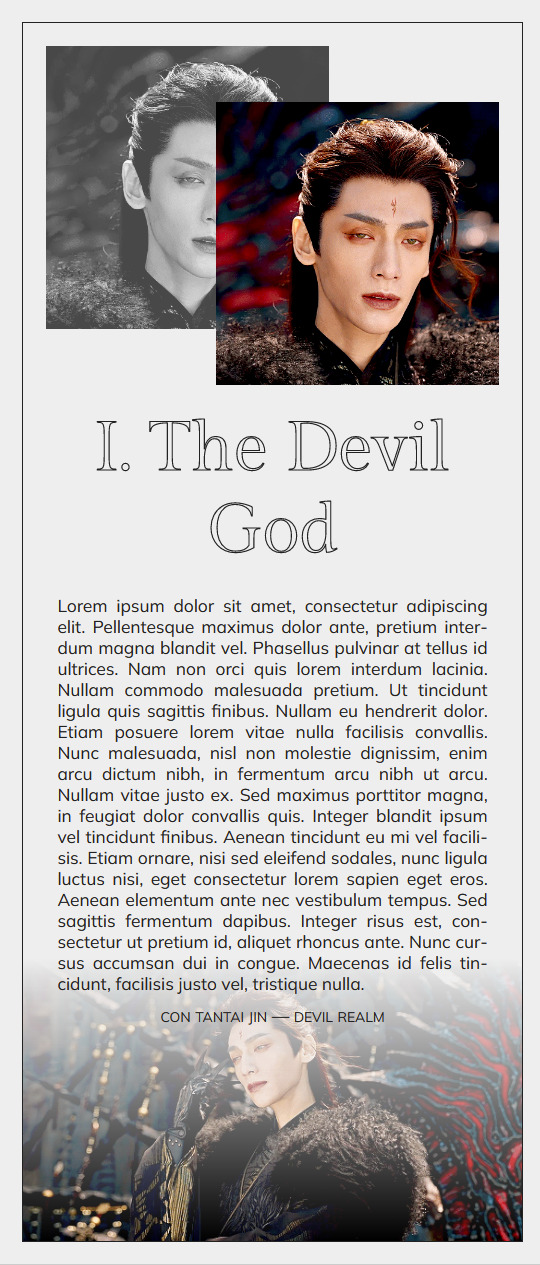
The Devil God — post de rol

PREVIEW — DESCARGA
Dos versiones disponibles, con imagenes de encabezado o sin ellas.
No hay cambios de color porque es blanco y negro, si alguien lo quiere en modo oscuro estoy dispuesta a hacerlo, sólo menciónenlo en el post, en mi ask, en mis mensajes, whenever.
CSS externo
Las imagenes se autoajustan al centro y a lo ancho o largo, depende de lo que la imagen necesite.
No hay post de trama para este ni es parte de ningún pack. Sin embargo si quiero hacer un pack más completo con cosas de Til The End of The Moon.
Gifs del demo de Til The End of The Moon.
#elalmacenrp#recursos rol#tablillas#tablilla de rol#code rp#code rpg#tablilla post de rol#post de rol#tablilla foroactivo#html y css#the devil god#tteotm#luo yunxi
36 notes
·
View notes
Text
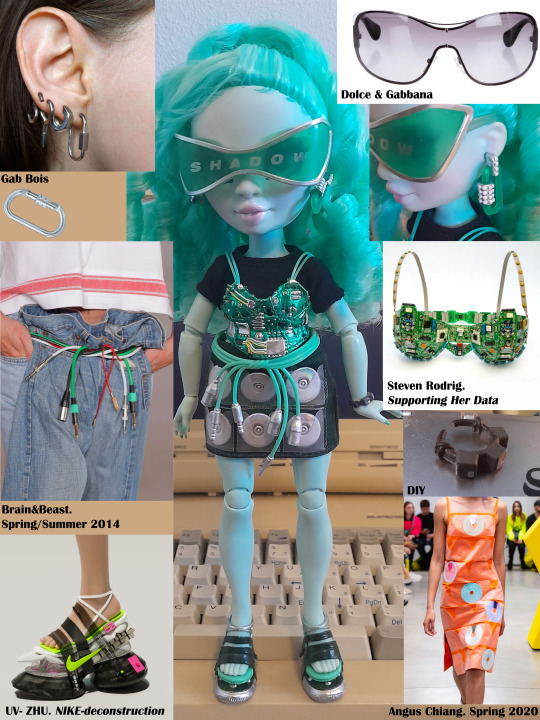

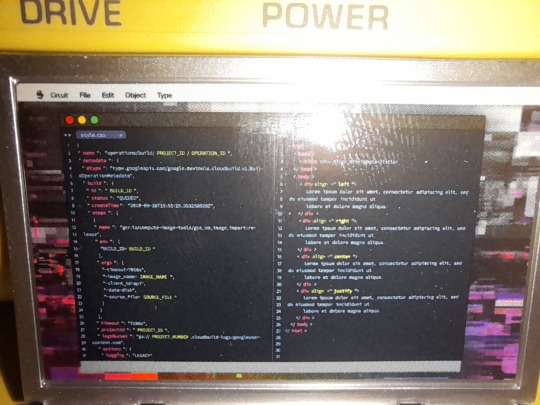
I got Berrie Skies' doll the other day and have been researching her for a few days. There's some things others have already pointed out like the Angus Chiang inspiration behind her CD-skirt and the Brain&Beast aux cable belt. Her bracelet is like a DIY project using recycled key caps and wire. I believe her earrings, which look like screw carabiners, are inspired by Gab Bois. They aren't computer-y but they do fall in line with her theme of recycling hardware. Her shoes are from UV-ZHU's NIKE-deconstruction series, again with a recycling theme. I couldn't find anything that exactly matched her circuit top but I do like Steven Rodrig's piece, Supporting Her Data. I also couldn't find an exact match for her glasses, just a lot of results for y2k shield sunglasses.
Her color theme reminds me of the iMac color Bondi blue, I wish she was a little closer to that color. There was also a line of fruit colored iMacs, including a blueberry color.
On her laptop, Berrie is editing HTML and CSS files which are what websites are made of. CSS files usually define the style of webpages but this file is showing info about google cloud API. I'm not sure if that's supposed to go in a CSS file as I only know how to write basic CSS. The HTML file looks like example code for how the "div align" element works. She might be the designer/programmer for RH's site or the Daily Shadow's website?
Regarding her name, I like the comparisons to the Raspberry Pi, so I've been calling her Berrie Pi :)
129 notes
·
View notes
Text

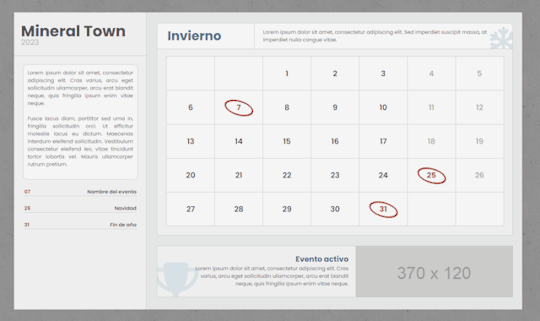
codember23 | estaciones
vista previa | css | html
@elalmacen-rp. Sí, la más obvia. Estaciones = Un calendario chulito para vuestros foros. He tardado porque hice un primer boceto que no me terminó de emocionar, así que lo volví a empezar de 0 y salió este, más cuquito.
No os preocupéis, que aquí traigo como instalarlo:
Para instalarla tenéis que crear una nueva página HTML desde la pestaña de Módulos, HTML & Javascript. Usando siempre el modo avanzado (HTML) pegáis el html ahí, y el css donde siempre.
Si no utilizáis las partes superiores e inferiores de vuestro foro en la página, tenéis que colocar el css junto al html, metiéndolo dentro de .<br>
El código se adapta al 100% del wrap, pero posiblemente tengáis que tocar tamaños para adaptarlo a vuestro gusto.
Si queréis modificar colores, tenéis las variables en el css. Tenéis el color de acento, tres tonos diferentes para el fondo y el color que marca los eventos.
Ok, ¿y cómo lo edito para poner mis eventos?
Cada día del mes es un <li>, así que tienes que añadir el tipo de día añadiéndole una clase a su etiqueta. Es decir:
Día festivo: <li class="fest"> Día de evento: <li class="ev" title="Nombre del evento"> * Es importante que el día de evento incluya el número dentro de las etiquetas <b> y esté acompañado de un icono para que funcione el efecto hover.
82 notes
·
View notes
Text
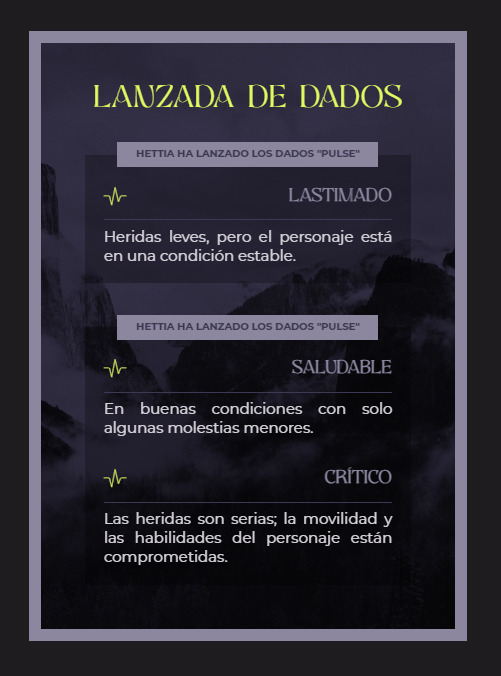
Codember2024 - Pulse
Buenas a todos, para este challenge del codember2024 organizado por @elalmacen-rp e inspirándome en pulsos, he decidido compartir un código en el que vengo trabajando hace tiempo y es un código que permite hacer que el código bbcode de la lanzada de dados se vuelva un HTML fácil de estilizar con CSS. Además, también permite modificar las lanzadas de dados para que, en vez de un número se muestre información en HTML como se muestra en la imagen permitiendo personalizar aún más cada lanzada de dado.
Os dejo los códigos comentados con notas para mejor edición, agradezco like/reblog si van a utilizar los mismos.
Ante cualquier duda, mis ask están abiertos.
Códigos
Nota: en codepen está el código HTML ya "transformado" para que puedan visualizar el estilo y cómo se vería. Además, no se puede visualizar los iconos de font awesome por cuestiones de licencia.
Para instalar correctamente, copiar el código JS en un nuevo JavaScript habilitado en todas las páginas para que también se pueda ver en el historial de mensajes (preview).
Crear un dado con el nombre 'Pulse' de seis caras, para visualizar el ejemplo. Lanzar dados de manera normal.
Aquí os dejo un pequeño video para que puedan ver cómo crear los dados y agregarle información con el JSON para que se visualice una vez que se realizan las lanzadas de dados:
Pueden incluir todo el HTML que deseen, desde imágenes, más cajas interiores, etc.
Cada nombre de dado, en el ejemplo 'Pulse', agrega una nueva clase: roll-nombre (en el ejemplo, roll-pulse) permite personalizar cada lanzada de dados a gusto permitiendo más versatilidad a la hora de diseñar el mismo.
53 notes
·
View notes
Text
FAQ Installation, problèmes❓
Hello ! 😄 Après de longs mois à galérer pour trouver du temps, voici enfin un post qui recense les principaux bugs ou problèmes d'installation que la plupart d'entre vous ont pu rencontrer suite au partage du thème. Vous êtes très nombreux·ses à venir dans mes messages privés et parfois pour des soucis similaires (je suis d'ailleurs désolée si je ne vous réponds pas/plus... je vois tout mais je suis très vite submergée et très vite ré-alpaguée par mon irl donc je fais l'autruche... 🫠 ). Rappel des bonnes pratiques : - S'assurer d'avoir configuré son forum comme le Blank Theme l'indique. - Faire attention à bien avoir coché les bonnes cases dans la gestion des javascripts, en n'oubliant pas d'activer la gestion de ces derniers. - S'assurer qu'il n'y a pas de // ** "" “” en trop dans vos urls/html/css.
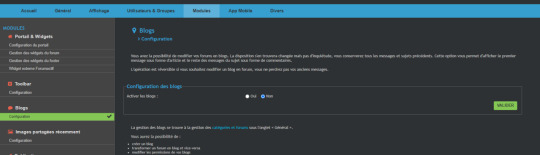
➡️ Image_List La plupart d'entrevous n'ont pas trouvé le template image_list. Pour le faire apparaître, il suffit d'aller désactiver les blogs dans votre panneau d'administration : MODULES > BLOGS > CONFIGURATION > ACTIVER LES BLOGS [X] NON
➡️ Mon CSS ne s'actualise pas Il y a un soucis que j'ai rencontré quelques fois, si on héberge son css sur archivehost et qu'on sauvegarde par-dessus, il arrive parfois que ça ne s'update pas correctement (et donc, par extension, que le forum affiche encore la feuille précédente même si elle a changé sur archivehost). Ce que je fais pour contrer ça, même si c'est super relou à la longue, c'est que j'édite le nom de ma feuille de css (genre, je rajoute version _01 / _02 / 03 etc. pour chaque mise à jour), je ré-héberge, et je re-remplace l'url vers la feuille dans l'overall_header 🥲 Je n'ai pas trouvé d'autre solution (je n'ai pas cherché non plus oups- mais peut-être que dropbox est moins pénible pour ça, à tester!).
➡️ Les Champs de mes profils semblent décalés Plusieurs possibilités et conditions pour résoudre ce problème : 1) Il faut que les champs soient obligatoirement remplis !

2) Veillez à ce que l'ordre des champs soit identique à celui que je vous ai partagé. 3) Le FACECLAIM est un champ de base de forumactif, anciennement HUMEUR (c'est pour ça qu'il n'a pas de croix à côté pour le supprimer). 4) N'oubliez pas non plus d'activer le système de points. Un compte sans point fait que son profil est décalé. Généralement dans la gestion des points, là où l'utilisateur·ice poste en premier (fiche de présentation, espace invité, préliens etc), j'y mets +1pt. Ou +1pt de gain par jour depuis l'inscription. 5) Pour ceux qui s'y connaissent un peu plus en code, sur le forum où j'ai réalisé mon thème, les champs ont pour id ceci :
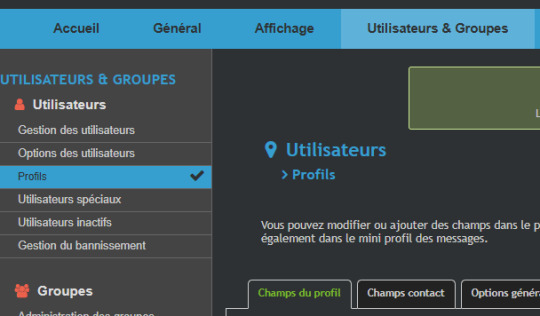
Image 2 : 18 Aesthetic : - 16 Trigger Warnings : 2 Pseudonyme : 3 Faceclaim : -8 Date d'inscription : -4 Messages : -6 Dollars : -13 Crédits : 14 Multicomptes : 5 Disponibilité : 7 Couleur : 8 Statut : 9 Occupation : 15 Habitation : 6 Image : 12 Rps, appel & sms : 11 Liens : 10 ATTENTION ! Il se peut que les id de vos champs ne soient pas les mêmes (dépendamment de l'ordre dans lequel vous avez conçu les champs) et donc que cela décale l'apparition de ceux-ci dans vos messages ou votre profil si les solutions du dessus ne fonctionnent pas. Comment vérifier ? Allez dans votre panneau d'administration > Utilisateurs & Groupes > Utilisateurs > Profils > Champs du profil.
Appuyez sur F12 pour ouvrir votre INSPECTEUR. En haut à gauche de votre inspecteur, cliquez sur cet icon.

Ou appuyez directement sur CTRL + SHIFT + C. Survolez le bloc de croix de la ligne qui vous intéresse tout en étant en mode de sélection puis cliquez sur ce bloc.
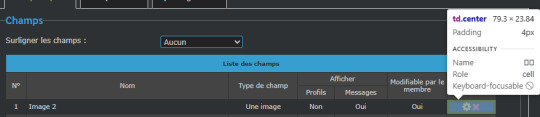
Votre inspecteur va vous indiquer à quoi correspond la ligne. En l'occurrence et pour tous les champs, il s'agit d'une <td class="center"></td> que vous aurez juste à ouvrir en cliquant sur le petit triangle à gauche.

Vous trouverez en deuxième ligne sa value, ici value="18". 18 correspond à l'id de votre champ. Image 2 a donc, pour moi, l'id 18. Mais il se peut que chez vous cela soit autre chose ! Cela dépend de l'ordre dans lequel vous avez créé et ajouté vos champs. Si cela est différent, dans ce cas vous devrez : 1) soit modifier la partie css pour faire correspondre les id si vous avez la flemme de refaire vos champs. 2) soit refaire vos champs dans le bon ordre, tout en sachant que vous pourriez vous tromper ou qu'un champ n'apparaisse pas avec le bon id pour une raison obscure. Par exemple, le champ Trigger Warning est censé avoir pour id 2 sur mon forum, mais sur le forum d'une personne, la création des champs ne commence qu'à partir de l'id 4 (si quelqu'un a la réponse à ce mystère, je suis preneuse...). Dans le cas échéant, vous n'aurez qu'à modifier la partie css des champs qui n'ont pas la bonne id malgré leur recréation. Si vous devez modifier la partie css, voici les éléments concernés : /* ----------- PROFIL DES MEMBRES ---------- */
.SOB_profperso dl:not(#field_id17):not(#field_id15):not(#field_id1):not(#field_id4):not(#field_id6):not(#field_id16):not(#field_id9) { display: none; } Ici, remplacez mes id par les vôtres. Cela correspond à l'onglet personnage de votre profil (donc l'aesthetic, le statut, l'occupation, l'habitation).
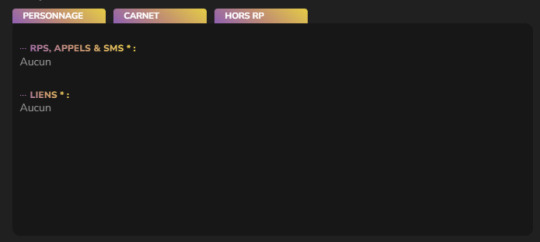
.SOB_profcontact dl:not(#field_id18):not(#field_id11):not(#field_id10) { display: none; } Ici, remplacez mes id par les vôtres. Cela correspond à l'onglet carnet de votre profil (donc rps, appels & sms ainsi que liens)
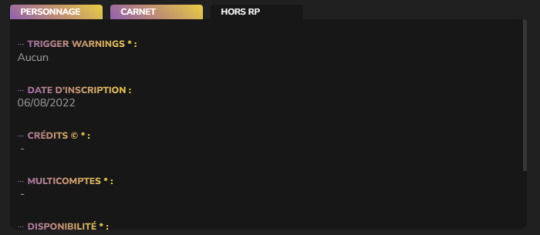
.SOB_profhrp dl:not(#field_id8):not(#field_id-4):not(#field_id2):not(#field_id5):not(#field_id7):not(#field_id14) { display: none; } Ici, remplacez mes id par les vôtres. Cela correspond à l'onglet hors rp de votre profil (donc trigger warnings, date d'inscription, crédits, multicomptes, disponibilité, couleur)
.SOB_profimg dl:not(#field_id12) Ici, il s'agit de l'image en haut à gauche de votre profil.

.SOB_profdollars dl:not(#field_id-13) Les dollars. .SOB_profmessages dl:not(#field_id-6) Les messages. .SOB_profpseudo dl:not(#field_id3) Votre pseudo. .SOB_proffc dl:not(#field_id-8) Le fc de votre personnage. Si cela s'est décalé également dans vos messages, allez modifier le css de cette partie : /*--------- VIEWTOPIC BODY ---------*/
#post_avatar_pseudo #field_id:nth-child(-n+3), #post_avatar_pseudo #field_id:nth-child(n+5), #post_avatar_img #field_id:nth-child(-n+15), #post_avatar_img #field_id:nth-child(17), #post_avatar_img #field_id:nth-child(18), #post_avatar_faceclaim #field_id:nth-child(-n+4), #post_avatar_faceclaim #field_id:nth-child(n+6), #post_avatar_dollars #field_id:nth-child(-n+7), #post_avatar_dollars #field_id:nth-child(n+9), #post_avatar_messages #field_id:nth-child(-n+6), #post_avatar_messages #field_id:nth-child(n+8) { display: none; } Ici, cela correspond aux champs appelés au survol de l'avatar (donc l'image ronde, le pseudo, le faceclaim, les dollars, les messages).
.profil-cache #field_id:nth-child(4),.profil-cache #field_id:nth-child(3),.profil-cache #field_id:nth-child(5),.profil-cache #field_id:nth-child(7),.profil-cache #field_id:nth-child(8),.profil-cache #field_id:nth-child(16) { display: none; }
Ici, cela correspond aux champs appelés dans le bloc " [INFORMATIONS] " en dessous de votre avatar (donc l'autre image, l'aesthetic, la date d'inscription, les crédits, les multicomptes, la disponibilité, le statut, l'occupation, l'habitation, les rps/appels et sms, les liens)
.profil-tw #field_id:nth-child(-n+2), .profil-tw #field_id:nth-child(n+4){ display: none; } Ici, cela correspond au bloc des Trigger Warnings qui apparaît au survol de votre avatar. Comment fonctionne ce format de sélection des champs ? Honnêtement j'me suis arrachée les cheveux un nombre incalculable de fois dessus. J'aime pas. Je me suis aidée ici : https://developer.mozilla.org/fr/docs/Web/CSS/:nth-child pour mieux comprendre. On cible des éléments (un seul, un en particulier et ceux qui suivent, les X premiers, etc... ) et on se démerde pour cacher les indésirables. Exemples:
:nth-child(n+7)
Cible le septième élément et ceux qui suivent : 7 [=0+7], 8 [=1+7], 9 [=2+7], etc.
:nth-child(-n+3)
Cible les trois premiers éléments. [=-0+3, -1+3, -2+3]
Franchement, bon courage pour cette partie là, je déteste de toute mon âme cette façon de faire (mais c'est celle qui était sous mon nez au moment de construire alors...) Il existe d'autres façons de coder bien plus simples pour empêcher les utilisateurs·ices de s'embêter avec tout ça (des tutos sont dispos un peu partout, que ça soit sur le Discord de La Piscine ou des forums pour le codage), pour l'heure je n'ai pas eu le temps de regarder... À voir pour une future update. ➡️Les messages du compte Administrateur en format sans profil ne fonctionnent pas Pour cela il faut créer un rang <span class="Administrateur">Administrateur</span> et l'attribuer au compte administrateur uniquement.

Je compte mettre à jour le post chaque fois qu'un problème récurrent fera son apparition dans mes DMs. N'hésitez pas à repasser dessus pour être tenus au courant. ✨ Encore merci pour l'utilisation que vous faites du thème, ça fait chaud au cœur de le voir autant apprécié et personnalisé ! Je vois vos forums s'ouvrir petit à petit sur les topsites et ça me fait sourire. Je suis contente que cela puisse vous aider à construire vos univers et à vous poser quelque part. Dans une ère où les forums perdent en vitesse, ça redonne espoir et ça a l'air d'en encourager beaucoup plus à se lancer dans l'aventure administrative ! 🥹
13 notes
·
View notes