#i wanted to try out using the shape tool on fire alpaca!
Text

INTRUDER ALERT!
alt below!
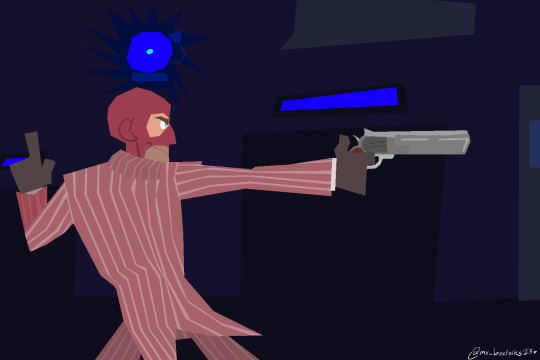
#i wanted to try out using the shape tool on fire alpaca!#its super fun#its how i made my sticker designs#which i will be posting here sometime next week#once i finish the whole defense trio#i have engie's done so far!#and i wanna get them up on my ko-fi once i have stamps to send them out#anyways#tf2#team fortress 2#team fortress two#tf2 spy#tf2 fanart
68 notes
·
View notes
Note
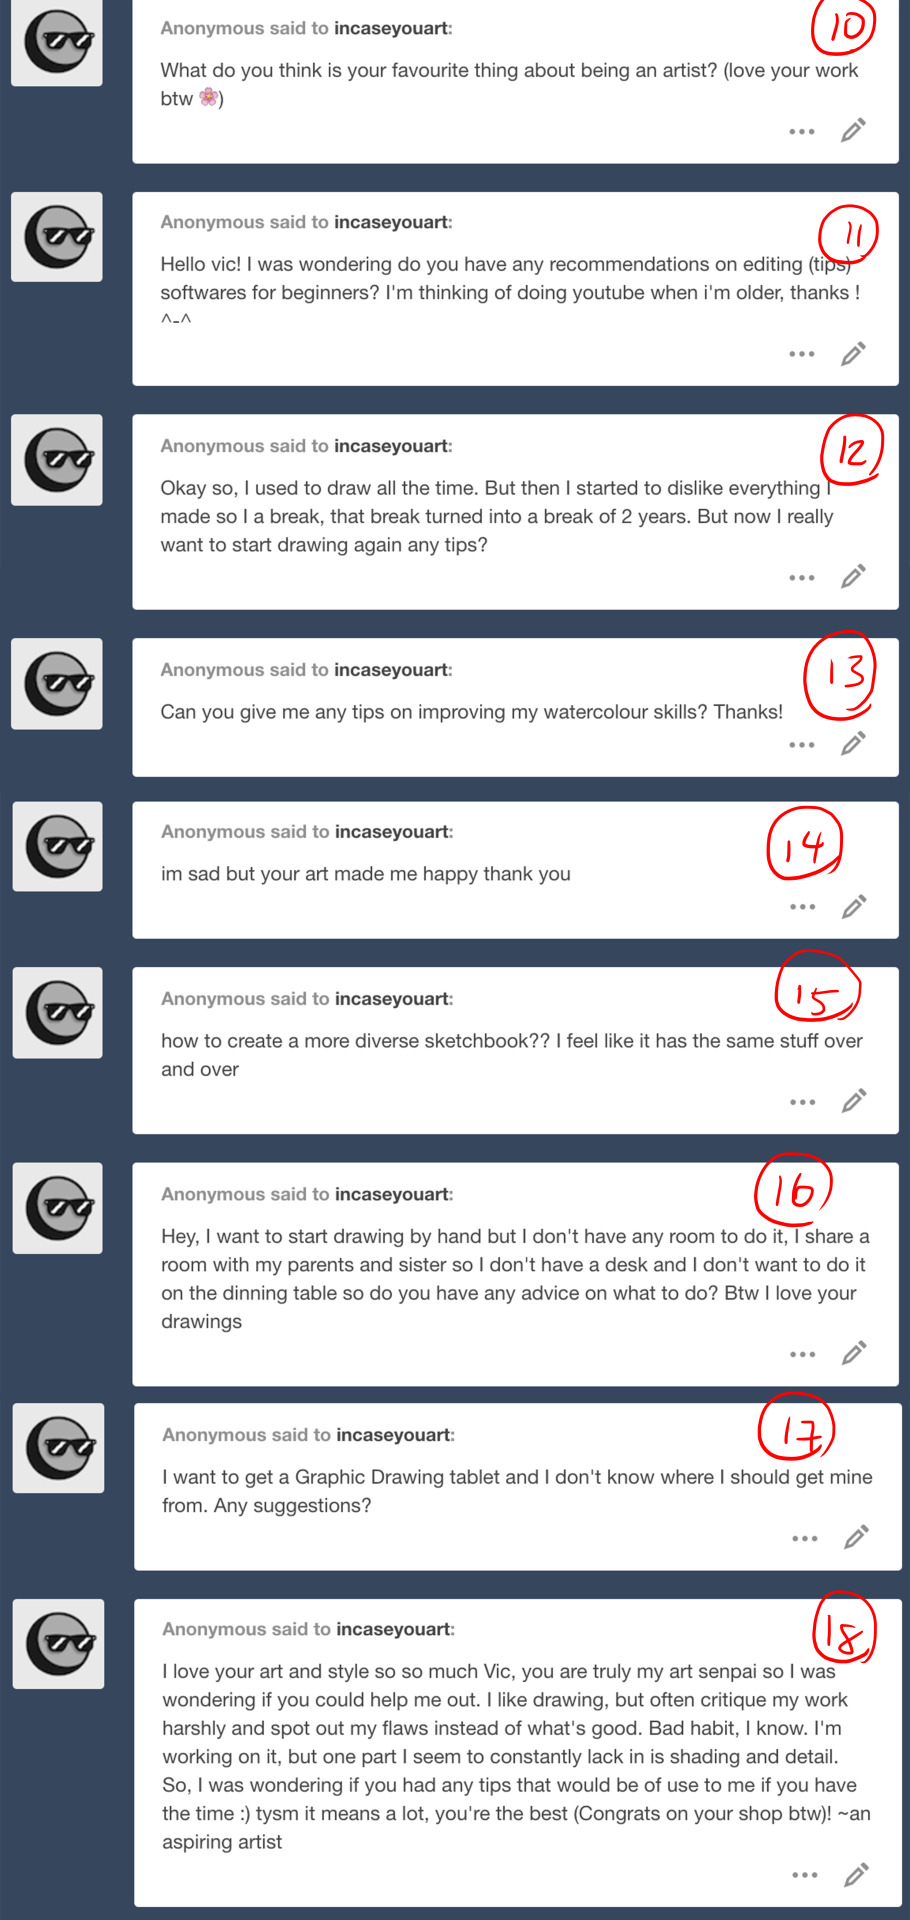
Could we please get a tutorial on how you did your latest lookbook? Ily 💌💌
ok this is gonna be a long post so under the cut is a general tutorial, i cant go step by step exactly as i did it since i didn’t save the editing file, but here’s at least my basic process i always start out with, plus how to do the silhouette effect i used in the last example!! also i’m not sure about your experience level re: image editing or digital art so i’m going to try and explain it in a way that hopefully anyone can understand but please feel free to come to me with more questions!! Also my screen res is very wide but I wanted to be able to show off where all the menus are, so clicking on the images for full view may be necessary for you.
OK so step 0 is gathering materials- you will need a photo that you want to edit plus an image editing program. You can easily get photo’s from your switch with the switch’s built in image sharing mode, either by posting them to facebook or twittter, and then saving them to your computer from there. Or if you have a computer that can read a microsd card or you have a microsd card reader you can plug into your machine, you can transfer images that way. The only other thing we need is an image editing software. I will be showing you my process by using Clip Studio Paint but you don’t need to use this specific program. I personally recommend using a program that allows for transparency even if the end result isnt transparent because it’s easier to move layers and elements around but that being said you COULD edit images with a program as simple as microsoft paint. There are free more advanced softwares out there like krita, gimp, fire alpaca, etc.

Step 1) While this step isnt necessary, I personally run my images through a filter to reduce the JPEG noise, to smooth out edges and to make the image clearer. You can also use websites or apps that do this for you like waifu2x or yome2x if you want.
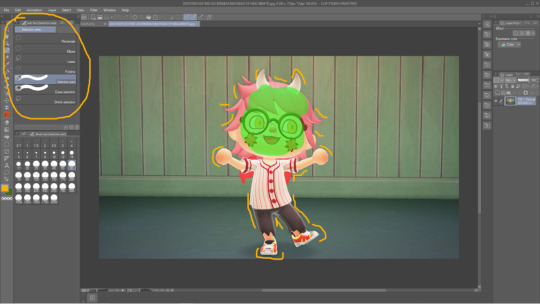
Step 2) Isolate your subject from the image’s background. You can either choose to just erase away directly on the image layer or you can use selection tools to choose the parts of the image you are going to separate first. I prefer the selection method because then I can use a masking layer which I’ll get into in the next step. You’ll want to erase or select out everything except for your character (or other photo elements you want included in there too like if you decorate a bit). There are many different ways you can use the selection tools depending on if you want to opt for speed or for the cleanest possible edges. I usually use the magic wand tool to get a good chunk of my selection and then go in with the selection brush for precision.

Step 2.5) If you have opted to select out your desired subject then the next step is to create a masking layer. The easiest way to do this is to finish your selection and then to hit the Quick Mask button circled in yellow, it is represented in my version of CSP as a rectangle with a dark circle inside. This will automatically create a mask including everything except your selection, making those unselected elements completely transparent. The mask if shown to the immediate right of the affected layer. The black bits are what is hidden and the white is what is shown. You can edit the mask using the brush and eraser tools- the brush will expose hidden bits of the layer and the eraser will hide. You can also create a layer mask by opening the Layer menu at the top of the window > Layer Mask> Create from Selection. This is how it works in CSP, other softwares may not make use of the eraser tool but instead only the brush tool will be needed to edit a mask. I encourage you to search the web (google, duckduckgo, etc) “masking layer + (your drawing program)” for specifics on your particular program.
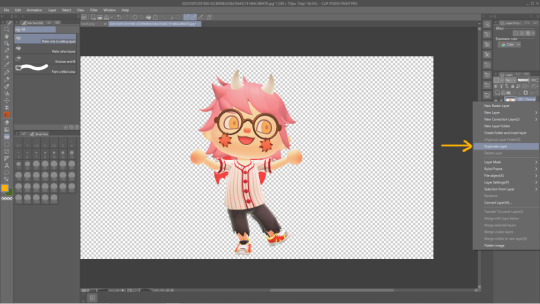
Step 4) Now comes the silhouette effect specifically from my lookbook post. Duplicate the character layer. This will create an identical layer for us to edit.

Step 5) Create a new empty layer and make sure it is on Top of yhe layer we just duplicated in the above step. Then create a Clipping Layer using the empty layer. Clipping layers will chain to the layer immediately below, and allow you to create effects that only affect the layer it is attached to. You may chain multiple clipping layers to a single layer in order to layer almost infinite effects.
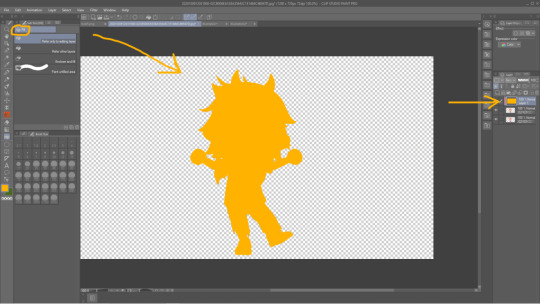
Step 6) Using the fill/Paint Bucket tool, fill the empty clipping layer with your preferred color. Notice how the layer is technically completely filled with yellow, but it only shows up in the actual image as the shape of the layer the clipping layer is attached to!

Step 7) Reorder your layers so the original layer we started with is displayed on top.

Step 8) Use the move tool to drag either the copied layer or the original layer around to a position of your liking. You can then repeat this process as many times as you want, using whatever colors or gradients or brushes or textures you like.
Step 9) Draw or import textures or clip art* or literally whatever to decorate your image how you like. Elements from this piece include a heart shaped brush that came with CSP for free, a polka dot screen tone brush I downloaded for free from the CSP shared asset website, and hand drawn elements and lettering done by me! *When using materials you find on the internet for your edit work please, please make sure you have permission to use it. Don’t take art from people’s art blogs and turn them into stickers or whatever unless u have permission. If you dont want to draw it out yourself i recommend searching the web for royalty free clip art or textures. Hopefully this tutorial was what you were looking for! If not you can always ask me more questions and if it’s helpful or interesting for anyone out there the next time I make a lookbook edit I can record that as a video so you can see my step by step process as I actually create the image,
18 notes
·
View notes
Text
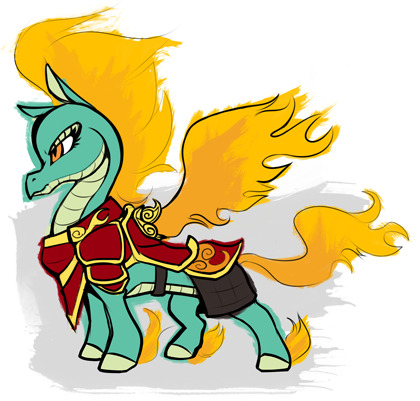
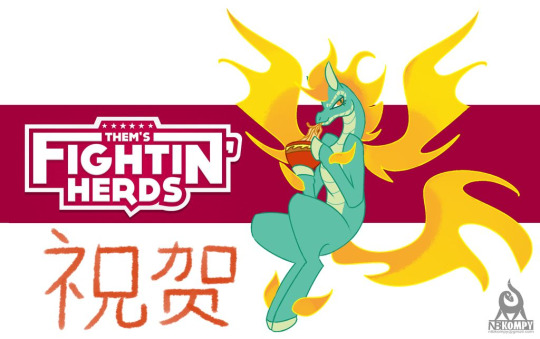
5e Tianhuo the Fire of Huoshan build (Them’s Fightin’ Herds)
(Artwork by Mane 6)
看最長的龍馬!
In my attempt to branch out from making nothing but League of Legends builds here’s a character from Them’s Fightin’ Herds! The Fighting is Magic project is something I followed for quite awhile and I was quite happy to back their IndieGoGo. (You can find my name in the credits!) While I’m personally not that great at fighting games TFH is a lot of fun and is rather welcoming to newcomers with several features to move it away from the traditional elite crowd that fighting games draw in.
Personally I’m a garbage Tian spammer who has no idea how to combo or do anything. (Occasionally play Papi and do want to learn Oli someday. Warlock Unicorn uwu) Tian has a fun rushdown style and focuses on aerial combos which as a garbage Bella / Beo spammer in Skullgirls really tickles my fancy.
GOALS
拳頭格鬥遊戲 - Them’s Fightin’ Herds is a game of hoof-to-hoof combat. Tianhou needs to punch, kick, and flip with the best of them.
龍的火焰 - The longmas of Huoshan channel the dragon’s fire magic into every strike. I mean, how else could you tolerate living on a volcano?
龍的飛行 - With wings of flame we’ll need to be able to take off in combat.
RACE
There are two directions we can go for the race: Centaur or Dragonborn.
Centaurs are interesting if you want to channel more of the horse aspect of Tian. You get a plus two to Strength and a plus one to Wisdom, but notably you start with 40 feet of movement putting you 10 feet ahead of everyone else. You also count as a Fey instead of Humanoid which does have some interesting interactions with spells like Hold Person. But as a Centaur you get the Charge feature which lets you make an unarmed strike with your hooves after making a weapon attack, and your Hooves do damage equal to a d4 plus your strength modifier. However full disclosure we won’t need that extra attack for this build, and your Equine Build affecting your climbing speed isn’t that useful either. You do get extra skills from Survivor however but seeing as we won’t be using Centaur I’ll talk about our other option:
Dragonborn! Dragonborn are much easier to summarize than Centaurs and are going to be our race of choice. You get a +2 increase to Strength and a +1 to Charisma along with a choice of Draconic Ancestry. Your ancestry of choice will determine your Damage Resistance as well as the damage type and shape of your Breath Weapon. For maximum fire damage choose either Brass, Red, or Gold depending on what size of breath weapon you want. I personally opted for Gold as gold is good luck in Chinese mythology. But most importantly Dragonborn won’t immediately label you as the guy playing their MLP OC at the table... it’s not an OC dammit!
ABILITY SCORES
15; DEXTERITY - You move so fast your hair is literally on fire!
14; WISDOM - “The wise are like a river; they go forward and upward, never backward or downward.” ― Matshona Dhliwayo
13; CHARISMA - You need an intimidating face to bring your soldiers in line. Charisma is also a requirement to multiclass.
12; CONSTITUTION - To fight with an ice-slinging diva, occultist unicorn, or crazy love-bug alpaca you need to be able to take a hit.
10; INTELLIGENCE - To study the art of war you need to be smart. As a general you follow the orders but you need to know why.
8; STRENGTH - While I wish this could be higher it’s unfortunately not too necessary for this build, but thankfully our racial bonus will increase this to a flat 10.
BACKGROUND
Your background is very straight forward for Tianhuo: you’re a Soldier. You get proficiency in Athletics and Intimidation as well as land vehicles and a gaming set: I’d opt for Three-Dragon Ante as it makes sense for a dragon soldier.
As a Soldier you get a Military Rank, meaning that soldiers in the Huoshan army defer to you. In addition you can influence other soldiers to provide aid, access to military encampments, or horses... to ride. That’s insulting!
(Artwork by Mane 6)
THE BUILD
LEVEL 1 - MONK 1
We’ll be starting off as Monk so we can kick as well as flip. You get proficiency in two Monk skills: Acrobatics are a must and for your second skill I’d opt for Insight so you can tell if your soldiers are lying to you. You also get proficiency in one Musical Instrument or Artisan’s Tool and of course we must go for Calligrapher's Supplies; the pen’s mightier than the sword and to master the pen makes you the mightiest of them all.
But as a Monk you get Unarmored Defense equal to 10 plus your Dexterity and Wisdom modifier. While Tian has been shown to wear armor it’s mostly for show, and she mainly fights with nothing but her scales to protect her. You also get Martial Arts which have a bunch of benefits:
You can wield Monk Weapons, including shortswords and any simple melee weapon that doesn’t have the heavy or two-handed property.
You can use Dexterity instead of Strength for the attack and damage rolls of your unarmed strikes and monk weapons.
You can roll a d4 for the damage of your unarmed strike or monk weapon.
When you Attack with an unarmed strike or a monk weapon you can make one unarmed strike as a bonus action.
As a Huoshan warrior you’d be trained to use a spear or a sword, but at the end of the day your weapon of choice is your two hooves... hands... being a horse in D&D is weird.
LEVEL 2 - MONK 2
Second level Monks get Ki points to use on a variety of combat techniques. Flurry of Blows lets you make two attacks with your bonus action instead of one, Patient Defense lets you take the dodge action as a bonus action, and Step of the Wind doubles your jump distance and lets you take the Dash or Disengage action on your turn as a bonus action.
In addition second level Monks get Unarmored Movement to move 10 feet faster if they’re not wearing armor or using a shield. You need to rush your opponents and never let up! Stop trying to hit me and hit me!
LEVEL 3 - MONK 3
Level 3 Monks get their Monastic Tradition and there are a lot of traditions to choose from for a fire horse-dragon: Four Elements, Kensei, Sun Soul... but the fighting style of choice for fighting characters would be Way of the Open Hand. Open Hand Monks get Open Hand Technique: when you hit an enemy with Flurry of Blows you can force a variety of effects on your target. You can either force a Dexterity saving throw or knock them prone, force a Strength saving throw or push them 15 feet away, or just make it so they can’t take reactions until the end of your next turn.
You also get Deflect Missiles which lets you reduce the damage of a ranged weapon attack by a d10 plus your Dexterity modifier and your Monk level. If you reduce the weapon’s attack to 0 you can spend a Ki point to throw it back at the enemy like a dart. Most of your opponents are blasting you with magic but that’s just because they know how pointless a bow would be. Burn up any projectile before kicking it back at them!
LEVEL 4 - MONK 4
At level 4 you can spread your wings of fire with Slow Fall, reducing any falling damage you take by 5 times your Monk level.
You also get an Ability Score Improvement or Feat and the Athlete feat will let you quickly get up if a cow causes an earthquake. Standing up only uses 5 feet of movement, climbing doesn't cost you extra movement, and you can make a running jump after moving only 5 feet. You can also increase either your Strength or Dexterity and of course we’ll be going for Dexterity for nice even numbers.
LEVEL 5 - MONK 5
5th level Monks get an Extra Attack, adding up to 3 attacks total or 4 attacks when you use Flurry of Blows. Speaking of attacks your Martial Arts die increases to a d6 at this level. But most notably you get Stunning Strike to start up some combos: when you hit a target with a melee weapon you can spend 1 ki point to force a Constitution saving throw or stun the target until the end of your next turn. Keep your enemies in hit stun and get that Ultra Combo!
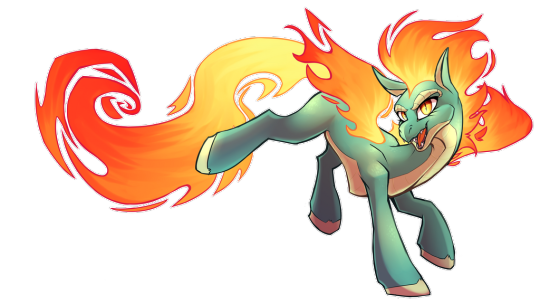
(Artwork by Aegann on DeviantArt)
LEVEL 6
Now that we know how to fight it’s time to get our wings and learn how to fly. There are a lot of subclasses that can get the ability to fly: Sorcerers and Wizards can learn the Flight spell but get a bit too much magic for my liking, and while Artificers can make Winged Boots that requires a lot of level investment and Tian is hardly an inventor. I want a class that can provide powerful and consistent results, all with an infernal flair to keep us in the fight.
WARLOCK 1
Here’s a shocker huhn! You can rule the Warlock multiclass as a variety of things: the strength of your dragon mother, your allegiance to Huoshan... regardless you’re going to have to explain why you have a Fiend as your Otherworldly Patron. I have to remind everyone that the names of the classes are suggestions only! Feel free to roleplay them however you want.
Regardless: Fiend Warlocks get Dark One’s Blessing, granting them temporary hit points whenever they slay an enemy equal to their Charisma modifier plus their Warlock level.
You also get Pact Magic allowing you to cast some dragonfire! Prestidigitation will let you do a variety of small tricks including heating food and drinks with your fire breath or lightning candles with a puff of flame. And since this is a Warlock build you may as well take Eldritch Blast to fight at range - it’s more of Oleander’s thing yes but it’s not like you have much else to choose from.
You also get two spells of your choice at this level: Burning Hands from the Fiend list is a more potent dragonfire, and Hellish Rebuke will let you burn anyone that strikes you.
LEVEL 7 - WARLOCK 2
Second level Warlocks get Eldritch Invocations: Devil’s Sight will let you fight in the dark because Dragonborn don’t have Darkvision for some reason. Fiendish Vigor will give you a bit of added vitality to block some attacks during a fight. These are the choices I’d personally go for but there are a few other suggestions I can make:
Armor of Shadows will increase your AC by 1 at the moment since you only have +2 in your Wisdom.
Beguiling Influence will make you a master of social affairs, though Deception isn’t very in-character for you.
Agonizing Blast, Eldritch Sight, and Eyes of the Rune Keeper are all just generally useful.
You also learn another spell at this level and Hex will let you do an extra d6 of damage with every hit in your combo. Considering that as a Monk you can attack a total of 4 times per turn that’s a lot of damage!
LEVEL 8 - WARLOCK 3
Third level Warlocks get access to their Pact Boon, and seeing as Tian doesn’t use weapons or have a familiar we’ll of course be going for Pact of the Tome. You get three cantrips from any class’ spell list: Control Flames will allow you to channel your dragon lineage to do some funky fire magic, and while there are other fire spells (Firebolt / Produce Flame) they’re not nearly as useful for us so take Guidance to assist your soldiers and Thaumaturgy for the voice of a general. (As well as some more fire shenanigans.)
You also get access to second level spells and Scorching Ray will let you spread your wings to scorch three enemies within 120 feet of you.
LEVEL 9 - WARLOCK 4
4th level Warlocks get an Ability Score Improvement and you’re going to want to further increase your Dexterity for stronger strikes and tougher scales.
You also get another spell at this level but I’d hold off on it for now since we get some pretty good stuff at our next level. You do get another cantrip but truthfully you can grab just about anything and still remain in-flavor. I personally opted for Create Bonfire because it’s a fire.
LEVEL 10 - WARLOCK 5
First and foremost 5th level Warlocks get access to 3rd level spells and there’s two in particular we want: Fly gives a creature you touch (ideally yourself) a flying speed of 60 feet. Secondly Fireball... you know what this is. It’s Fireball. In D&D. Use Fireball and only Fireball; nothing but Fireball. Just Fireball. Just Fireball. Just Fireball. Jokes you can now fly and use your super! 闷烧踢 燃烧风! (Thanks to the TFH devs on their official Discord for giving me the kanji for Tian’s super.)
5th level Warlocks also get another Invocation. Cloak of Flies can be good for an immolation aura or if you want to straighten up your soldiers but feel free to take other options from earlier levels if you so desire. If your DM allows Unearthed Arcana the Class Feature Variants UA has a few options: Eldritch Mind can help compensate for your low Constitution so you don’t stop flying, and Far Scribe can be nice to keep in touch with your soldiers over long distances.
LEVEL 11 - WARLOCK 6
6th level Fiend Warlocks get Dark One’s Own Luck, letting them add a d10 to an ability check or saving throw. It’s called “luck” but you can contribute it to raw skill. You also get your last spell at this level and while I personally opted for Counterspell you can take just about anything. Truthfully all we’ll really be using is Fly and Fireball.

(Artwork by unousaya on DeviantArt)
LEVEL 12 - MONK 6
Straight through Monk now. Level 6 Monks get Ki-Empowered Strikes making their fists magical for the sake of overcoming resistances. Paprika’s wool might be able to absorb regular blows but they can’t absorb the flames of Huoshan! Your Unarmored Movement also increases to 15 feet, giving you 45 feet of movement total.
Open Hand Monks meanwhile get Wholeness of Body. You can take an action once per Long Rest to regain an amount of hitpoints equal to three times your Monk level. They can knock you down but they aren’t ready for Round 2!
LEVEL 13 - MONK 7
7th level Monks get Evasion: if you’re forced to make a Dexterity saving throw you only take half damage if you fail, and you take no damage if you succeed. Blocking is great and all but dodging is important to avoid chip damage! You also get Stillness of Mind letting you channel your inner dragon to remove an effect of Charming or Frightening on you as an action.
LEVEL 14 - MONK 8
8th level Monks get an Ability Score Improvement: cap off your Dexterity for swift strikes and expert evasion.
LEVEL 15 - MONK 9
Level 9 Monks get an Unarmored Movement Improvement letting them run across water or along walls as long as they end their turn on solid ground. Clearly this isn’t you running “across” the water or “along” the wall but rather you just gliding over them.
LEVEL 16 - MONK 10
Level 10 Monks get Purity of Body, making you as hearty as a horse and immune to Poison and Disease. Your Unarmored Movement also increases by 5 feet for +20 feet, or 50 feet total. Just a reminder that the Fly spell makes you move 60 feet per turn.
LEVEL 17 - MONK 11
Level 11 Open Hand Monks are affected by Tranquility, giving them the effects of the Sanctuary spell whenever they finish a long rest. Sanctuary does go away if you attack though, which by the way your Martial Arts die increases to a d8 at this level.
LEVEL 18 - MONK 12
12th level Monks get another Ability Score Improvement and you have a few options: Constitution will increase your health and the effectiveness of your fire breath as well as help you keep your concentration on Fly, Wisdom will increase your AC and make your Open Hand techniques / Stunning Strike harder to resist, and Charisma will let you roleplay the captain better and give you better attacks with your fire magic. And of course if none of those appeal to you feel free to take a Feat instead: this build is just a suggestion and you’re welcome to change it however you want.
LEVEL 19 - MONK 13
Level 13 Monks get Tongue of the Sun and Moon, allowing you to speak and understand all languages. I’m sure the translators have already localized you for every region: they certainly have China down!
LEVEL 20 - MONK 14
Level 14 Monks get our final Unarmored Movement increase, bringing your movement speed up to 55 total. Reminder that this is 5 under your speed if you cast Fly.
But more importantly you get Diamond Soul as your capstone, giving your proficiency in all saving throws! This is insanely useful for keeping your Concentration on Fly, and now your lowest saving throws should be a +6 while your highest saving throw (still Dexterity) is at a whopping +11! 鑽石堅不可摧!
FINAL BUILD
PROS
迅速的火焰 - You have an immense amount of mobility with 55 feet of movement that can go across water and along walls as well as the ability to quickly get on your feet and jump into the action. And if worse comes to worse you can fly!
四分之一圈 沖床 - Unlike most Monks you have quite a few good ranged options, and even though you’re best in melee you’re not above some projectile spam like Velvet.
像馬一樣健康 - You have quite a bit of sturdiness to you. Good AC, proficiency in all saving throws, 9 Temporary Hitpoints whenever you strike an enemy down, and Wholeness of Body giving you a 42 HP pickup when needed.
CONS
冰很好 - All your damage is either bludgeoning or fire. Remember that you are allowed to take spells that are less roleplay-focused if you want to do better in the mirror match.
你一定是 MAD - The Warlock dip makes an already MAD (Multi-Ability Dependent) class even MADder. This build requires Dexterity, Wisdom, Charisma, and Constitution is also good to have. See if you can grab some Ioun Stones, stat tomes, or a better initial stat array; because damn you’ll need it.
英雄不孤單 - The truth is that while the Warlock dip is nice to throw Fireballs we really don’t need flight from the Fly spell. If you have an Artificer or a cool DM you can easily get either a pair of Winged Boots or the Wings of Flying to give you the flight speed. And even then as a Monk you truthfully have more than enough mobility to not need flight on top of it.
But self-sufficiency isn’t a weakness. Of course a general is nothing without an army, and while Foenum may rule one-on-one combat the rules are different in the forgotten realms. Command your troops and take the frontline to fight the predators back! Just know when to take a loss and call it quits: no one likes a salty dragon-horse.
(Artwork by kompy on DeviantArt)
#DnD 5e#dnd build#dnd guide#dnd monk#dnd#them's fightin' herds#tfh#Tianhuo#them's fightin' herds Tianhuo#tfh Tianhuo#longma#ungulate
10 notes
·
View notes
Text
rainyluneblogs replied to your photoset “I’m lowkey weirdly drawn to Star-Crossed Myth despite only playing...”
@shadowfairyy this loooks sick as hell?????? how did you do that effect please teach me your ways
adjsjsj thank u for asking i spent way longer than needed on those effects and I am ITCHING to TELL MY TALE OF TRIALS AND TRIBULATIONS
okay to preface this: there is Absolutely a better, more efficient way to do this, maybe with something like after effects? i don’t have that ‘cause its a trillion dollars but there’s probably alternatives but also I was Too Lazy to learn something new but not too lazy to spend 2 hours tryna fudge it with my trusty drawing program clip studio paint and also a copy of photoshop
so like..,, i drew the drawing right? the bishounen freaking out in the foreground, the space-y background in the..background (i used some default pastel type brushes just really big and some constellation brush i got off clip studio assets and just went ham qwq i have no restraint with fun brushes im like an 8 year old with kid pix)
i used one of my many, many glittery effect brushes to make slap some on a layer between the background and foreground and also on a layer on top of it all, this brush was like, glowing shards? random glowing shapes, i thought it looked neat, i got it off clip studio assets but if you use another program you can probably find similar brushes or resources for other programs~ or if you really wanted you could draw it all in yerself lol
I gave a little buffer space all around the drawing, so like theres this blank space surrounding it where the shards keep going, this was so when they move they dont get cut off lol
what i did was i opened it in photoshop to make an animation (still havent learned the clip studio animation features lol, i think fire alpaca has some pretty good animation stuff tho so thats an alternative!) and like
so each frame i just
shifted the glowing shard layers up or down (i made the two layers go in different directions ‘cause i thought it looked cool) by one single arrow key press
each frame
i did it manually
sobs
15 frames each colour so it wasnt too bad
here’s what the timeline looks like!

so yeah theres definitely better ways to do that but this...is what i did
for the transition frams between colours i just used a motion blur effect, i think both clip studio and photoshop have it, sai probably has it too? i remember gimp having it, not sure about fire alpaca its been a minute since i used that one
but yeah just a motion blur lol
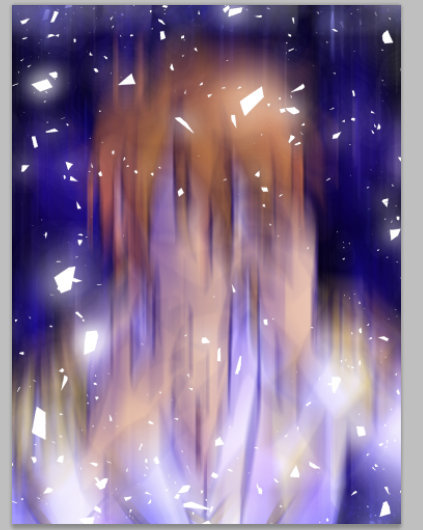
he must go.... his planet needs him
the framerate was consistent throughout, i think it might be like 12fps? 30fps? i chose no delay for the timing on photoshop I don’t know what that is in real person words
and then i just cropped out that buffer space i added earlier~
and BAM it was done
the actual full sized gif file was wayyy bigger than the one i uploaded to tumblr so i made it like a quarter of the size but if you wanna watch yer internet Beg For Mercy as it attempts to load a 25mb gif here’s the link to it on my dA~
OH i almost forgot, in the background glowing shard layer, I went at some of the shards with an airbrush shaped eraser tool with the opacity real low so I could make some of the shards look like theyre fading into the distance
atmospheric perspective babey
if you wanna try something similar I’d recommend not being like me and instead learning some kinda aftereffects type program or something BUT if yer determined all you need is yer draiwng program of choice and access to a copy of photoshop OR
oorRR this might be even more tedious but you could use just firealpaca and alpacadouga ‘cause its free and really good in my opinion (i used to use it before i got csp), or if you wanna use a different drawing program that doesnt have an export each layer as a separate image button theres this little free tool i like called grimace for exporting a bunch of images from one psd that i adore, its supposed to be for visual novel assets but I use it for all kinds of things now lol
i guess the moral here is you can do all kinds of professional looking stuff with just what you got on hand or maybe some little freeware things (and a few hours) if yer determined enough qwq
the other moral is that im crazy
#rainyluneblogs#reply#also thank u im very proud of that drawing qwq#i dont draw cool stuff enough but its so much fun ahghHH
16 notes
·
View notes
Note
What do you use to do your sketches, I've been wanting to start drawing online buy I don't really know where to start. Also do you know any good free art programs for beginner artists? If not that's fine, happy (like 5 days late xD) new year.
Well, let’s see...
I use a Wacom Cintiq 13HD pen display as well as a Wacom Intuos Pro tablet. You don’t want to start this big tho, since these tablets are quite expensive, you wanna build up your workplace slowly, over time. I’d definitely go with wacom tho. There are other brands, you might want to look into them, but wacom makes very solid tablets, you usually can’t go wrong there. You could also buy them second hand (both my tablets were cheaper cause they were used already, but they are in very good shape, almost new) to save some money, but you have to be careful with that so you don’t get scammed or buy a broken tablet.
The best free art program I’ve heard of is Krita. There’s also Fire Alpaca, I think? And GIMP ( I used to use gimp when I was still only trying out digital art. I’m not sure how much it developed over time, but I didn’t like it much back then...)I use Photoshop. Paint Tool Sai is probably the best for digital art. Clip Studio Paint is another good program I think.You can also draw with an iPad Pro, there are a lot of free apps for drawing.Not sure about android, I think Samsung once made a tablet that’s pretty good for drawing? Galaxy-Note-something, maybe. But I think they discontinued that line.Anyways, I hope I could help! Don’t be afraid to ask if you have more questions!

Oh and a happy new year to you as well!;)
24 notes
·
View notes
Photo


Time for another batch-answer!! Sorry if this is impersonal but I didn’t want to spam people’s dashes!!
1. Yes I like to try and avoid white backgrounds when I can! Even if it’s just a simple block of colour.
2. This is a FAQ - I use Fire Alpaca, which is amazing and free for the PC and Mac. I’m not sure if it works on a Chromebook but I assume it does? You could also try Medibang Paint which is very similar and also free!
3. Congrats!!
4. My animation professors have told me that if you’re doing it properly you actually should lose track of time - something about using the right brain. References are ESSENTIAL to creating accurate art, so yes, they are extremely helpful and I’m glad you’re using them!!! DAPGO is a treasure trove :D
5. Yes I think you should post your art!! People will give both negative AND positive feedback - I believe you have to receive constructive criticism to grow as an artist. That’s literally all that working in a studio or for clients is - creating your stuff and then getting revisions (but it has to be constructive, not just empty feedback like “that sucks” or “that’s great”). Please read these posts on self-esteem!
6. Haha I love that phanime, and I’m so grateful @arctoids let me collaborate with her for the third episode!!
7. Hello! Thanks :D There are some ideas on this art challenge list I made here: http://incaseyouart.tumblr.com/post/155100106331/31-art-challenges
8. See answer 5! And don’t focus on notes/likes/social currency so much as creating stuff for YOU and your friends - if you genuinely are happy about the stuff you share, then people will enjoy it more, seeing you’re happy.
9. Thank you!! I have had a lot of practice drawing Phil hahah~
10. My favourite thing about being an artist is creating my own content - like, not original characters because mostly I draw fanart - but seeing inspirational things (like Dan and Phil), having a vision in my head, and being able to translate that vision into something visual.
11. HAHA DID YOU JUST ASK ME FOR EDITING TIPS?! Basically just practice with timing I guess? I’ve been editing videos for like, 10 years now, with various software (Adobe Premier, iSkysoft, Windows Movie Maker, and recently iMovie which is the best ever omg) and each time I learn more about how to cut clips and time them to music, how to add in sound effects, change opacity of the clips etc.. I’ve kind of just been learning it all on my own slowly - I’m sure there are tutorials on Youtube!!
12. It’s okay to take a break! Here’s my advice about getting over art block.
13. http://incaseyouart.tumblr.com/tagged/watercolour%20tips I’ll try to make a video soon!
14. I’m glad you’re feeling better and that I could contribute to that :D Thank you! Have a good one ^_^
15. Try some of my art challenges!!
16. Can you go out to a cafe or maybe a library or some other public venue with table space?
17. Wacom Intuos Draw (Small) is what I use (see my tags about drawing tablets here)
18. Being able to critique your own work is an essentially critical skill to growing as an artist. But you have to balance self-critique with positive feedback - try to find two things good and one thing you need to work on. For example maybe the head and eyes are really well drawn, but you can work on the hands? Seeing your mistakes and then knowing how to correct them is a REALLY really good skill, NOT a bad habit. For tutorials on shading, Google has some good ones - the most important thing is figuring out your light source(s), and knowing the physics (plane changes) of whatever you’re drawing.
19. Yup pretty sure! If you scroll through all my palette challenges here you’ll see them~
20. Just drag & drop the image file directly into the software and it becomes a layer, and then lower its opacity - BUT I WOULD HIGHLY DISCOURAGE TRACING DIRECTLY FROM IMAGE. INSTEAD YOU SHOULD REALLY TRY TO REFER TO/COPY FROM AND MAKE IT YOUR OWN.
21. I would just use a mouse, personally!
22. So, with realism, it’s more difficult because there’s the expectation that all the details and proportions have to be EXACTLY accurate - as realistic as possible - and that takes a more time and patience than a caricature of a human figure/face. But, to accurate caricature something you need to be able to draw it realistically first. So in my opinion cartoon-style is both easier (you can communicate the same body language/emotions with less lines/detail) but also harder because you need to have everything be SIMPLE but also ACCURATE.
23. I often think a sketch looks better than the lineart because with a sketch you are more free as you draw - it is messy but also all the lines flow well and it just looks more organic. When you focus on making the lines perfect or cleaner you lose some of that organic flow. My suggestion would be to do an extra step in between the sketch and finished lineart - so draw your image 3 times - sketch, rough lineart, clean lineart. It might help transition your cleaned version a bit better!
24. Break down the figures into LINES OF ACTION and basic shapes before adding ANY detail at all. Check out my life drawing gestures here!
25. Aaaah sorry I hope I answered in time - regardless of medium you have to break down the face into basic shapes and guidelines before adding any details. Charcoal can blend really well to shade easily!
26. When I have time, yes!
27. Just a simple “hello” would do, I think! That way the person on the other end can greet you back, and then you’ve established a connection without the pressure of thinking of any topics of conversation - you could put the ball in their court, so to speak. Also you could just like and reblog a bunch of content you like, and leave nice comments!
28. Haha I don’t know if any of it is natural talent - it took me 14.5 years of almost constant practicing to get to where I am now!
29. Yay, more fanart!! ALL THE ART!
30. Oh my God thank you that’s so sweet (this makes me think of what people say about Phil Lester because he’s such a ray of sunshine <3)
31. It’s okay to take breaks! Step away from drawing for a while and just write a story, or read, or play outside, or do a sport, or anything else you like! Don’t force yourself to draw!
32. Watch my video on self-esteem for artists and hopefully it’ll motivate you: https://www.youtube.com/watch?v=_5AjCbYrPlk&t=95s You’ll only get better at a skill if you practice it :D
33. I would just get the better drawing tablet first if you can afford it - unless the cheaper one is a good brand like Huion or Wacom!
34. You are improving if you use references, trust me. An easy way to see improvement is looking back at your old art, and maybe redrawing it?
35. Yay! Yeah tools can be common amongst artists - it’s just the level of practice and time put in :D
36. It can take a while to gain a strong following, but keep doing what you’re doing and people will come!!! Keep creating and sharing with the world :D
Thanks for all the asks guys~
44 notes
·
View notes
Last Seen Blogs

itsa-revalution
no envy, no fear

simbalite
Stage Lighting Factory

drtrig
Wet Trout/Wizard Trig/Wretched Thing

grotesque-arugula-memes
Jesus Ain't Gonna Save Ya Now

growthanyalasis
Untitled