#increase website speed
Text
WordPress Speed Optimization without GPL Nulled Or Paid Plugin
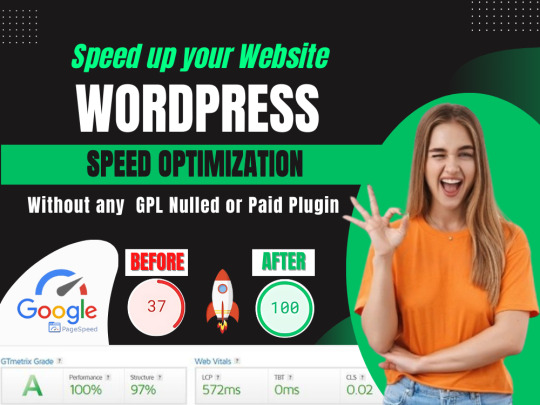
Are you using GPL or Nulled plugins for website optimization? GPL or Nulled plugins are very Harmful to websites. There is a lot of possibility of hacking the site. I will do WordPress website optimization for you without GPL, Nulled, or any Paid Plugin.
My name is Saiful Ahmed, and I specialize in WordPress website speed optimization. I trust this message finds you well. I've been following your agency's exceptional work in the WordPress sphere, and I'm reaching out to explore the possibility of a partnership that could bring added value to your clients.
Here's how we can collaborate:
✅ Comprehensive Speed Analysis
✅ Customized Optimization Plan
✅ Image Optimization
✅ Database Optimization
✅ Caching Configuration
✅ Server Optimization
✅ Content Delivery Network (CDN) Integration
✅ Performance Testing and Monitoring
✅ Guaranteed Results
Thank you for considering this proposal. I look forward to the possibility of working together to elevate your agency's offerings and deliver exceptional results for your clients.
#wordpress speed optimization#website speed optimization#page speed optimization#increase website speed
2 notes
·
View notes
Text
Top 10 Tips on How to Increase Website Speed
While using Website Speedy is a great idea, it’s always better to have an idea of things you can do on your part to boost your website loading speed. In this article, we will explore the top 10 tips to increase website speed, diving deep into each strategy and explaining why they matter for your website’s performance.
Read full article - https://websitespeedy.com/blog/tips-on-how-to-increase-website-speed/
0 notes
Text
10 Ways to increase website speed
Those are excellent suggestions for improving website speed! Here’s a detailed breakdown of each point along with some additional tips:
Minify JavaScript and CSS Files: Minification reduces the size of JavaScript and CSS files by removing unnecessary characters like comments, whitespace, and newline characters. This can significantly decrease file sizes and improve load times.
Asynchronous Loading of JavaScript and CSS Files: By loading JavaScript and CSS files asynchronously, you allow other elements of the webpage to load simultaneously. This prevents these files from blocking the rendering of the page and enhances overall speed.
Defer Larger Size Elements: Large elements such as images, videos, and other media files can slow down website loading times. By deferring their loading until after the initial page content has loaded, you prioritize critical content and improve the perceived speed of your website.
Media Compression: Compressing images and videos reduces their file sizes without sacrificing quality. This can be achieved using various compression techniques or tools, resulting in faster loading times for media-rich webpages.
Convert Images to Next-Generation Formats: Next-generation image formats like WebP offer superior compression and quality compared to traditional formats like JPEG and PNG. By converting images to these formats, you can further reduce file sizes and enhance website speed.
Enable Browser Caching: Browser caching allows web browsers to store static resources (such as images, CSS, and JavaScript files) locally, reducing the need to re-download them each time a user visits your website. This improves loading times for returning visitors.
Apply Content Delivery Network (CDN): A CDN distributes your website’s static content across multiple servers worldwide, allowing users to access it from a server closest to their location. This reduces latency and improves loading times, especially for users located far from your server.
Optimize CSS: Optimizing CSS involves reducing redundancy, removing unused code, and organizing stylesheets to improve efficiency. This streamlines the rendering process and accelerates website loading times.
Enable Lazy Loading: Lazy loading delays the loading of non-critical resources (such as images below the fold) until they are needed, typically when a user scrolls down the page. This conserves bandwidth and speeds up initial page load times.
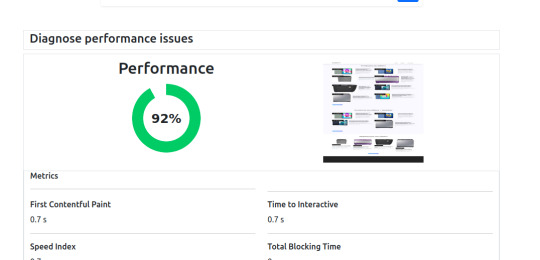
Regular Monitoring of Website Speed: Continuous monitoring of your website’s speed using tools like Google PageSpeed Insights or GTmetrix helps identify performance bottlenecks and allows you to implement further optimizations as needed. Regular monitoring ensures that your website maintains optimal speed levels over time.
By implementing these strategies and periodically evaluating your website’s performance, you can enhance its speed and provide users with a smoother browsing experience.
#increase website speed#technical seo#seo tips#seo expert#website traffic#page speed#seo services#seo marketing#smm services
0 notes
Text
How To Speed Up Our Website.
In the fast-paced digital era, the speed of your website can make or break the user experience, influencing visitor satisfaction, search engine rankings, and ultimately, your online success. Slow-loading websites lead to higher bounce rates, frustrated users, and missed opportunities. Fortunately, there are several strategies and best practices to speed up your website and ensure it operates at peak performance.
1. Optimize Images:
Large, uncompressed photos are one of the main causes of websites loading slowly. Compressing your photos can optimize them without compromising quality. Use WebP or JPEG image formats, and use lazy loading to load images only when they enter the user’s viewport.
2. Leverage Browser Caching:
Enable browser caching to store static files (such as images, stylesheets, and scripts) on a visitor’s device. This reduces the need for the browser to reload these elements upon returning to your site, resulting in quicker load times for repeat visitors.
3. Minimize HTTP Requests:
Every element on a webpage, whether it’s an image, script, or stylesheet, requires an HTTP request. Minimize the number of these requests by combining files and using CSS sprites to create a single image containing multiple graphics. This reduces the load on your server and speeds up page rendering.
4. Implement Content Delivery Network (CDN):
A Content Delivery Network distributes your website’s static assets across multiple servers worldwide. This ensures that users receive content from the server closest to them, reducing latency and improving load times. Consider using a reputable CDN service to boost your website’s performance.
If you want to know "How To Make Website".Then you can visit my original blog. The link has been provided below.
5. Optimize Code:
A website that loads quickly needs code that is clear and effective. Take off all extraneous line breaks, comments, and spaces from your JavaScript, HTML, and CSS files. Reduce the size of your files with technologies like minification to make them easier to download and parse.
6. Prioritize Above-the-Fold Content:
Prioritize loading critical, above-the-fold content first to give users a faster initial experience. Delay the loading of non-essential elements further down the page using asynchronous loading or deferred scripts. This technique, known as “lazy loading,” allows the essential parts of your page to load quickly, enhancing user engagement.
7. Upgrade Your Hosting Plan:
Ensure that your hosting plan aligns with your website’s traffic and resource requirements. Upgrading to a faster server, opting for a dedicated server, or considering managed WordPress hosting can significantly improve your website’s speed. Choose a hosting provider that offers fast and reliable servers.
8. Enable Gzip Compression:
Enable Gzip compression on your server to reduce the size of your web pages and stylesheets before sending them to the user’s browser. This compression technique can result in substantial bandwidth savings and faster loading times.
9. Reduce Server Response Time:
Optimize your server’s performance to reduce the time it takes to respond to a user’s request. Consider server-side caching, database optimization, and upgrading your server hardware or switching to a faster hosting provider to improve server response times.
10. Monitor and Analyze Performance:
Make sure you use tools such as GTmetrix, Pingdom, or Google PageSpeed Insights to regularly check the speed of your website. These tools offer recommendations for optimization as well as insights into areas that require work. Analyse performance indicators often in order to spot possible bottlenecks and take appropriate action.
In conclusion, speeding up your website is not just about improving user experience; it’s a strategic move for search engine optimization and overall online success. By implementing these techniques, you’ll not only enhance your website’s performance but also create a positive and efficient online environment for your visitors. Stay proactive in monitoring your site’s speed and make adjustments as needed to ensure a seamless and fast user experience.
1 note
·
View note
Text
The Importance of Website Speed for User Experience
When you go online, think about how fast you want sites to load. Most of us can’t stand waiting more than a couple of seconds. We’ve all gotten used to quick internet access, making our patience thin when things slow down.
Now, picture this: if your website takes over three seconds to show up, people leave in a hurry. They expect speed; not meeting that need means they might not come back. In the…

View On WordPress
#how to improve website speed#how to increase website speed#how to make website load faster#how to speed up my website loading#how to speed up wordpress website#how to speed up your website#increase website speed#optimize website speed#speed up website#speed up wordpress website#user experience#website speed#Website Speed for User Experience#website speed increase#website speed optimization#website speed test
0 notes
Text
Pagespeed
IDigitalWay Speed Tools is a free test and analyse tools using Google pagespeed Insight API.
Make Your Web Page Fast on all devices by following suggestion after analyse.
Pagespeed is an important factors in website success. Faster Pagespeed increase customer satisfaction, impach search Ranking
This Tools not only analyze performance of website but provide tools for minification of CSS and JSS.
It will also automatically analyze images and convert it to Next-Gen Webp Images.
Minified CSS
IDigitalWay Speed Tools will analyze CSS and minified it during pagespeed test
Minifying a CSS file implies the removal of unnecessary characters in the source code to reduce the file size and facilitate faster loading of the site.
Minification reduces the size of css file which makes your website load faster.
Minification will increase site speed and accessibility by decreasing load time
Mification enable user to surf website efficiently on lower bandwidth
Minified JS
IDigitalWay Speed Tools will analyze JS files and minified it during pagespeed test
Minifying a JS file implies the removal of unnecessary characters in the source code to reduce the file size and facilitate faster loading of the site.
Minification reduces the size of JS file which makes your website load faster.
Minification will increase site speed and accessibility by decreasing load time.
Mification enable user to surf website efficiently on lower bandwidth.
Next-Gen Images
IDigitalWay Speed Tools is a free tools to convert your images to Next-Gen Images[webp].
It will show option to download converted images after analyze.
Next-Gen images are highly compressed and quality images than JPEG and PNG.
Next-Gen images also support lossless compression,lossy compression and animated images.
iDigitalWay Tool will convert images in webp images which will be 25%-35% smaller then JPEG and also maintain quality.
#pagespeed#website performance#increase pagespeed#minified css#css#jss#minified jss#website load speed#page speed#website#website speed#webp#images to webp#next gen images
2 notes
·
View notes
Text
1 note
·
View note
Text
Boxing Training Course, Complete Workout Set - Precision Striking
Can I learn boxing online?
Yes, you can learn boxing online, but there are some important considerations to keep in mind. Learning boxing online can be a convenient way to start your training, especially if you don't have access to a local gym or experienced trainers. Here are a few ways you can learn boxing online:

Online Tutorials and Videos: There are numerous online tutorials and instructional videos available on platforms like YouTube. These videos can teach you basic techniques, footwork, and workouts. Many experienced boxers and trainers share their knowledge through these platforms.
Boxing Apps: There are several mobile apps designed to teach boxing skills. These apps often include video tutorials, workout plans, and even virtual coaching to help you improve your techniques.
Online Boxing Classes: Many websites and platforms offer live or recorded online boxing classes. These classes are often conducted by experienced trainers and can provide you with structured lessons and real-time feedback.
Virtual Personal Training: Some trainers offer virtual personal training sessions via video calls. During these sessions, a trainer can watch your form, provide feedback, and tailor the training program to your specific needs.
Boxing Forums and Communities: Engaging in online boxing forums and communities can also be a valuable resource. You can ask questions, participate in discussions, and get advice from experienced boxers and trainers.
However, there are limitations to learning boxing online. Boxing is a physically demanding sport that requires proper form and technique to prevent injuries. Without proper supervision, there's a risk of developing bad habits that can be difficult to correct later on. Moreover, boxing involves a level of physical contact and sparring that can't be fully replicated online.
If you're serious about learning boxing, it's highly recommended that you eventually find a local boxing gym or club where you can receive hands-on training from experienced coaches. They can provide personalized guidance, correct your form, and ensure that you're learning in a safe and effective manner. Online resources can supplement your training, but they are best used in conjunction with in-person instruction, especially as you advance in your skills.
#online boxing#box training at home#boxing training camp#best boxing techniques#how to increase punching speed#boxing training websites#defensive moves in boxing#boxing training camps
0 notes
Text
How to improve website speed
How to improve website speed
Title: Boost Your Website Speed: A Comprehensive Guide
Introduction
Website speed is a critical factor that directly impacts user experience, SEO rankings, and overall website success. In today’s digital age, users expect fast-loading web pages, and search engines like Google consider speed as a ranking factor. Slow websites can drive visitors away and harm your…
View On WordPress
#How to improve website speed#How to increase page speed Insights#page speed insights#Tools to check website speed#website speed test free#why my website is slow
0 notes
Text
Blogging 101 Do You Have a Blogging Addiction?
Subscribe to get access
Read more of this content when you subscribe today.
Subscribe

View On WordPress
#5 to 10 blogs a day#addiction#as a writer or blogger#blog addiction#Blogging 101 Do You Have a Blogging Addiction#blogging about topics#increase your speed in typing#increase your website traffic organically#increasing your audience organically#saving their lives#with one blog entry#would you help someone in need?#write clear concise content#write several times a day#write what your passionate about
1 note
·
View note
Text
How To Increase Shopify Website Speed: Shopify Speed Optimization
Doing so will yield great results on your site’s performance thus creating a seamless and enjoyable shopping experience for the customers. Let us discuss some effective strategies that you can employ to optimize website speed. Here, we will explore the good store speed score, how to check it, and techniques for boosting Shopify store speed.
Read full article - https://websitespeedy.com/blog/increase-shopify-website-speed-optimization/
0 notes
Text
#search engine optimisation company#seo agency#google ranking#increase your website speed#increase website traffic#organic ranking#off page seo#seo services#seo expert#seo comapny#local seo
0 notes
Video
youtube
Best settings for WP-Rocket plugin to achieve High GT Metrix score and website speed - eComHardyGet a discount when you purchase the WP-Rocket plugin from the below link. https://ecomhardy.com/wprocket You will receive an extra discount as follow; 10% OFF on Single license 15% OFF on Plus license 20% OFF on Infinite license In this video, I have explained the best settings in the WP-Rocket plugin for your WordPress Woocommerce website which will help you not only to achieve the best GT Metrix score but also boost the website speed. ------------------------------------------------------------------------------------------------ Part 1- How to make a website - Buy right Domain and Hosting https://youtu.be/y-JoRxhwhE8 Go to, https://ecomhardy.com/make-a-website All the steps with useful information are provided there. Part 2- Make a website- How to install WordPress on your website; https://youtu.be/t0E7_rp8LrY Bonus video: To know How to point the domain name servers to your hosting, check out the link; https://youtu.be/6UNA7AY-lxw Part 3 - How to install a theme on WordPress. https://youtu.be/inO0H4LPpNQ Thanks for watching. Consider subscribing.
#wordpress#woocommerce#elementor#dropshipping#ecommerce#ecomhardy#wp-rocket#best settings for wp rocket#how to increase the website speed#how to increase the speed of wordpress website#use wp rocket to speed up your slow page builder sites#wordpress speed optimization - how i got 100% gtmetrix scores#how to speed up your wordpress website#cache plugins#caching#cdn#cloudflare#core web vitals#wp rocket
0 notes
Text
Web Host Performance and Website Speed
Your website’s speed can make or break the experience for your visitors. Fast loading times, easy site flow, quick server replies, and well-set content delivery are key. These parts ensure users enjoy their visit from start to finish across all gadgets.
A slow site often means people leave fast which isn’t good for how they see your brand. Everyone likes a snappy website; it helps them get what…

View On WordPress
#how to increase website speed#how to make website load faster#how to speed up my website loading#how to speed up wordpress website#how to speed up your website#how to speed up your wordpress website#improve website speed#increase website speed#speed up website#speed up wordpress#speed up wordpress website#speed up your wordpress website#website speed#website speed optimization#website speed test#wordpress speed optimization#wordpress website speed
0 notes
Text
1 note
·
View note
Text

COLORING + SHARPENING TUTORIAL
someone asked for a coloring tutorial and my sharpening settings, so here it is! there are also a few tips to achieve more HQ gifs. :)
tutorial under the cut!
FOR HIGH-QUALITY GIFS
FILE SIZES
it doesn’t matter what your sharpening settings are if the file you’re using to gif is too low quality, so i tend to look for the best that i can get when downloading stuff.
usually, movies (+2h) look better if they’re 5GB or more, while an episode (40 min/1h) can look good with even 1GB. the minimum definition i try to find is 1080p, but i gif with 2160p (4k) when available. unfortunately, not every computer can handle 4k, but don’t worry, you can gif with 1080p files just fine if they are big enough. contrary to popular belief, size does matter! which means sometimes a bigger 1080p file is better than a smaller 2160p one, for example.
SCREENCAPPING METHOD
this can too influence the quality of your gifs. as a gifmaker, i’ve tried it all: video frames to layers, directly opening video clips, loading files into stack, and i’ve finally settled down with opening screencaps as an image sequence. with bigger files, it doesn’t matter much what technique you use, but i’ve noticed with smaller files you can do wonders if you screencap (either by loading files into stack or opening as an image sequence) instead of using video clips. for example, this gif’s original video file was only 4GB (so smaller than i’ve usually go for), if you can believe it!

here’s a tutorial for setting up and screencapping with MPV, the media player i use to screencap. again, you can keep using video clips for bigger files, but you’ll find this useful when dealing with dire causes. i don't file loads into stack, though, like the video does. i open as an image sequence (open > screencap folder > select any image > click the image sequence button). just select OK for the speed. this will open your screencaps as a video clip (blue bar) in timeline mode (i'm a timeline gifmaker, i don't know about you). you will need this action pack to convert the clip into frames if you're a frames gifmaker. i suggest you convert them into frames even if you're a timeline gifmaker, just convert them into a timeline again at the end. that way you can delete the screencaps right away, otherwise you will delete the screencaps and get a static image as a "gif".

ATTENTION if you’re a Mac Sonoma user, MPV won’t be an option for you unless you downgrade your system. that is, if you have an Intel chip. if you have M1 Max chip (or even a better one), here’s a fix for MPV you can try while keeping that MacOS, because nowadays MPV is skipping frames in its latest build. or you can use MPlayer instead for less hassle. here are two tutorials for setting and using MPlayer. Windows users are fine, you can use MPV without trouble.
FOR EVEN MORE QUALITY
ADD NOISE
here’s a tutorial for adding noise as a way to achieve more HQ gifs if your original material is too low quality.
REDUCE NOISE WITH CAMERA RAW
instead of adding noise, you can reduce it, especially if your gif is very noisy as it is.
the path is filter > camera raw > detail > nose reduction. i do this before sharpening, but only my video file isn't great to begin with. because it’s a smart filter, you can reduce or increase its opacity by clicking the bars next to its name in the layers panel.
TOPAZ AI
i use Topaz Photo AI to increase the quality of my screencaps when i need to. it’s paid software, but there are… ways to find it for free, usually on t0rrent websites. if someone’s interested, i can make a tutorial solely about it in the future.
SHARPENING SETTINGS
here are my sharpening settings (filter > sharpen > smart sharpen). i sharpen things twice: 500% 0.4px + 10% 10px. here's an action for it, for more convenience. here's a tutorial on how to use Photoshop actions. for animated stuff, i use this action pack.

COLORING
here’s the gif i'm gonna use as a base. it’s already sharpened like the way i always do it.

LIGHTNING THE SHOTS
half of the secret of a good coloring is good lightning. i always useCurves (layers > new adjustment layer > curves) and Brightness & Contrast (layers > new adjustment layer > brightness & contrast). the settings depend on the scene you’re giffing, but i always try make my gifs bright and with high contrast to make the colors pop.
CURVES
besides lighting your scene, the Curves adjustment layer has four automatic options that will color-correct it for you. it’s not always perfect and it doesn’t mean you won’t need to do further coloring, but it’s a great start. it’s a lifesaver for most ridiculously yellow scenes. look at the difference! this gif uses the 3rd automatic option (the screenshot below isn't mine btw so that's why the fourth option is the chosen one), from top to bottom. what automatic option you need to choose depends on the gif.


sometimes i like to tweak my Curves layer. not everybody does that, it’s not that necessary and if you’re not careful, it can screw your gif up. to modify your layer by hand, you will need to click and drag points of that straight line in the position you desire. this is the concept behind it:

basically, the lower part of the line handles the shadows, while the upper part handles the highlights of the image. if you pull a highlight point up, the image’s highlights will be brighter. if you pull it down, it will make them darker. same thing for the shadow points. you should play with it to get a grasp of it, that’s what i did when i first started giffing.
BRIGHTNESS & CONTRAST
then i added a bit of brightness and contrast.

CHANNEL MIXER
the scene looked a bit too yellow, so i used the Channel Mixer (layer > new adjustment layer > channel mixer) adjustment layer. here’s a tutorial of how it works. not every scene needs the Channel Mixer layer though, i mostly use it to remove heavy overall tints. in this particular case, the Curves layer got rid of most of the yellow, but i wanted the gif to be just a bit more blue so the Channel Mixer tweaks are very minimal.

SELECTIVE COLOR
now, this adjustment layer i always use: Selective Color (layer > new adjustment layer > selective color). this is THE adjustment layer to me, alongside the Curves one. this is how it works:

ie, you can separately edit a color this way, giving it tints. for this gif, i wanted to make the colors more vibrant. to achieve that, i edited the selected colors this way:

for the reds, i added even more red in them by moving the first slider to the right, making the color more vibrant. for his hat to have a more warm tint, i added yellow to the reds (third slider, moving it to the right). finally, to make the reds stronger, i moved the last slider to the right (more black).
for the yellows, i made them brighter by adding white to them, thus making the tile wall and Paddington more bright as well.
for the cyans and the blues, i just added the maximum (+100) of black that i could.
i wanted for Paddington's nose to be brighter, so i added more white to the whites.
lastly, i added depth to the blacks by increasing their own blackness.
you should always play with the Selective Colors sliders for a bit, before deciding what you want or need. with time, you will automatically know what to change to correct the color grading. it all takes practice!
HUE/SATURATION
i don’t know if you noticed, but there are some green spots on the blue wall behind Paddington. to correct that, i added a Hue/Saturation adjustment layer (layer > new adjustment layer > hue/saturation) and made the saturation of the greens 0%, making that unwanted green disappear from the background.

while the green spots on the wall are specific for this gif, i use hue/saturation a lot to tweak, well, hue and saturation. sometimes someone’s skin is too yellow, i made it redder by tweaking the reds and the yellows, or vice-versa. the hue bar follows the rainbow bar, so the maximum settings (+100 and -100) give the selected color to change its hue to something more red or pink (the rainbow extremities). changing hue can give pretty whacky results, like turning someone’s skin tone to green, so you will need to play with it to get the hang of it. you can also tweak the opacity of your hue/saturation layer to further improve your gif’s coloring. i didn’t do it in this case, the opacity is still 100%. the reds and the blues had their saturation increased to make them pop just a bit more, without affecting the other colors.
COLOR BALANCE
the highlights of the gif still had a green tint to it due to the automatic correction of the Curves layer, so i used Color Balance. this is how it works: instead of giving specific colors some tints, you can give them to the shadows, highlights, and mid-tones. if your shadows are too blue, you counterbalance them with the opposite color, yellow. same thing with the cyan-red and magenta-green pairings. in my case, i added a bit of magenta.


B&W GRADIENT MAP
now, if this gif was a dish, it’s time for the salt and pepper. i always add a Gradient Map (layer > new adjustment layer > gradient map) (black to white gradient) with the Soft Light blending mode, thus giving my shadows more depth without messing with the mid-tones and highlights. it also doesn’t “deep fry” (you know those memes?) the gif too much by adding even more contrast. usually, the opacity of the layer is between 30% to 70%, it all depends on the gif. it always does wonders, though!

COLOR FILTER
finally, i like to add Color Filters (layer > new adjustment layer > color filter) to my gifs. it’s very handy when giving different scenes for the same minimalistic set because it makes them kind of match despite having completely different colors. in this gif’s case, i added a “deep blue” filter, opacity 50% density 25. you can change the density and the opacity of the layer for further editing, again, it all depends on the gif.

VIBRANCE
if i feel like it, i add a vibrance layer (layer > new adjustment layer > vibrance) to make the colors pop. this can ruin your coloring sometimes, especially when regarding skin color, so be careful. i didn't do it in this gif because i felt i didn't need it.
TA-DA! 🥳
AN OTHER EXAMPLE
the color grading of the original scene it’s pretty good as it is, to be honest. let’s see a worse scenario, a VERY yellow one:


no channel mixer this time because the automatic curves option dealt with the yellowness, but you can see it made the gif too green. i needed to correct that with the following adjustment layers:
curves (automatic option) (gif 2) >> same curves layer (tweaks) (gif 3) >> brightness & contrast (gif 4) >> hue/saturation (tweaked cyan+blue+green) >> selective color >> color balance (gif 5) >> b&w gradient map >> (sepia) filter >> vibrance (gif 6)
i added a hue/saturation layer to remove the blues & greens before my selective color layer because i thought that was more urgent than tweaking the tint of all colors. color balance (gif 4) was the real hero here, though, by removing the green tint. the selective color layer was meant to make the red pop more than anything else, because the rest looked pretty good, especially her skin tone (despite the green tint). you can notice that tweaking the curves layer (small gif 3) also helped A LOT with the green problem.
tl;dr 😵💫😵💫😵💫
here's a list of my go-to's while coloring and lightning gifs. it's not a rule, just a guide. there are gifs in which i don't use all these adjustment layers, or use them in a different order. it all depends!
1. curves (automatic option + tweaks)
2. brightness & contrast
3. channel mixer
4. selective color
5. hue/saturation
6. color balance
7. b&w gradient map
8. color filter
9. vibrance
i'll suggest that you study each adjustment layer listed for more info, either with other Tumblr tutorials or YouTube ones. the YouTube ones focus on images, but you can translate what they teach to gif making very easily. you can ask me to further explain any adjustment layer, too! i was brief to keep this short (which i kinda failed lol).
feel free to ask me for clarification or something else about gifmaking wise, i always like to help. ❤️
#*#*tutorials#gifmaker tag#resources#resource: tutorials#ps help#uservivaldi#tuserjen#userrin#userelio#useralien#userzaynab#userchibi#userbuckleys#usertj#userbess#tuserlucie#useraljoscha#userdavid#usershreyu#usernolan#userhallie#userisaiah#tusergio#tusergeo#userjesslynn
540 notes
·
View notes
Last Seen Blogs