#input binding tutorial
Explore tagged Tumblr posts
Visit Tumblr Blog
Explore Tumblr blogs with no restrictions, modern design and the best experience.
Last Seen Tumblr Blogs


Fun Fact
Tumblr has a 66 index score for customer satisfaction in the US.
Text
BG3 Photomode Tutorial #3: Otis_Inf Camera Tools
Chapter 0: Overview
Chapter 1: Script Extender Debug Console
Chapter 2: Scene Manipulation
Chapter 2.5: More Scene Manipulation
Chapter 3: Otis_Inf Camera Tools
Supplement: Mods and Resources
Instead of talking about ReShade, I'm going to talk about the awesome Otis_Inf BG3 Camera Tools. These will allow you to pause the game, move the camera around, and add some depth of field effects using ReShade and an addon.

If you want to know about ReShade and basically have a video version of what I'm going to cover, check this video here. This video is where I learned pretty much everything about these tools. If you like watching over reading, go for that!
What you need to use these tools:
ReShade - @moriarfer reported some issues with 6.4.1 (latest as of this post) and downgraded to 6.3.3 to resolve that issue. If you're worried, download from that 6.3.3 link (links to the ReShade site.) Either way, you should grab the "Addon" version for IGCS.
Otis_Inf Baldur's Gate III Photomode Tools v1.0.23 (latest as of this post) - It's behind a Patreon for $5.50 USD a month. Note that sometimes it breaks after a major update and Patch 8 is Soon (tm) so ... buyer beware.
IgcsConnector - note that when you install ReShade, you can select IgcsConnector as an addon when you go through the wizard. However, you can also download it from here: IGCS Connector - I personally use v2.5.1 but 2.5.2 should be fine if you're running ReShade 3.x. If you're running ReShade 4.x, go for 2.5.3. Scroll to the bottom to see your options.
Installing ReShade
For installing ReShade, I recommend that video, but the Wizard guides you through it pretty easily. If you don't know what shaders to get, stay tuned for another post on that. There is one configuration you may have to make if you've never got ReShade working in BG3 before, and that's the Depth settings.
Installing IGCS
The video also covers IGCS but truth be told, it's easy to install manually if you didn't do it with the ReShade Wizard. Download that zip for IGCS and extract it to your Baldur's Gate folder. If you installed ReShade with the wizard, it will likely have a structure like I have. If you didn't, it may be slightly different.


ReShade Depth Settings
When you run ReShade for the first time in BG3, you may need to configure the Depth settings. This is easy to do if you have the DisplayDepth shader installed. It should be installed by default, if I recall.
Toggle that on and check your settings: just make sure that the Reshade Depth Input is Reversed. You can check if it looks okay - a setup with characters in a foreground should look like this while DisplayDepth is toggled on:

Make sure to uncheck DisplayDepth when you're done so the game looks normal.
Camera Tools!
At last! The fun stuff!
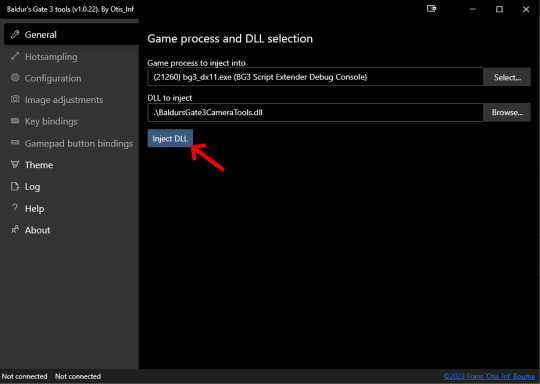
There's no "installing" them. You extract archive and you have a standalone program that injects code to unlock the camera. As such, it may be flagged as a virus by certain virus scanners. Be assured, if you got it from the Patreon, it is safe.
For best results, run the tools (IGCSClient.exe) after you've started BG3 and at least loaded the start menu. And then press Inject DLL. Once you do that successfully, the button will change from "Inject DLL" to "Re-Hook XInput".
I personally use the keyboard/mouse, but it is possible to configure the buttons with a controller under "Gamepad button bindings". I will not be teaching you that, however.
Let's start with the essentials to take a single shot. I use the default keyboard settings so I'll be using those.
You can start a scene or just find a nice place or animation in the game you like and set up a shot. Once you find a shot you like, press 0 on the NumPad to freeze time.
I'm going to have my Tav, Coranzan, hug his sister, Z'ress so I'll pause it mid-animation so I can take as many shots as I like from as many angles as I like.
I've frozen time and the default camera shows this, which isn't particularly interesting to me.

Here's some default controls for your reference:
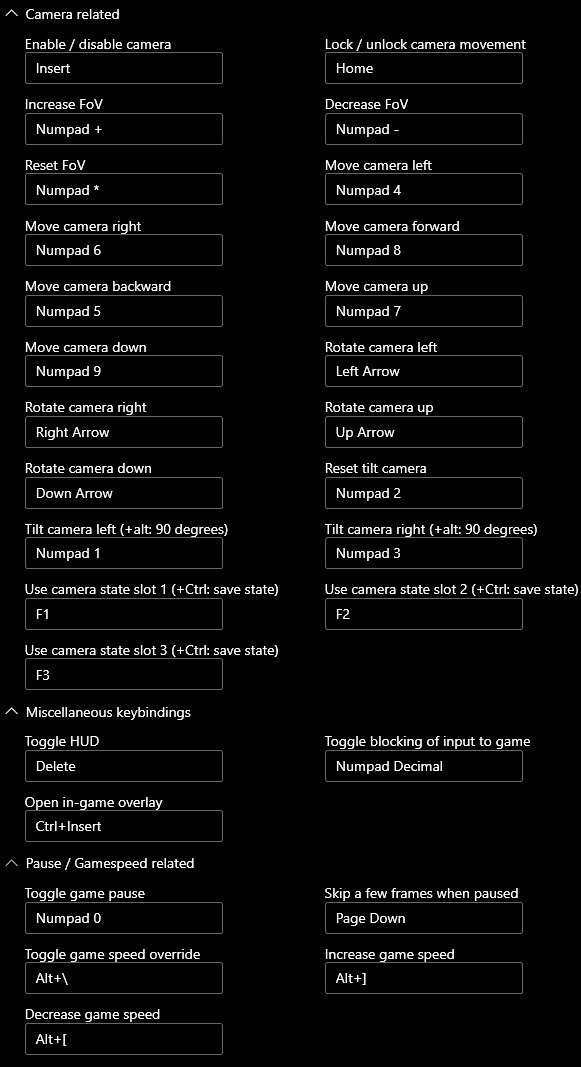
TL;DR:
8456 on NumPad is WASD
7 and 9 on NumPad is Up/Down
1 and 3 on NumPad Rotate Left/Right
2 on Numpad resets rotation
Up/Down/Left/Right arrows on Keyboard Rotate the Camera
NumPad + and - Increases and Decreases FoV
NumPad 0 Pauses/Unpauses
Delete on Keyboard Removes the HUD
So I let's press Insert to unlock the camera and used Up/Down/Left/Right arrows and 8/4/5/6 on NumPad to move the camera to their side.

This is okay, let's work with this. I would like them to be a bigger focus in the shot. So I'm going to Increase the FoV with + on the NumPad until I get what I like. I'll have to adjust with a Arrow Keys and 8/4/5/6 NumPad as I do that.

Alright this is okay. Let's make the backdrop nice and soft. By default you need to open ReShade using Home. By default you should get something like this, which may vary depending on your settings - don't worry about that too much for now. For now got ahead and click on the Addons Tab and then click Start depth-of-field session.


Depending on the settings, your game might look really blurry - don't worry, that's normal:

Most of the settings I do not regularly change, so if you want to copy the numbers as a starting point and slowly modify them, you totally can. But this will get very long if I get into each of the settings. So here's my "quick and dirty" depth of field settings. Some settings like Blur Type may drastically increase the time that it takes to render a shot, as a heads up.
Let's focus on a couple numbers for now:
Max bokeh size: This is basically the amount of "blur" you want to add to distant objects. If you increase the number, the double-images get further apart. If they're VERY part apart, the background will be EXTREMELY blurry.
Focus delta x: This controls the plane where the image maintains focus. If you increase the number, the foreground characters/objects will slowly come into focus. If you go too far, they will lose focus again. So we need a tool to help us with that to ensure details stay focused: The magnifier.
Magnifier: Check Show Magnifier and adjust the location numbers to change its left/right, up/down values. Pick something to focus on like an eye or some other tiny detail. Now adjust the magnification factor to zoom in on that detail.
I know Coran's tattoo pretty well so I'm going to get these two points from his tattoo to line up:
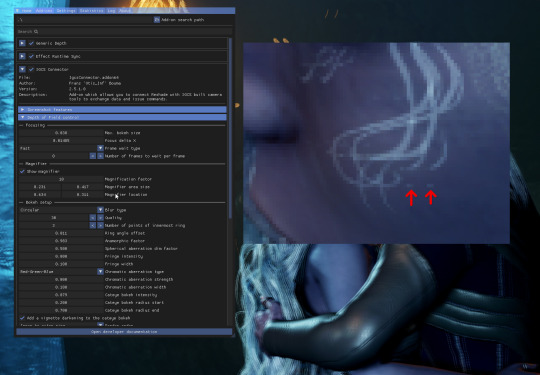
So I just need to modify the Focus Delta X to line them up like so:

Now that we've done that, we can see that their faces are nice and clear but there's double images for the fireflies and the like. These will become nice soft blurry bubbles when we render the shot.

So now you're going to want to click the Start Render button at the bottom of this section:

Once you click on that a bar should appear in the top left and the double-images should disappear. It should start blurring the background more as the meter increases.

And once it's done, you can simply press the ScreenShot key and it shoulder render a screenshot using ReShade. If I recall correctly, this will be the Baldur's Gate III executable folder, but if you click the Settings tab, you can change it.
The resulting screenshot should be nice and soft in the background and focused in the foreground with perhaps a bit of smoothing on features like hair:
Before rendering:

After rendering:

Some other options I'll go over briefly:
Hot sampling: This gives you the ability to resize the window beyond what you monitor can see for extremely high resolution shots. I generally don't do this unless I want to do a detail shot like an extreme closeup or some mark/scar or something.
Configuration: If it's taking you WAY too long to move the camera because you increased the FoV to zoom way in, slide the options in the left column around, it really helps.
Image Adjustments: check Higher LODs for distant objects to have better rendering.
And that covers most of the tools. I may add another couple supplementary posts after this of some mods that I use and the shaders that I use in ReShade.
But for now, I believe I have at least briefly covered the major points, but it could be that I've glossed over some details. If you're struggling, please let me know.
Thanks for reading! Please send me any questions and I'll be happy to help in the comments, DMs, Discord, or whatever you need!
#mog's bg3 virtual photography tutorial#bg3 photomode#bg3 photography#bg3#bg3 virtual photography#baldur's gate iii#baldur's gate 3
32 notes
·
View notes
Text
API Vulnerabilities in Symfony: Common Risks & Fixes
Symfony is one of the most robust PHP frameworks used by enterprises and developers to build scalable and secure web applications. However, like any powerful framework, it’s not immune to security issues—especially when it comes to APIs. In this blog, we’ll explore common API vulnerabilities in Symfony, show real coding examples, and explain how to secure them effectively.

We'll also demonstrate how our Free Website Security Scanner helps identify these vulnerabilities before attackers do.
🚨 Common API Vulnerabilities in Symfony
Let’s dive into the key API vulnerabilities developers often overlook:
1. Improper Input Validation
Failure to sanitize input can lead to injection attacks.
❌ Vulnerable Code:
// src/Controller/ApiController.php public function getUser(Request $request) { $id = $request->query->get('id'); $user = $this->getDoctrine() ->getRepository(User::class) ->find("SELECT * FROM users WHERE id = $id"); return new JsonResponse($user); }
✅ Secure Code with Param Binding:
public function getUser(Request $request) { $id = (int)$request->query->get('id'); $user = $this->getDoctrine() ->getRepository(User::class) ->find($id); return new JsonResponse($user); }
Always validate and sanitize user input, especially IDs and query parameters.
2. Broken Authentication
APIs that don’t properly verify tokens or allow session hijacking are easy targets.
❌ Insecure Token Check:
if ($request->headers->get('Authorization') !== 'Bearer SECRET123') { throw new AccessDeniedHttpException('Unauthorized'); }
✅ Use Symfony’s Built-in Security:
# config/packages/security.yaml firewalls: api: pattern: ^/api/ stateless: true jwt: ~
Implement token validation using LexikJWTAuthenticationBundle to avoid manual and error-prone token checking.
3. Overexposed Data in JSON Responses
Sometimes API responses contain too much information, leading to data leakage.
❌ Unfiltered Response:
return $this->json($user); // Might include password hash or sensitive metadata
✅ Use Serialization Groups:
// src/Entity/User.php use Symfony\Component\Serializer\Annotation\Groups; class User { /** * @Groups("public") */ private $email; /** * @Groups("internal") */ private $password; } // In controller return $this->json($user, 200, [], ['groups' => 'public']);
Serialization groups help you filter sensitive fields based on context.
🛠️ How to Detect Symfony API Vulnerabilities for Free
📸 Screenshot of the Website Vulnerability Scanner tool homepage

Screenshot of the free tools webpage where you can access security assessment tools.
Manual code audits are helpful but time-consuming. You can use our free Website Security Checker to automatically scan for common security flaws including:
Open API endpoints
Broken authentication
Injection flaws
Insecure HTTP headers
🔎 Try it now: https://free.pentesttesting.com/
📸 Screenshot of an actual vulnerability report generated using the tool to check Website Vulnerability

An Example of a vulnerability assessment report generated with our free tool, providing insights into possible vulnerabilities.
✅ Our Web App Penetration Testing Services
For production apps and high-value APIs, we recommend deep testing beyond automated scans.
Our professional Web App Penetration Testing Services at Pentest Testing Corp. include:
Business logic testing
OWASP API Top 10 analysis
Manual exploitation & proof-of-concept
Detailed PDF reports
💼 Learn more: https://www.pentesttesting.com/web-app-penetration-testing-services/
📚 More Articles from Pentest Testing Corp.
For in-depth cybersecurity tips and tutorials, check out our main blog:
🔗 https://www.pentesttesting.com/blog/
Recent articles:
Laravel API Security Best Practices
XSS Mitigation in React Apps
Threat Modeling for SaaS Platforms
📬 Stay Updated: Subscribe to Our Newsletter
Join cybersecurity enthusiasts and professionals who subscribe to our weekly threat updates, tools, and exclusive research:
🔔 Subscribe on LinkedIn: https://www.linkedin.com/build-relation/newsletter-follow?entityUrn=7327563980778995713
💬 Final Thoughts
Symfony is powerful, but with great power comes great responsibility. Developers must understand API security vulnerabilities and patch them proactively. Use automated tools like ours for Website Security check, adopt secure coding practices, and consider penetration testing for maximum protection.
Happy Coding—and stay safe out there!
#cyber security#cybersecurity#data security#pentesting#security#coding#symfony#the security breach show#php#api
1 note
·
View note
Text
Blog Post 13: Testing Locomotion and Controller Settings
Research on VR locomotion methods led me to evaluate between retaining teleportation and adopting smooth joystick control mechanisms. The goal was to seek out smooth locomotion because it provided a more immersive experience after conducting tests through Unreal's VR template.
youtube
The configuration of Meta Quest controller input through the Enhanced Input plugin was another task I handled. The implementation process was complicated because pre-configured bindings interfered with one another until I managed to refine the response time by testing different setups.
Reference:
DrakeMakes (2023) UE5 VR SMOOTH LOCOMOTION | Unreal Engine 5.2 Tutorial + Environment Showcase. Available at: https://youtu.be/mLF1Jhg7WDY?si=fGFdm6HVIzwX6Cvd (Accessed: 8 March 2025).
PrismaticaDev (2024) Smooth Locomotion for Meta Quest in Unreal Engine. YouTube. Available at: https://www.youtube.com
#CreativeProjectDevelopment#APACHE#game design#hertfordshire#learning games#art#beingmughal#VR#game#virtual reality#vr games#video games#study blog#being#Mughal#University of Hertfordshire#Youtube
1 note
·
View note
Text
Blog Post 58: VR PROJECT: Movement System
In this brief blog, I’ll walk through the ongoing technical issues I’ve faced with the movement system in my VR project—specifically the teleportation system—and my current workaround plans.
VR Movement Not Working
There isn’t a huge amount of visual progress to show this week because most of my time has been spent troubleshooting the VR movement system. To put it plainly: the teleportation function just doesn’t work in my custom level.
What’s baffling is that the same teleportation system works perfectly fine in the default VR template level provided by Unreal Engine 5. However, as soon as I try to use it within my own project environment, it simply refuses to function—even though all relevant settings appear identical.

Despite several attempts to diagnose the problem (including comparing level settings, navigation meshes, and input bindings), I’ve been unsuccessful in resolving it.
Plan Going Forward: Custom Movement Blueprint
youtube
Due to the persistent issues with teleportation, I’ve decided to create my own custom movement blueprint, likely based on tutorials available on YouTube. My aim is to use thumbstick-based locomotion instead of teleportation, which I believe will offer smoother control and greater compatibility within my project’s current architecture.
While not ideal, this workaround may give me more flexibility in designing how the player moves through the environment.
Meta Quest 2 Setup Struggles
youtube
One more thing I want to highlight—setting up Meta Quest 2 for Unreal Engine has been an absolute grind. The process is not beginner-friendly at all and involves multiple steps across different platforms (Oculus developer mode, OpenXR setup, Unreal plugins, Android SDK configs, etc.). To make things worse, there's no comprehensive, up-to-date guide that walks through the setup cleanly from start to finish.
So, while the movement system isn't functional yet, just getting the headset running and the project building properly in VR is a monumental win in my book. It may not feel like a visible milestone, but it definitely is a technical one.
RESOURCES USED:
Interactive Entertainment Group, Inc. (2023). Interactive Entertainment Group, Inc. [online] Available at: https://interactiveparty.com/product/vr-beat-saber/.
Darktide (2022). Warhammer 40,000: Darktide - Official Website. [online] Available at: https://www.playdarktide.com.
Owlcat.games. (2025). Warhammer 40,000: Rogue Trader. [online] Available at: https://roguetrader.owlcat.games [Accessed 13 Feb. 2025].
Apache.co.uk. (2018). Apache: BARDO Virtual Reality Experience | APACHE. [online] Available at: https://apache.co.uk/work/bardo/ [Accessed 13 Feb. 2025].
Stealthoptional.com. (2023). Darktide error code 3001 - how to fix ‘Failed joining server’ error. [online] Available at: https://stealthoptional.com/article/darktide-error-code-3001-fix-failed-joining-server-error [Accessed 13 Feb. 2025].
DiSalvo, P. (2021). The Best Eldritch Invocations In Dungeons & Dragons. [online] TheGamer. Available at: https://www.thegamer.com/dungeons-dragons-best-eldritch-invocations/ [Accessed 13 Feb. 2025].
to, C. (2024). War in Heaven (Necron). [online] Warhammer 40k Wiki. Available at: https://warhammer40k.fandom.com/wiki/War_in_Heaven_(Necron).
Focus-entmt.com. (2023). Space Marine 2 - Focus Entertainment. [online] Available at: https://www.focus-entmt.com/en/games/warhammer-40000-space-marine-2.
hbitproject (2023). Mastering details in Blender - trim sheets tutorial. [online] YouTube. Available at: https://www.youtube.com/watch?v=1M-GNe_pB9M.
Sketchfab (2022). Sketchfab. [online] Sketchfab. Available at: https://sketchfab.com/3d-models/spartan-helmeta391427a539e40788432e84835e62e3a [Accessed 10 Mar. 2025].
Sketchfab (2017). Sketchfab. [online] Sketchfab. Available at: https://sketchfab.com/3d-models/ak47-weathered9d3315806e524acf8f411a9c22442cf6 [Accessed 12 Mar. 2025].
Sketchfab (2023). Sketchfab. [online] Sketchfab. Available at: https://sketchfab.com/3d-models/military-artillery-gun-low-poly-from-scandc18a91f8cee48a5ba6f992cca167131 [Accessed 10 Mar. 2025].
Sketchfab (2020). Sketchfab. [online] Sketchfab. Available at: https://sketchfab.com/3d-models/war-hornc0bd664d2b9e41398862a2c1c1831cdb [Accessed 10 Mar. 2025].
0 notes
Text
Unlocking the Power of Angular: A Guide to Modern Web Development
Introduction
Angular is a cutting-edge web development framework designed by Google to build interactive and high-performance web applications. As an advanced front-end technology, Angular offers a structured approach to application development, making it a go-to choice for developers worldwide.
What Makes Angular Stand Out?
Angular is a TypeScript-based framework that facilitates the creation of robust and scalable web applications. With its powerful tools and features, developers can efficiently build dynamic single-page applications (SPAs) that offer a seamless user experience.
Core Features of Angular
1. Component-Driven Architecture
Angular applications are built using a component-based structure, where each component is a modular and reusable unit. This promotes better organization, maintainability, and scalability of applications.
2. Efficient Data Binding
Angular employs two-way data binding, ensuring instant synchronization between the model and the view. This reduces the need for excessive code, streamlining the development process.
3. Dependency Injection
A robust dependency injection system allows Angular applications to manage services efficiently, making the code more modular and testable.
4. Enhanced HTML with Directives and Pipes
Directives help extend HTML’s capabilities, while pipes transform and format displayed data, offering flexibility and ease of manipulation in the user interface.
5. Seamless Navigation with Built-in Routing
Angular’s built-in routing module enables smooth transitions between different sections of a single-page application, eliminating unnecessary page reloads.
6. Advanced Form Handling and Validation
Angular supports both template-driven and reactive forms, allowing developers to implement structured form validation and user input management effortlessly.
7. Angular CLI for Streamlined Development
The Angular Command Line Interface (CLI) automates repetitive tasks, helping developers create, test, and deploy applications efficiently.
Why Choose Angular for Your Development Needs?
High Industry Demand
Many companies rely on Angular for their web applications due to its ability to handle complex functionalities with ease, making it a valuable skill for developers.
Versatility Across Platforms
Angular can be used to develop progressive web applications (PWAs), enterprise software, and mobile applications using frameworks like Ionic.
Strong Developer Community and Support
Backed by Google and a large community, Angular offers extensive documentation, frequent updates, and continuous improvements, making it future-proof.
Best Practices for Angular Development
Use Lazy Loading to enhance application speed by loading resources only when required.
Adopt a Modular Approach to improve code maintainability and scalability.
Utilize State Management tools such as NgRx to manage application states efficiently.
Optimize performance with Ahead-of-Time (AOT) Compilation, reducing page load times.
Strengthen Security Measures by preventing cross-site scripting (XSS) and other vulnerabilities.
How to Master Angular Effectively
To get started with Angular, it’s essential to have a foundational understanding of JavaScript and TypeScript. Engaging in practical projects, enrolling in structured courses, and leveraging online tutorials can significantly improve learning outcomes.
If you are searching for the best Angular training institute in Hyderabad, ensure that the course provides hands-on training, real-world applications, and expert guidance.
Conclusion
Angular remains a dominant force in modern web development, providing developers with the tools needed to create interactive and scalable applications. Learning Angular opens doors to exciting career opportunities in the tech industry. To gain expertise in this powerful framework, consider enrolling in a professional training program. Monopoly IT Solutions offers comprehensive Angular training, equipping learners with the skills needed to excel in the competitive job market.
0 notes
Text
Building Robust Forms in Vue.js: Best Practices & Techniques
1. Introduction Forms are an essential part of web applications, used for collecting user input, managing data, and facilitating user interactions. However, building robust, user-friendly, and maintainable forms can be challenging. Vue.js, with its reactive data binding and component-based architecture, provides a powerful framework for building forms. This tutorial will guide you through best…
0 notes
Text
Instructions UI:
The last important in game UI I needed to make was a controls UI. For this, I wanted to add all control binds that I had used on the glove controller. This would include W,A,S,D & Space Bar. I made a cool effect for the images of this so they looked pencil drawn and rough to try and support the theme of this being a concept. I then used the second image to explain what each of these inputs do by stating that each separate colour equals the random number generated as well as what finger the player needs to use. The final image explains a space bar input and how it is used to check your answer. Once I put these into a new widget, I tried positioning them so they all would point toward the glove controller so the player knows what to press.

I also went back to the website Eleven labs so that I could manually write out what I wanted the original voice to say. I broke this into three parts so the player could interact with the page. This arguably helps improve accessibility as this helps to support players who may suffer from being blind. I also went to the widget event graph and added all inputs on my glove to control what happens on the screen. The player also has a way of either going to the main menu or just starting the game.

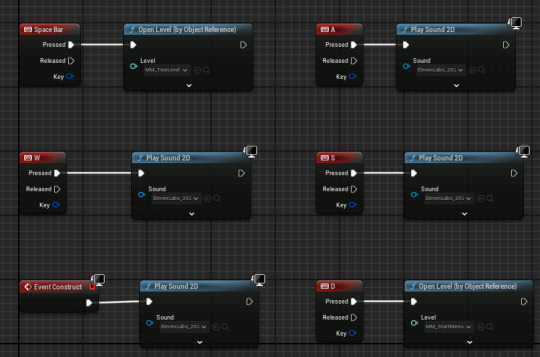
This video shows the outcome of this UI. The player can interact with this screen so they can hear parts of the tutorial being shown in the voice UI. They can also see what is being explained on screen as it shows all the images I made. I have now finished all the main game menus so I have now nearly got a MVP. I am really happy with how this turned out as I feel it supports the theme well.
0 notes
Text
Step-by-Step Tutorial: Integrate Azure PowerApps with AI Search

Microsoft PowerApps Training, Businesses today are leveraging AI-powered search capabilities to enhance user experiences and streamline data retrieval. Azure PowerApps provides a low-code development platform that allows organizations to integrate AI-based search functionalities seamlessly. In this guide, we will walk you through a step-by-step tutorial on how to integrate Azure PowerApps with AI Search to enhance your application’s efficiency and user engagement. PowerApps Online Training
Benefits of Integrating AI Search with Azure PowerApps
Enhanced Search Experience: AI-powered search helps retrieve relevant data quickly.
Improved Productivity: Users spend less time searching for information.
Seamless Integration: Azure PowerApps connects easily with various Azure services.
Low-Code Development: Reduces dependency on developers and speeds up deployment.
Scalability: AI search can process vast amounts of data efficiently. Microsoft PowerApps Training
Prerequisites
Before proceeding, ensure you have the following:
An active Azure PowerApps account.
A configured Azure Cognitive Search service.
Microsoft Dataverse or SharePoint as a data source.
Basic understanding of Power Automate.
Step 1: Set Up Azure Cognitive Search
To integrate AI-powered search, Azure Cognitive Search must be configured first.
Log in to the Azure Portal.
Navigate to Azure Cognitive Search and create a new search service.
Provide a unique name, pricing tier, and resource group.
Click Review + Create and deploy the service.
Once deployed, navigate to Indexes and create a new index.
Define the fields, keys, and search attributes. PowerApps Online Training
Upload sample data and test the search queries.
Step 2: Create a Data Source in Azure PowerApps
To fetch search results, a data connection must be established in Azure PowerApps.
Open Azure PowerApps and navigate to Data > Connections.
Click New Connection and select Azure Cognitive Search.
Enter the Search Service Name and API Key.
Save and authenticate the connection.
Ensure that the required datasets are accessible within Azure PowerApps.
Step 3: Design the PowerApps User Interface
Once the data source is configured, a user-friendly interface must be designed.
Open Azure PowerApps and create a new canvas app.
Insert a Text Input field for user queries.
Add a Button labeled "Search".
Insert a Gallery control to display search results.
Bind the Gallery control to the search results.
Customize the layout to match your business requirements.
Step 4: Implement AI Search Logic
AI search functionality will be powered through Power Automate.
In Power Automate, create a new Automated Cloud Flow.
Choose when a user clicks Search Button as the trigger.
Add an action to call Azure Cognitive Search API.
Parse the JSON response to extract search results.
Return the results to Azure PowerApps.
Test and validate the flow.
Step 5: Connect AI Search with PowerApps
Now, integrate the Power Automate flow with Azure PowerApps.
Navigate back to Azure PowerApps.
Select the Search Button and set its OnSelect property to trigger the Power Automate Flow.
Bind the Gallery Control to the search results.
Configure error handling for smooth user experience.
Save and publish the app.
Step 6: Test and Deploy
Run the Azure PowerApps application.
Enter a search query and click Search.
Validate the results retrieved by AI-powered search.
Optimize performance by adjusting index parameters in Azure Cognitive Search.
Deploy the app for end-users.
Best Practices for Optimizing Azure PowerApps with AI Search
Optimize Search Indexes: Ensure indexes are correctly structured for faster retrieval.
Leverage AI Capabilities: Utilize cognitive skills to enhance search results.
Monitor Performance: Regularly check query execution times.
Enhance User Experience: Implement filtering and sorting for refined searches.
Ensure Security: Restrict data access using Azure Role-Based Access Control (RBAC).
Conclusion
By integrating Azure PowerApps with AI Search, businesses can improve data accessibility and enhance user experiences. This step-by-step tutorial has provided a comprehensive guide to setting up AI-powered search within Azure PowerApps. Implementing AI-driven search capabilities allows organizations to streamline operations, reduce manual efforts, and improve decision-making processes.
Visualpath is the Leading and Best Institute for learning in Hyderabad. We provide PowerApps and Power Automate Training. You will get the best course at an affordable cost.
Attend Free Demo
Call on – +91-9989971070
Blog: https://toppowerautomatetraining.blogspot.com/
What’s App: https://www.whatsapp.com/catalog/919989971070/
Visit: https://www.visualpath.in/online-powerapps-training.html
#PowerApps Training#Power Automate Training#PowerApps Training in Hyderabad#PowerApps Online Training#Microsoft PowerApps Training#PowerApps Training Course#PowerApps and Power Automate Training#Microsoft PowerApps Training Courses
1 note
·
View note
Text
Setting up signals and mouse detection
The title sounds almost professional, lol
Today got to godot again, although nothing particularly interesting. Usually if I have several ideas for something, I leap from one to another, and this is the case. I temporarily moved away from the platformer tutorial, instead trying to figure out what I may need for a tiny escape room game. It's not much actually. What's a point and click game is, when broken down to its simplest components? Basically the following:
Display sprites and UI
Detect clicks on specific areas on the screen
Run some code (mostly change sprites to other sprites and change variables)
Show a cutscene when solved the puzzle
If the first one is super-duper easy and I've done that before, the second one gave me some moments of shame. I've expected it to be two clicks, not a big deal, wheeesh-and-whoosh! But it did not work! Would you imagine?! On the first attempt I connected appropriate signals but placed them in func _ready(), the result was... expectedly bad. For some reason I thought we should check mouse position every frame. Another mistake was to actually call signal-related functions, so instead of checking if mouse is over one of the test shapes it would execute them straight away.
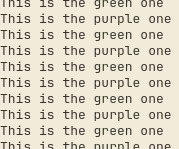

Oh, and function names are not similar to outputs because at first I drew two shapes via polygon2D, which it turned out does not simply scale. People online said you have to adjust anchor points position instead. So godot logo it is! This setup finally allowed me to detect mouse cursor and scale test images as intended (just noticed the cursor did not make it into the screenshot; its on the purple logo):
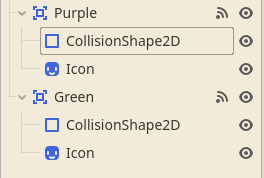

The code which worked:
func _on_triangle_mouse_entered() -> void: print('This is the purple one') $Purple/CollisionShape2D.set_scale(Vector2(1.25, 1.25)) $Purple/Icon.set_scale(Vector2(1.25, 1.25))
func _on_purple_mouse_exited() -> void: $Purple/CollisionShape2D.set_scale(Vector2(1, 1)) $Purple/Icon.set_scale(Vector2(1, 1))
func _on_rectangle_mouse_entered() -> void: print('This is the green one') $Green/CollisionShape2D.set_scale(Vector2(1.25, 1.25)) $Green/Icon.set_scale(Vector2(1.25, 1.25))
func _on_green_mouse_exited() -> void: $Green/CollisionShape2D.set_scale(Vector2(1, 1)) $Green/Icon.set_scale(Vector2(1, 1))
(jee, there must me a better way to paste code into tumblr)
Area2D refused to scale at once too, throwing its children all other the canvas, so I had to scale the children separately. No idea why is that and if there is a better way. But it works.
And lastly the code for checking for a mouse click, so my holey memory did not lose it.
func _on_purple_input_event(viewport: Node, event: InputEvent, shape_idx: int) -> void: if event.is_action_pressed("click"): print("something")
I did not even open the input map before (however I have a shadow of a memory of a tutorial where you have to), and it was a pleasant surprise how easy it was to set custom inputs. Basically similar to changing key bindings. It allowed to count as a click touchpad click and phone tap at the same time.
I can now get to drawing first sprites! You know it's so funny how happy all this is making me. I realize how basic this knowledge is, and how infinitely far away I am from being an actual developer. And yet there is a bit of a pride. This may be how people feel when their toddler makes his first steps, clumsy, silly and immediately falling. But through this falling he will one day run.
0 notes
Text
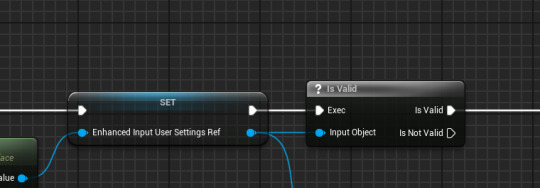
Key Mapping and Ethical Considerations
After creating the pause menu we were provided with a tutorial to create a Key mapping/binding system to facilitate customizable controls for a game. This is hugely beneficial from an accessibility standpoint because it allows for players to lay out their control scheme in any way desired, allowing people with disabilities to remap all the inputs to, say, the mouse for example.
The Tutorial: Key Remapping - Google Docs
I'll skim over some the new technical features I figured out over this tutorial as well:
Enabling User Settings in the Project Settings menu. This basically makes it so that the player can save Input related settings like keybinds.

IsValid? Node. This node just checks if the inputted object can be found, this would've been really useful in Vestibular for my volume settings as UE kept spitting out errors in editor despite the feature working, this probably causes a memory leak and IsValid? would solve that problem.
Break and Make nodes. Break nodes essentially break down data into specific data types and creates and output pin, whereas Make nodes take input data and forms a singular output comprised of that input data.
0 notes
Text
ReactJS Tutorial: A Beginner’s Guide to Optimizing Performance
ReactJS is one of the most popular JavaScript libraries for building user interfaces, especially for single-page applications (SPAs). While it provides a powerful toolset for creating dynamic and responsive user experiences, maintaining performance in a growing application can be challenging. Optimizing ReactJS applications is essential to ensure fast load times, smooth interactions, and a positive user experience. In this blog, we'll walk you through some key strategies to optimize your ReactJS applications effectively.
At our ReactJS tutorial portal, we focus on simplifying the learning process with hands-on examples. Whether you’re a beginner or an experienced developer, our tutorials are structured to guide you step-by-step through essential concepts, with a specific focus on real-world applications. Let’s dive into how you can enhance the performance of your ReactJS applications.
Understanding ReactJS Performance Optimization
ReactJS offers several built-in methods and techniques that can help optimize application performance. As your application scales, you might notice slower rendering or inefficient use of system resources. Performance optimization addresses these issues by ensuring that ReactJS components only re-render when necessary, and the app performs efficiently under different conditions.
Here are a few common strategies for optimizing ReactJS applications:
1. Use of shouldComponentUpdate and React.memo
In React, components re-render whenever their state or props change. However, not all components need to re-render every time, especially when their state or props haven’t changed. You can control this behavior using the shouldComponentUpdate lifecycle method in class components or React.memo in functional components.
By using React.memo, you prevent unnecessary re-renders of functional components by only re-rendering them when their props change. This helps reduce the computational overhead and speeds up the rendering process, particularly in large applications.
2. Code Splitting
Code splitting is a technique that allows you to split your JavaScript bundle into smaller chunks. By doing so, the browser only loads the necessary code for the current view, which reduces the initial load time of your application. React's React.lazy and Suspense features make it easier to implement code splitting, especially for loading components on-demand.
This approach ensures that users aren’t overwhelmed by large bundles of JavaScript, making your application feel faster and more responsive.
3. Optimizing Image Loading
Large images can significantly impact your app’s load time. To optimize images in React applications, you can use lazy loading techniques with libraries like react-lazyload or native HTML loading="lazy" attributes. This ensures that images load only when they are about to enter the viewport, reducing the initial load time and enhancing performance.
4. Avoid Anonymous Functions in JSX
When using inline functions in JSX, such as anonymous functions inside onClick handlers, it can cause performance degradation. React treats these functions as new instances each time the component renders, triggering unnecessary re-renders. To avoid this, move these functions outside of JSX or bind them properly using the useCallback hook to ensure the function reference doesn’t change on each render.
5. Debouncing and Throttling Events
In applications that handle frequent user inputs (e.g., typing or scrolling), performance can suffer if events trigger multiple state updates in quick succession. You can improve performance by debouncing or throttling these events. Debouncing delays the execution of a function until after a certain period of inactivity, while throttling limits the function execution to a specific interval.
Both techniques can prevent excessive renders and state updates, ensuring that your ReactJS application performs efficiently under heavy user interaction.
Why Performance Optimization Matters
Optimizing ReactJS applications is crucial for delivering fast, responsive, and user-friendly interfaces. Poorly optimized applications not only frustrate users but can also affect your SEO and engagement rates. By implementing performance strategies early on, you can ensure that your application scales smoothly and maintains its speed as it grows.
For those new to React, learning these performance optimization techniques can seem overwhelming. However, our reactjs tutorial for beginners is designed to guide you through these concepts in a simple and straightforward way. We offer hands-on examples and exercises, making it easier for you to grasp the importance of optimization and how to apply it effectively in real-world projects.
About Us
We offer a free online e-learning tutorial portal aimed at simplifying programming concepts for students and developers. Our platform provides live examples and easy-to-understand tutorials that cover a wide range of programming languages, including ReactJS, helping learners grasp new concepts quickly. Whether you're just starting or looking to deepen your knowledge, our tutorials are designed to make learning fun, interactive, and accessible.
Start your journey with our comprehensive ReactJS tutorials today, and learn how to build fast, efficient, and scalable applications with ease.
0 notes
Text
Tutorial for converting USDT to BTC on Bitcoin exchange!
Tutorial for Converting USDT to BTC on a Bitcoin Exchange Converting USDT (Tether) to BTC (Bitcoin) is a common task for crypto traders. This tutorial will guide you through the process step by step on a typical cryptocurrency exchange platform. First, make sure you have an account with a reputable exchange that supports both USDT and BTC trading pairs, such as Binance, Coinbase, or Kraken. Once logged in, deposit your USDT into your exchange wallet. After the deposit is confirmed, navigate to the trading section. Select the USDT/BTC trading pair, input the amount of USDT you wish to convert, and execute the trade.
How to use a savings card to buy USDT and exchange Bitcoin (BTC) Step 1: Card click Buy Cryptocurrency and select a card Step 2: Select My Profile in the upper right corner Step 3: Select Add Payment Method in the lower right corner, select your applicable debit card to fill in the information and bind, such as: Payeer, ABA bank, TowerBank, etc. Step 4: Click transaction, find the P2P option, select the corresponding payment method and choose the appropriate merchant to complete the transaction. Step 5: After completing the transaction, your amount will be converted into USDT (USDT is a stable currency of US dollar, 1:1 with US dollar) and deposited into the account, that is, click transaction, search for Bitcoin (BTC), and buy tokens. https://www.coinmapai.com/how-to-buy/bitcoin
0 notes
Text
FLASHLIGHT MECHANIC
I know I said how I wanted to focus on level design first however I've already created the fog mechanic so I would to see how the flashlight would react in this fog, whether it's too dark or if I need to adjust the fog settings.
I used the same process to create the flashlight as a previous project, however I tweaked a few things.

I first created a new input action, by duplicating an already existing one, and then renaming it as flashlight. Then, in the mappings collection, under the new flashlight action, I changed the key bind to be F.

Also, I found this free model of a flashlight on Sketchfab, it is free to use as long as I credit the person who created it which is fine. I'm going to download this and import it into my project so I can use it.

In game it looks like this:


Problem solving:
However I think I can improve this. It doesn't look very realistic at all. In real life, flashlights have this circular glare to them, which is from the glass reflecting.
Some quick research and a tutorial on YouTube and I've found a way to make the flashlight look much more realistic, so this will help me.
youtube

So I found this free to use flashlight pattern, I'm going to import this into my project, and then create a material with it.
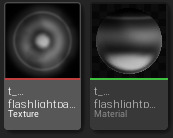
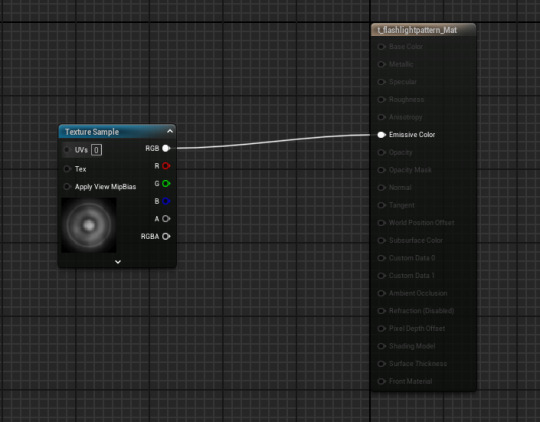
Now just have to add the material to the light function.

Now this pattern will show over the spotlight and it will hopefully now look much more realistic.
0 notes
Text
8/Mar/2024: Limited playability of the Companion
This is not the update with the new world and Nort part 3 but it is one with a very big feature: Being able to play as the younger sibling.
This is because people struggle with the command/AI system and suggested me to take a hint from Lost Vikings.
So far the system kinda works but don't be surprised if there's both technical issues (If both characters are (un)playable, press O or P again to go back to just one) or unappealing aspects like all the things built around the Player that the Companion can't do even if playable.
This feature in general exists as an response to the main gameplay format getting a bit too tricky to most people.
But Stella is still a companion and there's at least one more character idea to be like her (Don't worry, in this character's case, she will have no health bar or ladders, so things will be different).
There's also other stuff in this update:
* Press V when gameplay/cutscenes are paused, so the game remains paused but the pause menus are gone, so you can screenshot things better (And press V again to bring back pause menus).
* Z and X allow cutscenes to move either faster or slower (Based on responses to cutscenes either being too fast or slow).
* First level has new texts/images in regards to Companion ladder stuff and some were even edited.
* Player no longer knocks Companion off ladders, with one tutorial book being changed to something else.
* Companion now climbs slower (Because without the knock off, you’d have them vibrate weirdly when catching up with the Player’s climbing speed).
* HUD now has an icon next to Comp’s health bar indicating their follow/avoid/idle state.
* Stella got the same treatment with the 3 points above.
* These changes also lead to some level design tweaks and Companion's ladder detecting Raycast being a bit bigger.
* Cutscene before Krimb level 3 now ends with the same text in that level’s yellow book, to inform players about Stella.
* Added option to turn on/off smooth camera due to responses about some weird jittery stuff going on.
* TEST: There are now individual buttons for the Comp’s states and they’re 1/2/3. I might change inputs but it has to be made with the other buttons in mind because I don’t think I’ll ever do key binding settings (And Stella gets 4/5/6).
* Hirdrih level 2: Sky now has a sun and moon.
* Krimb-Stone level 2: Added a police car scene.
* Added a moving vertical platform at the end of level p33tt3 for backtracking.
This update was mostly tweak/feature implementation stuff and based of feedback.
The next update might be the Massag-Coav/Nort part 3 one with all the new characters and story stuff to introduce, along with new gameplay features and interactive worldbuilding stuff.
1 note
·
View note
Text
Angular JS Tutorial for Beginner's Step by Step
Introduction :
AngularJS is a powerful open-source JavaScript framework developed by Google for building dynamic, single-page web applications. it simplifies the development process by providing a structured framework for creating responsive and interactive front-end applications. AngularJS uses a declarative approach to programming, allowing developers to express the desired outcome, and it takes care of the underlying complexities.
Overview :
AngularJS is a JavaScript-based open-source front-end web application framework developed and maintained by Google. It is designed to simplify the development and testing of dynamic, single-page web applications (SPAs). AngularJS uses declarative programming and follows the Model-View-Controller (MVC) architectural pattern.
Key Concepts:
Data Binding:
AngularJS facilitates two-way data binding, establishing a connection between the application’s model and the user interface. When the model changes, the view automatically updates, and conversely, when the user interacts with the view, the model is updated. This bidirectional synchronization reduces the need for manual manipulation of the Document Object Model (DOM) and enhances the responsiveness of the application.
Directives:
Directives are a cornerstone of AngularJS, enabling developers to extend HTML with custom behavior and create reusable components. They are markers in the HTML that trigger specific functionalities. Examples include:
ng-model: Binds an input element to a property on the model.
ng-repeat: Iterates over a collection, generating repeated content.
ng-if: Conditionally renders content based on a given expression.
Custom directives: Developers can create their directives to encapsulate complex behaviors or UI components.
Controllers:
Controllers are JavaScript functions responsible for managing the application’s business logic. They act as intermediaries between the model and the view. Controllers handle user input, update the model accordingly, and ensure that changes are reflected in the view. This separation of concerns enhances code organization and maintainability.
Services:
AngularJS services are singleton objects providing common functionalities that can be shared across different parts of an application. Common use cases include:
HTTP Service: Facilitates communication with a server.
Data Service: Manages shared data between components.
Utility Service: Encapsulates reusable functions or business logic.
Services promote code reuse, modularity, and maintainability by encapsulating specific functionalities.
Dependency Injection:
AngularJS embraces dependency injection, a design pattern that enhances code modularity and testability. Dependencies, such as services or other components, are injected into a controller or service rather than being explicitly created within it. This approach reduces tight coupling between components, making the codebase more flexible and easier to test.
Modules:
AngularJS applications are organized into modules, which act as containers for related components. Modules encapsulate different aspects of an application and promote modularity.
Key characteristics include:
Declaration of Dependencies: Modules can depend on other modules, allowing for a hierarchical organization.
Containment of Components: Controllers, services, directives, and more are defined within modules.
Modules help structure and organize code, making it more maintainable and scalable.
Templates:
AngularJS templates are HTML files augmented with Angular-specific expressions and directives. These define the structure of the view and include dynamic elements:
Expressions: Embedded within double curly braces ({{ expression }}), expressions are evaluated and displayed in the view.
Directives: Extend HTML with additional behavior, allowing for data binding and manipulation of the DOM.
Templates facilitate the separation of concerns by isolating the presentation logic from the underlying application logic.
Understanding these AngularJS concepts collectively empowers developers to build robust, maintainable, and scalable web applications. They form the foundation for effective utilization of the AngularJS framework.
Why AngularJS:
Declarative Code:
In AngularJS, developers declare the desired outcome, and the framework takes care of the underlying processes. For example, in two-way data binding, you declare the association between a model and a view element, and AngularJS handles the synchronization automatically. This approach improves code readability and maintainability, as developers can focus on the “what” rather than the “how.”
Rapid Development:
AngularJS accelerates development through two-way data binding, ensuring that changes in the model instantly update the view and vice versa. This reduces the need for manual DOM manipulation, resulting in cleaner and more concise code. The modular structure of AngularJS also contributes to rapid development by promoting code organization and reusability. Developers can create modules encapsulating specific functionalities, making it easier to manage and extend the application.
Community Support:
AngularJS benefits from a robust and active community. This community-driven support system is invaluable for developers. Extensive documentation, tutorials, and online forums provide a wealth of resources for learning and problem-solving. The availability of third-party libraries and tools further enriches the ecosystem. Community support ensures that developers have access to up-to-date information, best practices, and solutions to common challenges, fostering a collaborative and informed development environment.
In essence, AngularJS stands out not only for its technical capabilities but also for the developer-friendly features and the strong community backing, making it a compelling choice for building dynamic and responsive web applications.
1. MVC Architecture:
Explanation: The Model-View-Controller (MVC) architecture is a design pattern that divides an application into three interconnected components, each with a specific role.
Model: This component represents the application’s data and business logic. It is responsible for managing and manipulating data.
View: The view represents the user interface and is responsible for displaying data to the user. It observes changes in the model and updates accordingly.
Controller: Controllers handle user input and act as intermediaries between the model and the view. They process user actions, update the model, and ensure that changes are reflected in the view.
Tutorial Insight: Tutorials on MVC architecture in AngularJS often explain how data flows through the application, emphasizing the separation of concerns and the importance of organizing code into these three components.
2. Directives:
Explanation: Directives are a powerful feature in AngularJS that extends HTML with new attributes or creates reusable components. They are markers on the HTML that tell AngularJS to attach a specified behavior to a DOM element.
Tutorial Insight: In-depth tutorials on directives cover built-in directives like ng-repeat and demonstrate how to create custom directives. They guide developers on using directives to manipulate the DOM, create dynamic components, and enhance the interactivity of their applications.
3. Expressions:
Explanation: Expressions in AngularJS are similar to JavaScript code snippets but are embedded within double curly braces ({{ expression }}) in HTML. They are used to bind data to the HTML and are evaluated to display dynamic content.
Tutorial Insight: Tutorials on expressions in AngularJS teach developers how to use expressions for data binding. They explain the syntax and showcase examples of how expressions facilitate the dynamic updating of content in the view based on changes in the model.
4. Data Binding:
Explanation: Data binding in AngularJS supports two-way synchronization between the user interface and application objects. Changes in the UI instantly affect application objects, and changes in the application objects reflect in the UI.
Tutorial Insight: Tutorials emphasize the significance of two-way data binding in AngularJS. They guide developers on establishing and utilizing this bidirectional connection, illustrating how it simplifies the development process by reducing manual DOM manipulation.
5. Controllers:
Explanation: Controllers in AngularJS are JavaScript functions associated with a particular scope. They serve as the application’s business logic, handling user input and updating the View or Model accordingly.
Tutorial Insight: In-depth tutorials on controllers cover creating controllers, organizing business logic, and linking controllers with specific views. They demonstrate how controllers maintain the separation of concerns in AngularJS applications.
6. Services:
Explanation: AngularJS services are singleton objects performing specific tasks common to web applications, such as making HTTP requests or managing shared data.
Tutorial Insight: Tutorials on AngularJS services demonstrate how to create and use services for modularizing code. They showcase examples of creating services for common functionalities and guide developers on utilizing services for code reusability and sharing functionalities across different parts of an application.
7. Modules:
Explanation: AngularJS applications are modular, organized into containers called modules. Modules encapsulate different components like controllers, services, filters, and directives. They promote modularity and ease of maintenance.
Tutorial Insight: Tutorials on AngularJS modules guide developers on creating, organizing, and structuring modules. They explain the advantages of using modules for code organization, making applications more modular, maintainable, and scalable.
8. Dependency Injection:
Explanation: AngularJS has a built-in dependency injection subsystem. Dependency injection helps make components more modular and testable by injecting dependencies into components, reducing tight coupling.
Tutorial Insight: In-depth tutorials on dependency injection in AngularJS explain the principles and demonstrate how to use it to improve code modularity. They guide developers on utilizing dependency injection to make components more testable and facilitate easier testing in AngularJS applications.
9. Routing:
Explanation: AngularJS provides routing for creating single-page applications with navigation. Routing allows developers to define different views for different parts of the application, facilitating a seamless user experience.
Tutorial Insight: Advanced tutorials may cover routing in AngularJS, guiding developers on setting up routes, defining views, and creating a navigation structure for a single-page application. Understanding routing is crucial for building complex, multi-view applications.
In essence, these elaborations provide a deeper understanding of each concept, showcasing their importance in AngularJS development and how tutorials can guide developers in mastering these concepts for building robust and scalable applications.
Conclusion :
AngularJS has played a pivotal role in reshaping web development by presenting a framework that streamlines the construction of dynamic and responsive web applications. Despite the emergence of subsequent Angular versions, AngularJS stands as a foundational technology that set the stage for contemporary front-end development practices. Its innovative features, including two-way data binding, modular architecture, and a robust community, have significantly influenced how developers approach building interactive and maintainable web applications. The enduring impact of AngularJS is evident in its enduring relevance and its enduring influence on the evolution of web development frameworks.

Thanks for reading, hopefully you like the article if you want to take Full stack Masters course from our Institute please attend our live demo sessions or contact us: +918464844555 providing you with the best Online Full Stack Developer Course in Hyderabad with an affordable course fee structure.
0 notes
Text
How can AngularJS Development Benefit My Business

A robust and dynamic web application is crucial for success in today’s competitive business landscape. AngularJS, a popular JavaScript framework, has gained significant traction among developers due to its numerous features and benefits. This article will explore how AngularJS development can benefit your business, from improving user experience to enhancing productivity and scalability.
Introduction to AngularJS
AngularJS is an open-source web application framework developed and maintained by Google. It uses JavaScript to build dynamic web applications and simplifies the development process by providing tools and features for building robust single-page applications (SPAs). AngularJS follows the Model-View-Controller (MVC) architectural pattern, which separates the application logic into three distinct components — model, view, and controller — for better code organization and maintainability.
Improved User Experience
User experience (UX) plays a critical role in the success of a web application. AngularJS enables developers to create highly interactive and responsive user interfaces, enhancing user experience. Its declarative approach to building UI components allows for easy data binding, which means any changes in the data are automatically reflected in the view and vice versa. This real-time synchronization of data and view results in a smooth and seamless user experience.
Additionally, AngularJS provides powerful two-way data binding, which eliminates the need for manual DOM manipulation. This reduces the amount of code needed to update the user interface, resulting in faster development and better performance. AngularJS also includes a set of built-in directives, such as ng-model, ng-show, and ng-hide, which makes it easy to handle user input, display or hide elements, and perform other UI-related tasks.
Enhanced Productivity
AngularJS offers a wide range of tools and features that help developers build web applications quickly and efficiently, resulting in enhanced productivity. One of the key features of AngularJS is its modular architecture, which promotes code reusability and maintainability. Developers can create reusable components, services, and directives that can be easily used across different parts of the application, reducing redundant code and development effort.
Moreover, AngularJS comes with a comprehensive set of testing tools, including built-in support for unit testing and end-to-end (E2E) testing. This allows developers to write automated tests for their applications and ensure its quality and stability. AngularJS also has a large community of developers who actively contribute to its development and share their knowledge through online forums, tutorials, and documentation, which further aids in productivity.
Scalability and Flexibility
As businesses grow, their web applications need to scale to accommodate increased user traffic and data processing. AngularJS provides robust features that make it scalable and flexible for handling complex applications. Its modular architecture allows for easy integration of additional modules and components as the application grows. Developers can create custom modules and inject them into the main application module, making adding new features or functionalities easy without affecting the existing codebase.
Furthermore, AngularJS provides support for asynchronous programming using promises, which allows for efficient handling of server-side requests and responses. This helps in building responsive and high-performance applications that can handle a large number of concurrent users. AngularJS also supports lazy loading, which means that components are loaded on-demand as users navigate the application, resulting in faster initial page load times and better performance.
Cross-Platform Compatibility
In today’s multi-device world, web applications need to be compatible with different devices, browsers, and operating systems. AngularJS offers cross-platform compatibility, allowing businesses to build web applications that can run seamlessly on various platforms. AngularJS uses standard HTML, CSS, and JavaScript, which are supported by all modern web browsers, making it highly compatible.
AngularJS also provides support for responsive web design, allowing developers to create applications that can automatically adapt and adjust to different screen sizes and devices, including desktops, tablets, and mobile phones. This ensures that your web application looks and performs well on all devices, providing a consistent user experience across different platforms.
Ease of Maintenance
Maintaining a web application can be complex and time-consuming. AngularJS simplifies the maintenance process with its modular architecture and separation of concerns. The MVC pattern followed by AngularJS allows for clear separation of application logic, making it easy to identify and fix issues or make updates without affecting the entire codebase. This results in better code maintainability and reduces the risk of introducing new bugs during maintenance.
Additionally, AngularJS provides robust error handling and debugging features, including detailed error messages, logging, and debugging tools, which helps developers identify and fix issues quickly. The availability of a large community of AngularJS developers also means a wealth of knowledge and resources available for troubleshooting and maintenance purposes.
Cost-Effective Development
Cost is a significant factor for businesses when it comes to developing web applications. AngularJS offers cost-effective development solutions that can benefit businesses of all sizes. Its modular architecture and code reusability allow for faster development, which reduces the overall development time and cost. Additionally, AngularJS’s comprehensive testing capabilities help in identifying and fixing issues early in the development process, reducing the cost of bug fixes and maintenance in the long run.
Moreover, AngularJS’s large and active community of developers provides access to a wide range of open-source libraries, tools, and resources, which can save development time and cost. These resources can be easily integrated into the application to add additional functionalities without starting from scratch, resulting in cost savings.
Why Choose Sterling Technolabs for Angular js Development
Choosing Sterling Technolabs for AngularJS development can significantly benefit your business. With our extensive experience, expertise, and proven track record in web application development, Sterling Technolabs is well-equipped to deliver high-quality AngularJS solutions tailored to your business needs.
Our team of skilled developers deeply understands AngularJS concepts, architecture, and best practices, ensuring your web application is built to industry standards and optimized for performance. Sterling Technolabs offers comprehensive services, including consulting, development, testing, and maintenance, covering the entire development lifecycle and providing end-to-end solutions.
One of the key advantages of working with Sterling Technolabs is our agile development approach, which allows for flexibility, adaptability, and quicker time-to-market. We work collaboratively with you, ensuring regular communication and incorporating real-time feedback, resulting in efficient and successful project delivery.
Quality assurance is a priority for Sterling Technolabs. We conduct rigorous testing at each stage of the development process to ensure that your AngularJS application is reliable, scalable, and bug-free. We also offer post-development support and maintenance services to keep your application up-to-date and performing optimally.
Moreover, Sterling Technolabs offers competitive pricing and transparent, flexible pricing models, making them a cost-effective choice for businesses of all sizes. Our commitment to excellent client support ensures exceptional service throughout the project and beyond.
Conclusion
AngularJS is a powerful and versatile JavaScript framework that offers numerous benefits for businesses. From improving user experience to enhancing productivity and scalability, AngularJS can significantly impact your web application development process. Its modular architecture, two-way data binding, testing capabilities, cross-platform compatibility, ease of maintenance, and cost-effective development make it a popular choice among developers and businesses.
If you’re looking to build a robust and dynamic web application, considering AngularJS development can be a wise choice. Its features and benefits help you create a high-performance web application that provides an excellent user experience, is easy to maintain, and is scalable to accommodate the growing needs of your business. Embrace the power of AngularJS and leverage its capabilities to drive your business toward success in the digital world.
0 notes