#intercusper
Explore tagged Tumblr posts
Visit Tumblr Blog
Explore Tumblr blogs with no restrictions, modern design and the best experience.
Last Seen Tumblr Blogs


Fun Fact
Post activity is at the highest at 4:00 pm EDT; notes peak at 10:00 pm EDT.
Text


made some flags for intersex cuspers
Left to right:
Cuspfem, cuspfemmasc, and cuspmasc intersex flags
Just when you're on the cusp of being trans fem/femmasc/masc but aren't quite due to being intersex (aka literally me). These technically fall under the intercusper umbrella but I didn't model them off that flag color wise (I instead used Vibes).
@interarchive for archiving purposes ,
this is NOT a mogai blog!! don't follow me if you want more mogai stuff!!!! this is a very rare occurrence where I post flags here, ok?!!!?!!!?!
#intersex flags#flag making#mogai#gender flag#intersex flag#intergender#intersex gender#intersex#actually intersex#cusper#cusper flag#intercusp#intercusper#can yall tell i like green /hj#its not mt favorite color at ALL but i am a sucker for it with pink and blue#no spoons for IDs#but anyone is free to add rhem#this is not a mogai blog btw dont ask me for shit to make
54 notes
·
View notes
Text


[ID: Six pixel hearts of various flags in order being Intercusper, Intersex4Intersex, Hyperestrogenism, Trisfluid, Trisfemfluid, and Trismascfluid. End ID]
#hyperestrogenism#trisfluid#trisfemfluid#trismascfluid#intercusper#Intersex4Intersex#i4i#rentry#pixel#discord emoji#heart#liom#mogai#queer#missing credit
14 notes
·
View notes
Note
Intercusper? ❤️ Btw, I love the objectum one you made<33


Quick note before we begin, this Kid’s Image ID was written by my friend @nerdiwolverine and only edited by me!
Intercusper is a term and flag coined by @isobug and inspired by the term Cusper (specifically the flag and definition which were compiled by @beyond-mogai-pride-flags) describing someone whose gender identity is on the cusp of being transgender or gender non-conforming in a way directly related to or caused by the individual’s intersex variation or experience!
This Magical Kid has a Heavenly Bodies Theme! It uses He/They/She/It pronouns and Cel/Cer/Celes/Celeself, Glim/Glimmer/Glimmers/Glimmself, Rev/Rever/Rie/Reverself, Halo/Halos/Haloself, and Cherub/Cherubs/Cherbuself Neopronouns!
Her name is Jemima, a biblical name that means dove, but they’ll also go by Gem! Glimmer can smite enemies, which essentially means burn them to a goddamn crisp once halo gets halos hands on them. Well, technically all the fire does is burn out the evilness in their heart/all ill will but it certainly LOOKS like they can just set people on fire at a touch. It’s very useful for intimidation purposes. They can do this to allies as well- it has no effects other than setting them on fire, but the fire doesn’t hurt. So basically Jemima can create an infinite fire source by lighting an ally on fire and pointing them towards a particularly flammable group of enemies.
Its Magical Kid Weapon is a flaming sword which… honestly can’t do much? It’s hot, sure, but if an enemy’s close enough for Gem to even USE their sword they are close enough to smite.
A useless fact about rever is that rev is…. A tiny bit outcast by the general Magical Kid population. You see, the main antagonist (who will here be gaining the moniker The One) has a very heavy holy theme, and when they corrupt civilians they take on an Angel theme. Essentially, Jemima’s appearance is the equivalent of someone with long black hair and red eyes ominous standing around. Sure, a lot of magical kids are friendly, but most of the older ones steer clear. It’s a little grating on their confidence. Another useless face is that their eyes are always closed.
#the magical kid project#artists on tumblr#pride flag#digital art#lgbt pride#original art#lgbt#lgbtq#intercusper#intersex#cusper#character#my characters
51 notes
·
View notes
Text


icon id: 4 icons in 2 pairs. in each pair, both icons have the listed flags in order in the background and the left icon has an image of the listed character with a white outline and a black shadow. end id.
banner id: a 1500x150 teal banner with the words ‘please read my dni before interacting’ in large white text in the center. end id.
Fang from Goodbye Volcano High is a vesbigai canonically queer canonically transmasculine canonically nonbinary canonically genderqueer abigender genderpunk intercusper!
Naomi is a canonically queer bipan agender girl gxrl bigender demigal!
dni link
#mogai headcanon#goodbye volcano high#fang#naomi#vesbigai#queer#transmasculine#nonbinary#genderqueer#abigender#genderpunk#intercusper#bipan#agender girl#gxrl#bigender#demigal
7 notes
·
View notes
Text


Intercusper / Intercusp and Interevenic
Intercusper / Intercusp - An Intersex Cusper, or one who is feeling like one is on the “cusp” between being transgender and a gender non-conforming “cis” person in a way connected to or even caused by their Intersex variation/experiences. Or simply a broad combination term for anyone who is both Intersex and a Cusper.
Interevenic - One who is both Evenic and Intersex, a term for when someone is on the boundary of two existing identities in a way connected to or even caused by their Intersex variation/experiences. Users may feel as though they partly or entirely fall under both, or they may not identify as either one individually.
Unlike Intercusper / Intercusp, this term does not exclusively describe a boundary between gnc cis and trans, it can be described as someone whose identity is on the boundary of any two identities, usually ones that do not typically go together (though not always.)
Each flag combines the Carpenter Intersex flag with the Cusper flag / Evenic flags. A plain version of each is given for those who want to reposition the circle, use a different symbol, or just for those who want it.
Made for anon, help with image descriptions welcome and free to use as always. Just please be respectful of Intersex people if you're perisex and mind that these are exclusive to Intersex individuals only.
Taglist - @revenant-coining, @radiomogai, @interarchive
#intercusper#intercusp#interevenic#cusper#evenic#intersex#mogai coining#liom coining#combo flag#combo flags
51 notes
·
View notes
Text


flag id: two flags with 7 stripes. the left flag's stripes are dark indigo, faded blue, very light sky blue, light purple, very light red-pink, pink-red, and dark pink. the right flag's stripes are purple-black, dark blue, very light sky blue, light purple, very light red-pink, faded red, and dark pink. end id.
banner id: a 1600x200 teal banner with the words ‘please read my dni before interacting. those on my / dni may still use my terms, so do not recoin them.’ in large white text in the center. the text takes up two lines, split at the slash. end id.
anisocusper | anisoevenic
anisocusper: an anisohormonal cusper; a person who feels they are on the 'cusp' between being transgender and being a gender nonconforming 'cis' person in a way that is connected to and/or caused by their anisohormonal experience
anisoevenic: an anisohormonal evenic person; a person who feels they are on the boundary of two existing identities in a way that is connected to and/or caused by their anisohormonal experience
[pt: anisocusper: an anisohormonal cusper; a person who feels they are on the 'cusp' between being transgender and being a gender nonconforming 'cis' person in a way that is connected to and/or caused by their anisohormonal experience
anisoevenic: an anisohormonal evenic person; a person who feels they are on the boundary of two existing identities in a way that is connected to and/or caused by their anisohormonal experience. end pt]
for anon! these are anisohormonal versions of intercusper and interevenic. the flags use colors from the anisohormonal flag and the cusper and evenic flags.
tags: @radiomogai | dni link
#anisocusper#anisoevenic#anisohormonal#cusper#evenic#my flags#my terms#new flag#new term#mogai flag#mogai term#mogai
30 notes
·
View notes
Note
Hey there! I love what you're doing, so I wanna give you some tips for designing a gender buddy for any intersex-exclusive identities (intergender, intercusper, internon, interevenic, etc) you may do in the future!! (From an intersex person)
- Do not use purely hermaphroditic animals to represent these! Trust me, a lot of intersex people are sick and tired of being represented with only snails and slugs. Mix it up with some beetles, birds, mammals, butterflies, and other things!! Don't just see "oh this fish can change sex" and use that, it's kind of disheartening to see that as the only intersex representation, lol.
- Don't be afraid to research how intersexness effects animals physical appearance! Things like bilateral gyandromorphs are a good starting point, as they're very interesting from a biology standpoint and very clearly intersex
-You can use both the old and new intersex flags for colors! (The pink blue and white one with a gradient in the middle is the old one, the yellow with a purple circle is the new one :]) Many members of the intersex community feel represented by both flags, and just using the new one would be really restricting from a creative standpoint.
-Remember that intersex isn't a gender or third sex sex, but instead a web of different experiences and different bodies many people have that are intertwined under one label.
I very much appreciate this anon! I'm choosing not to do any exclusive identities that I don't already experience, just so that I know I'm representing them correctly. I've done Autigender and Neurogender, but I don't plan to do much else.
This was very helpful, though. Thank you!
- 💜
3 notes
·
View notes
Text
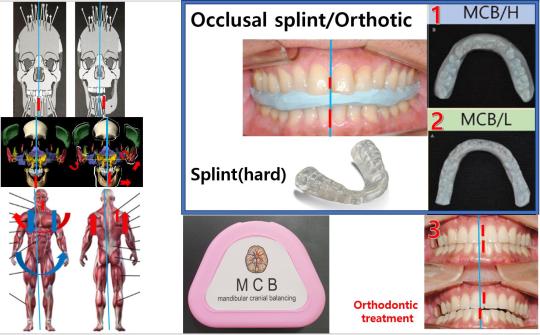
※ There are three types of MCB splint position.
1. MCB/H (high)
The first one is a disposable splint used for 10 minutes and is used in the MCB technique. This splint has a good effect of moving all the skull movements.
For instance, a patient who is a nurse underwent 8 hours of laparoscopic surgery for intrauterine fibroids and received a 7-day sick leave following the day of surgery for care at the hospital. When the surgical site was palpated, the motility of the surgical site gradually decreased when the device was worn, and the patient became more comfortable as the surgical site was gradually healed. Initially, the effect lasted for 10 minutes.
For patients with dystonia, the splint is immediately twisted and the head can be turned straight. However, symptoms reappear after 10 minutes. So, after checking the wrong direction, a splint is re-made and worn again. As the treatment progresses, the patient's symptoms improve little by little, depending on the degree of distortion of the skull. However, the treatment time is extended to 1 hour after approximately 130 treatment sessions. It can also be seen by palpation that the distortion of the whole body is improved.
2. MCB/L(low)
The second one is a semi-permanent splint. This splint is a device worn at bedtime and is thinner than the MCB/H device for daytime use. The characteristic of this device is that it is worn during bedtime and it is effective because it is worn for a relatively long time, and it is remade and worn when the movement of the skull is distorted. When orthodontic treatment is performed, the final thickness is treated to be MIP at the front and rear, left and right positions where the thickness becomes 0mm. In the case of dentures or full mouth prosthesis, the teeth are treated with MIP at 0mm. If the teeth are occluded in this position, the patient's skull moves normally every time the teeth are touched, and the overall health of a body gets better with time. This location is relatively easy to find.
3. Tooth contact position (maximum intercuspal contact position)
This is the location when you want to treat malocclusion with orthodontic treatment.
Currently, most orthodontic treatments involve moving teeth while they are biting together. If the left and right centers of the lower jaw are misaligned after correction is completed, the sphenoid bone will continue to shift and move. If your lower jaw is off-centered anteroposteriorly, your temporal bone will shift and move. Ultimately, if the height of the teeth is off when they reach, the occipital bone will be out of alignment. If the occlusal height is low, the left occipital bone continues to send signals that it is misaligned, but if the dentist cannot palpate, the patient cannot tell. However, as time goes by, little by little, the effects begin to appear in the body. Therefore, if you undergo orthodontic treatment, your teeth must be aligned in a three-dimensional position of the lower jaw that normalizes the movement of the skull.
Then, my teeth will play the role of an MCB splint for the rest of their lives, normalizing the movement of the skull every time it touches. Could this be the herb of immortality(elixir plant)that King Jinsi is looking for?
#mcbsplint
0 notes
Text
A Case Report on Unusual Severe Superolateral Dislocation of Right Condyle Associated with Sagittal Split of Articular Eminence in Pan-Facial Trauma Managed with Inverted L-Plate | Chapter 08 | New Horizons in Medicine and Medical Research Vol. 1
A difficult case for a maxillofacial surgeon is head and neck trauma, because not only must pre-injury anatomy be restored, but also the cosmetic aspect must be enhanced. The treatment of such patients is challenging and frequently involves the participation of a multidisciplinary team. One of the leading causes of severe trauma is unprotected driving or high-velocity crashes. Pan-facial trauma affects not only normal face structure but also normal functions such as vision (dystopia, diplopia, enophthalmos), breathing (airway) and olfactory senses, mastication and natural occlusion and intercuspation, deglutition, and the patient's overall appearance. In such trauma patients, restoring and rehabilitating the pre-injury shape of the facial skeleton involves artistic labour on the part of the operative maxillofacial surgeon. In the case of trauma, open reduction and internal fixation (ORIF) under general anaesthesia is the therapeutic option (GA). Various methods for achieving near-normal anatomy have been proposed. "Top to bottom" or "bottom to top," as well as "outward to inward" or "inward to outward," were offered in previous studies. The major goal is to restore the horizontal and vertical pillars of the face. This case was exceptional in that the complete mandibular condyle remained superolaterally displaced even after the zygomatic arch was fixed; the inverted "L" plate was employed to preserve the condyle in its natural position. Even in dynamic motion, the results were functionally satisfactory, and we advocate it as a viable therapeutic option for superolateral dislocation of the intact mandibular condyle. Author(S) Details Kansara Jay Department of Oral and Maxillofacial Surgery, Mahatma Gandhi Dental College and Hospital, Mahatma Gandhi University of Medical Sciences and Technology, Jaipur, Rajasthan, India. Vikas Singh Department of Oral and Maxillofacial Surgery, Mahatma Gandhi Dental College and Hospital, Mahatma Gandhi University of Medical Sciences and Technology, Jaipur, Rajasthan, India. Ruchika Tiwari Department of Oral and Maxillofacial Surgery, Mahatma Gandhi Dental College and Hospital, Mahatma Gandhi University of Medical Sciences and Technology, Jaipur, Rajasthan, India. Vaishali Jamdade Department of Oral and Maxillofacial Surgery, Mahatma Gandhi Dental College and Hospital, Mahatma Gandhi University of Medical Sciences and Technology, Jaipur, Rajasthan, India. Yogesh Kumar Sharma Department of Oral and Maxillofacial Surgery, Mahatma Gandhi Dental College and Hospital, Mahatma Gandhi University of Medical Sciences and Technology, Jaipur, Rajasthan, India. View Book:- https://stm.bookpi.org/NHMMR-V1/article/view/6173
#Lower third facial fracture#mid facial fracture#open reduction and internal fixation#pan-facial trauma#superolateral dislocation of the intact mandibular condyle
0 notes
Note
favorite color?
favorite season?
favorite flag(s) (can be any type of flag)?
collectively purple mine's orange
collectively fall and i can get behind that
favorite flag uhhhhh Achigirl, Xenoman, Alienaesic, Sillygender, All Mulvi, Slushie, and Gijinka (actively working on a lot of these)flags, Emobitch, Oh all Xenintation flags, Evenic with the sun, Devilic, All of the tma flags are tasty All of greys genic flags Interevenic and Intercusper it/he/war pronoun flag Plural peafowl bonus non liom/mogai/gai/etc flag Estonia I just think it's pretty
these are all just ones we've made pixels of there are so many flags we just can't think of the names of that we love and we'll try to add links to everything but,, thats a lot of links alkdfje
2 notes
·
View notes
Note
Fang from GBVH is a (canon) transmasculine nonbinary genderqueer queer (hc) vesbigay abigender genderpunk intercusper
Naomi from GBVH is a (canon) queer (hc) bipan (agender girl) gxrl demigal bigender bipan
queued! i figured you meant vesbigai since i can't find vesbigay, but lmk if i was wrong!
0 notes
Photo

Acquired centric position Acquired centric position is the complete intercuspation of the opposing teeth independent of condylar position, sometimes referred to as the best fit of the teeth regardless of the condylar position also called maximal intercuspation. (at Easydent) https://www.instagram.com/p/CBTdehnp9TA/?igshid=14iuvh8zsnp5r
0 notes
Note
Could you make a flag/term for an anisohormonal equivalent of intercusper/interevenic? Like anisocusper/anisoevenic?
queued!
4 notes
·
View notes
Text
Best Orthodontic Treatment in Bellandur | Bangalore | #NelivigiDentalClinic
Orthodontic treatment is done to align the teeth and the jaws in correct occlusion. Orthodontic treatment is most commonly done during the teens, however adult orthodontics constitutes a significant proportion of our orthodontic practice.
Orthodontic Treatment is done to align the teeth and the jaws in correct occlusion. They eliminate the problem of
* Crowding/spacing
* Crooked teeth
* Deficient/excessive Lower jaw
* Deficient/excessive Upper jaw
* Intercuspation of teeth etc.,
To know more log on to https://nelivigidentalclinic.com/our-services/orthodontic-treatment/ or contact us @ 81238 03803
#Dr Nandini Nelivigi#Dental Care#Dental Hygiene#Dental Clinic#Dental Hospital#Dentist#DentalSpecialist#Dental Doctor#Dental Treatment#Dental Services#Tooth Decay#Orthodontic#Orthodontist#Dentistry#Oral Health#Oral Hygiene#Healthy Teeth#Root Canal#Endodontist
0 notes
Text
300+ TOP DENTAL Lab Viva Questions and Answers
DENTAL Lab Viva Questions :-
1. Explain operative dentistry? Operative dentistry is the art and science of diagnosis, treatment and prognosis of teeth that do not require full coverage restoration for correction. such treatment should result in the restoration of proper tooth form, function and esthetics while maintaining the physiologic integrity of teeth in harmonious relationship with the adjacent hard and soft tissues, all of which should enhance the general health and welfare of the patient. 2. What is endodontics? Endodontics is the branch of clinical dentistry associated with prevention, diagnosis and treatment of the pathosis of dental pulp and their sequelae. 3. What is tooth preparation or cavity preparation? Tooth preparation or cavity preparation is defined as mechanical alteration of a defective, injured or diseased tooth to best receive a restorative material that will reestablish a healthy state for the tooth, including aesthetic correction where indicated, along with normal form and function. 4. What are the types of tooth preparation? Conventional: A preparation where apart from removal of diseased portion, extension is also made so as to include all pits and fissures, unsupported areas to prevent further caries formation, for a specific restoration, e.g. amalgam, direct filling gold, cast restoration. Conservative: It is preparation where tooth structure is removed as much as needed for a given restoration, without extending for prevention of further decay, e.g. slot, box only, tunnel, occlusal pits, composite restoration, glass ionomer restoration where only diseased portion is removed. Modified: Modified tooth preparation is one where tooth devoid of caries is prepared in the form of acid conditioning or acid etching to receive the restoration. 5 . Who is the father of modern operative dentistry? G.V Black 6. Classification of cavity preparation ? Classification of cavity preparation by G.V Black Class I: Cavities occurring in the pits and fissures of the premolars and molars and on the occlusal two third of facial and lingual surfaces of premolars and molars. It also includes cavities occurring on the lingual surfaces of the maxillary incisors. Class II: Cavities occurring on the proximal surface (mesial and distal) of the posteriors. Class III: Cavities occurring on the proximal surfaces of the anteriors that do not involve the incisal edge. Class IV: Cavities occurring on proximal surfaces of the anteriors that involve the incisal edge. Class V: Cavities occurring on the gingival third of the facial, lingual or palatal surfaces of all teeth. Class VI: Cavities occurring on the incisal edge and the cuspal heights of the posteriors 7. What are the types of cavity? There are three types of cavity based on the number of surfaces involved. They are: simple cavity, compound cavity and complex cavity. Simple cavity: cavity involving on surface of the tooth, e.g. class I occlusal cavity Compound cavity: cavity involving two surfaces, e.g. class II mesio-occlusal Complex cavity: cavity preparation involving three or more surfaces of tooth, e.g. class II mesio-occluso-distal cavity 8. What is enameloplasty? Enameloplasty is reshaping of enamel by selective grinding so as to include deep pits for easy cleansability. The area around the pit is made into a saucer shape and hence it is also called saucerization. 9. What is the cavosurface angle for an amalgam cavity? Cavosurface angle for an amalgam cavity is 90o .It is also referred as butt joint. 10. What is a cavosurface angle? it is the angle of the tooth structure formed by the junction of a prepared cavity wall and the external tooth surface.
DENTAL Viva Questions 11. What is the minimum bulk of restoration for an amalgam cavity? 1.5mm 12. What should be the depth for amalgam cavity? 0.2mm-0.5mm 13. What is the ideal width for an amalgam cavity? 1/4th to 1/3rd the intercuspal distance 14. What is the minimum amount of marginal tooth structures to be preserved during cavity preparation? Molar – 2mm, Premolar – 1.6mm 15. What are the principles of cavity preparation? Initial steps of cavity preparation: Establishing outline form Establishing primary resistance form Establishing primary retention form Establishing convenience form Final steps of cavity preparation Removal of remaining carious dentin Pulp protection Secondary resistance and retention forms Finishing of enamel walls 16. Why you have chosen the field of a Dentist? Well Sir, I chose the area of Dentist because of my interest in this field. I always want some new discovery in this field to make the world free from the mouth disease. I believe smile is the key for success and for this you should have good and proper teeth. 17. What do you mean by Dental Bridges? Dental bridges are the techniques which are used to replace missing teeth in a patient’s mouth. A dental bridge usually consists of two crowns with a false tooth “bridged” between. The dentist places the crowns on the teeth adjacent to the gap for strength and stability. Other options for replacing missing teeth include partial dentures and dental implants. 18. What do you mean by Dental Erosion? Dental Erosion is the wearing down of the teeth in the form of fissures or queries and other mouth problems. 19. What is the treatment for tongue cancer? Treatment of the tongue cancer will depend on the size of the cancer and its occupying area of spread i.e. from the lymph nodes in the neck. The best treatment of tongue cancers is surgery. Small cancers of the oral tongue can be quickly and successfully treated by surgical removal leaving behind little cosmetic or functional change. For the larger cancers that have spread to the lymph nodes in the neck combination of surgery and radiotherapy is needed. 20. What do you mean by Dental Caps or Crowns? It is a process applied when a tooth is extremely damaged. In this a dental cap or crown may be used to restore its appearance and strength. Crowns use to cover the entire tooth and seal chipped or broken areas. 21. What do you mean by Dental Implants? Dental implant is a technique which is used to replace missing teeth. A dental implant is a false tooth that is permanently fitted and secured to the jaw. In this process, a small titanium rod will be fixed into the jawbone and once the jawbone has adhered to the structure, a false tooth will be attached to it as its replica. 22. What would you do, in case you could do anything different in your schooling? Best answer: I wish I would have started school before. I feel as though I’m a small bit behind in my own life plans as a result of returning to school after. But this also provides me with an advantage in understanding what I really desire to do and having work experience which provides me with more drive to reach my aims. Second best: If not a dental hygienist than something for sure relating to a medical subject. 23. Describe the people you work with best. Best answer: Someone that’s high work ethics like I do, someone that’s prepared to collaborate and lend a helping hand if needed. Second best: I am friendly and outgoing and operate well and get together with pretty much everyone. I could be a leader or a follower if necessary. I like working with folks that are easy going. 24. What do you really think about truly being a hygienist, you’ll dislike the most? Best answer: May have a nerve problem in hands, arms, and back in the future because of repetitive hand work. Second best: Honestly, unable to command the cost of cleanings or the ability to financially work with low-income patients. 25. A patient has AIDS, can you still treat them? Best answer: yes..not everyone’s truthful about their medical health so you treat everyone the same ie that includes those with AIDS Second best: If a patient has AIDS I will still treat them as a hygienist because that’s part of my job description. I’m in no position to discriminate against anyone due to their condition or history. I might make it my responsibility to execute the job cautiously and attentive. DENTAL Viva Questions with Answers Pdf Download Read the full article
0 notes
Text
Effective Use of Dental Implants and Prosthetics for Dental Missions: Clinical Case Presentations- Juniper Publishers
Authored by Charles J Arcoria

Abstract
Dentists practicing in a mission setting have limited options for comprehensive treatment of patients because of the distance from the full resources available in conventional dental office setting. Because of the limited time aspect of team mission work, emergency extractions and limited operative treatment are typically performed. Inherently, the lack of follow-up care with extensive restorations and the need for proper maintenance, preclude many treatment modalities. As a result, this efficient but not simplistic model of mission dentistry is designed to deliver treatment that can be quickly accomplished with recurrent follow-up over a series of eight week time frames. These three clinical case presentations document the type of functional and esthetic treatment that can be accomplished with intermittent and minimal appointments scheduled over an interval of less than one year. This treatment concept depicts complete dentures retained with a minimal number of implants, bypassing the traditional Operative Dentistry procedures which in these types of cases cannot be easily maintained. The contrast of restoring severely decayed tooth structure vs. extracting those teeth which have a low probability of long-term survival, sets the basis for the combined maxillary-mandibular dental implants and prosthetics treatment plan. Designed to be used as a template for many adult patients, the mission dentist has an avenue for helping patients achieve optimum health, with reduced resources and costs. These clinical case presentations will demonstrate the: 1) effective use of multiple extractions, 2) precision alveoloplasty, 3) immediate implant placement in strategic locations in the mandibular and maxillary arches, and 4) placement of maxillary and mandibular dentures over the existing implants. Combining optimum prosthetics and esthetics, the emergency patient in a mission setting can obtain results that are both comprehensive and sustainable.
Keywords: Implants; Prosthetics; Dentsply
Introduction
How does the mission dentist develop and administer effective and long-lasting treatment plans for patients that are seen approximately three of four times in the span of one year [1]. This is the perplexing question that mission dentists have struggled with for decades. The effort to help indigent patients in distant locations who have minimal access to follow-up care, once the dental mission team has departed, is a crucial problem [2,3]. Because of the greatly improved success rates of placing and restoring dental implants within the past ten years, unsophisticated and uncomplicated treatment regimens which potentially bypass traditional dental care can now be frequently employed for even indigent patients. As a result, mission dentistry treatment planning must now encompass a more efficient method to insure longevity of restorative work to be undertaken. But, what can actually be accomplished involving intermittent intervals over the duration of one calendar year? It is acknowledged that the placement of multiple restorations in severely decayed teeth, without the availability for possible Endodontic and/or Periodontal follow-up treatment is a prescription for eventual failure. Practitioners have experienced a form of this problem during their undergraduate curricula, but not by design [4]. Phenomenal efforts were undertaken to “save” teeth at all costs, which is not a dishonorable pursuit. However, what commenced as a sizeable class II restoration on a permanent mandibular first molar, progressed to a full crown, then Endodontic therapy with a second crown, then Periodontal treatment to address the osseous support problems, and finally extraction as the unrestorable tooth has served its usefulness over the span of approximately five years in the dental education of several students [5]. But, is this really the best approach for the indigent patient that deserves better? Mission practitioners may need to discard many types of Operative and Endodontic treatment regimens that could only be successfully conducted within a traditional dental office setting. If the clinician were to be relieved of the burden that all teeth in all conditions in all patients must be saved at all costs, then comprehensive dental treatment could be accomplished with multiple tooth extractions, placement of dental implants in strategic locations, and secured with maxillary and mandibular dentures. Would this not be an acceptable form of long-term treatment for many indigent patients in a mission setting? Understandably, this new mission treatment regimen is more complicated instead of placing multiple restorations in severely compromised teeth or undertaking extensive Endodontic and Periodontal therapy. But, the long-term functioning capabilities and prosthesis management by the patient easily can surpass this problem. Many of the same principles and procedures we use in traditional implant dentistry in the private setting, with respect to implantsupported over-dentures and implant-retained hybrid bridges, can also be applied to domestic and international dental mission endeavors. The mini implants so often relied on to retain transitional prostheses while waiting for extraction sites and alveoloplasty to heal, and conventional implants to integrate, can also be considered as “permanent” supports for chair-side relined and retained transitional dentures when further care is limited by inaccessibility to conventional dental labs, or inability for further appointments. Thus, in a missional setting, whether domestic or international, if a minimum of three appointments can be assured within the course of six months to a year, then a transitional denture can be fabricated at the dentist’s lab of choice after only a single set of impressions during a first visit. Subsequently, at a second visit (whether by the original dentist or another from the same or different ministry) extractions, alveoloplasty and mini implant placement can be accomplished, with initial reline and stabilization of the transitional denture. Finally, at a third visit after complete tissue healing, a final chair side reline can be performed to re-adapt the mini implant retainers if needed, and contour tissue surfaces to their most ideal form. If no further treatment is possible then the dentist can take comfort knowing that the patient will be in a much healthier state, have a much more functional dentition, and have a significantly improved sense of self-esteem than when first encountered. Should circumstances change in the future, whether with respect to patient financial ability when dealing with domestic mission endeavors, or patient availability and proximity when care has been undertaken internationally, then such cases can be “completed” in the conventional sense with additional conventional implants and over-dentures or hybrid bridges as seen in the following cases.
Patient Selection and Evaluation
With this initial concept, it is important that the proper selection of patients be undertaken. Careful triage of patients during the initial mission dentistry experience will determine the best use of time and also the most optimum form of treatment. Substituting extractions for Operative preparations that are destined to fail in a short period of time, determine the type of implant placement and prosthetics that will be placed at a later date. Treatment can be accomplished by utilizing the following approach:
Triage teeth regarding the potential to salvage, or to extract.
Alveoplasty select areas.
Mandibular implant placement.
Prosthetic construction and placement.
For these patients, when the teeth are extracted, a precise and profound alveoloplasty will be performed, in all dimensions [6]. Clinicians should consider an alveoloplasty procedure as possessing a combination of artistic and mechanical methodologies. Mechanically, it is incumbent upon the dentist to smooth and level the osseous tissue to remove sharp and irregular projections [7,8]. In addition, it is just as important to reduce the height of the bone in each arch, superiorly on the maxilla and inferiorly on the mandible so that there is sufficient room subsequently for the prosthetics. This necessary dimension (inter-arch space), and properly planning for it, and actually purposefully creating it, is absolutely vital to the success of any combination dental implant and prosthetic case. This allows for adequate inter-arch space and sufficient room for the necessary thickness of an attractive and properly proportioned set of dentures [9].
Clinical Case Presentations
Case 1
Dale is a 52 year old male who stated: “I want to fix my teeth and have a great smile when I’m done!” He was missing a number of teeth, and many that were remaining in his mouth had failing restorations, and/or long-term poor periodontal prognoses (Figure 1A-1E). After reviewing radiographs and digital photographs, implants were not an option to replace the patient’s existing missing teeth due to severe atrophy in all edentulous areas, and extensive sinus pneumatization in the left maxilla (Figure 2). Due to loss of the posterior teeth intercuspal position centric stops and excessive attrition of the remaining anterior teeth, the patient exhibited posterior occlusal collapse, with approximately 5 mm of lost vertical dimension. The patient did not wish to consider “patch and fix” treatment, nor did he wish to replace current or future missing teeth with removable partial dentures. After thoroughly discussing other options, which potentially included complete dentures, implantsupported over-dentures, and implant-retained hybrid fixed prostheses, the patient requested removal of the remaining teeth and replacement with four implants in each arch to anchor screwretained hybrid bridges [10]. Once implant-supported prostheses were chosen, the option of conventional sinus grafts to allow placement of implants in the molar regions was discussed. The patient did not wish to pursue this regimen, due to the potential morbidity of the procedure itself (and the associated cost) or the additional healing time for graft maturation (traditionally six months prior to implant placement). Consequently, it was opted to place four implants in each arch, and incline the two maxillary posterior implants at approximately 25 degrees distally to disengage from the maxillary sinuses. Similarly, the mandibular posterior implants were inclined approximately 25 degrees distally to separate from the mental foramina and the small, but present, anterior loops of the mental nerves. The patient elected not to immediately place provisional restorations for the implants (as is commonly performed with the All-on- Four, and similar techniques) because it was desired to maintain optimal hygiene throughout the healing phase. The patient believed he could perform that much better if the provisional prostheses were removed, as needed. He also desired to lessen any potential risk factors such as post-operative infection around his implants, or mechanical overload (since he exhibited an aggressive bruxism habit), by completely submerging them beneath soft tissue during their integration period. As a result, conventional maxillary and mandibular transitional dentures were fabricated, and mini implants (MDI by 3M) placed to help stabilize and retain his mandibular transitional prosthesis throughout the treatment process. Treatment was initiated by extracting the patient’s maxillary teeth without complication, and performing judicious alveoloplasty to smooth and level his remaining osseous ridge prior to implant placement (Figure 3A&3B). Care was given to removing sufficient osseous height to allow room for the necessary layers of materials and components required by a hybrid bridge (teeth, acrylic gum tissue, supportive framework and implant abutments), though it’s worth noting that some of the inter-arch space required was actually gained by opening the occlusal contacting space dimension approximately 5 mm (2.5 mm per arch) to regain ideal vertical dimension. Once the osseous ridge was prepared, the posterior implant positions were sited using previous tooth positions as landmarks (Figure 4A&4B) (Figure 5). Initial osteotomies were prepared following the expected medial wall positions and angulation of the sinuses and paralleling pins were placed with digital radiographs taken to verify the position and angulation. It is worth noting that paralleling pins are significantly narrower than the final implants so care was taken to ensure that there was sufficient room distal to the paralleling pins to allow enlargement of the osteotomies without perforating the medial sinus walls. Once the posterior implants were sited, the anterior implants were located in the lateral incisor positions, and their osteotomies were directed towards the palatal aspects of the sockets to engage the thicker, denser portion of the alveolus. All four implants (ASTRA TECH EV by Dentsply, 4.2 x 11 mm) were placed at 45 newton centimeter (N•cm), following the manufacturer’s protocol of sequentially enlarging the osteotomies, and using copious sterile saline irrigation (Figure 6A-6D).
Bone grafting material (Symbios DBX Putty by Dentsply) was placed in the remaining extraction sites and the flaps were approximated without tension and closed with 4-0 PGA sutures (Hu-Friedy). The maxillary transitional denture was then delivered after relining with Coe-Soft. Four weeks later, the patient’s mandibular teeth were extracted without complication and alveoloplasty was similarly performed to smooth and level the boney ridge in preparation for implant placement. Care was given to remove sufficient osseous height for his future prosthetic needs, noting that approximately 2.5 mm of the inter-arch space required was actually gained by opening the patient’s occlusion to regain ideal vertical dimension. Following mandibular alveoloplasty, the soft tissue was carefully reflected to visualize the mental foramina, and both posterior implants were sited accordingly. Paralleling pins and digital radiographs were used, as with the maxillary posterior implants, to ensure the enlarging osteotomies would not encroach upon the mental foramina or anterior loops of the mental nerves. The two anterior implants were then sited appropriately between each other. All four implants (ASTRA TECH EV by Dentsply, 4.2 x 13 mm) were placed at 45 Ncm, following the manufacturer’s protocol; sequentially enlarging the osteotomies, and with copious sterile saline irrigation. After utilizing the prime mandibular positions for the permanent implants, sites were then selected for the mini implants and they were placed to a torque value of 40 N•cm. A 13mm implant was placement in the anterior area, while 10mm implants were used posteriorly to stay well superior to the mandibular canals. Bone grafting material (Symbios DBX Putty by Dentsply) was placed in the remaining extraction sites and the flaps were approximated without tension and closed with 4-0 PGA sutures (Hu-Friedy). The O-ring housings were placed on the mini implants with white rubber spacers used to prevent subsequent acrylic from locking into undercuts should the implants not be perfectly parallel. The underside of the transitional denture was hollowed out to allow complete seating on the tissue without binding or impinging on the O-ring housings. Following application of the associated primer, EZ Pickup (Sterngold) was used to capture the housings into the denture and provide tissue adaptation to the newly sutured gingiva. After curing, excess material was then trimmed and polished away, and the transitional denture was inserted with instructions to leave in place for the first 24 hours to help contain any intra-oral swelling. Thereafter, Dale was instructed to remove his lower temporary denture each evening to allow fresh air to better reach the tissue, and also to rinse with Peridex, approximately 2-3 times daily. A total of four months was allowed for maxillary implant integration, with a concurrent three months given to the implants in the mandible. All eight implants were uncovered at a single appointment and healing abutments were placed, with the tissue closed again with 4-0 PGA sutures (Figure 7A&7B). The maxillary transitional denture was relined with Coe-Soft to accommodate the new abutments, while the lower transitional denture required more preparation. The hard EZ-Pickup that was used to capture the O-ring housings previously was largely removed with an acrylic burr, while taking care not to loosen the housings themselves (Figure 8A&8B). Coe- Soft was then used to fit the underside of the transitional denture to the new abutments. Peridex use was resumed to help keep the tissue, sutures and abutments clean (Figure 9). One week later all sutures were removed and the patient was instructed to start brushing his tissue and abutments, not just to help keep them clean, but to also stimulate the soft tissue blood flow, and aid in its maturation. At this time initial impressions were made to send to the lab (Root Dental). Another two weeks were allowed for the soft tissue to gain its near-final dimensions prior to final impressions. The healing abutments were removed and open tray impression pins were placed. Custom trays were used with Aquasil Ultra (Dentsply) for final impressions. Tray design for implant impressions is critical, and must have sufficient space in the implant region to allow impression material to completely encase the impression pins (Figure 10A&10B). Otherwise, the pins can “flex” in the elastomeric impression material and affect the accuracy of not just the final model, but the framework and subsequent final prosthesis as well. Once final models were fabricated with the appropriate implant abutments, conventional baseplates with wax rims were made and fitted. A subsequent teeth-in-wax try-in was performed to establish ideal vertical dimension and facial form, ideal teeth and smile esthetics, and ideal phonetics. After approval by the patient, the case was returned to Root Lab where final Astra abutments were selected the frameworks were made. The maxillary and mandibular frameworks and their associated abutments were tried in and the fit verified visually, tactilely and radiographically prior to returning to the lab for final processing (Figure 11A&11B). At the final delivery, the mini implants were easily removed (unthreaded, without the need for local anesthetic) and the final abutments placed, and hybrids delivered, with all components torqued to Astra’s specifications (Figure 12). The screw access openings were sealed with silicone tape and tooth-colored or gingival colored composite resin (Herculite Ultra Flow by Kerr) as the site called for. Final occlusal balancing was negligible and easily performed to provide Dale the potential for bilateral group function occlusion (Figure 13A&13B). Optimal hygiene was discussed and demonstrated using a Sonicare, Water Pik, floss threaders or Oral-B Superfloss.
Case 2
Joe is a 53 year old male who presented to our office saying he had already been told he needed to have his remaining teeth removed and additional implants placed in his maxillary arch, along with implants added in his mandibular arch, to support full arch Zirconia bridges. His natural teeth and surrounding bone suffered from severe periodontal disease, but the patient needed to be informed that his three maxillary left implants suffered from extensive bone loss. This was initially seen on his digital panoramic radiograph, with the severe extent of the periimplantitis confirmed with digital periapical radiographs (Figure 14). The patient was surprised to learn that bone can be lost around implants and desired to understand the conditions and situations causing this loss [11]. Because of the uncertain and numerous potential factors that could cause bone loss, the primary supposition was that a continuation of a local or systemic process may have led to the bone loss around his natural teeth. Additionally, an associative factor for this patient was the fixed prosthesis design attached to the implants, and how it affected the peculiar type of occlusion [12]. The patient has a skeletal Class III maxilla-mandibular relationship, with an additional skeletal posterior bilateral crossbite tendency (Figure 15A-15D). His maxillary alveolar osseous structure is significantly smaller in every dimension than that of his mandible. But, the patient is dentally compensated to such a degree that all maxillary teeth flare significantly toward the facial to “fit over” his mandibular teeth. Consequently, when his maxillary left implants were inserted, they were placed in alveolar bone that was substantially palatal to the opposing mandibular teeth. In addition, the patient’s subsequent screw-retained 10 x 12 x 14 porcelainfused- to-metal (PFM) fixed prosthesis was designed to flare facially as his natural teeth had presented. This had the unfortunate side effect of creating severe non-vertical, off-axes forces on his implants and surrounding bone. This condition accounted for the significant bone loss. Additionally, in an effort to visually mask the flaring of the prosthetic teeth, the original lab technician created a large facial “ridge-lap” of pink porcelain. This had the unfortunate side effect of creating a significant food and bacterial trap that contributed to the bone loss around the supporting implants. As a result of these contributing factors, it was not recommended that his three current implants be considered healthy enough to help support a final restoration. The option of removing these implants was discussed and grafting the sites with the hope that they specifically, or the region in general, would support new implants in the future. This would result in significant loss of surrounding alveolar bone, and would likely entail 4 - 6 months of graft maturation, with no guarantee of success. It was conceivable that the bone grafting might prove less than successful, with the potential loss of more alveolar structure. If this was to occur, a conventional sinus lift would prove necessary. The patient desired not to wear a transitional denture for an extensive period of time, especially without the assurance that implant placement would be located in preferred areas. Therefore, the implants were opted to be put “to sleep.” This was expected to serve dual purposes: 1) allow the placement of new implants immediately in the previously nonimplanted adjacent sites, and 2) allow the submerged implants that were put “to sleep” to serve as a buttress for the bone. A lengthy discussion ensued with the patient regarding the design and type of final prostheses that would be appropriate. The possibility of screw-retained Hybrid bridges, specifically made in Zirconia, was rejected because his alveolar arch form discrepancy (underbite and crossbite) fixed prostheses would prove very problematic. The resulting smile esthetics and facial form of this type of prosthesis would be untenable. Although Zirconia might be considered a “strong” material, it has no functional resilience. In the incorrect occlusal scheme (compensated underbite/crossbite), this could transmit significantly more force to the underlying implants, thus essentially ensuring their failure from simple mechanical overload. An acrylic hybrid bridge might prove more resilient, and thus be potentially “kinder” to the underlying implants, but in a similarly inappropriate occlusal scheme it would be expected to fracture readily (most likely in the anterior region). Finally, a PFM hybrid might be considered stronger than acrylic, but porcelain has little shear strength, and in a flared design attempting to compensate for an underbite/crossbite fractures would be considered the expectation, rather than the exception Ideal esthetics were paramount to the patient. Optimal and easy hygiene were similarly paramount. Protecting the new implants and their overlying prostheses from inappropriate and damaging forces was critical. Ease of repair or replacement when away from home was not considered a luxury. Consequently, the recommendation was given for removable over-dentures, rather than screw-retained hybrid bridges. The patient had to overcome the predisposed bias that “removable” teeth were somehow inferior to “permanent” teeth. A wide-variety of patients and needs can benefit from different types of prostheses, and for different reasons. As such, removable prostheses could solve the patient’s problems by optimally enhancing oral hygiene. The prostheses can be removed from the mouth for unimpeded access to the implants, abutments and surrounding tissue. Also from an esthetic standpoint, the patient desired a natural facial appearance, and over-dentures allows a facial flange on the upper prosthesis with sufficient fullness to provide the right balance to the profile. Treatment was initiated by removing the patient’s remaining maxillary teeth and performing sufficient alveoloplasty to smooth and level the remaining alveolar ridge (Figure 16A&16B). Visual confirmation of the anticipated radiographic profile regarding the three maxillary left implants occurred, exposed portions of the fixtures were removed, the new coronal surfaces were smoothed, and the internal portions were filled with composite resin. Six new implants (ASTRA TECH TX by Dentsply, 4.5 x 11 mm in all positions, except the maxillary left posterior, which was 4.5 x 9.0) were placed evenly throughout the arch. All implants were placed at 40 N•cm, following the manufacturer’s protocol of sequentially enlarging the osteotomies, and using copious sterile saline irrigation. Bone grafting material (Symbios DBX Putty by Dentslpy) was placed in the remaining extraction sites and the flaps were approximated without tension and closed with 4-0 PGA sutures (Hu-Friedy). The maxillary transitional denture was then delivered after relining with Coe-Soft. It’s worth noting that the maxillary transitional denture was designed with approximately 2 mm of vertical dimension opening to help compensate for the patient’s shifting and over-closure. This increased vertical dimension also had the effect of rotating the mandible posteriorly and inferiorly, thus lessening his Class III facial appearance. Four weeks later, the patient’s mandibular teeth were extracted without complication and judicious alveoloplasty was similarly performed to smooth and level the osseous ridge in preparation for implant placement (Figure 17A&17B). Care was given to removing sufficient osseous height for his future prosthetic needs. Six new implants (ASTRA TECH TX by Dentsply, 4.5 x 11.0 in the four anterior positions, and 5.0 x 9.0 in the two posterior positions) were placed evenly spaced throughout the arch (Figure 18A-18C). All implants were placed at 40 N•cm, following the manufacturer’s protocol of sequentially enlarging the osteotomies, and using copious sterile saline irrigation. The anterior implants were placed with a slight lingual angulation to allow the new prosthetic teeth to be placed as far lingually as possible, and to help minimize the patient’s previous Class III facial appearance. Bone grafting material (Symbios DBX Putty by Dentslpy) was placed in the remaining extraction sites and the flaps were approximated without tension and closed with 4-0 PGA sutures (Hu-Friedy). The maxillary transitional denture was then delivered after relining with Coe-Soft. After utilizing the prime mandibular positions for the permanent implants, sites were then selected for the mini implants (MDI by 3M, 1.8 x10.0 mm), which were placed to a torque value of 40 N•cm. Bone grafting material (Symbios DBX Putty by Dentsply) was inserted into the remaining extraction sites and the flaps were approximated without tension and closed with 4-0 PGA sutures (Hu-Friedy). The O-ring housings were placed on the mini implants with white rubber spacers used to prevent subsequent acrylic from locking into undercuts, should the implants not be perfectly parallel. The underside of the transitional denture was hollowed out to allow complete seating on the tissue without binding or impinging on the O-ring housings. Following application of the associated primer, EZ Pickup (Sterngold) was used to capture the housings into the denture and provide tissue adaptation to the newly sutured gingiva. After curing, excess material was then trimmed and polished away, and the transitional denture was inserted with instructions to leave in place for the first 24 hours to help contain any intra-oral swelling. Thereafter, the patient was instructed to remove his mandibular temporary denture every evening to allow fresh air to better reach the tissue, and also to rinse with Peridex approximately 2-3 times daily. Three months was allotted for maxillary implant integration, with a concurrent two months given to the mandibular implants. All twelve implants were uncovered at a single appointment and healing abutments were placed, with the tissue closed again with 4-0 PGA sutures (Figure 19A-19D). The maxillary transitional denture was readily relined with Coe-Soft to accommodate the new abutments, while the mandibular transitional denture required more preparation (Figure 20A-20C). The hard EZ-Pickup that was used to capture the O-ring housings was removed with an acrylic burr, while care was taken not to loosen the housings. Coe-Soft was used to fit the underside of the transitional denture to the new abutments. Peridex use was resumed to help keep the tissue, sutures and abutments clean (Figure 21A-21D). One week later all sutures were removed. The patient was instructed to start brushing the tissue and abutments, for cleanliness purposes and to stimulate the soft tissue blood flow aiding in maturation. Initial impressions were taken, sent to the laboratory (Root Dental). Two weeks were allowed for the soft tissue to gain its near-final dimensions prior to final impressions. The healing abutments were removed and open tray impression pins were placed. Custom trays were used with Aquasil Ultra (Dentsply) for final impressions. Tray design for implant impressions is critical for success, and must have sufficient space in the implant region to allow impression material to completely encase the impression pins. If not, the pins can “flex” in the elastomeric impression material and affect the accuracy of not just the final model, but the framework and subsequent final prosthesis as well. Once final models were fabricated with the appropriate implant abutments, conventional baseplates with wax rims were made and fitted. A subsequent teeth-in-wax try-in was performed to establish ideal vertical dimension and facial form, ideal teeth and smile esthetics, and ideal phonetics. The case was returned to Root Lab where final LOCATOR abutments were selected, the frameworks were made and the final prostheses were processed. An exact duplicate maxillary prosthesis made for the patient to keep, especially for travel purposes. At the final delivery, the mini implants were removed (unthreaded, without local anesthetic) and the final LOCATOR abutments placed, and over-dentures delivered, with all components torqued to Astra’s specifications (Figure 22A&22B). Final occlusal balancing was negligible with all three prostheses (the two maxillary and one mandibular) and easily performed to provide Joe with acceptable bilateral group function occlusion (Figure 23A-23E). Optimal hygiene was discussed and demonstrated using a Sonicare (Figure 24A-24D).
Case 3
Joan is a 73 year old female desiring implant supported over-dentures. She was missing many teeth, and had worn a mandibular removable partial denture for over thirty years. Many of her remaining teeth had failing restorations, long-term poor periodontal prognoses, or had shifted far from their original and ideal positions. Most notably, her maxillary teeth and their previous restorations were unsound and unattractive, and her mandibular teeth had extruded to the point that they were in an un-esthetic “high” position when Joan spoke or smiled, all contributing to her being self-conscious (Figure 25A&25B). A number of restorative options were presented, including conventional dentures, implant over-dentures, and implantsupported hybrid bridges. Keeping and restoring the remaining mandibular teeth was discussed, but the patient did not wish to consider an orthodontic referral to discuss the possibility of tooth intrusion. Full-coverage crowns, while they could make the teeth themselves look better, could not be “intruded” sufficiently for optimal esthetics without prior osseous crown lengthening. In addition, there is a high probability of endodontic issues due to pulpal encroachment when preparing the teeth sufficiently to make the incisal edges of resulting crowns 2-3 mm lower than they currently are [13]. Even if the patient’s mandibular teeth were kept and restored, the insufficient alveolar structure in the molar areas to support implants would require a removable partial denture to gain molar function. As a result, the patient opted to have all remaining teeth removed and requested four implants in each arch to support over-dentures. Treatment was initiated by extracting the patient’s maxillary teeth and performing an alveoloplasty to smooth and level the remaining osseous ridge prior to implant placement (Figure 26A-26D). Care was given to removing sufficient osseous height to allow room for the necessary layers of materials and components required by an over-denture. These include: 1) teeth, 2) acrylic “gum tissue”, 3) strengthening framework and 4) implant LOCATOR abutments. Once the osseous ridge was prepared, the posterior implant positions were sited using previous tooth positions as landmarks. Initial osteotomies were prepared relative to the expected medial wall positions of the sinuses, and paralleling pins were placed with digital radiographs taken to verify the position and angulation. It’s worth noting that paralleling pins are significantly narrower than the final implants so care was taken to ensure that there was sufficient room distal to the paralleling pins to allow enlargement of the osteotomies to the appropriate size without perforating the medial sinus walls (Figure 27A-27D). Once the posterior implants were sited, the anterior implants were located in the lateral incisor positions, and their osteotomies were directed toward the palatal aspects of the sockets to engage the thicker, denser portion of the alveolus. All four implants (ASTRA TECH EV by Dentsply, 4.2 x 11 mm) were placed at 45 N•cm, following the manufacturer’s protocol of sequentially enlarging the osteotomies, and using copious sterile saline irrigation.
Bone grafting material (Symbios DBX Putty by Dentslpy) was placed in the remaining extraction sites and the flaps were approximated without tension and closed with 4-0 PGA sutures (Hu-Friedy). The maxillary transitional denture was then delivered after relining with Coe-Soft. Four weeks later, the patient’s mandibular teeth were extracted and an alveoloplasty was similarly performed to smooth and level the boney ridge in preparation for implant placement. Care was given here as well to removing sufficient osseous height for her future prosthetic needs. For this case, the clinician opted to “lower” her mandibular anterior teeth to return them to their pre-extruded position. The height of the remaining osseous crest was reduced to allow for this (Figure 28A-28F). Following mandibular alveoloplasty, the soft tissue was carefully reflected to visualize the mental foramina, and both posterior implants were sited accordingly. Paralleling pins and digital radiographs were used, as with the maxillary posterior implants, to ensure the enlarging osteotomies would not encroach upon the mental foramina or the anterior loops of the mental nerves. The two anterior implants were then sited appropriately between. All four implants (ASTRA TECH EV by Dentsply, 4.2 x 11 mm) were placed at 45 N•cm, following the manufacturer’s protocol; sequentially enlarging the osteotomies, and with copious sterile saline irrigation. After utilizing the prime mandibular positions for the permanent implants, sites were then selected for the provisional mini implants that would be used to help stabilize the mandibular transitional denture throughout the process. Two 1.8 x 13 mm implants (MDI by 3M) were placed in the two canine positions and were tightened to a torque value of 40 N•cm. Bone grafting material (Symbios DBX Putty by Dentsply) was placed in the remaining extraction sites and the flaps were approximated without tension and closed with 4-0 PGA sutures (Hu-Friedy). The O-ring housings were placed on the mini implants and the underside of the transitional denture was hollowed out to allow complete seating on the tissue without binding or impinging on the O-ring housings. Often, white rubber spacers are used to prevent subsequent acrylic from locking into undercuts should the implants not be perfectly parallel, but were not needed in this case, as the housings were intimate with the soft tissue (Figure 29A-29F). Following application of the associated primer, EZ Pickup (Sterngold) was used to capture the housings into the denture and provide tissue adaptation to the newly sutured gingiva. After curing, excess material was then trimmed and polished away, and the transitional denture was inserted with instructions to leave in place for the first 24 hours to help contain any intra-oral swelling. The patient was instructed to remove the mandibular temporary denture every evening to allow for air to reach the tissue, and also to rinse with Peridex, approximately 2-3 times daily. Three and one-half months were allowed for maxillary implant integration, while two and one-half months were allowed for those in the mandible. All eight implants were uncovered at a single appointment, healing abutments were placed, and the tissue closed with 4-0 PGA sutures. The maxillary transitional denture was readily cleaned out and relined again with Coe-Soft, while the mandibular transitional denture required minor preparation prior to its relining. The hard EZ-Pickup that was used to capture the O-ring housings previously was largely removed with an acrylic burr, while taking care not to loosen the housings themselves. Coe-Soft was then used to adapt the underside of the transitional denture to the new abutments. Peridex use was resumed to help keep the tissue, sutures and abutments clean (Figure 30A-30C). One week later, all sutures were removed and the patient was instructed to start brushing her tissue and abutments to keep them clean, while also stimulating soft tissue blood flow to aid in maturation. Initial impressions were taken and sent to the lab (Root Dental). Another two weeks were allowed for the soft tissue to gain its near-final dimensions prior to final impressions. The healing abutments were removed from all implants and open tray Astra impression pins were placed. Custom trays were used with Aquasil Ultra (Dentsply) for final impressions (Figure 31A-31D). Once final models were fabricated with the appropriate implant abutments, conventional baseplates with wax rims were made and fitted. A subsequent teeth-in-wax try-in was performed to establish ideal vertical dimension and facial form, ideal teeth and smile esthetics, and ideal phonetics. The patient’s case was returned to Root Lab where final LOCATOR abutments were selected, strengthening frameworks were cast, and the upper and lower implant over-dentures were processed for final delivery (Figure 32A-32F). At the final delivery appointment, the mini implants were easily removed (unthreaded, without local anesthesia) and the final abutments placed and torqued to Astra’s specifications (Figure 33A-33F). Final occlusal balancing was negligible and easily performed to provide the patient proper bilateral group function occlusion. Optimal hygiene was discussed and demonstrated using a Sonicare (Figure 34A-34D).
Summary
The lack of appropriate and sufficient resources to undertake comprehensive dental treatment plans for the mission patient has been a difficult problem for practitioners over the past thirty years. In addition, the lack of appropriate and consistent treatment time, and the inability to phase treatment over many months, greatly reduces the potential for an optimum outcome. This clinical case report displays a clear-cut, and cost-effective approach that is more serviceable for a wider range of adult patients, than attempting to complete a high-end comprehensive treatment plan. Although clinicians are trained to perform dental treatment that encompasses a wide variety of potential treatments and procedures, the dentist in the mission field has a limited number of treatment options. Proper triage of the patient determines the probable path of treatment, which invariably involves multiple extractions, implant placement and attached complete dentures. Mission clinicians can achieve professionally accepted standards of care for many indigent adult patients without the need for complex restorative treatment.
Acknowledgement
Dentsply, Susquehanna Commerce Center, 221 West Philadelphia Street, York, PA 17401, 1-844-848-0137.
Sonicare, 3000 Minuteman Road, M/S 109, Andover, MA 01810.
Sterngold Dental, LLC, 23 Frank Mossberg Drive, Attleboro, MA 02703-0967.
Symbios, Susquehanna Commerce Center, 221 West Philadelphia Street, York, PA 17401, Phone: 1-844-848-0137.
Hu-Friedy Mfg. Co., LLC, 3232 N. Rockwell St., Chicago, IL 60618-5935, 1-800-483-7433.
Aquasil, 38 West Clarke Avenue, Milford, DE 19963, 1-800-532-2855.
Peridex, 3M Oral Care, 2510 Conway Avenue, St. Paul, MN 55144-1000.
Water Pik, Inc, 1730 East Prospect RD, Fort Collins, CO 80553, 1-800-525-2774.
Oral-B, 301 E 6th St, Cincinnati, OH 45202, 513-634-1111.
Kerr Corporation, 1717 West Collins, Orange, CA 92867, 877-685-1484.
3M Oral Care, 2510 Conway Avenue, St. Paul, MN 55144-1000.
Dan Root Dental Laboratories, 5201 College Boulevard, Leawood, KS 66211, 1-800-874-5609.
For more Open Access Journals in Juniper Publishers please click on: https://juniperpublishers.com
For more articles in Open Access Journal of Dentistry & Oral Health please click on:
https://juniperpublishers.com/adoh/classification.php
To know more about Peer Review Journal of Dentistry & Oral Health
0 notes