#it has a WASD -> arrow function now
Explore tagged Tumblr posts
Visit Tumblr Blog
Explore Tumblr blogs with no restrictions, modern design and the best experience.
Last Seen Tumblr Blogs


Fun Fact
In 2020, 44% of users from Denmark used Tumblr daily.
Text
okay yayyy the compsci final works ^-^
1 note
·
View note
Text
2023 End of year keyboard review
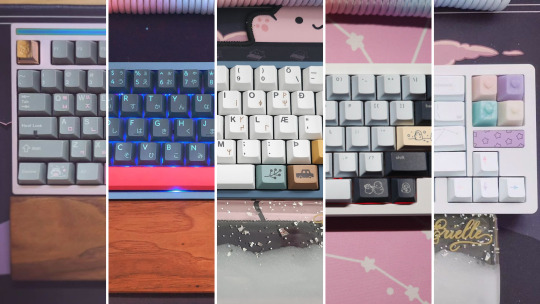
Hi yalls!
So we're approaching the end of the year. Since then, more keyboards have entered the market and I've managed to build some of them. At the same time, group buy orders managed to arrive. I'm so happy that I've been able to expand my collection with these items.
Honourable mentions
Due to how expensive the keyboard hobby is, I couldn't grab everything that was released this year. At the same time, I had to sell some of the keebs that I used to own due to a variety of reasons.
For starters, the QK and Jris series have been super amazing for opening doors for high-quality budget options in the market. I own the QK75 and remade my first keyboard build and I swear to god the improvement is immaculate.
Next is Mode Designs. They have released a bunch of high-quality boards and boy howdy, I wish I could own them all. The Envoy was well-loved in the community and the release of the Loop is so cute. I wish I could grab my hands on it, but I'm satisfied with my Sonnet, which is still available to this day and now has new colour options.
Lastly, it's the established keyboard companies like Asus and Razer as they've released some hotswap keyboards. The one that caught my eye the most is the Azoth. I would trade in my old Corsaid K70 for that keyboard. If anyone is willing to do so, hit me up.
Now, here are my top 5 boards.
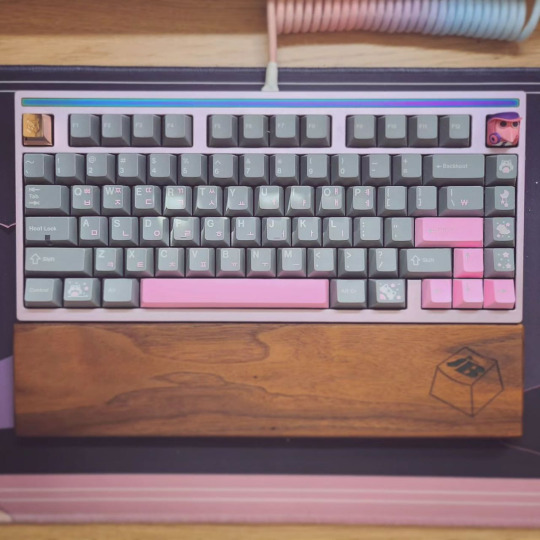
5. The Dreamscape build
We all know how I've felt about this build. It took 2 years and it's finally here. I love this build for the soft aesthetic and I'm so glad I can finally use this keyboard. It's such a shame it took so long because there were times I was losing hope and was considering giving it a different build.
Specs:
Ikki Aurora x EPBT Dreamscape
EPBT Dreamscape
Gazzew Bobagums
Artisans from Namong and From Scratch
As for the use and feel, it's nice. A bit mushy cuz of the switches. But at least no one will get mad at me when I type during meetings because apparently, they can pick up my typing sounds. Its the ultimate dream silent keyboard.
I'm just happy this build is finally complete cuz omg, imagine if this went on to 2024. I would lose my sh*t.
4. Rama Thermal
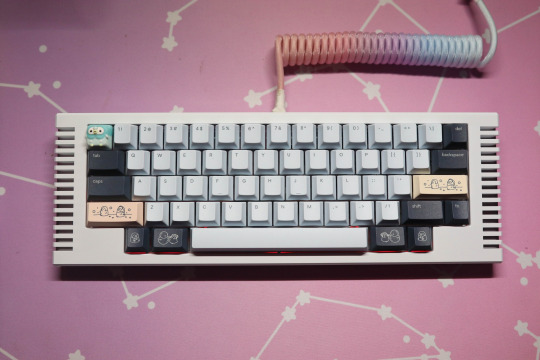
Getting used to the HHKB layout has been a challenge. Fortunately, I ended up getting used to it after a few months. I do miss my arrow keys but using function + WASD was a good alternative. I will admit that my productivity at work did slow down during the first few weeks.
Specs:
Thermal by RamaWorks
Osume Winterglow Eve
Clackbits
Artisans from Tulipclay
While Rama might have some controversies, it's actually a really nice board. Has a really unique look it, something that I'm after when I buy keyboards. However, after comparing it to other builds, it's not really great. The sound quality feels hollow (despite tape modding it), and the keycaps and switches sound output doesn't help at all so I ended up rebuilding it.
Right now, as of writing, I'm using temporary parts for a later build and it's going to take a while for me to find the right combo. I will update you once I made something worth showcasing a sound test. I am interested in trying out the Akko Penguin Silent Switches so hopefully a muted build is what this build needs.
If there is something I learned from this keyboard - DON'T BUY FROM RAMAWORKS.
3. The Nordic Build
The boards may look good but their reputation sunk so bad. I had to file a bank complaint just so they could reply and get this board shipped (mind you, it was a in-stock item).
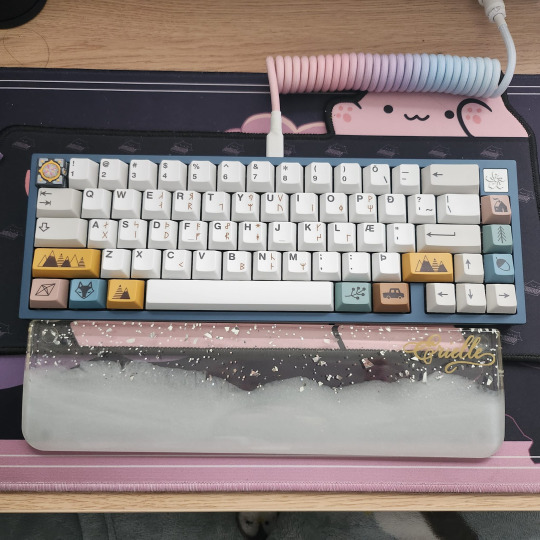
Originally, the keyboard that I wanted to use was the Loki65. But thanks to Mechs and Co, that was heavily delayed. I've always had eyes on the Fuji keyboard series since I started this hobby in 2021. So thanks to the Keebs For All Marketplace, someone was selling theirs for a good price and I got it.
Specs:
Fuji 65
EPBT Scandi
Hera Switches
Artisan from EzKeys
Aesthetics-wise, it looks pretty good. All the colours complement each other and I'm quite happy. The reason I wanted to make this build is that my favourite country is Iceland and I wanted to build a keyboard inspired by my trip there in 2019. The only flaw with this build is that the switches sound scratchy. But that's because I didn't lube them. Could be fixed if I do that.
I look forward to the day when the Loki65 gets shipped as I think my thoughts will change when it arrives.
2. The Tofu Build
Believe it or not, this was the first keyboard I built this year and I'm quite happy with how it turned out. The reason why built this keyboard is because I was inspired by Magic The Gathering - Kamigawa Neon Dynasty and this build resembles that trading card set.
Specs:
Tofu 60 (the original)
PBT Fans Kabuki-Cho
Tecsee Ruby Switches
This keyboard is THOCKY. It's not as thocky compared to modern builds but it has that low-profile sound that was highly sought after during the pandemic. I can see why this was a beloved build back in the early days of the keyboard hobby.
While the Tofu has increased in price over the years, I believe it's a testament to how the hobby has changed. I'm glad to have a piece of keyboard history in my collection.
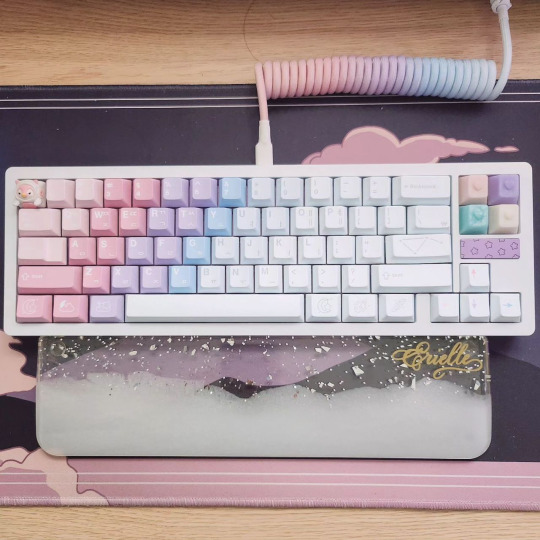
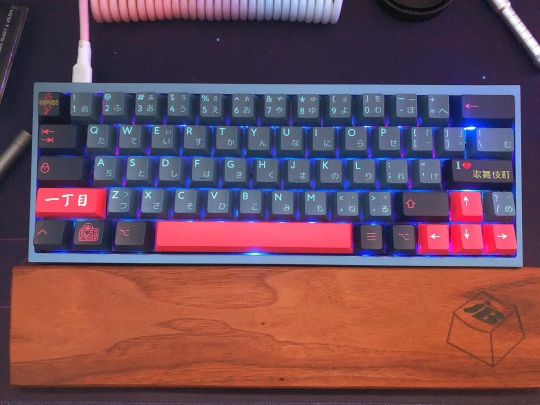
1. The Sonnet Build
This has to be my newest go-to keyboard. From the looks, sound, and aesthetics, it was worth it. It took a while for me to figure out which keycaps to use since it originally had Osume Dusk. I think the greys from the Hooties are much better.
Specs:
Sonnet from Mode Designs
GMK Hooty
Popu Linears
Artisans from Hibi.MX and Geekkey
Using this board has that 5/5 experience. The sound is so satisfying, the feel is really nice. The artisans complement the board so well. And the fact that the Sonnet is a really good quality keyboard adds extra points. I highly recommend getting the Sonnet when you have the chance to do so.
#mechanical keyboard#custom keyboard#technology#keyboard#mechanical keyboards#cute keyboard#review#keyboard review#end of year#end of year review
7 notes
·
View notes
Text
MSI Cyborg 15 AI Next-Gen Power Laptops !

MSI Cyborg 15 Laptop Presenting the MSI Cyborg 15 AI, a laptop that is a real game-changer in addition to being fashionable. Its elegant appearance and light weight chassis draw attention, and its customized 4-Zone RGB keyboard and AI capabilities improve productivity as well as gaming, setting it apart from other major gaming laptops. The Cyborg 15 AI is an excellent option for satisfying the many requirements and desires of users, ranging from students to casual gamers.
Portability and Futuristic Design Together The MSI Cyborg 15 AI’s remarkable chassis design, which includes a transparent bottom that gives off a genuine gaming atmosphere, redefines portability. With its featherweight champion status and 1.98 kg weight, it relieves the strain of hefty computers on your back and is very portable. With the Cyborg 15 AI, performance and flair are always at your side, whether you’re heading to school, a café, or a gaming competition.
MSI Cyborg 15 Keyboard With features designed to improve both elegance and usefulness, the Cyborg 15 AI keyboard is a wonder of both design and functionality. With its 4-Zone RGB lighting system, each arrangement can be fully customized to have a unique touch. The transparent power button, arrow keys, and WASD make it simple to recognize even in poorly light areas, offering both functionality and visual appeal.
A number pad is another feature that makes it more convenient for users to do computations or other numerical chores, making it a useful tool for work, study, and enjoyment.
Play AAA Titles Easily and Seamlessly Performance-wise, the Cyborg 15 AI is quite powerful even with its thin and light chassis. This powerful laptop’s NVIDIA GeForce RTX 40 graphics card allows for amazing visual quality and amazing gaming experiences. While improving AAA game performance, the DLSS 3 technique may significantly improve the picture quality in ray-traced scenes.
Discover New Heights with AI-Powered Potential The state-of-the-art Intel Core Ultra 7 CPU, which powers the Cyborg 15 AI, has a unique integration of a Neural Processing Unit (NPU) that achieves the ideal balance between performance and battery life. Since the NPU now handles AI tasks instead of the CPU, the CPU can concentrate on more important work, which improves efficiency and power usage.
The MSI AI Engine is an advanced system that enhances its intelligence by identifying the present situation and constantly switching the system between several modes. The Cyborg 15 AI dynamically optimizes performance depending on the user’s demands to guarantee the best possible experience, whether it is for gaming, creating content, or daily productivity.
MSI Cyborg 14 A13V: the pinnacle of performance The next stage of development is upon us: show off your sci-fi attire, immerse yourself in the world of video games in a cyberpunk setting, and defeat your rival with cutting-edge gear. With its futuristic mechanical look, the Cyborg 15 AI A1V is designed to be the most innovative and cutting-edge gaming laptop available.
MSI Cyborg 15 Display You can see through some of the internal components thanks to the transparent sections on the keyboard and chassis. Cyborg Series redefines the future with cybernetic trimmings and language.
LIGHT AND THIN BODY The 1.98 kg weight and 21.95 mm thin Cyborg 15 is ideal for gaming while traveling. The cover’s use of aluminum alloy ensures a light and silky feel at first touch.
TRANSLUCENCE PERIMEDIC The bottom, four sides, and other transparent sections of the chassis provide a see-through appearance on the outside. Entire gratification for enthusiasts of mechanical beauty, from ports to screws.
KEYCAPS INSPIRED BY CYBERPUNK The Sci-Fi accent space key, arrow keys, and power button provide a cyberpunk touch, while the highlighted neon WASD keys allow for more rapid and precise movement throughout the game.
BOTTOM CYBER-ENHANCEMENT Beneath the bottom plate, there are drawn geometric forms and lines that represent altered cyborgs from science fiction works. Additionally, there are styled words concealed in ventilation holes that communicate the gaming spirits of MSI.
Future-Gen Hybrid Capabilities
Intel Core Ultra 7 CPU up to 155H With its blazingly quick processing capabilities and Intel’s first integrated NPU for laptop local inference and power-efficient AI acceleration. The most recent Intel Core Ultra 7 CPU, model number 155H, is revolutionary. This is your pass to smooth and high-performance computing, whether you like gaming, creating content, or intensive multitasking.
BEYOND FAST: GEFORCE RTX 40 SERIES LAPTOPS The fastest notebooks for gamers and artists in the world are powered by NVIDIA GeForce RTX 40 Series laptop GPUs. They offer realistic virtual worlds with complete ray tracing and AI-powered DLSS 3 with the ultra-efficient NVIDIA Ada Lovelace architecture. With Max-Q, system capacity, power, battery life, and audio are optimized for efficiency.
Character Design by Paul Cheptea, Concept Artist “C15” is a cyberpunk-style concept figure that MSI created in collaboration with Romanian concept artist Paul Cheptea. Paul is a sci-fi and cyberpunk oriented artwork creator who has contributed to the design of popular video games like the Battlefield series. Blade Runner and Dune are two major sources of inspiration for Paul’s artwork. His vision for cyberpunk-style paintings and his wild, magnificent imagination are a wonderful fit for Cyborg 15. The precise version of Cyborg 15 is “C15”: a fully functional, mechanical body with a stylish form.
NEXT-GENERATION HEATING UPCOMING GAMING Real-time heat dissipation balancing between the CPU and GPU is made possible by the CPU&GPU Shared-Pipe architecture, which increases efficiency. combined with MSI-only thermal grease, guaranteeing peak performance throughout intense gameplay.
MSI Cyborg 15 Release Date To summarize, the Cyborg 15 AI has a sleek appearance, a lightweight build, an adjustable 4-zone RGB keyboard, strong performance, and AI integration. This gaming laptop offers outstanding gaming experiences in addition to a stylish appearance. The Cyborg 15 AI redefines the norms for gaming laptops with its stylish, portable, and intelligent design, providing gamers with a compelling product that checks all the boxes. The release date for the MSI Cyborg 15 AI on 2024
Read more on Govindhtech.com
0 notes
Text

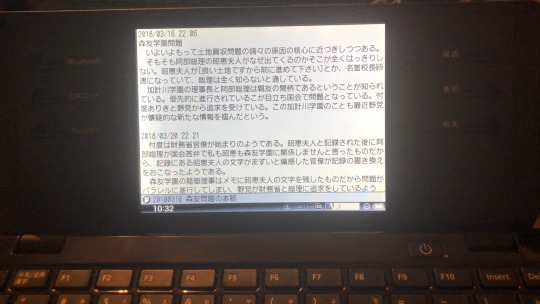


(PART 1 of this series of posts)
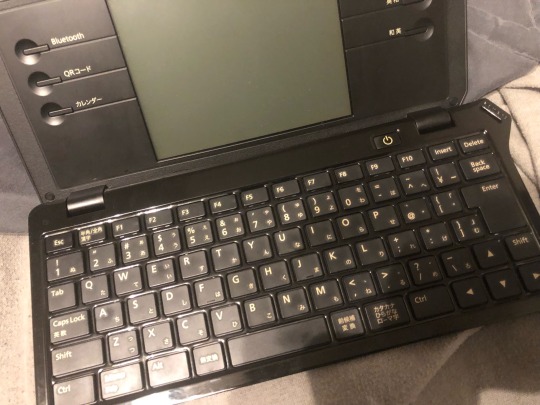
Here are some photos of my King Jim Pomera DM100, as I promised.
The screen is a LCD screen, giving a very different feel from the primitive but effective dot matrix screen on the Alphasmart line of word processing devices (which frankly resembles a toy laptop from 1997), or the e-ink displays on the Astrohaus Freewrite family.
DM100 is powered by AA batteries which last forever, relatively speaking. You won’t have to worry about plugging in for power on a long car, bus, or train ride.
Of the three, devices (Pomera DM100, Alphasmart, and Freewrite), the DM100 is the only one with a display or an interface resembling a “real” computer.
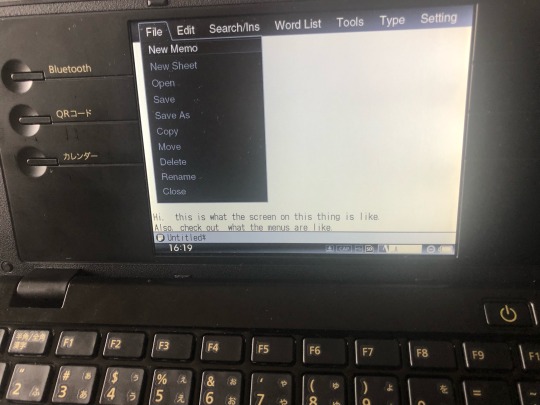
There’s a menu system operated by pressing the MENU key on the keyboard and moving with the arrow keys, which is hard to hit while typing even though it’s among the keyboard with letters, numbers, and characters.
It’s effortless to change the operating system language from Japanese to English, as the options to change the language are written in English to start with.
Typing in English requires nothing but pressing the CAPS LOCK key, which needs to be done before typing. Turning CAPS LOCK off reverts the keyboard to Japanese mode.
Also of note is the mere existence of arrow keys on this device to do things like move the cursor, which is completely absent from the Freewrite, and is done via WASD + key combos on the Freewrite Traveler.
The interface while being the most “intrusive” is by far the most obvious to operate and needs neither a row of specialist keys like the Alphasmart or a mess of key combinations combined with switches and buttons like the Freewrite.
I took pictures of some of the documents the previous owner in Japan had on the device before they sold it, and also some English text I posted myself after I wiped it, I don’t have any in-depth documents I want to show off right now, so I left my own out of these photos for now.
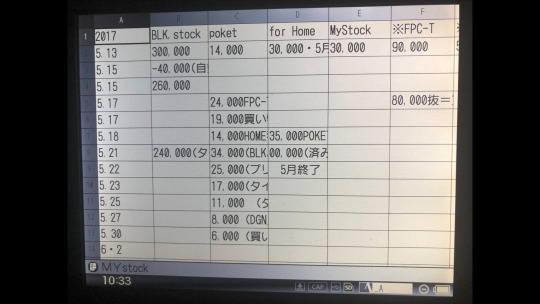
As you can see, this also can do very simple spreadsheets, but that’s the only non-writing related function on here aside from some sort of simple to-do list I haven’t messed with.
If the urge to spontaneously make spreadsheets is enough to distract you from your writing work, the Alphasmart or Astrohaus options are for you - otherwise this fits the bill in the “distraction free writing” category in my book.
Sending text files can be done by USB cable, the device is simply detected by PCs as though it were any storage device to drag and drop files on and off of. This works in terms of .txt files, you can take files from your PC to your PM100 or from the PM100 onto the PC, the device does not deal in formatting such as bold or italics as far as I can tell.
The lighting makes it look like a fingerprint magnet, but the device is matte, not glossy, only the photos make it look that messy.
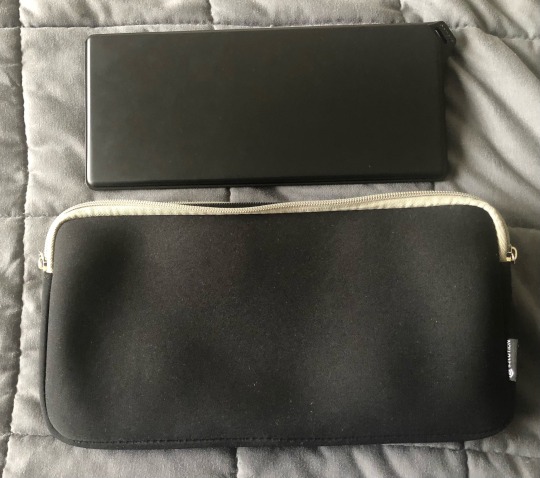
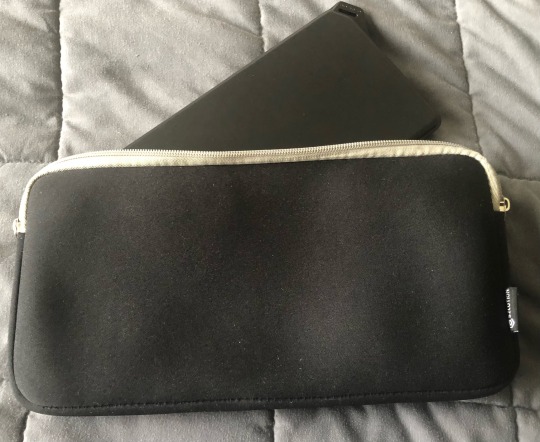
I took photos of the device alongside a Nintendo Switch for a sense of scale.
The case is a generic neoprene case intended to carry a portable Bluetooth keyboard, and being this device is essentially a Bluetooth keyboard with a screen, it’s just the right size.
Speaking of Bluetooth keyboards, the “Bluetooth” key on the left of the screen allows the PM100 to be used as a Bluetooth keyboard for a phone or tablet, a feature which I guess might be considered useful in the Japanese office professional scene.
There is also a button that allows a surprisingly big (maybe a page I think) amount of text to be scanned to a phone via a QR code that will be displayed on the device. This is a quick way to transmit text intended for something like an email or text message you want to send on the go, without having to have the phone out and watching on the phone as you type the email using the PM100.
This device has no wireless capabilities in terms of internet connection, wifi, or using Bluetooth to send or receive files, so if you care about having automatically syncing wifi backups of your work, the Freewrite devices are your only option.
And there’s a strap loop for keys, a charm, a wrist strap, or whatever else you want to put on it, as is common practice for Japanese devices.
Next I’ll have a few photos of the my Pomera PM100 in comparison to the Alphasmart Neo 2.
(PART 3 of this series of posts)
#pomera dm100#king jim pomera#writing tools#writing devices#word processors#alphasmart#freewrite#freewrite traveler#computers#technology#writing#writeblr#a.griffin writes
9 notes
·
View notes
Text
Week 4
22/03/2021 Monday
Controller Camera
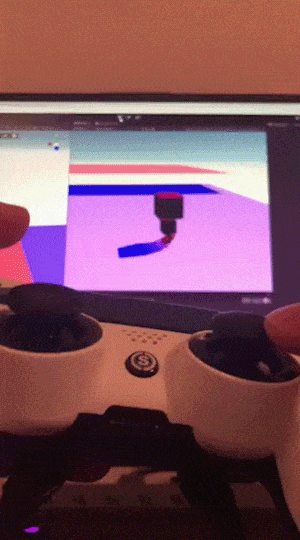
Today I got the PlayStation and Xbox controllers to work with the players. My group has decided that we'd like to have somewhat of a working prototype by Wednesday's class so that we have more feedback to show for assignment 1. Because of this, we'd like to have working controllers for both PlayStation and Xbox.
Ashton and Matt were having issues when trying to use the PlayStation controller, so Matt has lent me one of his spare PlayStation controllers. I spent today fixing some issues where the right joystick on the controller would not accurately rotate around the player. I fixed the camera issue by creating a new input axis that was relative to the Xbox and PlayStation controllers. The Xbox and PlayStation controllers use different axis for some weird reason, so I had to create a separate axis for each controller. After this, I just had to set each axis to their respective controllers.
This is a very broken way of getting the controllers working but it’ll do for Wednesday's class.
Gif of working Playstation controller camera movement:
23/03/2021
Tuesday
New player prefabs
Today I made four new player prefabs, two for keyboard (WASD and Arrow keys) and two controller (Xbox and PlayStation), I also set up a spawning system for these prefabs.
I created four spawn-able players from the player character that I had most up to date with my changes, the first one had WASD controls on a keyboard, the second Arrow controls on the keyboard, the third Xbox controller controls and the fourth PlayStation controller controls. I had to make separate players for the Xbox and PlayStation controls as a temporary fix so that I can differentiate the axis that I created yesterday. There is supposedly code that can determine which controller needs which axis, this was not working for me when testing it so for now I’ll be using this system.
Adjustments to the spawning system
I then had to do some tweaking to my player spawning system. This required tweaking as I had it so that either A or X on the Xbox or
I then found the issue that Ashton and Matt had told me about when trying to test out the player on a PlayStation controller. It was because of some code that I had introduced in the spawning system I had created. I had basically made it so that if A is pressed on controller one an Xbox prefabbed player would spawn and if controller 2 presses X a PlayStation prefabbed player would spawn. this was proven to be an issue for my group mates as they only had one controller being a PlayStation controller and with the code that I had set up, that meant that the Xbox prefabbed player would spawn. To fix this I just made it so that controller one would spawn a PlayStation controller and controller two would spawn an Xbox controller. For now, I have to use this system for spawning as I don't have time to set up one that can determine whether or not it is a PlayStation or Xbox controller.
Bug fixing
Lastly while testing I found a bug where if one player is on top of the other players head and they both jump at the same time they can get stuck inside of each other. To fix this, I added a boolean that when a player is jumping would be on and when the player is touching the ground would be off. I then added this Boolean as a requirement to be false when a player is on top of another player’s head.
24/03/2021
Wednesday
Camera Tweak
Today was the day of the crits, they were scheduled in the afternoon, so my team and I did some small tweaks to the player's camera while waiting. We were trying to find the perfect values to give to the camera movement to allow it to be smooth and comfortable. we loaded up Risk of rain 2 on my laptop to see how that game's camera functioned, upon doing some testing with it we went back to the camera movement and did some additional tweaking using that risk of rain 2’s camera as inspiration.
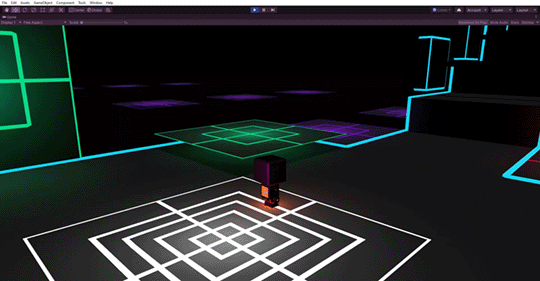
Disappearing Jump Pads
After doing this we still had time to spare so I decided to mess around in the unity project and came up with the idea for a disappearing jump pad. This was easy to make as it was just my jump pad and disappearing platform combined, it worked by thrusting the player upwards when they collide with the platform and then upon the player leaving the platform the platform is disabled. I then duplicated the new disappearing jump pad a bunch so it could be tested later.
Crits
It was now time for crits, we got the people in our crit group to come over and test out our game. hey gave us the following feedback:
Improve the lighting/aesthetics.
The camera is too close to the characters, feels claustrophobic.
More game modes/party games (Obstacle course, spleef, infected).
Further jump distance if the player is sprinting.
Improved Skybox.
Focus heavily on the multiplayer aspect (more teamwork puzzles).
Power-ups/Upgrades/Crystal life source that contains different abilities.
Mini Bot that carries your upgrades and parts.
Enemies to fight.
Adding extra horizontal movement when on jump pads.
Image of Crit testing:

Feedback from Game Jam
This would also be a good time to discuss our game jams feedback and rating. As I have stated we created an earlier version of the project for a week-long Game Jam, after the submission ended on the 22nd of Feb at 12am it then started a two-week-long voting period. During this, the contestants were to play other games vote on them and give feedback.
We received the following placement out of almost 2000 total entries:
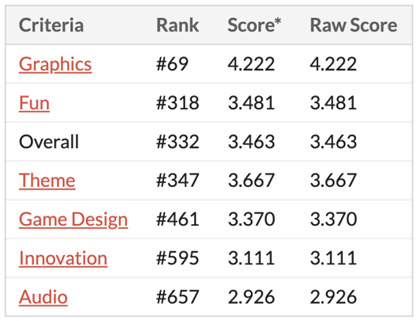
We received the following feedback grouped together by Ashton:
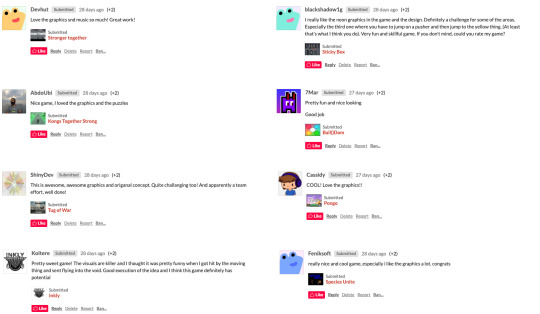
Positive Feedback:
The feedback below is purely positive talking about how much they enjoyed BroBots. It was great to see as it not only removed any concerns we had of our game but also lead to us deciding to continue with this as our project for studio.
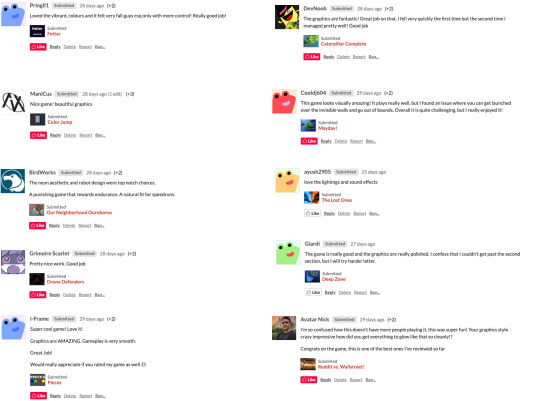
Critical Feedback:
The feedback below this is constructive criticism talking about what they felt the game needed. Such as a checkpoint system as they found it annoying to start from the beginning after every failure. They also talked about how this could work better as a coop game which we have now switched to. The need for some sort of explanation on the game's controls. How they found the timer system to be annoying, this was something the group decided to remove as we want the game to be challenging without the need for a count down. Lastly some smaller critics about improving the audio and menu screen. All of this was much-needed criticism that has helped us to create a much more enjoyable prototype.
These images were cut together by Ashton
Extra speed when on jump pad
The feedback from the crit session that I found most important for me was that they recommended adding extra horizontal speed when on a jump pad. This isn't something that I thought of before and made a lot of sense for our game.
I liked the idea of this so much that when I got home, I immediately added it to the player. So now once you've bounced on a jump pad you will get an extra movement boost which lasts until you touch the ground again.
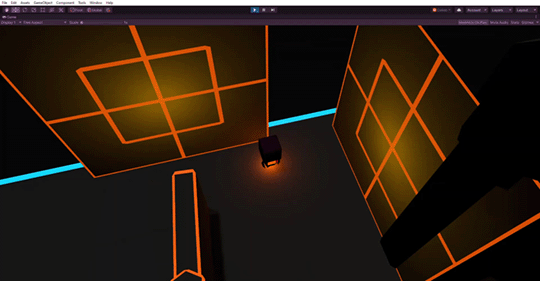
New Directional Jump pads
Lastly, when looking over the new Disappearing jump pad code I thought of a potential way to make jump pads that affected the player's movement on the X and Z axis. This is something I'd wanted to do for a long time but had no idea how to approach it and had more pressing issues to fix. But since we had just finished the required elements needed for the crit session, I now had time to implement this new obstacle.
The way the jump pad works is by increasing the player's height in a burst upwards while having a downwards gravitational force on the object to push it back down to the ground level. I couldn't use the same gravitational force to cancel the player's momentum on the X and Z axis as there is not a gravitational force applied on the player's horizontal axis. To get around this I made it so that once the player has been pushed if they exceed a certain speed on the X or Z axis in the positive or negative it will decrease by 1 every frame until it reaches 0. This allows the player to be thrust in a horizontal direction and then to have that thrust decrease over time until it reaches 0 giving a nice and clean pushing movement.
Gif of disappearing jump pads and extra player speed when jumping on pads:

Gif of new directional jump pads:
26/03/2021
Friday
Ragdolls working with jump pads.
Today I decided to look into getting the rag-dolls working with the jump pads. the reason it doesn't work is that when the player is in his normal state he is controlled by a character controller this controller is what is used to calculate thrust away from a lift platform. when the player is in the rag-dolling state its character controller is disabled this makes it unable to move and also interact with jump pads.
Because of this, I had to create a new system for adding thrust to a player. I use the character controller to add thrust because that is what controls the player's gravity. But since this is turned off and the ragdoll has a rigidbody components on it I'll be using something called rigidbody add force. I set up a new system with the jump pads so that when the player is in the ragdoll state and if a part of its body collides with the jump pad it will add a thrusting force to it determined by what type of pad direction it is (y, x, or z).
Gif of ragdolls working with jump pads:
1 note
·
View note
Text
Clean Logitech G710 +
Clean Logitech G710 + A gaming keyboard is primarily designed for computer gamers. In addition to a robust chassis, the keys are also much more resistant than on a conventional keyboard. These keyboards come in many sizes and heights. They are usually included in the scope of delivery of every new PC or Apple computer. Regardless of the cable connection, these keyboards are among the most reliable input devices. With a radio keyboard, remove the batteries. Then flip the keyboard over and gently tap the back several times with the palm of your hand to remove dust and crumbs that have slipped between the keys over time. However, you should carefully regulate the suction power. In addition, in the event that a key cap comes loose, it is advisable to insert a fresh dust bag beforehand. Then you can easily find the cap and reinsert it and press it down. Again, you get a rubber dome keyboard with multi-colored LED lighting with two different modes - constant lighting or rainbow. However, there is no wrist rest on this model. How much does a gaming keyboard cost? Compared to other gaming accessories, gaming keyboards are comparatively cheap to have. You can find the cheapest models in the lower two-digit range. The dimensions here are 46.3 x 22.4 x 3.1 centimeters and the weight is 950 grams. The KM-G6 (with lighting) or the KM-G8 (somewhat different layout, without lighting) is basically the big brother of the KM-G9. With 105 keys, it contains a full numeric keypad. Basically relies on the same technology as the smaller model. The disadvantage of this is the increased volume due to possible rattling, but the HP standard keyboard remains comparatively moderate in terms of noise, although the keys sound a bit hollow - there is a much louder standard. The status LEDs are located in a classic position and glow green in dots.
This is particularly noticeable because the little used keys continue to appear muffled, but the much used ones are all the more rickety.
However, if you want to enter the world of so-called mechanical keyboards, you know that the G81 is not a real mechanical keyboard.
In the beginning there were not only the keyboards with plastic keys, but models with rubber or
After that, they were blow-dried for a good 10 minutes and then 3 days on the heating.
If the keyboard is connected to the computer via a USB plug, the first countermeasure is to simply insert the keyboard plug into another USB socket.
If you press this key, you have access to your macro keys, which you can freely assign. The US company Razer was founded in California in 1998 and has been committed to gaming from the start. A special feature of Razer products is that they are usually named after animals. The mice are named, for example, after mythological snakes such as "Naga" or "Ouroborus". Razer keyboards, on the other hand, mostly have the names of spiders, such as "BlackWidow". The following video should clarify these modes and the colors used. Then I borrowed an electric cleaner from my father for the final with which he connected audio amplifiers e.g. crackling potis cleaned etc. in the end the stuff made the decisive difference. I didn't really want to try that and I decided to just believe Nanoxia on this point;). I really want to write a long review for it, mainly because I love how it sounds when I type now. The mechanical keyboard is great fun and the lights are brilliant, they can be a little difficult to figure out, but once I read the manual, I found it easy enough to use - it's a very professional keyboard, type with and before Everyone have fun because of the different lighting effects. I'm sure some of them are more of a gimmic than anything else, but I still enjoy it and see the different lighting effects - ideal for gamers and for lighting up the WASD and arrow keys with one of the options and has only certain keys on illuminate. It continues with the KLIM Lightning gaming keyboard, which is also a product from the lower middle class. With this model you get a semi-mechanical keyboard that offers you a clear keystroke, but is significantly quieter. The manufacturer also refers to this property as Blue Cherry MX Series switches. This is a rubber dome keyboard with a solid response speed of 2 milliseconds. The anti-ghosting function ensures that you can easily press several keys at the same time during the game. Unfortunately, you get the inexpensive device without the palm rest.
1 note
·
View note
Text
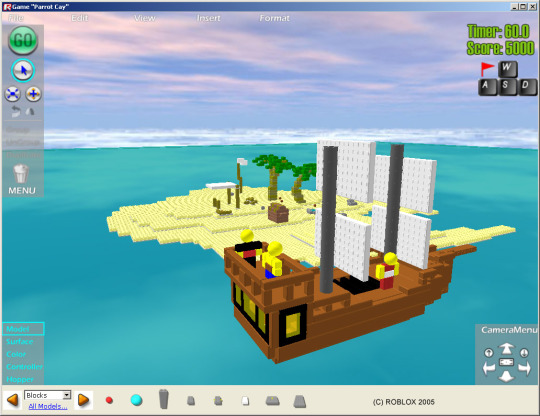
History of Roblox, 2003-2006
This post will be updated over time as more information is found.
2003

Roblox, Dynablox, and Goblox domains are registered by Jim Stevens.
2004
Up to July

Erik Cassel, Keith, and David Baszucki are Roblox’s primary developers.
Builds of roblox from this time were most likely attached* to the browser. The 3D view would show some general information, but build tools were contained in an html panel on the website.
*full ability to use the program required input from buttons on the roblox website, rather than in a UI hardcoded into the exe. Think of how the oldschool Toolbox worked: it was a webpage rendered inside the game window that could send special function calls to the program to insert content, use certain building tools, manipulate bricks, etc. This technique was abandoned by 2006 at the latest.
Surfaces and Joints existed. “Bumps”, a surface type resembling studs but later superseded by Glue, would create raised square bumps on the entire face of any surface it was applied to. To this day, trying to set a part’s surface to “Bumps” will instead turn it into a Glue surface.
Cards - A section of properties for parts and models. Would display in the upper right-hand corner of the screen whenever a part or model with set cards was selected. The text could be set by the user. The properties were Title, Description, Color, Image, Row0, Row1, Row2, Row3, and Row4.
Early evidence of planning for humanoids and multiplayer - Humanoids in the form of ‘PhysicalCharacter’, a subInstance of Models intended for models such as the red/blue figures, with support for Posing (sit, stand, and climb) and Control.
Roblox Website and forums are created. Client could be installed from the website.
In-game camera controlled by arrow keys, right mouse button, and scroll wheel.
2005
Up to the patent build (May)

Builds at this time, while not known if standalone or still required use of the browser, did not rely as much on build tools in an html side panel. All tools used for manipulating the level were contained within the 3D view, as well as a toolbox on the bottom of the screen for inserting parts and models, changing part colors, adding hopperbins, applying ControllerSchemes, and changing surface types. On the top of the screen were six drop-down menus: File, Edit, View, Insert, Format, and Run. A panel on the Left-hand side of the screen Contained basic build tools, from top to bottom: Go, Drag, Axis Drag, Resize, Rotate, Tilt, Group, Ungroup, Duplicate, and Delete. A Camera control cluster in the Lower right-hand corner of the screen could be used to tilt, zoom, pan, and focus the camera.
The property “className” was instead called “Keywords”.
Surfaces worked differently - each face of a part had 5 sub-properties: Type - the type of surface that face would use (Smooth or Bumps), Constraint - the type of rotating joint that would be used if any (Hinge, Motor, None, or SteppingMotor), SurfaceInput - the InputType for any rotating joints (LeftTread, RightTread, Steer, Throtle, Updown, Action1-5, Sin, and Constant), ParamA -the first parameter for any rotating joints, and ParamB - the second input for any rotating joints.
A mysterious surface called “Spawn” existed until early 06, used in models such as “Electron Gun” and “Figure with spawn gun.” Presumably, it would regularly respawn any object attached to it at intervals set by ParamA/ParamB. The cursor used when applying the ‘Spawn’ surface to a part is still in content/Textures up through at least 2008.
Motors were applied in a different way - one could choose from “LeftHandMotors” or “RightHandMotors” which would automatically set the surface’s input parameters to “LeftTread” or “RightTread” respectively. Another option, “OscillateMotor”, would set the input parameter to “sin”, allowing the motor to oscillate back and forth rather than constantly rotating. The tools for applying these motor types are, apparently, still in modern builds of studio.
Another, now long gone, service named “Level” with the following properties: SplashHTML - an unknown feature, though likely a window or text that would appear when a level was loaded to provide instructions, DragExtents - a constraint on where parts could be placed in the level, Messages - WinMessage and LoseMessage respectively, which would be displayed when the game reached either a win state or an end state, HighScoreIsGood - presumably to determine whether it’s better to have a low or high score (think golf), RunOnOpen - determined whether the game would being immediately upon being opened, InitialTimerValue - the amount of time the user would have to complete the level, InitialScore - the score the user would start with, TimerUpAction - what would happen if the timer ran out (Draw, Lose, Nothing, Pause, or Win), and TimerAffectsScore - how the timer would change the score (Decrease, Increase, or NoChange).
Parts had some more properties, too: HasOnTouch - a boolean to set whether the part would perform some action when touched, Color - still exists though hidden in the properties menu up until modern builds of Roblox - contains the Color3 value of the part’s BrickColor, Offset/RotVel - older names for “Position” and “RotVelocity” respectively, CanSelect - older name for “locked”, CanUngroup - sets whether the part/model can be ungrouped, NameShown - sets whether the name of the part/model would be displayed above it in the 3D space (code likely later reused for humanoids), Action - the action to be done when touched if HasOnTouch is set to true (Draw, Lose, Nothing, Pause, or Win), Sound - the sound to be played when touched if HasOnTouch is set to true (Boing, Bomb, Break, Click, Clock, NoSound, Page, Ping, Slingshot, Snap, Splat, Step, StepOn, Swoosh, or Victory), ChangeScore - the amount to be added to/subtracted from the score if touched when HasOnTouch is set to true, ChangeTimer - the amount to be added to/subtracted from the timer if touched when HasOnTouch is set to true, SingleShot - a boolean to set whether the OnTouch events can be triggered more than once, KeywordFilter - sets whether the part should look for all parts with a certain Keyword or without a certain Keyword (Exclude, Include) and Keyword - the Keyword to look for, TouchesToTrigger - the amount of times the part has to be touched to trigger the OnTouched actions, and UniqueObjects - How many unique objects have to touch the part to trigger the OnTouched actions.
Hopperbins were contained in the Hopper service and were not scriptable. Instead, users could select from the following “commands”: Clone, Grab, and Hammer. Grab could drag entire models or single ungrouped parts, and instead of displaying the chassis/yellow brick it does now, it simple displayed the click cursor with the blue text “grab”. Artifacting from this text is still slightly visible in current versions of the icon. Hopperbins could be added to a Level if building was required in order to complete it. HopperBins also had two other properties: “Cost” - the score the play would have to achieve before being granted the ability to use that HopperBin, and “Quantity” - unknown.
Chase and Follow ControllerSchemes.
Camera control keys possibly changed from Arrow cluster to UHJK, as the two known ControllerFlag schemes from this time were WASD and the Arrow cluster. Plausible that the behavior of Format>Camera View at the time was such that using WASD when the camera was focused on a model would not break that focus, thus allowing KeyboardLeft to be used without interfering with the camera.
Addition of the ability to view Properties of instances - a Properties window could either be shown by selecting it from the drop-down “View” menu or would appear whenever a part of model was double-clicked.
Undo function added.
Cards deprecated(?)
Up to the Morgan McGuire builds (October)
“Run” menu removed.
2006
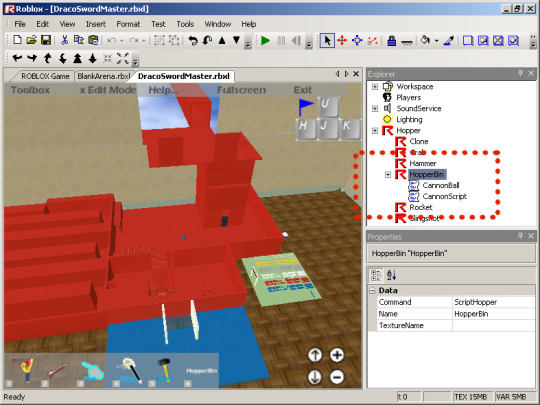
Up to march

The 3D view for edit mode was placed into a Visual-Studio styled IDE initially referred to as the “roblox developer’s environment.” Build tools were removed from the in-game UI and relocated to the topbar, as well as the 5 dropdown menus. An explorer window was added to view the child hierarchy of the entire Level (now referred to as “game”) and the Property of any instance currently selected would display below that.
Humanoids are added, allowing for models (specifically player models with a certain structure) to be controlled by ControllerFlags without the use of motors. In conjunction with this, the “Player” ControllerScheme is added, as well as the Players service, and the Player instance. This occurred during Fall 2005. Mike Rayhawk was commissioned to make designs for characters that were ultimately never used, though he did design the bulk of Roblox’s classic badge Icons.
A Lua virtual machine was incorporated with its own API specifically for interacting with roblox, resulting in the addition of scripts and scriptable hopperbins. An output and command bar were added for better interaction with the Lua VM. This occurred during Fall 2005.
Explosions are added, and display as big red orbs. The hopperbin gets another four pre-scripted options: Rocket, Slingshot, Laser, and GameTool.
The UHJK ControllerScheme is added, and the studio camera is again controlled via the arrowkeys. It is unknown when WASD becomes an option for controlling the camera.
When the surface tools were added to the topbar, the motor tool was taken from the old “Right-Hand Motor tool”, resulting in all motors being automatically given the “RightHandTread” surface input.
At this time the lighting service is now visible (might always have been, unknown), and has the following properties: TopAmbient2 - how the areas of parts facing toward the sun will be shaded, BottomAmbient2 - how the areas of parts facing away from the sun will be shaded, Spotlight2 - the color of sunlight, and ClearColor - the color to be displayed in lieu of the skybox if the quality level is too low to render it.
Up to June

All or most 04/05-era properties of parts and other instances, such as the “Level” service, are removed or renamed, leaving them more or less as they are until 08.
Multiplayer was added, bringing with it the NetworkServer and NetworkClient services, as well as the chat bar and chatlog. Early multiplayer games were hosted on dedicated roblox servers and user-made games were restricted to singleplayer.
Telamon joins the roblox team, becoming their fourth engineer. He gives humanoids the ability to jump and begins working on AI.
Up to October
User-made games, now called “places”, may be played in multiplayer.
Beyond
In January of 2007, ‘Hopper’ is renamed to ‘StarterPack’ to better reflect its intended purpose, and a dummy ‘Hopper’ class is added purely to ensure that, when loading older levels with HopperBins stored under ‘Hopper’, they would all be dumped into the StarterPack. The dummy class would then delete itself.
In May of 2009, Controllers were rewritten - the ‘Player’ ControllerType was hard-coded into whatever model was set as the Player’s character, and all the Controller functionality involving motors was reworked into VehicleSeats, resulting in some loss of functionality, as individual Hinges/Motors could no longer be set to rotate with specific inputs.
-DirtPiper
9 notes
·
View notes
Text
Advent Calendar 03: 2 Fire Buttons, 101 Keys
Greetings, and welcome to Advent Calendar 2022! This year we're being self-indulgent and rambling about video games.
As usual, the Advent Calendar is also a pledge drive. Subscribe to my writing Patreon here by December 15th for at least $5/mo and get an e-card for Ratmas; subscribe for $20/mo (and drop me a mailing address) and you'll get a real paper one!
I hope you're all having a happy winter holiday season. Let the nerd rambling commence!
I am about the right age to have toyed with an 8-bit micro, but it's something I never got into. My father was in networking, then avionics design, when I was little, and did a lot of telework before "telework" was a word, so we always had at least one computer in the house bright enough to run CAD software. By the time I cared about how computers worked, we'd already graduated from the VIC-20 that took cartridges and plugged into a TV, to an Intel 8088 with dedicated amber monitor and peripherals. I skipped the whole Atari/Commodore thing and went straight to PC -- never learned much BASIC, but still remember an embarrassing amount about writing batch files in MS-DOS, which will actually be relevant later.
While early console RPGs were taking over our personal living room, a very different kind of RPG was taking shape on microcomputers. The two major differences were storage space and input style. A Nintendo controller (officially a "game pad") is basically a mutated joystick. It has four directions, two fire buttons, and two other dedicated buttons that usually handle system functions like pause or bringing up the menu. A computer has an entire keyboard full of things to bang on when you want to tell the game something. Not all microcomputers had dedicated arrow keys, and the WASD style of movement hadn't taken shape yet, but on the up side, you didn't have to A/B your way through a million menus to access your inventory.
The earliest licensed Dungeons & Dragons game I can find is Akalabeth (1979), which is actually slightly earlier than I expected. Kudos to the Apple ][ programmer that bashed that together. Observant viewers might have caught the name Lord British in the credits and gone, "The Ultima guy?" Yes! And the much more recognizable Ultima (1981) was not far behind.
youtube
Now, if you watch that video, you'll note that it starts with a very long and boring segment of someone pressing some numbers, thinking it over, pressing some more numbers, etc, and only after that does it loop back to the title screen and let you start an actual game. You'll be familiar with this tedious mathematical process if you've ever actually played tabletop D&D. After that you get dropped into what actually looks like an intricately detailed top-down world by the standards of 1981 (compare to the cartoony visuals of the contemporaneous COLECOVision Donkey Kong a couple days ago)... with a cluttered list of command hotkeys down at the bottom of the screen. Vive le clavier. If you want to know more about how Lord British achived these stunning graphics, I recommend this article over at The Digital Antiquarian. And if you'd like to see the much prettier 1986 re-release, take a look at it here.
The other thing of note is how often Ultima asks the player to insert a new disk. The size and storage requirements of a computer game was limited only by the number of diskettes you could convince your publisher to copy and your player to keep on hand. Cartridge games -- which did exist as an option for computers, but were universal for consoles -- were limited to however much ROM was physically in the cart, and if you were willing to let it drive up the price, a chunk of battery-backed save RAM.
For a long time, the Ultima series was to computer RPGs what Final Fantasy was to consoles. The main line ended with the 1999 release of Ultima IX: Ascension, which going by the leaked details of the plot they didn't use, was really meant to be THE END. Electronic Arts, who'd owned the IP since 1992, thought otherwise, and continued trying to capitalize on it until 2014, when its last unimpressive free-to-play effort full of microtransactions shut down.
from Blogger https://ift.tt/cTHMSEt via IFTTT -------------------- Enjoy my writing? Consider becoming a Patron, subscribing via Kindle, or just toss a little something in my tip jar. Thanks!
0 notes
Text
Super smash flash 2 beta 1.3.0.1
DOWNLOAD NOW Super smash flash 2 beta 1.3.0.1
SUPER SMASH FLASH 2 BETA 1.3.0.1 MOVIE
SUPER SMASH FLASH 2 BETA 1.3.0.1 MOD
Ultimate modpack brings you a new experience of gaming modification.
SUPER SMASH FLASH 2 BETA 1.3.0.1 MOD
this is the super smash flash 2 version 1.3.0.1 in the sandbox mod is patch 4 esta es la versión del súper smash flash 2 1.3.0.1en el mod sandbox es parche 4. Latest Downloads: SSF2 Beta (1.3.0.1 beta): MEGA: Windows 64-bit (Installer) Windows 32-bit (Installer) Windows 64-bit (Portable) Windows 32-bit (Portable) Mac 64-bit Linux. Inspired by Super Smash Bros this fan-game allows to play. 3.1 This update reaches a huge milestone with every character now having a functional final smash and home stage. es la versin del sper smash flash 2 1.3.0.1en el mod sandbox es parche 4. The O and P keys still remain in P-1's possession, the P key for standard attacks, the I key for shield, and the 1 key for taunting. Latest Downloads: SSF2 Beta (1.3.1.1 beta): MEGA: Windows 64-bit (Installer. Make use of WASD keys to move Player while the arrow keys are used to control second player. The controls of Super Smash Flash 2 are also different from the previous version. Super Smash Flash 2 is a game made by hundreds of people over several years.
SUPER SMASH FLASH 2 BETA 1.3.0.1 MOVIE
Mp4 & MP3 GidiPortal, NetNaija, Fzmovies videos Download Movie download 720p. Super Smash Flash 2 is not a game made by one person in a month, like SSF1. DOWNLOAD: Super Smash Flash 2 Beta 123 All Final Smash Included Waluigi. It was the last of two versions released in 2020. Now, with the knowledge we've picked up along the way, we're striving for the utmost quality this time around. Beta 1.3 is the fourth revision of the final major release of the Super Smash Flash 2 Demo and followed the third beta phase of development. < Super Smash Flash 2 Demo View source Beta 1.1 is the second. It showed very few similarities to the actual Smash Bros gameplay as it was our first game, yet still somehow attracted large crowds of people. Though SSF2 has a different game engine than Super Smash Bros, the combat mechanics are similar. Super Smash Flash is back! You do remember us, right? The original Smash Bros fangame, most popular for content and difficulty, rather than gameplay, Super Smash Flash was…well, Super Smash in a Flash. After the revision of Super Smash Flash 2 Beta 1.3.0.1, this fan-game became a Tokyo.
DOWNLOAD NOW Super smash flash 2 beta 1.3.0.1
0 notes
Text
Fnf dark sheep with modchart

#Fnf dark sheep with modchart for free#
#Fnf dark sheep with modchart how to#
#Fnf dark sheep with modchart mod#
#Fnf dark sheep with modchart mods#
#Fnf dark sheep with modchart download#
Hope this game bring a little joy into your daily life.
#Fnf dark sheep with modchart download#
No download or installation needed to play this game. Play FNF - Dark Sheep with Modchart Tutorial game free online Friday Night Funkin FNF - Dark Sheep with Modchart Tutorial All about the game Player reviews and tips Music Agility For small kids Friday Night Funkin Description and purpose of the game Thanks to this mod, Boyfriends adventures will become even more complex and dangerous.
#Fnf dark sheep with modchart for free#
You can use WASD or the arrows to play FNF: Dark Sheep with Modchart Mod on the keyboard. Home Sheep Home is a Animal Game you can play online for free in full screen at KBH Games. This game has a siample gameplay but is very challenging. You will fall for it: Friday Night Funkin vs Jeb v2: Madness Expanded and FNF VS BERDLY v2.
#Fnf dark sheep with modchart mod#
You can also click on this link to explore the other two Mod versions of FNF Online.
#Fnf dark sheep with modchart mods#
In order to play, you need the FNF Mods (file attached at the end) to be extracted to. You can also download the game to your device to play offline. In the KBH games, you can play FNF: Dark Sheep with Modchart Mod online or right on our website by clicking on Play now!.
#Fnf dark sheep with modchart how to#
Once you get familiar with how to play, you can switch to the normal mod.Īt Friday Night Funkin: Dark Sheep with Modchart Mod, you must overcome the challenge and defeat your opponent to win the heart of the girl and her Dad. The challenges in FNF are tough for players, but with a mod, you can turn down the difficulty. The mod is receiving tons of preferences from the FNF community. It’s one of the most popular games developed by ninja_muffin99 and his team. 0 = closest note to any receptor, last index = the farthest away from any receptor.FNF: Dark Sheep with Modchart Mod is a well-known mod among Friday Night Funkin players. Note: Rendered Notes id's are special in the way that they act. Return's the alpha of the rendered note id 0 = closest note to any receptor, last index = the farthest away from any receptor. Return's the scale y of the rendered note id Return's the scale x of the rendered note id Return's the y position of the rendered note id Return's the x position of the rendered note id Set's the hud's zoom Actor's getRenderedNotes() Set's the current camera's zoom setHudZoom(int zoomAmount) Returns the current camera's y position setCamZoom(int zoomAmount) Returns the current camera's x position getCamY() Set's the current camera's position in space getCamX() Returns the hud's y position setCamPosition(int x, int y) Note: Sprite Path is normally the FILE NAME so if you have a file name of Image it'll go to assets/data/songName/Image.png so don't include the extension Hud/Camera setHudPosition(int x, int y) Als je het leuk vond, laat dan je indrukken achter in de reacties. Deze game is gecategoriseerd als Speelhal. Sprites makeSprite(string SpritePath,string SpriteId,bool DrawBehind)Ĭreates a sprite out of the specified image, returns the id you gave it. Je kunt het spel hier spelen FNF: Dark Sheep with Modchart Html 5 in online browser. These premade id's are the following: Sprite Id To get started every sprite has an id, and there are some id's that are accessible without creating one. Kade Engine exposes a lot of functions that let you modify elements in the game field. (0-7 is strum0,strum1,strum2,etc) get the default Angle for the strum (0-7 is strum0,strum1,strum2,etc) get the default Y coordinate for the strum (0-7 is strum0,strum1,strum2,etc) get the default X coordinate for the strum Whether to show the secondstrum line or not Whether to show the first strum line or not Whether to show the Hud and Strums or only the Strums The y offset to be added when the camera moves between a character NOTE If you watch the YouTube video, the Bongo Cat may not press some notes due to the OBS overlay does not show arrow keys. The x offset to be added when the camera moves between a character Usable in FNF Modding Plus, or default FNF. The angle that the Main Camera should be rotated Whether the player is in downscroll or not Kade Engine provides a list of global variables to be used in the lua scripting interface. Get's called when ever a step hits (steps are in between beats, aka 4 steps are in a beat) Get's called every frame (after the song starts) For i = 0, getRenderedNotes() do - sets all of the rendered notes to 0 0 on the x and y axsis setRenderedNotePos( 0, 0,i)
0 notes
Text
Super Smash Flash 2 Download Portable
It showed very few similarities to the actual Smash Bros gameplay as it was our first game, yet still somehow attracted large crowds of people. Now, with the knowledge we’ve picked up along the way, we’re striving for the utmost quality this time around. Super Smash Flash 2 is not a game made by one person in a month, like SSF1. The one for Super Smash Bros Flash 1 is an installer called 'ssfsetup.exe'. Super Smash Bros. Flash 2 is just the program files itself in a zip archive. The second is still an unfinished project from what I understand.
Download Super Smash Flash
Super Smash Flash 2 Full Game
The controls of Super Smash Flash 2 are also different from the previous version. Make use of WASD keys to move Player while the arrow keys are used to control second player. The O and P keys still remain in P-1's possession, the P key for standard attacks, the I key for shield, and the 1 key for taunting.
Super Smash Flash 2 Portable Super Smash Flash 2 Unblocked Super Smash flash unblocked download. Home Download Games! Arcade Corner.BAT Files Troy's Blog Contact Super Smash Flash 2. Super Smash Flash 2 Portable prepare for some epic battles! With 28 classic characters to choose from, the possibilities are endless!
With Super Smash Flash 2 however, things are different. SSF2 uses the first folder inside SharedObjects, like every other online flash game, it can find and dumps 'localhostSSF2V9.sol' inthere. The game swf online and offline are the same, offline simply has a wrapper exe around it.
Happy new year to all!
Download Super Smash Flash
The year 2021 has (finally) arrived, and looking back we had a busy past year with the SSF2 Rotation Release Cycle and the announcement of Fraymakers! After a year like that many of you may be wondering what’s in store for this year at McLeodGaming.
The End of Flash Player
Many of you probably already know that the end of Flash Player support arrived today, with the full transition to being globally disabled arriving on January 12th, 2021. As the creators of one of the most ambitious Flash-based projects on the internet, it pains us greatly to see it go. Flash is what allowed SSF2 to blossom into the ultimate Smash tribute that you see today, and it’s also what put McLeodGaming on the path to being a real independent game studio in the early 2000s. We may never see a technology exactly quite like Flash again in the future, and we think it’s important to look back and appreciate how it allowed all sorts of creative individuals to express themselves, despite all of the negative press.
Super Smash Flash 2 Full Game
On the bright side, a project called Ruffle has been underway for quite some time to emulate the Flash Player in-browser without requiring a plugin. It’s made great strides supporting tons of games from the ActionScript 2.0 days, including an almost fully-functional Super Smash Flash 1 (which we’ve enabled a toggle for on the Super Smash Flash home site, go check it out!). It may be some time before we see SSF2 supported since the game is built in ActionScript 3.0, but in the meantime you can always download the game to play on your desktop using Adobe AIR in place of the Flash Player.
(By the way, if you’d like to support such an awesome project, we encourage you to check out Ruffle’s Open Collective page)
SSF2 Development
Rest assured, despite the demise of the Flash Player and the end of the Rotation Release development cycle, SSF2 isn’t stopping any time soon! While the SSF2 Team is going to start off a bit slower this year, there are plenty of content plans in the pipeline. Expect more news to come as the team begins picking up the pace again.
Also please be aware that moving forward, the primary source for SSF2 news and content will be found onSuperSmashFlash.com. While we may mention SSF2 updates here on McLeodGaming from time to time, the optimal place for uninterrupted, dedicated updates can be found there (and most existing SSF2 pages here will be automatically redirected). Also make sure to follow SSF2’s new Twitter account and subscribe to its new YouTube channel so you don’t miss out anything!
Fraymakers Development
Team Fray is excited to continue with the development of Fraymakers after its incredible Kickstarter campaign! There are plenty of characters to be animated, stages to be designed, and music tracks to be laid down, so you can expect us to be quite busy getting ready for Early Access launch. We’re already seeing some fun data come in via our Backer Content Survey (exclusive to backers only!), in addition to a lot of buzz throughout our socials about all the things everyone is looking forward to in Fraymakers. Make sure to join our socials listed over in the sidebar so you don’t miss any updates!
If you were unable to support the Kickstarter and are hoping to help in some way, one great method to do that is to wishlist Fraymakers on Steam. This way you’ll be notified when the game is released in Early Access and it’ll help add momentum to our initial launch.
Anyway, that’s all for now. Talk soon!
0 notes
Text
Get Pipped: Postmortem
Last week our required (ch.10) reading was on functionality, completeness and balance as I mainly focused on functionality mostly on my hitboxes on the cars. They function very well and did need to be refined quite a bit more than I anticipated. But as a whole the prototype functioned well where a naïve tester could sit down and naturally gravitate towards the arrow or wasd keys and figure out the basic mechanics as this is defined as “the system is established to the point where someone who knows nothing about the game can sit down and play it.” (ch.10, pg.313). As I had two play testers who did just that and very much enjoyed the “murdering of cars” and both felt like that the mechanic that were implemented were functional but felt the game wasn’t complete as it got quite repetitive with the same enemies following the same patterns coming at the player.
What I very much wanted to try with this game is to play around with hitboxes and to have different mechanics different hitboxes. I implemented this by having game where the player crashes into opposing racers to try and kill them but only if they get hit them in the back left and right corners. But if they hit them on the side they would bounce you and if the player get hit in their back corners the player would lose. The control scheme for this game is very simple as all the user has to do is use the left and right arrow keys or the A and D keys to move left and right.
If I had to redevelop the game now with what I have learnt of developing this game is I would have the enemies be more complex as the only move in a straight line at a singular speed. As well as add some powerups to the game to spice up the game as it can get repetitive very quickly and a finish line as currently the only way to win is to kill 10 enemy racers.

0 notes
Text
How to Choose the Best Mechanical Keyboard in 2020
We spend a lot of time talking about the best CPUs or GPUs to make your computer more awesome, but you might be forgetting one upgrade that can change the experience drastically for the better: a mechanical keyboard. I make no secret of my obsession with mechanical keyboards as both a hobby and a tool of my profession. Naturally, I spend a lot of money on them. You don’t need to, though. Mechanical keyboards have never been cheaper or better, and it’s an upgrade you’ll benefit from greatly. You might be spending more time than usual at your computer as we all hunker down to limit the coronavirus pandemic, so this is a good time to jump in. But…which board should you get? And what’s all this about switches? We’re here to help.
What Makes a Keyboard Mechanical and Why You Should Have One
The keyboards that come with desktop computers are usually some version of the rubber dome design. You push the key all the way down, and the contact on the dome triggers a press. The downside is that the rubber membranes are mushy, inconsistent, and you have to push all the way down every time. Laptops aren’t much better with their scissor switches. They offer a little tactility, but the low travel and mushiness are still grating over time.
A mechanical keyboard can best be described as any board with switches that actuate before the point of bottoming out. For example, Cherry-style metal contact switches. When you press the key down, a stem moves into the housing and allows metal contacts to touch. This is what fires off each letter. Other types of switches are considered mechanical but have entirely different mechanisms. Topre switches are popular but rather expensive. These switches have a stiff rubber dome and a conical spring. Here, the actuation is triggered by a change in capacitance of the spring as you press, and the tactile bump comes from the dome collapsing. There are also Alps-style metal contacts, buckling springs, and Hall effect switches. These are all fairly uncommon in modern boards, though.
Using a mechanical keyboard can make you a much more effective typist thanks to the precise and consistent feel of the keys. Many switches also have high tactility that helps you estimate when a press will register, allowing you to release and move on to the next key without bottoming out. For gaming, you can use switches that are much smoother and faster to actuate than the keys on cheap membrane boards. The sound of a clicky switch can also be fun, provided you don’t have nearby coworkers to annoy.
Mechanical boards are also built to last. Each switch is good for millions of presses. Even with heavy use, a good mechanical keyboard can last many years. Enthusiasts actually harvest switches from decades-old keyboards with bad electronics to use in newly build custom boards.
Choosing a Form Factor
The first step in choosing the right keyboard is deciding what layout you want. The traditional full-size board is still the most common, but you might want to use your mechanical transition to change it up. A full-size board has all the keys you need to operate a computer without worrying about any function layers. There’s a full number pad as well. The main drawback of this size is that it’s rather large and inefficient. You have to move your hands rather far to reach everything and the number pad means your mouse will be pushed farther away from your main typing area. This is why I don’t like full-size boards personally.
The next step down is tenkeyless (TKL), sometimes known as 80 percent keyboards. These boards still don’t rely on function layers for basic features, but there’s no number pad. There’s still a number row, of course. If this sounds stressful to you, just give it some thought. How often do you really need a dedicated number pad? Unless you’re doing data entry, you can probably do just fine without one. This makes the board much smaller and brings the mouse in closer.
The next step down in mainstream boards is 60 percent, which has become popular in the last few years. A 60 percent board just has the alphas, number row, and modifiers. There are no dedicated arrow keys, no F-row, and no number pad. All those features are there, but they’re in the function layer. So, you hold function and press a different key. For example, the arrows are usually Fn+WASD or Fn+JIKL. The main advantage of the 60 percent form factor is that it’s compact and efficient once you get used to the function layer.
If none of those do it for you, there are some more exotic layouts that are just catching on. The 65 percent size is smaller than a TKL, but you get arrow keys and a few more keys like delete, page up/down, and so on. This is a good middle ground that I’m personally very into. The WhiteFox is a 65 percent board. They don’t take up too much space, but they reduce your dependence on function layers.
There’s also the super-small 40 percent category. These boards have just alpha keys and a few modifiers. They’re essentially pocket size and usually have at least two function-key layers to get all the basic keyboard commands covered. If you get good with a 40 percent board, you can be extremely efficient as everything is so close together.
Choosing a Switch
So, you know what size board you want, but what do you want typing to feel like? Cherry’s main mechanical switch patents expired a few years ago, so there are a ton of clone switches that are Cherry-compatible. The vast majority of boards use Cherry and Cherry clone switches, so let’s go over those.
The first order of business should be to get a switch tester. You can get one for under $20 on Amazon that has all the major Cherry variants: blue, green, brown, clear, red, and black. These switches come in three different varieties: clicky (blue and green), tactile (brown and clear), and linear (black and red). Each of those categories is split into a heavier and lighter version. Here’s a chart with the weights of each. Note: the “color codes” of clone switches are usually the same for switches with the same properties.
I can’t tell you which switches you will prefer, but I’ll note that heavy typists tend to use tactile and clicky switches, but blacks are a common choice as well. Don’t make a final decision yet, though. Your goal should be to figure out how what general type of switch you like and what weight feels best. Cherry is not the only game in town anymore, so you might be able to mix and match some of these properties to find the perfect switch.
Some of the most popular Cherry-compatible switches come from Gateron and Kailh. Gateron switches look like Cherry switches, but Kailh has a variety of innovative choices. For example, the “box” switches like the Pale Blue below are less wobbly than traditional Cherry-style stems.
Kailh x Novelkeys Box Pale Blue switch.
If you find you like tactile switches, you may consider trying a Topre board. There are very few switch testers with Topre domes, so you might need to jump in with a real keyboard like the HHKB2. Keep in mind, if you fall in love with Topre, that limits your choice of boards and keycaps. It also means you’ll spend a lot more on the keyboard.
Picking a Pre-Built Board
Now you know what pieces you want, so the challenge is finding the right board. I will say off the bat that I think you should steer clear of “gaming-oriented” boards. They try to lure you in with flashy lights, but they require annoying, buggy desktop software and often use poorer quality clone switches. Cherry, Gateron, and Kailh are all respected switch manufacturers.
A good starting point is WASD Keyboards, which makes boards in full, TKL, and 60 percent form factors. The 60 percent option is actually a re-branded Poker 3, which is available from multiple retailers. This is an excellent little board with programmable layers and a full aluminum case. WASD has a full selection of Cherry switches, as well as some more exotic options like Zealio and Cherry. That’s rare in pre-build keyboards. MechanicalKeyboards.com has numerous options like the aforementioned Vortex Poker 3, but also well-reviewed boards from Ducky, Leopold, and more.
All of the above boards are priced competitively but are not particularly inexpensive. Rantopad makes some nice TKL boards with Gateron switches. Those are a little cheaper than Cherry switches, but I think they’re just as good. You can get these for under $100.
I’m also very much a fan of the Magicforce 68 (above), which is a 65 percent board that can be had for around $60-70 with either Gateron or Cherry switches of your choice. These boards are excellent values and a good way to try a switch out in practice without dropping a lot of cash. Drop (formerly Massdrop) also has several high-end 65 percent and tenkeyless boards available most of the time. The Alt is a fully-programmable compact 65 percent, and the Ctrl is a similar tenkeyless.
Input Club’s Kono Store has a number of solid boards under the Hexgears brand. IC’s own WhiteFox, NightFox, and Kira boards are sold out at the moment. When and if they come back, those are great options for a bit more money.
Getting in Deep
So you have a keyboard, now what? Depending on how crazy you want to get, you can start customizing your board with custom keycaps and cables. You could even just decide to build your own keyboard. But why would you want to do that? With a custom board, you can put your experience with switch testers to work and find the perfect switch. Most of the cool, innovative switches in the keyboard world aren’t used in retail keyboards.
The aforementioned Zealio switches are popular and come in many variants. There are also numerous Kailh switches that offer additional spring weights and click designs that don’t have a Cherry equivalent—check out the selection at retailers like NovelKeys. There are a handful of hot-swappable boards out there, but you’ll probably have to learn to solder if you want a keyboard with these exotic switches.
The KBD75 from KBDfans.
If you want a custom board but are apprehensive about soldering, KBDfans might be your best bet. This China-based keyboard manufacturer sells DIY kits, but there are also finished boards in stock on its website. You can even buy a DIY kit of certain boards and pay $17 extra to have it assembled with the switches of your choice.
If you don’t want to jump right into custom boards, you can still jazz up your mechanical keyboard with some custom keysets. Just make sure you get a board with a mostly standard layout. You can look at the bottom row to get a good idea of whether or not a board is standard. It should have 1.25-unit modifiers and a 6.25-unit space bar. Anything else and custom keysets get more expensive and rare.
Most keysets are sold in group buys, which you have to join prior to production, then wait for the set to be produced. This can take months and gets pretty confusing. The easiest way is to join buys organized by Massdrop. You can also buy some custom sets straight-up from companies like Pimp My Keyboard and Originative. Almost every custom keyset is MX-only. If you get a Topre (or the rarer Alps), you’re out of luck here.
Expect to pay at least $60-70 for a basic set and well over $100 for a high-end custom set. You get what you pay for, though. Keycaps made from PBT or thick double-shot ABS are more durable and pleasant to type on than the caps that come with keyboards. Even the nicer mechanical keyboards don’t go all out on the keycaps. I guess they assume you’ll buy something fancy if you care that much.
The Zephyr with GMK Nautilus keycaps.
If you do decide to build a custom board, be prepared to spend at least a few hundred dollars on the kit. These keyboards are in high enough demand to command high prices, but not enough to be in mass production. So, you can easily spend $500 or more before you even get to keycaps or switches. The Zephyr above is a $600 kit that includes a PCB, plate, and case. A more modest custom kit might cost $250-300.
I’m going to close by mentioning something that sounds absolutely bananas to people who aren’t into the hobby, but you’ll get a kick out of it, I assume. For additional customization, there are “artisan keycaps.” They’re hand-sculpted and cast single keycaps that are meant to be used as decoration on keyboards (see above). They are mostly made in small batches and sold in raffles, as well as the occasional group buy on Drop. They’re expensive, and you’ll pay even more if you miss the group buy and have to buy second-hand from someone in the community. Maybe this guide will be your first step along the way to that kind of incoherent madness. I’m sorry.
Check out our ExtremeTech Explains series for more in-depth coverage of today’s hottest tech topics.
Now read:
How to Build a Star Trek: The Next Generation Mechanical Keyboard
Building a NASA-Themed Mechanical Keyboard
PCMag’s guide to the Best Mechanical Keyboards
from ExtremeTechExtremeTech https://www.extremetech.com/computing/241872-choose-right-mechanical-keyboard from Blogger http://componentplanet.blogspot.com/2020/03/how-to-choose-best-mechanical-keyboard.html
0 notes
Link
Today we’re going to talk about the SteelSeries Apex PRO keyboard with new Omnipoints switches. Now we have done several videos on the keyboard and the switches during Computex – which you can check out over here, but now that I’ve actually had the keyboard in my studio for about a week I can finally make up my mind of what I think about the Omnipoint technology.
The Key Technology
The general overview of the Omnipoint switches is that there’s a magnet at the bottom, there’s another magnet in the stem, and when you press the switch it creates this magnetic flux. You can then measure that flux and through software and through different calibration processes, you can change the actuation point on when that key is registered from 0.4 millimeters to 3.6 millimeters, which gives you that whole range of movement of when that key is actually registered. So you basically can create your own speed switch or create something with a little depth for typing, basically all the way up to 3.6mm which means that you most likely will have to bottom out the key in order to activate the switch.
It is important to know that measuring this magnetic flux – known as the Hall effect – is nothing new, this is not something that Steelseries has patented and in fact we’ve seen this sort of a actuation customization that on the Wooting One and Wooting Two keyboards a via the Flaretech optical switches. So there’s a laser and it detects how much distance is passed between the stem and the bottom. So the Omnipoint direction with magnets a kind of better in a way because we have a much larger range of actuation customization. But this isn’t something that Steelseries invented, so I wanted to clarify that here.
APEX PRO & APEX PRO TKL
Overall I’m pretty happy with the execution of the Omnipoint switches, but it is an expensive keyboard for $199 or $179 for the TKL version. Now before we get into the meat of the Omnipoint switch, let’s talk about the keyboard itself. I love the low profile nature of the actual frame, there is no excessive pieces sticking out above the F keys, nothing on the sides, nothing below the space bar. I love the low profile and really smooth wrist rest, and the fact that it attaches magnetically is wonderfully executed.
There is a USB passthrough in the top left corner that is illuminated, which is why the cable is so thick. That is one disadvantage, it would be nice if the cable was removable, but you can route it across the bottom of the keyboard to channel it in whichever direction you want. The keyboard feet have one orientation angle, which is nice. However, they’re not strong enough, so if I push the keyboard from the front they might collapse and that has happened to me many times and it destabilizes one end of the keyboard and completely messes up my a finger placement on the WASD area.
Now regarding this whole OLED screen implementation in the actual keyboard. In the beginning I was like this is kind of cool, but after having used it in some games, it’s kind of pointless. I will say it is fantastic for menu customization so you can access your macros, your illumination, your actuation point, your profiles and different other settings without actually going into the driver software. All that is done through the OLED screen, and with the help of a little joystick wheel and one multi-function button, but the actual wheel feels very cheap. The scroll steps for example are kind of weak, I feel like I have no control. The actual click of the wheel is also kind of poor and for $200 this is not what I was expecting.
OLED screen
The reason why I say the screen is pointless for in-game integrations and applications is because it is so limited. It works in games like CS:GO or DOTA 2 or Minecraft and you can see your kill-to-death ratio, you can see which round you’re on, you can customize when those appear and for how long they stay on screen. But the screen is kind of out-of-sight, when I’m playing a game I’m never looking down to see what my kill-to-death ratio is and what round it is. From my perspective, given the supported games list is so little, unless you play one of the supported games this is really not a value add.
Of course, you can do cool things with animated GIFs and actually draw your own little graphic to display. But do you ever really look at the keyboard for any information outside of maybe readjusting your hand or seeing where certain characters? Basically the display on the keyboard is more of a gimmick than it is actually useful in real life. That is of course my opinion based on my recent experience.
I will say that the Omnipoint switches really saved the APEX PRO and the PRO TKL keyboards because they really are fantastic at what they do and how they feel. I’m a huge fan of Gateron Red switches, they are currently my favorite and the Omnipoints remind me of those with their incredibly smooth travel distance throughout the entire range, which is exactly what you need when you can customize the actuation points from 0.4mm to 3.6mm. Just let that sink in for a second, less than half a millimeter to press before the keys register. In game sometimes I would not realize that I’d be pressing the Shift key and my character was walking or sometimes I would be going slightly sideways because my finger weight was at registering as a keystroke.
At one point my favorite switches were MX Speed that registered at 1.2mm, so they’re really fast and I was really comfortable with that, but eventually moved on to something that actuate at 2.0mm. But here with this keyboard you have that whole customization range basically. You can make your own speed switch, you can go back to red switch, you can maybe even drop the actuation point all the way to 3.6mm in case you really want to bottom out while you’re typing, which is what makes the switch so special.
The Software
In the software you can select between one and 10, but you won’t know exactly where the actuation happens in terms of millimeters. So that makes recreating a certain switch that you’re comfortable with kind of difficult. What is five? With a range of 0.4mm to 3.6mm the 5 setting should be 1.6mm, so I guess they are expecting you do to your own math.
Also important to note Omnipoint switches are only located on 61 keys. Everything below the F keys and everything to the left of the arrow keys. The rest of the keys are Steelseries Red.
I do appreciate the per-key actuation customization for those 61 switches because my WASD area can be really fast. Same thing with my spacebar. My Shift and Control can be fully actuated so that I don’t accidentally press them or so the weight of my fingers don’t register as a keystroke. And the same thing when I’m doing something around the WASD area just to eliminate any errors while I’m in game. But when I go back to my desktop, all the keys go back to my custom 2.5mm actuation point, which I’m quite comfortable with and I like to bottom out anyway. Basically, the whole per-application and per-switch customization is awesome.
Weirdly they’ve only recently added the per-key illumination customization, before that it was just the whole board and you chose between the different color presets and different profiles. But now you can select your entire range of keys and color them to whatever you want.
Shortcomings
Now I am disappointed that Steelseries decided to use ABS key caps instead of something more premium and quality. Once you go PBT it’s hard to go back and you notice the difference in quality of the actual key caps. Just noticing the sub-optimal feel on a premium keyboard like the APEX PRO is disappointing.
You should know that Steelseries decided to avoid the analog direction of being able to detect how far you press and actually registering it that as movement. For example, like we’ve seen with Flaretech, which is on the Wooting One keyboard, you can usually use that feature to like slow down your character depending on how far you press. That is not present with the Omnipoint switches, so it’s only based on the actuation customization and that’s cool, but it’s also limited due to the tech that’s built into the switch.
If you are interested in actuation customization plus having the full analog control, check out the Wooting One and Wooting Two keyboards because through the drivers software you can remap certain keys so they are seen by the program as analog inputs, which gives you the full range of motion in terms of how far you press to, how fast your character moves. I was also hoping to see more functionalities and features built into the Omnipoints switch outside of the actuation control, so like maybe setting the recent point at certain level and having different actuation points beyond the first one, so it’s like double tabs activates something else. Basically, having dual functionalities that are built into the hall effect functionality would be amazing. However, as it is it’s quite basic with the actuation registering distance only. It is cool though to play around with different acceleration points and seeing how it influences your gameplay and your typing experience or whatever.
Given the 100 million key strokes this keyboard will last you for a while so you can switch back and forth depending on how deep you like to press or how light you like tap. All right, so that’s my experience with the APEX PRO keyboard, the Omnipoint switches are fantastic, the actuation customization is super fun, but it’s one of those things where once you set it maybe for like certain games and certain applications.
The OLED screen is pretty underwhelming, it would be nice if it was slightly bigger or maybe in a more visible area. I would like the keyboard feet to be improved. And also the actual little scroll wheel to have a bit more resistance and feel more premium, because using it to control different things just didn’t feel really good.
Thankfully, the frame plus the amazing wrist rest really kind of completes the package and makes this a really premium keyboard, so if you don’t mind spending $200 and want to play around the customization of the actuation for the 61 switches then the APEX PRO and APEX PRO TKL might be for you.
The post Steelseries APEX PRO Review – Does Omnipoint REALLY Matter? appeared first on Hardware Canucks.
from Hardware Canucks https://ift.tt/2TWa9iP
0 notes
Text
62 Windows Eight Secrets You Require To Know
Click this and select 'Shut Down' or 'Restart'. X, click 'Shut down or sign out' and choose the choice you require. Apple loves OS X the way it is and it will most likely stay the way it is for the remainder of its life.
A vocal, minuscule minority has pooh-poohed the improve in version numbers, but that is hardly a reputable complaint in a globe exactly where mobile apps update silently and successfully.
2When logged on to a Windows ten desktop, the disconnect choice is not accessible. Two values in specific are essential: VSIbase and VSImax. To select the desktop version, alter the setting to Usually in Web Explorer on the desktop.
Back in the XP and Vista days this was fairly simple—you could hold down the Ctrl important whilst choosing numerous windows on the taskbar, and then correct-click on any of them to tile or cascade them.
It tends to make the tiniest font readable, particularly on my tiny Sony VAIO pocket pc. The new OS combines the list of installed apps with Reside Tiles and shortcuts pinned to the correct pane.
Cannot say any cons about it really… its just that there are random ‘popping’ sounds occurring. You can also click to see a list of all communications in between them and you at a glance.
So you begin with discovering devices, discovering what versions they are on, prepare them by performing that initial capture of the profile and file information. Whilst moving a tile, if you require a bigger view of the Begin screen move the tile towards the leading or bottom of the screen to zoom out.
two. Confirm the UAC prompt that Windows loads. four. Verify if the Registry worth AllowOnlineTips exists currently. Dword (32-bit) Worth from the context menu.
Disabling the Shop is a great way to stop anybody else from installing any undesirable app to your method, nevertheless, there is no default choice to disable the Windows Shop.
Step 2: Then kind the following command and hit “Enter” to continue. Step 3: Then input msoobe command and hit “Enter” to continue. Getting the taskbar, begin menu, and action center transparent can be great for your eyes, but the function consumes some of the sources on your Computer.
Let us checkout some of the most helpful Windows ten tweaks, tricks and suggestions I’ve discovered. Microsoft has a webpage with directions for each of these techniques. Numerous chemists just require to print a spectrum on their personal or to insert it into a slide. NMR reader is much more than sufficient for these tasks.
Utilizing this shortcut, you can rapidly produce a sticky note, open a new sketchpad or do a screen sketch. Step 2: Launch the AutoHotKey software program. A dialogue box will appear prompting you to produce a sample script. Click the ‘Yes’ button on the dialogue box.
Whilst you are poking about Cortana’s choices, you can dive into the Notebook menu to fine-tune precisely what individual information Microsoft’s digital assistant can access. Keep in mind, nevertheless, that like Google Now, Cortana’s effectiveness is straight associated to how a lot she knows about you.
Once more, it is up to you to determine which important to use. Because some Apple Bluetooth keyboards do not have devoted arrow keys, Veeer also functions with the WASD keys.
Note. If you cannot discover the driver automatically Windows will recommend you to specify the path to the essential device driver. Microsoft has produced steady and substantial improvements to Windows ten which is why much more and much more longtime macOS owners are now switching to it.
Now it indicates that any Window customers may have much more than 1 apps installed on their pc device and it could be such that the normal customers may have a quantity of apps installed on their device.
It is also the regular tool utilized in all tests executed in the internationally acclaimed study project VDIlike a Pro (formerly recognized as Project Virtual Reality Verify).
Windows ten does not come with a pre-installed application to play DVD films, which appears crazy to us but there you have it. 15 (unless you upgraded). So, we are going to share a technique that will assist you crack your Windows password.
Later iterations minimized the interface by such as a welcome web page with hyperlinks to the Web, a section for new subjects, and a web page with hyperlinks to all subjects in the app.
If you can boot into the operating method -- even if you have to boot into secure mode -- you ought to carry out a file scan to verify for issues.
Every thing is nonetheless there, occasionally just in various places. “How about the taskbar? ”, you ask. Accurate, the default taskbar for Tablet mode is fairly various, but only superficially.
Windows ten can do it, OS X El Capitan can do it—and Chrome OS can do it, as well. By default, it does not have a lot there, but if you happen to be on the desktop a lot, you can add some hyperlinks to your preferred applications.
The procedure is fairly comparable, click (…) and navigate to settings, exactly where you have to appear for ‘open tab with‘ menu.
Note: A couple of of these suggestions involve editing the Windows Registry. In addition, you can also sign up for the month-to-month Discover Windows newsletter, containing extra articles, downloads, and much more.
Windows is now right here to rock the globe! Then they changed the architecture a couple of occasions, added settings to a couple of much more locations in the registry, in the file method that we had to start collecting these, as nicely.
Regardless of the reality that Microsoft is encouraging builders to produce Windows apps, classic desktop functions are extremely a lot alive and are right here to remain for the foreseeable future.
My preference although is for Microsoft’s Repair it which also comes as a transportable application. On 1 of my machines is primarily based on Win7x64-Ultimate.
0 notes
Text
[2018-07-30] What‘s been going on recently
LONG POST AHEAD!!!
Since July 9th, I’ve been coding in Haxeflixel to get back into coding and understanding it more. While I haven’t exactly been making games, I’ve been creating stuff like rebindable keys, multi language support and LAN (couldn’t successfully test online).
The only “game” I made was for my cousin’s birthday and it was just a meh clicker game that used audio from a youtube video and quick image editing skills (won’t say Photoshop as verb, since I used Affinity Designer), which I spent around 18 hours straight doing, although some of that time I was just getting sidetracked and testing various things. I don’t really count it as a game, since it had stuff that I didn’t make or have a license for.
I’m now gonna quickly go through all the projects I did from the start.
[2018-07-09] Making a Sprite
Yep. That’s a square alright. Was slowly remembering constantly checking the docs to make that square.
[2018-07-10] Experimenting with FlxNestedSprite & Multiple Tilemaps

Here I was messing with FlxNestedSprites. I couldn’t get everything to stop when that little square collided with something, instead that square just moved by itself and repositioned itself when it had free space.
I also was experimenting with placing tilemaps in random places and using multiple tilemaps.
[2018-07-11] FlxGroup things and audio

Here you click on the screen and it spawns that sprite that falls down plus makes a sound, when the sprite is no longer on screen, it kills it.
My goal here was mainly to test how FlxGroup’s recycle() works, but I ended up doing it a different way - .getFirstAvailable() from the FlxGroup and .reset(FlxG.mouse.x, FlxG.mouse.y) on the sprite whenever I clicked and doing a check if there are no dead members in FlxGroup ( if(shots.countDead() < 1) ).
This is also where I learned how to add audio and also how to do a recording in Reaper.
This is also where I learned that you could put classes within classes.
[2018-07-12] Nape, Keys and Key Rebinding
Here I learned something completely new to me: Nape - a 2D physics engine for Haxe, made easier with FlxNape. Nape uses it’s own “space” by doing FlxNapeSpace.init(); having it’s own gravity and more. Spent a lot of time trying to make it work.
But majority of the time wasn’t spent on nape. No it was the start of the saga of rebindable keys.
I spent many hours trying to find how to do it online using Haxeflixel, but I couldn’t find one post even talking about it. So I took it upon myself to teach myself how. This day I failed to do so.
But I was able to make a Key History and the Keys that are currently pressed. I was inspired by fighting game’s practice modes where you see all the buttons pressed. I’ll probably reuse this code and instead of text, It’ll be sprites representing each key. Still need to do a gamepad version though.
[2018-07-13] The Key Rebinding Saga - Episode 02 - Part 01/05

Semi Successful, main problem was rebindingKey stayed on after being true. Forgot why this works.
[2018-07-13] The Key Rebinding Saga - Episode 02 - Part 02/05

Was trying to use the number keys to rebind certain keys, also added a button to start the rebind, but couldn’t find a way. Did worse than the previous one. Note: The green bit at the end was the GIF recording program.
[2018-07-13] The Key Rebinding Saga - Episode 02 - Part 03/05
The moment where I found out, you can’t use an array of string for keys, even though you can do “ONE” or “W”. I couldn’t be bothered fixing this when I tried testing it again.
[2018-07-13] The Key Rebinding Saga - Episode 02 - Part 04/05

Success! Was able to press ENTER to go into rebinding mode, switch a key, then press enter again to confirm it. Also was able to implement a menu kinda thing, while also learning about borders and borderstyles for FlxText.
The solution to that array problem was to make a Array<FlxKey>, however the problem with that was it came up as numbers when you want to see what was pressed, so I had to make a function to translate the keys using the FlxKey.toString().
[2018-07-13] The Key Rebinding Saga - Episode 02 - Part 05/05

Just added movement to a sprite, using the binded keys. Also demonstrating the multiple keybindings (which was available before).
[2018-07-14] The Key Rebinding Saga - Episode 03
Here I put all that keybinding stuff into a FlxSubState, to open up like a pause menu and rebind on the fly, in addition to that, I added sound effects to when the sprite moved, moving in the rebind menu, and rebinding a key.
[2018-07-15] The Key Rebinding Saga - Episode 04
Here I think I just cleaned up some code and made the menu WASD & Arrow Keys, while also adding a cancel key (ESCAPE).
[2018-07-16] The Key Rebinding Saga: A new UI - Episode 01

So here I didn’t really do any rebinding stuff yet. But I did learn about FlxUIState, FlxUIButtons and firetongue. If I remember correctly, I spent most of the time making firetongue work and configuring it.
FYI, firetongue is a library for allowing multiple languages for your text, it also requires FlxUIState. I don’t know if you can use it on a normal state, I haven’t figured it out yet.
[2018-07-18] The Key Rebinding Saga: A new UI - Episode 02

Here I did a lot of stuff! Learned that FlxUIButton’s use a getEvent() function to detect each button’s status, they also have a params variable where you can add various parameters to do many things with the button and to change the label of the button you need to .getLabel().text on the FlxUIButton and add your string, in my case, I used firetongue!
Had a hard time figuring out how to “click” on a button using a Key and navigating through each button using keys. In regards to “clicking” with a key, I used FlxUIButton’s .forceStateHandler(”click_button”) when the ENTER key was just pressed.
Side Note: Had some issues recording this GIF with GifCam, then I found out a new version came out and fixed the issue I was having! Download & Donate: http://blog.bahraniapps.com/gifcam/
[2018-07-19] The Key Rebinding Saga: A new UI - Episode 03 FINALE
With this one, I added Text to the top and fading text on the bottom indicating what was rebinded (I got most of the fading text code from FlxSave).
[2018-07-21] The Key Rebinding Saga: A new UI - Episode 03.5 BONUS
Nothing really to see, all my classes up until this point was all in the PlayState.hx, this day I separated everything in separate classes.
[2018-07-22] (get, set) go? Variables in haxe
Here I tried to learn to use the var testArray(get, set):Array<Int>; just the things in brackets to try and get and set variables from other classes, instead of making a variable in that class and casting the variable from the PlayState. I pretty much failed at that and can’t even run it.
[2018-07-23] Help, Navigation Keys, Legend. I have no idea what to call the things in the bottom of the screen that menus have to tell what buttons to press.
Pretty much just put text in the bottom to say what keys the player can press, it directly reads what keys are binded, so it will change when the keys change.
[2018-07-24] LAN MULTIPLAYER?! - Part 01
No, not LAN, not just yet. But I did get a local sever running and connected to it. I used the library: extension-networking. Also, when the window isn’t focused, I think it stops listening for new network events, which is why the position doesn’t change on the server until I click on the window.
[2018-07-24] LAN MULTIPLAYER?! - Part 02

I got LAN working, although I had to change the IP in Client and Server Class the code in order for it to work. Was soo satisfying seeing my other laptop, GPD XD and my android phone all running this at the same time.
[2018-07-26] The Key Rebinding Saga: A new UI - Episode 03.7 BONUS
Just some code cleanup and making it easier to add more things using functions.
[2018-07-27] - 01 The Key Rebinding Saga: Return of the Sprite
I changed some colors, added collision to sprites spawned by mouse clicks (the first two sprites don’t collide).
[2018-07-27] - 02 FlxNape and FlxNapeSprite Dragging!
Now this took me a while, to get the ability to drag a FlxNapeSprite. I used some of the code from the FlxNape demo, specifically the shooter class, which contained the shooting and the dragging of FlxNapeSprites (which I noticed from the balloon demo). It was a lot of trial and error. In the end I found out it had something to do with anchors, FlxMouseEventManager and a function from shooter class called createMouseJoint(). Still don’t know exactly how that last function works, hopefully I will soon.
[2018-07-28] Fun with Colors and Nape
So after doing soo a lot of non-gameplay stuff, I decided to do something a little fun. In this, I used FlxG.random.color() to get a random color, sets that as the background color and using FlxColor I get the complementary color and set that on the square.
I also added butons to switch between spawning and dragging sprites and a reset button to easily reset the game.
That’s all I’ve done soo far, besides one game I made for my cousin, which I won’t show here, because it has their face on it. The biggest issues I had with that game, was that I had 18 hours to do it, because the party was on the same day and I’ve been putting it off for a bit. Guess that was the first time I did crunch lol.
After that, I just took a break from coding for a day, although that might have just been because I had a hangover from the party that night, but I also took a break for today to think on what to do next and to make this massive post, which has taken me like 3 hours to make.
0 notes