#it started with scraps and I ended up having to buy some fabric to finish it
Explore tagged Tumblr posts
Visit Tumblr Blog
Explore Tumblr blogs with no restrictions, modern design and the best experience.
Last Seen Tumblr Blogs


Fun Fact
US Tumblr user growth rate is estimated to slow down to 4.1%.
Text

The rug is almost finished!!! I think I’m going to continue the darker purples just a little bit longer and then bring it to an end
#handmade#rag rug#stashbuster#this thing unexpectedly took SO MUCH FABRIC#it started with scraps and I ended up having to buy some fabric to finish it#because it’s eating nearly 3/4 of a yard of fabric per round at the end
196 notes
·
View notes
Text
How To Make Medieval Fabric Buttons
You will need:
• fabric (I’m using a medium weight wool)
• a sewing needle
• cotton or silk thread (it MUST be strong)
• a thimble
• dressmakers pins
Using this style of button as a fastening technique was very prevalent in 14th century Europe, on both men’s and women’s clothing. It was used for anything from sleeves and openings on the front of garments, to the iconic liripipe hoods (which is what these are gonna be for!).
They were usually made out of leftover fabric from the same material that was used for the garment they were intended for. As well as using every scrap of material possible, they also save you from having to buy metal buttons, which… aren’t cheap (both now and then).
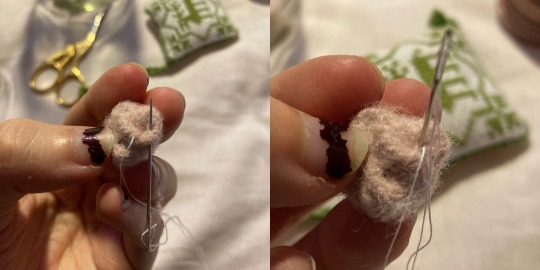
The trade off is of course having to make them, which can be a painful process (literally - try not to get stabbed by the hedgehog ball at step 4!!). I thoroughly recommend a thimble to push the needle through as you form the ball - this is hard enough without having to pull it through.
Making buttons in my experience is 10% knowledge, 60% spite, and 30% hatred. It is a contest of wills between you (who wants a button) and the fabric (who doesn’t want to be a button). I wish you luck soldier.

To start with, cut a circle out of your fabric. How big will depend on what fabric you use - if it’s linen, you’d cut a larger circle than you would for wool. Mine is about 30mm.
Using a long long thread, bind on and then sew running stitches around the outside, about 5mm from the edge (may vary with fabric).
Pull this thread tight like a pouch, and turn the raw edges inwards in one direction. Try and tuck them inside the “bag” section. It will likely be more of a squashed oval at this point than a sphere.

Now, get your dressmakers pins and go absolutely ham. Continue to squish it “inward” (towards where the opening was) as you pin. The button should now resemble a very unfriendly little creature now (good luck with not getting stabbed, it can be a bit of a prick).
Next, basically use your needle to try and get it to stay in that shape. I usually do a bunch of stitches around the edge of the “back” end, and then spend some time criss-crossing the back. Try and put your needle in close to where it came out, so that you don’t get long pieces of visible thread.
Once you are confident that it will hold A Shape ™ (but also isn’t so stabbed that you can’t refine it further!), remove the pins. Your button will most likely resemble a little tiny messy wool brain at this point, but that’s ok!
The next step is to use your needle and thread to continue tucking the ball inwards to the centre of where the opening was. Above illustrates how I’ll flip the open part of a fold inward, by coming up through the fold and then levering it downwards so it gets tucked away. You can also just use the thread to pull errant folds inwards. Use the hand holding the button to squash it into form, and then sew it into place.
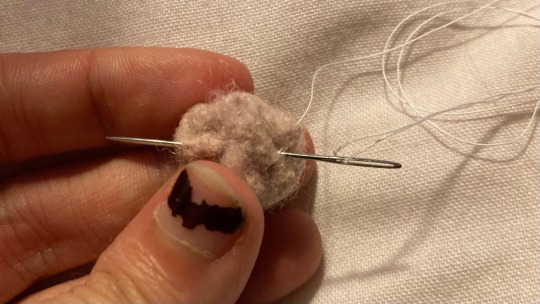
Once the button is actually a ball shape, crisscross the back of it a bit so that everything is firmly held in place. It should now (all things going well!!) actually be a sphere.

Once you’re happy with the shape and firmness, take your thread to stem out of the centre back. Bind off, and then slide the needle off the thread, leaving the long end. This can then be used to sew the button onto the garment.
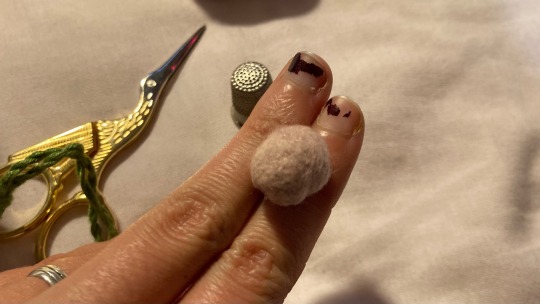
The back will still be somewhat messy, but the front should be smooth, and the whole shape roughly spherical. When the button is sewn on using the remainder of the thread, you won’t be able to see the back!
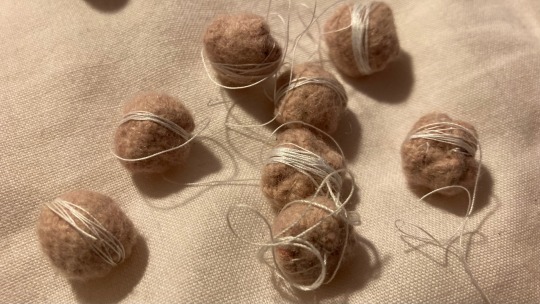
I wrap the remainder of the thread around the finished button so it won’t get tangled, and then pop it in a jar with the rest while it waits to be sewn onto the garment.
Good luck with your crafting! Feel free to ask any questions in the notes, or straight into my inbox :)
#sewing#tutorial#medieval#medieval reenactment#medieval clothing#medieval costume#historical fashion#historical costuming#medievalcore#14th century#buttons#crafting#diy#i’ll be on my merry way now#I have…… sO many of these to do#truly pain torture and misery hours over here
587 notes
·
View notes
Text
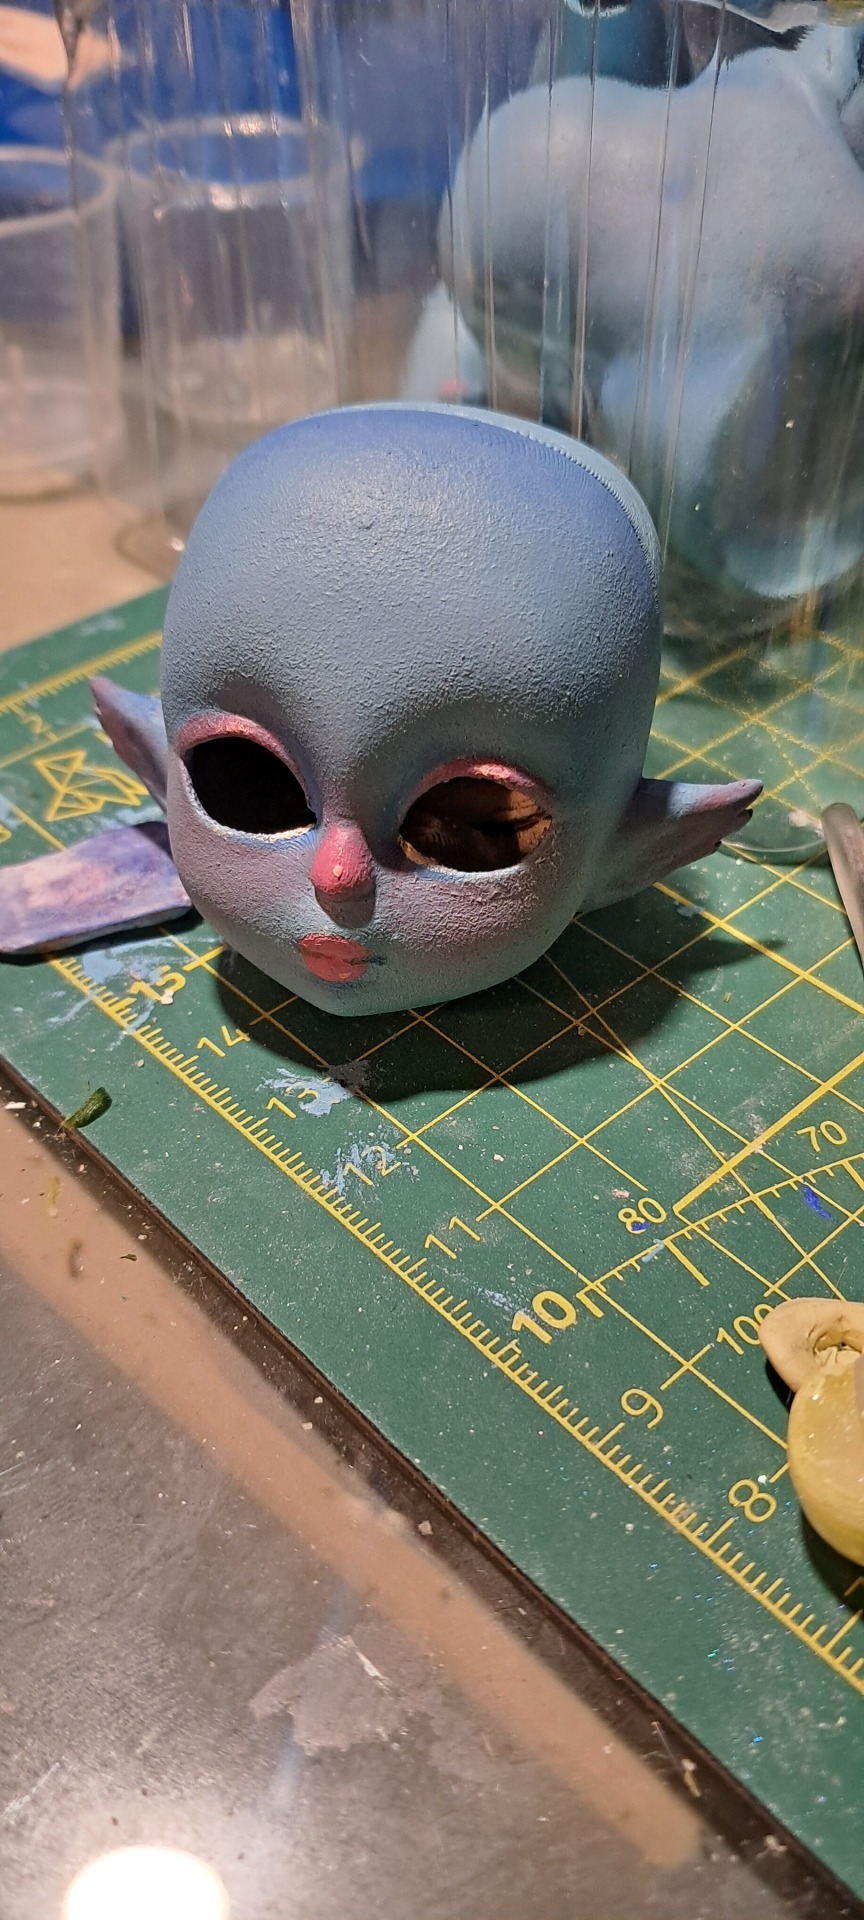
Here's a long post that I really hope Tumblr will not flag as NSFW (please don't flag this), I remember back when I showed off the needlefelt Gomer sculpture I had made, someone asked if I had like a work process to show off for it. And I did not, because I had kept it all confined to a private account. I thought it'd be fun to have something to show for it for this one.
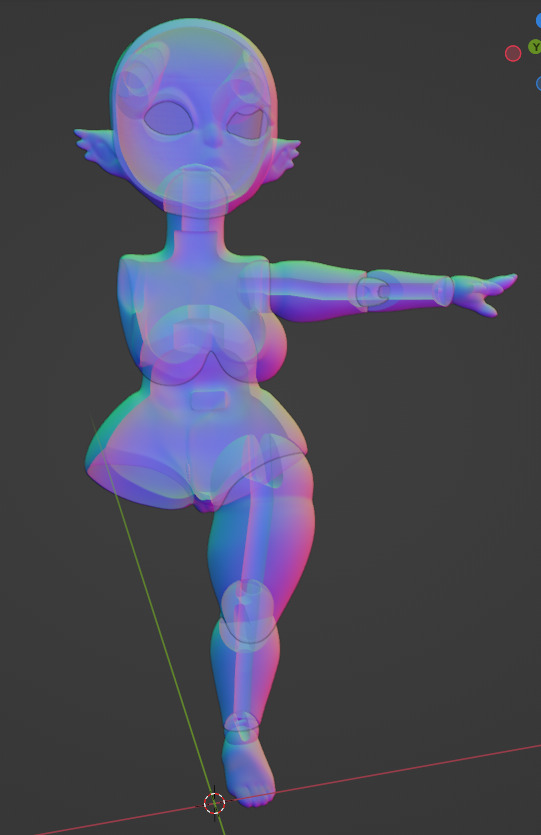
So I've been wanting to make a BJD for at least the past 15 years, back when I was a kid with no money to buy supplies with and also with a worry for symmetry, and also also I wasn't very skilled. It's 2024, and I vaguely know how to use Blender now
I've started this project on April 6th, as I've been documenting this on the above mentioned private account.


Of said model I (much) later ended up only being able to salvage the physical sculpts of the chest and torso parts as I messed up somewhat badly, see down below. I also ended up dropping the 'magnets in hands & feet' concept as it was just redundant, one can simply unhook them off the elastic if they are to swap them out.
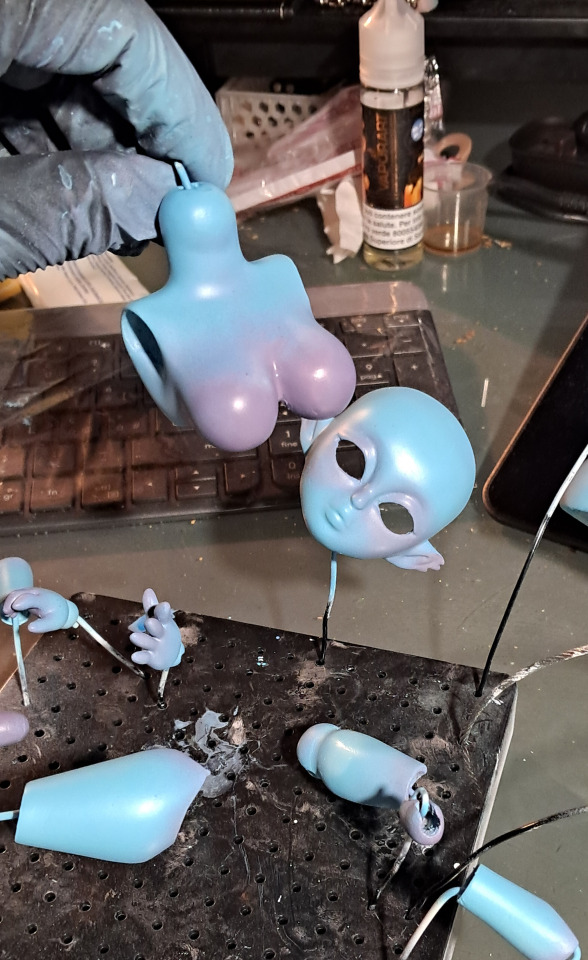
At any rate, I 3D printed it all and got to sanding, and painting.

So far so good I guess, really not a fan of how the knee and elbow bean slots were just holes (I fixed that later don't worry)

So This was Not looking good lmao. I used acrylic paint, which was not necessarily the problem, the problem was that I'd applied it with a sponge brush which caused the surface to feel really sandpapery once dry. So don't do that I suppose, bad idea
On top of this, I realized that given the thickness of this doll I absolutely needed double joints in the legs, in order to have decent articulation. You can see in the above pics I *had* sculpted those, but I later fused the knee beans with the shins with apoxy resin, for some reason? I think it was because as I posed the legs the knee beans kept falling *into* the hollowed out shins/thighs, and I got tired of it.
The final blows for this model were me applying some 3D finish resin in a last ditch effort to smooth out the horrible texture, which rendered the pieces extremely shiny and smooth (disgusting), WHICH then prompted me to apply matte varnish to fix that bullshit. It absolutely did not work lmfao, and I have no pictures of that disaster because I became pretty discouraged about having to go back to like square two or three.
Some time passed (months really because I kept getting distracted for many a reason [sanding is so fucking boring, Blender was a mistake, I was feeling overwhelmed, I was too sad/tired to work that day, etc.]), I buckled down and finally retooled the pieces that needed it: everything But the chest and torso parts, off of which I managed to sand the varnish and smooth resin. I had fixed all the double joints too to actually be decently functional this time. The head was completely resculpted to better reflect the character's latest design iteration.


bean slots: Fixed
So after sanding (which was the part I was dreading the entire time, because it's so tedious and also it hurts after a while), I caved and got myself an airbrush to, hopefully, lay paint down good this time.
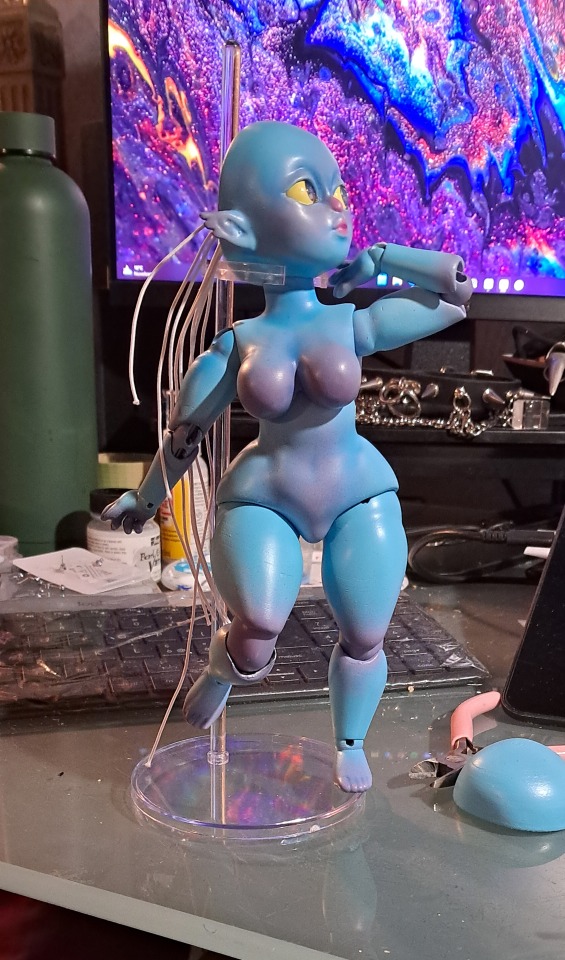
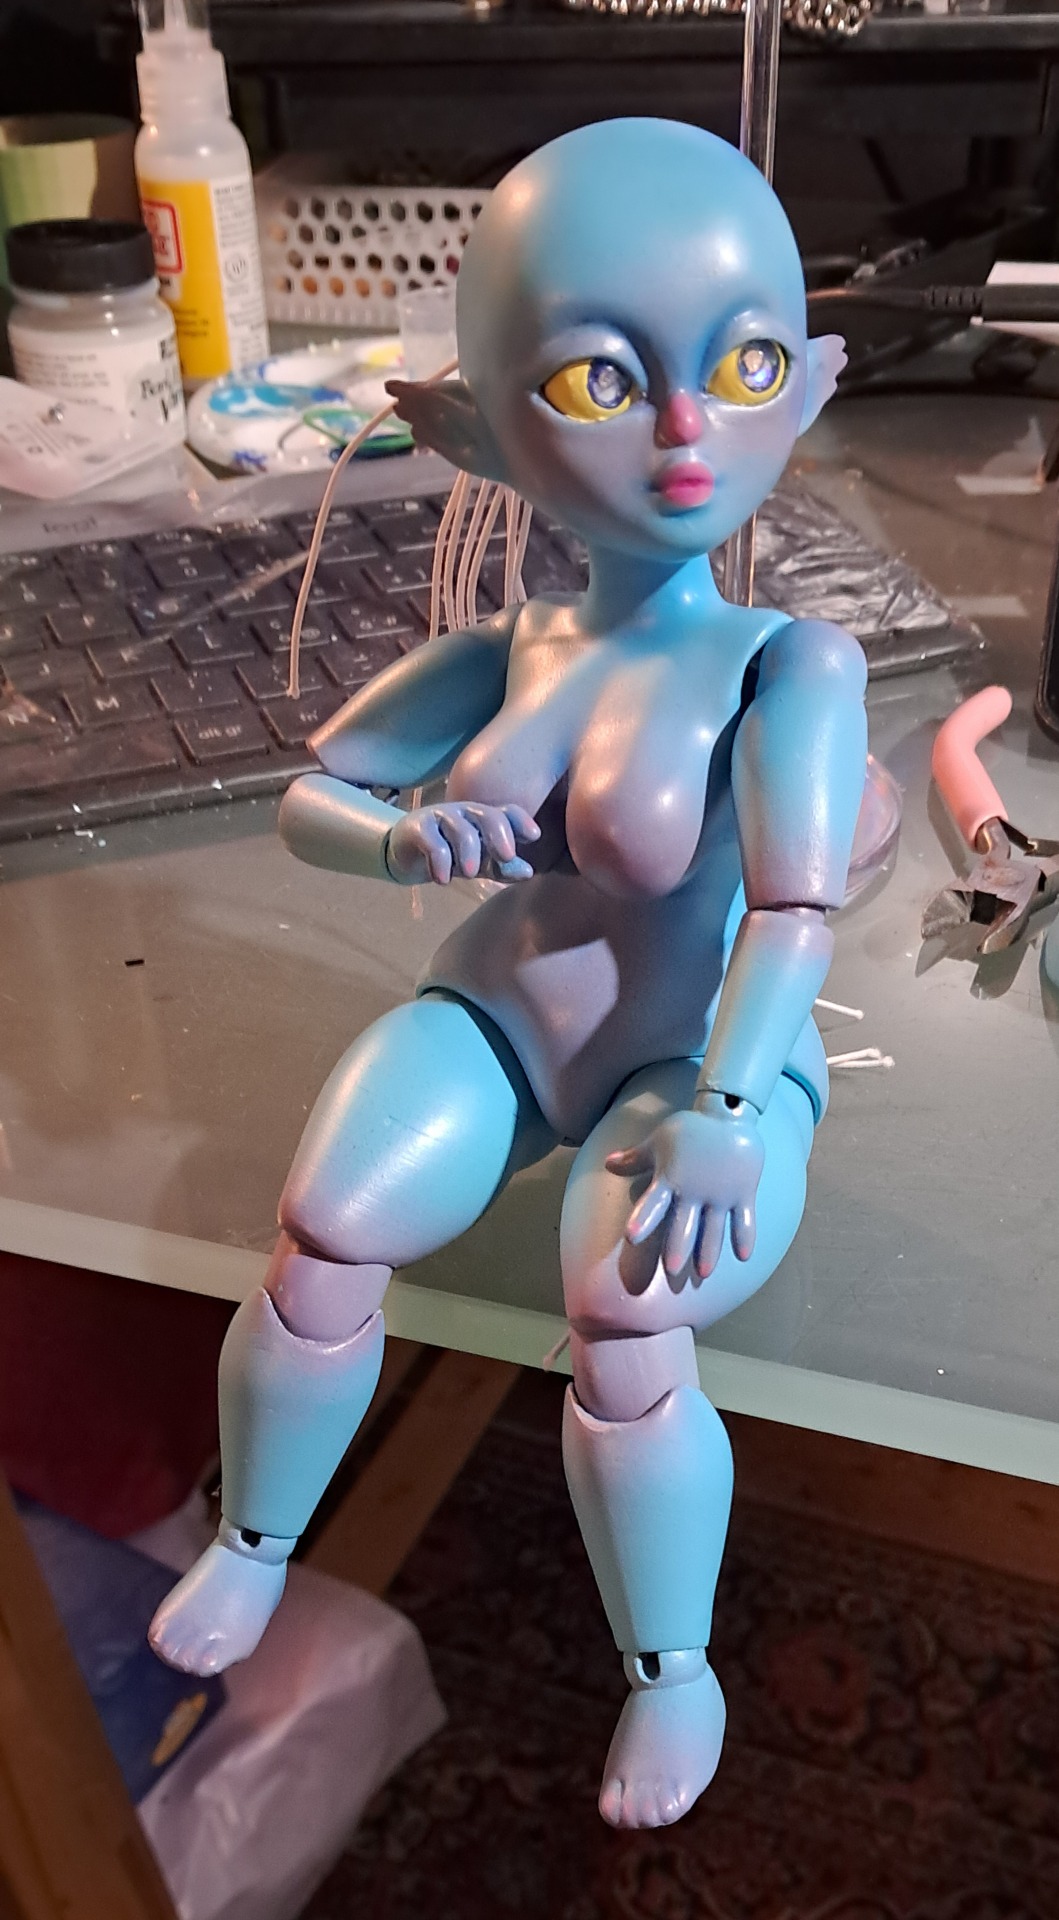
Very glad I did because the difference is kinda crazy. Please ignore my dirty ass desk, it's what happens when you craft. These pictures are from last week btw.
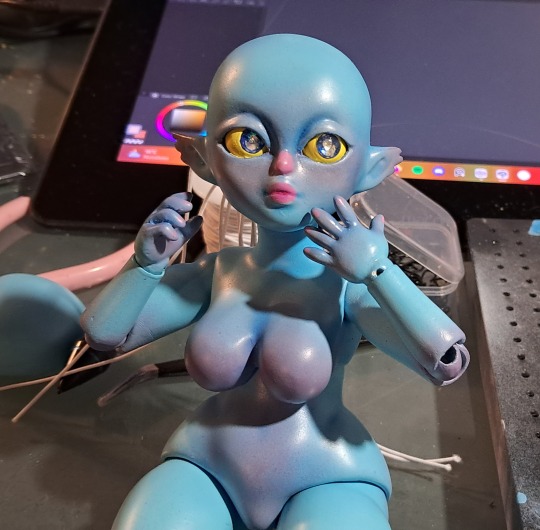
The blue base and the blush were airsprayed, the finer details like the dark shading and the pinker parts were done with both chalk and just acrylic paint. I miiight remake the eyeballs, or at least add more of a smooth finish. The shine to them is really nice
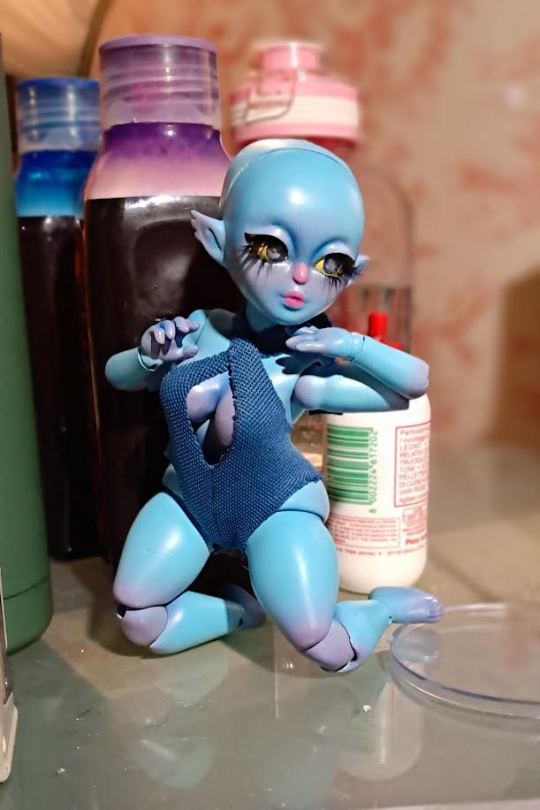
Here's she with lashes, wearing a shitty little scrap of fabric I cut in 10 minutes for fun (please DON'T flag th), and posing to test out the double joints too, they definitely could be better but they work Fine and I'm okay with that.
As of today I'm waiting for the fibres to deliver, for the wig, I already have the cap done. I guess I can update this when it happens, thanks for reading so far, I hope it was interesting, see you next time.......
#carniekisses#carniekissesart#art#artists on tumblr#character design#oc#original character#oc content#~iivi#sculpt#sculpting#bjd#doll#ooak#ooakdoll#artdoll#2024
36 notes
·
View notes
Text
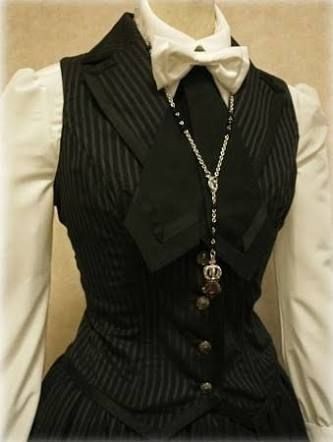
I made Aziraphale’s waistcoat about two months ago and boy it was a journey


Rant about the process under cut!
First thing to do was pick a fabric. For the visible fabric on the front and collar, I knew I definitely wanted to use something piled. I also did not want to use a synthetic fabric, which would have been cheaper but miserable to wear. I settled on cotton velveteen which would be more comfortable, slightly cheaper and easier to work with than silk velvet, and generally less shiny than silk. I was able to order some beautiful cotton velveteen from someone local.
Unfortunately it was not even in the same ballpark as the color I needed. This was due to a combination of reasons including the lighting in the photos they had (they were online only and didn’t have a storefront I could walk into), piled fabric in general being nigh impossible to accurately photograph the color of, and probably also some variations between dye batches. This is why we buy swatches when we can, folks.
The fabric itself was absolutely lovely though. So. No biggie I’ll just dye this myself what could go wrong

The dark brown here is after the first dye; the scrap laying on top on the right is the original color; the beige coat underneath for color reference. Note that even the colors in this picture looked quite different from irl. I did dip a scrap in first to check the color, but because Dyeing Is Weird and also I made some mistakes the final dye did not end up the same. I can write several more paragraphs on why this probably happened. We’d be here for a while.
But maybe it’ll be fine right? The color’s not exact but not offensive, maybe I’ll just start sewing and it won’t bother me that much.
Here’s a bit of that process, where you can see the interior of the waistcoat with interlining and twill tape, following some 19th century construction techniques. Lots of tedious but relaxing hand sewing. (Also, real pockets!)
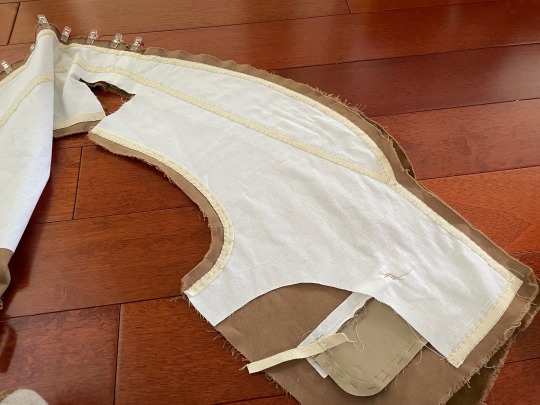
I chose broadcloth for the interlining rather than a more typical canvas, because I wanted a more soft and aged look rather than crisp and new.
(I made another mistake here using cotton twill tape straight off the roll, which shrunk later in the process. You can see this later in how the edges pucker a bit. Oops. Oh well.)
(I also have no other photos of this stage because I went into the hyperfocus zone and forgot about everything except the task in front of me)
Turns out I was not ok with the color. It bothered me a lot.

So I tried to bleach it a tad to lighten the color, but Bleaching Is Also Weird and doesn’t always give you back the same color but lighter.
I got back something extremely orange tones, which bothered me even more. Had a minor breakdown until reboot papped me and helped me talk through how to fix this.
This ended up going through another round of light bleaching, and two rounds of dyeing over with blue to cancel out the orange. Finally I got something I was happy with!
You can very clearly see the puckering here caused by the shrinking tape..thankfully a good steaming was able to get rid of the worst of it.
The color is also slightly uneven if you look very closely, because rounds of the dyeing/bleaching happened after it was sewn together rather than as fabric pieces. Oh well. I can chalk this up to an “aged” look.
Time to finish it off with some buttons and 19th century style hand-worked buttonholes! The buttons aren’t accurate but I just went for ones that were the right size and vibes.


Last step was to add the wear around the buttons, hem, and collar. I’m sure there’s some faster way to do this, but I did it with a pair of eyebrow tweezers to pluck out the pile and a bit of sandpaper to finish off.

And that’s it! For the waistcoat at least. I also made the outer coat, the bow tie, and the blue shirt because I couldn’t find one for purchase that fit me. I still need to make other things. But that’s for another time.
109 notes
·
View notes
Note
hey, congrats!! totally deserved AND your celly theme is super cute!! So so so sorry this is super long
SPIDERHEAD, drabbles ─── send in a thought/headcanon you have about a character and I’ll expand on it in a drabble!
This is totally self indulgent but!! Hobie is such a craft guy. It’s totally punk, obviously, DIY that shit!! He maybe won’t call them dates out loud, because labels or something, but he invites you on crafting dates, he’s got boxes of materials and trinkets—beads, buttons, bottle caps, sewing supplies, glue, you name it. Crafting dates are the greatest because making things with/for people you really like can be so intimate
I’ve also been spending my last few days making pins, and tonight, I accidentally sliced my fingertips with an exacto—I think Hobie’s crafting supplies and his suspiciously well-stocked first aid supplies are near eachother for convenience when crafting and totally not because he has a super secret spider-man alter ego
no because ur so right anon
hobie brown is such a crafty guy!!!! you would think he thinks it’s lame and nerdy cos he’s such a cool guy but honestly he thinks it’s totally punk. he for sure is always cutting up his clothes, adding pins to them, making them look better and more unique because why would you want to dress the same as everyone else? he has a bunch of unfinished projects around his place, a vest he was adding patches to or a pair of jeans he was drawing spiderwebs all over in permanent marker but never got round to finishing. sometimes he’ll buy something just for the sake of cutting it up and ruining it (aka, making it better).
when he finds out you’re into crafts too — maybe he compliments a piece of jewellery you’re wearing and you beam, all thanks!! I made it!!! — hobie is immediately smitten. he’s like woah! that’s sick, can you teach me? (cos he’s totally smooth like that. he’s been watching you from across the pub all night and this is the perfect excuse for a ‘date’), and of course you say yes — if a pretty boy like hobie is asking to spend time with you you’re not gonna deny him.
you end up going to his place, and you bring some of your own supplies of course, but he surprisingly already has so. much. stuff. beads and wire, buttons and string, scraps of fabric, a janky old sewing machine that was probably second-hand but it does the job!! you teach him how to make earrings and you both end up making a whole bunch of them and then when you’re done he gives you his favourite pair, claiming pretty jewellery needs a pretty face to go with it :))
after that, craft dates become a regular thing with you and him. you make all sorts of things together, taking turns teaching each other the skills you already have. or sometimes you’ll be doing your own separate projects but in the same room, hobie’s music playing in the corner while he works on a pair of patchwork jeans and you work on a crochet top. after a few of these ‘dates’, hobie asks you out with a handmade necklace that holds one of his guitar picks on the chain. of course you say yes and keep the necklace forever and ever!!!!
also yes he absolutely has a first aid kit on hand. not so much for himself, usually when he cuts himself or pokes himself with a sewing needle he’ll just let it bleed lmao. but once you start coming over more he’ll make sure it’s always fully stocked. and when you hurt yourself, even if it’s just a tiny paper cut or something, he’ll dote on you, kiss it better, and wrap it in a spiderman bandaid <3
#★ mal writes!#hobie brown#hobie brown imagine#hobie brown fic#hobie brown x you#hobie brown x reader#hobie brown blurb#hobie brown x fem!reader#hobie brown drabble#hobie brown x y/n#hobie brown au#spiderpunk#spiderpunk x reader#spiderpunk x you#spiderpunk x y/n#spider punk#atsv hobie#atsv hobie x y/n#atsv hobie x you#atsv hobie x fem!reader#atsv hobie x reader#⟡ 4k celebration!
324 notes
·
View notes
Text


WiP - Qifrey - Hat
Here we are again with the next cosplay, I had ... time on my hands and the funds to buy material for quite a bunch of projects.
To be honest I started with the hat before I got all the fabrics therefore I had quite a long break between making the base shape and actually finishing it.


My luck was that I have quite a stash of leftover EVA Foam from Allen's sword and was able to work on the base for the hat right away.
But to be honest I am not the best with math and related shapes... therefore it came out way too big.


I tried to correct it but ... you can see it didn't end well it was all crooked. I decided to scrap the whole thing and start again (the scraps were later used for the Okarun mask btw).

And here is the new base shape. It took me ... 1,5 months until I continued as I made the hat last.
... look what I did to it just a few into it :')


I did some math and ended up questioning my sanity that I went back to my bullshitted pattern which was ... like ... 1cm off from what I had calculated.
The progress from the inside and everything was just ... me repeating "trust the process, trust the process" all over again as urgh this was a really ugly stage.


Luckily it truly got better, especially after I put on the top layer and sew it together by hand. Next up .... I want to add a certain spell.
13 notes
·
View notes
Text
It's been a busy and stressful few weeks between personal life and working overtime, but I've been channeling that stressful energy into crafts, and it's made it all more manageable. So, time to rant about all the creative ideas I've been working on lately.
First up, knitting.

My sock is coming along, slower than I would like, but I had to frog back twice. After I finished the heel flap, I tried it on and it did not fit very well at all for various reasons. So, I pulled back and tweaked a few things and also did an after thought heel instead of a heel flap (which fit much better and was much simpler to make). I started to do a 3rd chart repeat on the leg, but decided it was going to be to tight, so I switched to 1x1 ribbing instead. Right now I'm just working the ribbing until it's the length I want or I run out of yarn (I had 2 50g balls of it so I know I have plenty for the 2nd sock already).
Next, hand spinning.

After messing up the last singles I tried to ply into a sample, I spun up a few more grams of fiber and I'm going to let them rest for awhile on the spindles before I ply.
And lastly (because I've been watching a lot of Bernadette Banner on YouTube lately) I decided to learn to hand sew. So, made a trip to Joanns to see what they still had in stock, and I ended up buying more than I planned.

I picked an iron, what looked like their last darning egg, a tailors ham, a nice rigid clear ruler, some scrap remander fabric to practice on, and this gorgeous green floral print cotton that I though would look amazing as a skirt. I already ordered other tools and notions online, so I have some needles, fabric shears, thread, and such. I have some projects that I had specific fabric in mind for that I wasn't sure if I'd be able to find locally (for a reasonable price at least), so I order some fabric samples that should be arriving soon. There's a few more fabric store within driving distance, but most of them have hours that don't work with my schedule. One of them is a discount fabric outlet store that I do want to check out at some point though.
3 notes
·
View notes
Text

I have been thinking about what types of notions and things the craft dorm (what I've been calling the Shu/Izumi/Kuro/Mao dorm) would have in their respective kits and ended up making some collages with my thoughts. In order it's Shu, Izumi, Kuro, and Mao. Longer explanation below the cut.
Shu:
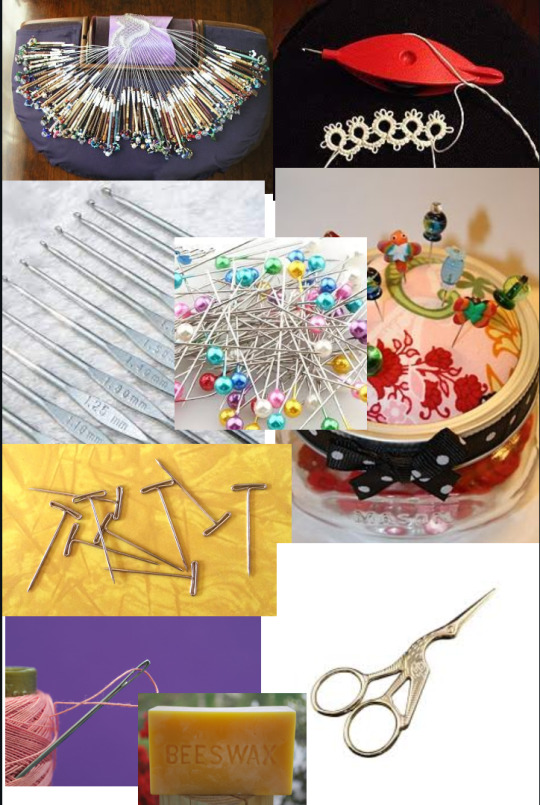
Since he canonically makes lace I put all sorts of different lace making tools on his. In the english server it got translated as crochet and crochet lace can be absolutely gorgeous and it's pretty portable so it makes sense, hence the steel hooks. The other lace making tools are bobbins and a bobbin pillow and a tatting shuttle. While tatting is the "lesser" form of lace making compared to crochet and bobbins, it's by far the most portable as the thread is wound around the shuttle and to me Shu would probably do tatting on the plane to/from Japan and France. Also included for him are pretty generic sewing notions, your pins and pincushion, scissors, a needle and thread, t-pins, and beeswax. T-pins can be used to block the lace as well, and the beeswax is for hand sewing. Fun fact but if you run your thread over beeswax a few times before starting to sew it'll help strengthen your thread and prevent it from splitting! Shu also heavily prefers working with natural fibers over synthetic.
Izumi:
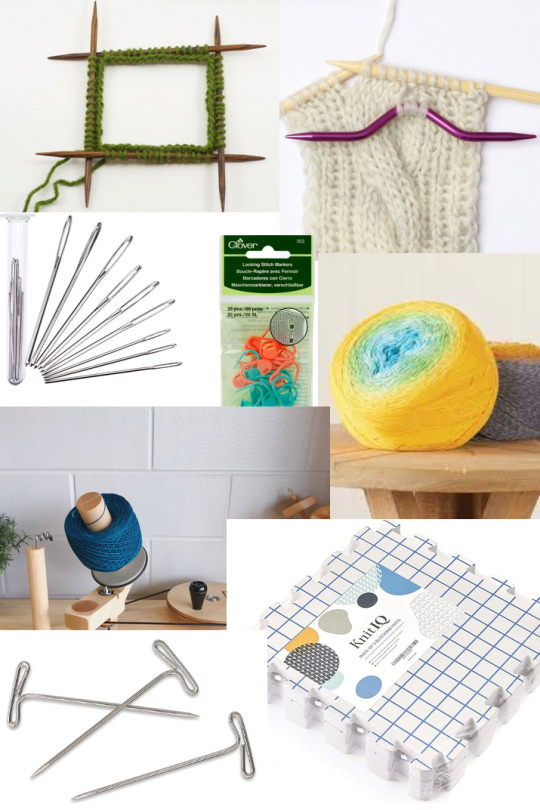
Guy absolutely uses DPNs (double pointed needles) for his knitting, at least when it comes to socks and hats. I believe in some of the examples of his knitting we've seen he has done cabling so a cable stitch holder is there as well, though I can imagine he does it without it too if it gets lost. He also has a ball winder and I wish I had thought to put a swift on here too but like Shu, he prefers to get natural fibers over synthetic and hand dyed wool is great but it comes in hanks which areeeeeee hard to work with so a swift and ball winder would be necessary for him. Also included are more t-pins, a blocking board, stitch markers, and yarn needles.
Kuro:
To me, Kuro is the type of guy to make scrap quilts with left over fabric from the outfits he makes for his friends (and also out of like old shirts his sister has grown out of), so he has a huge scrap fabric pile he's constantly thinking about what type of blocks to make them into. I feel like he'd also make his own appliques for these quilts and would use basting spray to hold those down, obviously. Also the type of guy who just carries spare buttons on him in case of an emergency. Also has a seam ripper, scissors (thread, fabric), a tailor's measuring tape, and a cutting board.
Mao:
I know he doesn't really craft but to me? He's a crocheter. He tried knitting once and failed very badly but crochet (in my opinion at least) is a lot easier to grasp for beginners and I think he made the dorm a few dish cloths at first but mostly makes amigurumis now of his favorite manga characters, as well as little toys for his friends, hence the safety eyes. Probably works more with synthetic fibers due to ease of accessibility and variety of colors, though he tries not to buy too much of the same color unless he knows what it'll be used for. Also has stuffing, yarn needles, stitch markers, and a little crochet hook carrying case.
General Notes:
There were some things I didn't think to add until after I had already finished all of these collages, and some things that were things I thought everyone would have. To start, Shu would obviously also have a blocking board for his lace blocking, and as mentioned earlier Izumi would have a swift. Shu probably also has a swift and ball winder or just borrows Izumi's when he buys anything heavier than thread for crochet (which isn't often so I'm leaning more towards borrowing). Kuro would also have a bar of beeswax for the same reason as Shu, as well as maybe a thimble? Though I suppose it depends on how much he cares about his fingers being callused from the needle. Shu has a thimble. I also think all four of them would have some sort of project bag, whether it's just an old backpack or something a bit more expensive, they all have something that allows them to take their crafts on the go.
Anyway that's all I had but please tell me your thoughts if you want :3
#shay speaks#enstars#ensemble stars#shu itsuki#izumi sena#kuro kiryu#mao isara#ensemble stars headcanons#enstars headcanons#i want to get a tatting shuttle :( i know how to make nets though with a shuttle and spacer#tatting lace can look really beautiful if you know what you're doing please look up some examples of it#ragh. anyway. i'm gonna stop myself from going off on too much of a tangent rn#i <3 crafting
15 notes
·
View notes
Text
Like I mentioned at the end of my last post, besides making a few alterations to my shirt and vest for my Batuu Bound outfit, I also got started on a new sewing project over the last two weeks, something which might also make an appearance if/when we're able to go to Batuu again, but until then will also be a nicely functional piece just around the house.
To back up a bit, I ordered a lightsaber for my birthday -- as you do when you're an adult going through a resurgence of your childhood love for Star Wars, lol -- but the one I bought on Amazon ended up being not quite what I was hoping for. I returned it and spent some more time researching exactly what I wanted for my purposes (spinning and flow arts) and what would fit my small hands and short stature the best.
I ended up ordering from an excellent small business called Vire Sabers that lets you assemble your own lightsaber from the 'variable hilt component' system of pieces that all fit together. I spent a lot of time looking through all the various pieces and combinations, including putting them all together in a photo editor until I had something that I was happy with, that is just mine, and no one else's.
The saber really deserves a post all of its own, but first I want to do some weathering on the hilt and get some video of the flow skills I've been building up over the last week and a half since it arrived. I'll post something about it eventually.
And anyway, this post is really more about sewing a padded sheath for the saber.
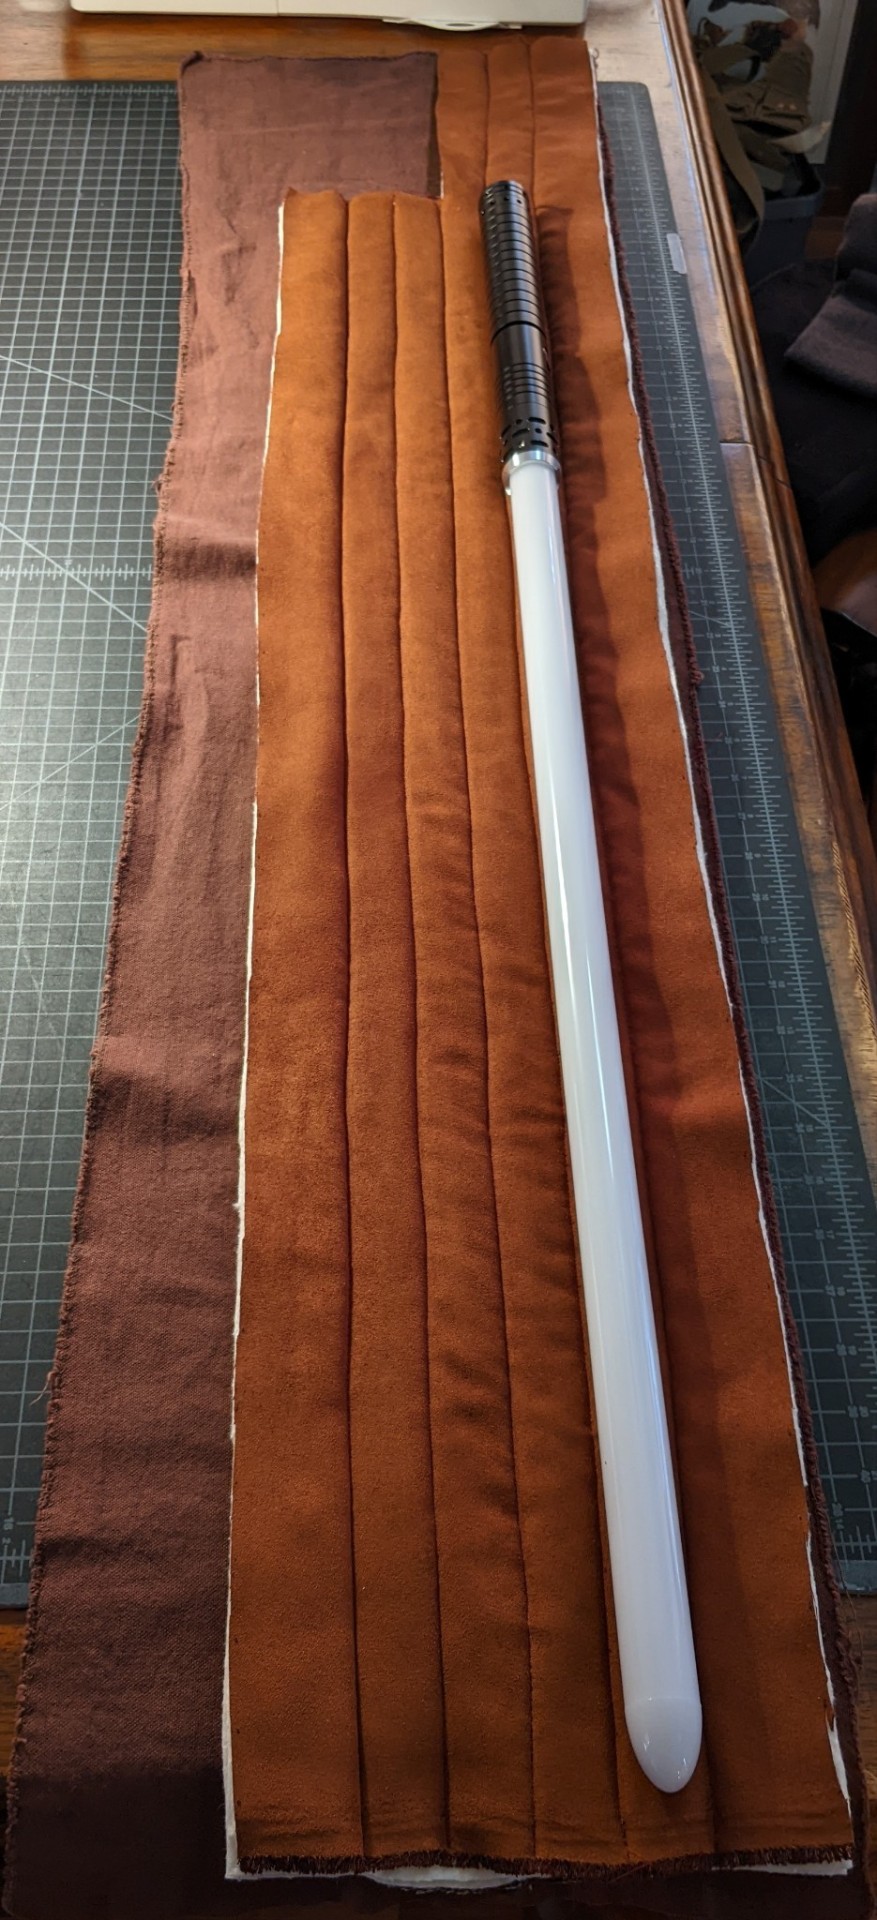
It's another stash-busting project, like everything else in my Batuu Bound set, for which I only bought ~$4 of cotton batting -- which is handy because when I started on it, I wasn't sure when Jack and I would be working next. The contract work situation has resolved now, but even without that, it's always nice to move fabric and crafting supplies out of my stash and into a finished, useful item.
With consideration to possibly wearing this on my back with my Batuu Bounding outfit in the (near?) future, I decided to go with a brown color palette. From my stash I pulled out:
some yardage of non-stretchy faux suede that I probably bought more than 10 years ago for a project I can no longer remember, that has kind of a grippy texture to the suede surface
wool scraps left over from the screen-accurate Jedi robe I sewed for Jack in 2012
the tan cotton canvas I bought in January when I was thinking about covering the zippers of my Moment vest rather than sewing a completely new one
brown RIT dye that again I have no idea when or why I bought it, along with a little pink and violet RIT dyes probably left over from Hit Girl in 2010
brown velcro left over from an ill-fated attempt at building disability-friendly pillows for my couch nest
~34" of 1" wide twill tape left over from my steampunk corset I sewed in 2011
rock climbing-rated seamless aluminum O rings left over from the tensegrity stand and tent I built for Wasteland Weekend 2018
dark maroon thread that came in a set of thread that I bought online when I sewed my Oswin Oswald cosplay in 2020 and couldn't go to a store to buy just one color of thread, lol
The cotton canvas was perfect for the exterior of the case/sheath/bag thing, but the color wasn't a great match for the rest of my Batuu Bounding outfit. I had used a bit of the canvas to make a collar stand for Jack's jacket late last month, so I zigzag stitched the cut edges and threw it in the washing machine with a bunch of nearly boiling water, salt, and the brown, pink, and violet RIT dyes. I had more of the brown than the pink and the violet together, but my hope was to bring the "dark brown" RIT color plus the slightly greenish tan of the cotton towards a warmer brown. I let it agitate for about half an hour, and ended up really loving the final color.
With the exterior in progress, it was time to figure out the interior. I knew I wanted to make this case/sheath padded to give the saber a bit of cushioning while being carried around, but I also didn't want to buy more than I would use (or spend a ton of money, given that I was buying this while we were in between work contracts), so most quilt batting was out, as was most foam. I ended up buying half a yard (18") of 90" long cotton batting, then cutting it into four 9" x 45" pieces and layering those on top of each other. It's not a huge amount of loft, but it is a good amount of squish, and hopefully reasonable padding for the circumstances I expect to use the case in.
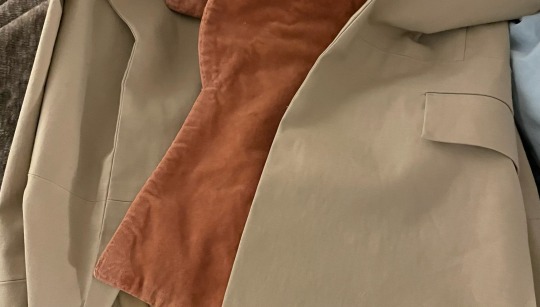
I sandwiched the cotton batting between one layer of the brown (Jedi robe!) wool and one layer of the non-stretch faux suede. In the picture below, the darkest brown is the wool, and just to the left of that is the dyed canvas.
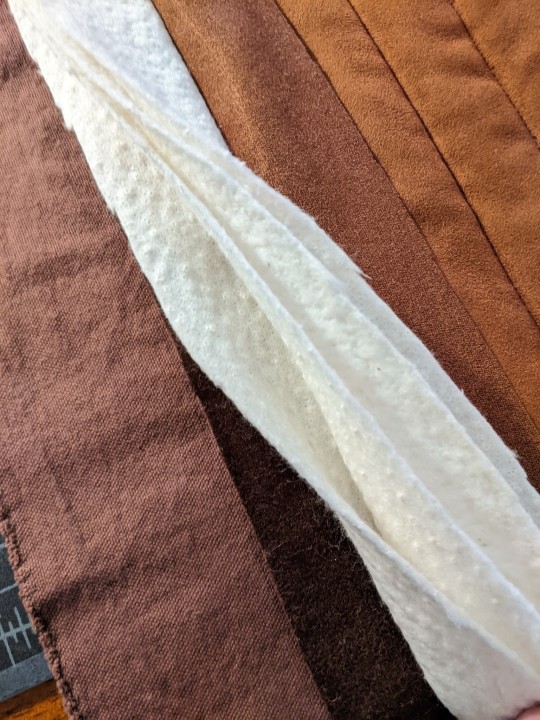
The wool won't be visible at all once this is all sewn together, and the faux suede only slightly visible at the top opening, but I like how the colors all coordinate without matching exactly.
Since the cotton batting is pretty solid, quilting wasn't entirely necessary, but I did want to make sure the layers stayed together without shifting around too much, and also give the thick layers specific places to bend to form a nice round tube shape. I ended up quilting it into six narrow panels that run the whole length of the sheath, with the outer two panels each 1 cm wider for seam allowance when I sew this into a tube.
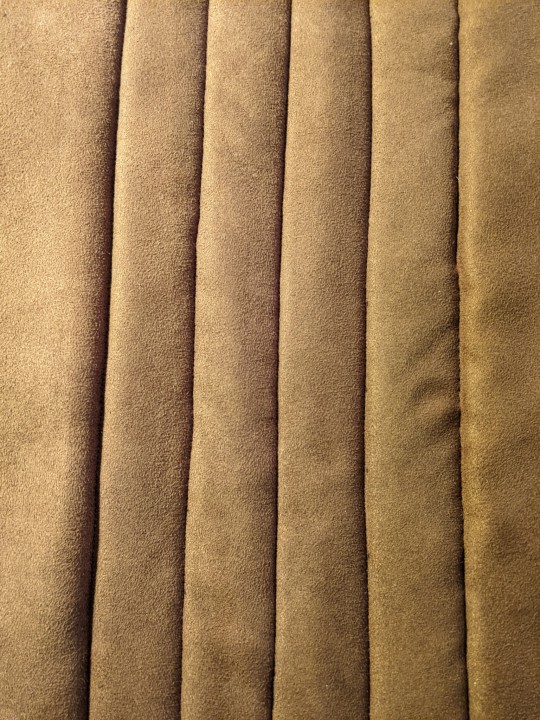
I also narrowed the entire interior from 9" (measured flat) to 8", so that it hugs the saber better, and so that I can fit the narrow portion of the canvas around the bulk of the interior + saber.
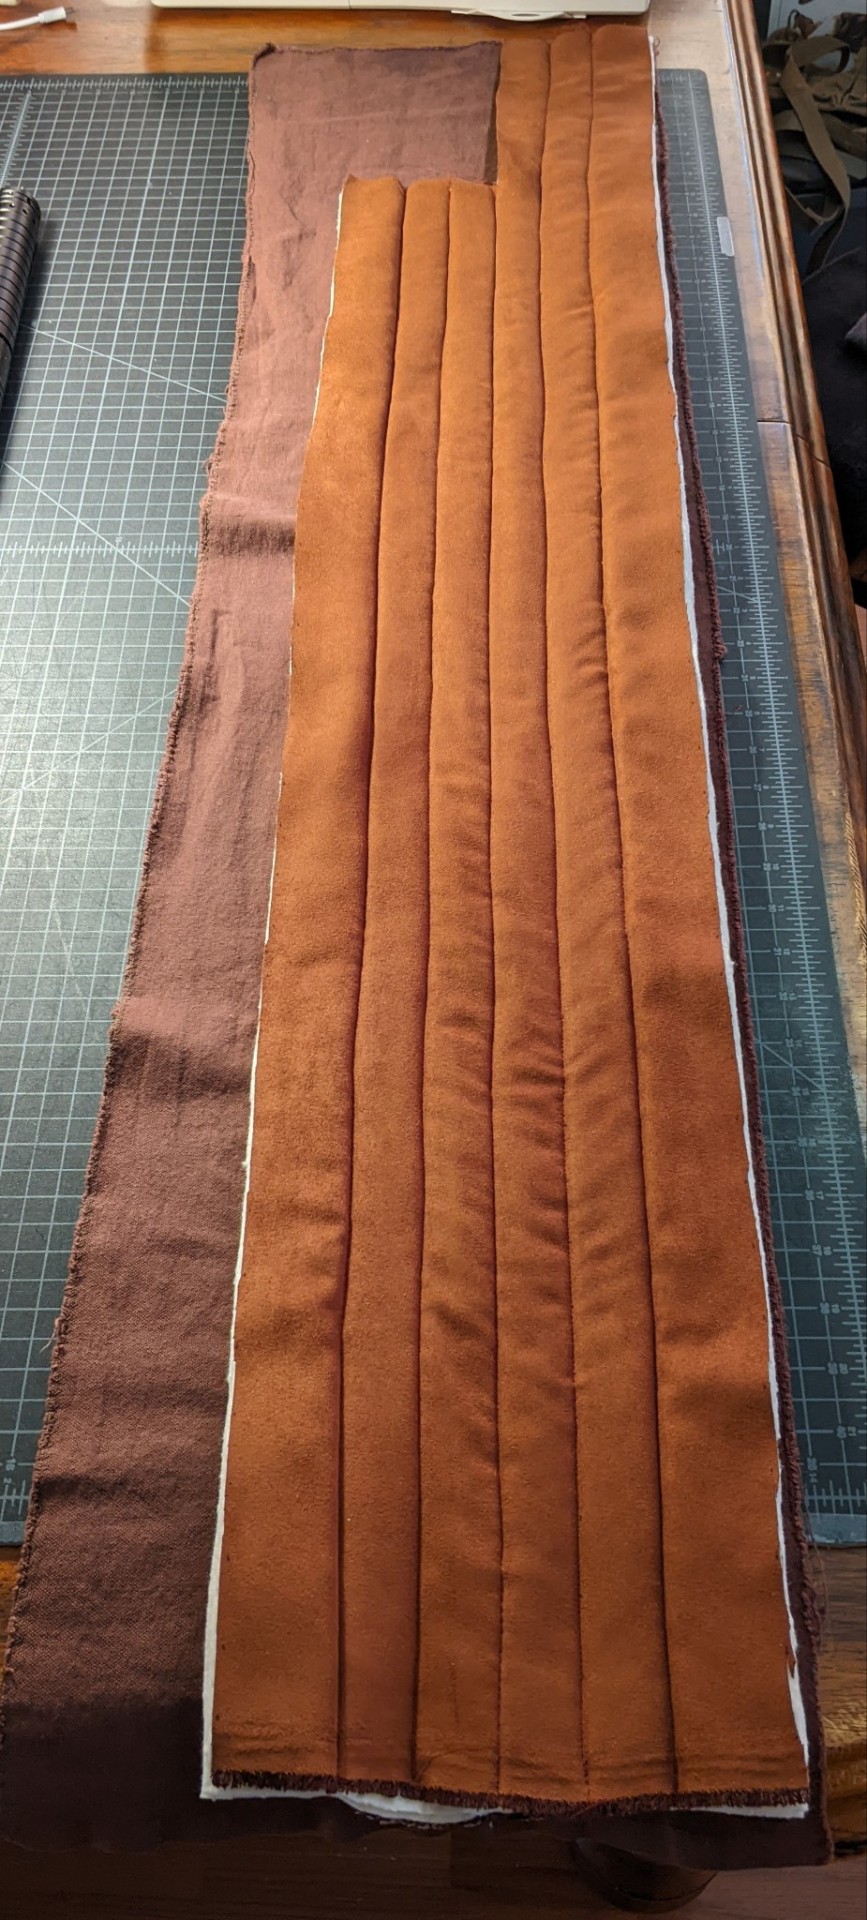
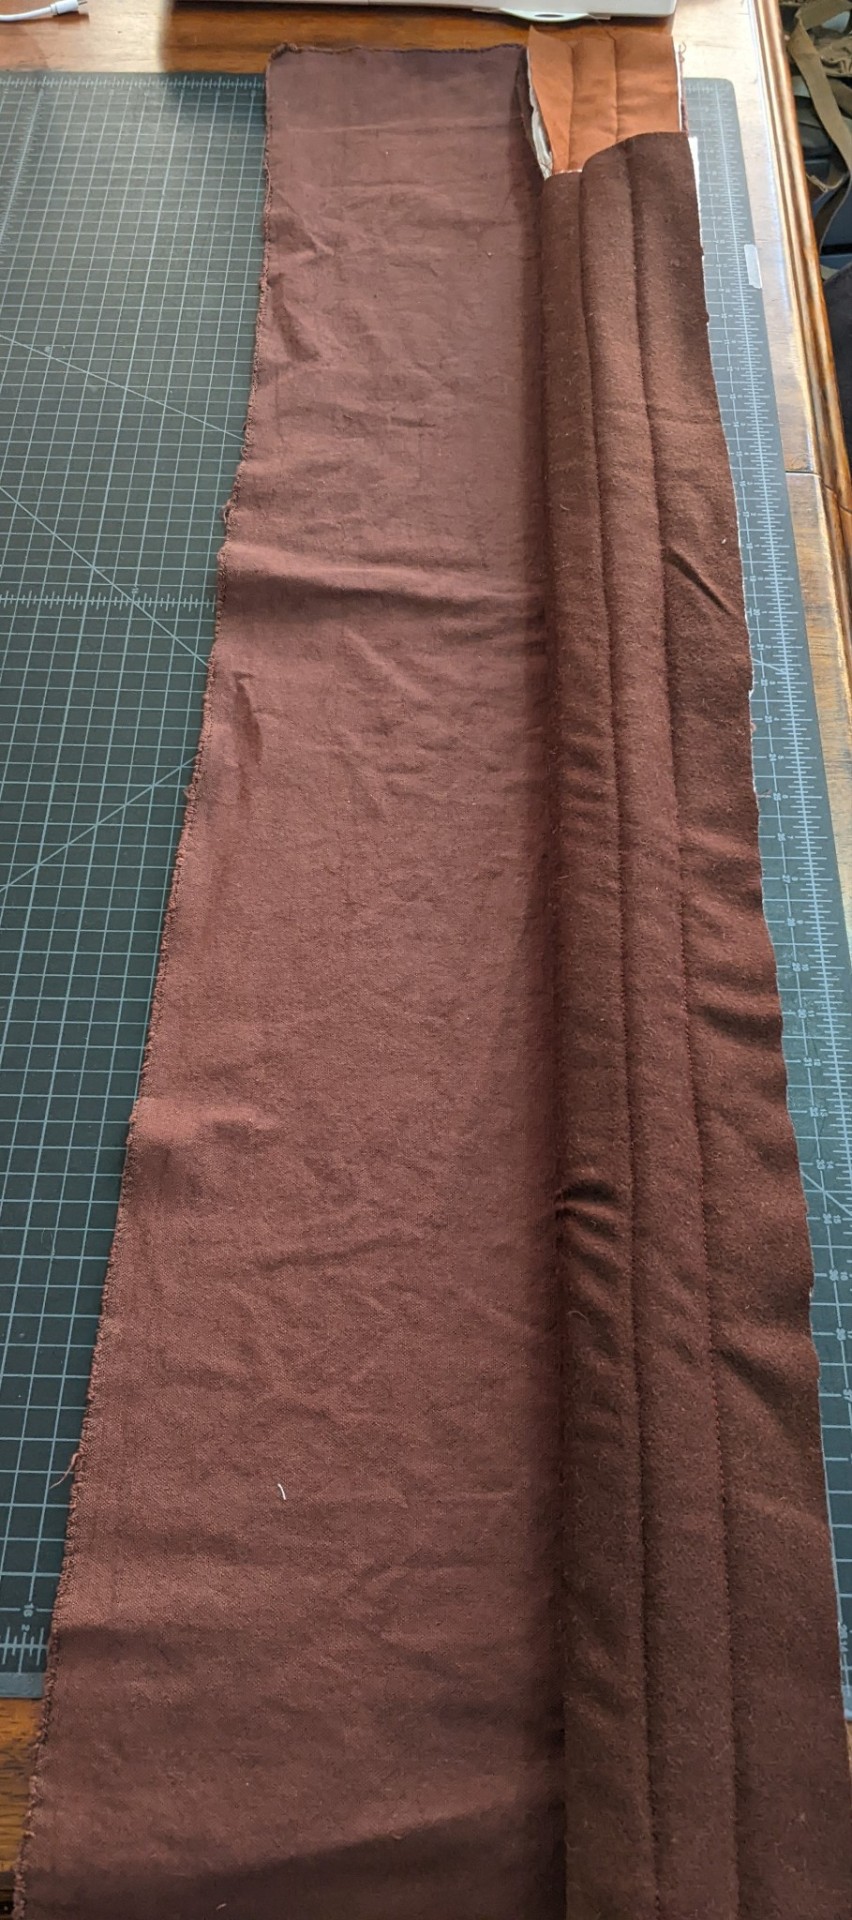
The notch cut out of the upper left corner of the interior is there to create a flap that will fold over the open end of the bag/case and secure in place with velcro. I may try to find ways to sneak a few velcro attachment points into the exterior, so that it can be closed at various lengths (ie with or without the hilt).
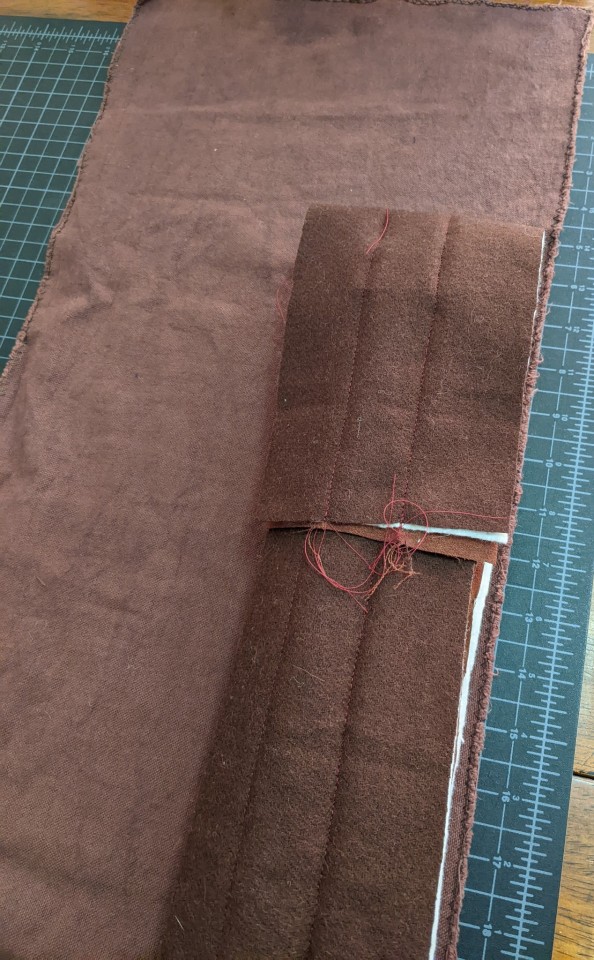
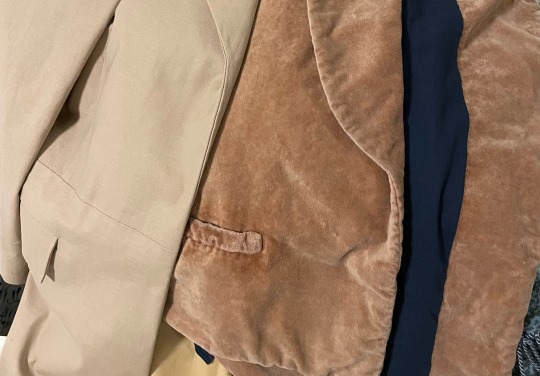
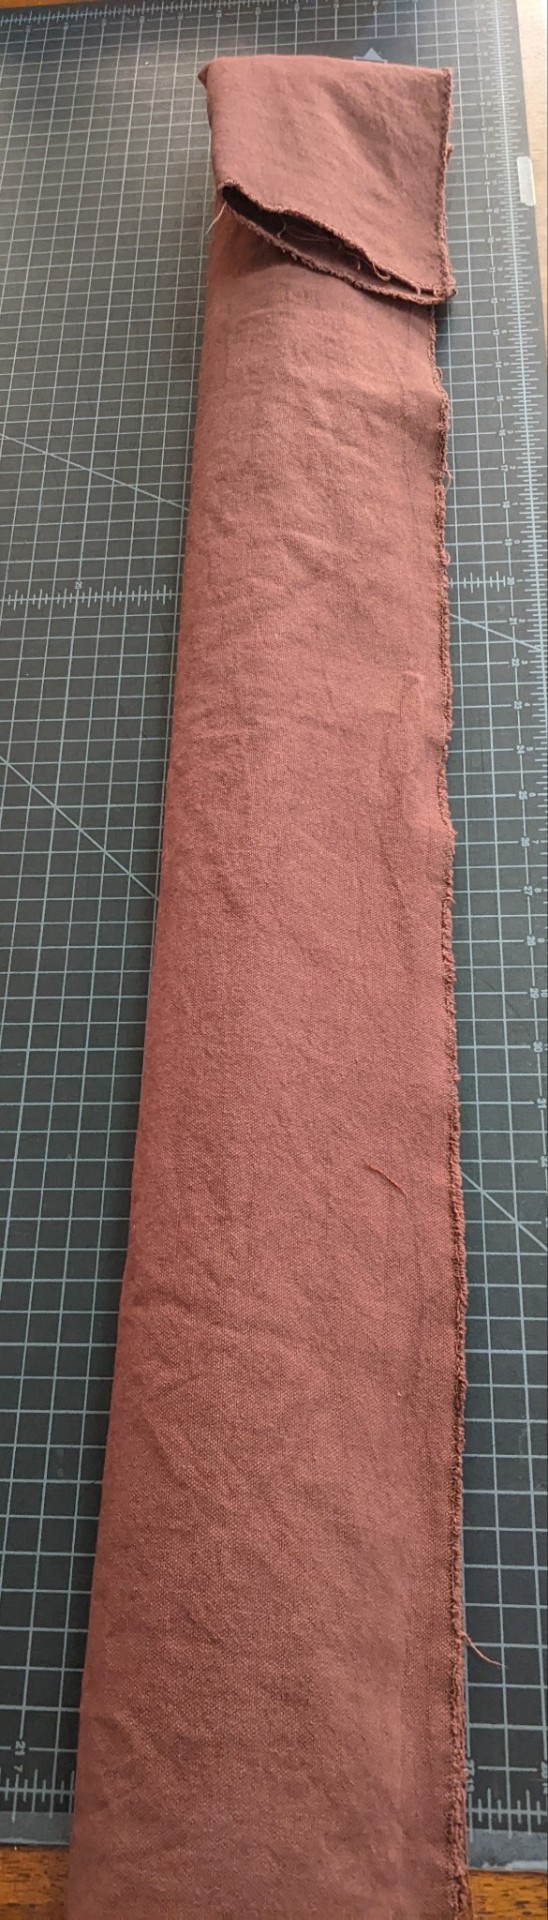
The dyed cotton canvas will eventually get a matching notch cut out of it, and the right sides of the interior and exterior sewn together before the interior is stuffed into the exterior, at which point it will look somewhat like this:
Before I sew the exterior into a tube, I'm going to sew a pocket or two for carrying small essentials like blade tension screws. I'll also sew the twill tape into place, set slightly in from the top and bottom, and put those aluminum rings onto the twill tape when I do. That way the carrying strap will be gripping the whole case, all the way around, rather than have all the stress in one place. The lightsaber is only about two and a half pounds, and I can't imagine the case will weigh any more than that, but still, I want to be sure that there's nice firm support that won't give out and end up dropping the saber on the ground.
Also, can I just point out the color match between the dyed canvas and the old left over piece of twill ribbon? I wasn't aiming for that! I wanted a warm brown, which is why I added the pink and violet dyes (and would have added red if I had any on hand), but I didn't even pull the twill tape from my stash until after I was done dyeing the canvas. It matches so well it looks like I bought them as a pair, but they were bought more than a decade apart and didn't match before I just chucked whatever dyes I had on hand into the washer, lol. I would have been fine with a bit of a color mismatch, but this works too!
At this point, I think I'm ready to sew the interior into a tube, with the grippy faux-suede on the inside, and the wool on the outside where it will eventually be sandwiched next to the canvas. I have squares of the cotton batting from where I cut out the notch for the flap, so I think I'm going to try to sew those to the outside of the seam along the narrow bottom edge, to give that even more padding. That's a lot of layers to put through my sewing machine, so we'll see if it'll cooperate or if I'll end up doing that bit by hand.
After that, I'm going to turn my attention to the exterior. I have some smaller pieces of dyed canvas that aren't in the above pictures, that I'm going to use to make a crossbody strap that connects to the those rings, along with a pocket or two. The pockets, some of the velcro closures, and the twill tape and rings need to be sewn down before I can turn the canvas into a tube, so all of that will be the next major step in this project.
I think I also want to paint (or sharpie) some Aurebesh on the exterior canvas, something along the lines of 'fragile antique - handle with care'. The character I put together for my Batuu adventures isn't a Jedi (or a Sith), but rather makes a living finding antiques and oddities on outer rim worlds and transporting them to the inner rim and core worlds to sell at a profit. Not many people can read Aurebesh, but it'll add a bit of visual texture and storytelling all the same. And then if I have another run in with Kylo Ren, I can state for certain that I'm not a Jedi sympathizer, just an antiques dealer looking to turn a profit, lol.
If we do end up going to a Star Wars Nite at Disneyland, I think it could be fun to take my saber along, participate in the lightsaber meetup in front of the Falcon, and maybe even get some photos or videos of my spinning skills while I'm there. But even if this case is only ever used to store my saber here at home, it'll give it a place to live that's not my sewing table, where it's been living since it arrived, and the rings will let me hang it from a hook on the wall rather that take up any horizontal surface space. It'll be nice to look at while also keeping my saber easily accessible and ready to spin.
We don't have tickets for a Star Wars Nite event yet, but the first one is on April 16th, so I'm giving myself just under a month to finish this. I don't think I'll need that long -- but with the new work situation starting up tomorrow, it's really hard to say. I could have it finished by this time next week, or be hurrying to finish it the last weekend before we go back to Batuu, we'll just have to see how this next month works out.
Either way, I'll post more pictures here as it comes together.
2 notes
·
View notes
Text
Late 1890s Corset Part 4 - Flossing and Wrap Up
July 22, 2021
[Image ID: a neck-to-hips photo of Alex wearing a blue and ivory corset over a muslin shift.]
Part 1 - Research
Part 2 - Mockups
Part 3 - Construction
My 1890s corset is finally constructed and wearable, but it's not quite complete yet. It's time for some finishing touches!
Flossing
For the flossing, I used a silk buttonhole twist from B&T in a cream color that matches the lacing in the back and the lace I'll use to decorate the top edge of the corset later.
I started along the top edge of the boning with a simple crossed pattern, like these instructions from Sidney Eileen, but only doing two threads in each direction and... not going in the correct order. It turned out the same, so whatever I guess. My flossing here isn't perfect, but I wanted to get a feel for it in a place where I could cover my mistakes.
Should I have just done a test on some scrap fabric? Yes! Did I just jump in with no practice instead? Also yes!
While I do like the simplicity of the flossing design I used along the top, I wanted something a bit prettier for the bottom edge, since it'll be exposed.
I found this flossing design from 'Bridges on the Body,' a corset-sewing blog, and fell in love with it. (Seen on the far right in the photo at the end of the post.) I was afraid the design would be difficult, but it's really deceptively easy. I even followed the directions this time! It took a few attempts to get it perfect - figuring out the spacing and whathaveyou - but I had really nailed it by bone #5. (I have to say that it also looks really nice with fewer crisscrosses, too.)
I used a slightly altered version for the bones on either side of the lacing, and yet another variation on the busk. (The left two and second-to-right designs in the photo at the bottom.)
Lace
With the flossing done, I could attach some lace! In my stash I had a cream-colored, two-layered lace that had holes for ribbon along the top. I attached it using small, spaced-out stitches, with the more solid part of the lace (under the lacing holes) lined up right under the edge of the binding.
I found quarter-inch grosgrain ribbon in a similar shade of blue to the corset and threaded it through the lace. I secured the end to the binding at the lacing panels, and tacked the ribbon at a few more points to keep it upright. I left ribbon tails at the busk so I can tie a bow at the center front when I'm wearing the corset.
And then I was done! Completely, finally, 100% done.
Final Thoughts
I thought sewing a corset would be really difficult and take me all year to do, but it didn't. I started back in January and finished in June, and that includes long periods of inactivity. It's not perfect by a long shot, but I'm proud of my work and I've learned a lot.
This project was kind of expensive, though (at least by my standards). All told, I spent about $77 on this project. I could have saved a few dollars if I didn't buy way too much fabric (3 yards when I could have gotten 1.5 yards and still had extra) and an extra spool of thread, or if I opted for cotton embroidery floss instead of silk buttonhole thread. But I also could have spent a lot more if I had splurged on coutil instead of canvas. I'm doing a lot of stash-bushing this year, so I had room in my sewing budget.
So, what's next? While I do have some more late-Victorian projects planned (like combinations, a corset cover, padding/"enhancers", etc...), I'm headed back into the Regency for a while to do some stash busting and expand my wardrobe a bit. I also have a few small one-off, non-historical projects that need my attention too.
Stay warm. Stay safe. Stay healthy.

[Image ID: a detail photo of four flossed areas of the corset, done in ivory silk thread on dusty blue canvas. The two on the right are on either side of the lacing, the third one is the bottom of the busk, and the last one on the left is an example of the flossing at the bottom of most bones.]
5 notes
·
View notes
Note
Hi my very favorite quilter in the entire world! I have a question (a few questions). Weighted quilts are a thing? If weighted quilts were to be a thing,how could one medium level deamstress with absolutely No quilting experince go about making one (making five or seven, if possible)? And, also, where do you get quilt top ideas or inpo? I love love love absolutely all your quilts, the scrap one in particular reestructured my ideas around scrap fabric and the importance of garment care
Good luck on the house repairs by the way
Hi!! I am so flattered to be your favorite quilter! This got long so it's below a read more
Yes, weighted quilts are a thing. I personally haven't made any, but I think there are two main ways to make them (I'll tag @creations-by-chaosfay to chime in if she wants to, she has a lot more quilting experience than I do and if you like my quilts you'll like hers too). 1. Add polypellets (or other weighted beads like them) to each square of the quilt as you make it. I think you'd need to enclose most of the outer edges of the quilt sandwich before you start quilting the sandwich together, put some beads in, quilt them into one square, more some more beads in, quilt the next square, etc 2. The easier but not as heavy option: extra batting would make the quilt heavier, and I think flannel is heavier than quilting cotton, so an all-flannel quilt would have some weight to it, especially if you use flannel for the batting too. I know some of my quilts have ended up pretty heavy, even if they aren't technically weighted blankets? If I remember later today I'll weigh some of my quilts
As for quilt top inspo, I have to admit I usually don't follow other people's patterns for quilts. I mean, I have followed some, like the cat quilt and the Postcards from Sweden quilt, but a lot of the time I just find fabric I like together, decide what size I want the squares to be, cut out all the squares, and go from there. The triangle quilts I've been working on recently are a case of that going wrong: I should have chosen a pattern because I laid out the patches like I do for my usual plain patchwork quilts and very much dislikes the fabrics together lol. Most of my quilts are just me dividing the quilt space into quadrants and trying to distribute each color of fabric as equally as possible across those quadrants The scrap quilt was me deciding what size finished block I thought would be easily divisible so I could cut out different sizes of scraps (12" finished blocks), and deciding on the two different 12" blocks I wanted (one made of 2.5" strips, one made of 6.5" and 3.5" squares). After I'd decided that and slowly started accumulating blocks, I learned about crumb quilting, so some of the scrap squares are crumb quilted from tinier pieces of fabric Wait I almost forgot to add: I follow a few quilting blogs here on tumblr, and regularly look at patterns they share. I also sometimes google "free fat quarter patterns" or "free baby quilt patterns", and go from there. For me personally, the part of quilting I enjoy is usually not the intricate tiny patterns, so I usually don't buy quilt patterns, but I have a few paid patterns I will be buying eventually (the Exploding Hearts quilt and the dog in a sweater quilt off the top of my head) Thanks! I am hoping the house repairs turn out to be not as bad as they thought they'd be
#long post#ask away!#quilting asks#some of my quilt inspo is also just that I like math#so sometimes I decide what size finished quilt I want#look at the fabric I want to use for it#and do a whole bunch of math repeatedly until I find the size blocks I want to use#it's like a puzzle! enrichment for my enclosure
51 notes
·
View notes
Text
Here's a Halloween costume in honour of my favourite event of 2021: The Ever Given getting stuck in the Suez Canal back in March. What a good time it was.

This is a pattern for a quilted, dolman-sleeve sweater which, with arms extended, becomes a stylised version of the Ever Given Container ship, perfect for wearing while blocking doors or passageways, yelling at everyone that you are stuck.
Dolman sleeves are the easiest to sew, because they are just an extension of the body fabric. As a result, the making of the sweater itself is very easy: it is the piecing and quilting that is the hard part.

But I made a way for you to cheat it!
A panel that looks the same as the result of the piecing instructions below is available on Spoonflower. It is super simple to order the panel, in any of their 56” wide fabrics (fleece and performance piqué are what I would go for, depending on if you want something warm or not), and skip down beyond the piecing and quilting instructions below to the cutting and sewing instructions, and make this sweater much much more simply.
If you do this, you will also need to buy a yard of the same type of fabric in a neutral colour for the back that also measures at least 56” wide (it is so much cheaper to get this at a store than from Spoonflower, although you could also just buy two of the panels), and 2-3 yards of elastic.
Another handy element of this design is that, because it is oversized, it should fit a wide range of sizes fairly comfortably. The only real fitting spot is the hip measurement (finishes at 56” (but could be made at up to 72”) with elastic bringing it down to a preferred size), and it is also possible to add an extra couple of inches to the arms by raising the height of the shoulder seam. More on this in the instructions after the cut.
If you are going to piece it:
These instructions assume you are only going to piece this on one side and leave the other side plain, but feel free to do it on both sides if you prefer - you will just need to get more of the small cuts of fabric, and do everything twice. Fabric requirements are based on 44" wide quilting cotton, rounded up for safety, and all cutting assumes a quarter inch seam allowance.
Materials Required:
1/4 yard each of five dark colours - These will be your containers on the ship. I went with black, two different dark blues, a maroon and a dark green.
1/8th yard of bright red. This will be the waterline of the ship, as well as some of the containers (if you want extra variety).
1/8th yard of white, for the letters, as well as enough fusible web to applique the letters. It is also possible to use iron on vinyl, fabric paint, or even just t-shirt transfer paper (for dark fabric) cut to size.
1/2 yard of a sand colour. Light brown, cream, or natural cotton all work. Part of this will be quilted and part will be used for the wrist cuffs.
EITHER 5/8ths yard OR 1 ⅝ yards of green. This will be your ship colour, and possibly also the back of the sweater, depending on preference. You NEED a piece measuring 8 ½” by 56 inches, which CAN be made by joining two strips together. But the leftover from cutting this strip’s width from along the edge of a 44" wide fabric will be the right size for the back, the colour will coordinate, and you won't have a seam in the front.
1/2 yard of a teal blue colour, for the canal water.
2-3 yards of 1 inch wide non-roll elastic.
White embroidery thread. A dark embroidery thread is also optional.
EITHER quilt backing and batting sufficient for two 36"x60" panels OR a fleecy fabric big enough to use as backing for two 36"x60" panels.
Bias binding for the neckline (which could be cut from the scraps of the above fabrics) or a couple of inches of ribbing/a pre-made stretch collar.
Sewing thread.
Piecing the front of the sweater:
This is what your pieced front will end up looking like.

Start by making the container blocks. There are 112 of them, and they are cut to 4” by 2”, and finish at 3 ½” by 1 ½”. Arranged horizontally, they are 8 blocks tall and 14 blocks wide, and measure 49” wide and 12” tall. They are made from the 5 dark colours, arranged randomly, as well as some of the red of the waterline if you would like.

Add a 4” wide, 12 ½” high strip of sand colour to either end of the container blocks. If you would like to add some length to the sleeves, you can make these wider. The remainder of the sand-coloured fabric will be cut into two 16” long rectangles for the wrist cuffs later on.

The green of the boat is 56 inches long and 8 ½ inches tall. This can be made by cutting two 8 ½” strips and using a vertical seam in the centre, or by using 56 inches of fabric (1 ⅝ yards), cutting the 8 ½ inch strip from the edge, and using the rest for the back of the sweater.
Attach the letters before piecing the green of the boat to the other parts. They should measure about 2 ¼" tall, and about 20 inches wide, and be in the exact centre of the green of the boat. Use your preferred method of applique or iron-on transfer, or fabric paint. A PDF of the letters is available at bit.ly/EGLetters.

The red strip at the waterline of the boat and the teal green for the canal water can be cut from the width of the fabric, as this part of the pattern is narrower than the pieced containers and the green of the boat. From the red, cut a 1½" strip, and from the teal blue, cut a 10" strip (wider if you would like the sweater to be longer), the full width of the fabric. Line the middle of these two strips up with the middle of the green of the boat and attach.
Baste and quilt the front piecing. Do the same for a back piece, the same size as the front piecing.
Embroider the name of the Ever Given where shown on the pattern.

You can also embroider a little excavator on the sand coloured fabric at the wrist in a darker thread, but this is optional.

Cutting the Pattern:
***If you are using the printed panel, the instructions start here***
This pattern has two pieces - a front and a back - as well as some rectangles for the wrist cuffs. You don't even really need to print them out - you can use either the design on the panel or the seams of the quilted top as a guide for where to cut the shapes, as they are fairly simple and forgiving of variations.

If you would like a printable version, it can be found at bit.ly/EGPrintable, and prints on both A4 and US letter sizes from the same file.
The main lines of the pattern make a sweater with a finished maximum waist measurement of 56” and a finished lower arm measurement of 14”. If you need more room, you can shift some of the seams outwards to the limits of the pieced or printed design - the image above shows some potential lines, each of which adds 8” to the total hip measurement. Alternatively, if you prefer you can also make the waist and hips smaller.
The sleeve length is constrained by the maximum possible width of the fabric to about 59” wrist-to-wrist, but it is possible to add an extra inch to each of the cuffs using the fabric of the panel. If you would like more room in the arms, it is possible to move the shoulder seams up to level with the top of the panel for an extra couple of inches of room. The finished length of the sweater is 26 inches from the shoulder alongside the collar to the hem, but there is enough extra in the panel to cut it longer. Alternatively, you can make it a cropped sweater by cutting it down to a few inches below the red line.
Cut the front piece (the smaller of the two, with the deeper collar curve) from the panel or the pieced design. If you are using the panel, the offcuts from this piece will be used for the wrist cuffs (the sand coloured rectangles in the lower corners) and the collar (the excess from the shoulders or the bottom). Put these aside for after.

Cut the back piece from the plain fabric piece you have. The underarm shapes are the same but the sleeves are a little taller and the curve of the neckline is shallower.

Sewing the Sweater:
All seams are sewn at ½” allowance.
With right-sides together, sew the shoulder seams. For a neater finish, these can be top-stitched before you sew the side seams, otherwise, finish your seams however you prefer.

Next, sew the underarm seams. These are more difficult to flat stitch, so I just finished them with a zigzag.

If you are using the panel, turn the bottom hem towards the wrong side of the fabric about a quarter inch, and then again about 1 ¼”, to make a casing for the elastic. Stitch along the edge of this, leaving a couple of inches unsewn as a gap to insert the elastic. Cut your elastic to your preferred length and feed through the tube. Join the two ends of the elastic together and sew the gap closed. A youtube tutorial for this method can be found here.
If you have quilted the sweater and are worried that this will be too bulky, there should be enough of the teal blue fabric left to add a waistband with the elastic in it to the bottom hem rather than folding over the thicker quilting. Cut two strips 3 ½” wide and trim to the same length measurement as your hem. You might want to trim an inch or so from the bottom of the quilted piece to compensate for the extra length. Attach using the same method as for the wrist cuffs in the next step.
To make the wrist cuffs, cut rectangles measuring 5” wide from the remaining sand-coloured fabric, or up to 7” wide if you would like the extra sleeve length. These rectangles should be 16” long. If you added height to the sleeve, you will need to gather the sleeves slightly to fit the wrist cuffs.
Sew together the ends of each cuff into a loop, right-sides together. Cut lengths of elastic to your preferred size for your wrists and sew into loops. Fold the cuff loops lengthwise right sides out, sandwiching the elastic between the two halves. Sew the raw edges of the cuffs to the right sides of the ends of the sleeves. Turn the cuffs outwards and topstitch the seams. A youtube tutorial for this method can be found here.
Check that you are able to get your head through the collar, especially if you quilted it or are using a non-stretch fabric from Spoonflower such as the performance piqué. Because there is no stretch, you may need to cut it a little deeper to fit your head. Once you are sure it will fit over your head, either bind the raw edge using bias binding or scraps from the offcuts, or, for a tighter fit, cut a strip of ribbing or a pre-made stretch sweater collar to a couple of inches shorter than the length of the neckline edge. Sew the raw edges to the right side of the neckline, and then fold outward and topstitch the edges.
If you are using a Spoonflower panel in a fabric with stretch, cut a 1+1/2" strip from the offcuts of the top of the panel so that it measures an inch less than the collar - you may need to join two pieces together. Sew this into a loop and fold lengthwise with the right sides out. Sew the raw edges to the right side of the neckline using a quarter inch seam, and then fold the collar the right way and topstitch the edges. A youtube tutorial for this method can be found here.
It’s all done!
Now you get to spend Halloween (and really, any time you feel like being annoying) arms outstretched blocking every doorway yelling “I’m stuck!”
Have fun with it.
As always, this pattern is free to use and share and there are no restrictions on what you can do with the items you make.
I do not control your right to profit from your work. All art is derivative, and you making your own version transforms this pattern. Don’t let assertions of intellectual property rights be another way you are alienated from your labour. If you decide to sell your work, demand fair remuneration for your time and skills. Someone offering to pay for the materials is not enough. If you have decided to take an activity you love and turn it into work, make it worthwhile.
On the flip side, please don’t try to sell this bit of writing or the PDF of the pattern. They are free for you and for everyone else. Resist society’s message that you should try to profit from your every action, and especially resist the notion that true success is achieved by profiting from anyone else’s labour.
I love seeing what people make from my patterns! Please tag me in your posts or use the hashtag #EverGivenSweater on Instagram.
#sewing pattern#free sewing pattern#Ever Given#Suez Canal#that boat that got stuck#halloween costume#novelty sweater#quilting pattern#evergreen#Ever Given Sweater#please listen to me when I tell you that even though buying the panel costs more than solid coloured quilting fabric#it will save you between 5 and 20 hours of work#I could make this from the panel in maybe 45 minutes and half of that would be pinning collars and cuffs#also bonus: you can add a pocket! If you get the panel there should be enough fabric left in the teal blue to add a kangaroo patch pocket#It is much more of a faff if you are quilting but also very possible
556 notes
·
View notes
Text
OK SO
technically this is currently two vaguely different ideas, and ill probably only make one in the foreseeable future bUT
waistcoat !!! or pinafore !!!!! (technically three options because im unsure if id go tailored waistcoat or an almost corset style one)
my goal in this project would be to fill in some gaps in my wardrobe, so im thinking black (obviously honestly, i only wear black) and quite plain, but maybe with some embroidery or cording or something, something subtle to add some texture and detail, but still fit in with any outfit i might make.
im split which way yet!
ive wanted to make a waistcoat for a while, but i guess im a little worried that i wouldnt wear it so much? i tend to dress very femme and very. like fluffy? flouncy? lace and flare and delicate fabrics and im not sure a waistcoat would fit into that? but i do really want to make one, i think itd be so fun! i think i would learn a lot of techniques even from a simple waistcoat, pockets & tailoring and buttons (for real this time) (OH i could use some of the buttons i rejected for the black coat) i plan to add boning to it either way, but i also this a corset style waistcoat could be real cool! not like the kind of things that come up when you look up corset waistcoat, but like, a lacing back and more structured pattern cutting? this one would require some development to see through but.... fun!!! i also have some scrap fabric (brown) from a skirt ive been wanting to turn into a waistcoat- it wouldnt work for this specific project but depending on which way you spin it, it could be a practice run at this project (already having coat 'wearable mockup' flashbacks) or it could be a downside, having two similar garments in my wardrobe
part of me feels like making a pinafore is kind of a cop out- its a far simpler project, and i have a preeetty similar project in the pipelines (though in a completely different aesthetic- heres the inspo for that one), and a lot of my other ideas are similar to a lolita jsk. but also i want jsk. i want to make some for myself some day sooo... i think id would probably get more wear out of a pinafore- but thats just in my head (i wouldnt have to match blacks). i probably wouldnt be learning much new with this one, but it would be a much quicker project! less likely to get stuck in the middle of it because i run out of motivation. i feel like i havent said much pro pinafore but wearability is Super important to me! i have a terrible habit of picking projects that are fun and interesting and then are not actually something i really wear. sometimes an easy project is really good- i like to try and learn things with every project but sometimes i back myself into a corner with things i dont know.
decisions!!!!! i cant make them :(
as i mentioned earlier, this isnt in the immediate pipeline- i still want to finish all my current projects first, i dont think i have any fabrics that'd work for these and im trying to not buying anything right now, and really i shouuuuld make things ive already planned + bought things for. but i think itd fill in some areas of my wardrobe so i might more it before some other things....
below the cut is some very initial inspo, i ripped it all from pinterest (thats basically how i start any sewing project plan fhdbdn)
if youre interested on the brain tangent it was: (start a little unclear but i was thinking about izzy) > izzys sleeves. me too i love a shirt with puffy sleeves > i could make IZZYS shirt (this one is still on the cards btw) > thinking about my wardrobe in general i guess > i own a lot of white puffy shirts but i dont wear them, i tend to wear black things > what might make me wear them short of dyeing them? i love these shirts but theyre too. white for me. maybe something i can wear over them > waistcoat.... i want a waistcoat.... ( i think its hilarious this tangent that started with izzy + ended with waistcoat never went near izzy's waistcoat )


#i tried to format this so it was a bit easier to read the wall of text uhhh idk if it worked#welcome to another edition of girl (gn) shut the fuck up#project planning#sewing
9 notes
·
View notes
Text
#my current textile bugbear is rags#we've basically abandoned them as a society#and now you routinely get people who *have* done some worldbuilding thinking and are doing okay with the period content#but don't really grasp where rags come from or what they're good for#apart from labeling The Poors#and will say things like the torn and bloodstained garments had been thrown out#as they were no longer even fit for rags#how so????#what do you imagine the minimum qualifications of a rag are??#kakl;jdkdfa
#look rags are kinda the plastic bag full of plastic bags of the premodern era#only they're useful in a much wider variety of ways#and much more expensive#i threw out the rags because they were stained is like. i threw out your socks because they were stinky.#normal people don't *do* that#disposable fabric has made us insane
Just to give you some idea of why even rags were very valuable in any pre-industrial setting, here are some facts about fabric production throughout history.
In the Viking era, when drop spindles and vertical looms were the height of technology and every step had to be done by hand, it too about seven hundred hours to make a blanket big enough for one person. First you had to harvest the fiber that you were going to use, then you had to clean it and prepare it, then you had to spin it, then you had to weave it and then you had to finish it.
To support a household of five, and keep them supplied with a bare-minimum of fabric needs (so they weren't naked or cold), took approximately 40 hours of work per week just on textile production. In a reasonably prosperous family, everyone would have two outfits (one for every day work, and one nice one, and when the nice one became too worn or stained to be "nice" it would be your everyday outfit and (if you were lucky) you would make a new one to be nice, and your old everyday outfit would be either passed on to someone or (if it was in too bad a shape for that) would be cut up for various other uses.
As technology progressed, all of the steps in fabric production ended up taking less time; for example, the spinning wheel spins thread much more quickly than the drop spindle does. But it was still a hell of a lot of work.
In the 18th Century, here's the life cycle of bed sheets:
They start out as sheets (flat, both top and bottom) and are needed because they are MUCH easier to wash than your sheets than a blanket. As sheets get used, they develop worn patches to the middle. Those get darned. When even darning is not enough to save them, you cut them in half down the middle, flip the pieces, and sew the edges together so that what had been the edge is now a seam down the middle and the worn parts are on the edges (where the fact that they're worn doesn't matter much). When the new center gets worn out, you cut the fabric apart and turn the usable bits of fabric into pillow cases. When the pillowcases get worn out you turn the usable bits of fabric into handkerchiefs.
And the pieces of fabric that are truly too worn to be used any longer were not thrown out: they were sold. To a ragpicker. Someone whose entire job was buying rags and scraps from households and then selling them on to merchants and tradesmen who could use them. Rags too worn to be used as fabric any longer could be made into paper, for example. Or used as stuffing padded/quilted garments or cushions.
i think one of the reasons i get mildly annoyed about worldbuilding threads that are 200 tweets of why you should care about where blue dye comes from in your world before saying someone is wearing blue is that so few of them go up to the second level of "and that should impact your characters somehow" - i don't care that blue dye comes from pressing berries that only grow in one kingdom a thousand miles away if people are casually wearing blue
37K notes
·
View notes
Text
Gleam and Glow
Chapter 1
Pairing: Grey! Bucky Barnes x Fem! Reader
Word count: 3,374
Description: The reader has been held captive by their own mother their whole life, taught to believe the world is bad and that they need to be protected from it. That their gift needs to be protected from it. They possess 70 feet of hair with healing properties and some people will do anything for a chance at peace.
General Warnings: This story contains dark elements and various dark characters!! Do not read if this makes you uncomfortable!!!, kidnapping, violence, language, angst, whump, for the purposes of the story the reader has 70ft foot long hair that glows gold- this does not change regardless of hair color or texture, inspired by the movie Tangled.
Chapter Warnings: kidnapping, manhandling, betrayal, mention of trafficking (selling/buying of a human), John Walker, very naive reader, brief sexual implications,arguments, un-gendered pet names,choking, illusion to sexual harassment, language, please read at your own discretion.
DO NOT REPOST MY WORK, REBLOGS ARE WELCOME AND APPRECIATED
A majority of your childhood was peaceful. You got to do all the normal kid things- of course you were never totally sure what a ‘normal’ kid thing was on account of the fact that you’d actually never met another kid but, it felt normal enough. Aside from the very abnormal ‘birth defect’ you were ‘gifted’ with. You stopped considering your magical abilities as a gift by the time you were seventeen, when your mother made it abundantly clear that you could never leave the tower, you could never go outside, and you could never cut your hair.
The only thing more annoying than the seventy foot long tresses was your mother. According to her, your father was a sloppy one night stand she found in a tavern. He was a love em’ and leave em’ type of guy; he gave your mother one great romantic night and then disappeared off the face of the earth. You’ve never met him. You’ve never met anybody. Your mother has always been your only companion. She was a beautiful woman, she said you take after her more than your dad. While she was gorgeous and protective, she was also passive aggressive, rash, and ostentatious. If it was possible for her to get out of being “the bad guy” she lunged, dragging you under at the first chance. When you were younger she would tell you stories about the outside, she made it seem like a gorgeous place. She described the kingdom and the many villages outside its walls. She started with all the good things until you showed interest in escaping, then, she gave you the truth. She began to spin tales of roads rich with crime, vigilante gangs, covert groups of thugs, and rebel Viking camps. From what you could piece together, the rebel Viking camps were the greatest concern.
The rebel Viking groups weren’t actually Vikings. Your mother had said they called them The Vikings because of their rugged and brutal lifestyle. The camp they occupy is more like a small village, the structures following Norse architectural style, chalk-full of criminals and runaways. Runaways. Your mother had always explained to you that when young girls ran away from their mothers they ended up in that village living a life of crime. The very thought of falling into the wrong hands has kept you from sneaking out or from begging to leave the tower. You found ways to be content, ways to keep busy.
The tower wasn’t as big as it looked from the outside, the only living space was at the very top of the tower. The top of the tower had about two floors worth of open space, minimal and organized in the lower level and very maximalist in the bedrooms and wall decor. Mother said the rest of the tower below was sturdy white brick and vine, aged by time and the weather. Most of the exterior bricks were cracked or crumbling, so all the support for the turret came from the tower’s solid core. The roof was a chipped and rusty blue color mostly concealed by untamed ivy growth, which also hid the entrance to the tower’s turret. To your home. The only way in and out of the tower was an intricate pulley system made from twisted vine and rope. Originally, mother had used your hair to get into the turret, until one day a strand snapped from the pressure, dying and losing its magic. In an effort to protect your gift, you helped your mother make the pulley.
Crafting things was just one of the many ways you spent your time in the tower. After you’d turned eighteen your mother didn’t stick around much, if at all, leaving at night to go to the palace or the tavern, sometimes coming back in the morning and sometimes being gone for a day or two. With so much time alone the only option was to learn how to entertain yourself. Reading books, cooking, painting, testing the information you soaked up from all of the books, sewing holes in clothes, polishing leather, polishing silver, dusting, drawing in the dust. It’s a really long list. If there’s more to add you add it, forever stretching the possibilities. As the sun started to go down however, it started to seep in just how repetitive and predictable your daily activities had become. While you knew leaving the tower would be a horrible and dangerous mistake, you couldn’t help but long to be outside. To feel the grass between your fingers or to stand out in the sun, somewhere other than where it leaks through the turrets window entrance. It could never happen. Knowing this was an impossibility kept an icy grip on your stomach, a lonely sort of feeling, naturally touch starved by fate. It’s been years since the last time you asked to leave. Much before you knew how dangerous it really was out there. Asking one more time couldn’t really hurt could it? You’d be twenty soon enough, just one touch wouldn’t hurt anyone.
Mother had left early in the morning, off to do some much needed grocery shopping; if she hadn’t decided to stop by the tavern she would be home very soon. Too soon to come up with a better plan. Quickly you started to prepare for her to come home, sweeping the dining area and pulling out the utensils needed to make a special stew recipe you remember she had enjoyed. If she was going to say yes she needed to be buttered up first. Once the cooking utensils were nicely organized on or beside the unlit stove, and the dust was done away with, it was time to make quick work of anything she could use against your argument. Rushing to one of your most treasured bookshelves you pulled a discarded velvet scrap from the back of one of your more worn astronomy books. The midnight blue fabric had been torn from one of your favorite dresses when you were sixteen, unwilling to part with the shredded material, it was quickly fashioned into a long braided bookmark. Since then you’ve opted for shorter than floor length gowns or comfortable riding pants and tunics. The supposedly “masculine” style annoyed mother to no end but then again she really couldn’t understand how suffocating the corsets could become, or how difficult it was to fasten them without getting hair caught beneath the strings.
Unbraiding the bookmark allowed it to become one long thick strand, setting it on the dining table, you went to gather your hair. For the most part, you tried to keep it close to yourself. Getting any part snagged or wrapped around something was more of a pain in the ass than taking the time to gather it together. Gathering so much hair was difficult, it took time and it was unbelievably heavy. Once you were finally able to get it all in one place you started the tedious task of braiding. In order to braid it up enough to keep it off the floor you split it into three sections, braiding those separately before braiding them up into a complex Dutch braid. It took nearly two hours to finish so you could finally tie up the end with the dismantled bookmark. The complexity allowed the braid to settle halfway down your calves, keeping it neat and off the ground. Now all that was left to do was light the lanterns around the room and wait. Waiting for mother to get home was nerve wracking, if possible you’d busy yourself with starting the stew but you were fresh out of the most important ingredients.
“Y/n let down the vine!” Mother yelled from the bottom of the tower and the tension finally broke.
“Coming!” You sighed out in relief rushing to the window and lowering out the vine life you had made.
Once you were sure she was safely in the lift’s sling, you utilized the pulley system to begin pulling her up. The tower was around forty feet tall, making the trip up lengthy and difficult. When she was close enough to the window entrance you hooked the vine slack onto the wall hook, keeping it stationary, before quickly coming to help her in with the groceries. Taking the canvas grocery bags from her arms and into the kitchen, you started pulling out the items to take inventory on what she’d bought at the market.
“How was the market? Did that man give you trouble on the celery prices again?”
“Ugh doesn’t he always? Absolutely exhausting, he wanted double, and then there was a fight at the tavern again which I always have to break up.” She pulled out a chair at the dining table, sitting into it and slinging her feet up into the neighboring chair.
You slowed for a moment, pulling the bundle of carrots from the bag slower as you processed that she may be intoxicated which meant there’d be zero chance of having the conversation you desperately desired.
“You went to the tavern?” You asked, feigning excitement.
“Of course sweetheart, I promised that I would but I wasn’t there for long I promise.” She got up to meet you in the kitchen, resting her hands on your shoulders.
“Now what are we having? I’m absolutely starved.” She smiled.
“I was going to make that stew from last winter that you liked so much. Now that fall is settling in.” you started to add broth and small peeled potatoes to the pot.
“That sounds delightful darling, I’m going to go rest my eyes, call me when it’s done?” Mother started to walk away. It was now or never.
“Actually!” You cleared your throat., “Actually I was hoping I could talk to you about something.”
“Alright but let’s make this quick, mama’s feet are aching.” She turned back around to sit in another chair.
“Well as you know I’m almost twenty, an adult really and I’m already very responsible around the tower-“
“Y/n where is this going?” She interrupted, rubbing her temples.
“I want to go outside.” You turned to look at her.
“We’ve talked about this! It’s far too dangerous! You know what would happen if anyone discovered your gift!”
“I know, I know, but I’ve thought about it and no one would even know! I won’t tell anyone about it, and if they don’t know I have it then they don’t know how to use it, so it’s useless to them. If I just keep it braided I’ll be completely normal!” You came to sit across from her, hoping it’ll be convincing.
“No absolutely not, it’s much too risky! I have kept you safe for nearly twenty years! I am not stopping now! You’re far too young to understand but this is what’s best for you!” She got up and started to walk away again.
“But it’s not! I’ve never met anyone else! I’ve never had friends or met other people my own age! I’ve never even seen a real man!” You were absolutely desperate.
“Oh a man?! This is about men huh?! So you want to leave the safety of the home I built for you to go whore around for a man?!” She was absolutely furious, beyond cooling down.
“Mother no!” Your face was burning with embarrassment at the very suggestion of sexual activities.
“No truly I understand! You would rather leave this place and be used by men! Drained of your power in one of those Viking camps no doubt! I won’t hear another word, I’m going out for air and your attitude better be gone by the time I get back!” She walked over to the vine, untying it from the wall and setting it into a rustier pulley wheel that would let her down slowly, she was gone just as soon as she’d finished her sentence.
You had no choice but to sit in utter silence and shame. Swallowed by guilt that mother could ever consider you’d do that to her. As much as you wanted to leave and experience the real world, you desperately didn’t want to disappoint your mother or end up somewhere bad. Very quickly you dissolved into regret, backing over to try and undo what’s already been done, planning a way to forgiveness. Finishing the stew was the only way you knew how to start so you got to work, making this the best stew you could ever devise. Having never written the recipe down you had to go solely based on flavor and gut feeling. That was the best way to cook anyway. Once it had been spiced to taste you put the lid on the pot to let it simmer.
Almost immediately you found yourself overrun with anxiety, filled with a need to do something with your hands. To occupy your mind. There really wasn’t much to do in the tower to occupy you enough to erase this from the forefront of your mind. So you opted for the only thing that you could: cleaning. Your started polishing, dusting anything that you could and when there was nothing left you sat and you waited. The silence was absolutely deafening. You’d totally zoned out until you heard the rattling of the pot lid on the stove, snapping your head to it only to see the stew boiling over.
“Shit!” You rushed to turn it off, burning your hand in the process as you cleaned up the mess. Suddenly you were no longer hungry.
Opting to leave the stew on the stove for whenever mother would return you left the kitchen, going to your room as you cradled your hand gently. Tears stung your eyes, threatening to drip through your lashes and you curled up on your bed. Reaching for your braid with your uninsured hand, you gently took the end and rested it over your burned palm, reaching to wipe away some loose tears. Whether the tears were from the pain or from emotional discourse you couldn’t be sure. After drying your tears you closed your injured fingers around the large amount of hair, and began to hum a soft familiar melody. As the melody continued your hair began to glow a brilliant gold, almost glittery in color. Once the shimmer reached your palm, the heat faded and the wound healed. You were able to breathe. You looked to your palm, it was as soft and unharmed as it had been that morning. As it had always been. No scars or leftover pain. Just smooth healthy skin.
You couldn’t be bothered to really prepare for bed. The dress you wore was moveable, the corset easily undone as it tied in the front rather than in the back. Laying back you took a deep breath, closing your eyes momentarily to let go of all the stress that you could. After a minute of peace you pushed yourself up and off the bed, walking over to the dark wood armoire, opening it to look in the mirror, you sighed looking at your dress. There was stew on the navy skirt and what looked like a sizable carrot. You’d have to change to sleep. Lifting the skirt up closer you plucked off the carrot and disposed of it in the nearby waste basket. Returning to the armoire you flipped your braid back over your shoulder and checked the white sleeves of the off the shoulder blouse, slid your hands over the black corset, grabbing the tied strings from the vertex of the sweetheart neckline you untied the knot. Just as you’d finished untying the security knot you heard a loud grinding bang from the lower level. Pausing to listen you grew concerned.
“Mother? Are you alright?” You called gently.
When you didn’t receive a response you dropped the corset strings and left your bedroom, looking over the bannister you were met with the worst sight you could possibly have imagined. A large piece of the stone floor was broken and pushed out of the ground, slid off to the side and two large men climbed out of the dark hole below. Half a million questions filled your head. How was there a space under the floor? How did these men find you? Did they know who you were? There wasn’t time to think, you had to act. Silently and quickly you snuck back into your bedroom, burning out the lamps and climbing into the armoire as best as you could. Tilting your chin up to silence your breathing you listened. Waiting. Thinking. The men were much bigger than you thought a man would be. From what you could make out they dressed in dark clothing. Leather. Worn and hardly taken care of if at all. They were similar heights. One a redhead and the other blonde, both with rugged facial hair. You only had a brief look and the adrenaline pumping through your veins was making it difficult to focus.
“I am never doing that shit again, forty feet of crumbling bricks and thirty feet of rope, you seriously didn’t think that through?!” You could hear them arguing.
“It didn’t look that tall alright? Can we just find the chick and get out of here? I lost my good boots in a poker game with trash panda and if I don’t win them back he’s gonna tear them apart.”
It was clear they were coming for you. The only thing you could do was hope mother came home or that they didn’t see you behind all the other clothing in the armoire. The stairs creeped. Once. Twice. There was only one creaky step. They were both coming up. You held your breath.
“Food on the stove and the lamp in here is still warm. She was here recently.” They made it into your bedroom.
“If I had to guess I’d say she’s still here.” The footsteps stopped. It was silent.
Suddenly, the hem of your skirt was yanked-it had been caught in the door-and then the armoire burst open. The blonde man grabbed your arm as you struggled, ripping you from the small dark space and out into the open. He spun you around, pressing your back to his chest, his left forearm braced across your neckline and gripped your right shoulder. His right hand held a sharp silver blade to your heart.
“Well, well, well, Princess did we catch you at a bad time? These corset strings are so very loose for company.” The blonde man taunted, using the tip of his blade to pull on the cords.
You gripped this forearm, pushing back closer to his chest in an effort to get away from his blade as you struggled.
“P-please just leave me alone, I won’t tell any-anyone.” You stuttered, trying to stay calm the way your mother had taught you.
“We have plans for you, this hair of yours… hear there’s some people willing to pay a pretty penny for just a touch.” The red headed man stroked your braid, you jerked your head away.
“Oh oh oh” the blonde man laughed. “She’s a feisty one, are you sure we have to deliver her so soon? Could be fun…”
“Oh c’mon man don’t be gross he wants her unharmed. Mostly. C’mon just cloth her so we can go. Boots remember??” The red head said, grabbing your wrists and tying them together roughly. He took the dagger from the blonde, continuing to hold it in its position as the blond reached into his pocket.
“No no no no no please please I’ll give you anything you want just leave me alone!” You begged, swerving your head away from the blondes clothed hand as it moved towards your mouth.
“Bitch stop fussing around!” He slid his left forearm up to your throat, both choking you and effectively stabilizing your head long enough to clamp the cloth over your mouth and nose.
It hardly took thirty seconds before your vision started to swim and your vision started to fade to black.
“We’re already late. He’s waiting.” One of the men said as he slipped a cloth bag over your head. Your hearing went out, senses dulled as you gave in the the dark.
#marvel fanfiction#marvel reader insert#reader insert#x reader#bucky x reader series#bucky barnes#bucky x reader#bucky fic#bucky x you#dark!bucky x reader#grey!bucky barnes x reader#bucky barnes x reader#Gleam and Glow#bucky Barnes tangled au!#tangled au!#marvel au
79 notes
·
View notes
Text
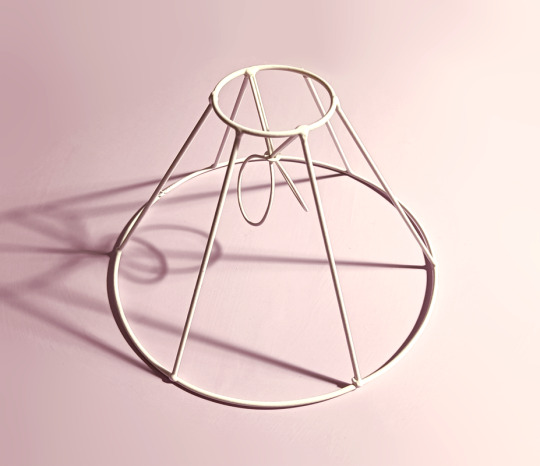
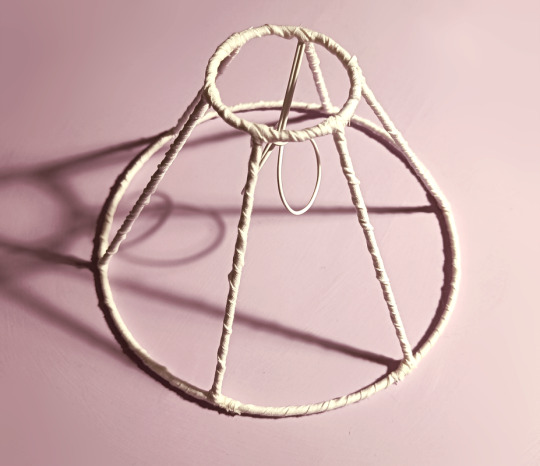


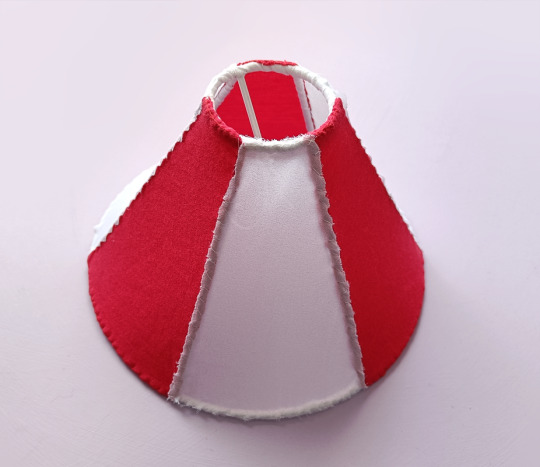

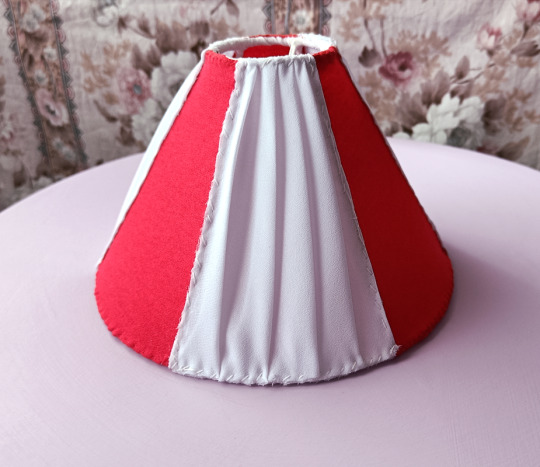


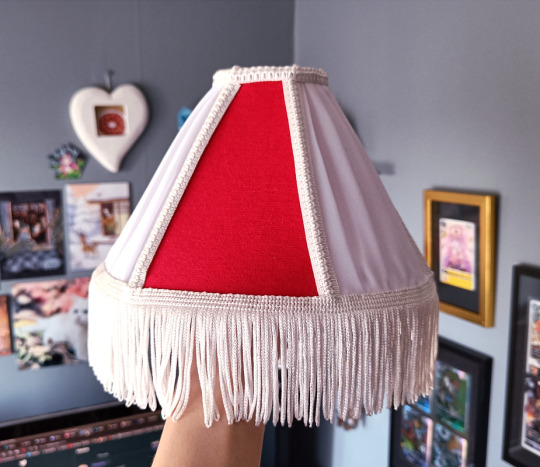
Certainly turned out wonky but I sure did make a lampshade
Okay so earlier this year I started getting reccomended a bunch of videos of a woman (re)upholstering (not sure if that's the right word to use here but w/e) vintage lampshades on Instagram. Unfortunately for me, she made it look really fun and easy.
Even more unfortunately for me, I just happened to have this small lampshade frame sitting in our attic
So of course I wanted to give it a shot
I could not fuckin resist man
So for this project I did have to buy some cotton ribbon to wrap the frame, some fabric glue and the decorative ribbon, but all these things together were like 15 bucks at most (if even that). The frame was free and I used some random fabric scraps I already had, so, ye
So, kinda using those videos as a guide, I did start by wrapping the frame with the ribbon (so I could sew the fabric onto something). Then I sewed on some red fabric on the frame, followed by white
Now I originally wasn't even going to buy the fabric glue, but the white fabric (I think it might've been chiffon but I can't say for sure) was actually shedding like, A LOT. To the point I was worried the fabric would fall apart if left alone, so I actually got the fabric glue so I could just gently dab some onto the edges of the white fabric so it'd just stick to itself and stop fraying. And it actually worked really well
Anyway, after doing one layer of white fabric, I did come to the conclusion the white was much more transparent than the red, and I did want to try to do something more interesting than just two flat fabric types
So I tried pleading an extra layer of white of top
I have never tried to plead fabric before
It turned out like shit
(At least the first panel did, by the time I finished the third and final panel I had kinda figured out what I was doing, but man, the first panel looked like ass)
But hey this was just a fun little project for myself, it didn't have to turn out good lmao
Now I did actually get some lace fabric with the intent of putting it over red, but the fabric scrap I got from the fabric store was actually like... Like the lace pattern on it was too dense, so it made it a lot more opaque than I had expected, and the pattern was too big too. So I did end up scrapping the idea (I can use the fabric for something else, it's fine)
But it might've been for the best because... Like if you watch Ace of Shades' videos, there's a reason you see her always sew the fabric and the lace together- the more fabric layers you need to sew on top of the frame, the harder it actually gets to sew. Like I had three layers by the time I had added the pleaded part, a fourth layer would've been a nightmare to try to add man
Anyway, with the panels done, I started glueing the decorative ribbon onto the frame (I had originally intended to sew it on but, since I knew how hard it was to sew and since I had the glue, I just went with the glue instead)
Now I actually glued some ribbon right on top of the frame, when I realized... I wanted to actually block the top of the frame too. I had intended to leave it open but when I put the ribbon down, I realized it looked really ugly because you could kinda see inside
So I carefully removed th eribbon before the glue finished trying, got some more red fabric and very painstakingly sewed on a tiny piece of fabric on the top. Then I just reglued the top ribbon, did the ribbon on the bottom edge of the shade, and yeah. Lampshade done!
Like I said, it turned out wonky, but considdering this was my first time trying to make a lampshade, it's arguably kinda decent. And it's mine so whatever
Now I just need to find an actual lamp I can use it with LMAO
#Mine#Yarncraft Diary#Refinish Diary#Don't know which to tag this with so let's go with both lmao#I did actually finish this project like over a month ago (if not longer) but I just never got around to posting#But hey here it is
3 notes
·
View notes