#its way easier to draw realism when you have a frame of reference
Explore tagged Tumblr posts
Visit Tumblr Blog
Explore Tumblr blogs with no restrictions, modern design and the best experience.
Last Seen Tumblr Blogs


Fun Fact
When “GIF” was named word of the year in 2012, Oxford Dictionaries U.S.A. credited Tumblr for pushing the word.
Text

YOU WAKE UP IN THE MIDDLE OF SURGERY (YOU ARE GOING TO DIE)
#fay draws#house md#dr house#dr gregory house#gregory house#robert chase#lisa cuddy#eric foreman#james wilson#allison cameron#its way easier to draw realism when you have a frame of reference#based on that one post by dokani
68 notes
·
View notes
Text
i yearn for one(1) thing only, and that is to have a nice, simplistic, cartoonish artstyle. an artstyle that doesnt rely on anatomy, but the "movement" of the drawing, if you get what i mean.
i dont want realistic proportions and traditional colors and basic poses and gradient shading, i want funky lil dudes in funky poses with funky styles littering my sketchbook :( but alas i havent figured out how to develop that kind of style yet, my brain wants anatomy to look nice but also i dont want to draw eyes. i dont want to take time out of my day to learn how to draw lips i want to draw a line that extends past the characters face. i dont want all my characters to have pointy chins with curved cheeks i want their heads to be round and friend-like or full of sharp edges depending on their personalities and styles. i want to give them all not-quite human ears, blob feet, simple faces, but at the same time i want enough detail to convey the story or emotion im trying to tell.
ive spent so much time recently agonizing over how to use 3d model websites, using real-life references and tracing over them for practice, color-picking from real images to try and do realism and failing miserably, but you know whats easier than that? funky little dudes. little dudes who do not care if their legs are too long or their hair is too bouncy. i dont want my characters to look human.
ive spent enough time on the artfight website to realize that most people who classify their characters as "human" have the most basic ass designs (no offense to people who like basic human designs its just not my thing) or its like dnd-medieval style outfits which i cant draw for the life of me (ive tried). again no offense to people who actively enjoy and draw characters like that. i just need my dudes to have that certain,,, off-ness to them. tails are cool. wings are swag (especially if they arent even like,, fully attached,, ), elf ears are so wonderful to me no matter how much theyre overused, horns are so much fun to draw, and colors!! i have no knowledge in the color theory department so this works great for me!! the only thing i really know is dont shade with black, other than that i just colorpick from references usually but i dont want to do that!! i want the colors to hurt people's eyes but in a satisfying way. like the character's design is so nice to look at that you dont mind your eyes hurting a bit. like how im enjoying writing this post even though its 2 am and the brightness on my computer wont go any lower.
and then another thing ive noticed from being on the artfight website is that a lot of people classify their characters that are anthro/have anthro features under humanoids/monsters. like i made a google form to find some people to attack and someone sent me in a character with some sort of animal (wolf? idk) arms and legs. like dude!! peak character design i love her. but me personally? i cant draw that shit, its so hard for me. i tried a while back and its just Not my thing. nothing against furries i just. cant. and i dont want to either.
and i got another submission that i accidentally deleted that was like full anthro/wolf-like like my comrade,,, i cannot draw animals what makes you think i can draw an animal who acts like a human lmao. i can do like. very basic tails, and also animal ears but i cant do the arms and legs and such i just dont know the anatomy, and i know i was talking about how i dont want to care about anatomy but i feel like for anthros you really do need to know at least basic animal anatomy so you know how the limbs look and shit and i dont have that knowledge and dont feel like gaining it.
and then there were some submissions that i absolutely adored. there was one that like, was vaguely human shaped but definitely was not a human. they had a dark-ish lavender colored skin and horns and tusks and like goat ears and a sorta fluffy tail with spikes on it and they had wings and such and they were such a pleasure to draw i love them. and they had a fairly simple outfit too, nothing too complicated. and then i also enjoy object head characters, theyre so neato to me. i got one of those and i really wish i had the motivation to work on it cause it looks so fun.
i want to make funky characters but id have nothing to do with them because the only book i ever tried writing (key word tried - never got past planning it out) had strictly human characters in it, and most of the books i read are humans/humans with powers in situations specific to them so id have no idea what lore to make with the dudes. assuming i have the motivation to make lore and backstory because honestly i just really enjoy character designing its super duper fun.
(side note a song about trucks doing the deed came on just now and its interrupted my flow, apologies).
i only have three actual characters right now. one is an original roleplay oc whos design is literally athletic shorts, an oversized long sleeved grey sweatshirt, long purple hair, and demon horns. the second one is my persona whos design some sorta medival knight outfit kinda thing? but not ugly it looks really cool (idk one of my friends designed it bc i won some contest from him but the drawing was on a super small scale so idrk the details,,,) with a plague doctor mask and crown, and shoulder length wavy brown hair, dyed bright pink at the end. and then my last one im not too comfortable using other places because theyre a character my friend is using in the story hes writing, and thats really the only place theyve been used. but theyre easily my favorite and im already writing a ton so ill talk about them too.
they're a sorta elf species thing from another planet, with pale green skin and pointed ears. they also have a tail, its like,, super thin, but with a feathery bit at the end. probably not the texture of a feather but i dont know how else to describe it. they have short, curly, almost-draco-malfoy-blonde hair that when it gets too long they can put in a man bun. their eyesight is kinda shitty so when they got to earth, they were exploring some supply closets around the airship. drop off area. thing. like airport but for rocketships and also fancier. yeah. they were exploring that area and found a nice big pair of round glasses with grey frames. and they also found a cowboy-style hat and a sharpie so they wrote their name on the underside of the brim of the hat and stole the hat and glasses (but left the sharpie in the supply closet).
yeah theyre my favorite, my absolute beloved, my child, so cool. i want more characters like them but with maybe a bit more snazzier designs. theyre super cool and all but they could have more pizzazz if they werent in a story where its too late to give them more pizzazz. i just want to be able to give my characters thigh-high boots with a bunch of buckles and fluffy hair with tons of accessories crammed in and abnormally large and long ears that can harbor many piercings and horns that can hold rings on them and special little details on their outfits like who knows what but i dont have any characters to do that too, so i have to make them from scratch, which is always hard especially when you have artblock.
and i also have like 17 characters i need to fully draw, line, and maybe color for artfight before august 1st. so i dont know. i have many things to do and plenty of time to do it but instead i spend my time halfway watching repetitive youtube videos that get boring or sleeping all damn day because i stay up too late doing things like this or i just do nothing at all and its tiring and frustrating but i also feel nothing about it like theres no consequence if i dont do it besides you know. not doing it, not gaining that experience, not making something i enjoy.
so i should do it but i dont for whatever reason, i think its called executive dysfunction but im not sure. this post started out very differently than it ended and i said somewhere up there that i was writing this at 2 am but now its almost 3. this is so many words why couldnt i have put this energy into something productive
#long post#sorry its so messy but like i said its almost 3 am and i dont want to go back and format all this#i might come back and make it look nicer in the morning#maybe not who knows#i just checked and this is 1.5k words what the hell
3 notes
·
View notes
Text
Principles of Animation
After the presentation the only specific feedback I got was to look into Milt Kahl and his animation. Milt Kahl is a famous Disney animator who worked on movies like Pinocchio, Bambi, Jungle Book and much more. The feedback was to discuss the principles of animation, I have mentioned these before, but not gone into detail about them. Here I will list them and describe their function.
Other feedback I got was mostly praise for the work I did, especially people appreciated my physical based acting approach to the experimentation. But some people also wanted to see more 3D experimentation, which I will start doing once a base model and rig are produced. But until then I an focusing on the acting approach and learning Blender better, as I stated before, because I feel this will benefit me more in the long run than to animate aimlessly in 3D.
Animation Principles:
The 12 principles are: 1. Squash and stretch 2. Anticipation 3. Staging 4. Straight ahead action and pose to pose 5. Follow through and overlapping action 6. Slow in and slow out 7. Arc 8. Secondary action 9. Timing 10. Exaggeration 11. Solid drawing 12. Appeal. (Thomas and Johnston, 1981, p.47)
Squash and stretch
This bases itself upon the idea that all organic things squash and stretch with any movement and that only “the wax figure in a museum is rigid” (Thomas and Johnston, 1981, p.48). However, in animation, squash and stretch is about pushing those shapes to emphasize the movement. A crouch before a jump will be much more compact (squashed) than humanly possible to contrast the elongated (stretched) form of the jump. This creates a more dynamic performance.

The squash and stretch technique helps tick the eye into thinking something has more weight and force to the movement. Like the example below. Here you see the two examples of key frames from a bouncing ball, the left one without squash and stretch and the right one with. The Right one feels more dynamic and like it has more weight and power to it, whilst the left one feels flat and lack luster. However, the left one is more “realistic” as the shape keeps its integrity the whole time, whilst the right one manipulates the shape in order to create a better performance.

Anticipation
Anticipation is vital in animation. In animation the nuances of human body language is easily lost since the entire performance is manufactured instead of recorded like traditional film and TV is. “The audience watching an animated scene will not be able to understand the events on the screen unless there is a planned sequence of actions that leads them clearly from one activity to the next.” (Thomas and Johnston, 1981, p.51) Essentially, the audience needs to be prepared to be able to anticipate the next movement, making it easier to understand what they are seeing on the screen.
Example: Below you see Donald Duck winding up for a dash, this pose is easily recognizable and let’s the audience know he is about to run, thus when he does actually make a dash it isn’t unexpected or confusing for the audience.

Staging
Staging is a very general principle. It is about figuring out the best way to convey a “story point”, be that a mood, a personality or an action. To achieve “good” staging one asks questions like “will this scene be funnier if it is closer? Or is it better to have a moving camera? Or a series of short shots of different objects? Essentially, what camera angle or movement will convey the “story point” in the best way so that the audience understands it.
Straight ahead action and pose to pose
This is in relation to 2D animation techniques. Straight Ahead Action means animating the poses as they occur in the sequence. Whilst Pose to Pose is about planning out the shot and drawing the key poses and then filling in the tween frames later.
Follow through and overlapping action
This is an important principle when animating, it’s main function is to prevent “hard stops”. When someone moves their body and clothes or “floppy appendages” don’t all stop at the same time. The will have a “follow through” motion or an “overlapping action” as it is also called. This creates more movement in the character making them feel more alive and animated and creates smooth arching movements that feel fluid instead of hard and mechanical. There are many subcategories to this principle, but at the core it is about completing the movement of everything that has been set in action. Not everything moves at the same pace and this overlap is what creates a dynamic performance.
You can see the follow through here in Ariel’s hair, as it keeps moving after she has stopped.

Slow in and Slow Out
This principle is about timing your in-between frames so that they compliment the key frames. Having fast tween frames and then a slow entrance and exit to the key frames gives more focus to the most important actions in the scene and helps bring focus to those aspects of the performance. It also creates contrast in the movement, switching between fast and slow.
Arcs
Arcs focus on creating movement that doesn’t progress in a straight line. Organic being rarely move in straight lines, but rather moves in arcs. This might be because of gravity or the weight of organic bodies, but regardless, animating in arcs makes the motion feel more fluid and less constructed or robotic.
Secondary Action
This is about adding detail to a performance. A character will have his main action, example: standing up. But then you will add secondary actions to that movement to create a more interesting performance. Example: A character stands up and shakes his head. This gives you more insight to the character and creates a more appealing performance.
Timing
Timing is about planning your animation so that the movement feel correct and that it doesn’t all happen at the same pace. For example, falling, which is a quick action will not derive the same amount of time or frames as for example standing up. Thus we will allocate less frames for a fall than we would for someone standing up. In short it is about “Determining the number of drawings(frames) used in any move and the amount of time that action will take to complete on screen.
Exaggeration
As the name suggests this is about exaggerating movements and emotions so that they feel more animated. Exaggeration is heavily used in cartoons and other more comedic forms of animation, but when trying to achieve realism one must be careful at how much one exaggerates, as it can often read as unrealistic. However, when manufacturing a performance it can be beneficial to exaggerate as it usually makes your movement and poses more recognizable and thus easier for the audience to understand.
Here is an attempt at a “sneaking” pose. The first is Ok, but by exaggerating it the pose becomes more dynamic and interesting to watch. We also instantly know what is happening and how the character feels.

Solid Drawing
This is in relation to 2D animation and is about learning how to draw before starting to animate. A good traditional artist will have an easier time animating. Being a well rounded artist will give you more control over your craft and let you work with more challenging angles and movements.
Appeal
This is more of a pre-production principle as it deals with creating character that are appealing to watch and will engage to audience. I have gone into detail about this principle before and how it effects me. But in short this principle is the one I do not have control over. One could argue that is also has to do with creating an appealing performance, but combining all of the principles together is the guideline for creating an appealing performance, and since this principle is about the design of the character it is more up to the Character Artist than to me as a character animator.
References
Thomas, F. and Johnston, O. (1981). The illusion of life. New York: Disney Editions
2 notes
·
View notes
Text
Deleted sections from the essay in order to reach the wordcount
The education provided by the taxidermy in the NHM is minimal really, especially compared to the Hornimans or the Grants Museum, especially given their relative footfall – which is a problem. This leads to these creatures being separate from the ‘human world’ as they aren’t contextualised with what visitors know. The greatest book ever written is just words put in order, but the qualifying worth is in the craftsmanship, how those words are attached to one another. This isn’t to say that we scrap anything that isn’t a dioramic depiction of reality, but rather that we make more of an effort to educate, or elicit a response rather than simply witness. The mass extermination of American bison was something that was instigated by white colonialists, but it was only when taxidermy bison were taken to Washington did (white) people actually start to rationalise, and to care.
The guide takes you through vacuum sealed air and temperature-controlled rooms, explaining the pay per view specimens. Only when you get to the main specimen room does it hit you, not just the smell of decay and preservative fluids, but the attempt to document everything this side of the last ice age; mammals, birds, reptiles, fish, amphibians and invertebrates of all sizes and origins. Lying in the centre of the room is a giant squid called Archie - shadowing Darwin’s specimens in a locked 2” by 6” cabinet.
Collected on his trip to the Galapagos, these are marked with yellow dots on the top of the jars, signifying that they are the frame of reference for a then unknown species, the OG, the original genus. On the wall, there is a list of pager extensions to each of the head scientists, for each area of the animal kingdom –
The synopsis of the BBC Radio 4 programme titled ‘L’origine de L’Origine du Monde’ (2016) states:
‘L'Origine du Monde is perhaps the most notorious and explicit painting housed in a public museum…Its first owner was Khalil Bey, a wealthy art collector and diplomat for the Ottoman Empire. Visitors and dinner party guests would be led to his dressing room and towards a green curtain:
"When one draws aside the veil, one remains stupefied to perceive a woman, life-size, seen from the front, moved and convulsed, remarkably executed ... providing the last word in realism".’
There isn’t a logically plausible way that all art can be seen when it needs to be seen, but this point highlights that the creative world requires radical upheaval at the upper levels in order for the equality wanted to actually function. Self-proclaimed working class academic Lisa Mckkenzie states that ‘Until the middle class let their talentless offspring fail, the arts in Britain are doomed’, and one could argue that this issue of class privilege strangles not only the creative world, but prevents the reformation needed for the betterment of social issues throughout our modern culture. Taxidermy can be brought out of the backroom, to be used as another avenue in which to directly attack not only issues like global warming, but also establishments including those in the artistic world - with the antithesis of what humanity appears to have become, the organic matter we boil down to.
Education and action are the key elements to social progression, but for these a level of confrontation is required, which is why those without a need for change aren’t the right people to control education or indeed artistic institutions. Natural aspects of the world we live in are easier to avoid now as we exterminate species, expand cities, change our bodies and destroy forests, so one could easily argue that we need to employ preservation as an enlightening or artistic expression to break the systemic faults which take the easy route out
0 notes
Text
Art History Reader: Metalpoint

If you’ve ever carried something cumbersome and metal in a narrow space (say, an aluminum ladder or a bed frame) and, despite your repeated shouts to “PIVOT” you ended up scuffing up the painted wall, you might be surprised to learn that you didn’t just give up the rights to your security deposit that day. You also practiced the ancient art of metalpoint drawing.
Metalpoint is a drawing technique in which a piece of metal is used to make marks on a surface that has some tooth, just like that bed frame on the slightly gritty paint. Silver is the most commonly used drawing tool for this technique, however other metals, including lead, gold, copper, etc. may also be used. The term metalpoint describes the overarching use of drawing with metal of any kind, while silverpoint refers to metalpoint drawings made using silver.
Metalpoint can be traced all the way back to antiquity, but it is most commonly associated with the Renaissance, when it reached its peak of popularity and was used by artists such as Leonardo da Vinci, Albrecht Dürer, Jan Van Eyck, and Hans Holbein (both the Elder and Younger). In “The Craftsman’s Handbook” (“Il Libro dell’ Arte”), Cennino Cennini instructs 15th century aspiring artists to grind burned bones for two hours, then mix the ground bone ash with saliva and apply it to a wooden panel. Then, he says, “take a style of silver, fairly slender, smooth, and handsome. Then, using a model, start to copy the easiest possible subjects, to get your hand in; and run the style over the little panel so lightly that you can hardly make out what you first start to do; strengthening your strokes little by little, going back many times to produce the shadows.”
As you might imagine, 15th century metalpoint was a rather involved process. Easier-to-use drawing materials became available in the 17th century, and metalpoint subsequently began to fall out of favor. It mostly disappeared until the Victorians came along with their penchant for the unusual and arcane. Their interest in Italian Renaissance and academic artistic styles paved the way for a metalpoint revival in late 19th century England, pioneered by artists such as Alphonse Legros, William Strang, and Charles Prosper Stainton. Commercially prepared papers for metalpoint became available and made the medium more accessible than ever. America also experienced a similar renewed interest in metalpoint around this time.
Modernism marched on. Marsden Hartley used silverpoint as a preliminary sketching medium for planning paintings, while German social realist painter Otto Dix made over 200 silverpoint drawings, creating many of them while in exile from the Nazis with his family in the German countryside. Joseph Stella created a body of silverpoint work focused on portraits, plants, and flowers, and Jasper Johns made a small series of metalpoints in the 1980s.
Today, metalpoint is experiencing something of another revival. A small but solid selection of ready-made silverpoint tools, papers, and grounds from major art suppliers such as Sinopia, Legion, Natural Pigments, and Golden are a far cry from Cennini’s layers of bone ash, ground for hours and then spit upon. The major metalpoint survey Drawing in Silver and Gold: Leonardo to Jasper Johns at the British Museum in 2015, and recent books such as "Silverpoint and Metalpoint Drawing: A Complete Guide to the Medium" by Susan Schwalb and Tom Mazzulo, have enriched metalpoint scholarship and education.
Contemporary metalpoint artists also contribute to the medium. Many artists harken back to the medium’s Renaissance glory days by working representationally, such as Leo J. Dee, Aj Smith, Marjorie Williams-Smith, Tom Mazzulo, and Cynthia Lin. Others eschew realism in favor of abstraction, such as Susan Schwalb, Lucie Beppler, and Marietta Hoferer. Shirazeh Houshiary uses metalpoint in a series of text works that depict delicately rendered words and phrases expressing Sufi thought in a series of large-scale canvases. Some contemporary artists ditch the traditional stylus and ground completely. Linda Hutchins makes drawings with thimbles and silver spoons. Nathalie Loveless uses the medium in performances, such as in a 2009 work where she sought (and enacted) advice for how she should behave in front of a wall: kissing it, throwing things at it, etc. She then drew metalpoint lines around each image. Artist Erika Winstone combines video projections with fine silverpoint lines, such as in her work The Rink and the Talent Show. Ram Samocha draws on prepared papers over and over with silverpoint until the stress of the repeated marks causes the paper to take on sculptural forms.
Then again, there’s also your hallway; its “Landlord Special” beige paint now scuffed with your move-in day metalpoint. Maybe a small history lesson on the Renaissance would help smooth things over, or at least get you into the next metalpoint survey at the British museum?
Key Works of Art:
Bust of a Warrior by Leonardo da Vinci
A Bear Walking by Leonardo da Vinci
Self-Portrait at Thirteen by Albrecht Dürer
Head of a Horse from the Parthenon by Alphonse Legros
The Artist's Wife, Edith Holman Hunt by William Holman Hunt
Old Woman by Otto Dix
Small Drapery by Leo Dee
By: Katherine Vetne
0 notes
Text
2.5D zDepth Animations Tutorial
Due to the popularity of this post, I decided to write a simple tutorial for whoever wants to try the same thing with their favorite game. This method will work with every title that supports ReShade and Depth Buffer (and pretty much every static image you want to animate).
What is ReShade?
It’s more or less a mod that alters the original graphics, adding in more effects (like lens flare), different tones and fixing bad looking edges.
What is the 2.5D/Parallax effect?
2.5D is a method used by many editors to animate a completely still picture, from simple sceneries to characters. This creates a sort of 3D depth on your pictures, used a few times by many professionals to bring famous paintings and advertisements to life.
Note: This tutorial is mostly about scenery animation faking a camera movement and adding in a 3D space between layers. For the Parallax animation on characters I’ll write a separate guide.
What you need:
• The game (duh) (in this case I’ll use Assassin’s Creed Syndicate as example) • ReShade (I find myself more comfortable with a previous version, because I somehow cannot achieve the same results with ReShade 3+ at the moment. This should easily work with the latest version too, but for any problem or if you want to follow the guide better, grab ReShade 2.0.4f from here) • An editing program like Adobe Photoshop, anything that allows you to separate parts on layers and fill empty areas. • Adobe After Effects
A basic editing knowledge is required, along with a good understanding regarding Adobe programs in general. If you make graphics and gifs you’re already a step ahead, but you actually don’t need to be familiar with AE to do the animation.
The tutorial will include four parts:
1) In-game screenshot w/ Depth activated 2) Editing/preparation for AE 3) Compositing 4) Animating
Part 1: In-game Screenshot with Depth Buffer
1) If you are using ReShade 3+ you can follow this tutorial regarding its installation, otherwise copy the ReShade folder, ReShade.fx and ReShade64.dll (or ReShade32.dll if the game is 32bit) into the main game path (where the exe is, so to speak), then rename ReShade64/32.dll as dxgi.dll.
2) With ReShade 2 go to ReShade directory > Presets > Default and drag Shaders_by_CeeJay.cfg into Notepad, then scroll down to the very last line where you see a shader called DisplayDepth. Next to #define USE_DisplayDepth change the value from 0 to 1. With ReShade 3 press Shift+F2 and look for the same name, if you properly downloaded it along with the other shaders of choice it will most likely be already activated. It is highly recommended to set a hotkey for this effect so that you can easily turn it on and off in game (for example, #define Depth_ToggleKey VK_F12).
3) Open Pipeline.cfg and look for the line #include EFFECT(CeeJay, DisplayDepth). Select it, cut it away and then paste it to the very top before any other shader listed. This will allow you to obtain smooth shapes instead of jagged edges (you should also play around with AA options, specifically SMAA and/or FXAA, both included in CeeJay.cfg). Sadly I’m not sure how the setup works in ReShade 3+.
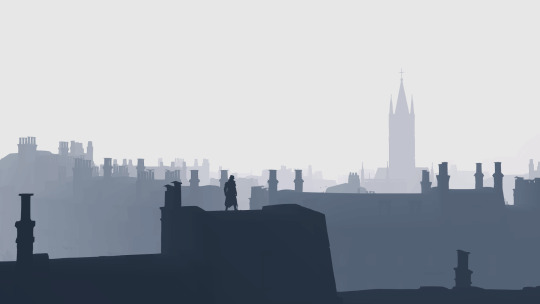
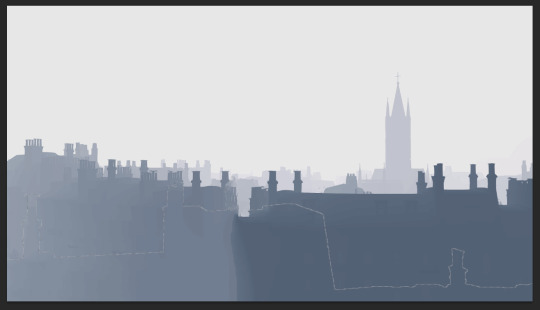
4) Now that your options are properly set you can start the game. Find an area you like and want to shoot, then press F12 (or any other key you chose for it). If the game has a photo mode or custom made free camera tools, you should totally use those for the best results. You can check this post for a few listed titles and all their respective links.

ReShade allows you to automatically store your screenshots directly into the game’s folder by simply pressing the print screen key. This is how the scene looks normally, without UI and with the free camera activated.
This is what happens when you turn DepthBuffer on.
Note: If all you get with Depth is a fully white or black screen, chances are you need to “reset” by simply entering the fullscreen mode (and switch back to borderless/windowed if that is what you usually like playing with). ReShade usually reloads whenever you apply a modification to the settings, but if even after this the effect doesn’t show up it probably means the game has no DepthBuffer support (or there is some incompatibility somewhere, which may be related to other shaders).
Part 2: Editing
1) Grab your depth screenshot and open it with your editing program of choice, I use Photoshop. In order to animate this, you have to create different layers (renaming them for an easier use in AE, but that is up to you) being sure each hole is covered, or else the empty part will definitely show up in your animation.
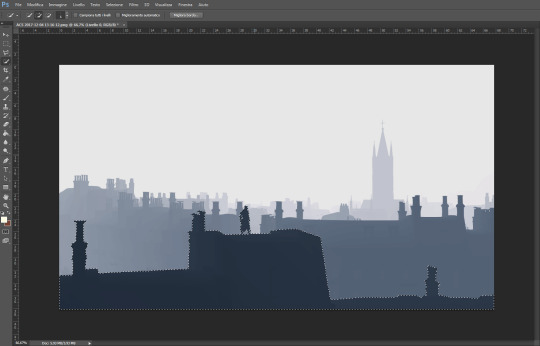
2) Make a selection around the areas you want to separate, I’m starting with what is close to the “camera”. Try to be as precise as possible to keep most of the details, especially around the character. Once you’re satisfied with your selection press CTRL+X to cut it out and then paste it into the same position, a new layer for it will be automatically created.
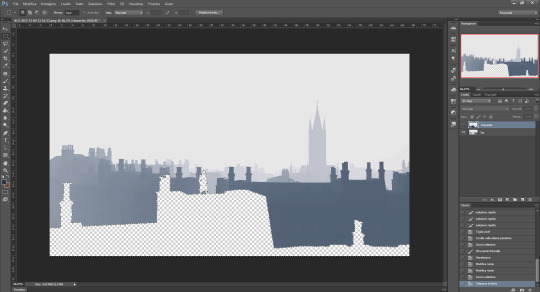
3) If you hide the layer you’ve just made, you will obviously notice an empty shape on the background right where you cut it. The easiest way to fill that properly is by selecting the layer (CTRL+LMB on it), inverting selection and going to Modify > Fill > Content-Aware.
As you can see the empty area has been filled completely, but a few fixes are required. You can use the clone stamp tool or the healing brush, in this case I choose the latter because it makes the process quicker.

It can be a bit tedious in some places... especially if there are a lot of buildings or trees, depending on your scene. Photoshop covered the outline using the existing content to generate the missing parts as I dragged the brush over it, but you may want to use the clone tool as well and even draw here and there where the brush failed.
Repeat the process for all the other layers you want to separate and then rename everything to know what you’re gonna edit in AE (again, this is optional). You can also make the back layer bigger to hide imperfections behind the other layers, which won’t be too visible while animating. Further edits will be done in AE later anyway.
Part 3: Compositing
1) Save the PSD file and load Afer Effects. I’m currently using the CC 2015 one, but even if you have an older version this method will work without problems.
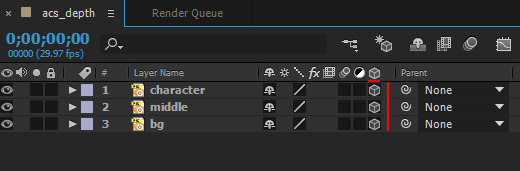
Go to File > Import > File and select your PSD.

Be sure the importer is set on Composition and Editable Layer Styles is checked, this is essential if you want to work on each layer.
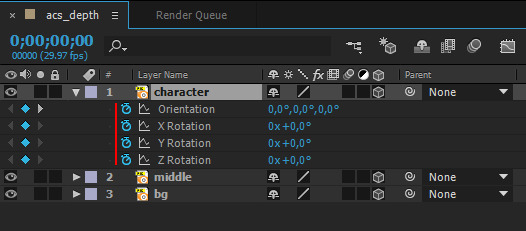
2) Double-click on the left to preview the PSD and convert every single layer into 3D. To do so simply check the third square on the right, under the cube icon:
Now we need to add a Camera. Go to Layer > New > Camera and leave the options untouched (the default configuration should be okay for this).
3) Right under your preview you should see a button called Active Camera. Switch to Custom View 1 to move the layers and create depth between them.
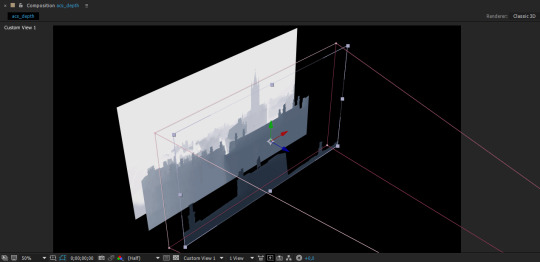
All you have to do is select each layer in the lower panel and move it using the blue arrow (z direction) to push it backward or forward. Use the order you’ve got as reference for the best result, then change the view to Active Camera again when you’re done.
4) Now that you have changed the original positions you need to fix their size to fit the composition. Select all layers at once, press S and activate the little watch icon that appears followed by the effect name (Scale). You will see three values then; place your mouse over the 100,0% one and drag it to the right or left in order to resize the layer(s). Use the directional arrows to also move them up or down eventually.
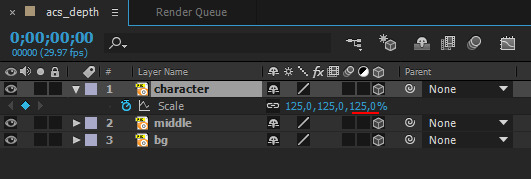
The stopwatch is absolutely fundamental, because it tells where to place each frame in the timeline. Whenever you apply an effect or any modification you need to be sure it’s recorded at the very start, this way it will affect the entire sequence and you won’t risk to only see it taking action in a few frames later instead.
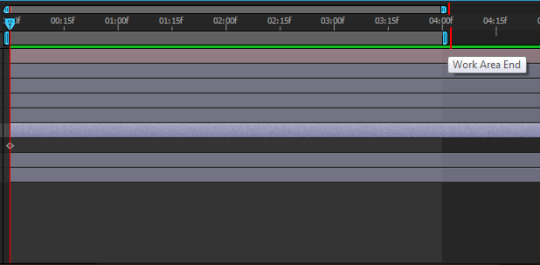
5) You can move the upper bars in your timeline to change the final time. A few seconds for this kind of animations will suffice, I always set it around 4s.
Part 4: Animating
1) Now we can finally animate, woo!!
It is highly recommended to make all the planes bigger than the composition, so that you can move them around without risking to get empty spaces. In this case we want to fake a camera movement with a sort of 3D perspective, like the gifs I’ve posted in that photoset.
Let’s start from the first layer. Click on it and press P (position) to store the current location on the first frame, then move the time indicator at the end of your sequence. I want the main layer to slide horizontally, thus I will move the red arrow on X axes.

As soon as your first animation is stored, another frame will be generated at the end of the timeline. After Effects automatically creates all the frames between the first and the last one, if you are happy with it select the second layer and do the same, then the third and repeat. You can also use the R (rotation) key to add more realism. Remember to ALWAYS check the stopwatch on frame 1 before doing anything else.
You can preview the animation with space bar, the rendering times change according to the amount of virtual memory installed on your PC.
For a nice camera shake you can follow this tutorial.
2) Once you’re happy with your animation you’re ready to export it. You can pick a simple video option, but that usually requires a second rendering in Sony Vegas or any other program for video editing to fix the bad-looking fps drop. I suggest you to export in frames instead, especially if you plan to make gifs. Go to Composition > Add to Render Queue, a new panel will appear on the bottom. Click on Lossless and pick PNG Sequence next to Format, then on Not yet specified (output to) and select a destination on your computer. Press Render, wait and it’s done! Again, the rendering times will highly depend on your RAM and composition size. The bigger, the slower; if you play in 4k you should reduce the screenshot size to a common 1920x1080 at least, even smaller after that for the final gif (tumblr has a 3MB limit).
Result:

Questions? Send me a note!
#my graphics#ac syndicate#assassin's creed syndicate#assassin's creed#jacob frye#tutorial#depth buffer#zdepth#after effects#animation#guide#graphics#camera shake#reshade#2.5d#2.5d animation#parallax animation#parallax effect
30 notes
·
View notes
Text
Applications of 3D Essay
From CGI in movies to creating entire worlds in games, 3D Modelling has become an incredibly helpful asset to many sectors of the creative industry.
In product design, 3D modelling can be used to render packaging work for a client. A designer can simply create a model of a can, bottle or packet based upon the product that the client provides, the artists can design the packaging, and finally display it on the model to pitch that work to the client.
Before 3D modelling, these companies would need to create 2D renders in programmes like photoshop or illustrator. This provided a neat but less realistic image of the potential product and took significantly longer than simply applying the design to a model that had potentially been made weeks ago.
3D modelling has become crucial in the games industry for some of the worlds, characters and stories that many designers want to create. Before the application of 3D modelling, companies would make 3D spaces using 2D images and animations. This can be seen in classic games like Qbert which are entirely 2D but try to create 3D worlds. 3D has allowed the games industry to use photorealistic graphics and real-time raytracing which becomes more and more accessible with every generation of graphics cards and consoles. With designers and artists learning to make 3D models from the comfort of their homes, the games industry is seeing better talent and original work from younger people who are passionate about games and their creation.
Similarly, with the Visual Effects companies working in film and TV, 3D has provided a great number of opportunities. 3D modelling allows VFX artist to capture realistic scene lighting, create characters to visualise in the real world and create spectacles that completely defy reality. A fantastic example of this is Christopher Nolan’s ‘Interstellar’. The blackhole known as Gargantua was a 3D model that had painstakingly accurate physics simulated for it and the result of that simulation created a beautiful and awe-inspiring model to be used for the movie. Without 3D modelling, simulations for physics and lighting like this would be far more difficult or even impossible.
3D Development Software
3DS Max is a proprietary suite designed to do particle effects with 3D modelling. 3DS Max saves projects in .3ds format, which is made up of the textures, polies and lighting of a model. The programme can also support motion capture, resulting in more realistic animations. This can be seen in James Cameron’s Avatar which features a whole race of CGI people in a CGI world. However, the programme can also place CG images into a real-life scene. Other examples of films made using 3DS Max are Alice in Wonderland, 2012, Blade Trinity and Cats & Dogs.
Maya is designed to be used along-side 3DS Max, using the proprietary file format .mb. This format is lossless but saves space using binary algebra. Maya is used for loads of things from texturing, lighting and particle effects to modelling and animation. Maya has the capability to transfer files to programmes like Unreal or Unity for games. Maya is currently used by Rooster Teeth Animation to make the series ‘RWBY’ which is modelled and animated within the programme. Other films made using Maya are Finding Nemo, Hugo, Rango and Frozen. Games created with Maya include Mirror’s Edge, For Honor and Dead by Daylight.
Cinema 4D is used by a wider range of industries such as architecture and science, and has been used to make Inception, The Golden Compass and Monster House. The programme uses .c4d, which is another proprietary file format. C4D focuses on motion graphics and sciences because of its simulation capabilities with particles and fluids.
Plugins are added to these programmes to add features that the default suit couldn’t use. Maya features a number of plugins that make the application easier to use. In Maya, Massive has been used for games on the Wii and the XBOX wherein it simulated crowds which, before the plugin, would have needed to be created manually. When your project is facing a budget, Massive bridges the gap and saves you time and money.
Application Programming Interface
Games are written in one language and machines like your PC or console use a different language. The API acts as a translator between these systems so that the game can use all of hardware that it needs to be able to run. There are two key APIs made for this process. These are Direct3D and OpenGL.
Direct3D is a part of Microsoft’s DirectX. PCs running windows primarily use DirectX as well as Microsoft’s XBOX which is where it got its name.
OpenGL is open source, meaning it can be changed by anyone who has access to a copy. Open GL is cross platform and so can run on PC and consoles. This means a game can be made for PS and also be released for PC or XBOX.
These two programmes are the leaders in the API market because of their complex nature and ongoing support. Around 60% of all computers use DirectX as it’s Microsoft Windows proprietary software. However, OpenGL can also be used on Windows as well as all other operating systems it supports such as OSX, IOS, Android, Linux and Playstation. Being open source, OpenGL receives constant community support but no official support. On the other hand, DirectX is proprietary so receives no community support, but Microsoft is constantly working on it.
3D models are made up of lines, vertices, faces and polygons. Working as dimensions, a vertices is a dot anywhere on an x,y,z axis and creates a line when two vertices are connected. When you join 3 or more vertices together you make a polygon and when you join polygons together, they act as faces of a mesh. More complicated models have more polygons and therefore a higher ‘Poly Count’, making a model take longer to render book look far more realistic. 3D software usually features pre-made meshes called Poly Primitives which can be moulded and modified to make different shapes such as a sphere being turned in to a head. Basic primitives are a cube, sphere, cylinder, pyramid and a Torus (Ring). Starting with these primitives can save an artist a lot of time and effort; This is called Box modelling.
With Box modelling, the artist usually needs to create many subdivisions in the primitive to be able to model it concisely and flexibly. Another way of modelling is with extrusion, where you stretch individual faces of the model which creates more faces and doesn’t require subdivisions. Both these methods can be used together to achieve more complex models.
When an artist is creating 3D models, they face limits and constraints. One constraint is the polycount. Considering rendering time, polycount may need to be lowered to complete the project for a deadline. As well as time saving, lowering the polycount allows the model to perform better when used in console games. Limiting compatible platforms by heightening the polycount makes for a smaller market and having to high a polycount can cause performance issues as they take more processing power to load in. When a company wants to render high quality assets quickly, they use a Render Farm. Other effective methods are also used such as fogging and draw distance so that objects in the distance are either fogged out and invisible or dynamically changed to a lower poly to save on performance whilst still being immersive for the player and saving on memory.
Lighting in 3D space can be crucial and has 3 core types: Point Light, Spot-Light and Area Light. Point lights are common for studio lighting effects and are close to real life lightbulbs. In this way, they emit light in every direction and disperses over distance. Spotlights operate like torches, being mainly directional in a cone shape and is typically used as a torch that the player can use. Area lights represent windows or screens, with a square of directional light. In Portal 2, Windows with fully lit offices behind them provided a large light source for the level scene. When lighting has been built, shadows are created relative to the 3 types of light used. Shadows add depth and realism to a scene and can potentially be built with raytracing when a light source is added.
Texturing is also important to 3D models as it provides realism and feel to an object. An artist can add colours and materials to an object and the object can match the properties of the material. With clear materials like glass, light is reflected and dispersed differently to hard opaque surfaces. Changing aspects like these when modelling leads to photorealistic graphics and convincing immersive worlds. To simulate lighting for textures, normal mapping and UV mapping are used. This makes clear what parts of the texture to pop out, and that has an effect on how lighting affects the model. UV Mapping refers to opening out a shape as a 2D net to best apply a design and tailor it to each face.
Pixel shaders are used with normal mapping to create more detain without eating up processing power, determining the characteristics and colour of a pixel to bring out more detail in models during animations. When rendering a scene as a 2D image, projection and clipping come in to play. Essentially, only what the camera sees is rendered and anything outside of the frame or obscured by an object is ignored. ‘Rendering’ itself refers to creating the 3D model using the aforementioned tools, tricks and methods. In this process, raytracing or radiosity can be employed to create a more realistic image. Radiosity is mainly used for real time rendering in games as it takes less processing power and runs more smoothly. Raytracing, however, is best used when rendering a single image as it works out lighting down to the individual pixels. Raytracing is becoming more accessible as technology improves and is beginning to find its way into film, TV and some games; though the gameplay performance does suffer significantly.
When rendering many frames of an animation or many images under a strict time budget, Render Farms are used to distribute work between multiple servers. This saves a lot of time as one computer doing every frame of a CG sequence in a movie is ineffective and very time consuming. These servers will be running Rendering Engines, which translate the 3D model or scene into a two-dimensional image or frame. Many different engines produce different results as they use a variety of different methods. The three leading Rendering Engines are Lux, Maxwell and Blender. Lux is the fastest of the three, but the results are less detailed and blurrier with the poorest lighting. Maxwell handles colours the best, but each frame takes the longest to render. Blender produces images with sharp, crisp lighting and shadows and looks more realistic but lacks the colours that Maxwell can produce.
0 notes
Text
Automatically Generated Computer Graphics Based On Hand-Drawn Design
Could artists hand-drawn designs be converted to 3d… Automatically?
New Computer Graphics Technology Idea
The artist draws a complete still of a whole scene from several (4-8) angles and then the computer automatically models a virtual 3d version of that scene.
The user would then tell the computer what each automatically generated 3d model and/or part in the scene represents and the computer would then calculate how its physics would work and how it would animate.
The user would then simply modify these scenes via their elements or through camera movements, etc… to create frames over time which would result in animation when not using motion capture technologies or models (either full scale or scaled).
Finally, since the original scenes would be drawn either with traditional media like pen ink, gouache paint and so on, or with something like photoshop with a certain colour palette brush or pen style etc… the computer would automatically calculate the rendering for the final image to match what the artist’s chosen media looks like in his or her finished artwork. This would include things like the lighting, colours, lines, shapes, perhaps textures and so on.
How Does That Differ From Current Technology?
The difference between the above idea and current computer animation media is that the artist would not have to model the elements in the scene themselves, instead they would draw in the same way as in traditional animation, just from different angles and the computer would automatically do the 3d modelling for the user, instead of such drawings only being used as visual reference while the artist is forced to model it in 3D from scratch.
The artist would not have to set up the physics, bones for character movement and so on either, they would simply identify what each element in the scene is and the computer would automatically set up the physics based on the artists’s chosen options on how things should animate.
Finally, the rendering system, instead of being based completely on algorithms by themselves to achieve a certain effect, like interpolation, it would be on a case per case basis, changing depending on the current frame’s composition rather than the virtual 3D calculations alone; based completely on the artist’s design and intended style with the use of things like colour palette, contrast, line and so on; a visual scripting system or equivalent could be used to connect the ins and outs of those different aspects of the design to how they will be rendered on a dynamic or conditional basis, like what is done with custom scripting for games or AAA animation as built-in user-friendly features.
Why this instead of current media?
The reason to use animation over live action is to more precisely and directly achieve the directors vision by being able to have the scenes, characters and look without the use of real sets, actors, lighting and so on.
Traditional animation has a good visual impact when watching it, but is inflexible when it comes to doing very dynamic animation, although it is capable of doing so, this is usually somewhat limited because of the consumption of time in doing so.
Computer animation is very flexible at making dynamic scenes without consuming too much time. However, because of the very indirect nature of the artists having to build everything in a virtual environment from the ground up, rather than simply drawing a scene, the impact in comparison to traditional animation becomes generally weaker.
Finally, although with many advanced and continually developing technologies for rendering animation making it possible to make extremely attractive, realistic and impressive computer animation, the result oftentimes can still look synthetic due to the nature of most of these technologies (excluding ones based on video footage for example) being that they are rendering scenes based on algorithms making the resulting image lacking the depth found in a hand rendered image.
One more note
In order to avoid the artificiality inherent in interpolated animation, motion capture technologies and classic hollywood special effects such as full scale or scaled models either filmed (using the artists hand drawn art as a reference for the final rendering of the production’s image) or animated via stop motion should also be employed. How much these methods should be employed should depend on such a method’s appropriateness for the given result.
Advantages over other current media if the above medium could be developed
More impact than usual computer animation (animation in games like Guilty Gear Xrd are an exception)
Generally a lower quantity of artwork required to be hand drawn than traditional animation.
Dynamic scenes less time consuming (like computer animation)
Casting is less difficult, since it becomes purely voice casting and real sets and shooting on location would not be necessary (like most animation)
Setting up animation less difficult than what I think it is in current computer animation in terms of setting up the physics, bone systems, weighting etc…
Easier to do scenes involving supernatural elements, scenes, representations etc… than live action (like most animation).
Disadvantages?
It would be very costly to develop such software
Not only the development but the polishing and refining of such technology would be a massive undertaking
It is a different direction than the current big studios like Pixar’s focus, being more on specific improvements on physics simulation for example so it would be hard to achieve funding soon
Even if this could be achieved, it may be difficult, like much other automatically computer-generated technology, to consistently get pleasing results
The artist may be forced to limit or standardize their artwork specifically to be better scanned and converted by the technology
Brand new software and standards would introduce a brand new learning curve to master on top of everything else a modern animator needs to know.
In summary
Such a medium would have the potential to at least look as good as traditional animation in general while being generally more engaging with greater ease in producing dynamic camera movements, and more easily produce accurate animated perspective than in traditional animation.
Such a medium would be able to generally be as engaging as computer animation while having a potential to look generally better with its rendering being based on on hand made visual art (it could even be oil painting for example) rather than solely algorithms.
Such a medium, with the use of motion capture technologies, stop-motion and models (replicas, real models or scaled) would allow for realism of movement that could match live-action while being simultaneously more easily able to produce scenes which are generally more difficult to produce outside of animation.
Not Already Out There?
The closest thing I can think of to doing this already is via amalgamating a combination of resources and production strategies. For instance employing stock 3D models as is or edited along with one’s own custom models. Thus not everything has to be done from scratch, yet the director can still achieve his desired results. The only issue with that is licensing, especially for games where it can get quite costly to employ the assets of numerous artists while not being exactly of one’s own design from start to finish. The not-so-distant future of animation media I am predicting then would break that compromise opening new exciting possibilities for animation, movies and games, like never before.
Like what you see here? Express your support and follow @HonourableHappy on Twitter to stay updated on all the latest daily. Fill out the consulting form to receive your newsletter and how you can qualify to have me setup and grow your Twitter account to over 10,000 real followers organically without fake followers, bots or cheating. (adsbygoogle = window.adsbygoogle || []).push({});
Related Posts
Would you upload your brain to cheat death?
Taking the first step
Production Hackers Presents: POWER-ARM © Design, Origin Story, & Background
“Why Are There C# & Java Web Developers When We Have Javascript?” #Programming College Student Q&A: #WebDev
Twitter’s 280 Character Update Breathes New Life Into The Platform #280Characters
Robots Replacing Jobs Is Not The Only Problem #Stoicism
Production Hacks 101 – Process vs Results “The Best Of Both” #Mentality
“What Is Visual Scripting Anyway?”
0 notes
Text
The twelve principles of animation
The twelve basic Principles of animation were introduced in the book ‘The Illusion of life: Disney Animation’ by Ollie Johnson and Frank Thomas who worked on several classic Disney films such as ‘Pinocchio’, ‘Lady and the Tramp’, ‘Bambi’, ‘Jungle Book’, and ‘Peter pan’ among many others. The twelve principles of animation teach us how to produce an illusion of physics, timing, character appeal, and exaggeration. Although written for hand drawn animation, all twelve principles are relevant to computer and digital animation.
The first principle of animation
Squashing and squishing is the most important of the principles which give a sense of flexibility and also weight to the objects drawn. A bouncing ball is the most common example, but is also used to help portray facial expressions. The more squash and stretch the object has the more elasticity and softness it appears to have, the stiffer it is the more solid the object appears. An over exaggeration of this effect is usually used for comedic effect (such as the Classic ‘Tom and Jerry’ cartoons or ‘Wile E. Coyote and the Road Runner’); however, in more realistic animations the volume of the object should not change when squashed or stretched. When stretched vertically the object’s width should expand in relation to it, and if working in 3D also the depth, the same should be applied vice versa.
The Second Principle of animation
Anticipation is the principle that readies the audience for an action, making it appear more realistic by having a build-up. A jump can be used as an example, with the bending of the character’s legs to propel them upwards, similar to a spring or the back swing of a golfer. It can also be used to indicate a character focusing on an object they are picking up. The character pulls back, winds up, or backs up to give the swing or movement momentum. This preparation for the next action gives the audience time to notice it.
The Third Principle of animation
Staging is akin to staging in a theatre, so that the presentation of any idea is completely clear, showing what is important in the scene, and direct the audience’s attention to it whether it be an action, a personality, an expression or a mood. This can be achieved by the placements of light and shadow, how a character stands in the frame, or the position or angle of the camera. This should be used when a person is doing a large action like jumping, the camera should be zoomed out with the action in full frame, while if it’s an expression, the camera should be zoomed in on the face capturing the small details of the expression. The main action of the scene should be very clear and simple. Attention is taken away from the action by other things that are going on. Try not to overlap the actions as this can be distracting.
The Forth Principle of animation
Straight Ahead & Pose to Pose are ty types of drawing for animation. Straight ahead you animate as you go, frame by frame. Pose to Pose is where you draw the beginning and end of each pose and fill in the in-betweens later. Pose to Pose is better for actions as it gives the animator more control, the bones of the action are visible early on in the process, so you needn’t worry if the character has the right positioning or not. Straight ahead animation can lead to the figure being animated being the wrong size or on the wrong level. Straight ahead animation is good for the unpredictable such as mist, clouds, fire, water, and explosions. The reason it works well is due to laws of physics work at a consistent rate and working out how it will look using pose to pose is difficult.
The Fifth Principle of Animation
Follow through and overlapping action is the technique of having body parts and appendages drag behand the body and have their own physics affect them, Follow through is in reference to the way parts of the body can continue even after the movement has stopped, like if a long haired girl were to suddenly look left her hair would follow through and continue that motion, overlapping action is the differences in the time of the movement of one appendage to the other, like one body part might move slower than a smaller lighter part or vice versa. Drag is the delay of movement of some of the parts. All three combined can add realism to a character. The appendage to the body should be the last thing to catch up with it, when stopped, the body should not follow through but the appendage should. This helps break up an animation and make it more interesting.
The sixth principle of animation
Slow in and slow out is the way that a movement starts slowly, builds speed, and slows towards the end. For this reason, animation looks more realistic if it has more drawings near the beginning and end of an action, only mechanical objects move at a consistent speed. To achieve this in 2D you would draw 2 poses, draw a single in-between, draw in-betweens those and then only in-between the drawings closest the in-betweens. This should not be applied to let’s say bullets, but to the recoil of the gun.
The seventh principle of animation
Arcs. Most living creatures will have a circler movement or arc, a natural movement will have an arched trajectory, following these arc gives an animation better realism. This technique can be applied to a moving limb by rotating a joint, or a thrown object moving along a U shaped trajectory. Machines are the exception as they move in straight lines. As the momentum builds the speed also builds. An object in motion that moves out of its natural arc for no apparent reason will appear erratic rather than fluid. For example, when animating a pointing finger, the animator should be certain that in all drawings in between the two extreme poses, the fingertip follows a logical arc from one extreme to the next. Traditional animators tend to draw the arc in lightly on the paper for reference, to be erased later.
The Eight principle of animation
Secondary actions are gestures that support the main action to add more dimension to the character’s animation and give it more life. A person can be expressing facial emotions while walking but it must emphasise the first action, rather than take the attention from it. It would be better to leave out the secondary action if it is too distracting from the first action or have then shown at the beginning of the movement
The Ninth principle of animation
Timing refers to the number of drawings or frames for a given action, which translates to the speed of the action on film. The closer the drawings are to each other the slower it will seem, the more spaced out each drawing is, the faster it will seem. Timing is critical for establishing a character's mood, emotion, and reaction. It can also be a device to communicate aspects of a character's personality.
The tenth principle of animation
Exaggeration is an effect useful for animation. Every pose, action or expression can be taken to the next level to increase the impact on the viewer, making the animation more convincing. It is important to employ a certain level of restraint when using exaggeration. If a scene contains several elements, there should be a balance in how those elements are exaggerated in relation to each other, to avoid confusing or overawing the viewer.
The Eleventh principle of animation
Solid Drawing is about making sure forms feel like they are in 3 dimensional space with volume, weight, and balance. Drawing the figure from all angles requires a knowledge of three dimensional drawing. When drawing a sphere and the curve of it, it cannot be a straight line, the line must curve with the surface of the sphere. Cubes should not be drawn parallel but with a vanishing point, perspective lines should also be drawn on the ground of the drawing to make it easier to draw the character walking. One thing in particular that Johnston and Thomas warned against was creating "twins": characters whose left and right sides mirrored each other, and looked lifeless, so it is best not to draw 2 parallel straight lines, but to draw a one or both lines with a curve.
The Twelfth Principle of animation
Appeal is designing a character that is appealing to look at, some physical trait that catches the attention of the audience, so the character feels real and interesting to them. Likable character is classically baby faced and symmetrical. Giving your character a dynamic design can boost your character’s appeal. Shapes should vary between characters ‘as well as proportions.
0 notes
Text
Moho Pro 12 Full Version - 2D Animations Software
New Post has been published on https://crackitindonesia.com/moho-pro-12-full-version-2d-animations-software/
Moho Pro 12 Full Version - 2D Animations Software
Complete 2D Animation Software for Professionals Everything you need to make amazing, professional animation. Moho™ Pro 12 (formerly Anime Studio Pro) offers the most powerful 2D rigging system of the market and mix it with traditional animation tools, allowing to get professional results easier and faster.
Moho™ Pro 12 is perfect for professionals looking for a more efficient alternative to traditional animation. With an intuitive interface and robust features such Smart Bones™, Smart Warp, Bezier handles optimized for animation, frame-by-frame tools, a professional Timeline, physics, motion tracking, motion graphs, 64-bit architecture and much more, Moho™ Pro 12 delivers advanced animation tools to speed up your workflow and combines cutting-edge features with powerful technology for the most unique animation program for digital artists.
NEW Moho Pro 12 Features:
NEW! Enhanced Freehand Drawing Tools Freehand tools have been hugely improved, giving more accuracy and creating less points.
NEW! Bezier Handles Get more design control with customizable vector Bezier handles. Create unique line bends with fewer points and optimized for animation!
NEW! Smart Warp Create custom meshes that can bend, shape, twist and animate assets. Works for both images and vectors and can be used with Smart Bones™!
NEW! Realistic Motion Blur A new setting allows for true motion blur. Control the amount of frames and blend. Apply to any moving asset for instant results!
NEW! Animate Multiple Layers at the Same Time Get MORE done by editing multiple layers on the timeline in Moho™ 12. No more jumping back and forth between layers for complex tasks!
NEW! Pin Bones Add one point bones to alter, move and reshape assets in fun new ways. Combine with traditional bones for more complex animations. Works with both vectors and images!
NEW! Updated GUI Icons are bolder, the library and layers panels have been revamped and a new backend panel allows for easy color and brightness customization.
NEW! Export/Import Actions Share actions with other rigs! Export an action to use later or import it into another rig. As long as the rig has a similar structure, your action will work!
And much more! Moho™ offers the most powerful 2D rigging system and mix it with frame by frame, Particles, Physics and many other features. Get professional results for animation or games easier and faster!
Revolutionary Smart Bones™ Smart Bones is an incredible feature that reduces or entirely removes distortion around your character’s joints – specifically around knees and elbows. Group a set of points and use the Smart Bones control levers to create 3D looking motion that you can easily repeat with the turn of a dial. For example with Smart Bones you can control facial expressions and head-turning on a character with simple dial movements instead of having to touch each bone point. Smart Bones not only steps up the quality and realism of the bone actions, but makes it MUCH easier to repeat complex movements and control your rigged elements. Smart Bones allow the ability to control Switch layers, Layer order, Layer visibility, Follow path, Flip layer horizontally/vertically, Stroke exposure, Shape effect positioning, Shape effect parameters (like gradient colors), 3D thickness of vector shapes that have been converted to 3D and even more smart bones controls.
Bone Constraints Several major enhancements have been made to Moho’s bone features. The new bone constraints feature will include rigging options that will help set up characters that are more complex and powerful. The independent angle constraint allows a bone to maintain its global angle similar to a camera crane and is not affected by inverse kinematics or its bone parents. Ideal uses for bone constraints include robotic arms or feet on characters that maintains constraints when the rest of the leg is moving. The squash and stretch bone scaling enhancement allows bones to squash and stretch objects. The elbow bending feature helps improve otherwise abnormal bending and squashing issues. New target bones help bones point in the right direction rather than having the need to consistently set angles. Other improvements in bones include an updated inverse kinematic solver and automatic bone scaling. Watch Video
FBX Support for Unity™ Game Developers Unity™ game developers and users will now be able to use FBX support of animated 2D content in Moho Pro, eliminating the need to create rigid sprites for game development and providing the ability to get the exact look and feel that they want. FBX, the adaptable file format for 3D animation from Autodesk®, is the most common method for integrating animated 2D and 3D assets in Unity. Watch Video
Import Photoshop Files Import your existing Photoshop files with all layers intact. Changes made in Photoshop instantly appear in the imported file in Anime Studio, allowing you to continually refine your Photoshop document. Many Photoshop features are supported in the imported PSD files, including blending modes, layer opacity, smart objects and smart filters. Groups are also supported and can be set up in Photoshop to automatically get imported into Moho Pro as switch layers for quick animating. Watch Video
Bounce, Elastic and Stagger Interpolation By applying the Bounce keyframe type to the timeline, any object interpolated will appear to bounce, all within two keyframes. Elastic provides a rubber band effect, making objects spring back and forth before reaching their end point. Settings can be adjusted for each of these interpolation types to change the amount of times the object bounces, the intensity and more. Stagger creates the effect that the animation is stuttering or staggering between two keyframes. No additional keyframes are created for this effect. This is great if you want to create the effect a character is having issue lifting a heavy object, as an example. Watch Video
Real Time Media Connection The new Real Time Media Connection in Moho Pro automatically updates image, movie and audio files in your imported Anime Studio files when edited in an external program. This is a great workflow enhancement for individuals and production studios alike. Watch Video
Separate Render Process The Batch Exporter and Renderer are now performed as a separate process. Even if you quit from Anime Studio Pro, the render process continues until the job is completed. Watch Video
Preview Animation You can now preview animations before committing to rendering. By going up to File > Preview Animation, a small video file will be created allowing you to view the animation, with no dropped frames, as it appears in workspace mode. While this method should not be used for final exports, you can take these files and save them elsewhere on your computer or even share them with others if needed. This can cut down tremendously on trial and error when animating and save lots of time, which is invaluable for creative projects. Watch Video
Depth Shifting When moving an object forward and back in Z, Depth Shifting is an option to preserve its apparent size. Moho Pro does this by automatically applying the proper amount of scale. This can be used to arrange landscapes, for example placing mountains far away without forcing them to become tiny. Watch Video
Media foundation The 64-bit Windows version of Moho Pro will now use Media Foundation. It is no longer necessary to install QuickTime to import popular audio and video formats like MP3, AAC, MP4, and QuickTime. When exporting animations on Windows 7 and higher, the application can create movies using the Windows Media Foundation media library. When exporting animations on Windows XP and higher, the application can create movies using the DirectShow media library.
GPU Acceleration Graphics Processing Unit (GPU) Acceleration takes advantage of your computer’s hardware, boosting performance and quality for several layer types while allowing you to see exactly what the tool is doing as you apply a stroke or shape to the Workspace. The performance boost will help reduce pixelation and artifacting when working with certain graphical elements, such as Vector and Image layers. Watch Video
Random Line Width Refined In previous versions of Moho, random line width could prove to be a bit jarring from point to point. Version 10 introduces a refinement to this feature by making the thickness between neighboring points more consistent when using random line width. More consistency means a more polished drawing. Watch Video
Nested Layer Controls Previously, bones could only control their direct children. Now, bones can control the children of their children. If you have a group inside a bone layer and then vector layers inside that group, the bone layer can manipulate the artwork in those vector layers if nested layer control is turned on. This allows for more powerful rigging options, while simultaneously simplifying and allow more organization in the layer hierarchy. Watch Video
Flexi-Binding Flexi-Binding allows you to isolate the influence of a set of bones from the rest of the skeleton. For example, only the right arm bones should affect the artwork for the right arm. This lessens (or eliminates) the need to separate artwork on frame zero, and then put it back together again with the Offset Bone tool. This is a great new feature for images and vectors. Watch Video
Adjustable Particle Source With Particle Layers, you can now use any shape, even ones that contain gaps, as an origin point for your particles. To do this, simply put your reference layer on the bottom of the Particle Layer folder. Turn on “Use base layer as source” in your Layer Settings and you’re set! Watch Video
Enhanced Depth of Field Now when you create a Depth of Field effect through the Project Settings, you will get a visual representation of where your focus will be on the Workspace by using the Orbit Tool. This is a great addition if you have a hard time remembering what the settings for Depth of Field will do to change the effect. Placing the focus line closer to assets will ensure they are in focus, while everything else is blurry, depending on your focus range. Watch Video
Scripting More scripting access and control. Moho Pro offers advanced scripting support and updates. More functions and data structures of the program have been exposed through the scripting API, allowing advanced technical users to create more personalized tools and add-ons. Watch Video
Layer Comps Export multiple layers individually with one click. Layer comps are useful if you want to export only selected items in your scene so that you can composite them externally in third party software. For example, you can create a layer comp that relates to background elements, another that relates to characters, and another that relates to foreground elements or titles. Turn groups on and off until you get elements that logically belong together. Then create a new layer comp from that group. At render time, you can then choose to render specific layer comps as a movie file.
Flexible Import and HD Export Capabilities Anime Studio can import several kinds of other media files into an animation project. Import QuickTime®, AVI or MPEG-4 video or even 3D scenes from Poser. Image Based Modeling allows you to create 3D objects from 2D vector layers. And the included Content Library contains hundreds of ready to use characters, props and more.
Patch Layers Patch Layers were designed for constructing characters and are similar to masks by allowing you to hide certain parts of a layer. Create each body part separately and then hide the overlapping lines. Adjust the size of the patch to perfectly blend the layers to get the desired style. Watch Video
64-Bit Architecture Moho Pro is a 64 bit application. Improvements in speed and memory will be noticed by all those who use 64 bit machines. Improve rendering speeds and preview performance.
Timeline Markers Take notes and make comments on the timeline for future reference.
Shy Bones Hide and see only the bones that you currently need.
Image Cropping Tool Crop your images easily and directly in Anime Studio.
Copying Content Easily copy layers and content from one document to another.
Copy and Paste Keyframes Copy and paste keyframes and animations from one layer to another or even to another document.
Sales Page:
http://my.smithmicro.com/anime-studio-pro.html
VIP MEMBERS ONLY! DOWNLOAD LINKS & INSTRUCTIONS:
Sorry, You need to be logged in to access this page. GET FULL ACCESS all the contents on this site for onetime payment ONLY $75. This includes FREE access to our new updated contents everyday. Access into our private groups WhatsApp support & share is given also. Please Login or Register to access.
0 notes