#jpeg file reader
Explore tagged Tumblr posts
Visit Tumblr Blog
Explore Tumblr blogs with no restrictions, modern design and the best experience.
Last Seen Tumblr Blogs


Fun Fact
Tumblr is used by 21% of adults online aged 18-29 years.
Text
Revolutionizing Digital Document Management: With an Online PDF Store.
Welcome to onlinepdfstore.com Document management is now one of the primary activities maligned by time in today’s dynamic world of technological innovations. Whether they are learners in school or employees in different organizations, they require a clean and efficient instrument to work with PDF files. Meet OnlinePDFStore.com; we have created a unique website that will help you to work with digital documents much easier. Whether you need to combine multiple files into a single PDF document, convert the format of your files, compress the size, or encrypt data, OnlinePDFStore.com is your source for everything you need for PDF files. What is OnlinePDFStore.com? OnlinePDFStore.com is aimed at presenting an effective difference in an easy-to-use, efficient, and flexible approach to the PDF files. This website is easily navigable and provides loads of options for both personal as well as commercial users. Using the principles of the use of both simplicity and state-of-the-art technology, the client of the OnlinePDFStore.com does not need to have specialized knowledge or expensive applications for all the PDF work. The Features of OnlinePDFStore.com The stand of OnlinePDFStore.com lies in the extent of the offered services. Here’s a look at some of the standout features:
Visit: onlinePDFStore.com
PDF Conversion: Save and convert Word, Excel, PowerPoint, and images to and from PDF formats.
Preserve all formatting, and do not alter the structure and quality of your documents beyond your sources.
Merge and Split PDFs:
Merge one file to another conveniently to make a single PDF.
Create new files from the overall document, which will help to divide a huge file into a small one, but it will contain all the data of the initial file.
Compress PDF Files:
Shrink your PDF size without the loss of quality so that files can be easily shared and stored.
Secure PDFs:
Users should put passwords on their documents to increase security measures in regards to their documents holding sensitive information.
Passwords from PDFs should be stripped off the moment security is no longer necessary.
Edit PDFs:
Insert text, annotations, and images to your PDF documents comfortably.
Switch between different pages or remove the material that is no longer relevant.
JPEG and PNG Conversion:
Read PDF files and save them in high-quality JPEG or PNG format.
Convert pictures to PDFs with high image quality and resolution.
Why Should You Buy PDF Assignments from OnlinePDFStore.com?
In a market flooded with PDF tools, OnlinePDFStore.com sets itself apart by offering:
Accessibility:
One great feature of the platform is the fact that it is web-based and does not require the user to download or install anything. It is fully portable and can be accessed at any time at any location with an internet connection.
User-Friendly Interface:
Ensuring that the concept of use of the tools is simple and convenient from careful arrangements, the application can easily be worked on by first-time users.
Affordability:
Get advanced functionalities that come at cheap charges relative to the classic PDF software. Some of the tools are open source, but most of them come with additional features if you are willing to pay for them.
Security and Privacy:
It is of utmost importance to OnlinePDFStore.com that user data is kept safe and secure. Documents uploaded are secured, then deleted after the file is processed to avoid cases of data leakage.
Speed and Efficiency:
By using such strong servers, functions like file conversion, compression, or editing occur in a matter of seconds and, in the process, help one save a lot of time.
Which People Will Benefit from the Site Located at OnlinePDFStore.com?
OnlinePDFStore.com is a versatile platform suitable for a wide range of users:
Students and educators:
Print lecture notes as PDFs, reduce the size of the files to share, and organize several resources into one.
Business Professionals:
Protect documents, agreements, and corporate belongings; sign documents; and record signatures and other critical values expeditiously.
Freelancers and Creatives:
Organize portfolios, invoices, and project documents with ease, as well as establish a polished look at every client touch point.
Personal Users:
File electronic papers such as books, receipts, or copies of records to suit the convenience and protection needed.
The Future of OnlinePDFStore.com
As an online platform, OnlinePDFStore.com not only offers the technologies of document retrieval but is a vision for the future’s document management. The team behind the platform works to ensure it is always being updated and more services are being added. Plans are already underway to introduce:
Cloud Integration:
Integration with more often used cloud storages such as Google Drive, Dropbox, and OneDrive is also smooth. (Currently not available)
AI-Powered Features:
First, the technology that allows the automation of routine processes, identification of mistakes, and improvement of documents’ quality. (Currently not available)
Mobile App:
The powerful tool to get to all the features of the platform on your finger tips with a mobile application well calibrated for productivity from your smart phone. (Currently not available-coming shortly)
How to Get Started
Using OnlinePDFStore.com is as simple as 1–2-3:
Visit: onlinePDFStore.com
Select the tool that is required from the simple menu.
Submit your file, view changes, and download your file.
The majority of functionality can be accessed without registration, which makes it really easy.
Final Thoughts
As established through its platform, OnlinePDFStore.com, it is revolutionizing the handling of writable PDFs. This makes it stand out in the world of PDF management tools as it comes with new features, is easy to use, and respects the user’s privacy. Whether it is a student who needs to sort notes or a businessman who wants to store contracts safely and on the end—this is what has to be done here—it is all sorted here.
No more spending days trying to work through complex software programs; get ready to organize your documents with ease. Thousands of amazing PDFs are just one click away; check out OnlinePDFStore.com today and look into the future!
#PDF#pdf download#pdfconversion#jpeg file reader#png#jpg#pdf conversion services#PDFTOOL#pdfwebsite#pdfsite#online#onlinepdf#onlinepdfstore#store#pdfstore#converter
0 notes
Text
Youtuber!Danny AU
Don't think I have the creative energy to expand this brainworm into an actual fic so ya'll just have to read a wall of text instead.
After a few close encounters where Danny's halfa identity almost gets revealed, Sam suggests the trio start a Youtube channel where they go about investigating all the so called "Ghostly Encounters" around Amity Park. Their goal would be to debunk as many ghost sightings as possible and establish themselves as well-known ghost deniers. After a bit of debate they eventually settle on naming the channel Chasing Phantoms.
Tucker really gets into it and eventually becomes the face of the channel. With Sam's coaching he learns how to play devil's advocate extremely well and figures out exactly how to craft his questions to manipulate people's responses. This way they can make these supposed "witnesses" discredit themselves within just a few minutes; Tucker will make them get worked up, angry, and confused about what they saw and trick the witnesses into making contradicting statements. This way they can throw out the witness statements as shoddy evidence because they're nothing more than a stress-induced hallucinations brought about by a gas leak. (They accidentally lean into the gas leak story a little too much in their early days - Danny uses his ghost powers to safely break piping in the places they're investigate to create evidence to back up their claims - thus triggering a mild panic in the citizens of Amity Park because one town should really not be suffering from this many gas line breaks.)
Sam is the director and editor, and has them film everything like it's in the style of found footage (she got the idea after watching The Blair Witch Project). They’re constantly making the "Looks directly into the camera like they're on The Office" joke whenever they interview someone who claims to have been attacked by a ghost.
Danny is the cameraman for the channel, but never shows his face because every time they tried to filmed him, his eyes would flash green in the lens flare and cause them to have to scrap the footage. He's still pretty chatty and viewers latch onto his sassy and sarcastic nature. They love his one-liners and the top comments of each video are usually just a repost of something witty he said (Sam leans into it and start naming the videos after lines that Danny drops while filming). Fans of the channel are constantly asking him for a face-reveal in the comments section. In fact, there's a whole subset of viewers that are dedicated to figuring out what he looks like. They have a poor quality jpeg file that's passed around and updated whenever a glimpse of Danny's appearance is reflected in a puddle of water or broken glass (which means Sam has to comb over the videos about ten times before they post them to make sure she didn't miss anything while editing).
Any time Danny ends up fighting a ghost and there's a witness, the trio will break into the site of the fight the next day (using Danny's ghost powers off-camera of course) so they can do an overnight stakeout. It always just amounts to the three of them goofing off and finding no evidence whatsoever. They do all the standard ghost hunting stuff but have to fib the data because Danny’s presence alone triggers the EMF reader and if they try and take the room temp anywhere near Danny it’s always like 10 degrees colder.
As time goes on, the channel starts to really kick off as people latch onto their goofy energy and start to get invested. However, they've also made themselves a lot of enemies within the student body at school, as most of their classmates have become discredited witnesses on their channel (with a few unfortunately souls even becoming trending memes for a few days). This also means Jazz learns about it and keeps volunteering to tag along or help out. She even gets Mr. Lancer to recognize the four of them as an official school club (she took initiative and made herself a part of the club AND club president without asking them), which he gladly approves since he doesn't believe in any of this ghost nonsense either.
Jazz is just really happy that there’s finally someone else in the family that is willing to stand up to their crazy parents' belief about ghosts, so she wants to be the supportive older sibling. However, she literally will not give the trio any space to deal with the ACTUAL ghost stuff. There are several pieces of unedited footage that lives on Sam's computer of Jazz showing up unannounced to an overnight stakeout asking Tucker and Sam “Where’s Danny?” and the camera would catch a glimpse of local menace Inviso-Bill getting his butt kicked by Skulker in the distance.
To get her off their back, Danny ends up publishing an hour long video essay about how ghosts ARE real, but that everything happening in Amity Park is just people making up bullshit for attention. He has to really commit to the act at home, but Jazz will eventually drop it and leave the trio to their own devices. This backfires however, as Danny's parents now believe he’s interested in ghost hunting and try to join him as well. Thankfully Danny is able to deter them by suggesting that they should all do their own research and compare notes later. You know, the more data the better, right? However, this means that in addition to his chores, homework, ghost fighting as Danny Phantom, and ghost hunting as Chasing Phantoms, he also now has to peer review his parents work so he's constantly exhausted. Tucker and Sam will usually let him copy their homework when the time crunch becomes really bad, and they will let Danny conk out for a much needed nap whenever the group gets together to brainstorm channel content or edit footage.
Following one of his encounters with Plasmius, Danny decided they should follow up the "Ghosts ARE real" video with a clickbait video titled “Top 10 places in Wisconsin that are ACTUALLY haunted!!!” They make Vlad’s Castle is #1 on the list and offer a reward to anyone that can bring them proof of a ghost haunting. They include a photo of Plasmius (that's been edited to look like bigfoot photos) so that people know what to look for. This means Vlad now has to hire extra security because the video triggers a mass influx of people that are constantly trying to break into his house and find evidence of this ghost for the reward.
Eventually Valerie and her dad end up on Chasing Phantoms as well, but as some of the discredited witnesses. It pisses her off so much that she starts up her own ghost hunting channel, Ghost Hunter Grey. She's constantly discrediting Chasing Phantoms in her videos and is very vocal on social media about how they give actual ghost hunters a bad name. Every time Chasing Phantoms uploads a new video, she stakes out the same place they did and uploads a video of her own a week later that includes all the evidence they clearly missed and a genuine, uncut interview with witnesses. She doesn't reveal her face (because of the reputation Chasing Phantoms has within the school) and uses a voice modifier when she edits her content.
Grey's videos aren’t nearly as popular as Chasing Phantoms content because Valarie tries to keep her videos more grounded in facts and backs everything up with proven science (unlike the trio’s videos which are just a constant barrage of ghost-themed brain-rotting jokes and funny reactions). It only frustrates her more and so she leans into the Popular Kids clique in order to low-key bully them as an act of revenge.
When the trio catches wind about Ghost Hunter Grey's channel, they will film a fake video and wait the next day to see if someone shows up. Sure enough, Valerie makes an appearance shocking all of them. Sam holds the braincell and say that since they know, they can just be careful and the group shouldn't try and provoke her anymore. Tucker agrees, but Danny has other ideas and starts greifing her as Phantom. At first he will purposefully reveal himself to her when he knows she doesn't have a camera on her, but once he starts getting a little more bold he will start to photo bomb her with the dumbest expressions and just being an overall annoyance. It basically boils down to him doing shit like saying "Nobody will ever believe you." or "It's been five years, you have to let me go." before slowly turning invisible and flying away.
#Youtuber AU#danny phantom#Nicktoons#nicktoons unite#danny fenton#sam manson#tucker foley#everlasting trio#that's all i got for now but who knows#this au has been on my mind for the past week and I can't stop thinking about it#honestly was thinking about an AU for the whole unite gang but Danny's stuff came to me first#would tag as greygh0st but not sure if this counts
343 notes
·
View notes
Text
outer banks masterlist ✧ . °
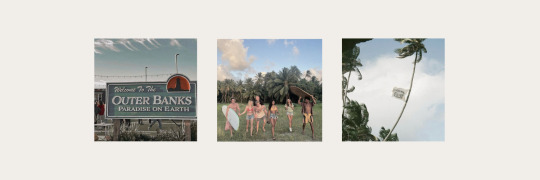
choose a file:
: ̗̀➛jj maybank.jpeg
revenge (nsfw)
summary: after being mad with each other, y/n decided to get JJ’s nerves again, but this was on purpose and the Maybank boy has a special way to deal with that.
nsfw alphabet
summary: the 26 letters of jj’s preferences.
dating jj would include (sfw)
summary: canon about traits of your relationship w/ jj.
safe (sfw)
summary:jj saves you from drowning
impulse (nsfw)
summary: being high made you express in a very impulsive way your intentions with your (former?) friend.
valentine’s day (nsfw edition)
summary: valentine’s night
valentine’s day (sfw edition)
summary: v-day date.
sweet desire (sfw)
summary: firsts with jj.
sweet touch (nsfw)
summary:first time with jj.
bad idea right? (nsfw)
summary: reuniting with your ex.
comfort (sfw)
summary: cuddle date.
no matter what (sfw)
summary: reader has a skin condition and jj helps her.
here for you (sfw)
summary: jj opens up to his girl.
drop-dead gorgeous (sfw)
summary: reader feels insecure
lonely (sfw)
summary: jj’s worried with his girlfriend isolating herself.
caught (smut)
summary: every time you and jj were caught.
by your side (sfw)
summary:jj waking up in the emergency room
: ̗̀➛rafe cameron.jpeg
coming soon
: ̗̀➛ kinktober 2023.jpeg
___________________________________________________________
© aj-archives 2025 — no one has permission to copy or translate any of my works, if you see any of my work being reproduced on another platform, please contact me! :)
#obx#outerbanks#jj maybank#jj obx#outer banks#rudy pankow imagine#outer banks fanfiction#obx imagines#obx fic#rudypankow smut#rafecameron#rafe obx#drew starkey
28 notes
·
View notes
Text
I'm working on a website for a comic (those who know, know) and it gives me a good opportunity to talk about the modern web innovation that's #1 most reviled on here: webp.
I was working on image quality. See, the author made the pictures high-quality, and since they're hand-drawn it's absolutely worth it — but it means we're talking ~2500x1100px PNGs. Which means ~2-3MB per picture.
Since on the actual website they'll be displayed at 1000px width, smart old me figured a pretty quick fix to save on readers' bandwidth would be to reduce the image size to 1000px width (after all, that's over 5x smaller than the original!).
The issue though: quality surprisingly suffered. Specifically there was a notable impact to the text (but also the colours and texture, if you look closely).

So I started wondering how exactly one could get a cleaner output from my image downsizing.
Which I spent the next 5 hours trying to crack. Turns out it's not easy.
On the other hand, there is another approach: simply finding a better way to store the image. On JPEGs and PNGs you can play with various compression settings which might help you reduce that file size without compromising quality (I tried a bunch, no dice!), but you could also switch to another format. For example, you might consider webp.
Here's what it brings to the table.
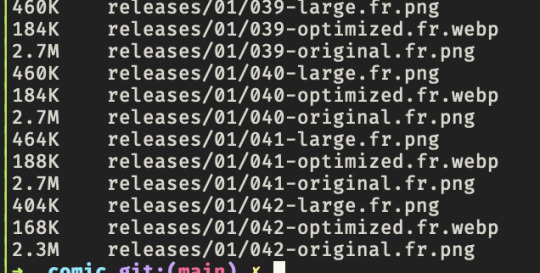
"-original" files are the HD originals, "-large" files are the blurry resized ones, "-optimized" are the webp ones.
They are 13-15 times lighter at the same size. This makes them even lighter than the 1000px-wide ones. (2 to 3 times lighter! despite being 5x bigger! that's insane!)
And the output:
I couldn't tell you which capture I took from which version.
And like, damn, that's p cool.
178 notes
·
View notes
Note
okay, I have to ask — how do you like your kobo ereader??
I’ve been eyeing one for a while bc I really *don’t* want a kindle, but also *so* many people have a kindle that it feels like it’s the only real option
Holy crap I LOVE IT. It's so much better than the Kindle. (Also: this got long)
I decided to upgrade my old Paperwhite (it was a second gen, so pretty old and small) and I almost got a new Paperwhite automatically (cause I felt much the same as you).
But the Kobos were on the same page and since I'm trying to be less impulsive, I started poking around and they are so good.
I went with a black Libra 2 and it's like the software was actually designed for human beings, unlike the Kindle software, which I think was designed for no one except the devil.
I side-load only and keep all my books organised in collections. The only way to do collections on the Kindle is manually, one book at a time, or jailbreak (and I'm not sure you can jailbreak the new Paperwhites, plus it's such a PITA).
On the Kobo, I can build collections from within Calibre, super fast and multiple books at a time. You can also do them manually on the Kobo, but even that is SO MUCH EASIER than on the Kindle.
The actual screen reading experience is basically identical (you can even side-load the Kindle font if you want it), since e-ink is pretty much e-ink, but it has few extra 'while you're reading' tweaks, like setting the all around margin size of the book (great if you switch between books and comics) and controlling the presence of, and info in, the top and bottom bar (pages left in book, pages left in chapter, percentage left to go etc). It also has a brightness and a warmness setting, so you can tweak those til they're just right for you.
I'm loving the physical page turn buttons so much - way easier than having to swipe the screen. I can hold the Kobo in one hand and just page forward with my thumb. It's also a teeny tiny bit lighter than my old Paperwhite.
I also love that you can 'archive' any books you've bought from Kobo, so they don't show up on the e-reader (you can still get them from Kobo later if you want), unlike Amazon where they're always right there unless you delete them forever. Like I said, I side-load everything, I don't want to see the Amazon-displayed copies. I don't want to see the Amazon displayed ANYTHING.
Kobo also doesn't advertise to you. Even in a non ad-supported Kindle, the home page of the new Kindle software shows trending and suggested books. It's bloody advertising. The home page on the Kobo shows you things about your library, with a discrete text invitation at the bottom to find new books or make a wishlist. There is a 'Discover' tab where you can see suggested books and such, but you have to actively go there, which means you're seeing it because you want to see it.
It's very intuitive to use - there's tabs down the bottom that do what they say on the tin and the settings are clear what they do. If it goes to sleep on 'Books' it wakes up on 'Books'. If you have authors sorted by last name it shows them all sorted by last name (this was endless aggravation on the Kindle which seemed to have an 'I do whatever the fuck I like' approach). It displays a cute little 'sleeping' when it's asleep along with the cover of what you're currently reading (you can turn that last one off).
It natively supports a decent assortment of file types: KEPUB, EPUB, EPUB2, EPUB3, PDF, FlePub, MOBI, PDF, JPEG, GIF, PNG, BMP, TIFF, TXT, HTML, RTF, CBZ and CBR.
I cannot recommend the Kobo Libra 2 highly enough. It's the damn bees knees and I wish I'd gotten one years ago. I can't ever see going back to the Kindle.
Some pics and Calibre details under the cut (which doesn't seem to be working, darn it).


(yes I have been rereading the Kitty series)
The Calibre plugins I grabbed are below, but tbh honest you don't really NEED any of them:

I also converted my library to kepub, which isn't necessary, but gives you some nifty extra reading features.
To create Collections on your Kobo with Calibre
Decide what Calibre column you want to use for setting your Collections (I use tags, because I don't use it for anything else, but you can also make a new column in Preferences or use one of the others).
Make sure your Kobo is ejected then go to Preferences in the toolbar, locate the Import/export section, then click Sending books to devices.
For Metadata Management, choose Automatic management.
Click Apply.
Remain in Preferences, locate the Advanced section, then click Plugins.
Expand Device Interface.
Scroll down and select either Kobo Touch Extended, or if that's not present, KoboTouch.
Click Customize plugin.
Switch to the Collections, covers & uploads tab.
Checkmark Collections.
For Collections columns, enter the name of the Column you're going to use for Collections.
Checkmark Create collections.
Click OK.
Close Preferences and exit and restart Calibre.
Fancy up your library by putting your books in Collections and when you're done, Send to Device and those collections will be there, all nicely and satisfyingly organised on your Kobo.
204 notes
·
View notes
Text
WIP Game
Tagged by @dreamauri @ice-man-goes-bwoah @checkeredflagggs
Tagging: @fabbyf1 @fangirl-dot-com @pucksandpower @astonmartinii @bunny-jpeg @cressidagrey @bonbonly @multicohn @ferrstappen @itsnesss and anyone else who would like to do it!
Rules: make a new post with the names of all the files in your wip folder, regardless of how non-descriptive or ridiculous. tag as many people as you have wips. people send you an ask with the title that most intrigues them, then post a little snippet or tell them something about it!
Agreeable For Us - Charles Leclerc/Max Verstappen Aren’t Girls The Worse - Max Verstappen Back to the Past - Charles Leclerc/Max Verstappen Bare It All - Charles Leclerc/Reader/Max Verstappen Big Leagues - Ollie Bearman Blanket Fort - Ollie Bearman Ceremony For Us - Max Verstappen Champagne Problems - No Driver Yet Despite It All - Logan Sargeant Do It Again - Oscar Piastri/Logan Sargeant Dutch Orange Not Papaya - Max Verstappen Grid Reactions - Max Verstappen (I ❤️ MILFS) Just The Tip - No Driver Yet Money At The Fingertips - Logan Sargeant More Similar - Charles Leclerc/Max Verstappen She’s Dying - Pierre Gasly The Months and Week Go On - Charles Leclerc Therapy With You - Charles Leclerc/Max Verstappen Wise Words (Are To Shut Up) - Max Verstappen (I ❤️ MILFS) Writing Romance - No Driver Yet Why Would I Lie (To You) - Charles Leclerc/Max Verstappen You Don’t Go To Parties - Charles Leclerc/Max Verstappen
20 notes
·
View notes
Text
Before the spread of the World Wide Web, the closest analogue in cultural terms was the collection of Computer Bulletin Board Systems or BBS services. Individual computers would connect directly to other computers via phone line in order to exchange information. These systems were limited by the technology of their era; client and service computers often had limited space, dial up modems had bandwidth so low as to be laughable by modern standards, and portable storage was limited primarily to magnetic floppy disks that could not even hold 2 MB of data. There were also issues of competing file formats and a lack of standardization, with ASCII being the lowest-common-denominator choice. Images were usually limited to ASCII art representations, as a lot of the file compression algorithms that turned large bitmap files into more nimble JPEGs, GIFs, and PNGs were just a gleam in some programmers eye.
This meant that, leaving aside variations in style and formatting, these files had to condense a considerable amount of information into a very small package, both in computer terms and human terms; it might take a while to download a particularly large file from a bulletin board, which might not prove to be useful or informative or entertaining compared to multiple smaller files that could be accessed in the same time frame. In a way it presaged the push towards small-form video content in the present day, but motivated purely by cost-benefit analysis on the part of writers, readers, and hosts rather than advertising engagement; it was naturally organic, not algorithmically enforced. To a lesser extent this also impacted the specific content of the files; according to the Wadsworth Constant, the first 30% of every YouTube video can be skipped while not losing any information content, something only possible because our computing and telecommunications technology has undergone multiple revolutions in the past three decades, while our precursors didn't have the luxury of "filler" content.
While I personally believe we have gained more than we have lost through the adoption of the World Wide Web and its various protocols, and indeed I cannot see the BBS era through rose-colored glasses because I did not experience it personally, only read about it after the fact through historical and personal accounts, the topic of condensing the maximum information into the smallest possible footprint is definitely on my mind a lot these days.
9 notes
·
View notes
Text
Using Icons and Images in Web Design 🖼️✨
Incorporating icons and images effectively can enhance your web design and improve user experience. Here are some essential tips to get you started!
1. Choosing the Right Icons
Consistency: Use a consistent style for icons (line, filled, etc.) to create a cohesive look.
Simplicity: Opt for simple and recognizable icons that convey meaning at a glance.
Size Matters: Ensure icons are appropriately sized for clarity and impact, especially on different devices.
2. Using Images Effectively
High Quality: Always use high-resolution images to maintain professionalism. Blurry or pixelated images can detract from your design.
Relevance: Choose images that complement your content and resonate with your audience. They should enhance understanding, not confuse.
Alt Text: Don’t forget to add alt text for accessibility and SEO. This helps screen readers and improves search engine rankings.
3. Optimal Placement
Visual Hierarchy: Use icons and images to create visual hierarchy. Place important visuals where users’ eyes naturally fall.
Whitespace: Give icons and images enough breathing room with whitespace to prevent clutter and enhance focus.
4. Image Formats
JPEG: Great for photographs; balances quality and file size.
PNG: Ideal for images with transparency or text-heavy graphics.
SVG: Perfect for icons and logos; scales well without losing quality.
5. Using Icons and Images Responsively
Ensure icons and images adapt to different screen sizes. Use CSS for responsive design (e.g., max-width: 100%; height: auto;) to maintain aspect ratios.
6. Explore Creative Resources
Envato Elements: Check out Envato Elements for access to thousands of icons and images. Unlimited downloads make it easy to find the perfect asset for your project!
Quick Tips:
A/B test different images/icons to see which resonate best with your audience.
Don’t overdo it—too many icons or images can distract users from the main content.
Regularly update visuals to keep your design fresh and relevant.
Incorporating the right icons and images can elevate your web design, making it more engaging and user-friendly. Happy designing! 🌟
----
What marketing strategies are you excited to try this year? Let’s share ideas and inspire each other! Visit Our Web Design Blog
4 notes
·
View notes
Text
FAQs
As the first few application responses go out (although only about half have been responded to, so don't worry if you haven't received one yet), there have been lots of questions from contributors, most of which appear several times, so the answers and any other possible questions have been compiled here for your benefit.

READERS:
When will the zine be published? The zine will be published at some point between the middle of April to the start of May, depending on how prompt contributions are.
I missed the deadline! Can I still help? While the last few application responses are going out, you could definitely still submit an application, especially if it's just within the next few days. Otherwise, general support towards the zine and participants will be enough, and there will definitely be future zines that you can sign up to on this blog. In the meantime, the Traffic Zine, Hermit Zine, Hermitcraft Season Zine and HotGuy Comics Zine (none of which are affiliated with this zine!) are all very cool projects with a similar focus.
CONTRIBUTERS:
What size, aspect ratio and general format should my (art) contribution be? Your contribution should be RGB (rather than CMYK) and the aspect ratio will be A4 proportions, so 2480 x 3508 (aspect ratio, not pixel count). Preferably files should be in a JPEG or PNG format, but other formats should work.
How long should my (writing) contribution be? About 3k to 5k, but this is more of a rough guideline and is very flexible.
How will I submit my finished contribution? A google form will be created to submit your contribution(s) closer to the time, but you may wish to show your progress via a link in DMs for check-ins.
What are check-ins? Check-ins are a way to make sure everything is running smoothly and on track, and dispel any problems that may have occurred. There will be two within the creative time period of this zine, one on the 24th of February and one on the 16th of March.
What content isn't allowed? Completely banned content for the zine includes: anything NSFW, anything graphically gory (although a bit of blood is fine given the nature of Secret Life) and anything that violates Gem’s boundaries. As for shipping, while implied is technically allow it (as long as it is between characters, not creators, and as long as it is within Gem’s boundaries) background relationships would probably best at most.
When is the deadline to submit my contribution? The current planned deadline is the 6th of April, but this can be extended if need be.
What counts as ‘Miscellaneous’? Miscellaneous just means anything that wouldn’t go into the category of the named SMPs (which are Hermitcraft Season 9 and 10, Secret Life and Empires SMP Season 1 and 2), so could include content: from stand-alone videos; from Gem’s skyblock series; from Gem’s hardcore series; from SMPs that aren’t named (like Afterlife SMP, Hermitcraft Season 8, New Life, X Life, etc.; from her Stardew Valley streams; from her times playing MCC; or just generally about her character.
If you have any more questions that aren't covered here, feel free to either DM or ask this blog.
14 notes
·
View notes
Note
hi! so i have a standard pdf on my hands right now (yknow one thats one page per "paper" and you scroll through) but i want to print it out and bind it. i was wondering how i would format it or what options i should press on the printer for it to be like a standard a4 print and able to be signatured. or if theyre not options i can simply press: how would i change the layout and format? thank you in advance!!
Hi! I love me some asks. So, just to make sure I understood the situation, you have a page-per-page PDF (single page per single page) you want to print and bind in signatures. And it is not a double spread PDF. (and, because I wondered at first, it is also not a PDF from this here collection (I got scared at first thinking I gave page per page pdfs somewhere lol).) Let's see if I can help you with that.
So as it turns out I don't actually know much about this because I've always worked with my own InDesign files, meaning when I printed signatures I'd just export a double spread PDF, and so I've never had to make signatures from a page per page. But after some research I can give you 3 options:
The booklet function and how to make it your bff
Cannibalize your PDF to make a double spread PDF
Give up (on the signatures, and bind it another way)
1. The booklet function
Most PDF viewer have one. For example I opened one of my PDFs in Adobe Acrobat Reader: the function is there, and it looks like it should work with a page per page PDF to make proper signatures out of it, but since I've never had to use it, I can't tell you precisely what to do with it. I can advise this much: TEST PRINTS!!! Make that thing your best friend by test printing with it a thousand times over until you're sure. You can use a PDF splitter to get just the first 4 pages of your PDF and make those go through the booklet function until you've figured out all the right parameters, etc. There are probably online tutorials, too. Accessorily, you can also split your PDF into the different signatures, it might make it easier as a whole when you make the final print.
2. Cannibalism
Honestly, this solution is for barbarians, but I'm including it because it sure would work and, well, if I was in your position, it's what I would have done (if the PDF was under 100 pages). The big idea here is to turn the page per page PDF into a double spread PDF by opening it in any software that lets you move it around like a jpeg, manually sticking each page next to the right one, and exporting it into a new PDF. And you can even make the signatures manually while you're at it (but you should also probably do that in InDesign, and it has an inbuilt booklet function, so no need for the recipe for disaster that is making the signatures manually). Not recommended unless you're a purist, a maniac, or a masochist. Do not do that. Go back to #1. Help yourself.
3. Give up
...on the signatures. I don't think the booklet function is that hard to master, but just to give you more options, there absolutely are ways to print and bind a page per page PDF without signatures. Here are a few:
Japanese binding: with thread, beautiful, will work no matter how many pages you have, however it does not open flat (at ALL) and if you have text/images close to the inside margin the binding will eat it all up.
Perfect binding: with glue, very common binding. You'll see it on most paperbacks, everywhere. When it's clean, it's really nice, however, while it's easy to make a perfect binding, it's hard to make a clean one yourself. Also can't be done if you have less than? 20? pages, doesn't open flat, eats the inside margin (but way less than a japanese binding).
Whatever this is called: with thread, can be nice… on very specific occasions. Opens flat and looks cool, NOT recommended if you have thin paper and/or a lot of pages.
So many things. Thread. Tape. Side staples. Spirals. Screws and bolts, if you're going for in industrial look. Don't let any loser tell you that staples or spirals or any of those can't be sexy in the right conditions.
15 notes
·
View notes
Text
How to Print a Digital Download from Etsy
The whole downloaded-file-to-framed-print-on-your-wall process breaks down like this:
- Save the file you purchased to your computer or thumbdrive.
- Take the file to a job printer and get it printed to the size you want.
- Take the printed file to a framer, and have it framed so it fits your décor.
Digital files are often much, much cheaper on Etsy than buying their physical item counterparts. Plus, when you buy a digital file, you can finetune it to the exact size you want for your own wall. And once it’s printed, you can also choose the exact framing and matting combination you want.
Now, the details:
You were on Etsy or an artist’s website, and you fell in love with an image. Perfect for your wall, but you’re not sure how the whole printing thing works.
Not to worry! Lots of people use printable downloads every day for party decorations, invites, or coloring pages for kids (using their own home printer, if they have one), or for higher quality prestige printing for smashing wall art. The following is a list of steps for accessing your digital downloads, and how to turn them into art you’ll be proud to see on your wall.
So, what’s a digital download, or ‘printable’? It’s not a physical object; it’s an image file, in the form of 1s and 0s, saved on your computer or a thumbdrive. You bought it, you keep it, and you can always print it, as many times as you like. You can copy the file to two or three locations, so you don’t lose it.
Digital downloads come in various formats, including PDF, JPG, PNG, SVG, EPS, and more. Each type of file depends on what you need to use it for and how you are going to print it. Printing services will specify which formats they need.
Etsy places the file to your account in the orders section and you can download it on a desktop. They’ll also send you an email with a link to it.
Or, log into your account and click on “Purchases and Reviews.” Find the button that says “Download Files”. If you run into troubles, there’s a Help page. (Remember, you can’t access your digital download file through the mobile Etsy app.)
Now that it’s downloaded, you can open your file, just to check whether you have the right image at the right size. You’ll need to use the right software.
.bmp (Microsoft Windows Photos, Apple Preview or Apple Photos, Adobe Photoshop, Adobe Illustrator, CorelDRAW)
.doc (Microsoft Word)
.gif (Microsoft Windows Photos, Apple Preview or Apple Photos, Adobe Photoshop, Adobe Illustrator, CorelDRAW)
.jpeg (Microsoft Windows Photos, Apple Preview or Apple Photos, Adobe Photoshop, Adobe Illustrator, CorelDRAW)
.jpg (Microsoft Windows Photos, Apple Preview or Apple Photos, Adobe Photoshop, Adobe Illustrator, CorelDRAW)
.mobi (Calibre, Stanza, Sumatra PDF, Mobi File Reader, popular eReaders)
.mov (QuickTime, iTunes)
.mp3 (Windows Media Player or iTunes)
.mpeg (Windows Media Player, QuickTime)
.pdf (Adobe Acrobat Reader, Most Internet Browsers)
.png (Microsoft Windows Photos, Apple Preview or Apple Photos, Adobe Photoshop, Adobe Illustrator, CorelDRAW)
.psp (Corel PaintShop Pro, Adobe Photoshop, ACD Systems Canvas)
.rtf (Microsoft Word, WordPad)
.stl (AutoDesk Viewer, Microsoft 3D Viewer, Microsoft Print 3D, ShareCAD)
.txt (Windows NotePad, TextEdit on Mac)
.zip (Usually, you can unzip a .zip file with any computer.)
.ePUB (Various eReaders)
.iBook (Internet browser or Apple iBooks)
You can print image files on home printers. This is great for low-resolution art up to 8.5” x 11”, like recipes, or sewing instructions. The downside here is that the print will only be as good as the printer itself. For larger wall art, the best move is to take your file to a professional printshop.
This can be done online, or it can be done in person. Local Walgreens and Costcos are often quite good. You can upload your saved image file to them using their official website, and just pick up your image, printed the size you specify, on the paper you choose, the next time you’re in the neighborhood. There are also online choices like Shutterfly or Vistaprint, who will ship you your prints in the mail.
You’ve got your print, and you love it. But it’s just a big piece of paper right now; what about framing? One easy option is to select a standard sized frame, mat and glass available at the local stores or mall shops, and insert your new print yourself. Or maybe your print deserves first-cabin treatment, and you’ll want to check out the local frame shop for the right frame, matting and glass. Either way, totally legit. Then just hang it on the wall, and enjoy.
And that’s the whole process. Before you buy a digital download, you should check a couple of things:
- Be sure you have the software you’ll need to open the download at home, or be sure you know where online to find a site that will open the image (such as Photopea.com, for opening a layered .psd file, if you don’t happen to have Photoshop on your own machine).
- Be sure you understand the optimum print size of the download and its aspect ratio. Artists generally will inform you that their image will look best at a certain size, say, 24” x 18”. Printing it larger will seem overblown, with visible pixellation; printing it smaller will cause it to lose detail.
In other words, make sure the digital download fits your needs before you buy.
+++++++++++++
#collage#abstract#art#modernart#digital download#etsy#midcentury#kolaj#homedecor#interiordesign#design
4 notes
·
View notes
Text
Designing an Effective Email Banner: Key Considerations for Format, Size, and Layout
Email Banner Format: Common Questions Answered
1. What is the best format for email banner?
The best format for an email banner is typically a JPEG or PNG file. These formats provide good image quality and are widely supported across email clients. Ensure the banner is optimized for web use, usually around 600-800 pixels wide, and keep the file size small to ensure fast loading without compromising quality.
2. How to make a banner for email?
To create a banner for email, use a graphic design tool like Canvas or Photoshop. Set the dimensions (typically 600-700 pixels wide). Choose a visually appealing background, add text that conveys your message, and include images or logos if needed. Save the banner as a JPEG or PNG, ensuring it's optimized for quick loading in emails.
3. What size is the email banner for 2024?
The standard size for an email banner in 2024 is typically 600 pixels wide by 200-300 pixels tall. It's important to keep file size small for faster loading times, usually under 1MB. Always check specific email client requirements, as they may vary. Using responsive design ensures the banner displays well on different devices.
4. What is an example of an email banner?
An email banner is a graphic that appears at the top of an email, often used for branding or promotional purposes. For example, a retail company might use a colorful banner featuring their logo, a seasonal sale message, and eye-catching images of products to attract the reader's attention and encourage engagement with the email content.
5. How do you layout a banner?
To layout a banner, start by defining its dimensions. Choose a clear, eye-catching background color or image. Place the main message or logo prominently using large, readable fonts. Use contrasting colors for visibility. Add supporting text or images, ensuring balance and alignment. Leave some white space to avoid clutter. Finally, review for clarity and impact before finalizing.
Visit: VS Website See: VS Portfolio
0 notes
Text
Price: [price_with_discount] (as of [price_update_date] - Details) [ad_1] Product Description Wide Compatibility Super High Speed The transfer speed of this USB Camera Adapter is 25MB/S-30MB/S which is 2 times faster than the speed of other products,the best way to copy photos and video to the iPhone or iPad in a short time Plug & Play Simple plug and play USB C to USB adapter, no drivers needed Keyhole Design It has an anti-lost design, allowing you to hang this compact adapter on your key ring or bag for easy portability. 【 Plug & Play】:Plug and Play & easy to use, no need to download APP, share your photos and videos from your camera to your social network freely, No need to use PC anymore, Fast and easy ! 【 New System Update】: Our USB Camera Adapter support USB 3.0, transmission speed up to 5Gbps, more faster than USB 2.0, help you save time. 【 Widely Compatible 】: USB Camera Adapter can be widely use for iPhone SE 2020/11/11 Pro/11 Pro Max/Xs/Xs Max/X/8/8 Plus/7/7Plus/6/6 Plus/5/5S/SE for iPad Air /Mini /Pro ( IOS 9.2 to 13 for iPhone & IOS 8.0 or Later for iPad ), supports standard photo formats like JPEG and RAW, along with SD and HD video formats including H.264 and MPEG-4. 【Support Peripherals】: Except suit for iPhone for iPad device, USB OTG Adapter also can be widely use for more USB 3.0 Device, like for Digital camera,card reader,USB flash drive,MIDI keyboard,mouse,U Disk,Hubs, mini portable fan, electronic piano,microphone etc., 【USB Camera Adapter】: Please don't worry if the no any dispaly when your plug your U disk or camera. just find “ Files” on the desktop & click “Browse” then you can see the U disk on your phone [ad_2]
0 notes
Text
Avoid These 5 eBook Conversion Mistakes

As digital publishing continues to gain momentum, more authors, publishers, and content creators are turning to eBook conversion to reach a wider, tech-savvy audience. Whether you’re converting a novel, a textbook, or a corporate training manual, the goal is clear: produce a clean, readable, and professional-looking digital book.
However, converting your manuscript into an eBook format like ePub or MOBI is not always straightforward. In fact, many people unknowingly commit errors that affect the readability, accessibility, and even the marketability of their eBooks.
In this post, we’ll explore five common eBook conversion mistakes and how to avoid them to ensure your digital book looks great on any device and delivers a smooth reading experience.
1. Ignoring Proper Formatting Before Conversion
The Mistake:
One of the most frequent issues is failing to properly format the source document (usually in Word, InDesign, or PDF) before initiating the conversion.
Why It Matters:
eBook conversion formats are reflowable—meaning text adjusts to different screen sizes and reader preferences. Poor formatting (such as hard line breaks, inconsistent heading levels, or excessive tab spacing) can lead to chaotic, unreadable content post-conversion.
How to Avoid It: ● Use styles (Heading 1, Normal, etc.) instead of manual formatting ● Avoid using the spacebar or tab key for alignment ● Create a clean and consistent structure using built-in tools ● Test a small section before converting the full book
2. Not Embedding or Licensing Fonts
The Mistake:
Using custom or fancy fonts without embedding them or ensuring they are licensed for eBook use.
Why It Matters:
If your chosen fonts aren’t embedded—or are unavailable on a reader’s device—your eBook may display with fallback fonts, ruining your design and readability.
How to Avoid It:
● Stick to web-safe or eBook-friendly fonts like Georgia, Arial, or Times
● Embed fonts where possible, especially in fixed-layout eBooks
● Check font licensing if you're using premium or downloaded fonts
● Use CSS font rules correctly in ePub files
3. Skipping Image Optimization
The Mistake:
Failing to resize, compress, or format images properly for eBook formats.
Why It Matters:
Large, high-resolution images can cause slow loading, increased file size, and even conversion errors. Additionally, image formats like BMP or TIFF may not display correctly in ePub readers.
How to Avoid It:
● Use JPEG or PNG formats for best compatibility
● Keep image resolution around 300 dpi for print, but 72–150 dpi for eBooks
● Use alt text for accessibility and SEO
● Compress images without sacrificing quality
4. Poor Table of Contents (TOC) Structure
The Mistake:
Creating an incomplete or non-functional TOC—or skipping it entirely.
Why It Matters:
An eBook’s table of contents is essential for navigation. Without a working TOC, users may become frustrated and leave negative reviews or stop reading altogether.
How to Avoid It:
● Create a logical hierarchy with proper heading tags
● Use your authoring tool’s “Insert TOC” or export feature
● Ensure the TOC is linked and functions in the final format
● Test it in multiple devices (Kindle, Apple Books, etc.)
5. Not Testing Across Devices and Platforms
The Mistake:
Publishing an eBook without thoroughly testing it across various platforms and devices.
Why It Matters:
An eBook that looks great on one device might display incorrectly on another. Compatibility issues can include spacing errors, broken links, and non-responsive images.
How to Avoid It:
● Test your eBook on multiple eReaders (Kindle, Kobo, Nook, Apple Books)
● Use emulators or preview tools (e.g., Kindle Previewer, Calibre)
● Ask others to test it for fresh perspectives
● Fix all issues before publishing or distributing
Bonus Tips for Seamless eBook Conversion
● Always validate your ePub files using tools like EpubCheck
● Keep your file structure clean—organize text, styles, and media properly
● Don’t rely solely on automated converters—manual tweaks are often required
● Consider hiring a professional formatting or conversion service for important projects
Final Thoughts
Creating a flawless eBook takes more than just hitting “convert.” It requires attention to detail, testing, and a clear understanding of how digital formats work. By avoiding these five common conversion mistakes, you’ll not only enhance your reader’s experience but also increase your eBook’s professionalism, accessibility, and long-term success.
Remember, your eBook represents your brand, story, or business—so make it count.
Source Link: https://latestbpoblog.blogspot.com/2025/04/avoid-these-5-eBook-conversion-mistakes.html
#dataentryinc#ebookconversion#ebookconversionservices#bestebookconversionservices#professionalebookconversionservices
0 notes
Text
Top 10 UX/UI Best Practices for Your Website that transforms User Experience

You build a website, but does it offer the best user experience for optimum conversions? Without the right UX/UI best practices in place, even the most visually appealing sites can suffer from low impressions, poor CTRs, and weak engagement. A lot of it comes down to the front-end designers and developers who fail to factor in key UI/UX metrics, and your business ends up with a mildly aesthetic but otherwise cluttered site.
Inconsistent design, confusing navigation, or unresponsive layouts can quietly undermine user trust, lower engagement, and hurt conversions. Great UI/UX design, on the other hand, is not just about aesthetics — it is about performance, accessibility, responsiveness, and alignment with user behavior.
In this article, we break down 10 essential UX/UI best practices that can transform your website into a high-performing, user-first platform. These are the same principles Altumind follows to help clients build digital experiences that engage, convert, and retain.
Top 10 UX/UI Best Practices
1. Performance: Slow page loads diminish user experience (UX) and increase bounce rates. You must optimize your Core Web Vitals — CLS, FID, and LCP — optimize your database, compress multimedia assets, and use a Content Delivery Network (CDN). Minify CSS, JavaScript, and HTML, reduce server response time, eliminate render-blocking resources, and regularly audit site performance using tools like Lighthouse or GTmetrix.
2. Responsiveness: Frustration from poor mobile experiences leads to drop-offs. Ensure a mobile-first, intuitive design using responsive frameworks like Bootstrap or Tailwind. Optimize for multiple screen sizes, adjust typography for readability, use scalable images and icons, and prioritize essential content for smaller screens.
3. Images: Images breathe life into a webpage, but when used randomly, can bloat the same and diminish user experience. Use icons and visuals meaningfully, use proper formats (JPEG, PNG, WebP, or AVIF), compress images using TinyPNG or ImageOptim, cache images, and reduce dimensions. Avoid using large resolution images unnecessarily, enable HTTP/2 for faster loading, preload key images, use sprites to reduce HTTP requests, try adaptive device-specific delivery, and finally audit image assets and remove unused files.
4. Accessibility for all users: Make your website inclusive. Add descriptive alt-text, transcripts, semantic HTML, and accessible forms. Follow the latest WCAG guidelines. Consider screen reader compatibility, readable color contrast, and structured headings. As Design should not just work for most it should work for everyone.
5. Call-to-Actions (CTA): CTAs get users to buy or drop a lead for your business. So, you want them to be clear and concise. Keep them short & relevant, use action-oriented text such as “Get Started,” “Claim Your Offer,” etc., and maintain consistency across the page, avoid clutter, and have more whitespace instead. Optimize CTAs for mobile devices, position them strategically, and place primary CTAs above the fold. Always A/B test them to arrive at the best converting one.
6. Forms: Keep forms short and user-friendly. Minimize the number of fields, auto-format entries, and use clear validation cues. Consider multi-step flows for complex data and tailor forms for mobile entry. A well-designed form is the difference between a lost lead and a conversion.
7. Whitespace: Whitespace reduces cognitive overload, leading to higher engagement. Whitespace enhances readability and improves user focus. Maintain consistent spacing, avoid clutter, and balance visuals with text and leave sufficient margins between sections and to the left and right of the page content.
8. Videos: Videos are a great way to captivate resources, but they tend to get a bit heavy on the page resources. So, avoid auto-playing videos, only preload the metadata, use compressed formats, implement lazy loading, and optimize thumbnails. Keep load time in check and prioritize usability across devices.
9. Pop-ups: Pop-ups are a great asset for catching user attention and highlighting offers but can disturb user experience. So, limit the number of intrusive pop-ups per session, minimize heavy animations, compress text and image assets in it, make them responsive, use lightweight pop-up scripts, reduce HTTP requests, and use succinct messaging in pop-ups. Further, defer loading non-essential elements, avoid auto-play videos, prefetch resources for critical ones, and update outdated frameworks or libraries used in them.
10. Textual Content: Content is good for SEO and for readers but stick to some hygiene standards. Keep content concise, structured, and SEO-optimized. Use readable fonts, break text into digestible sections, and maintain brand tone. Clear content enhances both usability and discoverability. Further, localize content for multilingual websites, add metadata, use descriptive anchor text, left-align body content, and center-align headings, and fact-check the content.
Final Thoughts: UX/UI Best Practices
Your website is your digital identity, and the UX/UI is the personality and voice that shape how your site is perceived, not just by bots/crawlers for SEO but mainly by users. A bad sitewide UX/UI can leave a terrible first impression, ultimately affecting your branding, revenue, and profits.
54% of users want the content to appeal to their design sensibilities and 45% expect it to work across multiple devices for it to be successful — Adobe
Want to turn casual visitors into buyers? At Altumind, we specialize in building user-first digital journeys backed by data and design expertise. From wireframes to fully responsive designs, we help businesses deliver web experiences that don’t just look good they work, convert, and scale! We bring years of expertise in delivering exceptional data-driven UI/UX experiences that resonate across all touchpoints.
0 notes
Text
Why Book Cover Design Can Make or Break Your Book

In the competitive world of publishing, readers do judge a book by its cover. A well-designed book cover can be the difference between a best-seller and a book that gets overlooked. Whether you're a debut author or a seasoned writer, your book's first impression matters. That’s where Clever Fox Publishing comes in—offering professional, eye-catching book cover designs that reflect your story and attract readers.
Why Book Cover Design Is So Important
1. First Impressions Count
Your book cover is your first marketing tool. It’s the first thing a potential reader sees on a shelf or online marketplace. A professionally designed cover draws attention and gives the impression that the content is equally compelling. On the other hand, a poor design can suggest the book lacks quality—even if the writing is excellent.
2. Attracts Your Target Audience
Book cover design is about more than aesthetics. It’s about communication. The cover should instantly convey the genre, tone, and theme of the book. A romantic novel has a very different design from a thriller or a non-fiction business book. A great cover speaks directly to your ideal reader and encourages them to pick up the book or click "Buy Now."
3. Boosts Online Visibility and Click-Through Rates
On platforms like Amazon or Goodreads, your thumbnail-sized book cover competes with hundreds of others. A high-quality, professional design increases your book’s click-through rate and makes readers more likely to read the description—or better yet, make a purchase.
4. Builds Author Credibility
Readers associate professional covers with professional writing. A polished cover can make a self-published author look just as credible as one backed by a traditional publishing house. This is crucial when building a fanbase or growing your author brand.
How Clever Fox Publishing Can Help
At Clever Fox Publishing, we understand the impact of strong visual branding. Our experienced design team crafts custom book covers that not only look stunning but also resonate with your genre, audience, and personal style.
Here’s how we support authors with our book cover design services:
Custom Design Based on Your Vision
We collaborate with you to understand your book’s message, tone, and genre. Whether you have a specific idea or need creative input, our designers work with you every step of the way to bring your vision to life.
Genre-Specific Expertise
Our designers are well-versed in the visual expectations of every major genre—from fantasy and sci-fi to memoirs, romance, self-help, and children’s books. This ensures that your book fits within genre norms while standing out from the crowd.
High-Resolution Print and Digital Covers
We provide professionally formatted cover files for both print and digital distribution, including specifications for Amazon KDP, IngramSpark, and other platforms. You’ll receive covers that look great as thumbnails and full-size prints.
Unlimited Revisions
We don’t stop until you’re happy. With unlimited revisions, you can fine-tune every element—fonts, imagery, colors, and layout—until your cover feels perfect.
What’s Included in Our Book Cover Design Package?
Front, back, and spine design
High-resolution JPEG and PDF files for print
Ebook cover for Amazon Kindle, Apple Books, etc.
Barcode placement
Assistance with ISBN and publishing specifications
Optional 3D mockups for promotional use
Final Thoughts
A compelling book cover does more than just look good—it drives sales, builds trust, and creates a powerful first impression. As a self-published author, you deserve a cover that does justice to your hard work and storytelling.
Clever Fox Publishing offers expert book cover design services tailored to make your book stand out in a crowded market. Whether you're publishing an ebook, paperback, or hardcover, our team is here to help you shine.
Ready to create a stunning book cover? Reach out to Clever Fox Publishing today and let's turn your story into a visual masterpiece!
0 notes