#just feeling poolish
Note
britt!! 18, 19 and 23 for asks :)
lola!!!!!! <3333
18. what’s a topic that you wish you knew more about?
i wish i knew more about film cameras! i've had a dslr one for almost ten years and even took a film photography class in college and i still feel like i didn't learn much about operating it! sure i still remember the whole process on how to develop a roll of film but my camera broke? (i still don't know) between monet's house and the palace of versailles on a tour in france last year and what if i just need to change a setting or something?!?
19. got a random fact you’ve been holding on to?
learned about our new bread program at work last week so! all of the breads we'll be producing are made with a poolish EXCEPT the sourdough which is of course made with a starter. poolish is like a sourdough starter buuuut made with commercial yeast so it doesn't add as much flavor as a starter :)
23. how are you feeling in this moment?
chillin, vibin, just got home from work so i'm relaxing, brain is kinda sad but when isn't it
fill my inbox 📬
1 note
·
View note
Text
😓🥐
#ive gotten a couple asks about my croissants which is embarassing jshsjs bcs#ive been procrastinating them for two days now 😓#bcs my dad is home and i get stressed about baking when hes here#also ive been feeling sick since yesterday...nothing bad i think its just i havent been eating well 😓#ill try to make the dough i have into buns bcs i dont think theyll be good for anything else#and ill redo the dough but instead of just throwing the proofed yeast in ill try to make a poolish#so it helps with rising and texture :0#🏹#🍞✨
1 note
·
View note
Text
Was up at 5 in the morning bc i got sick of laying in bed trying to sleep while in. So much pain. And figured that if life has to be terrible and if i have to feel like i've been hit by a car every time i try to lay down, i might as well have some cabbage and egg pirozhkiy about it. Have once again appropriated last night's poolish intended for bread to use for the dough, which i remember worked wonderfully last time but i have no idea what recipe i was using with it :/ so, another experimental dough.
Im sure the reality of actually having to roll out, fill, close, and shape 4 dozen pirozhkiy will set in soon but at the moment i am just thinking cabbage and hardboiled egg thoughts...
#probably should have just turned on the heating pad at the desk and made some lentils later#idk the problem with pirozhkiy being the best winter comfort food (not sick food but just when i feel like death food)#is that i have to make them myself. which is very taxing. and i always do huge amounts for some reason#oh to have someone spend 6 hours making my comfort food for me....#tbh though i would never ask anyone to do that it is a LOT to ask for#baking#chronic illness
28 notes
·
View notes
Text
ok i just made the poolish for another loaf of bread. i feel alive
4 notes
·
View notes
Photo
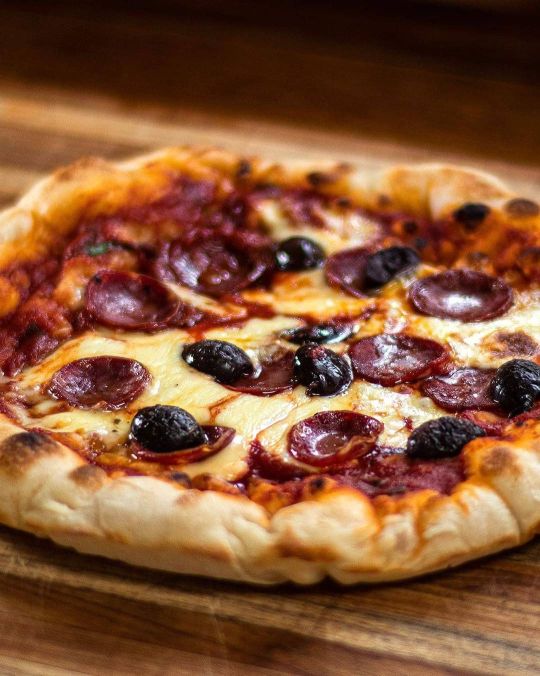
Neapolitan Pizza at Home The closest thing to Neapolitan pizza without a pizza oven Click on my profile link to watch video and get recipe. The closest thing you will find to a Neapolitan pizza in a domestic home oven. Normally, to achieve the perfect pizza base Neapolitan style, you need a very hot oven such as a powerful commercial electric or a woodfired oven. Pizzas should be cooked in 60-90 seconds in a 430C°-480C° (800F°-900F180 °) oven, that is hot!!! Domestic home ovens are lucky to get half that amount of heat. If you’re lucky enough to own a pizza oven, this recipe is still an excellent pizza base to use in super hot ovens. You will be amazed at the results, in any type of oven! So, what makes a good Neapolitan pizza base? It is the raised swollen edges, softness in the crust, fluffy texture with toasted spots on the outside. It should not weigh more than 280grams 35cm in diameter and be approx. 0.25 centimetres thick. Now don’t worry too much about specifications, this is for home use it, doesn’t matter, it’s just a guideline. For the base, I use a starter called “poolish”, made from mixed yeast, water and flour, I also use a little honey to help feed it. It is then proved in the fridge overnight; long cold proofing, 8 to 24 hours is the secret to any good pizza base. Plus you won’t feel as bloated afterwards. The pizza is cooked twice, once covered in a pan with steam and then finished under your oven grill (Broiler). This method gets you closest to the real deal of a Neapolitan pizza base If you want to keep your pizza dough for the next day, no problem, simply retighten pizza dough into round balls and place in oiled or floured covered container in the fridge. To use the next day, remove from fridge and bring back to room temperature before use. Continue as per recipe. #neapolitanpizza #pizzadough #bestpizza #homemadepizza #recipe30 https://www.instagram.com/p/CMZew3IBChU/?igshid=7m6secogqaf8
0 notes
Text
Rustic Italian Breads: Chef Michael Kalanty (Oakland)
Menu:
Pane di Como--The airy, tender, crusty table bread from the Lake Como region in the North.
Roasted Potato, Garlic, and Green Onion--Dinner Rolls or Burger Buns? You decide!
Tender/chewy Semolina Bread with Golden Raisins and Fennel Seed. Savory and slightly sweet.
Master Baker Michael Kalanty shares more professional tips and techniques, this time with Italian crusty breads. A solid step forward in building your basic baking skills. Learn to incorporate Poolish and Biga pre-ferments into your doughs to give more flavor, better chew, and longer shelf life!
Class running time: between 3 and 3-1/2 hours.
Chef Bio:
With more than 20 years of baking and cooking experience, Michael Kalanty is a master in all things bread and has won several awards for his writing and teaching.
His certifications include Executive Pastry Chef, Culinary Educator and Master Taster. Kalanty was also named Chef Instructor of the Year by Le Cordon Bleu and has several full-length baking courses online, produced in partnership with Craftsy.com. His first book, How to Bake Bread, won "Best Bread Book in the World" at the Paris Cookbook Fair in 2011.
What to wear/bring to class: Close toed shoes are mandatory and high heels are not allowed in the kitchen. If you have shoulder-length hair or longer, please wear it back and away from your face; we have plenty of hair ties in the kitchen for you to use and keep. Feel free to bring a favorite apron or a knife you want to practice with, but know that we will supply all the tools you need at class.
Wine and other Alcoholic Beverages: We whole-heartedly invite class participants (who are 21 and older) to bring any beverages they would like to enjoy during their stay at Kitchen on Fire for personal consumption. We cannot sell or distribute alcohol and we uphold ABC regulations. No minor can drink and we cannot have intoxicated students attending a class. Our friends at Vintage Berkeley wine shop on Vine Street will extend a 10% discount on any bottles you purchase for your class at Kitchen on Fire - just bring in this letter.
Allergies: Please take a look at the class menu. If you think you might be allergic to anything on the menu please get in touch and we can double check the ingredient list ([email protected]).
Happy Cooking!
Location: 6506 San Pablo Avenue, Oakland, CA, USA
0 notes
Text
Croissants of Long, Slow, Layered, Complex Rise to Victory
This is a guest post from s.e. smith, a writer, journalist, and agitator who enjoys writing about structural inequality, baking complicated things, attending city council meetings, and chasing chickens. You can follow s.e. on Twitter, Instagram, and Facebook.
People have told you croissants are too complicated. That you do not deserve these nuanced, light, airy layers of delicate pastry shrouded in butter. That no one is willing to take the time.
Those people are wrong. Those people are afraid of pastry that has done the homework, of pastry that has patiently worked and waited and swelled with fullness over the course of several days, of pastry that demands attention to detail but rewards you with things you could never even imagine.
The sweetest, most flavourful victory is the one constructed over time, and such is the noble croissant, which requests short bursts of energy followed by long intervals of waiting. Croissants call their representatives and go to city council meetings. Danish have Twitter fights about Bernie Sanders and don’t even know who their representatives are. Which would you rather eat, I ask you?
You will start with the poolish (pooh-leash). This delightful little nugget of prefermentation is the thing that will give your croissants that extra depth of experience from the start.
½ teaspoon yeast, or one tablespoon sourdough starter
1 cup all purpose flour
2/3 cup water
Whisk the dry ingredients together, ideally with a wand whisk, which is a superb kitchen invention that everyone should own, add the water, pull into a sloppy dough, cover, and stick in a warm place for three to four hours. It will begin to bubble.

It is time for dough.
Poolish
1/3 cup water
½ cup whole milk
2 teaspoons yeast
¼ cup sugar
3 cups all purpose flour
Use the twee measuring cups from Anthropologie. What better time? Heat the milk and water until they’re about blood temperature. If you’re not quite sure how to gauge that, think about the last time you fed upon the flesh from your enemies, and guess. Drop the poolish in a mixing bowl with the liquid, yeast, and sugar and stir it a bit to break it up before adding the flour and kneading for around five minutes, until it’s a loose ball. You can do this by hand or with a stand mixer, depending on your inclinations.

Swirl your dough around in an oiled bowl and then cover it, leaving it somewhere warm until it doubles in size, about an hour. Form it into a rough disk, put it on a plate, and stick it in the fridge overnight. It will rise. Make it a big plate. Don’t be afraid to use a (clean) garbage bag to cover it if you don’t have something large enough. Everything is garbage in the end, right?
In the morning, you have a reason to get out of bed: It is time to make the butter block. Spread out a sheet of wax paper and chop 1 ¼ cups of butter into chunks. Beat them with the end of a rolling pin, or a kitchen hammer, or the heart of an enemy, until they soften. You don’t want them to melt, just…soften. You’ll know when they’re soft enough because you can form them into a loose square and bend the block, but the butter doesn’t break. Make a 4x4 block — trim along the edges and mash the extra back in. Put your block in the fridge, and while it chills for ten minutes, reach for the dough.

Roll your dough out and form it into something approximating a seven-inch square. You may need to flour the surface but go lightly — working on marble or a pastry mat helps with this. Fish your butter out of the fridge, place it at right angles on the dough, and fold the dough around it, like an envelope.

Are you ready to laminate? Of course you’re ready to laminate. Make sure it’s cool, because when things warm up, so does butter, and that is bad. If the dough starts to fight you, put it in the fridge for a time out. There’s no need to hurry. We’re here all day.
Pinch the seal of the dough and flip it face down. Begin rolling briskly and smoothly, elongating the dough, up and down. It can be meditative. The dough should get about a foot long, and six inches wide. If a bit of butter shows, pat it with flour. Now, fold it in thirds — top third over middle, bottom over both.

Rotate it. Imagine the dough is a book — the folds should be positioned such that you are about to open it and find out what’s inside. Don’t do that. Instead, roll the dough out again, twelve inches by six inches. Fold it. Cover it. Put it away in the fridge.
Come back in an hour and a half or so. Your folded dough should be swollen, with a glorious, yeasty smell. Roll it out, fold it, and roll it out again. Fold it, and deliver it back to the fridge.
Return in another hour and a half. Roll it out, fold it, roll it out again, and fold it. You have now completed six “turns” of the dough, and it should feel silky soft, but try not to become too besotted with it. There is more work to do. Put the dough back in the fridge and chill it for at least two hours.
Rescue the dough from the fridge and roll it out again, for the last time. It may struggle, slightly. It knows what is coming. It should be roughly rectangular in the end, and about half an inch thick. When you’re done, lift the dough up slightly by both ends, to allow it to contract.

Slash it right down the middle, along the length of the dough. Cut a series of triangles from each side — you should end up with six to eight. Yes, my friends. We’re so close. You are indeed going to roll those up into little croissants, wide end to narrow end. You can be fancy and curve them, or let them lie straight.
But first, if you wish, you can secret a little surprise, like a chunk of nice chocolate, or a wedge of cheese, in the wide end of the triangle, bundling it up in layers of pastry.
Lay your croissants out on a baking sheet, and admire them, for a moment. It is evening. Perhaps you should have some wine. I’m particularly enamored of Goldeneye’s Brut Rose. Treat yourself. You’re worth it.
After you’ve appreciated the beauty of your croissants, cover them — our friend the trashbag is useful here — and stick them back in the fridge. Yes. I’m sorry. You have to wait.
But in the morning, oh, the morning, my friends, you can slide them out of their chilly resting place and you will see, they have become puffy with possibilities, the layers of pastry just visible. Perhaps you will think that this is entirely too many croissants for your purposes. That’s all right, because you can freeze whichever ones you don’t want to eat this very second — freeze them covered on a baking sheet for several hours until they’re nice and solid, and then stick them in a container or bag. I like to separate them with wax paper so they don’t get any ideas about sticking together. When you want to eat them, pull them out of the freezer and let them warm up for ten minutes or so before plunging onward.
For the baking, you will crack an egg into a dish, and add a little milk, and then whisk them — a wand whisk is useful here too — while the oven preheats to 425 and the croissants begin to wake up and murmur to themselves on the counter. You will brush each and every one lovingly with your egg wash and slide them into the oven when it’s come to temperature.

Bake them for 20-25 minutes, until they are golden brown and glorious. You will know the moment. My oven prefers 22 minutes, but maybe yours does not. And when they come out, eat them quickly quickly, my friends, catch them in the golden hour, when they are light and flaky and go well with lemon curd, jam, or ativan. Think to yourself that there is nothing too complicated for you, that you thrive on layers and nuance, that you are willing to wait for perfection, rather than settling for what everyone else thinks is acceptable.
This recipe has been adapted from Emma Christensen’s at The Ktchn.
14 notes
·
View notes
Text
Homemade Focaccia Bread Recipe | Serious Eats
[Photograph: Vicky Wasik]
If you’re anything like us, you may have recently experienced dough envy while scrolling through an endless stream of beautiful, homemade bread on social media. But sourdough bread–making can be pretty daunting, so start with focaccia, an easier, dip-your-toes-in-the-pool (or poolish* if you feel like getting fancy), quarantine-friendly bread.
Unlike sourdough, which requires that you feed a hungry little starter gremlin every day, focaccia is mostly hands off. It also doesn’t require any special equipment besides a digital scale. Made with a high-hydration (80% in this case) dough, it comes together quickly in a bowl and doesn’t need to be kneaded.
For this simple olive oil focaccia, we started with the same dough from our copycat trapizzino recipe, just scaled down to make one large focaccia in a cast iron skillet.
In order to give the focaccia a tender, open crumb with plenty of lift, we fold the dough multiple times before cold-proofing it in the refrigerator for up to three days. The folding process incorporates air into the dough for a more even crumb, while also strengthening its gluten network for better chew. The longer refrigerated proofing step produces complex flavor that a quicker, warmer proof won’t.
When ready to bake, the dough easily fills a cast iron pan (both a 10- or 12-inch skillet will work for this recipe), with no real stretching required, thanks to its high hydration. To let its flavor shine, dress the focaccia simply, with olive oil and coarse sea salt—although you can add other toppings if desired. After less than 30 minutes in a hot oven, you’re rewarded with burnished, crisp, golden brown focaccia, ready to be devoured—right after you snap those requisite bread thirst traps for the ‘gram.
*That’s some baking humor right there.
Source link
Tags: bread, Eats, Focaccia, Homemade, Recipe
from WordPress https://ift.tt/3f54PE7
via IFTTT
0 notes
Text
What you need to know about gluten – Weekend Baker...
New Post has been published on https://makesomethingtasty.com/what-you-need-to-know-about-gluten-weekend-baker/
What you need to know about gluten – Weekend Baker...
amzn_assoc_placement = "adunit0"; amzn_assoc_tracking_id = "pramedgro-20"; amzn_assoc_ad_mode = "search"; amzn_assoc_ad_type = "smart"; amzn_assoc_marketplace = "amazon"; amzn_assoc_region = "US"; amzn_assoc_title = "Shop Related Products"; amzn_assoc_default_search_phrase = "cooking"; amzn_assoc_default_category = "Kitchen"; amzn_assoc_linkid = "51fe4d035c7af8dc5928e6f5e5b79c4e"; amzn_assoc_default_browse_node = "284507"; amzn_assoc_rows = "4"; amzn_assoc_design = "text_links";
Gluten-free or not, it is always beneficial to bake your own!
What the heck are gluten?
Gluten have been getting a lot of bad press. But what are gluten? Starting with the flour: Flour is milled grains. For example, wholewheat flour consist of the whole wheat grain milled into a fine flour. Everything from the grain is incorporated in the flour, the bran, the germ with lots of minerals and enzymes, the endosperm consisting of starch and of course the gluten. The amount of gluten depend on the type of grain. Some contain almost none, and some types contain a lot of gluten. The grain we use most often in our food are wheat, rye, barley, oats, spelt and kamut. Gluten are a mixture of proteins with viscose-elastic properties, a bit like chewing gum.
Gluten are the main structure builders in your bread, they hold the air and give your bread a chewy and elastic texture. When you knead your flour and water into a dough, the wet gluten interlink with each other and form a web. The longer you knead the more links are being formed and the tighter your dough will get. These links are also formed automatically when wet dough is left alone for a while (the autolyse process) and during bulk fermentation. This is why your dough also gets stronger during these steps. The carbon dioxide gas produced by yeast is trapped within this web of gluten, a bit like air inside balloons. This is what makes your dough rise. Next to kneading and time, gluten are also developed and influenced by the amount of water, water quality, temperature and the addition of other ingredients (salt, milk, milk) and chemicals / additives (enzymes, conditioners) in a recipe.
Quality and quantity of gluten
Just like different quality balloons, some flours produce very tight balloons which are hard to inflate, and some flours produce very slack balloons, which are easy to inflate but can also easily break. The most important proteins within the gluten are gliadin and glutenin, the balance between these proteins defines the baking properties of the flour. Which means dough can be elastic and very springy, but dough can also be very extensible, depending on the type / brand / kind of flour. The glutenin contributes to the strength and elasticity of your dough and the gliadin contributes to the extensibility. For most bakes you want lots of extensibility (stretching without breaking) and not so much elasticity. When you make pizza for example, you want to have an extensible but not very elastic dough. This way it is easy to roll out and it does not spring back. When you are making fluffy light diner rolls, it is good to have strong ‘balloons’ which can trap a lot of carbon dioxide. For this you need a flour with lots of gluten, a bread flour high in protein.
Show me the gluten!
To get an idea of what gluten ‘look and feel’ like, we did a little experiment by washing out the flour from a ball of dough. It is very easy to do.
Make a dough containing only water and bread flour, so no yeast or salt. We used a Manitoba bread flour with a 14% protein content for our experiment. Knead the dough for 5 minutes into a tight ball, cover and store for 60 minutes. During this time the gluten will develop a tight web of links inside the dough.
Fill a bowl with cold water and ‘knead’ your ball of dough while keeping the dough under water. This way you wash out all the starch from the flour. The water will turn milky white after a while. Refresh the water and continue kneading the ball of dough until the water does not turn white anymore. Slowly but surely your ball will get smaller and you will end up with a ball of pure grayish-beige gluten which feels squeaky like chewing gum. Let this ball relax for an hour inside a bowl of fresh clear water. After this hour your gluten chains have relaxed and you can now stretch these gluten beyond believe. Just try it yourself!
Ingredients for the gluten experiment
400 g bread flour (we used 14% Manitoba bread flour)
250 g water
So, the more gluten the better?
You would be tempted to think that when it comes to bread baking, the more gluten the better. But this is too simple a statement. You will not be surprised that there is of course an optimum amount, depending on the recipe you are making. When bread dough contains too much gluten it loses its extensibility and springs back too much, making it difficult to work with and resulting in a bread that is tough and has lower volume and a compact crumb. Lack of gluten, especially with breads that are free form baked without support of a bread tin, can result in collapse of the dough.
With our own bread baking, we have experienced that not enough gluten results in collapse of free standing loafs and too much gluten results in a compact crumb without the so desired large holes. The protein content of the flour we use when making rustic bread, giving us the best result, lies between 12 and 13%.
Starch & Fermentation
Without getting too technical, the next part is a (over-) simplification of the processes happening when making your own bread. The bulk of the flour consists of starch which are carbohydrates in glucose form, bonded together into long chains. When making bread, during bulk fermentation, these long chains are cut into smaller pieces. The yeast, enzymes and the bacteria from sourdough do most of this work. It takes a couple of hours for this to happen. So bread which has been made in a hurry, like most factory and supermarket bread, still contains a lot of the original long glucose chains, the raw flour, and less of the smaller chains. These long chains are harder to digest and this makes most factory bread harder on your internal system. The long bulk fermentations, the use of poolish / preferments, smaller quantities of yeast etc, all help you to make bread that is easier to digest and more complex in taste. The yeast, enzymes and bacteria are doing the hard work for you, transforming complex carbohydrates into easy to digest (for example) maltose pieces. The factories are compensating this valuable time with lots of additives, extra added enzymes, intensive kneading, aroma’s etc. All this to make up for and hide the fact that the bread is made too quick. Sadly these shortcuts and unwanted ingredients give bread a bad reputation because they can lead to all kinds of health problems.
Gluten vs health
Except of course for people with Coeliac disease, an autoimmune disorder affecting primarily the small intestine, and people with obvious gluten intolerance, if you have never been tested but think you might have a problem with digesting gluten, why not try to bake your own ‘slow’ bread without additives and enzymes and see how your body reacts. Because if you buy bread from a supermarket or a baker that uses additives and bread enhancers there is a chance your internal system is protesting against raw flour and other things you do not need or want in your bread and will never add when baking your own!
When it has to be Gluten-free
We are absolutely no experts on gluten-free baking, except for the odd pancake. We know it can be a challenge to produce a good gluten-free loaf of bread and you always need a mix of gluten-free flours to get a satisfying result. There’s lots of websites and blogs to be found full of gluten-free information and recipes. Below is a list of the most popular gluten-free flours for bread baking. So, if you want to see the difference between the bread with gluten you normally bake and a gluten-free version, try and make a loaf with flour from the list below.
List of gluten-free flours for bread baking
Amaranth flour – Made from the South American amaranth plant – High in protein, calcium and iron
Buckwheat flour – Made from the seeds of the buckwheat plant – Source of B vitamins and lysine
Chestnut flour – Milled from dried, roasted sweet chestnuts – Source of vitamins B and C and fibre
Chickpea flour – Milled from chickpeas – Also called garbanzo, besan, ceci – Source of protein, iron, folate
Cornflour – Corn meal (maize meal / polenta) is made from whole maize seed – Good source of vitamin A, protein and fibre
Lupin flour – Made from the seeds of the sweet lupin – Source of omega 3 and 6, protein, fibre, antioxidants
Millet flour – Millet flour can be made from a number of highly variable small-seeded grasses – While glutenfree, people intolerant to gluten can still react!
Potato flour – Potato flour is made from dried and ground potato – Source of vitamine C, B6 and copper
Quinoa flour – Made from the sseds of the quinoa, member of the spinach family – Source of protein, calcium, iron, vitamines B and E
Rice flour – Made from the seeds of ‘oryza sativa’, can be white or brown – Brown variety source of vitamine B and several minerals
Soy flour – Made by grinding soy beans -High in protein and fat, also contains folate, biotin and copper
Tapioca flour – Made from the cassava plant roots. Useful because of thickening and binding properties. Not much nutritional value.
Flours that have different properties, protein levels, gluten properties and taste profiles than wheat but are not gluten free are rye, spelt, barley, oats, kamut, einkorn and emmer. Adding these to your recipes can make the baking more of a challenge but can also lead to interesting new tastes and textures.
amzn_assoc_placement = "adunit0"; amzn_assoc_search_bar = "true"; amzn_assoc_search_bar_position = "bottom"; amzn_assoc_tracking_id = "pramedgro3-20"; amzn_assoc_ad_mode = "search"; amzn_assoc_ad_type = "smart"; amzn_assoc_marketplace = "amazon"; amzn_assoc_region = "US"; amzn_assoc_title = "Shop Related Products"; amzn_assoc_default_search_phrase = "cookware"; amzn_assoc_default_category = "All"; amzn_assoc_linkid = "b45319dac495d29e17b5eff312392025";
Source link
0 notes
Photo

4pm. This almost evening time is the most gorgeous time of the day. The sunlight flatters anything it touches. Including this sage and onion focaccia. I have been using a poolish with high hydration to make focaccia these days for a very simple reason. The more the water content, the softer the focaccia, the olive oil absorbed by the focaccia while baking is somehow more flavour full and it's an almost sourdough bread kind of feeling because the amount of yeast needed is very less. Be that as it may, This Is My Backup... My daily bread ,just in case I am in no mood to make chapatis. Would you like to try a focaccia using poolish which is nothing but a very soft sponge like dough. Let me know and I'll be happy to share it with you. . . . . . . . . #focaccia #bread #flatbreads #homebaked #breadporn #food #foodporn #foodporner #bake #baker #wholewheat #heresmyfood #wholewheatbread #instabread #dailybread #mumbai #weloveyeast #yeast #instabaker #healthyfood #extravirginoliveoil #himalyansalt #pink #herbs #bakerchick #feedfeed#poolish #feedfeed #ilovebaking #bakefromscratch #veganfood #poolish #weloveyeast #hearty (at Colaba, Maharashtra, India)
#breadporn#wholewheat#flatbreads#herbs#heresmyfood#pink#wholewheatbread#bakerchick#hearty#veganfood#baker#focaccia#ilovebaking#poolish#healthyfood#bread#homebaked#foodporner#instabread#mumbai#himalyansalt#food#feedfeed#dailybread#weloveyeast#instabaker#bakefromscratch#yeast#bake#foodporn
0 notes
Text
Homemade Focaccia Bread Recipe | Serious Eats
[Photograph: Vicky Wasik]
If you’re anything like us, you may have recently experienced dough envy while scrolling through an endless stream of beautiful, homemade bread on social media. But sourdough bread–making can be pretty daunting, so start with focaccia, an easier, dip-your-toes-in-the-pool (or poolish* if you feel like getting fancy), quarantine-friendly bread.
Unlike sourdough, which requires that you feed a hungry little starter gremlin every day, focaccia is mostly hands off. It also doesn’t require any special equipment besides a digital scale. Made with a high-hydration (80% in this case) dough, it comes together quickly in a bowl and doesn’t need to be kneaded.
For this simple olive oil focaccia, we started with the same dough from our copycat trapizzino recipe, just scaled down to make one large focaccia in a cast iron skillet.
In order to give the focaccia a tender, open crumb with plenty of lift, we fold the dough multiple times before cold-proofing it in the refrigerator for up to three days. The folding process incorporates air into the dough for a more even crumb, while also strengthening its gluten network for better chew. The longer refrigerated proofing step produces complex flavor that a quicker, warmer proof won’t.
When ready to bake, the dough easily fills a cast iron pan (both a 10- or 12-inch skillet will work for this recipe), with no real stretching required, thanks to its high hydration. To let its flavor shine, dress the focaccia simply, with olive oil and coarse sea salt—although you can add other toppings if desired. After less than 30 minutes in a hot oven, you’re rewarded with burnished, crisp, golden brown focaccia, ready to be devoured—right after you snap those requisite bread thirst traps for the ‘gram.
*That’s some baking humor right there.
Source link
Tags: bread, Eats, Focaccia, Homemade, Recipe
from WordPress https://ift.tt/3f73FIi
via IFTTT
0 notes
Last Seen Blogs

justagirlfangirling
gabs


whynotfangirl
Cassie's Conundrums

captainditrag
Captain Ditrag's Movie Reviews & Singing Videos

thatgirlglowup
glow.up202.com