#logotype tutorial
Explore tagged Tumblr posts
Visit Tumblr Blog
Explore Tumblr blogs with no restrictions, modern design and the best experience.
Last Seen Tumblr Blogs


Fun Fact
70% of Tumblr users say the Dashboard is their favorite place to spend time online.
Text
NOOR LOGO DESIGN
Are you looking for an innovative and simplified business logo design (a professional logo for your brand)? Look no further! You can get a unique logo through the following link and you will see for yourself the number of positive reviews: https://tr.ee/7pZcjZvOpr Don't miss this great opportunity to get a professional logo at affordable prices!
#brand design#graphic design#brand design process#logo design#golden rules of logo design#rules of logo design#logo design rules#logo design golden rules#logo design list#logo design tutorial#logo design satori graphics#satori graphics#satori graphics logo#logotype#logotype design#logotype tutorial#design#photoshop#illustrator#adobe#makeadobecc#7 mind blowing logo design tips ✍#hidden messages in logos#how to design a logo#logo design tips
0 notes
Text
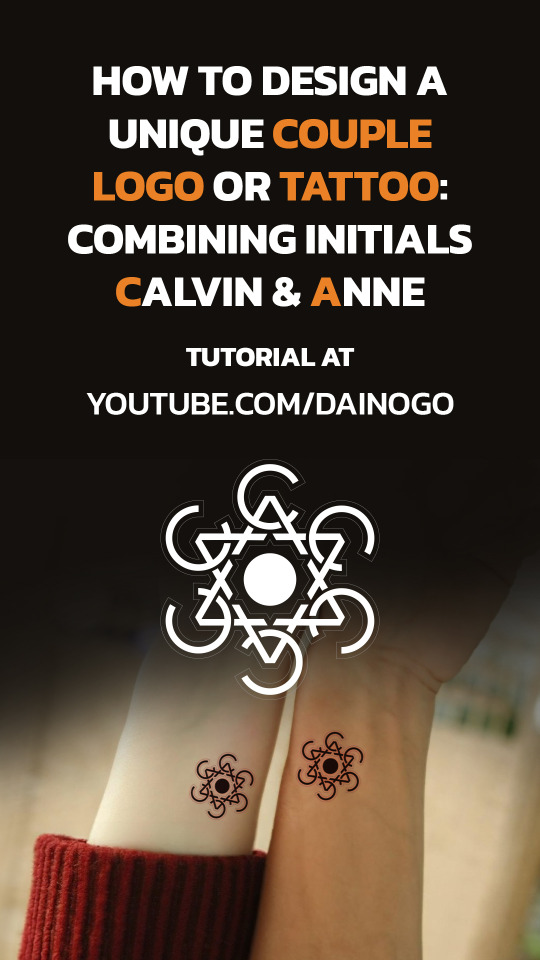
I have just upload video How to design a Unique Couples Logo or Tattoo: Combining Initials C & A
I hope it proves helpful to you. If you like it, please give me a thumbs up. Thank you!
#logo inspiration#logo#logo design#logotype#graphic design#design#logo designer#creative logo#couple logo#couple tattoos#lovers logo#lovers tattoo#logos#graphic designer#business logo#brand#brand identity#how to design a logo#logo tutorial#illustrator tutorial#dainogo
35 notes
·
View notes
Text

Great design for beauty skin care logo and product label design
We make sure that the artwork we give to you is up-to the mark and attractive as well to generate more sales because More glamorous the product, More sales it comes up with Our motive is to work on high quality standards, and to fulfill the need of customer at any cost or based on the commitment.
logo design, product label design, label design, packaging design, product design, how to design labels for a product, brand design, designing a label for a product, how to label skin care products, product label design in canva, how to make labels for products, label design for product launch, bts product label design, logo design process, how to make labels for skincare products, label design tutorial, beauty product logo, cosmetic product label design
#logo design#product label design#label design#packaging design#product design#how to design labels for a product#brand design#designing a label for a product#how to label skin care products#product label design in canva#bts product label design#logo design process#label design tutorial#beauty product logo#cosmetic product label design#skincarelogo#logo#logodesigner#branding#graphicdesign#logomaker#graphicdesigner#logoinspirations#logoinspiration#logodesign#beautylogo#logotype#skincare#logos#design
2 notes
·
View notes
Text
Watch only if your name start with Letter B - Logo Tutorial
Hey there, logo lovers whose names start with B! 👋 "Design Logos Like a Pro With This One Weird Trick" - sounds cool, right? Well, if your name begins with B, you're in for a treat! I've got a super simple trick that'll have you whipping up awesome logos faster than you can say "Branding"! 🚀
It's so easy, you'll wonder why you didn't think of it before. Ready to level up your design game? Let's dive in and make some Beautiful logo magic happen! ✨🎨
Trust me, your clients will be blown away by your newfound skills!
logodesigner #logodesign #graphicdesign #letterblogodesign #letterblogo #logodesigners #logodesignersclub #logodesigning #logodesignlove #logodesignservices #logodesignershub #logodesignerclub #logodesignlovers #logodesignprocess #logodesigninspiration #logodesignerforhire #logodesigncompany #logodesignph #logodesignservice
letter B logo,logo design,logo tutorial,personalized logo design,branding,graphic design,unique logos,logo inspiration,design tips,typography logo,Adobe Illustrator,professional logo,custom logo design,initial logo design,creative letter logos,how to design a letter B logo,logo design for beginners,personalized branding,unique logo ideas,letter logo tutorial, branding with logo design,unique logo design ideas,how to design a letter logo,creating a logo in Adobe Illustrator,logo design for small businesses, how to make a logo with your initials, b letter logo design illustrator, how to make alphabet logo in illustrator, how to design a logo with letters, how to create alphabet logo in illustrator
#quicklogotutorial#logodesigns#logotype#logo#graphic design#creative logo#brand identity#logo design#tutorial#logodesigner#brandingmadeeasy#branding#personal brand#business#sales#corporatelogodesign#logomockup#mockup#minimalist#graphic art#design#creative#graphicdesigntricks#graphicdesigntips
2 notes
·
View notes
Video
youtube
How To Design A Real Estate Logo | Adobe Illustrator | House logo
#youtube#logo#logo design#logotype#creative logo#business logo#realestate#reality#corporate#tutorial#logos
1 note
·
View note
Text
youtube
In questo video voglio mostrarti come creare tratti dinamici con Adobe Illustrator simulando efficacemente un effetto di illusione ottica molto performante. Ideale per generare Pattern originali :) Ecco altre GUIDE UTILI per te: ✍️8 Trucchi da Professionisti per Adobe Illustrator✍️ https://youtu.be/DHa-Dy7Eo7I ✍️Come disegnare uno SFONDO ondulato con Adobe Illustrator✍️ https://youtu.be/eYrGmaaeJIE ✍️Come personalizzare un testo in modo FANTASTICO con Adobe Illustrator✍️ https://youtu.be/59EDP0AvMww ✍️ 4 segreti da sapere sullo Strumento Testo di Illustrator✍️ https://youtu.be/7SkDMJTkAkY ✍️Come ripetere FACILMENTE le forme in modo radiale con Illustrator✍️ https://youtu.be/tr5qpONQRXQ ✍️Come aggiungere una TEXTURE con Adobe Illustrator✍️ https://youtu.be/lTu1CqRnyRY
#graphicdesign#graficapubblicitaria#graphic design#artwork#lettering#logotype#tutorial#adobe illustrator#Youtube
0 notes
Text
Blog Post Week 10
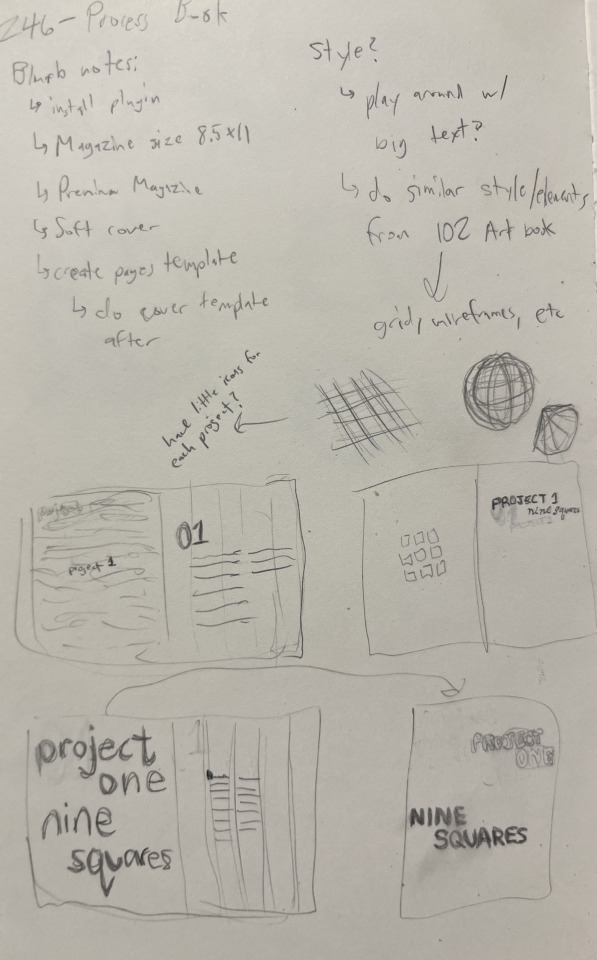
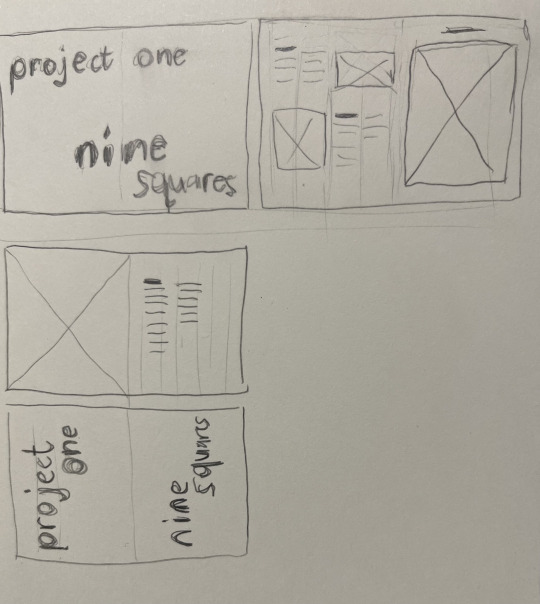

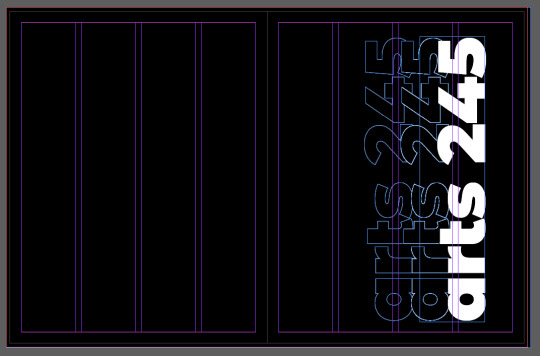
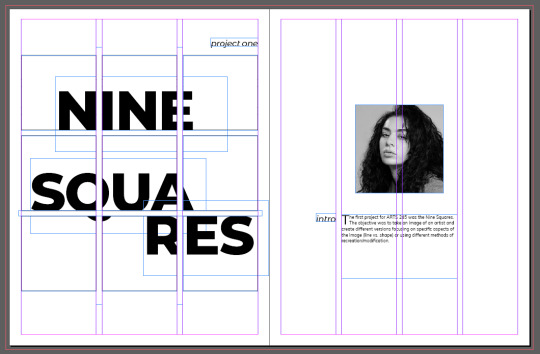
Top: sketches
Bottom: some spreads... maybe the whole thing could be white on black?
Continuing with the process book, I'm thinking of having a connecting theme with the title pages of each project with big, dramatic type. I think this ties in with my work this semester since both posters played with having large type, especially the Soda City poster since the logotype was large enough to be cropped off the edge. I also found a bit of annoyance; while luckily we already have existing text for the process book with our blog posts, my first few posts from ARTS 245 were worded odd—I wanted to specify which parts of my blogs were from reading and from actual process but I merged them sometimes so that plan is out the window. I'm also still playing around with the amount of columns I want to use, I'm currently using 4 but it doesn't always feel the best.
For the table of contents, I remember in the past seeing a quick hack on how to have an automatic line of ellipses without having to type each one out and manually space so the right side lined up. I wanted to do an effect like this, so I searched and used this tutorial. I think small tricks like these are super helpful because they help show those who are not as experienced with programs like Adobe just how deep their details are and what you can modify/customize.
0 notes
Text
Alzheimer Nederland Identity
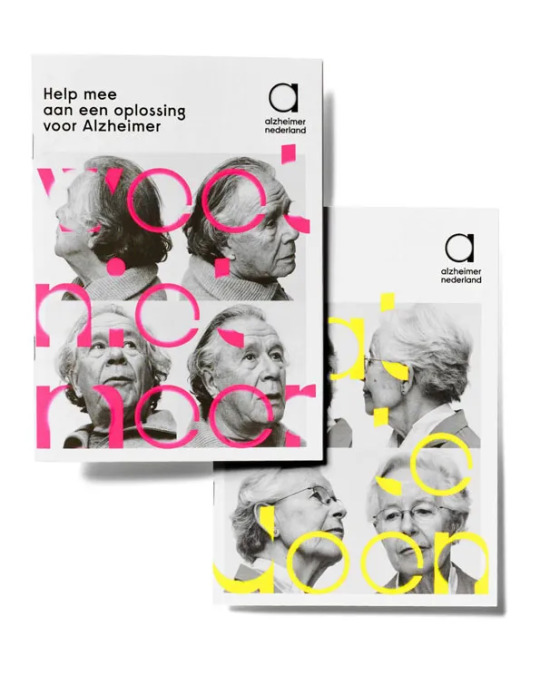
'The studio created a striking logotype that represents the physical manifestations of Alzheimer’s on the brain'
'Paired with bright colours and clear type that renders the organisation instantly more approachable.'
I was recommended to look at this rebrand project in my tutorial, I have looked at it previously but I think it really links to my idea of showing human like qualities in type. The type itself visually represents the effects of Alzheimer's featuring the vanishing points. I think this works particularly well in the first 'a' as the vanishing is contained in the counter so legibility is still kept but it is still a striking visual.
0 notes
Text
Blog for ch 3: Legibility

This is probably my favorite chapter I’ve read in our book so far, just because as I was reading there were so many times where I thought to myself “wow that makes so much sense with what we’re working on right now” or “that’s so useful, no wonder it looks better that way.” I first thought this on pg. 52 when it explains shape, and how the word structure can change that. I think this is part of why I prefer capitals, because it can form a rectangle which is easier to work with. We are working with weight currently in our project so it was helpful for me to read pg. 55 as well, and even 56 because I’m thinking about making my font a color for my poster. My biggest takeaway might be from pg. 67 where space and text placement is discussed. It’s a lot like the presentation prof. Wanco gave last week about text and how it can be too close to the edge, etc.
Right now in class we’re making progress on our third project, which involves branding and designing for a music festival. I have a lot I still want to do on mine, but yesterday I spent some time updating my mood board and continuing the design for my poster and logotype. I’m spending the post time on the last two now and I chose a font I think is great, I just have to manipulate the text a bit to get it how I want. This weekend I plan on working on that as well as watching some tutorials and the demo provided on Thursday so I can try some new things regarding shape and color with my projects.
0 notes
Text
(ARTS246) Ch. 3: Legibility & Project #1 Poster Design Variations 1 and 2

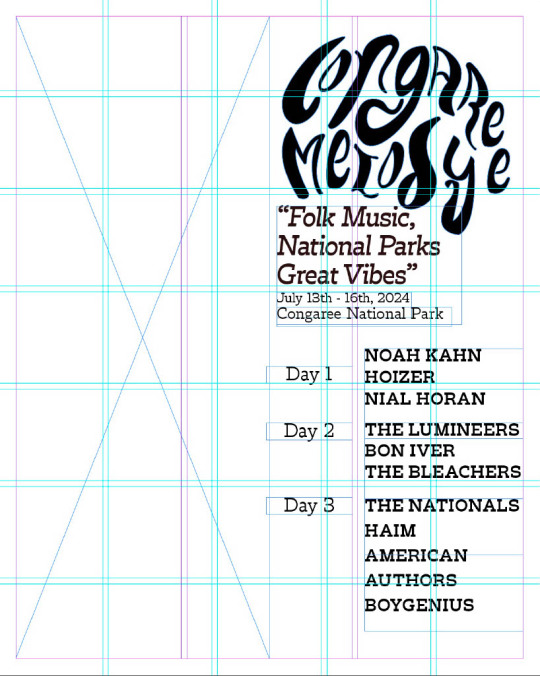


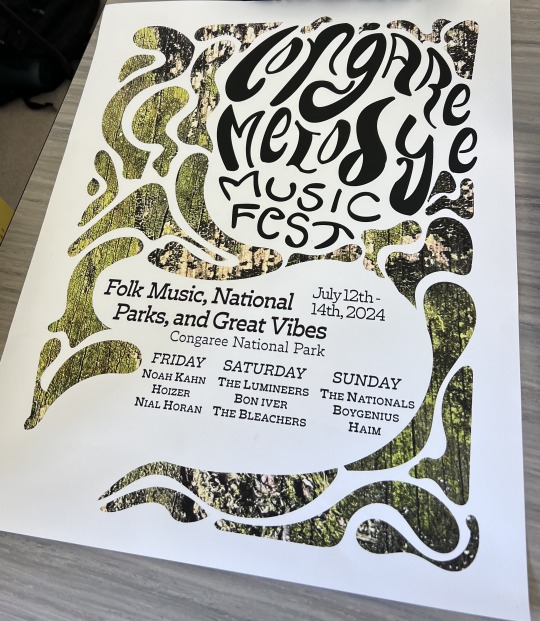
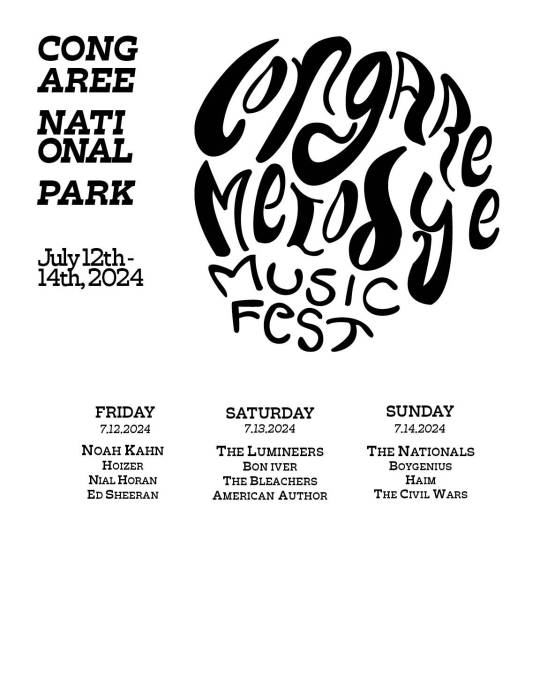

I spent most of this week working on the poster component of the music festival design system. My task was to take at least 10 abstract images with my phone camera and create a primary abstract component that would complement the logotype and typeface. Last week, I worked on the logo and chose Trilby as my primary typeface. I used its font family to play around with the visual hierarchy of the information. The poster needs to be 16x20 and include the logotype as the primary visual element, the festival's location (Congaree National Park) as the secondary visual element, and the headliners, follow-up acts, and dates/days of the week as the third visual element. My goal is to create a layout that not only complements the logotype but also makes the information legible and easy to read from either a distance or up close. I plan to create three variations of posters that capture the essence and vibe of the music festival and serve as a fun work of art that would draw people's attention to the visual elements. As Professor Valdes says, "You know you have made a good poster once it's been stolen." While I don't necessarily want my posters to be stolen, I would consider it a compliment if that were the case!
I'm having trouble with the grid system when it comes to designing the layout of the poster. Usually, I work on projects that have a pre-built grid system. However, this project has challenged me to create my own grid that not only looks good but also helps organize the content on the poster. Although I learned how to turn on the grid function in inDesign by watching tutorials from my professor, I still find it difficult to work with grids. I need to practice more to become more familiar with the system. It's important to keep in mind that grids are helpful tools that aid in creating a well-organized poster design.
During Monday's class, I received some advice on the layout of my project from my classmates via Basecamp. They were in favor of the hand lettering of my logo but found the typeface difficult to read due to the contrast with the textured background image. The spacing was also a little off, which was due to my struggle with the grid. On Wednesday, we had an in-class discussion in which most of my classmates favored my second draft of the poster. I decided to make the background elements look swampier by using the pen tool to create cutouts around my logo. This design choice was well received, and my professor encouraged me to explore incorporating more color into my logo and text. For my second poster variation, I decided to use a wooden texture and incorporate the same technique with narrower shapes. However, I am worried that the wooden texture might make the poster too distracting from the primary and secondary visual elements. I started playing around with color in my logo but I am planning to continue experimenting with darker colors since it appears to blend too much into the abstract background. Unfortunately, this poster variation also has a legibility issue since the text appears too condensed. To solve this, I need to incorporate more room around the text and make the shapes more fluid and spread out. Making my borders a quarter of an inch would also help in making my poster appear more full and fluid.
When it comes to legibility, the reading material assigned for this week's textbook couldn't have come at a better time. The chapter discussed the principles of type size, line, and interline spacing, as well as legibility and color. Initially, when I started working on my project, I encountered legibility issues with my logotype. My main concern was the readability of the logo from a distance. I realized that the spacing between my letters was too close together, and my professor suggested that I find a balance between filling in the empty spaces in the logo and providing enough space to make it legible. I traced over the image of the logo in Illustrator and experimented with the spacing, which made it easier to understand my professor's feedback and the basic principles highlighted in this week's chapter. I am still revising my logo, but by next week, I should have a final design that is fun, legible, and reflective of the vibe of my music festival. If I encounter any difficulties or require a refresher on how to make my design element legible and easy to understand, I will refer back to this chapter.
0 notes
Text
Look at the first design, and you immediately think: "Oh, it's simple, I know how to design it too."
And do you know what? 95% of people who think it's simple couldn't do it, or at least they did it wrong.
I just uploaded a tutorial video on Illustrator tips will blow your mind and change the way you design. I hope it proves helpful to you. If you like it, please give me a thumbs up. Thank you!
Video:👉 These Illustrator Tips will Blow Your Mind (Part 1)
#logo#logo design#logotype#logo inspiration#graphic design#logo designer#design#illustrator tips#illustrator tutorial#illustrator tips and tricks#adobe illustrator#design tips#illustrator for beginner#advanced illustrator tutorial#dainogo#tutorial#logo tutorial
29 notes
·
View notes
Text
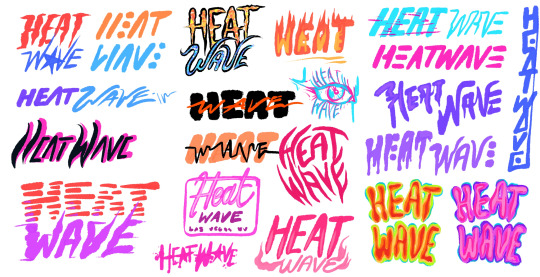
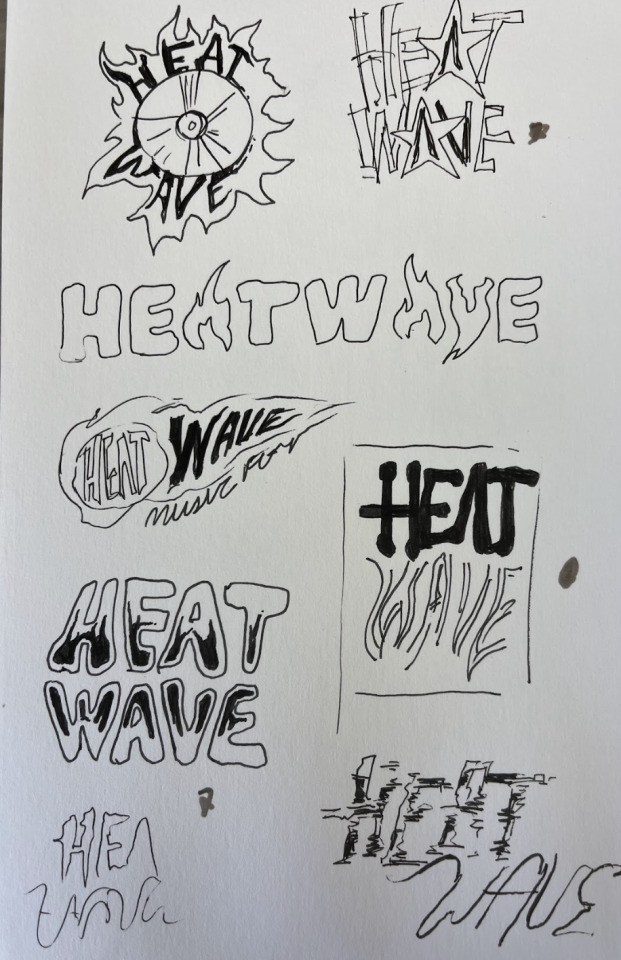
Week 3: Chapter 2 + Logotype - 1/26/24
It was interesting to read about the technical terms for the anatomy of type in Chapter 2. I learned a lot of these names and concepts in Typographic Design I, but that was my first brush with a lot of these technical words. I have a hard time remembering a lot of the specific words for parts of type, so it was good to refresh my memory and learn some new things as well. I found it neat to read about the impact of writing and writing tools on typographic anatomy; I also thought it was cool that the ampersand came from French et as a ligature, because I’ve never realized that or thought about it. I have also wondered about the difference between book and normal in a typeface, but it makes sense that they refer to the same font, just differently named.
I really enjoyed working on the logotype sketches for this week. It was a bit hard to come up with a lot of variations on the ideas, but I found that once I got working it became easier to get in a groove and explore a lot of unique concepts. I worked with a lot of ideas; I wanted to play with the word “heat,” so many of my designs were inspired by fire or melting. It was cool getting to apply the kind of stuff we watched in video tutorials last week, such as how to make certain letters unique, or how to create unity and flow in the overall designs of the logotype. Keeping all those techniques in mind through the design process was a big help, and I'm looking forward to narrowing down my designs for the final logo.


0 notes
Text
Can you guess how I created this eye-catching 3D 'E' logo
Unlock the secrets of creating a captivating Letter E logo that demands attention! In this video, brand identity expert kreatkro shares his 10 years of professional experience to guide you through the process of designing a unique and memorable 3D Letter E logo. Discover innovative techniques to transform this simple letter into a powerful brand symbol that sets you apart from the competition.
Whether you're a budding designer or a business owner looking to refresh your brand, this tutorial will equip you with the tools to craft a Letter E logo that truly stands out. Don't miss out on these game-changing tips – watch now and elevate your logo design skills!
FOLLOW Me ON
www.instagram.com/kreatkro
www.tiktok.com/kreatkro
www.fb.com/kreatkro
www.dribbble.com/kreatkro
www.behance.net/kreatkro
Don't Forget to SUBSCRIBE
#quicklogotutorial#branding#graphic design#graphicdesigntips#graphicdesigntricks#kreatkro#tutorial#brandingmadeeasy#logodesign#logo design#logo#logotype#creative logo#logomaker#graphicdesign#graphicdesigner#creativedesign
1 note
·
View note
Text
WEEK 7: 1-1 TUTORIALS
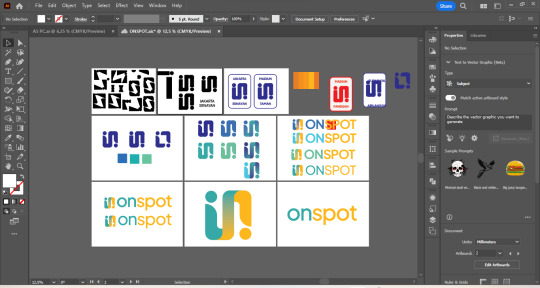
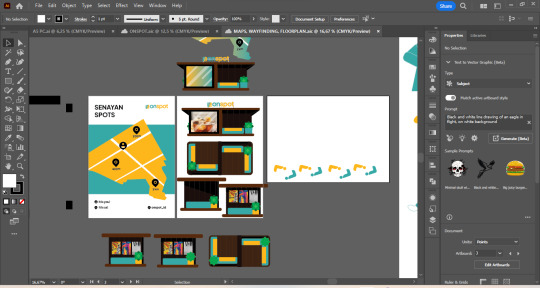
Some sketches I had done for ONSPOT, my 15-Minute City.
First Logo

Chose the color blue because it is a relaxing color. Picked the shape because it symbolizes people and and connection that is also a vision for ONSPOT.
Fixed Logo after 1-1 and Studio Day:

Picked contrasting color that is less 'corporate' and rounded the corners to make it softer and dynamic. Added a logotype so it will be more memorable for the people and more clear as brand identity proposition. The font that I used is Plus Jakarta Sans. An iconic font for the greatest city branding that ever happened in Indonesia.
0 notes
Text
Designers giving out their price options by
.
💥Congratulations @borguinho1 😯!
You are the #ewanderfuldesign creative artist of the day!
•
•
•
•
𝐅𝐎𝐋𝐋𝐎𝗪 US⤵️😉
@emmy_wander to get daily inspiration and tutorials.
🔖Tag us via #emmywander in your creative design.
🔔Turn on Post Notifications, so you don't miss our daily updates
.
.
.
.
.
.
.
.
.
.
.
.
.
.
.
.
.
.
.
.
.
.
(DM for credit or removal/ No copyright intended/ All rights are reserved & belongs to their respective owners)
.
.
.
.
.
.
.
.
.
.
.
.
.
.
#logo #logos #icon #logotype #monogram #logodesigner #awesome #logoinspire #brand #brandidentity #lattering #graphicdesign #vectorart #logoinspirations #logonew #brandmark #lattering #apparelbrand #logoplace #clothingbrand #brandmark #instalogo5f
#logo#logos#logo design#graphic designer#branding#brandidentity#adobe illustrator#photoshop#adobe#digital art#behance
0 notes