#mcl tutorial
Explore tagged Tumblr posts
Visit Tumblr Blog
Explore Tumblr blogs with no restrictions, modern design and the best experience.
Last Seen Tumblr Blogs


Fun Fact
Tumblr Inc. is using 66 technologies for its website.
Note
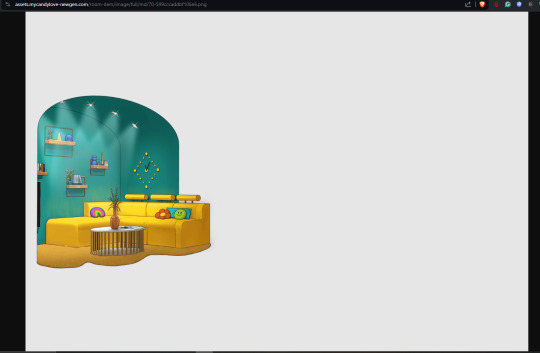
hii could you make a tutorial on how to get the furniture from the new gen room?
Hi,
Sure.
First, go to 'personalize your wardrobe' and go to where you can customize your room.
Press F12 or right-click inspect element and then either go to 'sources' or 'network'.
For sources:
You look for assets.mycandylove-newgen.com (depending on what server you are on, it can change, important is the 'assets' part) and then look for room-item. Here is what you need. What's important is to check the categories of items from the room (the numbers from 1 to 4 and that background).
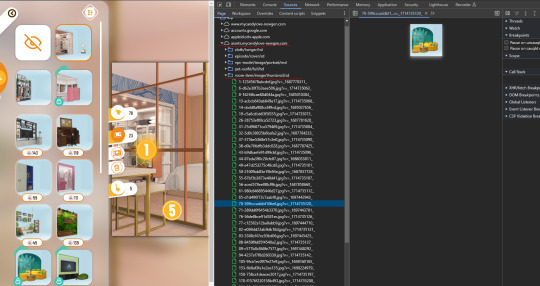
After that, you right-click on the image and open it in a new window. Here you have to make some changes to the URL:

So you change 'thumbnail' with 'full', 'sd' with 'md' and immediately after that there are some numbers and there's also this line '-'. You add another one and between these two you add either 'day' or 'night'.
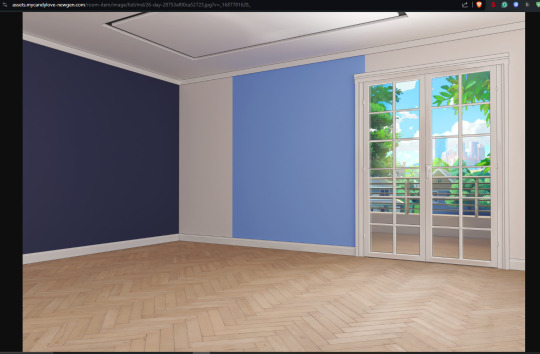
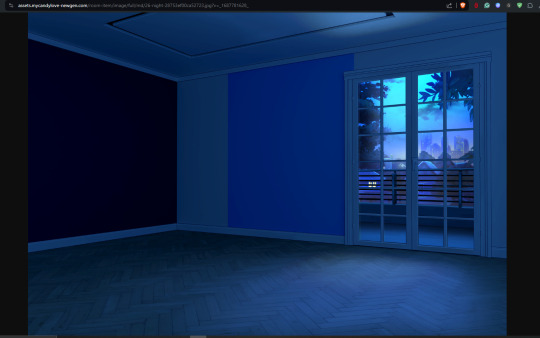
You will think "Oh, that's easy"... I guess, because this day-and-night mode only works like this for backgrounds. For items, we have some other stuff.
For items we change 'thumbnail' with 'full' and 'sd' with 'md' but also add or not another '-' and between those 2 add 'light', 'shadow', 'ambient' ('light' will not work for every item) and also change the very last thing, to be exact we change '.jpg' with '.png'.

And that's it.
For network:
Here is almost the same but you have a bunch of things gathered together. Like last time, you have to go through the categories so the site registers them to show up. Now, if you have the items unlocked already, it's easily, you just double-click on them and it will open in a new window already prepared:

You will also see 'light', 'ambient', and 'shadow' which are on display for the room you have currently saved or items unlocked.
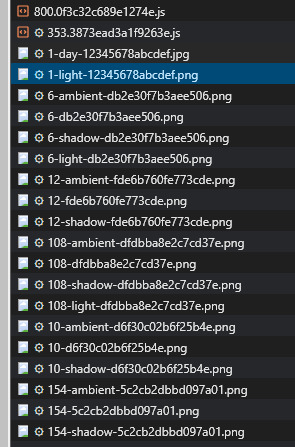
You will find the rest of the items if you scroll a bit and check them on your right side. From here you open them in a new tab and change stuff in the URL.
And I guess that's all.
I hope this helps!
28 notes
·
View notes
Note
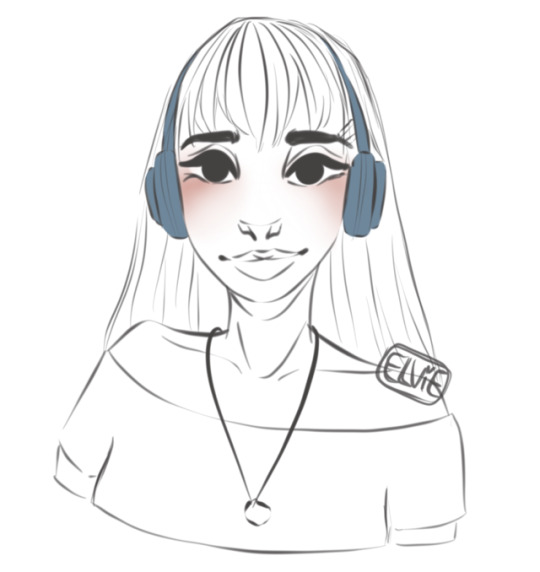
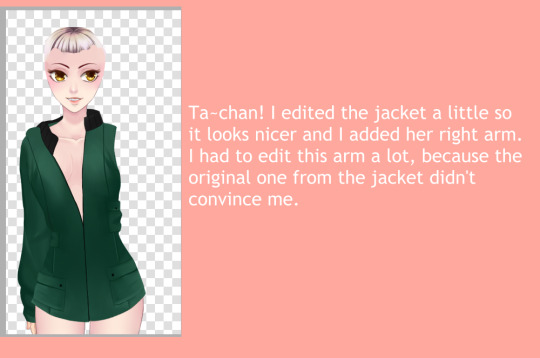
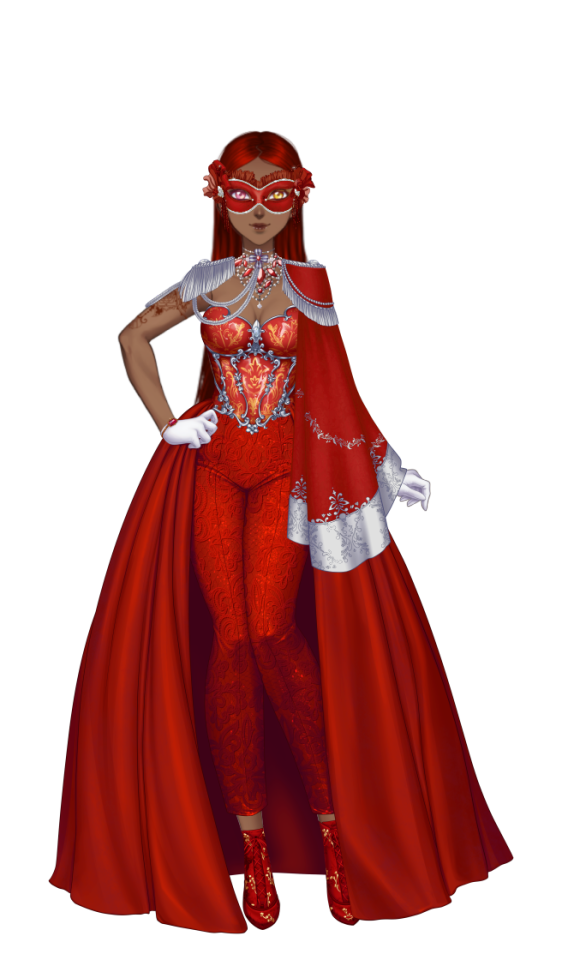
adding to my previous ask, Olivia's sweater in EP4 is simply astounding. teach me your ways plsss
(tipo mana nmrl tu é incrível e talentosa p krl)
Oh, hello again!
This is the first time I’m doing a character editing tutorial, so I apologize if it’s confusing. But I’ll do my best!
To start, two considerations: I do my edits on my phone, using IbisPaint. And second, as I mentioned in your previous question, I first establish the character’s details, that is, appearance and mental state, because that provides the basis I need to create the expressions in the image.
In Olivia’s case, her entire character foundation follows the parameters of a sweet person. I established from the beginning that she could be a refreshing and empathetic person who only wears pastel and cute tones, comfortable clothes. There’s a bit more about her in this old post I made before the game was released, if you’re interested.
In any case, with the clothes and mental state of the character in the scene established, I start the editing.
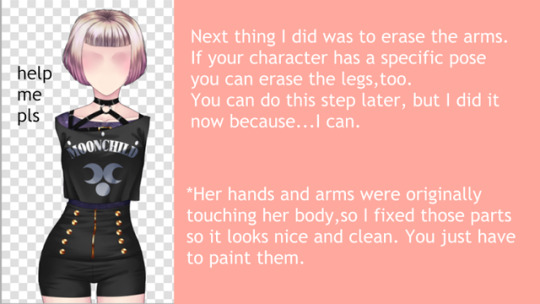
I like to start by adding the pieces of clothing over the image, shaping them to the character’s body using the "move" function. To help, I adjust the transparency of the piece.


With that done, I erase parts of the piece where it conflicts with other elements in the image, like the bench the grandpa is sitting on or Roy’s hand around the character’s waist.


The same goes for this famous sweater. It's easier for me to add clothing pieces from the game instead of drawing them from scratch, but it inevitably requires some minimal painting and composition skills to blend things well together. Otherwise, it might end up looking disproportionate on the character's body. The sweater template, however, only has a front view, so I had to adapt it for the back, not only by moving it with the "Forma de Rede" function but also by painting over some parts, like the chest area, to make it straighter.


Finishing that part, I start adjusting the sleeves. Basically, I cut them from the bust area and begin positioning them over the arms.

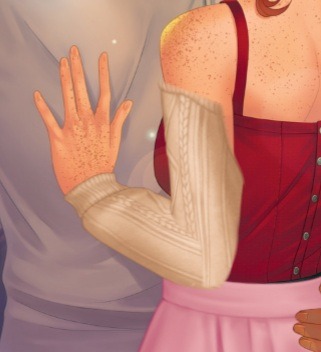
Next, on a different layer and below the layers with the clothes, I start painting her skin to cover the original parts of the image that interfere with the design. The brush I like to use in these cases is the "Aerógrafo (trapezoide 60%)," as I find it smoother. It has a somewhat blurred and smudged effect that helps create a decent gradient on the skin.
(I’ll owe you the images because, unfortunately, Tumblr has a limit of 10 images per post...)
Well… That's it, I hope I helped! If something is not clear, you can continue asking, I will do my best to answer.
(De verdade, fico muito feliz com seus elogios. Estou quase explodindo de tão sem jeito que fiquei. OBRIGADA MESMO.)
5 notes
·
View notes
Note
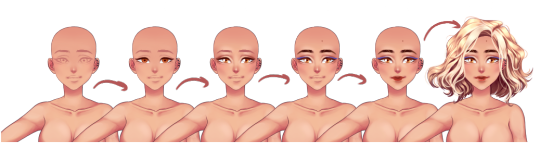
hello! I would like to know how you do the sprites of your characters, I mean, how do you put the eyes, the hair or the clothes upon the body? I´m still new in this place... I would be very happy if you told me how you do...
its a little complicated to explain,but i will try:
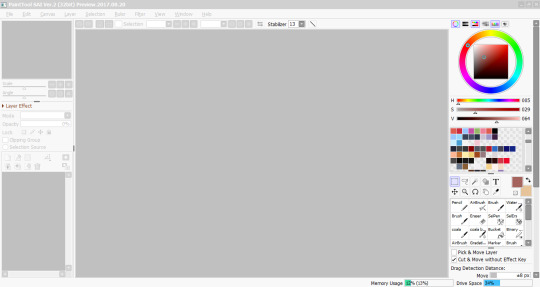
the first thing that you need to know is that i use Paint Tool Sai 2 to make my edits.
it is very easy to download,but you can also use the Photoshop to do the edits if you used to this one.
now that you have an tool to edit,you need download the sprites.
there is some ways to download, but i will give you two:
1- the first one,is to download direct from the site of My Candy Love or from that one: https://customsucrette.glitch.me/
you will find everything there,base,eyes.hair,clothes etc.
you will find everything there,base,eyes.hair,clothes etc.
for download the sprites is easy,you can find how to do that on this tutorial made by @/ bubbleroshelle: https://bubbleroshelle.tumblr.com/post/189903257567/for-those-of-you-who-dont-know-how-to-download
2- the second one is the one that i normally use to edit,because is the easier.
when i start to make the edits,i normally downloaded packs made by people on Deviantart,but they stop to make packs a long time ago. still,you can find some very interesting packs there.
now,i normally download packs of this group on VK (mybe you will need to make a account to entry the group): https://vk.com/album-48409005_194133594?rev=1
here,you can find the clothes of the event,eps,etc: https://vk.com/wall-48409005?q=%23%D0%B1%D1%83%D1%82%D0%B8%D0%BA
there are to type of sprite to download. i use the /normal/, but i recommend to use the /normal_MD/ because is more detailed.
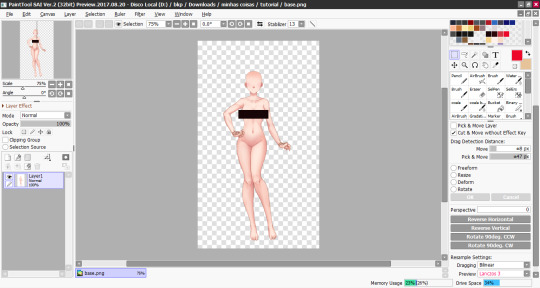
now that you have the bases,eyes,hair,everything. let's combine all together!
(i will use the paint tool sai to continue the tutorial of now on.)
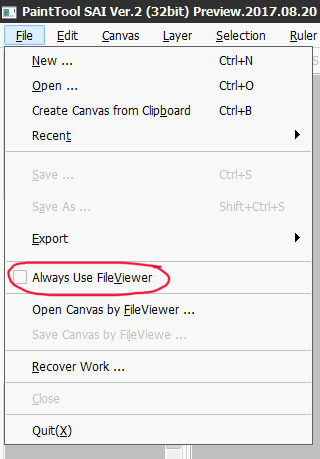
open the paint to sai and click and file:
and disable this box:
now you go to click in this option:
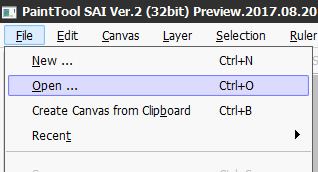
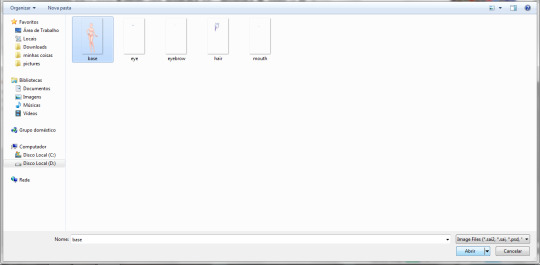
it going open on the gallery of the computer,click on the past that you left the sprites and click on the sprite that you will use:
now that is open,you will do the same with the thing that you want to put in the base:
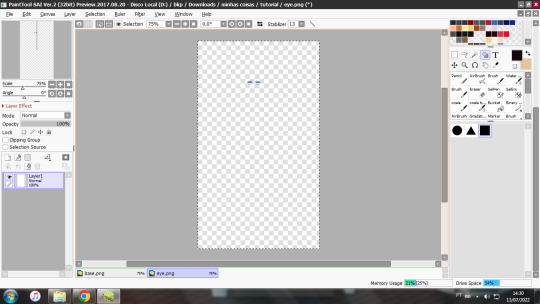
you wil press the Crtl+A and Crtl+C.
after that,you can close the sprite since you will not use it again on x and go back to the base:
pressing the Ctrl+V the sprite will appear like a second layer:
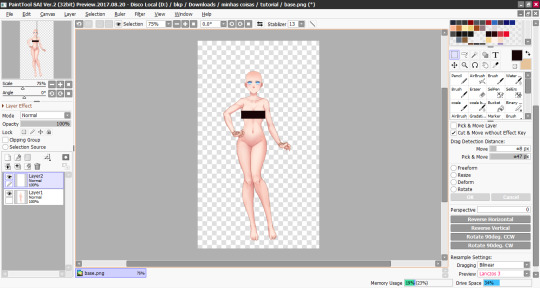
you will keeping doing it until you put it all together:
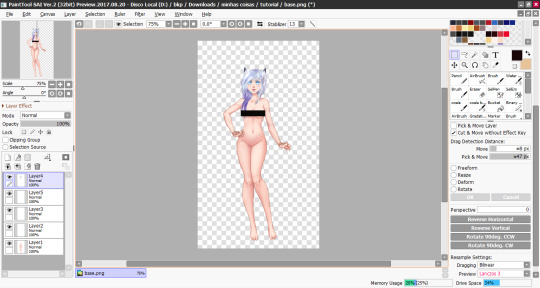
now from the clothes. you will go on the paste the you let they and do the same thing that you did with the eye,eyebrow,mouth and hair:
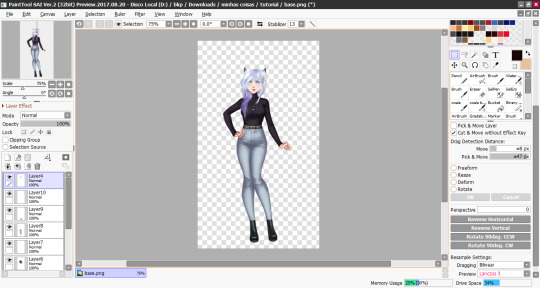
and now your candy is ready!
i hope this help you 💗
4 notes
·
View notes
Note
Lizzzzzzz! i need a little tutorial on editing the illustrations! i wanted to edit the Rayan one from ep 2 buuut i'm so lost sadly-
I’m not satisfied with the result, I’m not that good :c but I did my best and I hope this helps you ♥
youtube

#mcl#my candy love#mclul#mcl campus life#cdm#corazon de melon#cdm universidad#amour sucre#amour sucre campus life#amor doce#mcl edit#edit#mcl tutorial#alizee#my oc#mcl alizee#mcl Rayan#Rayan cdm
133 notes
·
View notes
Note
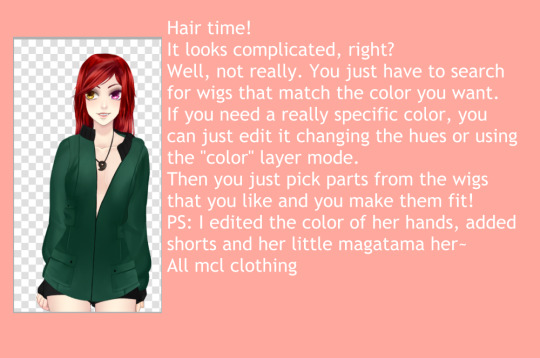
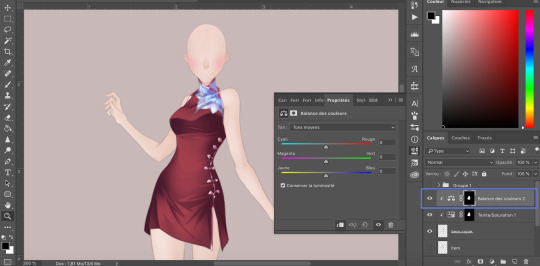
How do you change the color of clothes?
Hi anon ! For changing colors I use the settings Hue/saturation and Color balance on photoshop, using a layer mask because I love it and I'm more comfortable with this technique. If you don't know what the hell is a layer mask check my tutorial : here
Let's go for a tiny tutorial *sorry for any english mistakes !! I'll show you how I do it ٩(๑`^´๑)۶
Part 1
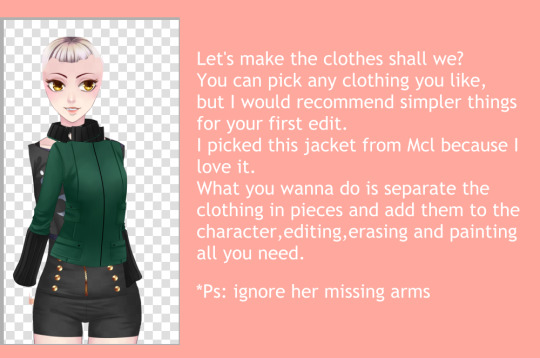
1- First import your item, I always duplicate my item layer because I love keeping my source material, just in case ...
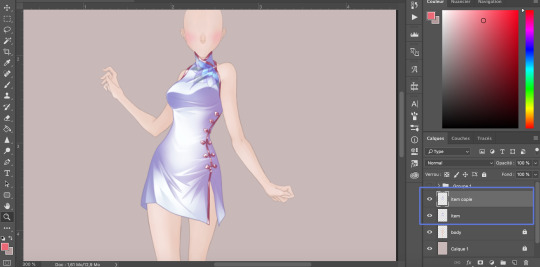
2- Then select the part of the item you want to change. For that I used Lasso tool but you can do as you prefer :

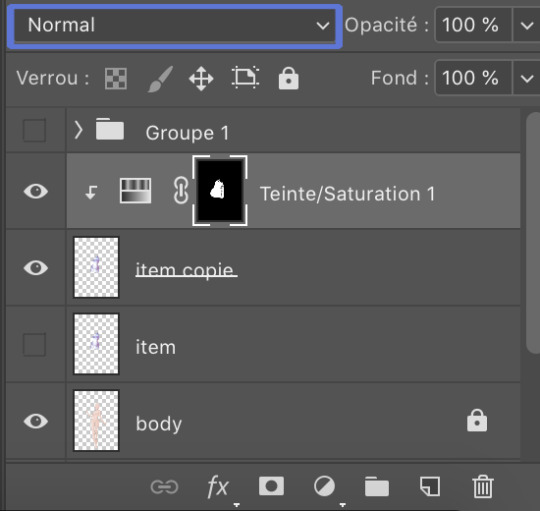
3 - When it's selected, create a fill layer/adjustment layer. Depending of what you want you can choose Hue/saturation or Color balance. Here I started with Hue/saturation :

4 - When you create your fill/adjustment layer it create a new layer on top of your item layer. Clip this new layer on your item layer, like that you are sure that all of your modifications will be on this layer and not on all of them. Here as you can see the colors are only changing on my item layer and not on the body as well. If you don't know how to clip a layer, then again check my tuto. When it's done you can focus on the Hue/saturation window, select "Colorize" and adjust the color as you wish :

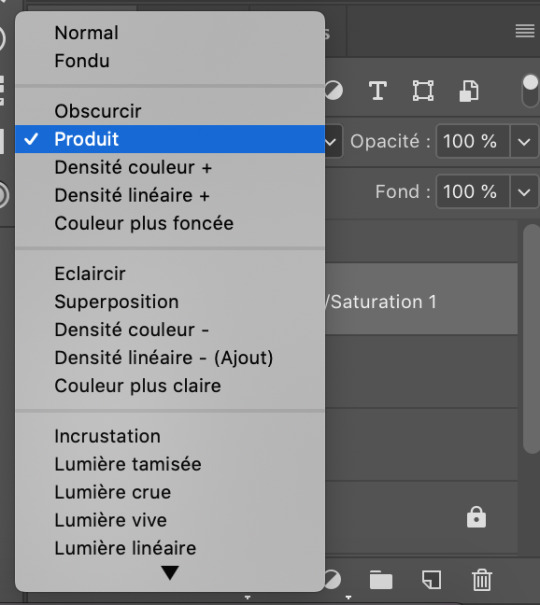
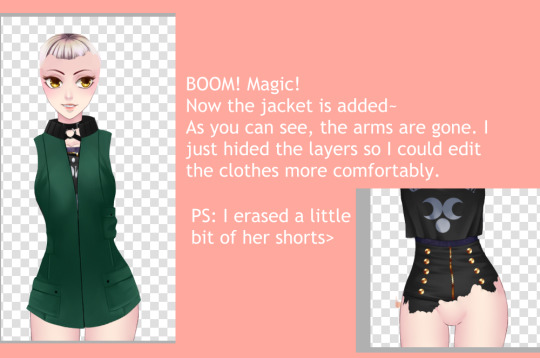
5 - When you find the color you like, you can change your fill/adjustment layer mode for more fun. Here I picked multiply, but try them all !
- As you can see it can change your color a lot !

6 -Now it's time to clean it a bit and delete the part you don't want to change. Select your Layer mask (the black thumbnail of your Hue/saturation layer) and with your brush tool delete the part you don't want to color. For that be careful that your first color is black !

Yeah we did it ! But it's not finished yet ...
7 - Let's go further and change the colors again but this time with the setting Color balance. Before creating a new fill/adjustment layer let's selected only the part we want to change. You worked hard to clean your item and you don't want to do it again ! For that press Ctrl and click on your layer mask (the black thumbnail of your Hue/saturation layer). It will select the same part of the item
Part 2 : here
29 notes
·
View notes
Photo
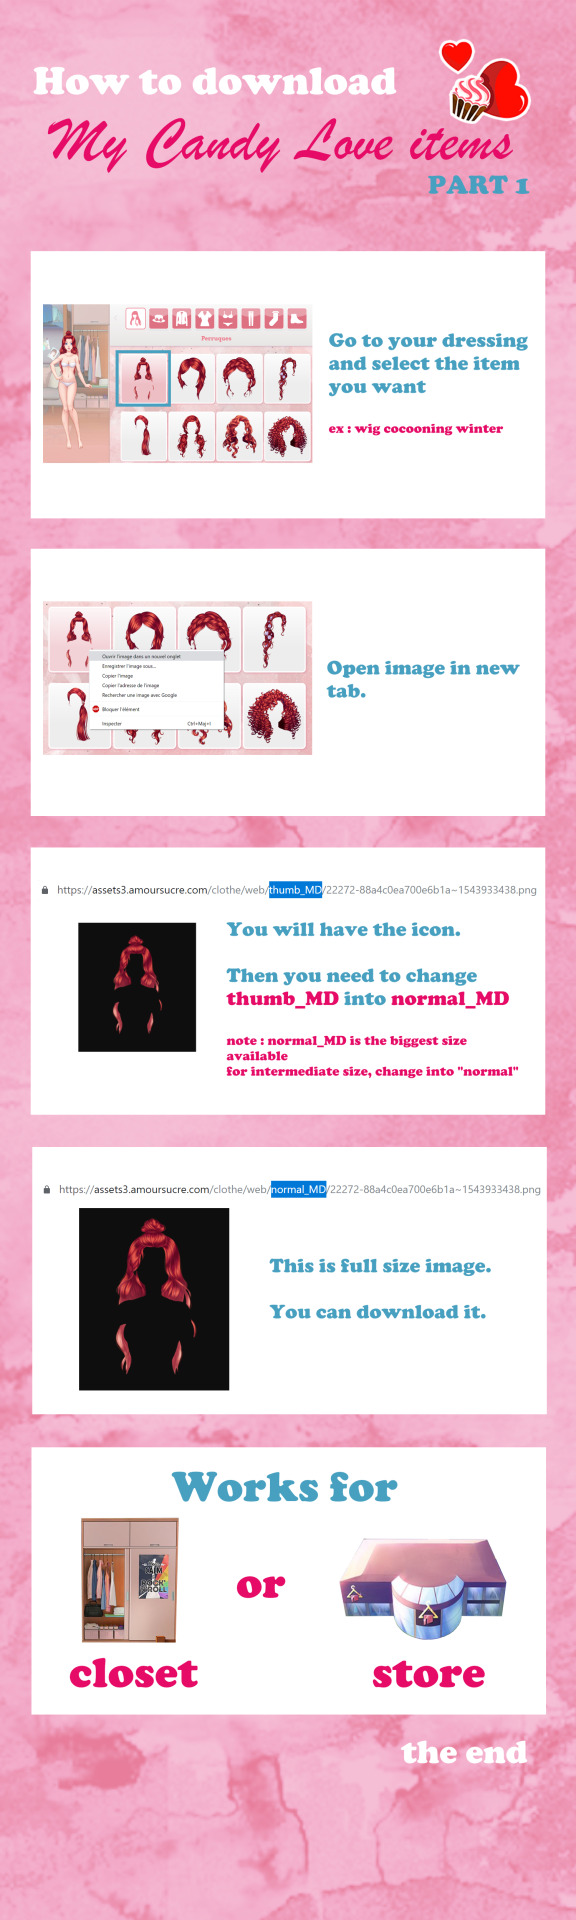
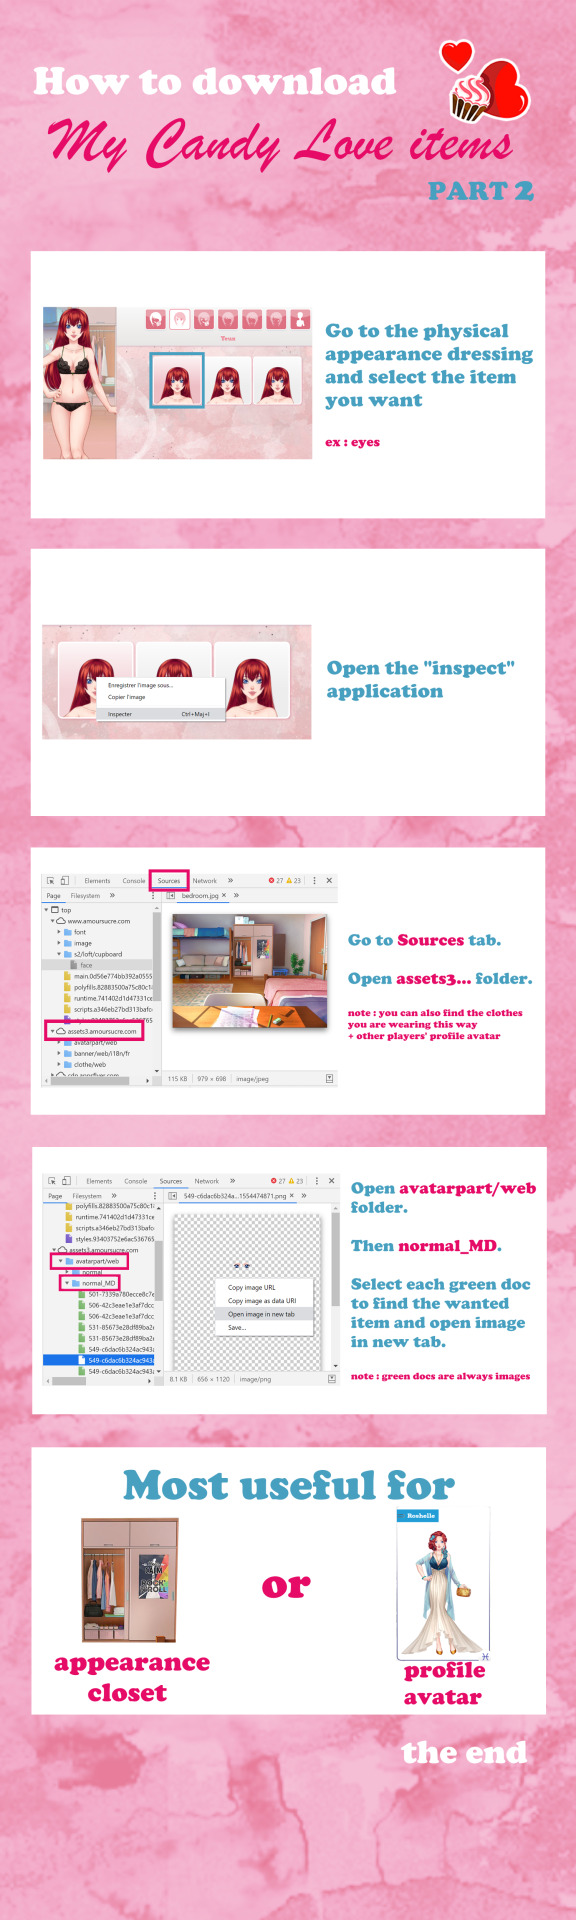
For those of you who don’t know how to download MCL items
139 notes
·
View notes
Text


Soooo I know this took me very long and then I got a bad conscience because of this and so I decided to draw more winners and then I was so motivated that I drew something small for everyone who joined.
@vanillaamoursucrethings @colombia-chan @eldaryavalkyrie @404-babe-not-found @debgall @guardofdecay @nonshishi @the-doctors-hogwarts-companion @minty-bear @giihp-art
Thank you all for your interest and especially for all your kind words. For 2019 I try to post more, work on anatomy and backgrounds and to finish more stuff I begin.
Anyway happy new year everyone!!c:
#my art#digital drawing#sweet amoris#mcl ul#mcl fandom#procreate#ipad pro#ocs#illustration#digital art#drawing#sketches#doodles#also thinking about doing a tutorial next year#really hope you like the drawings
59 notes
·
View notes
Photo


MCL Sprite edit tutorial!
FINALLY! GOD DAMN IT!
I know what you’re thinking. “Wtf, you said you were going to make this a million years ago!”
Well, yeah, I know... It’s not that I forgot... It’s just that I’m a lazy bitch. Sorry, I love y’all <3
At least I did it, right?
If you have some questions you can just ask me~! I’ll try to answer them!
#cdm#cdmu#mcl#mclu#my candy#sucrette#mcl edit#amor doce#ad#docete#candy#sucrette edit#edit sucrette#amour sucre#amour sucre edit#edit tutorial#my candy love#my candy love edit#corazon de melon#corazon de melon edit#amor doce edit
95 notes
·
View notes
Note
Could you please show us how you make the Candy’s face like eyes, eyebrows and lips? ;-;

If you got any questions, just let me know anon! I hope it helps
#mycandylove#amordoce#amoursucre#sweetamoris#dolceflirt#corazondemelon#slodkiflirt#csabitasboljeles#mcl#cdm#edit#candy#sucrette#docete#mcl ul#my candy love university life#tutorial
257 notes
·
View notes
Text

Salve Dolcette e PAssanti!
Fra qualche settimana inizia la scuola e le vacanze saranno finite 😭😭per fortuna che Dolce ci fa compagnia tutto l'anno!
Kehleyr sta provando la sua nuova tenuta per il liceo, come vi sembra?
Voi che scuola fate ?
Cosa vi mancherá dell'estate?
#beemoov#mcl#kehleyr#dolceflirt#amour sucre#chinomiko#gameplay#my candy love#yt#mycandylove#otome#tutorial#corazon de melon#amoursucre#cdm#outfit#outfits#otomegame#amor doce
10 notes
·
View notes
Video
vimeo

Tried to do a voice over but it’s 11pm lmao Will do other livestreams soon, so I can actually explain shit live
#my candy love#mcl lysander#mcl lys#amour sucré#amor doce#Corazon de Melon#lysander#krasnyzmeya#video#livestream#tuto#step by step#tutorial#painting#sketch#art#digital art#lys#as#as lysandre#goth
105 notes
·
View notes
Note
Hi ! I'm coming to you because I obviously don't understand how to get the eyes or even the "avatar" parts of the Su' (Eyes, Mouths, etc...) Do you know how we can do it? Because I admit that with the new makeup, some people might seriously interest me in my Customs and my OCs! TwT
I also point out that I tried to mark full instead of hanger but it didn't work... So I was wondering if there was anything else to modify! And so if you had the answer! Sorry again for the inconvenience...
Hi,
I did some tutorials before but I feel like it was all over the place so let me do it again since I sort of "master it".
First, you go to the closet and press f12 or right-click and then inspect element. A panel will open. From here you go to Network.
As you can see there's nothing here, yet. Click on another category or even on a single element. I went to dresses and the thumbnails started to appear.
You mentioned you wanted to download avatar parts. So let's go there. Let's take eyes for example. We go to the eyes category and then click on them. Yes, unfortunately you need to own them but we can get around that too if we want but let's finish here. You click on the eyes and you notice more stuff started to appear on the other pannel, particularly these:
Those are the elements that make your avatar, eyes, lips, brows even skin. Click on them and then it would automatically on in a new tab exactly how you need them. No need to change anything, if you have something in the game you can get it like this no problem.
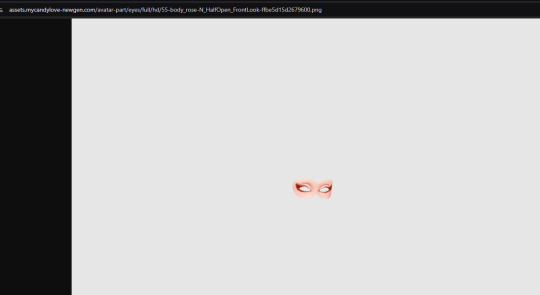
If you don't... you have to open them in a new tab ann change some stuff on the URL. Let's take these colorful calavera eyes.
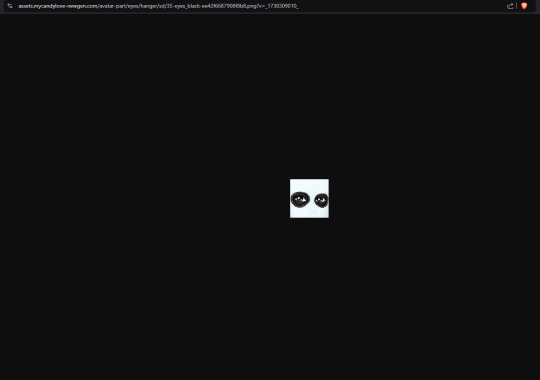
Now let's compare the URL of this to the earlier image:


As you can see in the one that's full HD there are also some other stuff added like "N_HalfOpen_FrontLook" and also "Body". There is also "rose" that's the skin tone( there are 7 skin tones including an 8th which is just for any skin). What are those? What do they mean? Those elements are related to certain facial expressions.
The capital letter N means normal but there also can be H (happy) or S (sad -for lips) or even A (angry- for eyebrows).
The other one is how the eyes are presented. We have Closed, Open, HalfOpen, WideOpen and Closed_Open.
And FrontLook is the direction of the eyes. There is also
LeftLook
and TopRightLook

You can find these if you go to facial expression and click on some and see every variations.
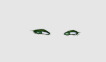
So what will we do is copy some stuff from the first one and put it in the second one:
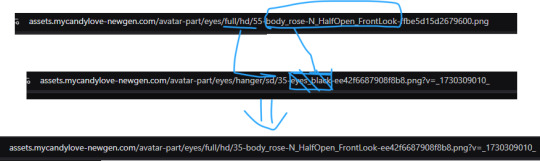
That is for eyelids or "FrontLook". For eyes only, you just need to add things:
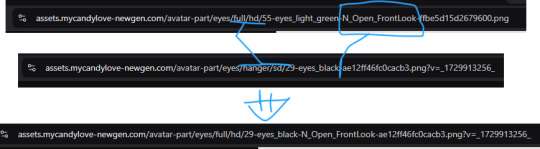
For skin tones. Those are lys, rose, tulip, marigold, hortensia, orchid pansy and "no" which is basically no skin tone
Those are some of the examples I could give.
I hope it helped!
12 notes
·
View notes
Note
Hi!! Do you know how to save clothes from eldarya like from mcl? I mean, like for edits and all...
Eldarya:
Right-click on the item of your choice and click the first option “open in new tab”

Change the “icon” of the new url into “web_portrait”


Now you can save the high-resolution image to your computer (:

My Candy Love:
Right-click on the item of your choice and click the first option “open in new tab”
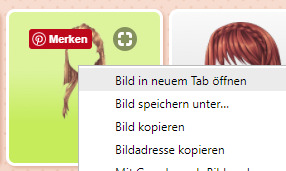
Change the “thumb_MD” of the new url into “normal_MD“


Now you can save the high-resolution image to your computer (:

169 notes
·
View notes
Text

music day 2022: alternative outfits.
i saw the music day outfits for eldarya and got inspired to make alternative outfits for mcl's music day event mainly because i thought this music event's outfit was kinda plain. thank god for @candysweetposts because i don't think i could've done the first outfit without their tutorial.

#「blowing up my phone consider you blocked...」 posts#「i'm a poppin' •ss b•tch let me remind ya...」 outfits#「they said rico you so nasty i said thank you very much...」 rico#mcl#my candy love#mclll#my candy love love life
40 notes
·
View notes
Note
Could I ask how you make Candy’s face? Like eyebrows and lips and eyes?
I draw, honey :3 ♥
youtube
I like big eyes, long lashes and thick eyebrows :D
#mcl#my candy love#cdm#corazon de melon#mclul#mcl campus life#cdmu#amour sucre#amor doce#mcl edit#mcl tutorial#edit#tutorial
61 notes
·
View notes
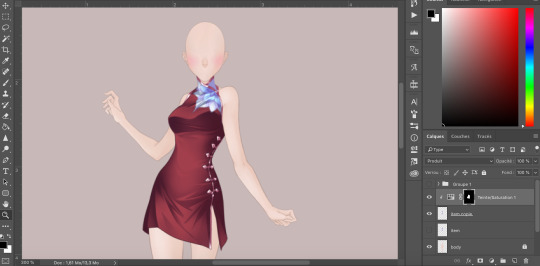
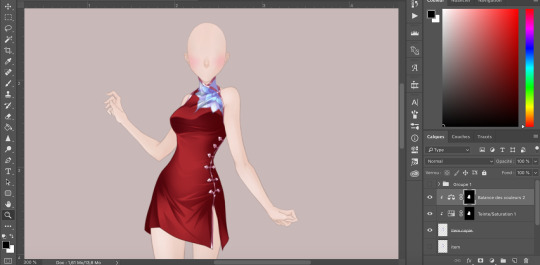
Text
Tutorial : Changing colors on photoshop part 2 ! Part 1: here
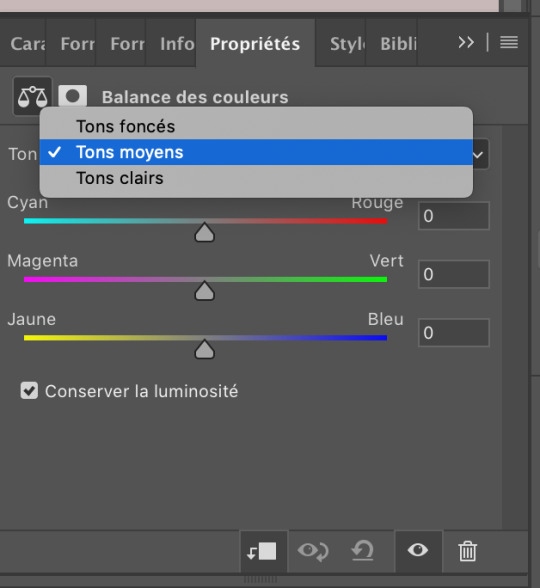
8 - Now, create a fill/adjustment layer like before but choose Color Balance

9 - Then with your Color balance window change the settings as you want. There are 3 possibilities : Shadows, Midtones, and Highlights. You can choose to change just one of them or change them all !
Here my final result :
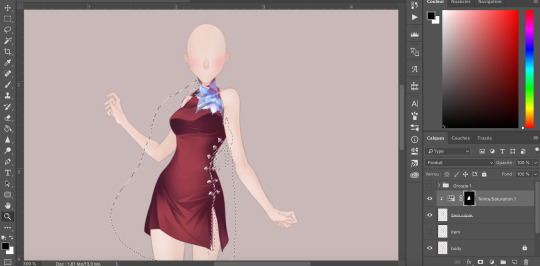
And because now you know how to change colors, have fun and change the others part of your item as well !
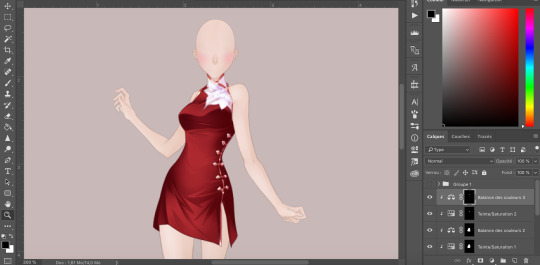
Before / After

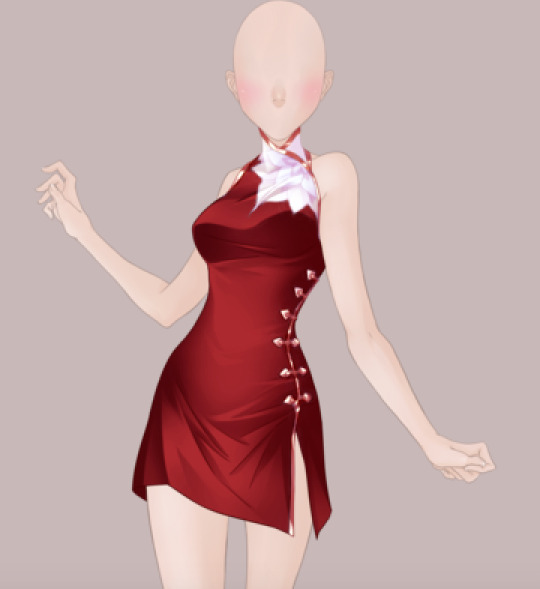
We did it ! Hope it helps a bit and have fun ٩(๑˃̵ᴗ˂̵๑)۶.:*✧
#sorry for my bad english T_T#cries in french#but I do hope it helps some of you#photoshop#edits#colors#eldarya#mcl#tutorial
31 notes
·
View notes