#menu tutorial
Text
Recipe tutorials
Quick meals
Healthy recipes
Vegan cooking
Vegetarian dishes
Meal planning
Budget meals
Family dinners
Breakfast ideas
Lunch recipes
Dinner options
Snacks
Appetizers
Soups
Salads
Desserts
Baking basics
Bread making
Pasta dishes
Seafood recipes
Meat meals
Poultry recipes
Barbecue tips
Grilling techniques
Slow cooker recipes
Instant Pot meals
Food prep hacks
Cooking tips
Chef secrets
Culinary skills
Knife skills
Food safety
Gluten-free
Keto recipes
Paleo diet
Low-carb options
Dairy-free
Nut-free cooking
Sugar-free desserts
Comfort food
Gourmet dishes
International cuisine
Asian recipes
Italian cooking
Mexican dishes
French cuisine
Indian recipes
Middle Eastern food
Vegan desserts
Vegetarian breakfast
Festive meals
Thanksgiving recipes
Christmas dinner
Easter treats
Halloween snacks
Valentine’s Day dishes
Cooking shows
Food challenges
Kitchen gadgets
Cookware reviews
Ingredient guides
Spices and herbs
Organic ingredients
Farm-to-table
Sustainable eating
Leftovers ideas
Kids' meals
Baby food
Cooking for seniors
Student recipes
Batch cooking
One-pot meals
Charcuterie boards
Cheese pairing
Wine pairing
Cocktail recipes
Smoothies
Juices
Coffee concoctions
Tea recipes
Plant-based nutrition
Superfoods
Anti-inflammatory meals
Probiotic-rich foods
High-protein snacks
Energy-boosting meals
Low-calorie snacks
Heart-healthy diets
Diabetic-friendly meals
Allergy-aware cooking
Culinary trends
Food vlogging
Cooking classes online
Food photography tips
Food festival tours
Culinary competitions
Chef interviews
Seasonal ingredients
Food market tours
Culinary travel adventures
#lifestyle#food#dinner#Dinner ideas#Easy dinner ideas#Dinner recipes#Dinner ideas healthy#Healthy dinner ideas#Quick dinner ideas#Easy dinner recipes for family#Easy dinner ideas for family#Dinner ideas for two#Easy dinner ideas healthy#Dinner ideas for tonight#Easy dinner ideas for two#Dinner ideas for two easy#Dinner ideas vegetarian#Quick and easy meals#Dinner ideas easy#Quick dinner ideas for 2#Easy weeknight dinners for family#Dinner ideas for two healthy#Dinner menu#Recipe tutorials#Quick meals#Healthy recipes#Vegan cooking#Vegetarian dishes#Meal planning#Budget meals
80 notes
·
View notes
Text

They aren't the same thing. They aren't the same thing. They aren't the same thing. They aren't the same thing.
#cool argument but as you can see i have a visual aid#anda loves shippers#if you cant tell where characters land then you are missing foundational knowledge go back to the tutorial menu
81 notes
·
View notes
Text
my biggest pet peeve about modern fighting games is that they NEED to stop hiding their tutorialization behind the casual 'arcade story mode' gamemodes (world tour sf6/arcade quest t8). i do not want to engage with your metaverse avatars i want to read what my options are when i'm downed!!!!
#shut up mira#SC6 just had a fucking tutorial menu with text explaining everything accessible from anywhere even ingame#if my bunk-ass poverty game can do that why can't the AAA ones
54 notes
·
View notes
Text
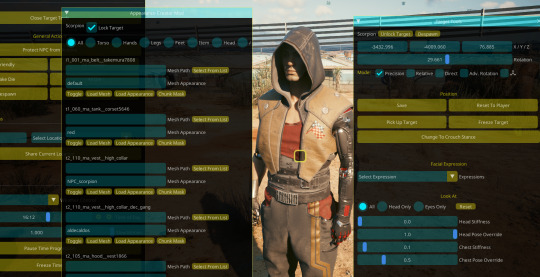
🟨 Appearance Creator Mod Infos Dump
With the release of ACM (Appearance Creator Mod) I wanted to dump some information that might be useful, especially for non-modders that want to play around with it!
(I had no involvement with the making of this mod at all, nor I have any tie with AMM development, just throwing my two cents as a regular user, player and modder)
You'll find some How To, Tutos and other useful heads-up under read more, if you plan on using this mod as a modding tool (sketching up outfits ideas before modding them as custom appearance for your blorbo for example) or simply want to play blorbo dress up!
━━━━━━━━━━━━━━━━━━━━━━━
First, You might want to get familiar with these suffix, as you will need to identify what part of a character's outfit you wanna swap
▶ Garments Components Names
h0 - Character's head mesh
he - Eyes mesh
heb - Eyebrows mesh
ht - Teeth mesh
hx - Head's details meshes (pimples, makeup...)
hh - Hair mesh
t0 - Character's Body mesh
t1 - Torso Inner Garment (T-shirt, Tank top...)
t2 - Torso Outer Garment (Vest, Jacket, Hood...)
a0 - Character's Arms mesh (Cyberarms...)
l1 - Legs Garment (Pants...)
s1 - Feet Garment (Shoes, Socks...)
i1 - Accessory / Item Garment (Cyberware, Belt, Necklace...)
▶ Garments Rigs Names
ma - Man Average
mb - Man Big
mc - Man Child
mf - Man Fat
mm - Man Massive
wa - Woman Average
waf - Woman Average Fat
━━━━━━━━━━━━━━━━━━━━━━━
⚠ It's important to note that Garments are NOT automatically refited to the character! You can use a WA garment on a Male NPC but it won't magically fit his shape
⚠ Johnny and Kerry, despite using the MA rig, both have a thinner bodies and most of the garment will float and appear larger on them
⚠ A lot of Garments have their own RIGs and physics, and might T-pose / break upon being swapped on your NPC of choice! For this reason, Hair with physics will automatically break as well
━━━━━━━━━━━━━━━━━━━━━━━
AMC is a standalone window in game, and not included in AMM main window!

After spawning a NPC, the AMC window should fill up with the spawned entity's garment components (and yes it can get crowded really quick, especially on smaller monitors and resolution)
Yes, It also works on NPVs and NPC+! 🔥
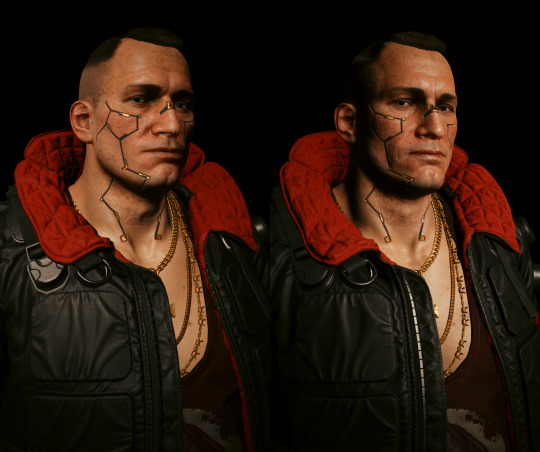
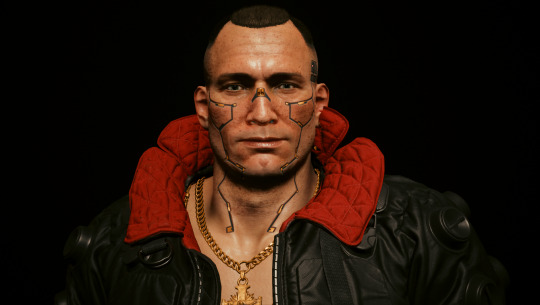
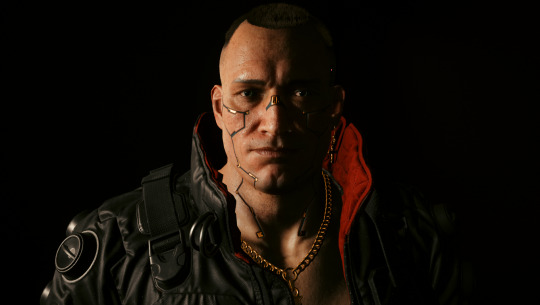
Everything on these windows can be overwhelming especially if you're not familiar with modding, so I'll throw a little example here using Scorpion
First I want to get rid of his hood and vest, without using AMM's custom appearance, using only ACM
In the list, I look for his Vest and his Hood component

We can easily turn them invisible by clicking the "Toggle" button
Make sure to also disable any decals, stickers, and additional component (his vest also has a decal component, see in the screenshot)

The little icon next to a component's name indicate it has been edited in some way
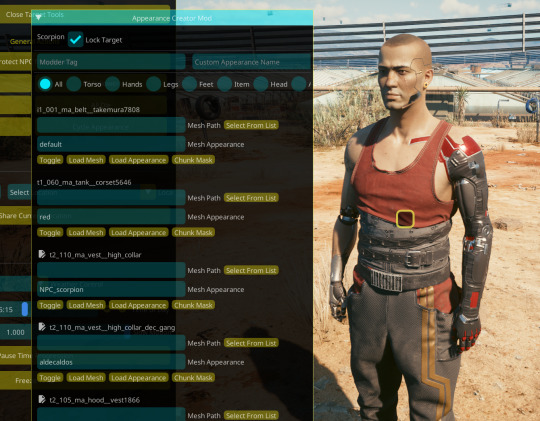
I'll now switch his tank top for something else
Click on "Select From List" next to the "Mesh Path" of the desired component (in Scorpion's case, t1_060_ma_tank__corset)
Open up the "Torso" list, and you'll be able to click on any of the listed t1 and t2 garments!
⚠ As mentioned above, garments doesn't magically refits on characters; Scorpion use the Man Average body and rig, anything that isn't a "ma" garment won't fit him correctly!
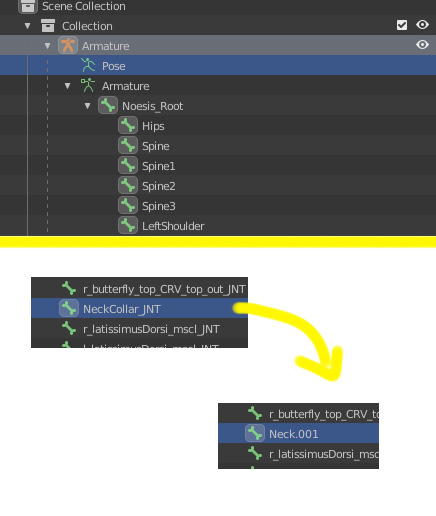
⚠ Another thing to be aware of is that a lot of garments's might break around the collar area! However if you plan on using this same mesh in an outfit, don't let that scare you, as it's easily fixable in blender
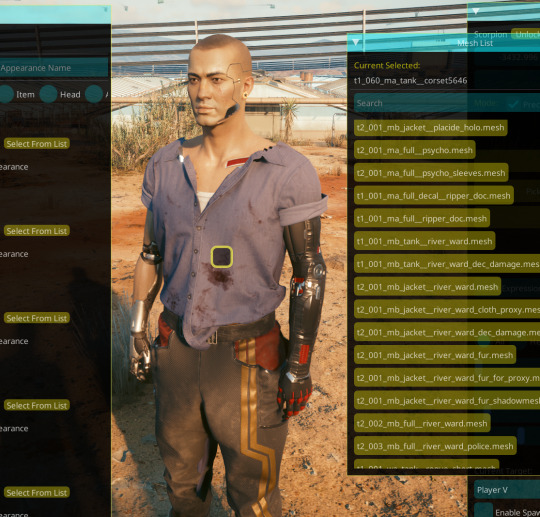
Export your desired mesh and look for the "NeckCollar_JNT" bone and simply rename it to "Neck" (blender will put some numbers next to it but that's fine, ignore that)
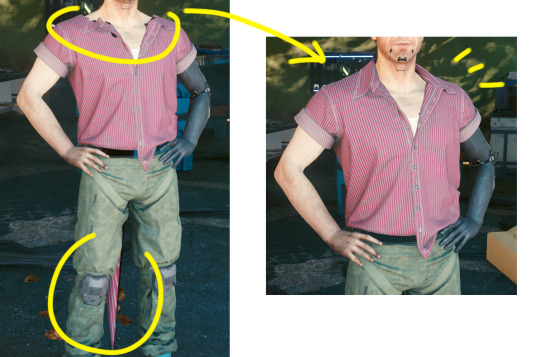
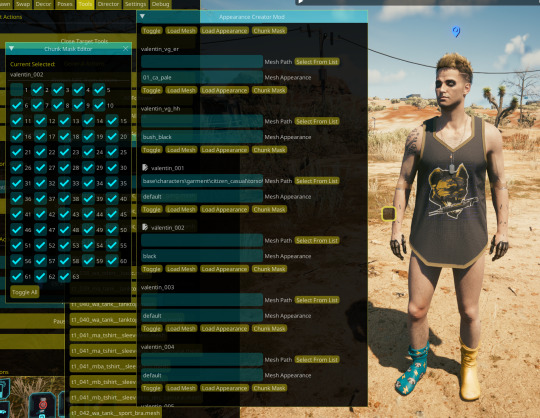
I'm going to switch to Valentin here to showcase how to deal with potential clipping 🤏 Since Valentin's body is customized, bit chubbier, he always needs refiting
Let's say you swapped your character's top for something else but part of his torso clips out

To put my boys titas away, I'll look for his body component (t0)
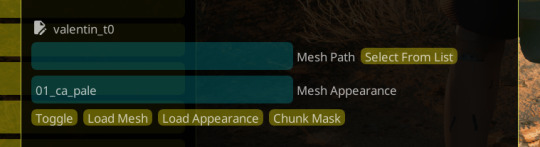
Click on "Chunk Mask" to open the garment's submeshes list
Garment's meshes are broken down in multiple submeshes that can be easily chunkmasked (disabled) at will to deal with clipping! This is why NPC usually don't even have a full body mesh when taking off their clothes, they are chunkmasked to avoid clipping :D
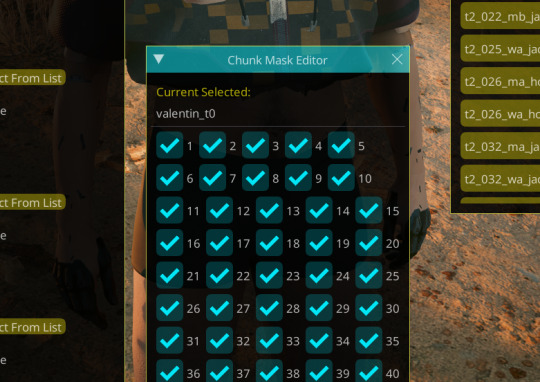
I will disable the Submesh 1 by unchecking the "1" box
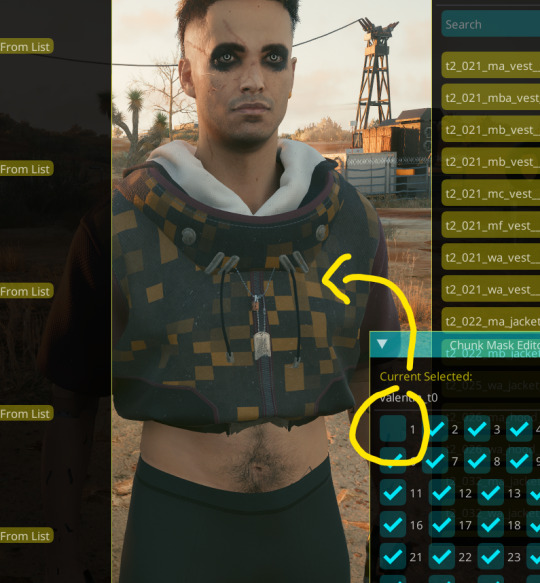
Don't be afraid to click on multiple box and see what gets chunkmasked on different meshes! You won't break anything 👌
aaand for now that's about all I can think of that might be confusing for users- tho if you have question don't hesitate to ask on this post, to reblog or to come into DMs!
107 notes
·
View notes
Text
New Game+ Tutorial
"I don't remember this part of the story." "It's been so long since I played X expansion." "What happened during that raid again?" "Who was this character?" "I story skipped the MSQ/job quests so I don't know what happened and who these people are!"
There's answers to this, friends. Not only is the game's own Unending Journey (in inn rooms, or as furnishing in your FC or private rooms/homes) able to replay many cutscenes, and there's the completed quest log, but there are places online, such as Garland Tools and the FFXIV Game Script, that keep most (not all) of the quest text handy.
But if you want to relive those quests, and/or get the side dialogues and replay (or first time play!) the experiences, as of Shadowbringers 5.1 there's a feature called New Game+ to allow that.
New Game+ (or NG+) will let you replay past questlines, at your current level (which makes it go pretty fast in a lot of cases). There is No experience or rewards to gain through this feature--no using it to level alt jobs. It purely exists to allow experiencing, or re-experiencing, completed content.
Once defeating the Ultima Weapon and Lahabrea at level 50 in ARR's finale of 2.0, you can go to Vesper Bay and find the Wistful Whitebeard.
More info and images below the Keep Reading cut...
(image taken from gamesconsolewiki and their article on this feature.)
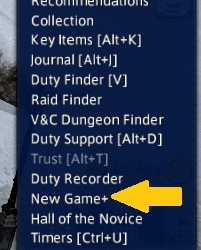
Once you've unlocked the feature by talking to him, you get a new menu option in your Duty menu (the exclamation point icon), right between Duty Recorder and Hall of the Novice.
Once you select the feature it brings up a menu of options; it usually defaults to Main Story Quests, but I also have a paused replay under "Suspend" in progress. There are also options that match other quest interfaces, like your Journal or the Unending Journey; Chronicles of a New Era for raids and trials, Side Story for quests like Hildibrand, the Scholasticate, Role Master Quests, Void Quests, and Chronicles of Light (story important side quests, like Tales of the Dragonsong War, Tales from the Shadows, Tales of Newfound Adventure). Tank, Healer, DPS, Crafting, and Gathering quests also have their own categories.

Each Expansion MSQ is broken into parts; usually 2 parts for the x.0 main expansion, and then 2 parts for the patches. They're only available after x.0 or the patch stories are complete.
Also notice the "Help" icon in the top right of the NG+ overlay; it opens a pretty comprehensive guide, divided into menu sections, about how the feature works.
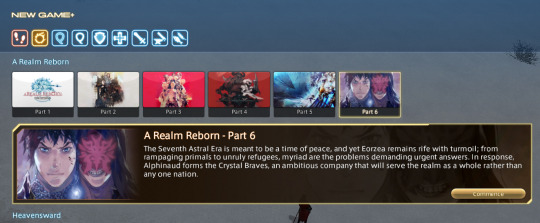
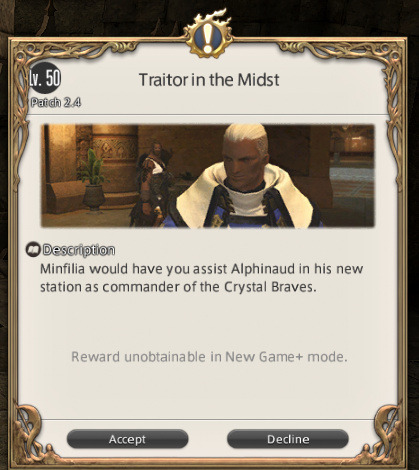
ARR is split into 6 parts, and I do think 2.0 could use a rework in how they're split but for now, I'm selecting Part 6 to look for specific side dialogues that only exist in this timeframe.
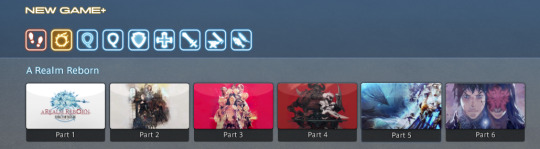
Selecting Part 6 opens the description; the Crystal Braves have just been formed, to help the Scions with the turmoil still facing the realm--from refugees, to Garlemald's continuing threat, to primals and Ascians.
Once you do, the NG+ quest info shows up, usually around where ever you keep your MSQ quest marker. I hide my MSQ tracker once it's done, so NG+ fits in that same spot in the upper left for me.
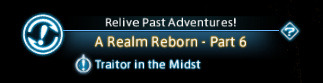
It tells me to "Relive Past Adventures!", which expac and part I'm in, and which quest is my starting point in this case, "Traitor in the Midst", the start of the Ivy spy plotline in Patch 2.4.
From here it progresses as if I am back in that patch and on those quests, but without any experience or rewards. Aeryn's in her current level 90 appearance and skills, making it easy to skip past and handle level 45-50 enemies in these zones.
So long as I am in NG+, I cannot do current quests, plots, or other content; I can't complete new current level duties (duties new in NG+ itself are fine), I can't access the MB, my retainers, or the Unending Journey. I can manually Suspend my current playthrough, or performing some of these actions (like duties) will automatically suspend my NG+ playthrough. You also cannot start NG+ while doing certain things (like some quests, such as leves).
This also will not let you play through the start of other city-states, only your original starter town. Solo duties will let you choose their difficulty immediately, without having to fail them first like in normal play.
If I want to drop my NG+ save before I've finished the replay--maybe I found the info and screenshots I wanted--I can delete the save.
This is an extremely helpful feature that can be used to replay events and quests, either for the fun of it, or because you want to find specific dialogue or lore information that only exists in a specific point in game. Maybe you want to visit old friends lost along the way, or take new screenshots of your WoL as they are post-fantasia.
Maybe it's just been a few years, and you've found you've forgotten some things and want to remember how the story actually went, especially knowing what you know now.
34 notes
·
View notes
Text
the difference between blender tutorials and live2d tutorials is so fucking funny bc every blender tutorial assumes you're technologically illiterate and only doing this because you've read somewhere that 3d modelling is a Hot Disruptive Tech Industry Career. and every live2d tutorial assumes you're an arcane virgin who has touched more mechanical keyboards than blades of grass and that your horniness and fervent desire to be a streamergirl somehow gives your brain superpowers that allow you to telepathically link with the software and intuit every single ui element as soon as you see it
#'heres how to make a cube (30 minutes long)' vs 'you already know which deformer type to use. kill yourself.'#cant wait to get into rigging in blender when this completely flips and im back in anime loserland#i feel like im being talked down to by all these blender men. fuck. thanks for showing me the menus though#disclaimer. im sure nobody who uses either of these programs fits into either of these stereotypes but boy do these tutorials say they do
13 notes
·
View notes
Note
How can I start modding?!
To mod, you need to own the computer version of the game. Most importantly, the original Steam version (otherwise it won't work).
Once you have this set, you just go to Nexus and download the Tlou debug dev menu mod by Goghor (link here).
The installation is a bit tricky. If you have never installed mods in any game before, I recommend to ask someone who has experience. If you want to try it on your own, I advise you to download Vortex (which should be on the Nexus page) and install it via this utility.
When you finish installing Vortex, make sure to connect the game to it. It should be easy, but if you don't know how to do it, I'm sure there are a lot of tutorials on the internet. It's necessary to connect the game to it before doing anything else.
Then, when you're done connecting the game, go to the link I attached, and on the right, you'll see an icon called "vortex." Once you click on it, it should install the mod right into the game without you having to deal with it manually. This is perfect for beginners; this way you can be sure you're doing it right.
Then, after all this is done, the real fun begins. I'm not even shitting you when I say I spent over 5 hours figuring out how to work with the freakin' mod. I couldn't find out how to turn on the free roam camera, and it was driving me crazy.
So, just in case you went through all the previous steps and got the mod into the game, here's a little help on how to work with the dev menu!
Once the game launches and you're in the main menu, you need to open the dev menu to activate the mod. To do it, you need to press [CTRL] + [~]. When the little window in the left corner pops up, don't bother with the "camera" option. It doesn't work. To use the free roam cam, you have to go to "display" and press [1] - the one above Q and tab. This should open a quick menu. From here, you just go to "manual camera" and you're good to go.
This is what it should look like before you press [1] and the manual camera option shows up.
I'm from Europe, and the keys work just fine for me. But I heard some people have trouble opening the dev menu with the keys mentioned. For those who can't use the [CTRL] + [~] option, try [CTRL] + [ ' ] to open it.
If you don't know where to find the [~] button, it's under the ESC key on your keyboard. The [ ' ] is basically the apostrophe you use in English grammar.
Also, when ready to mod, I highly recommend connecting a controller, because the manipulation with the camera is pretty sketchy, and unless you want to fall into mild rage, this is the easier way.
I wish you the best because I almost lost my fucking mind learning to work with this, lmao. So good luck!
#tlou debug dev menu tutorial#the last of us#tlou#the last of us game#tlou game#the last of us part 1#tlou part 1#goghor#nexus mods#elliespuns answers
7 notes
·
View notes
Text
The funniest fiber arts BS is doing your current fiber-art-of-choice project while playing a youtube video tutorial about a completely different fiber art
#art#fiber art#crochet#knit#(i'm crocheting something and watching a youtube tutorial about a knit hat that i have never even attempted)#the worst thing is that i've watched this specific video multiple times while crocheting#also the worst thing is that i'm sat in front of my laptop on the sdv start menu (i was GOING to play some)
18 notes
·
View notes
Text
i really wish sonic battle would.... explain anything....
#maybe this is what the tutorial in the main menu is for but ermm idk how to get there#like it explains in the game how to do a heavy attack and a uh. sonics upper attack idk if that's what its called#but a lot of what im doing still feels accidental#i keep triggering the dash somehow i think#dunno how healing works#grrr#this is ehy i don't like games#myaa
11 notes
·
View notes
Video
youtube
🎥 TUTORIAL: How to make characters kiss
After some requests from friends and chooms, here's another video tutorial, this time on how I pose characters for kisses! There’s probably others methods and others workflow, but this is how I do it, hope y’all can find it useful!
Still featuring beloved stinkies, Mitch and Valentin 😌🧡
Disclaimer: It is funny and “cringe” on purpose! I don’t spent the necessary time on fixing all of the generated voice lines, using the little fucked up cut-out of the babies to match the fucked up voices. It’s funny and I love it gfhhgf it’s a lot of fun to make and in No Way want it to be serious!
Do NOT see this as “THE ONLY WAY” to do it. I know people will find a way to get offended by this video- I made it for my friends and for people who were interested in seeing my workflow.
If it can help you, GOOD! That’s why it exist and I’m really glad it can help 🧡
#Cyberpunk 2077#Appearance Menu Mod#Tutorial#Virtual Photography#Video#uuUUHHH IDK HOW TO TAG THIS HGFH#enjoy the funny lil video uwu
60 notes
·
View notes
Text

girl*friend is opening the sim4 for the first time in a bit and wanted to check on her "dont ask" house
theyve got this guest over

kyle kyleson (job kyle)
and the two residents are


white washed mark iplier (from the gallery) and pregnant Jeremy 985
#the sims 4#hunters things#also wicked whims is screaming at her to update every time she tries to do basicly anything#and it keeps trying to give her the tutorial every time she opens a new menu
5 notes
·
View notes
Text
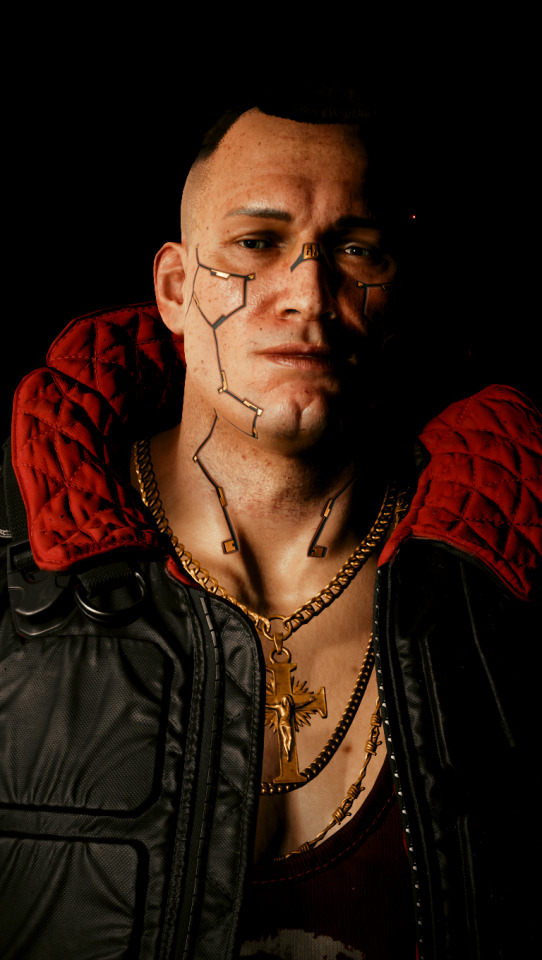
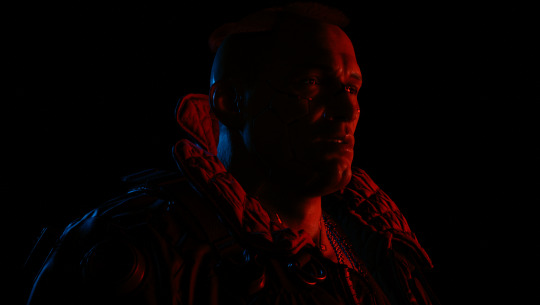
Cyberpunks’ Portrait Lighting Patterns with AMM
One of the fundamentals of portrait photography are lighting patterns. By having an understanding about position of light sources to our subject, we can create exciting and flattering portraits.
I’ll be mostly using Customizable Spot Light decor. Alternatively, you can use IGCS (Injectable Generic Camera System)’s Cyberlit mod for this.
As always, this is my dark studio at the top of Arasaka Tower (we’re in the major leagues!);
Game.TeleportPlayerToPosition(-1347.3859863281,140.73120117188,545.84606933594)
Types of Light Patterns for Portrait Photography
1. Broad Lighting (R)
Angle subject from the main light source, facing the bright side of the face.
2. Short Lighting (L)
The opposite of Broad lighting. Darker side of the face is angled towards the camera.
3. Butterfly (Paramount) Lighting
Overhead light angled down. Dark shadows underneath the face and nose (depending on the nose shape).
4. Split Lighting
90° to the subject.
For true split lighting; (with Photoshop)
5. Loop Lighting
45° to the subject (slightly above eye level and slightly down).
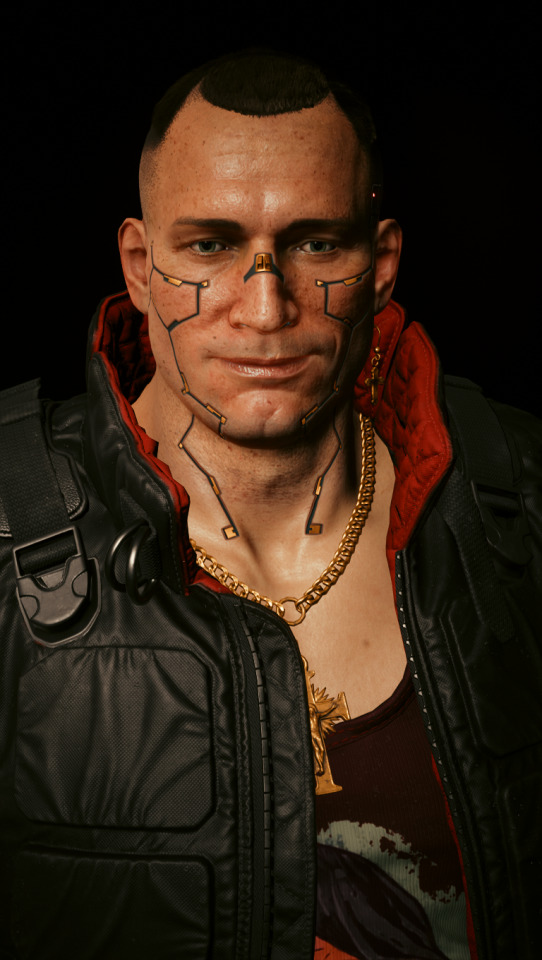
6. Rembrandt Lighting
30° from the subject, a bit above their head and angled down. Triangle shaped on cheek (also depending on nose shape)
7. Back Lighting (Rim Lighting)
Bright outline that define the subject.
#Cyberpunk 2077#Jackie Welles#Portrait Tutorial#Appearance Menu Mod#Lighting techniques#Virtual Photography
112 notes
·
View notes
Text

sorry ive been in blender hell. i will continue to be in blender hell until further notice
#FUCKING VRCHAT AVATAR MAKING. GRAAAAAHHH#and mine isnt even that bad im just. exploding because i am drowning in the sea of menus#and also discovering shit that exists that would have made my life so much easier 2 hours ago#thank you random ass youtube tutorials#slimslime talks#ill post the shit when its done
14 notes
·
View notes
Note
Hey so uhhhhhhhhh
posing characters together. where do I even start?
👋 Heeeey~
I got JUST the thing for ya- time to plug my own lil videos 🤠
Here's how I go around to pose character kissing! I use the same process for all of my VP :>
youtube
I also have a video on how to use custom pose replacers, it's what we used before AMM's pose system! It's not really used nowadays but the end / the AMM part can still help maybe! (I still recommend replacers sometimes as its way more precise to pose versus the AMM's poses and pose pack that reset everytime we move a character around)
youtube
I do not personally use Photomode much since I prefer the freedom AMM can offer for VP! There isn't a "good" or "wrong" way to pose characters tho, so try different methods out and see what works best for you!
*Side note just to adress the use of custom generated voices in my videos, after multiple voice actors spoke up on the usage of such trained models, I realized that this type of training softwares and voice models were just as bad as any other AI scrapping method that uses other's work without their consent. I did not and will not share the Mitch voice model that I've trained since it has been deleted ever since! The male V voice was a public model. I'm keeping the videos up as the tutorials might be useful, but won't be using generated voices again! :3
I also recommend checking out my friend Bean's tutorial google drive folder here! There's a couple of AMM and NPC posing focused tutos, even if they're using old methods it can definitly help give pointers on how to use AMM :D
▶ Bean's tutorials
There is also a lot of general VP tutorials from other members of the community, I do not have any specific links or name that comes to mind, so don't hesitate to ask around! 🤙
#Cyberpunk 2077#Tutorial#Virtual Photography#Appearance Menu Mod#AMM#dani-the-goblin#ask#Video#Hope it can help! :3
18 notes
·
View notes
Text
maybe my horrendous inclination for computer guys is bc im so ass at computer stuff myself
#spent an HOUR looking at youtube tutorials downloading stardew valley mods cuz im so not tech savvy#my google searches are like: ‘where is finder menu’ ‘where is go bar in finder menu’ ‘how to move a zip file’#boomer levels skills 😭😭 EMBARRASSING
3 notes
·
View notes
Text

AMM Lighting Intro
I have to admit, I never got the hang of Cyberlit. When AMM introduced customizable spotlights and area lights, I was excited to try out the alternative. When I mentioned writing a tutorial on the Lizzie's server, several people expressed interest so I decided to share it with the larger community.
Currently this guide only covers spotlights but I will be adding area lights as well, as I find them just as useful—more so even, since I relied on them for months before figuring out how to effectively use spotlights. 😂
If you have questions or feedback, please let me know!
TUTORIAL HERE
#santiago aldecaldo#cyberpunk 2077#cyberpunk photomode#how to do things#wash tutorials#appearance menu mod#photomode tutorial#he's so handsome without his glasses
83 notes
·
View notes
Last Seen Blogs

hopefulgardensuitcasemonger
Untitled

gotthemagickalscissors
GotMagickalScissors
botiot
I draw shit

sicilyan-couple-enthusiast
Sensuale intrigo

eveofjannah
long lost child