#Recipe tutorials
Explore tagged Tumblr posts
Visit Tumblr Blog
Explore Tumblr blogs with no restrictions, modern design and the best experience.
Last Seen Tumblr Blogs


Fun Fact
BuzzFeed published a report claiming that Tumblr was utilized as a distribution channel for Russian agents to influence American voting habits during the 2016 presidential election in Feb 2018.
Text
Recipe tutorials
Quick meals
Healthy recipes
Vegan cooking
Vegetarian dishes
Meal planning
Budget meals
Family dinners
Breakfast ideas
Lunch recipes
Dinner options
Snacks
Appetizers
Soups
Salads
Desserts
Baking basics
Bread making
Pasta dishes
Seafood recipes
Meat meals
Poultry recipes
Barbecue tips
Grilling techniques
Slow cooker recipes
Instant Pot meals
Food prep hacks
Cooking tips
Chef secrets
Culinary skills
Knife skills
Food safety
Gluten-free
Keto recipes
Paleo diet
Low-carb options
Dairy-free
Nut-free cooking
Sugar-free desserts
Comfort food
Gourmet dishes
International cuisine
Asian recipes
Italian cooking
Mexican dishes
French cuisine
Indian recipes
Middle Eastern food
Vegan desserts
Vegetarian breakfast
Festive meals
Thanksgiving recipes
Christmas dinner
Easter treats
Halloween snacks
Valentine’s Day dishes
Cooking shows
Food challenges
Kitchen gadgets
Cookware reviews
Ingredient guides
Spices and herbs
Organic ingredients
Farm-to-table
Sustainable eating
Leftovers ideas
Kids' meals
Baby food
Cooking for seniors
Student recipes
Batch cooking
One-pot meals
Charcuterie boards
Cheese pairing
Wine pairing
Cocktail recipes
Smoothies
Juices
Coffee concoctions
Tea recipes
Plant-based nutrition
Superfoods
Anti-inflammatory meals
Probiotic-rich foods
High-protein snacks
Energy-boosting meals
Low-calorie snacks
Heart-healthy diets
Diabetic-friendly meals
Allergy-aware cooking
Culinary trends
Food vlogging
Cooking classes online
Food photography tips
Food festival tours
Culinary competitions
Chef interviews
Seasonal ingredients
Food market tours
Culinary travel adventures
#lifestyle#food#dinner#Dinner ideas#Easy dinner ideas#Dinner recipes#Dinner ideas healthy#Healthy dinner ideas#Quick dinner ideas#Easy dinner recipes for family#Easy dinner ideas for family#Dinner ideas for two#Easy dinner ideas healthy#Dinner ideas for tonight#Easy dinner ideas for two#Dinner ideas for two easy#Dinner ideas vegetarian#Quick and easy meals#Dinner ideas easy#Quick dinner ideas for 2#Easy weeknight dinners for family#Dinner ideas for two healthy#Dinner menu#Recipe tutorials#Quick meals#Healthy recipes#Vegan cooking#Vegetarian dishes#Meal planning#Budget meals
97 notes
·
View notes
Text

mike faist as jack twist and lucas hedges as ennis del mar in brokeback mountain 10/?
#one of these posts is going around again tonight. hiii people who like yankee twinks pretending to be cowboys.#there is no slime tutorial idk what anyone is talking about#however. i can send you the link to a mediocre lasagna recipe if you dm me and ask niceys#mike faist#lucas hedges#brokeback mountain#west end brokeback mountain
2K notes
·
View notes
Text
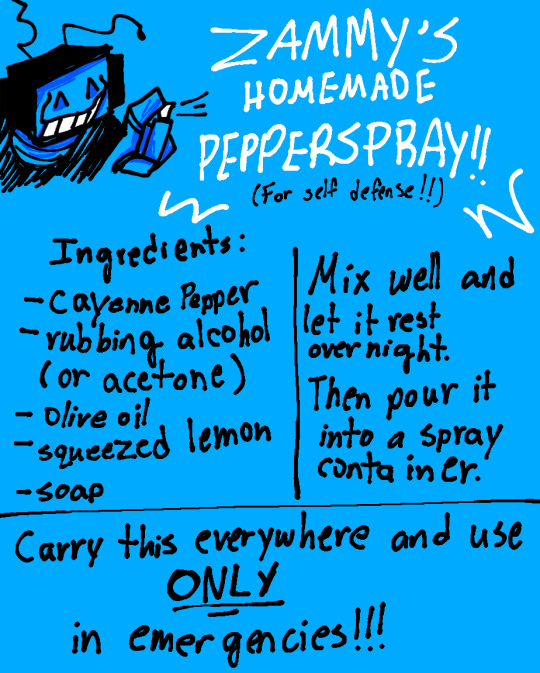
Take care!! Remember that this is only for self defense, DO NOT use it irresponsibly.
Protect yourself and those you love!
#art#digital art#tutorial#recipe#pepper spray#self defense#antifascist#trans#transgender#quotes#lgbtq rights#lgbtq#women's rights#blacklivesmatter#puerto rico#immigrant rights#us politics#2024 us elections#election 2024#LIVE OUT OF SPITE#BITE BACK#FIGHT BACK#MAKE THEM AFRAID#SHOW NO FEAR#eat the rich#rage#anarchism#Zammy'z Life Bookz
223 notes
·
View notes
Text

Source: tsu_ya_ko_mama on Instagram
They have a full step-by-step tutorial on their page!
#christmas#tutorial#disney#disneysfrozen#disney frozen#frozen#olaf#bento#bentobox#kawaii#kawaiicore#kawaiifood#kawaiiart#kawaiiaesthetic#キャラ弁#キャラクター弁当#弁当#food#recipe#recipes#harajuku#cooking#healthyfood#weeb#otaku#aesthetic#toothpicks
31 notes
·
View notes
Text
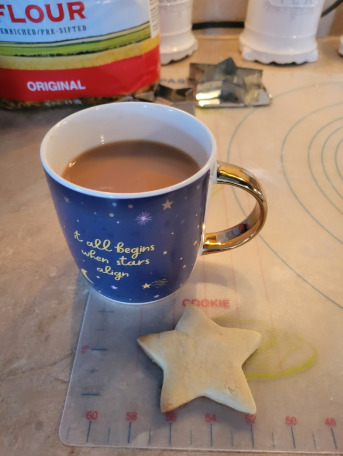
Let's bake some sugar cookies!
Okay so I technically did this way back in December but I'm finally getting around to posting everything now. Better late than never, right? The recipe I used to make the cookies is How To Make The Best Sugar Cookies from Tasty!
I did this mostly for fun, but also sort of to act like a tutorial, I guess, for anyone who might be new to baking. Honestly, the recipe video on Tasty is pretty comprehensive, most folks would probably get all the info they need just from watching it, but here's my take on it with a few tips of my own to hopefully make it even easier for people!
First off, ingredients! (List taken directly from the Tasty recipe):
24 tablespoons unsalted butter, softened
1 ½ cups granulated sugar(300 g)
3 tablespoons cream cheese, softened
1 large egg
2 large egg yolks
1 teaspoon Club House® vanilla extract
½ teaspoon Club House® almond extract
1 teaspoon kosher salt
3 ½ cups all purpose flour(440 g), plus more for dusting
½ teaspoon baking powder
2 teaspoons cream of tartar
And now, onto the process steps! This is going to be long and very image-heavy (edit: especially now that the images should be actually attached lol), so I'm hiding the rest of it under a Read More:
Here we go, making cookies!!
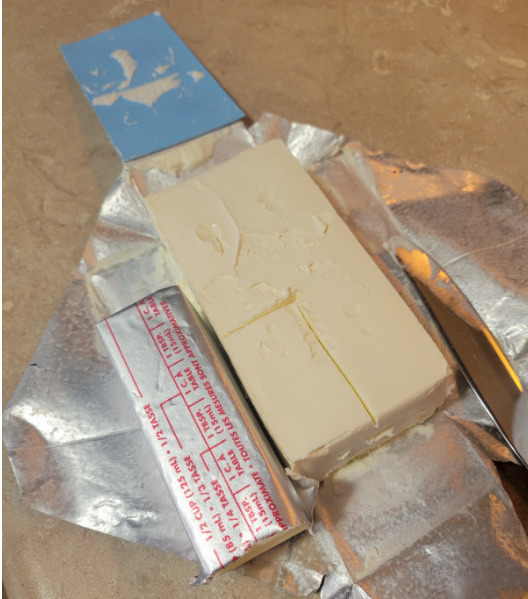
Got all of my ingredients together! Recipe calls for 24 tbsp of butter for some reason, that’s just 3 sticks (Each stick is 8 tbsp). I usually buy butter specifically sold as butter sticks to make it easier to measure, but they are typically a little bit more expensive. If you get one of those big blocks of butter, just remember that each block is 4 sticks (Cut in quarters down the length of it) and then each stick is 8 tbsp.

Tip for separating out egg yolks - literally just scoop it up with your hands. Yes it’s messy, but it’s also hella easy, and that way you don’t break the yolk (I may have even gotten that tip from the recipe video itself, I don’t remember, but I definitely didn’t figure that one out myself lol)


To measure the cream cheese, I just used a spare stick of butter. They’re about the same height, so I cut a groove the same width as the stick, and then used the handy-dandy tbsp markings on the butter stick to figure out how wide to cut to get 3 tbsp
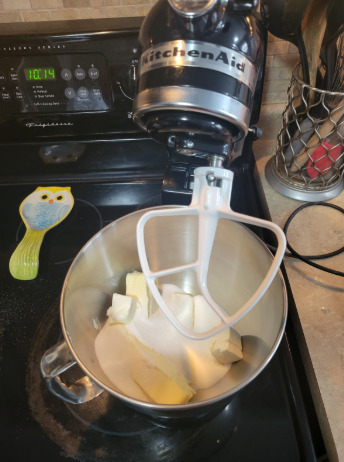
Very important step, make sure your mixer is actually plugged in

The Tasty recipe uses a hand mixer, but I’m a lucky bitch who got a stand mixer as a wedding present so I’m using that instead. You could theoretically do this all by hand, but, like, your arm would probably fall off before you could cream the butter and sugar together, and there’s so much more mixing coming up. Why would you do that to yourself? I definitely wouldn’t recommend trying to do this recipe by hand, make sure you have some sort of electric mixer, or make someone else do the mixing for you :P
Time to throw a bunch of stuff in there and start mixing! In goes the butter, cream cheese, and sugar! I set the mixer to med speed and mixed for 3 min, then scraped down the sides, then did 2 more, 1 more scrape, and 1 more min to make sure the sugar’s all dissolved in the butter and cream cheese. That's technically a little bit longer than what the Tasty recipe calls for, but this is one of those "your timing might vary moments", based on your mixing technique and equipment
Scrape!
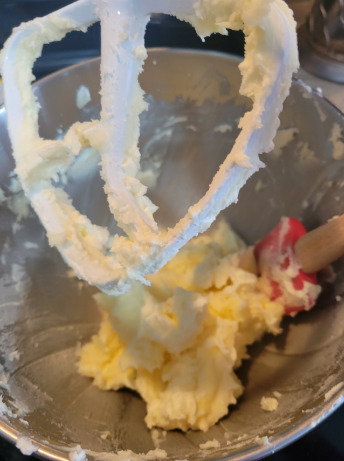
I think it mentions it in the recipe video, but the way you can tell if the sugar is mixed in well is if you pick up a bit of the butter and rub it between your fingers and it doesn’t feel as gritty. If you can feel a lot of grit, it’s not mixed in enough. Like, I can still feel something at this point, but it’s definitely not pure sugar crystals left.
She lookin FLUFF

Next we're adding the egg, egg yolks, vanilla, and almond extract. I highly recommend cracking your egg into a separate dish before adding it to the mix, just to avoid having to pick out egg shells if you’re bad at cracking them like I am. You can even use the same dish you were holding your egg yolks in if you want to make less dishes.
Add the eggos and extracts in! They’re going to be friends!
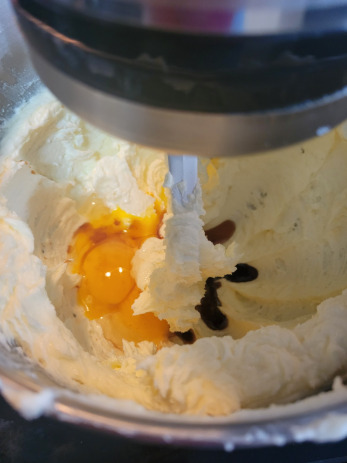
SPIN CYCLE. Basically mix until everything looks combined and you can't see the individual ingredients anymore. When you're done, scrape it down!
Time for the dry stuff! The recipe recommends sifting the flour, salt, baking powder, and cream of tartar directly into your mixing bowl. I forgot to take a picture of when I actually had the ingredients in the sifter, but here’s the set up, and the after. Basically you put your sifter over your mixing bowl, dump the dry stuff into the sifter, and then lightly tap the sides to knock the dry stuff down into the mixing bowl. Watch out, as you tap, the powders will actually start to travel UP the sides of the sifter, so you'll have to make sure to settle them back down towards the middle occasionally.


Side note: I don’t know if it’s 100% necessary to sift the dry ingredients, so like, don’t stress out too much if you don’t have a sifter, I think it just ensures that there’s no flour lumps in your dough and makes mixing easier/ your cookies look nicer at the end. They should still taste the same, regardless lol
Folding time! For anyone who’s new to baking, folding in your dry stuff just means mix it gently with a spoon or spatula first. Because if you try to take a mixer to this right away, all you’re going to get is a cloud of flour in your face. Even when I started mixing by hand, I still sent up a big puff of it everywhere.

Back to mixing with the mixer! You want to mix the dough just until it starts taking on the consistency of play-doh. You'll kind of know it's ready because suddenly it'll feel like the whole thing is clinging to your mixing paddle/mixing beaters at once.
Kronk Voice: Oh yeah, it’s all coming together

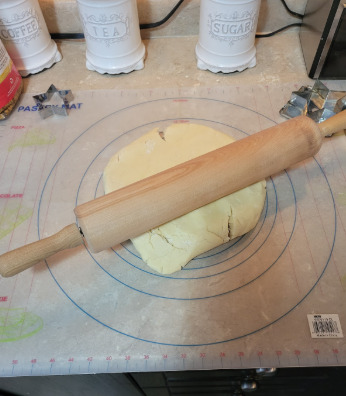
Take the dough out of the bowl and throw it onto A Surface. I happen to have a pastry mat because my mom got one once and loved it so much she bought one for everyone she knows, but a clean counter or really big cutting board works just as well. The dough is gonna be pretty sticky, so I’d recommend coating your hands and your Surface in flour to help prevent it sticking to everything. Just sprinkle a handful of flour onto your Surface and spread it around with your palm and you should be good.

Mush your dough together like it’s play-doh, and then wrap it up in plastic wrap. Try to make the disk as flat as you can without it spilling out of the plastic wrap because that’ll make it easier to roll out later. Then throw that bad boy in the fridge, and take advantage of your waiting time to wash some dishes. Future you will thank you for getting ahead of the dish pile-up

So! 2 hours later it’s time to transform and roll out! (the dough, that is). Preheat your oven to 350 degrees, and let's get to the fun part!
Unwrap your dough, put it down on your Surface, and start to squish it down to about a half cm thick (1/4inch) or so. If you have a rolling pin, great, but any hard cylinder will do (yes I know how that sounds). You could even squish it by hand, but it might be a bit tricky to get it flat enough to bake evenly. I also broke the dough into chunks and worked with small pieces one by one so that it was easier to work with and didn’t take up too much space
Time to break out the cookie cutters! Yes I know some of mine look kinda stained, but those are my grandmother’s cookie cutters (maybe my great grandma? IDEK) so you KNOW they’re the good ones

Dough is still sticky, use a spatula as needed to free cookies from your Surface. I’d also recommend using flour again to keep the dough from sticking. I definitely forgot lol

Start putting those cookies on your cookie sheet! The cookies do spread a little, so don’t let the cookies touch each other, but like, a cm of space is MORE than enough between the cookies. And trust me, you will need the space.

COOKIES
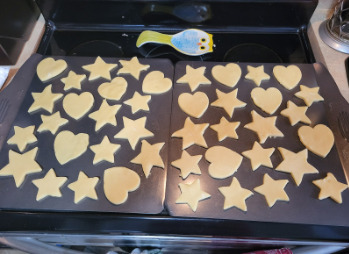
The tasty recipe says it’s supposed to make 12 cookies. Like, maybe if it’s Godzilla baking them? Or if you intend the cookies to be the size of a dinner plate? This isn’t even all of the cookies, this was just all I could fit on two cookie sheets
Into the oven they go!
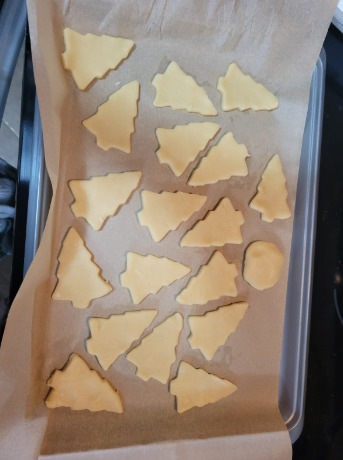
While the first batch is baking, I remembered I DID have a christmas tree shaped cutter, and these WERE supposed to be christmas cookies. I dug it out, and used it for the rest of the dough. I was getting a bit tired at this point, so these ones are a bit more lumpy and rushed. Oh well, I’m sure they’ll still be delicious
Batch 1 baked! I put them in for 11 min (recipe calls for 10-12) but I didn’t think they looked done at that point. Put them in for another 2, and that seems to have been perfect. Again, this is another one of those "your timings may vary" moments. What you're looking for is the very bottom edges of the cookies to have just a hint of brown on them. The tops should still be pretty pale. A couple of the ones on the edges here are a little bit extra brown (hard to tell in the photos), but overall these guys are looking good!

Quality assurance check!
So gooood

And batch 2! Did 12 min for these ones, because they were smaller and on a different kind of baking sheet, and they turned out perfect.

I ended up icing my cookies, but honestly you could genuinely leave them as-is, and they’re still a damn good cookie.
And there you have it! A step-by-step cookie tutorial/rant on how to make super tasty sugar cookies! Great for christmas, or any occasion, really!
I do a lot of baking and cooking, so I do have some baking equipment that not everyone may own, but hopefully I've offered suggestions for alternatives that folks can use for each step. I'm also no expert or professional, I do this for fun, but if anyone has any questions or needs clarification on any of the steps, I'm always happy to try to explain things in more detail! And if people like this, I might try to make another tutorial rant someday!
I hope y'all had fun making cookies with me!
#Baking#sugar cookies#Recipe#cookie recipe#Baking Tutorial#I'm just trying my best#I hope this helps someone somewhere!#long post
14 notes
·
View notes
Text

Want to smell like a yummy fresh baked gingerbread cookie?!
Make this for yourself or make a bunch for gifts!
Prep: 5 mins - EASY
1 cup of dark brown sugar
1/4 coconut solid oil
1 Tablespoon blackstrap molasses (FACT: molasses contains lactic acid and can help treat acne, eczema and rosacea. It also has anti aging antioxidants and it sooths skin!) So yeah...use it!
1 teaspoon cinnamon, dried ground ginger and 1/3 teaspoons of dried ground cloves.
Option: a teaspoon of vanilla
Mix all well in a bowl then transfer to mason jars. Add labels that say put on damp skin and scrub lightly. Wash off.
Also - warn them that they will smell like a snack so they might have to sing "catch me if you can I'm the gingerbread man" or replace with correct name :)

#diy#tutorial#recipe#craft#reuse#homemade#gift#sweet#recycle#upcycle#body scrub#scrub#ginger#gingerbread#brown sugar#molasses#christmas#christmas crafts#festive#holidays#happy holidays#coconut oil#skin#skin care#spices#cinnamon#cloves#vanilla#snack#smell
15 notes
·
View notes
Text
MAKING SOUPS THAT PHIL LESTER WOULD PROBABLY HATE:
WEEK 1 / ?

Starting strong with this plain ass vegetable soup I made because I’ve been having GI problems and needed something plain </3 if you want to follow my soup series it’ll be under #nikki’s soup series
I was bored so I made a YouTube video for it lmao it’s like thirty seconds and not that deep so follow along and make it if you want :)
I haven’t made cooking tutorials in forever and it was so fun so I might start making them again!
If you subscribed to my channel in 2017 and remember my old content too bad all my videos are private <3
P.s. if there’s a soup recipe you want me to try leave a reply or an ask so I can try it because I love soup <3
#mine#phil lester#amazingphil#soup#vegetable soup#cooking tutorial#college recipes#college cooking#soup recipes#soup recipe#nikki’s soup series
46 notes
·
View notes
Text
youtube
Drampa cookies by Prof. Rosemary's Lab!
20 notes
·
View notes
Photo

Source: http://frachella.tumblr.com
#Fashion trends#Digital art tutorials#Urban photography#Athleisure style#DIY natural skincare recipes
3 notes
·
View notes
Text
Learnt the hard way yesterday that if u put sugar in ur bread dough u best belief ubetter turn down that oven temp boy 😹😹😹
#The way i learn things is funny#Ill follow a very basic bread recipe and then never follow one again and just experiment by changing thingson my own#Im so allergic to tutorials#Tbh i guess its bc a lot of tutorials are just heres my absolutely perfect recipe so u can skip all the time and effort into being good at#This thing
8 notes
·
View notes
Text


Today I’m looking through old cooking tutorials from my 2010’s cookbooks🍰
7 notes
·
View notes
Text
Here we are, my tumblr full of food recipes and my tiktok full of crochet tutorials. That's what age is all about. An old, 28-year-old granny, with modern technologies...
5 notes
·
View notes
Text


Happy National Fairy Day!
In honour of today I'll share my personal favorite recipe for Angel milk! Angel milk is mostly for age regressors/little spacers but fairies are known to love eating sweet things anyway!
Ingredients
Milk
Sugar
Vanilla Extract
(OPTIONAL) cinnamon/honey
Method
Pour milk into a cup (as much as you'll drink)
Add a few tablespoons of sugar (as much as you like)
One splash of vanilla extract (or more depending on how much milk you have!)
Mix
Microwave until it's your desired temperature
Done!
Credits to smolbabybee on Tumblr for the recipe
#fairy#forestcore#fae#faecore#recipe#aesthetic#fairy folk#angel milk#little space#age regression#angel milk tutorial#forest#fairy painting#national fairy day#june 24th
18 notes
·
View notes
Text

Source: tsu_ya_ko_mama on Instagram
They have a full step-by-step tutorial on their page!
#anime#pokymon#pikachu#tutorial#bento#bentobox#kawaii#kawaiicore#kawaiifood#kawaiiart#kawaiiaesthetic#キャラ弁#キャラクター弁当#弁当#food#recipe#recipes#harajuku#cooking#healthyfood#weeb#otaku#aesthetic#love
21 notes
·
View notes
Text
Resource: Fiber Spider
First creator highlight of the year! Today I'm going to tell you about Fiber Spider, a crocheter on YouTube. Fiber Spider is actually the first person I learned an actual pattern from. I had made hats before - hats I did not wear and finally brought myself to frog. But his step-by-step tutorial, which he personally narrated with his charmingly soft voice allowed me to create this beautiful waffle stitch hat:
Hat from Tutorial

Hat That I Made

(while my hat looks a little off, I take full responsibility, having made it as a novice, and not fully understanding pattern language)
This hat, as of the time this picture was taken, has seen a few winters already, and has been through a washer and dryer a few times still coming out strong.
Fiber Spider showcases and teaches stitches, patterns, and various other crafts, like origami and baking. Mainly his channel includes tutorials for blankets and shawls. He has a Ravelry page as well.
He also narrates books! Currently he's reading the stories of L. Frank Baum (author of The Wizard of Oz).
Beyond all of that, he shares tutorials for boardgames, so if you're an indoors-hobbies person, Fiber Spider might be your guide.
#Crochet#patterns#pattern#yarn#yarnblr#yarn crafts#crafting#helpful#tutorial#amigurumi#shawl#crochet shawl#Hat#Hats#Baking#cooking#Resource#recipe#Narrator#free pattern#Fiber Spider#Book narration#Review
7 notes
·
View notes
Text
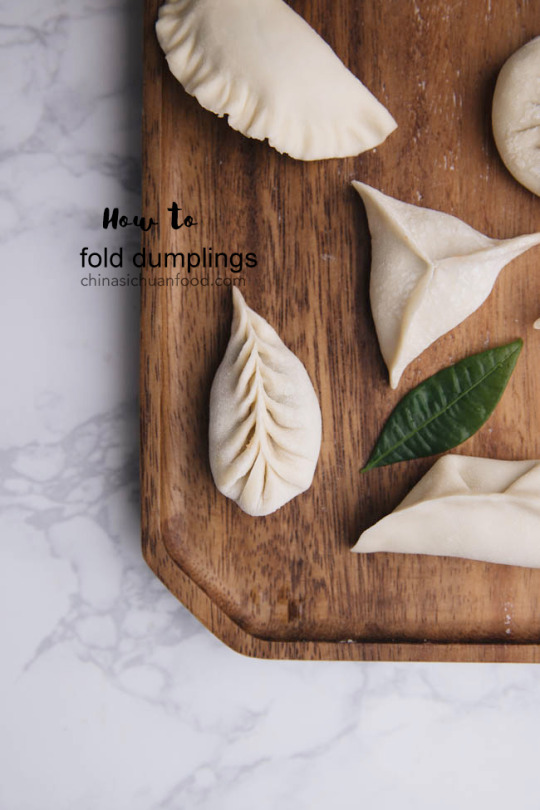
How to Fold Dumplings
Detailed guide of how to fold dumplings, popular types all covered.
✖✖✖✖✖✖✖✖
sew-much-to-do: a visual collection of sewing tutorials/patterns, knitting, diy, crafts, recipes, etc.
64 notes
·
View notes