#modification
Explore tagged Tumblr posts
Visit Tumblr Blog
Explore Tumblr blogs with no restrictions, modern design and the best experience.
Last Seen Tumblr Blogs


Fun Fact
Post activity is at the highest at 4:00 pm EDT; notes peak at 10:00 pm EDT.
Text

Clear Transparent Shell PSP 3000
#persona 2#innocent sin#eternal punishment#persona#psp#playstation#play station#playstation portable#transparent tech#modification#custom mod#old tech#tech#tech blog#cyber y2k#y2k#y2k aesthetic#y2k moodboard#y2kcore
453 notes
·
View notes
Text


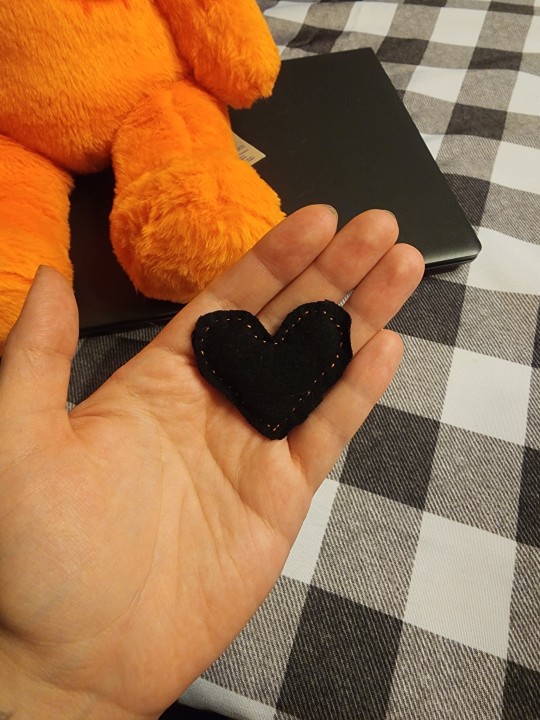


My pumpkin bear came lastnight and today with my sisters help I was able to go get them! I unstuffed them, created bean bags for their paws feet and tush, restuffed them and then took them back to my aunts where I commenced their top surgery!
First I trimmed the fur into the shape I wanted, and then I used some fabric markers to highlight the scars! I also darkened the leaf ontop their head cause it was too contrasting to the orange and hurt my eyes.
Then I ofc had to make their lil heart before putting it inside and sewing them up ♡ I decided to name them bug and they are dating Kuzya ofc cause we are plushies and we are in love ☆
#plushies#comfort#plushie#plush#stuffed animals#stuffed animal#playing pretend#plushblr#build a bear#bab#Kuzya#Bug#modification#plushy mod#top surgery#trans
63 notes
·
View notes
Text
Both of his eyebrows were littered with small silver rings and studs, some clustered so close together they overlapped. The piercings tugged at the skin, making his brows look uneven and perpetually furrowed.
His lower lip bore three large, mismatched rings spaced unevenly along its length. One dangled loosely, swaying with every movement of his mouth, while the others sat crookedly, pressing into his skin. Tiny studs adorned his cheeks, forming a haphazard line that accentuated the sharpness of his hollowed features. is earlobes were the most shocking of all. They had been stretched and gauged to such an extreme that the enormous silver rings hanging from them nearly grazed his shoulders. The lobes themselves looked raw and irritated, the skin stretched thin and scarred. In addition to the safety pin, his nostrils were pierced with small rings on either side, making his nose look almost animalistic. Every piercing seemed to amplify the grotesque transformation of his face, drawing attention to the deep shadows under his eyes and the gauntness of his cheeks.
James’ trembling hands reached for the collar of his shirt. Something beneath it felt… tight, almost restrictive. Pulling it off, he gasped.
His chest and arms were covered in tattoos—poorly drawn, crude, and entirely out of place on his once-pristine body. Across his chest, jagged black lettering spelled out “NO GODS, NO MASTERS” in an uneven scrawl. The letters were smudged in places, as though the ink had bled during the process. Beneath the text, an obscene caricature of a skull grinned up at him, its exaggerated features bordering on cartoonish. His arms were a patchwork of random designs, some overlapping in chaotic layers. A poorly drawn anarchy symbol sat on his right bicep, while crude flames licked up his forearm. Interspersed were vulgar phrases like “FUCK THE SYSTEM” and “BITE ME,” written in shaky, uneven lettering. His knuckles bore the words “HARD LIFE,” though the letters were misspelled and uneven, with the “R” in “HARD” noticeably smaller than the rest. His fingers were also adorned with tiny, random symbols—stars, dollar signs, and even a crudely etched smiley face. A snake coiled around his neck, its head resting just below his chin. The snake’s eyes were uneven, giving it a lopsided, almost comical appearance. Though he couldn’t see it, James could feel the tightness of fresh ink stretching across his back. The faint outlines of something large and angular were visible in the mirror—a chaotic mess of geometric shapes and dark smudges.
James’ face was almost unrecognizable.
16 notes
·
View notes
Text

Finally got around to modding my shoes more, the yellow paint is messy but i love it! Its hard to see on camera but theres also red paint splatters all over
15 notes
·
View notes
Text

Messengers Rouse by Leigh Schneider
#photography#leigh schneider#moth#art#pale#dark#goth#nu goth#gothic#grunge#style#tattoos#alternative#alt#tattooed girl#dark surrealism#modification
63 notes
·
View notes
Video
youtube
C-evo mod: Brazilians
#youtube#C-evo Mod#Civilization Evolution Mod#Mod#Modification#C-evo#Civilization Evolution#Brazilians#Brazil
3 notes
·
View notes
Text

#y2k aesthetic#y2k moodboard#y2k#tech#tech blog#playstation#psp#sony playstation#playstation portable#modification#console camera#console gaming
24 notes
·
View notes
Text
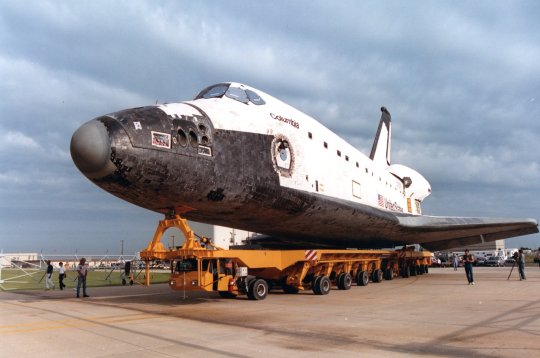

"Columbia (OV-102) returned to KSC after its 2nd Orbiter Maintenance Down Period (OMDP) overhaul to prepare for its 12th mission (STS-50 USML-1) in June. Later in the OPF Columbia was fitted with the 1st Extended Duration Orbiter (EDO) kit allowing for 14+ day missions."
Date: February 9, 1992
source
#STS-50#Space Shuttle#Space Shuttle Columbia#Columbia#OV-102#Orbiter#NASA#Space Shuttle Program#Extended Duration Orbiter Modification#EDO modification#EDO#modification#Kennedy Space Center#KSC#Florida#February#1992#my post
22 notes
·
View notes
Text
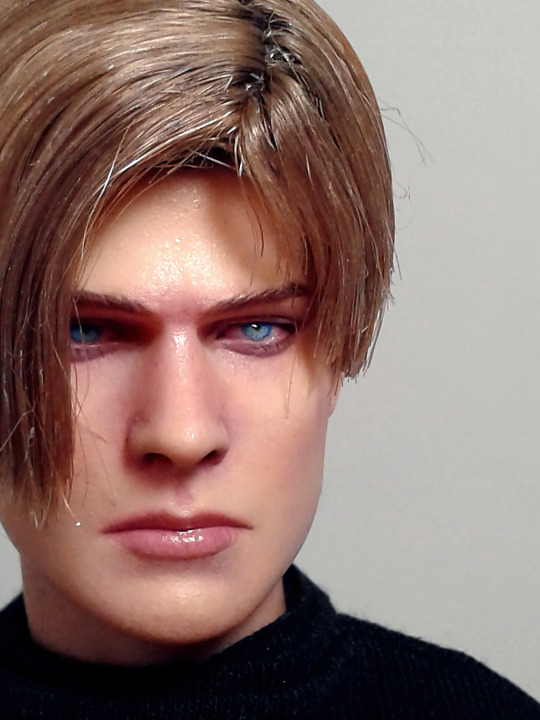
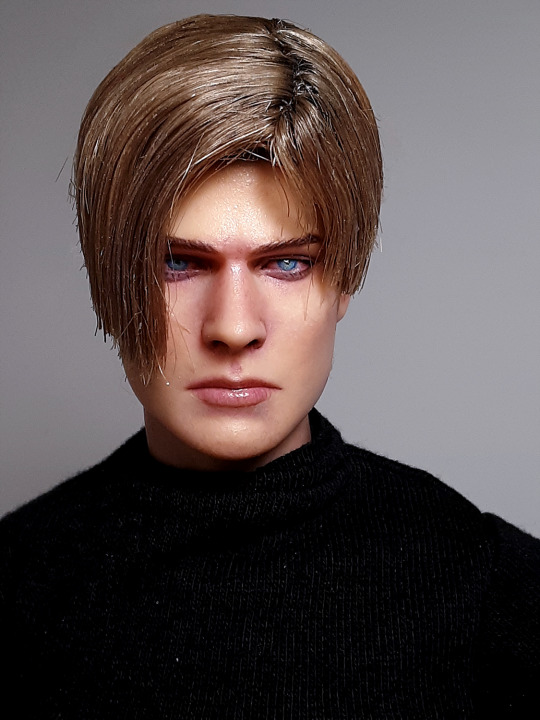
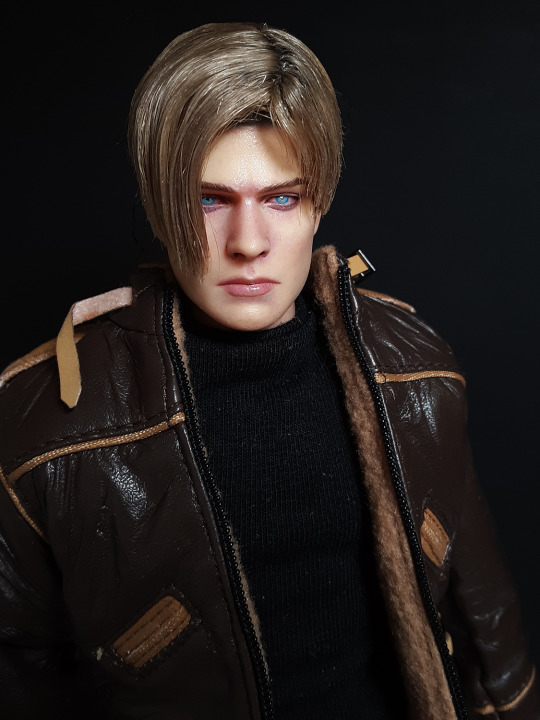

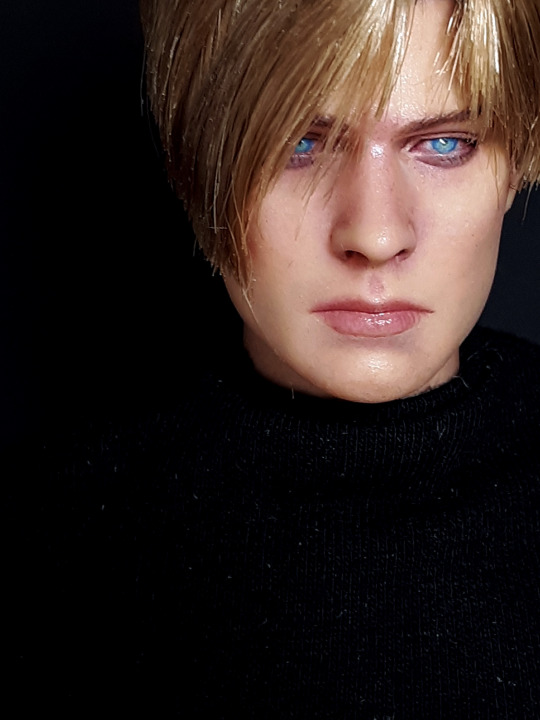
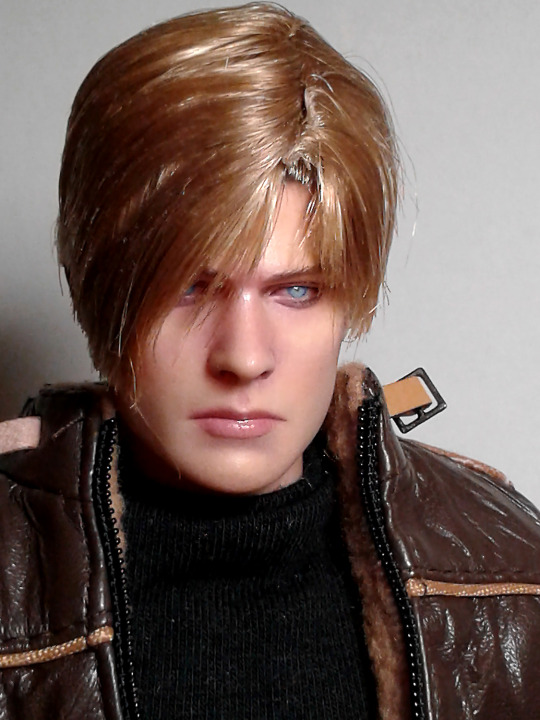

I modified my 3D artist OG-RE4 Leon S. Kennedy head sculpt. I also repainted him, for the gazillionth time, if that wasn't obvious. I have to say, modifying a tiny eyelid was pretty easy to do with the Vallejo Plastic Putty, the only issue is, it doesn't seem to sand all that well. It started to crumble when I tried to sand it. I let it cure for longer than 4-hours, when is supposed to take only one to two hours, according to Vallejo's own website. I had read mixed reviews about it sanding well, or not. I guess it doesn't? Kind of weird, considering it is meant to be filler for models, and then it goes without saying, meant to be sanded afterward for a perfectly smooth finish...?
Regardless, I feel it works well enough for me, for tiny modding projects. I am definitely going to use it again for my Leon, whom I feel happier about right now, but I still know that he's not accurate enough. He'll never be, because he wasn't sculpted accurately enough, and that's pretty sad. However, the only thing I can do is try to make mine as accurate as I can without having to pay someone else to 3D sculpt another one for me. I could try myself, but I live in the middle of nowhere and I don't want to have an adventure trying to figure out how to create a 3D sculp/mesh/file to then have it 3D printed somewhere. I haven't (3D) modeled anything in more than a decade. I feel like my old dusty 3D Max and Maya, are probably not it, for 3D printing and that's all I know. Since those were the programs, we were allowed to use in college, back in the dark ages. When I learned how to 3D model. I believe blender is the popular choice for 3D printing nowadays, but that wasn't allowed so I didn't even bother trying it. Of course, I am not going to be 3D modeling a head at this stage. I much rather mod this boulder of a 1:6 head sculpt. It's a huge head for what it is, and not accurate, but it's all I got! DX
I am happy that I found something that is less wasteful than a tiny .25 oz container of Aves Apoxie, and less expensive as well. I am probably going to try modding my Myou Bettina next, since I wanted to give him smaller eyes, but still don't want to waste money on Aves' clay, when I know I won't get even halfway through the tiny container. Now, I can actually try, without fear of wasting clay, money and possibly sanity. Modifying (relatively) tiny heads is a huge pain in the gut, but I still want my Leon to be more accurate, but not enough to pay anyone again for another failed likeness. I also want my Bettina to have much smaller eyes. He looks too baby faced for my taste. I do love my Leon so far, I feel he makes a gorgeous looking figure. However, I want my OG-RE4 Leon to be accurate and this is not it. I sanded his upper lid a lot, the 3D sculptor gave him te droopiest lids ever, I also sanded his jaw quite a bit -- Leon has a very roundish head. Not sure what the artist was thinking. I added an actual upper eyelid with the Vallejo putty, because the 3D-sculptor didn't give him any. Certainly not even close of an eye-shape as Leons, but I feel like I'm doing good progress. I wanted to see what the putty was like, before doing heavier eye mods. Now I kind of know, so I am comfortable moving on. I will try first on m Bettina, however, because that is an even larger head, with huger eyes to try plenty of times, without worrying too much about heavy damage (I hope!).
The 1st image and the last two were taken with my older than dust cellphone. I like the way those look, the "newer" phone adds a lot of noise/grain, for absolutely no reason, and also the colors are kind of gross, but they are all samsung phones, so I have no clue why the "newer" ones suck so badly -- I suck at taking photos as well, but I need all the help I can get. The "newer" phone, doesn't do me any favors. Sadly.
#LeonSKennedy#LeonKennedy#OGLeonKennedy#LeonScottKennedy#Leon Kennedy#Leon S. Kennedy#ResidentEvil#ToyPhotography#Photography#Modification#FanArt#ActionFigure#OnesixthActionFigure#OnesixthScale#1:6Scale#1:6#3DPrintedHeadSculpt#3DHeadSculpt#PUresincoldcast#EyeMods#EyeModification#PlasticPutty#ToyCustomization#Repaint#FigureRepaint#DollRepaint#ResidentEvil4#Biohazard4#CustomActionFigure#Biohazard
15 notes
·
View notes
Text
What do you think about that?
7 notes
·
View notes
Text


After hours of sorting through pearls and burns from glue guns , I can finally become a pearly lady.
4 notes
·
View notes
Text

Hybrid
#cars#classic cars#hybrid cars#rolls royce#battle cars#weird wheels#land rover#they see me rollin#silver shadow#Travis McGee#carmode#modification
2 notes
·
View notes
Text
bf that makes me get body mods and piercings.
pretty jewelry for a bellybutton piercing, bright bars for nip piercings. snakebites and venom piercings for more stimulation while i suck his dick. anything he wants me to get, mostly to make me look more attractive—proving im just a doll he can dress up.
#fakeboy#ftmtf nsft#forced detransition#detransition kink#detrans kink#body modification#modification
2 notes
·
View notes
Video
youtube
C-evo mod: Kärntner
#youtube#C-evo Mod#Civilization Evolution Mod#C-evo#Civilization Evolution#Mod#Modification#Kärntner#Kaerntner#Kärnten#Kaernten#Carinthia
2 notes
·
View notes
Text
Modifying a shift dress
I purchased this shift dress in 2015 or so, and at that time it just ~barely~ fit. It was a specially ordered style for a customer at a retailer I worked for at the time. The customer originally wanted a different style, and opted not to purchase this dress in the end. I couldn't pass up the opportunity to buy it with my employee discount.
I had to sew down the button placket with a hidden line of stitches to stop it gaping. A column shaped garment below the waist is a tough fit for me.

After about 5 years, it stopped fitting below the waist. I thought about selling it a couple of times, but the fabric is so fantastic, I kept it. I figured I would do something with it one day. And that day happened recently!
The fabric is gray linen with a sheer black interfacing, and cracked distressing throughout to show the sheer black. Creating that fabric was clearly quite laborious, and I've not seen anything like it elsewhere.

It still fit alright from neckline to bust, so I opened the side seams on both sides up to the underarm hemline. I was lucky that I didn't have to modify the sleeve or sleeve hem!
The dress originally came with a super wide obi style sash. I ripped the seams of the sash so I could cut two long arrow shaped strips. Think of the shape of a pencil: a long column with one pointed end.
I serged the sides of these pointed column pieces of fabric. I then sewed them into the side seams of the dress. It was fiddly sewing around the top of the point hear the underarm. I hand sewed that area on one side. Then bravely used my machine for the other side.
Here's the wrong side, where the point of the inserted fabric meets the sleeve hem:

Same area from the right side:

Here's a slightly tilted photo of the entire side seam with the strip of fabric inserted:

It wasn't too bad rolling up the hem to match what was already in place at the bottom:

It is remarkably easier to modify clothing that is made with simpler machines and quality materials!


Now I can wear it as a plain shift, or with the remaining sash (which is still quite bulky) tied in the front or the back.
It's been wonderful to have something old that's new again in my closet! Happy new year, happy new(sort of) dress!
3 notes
·
View notes