#modular switch board
Explore tagged Tumblr posts
Visit Tumblr Blog
Explore Tumblr blogs with no restrictions, modern design and the best experience.
Last Seen Tumblr Blogs


Fun Fact
12.7% of mobile users access Tumblr.
Text
modular switch board
We are one of the leading electrical solution provider in India. Gold Medal offers a variety of products for homes and businesses, including modular switchboards, LED lights, wiring, and accessories.
0 notes
Text
Purchase modular electric switch board designs online, from the convenience of your home. We are the correct stop. It is essential for controlling and protecting electrical circuits in a variety of applications. It ensures efficient and secure energy distribution, making it an essential component of modern electrical installations that require a moderate number of circuits. For more information, please call 022 4005 8914 or 022 4016 7856.
0 notes
Text
Top Electrical Tools Every Electrician Should Own

When it comes to electrical work, having the right set of electrical tools is crucial—not just for completing tasks efficiently, but also for ensuring safety, accuracy, and long-term reliability. Whether you are a seasoned professional electrician or an apprentice just starting out, using high-quality tools can make a significant difference in the outcome of your work. The right tools allow you to work smarter, minimize errors, and handle complex tasks with confidence.
Let’s take a look at the must-have hand tools for electricians that should be part of every professional’s toolkit:
1. Screwdrivers and Nut Drivers
A dependable set of insulated screwdrivers and nut drivers is essential for safely interacting with electrical components. Electricians frequently work with miniature circuit breakers, electrical panels, switchboards, and wiring systems that involve various fasteners. Having a range of screwdriver heads and sizes makes it easier to loosen or tighten terminals without slipping, which not only improves efficiency but also prevents damage to sensitive electrical systems. Insulated handles provide an added layer of safety against electrical shocks.
2. Pliers
Pliers are among the most versatile tools in any electrician’s toolkit. There are several types that serve different purposes:
Lineman’s pliers are great for gripping, twisting, and cutting heavy wires.
Needle-nose pliers are ideal for reaching into tight spaces.
Diagonal cutting pliers are perfect for cutting wires cleanly. These tools are indispensable for stripping insulation, making wire loops, and securing fasteners—particularly inside concealed metal electrical boxes, where access can be limited.
3. Voltage Tester and Multimeter
Safety and precision go hand-in-hand in electrical work. A voltage tester is a simple yet vital tool that quickly checks whether a wire is live. This is especially important before beginning work on any electrical component. On the other hand, a multimeter offers more advanced diagnostics by measuring voltage, current, and resistance. This tool is essential for troubleshooting and ensuring that systems are functioning within safe parameters.
4. Wire Strippers
When it comes to working with wires, a high-quality wire stripper is a must. These tools allow electricians to remove insulation from wires without nicking or damaging the copper conductors inside. Available in various sizes and styles, wire strippers make it easy to work with multiple wire gauges, improving both speed and safety.
5. Fish Tape
Fish tape is an essential tool for running wires through walls, conduits, and tight spaces. It’s especially useful in renovation and retrofit projects where access to wiring paths is limited. Fish tape allows electricians to pull wires across long distances without having to dismantle walls or ceilings, making the process far more efficient.
6. Tape Measure and Level
Precision is key in electrical work, particularly when installing outlets, switches, or junction boxes. A sturdy tape measure helps ensure accurate spacing, while a level ensures that components are installed straight and professionally. These tools are simple yet fundamental for any installation job.
7. Conduit Bender
For projects that involve conduit wiring, a conduit bender becomes a vital tool. It enables electricians to shape conduit pipes to specific angles, which is necessary for fitting them neatly into tight or irregular spaces. Proper bends not only make the installation look clean but also improve safety by reducing strain on the wires.
8. Safety Gear
No electrical work should ever begin without the proper safety gear. Insulated gloves, safety glasses, and rubber-soled boots are essential for reducing the risk of electric shocks and injuries. Following electrical tool safety tips is not just best practice—it’s critical for the well-being of both the electrician and the end user.
Conclusion
Equipping yourself with the right tools is one of the smartest investments you can make as an electrician. It boosts your efficiency, improves the quality of your work, and most importantly, keeps you safe. At Precision Electricals, we are committed to supporting electricians by providing top-quality accessories, including miniature circuit breakers, concealed boxes, and other essential components. With the right tools and supplies, every electrical task—from simple repairs to complex installations—can be completed with precision and confidence.
#electrical accessories#concealed box#gang box manufacturers#concealed electrical box#concealed metal box#piano type switch#piano switch#modular electrical switches#modular switches#mcb manufacturing company#mcb manufacturers#miniature circuit breaker#non modular electrical switches#electrical distribution boards#electrical fittings#modular switch manufacturer in mumbai#modular switches manufacturers#electrical switches manufacturers#electrical switches
0 notes
Text
Sometimes you might be in a situation where you're trying to use an appliance and suddenly the lights flicker. Thus, a power outage still requires flipping the switch on the circuit breaker box so that it can trip as required. One way of avoiding the problem of having circuits is to use a best modular electric switch board.
0 notes
Text
8 modular switch board | 8 module plate price | 8 modular switch board price list
Buy now modern 8 module cover plate on Eleczo,Discover a wide range of 8 module cover plate brands with great discounts only on Eleczo. Discover the best-selling 12 module switch plate on Eleczo online store. Fast shipping is available across India

0 notes
Text
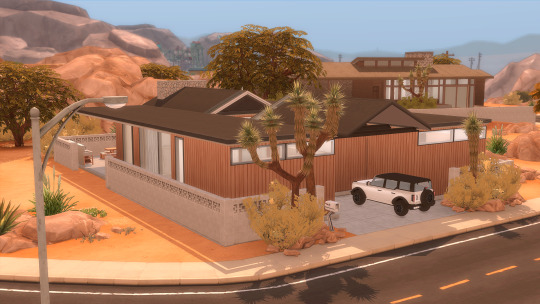
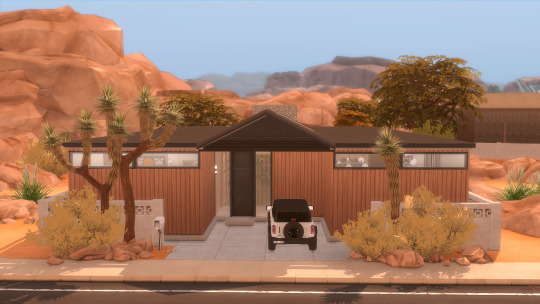


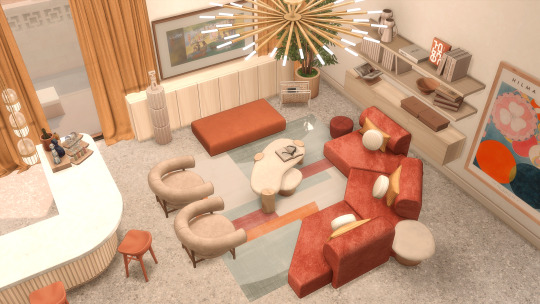
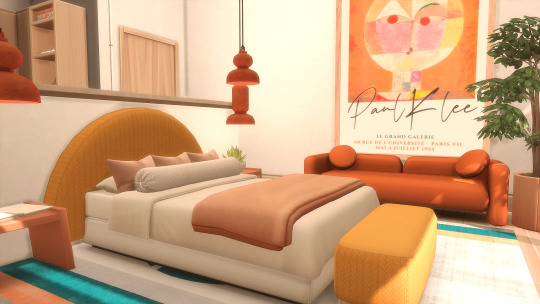

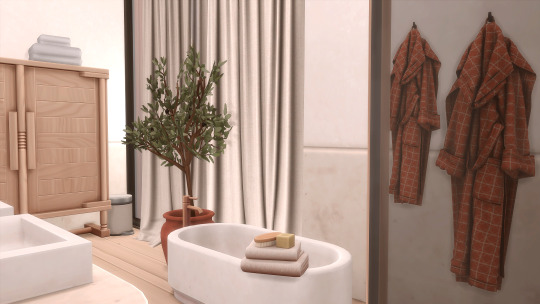
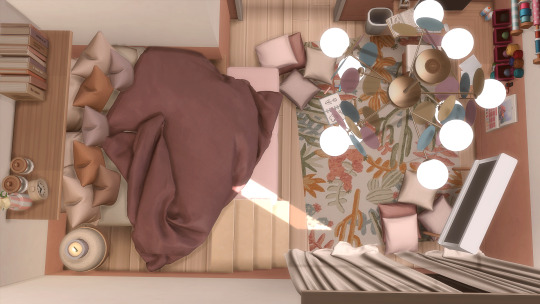
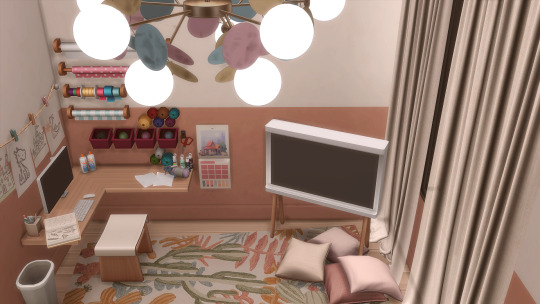
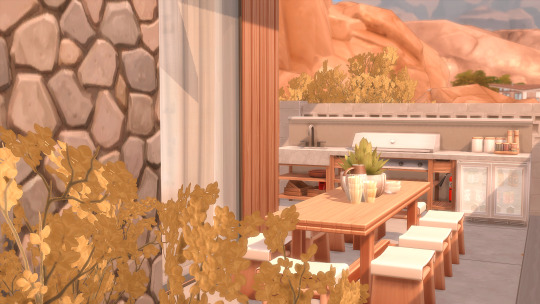
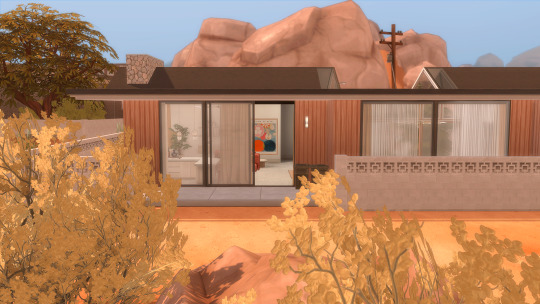
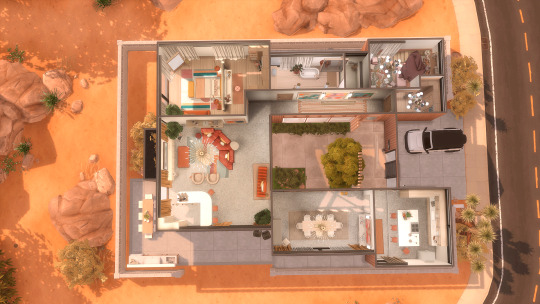
Sandtrap Flat
(CC List + Links)
World Map: Oasis Springs
Area: Bedford Strait
Lot Size: 30 x 20
Gallery ID: Simstorian-ish
Packs Needed
Expansion Packs
Cats & Dogs
For Rent
Get Famous
Get Together
High School Years
Game Packs
Dream Home Decorator
Parenthood
Strangerville
Kits
Desert Luxe Kit
Build Mode
Felixandre
Soho Pt. 2 (Light Switch Medium, Metal Door Medium)
Harlix
Orjanic Pt.1 (Glass Roof 2)
Harrie
Klean Pt. 2
Klean Pt. 3
Kwatei Pt. 1 (Double Arch Short, Front Door Glass- Medium, Front Door Solid – Short)
Peacemaker
Rustic Siding
Pierisim
Tilable (Plaster)
Woodland Ranch (Wooden Ceiling)
Sundays
Juniper Terrazzo Floor C
Buy Mode
Anniee-sims
Lilah Prints (Mesh Needed)
Anye
Prio (Duvet)
Townhouse (Loopchair)
Awingedllama
Boho Living (Wooden Arch Floor Mirror)
BlueTeas
Curtains
Jasmine Teenage Bedroom (Pendant Lamp)
Allen Seating (Walt Ottoman V2)
CharlyPancakes
Lavish (Clothing Only)
ClutterCat
Baby Boo (Coloring Book, Pouf, Tulip Vase)
BubbleGum (Calendar, Color Candle I Big)
Busy Bee (Glass Jars, Pen Holder, Pencil Case)
Cozy Cocina
Fairylicious (Cushion Pile, Kids Art)
Sunny Sundae Pt. 1 (Candle Small)
Sunny Sundae Pt. 3 (Alarm Clock, Open Book, Vanity Mirror)
CowBuild
Minotti Ottoman I
Felixandre
Berlin Pt. 3 (Desktop)
Kyoto Pt. 3 (Bath Tray)
Shop The Look S1 (Magazine Stand, Tassel Rug)
Shop The Look S3
Soho Pt. 1 (Sideboard, Woven Rug)
Soho Pt. 4 (Ficus Planter, Stool)
Harlix
Baysic
Baysic Bathroom
Harluxe (AC Control, Book w Sunglasses, Light Switch, Makeup Tray, Mini Bar)
Jardane (Counter, Grill, Sink – Deep)
Kichen (Bowls, Glasses, Plates)
Livin’ Rum (Bookstand, Coffee Table Book, Frame Tv, Stacking Box)
Orjanic Pt. 2 (Foxglove Vase)
Harrie
Brownstone Pt. 1 (Sink, Shelves)
Brutalist Bathroom (Bathtub, Block Vanity – Centre/Curved Left & Right, Frame Mirror – Large, Rectangular Sink, Shower, Tiled Decorative Shelf)
Coastal Pt. 7 (Mirror)
Country (Bed Vase)
Halcyon Kitchen
Shop The Look (Wooden Bowl)
Shop The Look 3 (Coffee Tables, Cushions, End Table)
JoyceIsFox
Simple Live #7 (Cooking Utensils, Double Chopping Board)
KiwiSims4
Blockhouse Dining (Pendants)
Piha Living (Chandeliers)
KKB
Citrus Room (Samsung the Serif Ver1)
Ledger Atelier
Mohan Living Pt. 3 (Sofa)
Nordheim Bathroom Pt. 1 (Bathrobe)
LittleDica
Delicious Kitchen (Paper Towel)
LorySims
2021 Ford Bronco
MyCupofCC
Bathroom Collection (Woven Bath Mat)
Nordica Sims
Art Poster 01
No Style x Woodland
Annika Meabh Sofa
Peacemaker
Creta Kitchen (Bar Fridge, Short Lineal Light Beam)
Ellipse (Ottoman)
Kitayama Bedroom (Half Moon Headboard)
Kassova Sectional
Matilda (Backpack, Jacket, Knit)
Pierisim
David’s Apartment Pt. 1 (Books 3 & 4)
David’s Apartment Pt. 2 (Nightstand, Open Book, Pile of Jumpers 2, Pile of Trousers 1 & 2, Shoes, Wooden Side Table)
MCM Pt. 3 (Metal Sconce 2, Narrow Rug Long, Narrow Rug Short, Wall Mounter Accent Table)
MCM Pt. 5 (Hair Dryer, Hair Straightener, Wigs)
Winter Garden (Olive Tree)
Pilar
Osaka Lamp Oval Large
Plush Pixels
Calm Sofa
Ravasheen
Knit Happens Clutter
Procrafination
RusticSims
Kind of Modular (Books, Deco Jar)
Loft Pt. 1 (Lampara de Pie Petrea)
Sooky88
Justina Blakeney x Loloi Area Rug
Mixed Modern Square Rug
Sundays
Canggu Pt. 3 (Pillows I)
Kediri Pt. 1 (Throw Pillow – Solids)
Swell Pt. 1 (Bolster Pillow)
TaurusDesigns
Eliza Walk-in Closet (Clothing Only)
Tuds
CRIB (Pendants – Small/Medium)
Winner9
Yokeda Wall Lamp Triple
DO NOT REUPLOAD MY LOTS.
DO NOT CLAIM THEM AS YOUR OWN.
DO NOT PLACE BEHIND A PAYWALL.
Tray Files: DOWNLOAD
#simstorian#the sims 4#sims 4#ts4#cc#ts4 simblr#build#sims 4 build#oasis springs#bedford strait#sandtrap flat#residential lot#colorful#interior design#blacksimmer
84 notes
·
View notes
Text
Surfboards
Hi! In Undercurrent, you will the choice to choose your own personal surfboard with their own personal skills and default appearance. There are three to choose from as early as in Chapter One. As the story continues, you'll get to customize your surfboard, possibly switch it out with another, and further enhance your own if you choose to keep it.
Surfboards:
Driftboard: They're sleek and responsive, hovering over water and terrain using grav-tech and syncs to your neural signals. This board is ideal for fluid movement, fast turns, and riders who are intuned with who they are.
Vortexrider: Engineered for control freaks, adjusting to any surface with hydrofoils and neural syncing. Great for technical runs and riders who play smart. Calculated, smooth, and deadly accurate.
Shredder: Fast, loud, and a little unstable. The Shredder is built for wild rides, hard turns, and hacked systems. The Shredder is perfect for risk takers and adrenaline junkies.
Appearance:
The Driftboard: Long and smooth with a liquid-metal sheen trimmed in soft, color-shifting neon that pulses subtly with mood. Clean lines, slightly curved tip, and an embedded interface near the tail.
The Vortexrider: Flat, sharp edges with a low-profile deck. It has deployable foils underneath and subtle glowing lines along the sides. Matte-black with a utilitarian finish, looking more military than anything else.
The Shredder: Chunky and aggressive, with modular parts that jut out like armor plating. Neon tubing snakes across the surface in electric pink, blue, and green, and some panels look jury-rigged. It's a Frankenstein type of board.
13 notes
·
View notes
Text
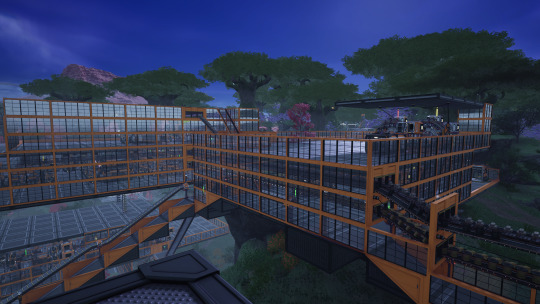
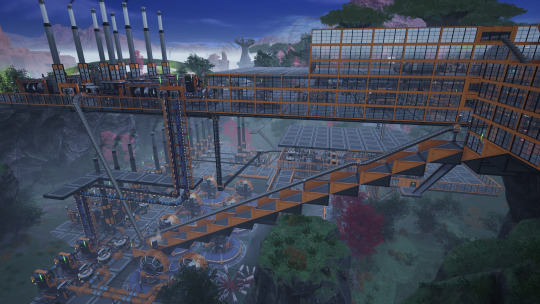
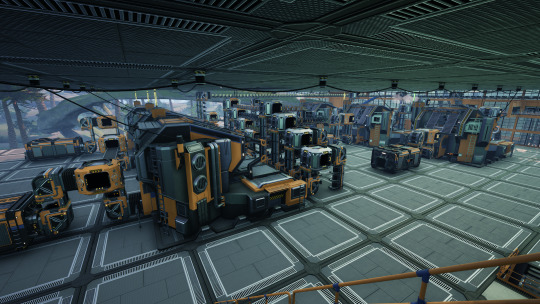
Current Satisfactory Build!
Long post under construction
It's time for another build post! this one is still pretty early but I wanted to show it off anyway
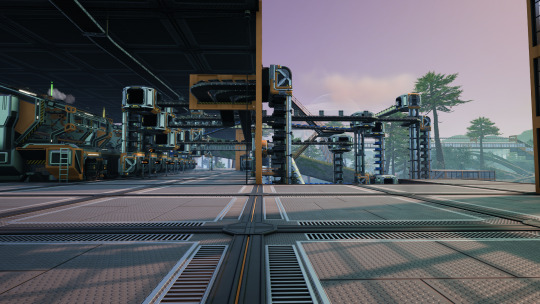
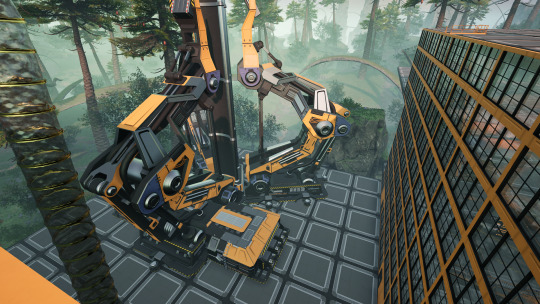
Oil processing, plastic, rubber, and fuel production, as well as 7 generators producing 1750MW. Belt hallway still in progress, debating turning it into a railway after train unlock but still undecided. Will eventually be ths site of Bauxite processing because of the access to water. Bauxite miner is on the mountain just behind

Caterium and steel happened to be right next to eachother so I combined them in one facility. Quickwire at the bottom supplying high speed connectors above and eventually more processes
Steel production is right behind the quickwire. Steel currently maxed out at mk4 belts producing 480 steel ingots/min, 120 beams, and 40 pipes. I have 30/min iron being processed into plates and rods for local use, and I have an uploader on each

in front of, and underneath steel, coal power chuggs away producing 1350 MW supplementing the fuel generators. Coal and sulfur mix to produce compacted coal for better fuel efficency
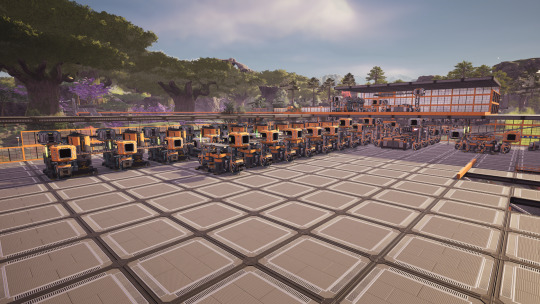
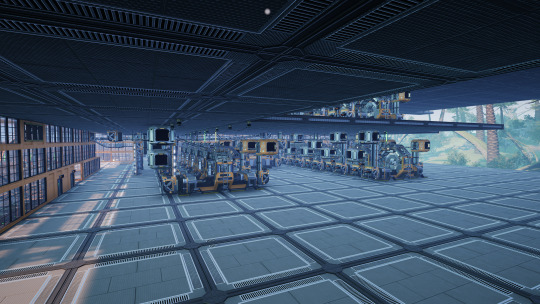
And now my favorite part! My main facility where ALL the magic happens.

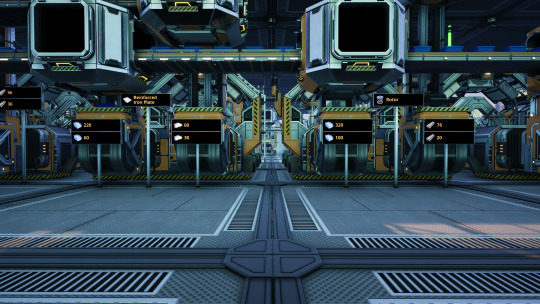
Floor 1 contains my main iron processing, churning out 600 ingots with plans to double.

The west end houses the copper plant making wire and cable throughout the rest of the facility, and also an uploader for each

Right next to copper is my backup biomass manifold. I have plans of installing priority power switches everywhere and using this as emergency power

Level 2 includes modular frames, rotors, smart plating, and reinforced plates, as well as
Copper sheets

Level 3 has circuit boards, versatile framework, automated wiring, stators, and motors
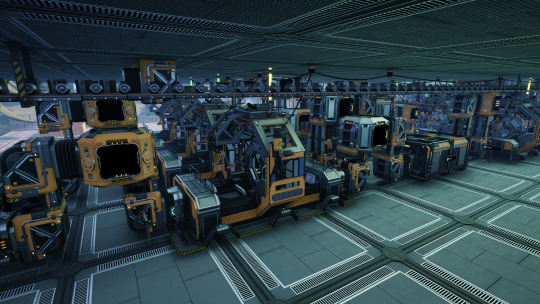
Level 4 houses almost exclusively manufacturers for: computers, heavy modular frames, adaptive control units, and modular engines. I may expand level 4 as necessary.
Belt spaghetti
Level 5 will make project parts for phase 4 though I may expand to level 6 as well. Not sure
Behind this megafactory is the space elevator. Its central location between the North and West wings make it easier move parts over

Not completely sold on this distribution system but I don't really have a better way at this particular point. Still serves the purpose but it is certainly spaghetti

Hopefully aluminum soon, trains soon, jetpack next
3 notes
·
View notes
Note
🐱📝
youtube
Boop boop boop :3
Ooh yay thank you for the excuse to rant about my tiny army men project. Here's all the ones I've done so far!

Together these amount to one unit each of Germans and Soviets for Flames of War plus a couple of cannons. I have the rest of the cannons all sprayed up and ready to paint. I feel I need to up my game a bit with the bases, as they're the most visually noticeable thing about the figures from a distance. At the moment I'm just sticking on some static grass and calling it a day.
In total I have another platoon/battalion of German and Soviet infantry, 3 more 76mm cannons, another PAK gun, 3 nebelwerfer rocket artillery launchers, and the command squads still to paint up of the infantry, and then 7 T-34s, 3 Valentines, 4 SU-85s, 2 Panzer 4s, 2 Panzer 3s, 2 Panthers, and a Tiger to go for the tanks. The tanks should be a lot quicker to do as they are not so tiny and the Soviet tanks just tend to be big and green. Only taken me about 5 months to get what I've done so far finished!
I also have a plan to make a gaming board for them to play. I found a tonne of polystyrene on the street which I'm planning to use as a base for it stuck to some mdf. The polystyrene was convenient all cut into 2' x 4' rectangles, so I'm going to assemble each separately so they can be stored easily in 3 sections and allow for some modular switching around of the map.

I'm going to carve a river into one section of polystyrene, and then use some grass textured paper that is sitting in my parents' loft from back when I first went insane about this to cover it and give it a nice texture. I really ought to read more into how to do this before just Doing It but I feel like I've got a good idea about what I want and how to do it.
What I'm less sure of is building other features into the polystyrene, like hills, and in the back of my mind there are other issues like whether the river is going to be too annoying a feature to permanently include on the map when it comes to gameplay (although I'm pretty set on it - I'm modelling a crossing over the River Psel during the Battle of Kursk). I want to be able to turn it into a city environment with lots of ruined buildings too.
But yes this has taken over my brain completely - it will take a while but I'm having a lot of fun :)
4 notes
·
View notes
Text
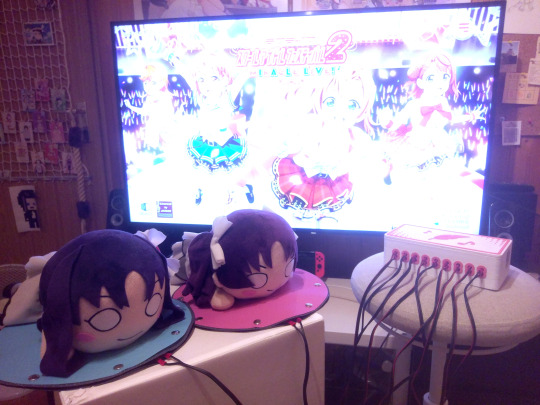
Making BIG SIF2 (Part 3)
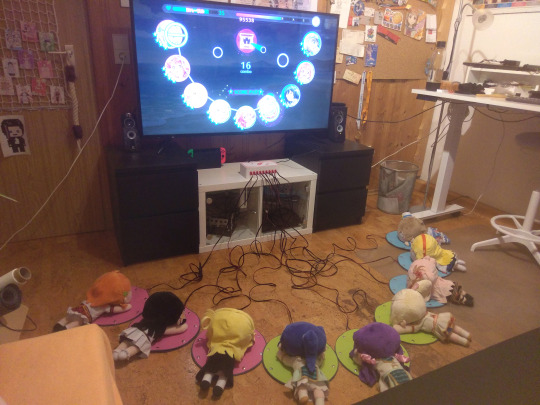
Hi! I'm back, and my BIG SIF setup is complete! That's not to say I'll never touch anything about it ever again, but it works great, and it also looks great now. Almost as if it's not just a pile of jank and bodges!
If you missed part 1 and part 2, the tl;dr is: I recreated an old SIF event where you stomp on big old floor buttons with eight other players to play songs together as a team. The other two posts talk about how the switches work, and various details about how it's all connected respectively, in case you are interested!
This post is another write-along of me working on stuff, and this time, it's about just finishing off the last few problems and to-dos - making a case for the electronics, and thinking about reliability and portability. Because of how many topics I want to cover, everything will only be covered relatively briefly. But if you want to know more about something specific, drop me an ask and I'll write more about that topic.
And just to have this important bit above the fold: I'm bringing the setup to Connichi on Saturday next weekend, in case you are there and want to play. More about that at the bottom of the post - but let's get started!
First off, an admission: I lied to you. Last time I said I made eight more floor switches. But that was not quite the truth:
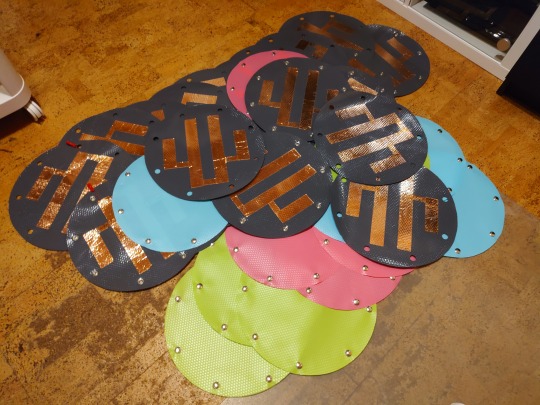
It was eleven.
So multiply everything I said last time by 1.33 - 12 total switches, with 36 shelf liner layers, 24 of those copper taped and soldered, 144 holes cut into 12 rug pad layers, 192 snap caps pressed by hand, 48 cables crimped with bullet connectors by hand. Needless to say, I have been taking it easy to give my wrist a break... The first question is probably "why?" - it's not like there's a 12-spot mode or something. That's true, I'll never use more than nine of the switches at the same time. The reason these extra three buttons exist is reliabilty: there can be three backup floor switches on standby, to swap in if something breaks.
The switches are probably fairly easy to fix if something goes wrong - just need to re-solder a connection or repair some copper tape, at most. But that will still be a problem when actually playing with the controller system, because it will always take some time, during which the game will not be playable. Having more switches on standby means you can swap out the faulty button to diagnose and repair it, while the game can go on! But the main thing is that I will not be having the means to repair switches in most locations in the first place. I'm not going to bring my screwdrivers, soldering station, multimeter, extra copper tape, cable and everything else to wherever we're playing! And there's a good chance there's no power or space for a repair station, anyways.
That's why I went with three backup buttons, so the game can go on even longer even if I I'm unable to do repairs right away. We'll just keep playing, and I'll repair the broken switches when I'm back home. And technically, because all the buttons are modular and I can swap out the separate layers, the system doesn't become unusable until four of the same part break! That should be more than enough reliability for almost any situation, especially since it probably won't be used for more than a couple hours at a time.


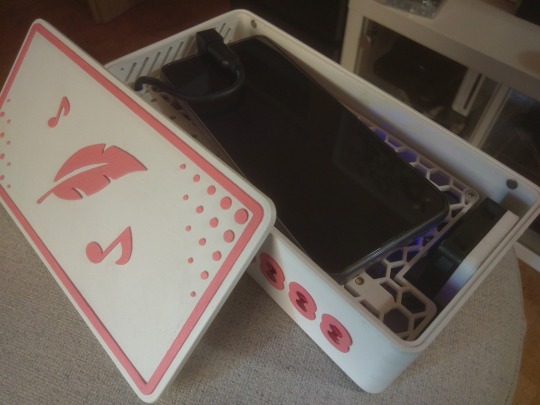
Next up: let's hide all of the work I did. Having the wiring visible is a little ugly, so let's just put everything in a box. Building an enclosure also makes transporting and setting up everything a lot easier, since I can already connect everything inside the box ahead of time, and then just have to plug in and place the switches on the floor. And the easiest way to make a bespoke enclosure is 3D printing it!
What I'll need - besides the obvious "places to put all of the adapters and the phone" - is some way to access the sockets and board from outside so I can plug all the cables in. Also, even though SIF2 isn't that demanding, it's still a closed box, so I'll probably want to add a fan. But that sounds doable, most of these won't be any problem. I can draw a box with some holes. I decided to go for OpenSCAD for this project instead of FreeCAD - while it would have been nice to have FreeCAD to plan cable routing and be able to set constraints and everything, I just didn't need all of these complicated features. Again, it's just a box with holes, and I can do that real fast in OpenSCAD.
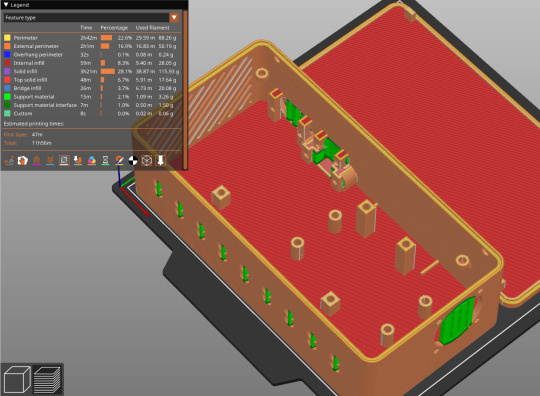

To make sure I get the box right the first try, I implemented every component as a seperate module in OpenSCAD, so I could print them seperately - for example, I could easily test print only the part of the wall that would house the Ethernet socket, to make sure that it fits perfectly before printing the whole box - and then adjust their position easily without messing up the rest of the components.
For the adapters without screw holes, I used threaded inserts that you melt in the plastic. I've never used them before, but since self-tapped holes wear out after a few times of putting screws in and out, I wanted to try out a more reliable method. These ones will last probably forever, and hold the screws in real tight. They were surprisingly easy to use, I assumed they would be harder to get straight... With this, I can use pillars with threaded inserts and some clips to screw in to keep the adapters in place, no matter how much the box gets thrown around. These threaded inserts can also be used to mount the arcade controller board and the fan. The fan even gets power right from the arcade board, which has 5V pins meant for LEDs - but they work just fine for anything else that needs power, too. I did add a resistor on the wire though, to turn down the fan speed and noise. Finally, to access the adapter sockets easily without having to open the box, I found panel mount extension cables for all the sockets that needed to be accessible outside - HDMI, Ethernet and USB-C (power delivery).
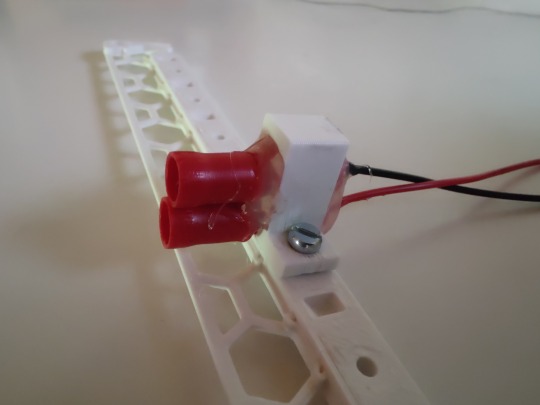

One difficulty was the sockets for the button cables. These are not some standardized kind of plug, after all, so I can't buy a panel mount cable like the others - I have to figure out how to mount these flush with the outside wall myself, and they have to stay in place, both when inserting and pulling out the cable. In this case, I was able to use the middle shelf I already had, that mainly exists to hold the phone, since it's placed right above the cable holes. I hot glued the sockets for the cables to some small clips, which can be screwed into the shelf with screws. Finally, the shelf can be aligned with the holes in the wall when placing it in the box, all the sockets being inserted at once. There's even a bit of a taper on the button cable holes, so the sockets self-align with them!
All that's left then is just jamming all the cables in there somehow. The only real awkward cable was the USB-B-to-A cable for the arcade board connection - the one that came with it was two metres long, far too much to fit in there. So I just cut it up and soldered it back together, reducing the length down to just 20 cm. That way, all the cables actually fit in there quite nicely, and there's plenty of space left for the board connector cables, so the middle shelf can lock everything in place!
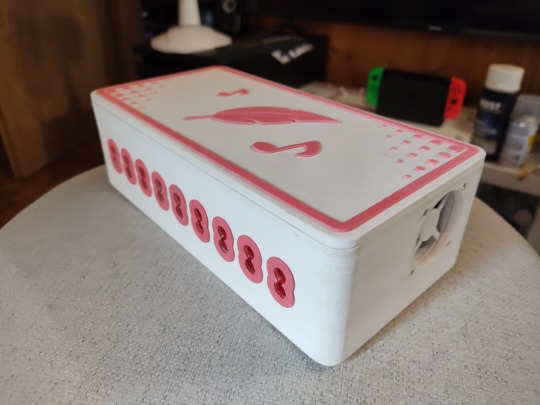
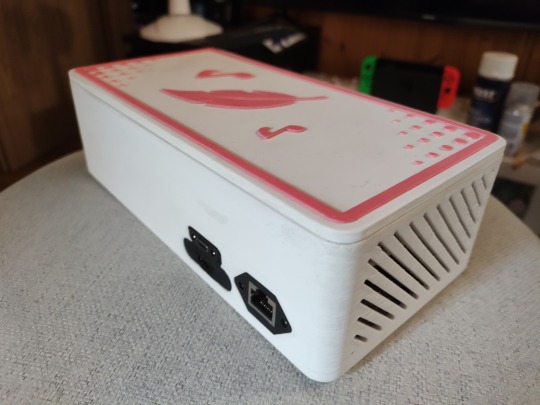
And here's the finished box! That's a good box, right?
As one little last addition, I worked on some decorations. A plain white box would look a little boring, after all, so I added some accents and icons on the front and top. While it would have been super easy to do by printing the lid in one go and changing to a pink filament for just the decoration layers, I thought I'd be smart and not buy an entire spool of filament just for that. Instead, I printed everything seperately in white filament, and then painted it all with pink acrylic paint instead. That made the decoration only cost half - but it was such a pain. Between all the coats of paint needed to get a result that didn't look completely awful, having to glue on all of the little dots on the lid by hand, and then the clear coat, which kept getting tiny bits of dust getting stuck in it which are painfully noticable on a white background... I should have paid the extra price for the filament, it would have been less work and looked much better. Hindsight is 20/20. At least it looks okay from "standing on the floor switches" distance, I guess.
To close up the box securely, I also ended up adding some magnets I had around, glued into holes in the lid and the box walls. This way, to set up the game, I don't need any tools - all the cabling in the bottom department can be done far ahead of time, and then, at the location, I just open up the magnetic lid to place my phone into it, plug the floor switch cables into the sockets, connect the output cable on the back of the box, and it's good to go! This was an important step for the project - instead of a nest of wires openly sitting next to the TV, it looks nice and properly finished now. It probably could have been done way easier by just grabbing a shoe box, punching some holes into it and just having extensions cables hang out, but I wanted to try doing it "right", and I think the result is absolutely worth it.
One more note: I tried to reduce printed waste by just printing small parts to test and only doing the full box print once I was sure everything would work - but all those test prints shown above are still waste of course. This is sadly something that cannot be avoided, but I can at least make sure to reduce the impact it has. The test prints are not getting thrown into the trash, but will eventually make their way to the Recyclingfabrik. If you've never heard of them, they're a company based here in Germany that makes 100% recycled 3D printer filament! That way, my useless prints won't get burned or end up in a landfill, but can instead be reused in the future. (Also, they make some really cool filament colours, I highly recommend checking them out!)
Alright, now that we made a really good box, it's time to get back to something questionably janky.
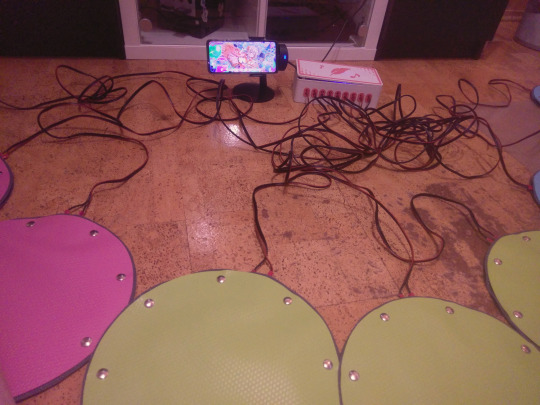
With everything in the box running off of the phone battery, the system already is completely portable! Imagine being able to set up a quick BIG SIF game wherever you are, at cons or something… but in order to do that, there's still one massive component missing, and that's a screen to play on. Obviously, playing the game on a 15cm phone screen while standing on buttons up to two metres away is not a good time. You need something bigger! The coolest thing would be to buy a battery powered projector. That would give you a giant picture and be easy to set up anywhere - I'll probably get one sooner or later, but I'm not pulling the trigger on that purchase just yet. It'll be a lot pricier than the rest of this project, and choosing an outdoor projector seems hard, anyways… (I've been looking for comparisions of images from projectors with different Lumen amounts in different light conditions, but that doesn't seem to exist. Maybe some of you know something similar?)
There's also portable monitors. These are mainly meant as a simple second screen for laptops when working, but they would be a good fit for this situation as well, since they only need a USB connection for power. Something like that could work if I could find a screen that is large enough, and it would also be quite easy to carry around with the setup, as these are usually pretty thin. But again, good ones are usually in the "costs more than this entire project in total" range. But the thing is, technically all we need is a screen and a battery. I think if we bodge things a little, we can use another device that has a screen and a battery, and is made for being portable: your laptop.
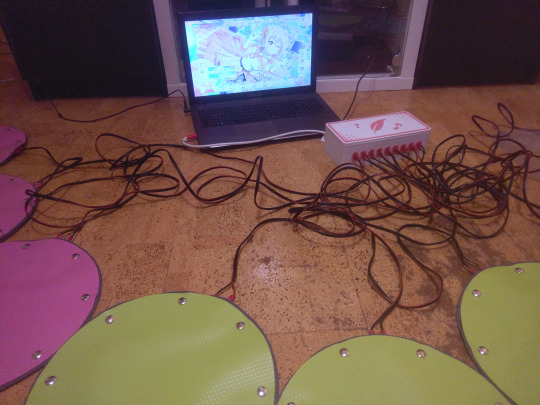
Let me introduce you to scrcpy, which is pretty much the best thing since sliced bread. If you want your Android screen on your PC screen, it is hands down the best way to do it. All you need is an USB cable - no app needed, no massive latency due to WiFi, and no need to send all your video data through some provider's remote server. scrcpy has almost no delay, you can use your PC keyboard and mouse, and you can even play phone audio on your PC with the newer versions. It's incredible, and I use it almost every day. So, plug the USB cable into the phone, and you can have SIF2 on the laptop screen! A luxurious 40cm screen, and speakers included, no emulators needed! But wait... now that the phone is directly connected to the laptop, I can't connect the other adapters in the box. It doesn't make sense to have the video on the laptop if I can't use the floor switches. Those are the entire point of the project! So, I can't use an USB connection.
But remember that Ethernet adapter I added? The main use for it was to be able to wire up to get a good and stable internet connection when the wireless one is too weak. But by using a special Ethernet crossover cable, two devices can communicate without needing a router or switch, and can create their own network just between them! scrcpy doesn't work just over USB, a network connection works, too - and I can set up that connection with just that cable. The video stream to the laptop is back up, and the board can still be connected! And now, we have a solution for a portable screen - it shows the game, it has it's own battery, and it's easy to transport! This approach is obviously not perfect - it's pretty janky, and "almost no delay" is still a delay - but for a quick spontaneous game of BIG SIF, this is a fine way to play.


The final hurdle to take is the internet connection the game needs. This is still a massive weak point in the portability, because, as every con-goer knows, it's basically impossible to use mobile internet at cons, as it is immediately overloaded by the amount of people there (or at least German con-goers know, idk if other countries are as bad). Unless you are have a provider that uses the higher tier mobile networks, it's either extremely slow or just unavailable. If the connection is laggy, that should still be enough to play, as you'd only have to fetch song info at the start of a Live - but SIF2 makes it difficult, due to how the game handles assets, specifically, the music files.
Every time the game loads a new song, it needs to download a file from the servers. That's the reason why, if you scroll through the song list quickly or hit the Random button a lot, the preview music doesn't play for a while: The game has to load all the server files for all the songs you stopped on... The song files are on your phone, but they are not complete. There's parts missing, and that file that has to be downloaded contains those missing parts. Without being able to download these server parts, the game would not be able to reassemble any song files, and could not play any music. And this is why a stable internet connection is so important for this project. We'd have no music at all without one, because every file must download it's missing parts from the servers! If only there was a way to keep the missing parts files, and store them on the phone so we wouldn't have to download them every time...
Trying to avoid too much technical details, here's the idea in a nutshell: I made an app that runs in the background while SIF2 is open, and whenever the game contacts the asset server, we trick it into instead requesting the missing parts file from that app. The app will handle the download instead, but in addition to delivering the file to the game, it will also save it on the phone. And if the same file is requested again, we just take it from storage instead of downloading it from the server again! The code for it is surprisingly simple, but the difference it makes is massive - it's noticable even with a stable and fast WiFi connection, because the delay between selecting a song and the preview starting is completely gone! So I'll probably keep using this app even when playing normally, but most importantly, this is going to work wonders on mobile connections! Maybe, that's enough to play the game even with things slow down... I won't know for sure until we get there.
And hey, while I already made an app, I also added a bunch of buttons to make setting up easier without having to use the shell. Everything that's needed to do a BIG SIF, on a single screen!
Anyways, we've come to the end! That's all for this project for now! Thank you for reading all the way to here!
If you're planning to make a BIG SIF setup for yourself and have any questions, or are just interested in more details on anything I've talked about, feel free to drop me a ask/message and I'd be happy to answer! If you want to come play with me on this setup though, that'll probably be a little harder for most people reading this due to distance, sadly :) But you could try checking my Mastodon, where I might be talking about any cons I'll be bringing it to! Just to mention it again, I'll be bringing everything to Connichi in Wiesbaden next Saturday (September 2nd)! I won't have a proper setup location, but if you have a group who's up to play, keep an eye out for the GenYoha!Kanan cosplayer - assuming I finish the cosplay in time, otherwise, look for a nesoberi-laden Lanzhu. If we can find a place where we don't annoy others, and the mobile internet connection plays nicely, maybe we can play a few rounds - so, see you there, possibly?
And as the last last last topic, here's some final thoughts - on things I'd like to change, or that you can consider changing if you make something like this yourself!
One obvious part of the project you could change is how the buttons work. I like the copper tape approach - it seems robust, is easy to build and fix in case of problem, and works reliably. But as long as you can make something that can close an electrical circuit, anything could work! One obvious choice would be contact sensor, but personally, I feel that's just a big point of failure, but maybe there's some cool approaches out there I didn't think of... One thing that I want to try though is replacing the rug pad with some light foam, about 1cm thick or so. As it is right now, the switches are lacking some kind of physical response, you don't feel much of a press. Maybe the foam would allow the button to have a "travel", being able to feel the switch depress and bottom out could be nice.
And regarding the caching app for the sever files, maybe I should just go all the way with that idea? Because ideally, I'd extend this concept to not just the missing part files, but generally all server communication. The app would just replay responses from when I logged in earlier instead, and have infinite plays without a connection! But I'm not sure whether I want to go down the private server rabbit hole...
The big thing I'd love to do though is improve the menuing. SIF2 is just not meant to be played with buttons - it's made for a touchscreen! And the keyboard solution I have right now works, but it's not a great solution. The floor switches will still be functional on the menus and mess around there, and the keys will also be usable on the screens they're not meant for. It's definitely not something I can just pass to someone and say "here, have fun". But what would the better approach be? The base requirement for any better interface would be to be able to track which screen the game is on, which is already a major problem. One thing I was able to come up with was making a helper app record certain regions of the screen, and doing image comparison - as in, "if this button is visible, the app must be on that screen". But that would be a whole different project, probably worth a full post in itself...
Okay, I'm stopping for real now. Too many ideas, not enough time, as always. byeee
#lovelive#love live#ラブライブ#school idol festival#sif2#スクフェス#i sure hope i can actually play this someday with someone#because con season is kind of about to be over#bad timing i guess haha#update january 2024: lol#lmao even
14 notes
·
View notes
Note
Got any background/setting lore for BUBBLGUM, her line of fellow robots, and their creators?
A lot of lore surrounding these bots is actually pretty up in the air at the moment, but I could probably talk a little about the very work in progress stuff I have at the moment!
BUBBLGUM is certainly not the first time I've drawn one of these highly modular bots!

Basically though, the entirety of their existence is essentially all of the fun of tinkering and messing with something in a fun, friend shaped package!
Pretty much any part of these robots can be changed out, the only constant being the absolute basic frame that every single one starts on. They can be bipedal, quadrupedal, taurs, or a whole lot else, all in a fun variety of shapes, sizes, and specifications (Though, size-wise, these machines rarely exceed 5 feet in height). Their facial projectors can be switched out for display panels, more protogen or synth-like. They can have on board machines like drink dispensers or coffee machines, the sky's the limit, especially when their creators happily encourage modding!
Some people make theirs to fill a certain utility purpose like cleaning or maintenance. While these machines can be mass produced to fill in those jobs, oftentimes, they're bought to fill a personal or companionship role. BUBBLGUM was custom-made to be a friendly companion (TUMM isn't only useful for heat regulation, ehehe).
As far as their creators go, neither of the two are named as of now, but they made a startup after realizing how fun it is to mess around with machines, eventually workshopping and prototyping how to make a base machine with an easily accessible modularity system so that experimwntation was fun rather than confusing. It took a while for the idea to catch on, but soon, the two of them had established themselves as legends in robotics history!
#hat answers#my ocs#my art#botfolk#its kinda funny how much ac6 got me back into all things mechanical#i dont remember the last time i drew bubblgum before having a spur of the moment pose idea turned mini lore dump yesterday
11 notes
·
View notes
Text
We are one of the leading electrical solution provider in India. Gold Medal offers a variety of products for homes and businesses, including modular switchboards, LED lights, wiring, and accessories.
0 notes
Text
Elleys' certified leader in modular electric switch board design& accessories, prioritizes customer tech advantage. Our innovative products, distributed by a vast network of reps, dealers & distributors, ensure the best modular switches in India.
0 notes
Text
Working on Sophias Story again :D
-> A little later, Sophia reached maintenance shaft [xy], where the main security system of the SD of the Abyss Chrusher was located. The light activated by a motion sensor flared up in cold white with a delay of a few seconds. Neon Xilkor tubes of the NX-6 series had this somewhat unpleasant habit, which the manufacturer Asterisk never rectified. Despite this, Hallinger-FTL continued to install them in all maintenance rooms of their ship series to this day. The Davar class in particular suffered from this fact, as it had a higher number of such areas due to its modular design. As a result, Sophia had only been able to recognise the large control cabinets and component racks by the myriad of flashing LEDs when she arrived. This sea of red, orange and green diodes, which greeted her auspiciously from the steel racks, secretly watched over the entire crew and ensured that the safety units of the individual SERAHs were working.
Now that the white light flooded the room, she saw it in its entirety, and with it the technology inside. In contrast to the blinking confusion of the Sevix control racks on the right side of the room, the Servagul control cabinets on her left, unusual for a Davar-class ship, emitted a soft green glow. The reason for this was that Servagul built light panels into the doors of their products, which no self-respecting shipbuilder needed. Such nice lighting did nothing but waste power unnecessarily. Sure, ships like the Abyss Chrusher might not lack power, but that was no reason to be so wasteful.
Shrugging her shoulders, the engineer lifted her tool and the testing device before taking them to the control cabinet labelled SUR-2, where she set them down. She unlocked the door with her CAM and the handle whirred out, allowing her to open the cabinet. Sophia sighed, pulled open the cupboard door and, coloured by the light from the front panel, saw another flood of flashing or glowing diodes emanating from the security register cards. It was a sight that filled the engineer with joy, because she had hardly been able to wait to get back into the bowels of the Abyss Chrusher, but the work that was to follow was rather dull. So she plugged her headphones into her CAM, put them in her ears and switched on an album by a band Liv had shown her a few days ago. A harsh guitar riff accompanied by the vocals of a woman singing in the language of the Marlan system rang out.
She then began checking the security tabs, which initially consisted of informing the SD-SERAH of her work via the control panel in the top frame of the device. In fact, Sophia was only slightly keen on an emergency lockout of the SD, even if she could override it with her system authorisations. Basically, you had to give Servagul and Sevix credit for the cleverness of their products. After all, the automatic security system, which according to Ela - unfortunately there were no plans on this subject - summarised one subsystem of the drive per cabinet in order to pass them on to SERAH in a bundle.
You could imagine the tabs and their subsystems as the nervous system of a body, which transmitted every pain of the machines to the consciousness or to an AI. SERAH then reported the information to the Abyss Chrusher's SAM, the ship's main AI, which ensured that appropriate action was taken. What the SERAH was to the SD, the SAM was to the entire ship.
Sophia pulled a small screwdriver from the side pocket on her left arm. She used it to loosen the two neck screws on the top and bottom of the front panel of each of the seven assemblies. She was then able to pull them out by the handle to insert them into the test device. This established a serial, wired connection with the fuse register in order to then interrogate the main function of the unit on the two circuit boards of the modules. For this purpose, the test device simulated a fault by sending a specific signal sequence via the bus interface. The module processed this within a few femtoseconds and signalled an alarm back to the test device. At least that's how it worked when everything was OK. The process only took a few blinks of the eye until the technical measurement results - such as resistance, time and induction values - appeared on the display of the test device. Confirmation of the success or failure of the analysis could then also be obtained.<-
The story of the empty sky - 1 Dreams of electronic tears Chapter 10, A fairy tale of normality
#writing#booklr#books#books and reading#books and literature#writerscorner#author#books & libraries#writers on tumblr#science fiction#science fantasy#spaceship
2 notes
·
View notes
Text
Seven Hundred Signs
The Seven Hundred Signs of the Unseen, Alice White, 2013
Alice White is quite the multi-talented individual. She's a solid game designer, and writes clearly, but her main skill is as an artist. Seven Hundred Signs puts her creative talents front and center.
The game's core conceit is that there is a hidden world layered beneath our own, "the Unseen", with magical conspiracies, invisible portals, impossible buildings, astral technologies, etc. People disappear from our world and end up trapped in an in-between state, from which they eventually escape. The way in which they escape - ripping, bargaining, squeezing, etc. - sets their character type. That's Session 0. After that the game revolves around various major factions and their quests for worldly power, often by acquiring magical power.
You've heard this setting's story before, but that doesn't make it bad. It just means that you can take bits and pieces from Unknown Armies, Delta Green, Over the Edge, Mage: The Awakening, Underground, Living Prism, Kingdom of Nothing, JAGS Wonderland, Night's Black Agents, ConX, Nahual, and more and they'll all fit in your game without too much extra work.
The mechanics are taken from Exacting Calibration, a 4000-word game in the same lineage as Snow & Silence. It uses a deck of playing cards that you write on and alter as the game goes on, a little like "legacy"-style board games. Your character might want there to be more 3s in the deck, for instance, because one of their powers triggers when a 3 comes up, so they might quest for the ability to add an extra diamond to the 2 of diamonds. Or you can place special sigils on cards, which lets you reduce ill effects or trigger critical successes and unseen power surges. It's a fairly slow progression, but by the end of the game the deck is pretty literally stacked in your favor. Balance is not necessarily great. The number of people playing also has a major effect on the odds of a particular card coming up. We'll eventually see those kinks get ironed out in Break of Night (2021), but for now it's still a bit wonky.
The game really shines in its layout and artwork. Full-color two-page spreads are common. Text is placed where it reads clearly, without trying to get too clever about it. On pages that are mostly text, there's still always at least one piece of art - things like a character walking past a streetlight in a bottom corner, or a monster creeping out of the seam in the center of the book.
Two intertwined stories run through the book's art: one of redemption, one of corruption. Different factions have their own subtle color themes. That makes for a really cool moment when the color of someone's wallet makes you realize that they've switched sides. The Unseen is painted in a hyperreal fashion that contrasts with the more typical painting style of the Common World (our world) in a way that makes it feel more real and more important.
There's a little bit of weirdness in the specific conspiracies - some of them are connected to real-world antisemitism and pseudoscience - but it seems like Alice was genuinely unaware of that at the time she wrote the game. Ten years ago I would not have possibly guessed that lizard people theories, of all things, are connected to antisemitism... but it turns out that if you dig deep enough in almost any conspiracy theory, someone starts spouting off about "Elders of Zion" and it alllll rolls downhill. Anyway, like I said, it doesn't seem to be intentional here, and the setting is modular enough that you can remove the problematic elements.
Seven Hundred Signs was expensive when it was first published, and it's only become more so since then. Your best bet may actually be the art book section of a used bookstore. Alice left the RPG scene for computer game visual design back in '15.
#rpg#ttrpg#imaginary#indie ttrpg#unreality#Weird how these signs always come in suspiciously round numbers#Like I wouldn't be surprised to see 333 signs#But having i dunno 419 signs? Who even does that?
1 note
·
View note
Text
How Do Power, Motor & Robotics Development Tools Drive Innovation in Automation?

Introduction to Modern Development Ecosystems
As the era of intelligent machines, automation, and smart manufacturing continues to advance, Power, Motor & Robotics Development Tools have emerged as essential components in transforming ideas into functioning prototypes and commercial solutions. These tools serve as the backbone for developing precise and reliable control systems used in a wide variety of sectors—from industrial robotics to electric mobility.
With the increasing integration of microcontrollers, sensors, thermal management components, and electronic controllers, development tools offer a modular and practical approach to building sophisticated electronic and electromechanical systems.
What Are Power, Motor & Robotics Development Tools?
Power, Motor & Robotics Development Tools consist of hardware kits, interface boards, and control modules designed to help developers and engineers test, prototype, and deploy automated systems with precision and speed. These tools make it possible to manage current, voltage, mechanical motion, and real-time decision-making in a structured and scalable manner.
By combining essential components such as capacitors, fuses, grips, cables, connectors, and switches, these kits simplify complex engineering challenges, allowing smooth integration with controllers, microprocessors, and sensors.
Exploring the Primary Toolsets in the Field
Power Management Development Tools
Efficient energy management is crucial for ensuring stability and performance in any robotic or motor-driven system.
Development boards supporting AC/DC and DC/DC conversion
Voltage regulators and surge protection circuits for safe energy flow
Thermal sensors and oils to maintain system temperature
Battery management ICs to control charge-discharge cycles
High-efficiency transformers and current monitors
Motor Control Development Tools
Motor control kits are built to manage torque, direction, and speed across a range of motor types.
H-bridge motor drivers for bidirectional motor control
Stepper motor controllers with high-precision movement
Brushless DC motor driver modules with thermal protection
Feedback systems using encoders and optical sensors
PWM-based modules for real-time torque adjustment
Robotics Development Tools
Robotics kits merge both mechanical and electronic domains to simulate and deploy automation.
Preassembled robotic arm platforms with programmable joints
Sensor integration boards for object detection, motion sensing, and environmental monitoring
Wireless modules for IoT connectivity using BLE, Wi-Fi, or RF
Microcontroller development platforms for logic execution
Mounting hardware and cable grips for secure installations
Benefits of Using Professional Development Tools
Advanced development kits offer more than just experimentation—they serve as stepping stones to commercial production. These tools minimize development time and maximize productivity.
Enhance system performance with modular plug-and-play designs
Enable easy integration with laptops, diagnostic tools, and controllers
Reduce design errors through pre-tested circuitry and embedded protection
Facilitate rapid software and firmware updates with compatible microcontrollers
Support debugging with LED indicators, thermal pads, and status feedback
Key Applications Across Industries
The adaptability of Power, Motor & Robotics Development Tools makes them suitable for countless industries and applications where intelligent movement and power efficiency are essential.
Industrial robotics and pick-and-place systems for manufacturing automation
Smart agriculture solutions including automated irrigation and drone control
Automotive design for electric vehicle propulsion and battery systems
Aerospace applications for lightweight, compact control mechanisms
Educational platforms promoting STEM learning with hands-on robotics kits
Essential Components that Enhance Development Kits
While the kits come equipped with core tools, several other components are often required to expand capabilities or tailor the kits to specific use cases.
Sensors: From temperature and light to current and magnetic field detection
Connectors and plugs: For flexible integration of external modules
Switches and contactors: For manual or automatic control
Thermal pads and heatsinks: For preventing overheating during operation
Fuses and circuit protection devices: For safeguarding sensitive electronics
LED displays and character LCD modules: For real-time data visualization
How to Choose the Right Tool for Your Project
With a vast array of kits and tools on the market, selecting the right one depends on your application and environment.
Identify whether your project focuses more on power management, motor control, or full robotic systems
Consider compatibility with popular development environments such as Arduino, STM32, or Raspberry Pi
Check the current and voltage ratings to match your load and motor specifications
Evaluate add-on support for wireless communication and real-time data processing
Ensure the tool includes comprehensive documentation and driver libraries for smooth integration
Why Development Tools Are Crucial for Innovation
At the heart of every advanced automation solution is a well-structured foundation built with accurate control and reliable hardware. Development tools help bridge the gap between conceptualization and realization, giving engineers and makers the freedom to innovate and iterate.
Encourage experimentation with minimal risk
Shorten product development cycles significantly
Simplify complex circuit designs through preconfigured modules
Offer scalability for both low-power and high-power applications
Future Scope and Emerging Trends
The future of development tools is headed toward more AI-integrated, real-time adaptive systems capable of learning and adjusting to their environment. Tools that support machine vision, edge computing, and predictive analytics are gaining traction.
AI-powered motion control for robotics
Integration with cloud platforms for remote diagnostics
Advanced motor drivers with feedback-based optimization
Miniaturized power modules for wearable and mobile robotics
Conclusion: Is It Time to Upgrade Your Engineering Toolkit?
If you're aiming to build smarter, faster, and more energy-efficient systems, Power, Motor & Robotics Development Tools are not optional—they’re essential. These kits support you from idea to implementation, offering the flexibility and performance needed in modern-day innovation.
Whether you're developing a prototype for a high-speed robotic arm or integrating power regulation into a smart grid solution, the right development tools empower you to transform challenges into achievements. Take the leap into next-gen automation and electronics by investing in the tools that make engineering smarter, safer, and more efficient.
#Power Motor & Robotics Development Tools#electronic components#technology#electricalparts#halltronics
0 notes