#my blender guides
Explore tagged Tumblr posts
Visit Tumblr Blog
Explore Tumblr blogs with no restrictions, modern design and the best experience.
Last Seen Tumblr Blogs


Fun Fact
Tumblr Inc. has $15.1M in annual revenue.
Text
How to Kitbash (or Head Hack) Models to Different Rigs
Kitbashing (aka "Head Hacking" in Source communities) is the technique of combining models together to create something new. This can be useful for allowing a character to have a different outfit or body. In this guide, we will be combining Sniper's head with Spy's body, as an example.
Kitbash Guide:
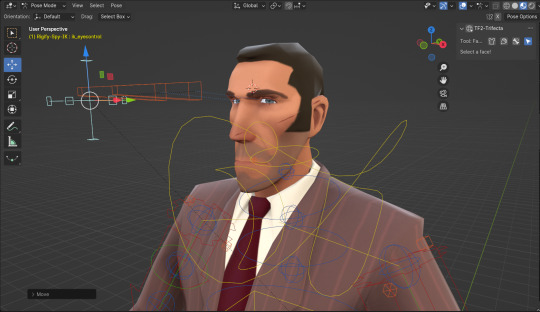
Create a scene with the two models you want to combine. Position them to be in the same spot. Hide the visibility of the armature of the model you want to keep the head of. In this example, the rigs are IK/FK Rigify armatures, but FK rigs should work too with this method.
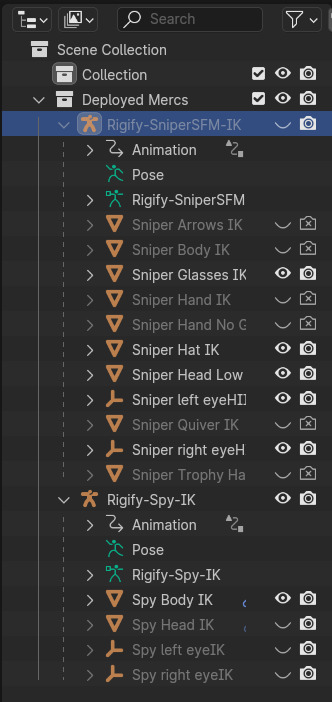
Hide (viewport and render) visibility of the old head (Spy's) of the model you want to keep the body of (via the Outliner window). This is to make it eaiser to see what you're doing, and to prevent seeing the head when you're animating and rendering the armature.
Also hide the visibility of any meshes you don't plan on using for the final kitbash. (see: image)
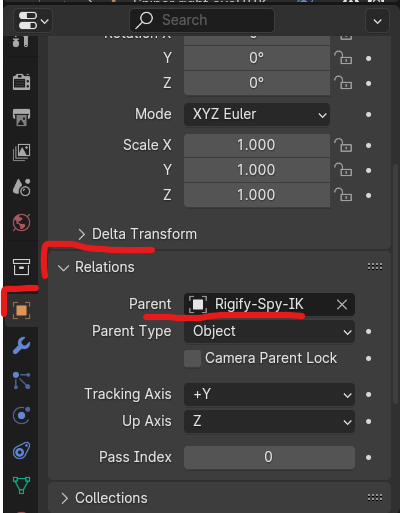
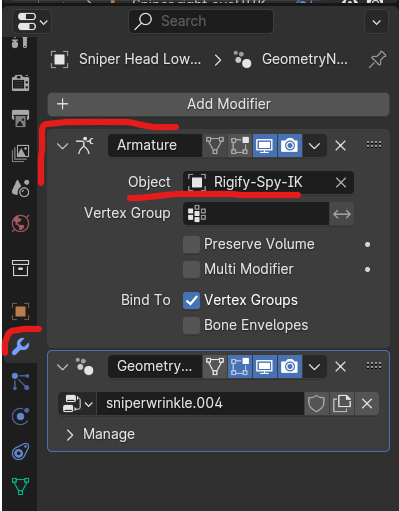
Reparent the Head Mesh: Select the head mesh of the head you want to add on (Sniper's) and go to the Object Properties tab. Under Relations > Parent, change the value from Sniper's rig to Spy's. The head is now parented to Spy's body.
Edit Modifiers of the Head Mesh: In the Modifiers Property tab, Change the Armature modifier's Object value to Spy's rig. The head should now follow Spy's head controls.
The Eye Controls: Select the left eye Empty sphere of Sniper's rig (Sniper left eyeHIIK). Snap the Viewport Cursor to the Empty's location (Object > Snap > Cursor to Selected). Set the Viewport Cursor to be in the same location of the left eye Empty sphere. Go to the Constaints property tab. Edit the Track To modifier's Object value to Spy's armature. Do the same for the Copy Scale modifier. The eye Empty will have moved position, which we don't want. Snap the eye Empty to the Viewport Cursor (Object > Snap > Selection to Cursor). Repeat these steps for the right eye.
Reposition the Head: (If you also want to include additional meshes from the old/Sniper's model, like his hat/sunglasses, see the "But what about Sniper's hat?" section below before doing this next step.) Select the head mesh, any additional meshes you want to add to the new rig, and the eye empties of the head you're adding. Move head mesh (and the additional things you've selected) in place, using the old head's placement as reference (toggle its viewport visibility on/off).
The head and eyes should now move with the new body rig. In this example, Sniper is wearing Spy's suit.
But what about Sniper's hat? And his sunglasses? Or other item the old rig has a control for that the new rig doesn't?
You can add an additional bone to the new rig by selecting the armature, switching to Edit Mode, and selecting Add > Single Bone. Move the bone where you want it (you can snap the viewport cursor to the old rig's hat control and then snap the new single bone's head to the viewport cursor), set the bone's parent (via the Bone Properties > Relations > Parent value), and rename the bone to the same name that bone on the old rig has. Using the same name is important, because that tells Blender what assigned weight paints (on the mesh) the bone should control.
To find the name of a particular bone, select it from the old rig and check its name in the Bone Properties tab (if you have trouble finding/selecting it in Edit Mode, switch to Pose Mode and select the control, then switch back to Edit mode. It will now be the bone selected). Also make note of the bone's Relations values in the same tab.
Then reparent and edit the modifiers of the hat mesh the same way you did for the head mesh.
Selecting the bone in Pose Mode should now move the hat.
This same methodology can be used for anything else you want to add to the kitbash that contains weight paints.
Tip: I recommend doing these steps for any additional meshes you plan on using just before the "Reposition the Head" step from earlier. That way, when you reposition the head mess and eye Empties, you can also select the hat and sunglasses and reposition them together to make sure they line up correctly.
But now Sniper's hands look too small! How can I make them more Sniper-sized?
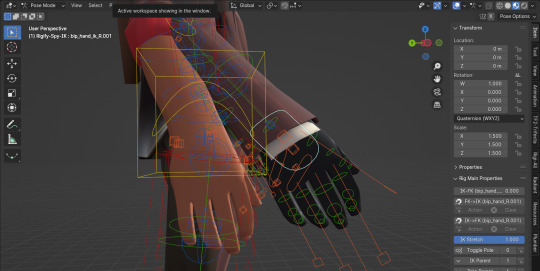
You can select controls for different body parts in Pose Mode and scale them to change the size of the corrosponding body part. Child controls should scale accordingly.
In this example, Spy's hand control has been scaled up by 1.5 and becomes a similar size to Sniper's.
I hope you have found this kitbashing guide useful, and I am looking forward to all the mixmatched models you make in the future!
9 notes
·
View notes
Text
So I've created a little 3D process guide on how I created this Rowbot scene from Oneshot. Do note that this is NOT a 3D modeling tutorial and rather a process of how I've went through 'start to finish'.
Cheers!

#blender#oneshot#rowbot#basically a guide on how I create my 3d artworks in general#hope you enjoy it
38 notes
·
View notes
Text
Hoyo marketing girls: "We're gonna show off her charms! 🥰"
Hoyo marketing guys: "We've put him in the blender for you.👍"
#Mualani backstory: “I've always wanted to be a top notch guide!”#Kinich backstory: “I've been orphaned abused bullied alienated and literally died.”#or like#Burnice trailer: “she's cute and silly and hot!”#Lighter trailer: “my friends died and i sold my freedom for money to support their families”#okay admittedly i was trying to think of a HSR girl who doesn't have some kind of trauma in her backstory and i can't think of any#props to HSR they're ALL in the blender#hoyoverse#honkai star rail#hsr#genshin impact#zenless zone zero#zzz#zzzero
48 notes
·
View notes
Text
.
#probably going to try again to get these poses imported#still don’t have any clue as to what the hang-up is as I can’t see any difference in what I’ve done and the guides#mod wiki says my blender etc should all be able to do it#NLA strips were named properly according to the guides#the troubleshoot section only exists on the mod wiki and doesn’t help in the slightest#if something in the process has changed I have no idea#but at this point I don’t want hours of work going to waste and collecting dust so we shall see if I can ever figure this out#don’t even get me started on the photo mode add on guide…how am I meant to follow this fr fr#the anim file section doesn’t even explain what#when or how to add in the anims#way too much assumption of knowing ahead in these a lot of the time it feels like#not great for a literal thinking neurodivergent lol#tbd#also sorry for the inevitable crash out incoming lol
8 notes
·
View notes
Text

opened blender for the first time in months
#man why do my sims look like Ass#does anyone have a cool new blender guide or somethin i need to brush up and relearn this#posed and went no ❤️#that is enough for tonight
23 notes
·
View notes
Text
WIP
#IM---#WHY IS HE GOING SIDE TO SIDE#BROTHER PLEASE WALK STRAIGHT#shouldve made this wwx or something#ok so i found an alternative route to get this shit in 10 minutes#whereas the other path took me a week and it still works less than this#so first take the vrm make a copy and turn the copy into a glb. just change the extension name. then import it to blender#then generate an fbx with or without textures nobody gives a shit just do it#get the animations on that and then import back the skeleton to blender#then on your static model you will want an animation track so literally go into pose mode pick a bone and then add a keyframe#then go ahead delete it. you just wanted a blank animation track#then rename the imported skellys and then push down the animations to make them actions#then add the actions to this model by going to the NLA and just. adding the actions.#thats how to get to this point. idk why hes swaying and how to fix that. im gonna go mess with that now#once this works i can fulfill my dream and i can start mocapping myself with a whip#ive been mocapped before ive never done it myself tho#ive always been a minor antagonist in every game ive been in#is there something about my face?#forgot to mention. this fixes the glb file geometry rendering export issue. now i can use glb again#which means i can put this shit on neocities#edit: I found the issue. DO NOT adjust the skeletons and absolutely do NOT EVER transform all while importing#this is my guide to myself because I will forget and then get screwed so bad#edit edit: do not import glb using the default setting on blender. use the middle setting. idk what it says but thats the one.#use the one with cones not balls
5 notes
·
View notes
Text


lethal company suit for @lancingmangos
#visceral.png#you guys have nod idea how bad the texturing process was#I HAD TO FIGURE OUT HOW TO DO THE IMAGE THING IN BLENDER ON MY OWN#BECAUSE THERE WERE NO NEW GUIDES#BUT I DID IT#I used aseprite heavily because it could select and replace colors automatically ily aseprite#but for images like the jumex and face#blender and death#like I had to figure out the whole stencil brush thing on my own#but it is so much better than lining up the suit face yourself
9 notes
·
View notes
Text
TF2 Blender Guide: Remove Cosmetic Clipping

Want no outfit clipping? Here are 3 methods to remove clipping between a TF2 merc's default outfit and cosmetics they're wearing (or even custom outfits you've made for them). These methods are non-destructive compared to deleting parts of a mesh, which cannot be undone.
Guide by Katy133. The example I'm using is Scout wearing the Ripped Rider jacket cosmetic.
Method 1: Use an Invisible Material
Recommended situations to use this method: You want to quickly make the mesh underneath invisible, but only parts of that mesh (example: Hiding the visibility of Scout's torso won't work because his arms are also on that layer).
Select the part of the merc's model that's clipping through the cosmetic (in this example, it's Scout's default shirt, which is part of his torso model). In the Materials tab, select Add New Material Slot (+ button to the right of the materials list). Press the +New button to add a new material to it. (See: Image 1, below)
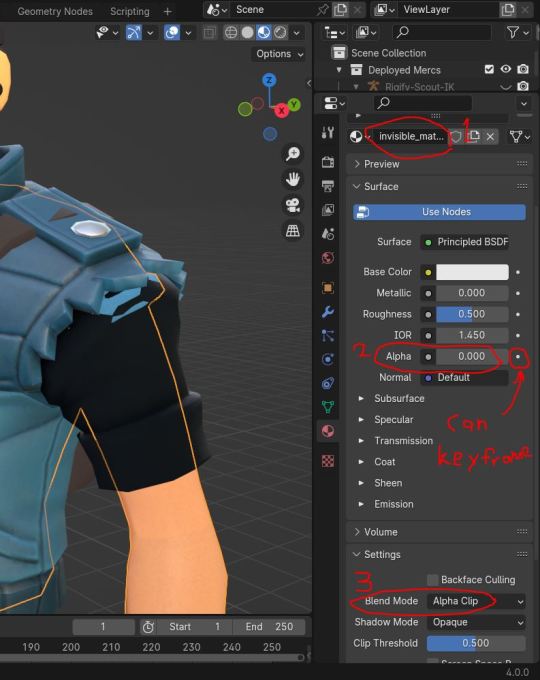
Rename this new material something clear (like invisible_material). Set the new material to have 0.0 Alpha (under the Surface header) and change the Blend Mode to Alpha Clip or Alpha Blend (under Settings). (Image 2)
Go into Edit Mode. Toggle select faces mode. Select the faces that are clipping. These need to be faces that never need to be seen by the camera (they're being covered by the cosmetic). (If it's difficult to select the faces, go into Local View mode with the model selected by selecting View -> Local View -> Toggle Local View, or by pressing your Local View hotkey.) Various methods to make selecting the faces easier include switching your selection mode to Lasso, and turning on X-Ray in your view (circled in blue in the attached image). (Image 3 and image 4)
With the faces selected, select invisible_material from the materials list and press the Assign button. (Image 5)
Go back to Object mode (and leave Local View if you haven't already). The faces assigned to the invisible material should now be fully transparent, leaving the cosmetic covering it.
Optional: If you wish to animate the invisible material's visibility: Go to the materials tab, select the invisible_material, and Press the dot button to the right of the shape key's Value. This adds a keyframe. Yellow means that keyframe in the timeline has a keyframe. Green means the value has keyframes but not on the current frame. Influence set to 0.0 is off, 1.0 is on 100%. This can be useful if you're animating Scout putting on the cosmetic for example.


Method 2: Use a Mask Modifier
Recommended situations to use this method: You want to make parts of the mesh underneath invisible without editing the applied materials of the mesh (example: You use the Materials list to quickly select vertex and reassigning vertex to a new material slot would slow down your process).
Select the part of the merc's model that's clipping through the cosmetic. Go to the Data properties tab and add a new vertex group (+ button to the right of the vertex group list). Rename it something clear, like Mask_mesh. (See: Image 1, below)
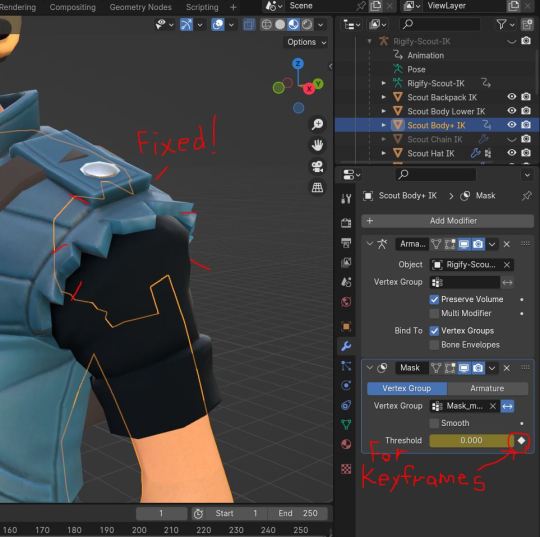
Go to the Modifiers property tab. Press Add Modifier. Add a Mask. In Vertex Group, select Mask_mesh. Then press the Invert button to the right of that. (Image 2)
Go back to the Data properties tab. Go into Edit Mode. Select the vertex that's clipping through the cosmetic. (If it's difficult to select the faces, go into Local View mode, switch the selection tool to Lasso, and toggle X-Ray mode--see: Method 1 above for details.) (Image 3)
With the vertex selected, select the Mask_mesh vertex group and press the Assign button. (Image 3)
Optional: If you wish to animate the invisible material's visibility: Go to the modifiers tab. In the Mask Modifier, Press the dot button to the right of Threshold. This adds a keyframe. Yellow means that keyframe in the timeline has a keyframe. Green means the value has keyframes but not on the current frame. Since the Mask is inverted, Threshold set to 0.0 is on, 1.0 is off. This can be useful if you're animating Scout putting on the cosmetic for example. (Image 4)


Method 3: Use Shape Keys
Recommended situations: There's clipping, but you want the vertex of the default outfit to stay visible (example: you want to adjust Scout's backpack strap so it's entirely layered over his new cosmetic jacket). Or you want to animate when the clipping adjustment happens (example: An animation of Scout putting on a cosmetic, wherein you see Scout in his default outfit and his his cosmetic within the same shot).
Select the part of the merc's model that's clipping through the cosmetic. Go to the Data properties tab and add a new Shape Key (the + button to the right of the Shape Kay list). This is the Basic layer (default shape of the mesh), don't ever touch it. Now add a new shape key layer (by default, it's named Key 1). Rename it something clear like Clipping_fix. Select it, and set it to 1.0. (See: Image 2, below)
Go into Edit Mode. Make sure that the Clipping_fix shape key is the one selected (otherwise, you are editing either the Basic shape key layer or a facial flex shape key, which can have destructive results). Start selecting vertex and moving them where you want. (If it's difficult to select the faces, go into Local View mode, switch the selection tool to Lasso, and toggle X-Ray mode--see: Method 1 above for details.) (Image 3)
Go back to Object mode. The shape key should now be affecting the mesh. (Image 4)
If you wish to animate the shape key: Press the dot button to the right of the shape key's Value. This adds a keyframe. Yellow means that keyframe in the timeline has a keyframe. Green means the value has keyframes but not on the current frame. Influence set to 0.0 is off, 1.0 is on 100%. (Image 4)


For more guides, see my tag: #my blender guides
48 notes
·
View notes
Text
Needle Felt Siffrin Build Log: (oct 6 - nov 20, 2024)


Credits goes wholely to @insertdisc5 for creating ISAT and siffrin's design! I am just here to attempt to make cool fanart (and get more people to play isat.. my devious plans are going great so far :3) As always, this isn't a tutorial- it is just a log about how i go about approaching a sculpture and I hope this collection of resources can help others make their own sifs!!
PSA: this has some spoilers for endgame CGs/sprites on my references image board ( also might see it in the backgrounds of my process pics). And bc this is needle felting, you will see some sharp needles! beware!
my inspiration was the intro cutscene where Sif eats the star, so my main goal was to adhere to the style of ISAT as closely as possible while transfering it to 3D space. And I knew i also wanted to try making the cloak for stopmotion purposes, so my process was tailored towards having control over the fabric with wire inlaid within the cloak (more on that later).
I ended up not sticking eyebrows on top of siffrin's bangs lol but anyways, first order of business is Gather Reference! v important. pureref is free and an awesome program. I also do some sketches to visualize the pose and important details i wanted to include in the sculpt.
behold the isat wiki gallery page! tawnysoup wrote an awesome ISAT style guide that absolutely rings true in 3d space too!! adrienne made a sif hair guide here!! (sorry i couldnt find the original link, but it's on the wiki). It says ref komaeda hair so that's what i looked at, along with other adjacent hairstyles! I also like doing drawovers on in progress photos to previs shapes n stuff to get a better idea of the end result.
Also if you're like me and struggle with translating stuff into 3D space, take a look at how people make 3d models and figurines! sketchfab is also a great resource! I looked at the link botw model by Christoph Schoch here for hair ref. (I used Maya, but there's a blender version too ! you can pose characters too if your model has been rigged!)


Face:
Started off blocking out the main shapes of eyelids and iris, and then filling in the colour details in the iris and the star highlights before moving onto adding thin black outlines and eyelashes. I didn't take many in-progress photos cause i kept ripping stuff out to redo them many many times, sorry!! This eye took about 3 hrs bc i just wasn't happy with it!! Sometimes it do be the vibe to give up, go to bed and see how it looks in the morning (more often than naught, it looks fine and it was the "dont trust yourself after 9pm" speaking)

The Mouth:
Couldn't decide if i even wanted to add a mouth as per usual with all my humanoid sculptures.. but i did some drawover tests first to see what expression i liked and to try to visualize it from multiple angles. (I was also testing the placement of stars on the hat brim here)

And then I redid the mouth like 3 times cause the angle just wasn't right (this went on for about the course of a week yay!)
Hair: woe baldfrin be upon ye


I made the hair strands individually first, and then since Sif has some of the hair at the back dyed black, i covered some of the tips with black wool (manually) (I think it would go much faster if i just took a marker to it, but hahaha i love pain and detailing!! )
And then the rest of it was positioning strands with sewing pins layer by layer, always looking at it from different multiple angles- sometimes tailoring the angle or swoop of individual hair flippies. At one point I thought the back looked too cluttered, but the hat covers a lot of it anyways!! yay for hiding mistakes! (imo this is a similar process to how cosplayers style wigs, but on a smaller scale and the same level of time consuming)
As always, look to your reference for guides, and I always do a whole bunch of drawovers over in progress photos to ascertain what was working and what wasn't.
Hat:
A trick to get a super pointy tip, make another tip seperately while keeping the connection point unfelted, and then combine the two to make super pointy hat!! (this also helps if you made the hat too short and need it to be taller. ask me how i know)

The embroidery on the hat brim was done in a hoop and then invisible stitched to the felted top portion. Technically you don't need a hoop but it helps keep the fabric tension, so you avoid puckers in your embroidery. You can also use iron-on stabilizer if your fabric is loose weave or particularly thin. this is the tutorial i used for the stars embroidery! particularly the fly stitch one, french knots, and the criss-cross stitches. highly recommend needlenthread for embroidery stitches and techniques! i learned all my embroidery from this single site alone.

For fabric, I think I used a polycotton i had in my stash,, unsure of the actual fiber content bc i bought it a long time ago. I used DMC Satin floss which was nice and subtle shiny but frayed a lot so it was kind of a pain to stitch with... but keep a short thread length and perservere through it!! After the embroidery was done, I folded up the raw edges and invisible sewed it to the top portion of the hat.
General shape:
Ok general structure of the body is this: wire armature body covered with black wool -> cloak lining & wire cage -> edge of lining is invisibly sewn to the main cloak at the hem -> head

Don't be afraid to mess around with the pattern, it's essentially a pizza with a slice taken out of it to form a steep cone shape!! Use draft paper before cutting into felt to save material! (i think i made like 3 cloaks before i was happy with the shape lol).
You can also hide the seam of the cloak and collars by gently messing up the fibers of the felt with your fingers or a felting needle btw! you can also sandpaper the seams according to Sarah Spaceman in this vid (highly recommend them for their in depth cosplay/crafting builds holy smokes), though since sif cloak is at such a smol scale, I just blended the seam with my felting needle.
For the lining wire cage section, I sewed in wire around the cloak, so the main rotation point is at the top neck area under the collar. These paddles are used to keep whatever pose I need the cloak to be in for stopmotion purposes. Then after the wire is done, I invisibly sewed the lining to the cloak at the hem (same technique as the hat brim to the lining there).
In hindsight, I should've used a thinner fabric for the lining, but i only had sheer white in my stash so had to go with double felt, thus resulting in a really bulky lining but oh well!

Heels:
started with the general boot shape, then tacking on the diamond shape heel stack and also diamond shape sole bc we're committed to the bit here. I skewer the boot onto the armature which also conveniently hides the connection point into the base to keep the whole thing upright and also I can rotate the boot to tweak the angle if needed.

Pins:
I kinda just trial and error'd jewellery wire with pliers into the pin shapes. They're itty bitty!! had a whole bunch of fails before i got two nice ones. A hot tip is to use needle nose pliers and wrap the wire around the tip to get a smooth circle shape!

Base:
I smoothed out the edge of a circular wood base with a dremel, and then used wood stainer to get the black colour. It ended up kinda looking like I took a sharpie to it, but whatever.... now i have a whole ass can of black wood stainer........ I then made a rough mountain of black wool and stuck the feet armature in. And now he's standing!!

Normally at this point when I'm done felting everything, to get a smooth finish, I'd take a small pair of scissors and carefully snip away any flyaway fibers, but this time, I just left them fluffy cause i think that's what sif would do :3c
Photoshoot:
Normally I do shoots using daylight but it was winter so the sun was nonexistent. So I broke out the home lighting setup aka dollarstore posterboard for a nice smooth background, and then hit it with the overhead Fill, side Fill 2, and Rim light, and use white paper/posterboard for bounce light if one side feels too dark. But if things are overexposed, you can move the light sources away until the harshness dims down. I'm using a Olympus mirrorless camera (handed down to me by my sibling so i dont remember the model exactly), which can connect to my phone as a remote so I can avoid shaking the camera when i take photos. Pretty nifty for stopmotion purposes! (yes my camera stand is a stack of notebooks, a tissuebox and some eva foam under the lens, don't judge me)


Stopmotion animation:
I'm still figuring stopmo out on my part, but my process was straight ahead animation ... move the cloak a cm, take a pic.... move another cm, click.... and repeat until i get a version I was happy with. My ref was the cloak animation from Gris (beautiful game btw). The 2d star animation was also done straight ahead using procreate, exported in png with a transparent background, and finally stitched together with the stopmotion footage in photoshop.

My turnarounds are also stopmotion! also secret hack, the turntable is a fidget spinner sticky tacked to a cake platter.
And i think that's all! i mainly wanted to share how I go about thinking about taking a 2d concept and moving it to 3D. I also didn't go in depth into how to actually do the needle felting bc I don't think I''d be very helpful I'm a very good teacher by telling yall to just keep stabbing until it looks right (i'm self taught for this hobby),,, if anyone wants it though, i can share a bunch of tutorials and other felters' process that helped me learn more needle felting!
Hopefully this was helpful to someone! Feel free to send asks if ya got any questions or if anything needs clarification! Or show me your works! I love seeing other people's crafts :3
here have a cookie for making it this far 🥐
#in stars and time#siffrin#isat#isat siffrin#isat fanart#needle felt#soft sculpture#know that i am devouring all the nice words yall leave in the tags/comments of my posts :holding back tears:#I hesitate to call this a tutorial bc this is just how i fumble my way through crafting anything lmao#the only reason I know how long I worked on a project are timestamps on wip photos and however long the day's video essay or letsplay is#sorry time is immaterial when i get into crafting mode#reason why this log is so late is bc after i finish a project i'm perpetually hit with the ray of 'i dont ever want to look at this again'#hence why photos never get edited#AND THIS POST SAT IN MY DRAFTS FOR 2 MONTHS DUE TO BLOODBORNE BRAINROT SORRY#done is better than perfect!!!#sorry i dont control the braincell#sorry for using a million exclaimation points! i am not good at this.. conveying my anxiety in written form!!! my toxic trait
1K notes
·
View notes
Text
Hey All! I had the absolute honour and pleasure to be lead animator for Dust Queen! We worked TREMENDOUSLY and incredibly and ridiculously and insanely hard on this! And I really hope you like it!
I had a lot of responsibilities as lead:
I made the facial expression, hand pose, lip sync, and walk cycle reuse libraries
Helped the riggers tailor their rigs to our needs as animators
Interviewed and trained the team, with guides on how to animate in Blender and keep the style consistent with choices RWBY makes
Talked a lot of my friends into working on this project and helping (Hi Ioana Hi Jackson Hi Cass Hi Beth Hi Issa Hi Kat Hi Kemmer Hi Andy Hi Vincenttt)
Managed the schedule/checked in with our volunteers, until we got dedicated Production Coordinators for animation (Vincent and John thank you for my life)
and left notes/feedback/drawovers on just about every single shot in the episode. hoo boy!
But I Also did some shots! Here they are! I touched up a few others before they went to rendering, but anything that's at least 80% Not Mine I didn't include. The team did such FANTASTIC work, I'm so floored and working with everyone was nothing short of a pleasure!
Anywho! Thank you all so much for watching!
-Rocket
#rwby dust queen#dust queen#rwby#yang xiao long#blake belladonna#weiss schnee#ruby rose#dq#can you tell yang is my favorite#i saw the shots where she mediates and without hesitating i was like 'sorry team i would like these'#same with blake shoulder checking and flirting with yang i took those before the casting got opened to the whole team#i couldnt be too selfish though and wanted to leave the other yang/bee moments to others who wanted time with them#but getting to animate Yangry and Bees Flirt is. all i could possibly wish and ask for thank you Sy for making my dreams come true#i also get credit for Buff Yang i asked for that hehe#officialrocketanimates
372 notes
·
View notes
Text
vogue beauty secrets - jacob elordi blurb
MASTERLIST | MY PATREON
YN's Guide to Glowing Skin and Easy Everyday Makeup
"Hey everyone, It's YN," you said as you stood in your bathroom, face bare of any products and a comfortable top on, "I'm going to be talking you through my skincare routine and my everyday makeup look."
"Just so you guys know, it's really early over here," you said as you took out your products from your skincare bag, "My boyfriend is still sleeping I think," you smiled at the mention of him, "You might know him from his bathwater in the movie Saltburn, I don't know if you're familiar with that."
Playfully talking about each other in interviews was a really common thing for both of you and Jacob to do, and fans absolutely loved it.
"So first things first, gotta cleanse the face," you showed your cleanser to the camera and then applied it to your face smoothly and washed it off, "Now this face mask, has gotten me more compliments about my skin than anything else I've ever used, even Jacob is obsessed with it and steals it from me all the time," you couldn't help but mention him again, "So I will do a generous amount, which is like pea size for me."
You applied the face mask all over your face and waited 15 minutes to take it off and move on to your makeup.
"Before applying any makeup, we need to put sunscreen on," you showed the bottle to the camera, "I never leave the house without this, I have one in my bag at all times. It's so important."
You rubbed the product all over your face, making sure to cover every inch of your skin correctly.
"So, let's start," you grabbed your makeup bag and took your foundation out, "I'm obsessed with this illuminous silk foundation, I discovered one time I visited Jacob on the Euphoria set and I saw the makeup artists using it, it has been my go to ever since."
You grabbed your pink beauty blender and gently applied the foundation on your face, getting closer to the camera to show the process better.
"I learned how to do my makeup by watching how other people did it," you said as you applied the product on your nose, "I think I've gotten very good at it, or at least I would like to believe so."
"Now, It's time for concealer," you showed the product to the camera, "We're running low people, someone might be stealing some from me," you said as you tried to grab the most product you could and applied it under your eyes, "Okay, concealer is done, now let's do some contour."
Just as you grabbed your brush to apply the contour, you heard some noises coming from the bedroom, "Guys I think Jacob just woke up," you said as you moved the brush around your face, "So we have to be very quiet so he doesn't crash my video, okay?"
You heard the bedroom door open and some footsteps down the stairs, and you guessed that Jacob was looking for you in the kitchen.
"Alright, contour is done," you continued in a hushed tone, "Now, let's move on to blush." You picked up a peachy blush and lightly applied it to the apples of your cheeks, blending it out with your fingers. "I love this blush because it gives such a natural flush to the cheeks, perfect for everyday wear."
Next, you reached for a neutral eyeshadow palette and selected a soft brown shade. "For my everyday makeup look, I like to keep it simple on the eyes," you explained as you applied the eyeshadow to your lids, blending it into the crease. "Just a wash of color so I don't look completely dead."
"Now, for my favorite part - mascara," you exclaimed as you held up a mascara tube, "I think mascara is a game-changer. It instantly opens up your eyes and makes you look more awake."
You applied a few coats of mascara to your lashes, making sure to cover from the roots to the tips.
"YN?" you heard Jacob's voice calling for you, making you instantly laugh.
"I don't know if you guys heard, but Jacob is calling for me," you said as you checked your mascara in the mirror, "Let's ignore him until he figures out I'm here."
"Now, last but not least, lips," you said as you grabbed a nude lipstick. "I like to keep it natural with a nude shade for everyday wear." You applied the lipstick to your lips, finishing off the look.
Just on cue as you applied the last touched of lipstick, you heard the bedroom door creak open behind you. You turned around to see Jacob standing in the doorway, rubbing his eyes sleepily.
"Good morning, sleepyhead," you greeted him with a smile, trying to stifle a giggle at his sleepy state.
"Morning, love," Jacob blinked a few times, trying to wake up fully, "What are you up to?"
"I'm filming a skincare and makeup video for Vogue," you explained, motioning to the camera set up on the counter. "I was just finishing up, actually."
Jacob walked over to you, wrapping his arms around your waist and resting his chin on your shoulder to look at the camera.
"Oh, am I interrupting?" he asked, glancing at the camera with a devilish grin.
"Just a little," you chuckled, "But it's okay, you can join if you want."
"Nah, I'll let you finish," Jacob leaned in and pressed a kiss to your cheek, "I'll just be in the background, quietly judging your makeup skills," he teased, earning a playful swat from you.
"Hey, I'll have you know, I've gotten pretty good at this," you said, pretending to be offended.
"I know, I know," Jacob laughed, planting another kiss on your cheek, "You always look beautiful, even without makeup," he said sweetly.
You couldn't help but smile at his words, feeling a warm flutter in your chest. "Thank you, babe, you're really sappy," you replied softly, turning to give him a quick kiss.
"I'll let you finish your video. I'll make us some breakfast," he called out as he disappeared from view.
"Well, it looks like I've got breakfast waiting for me," you turned back to the camera, a smile still lingering on your lips, "I better wrap this up," you said to the camera, giving a little wave. "Thanks for watching, and thank you Vogue for having me, I hope some of this beauty tips are helpful for all of you. Bye!"
#jacob elordi fanfiction#jacob elordi fake instagram#jacob elordi blurb#jacob elordi one shot#jacob elordi fic#jacob elordi writing#jacob elordi story#jacob elordi social media au#jacob elordi masterlist#jacob elordi request#jacob elordi fanfic#jacob elordi au#harrysfolklore#jacob elordi smut#jacob elordi instagram blurb#jacob elordi imagine#jacob elordi series#jacob elordi fic rec#jacob elordi x reader#jacob elordi x you
1K notes
·
View notes
Text
select an ice cream for a reading !

₊˚⊹ᰔ ˚⟡˖ ࣪ the thoughts on your mind & the purpose they are soft-serving 🍦🍦♡ [paper slip reading + intuitive channeling] ₊˚⊹ᰔ ˚⟡˖ ࣪

𝓬𝓱𝓸𝓬𝓸𝓵𝓪𝓽𝓮 𝓲𝓬𝓮 𝓬𝓻𝓮𝓪𝓶
˚‧⁺ ・ ˖ · group one ˚‧⁺ ・ ˖ ·
confirmations ! 422, 44, crescent moons, letters D, N, M, life path 6, an album with a question mark on the cover or a song with a question mark in the title, king arthur (drawing a sword from a stone, camelot, excalibur), night hangouts, lanterns, green beetles, fruit flies, fireflies, leaves on the floor, cleaning supplies, air signs
hey there group one !! glad to see you here ! let’s talk about some of the thoughts you’ve been having recently. some of these are going to be relatively mundane on the outside but spirit is directing you towards them for a reason. these will probably be thoughts that keep reappearing for no apparent reason but i’m not getting that they weigh on you or anything unpleasant. it all seems very gentle and chill.
₊˚⊹ᰔ the thoughts
something about upgrading or cleaning a physical space. you may be wondering how to make a certain space that you reside in more clean & beautiful. how to put your essence to it, and how to make it more livable and soothing. i sense this is a need for groundedness. part of earth energy (root-chakra) is having a pleasant physical environment that you look forward to spending time in / unwinding in. i’m guessing you want to figure out how to do that for yourself! first of all, sit down and actively write notes on it that intuitively come to mind. i mean literally just sit on your bed, open your notes app or pull out some sticky notes, a paper sheet, anything ! and just Think about what things you would like to add in your room. let the creative ideas flow to you, but choose to open up to them. if you’d like, you can say something to yourself like “higher-self, please guide me to some ideas to better my living space!”. let them come to you, your thoughts will find something wonderful if you just ask them to look for it. write em’ all down!
something specific you can do is rearrange some furniture. or remove some larger items that you don’t Need in your room / area that you are focusing on. make more space! sitting on the floor could be really important for you to ground yourself. i’m specifically getting that if you have a small table or some sort of chair / couch / chaise lounge you should relocate it within the same room, just a different part of it. it will do wonders. some feng shui coming into work here LOL maybe you would benefit from an interior design-fengshui magazine right now !? if you’re reading this in the summer or a season in your life where you are taking a break and just wanting to relax, now is the perfect time !!!! this will be very beneficial. and even crucial i just heard to your well-being. these seemingly small moves. did you buy or receive a house appliance back in october / a while ago that you haven’t put to use ?? don’t let it collect dust. use it !!! it’s going to help you with a significant issue / mini-trouble you’ve been having. like a vacuum, coffee machine, or blender. also.. have random spoons or utensils / items from the kitchen been going missing in your home ? then reappearing in a strange spot ? if you pray to angels, that is them. any spirit guides really.
watch that comfort movie you’ve been wanting to watch. listen to that new album your favs dropped. collect things you find outside that seem strange to collect — have fun! indulge in some candies! answer some emails or texts that you’ve been procrastinating. if you’ve been having some questions come up in your mind, try answering them yourself. try this: write your question on a sheet of paper, pretend you are a friend or therapist, and write down an answer to the question with whatever comes to mind. you may see some very interesting insights show up. and you can try it with any question no matter how mundane such as “what color soap should i buy?” LOL. pleasant aromas are a really big theme for you ??? aromatherapy is definitely a FRIEND right now !! candles, bed & linen sprays, hair mists, essential oils. make a small investment into those if you’ve been feeling a bit on edge, anxious, or nervous.
₊˚⊹ᰔ the purpose
so if you were to follow your thoughts through with curiosity and take any actions, the purpose that would be fulfilled is: motivations to get more in touch with yourself, specifically your body and the enjoyment part of life. getting to know your essence better. doubting your instincts and intuition a lot less. noticing the small things and appreciating them. flushing out stagnant energy. releasing bodily tension (feet, legs, lower back) bonus points if you are have prominent capricorn placements / capricorn in the 1st or 6th house. overall, pay attention or look into your 6th and 1st houses right now ! that may guide you to some answers you’ve been seeking. this is a time where you can release any control, grudges, or pressure you’ve been experiencing. i just got a visual of the 10 of wands tarot card in my head so look out for her in other readings right now!
thank you so much for reading! i send you a lot of light. ♡
𝓿𝓪𝓷𝓲𝓵𝓵𝓪 𝓲𝓬𝓮 𝓬𝓻𝓮𝓪𝓶
˚‧⁺ ・ ˖ · group two ˚‧⁺ ・ ˖ ·
confirmations ! november, september, autumn, seeing lots of animals, tiny heart tattoos & doodles, large trees, daylight outings, summer solstice (june 20th), marker or paint stains, cool toned flowers (purples, blues)
hello group two! thank you for joining me here! today we are covering some thoughts that have been popping up in your head that spirit chose to talk about today. some may seem insignificant but we will dive into what purpose they are serving in your life afterwards. as always, take what resonates and allow the rest to belong with another soul ! thank you !
₊˚⊹ᰔ the thoughts
have you been questioning what you really want out of life? out of yourself? your deepest desires? it’s worth it to sit with that question intentionally and meditate on it. just sit down and reflect. think about it with no preoccupations. let them simmer and see what comes to you. i think you’re genuinely curious about what intrigues you, satisfies you, and helps you feel truly pleasured in life. a small tip i have for you is to make a list and any time you notice something making you laugh, smile brightly, excite you, or truly capture your attention, add it! it can be your “happy list”. another way to tap into your desires is to pay attention to what you admire in other people. i thought of a heart-clenching feeling like when you repress a desire because you think you’re never meant to have a certain something. you do not have to pretend you don’t want something to protect yourself from not receiving it. note that thing which lights you up, because there is absolutely a reason for it. i bet we’ll talk about that in the “purpose of your thoughts” section in a bit. but trust me please, and trust your heart. if you see something you really like in the internet that seems unattainable, remind yourself you can have it too. it’s never impossible. i’m thinking of material things mostly so know that you can decide what value and purpose an item holds in your life. but please know, it is normal and necessary for you to like things. love them. fawn over them. admire them. want them. desire is crucial to living a human life. i hope you can lessen the burden of shame you have towards “wanting more”. if you currently do not have access to as many resources as others or certain things, gratitude is a great soother for this time. look at what you DO have in the mean time. you have things that other people want as well, this is always true.
anyhow have you been practicing something? a script, a song, a dance? some sort of fun study? it’s shining a loooot of bright energy into your life and helping you become more vital. some of you may be facing an initial tiring feeling from this thing but it’s literally just going to be the first three times you do it aka the get-go. by the fourth time you’ll enjoy the hell out of it. sometimes your body just needs to readjust to a new situation and then once it does, your mind & spirit become comforted too! i just heard “smile more”. do you beat yourself up for your resting face or because you wish you smiled more? umm. honey.. i don’t know who or what made you feel bad about your natural expressions in the first place. know that people can sense your truth without you having to be super explicit and loud with your emotions. you’re doing just fine. please let that rest. i’m handing you a pink permission slip with bold black letters that says YOU ARE FREE TO GIVE YOURSELF A BREAK! i feel drawn to saying i love you so much. so i think you needed that. if you can, please hug someone close to you tightly one of these days. otherwise, i’m here. i’m telepathically sending a tight ass hug your way. with your consent. i’m flustered now i’m sorry KCBWLNDSK spirit takes me in such unique routes sometimes. but yes, let your quirks be quirks. they are a part of your true soul’s blueprint. the realest, most open you is veryyy quirky. that is a huge plus.
** i made this for you and anyone else who reads it . this is so funny2me. #theplacesintuitiontakesmeimlaughing
i just saw +++ do you need to replace some batteries or something?? do that.. yes.. hmm.. also go outside more often to just take a deep breath while feeling the sunlight or the fresh air. it doesn’t have to be a full 10 minutes or anything! this helps with circulation and with anxiety or pent up energy. i did want to mention that you may want to check out group one as well because i just had a feeling you could find something useful in there !!!
i just heard be a bit careful with what kind of content you’re consuming right now. you could be very vulnerable to media such as movies, people’s profiles, or just prone to distractions. try not to fall into a media trap right now! but it’s okay if you do. let your gut guide you. listening to soft, ambient, floaty music may be very veryyyy soothing right now ! you may be wanting to upgrade your playlists. just for that i’m gonna channel some songs for you in a bit dear :-) 🎵my all by mariah carey, express by christina aguilera, star by colde, backburner by niki, tokyo by RM.
₊˚⊹ᰔ the purpose
growing more accustomed to your “new life” is what i heard. maybe you’ve started visiting or living in a new environment and your mind is offering you lots of opportunities and insight on how to make this an easier transition and experience. if somebody gives you a notepad, it’s a lucky charm. if you’ve been seeing groups of animals that is a good omen. overall, your current thoughts are there to get you situated into a place. to know that enjoyment is neverrrr ever out of reach. you have the power to create it and make it bloom. if you have a birthday coming up, do not mope around. pleaaaasee go out that day even if it’s alone, date yourself. or do at least one thing for yourself. play a comfort movie. sit and sing your favorite songs. eat a really nice meal. something, anything that lights you up, DO IT !!!! if you aren’t the moper, do not let others mope around you on your special day or any day really. if you are generally upbeat and someone that you are in contact with just drains your energy in the snap of a finger, do not entertain this persons shenanigans or moping. i keep hearing moping. this is sucky energy of someone who has everythingggg at their disposal to enjoy life but for some reason they don’t do sh1t to change that. it’s really really bugging me. you do not need this person in your atmosphere. annoying as he11. sorry. much love to this person and YOU especially though. please surround yourself with bright, vital energies. the colors yellow and green are lucky colors for you okay?? your thoughts are really trying to get you to 1. up your energy levels 2. enjoy more & make the most out of things 3. just feel more chill and comfortable wherever you are.
that’s what i have for you group two, thank you so so much for reading and i sincerely hope these messages found you well. sending you lots of light 💡 !!
𝓼𝓽𝓻𝓪𝔀𝓫𝓮𝓻𝓻𝔂 𝓲𝓬𝓮 𝓬𝓻𝓮𝓪𝓶
˚‧⁺ ・ ˖ · group three ˚‧⁺ ・ ˖ ·
confirmations ! “zone”, #12, money, muse, the letter R, crown chakra, the color purple, lock symbols 🔒🗝️🔑, strawberries, agate crystals, twilight
hello hello my group three. let’s address those recent amusing thoughts of yours that spirit is guiding me towards, big or small. it seems insights are forthcoming and these will be the ones worth your attention and care! i hope they find you well, thank you!
i see you are trying to enter a place ?? but feel blocked from it / lacking the access. it may seem like a golden opportunity is hiding from you behind closed doors. your guides / higher self’s piece of insight is to rest for now. do not force yourself into this situation, and let it go for now. i don’t mean lose hope or lose the goal, just step back for now ! you’ve done enough, it’s time for a slow retreat. have you been eating hot foods, tea, broth, root veggies, or any other grounding foods? or if you’ve been thinking about what to eat, those are some good options! the song that’s playing right now is saying “i just want to be happier.” and again, i’m thinking that you want to “earn” your way into a person’s life or into a situation and your message is that you do not need to earn anything. wanting something or someone is different than feeling like if you are granted permission or recognition from this thing you are confirmed to be “good” or “worthy” in some aspect. you are already deemed a respectable person. i think you’ve been having a lot of thoughts about putting in the hours, efforts, and time, and it not feeling satisfying enough. rather than external validation, you may just need a slight perspective adjustment or an extra addition to your routine that helps you ground your wishes and efforts. it can be something like a daily affirmation that your efforts today were enough even if you did just one thing. celebrate your actions, it is not easy whatsoever to be acting, moving, and giving all the time. it’s also not sustainable. any feelings of being stuck right now are due to this perception that you must keep pushing, pulling, forcing, or trying over and over. that’s not to say you are making “nothingness” happen or “attracting” it because you’re working too hard. no, not at all. you’re doing just fine—you’re just not crediting yourself for that. and that’s all you need love! it could be a good idea to write down all the tasks you completed in a day by the end of the day or weekly. like 1. did the dishes 2. washed clothes 3. responded to a text 4. **insert your actions. just recognize your work. slow down to observe your efforts. a loooottt of prize and progress can come from that seemingly insignificant moment of inaction. things will start to run then. gears turning. if you’ve been considering partaking in something of significance in the summer or in the fall, your mind is requesting rest before you enter and truly look into that prospect. clean up your mind and let yourself take a break in the mean time, and enter any new endeavors with that rested, clean, refreshed mind. you’ll be able to discern between what you feel pressured to do vs. what you are actually willing to do.
₊˚⊹ᰔ the purpose
a reminder that the only thing you Need is yourself. you need yourself. your mind seeks you for a reason, listen to it, open up your heart for your mind is a tender place. overall, your thoughts are helping you and assisting you in making more room for things in your life. that is, the quality of “receiving”. and it’s saying: but first! rest! reflection! stepping back! friends could be significant right now. make sure you’re paying a little more attention to your own concerns right now rather than other people’s. your business wants your attention! if you are interested in chakra work, your crown chakra and third eye chakra could require your attention right now. just simple awareness of them. overall, the purpose that your thoughts are serving is opening you up to receive more gifts! to open up your vessel to receive. to remember what is important to you. and to know that you are always doing more than enough, especially if you are a very restless person who wants more out of life. you’d be surprised how much you really do.. but you can’t always see it because of your restlessness!! you are lots better than your mind will sometimes allow you to think.
a song i channeled for you is “blue & grey” by bts (“i just wanna be happier” lyric). it is a mellow, emotionally vulnerable song that is quite .. tender.
thank you so much for joining me today, group three! i’m wishing you a lot of love, luck, and calm in your endeavors. the mighty storm is weathered by a mighty mind. take care.
#intuitivechanneling#intuitivereadings#tarot#oraclereading#tarotreading#spirituality#channeled message#pickacard#pickapile#pick a pile#pick a photo#pick a picture#pick a reading#channeled reading#channeled messages#divider by saradika-graphics ! ♥︎
181 notes
·
View notes
Text

Sims 4 CC Kit — Make Your Own Lights, Decor, Clutter & Textures
Ever wanted to create Sims 4 clutter or decor CC but got stuck?
This kit is for you.
It’s a step-by-step guide that shows you how I make my own Sims 4 decor CC — lights, clutter, textures — in a way that I found works for me. You get guides, cheatsheets, templates, and my personal workflow that I’ve figured out through trial & error.
This probably isn’t the “proper” way of creating CC — but it’s how I learned, and it works and I use it every single time I create something new.
⚠️ Just to be clear:
This is a written tutorial kit, not a video or image course.
BUT — I’ve included some visuals, some screenshots & cheatsheets to help you follow along but its alot of written stuff. It would also be beneficial for you to have some basic knowledge of blender.
✅ What You Get:
Decor, clutter, lights CC Creation Guide
Shadow Mesh Tutorial
Mesh Cleanup Workflow
LOD Creation Steps
Maxis Match Texturing Cheat Sheet
Alpha Textures Basics
Vertex Paint for Lights Guide
Custom Thumbnail Tutorial
Normal & Specular Map Basics
Blender Basics Recap
Sims 4 Studio Quick Fix Cheatsheet
Blender Hotkeys Cheatsheet
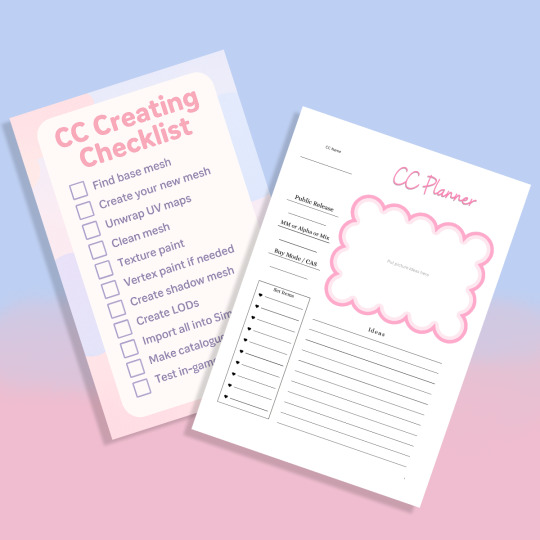
CC Planner to organize your ideas
CC Creating Checklist
PSD Thumbnail Templates (Decor)
Blank Normal & Specular Maps
Blender Render Setup File for Catalog Thumbnails
Texture Tips & Tricks
🎯 Why You’ll Love This:
No fluff — real steps, real help
Written for beginners who know basic Blender but need a hand
Includes a little bit of visual guides, printables & templates
Saves you HOURS of googling random problems
Helps you actually finish your CC & get it in-game
🖤 This is for you if:
You know basic Blender stuff (grab, rotate, edit mode) Got 3D Models you want to put into The Sims 4
You want to make clutter, decor CC and lights (not clothes or CAS yet)
You’re tired of tutorials that make you more confused
PS: Accessories & Clothing Creator Kits are coming soon.
If you get stuck, you can always join my Discord
(link’s on www.simmerkate.com).
Get Here (xx)
181 notes
·
View notes
Text
2016 NATURAL GLOW: FAITH’S GUIDE


OVERVIEW
This one’s my personal favourite. Simple, yet effective. A look to enhance your natural beauty. The eyebrows are very 2016, the lashes are bold, but everything else is quite toned down and simple. This look is perfect for everyday and special occasions. You can also do it without foundation to make it even more simple.
PRODUCTS
Primer
Baby powder
Foundation, tinted moisturiser(can be done without)
Concealer
Setting/loose powder
Pressed powder
Eyebrow gel
Brow pomade
Highlighter
Lashes
Lash glue
Lip gloss
Setting spray


TOOLS
Powder brush
Beauty blender
Tweezers
Brow brush
STEPS
BASE
Apply primer to skin, (skincare should be done before this step) make sure primer is applied ALL OVER your face
#faithtip After applying primer, use a brush to apply baby powder to your skin
These two steps will keep your makeup intact for AGES and prevent a lot of sweating through makeup
Then apply foundation or tinted moisturiser and blend well with a beauty blender (you can skip this step to keep your makeup light)
#faithtip wet your beauty blender with setting spray for better hold and easier blending
Apply pressed powder with a powder brush and blend well with a brush
This look is quite light, so instead of under-eye concealer apply loose setting powder from under your eyes to your temples, using a beauty blender
Apply loose setting powder from the side of your lip to the side of your face, under your cheek

Leave the setting powder unblended for now
BROWS
One of the KEYS to this look is eyebrows, make sure your brows have a defined shape
Brush through your brows and shape them with brow gel
Use pomade and a small brow brush to draw a line on the bottom of your eyebrows, following the shape of your brows

Draw a line at the top of your brows following the shape of your brows again

Fill your brows in within the lines

Brush through your brows again with brow gel

After this, apply concealer under your brows
The concealer should look like you have painted an outline of your eyebrows

Blend this in with a beauty blender
Use a beauty blender to apply loose powder underneath and on top of your brows, let it sit.
LASHES
When I do this look I don’t apply lashes because I wear cluster lashes/extensions, I find it quicker and easier for me to get ready
People who wear lash extensions/clusters can also skip lash application
STRIP LASHES
But for this step apply glue to strip lashes
Wave the lashes around for a bit so the glue dries a tiny bit and feels a little bit sticky
Place them on the lash line and adjust where needed (using tweezers or fingers)
youtube
youtube
CLUSTER LASHES
Strip lashes can also be cut into smaller pieces or use cluster lashes
Dip them into glue and wipe off the excess
Use tweezers to hold the lashes
Pull the top of your eyelid upwards so you can see underneath your eyelashes
#faithtip Wipe the glue on the part you are applying to then you can dip the lash in glue again before actually placing it underneath your lash
This make the lashes more firm and secure
Make sure it is not too close to your eye as this can be irritating
Fan your eyes if you can still feel wet glue
youtube
BACK TO THE BASE
Using a powder brush, brush away/blend out the loose powder, under your eyes, under your cheeks and around your eyebrows
Blend VERY well, as the powder has been sat on your face for a while, so it will not move easily
After this, apply a gold/bronze tone highlighter on the tip of your nose, on your cheek bones, your brow bone and cupids bow
Apply in moderation and blend slightly with finger to avoid looking ashy
Now use setting spray (holding it not too close to your face) over your face 3-4 times
LIPS
Add more highlighter to cupids bow if needed
Apply Vaseline/lip balm for moisture
Apply clear lip gloss
#Youtube#makeup#2016 makeup#mac#high maintenance#2010s#2010s aesthetic#black barbie#black women beauty#black women of tumblr#baddie aesthetic#ig baddie#girly#just girly things#girly girl#black women makeup#2010s baddie#insta baddie#glam#fabulous
685 notes
·
View notes
Text
dreams do come true / patri guijarro
a dream is a wish your heart makes. or a wish you make for your humble and talented girlfriend / wc: 1492

She can hear you before she sees you, down the hallway and into the living room, your voice traveling through the apartment, getting louder as you walk to find her.
“Patriii, como se dice “psychic” or whatever Raven Baxter was in “That’s So Raven” in Español, because I need to tell you about the dream I just had! Where are you?”
“In the kitchen!”
Patri’s at the blender, putting together a protein shake to end all protein shakes when you come into the room. You’re still in your sleep clothes while Patri is already in her training joggers, but she thinks you look so sweet, rumpled and warm from sleeping in her bed. However this morning, instead of sleep, you have excitement in your eyes. You head right over to her and wrap your arms around her waist, making Patri laugh.
“Hola, amor. Did you sleep well?”
“Yes,” you say into her shoulders. You stay attached to your girlfriend as she pours the shake into her travel cup and even when she shifts to rinse the blender in the sink. When you still don’t let go of her, she twists her body in your arms. You hum subconsciously when she wraps her arms around you, pressing a kiss onto your temple.
“Sí? And what was your dream you were screaming about?” she asks. You finally let her go when her question is processed in your brain. Your eyes light up again.
“Oh yeah. I had a dream you won the Ballon D’or!”
Patri scoffs.
“Hey! Don’t scoff! Everyone is talking about it. Even at my job, I overhear your name. This could be your year!”
“To win the Ballon D’or?”
“No, to fly to the moon.” You deadpan.
“Sooo funny.”
“You were nominated last year. And you’re gonna win this year. What - Don’t - You - Get?” you simultaneously tap the side of her head to get the point really across.
Patri shrugs. “I’m just being realistic. There’s a lot great players this year —“
“Including you.”
“Including me, sí, but I don’t want to get ahead of myself.”
You roll your eyes at her humble argument.
“Whatever, I’ll tell Alexia and Aitana about how you are talking and they will straighten you out.”
The two older girls do in fact scold Patri for being negative on herself during training later in the day, you having followed through with your threat.
Months later, you go to the awards as Patri’s plus one. Wearing an extremely silky suit that Patri adored on you, only three buttons and a low cut in the front. Patri’s tailored suit fit her so well you actually bit your fist when she showed off her look to you at your apartment. Patri made sure to wear your favorite perfume of hers and you made sure to thank her immensely in the car ride to the venue.
You follow after Patri as she goes through all the steps as one of the nominees. Carpet pictures with the other girls, the show runners, then she takes a few with the other Barcelona players, followed by the Spanish ones. You shadow her with Olga and the other partners, just off to the side of the cameras but in sight of each other.
After all the formal pictures were taken, Patri gestures towards you, wanting to take a picture with just both of you. You try not to show your nerves in front of the cameras as you walk over to her. You couldn’t see any of the people behind them, the lights creating a blinding barrier.
Patri feels your body tense up when she wraps her arm around you.
“Mi Vida,” she whispers. “It’s okay. breathe for me, please.” You follow her instructions and relax enough to look normal for the cameras and crowd. Olga and alexia are getting photographed together next to you and Olga reaches out to briefly squeeze your hand in comfort once you're done. Patri takes a hold of your other, using it to guide you into the auditorium. You find safety in the other Spanish and Barcelona girls again. As everyone settles into seats, you squeeze Patri’s hand in thanks when she lets you go into the aisle first.
The ceremony flows through all the scripts that award ceremonies always do and soon people in clean black attire comes up and asks all the nominees to sit near the front of the stage.
You press a quick good luck kiss to Patri’s lips and sit back down next to the other nominees’ plus ones. Olga grabs your hand and squeezes it. You don’t even realize that you’re following Patri down to the front of the stage with your eyes until Olga squeezes your hand again.
“Vida, you are more nervous about this than Patri is!” she whispers loudly. You and those nearby laugh because it’s true. Ever since the nominations were announced, you had been so sure that she would win because you had a dream about it. It may seem ridiculously to an outsider but to you, it was like a manifestation. You were so proud of Patri and you wanted everyone to know it. You even posted an Instagram pic of you wearing your Patri shirt, with a link to the official Ballon D’or website treated like a cited source.
You don’t have to grip onto Olga’s hand in anticipation for very long. The Ballon D’or montage is playing on the big screen. You see so many familiar faces flashing by. But you had a physical reaction when Patri’s highlights came on.
The presenters, with bright smiles on their faces, went through the list of nominees. You waited impatiently for the end.
“And the winner of the Ballon D’or is…… Patricia Guijarro Gutierrez.”
You’re up clapping before they finish speaking, everyone around you are also up, giving Patri a standing ovation as she climbs the steps and accepts the Ballon trophy. The presenters lead her to the microphone so she can be heard.
“Uh, hello, everyone… I’m going to be honest, I did not believe that I would win this tonight. All my fellow nominees are some of the greatest football players in the world and to even be considered alongside them is an honor. I don’t want to bore you with a big speech, so I’ll go to my Thanks. Thank you to my teams. Being able to play alongside you as a career is more than a dream. You all teach me in so many different ways. Thank you to my friends and family. For putting up with my football obsession all these years. Sorry, not sorry. A special thanks to my partner, because I wouldn’t be here without your support. And I mean that both in general and on this stage. Dreams do come true… Finally, thank you to the fans, to the supporters. To the people who come to the games, watch them at home, and everyone inbetween. We play for ourselves and for you.” Patri finishes. She picks up the trophy and holds it up higher, then speaks again into the microphone. “Thank you. Thank you from my heart, immensely.” She steps back and the presenters help her leave the stage while the crowd is clapping for her again.
You’re not crying but you are supporting goosebumps on your arms from Patri’s speech. It was perfect and so her. Her line about your dream made you giddy. What a subtle line that only a few would understand.
Patri and the other nominees eventually make it back to your original seats. Everyone congratulates Patri on the way back. When Patri stays standing while the others sit, you raise an eye brow in question.
She gestures you to come to her. “Vida, come with me. I still have a few things to do. But I want you there with me.” You hurry to make sure you didn’t drop anything while sitting, side stepping until you’re out of the row. Patri takes your hand. You use your other to squeeze her bicep.
“I am so proud of you! I cannot explain it in any language, so you’re going to have to trust me,” you tell her.
She smiles so sweetly at you. “Thank you, mi Vida.”
She leads you out of the auditorium into the foyer. Right outside are all the media outlets and photographers waiting for Patri to show her Ballon D’or to them.
You kiss the side of her mouth, now very aware of the cameras around you. She pulls you closer to her body and grins at you. You smile back.
Suddenly your remember the line in her speech. “Dreams do come true, eh? Finally believe that I’m a psychic?” You ask.
Patri hums, contemplating. “You might need more proof for the psychic powers but you were definitely right about it.” She wraps her arm over your shoulder.
“You know what? I’ll take it.”

a/n: MY 5TH PATRI FIC!!!! HIIIII GUYS!!!! i love these two so much!!! if anyone wants to hear more about patri and vida lemme know! i have headcanons 👉👈
shoutout to the anon who requested this <3 i love you! thanks for the idea 💗 💗 💗
the rest of my patri x vida fics are here
#patri guijarro x reader#mi sol <3#rpf x reader#woso x reader#woso imagine#woso fanfics#woso request#patri guijarro imagine#patri x reader#el sol y el amor de su vida
118 notes
·
View notes
Text
Blender Guide: Editing TF2 Merc Textures with Transitions


This is a guide on adding edits to the mercs' textures in such a way that the edit can fade in (for animation shots where a merc is given an injury, or blushes, gets marked by paint, etc). We'll be working on the face as an example, but this methodology can be applied to the clothes and other textures.
Making an edited texture
First, we need to make the textures.
Since we're editing the head textures, we'll want to save a copy of the head texture. Select the merc's face mesh. In the Material Properties tab, select the material slot for the merc's face texture you want to edit (example: sniper_head_red). Switch to the Shading tab at the top to see the Shader Editor. In the Shader Editor, select the Image Texture node for the merc's head (in this case, sniper_head.png). It should now appear in the Image Editor panel (if it isn't, you can select the png from the dropdown button at the top of the Image Editor). In this panel, select the three line menu button > Image > Save a Copy… In the new window, save the image.
Open an image editing program (example: GIMP is a free art program). Open the saved image. In a new layer, create the texture you want to place over the merc's face.
For bruises, I recommend using the TF2 cosmetic Beaten and Bruised (style 2) as reference: https://wiki.teamfortress.com/wiki/Beaten_and_Bruised You can grab its texture by spawning it in Blender using the TF2 Trifecta Blender addon and saving the texture as a png the same way you did for the merc texture.
Once you have it the way you want it, hide the merc's head texture and save the resulting image as a png. If you made your texture so that it's meant to be blended over the merc's head (examples: multiply or soft light), don't worry, there's a way to apply the blend mode in Blender.
Edit the Shader Material
In Blender, select the merc's face mesh. In the Shader Editor, select Add > Texture > Image Texture. In the newly added node, press the Open button and select the texture you made. Then add another node with Add > Color > Mix Color, adding a Mix Color node. Add in another Mix Color node so you have two.
Plug the Image node's Color to the Mix node's B. Plug the Image node's Alpha to the Mix node's Factor. Plug the Mix node's Result to the second Mix node's B. Set the node's Factor to 1.0.
Find the Image node for sniper_head.png already in the shader and plug in its Color output to both Mix nodes' A. Then plug the rightmost Mix node's Result to the Facemix group node's Color1 plug, replacing sniper_head.png's connection to it. You should now see the merc with the texture changes.

Depending on the texture you made, you may need to include some more steps here:
If your texture is meant to be given a blend mode (meaning, you used a blend mode in the art editing program earlier), you can left-most Mix node (the Mix node directly connected to the Image node) and change the Mix property to the blend mode you want (Multiply, Soft Light, etc.) in the drop-down menu.


If the texture still looks too dark/light, you can add a Gamma node (Add > Color > Gamma) and another Mix node between the first and second Mix nodes you already have. Then adjust the Gamma's value until the texture looks right.

Animating the texture
The rightmost Mix node's Factor can be keyframed on and off (with 0.0 being 0% off). To do so, hover your cursor over the number value and press your Add Keyframe hotkey (or right-clicking the value and selecting Insert Keyframe). The value should now be yellow. Yellow means the value had a keyframe on the frame you are currently on. Green means the value has a keyframe somewhere else on the timeline. Adding two keyframes of different values creates the transition.

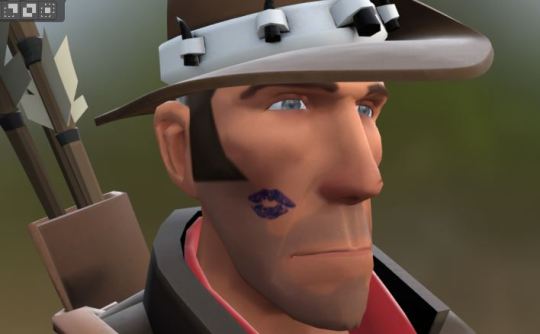
Depending on your needs, you can make the transition instant (a merc getting kissed with a lipstick mark), or gradual over multiple frames (a merc blushing from embarrassment).
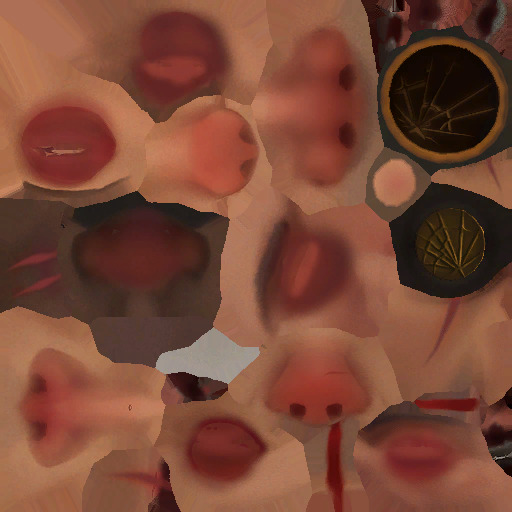
I am also including the pngs of the four example textures I used. Feel free to use them.


10 notes
·
View notes