#my photoshop crashed 4 times making this gifset
Photo


How To Show Affection by Wednesday Addams
+bonus:

#wednesday#netflix wednesday#wednesday addams#addams#wenclair#addams family#enid sinclair#thing#eugene#enid#my photoshop crashed 4 times making this gifset
7K notes
·
View notes
Text
Creator Tag Meme
Rules: It’s time to love yourselves! Choose your 5 (ish) favorite works you created in the past year (fics, art, edits, etc.) and link them below to reflect on the amazing things you brought into the world in 2020. Tag as many writers/artists/etc. as you want (fan or original) so we can spread the love and link each other to awesome works!
Tagged by the lovelies @tiffanytheweirdo and @b99peraltiago <3 love you!
Practically all of the content I made is from this year which is INSANE???
1. Ultimate parallel tiva gifset
I remember so clearly not sleeping after 17x11 aired because I had so many parallels to make and this was a few of them that got into a gifset! One of the first gifsets I was really proud and that I’ll cherish for a long time. Thier story is beautiful :’)
2. Elevator gifset
This one took THE LONGEST and I remember going mad about elevator moments (and I still lost one but we don’t talk about it) but it turned out great!!! A favorite one as well, it was worth all the photoshop crashes.
3. Black and white tiva gifset
This one took a whole eternity and then more. Beautiful, made me cry a few times and it turned out just like I wanted. I love love love this one.
4. Once Upon a Halloween
If you choose to read only one of my works, please let this collection be the one because 1) I had so so so much fun 2) I finally got to expand my horizons as a writer 3) it’s halloween themed!!! Oh, it was one of the best parts of this year. I wish I get the time to do one of this again.
Once Upon a Halloween (rated M // 50k words // complete)
Collection of ficlets (around 1k words each) based on a 31 days challenge, takes place in Fall/Halloween. One-shots, unrelated, about Tiva/Tivali.
Updated daily as in October 2020.
5. NCIS 17x11: the ending we deserved
My first fic ever, the one that came from the very depths of my soul and still resonates with me even if my writing changed so much. I remember being so bitter about the ending of 17x11 that I wrote this as soon as it ended, on my phone haha it has a special place in my heart.
NCIS 17x11: the ending we deserved (rated G // 500 words // complete)
The missing scene from the end.
We all know we deserved better.
> Honorable mentions
1) Something Blue
2) Cargo Pants and Shoulder Holsters
3) Ellick on S17 gifset
4) Pregnant Ziva
5) Sweet Glimpses
tagging the lovelies: @sweetsouldhavernas @ocheabutter @auraelie @softdeckerstars @benditlikepress @pro-bee @erinchristmaselvis @onlyhereforellick @enchantedbooklover18 @wanna-be-bold @justkindaoverhereobsessing @why-did-you-just-lie-to-mcgee @harmandmac and whoever wants to do this <3
20 notes
·
View notes
Photo

hi everyone! basically, when i start giffing on photoshop, i didn’t really know a lot of things and how to get started and so i’d be looking around searching on blogs for info all over the place and so i thought i’d give some tips and recommend sources for people who are new to giffing and put them into one place! i’ll be talking about downloading videos in high quality, fonts best for captions, dimensions for posting on tumblr, etc.
i’m honestly not an expert in giffing - it’s just a hobby as i’m crying full time from being a student so this is just stuff i’d personally recommend from my experience - and ofc, please like/reblog if you find this useful ♡♡
(this post was edited june 2020)
DOWNLOADING VIDEOS
1080p and 720p are best quality for giffing if you want your gif to look crisp and hd. here are some ways to download videos:
share mania is really good for music videos, documentations, live performances, etc. you make an account, find the forum that has the video you like, comment a “thanks,” and a download link will become available. sites like youtube compress the quality so on share mania, you can find the original files that are higher quality and file size.
if you’re unavailable to find what you want on share mania but it’s on youtube, you can download in hd by these:
4k video downloader is my best friend. it’s a free software. you copy the video link from youtube and paste it on here and it’ll download in very high quality
converto is a free online site if you’re not comfortable with downloading the above software. once you paste the youtube link, you’ll have to select “mp4″ and then click the gear icon to change the quality to the highest one available - it doesn’t always do that by default so always double check! i’ve used this in the past and it’s really good! the only issue is that sometimes, it won’t detect/download the video - i assume for copyright reasons but that only happens sometimes!
DIMENSIONS
as of october 2019, these are the best dimensions to use on your gifs if you’re posting on tumblr. i’ll give some examples of gifsets and their dimensions, if you’d like an idea of how they’d look
this set of 8 gifs is 268 px x 175 px
this set of 4 gifs is 268 px x 370 px
this set of 2 gifs is 540 px x 310 px
personally, when i’m unsure what exact length i want to make the gif, i save the uncropped/not resized version as a psd so i can quickly open that and change the dimensions later without having to upload that clip/frames again. but, make sure you don’t have too many frames (~70) that you’re saving uncropped/not resized because that’ll take time and you don’t want to risk your photoshop crashing/laptop slowing down.
the brighter and bigger the gifs + more frames, the bigger the gif size. you want to make sure your gif is under 10 mb because that is the tumblr gif size limit (currently in june 2020)!! your gif won’t move if it’s higher than that. if your gif isn’t moving, try to make it under 8 mb because for some reason, that is the limit for some accounts
COLORING
it’s hard to give a tutorial on coloring because everyone has different styles and tastes, but how i started was using coloring psds.
you can find a lot here and here!
you download the file, open on photoshop, and click and drag the folder of coloring on your gif. NOW!!! i really, really don’t recommend slapping on a psd and calling it a day. these colorings most likely won’t work perfectly with your gif because each scene is so different. different colors, brightness levels, objects, etc. so, you’ll have to adjust the settings. right click a layer and click “edit adjustment” and you can play around with them and delete + add some. this way, you’re making it look better for your gif and you’re learning what each tool on photoshop does.
over time, if you keep adjusting psds, you’ll get familiar with the coloring tools on photoshop and then you can create your own coloring from scratch!
FONTS
for using subtitles on gifs, i use the following settings. i add a stoke of 1 with 100% opacity

to show there’s another person talking (in the background or on screen), i change the text color to yellow (#fefc00). same settings as above, just a yellow font instead of white!
SHARPENING
there are two methods for sharpening.
first method of sharpening: smart sharpen
**if you use photoshop cs**
step 1: follow this tutorial to create a smart filter - when they say “select similar layers” it just means to select all the frames in your layer panel
step 2: do filter > sharpen > smart sharpen with these settings:
**if you use photoshop cc**
step 1: follow this tutorial to create a smart filter
step 2: do filter > sharpen > smart sharpen
step 3: follow this quick tutorial to see the settings
second method of sharpening: actions
action 1 and 2 - 1 is crisper than 2
action 3
action 4 with tutorial
+ more if you wanna try different ones
to use actions 1, 2, and 3 (basically these are actions that sharpen frames all together, rather than action 4 which does each frame individually), follow this tutorial. if you can’t open the action on photoshop by double clicking, go on windows on ps > actions > click the four little lines on the panel that pops up > load actions. and then play the action as shown in the tutorial! **when you play the action, make sure you don’t have your coloring/psd/text/anything other than the frame layer selected**
FRAME DELAY RATE
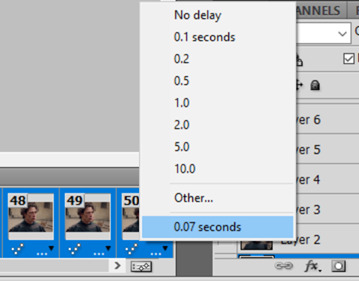
for videos that are 25 fps (frames per second), the matching frame rate is 0.05. for some live performances, the frame rate could be 60 fps. for that, the matching frame rate is 0.03.
when you convert to timeline, your frame delay rate will change automatically. it will either change to 0.03 or 0.07 (depending on which is closer to your set rate). these two rates would typically be too fast and too slow. so, once you’re done your gif, save it. then, reopen the gif and change your frame rate to 0.05 or whatever is appropriate and save it again - and make sure your loop option is on “forever”
i hope this helps you guys out!! my fave resource blogs are @yeahps and @completeresources so check out their tags for other tutorials and such!! and feel free to message me as well if you’re confused :”)
623 notes
·
View notes
Text
2020 Creator Wrap: Favourite works
Rules: It’s time to love yourselves! Choose your 5 (or so) favourite works you created in the past year (fics, art, edits, etc.) and link them below to reflect on the amazing things you brought into the world in 2020. Tag as many writers/artists/etc. as you want (fan or original) so we can spread the love and link each other to awesome works.
I was tagged by the wonderful @iressails. Thank you!💛
I don’t speak to many people on here, so I’m just going to tag some mutuals I simp for (i still love you if you’re not tagged sorry i have v bad memory and am generally scared of people) @coultxr @lmillers @atenexo @amirwilson @coulter @bitchinlyras
Also thank you to everyone for liking/reblogging/following me this year. I started making gifs again for the first time in so long and it warms my heart to see people enjoying them. Anyway, time for some controversial takes
1. This gifset of the dance scene in i’m thinking of ending things. Honestly one of the nicest colourings I’ve ever done. I really love that scene and I managed to up the vibrancy on the red hair without the skin tones going wack. Also the blues and the reds are just *chefs kiss* It also took me downloading two different versions of this and a different video player in order to capture the frames and photoshop crashed like twice ahhhh
2. This rainbow set of Mrs Coulter. Also a great labour of love (seriously finding that a gif to do red took so long). Not much more to say, I just think the colours are nice.
3. It’s a tie between what I shall call my ‘ruth being chaotic in interviews’ series. This one of her trying to say alethiometre, this one of general interview chaos™, and ofc brian fisher appreciation. The tags on all those sets were really wholesome and now I’ve seen more Ruth Wilson interviews than any one person reasonably should.
4. This one of Marisa and the spectres. Probably doesn’t seem that remarkable, but it was the first time I started playing around with sharpening and using a 2160p download. I really don’t know what I did, but it has a much more grainy look than my normal gifs, which was fun, and it can be hard to make big gifs look decent, so that was cool. Also that scenes really hot so
5. It’s got to be s01e04 of my hdm rewatch. This was my first series playing with colours a ton and I think this was my best one out of that set.
Some honorable mentions
Colouring I’m proud of: hdm rewatch s01e05 (I literally coloured every frame of the purple gif individually ahhh), mrs wilson (there was a lot of yellow to neutralise), hester and lyra + pan from the hdmsourcefanweek (really wish I could remember how to do this kind of colouring rip), mlm/wlw solidarity crack (again complete fluke, but it looks nice)
Basically I’m the funniest person on this platform: ‘acting choices’, wii music and boreal being dramatic
#personal#there are others but my brain is done rip#this was a fun way to realise im not actually mutuals with some people 👀
9 notes
·
View notes
Text
Tagged by the lovely @mamsellefreeman, and it’s now the last day of the year so I can’t keep procrastinating:
“Rules: It’s time to love yourselves! Choose your 5 favorite works (fics, art, edits, etc.) you’ve created this year and link them below to reflect on the amazing things you’ve brought into the world in 2020. If you don’t have five published works, that’s fine! Include ideas/drafts/whatever you like that you’ve worked on/thought about, and talk a little about them instead! Remember, this is all about self-love and positive enthusiasm, so fuck the rules if you need to. Have fun, and tag as many fellow creators as you like so they can share the love! <3”
(I’m trying very hard to resist the urge to edit the copy/pasted text above to something less effusively positive, which probably already tells you something about how I feel re ‘things I created in 2020′. Mostly because I have done pretty much no creating of things this year and I Dislike That. Let’s see if scraping a list together helps?)
1. This gifset - I only just started dabbling in gifmaking, and I’m pretty pleased with how this one turned out? Getting the colouring to work how I wanted was A Challenge, and I’m still stubbornly proud of myself for making anything at all in a 12-year-old version of photoshop that crashes if you breathe on it wrong
2. Also this gifset because I enjoy causing pain. (And also because, again, colouring it was a nightmare). Turns out gifmaking is a decent way to satisfy my weird ‘hey this lyric from this unrelated thing could fit this character/plot point if you put certain pieces together in a specific way’ habit, which I’d otherwise have to, like, resort to 2008-style songfic for, so let’s all be glad I don’t have to do that.
3. The accidental liveblog I started partway through The Untamed. Am I proud of myself for accidentally starting a second liveblog before finishing the first? No. Am I proud of the fact that I’ve only made it through ep27? Also no. But I suppose it does kind of count as content, and I don’t hate it, so. I’m reasonably pleased with this post if I have to pick one, or with... actually most of the posts following that one, I think, maybe? Liveblogging a TV series has proved to be very different to liveblogging books, and in a lot of ways I’m finding it a lot more challenging (a lot of this is the language, but a lot of it isn’t), but I have learned a lot from doing it and I think it’s been good for me. Also I hope it’s been entertaining for at least some of you.
4. Yeah, speaking of liveblogs... again, not very proud of making almost no progress with the Wheel of Time one, but I think I at least made an alright start at ToM?
5. I have written (or at least, completed) literally no fic this year, but the rules say I can talk about ideas or drafts so. I do have an outline that is slowly becoming a draft of a TGCF fic that I’m maybe kind of excited about? Also terrified to write because it’s well out of my usual writing comfort zone but it’s very much in my ‘this is pure idfic’ zone so maybe that’ll make up for it.
Tagging... anyone who’s made any content at all this year, if you want to have a go, tag me so I can see the cool things you’ve made!
#'self love and positive enthusiasm'? in this economy?#like yes on paper it's been a great year for Work Accomplishments#but for some reason I've decided that Doesn't Count?#me: gets promoted; also me: but i didn't do yuletide so :/#anyway in conclusion fuck 2020#but at least i learned how to gif#tag memes
4 notes
·
View notes
Note
14, 26, 30, 41 Sorry for being nosy 😉
dude!!! you’re not being nosy, i am INVITING you to ask me questions, i would love to answer these. thanks so much for asking!! 🥰🥰🥰
014. how long does it usually take you to make a set
depends! i just made 4 gifs for a set and it took about an hour to make, but there was some delay bc my photoshop crashed between making gif #3 and #4. for comparison i made 6 gifs yesterday and that only took about 30 min.
026. how many un posted sets are in your drafts right now
i’ve got 3 gifsets in my drafts and am working on at least 2 more today. i’ll post the 2 finale eddie begins gifsets today and then tomorrow we’re on to the one that got away
030. how frequently do you like to post
😂😂 oh man, right now i’m posting at least one gifset a day, and tbh it’s more like 3 or 4 sets. but this is just?? you know, pandemic living where i’ve got nothing else going on in my life and i’m working remotely so it’s easy to find time to make a lot of gifsets.
041. what is your least favorite part about your gif making process
i HATE trying to think of a caption, which is why for the most part i just list the episode title(s). it’s not v interesting, and i hate it, especially when i’m posting multiple sets from the same ep in a row. but i just....can’t be bothered to think of other captions lol
✨questions for gif-makers✨
#ask#anonymous#also a really annoying part of my gif making process tbh#is that my computer is super fucking old#so i basically have no space left on my laptop#and i have to try and clear my local snapshopts multiple times a day#Anonymous
1 note
·
View note
Note
1, 4, 19, 34, 36 for the GIF ask :dorime:
1. What are your top 3 favorite sets you’ve made
(in no particular order)
- Charles + name meanings: mostly because it’s just such a fun concept, I always love those etymology type gifsets and I got to play around with fonts and gradients here too which was fun. I struggled with this gifset for a long time (or rather it’s previous iteration) and then changed up the concept entirely and went with a black and white + grain and colourful text approach and I think that works much better
- Sebastian teaching Charles German phrases at the German Grand Prix 2019: This one was hell to make, between the text and constantly referring back to the video to make sure I was getting the subtitles right and then also some pixilation issues I had but I’m ultimately happy with how it turned out and oddly proud of myself for bringing that moment back into the spotlight for one night. Watching the dash freak out over this was pretty fun lmao
- Sebchal + Stacie Cassarino’s Summer Solstice: Again the font work was quite fun and I got to use some scenes I haven’t used before (Sauber Chal looking over at Seb in his Ferrari, the Singapore pit stop shenanigans, post-qualy moment from Japan.) Discovering the poem and having that connection was also fun. If I had to re-do it I would try to have a more neutral type coloring though because I feel like colourful edits/gifsets are generally hit or miss and most people seem to prefer more natural-looking colourings. But I couldn’t resist when this PSD looked so good across scenes *cries*. Maybe one day.
Also this makes me realise that I actually haven’t posted that many gifsets, lmao, I should probably do something about that...
4. A set that flopped but deserved better
I’m not sure that it deserved better, lmao, but I guess this one. I mean, I understand why --- the concept’s kinda niche and again the colouring issue (see above) so I get it. But damn it if I’m not proud of putting those garage scenes together. The ✨tension✨
19. What is your gifting process like
It’s just me having a string of mental breakdowns while Photoshop crashes on me.
Hm. Here’s the thing: I have two versions of Photoshop --- one is older but portable, meaning it takes up less space because it doesn’t have to be installed, and it works fine and is generally more efficient and less RAM-consuming but it’s missing some of my most-used features (or rather, they don’t work for me for ??? reasons???: Import Video Frames To Layers and the whole... thing where the text snaps to where you want it to be which is nice. There’s probably a manual option for that but I’m stupid and haven’t discovered it if it does exist. The second version of it is newer and has those features but it’s evil and RAM-consuming as all hell, meaning minimal background apps and a lot of interrupted giffing sessions because when you go to Sharpen it’ll tell you you can’t because he’s ran out of memory. Which... he hasn’t. it’s stupid. Anyway...
Step 1/2. VLC is a life saver, honestly one of my favourite programs. I use it to record shorter segments of the video I want to use --- say, only one particular scene from a DTS episode or a SkyF1 feature. The shorter the clip is the easier it is to manage once you open up Import Video Frames To Layers and get that little popup where you select the parts of the video you want to use. It’s easy to misjudge and miscalculate on a longer clip, select something that looks like a small segment and then end up with... 263 frames and a Photoshop on the verge of crashing.
3. I tend to crop and change the size of the imported frames first before doing anything else. Trying to play back a gif with like 60 layers in its full original size... see above. Then I’d play it back and decide where and if I want to chop some layers off. You ideally want to make the gif flow as naturally as possible. This is especially tricky when you’re doing subtitle gifs and you sort of have to do a bit of lip reading and/or referring back to the original clip and decide how much of the speaking part you want in there, again trying to make it seem as natural and seamless as possible.
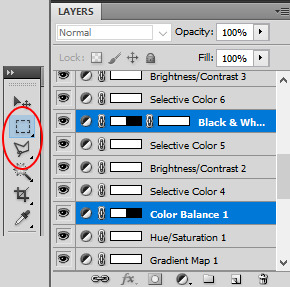
4. Colouring. I’m lazy and untalented so I generally rely on the PSDs provided by the kind creative souls of Tumblr and Deviantart. Obviously I’d tweak them accordingly and add my own layers if need be --- usually Curves, Color Balance and Selective Color. Those can be life savers when trying to adjust the colouring, getting too-yellow or too-red scenes to look more neutral and natural.
5. Over that I put the text (if I’m using it.)
6. From there it’s Convert To Video Timeline (I hate using the Timeline but it has to be done) -> Select all your layers -> Convert for Smart Filters -> Smart Sharpen. Sometimes Add Noise and/or Grain for a bit more spice
7. Save for Web..., then possibly cry if the gif size is too big, chop some layers off, go again, etc.
8. Unfortunately PS is bwoken and you need to open your finished .gif and change the Delay to anywhere between 0.03-0.05, depending on what looks good/natural on the gif (0.05 for “normal” gifs, less if the footage is in slow-mo)
That’s... probably it. I learned almost everything from Tumblr tutorials, so ajsdkfg
34. A set that took you a long time/was really hard but you’re really proud of how it came out
A cop-out but I’m gonna say Sebastian teaching Charles German phrases at the German Grand Prix 2019 again for this one because it legit took about two days, unexpectedly.
36. Do you gif with something specific in mind or do you just wing it
I usually have an idea of what I want to do or at least which scenes I want to use, but the ~creative vision~ definitely changes. Sometimes things just don’t work out the way I wanted them to (the clip is infuriatingly short when transformed into layers, or the colouring just doesn’t want to work no matter what you do, or something else entirely) and then you try doing it a different way and maybe that works better
3 notes
·
View notes
Text
basic gif tutorial (photoshop cs5)
today i’ll be showing you how to make this gif!

note: i will not be covering coloring in this tutorial because i personally tend to use psds that other tumblr users have created and shared (this psd pack is by far my favorite, i use it for 90% of my gifs - just remember to check the uploader’s terms of use before downloading psds for your own use to make sure it’s okay!) rather than doing my own coloring. if you want to make a really nice looking gifset you MUST add coloring to it - i would never upload this gif completely uncolored like this, i only left it out in this instance because it’s not part of the tutorial.
there are loads of great coloring tutorials out there by people who are better at it than i am, but the rest of the gifmaking process is shown below! i might have overexplained some stuff, so hopefully if you’ve never made a gif in your life, this tutorial will be just as helpful to you as to an experienced gifmaker who’s just curious about some of the settings i use
now, first thing’s first: you need a high quality video clip to gif from. the higher quality the video, the higher quality the gif. you can make do with lower res videos if you absolutely have to (god knows i do when i’m giffing matteo martari in obscure italian tv shows that are only available as shitty streams for people outside italy lmao), but try to find an hd version if at all possible.
some people torrent or download full episodes of shows in high quality, but personally, i find the easiest method is to use the xbox windows app to record my computer screen while i’m playing a video on netflix, youtube, etc. (i’m not familiar with macs, so mac users, you’ll have to poke around on your own to see if there’s a similar screen recording program available for you). this way i can just get the brief little clip that i want to gif rather than having to save an entire episode on my computer and take up space.
you’ve got your clip (the one i’m using in this tutorial was recorded from netflix) so on to business! some people use a screencapping method to gif, but i have never done that and i don’t know how it works, so i’m just going to walk you through the method i’ve always used. i don’t know if it’s more or less efficient than the screencapping method, but it works great for me.
make sure to save your work as you’re going because photoshop can crash OFTEN (esp if you have a lower powered laptop) and there’s nothing more frustrating than getting to the final step of a gif and losing all your work because photoshop crashed and you hadn’t been saving as you went along.
1. open photoshop (i’m using version cs5 in this tutorial, so if you have a different version, some steps might be slightly different idk). go to file -> import -> video frames to layers.

2. browse through your computer to find the video clip you want to gif from. click on it and hit “load.” you will be brought to this screen:
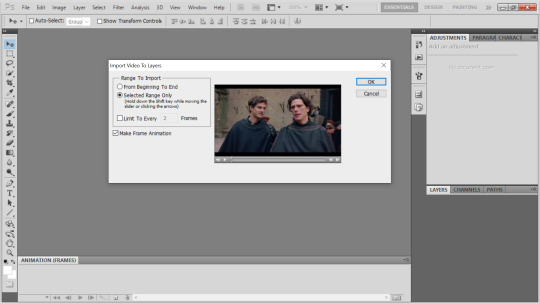
in the “range to import” box, make sure to select “selected range only” rather than “from beginning to end.” this will allow you to just highlight a specific portion of the clip to turn into a gif. do NOT click the “limit to every [x] frames” box, this will auto delete one frame per whatever number of frames and it will make your gif look choppy rather than nice and smooth.
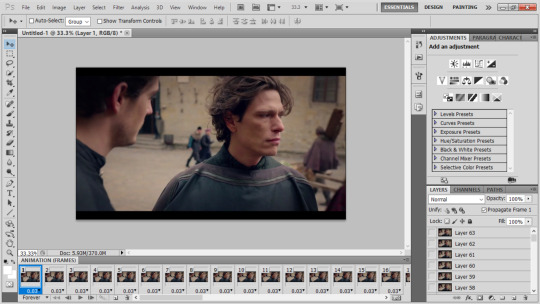
3. find the specific part of the clip you want to turn into a gif. while holding down the shift key, click the arrows in the bottom right until you’ve reached the end of what you want to gif (the little dark portion to the left of the video cursor is the selected part that will become a gif). then click OK

4. now we have our gif! it’s not pictured here, but do make sure to delete extra frames on the beginning and end if you overshot the portion you meant to select in the previous step. i can’t tell you how many times i’ve seen gifs where the shot right before or after the intended shot flashes up just for one frame at the beginning or end of the gif because the gifmaker forgot to make sure they didn’t have extraneous frames in there.
5. this next part is, i think, an extra step that people who gif using the screencap method don’t have to deal with, but it’s really just a minor little hassle so don’t worry. it’s not always the case, but depending on the video you’re using for the gif, there may be duplicate frames in there. i’m going to make a gif of my gif tutorial to show you what i mean:

you see how every few frames, the gif stops moving because there’s two or three frames in a row that are all the same? you MUST delete these duplicate frames or else your gif will have weird laggy spots. so yeah, you have to click through every single frame to delete the extras. it’s a pain, but once you get the hang of it you can go really fast through it and it only takes a minute or two.
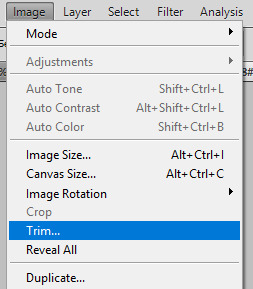
6. now you’ve got your frames all set, so the next thing to do is cropping. select this tool:

with this tool selected, click and drag to select the part you want to keep. everything outside the box will be cropped out. even if your video doesn’t have black bars at the top, i always trim a little bit off all 4 sides just to be safe.

now go to image -> crop, and voila! the part outside the box will now be gone
7. next up is resizing. here i’ll tell you my typical gif dimensions and show examples from other sets i’ve made. the way it works on tumblr is that gifs MUST be a certain width or else they’ll look blurry, but height you can play around with (as long as the height is consistent for all the gifs - if you have 2 gifs next to each other and one is 200px in height and the other is only 150, tumblr will try to autosize them to be the same height and it’ll make the gifs look all wonky or cropped)
large gif to go across the whole post: MUST be 540px in width, height doesn’t matter. i use a wide variety of heights for 1 gif across sets depending on how many are in the set, if i want more square or more narrow gifs, etc, so just play around and decide what you like best (pictured: 540x325)

2 gifs across: MUST be 268px in width. again, height doesn’t matter, but i’ll tell you the heights i usually use. for 4-gif sets (2 by 2) i usually make the height 325, 300, or occasionally 280 depending on whether i want the gifs longer rectangles or closer to squares (pictured: 268x325)

for 6-gif sets (2 by 3) i do 200px height, for 8-gif sets (2 by 4) i do 180px height, and for 10-gif sets (2 by 5) i do 160px height (pictured: 268x180 from an 8-gif set)
but again, these are just my personal preferences so feel free to mess around on your own! just remember that width must ALWAYS be 268, no flexibility there
3 gifs across: MUST be 177 or 178px in width. technically, tumblr’s dimensions make it so that in a 3 across set, the left and right gifs should be 177px in width while the middle gif should be 178 - i really doubt 1 pixel makes that much of a different in quality, but i usually follow this rule just to be safe. i don’t often make 3 across gifsets, so i don’t have any standard heights that i use. this gif here is 177x250 and is from a 9-gif (3 by 3) set
right now i’m going to make my tutorial gif 268x180 just because those are the dimensions i find myself using most often. go to image -> image size (or ctrl + alt + i). in the dialogue box, type in one of your new dimensions - i have to do the 180 height for this one because if i make it 268 width, the height will be too small
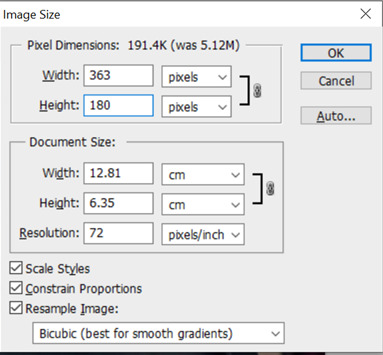
i never touch the settings at the bottom here so idk what they are, but make sure “constrain proportions” is checked off because otherwise, only one of the dimensions will change in size and the gif will get all stretched and wonky-looking
8. crop again! as you can see above, the new width of my gif is 363px, but i want it to be 268. go to image -> canvas size (ctrl + alt + c). change the unit to pixels and type in the new value for whichever dimension you want to crop (i’m cropping the width, but if you resized the width in the previous step and the height is too big, that’s what you have to crop here)

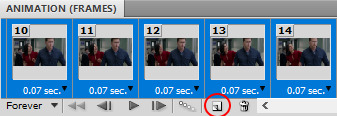
9. now that our frames and dimensions are all correct, we’re on to the final steps. first, change the gif speed. select all the frames, click on the little arrow next to the frame speed on any frame, and this little menu will come up. select “other” and type in 0.05 or 0.06, whichever you prefer. typically i do 0.06 as i find 0.05 slightly too fast, but i’ve seen other tutorials where the person said they think 0.05 is better, so it’s really up to personal preference.

10. convert to timeline animation (this little button in the bottom right of the frames bar)

11. select all the layers on the far right panel, then do layer -> smart objects -> convert to smart object. now all the frames will be condensed into one layer, which makes coloring and sharpening easier. you MUST convert to timeline animation before converting your layers to smart objects, otherwise it won’t work

once the layers are all one smart object, it’s also easier to reposition the gif - i’m going to click right on the canvas and drag the layer so francesco is more centered, and because it’s all one smart object, this will automatically move every other frame of the gif as well (unlike in frame animation when moving one layer only affects that one frame)

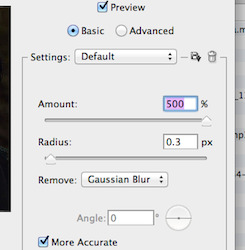
12. now we’re going to sharpen it. filter -> sharpen -> smart sharpen. these are the smart sharpen settings i use. some people go fancy by oversharpening, then adding a layer of blur and making the blur layer 50% opacity or so, and there are plenty of tutorials for that out there if you want to try it, but i prefer to keep it simple and you can’t go wrong with these smart sharpen settings:
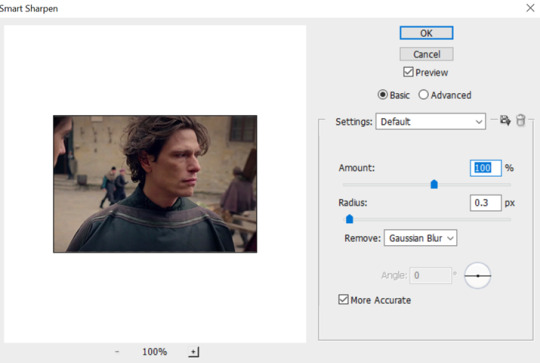
13. at this point you want to add all your coloring layers, but like i said, i’m not doing coloring in this tutorial, so we’ll skip that step. if you have a psd you want to use for coloring, add it now, or play around with coloring layers on your own. if you’re putting text/captions on your gif, you want to do it now too. (i’d be happy to make a separate captions tutorial if anyone wants one, but i'll leave it out of this one so we can stick to the giffing basics)
14. save the gif. go to file -> save for web and devices (alt + ctrl + shift + s). these are the settings i use:

watch out for 3 things:
1) make sure to change looping options in the bottom right from “once” to “forever”
2) the file size (circled in blue). tumblr’s max file size is 3MB update 2020: tumblr max is 10MB. if a gif is 3MB 10 MB or more, it won’t move when you post it on tumblr. we’re in luck here because this is a small gif with relatively few frames, so we’re well under the limit. if you’re over the limit, don’t panic! there are several ways you can fix it which i’ll explain in a second
3) play around with lossy (circled in red). this is also a way you can decrease the file size. the higher the lossy, the smaller the file size. i vaguely remember seeing a tutorial throw around a range of 2-20 for lossy and if you go outside that it starts looking bad - my go to is 10, i don’t know why, but it’s just a habit by now and i like how it looks. however, for big 540px width gifts, my go to is 16 because those gifs will obviously have much bigger file sizes than small gifs. fiddling around with lossy is a great trick to decrease file size without having to delete too many frames, but it can only get you so far and if your gif is seriously over the 3MB limit, you’re gonna have to delete frames
update 2020: because of tumblr altering some formatting and the way gifs display on the site, adding lossy now makes gifs look too blurry. so these days i always do 0 lossy on my gifs! if the filesize is too big, the only way to make it smaller without sacrificing quality is to delete frames.
15. this brings us to the last step. go to file -> open and select your new gif wherever you’ve saved it. you’ll see that it’s now in frame animation again. this is good because a) it allows you to easily delete frames if you need to decrease the size and b) when saving from timeline animation, photoshop automatically slows the gif down, so you’ll have to open the final gif and readjust the frame speed.
you remember we originally set the gif to go at 0.06 seconds, but now here it is at 0.07, which will look too slow. so just click “other” and type 0.06 seconds, save the gif with the exact same settings, overwrite the old version of the gif, and voila! you’re good to go!
i hope this tutorial was helpful, feel free to shoot me an ask if there’s any step of the process you want more clarification on!
#gif tutorial#photoshop tutorial#photoshop#tutorial#i know this looks like a lot of steps but that's just bc i really overexplained stuff lmao#and once you've gotten the hang of the process it goes really fast!#for me the longest part of the process is a) just deciding what shots to include in my gifset in the first place and b) coloring#the actual creation of one gif rarely takes me more than 10 mins
97 notes
·
View notes
Note
4, 6, 7! - yeeosang
thanks for asking!!
4. What do you enjoy about making graphics / gifs?
It’s something that calms me down, somewhat of an escape mechanism where I don’t have to think about real-life and can do anything I want (until photoshop crashes on me that is). I love how I can try out new things, new colorings, new textures. Although I have kinda paused on making gifs right now (because of school) I make layouts for my friends and get to experiment with different textures and colors for the headers which I’m currently enjoying quite a lot.
6. Your favourite graphic and or gif creators
uhhhh you @yeeosang… I’m being completely honest I’ve been following you on @changkyuh for such a long time, your tracklist gifsets (from the naekkung days) inspired my tracklist gifsets for ateez and txt. For some of my other current favorite ateez creators: @hongjooong, @park-seonghwa, @choisaan, @savetrcng, @dearmingki, @01degree, @sanbotaged, @wooyoungs, @visualsan @yunhohs @kyeosang i feel like i’m forgetting some people but yeah
7. Your favourite graphic and or gif by someone else
okay so I couldn’t choose just one:
for graphics: this one and this one by @choisaan i just love all the different elements and how you have to look at them for a while to absorb all the details
coloring wise: this one by @hongjooong and this one by @seunghunies
for original ideas: this one by @jungwooyung and this one by @changkyuh
for gifs that just mean a lot to me: this one and this one (idk if the ops of those gifsets would like to be tagged i don’t really know them so)
9 notes
·
View notes
Note
why dont you just download the mini series if you didnt wanna use the dvd... its not that hard
its not that hard. okay, well, why don’t you go find a non-torrent download that isn’t a mkv that would crash my video player, then wait the 4-20 hours it’ll take to download depending on the internet speed. (in my case, very shitty.) and add that all up on top of the actual time it would take for me to go through the mini series, it 2017, and the trailer. get all the screencaps. load them into photoshop. let the mini series take up an INSANE amount of space on computers hard drive, making the entire computer run slower so that photoshop crashes even more than usual. crop, colour, save. hope they’re under 3mb. hope they upload without glitching.
shut the fuck up. don’t reblog the gifset if you don’t like it??? im???
5 notes
·
View notes
Text
idk what my laptop has against them but the past 4 times i’ve tried to make sam and callen edits photoshop has randomly crashed mid gifset and like... rude
4 notes
·
View notes
Note
Gif maker ask game! 4, 19, 34, 41? :D please.
Hello, thank you for asking! (Your gifs are such a feast for the eyes!)
4. A set that flopped but deserved better:
This one. It’s a powerful quote, picking the scenes was arduous and it departs alot from my usual colouring, but the Milippa fandom is also small so it’s not really a flop.
19. What is your giffing process like:
I generally pick scenes I want to gif while watching a show or a movie, but often quotes or reflections I had will prompt a gifset as well. I do my screen captures and actual giffing separately, as capping scenes can take some time. Colouring is obviously what takes the longest and funnily once in a blue moon it’s not the scene lighting that causes problem but the atmosphere I want to render. Sometimes there are quotes that demand B&W and that’s all. Vignetting is also a huge part of my process; I doodle gifsets layout on paper to fix the idea I have.
34. A set that took you a long time/was really hard but you’re really proudof how it came out:
This one. I MEAN. Lots of frame by frame editing. Some ridiculous layers.Colouring issues. But it looks great. I find that more often than not beautifuland meaningful quotes inspire complex gifsets. this was a stunning quote from a fascinating book.
41. What is your least favorite part about your gif making process:
The program crashing. It always happens. I’ve tried photoshop beforeand it seems as cumbersome as Gimp. Also the gif size limit; I could make suchbeautiful things with 4MB.
5 notes
·
View notes
Note
thank you for the gif advice! it's much appreciated. i wanted to use what i learned for the extra life gifset i mentioned earlier, but then photoshop crashed :'(
of course! i live my life by trial and error so ive figured out a lot of shit at this point so if u ever need more advice im so happy to help!!!
im so glad mines never crashed on me (esp bc i import frames for every gif i wanna make and cut them down and size them one after another so ive usually got 4 or 6 gifs open at one time) bc i would absolutely looose it
#idk how u do it man#i throw a fit when photoshop gets slow i can imagine it crashing#kingpattillo#ask
0 notes
Text
An anon inboxed me today asking if I could explain how I make gifsets that appear to have more than ten gifs in them (see, e.g. (x) (x) (x)) so here’s a tutorial answering that. Hopefully by the end of it you’ll be able to create something like this (which looks like many gifs but is saved as only one):
(Note: I realise that not everyone is like me and still stubbornly using the old Tumblr dimensions, so I’ll try to accommodate those that choose to use the current dimensions where appropriate.)
I’m using Photoshop CS5. This tutorial assumes that you already know how to make a basic gif. Fair warning that this will be image and text heavy.
When creating gifs like these, always remember the maximum dimensions and gif size Tumblr allows. Here is a current template: (x)
Firstly, we’ll start with something simple and combine two separate gifs to form one. I’ll be using this gif as an example so that I can include a few extra tips:

Important: Before you make your gifs, keep in mind that each separate gif must contain the same number of frames, be set to the same speed as the one(s) you intend to combine it with, and for the sake of this tutorial, be the same height.
Here, I’m using 33 frames each set to 0.07 seconds for both separate gifs, with a height of 130 px.
To begin, you need to make both gifs individually as you normally would but without text, colouring and (if you prefer the easy route and sharpen your gifs after converting animation frames to timeline, converting image layers for smart filters and then sharpening rather than sharpening each frame one-by-one), sharpening. You’ll end up with something like these sad things:
Then, for any of this to work, you’ll need to ‘trim’ each gif. You’ll know if you haven’t when you try combining them later. To do this, go to image > trim > and then trim away all of the transparent pixels as shown below.

Save them as separate PSDs (I’m saving mine as ‘55.psd′ and ‘56.psd′ respectively).
“Now comes the fun part!” I exclaim unconvincingly with a forced smile in case my Photoshop crashes out of spite.
Create a new workspace with a transparent background and dimensions that will fit your two gifs. Because I’m using old dimensions and I want to combine my gifs horizontally and not vertically, I created one that is 500 px in width (and 130 px in height to match the gifs I made) as the two gifs are each 245 px in width and I need to allow for 10 px space between the gifs (245 + 245 = 490 + 10 = 500 px total width). These types of gifs can be a bit of trial and error in the Maths department. If you’re using new dimensions, you’ll want to make your gif 540 px wide, because your individual gifs will be 268 px in width and only have 4 px space between them when displayed in a gifset.
(Side note: Regardless of whether you’re combining your gifs horizontally (as I am here) or vertically, always remember the natural space between gifs. E.g. if you have two gifs 130 px in heigh you want to combine verticallyt, make your new workspace either 270 px in height (to allow for a 10 px gap) or 264 px if you’re using new dimensions.)
Now go back to the gifs you just trimmed and highlight all of your animation frames for one gif, click the button circled below and click ‘copy frames’.

Go to your new, empty workspace and, using the same menu as shown above, select ‘paste frames’. Then, select ‘paste over selection’.

You’ll end up with something like this:

Because I don’t want that gif to be on the left, I’m just moving it over to the right.
Repeat this ‘copy frames’ and ‘paste frames’ step for your second gif and then move it to the side you want it to appear on. If there isn’t a natural space between your two gifs, you forgot to trim them, so you’ll need to go back to that separate gif and do that. It’s only a minor setback.
Now, you should have this happening:
Which technically, if you wanted to, you could just sharpen, save now and walk away knowing how to make one gif appear as two separate gifs (following this, you could make your gifset appear to have 20 gifs without exceeding the 10 gif limit):

Not that I’d blame you, given the length of this tutorial, but if you leave now you’re going to miss out on all my tips. And BOY, let me tell you about my tips! ... They’re pretty okay. Please don’t go.
Anyway, if you’re staying, the next section is going to teach you some basics for what steps you can take to make life less painful when you’re working with changing text, how to colour if you intend to colour the two gifs differently (e.g. my left gif is going to be black and white, and I need to add more brightness to it), and what to do if you’re using a gradient/fill.
Tip 1: The next thing you can do is add any text you may have. If your gifs don’t have any text that changes, all you need to do is make sure that your text is centred for each gif and level with the other gif (for this tutorial, I assume you already know how to do this). However, if you have a gif that requires text changing like this:
You must make sure that you apply all of your text before converting your frames to timeline animation. I only stress this because sometimes I forget about that when I make combined gifs because I’m eager to sharpen them. It’s a lot more upsetting having to backtrack when you make this mistake for combined gifs than it is for regular, singular gifs. Trust me. I have pro status for it.
At this point, there’s no harm in converting to timeline for sharpening your gif. Before doing so, double check that your animation frame speed is consistent.
Tip 2: If you’re unsure as to what you can do if you intend to colour each gif individually or plan to make adjustments to your base colouring (as I am here), know that you can simply select one of the tools below (marquee or lasso), select the layer you don’t want appearing on both of the separate gifs, and erase (or add a layer mask then fill that section with black if you’re not certain that you want to delete it).
Tip 3: If you’re using a gradient fill or solid colour fill, using the same technique as above, you need to erase the parts of the fill that aren’t within your gifs. For example, this is what the space between my gifs looks like if I don’t erase the fill:

If you don’t erase the parts of the fill between your gifs, you’ll end up with something like this top picture when what you really want out of life is the very bottom image:
Know that I got an upload error when I tried adding that first gif to my drafts to check the gif gap. Even Tumblr has standards. Love yourself.
If the space between your gifs still isn’t transparent, the only other thing I can imagine being an issue is if you applied a blur layer in addition to your sharpened layer (if you’re someone who does this, you know what I’m talking about). Just go to those converted blur layers and do the same erasing technique for the gradient fill removal so that nothing overlaps between the two gifs.
Tip that cares about your OCD but not enough to be placed earlier in the tutorial: If one of your gifs is considerably longer than the other, say 50 frames, and you don’t want to delete any, you can make your shorter gif half the number of frames (e.g. 25) and then duplicate those frames to get the same number as your longer gif. Simply highlight all frames you intend to duplicate then click the button circled below. This way, you won’t have to sacrifice important frames and your gif will continue to loop naturally.
There are of course a number of ways in which you could combine gifs into one larger gif (some of which you will have seen if you clicked the links to the examples I have before the cut) so long as you correctly calculate the dimensions you’re working with:
But, if you’re interested in knowing how I created the very first mega gif at the introduction to this tutorial and you’re not confident that you can do it without some guidance, hold my hand because I’m going to teach you one last thing that you can combine with everything else you’ve learnt so far.
Lastly, we’re going to be making a gif like this:

Now, because I’m using old dimensions, which are 245 px width for gifs like this, I’m left with an odd number. Because I know I’m going to later be making this into a huge gif that is 500 px in width, I can go ahead and create a workspace that is 246 px. I do this because I want these side-by-side gifs to be the exact same width when I place them together.
Like before, start by giffing each gif separately. I have these set to 30 frames each, 123 px width and 140 px height. You’ll get two blurry gifs like this:


Trim them and go to your empty workspace (mine is 246 px, yours might be 268 px depending on your dimensions). Copying and pasting them into that workspace, position the gifs until they sit perfectly next to one another, touching but not overlapping. Save this gif but remember not to convert your animation frames to a timeline yet.
If you make four of these ‘joined’ gifs that have same amount of frames and then follow the tutorial above on how to add them all to a new larger workspace, making sure that if you’re using old dimensions you have 8 px separating them horizontally (because I added 1 px width for each 246 px gif to create an even number so I need to subtract that from the space between them) or 4 px of space separating them from one another using the new dimensions, you too can end up with something like this (which, if you’re wondering, is 500 px width and 290 px height):

And that brings us to the conclusion of this terribly long tutorial. I hope so much that it helped you! As always, feel free to message me if you need clarity for any of these steps or if you have any other Photoshop questions.
Until next time, remember to frequently save your work!
#yeahps#itsphotoshop#tutorial#ps tutorial#ps resources#my tutorial#resources#long post#7 hours of no regrets
30 notes
·
View notes
Note
tell me about your photoshop troubles. i have had the same in the past (specifically #THE AMOUNT OF VIRUSES I'VE HAD ON MY COMPUTER) and it's good to know someone else has them too 😂😂
Okay so it started last week. I've been "Photoshopping" things for years now but I've always used knockoff programs and never bothered to get the actual thing. So I decide to make an edit and I want to try using actual Photoshop this time, so FIRST I go to download the episodes but the fucking download program I got,,,,, it's in GERMAN. So I'm opening google translate and attempting to do this download, then it just crashes and it doesn't work. So then I get a rec from my friend for a good ENGLISH WORKING SAFE program so I get that and download it and the episodes. Day 1 is over. Next day I decide to download photoshop and fucking,,,,,, it's in SPANISH. Now I've been taking Spanish for 3 years now so it's to the point where I'm like "Okay I know that archivo means file so I'm just gonna stick with this" so I run downstairs and I pick up that old Spanish English dictionary I bought 3 years ago for my first Spanish class and haven't opened since, and I'm looking for the freaking import button, and the program itself DOESNT HAVE AN IMPORT BUTTON (I even clicked on that thing that was like 'show all menu options' or something like that, it still wasn't there, no import button) so THAT concludes my experience with Español Photoshop. The rest of Day 2 is downloading as many different photoshop links as I can find, just trying to find ONE that worked. I swear to God and Jesus I'm not exaggerating when I say I downloaded hundreds of things, I can open my laptop and check for the exact number but I swear it was at least 150 different things. Out of all of those, 6 of them worked. Number one was the Spanish one, and then the next one? In Italian. It worked perfectly but it was in Italian and this was one of the earlier downloads, I'm still full of hope, not just desperate for anything that says "Photoshop" on it, so I delete. Next one was Portuguese, and the one after THAT was Japanese. All of these claimed to be in English and btw I learned from my series of photoshop adventures that you can't change the language, it's connected to where you downloaded from and you have to pay to change it. So at this point I'm PRETTY far into the list of like 150 downloads, and out of the 4 that had worked so far, they were all in different languages. So understandably I'm getting very frustrated and I keep downloading things, and then finally, oh thank the lord finally, it's in English and it's working. Tears of joy running down my face-- and then my laptop just shuts off. I wait for it to power back on and then I get a little notification, it had found a virus and had to remove it. So I check and of course, English Photoshop was the virus it got rid of. So then, maybe 15 downloads later, that's when things got interesting. I find another working download, but the language of it is what's weird. It's half in English, half in Spanish. I don't ever want to look at another foreign word again. Sorry to my Spanish teacher, but this was like my 12th hour doing this and why are there so many languages to download photoshop in???? I was so exhausted, I couldn't do it anymore. I didn't want to settle at Half English though, so I delete it and keep looking. I kept looking for a while, until finally giving up. Six downloads had worked, and I couldn't use any of them. Now I think this is a good time to tell you that I'm currently having finals week, and instead of studying, THIS was what I've been doing (and it definitely didn't do anything to ease my anxiety levels). So I go and study for a few hours, figuring I'm done with Photoshop. But that's not who I am, when I spend so much time trying to do something, I'm gonna do it. Not out of determination, but it comes to a point where I'm doing it out of spite, just to say that I finally did it. So it's around 3am and I'm like "Okay I'm gonna download a few more and then I'm going to sleep" so I start downloading some and then around the third one, it's in English and it works. You can imagine my tears of joy. So I turn on FRIENDS and go the hell to sleep. Now it's day 3, I have the downloaded episodes and I have the working English photoshop, now all I have to do is make the edit, right? Wrong. I go to put the video into photoshop, and it's saying it's the wrong file type and it's not supported by Photoshop. So at first I'm like "okay that's understandable, I did just download them" so my FIRST problem is downloading a file converter. I'm not going to get into the story, but it's pretty similar to how it took to download Photoshop, hundreds of downloads, the only ones that worked are in foreign languages, and THIS was the day where I get the most notifications from my computer saying it located viruses. Now after a long long long time downloading tons of file converters, I finally find one to use. So I go to convert the files and then I try and put the converted files into photoshop and whoooop it didn't work. Now the rest of Day 3 consisted of me converting the files into HUNDREDS of different types. I converted them into basic things, things Photoshop claimed it supported, things all the people with similar problems online claimed they needed to convert into, things I hadn't even heard of. In the end, after around 15 hours of converting files, I FINALLY found something that photoshop will take. Now onto Day 4, this should be the easy day, now I just have the make the edit. Well my very first problem is that now I'm opening photoshop and I realize something, this has been going on so long I can't even remember what my idea to edit was. So then I'm just like "whatever I'll gif a random scene and put a meme on it, I gotta do something" So I go to make the gif, when I find out THE FREAKING PHOTOSHOP I DOWNLOADED DOESNT HAVE THE ANIMATION TIMELINE. I don't know why it didn't have it, but it didn't. So I end up going online and downloading the timeline separately, basically using it kinda like a psd. So I get the timeline and I want to make the gif and remove some frames, but for whatever reason my Photoshop doesn't let me select multiple frames at once, so I have to go through like 500 frames and manually delete each of them to get what I want. Now I think now is the time in this story to tell y'all that I'm not just stupid or anything. I know how to use Photoshop, I've been using it since I was in the sixth grade, I used to be in the digital editing club at my school, I know how to use photoshop, it's just this program is so wacky nothing is working. So manually I delete like 450 frames and after that everything with making the gif seems to be going well, up until it's time to add the text. I start typing and the font I'm using? Times New Roman. But instead these random symbols are showing up and it won't let me change it. So I just delete everything and start over and then I get up to adding text again, and this time symbols aren't showing up, instead just whatever letter I press, it just puts in a dash. So I'm tryna write the subtitles and instead what's coming up is "----------------" Now, after several several several redos it FINALLY starts writing letters, and there are a few more minor issues but for the most part everything is running smoothly, I finally make the gifs.So to conclude, this gifset took 4 days, 6 languages, hundreds of downloads, God-knows how many viruses, and an entire ocean of tears, but I finally made the gifs.Here's the link. God obviously determined that my making of this was a sin, because he definitely did everything in his power to make it stop, but dammit this was one of the most frustrating experiences of my life>>> enjoy http://themikewheelers.tumblr.com/post/156287152865
6 notes
·
View notes
Last Seen Blogs
escandalointimo
escândalo íntimo

algebralien-tickles
xfohv sfw tickle blog

barrychannel131
Barry channel
myauroraborealis
moved to @myladyofmercy